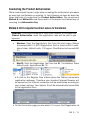
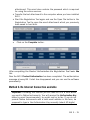
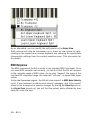
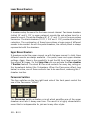
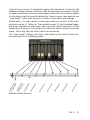
1
B4 II OPERATION MANUAL The information in this document is subject to change without notice and does not represent a commitment on the part of Native Instruments Software Synthesis GmbH. The software described by this document is subject to a License Agreement and may not be copied to other media. No part of this publication may be copied, reproduced or otherwise transmitted or recorded, for any purpose, without prior written permission by Native Instruments Software Synthesis GmbH. All product and company names are ™ or ® trademarks of their respective owners. User’s Guide written by: Thomas Loop, Michael Kurz, Darwin Grosse © Native Instruments Software Synthesis GmbH, 2004. All rights reserved. B4 Is a trademark of Native Instruments Software Synthesis. Germany Native Instruments GmbH Schlesische Str. 28 D-10997 Berlin Germany USA Native Instruments USA, Inc. 5631 A Hollywood Boulevard Los Angeles, CA 90028 USA [email protected] www.native-instruments.de [email protected] www.native-instruments.com Table Of Contents About the Native Instruments B4.......................................................... 5 Introduction..................................................................................... 5 Installation under Windows XP............................................................. 7 Software Installation......................................................................... 7 VST plug-in Installation..................................................................... 7 DXi 2 plug-in Setup.......................................................................... 8 RTAS plug-in installation................................................................... 8 Installation under MacOS X.................................................................. 8 Installing B4 II in OS X .................................................................... 8 MacOS Audio Unit plug-in Installation................................................ 9 RTAS plug-in installation................................................................... 9 Product Authorization.......................................................................... 9 What is the Product Authorization?..................................................... 9 Conducting the Product Authorization................................................11 Method A: B4 II computer has direct access to the internet.................11 Method B: Internet Connection on another computer...........................13 Method C: No Internet Connection available.......................................15 Registration support........................................................................17 Audio Interfaces................................................................................18 Standalone Application....................................................................18 More About Latency....................................................................... 20 B4 II as standalone........................................................................... 25 Soundcard (Audio Interface).............................................................25 Routing..........................................................................................27 MIDI............................................................................................. 28 B4 II as Instrument Plug-in................................................................ 29 VST 2.0 Plug-In............................................................................. 29 Audio Units Plug-ins........................................................................31 DXi 2 plug-in ................................................................................ 35 Using B4 II with Pro Tools............................................................... 36 B4 II – III The B4 User Interface........................................................................37 Using Presets.................................................................................41 Saving Presets............................................................................... 42 The Preset View............................................................................. 43 Keyboard Splits.............................................................................. 46 MIDI Response.............................................................................. 48 The B4 as an effects unit.................................................................49 Setup View.................................................................................... 50 Full Screen mode........................................................................... 55 Creating Your Own Sounds................................................................. 56 Manual View Controls..................................................................... 56 Organ View Controls....................................................................... 62 Expert View Controls...................................................................... 67 Drawbar Programming Basics..............................................................74 Theory...........................................................................................74 Practice.........................................................................................76 Appendix A: Keyboard and Mouse Control........................................... 79 Appendix B: Recommended Reading and Listening ............................ 80 Appendix C: The B4 Signal Flow......................................................... 84 IV – B4 II About the Native Instruments B4 Introduction The B4, in perspective... Congratulations on your purchase of the Native Instruments B4. The B4 combines the classic and robust tonewheel organ and rotating speaker sound with the convenience of software. The original B3 organ set many standards with its beefy sound and unique interface. This instrument spans all genres – from R&B to Jazz, House to Gospel – and is a valuable tool for any player or producer. The Native Instrument B4 honors this standard, and provides a software that maintains the classic look, lush tone, and famous presets of the original. B4 II – Of course, there are a number of advantages the B4 has over the original tonewheel organ, including: • Reduced size and weight • Increased preset storage • Velocity sensitivity • MIDI automation of all parameters • Multiple organ models in one package • Integrated reverb • A ample selection of cabinet models The Native Instruments B4 integrates seamlessly into the computer-based virtual studio. It is important to note that the B4 is not another sampled organ, but a complete software model of the tonal characteristics of the original tonewheel and rotating speaker and cabinet system. Effects like harmonic foldback (tones repeating in octaves at the high and low extremes of the keyboard) and loudness robbing (the same tone triggered with multiple keys “compressing” the tone volume) are faithfully reproduced as critical characteristics of the instrument. This attention to the details of sound production make the B4 a stunningly realistic and useful musical instrument. – B4 ����� II Installation under Windows XP Software Installation • • • • Insert the B4 II CD into the CD drive. Use the Windows Explorer to view the contents of the CD. Start the installation by double-clicking B4 II Setup.exe. The setup program will suggest C:\Program Files\Native Instruments\ Product Name\ as the path for the destination folder. You may also choose another folder if you wish. Installed Folders, Files, and Links The setup program creates a new folder called B4 II\ in the installation directory (Program Files\Native Instruments). This folder contains the files required to operate the software. If you do not choose a different program group during the installation, links to the Product and a ReadMe file are added to the Start menu under Programs/Native Instruments. VST plug-in Installation • Insert the Installation CD into the CD drive. • Use the Windows Explorer to view the contents of the CD. To start, double-click the B4 II Setup.exe file. • When the choice is given by the installer, select VST plug-in from the list of components to install. • You can now choose to automatically search for the VST plug-in folder or manually select the VST plug-in folder of your choice. Please select the option that best suits your installation requirements. Note: If more than one host program for VST 2.0 plug-ins is installed on your computer, the installer lets you install to multiple VST-folders by shift-clicking them. If you decide to install them at a later date, simply copy the “B4 II VST.dll” file into the VST plug-ins folders of these programs. Windows: If the VST plug-in files are not visible in the Windows Explorer, select the Show All Files option. This option is located in the Explorer menu View Folder Options... on the View tab below Hidden Files. Optionally, you can set up your programs so that they all use the same VST plug-ins folder. B4 II – DXi 2 plug-in Setup DXi 2 is a plug-in interface for software synthesizers and instruments based on Microsoft DXi technology. Sonar from Cakewalk and Fruity Loops are the most well known host sequencers that support DXi. Installation • Insert the Installation CD into the CD drive of your computer. • Use the Windows Explorer to view the contents of the CD and doubleclick the B4 II.exe file to start the installation. • Continue the B4 II installation until you come to the Choose plug-ins page. Tick the checkbox DXi plug-in. The installation program copies the B4 II plug-in to your hard disk and registers it as a DXi 2 plug-in for use in DXi 2-compatible host programs. After the installation, the software appears as a plug-in in the host program. RTAS plug-in installation • Launch the B4 II Installer from the CD. • Select the Custom installation type. • Select only RTAS from the list of components to install. Installation under MacOS X Installing B4 II in OS X • Insert the Installation CD into the CD drive of your computer. • Double-click the installation program B4 II Installer to start it. • The start screen appears first. After clicking Continue and confirming the license agreement, a dialog opens where you can select the installation location and the destination folder. The installation program suggests a path for the B4 II folder; if you do not select a different destination, the B4 II folder is created on the first hard disk. You can choose between Easy Install, where both the standalone and plug-in versions are installed, or Custom Install, where you can select which versions you want to install. – B4 ����� II MacOS Audio Unit plug-in Installation • Launch the B4 II Installer from the CD • Select the Custom installation type. • Select only Audio Unit from the list of components to install. RTAS plug-in installation • Launch the B4 II Installer from the CD • Select the Custom installation type. • Select only RTAS from the list of components to install. Product Authorization Part of the B4 II installation is a Product Authorization which has to be fullfilled in order to make permanent use of the software. We recommend that you take notice of this chapter first, then proceed with the software installation as described in the following chapters and finally return to this chapter. What is the Product Authorization? The Product Authorization includes a full registration. After having completed the authorization, you can make use of all online services related to the registered product. On the Native Instruments website you can read online tutorials, get technical support, participate in the NI forums and download updates. B4 II requires the Product Authorization in order to use the software permanently. You can run B4 II for 30 days without any limitations. As long as the software runs unauthorized a message at every program start reminds you that the authorization has not been completed yet and indicates how many more days the software is running without an authorization. The Product Authorization is performed by a small application called Registration Tool. The Registration Tool generates a so called System ID which serves as request code for receiving an Authorization Key. The System ID is based on some hardware components of your computer system, the operating system version and the serial number you have entered at the B4 II installation. B4 II – Note: Exchanging your audio card, MIDI interface or external equipment will not start the request for a new Authorization Key. Only exchanging a basic hardware component in your computer or installing a new operating system might produce a new Product Authorization request. In this case the Registration Tool will reflect the change by displaying a new System ID and you have to repeat the Product Authorization. The System ID has to be sent to Native Instruments in order to receive the Authorization Key which allows the permanent use of B4 II. Since the Product Authorization is part of the license agreement B4 II will stop launching after 30 days if it was not authorized until then. Of course, it is also possible to complete the Product Authorization after 30 days. In this case the software will launch again as soon as the Product Authorization has been completed. Note: The data transfer at the online Product Authorization is done via a secure connection using 128 bit encryption. Native Instruments keeps your personal data like email and postal address in confidence. No data will be passed to a third party. Registration Tool 10 – ����� B4 II Conducting the Product Authorization Native Instruments has set a high value on making the authorization procedure as easy and comfortable as possible. In the following sections we describe three methods of conducting the Product Authorization. We recommend Method A and Method B since these result in the easiest and fastest way of receiving the Authorization Key. Method A: B4 II computer has direct access to the internet Important: This method requires a valid email address to complete the Product Authorization, since the registration code will be sent to you by email. • Windows: Start the Registration Tool from the start menu (Native Instruments B4 II B4 II Registration Tool) or from the B4 II installation folder (default path: C:\Program Files\Native Instruments\B4 II\). • MacOS: Start the Registration Tool from the B4 II installation folder (default path: Applications\B4 II\). •A click on the Register Now button opens the Native Instruments registration webpage. Therefore your standard Internet Browser will be opened and an internet connection will be established according to your system settings. Your System ID will be automatically transmitted to the registration form. • On the first online page you are asked if it is your First Registration at B4 II – 11 Native Instruments or if you want to do an Additional Registration. • Depending on the option you have chosen on the first online page you now get a login page asking for your username and password or a form where you can fill out your address data. Please fill out all required fields and follow the instructions on the screen to complete the registration. • On the last online registration page your Authorization Key is directly shown in the browser. Please copy the full number (12 x 5 digits) and paste it to the registration tool. Within a few minutes you will also receive an email from the Native Instruments registration system containing the Authorization key. The Authorization key is available in the email body and additionally as text attachment. This email also contains the password which is required for using the online services. • Start the Registration Tool again and either copy the Authorization Key from the email and press the Paste from Clipboard. button in the Registration Tool or use the Open File button in the Registration Tool to open the email attachment which you previously have saved to hard disk. 12 – B4 ����� II • Click ������������� on the Complete button. After completing the Product Authorization the Registration Tool looks like this Now the B4 II Product Authorization has been completed. The authorization message at every B4 II start has disappeared and you can use the software permanently: Method B: Internet Connection on another computer Important: This method requires a valid email address to complete the Product Authorization, since the Authorization Key will be send to you by email. • Windows: Start the Registration Tool from the start menu (Native Instruments B4 II B4 II Registration Tool) or from the product installation folder (default path: C:\Program Files\Native Instruments\B4 II\). • MacOS: Start the Registration Tool from the B4 II installation folder (default path: Applications\B4 II\). B4 II – 13 • A click on the Save Registration File button opens a Save dialog for saving a HTML file. Save the HTML file to any storage medium. • Transfer the HTML file to another computer where you have internet access (via floppy disk, CDR etc.). • Open the HTML file in your internet browser. • The HTML page contains a link for the registration page on the Native Instruments website. When you click on this link an internet connection will be established according to your system settings. • On the first online page you are asked if it is your First Registration at Native Instruments or if you want to do an Additional Registration. • Depending on the option you have chosen on the first online page you now get a login page asking for your username and password or a form where you can fill out your address data. Please fill out all required fields and follow the instructions on the screen to complete the registration. • Within a few minutes you will receive an email from the Native Instruments registration system containing the Authorization key. The Authorization key is available in the email body and additionally as text 14 – ����� B4 II attachment. This email also contains the password which is required for using the online services. • Transfer the text attachment to the computer where you have installed B4 II. • Start the Registration Tool again and use the Open File button in the Registration Tool to open the email attachment which you previously have saved to hard disk. • Click on the Complete button. After completing the Product Authorization the Registration Tool looks ������ like this Now the B4 II Product Authorization has been completed. The authorization message at every B4 II start has disappeared and you can use the software permanently: Method C: No Internet Connection available Important: Following this method you will have to fill in a form which you send to Native Instruments. You will receive the Authorization Key either by email (recommended), by postal mail or by fax. If you do not provide Native Instruments with a valid email address in the form, be prepared to type in the Authorization Key manually (about 60 digits). B4 II – 15 If you do not have access to the internet or if you do not have a working email address, the Product Authorization can also be done via postal mail or fax. Although Native Instruments goes after a fast handling of your authorization requests, it is generally recommended that you prefer Method A or Method B for shortest return times and most comfortable operation. Please note the following instructions to fullfill the Product Authorization: • Windows: Start the Registration Tool from the Windows start menu (Native Instruments B4 II B4 II Registration Tool) or from the product installation folder (default path: C:\Program Files\Native Instruments\B4 II\). • MacOS: Start the Registration Tool from the B4 II installation folder (default path: Applications\B4 II\) • A click on the Fill Out Form button opens a local HTML file in the operating system’s standard browser or another program which you have defined as standard application for opening HTML files. • The HTML file contains all information Native Instruments requires for completing the Product Authorization and registration. Please fill in the required data and print it out, or write a letter containing the data. 16 – B4 ����� II If you write a letter please attend to a legible handwriting to avoid mistakes at the Native Instruments registration team. Illegible email or postal addresses can cause problems with the Authorization Key delivery. Send the form to Native Instruments using one of the following contact addresses: Native Instruments GmbH����������������������� Native Instruments USA Registration��������������������������� 5631 A Hollywood Boulevard Schlesische Straße 28 Los Angeles CA 90028 10997 Berlin���� USA Germany Fax: +49 30 6110352400 Fax: +1-323-372-3676 • You will receive the Authorization Key via email (recommended), fax or mail. • Start the Registration Tool again and either copy the Authorization Key from the email and press the Paste from Clipboard button in the Registration Tool or use the Open File button in the Registration Tool to open the email attachment which you previously have saved to hard disk. If you have received the Authorization Key by mail or fax, type it in manually. • Click on the Complete button. • Now the B4 II Product Authorization has been completed. The authorization message at every B4 II start has disappeared and you can use the software permanently: Registration support If you run into problems during the Product Authorization the Native Instruments registration support team will be happy to help you. In this case send a support request on the NI website using the following URL: http://www.native-instruments.com/registersupport.info Please describe the occurred problem as accurate as possible and provide the registration support team with the necessary details to solve the problem. B4 II – 17 Audio Interfaces Audio interfaces, which include software routines called drivers, allow B4 II (and other programs you have installed, if present) to communicate with your computer’s audio hardware. This section describes how to use various audio interfaces with B4 II. There are two main ways to implement B4 II: As a “standalone” device that requires no host software. The application’s audio and MIDI connections interact directly with your computer’s audio/MIDI hardware interface. As a plug-in that works in conjunction with a “host” program, such as sequencing or hard disk recording software. In this case, the host program interacts directly with the computer’s hardware interface. B4 II connects to the host program via “virtual patch cords.” The audio outputs appear as signals in the host’s mixer, and the host passes MIDI data to the software. We’ll describe each mode in detail, but first let’s look at the various interface drivers and plug-in formats used by different operating systems and programs. Standalone Application B4 II works in standalone mode with ASIO, MME, DirectSound, and Core Audio. The software/computer combination acts as an instrument, similar to a hardware digital synthesizer. The table shows you which drivers are available under which Operating System: Driver ASIO 2.0 DirectSound MME Core Audio Windows • • • MacOS X • • Plug-In Used as a plug-in, B4 II is not a standalone program but rather a program “module” that can be integrated into a “host” program such as a sequencer. plug-in mode allows you to integrate it seamlessly with the sequencer. Furthermore, it has many other uses as a plug-in: 18 – ����� B4 II • MIDI sequencing of B4 II and audio mix-down of the MIDI tracks within a single program • Comfortable automation of B4 II parameters in the sequencer • Further processing of B4 II signals using additional plug-ins • Sample-accurate timing with MIDI controllers (when used as VST 2.0 plug-in) • Restoring of all plug-in settings when the host document (such as a song file of the sequencer) is loaded • Integration with other instruments into a “virtual studio” Some shortcuts / key commands do not work in all sequencers. This is due to the fact that the host capture keys for themselves and do not pass them on to the plug-in. This table provides you with an overview of which interfaces are supported by which host programs: Plug-in Interface VST 2.0 Plug-in DXi Audio Units Host-Program Cubase, Nuendo Sonar Logic Windows • • Mac • • Note: Some hosts include “wrappers” that allow running B4 II with a choice of plug-in protocols. Try each one, as one may offer better performance than another. Example: With Sonar, running B4 II as a DXi instrument allows using multiple outputs, while running it as a VST instrument provides more automation options Interface Details The interfaces described below represent different ways B4 II can communicate with your sound card. Available interfaces depend on your computer, the audio interface (sound card) you’re using, and your computer platform (B4 II supports Windows XP or MacOS X). Choose the fastest interface protocol supported by your interface, which will likely be ASIO with Windows, or Core Audio for Mac. For Windows, you can also use DirectSound and Multimedia (also called MME), but expect a significant delay (called latency) between the time you play a note and the time you hear it. ASIO (Audio Streaming Input Output): This cross-platform plug-in protocol B4 II – 19 was developed by Steinberg. It is highly recommended for its low latency, multi-channel audio card support, and high performance. DirectSound: Developed by Microsoft, this is a is a component of DirectX 5.0 or higher for Windows. How well DirectX works well depends on your sound card. If you adjust the interface for an acceptable amount of latency, you may hear glitches and clicks in the audio output that can only be fixed if you increase latency. MME (Multi Media Extension): This is the standard Windows audio driver. Most sound cards support this interface and work with it quite well. However, MME is even less suitable than DirectSound for real-time applications due to its comparatively high latency. Core Audio: This audio interface for MacOS X is integrated tightly into the operating system, and works with external audio hardware as well as the Mac’s integrated audio output. Plug-In Details VST (Virtual Studio Technology): Like ASIO, this cross-platform plug-in technology was developed by Steinberg. It is the most common plug-in format, and many programs are optimized to work with VST plug-ins. DXi2 (DirectX Instrument 2): Based on Microsoft DirectX technology, this plug-in interface for software synthesizers and instruments is designed for low latency and high performance on the Windows platform. Cakewalk Sonar and Image Line FL Studio are the most well-known hosts that support DXi. RTAS (Real Time Audio Suite): This interface protocol from Digidesign allows using plug-ins with ProTools (or other Digidesign-compatible software). Unlike traditional TDM effects that depend on using Digidesign hardware, RTAS plugins are “native”. This means the host processor performs all computations needed for the plug-in. AU (Audio Units): This plug-in format is exclusively for the Macintosh OS X platform, and is tied in closely with the operating system. More About Latency As with any digital device (including hardware signal processors) that convert audio to data and back again, a computer adds a certain amount of delay (“latency”) when processing audio signals. Fortunately, with today’s computers and low-latency sound card drivers, this delay can be so small that you can’t hear it (e.g., under 3 milliseconds, which is about the same delay caused by moving your head one meter further away from a speaker). However, typical 20 – B4 ����� II computers are generally not set up for low latency; attempting to play in real time through B4 II will probably be unsatisfying because of the delay. Any computer-based audio system has some delay between the audio input and output. As a result, if you’re playing a MIDI keyboard through B4 II, you may hear an annoying delay between the time you hit a key and hear a sound. Even the most powerful computer can only do a certain number of calculations per second; generating and processing sounds demands a lot from a computer, so it’s important to minimize any computer-based delays. Fortunately, three main factors make delays virtually insignificant, assuming you have a suitable computer setup (see System Requirements). • Today’s multi-GigaHertz computers are so fast they dramatically reduce latency. • Many sound cards and audio interfaces include drivers optimized for low latency. • NI’s software has been optimized to function as efficiently as possible. Use Low-Latency Drivers Drivers are pieces of code that handle communications between your computer and audio interface, whether built into a computer or attached via USB or FireWire. The more efficiently they transfer data between audio interface and computer, the lower the latency. B4 II works with two low-latency driver types: • ASIO (Advanced Streaming Input Output). This cross-platform protocol was originally developed by Steinberg. • Core Audio (Mac only). This low-latency protocol was created by Apple for the Macintosh, starting with OS X. If your audio interface does not support one of these protocols, you will likely hear an audible delay if you play through B4 II in real time. Although B4 II can work with the DirectSound and MME drivers common in Windows machines, you will probably not have a satisfying playing experience. How Low Can You Go? 1.5 ms of latency approaches the theoretical minimum, because it will always take some time to convert a keyboard press into MIDI data, than convert B4's digital audio out to analog. However, note that ultra-low latency settings (or higher sampling rates) make your computer work harder, which may limit the B4 II – 21 polyphony or number of effects you can add while still retaining glitch-free audio. So, here are some tips on living with latency. About Samples and Buffers Audio cannot be handled continuously by a computer, but has to wait its turn while other operations are being carried out. As a result, sound cards create a “buffer,” which can hold a certain number of samples, where data can be stored and released as needed to create a smooth flow of data. An analogy would be if you had a hose that didn’t deliver water continuously, but in bursts. So, you use a holding tank to store the water coming in from the hose, and have a valve in the tank that releases a steady amount of water in a smooth, continuous flow. If the tank (buffer) is large, then you can store more water in case the hose goes dry for a bit. But it will take longer to fill the bucket, which is equivalent to latency. A smaller tank takes less time to fill, but the hose had better deliver water on a pretty continuous basis. All ASIO audio interfaces and sound cards include a control panel where you can adjust latency. This may be given as the number of samples per buffer, as shown in the Terratec EWX control panel: For example, the Terratec EWX ASIO control panel lets you choose a particular number of samples/buffer. The display then shows the resulting latency. In this case, 256 samples/buffer has been selected, giving latency of just under 6 ms at 44.1 kHz. Setting this to 128 samples/buffer will reduce the latency, but may stress out your computer more. Some control panels simply show the latency that results from choosing a particular setting in milliseconds rather than showing samples/buffer. 22 – B4 ����� II In this screen shot, note that Creamware’s ASIO control panel simply lets you choose the desired latency; buffers are adjusted “behind the scenes” within the Creamware Scope application (in this case, to 128 samples). The Device Setup panel in Cubase confirms the latency, which is about 4 ms, but doesn’t indicate the buffer size. Warning: Different Types Of ASIO It’s extremely important to use the ASIO driver written for the card you’re using. There are also “generic” ASIO drivers, typically called (for Windows) “ASIO DirectX Full Duplex Driver” or “ASIO Multimedia Driver.” They will usually be found in a drop-down menu in the host program where you choose the desired ASIO driver. If you’re not sure which one to use, try them all, and choose the one with the lowest latency. There should be an obvious, dramatic difference when you use the correct ASIO driver. B4 II – 23 Tips On Minimizing Latency • Set latency to the highest comfortable value. 256 samples/buffer is very responsive yet gives your computer some “breathing room.” 512 samples may also be acceptable; anything more will create too much delay. If you can’t get reliable audio with 512 samples, it’s time for a better computer! • If your ASIO Control Panel shows latency in milliseconds, you’ll find that anything over 10 ms or so gives an audible delay. 5 ms is a good compromise between speed and minimum stress to your computer. • Download your sound card’s latest drivers from the manufacturer’s web site. This can make a huge difference in performance. • If you are recording in a host application and using software synthesizers, use your program’s “freeze” function (if available) to disconnect some synths from the CPU. Or, render a soft synth’s output as a hard disk audio track (then remove the soft synth), as audio tracks are less taxing on the computer. Hint: If you retain the MIDI track driving the soft synth, which places virtually no stress on your CPU, you can always edit the part later by re-inserting the soft synth. • Sometimes there are two latency adjustments: A Control Panel for the sound card sets a minimum amount of latency, and the host can increase from this value if needed. Or, the host may “lock” to the control panel setting. 24 – ����� B4 II B4 II as standalone When used as a plug-in, the host program has already set up its audio and MIDI connections, and B4 II simply “plugs in” to these. However, with standalone operation B4 II communicates directly with your audio interface. It’s therefore necessary to specify audio and MIDI settings, as well as the preferred driver protocol (of course, plug-in format is not an issue). Setup for Mac and Windows machines is essentially identical, except where indicated. Note that if you change your audio interface, you will almost certainly need to re-adjust these settings. Call up the Audio + MIDI Settings setup dialog from the Setup menu. You’ll see three tabs for Soundcard, Routing (audio output patching), and MIDI. Soundcard (Audio Interface) Audio + MIDI Settings dialog Interface: Choose the fastest interface protocol supported by your interface, which will be ASIO or Core Audio. For Windows, you can also use DirectSound and Multimedia (also called MME), but expect a significant delay between the time you play a note and the time you hear it. Windows only: Avoid using any drivers listed as “emulated,” as they provide poorer performance than other drivers. For example, although DirectSound drivers generally outperform MME drivers, MME drivers will outperform emulated DirectSound drivers. B4 II – 25 Sample rate: The drop-down menu will display compatible sample rates for your audio interface. 44.1kHz is the same sample rate used for CDs, and is the most “universal” choice. However, some audio interfaces offer 48kHz and 96kHz (B4 II accepts up to 96kHz sample rates). These higher rates stress your computer more, but offer somewhat better high frequency response. If you are using B4 II standalone, choose whichever rate you prefer. When used as a plug-in with a host program (e.g., Cubase, Digital Performer, Logic, Sonar, etc.), the host will determine the sample rate. Output Device: Use ASIO written specifically for your audio interface (not “ASIO DirectX” or “ASIO Multimedia,” unless no other choices are available), or for the Mac, Core Audio. Output Latency: This field displays the output latency. For some drivers you can adjust the latency individually using a fader. Adjust latency for the fastest possible setting that gives consistent audio performance. The CPU may not be able to keep up with fast settings, resulting in possible crackles or pops in the audio. Slower settings will give more consistent audio performance, but the amount of delay may be musically unsatisfying. Experiment with the latency setting until you find the best compromise between consistent audio performance and fast response. A quick way to adjust latency is as follows: Select any instrument and play it while moving the Latency slider. Move the Latency slider to the left until you start to hear clicks in the audio output. Now move the slider to the right until the clicks disappear. This is the optimum setting. 26 – ����� B4 II Routing Using the drop-down menu, Output 1/2 is assigned to an output from a multioutput sound card. If your sound card offers multiple outputs, you can choose which ones connect. Click on Outputs to select the outputs from drop-down menus. Similarly, use input to select the audio input if you wish to use B4 II as an effect. If you experience a humming or buzzing, maybe even feedback, when you start B4 II, it is likely that you have the B4's input set to your computer's built-in microphone. Please select another input or disable input altogether by choosing "not connected" from the drop-down menu. B4 II – 27 MIDI If your MIDI interface offers multiple ins and outs, you can choose which one connects to B4 II. When you click on the MIDI tab you’ll see a list of MIDI I/O. Initially, each one will be Off. This field is a toggle – click on Off to turn an input or output On, click on On to turn an input or output Off. If you enable more than one input, they will be merged. 28 – ����� B4 II B4 II as Instrument Plug-in Plug-ins come in two forms, virtual instruments and audio effects. Most of you will use B4 II as a virtual instrument, but that shouldn't discourage you from also using it as an effect. Just plug B4 II into any audio track to use the various cabinets and speakers for signal processing. The instructions in the following section can be used to get started with B4 II instrument and your host. VST 2.0 Plug-In Using the B4 II in Cubase SX 3 • Launch Cubase, go to the Devices menu option and select the VST Instruments menu option or press F11 on your keyboard. • A window showing the instrument rack appears. Click on an empty slot and choose B4 II from the available list of instrument plug-ins. • The plug-in will now appear in your list and automatically be turned on. It will also create a set of audio channels in your VST mixer that will be used for mixdown within your project. This will allow you to mix, pan, and process B4 II's output just like any other existing audio track in your Cubase song. • Click on the Edit button to call up the B4 II interface. Here you can control and edit all the features and functions that B4 II has to offer. • Now go to the "Project" page and add a MIDI track (if you do not have one already created). • Go to the Output parameter section for this MIDI Track and click on the field. This will create a list of available MIDI out ports to assign to this MIDI track. Choose B4 II from the list. Note: If a product does not appear in the list of available VST instruments inside Cubase then ������������������������������������������������ you may need to enable it manually via the Devices/plug-in information window. If the product does not show up B4 II – 29 there, then it may not be installed correctly. ����������������������������� Please refer to the previous section on installing the plug-in for both Windows and Mac platforms for more assistance on setting this up. After having loaded an Instrument from the library you should be able to trigger it via MIDI using a keyboard controller. B4 II’s sound will generate through the VST mixer and directly to your sound card. If the plug-in does not receive MIDI or generate audio, then make sure to check the following areas: • Make sure "MIDI thru" is enabled in Cubase. • The MIDI channel of your MIDI track must correspond to the receive channel of the loaded instrument. • Make sure that you have properly configured your sound card for use with Cubase. (please refer to your Cubase manual for more information) Using B4 II in Nuendo 3 • • • Launch an empty or current project in Nuendo. Click on the Devices menu and choose VST instruments from the menu options (or press F11 on your keyboard). A window showing the instrument rack appears. Click on an empty slot and choose B4 II VST from the available list of installed plug-ins. • The plug-in will now appear in your list and automatically be turned on. It will also create a set of audio channels in your VST mixer that will be used for mixdown within your project. This will allow you to mix, pan, and process B4 II's output just like any other existing audio track in your Nuendo project. • Click on the Edit button to call up the B4 II interface. Here you can control and edit all the features and functions that B4 II has to offer. • Now go to the "Project Editor" page and create a MIDI track (if you do not have one already created). • Go to the Output parameter section for this MIDI Track and click on the field. This will create a list of available MIDI out ports to assign to this MIDI track. Choose B4 II VST from the list. Also make sure you assign the MIDI input port to correspond to whatever MIDI controller your are using. 30 – ����� B4 II • Record enable the MIDI track. Note: If a product does not appear in the list of available VST instruments inside Nuendo 3, then you may need to enable it manually via the Devices/plug-in information window. If the product does not show up there, then it may not be installed correctly. Please refer to the previous section on installing the plug-in for both Windows and Mac platforms for more assistance on setting this up. After having loaded an Instrument from the library you should be able to trigger it via MIDI using a keyboard controller. The plug-in’s sound will generate through the VST mixer and directly to your sound card. If the plug-in does not receive MIDI or generate audio, then make sure to check the following two areas: • Make sure "MIDI thru" is enabled in Nuendo. • The MIDI channel of your MIDI track must correspond to the receive channel of the loaded instrument. • Make sure that you have properly configured your sound card for use with Nuendo (please refer to your Nuendo manual for more information). Audio Units Plug-ins Use in Logic 7 • Launch Logic and create an audio instrument track or set an existing audio or MIDI track to an audio instrument track by clicking on it, holding down the mouse button and choose Audio Audio Instrument Inst 1. • Double click the audio instrument track to open the environment win dow. Logic scrolls automatically to the first instrument bus in the Logic mixer. • Choose the B4 II Audio Unit plug-in in the appropriate insert slot of the instrument mixer bus, either in the arrange or mixer window. To B4 II – 31 do so, click onto the insert slot, hold down the mouse button and choose Stereo AU Instruments Native Instruments B4 II • The B4 II interface opens and now appears in the instrument slot and is ready to use. The instrument mixer channel will allow you to mix, pan, and process the software's output just like any other existing audio track in Logic. • If the B4 II interface is not already open, double click on the mixer’s insert slot to call up the B4 II interface. Here you can control and edit all the features and functions that the product has to offer. Note: If B4 II does not appear in the list of available AU instruments inside your AU host application, then you may need to rescan your plugins using the AU Manager from within Logic 7 (Logic menu/Preferences). If the product does not show up there, then it is not installed correctly. Please refer to the previous section on installing the plug-in for the Mac platform for more assistance on setting this up. After having loaded an Instrument from the library you should be able to trigger it via MIDI using a keyboard controller. B4 II’s sound will generate through the mixer and directly to your sound card. If the plug-in does not receive MIDI or generate audio, then make sure to check the following two areas: • Make sure the Instrument track is selected in the Arrange window. • The MIDI channel of your MIDI track must correspond to the receive channel of the loaded instrument. • Make sure that you have properly configured your sound card for use with Logic. (please refer to your Logic manual for more information). 32 – ����� B4 II Use in Digital Performer 4.6 • Launch Digital Performer and create an instrument track by selecting Project Add Track Instrument Track B4 II. • Create a MIDI track by selecting Project Add Track MIDI Track. In Digital Performer’s track overview window (or in the sequence editor window) assign the ouput of this MIDI track to “B4 II-1” and a MIDI channel. • The plug-in is now ready to use. The mixer of Digital Performer will allow you to mix, pan, and process B4 II's output just like any other existing audio track. • • To play B4 II with your keyboard, record enable the MIDI track which you have routed to B4 II and make sure MIDI Patch Through is enabled in the Studio menu of Digital Performer. Double click on the B4 II slot in Digital Performers mixing board to call up the B4 II interface. Here you can control and edit all the features and functions that B4 II has to offer. Note: If the product does not appear in the list of available Audio Unit plug-ins inside your Audio Units host application, then it is not installed correctly. Please refer to the previous section on installing the plug-in for Mac platforms for more assistance on setting this up. After having loaded an Instrument from the library you should be able to trigger it via MIDI using a keyboard controller. B4 II’s sound will generate through B4 II – 33 Digital Performers mixer and directly to your sound card. If the plug-in does not receive MIDI or generate audio, then make sure to check the following two areas: • Make sure MIDI Patch Through is enabled in the Studio menu of Digital Performer. • The MIDI channel of your MIDI track must correspond to the receive channel of the loaded instrument. • Make sure that the instruments track output is correctly set. • Make sure that you have properly configured your sound card for use with Digital Performer. (please refer to your Digital Performer manual for more information). Use in Garage Band • • • • • • • Launch Garage Band Press the “+” button to create a new “Software Instrument” Track. From here you can choose the icon you wish to use. Double-click the instrument track icon or press the “I” icon to get the Track Info. From the Info window expand the Details triangle underneath the Instrument icon to expose the track settings. From the Generator drop-down menu, choose B4 II from among Audio Unit plug-ins. Clicking on the pencil icon next to the “Manual” drop-down menu will open the B4 II interface for editing. B4 II can now be played using an external MIDI keyboard. 34 – B4 ����� II DXi 2 plug-in DXi is a Microsoft DirectX technology based plug-in format Use in Sonar 4 • Launch Sonar • In the synth rack choose B4 II DXi 2. Loading the DXi 2 plug-in in the synth rack • Route a MIDI track to the DXi 2-Plug-in by selecting B4 II in the Out drop down list. Assign a MIDI track to the B4 II -DXi-Plug-in After having loaded an Instrument from the library you should be able to trigger it via MIDI using a keyboard controller. B4 II’s sound will generate through Sonar’s mixer and directly to your sound card. If the plug-in does not receive MIDI or generate audio, then make sure to check the following two areas: • Make sure MIDI Patch Through is enabled in the Studio menu of Sonar. • The MIDI channel of your MIDI track must correspond to the receive channel of the loaded instrument. • Make sure that the instruments track output is correctly set. • Make sure that you have properly configured your sound card for use with Sonar. (please refer to your Sonar manual for more information). B4 II – 35 Using B4 II with Pro Tools The RTAS format is an interface protocol for Mac OS and Windows that allows you to use plug-ins with ProTools independently from additional TDM hardware. In this case, the host processor alone performs all of the computations for the plug-in. • Launch Pro Tools • Create a new Instrument track : File New Track • Locate the channel mixer : Windows Show mix • The dark grey box at the topmost section of the Instrument channel is the RTAS insert section. Click on the first empty slot to show all available RTAS plug-ins. • Choose plug-in Instrument B4 II from the menu • A MIDI node is automatically created and after record enabling the MIDI track, you will be able to play B4 with your MIDI keyboard. (Please refer to your Pro Tools manual for more information on how to record the output of the B4 II). 36 – B4 ����� II The B4 User Interface The B4 “Manual View” You can adjust all of the front panel controls with your mouse. Additionally, you can test the current sound by clicking on the keys of either manual or the foot pedals. The B4 Control Center The B4 Control Center is always displayed and contains the interface to guide you around your virtual organ. You can quickly select presets with the Preset Menu and switch to the different views to accomplish the tasks at hand. The View Selection Switching around the interface… There are five views in the B4. Each displays different types of performance and/or programming controls. B4 II – 37 The Manual View is an “organ keyboard” view, which includes all three manuals (the upper and lower as well as the pedals), the three drawbar sets, the expression pedal and the performance switches. This is a good view to use when you are doing manual drawbar editing, and want to be able to “manually” strike the keys. These editing controls are covered in more detail in the “Creating Your Sound” section of the manual. The Organ View displays the most important editing controls used for programming your B4. It includes many of the program functions from the Manual View, but does not display the keyboard manuals or pedals. The Organ View has several editing sections, providing control over various tonal organ parameters, the modeled tube amp, plus various cabinet model and microphone options. 38 – B4 II The Expert View displays an additional set of controls for the tonewheel models, percussion and vibrato details, reverb, and the rotary effects. The major organ controls, like the drawbars, the Rotator controls, and the vibrato/percussion buttons are also available in the Expert View. These settings are also covered in more detail in the “Creating Your Sound” section of the manual. The Preset View shows everything you need to organize your organ sound library. It also includes a simple midifile player and options for import and export of presets. B4 II – 39 Last but not least, the Setup View helps you with setting up various MIDI channel options and with assigning MIDI controllers to the dials and switches of the B4. You will also use it for setting up MIDI channels, keysplits and manual transpositions. Most of the time you will work with the Manual- and Organ Views, as these contain the more performance-oriented controls. The Expert View is geared towards in-detail editing. The Presets Menu Let’s see what’s on the menu… The Control Center’s presets menu provides control over the B4 keyboard presets. Unlike the original tonewheel organs, the Native Instruments B4 stores multiple sets of presets for recall. The Control Center is always visible, independently from the currently activated view. Presets can be recalled by entering a number in the Preset Number field on the left side. By clicking on the preset name you can choose a preset from the drop-down list. 40 – B4 II Up : Loads the previous preset on the list. Down : Loads the next preset on the list. Store: Immediately stores the current setting in the current preset and overwrites it. The Preset View gives you more controls for handling presets and is described in the next section of this manual. Using Presets The B4 puts a broad range of organ sounds at your fingertips, giving you rapid access to a library of 120 presets, divided into 10 banks of 12 presets each. Individual preset hold the drawbar settings and every other user adjustable parameter that defines the instrument´s sound. Manual View In the Manual View, presets can be selected by hitting one of the “reverse image” keys – the keys on the left side of the keyboard that have black naturals and white accidentals. Presets selected from the upper manual change the settings for the entire instrument. Presets selected from the lower manual only change the lower manual and the pedal drawbars. Selecting a preset will immediately move the drawbars to the stored setting. Note: Unlike the B3, there is no “Cancel” preset. On the B3, the Cancel preset allowed direct manipulation of the drawbars to determine the sound of the organ. With the B4, the drawbars are always active, they reflect the sound of the current preset and are always editable. Banks are selected using the Bank Select Control on the “wooden” end block of the upper manual. Selecting a new bank will immediately change the preset in use, and therefore change the drawbars to match the newly selected preset. B4 II – 41 Of course, you can also use the preset section displayed in the Control Center to change presets or navigate to the Preset View to get a better overview over your currently available presets. Organ and Expert View Use the preset menu/ arrows buttons to change and the Store button to overwrite presets. Presets can also be selected using MIDI Program Change commands. Program numbers determine the bank and program to be selected. For example, Program Change numbers 1-12 are in Bank 1, 13-24 are in Bank 2 etc. At any point, you can change the current sound of each manual by adjusting the manual drawbars. The drawbars are automatically changed when a new preset is selected, so they always correspond directly to the current sound. Saving Presets Programming the B4 can allow you to create new and unique organ sounds. As described below, you can use the drawbars to determine the sound played with the keyboard manuals. Additionally, the Organ and Expert View settings can add realistic detail to the sound. Learning to use these setting is at the heart of creating a personal organ/speaker voice. Once you’ve created a sound you want to keep, you can save the settings as a preset. To save an edited sound as a preset, you need to click on Store in the Control Center or use the controls on the Preset View. There you will also find the Store To command letting you store presets to new locations in the preset memory. All parameter settings, except expression pedal (swell), are stored in the given memory location. 42 – B4 II Exporting Presets In sequencers, the preset memory is saved as part of the song that uses the B4 plug-in. But you will probably also want to export your presets to a file. You can save all 120 presets in memory as an “export” file using the Save function on the Preset View. If you only want to export the current sound as a single preset, you can use the Save Single function. These files allow you to share presets with other B4 users or to store settings for later use. If you are running the B4 in standalone mode, the Load and Save functions are also available via the File Menu. The Preset View Organizing the library of organ sounds… In the upper part of the Preset View you can see the preset list. Click on a preset to load it. With the page buttons below the presets list you can flip through all 7 pages containing all 120 presets. The Left button flips one page backwards and the Right button flips one page forward. You can also use the mouse to drag and drop presets to new locations in the list. By doing this the other presets will be shifted to new locations. With this function you are not going to overwrite existing presets. B4 II – 43 If you want to rename a preset, double click on its name and type in a new one. To store a preset you should use the Store To command. This important command lets you store presets in a location other than your currently selected preset. After clicking Store To you select the desired preset slot on the preset list and your new sound will get stored. Be careful, though, you will overwrite the preset that formerly dwelled in that location The B4 also sports a small MIDI file player. You can use it via the following controls: Audition Buttons: We have prepared some MIDI recordings to help you test sounds. Pattern one plays a short jazz pattern, with number two it is blues and rock for number three. Play: Toggles playback of the currently loaded midifile on and off. This acts as a combined play/pause button. Stop: Stops playback of the currently loaded midifile. Open Midifile: Opens a midifile to be played by your B4 organ. The next bunch of buttons deal with managing the preset list and with import and export of presets to and from disk. 44 – B4 II List Operations Store To: After clicking Store To you select the desired preset slot on the preset list and your current settings are stored into that preset slot. Delete: This command deletes the currently selected preset, leaving an empty preset slot. Compact List: This command pushes all empty preset slots to the end of the list. All presets will get renumbered accordingly. Protect!: If toggled on, this option prevents all presets from being overwritten. The memory is protected. Undo: By clicking Undo the last command in the preset view gets undone. You can step back up to 30 commands. When you save the list as a complete package, the undo stack gets deleted. Redo: By clicking Redo the last command that got undone with the Undo function is executed again. File Operations Load: This command imports all 120 presets from a preset file into the B4’s preset memory. This is how you load presets from NI or other B4 users. Save: The Save option exports all 120 presets from the B4’s preset memory to a preset file. Under Windows, the filename extension for a file with 120 presets is b4a. Load Single: This command will import a single preset from a preset file. The contents of the file are loaded as the current sound setting without affecting the preset memories. It is loaded into the preset buffer. Save Single: This command exports the current sound setting as a single preset to a preset file. Under Windows, the filename extension for a file with one preset is b4p. B4 II – 45 Keyboard Splits Unlike most instruments, the B4 must implement multiple keyboard ranks (called manuals in organ parlance). This is accomplished in two ways: either by responding to multiple MIDI channels, or by supporting keyboard splits. When using multiple MIDI channels (No Keyboard Split), the default response to MIDI information is as follows: Notes, Controls, and Program Changes received on MIDI channel 1 are used by the entire instrument. Program Changes received on channel 1 are equivalent to selecting a preset from the upper manual preset keys. Notes, Controls, and Program Changes received on MIDI channel 2 are used by the lower manual. Program Changes received on channel 2 are the equivalent of selecting a preset from the lower manual. Notes and Controls received on MIDI channel 3 are used by the bass pedals. Program Changes received on channel 3 are treated as if received on channel 2. You can change these default settings by choosing different MIDI channels on the Setup View. Please refer to the corresponding section in this manual for further information. Using this method for handling MIDI data, it is easy to maintain production control from your sequencer or multiple MIDI keyboards. When using keyboard splits, the MIDI information received on MIDI channel 1 is sent to the different manuals based on the keyboard split locations. In all cases, the upper manual is controlled using the highest MIDI notes, and the pedals are controlled with the lowest notes. Using the keyboard split mode, it is easy to play all three manuals “live” with just one keyboard, allowing a skilled player to simulate the complex manual control of a hot B3 player. Setting Split Points To split the notes received on MIDI Channel 1 between the B4’s upper and lower manuals right-click with your mouse on the desired key on the on-screen keyboard. 46 – B4 II On the resulting menu choose Set Upper Keyboard Split to define the upper split point. This key and all above it will play the upper manual from now on. The keys below it play the lower manual. Similarly, use the menu entry Set Lower Keyboard Split to set the split point between the bass pedals and the lower manual. When Keysplit is activated, the split points are shown with markers on the upper manual in the Keyboards View. To delete your keyboard splits, right click again on the upper manual and choose No Keyboard Split from the resulting menu. B4 II – 47 As an alternative, you can modify the split points on the Setup View. Each manual can also be transposed up or down by one octave by rightclicking on the respective on-screen keyboard and choosing the appropriate transposition settings from the context sensitive menu. This also works for the pedals. MIDI Response The MIDI response of the B4 is similar to any standard MIDI instrument. Once you have MIDI reception set correctly, you will find that the B4 will respond to the complete range of MIDI notes. As you play “beyond” the range of the standard B3’s keyboard range, the notes will “roll over”, or repeat their lower values. Unlike real tonewheel organs, the B4 will also respond to MIDI Note Velocity input. If your keyboard is able to send velocity messages, and if the current preset is set to respond to velocity changes (by having the Velocity knob on the Organ View turned up), you will find the output levels affected by how hard you strike the keys. 48 – B4 II The B4 is also able to have all of the on-screen controls manipulated by MIDI controller messages. The MIDI controllers used are listed on the Setup View. They can be changed to your needs. You can do this either on the Setup View (which is described in the next section of this manual) or by right clicking on the control and choosing MIDI Learn… from the pop-up menu. Afterwards just move the hardware controller you want to assign to that specific B4 control and you are done. Hint: The B4 can be used with any programmable MIDI controller box. The B4 comes with templates (in the form of MIDI Sys-Ex files) for various hardware controllers. The B4 as an effects unit You can route any audio signal through the B4 tone shaping sections. The external sound gets in just before the amp section and is mixed with the tonewheel signal. This opens up a world of possibilities for shaping external sound with the beefy tone engine of B4. B4 II – 49 In standalone mode the external signal comes from the audio input of your soundcard. Please refer to the Setup View section of this manual for more information. The FX plugin version of B4 will receive audio input from the host software it is running in. Please refer to the respective section of this manual and to the documentation of your sequencer or plugin host for information on how to route audio into the B4 FX plugin. The B4 is not only an organ but a full-fledged simulation of a tube amp and rotator rig including a variety of classic cabinets and microphones. Electric guitars will feel right at home when plugged into the B4. Feel free to experiment and use synthesizers, vocals or whatever audio signal you have. You will get a plethora of nice sounds from this approach. Setup View The technical MIDI side of the B4… 50 – B4 II The Setup View is for assigning MIDI controllers, managing controller maps and for setting some further details affecting the behaviour of your B4. Controller assignment On the left you have the Controller Assignment list representing the current controller map. The CC column shows the currently set controllers for the B4 parameters shown in the Name column. Click on the controller number to change its value. Press enter to commit the change. The MIDI channel for incoming controllers can be defined with the Controller Channel dial on the bottom of the Setup View. The Mode column sets the behaviour of the B4 parameters that can be operated by a switch. If Mode is on, one complete switch/release cycle toggles the state of the respective parameter. If Mode is off, the down-state of the switch represents one state of the control in your B4 and the up-state represents the other. The Mode function is not available for controls that need continuous controller input, like dials or drawbars. Let’s assume you want to control your rotor brake with a footswitch. With toggle active you have to press and release the footswitch to set the control into brake mode and press and release again to switch back to run mode. In switch mode a down-press switches the brake on and letting go of the B4 II – 51 footswitch means run mode. It depends on the parameter to be controlled and on your personal taste which Mode setting you should choose. For the rotor brake both settings can be useful but you will probably want to use things like Percussion on/off with toggle mode. Export and import of controller maps is provided via the following commands: MIDI Learn: With this control you can assign MIDI controllers interactively. First you select the parameter to be re-assigned on the controller assignment list. Then click MIDI Learn and move the desired knob or fader on your MIDI hardware. Another way of assigning MIDI controllers to B4 controls is to right-click on the B4 parameter on any View and to choose MIDI Learn… from the pop-up menu. Then you will have to move the knob or fader on your hardware controller and the new assignment is done. CC Dump: The current value of all panel controls is sent out as MIDI Controller messages. Use this if you have MIDI controller hardware with endless encoders displaying the current value of individual controls. To round up the controls for MIDI controller management we have: Load: This command imports a saved controller map. Save: Here you can save the current controller map to disk. Be sure to save your customized controller maps so that you can easily restore them in case of a system crash. The Load Controller Map / Save Controller Map functions are also available via the file menu of the standalone version. Under Windows, the filename extension for a controller map is bcm. Interfacing 52 – B4 II Rig-Kontrol-2 Active: This is for proud owners of the Native Instruments RigKontrol 2. Activate this option, if you want to control the B4 with the RigKontrol. Please be sure that no Guitar Rig is running when activating Rig-Kontrol for the B4. It cannot be used for both at the same time. The default state of this control is off. Furthermore you can only use the Rig-Kontrol 2 with your B4 in standalone mode. Audio Input Active: This control enables/disables the audio input from your sound hardware into the B4 standalone version. It is only available for the standalone version. Audio/MIDI Setup: This brings up the setup window for selecting the audioand MIDI interfaces. Please refer to the respective manual sections in the first part of this text for further information. This control is not available in the plugin version of B4. The host software takes care of all things audio and MIDI for the B4 plugin. Controller Options Xk3 MIDI Compatibility: Switch on if you want to control the B4 with the Hammond Xk3 controller hardware. This piece of kit uses its own protocol to communicate with the B4. Invert MIDI Drawbars: When using a MIDI controller to control the drawbars, this control inverses the effect of pulling/pushing the drawbar. CC Dump On Program Change: When this switch is active, every received program change sends out the current value of all panel controls as MIDI controller messages. You can use this if you have MIDI controller hardware with endless encoders displaying the current value of individual controls. The controller dump will happen when you switch a preset via the B4 interface and if you initiate a program change via your MIDI hardware or sequencer software. Drawbar options B4 II – 53 2 Pedal Drawbars: When active, the B4 pedals get only two drawbars (16’ and 51/3’). This does not mean that only two of the normally six drawbars are active but that the two drawbars control a mixture of tones. This emulates a feature of the original B3. Upper Drawbars On Left: When this control is active the upper and lower drawbar sections swap their positions in all views. Pedal Drawbars In Middle: Activate this if you want the pedal drawbars between those for the upper and lower keyboard. Percus. Disables 1’ Drawbar: When active and Percussion switched on, the 1’ drawbars for the lower and upper manuals are deactivated. Note: The stock B3 organ has nine contacts for every key, one for every drawbar. For the percussion effect one contact has to be used, so that one drawbar has to be dismissed. As the Percussion effect is only available on the upper manual this control does not apply for the lower. Manuals setup MIDI Channel: Assign individual MIDI channels for the three manuals and for the controllers. Click on the value and move the mouse up or down to change it. Use this if you are in the luxurious situation of having multiple MIDI keyboards for controlling your B4. 54 – B4 II Transpose: With the Transpose switches you can transpose each of the three manuals one octave up or down. Alternatively, you can switch the octaves of the respective manuals by right clicking them in the Manual View and choosing the respective option in the pop-up menu. Upper/Lower Keysplit: If you want to control multiple B4 manuals with one keyboard you can define keysplits. Click into the value field and move the mouse up or down to change the note number. Upper/Lower Keysplit Learn: This mirrors a command from the context-sensitive (right-click) menu of the Manual View. Click the button and press a key on your MIDI keyboard to set the splitpoint between pedals and lower manual. Upper/Lower Keysplit On/Off: Click to toggle the upper/lower keysplit on and off. Lower/Pedal Keysplit: If you want to control multiple B4 manuals with one keyboard you can define keysplits. Click into the value field and move the mouse up or down to change the note number. Lower/Pedal Keysplit Learn: This mirrors a command from the context-sensitive (right-click) menu of the Manual View. Click the button and press a key on your MIDI keyboard to set the splitpoint between lower and upper manual. Lower/Pedal Keysplit On/Off: Click to toggle the upper/lower keysplit on and off. You can also define keysplits in the Manual View. Right-click on the upper manual to bring up the menu. Please refer to the corresponding manual section for further information. Full Screen mode If you want to see the B4 without any distractions from underlying windows and other OS controls, click the Full Screen button. It is located to the right of the Control Center. To leave full screen mode click the button again or press the escape key on your computer keyboard. B4 II – 55 Creating Your Own Sounds Manual View Controls The B4 organ in all its glory… The B4 provides complete editing functions for all three manuals (upper, lower and pedal). This programming is provided by the drawbars and controls on the Manual View panel, and the adjustments located on the Organ and Expert Views. Using these edit functions, you can create new and exciting sounds to accentuate your music. The front panel controls are: Vibrato Switches The trademark sound produced by the patented Scanner Chorus/Vibrato system can be switched on and off for the upper and lower manuals independently. The bass pedals use the same setting as the lower manual. 56 – B4 II Vibrato Setting The Vibrato Setting switch allows for quick changes to the depth of the chorus or vibrato effect. The switch has six settings: V-1, C-1, V-2, C-2, V-3, C-3. These settings determine the depth and mix of the Scanner Chorus/Vibrato effect. In fact, changing these switches will change the Depth and Mix settings found on the Expert View. V stands for Vibrato effect and C is Chorus. The number indicates the depth of the effect. Pedal Drawbars 6 Drawbars setup the sound for the bass pedal channel. Anything is possible, from pure deep sine bass, to grooving wooden bass tones, to full orchestral sound. The drawbars include the 16’, 5 1/3’, 8’, 4’, 2 2/3’ and 2’ settings (in other words, just like the first six drawbars from the other manuals). Because preset selection will change the drawbars to the new settings, the drawbars always represent the current bass pedal sound. If you would like to stay true to the original B3 you can go to the Setup View and switch on the 2 Pedal Drawbars feature. By doing this, you will have only two drawbars (16’ and 51/3’) for the pedals. Note: This setting does not mean that only two of the six drawbars are active but that the two drawbars control a mixture of tones. B4 II – 57 Lower Manual Drawbars 9 drawbars setup the sound for the lower manual channel. Two brown drawbars (called 16’ and 5 1/3’ in organ parlance) provide the sub-octave tone for a powerful sound. The white drawbars (8’, 4’, 2’ and 1’) mix in the pure octave harmonics. The black drawbars (2 2/3’, 1 3/5’ and 1 1/3’) provide extra timbral coloration. The combination of these tones allows a huge range of different sounds to be created. As with the pedal drawbars, the current preset is always represented with the drawbars. Upper Manual Drawbars 9 drawbars control the upper manual, as with the lower manual. In total, three different sounds are always available – the pedal, lower and upper drawbar settings. Again, there is the possibility to get the B4 to act even more like the original B3 organ. On the Setup View you can activate the Perc disables 1’ Drawbar feature. The stock B3 has nine contacts for every key, acting on the tonewheels behind the 9 drawbars. When the Percussion effect (see below) is active, one of those contacts has to be sacrificed, rendering the 1’ drawbar inactive. Percussion Switches The four switches on the top-right hand side of the front panel control the use of the Percussion “effect”. The Percussion switch activates a circuit which amplifies one of the upper drawbars and lets it decay over time. The result is a highly characteristic sound that is indispensable for jazz and many other styles. 58 – B4 II When activating Percussion on an original B3, the 1’ tone becomes silent. The default setting for the B4 does not account for this. You can, however, activate the Perc disables 1’ drawbar feature on the Setup View to get your B4 act like the original in this aspect. The speed of decay and the percussion volume can be adjusted in the Expert View. As an enhancement over the original B3, the B4 allows any drawbar to be selected as the source for the percussion tone. The percussion effect is only available on the upper manual. The Percussion Volume switch toggles between two preset volume levels (Soft and Normal) for the Percussion sound. This switch will override the setting of the Volume dial sitting on the Expert View. On similar grounds, the Percussion Decay switch toggles between two preset decay speeds for the Percussion effect, overriding the preset setting. Using the Percussion Harmonics switch you can choose between two different drawbars producing the Percussion effect. Again, you will override the preset value on the Expert View that has more than two settings to choose from. On the lower-right of the B4 Manual View you will find two additional Knobs: With the Reverb dial you can set the amount of reverb signal getting mixed into the output signal. The Drive knob can be found both on the Manual View and on the Organ View in the tube amp section. You can use it to set the overdrive amount of the built in tube-amplifier model. This control provides a wide range of settings, be it clean jazz, bluesy crunch or downright heavy rock distortion. Be sure to check the Organ View for a selection of different authentic cabinet models that complement the overdrive sound. B4 II – 59 Bank Switch This rotary switch selects one of 10 banks of presets. Ready for immediate use, there are all the popular sounds for jazz, rock and classical play, as well as some more extreme settings. A change to the bank selection will cause an immediate change to the preset in use (and the drawbar, effects and Rotator settings displayed). Each bank holds 12 presets, one on each Preset Selector key. Upper Preset Selectors Just like on the original organs, these 12 inverse colored keys are used to select presets. However, the presets now provide complete recall for all settings affecting the organ drawbars, Tube Amplifier and Rotator. Unlike the B3, there is no “cancel” preset – all presets implement actual stored settings, and the drawbars reflect the current tone settings. As discussed earlier, the Upper Preset Selectors control the setting of all B4 manuals – upper, lower and pedal. Lower Preset Selectors These 12 inverse colored keys can be used to recall alternative drawbar settings for the lower manual and bass pedals. Again, there is no “cancel” preset – all presets implement actual stored settings. 60 – B4 II Rotator Controls The rotating speaker simulation (Rotator) speeds up and slows down realistically when operating this switch (which responds to the MIDI Mod-Wheel control). The rotation speeds and acceleration characteristics can be adjusted with complete flexibility in the Expert View. The Rotator effect can also be disabled for straight organ sounds by using the rotor brake. When switching the brake to Stop you will hear that it does not simply switch the effect, but that the rotor decelerates down to a complete halt. Switching to Run accelerates the rotor back to speed. The best way to use the Rotator features is having two footswitches – one for switching the speed and one for the brake. Note: The first generation Leslie cabinets did not have the brake feature. It was later introduced and became a much used feature. Expression Pedal The Expression Pedal (or Swell Pedal) is used to dynamically vary the instrument’s volume for expressive playing. Note: The Expression Pedal setting is not saved with presets – it is a performance control only. B4 II – 61 Organ View Controls The Organ View Panel… The Organ view is split into several sections: Organ, Tube Amp, Microphones, the cabinets selector, and an overview of the Manual View settings (reviewed above). The Organ section sets details in the tone generation model. In the Tube Amp section you can control the tone of the Amplifier model and the Microphone section deals, well, with microphone details. For extra fine control while working with knob or slider positions, hold down the Shift key while clicking on a control. This will increase the mouse movement needed to move the selected control. Apart from the Manual view the Organ view is the one you will probably spend most of the time on. It displays the most commonly used controls for shaping your organ sound. Organ Controls 62 – B4 II Keyclick amount adds an initial bite to the sound that is a popular part of the tonewheel sound. The “bite” provided by higher keyclick volumes will add definition to the organ tone (especially good for soloing), and is useful when the B4 needs to cut through a dense mix. The original B3 is not velocity sensitive. With the B4, however, you can add variable velocity sensitivity by turning the Velocity knob. This is a nice feature to play accentuated riffs and can greatly enhance your organ voice. The Leakage parameter simulates a crosstalk between the tonewheel outputs. As the value increases, the separation of the different tonewheels will decrease, resulting in a wider frequency range of the produced tone. This simulates an ageing effect. Tonewheels tend to get leaky and dolfed in badly maintained B3 organs over the years. Use it to your advantage when the sound has to be a bit trashy. The Sustain knob in the Pedal Bass section provides control over the volume envelope of the bass pedal sounds. If turned completely to the left, the bass pedal notes sound only as long as the incoming MIDI note signals dictate. The further the knob is turned to the right, the longer the notes will sound even after the key/pedal has been released. If you are using a MIDI pedal controller you can use this as a playing aid for held notes. The String/Organ switch changes the decay characteristics of the bass sustain function. In String mode it acts like a plucked bass string, sloping the volume to zero after a key is pressed. In Organ mode the volume is held at full volume for the complete hold phase. Tube Amp Settings and Indicators The Tube Amp Overdrive Indicator Tube provides feedback as to the amount of overdrive produced by the tube amp model. As overdrive is increased, the depicted tube will glow brighter. Tube Amp Drive determines the preamp level sent to the main tube amp model. At high levels, this will force the tube amp into overdrive, and can add a beefy Rock sound to the organ. B4 II – 63 The Tube Amp Volume sets the output level sent from the amplifier model. This determines the overall volume of the organ, and is used to provide volume compensation between presets. This is strictly a volume adjustment, and has no effect on the tone of the amp. The Bass and Treble knobs control two shelving equalizers helping to shape the sound of the amp. Tube Amp Bass boosts or cuts the bass frequency range and can give amplifier distortion a fuller sound. The Tube Amp Treble setting affects the high frequency tones sent through the amplifier. This can be used to reduce the high frequencies of the output sound, and create a more mellow output from the B4. Cabinet Settings The last part of the Tube Amp controls is the Cabinets panel. Here you choose the different cabinet models available as a tonal addition to your organ sound. Below are descriptions with some comments concerning sound character. Please use the comments as only rough guidelines. Most of the cabinet models can be very variable in sound depending on the settings of other B4 parameters. Feel free to experiment. Rotator 122 Open: This cabinet has an open, direct sound and is well-suited for everything rock. Rotator 122 Closed: If you are looking for that typical jazz flavor, use this cabinet. Rotator 147 Open: This one also provides very nice jazz tones. The microphones are placed off-axis in this model and the sound is a bit softer than with the closed 122 model. Rotator 147 Closed: Yet another setting similar to the Rotator 122 closed. Again, the microphones are placed off-axis and the sound character is more on the soft side. 64 – B4 II Citrus: This setting simulates an on-axis condenser microphone on a guitar cabinet and represents a well-balanced all-around tone. Tweedman: An on-axis dynamic microphone picking up a 4 x 10 guitar box. It is nice for a jazzy sound with pleasant bass tones. Think Jimmy Smith. Jazz: If you are looking for that dirty Jimmy McGriff sound, this cabinet can come close. It simulates a 2 x 12 speaker setup with a condenser microphone. Twang: This can sound soft and warm. A nice cabinet for ballad work, sporting an on-axis condenser microphone and a model of a well-known 2 x 12 guitar rig. AC Box: A British sounding guitar setup using both a dynamic and a condenser microphone. Farfisa and Continental tonewheels are welcome! Plexi: Another British sound from the sixties. This is a 4 x 12 with an onaxis dynamic microphone and an additional off- axis condenser. Can you say “Heavy Rock”? Lead 800: This setup is similar to the Plexi setting, only more on the modern side. You will get increased presence with a more aggressive sound. Bass-VT: This is a simulation of a famous bass guitar setup. It can sound very beefy and sports a horn speaker for some extra presence. Direct: With the direct setting the cabinet is replaced by a D.I. box. It simulates plugging the rotator output directly into the mixing desk. Microphone Settings The output of the Rotator is “picked up” by pairs of virtual microphones – models of physical microphones that can accurately reflect the real-world output of the Rotator. The Rotator control balances the mix between the rotor signal and the Amp/ Cabinet output without rotor. Use this knob to determine how strong the rotor sound is present in your signal. B4 II – 65 The Balance control determines the relative mix between the treble and bass speaker outputs. This provides control of the tonal characteristics of the speaker output (and, therefore, the entire plug-in). When turned all the way to the right you hear only the treble rotor. Fully left and only the bass rotor is heard. With the knob centered you get an even mix of the two rotors. The Pan control can place the treble to one side and bass to the other side of the stereo output. In the extreme positions, one side will be pure bass and the other pure treble. Center is neutral, with both treble and bass going equally to both stereo channel. Operation of Balance and Pan controls. Finally, the Air control adjusts the level of early reflections in the room response of the B4 microphone model. Use this if you are looking for a relatively “roomy” and a bit more indirect sound character. 66 – B4 II Expert View Controls Advanced controls on the Expert view… The Expert View also displays the regular performance controls on the lower part of the screen. However it is more geared for programming sounds. Tonewheel The B4 goes beyond what is possible with an old Hammond organ in many ways. One important feature is that it is equipped with a replaceable tonewheel generator as standard. This means you can easily take out the whole set of 91 tonewheels and replace them with a new set. In this way you can quickly change the basic sound of the organ. In the old days, if you weren’t happy with the sound quality of your Hammond organ, for example because the tones weren’t pure any more, you had to get a specialist to replace the filter capacitors in the tonewheel generator and calibrate the tone filter circuits. With the B4, you can quickly switch between different tonewheels by selecting a set from the menu - it activates instantly. B4 II – 67 Just like the old tonewheel organs, the B4 has no master tune control because tonewheels run at a fixed synchronous speed that cannot be changed. The only way to change the master tuning is to change the transmission ratios in the tonewheel generator, something that’s completely impractical in hardware but easily achieved with the B4’s replaceable tonewheel generator. You can now choose the B3 Classic Tonewheel Set in different tunings. The B3 classic set is in standard 440Hz tuning. You can also choose the tunings 436Hz, 444Hz, 448Hz and 452Hz. Another important aspect of musical instruments is age. The filter capacitor in Hammond tonewheel generators deteriorate with age, which leads to an increase in leakage and rattle in the basic tone sound. To simulate organs with different degrees of ageing there are Sets with varying amounts of purity or dirt. B3 classic B3 clean B3 pure B3 dirty B3 filthy B3 trash B3 classic 436 B3 classic 437 B3 classic 438 B3 classic 439 B3 classic 441 B3 classic 442 B3 classic 443 B3 classic 444 B3 classic 448 B3 classic 452 Continental Soft Continental Hard Continental Mix Farfisa Compact Farfisa Compact Boost Harmonium well-matured good condition better than on day one excessive ageing very crunchy far beyond repair tuned to 436Hz tuned to 437Hz tuned to 438Hz tuned to 439Hz tuned to 441Hz tuned to 442Hz tuned to 443Hz tuned to 444Hz tuned to 448Hz tuned to 452Hz Soft version of the Continental Bright version of the Continental Medium version of the Continental Farfisa sound brighter Farfisa sound Derived from an Indian Harmonium Hammond was not the only maker of classic electric organs. Another famous company build the Continental, whose organs were played by many of the great bands of the sixties and seventies, such as The Doors and The Animals. Another well-known manufacturer is Farfisa, known through Pink Floyd, Can, Tangerine Dream, or Stereolab. With your B4 you also have three Continental tonewheel sets, two Farfisa sets 68 – B4 II and a Harmonium simulation right at your fingertips. Percussion The Percussion Volume control determines the amount of percussion effect in the sound. The use of percussion provides a lightness to the sound, and is particularly useful for jazz and house organ sounds. Percussion Volume has only two positions on the B3: “Soft” and “Normal”. On the B4, this is continuously variable over a wide range. The position corresponding to the B3 setting “Soft” is labeled S and “Normal” is labeled N. Note: When setting Percussion to the “Normal” volume on a stock B3, the overall volume of the upper manual drops. This is regarded as a drawback by most players and is not reproduced on the B4. The Percussion Decay control determines the speed at which the percussive sound decays. Percussion Decay only has two positions on the B3: “Fast” and “Slow”. On the B4, this is continuously variable through a wide range. The position corresponding to the B3 setting “Fast” setting is labeled F and “Slow” is labeled S. Percussion Harmonic controls the drawbar used for the percussion tone. This control has 9 steps representing the 9 harmonic drawbars available for percussion generation. The Percussion Harmonic Selector has only two positions on the classic B3: “Second” (4’) and “Third” (2 2/3’). On the B4 any of the 9 Drawbars can be used as the source for the percussion sound. The positions corresponding to the B3 settings are labeled 2 and 3. Note: Just like on the B3, the B4 percussion effect is single-triggered, meaning that it only starts with the first key pressed and does not retrigger with any notes played legato. Only after all upper manual keys are released will percussion trigger again. B3 players know how to take advantage of this in their playing technique. B4 II – 69 Vibrato The Vibrato Mix control determines the type of effect. This is continuously variable from Vibrato (Mix knob right) through Chorus (Mix knob centered) to almost no effect (Mix knob left). The Vibrato Depth control determines the amount of vibrato applied to the sound. Note: The Vibrato And Chorus knob on the Manual View (as with the original B3) allows only Vibrato or Chorus effect to be selected (at depth settings of 1, 2 or 3). The B4 implements continuous controls to provide more subtle use of the vibrato and chorus effects. Reverb The Reverb section provides control over the room simulation of your B4. First of all, you can switch between a Studio and a Spring reverb. The Studio reverb has a clean and smooth character, while the spring reverb is modeled after the classic reverbs used in guitar amplifiers. Both settings can produce lush and harsh sounding reverb effects. Simply experiment to find settings that fit your style. The Time dial is your main control for the reverb time. It spans a wide range of decay times from a few hundred milliseconds up to several seconds. The Size parameter sets the dimensions of the simulated room. For the Studio reverb higher settings increase the pre-delay of the reverb algorithm. With the spring reverb a higher size value equals a longer spring. The Reverb gets its signal from the tube amplifier. With the Pre/Post you can control how much of it is being fed into the cabinet and how much goes into 70 – B4 II the signal chain after the Rotator. Have a look at the following diagram to get a better understanding of the reverb signal flow. Reverb Signal Flow… Rotator Controls B4 II – 71 Treble Rotor The indicator lamp provides visual feedback of the current treble rotation rate. The Slow speed sets the rotational speed of the treble rotor when the Rotator Speed switch is set to Slow. This setting is continuously variable between 0 and 85 rpm. When the knob is centered you get a typical chorale effect. The Fast speed setting determines the speed of the treble rotor when the Rotator Speed switch is set to Fast. This setting is variable from 85 to 700 rpm. When the knob is centered you get a typical tremolo effect. The Accel control sets the rate of change (acceleration or deceleration) when the Rotator Speed switch is changed. The range of this setting is 0.1 to 20 seconds. The Spread setting determines the difference between the left and right microphone signals by moving the microphones apart a certain distance. This provides a perceived “width” or stereo spread when the Rotator is spinning. With Spread at minimum, both mics are in the same place. As Spread is increased they move around the speaker cabinet in a circle, but in opposite directions. With Spread at maximum they are at opposite sides. Bass Rotor These control work exactly like the Treble Rotor controls but this time they affect the bass rotor. The Single/Dual switch offers the possibility to have 2 Rotators running in a stereo setting. A single Leslie cabinet is already stereo per se, but sometimes more is better. With the Dual setup you get 2 complete Rotators spinning in opposite directions and with slightly different speeds for that extra wide sound. Finally, the Distance control sets the apparent distance between the microphones and the rotors. This affects the “amplitude modulation” of the mic’d sound (the change in volume as the rotor horn passes the microphone). When the microphones are at a small distance there is a lot of amplitude modulation, making the sound pulsate. 72 – B4 II Operation of Spread and Distance controls. B4 II – 73 Drawbar Programming Basics Theory The key to understanding drawbar programming is to understand the use of harmonics. Harmonics are the basis of complex sound generation, and are present in almost every sound you hear. The most basic sound is the pure sine wave. It consists of the “fundamental” tone only. The fundamental is the base frequency of a pitch. For example, the frequency of the A above middle C is 440 Hz. The sound of a pure sine wave is not very interesting (although it can be used for deep bass sounds). We can make the basic sound more interesting by adding “harmonics” – frequencies that are related to the fundamental tone. The “first” harmonic is a tone one octave above the fundamental. By mixing some of this first harmonic with the fundamental, we get a brighter and more complex sound. Harmonics can be manipulated in two different ways: either by starting with a simple tone and adding harmonics (additive synthesis), or by starting with a complex sound and removing harmonics (subtractive synthesis). Most synthesizers use subtractive synthesis to create sounds, but the B4 (and any real tonewheel organ) uses additive synthesis to create its sound. This is one of the reasons that tonewheel organs have a very different sound from their synthesizer cousins. There is a series of harmonics (called the natural harmonics) that are related to the fundamental in a specific way. These harmonics, if mixed together, will describe something like a sawtooth wave (a moderately buzzy sound). The natural harmonics of middle C, for example, are: The first 8 harmonics of Middle C 74 – B4 II It would be convenient if tonewheel organs used harmonics to describe the drawbars settings. However, the terms used for describing the harmonic content of organs historically comes from pipe organs, where the use of various lengths of pipe determines the tonal characteristics. Hence, organs have come to use “pipe length” rather than harmonic number to describe sound settings. Additionally, it is quite useful to have tones that are not part of the basic harmonics series to “fatten up” the resultant sound. On the tonewheel organ, the brown drawbars provide tones which are not natural harmonics of the fundamental frequency, but belong to the harmonic series starting one octave below. That’s why they are often called sub-harmonics. The “pipe length” settings, and their relationship to the natural harmonics, are described in the following graphic: Drawbars and their Harmonics B4 II – 75 Practice Now that we’ve reviewed the technical and historical aspects of the tonewheel organ, let’s use this information to create some useful sounds with the B4. We will use the upper manual to experiment with the organ sound, although all of the following concepts will work equally well with the other manuals. The only exception is pedalboard programming, as the drawbars provided for the bass pedals are missing the highest three drawbars. Let’s start with a very basic setting. Select the Manual view, and turn off all of the effects (the Percussion, Rotator and Vibration switches, and the Drive dial). This will allow us to hear the pure tone generation without any interference. Now, “push in” all of the drawbars, and pull out the 8’ bar (which is the fundamental tone). You can now hear the pure frequency of a note. The white programming drawbars provide octaves above the fundamental tone. If you pull out the white bars, you will hear tones one (4’), two (2’) and three (1’) octaves above the basic tone. Notice how the drawbars act like a mixer, allowing you to add the harmonics tones to the output sound. The first brown drawbar (16’) will also give an octave sound, but below the fundamental tone. Using the octave drawbars alone, and especially the higher octaves (2’ and 1’), you can produce “cheesy organ” sounds popular with 60’s and 70’s bubblegum pop, and also useful for adding a bit of humor to modern dance mixes. The following setting is a good example of a typical cheese organ sound: 76 – B4 II Now, let’s work with some of the other harmonics. Again, reset the drawbars with only the 8’ bar pulled out. Then start adding tones using the black drawbars. Notice how the sound becomes more “angular”, and there is less of a pure tone nature to the sound. In fact, you can even eliminate the 8’ drawbar, and only hear the high harmonics. Since there is no fundamental in the produced tone, the note is only “implied”. By varying the amount of fundamental, you can get a variety of standard jazzy organ sounds. Now, for some more useful settings! Here is a patch that is often used by rock organists: Note that the lower tones carry the entire weight of the sound. This gives a very ballsy sound, and reinforces the bass in a typical rock combo. Dial in a bit of overdrive to add the grungy sound of an overdriven tube amp to complete the sound. Church organists and “soap opera” stylists will use a fuller range of drawbars. This can give the illusion of a great pipe organ, especially when combined with the Rotator. Turn on the Rotator, set the speed to Slow, and use the following patch to create the Days of Your Life... B4 II – 77 Both jazz organists and house producers tend to use similar drawbar setting – primarily using lower drawbars with just a touch of higher harmonics, and the addition of the percussion sound. The difference in use is based on details: jazz cats will make a significant number of changes to the Rotator while playing, while a house player will typically leave the Rotator at the slow setting (using the organ sound as a grooving pad). A jazzer will breathe life into the performance by pumping the expression pedal, but in house music Velocity Sensitivity is used for accenting the groove. The following settings will give you one (of an infinite number) of settings used in this genre: Finally, let’s look at a drawbar setting that will be useful for pulling off rock solos. In addition to the rock pad sound listed above, we will want to add both percussion and keyclick sounds. The percussion sound is added using the Perc. switch, but the keyclick has to be added using the Keyclick control on the Organ View. Turn up the level of Keyclick, and you will hear a bite at the attack of each note. This, combined with the percussion and a slight bit of overdrive will give you a sound that will bite its way through any mix. The above tips are just a start. The tonewheel organ system has been in use for several decades, and players are still finding new settings, techniques and effects combinations for their sound. Experiment, try “impossible” settings and fully exercise the B4’s capabilities. You will find that the seemingly simple B4 interface can be used in an incredible number of musical applications. 78 – B4 II Appendix A: Keyboard and Mouse Control Keyboard control standalone Mode F1 F2 F3 F4 F5 F6 F7 F8 F9 F10 F11 F12 Space Shift-Space Alpabetic Keys Numeric Keypad 1 Numeric Keypad 2 Numeric Keypad 3 Numeric Keypad Enter Numeric Keypad 0 Function Preset +1 Preset -1 Preset -12 Preset +12 Vibrato Lower on/off Vibrato Upper on/off Percussion on/off Percussion Volume Percussion Decay Percussion Harmonic Manual view Organ view Expert view Preset view Setup view Full Screen mode Learn lower keysplit Learn upper keysplit Rotator slow/fast Rotator stop/run play notes Audition 1 Audition 2 Audition 3 Play/Pause MIDI file playback Stop MIDI file playback Mouse control + Mouse button LEFT RIGHT LEFT LEFT LEFT/RIGHT Function Value adjustment Context menu for MIDI Learn etc. Fine value adjustment Undo stored value swap linear/circular movement B4 II – 79 Appendix B: Recommended Reading and Listening Suggested Reading Keyboard presents: The Hammond Organ, Beauty in the B by Mark Vail, published by Miller Freeman Books ISBN 0-87930-459-6 Keyboard Magazine: June 1999 Article: Master Class, featuring Joey DeFrancesco Hammond Organ Complete: Tunes, Tones, and Techniques for Drawbar Keyboards by Dave Limina ISBN 0-63401-433-1 Hammond Links on the WWW The Absolute Beginner’s B-3 Newsletter http://theatreorgans.com/hammond/faq/files/b3-letter.txt Jimmy Foster: http://www.jimmyfoster.com Joey DeFrancesco Master Class: http://www.keyboardmag.com/master/joeyd/joeyd.shtml Hammond and Leslie FAQ: http://theatreorgans.com/hammond/faq The History of the Hammond B-3 Organ http://theatreorgans.com/grounds/docs/history.html 80 – B4 II Leslie Speakers and Hammond Organs - Rumors, Myths, Facts and Lore: http://www.mitatechs.com/leslierumors.html The Hammond Forum: http://www.zeni.net/~hf The International Archives for the Jazz Organ (IAJO) http://iajo.jwolf.com/# Hammond Tonewheel Organ WebRing: http://u.webring.com/hub?ring=hammond Suggested Listening • Organ-Ized: All-Star Tribute to the Hammond B3 Organ • Kickin' The 3- The Best of Organ Trio Jazz • Any recording by Jimmy Smith. • Any recording by Jimmy McGriff. • Any recording by Joey DeFrancesco. • Emerson, Lake & Palmer: Tarkus and Brain Salad Surgery. • Santana: Santana, Abraxas • The Best of Booker T. & the MG’s (Green Onions, of course). • Sly & the Family Stone: Greatest Hits. • The Spencer Davis Group: “Gimme Some Lovin’” • Paul Schaeffer & the Party Boys of Rock ‘n’ Roll: The World’s Most Dangerous Party. ... among thousands of great recordings... B4 II – 81 Genres: Jazz Well-known artists: Jimmy Smith, Jimmy Mc Griff, Barbara Dennerlein, Funk Brothers, Brother Jack Mc Duff... Jazz was the first contemporary musical genre using the Hammond in a completely new context. Laurens Hammond originally presented his organ as a portable and affordable replacement for the church organ. Thus, it got introduced into the gospel music of the black community and finally into jazz! Rock Well-known artists: Procul Harum, Keith Emerson, Rick Wakeman, Stevie Winwood... The guitarists were having fun with more and more powerful amps. Therefore the keyboard folks had to look around for something louder then a piano: the Hammond! Soul/R+B/Funk Well-known artists: Booker T. and the MG’s(Stax), The Funk Brothers (Motown), James Brown, Prince, Sly and the Family Stone... Black music embraced the Hammond right from the start. House Well-known artists: The KLF, Armand van Helden, David Morales The classic house organ sound was produced by cheesy preset boxes ((Casio CZ101, Yamaha DX-21 etc.). Now it finds its way back into the virtual original! Please switch velocity on for house music. Hi Gain Well-known artists: Deep Purple, Uriah Heep, Spooky Tooth... The second guitar of Smoke on the Water“ was no guitar but a Hammond organ played through a Marshall amp! Play harder, play louder!! Reaggae Well-known artists: Toots and the Maytals, The Wailers, Desmond Dekker, Peter Tosh 82 – B4 II The Hammond can already be heard on the legendary Studio 1 recordings, from the times when reaggae still was called ska. Transistor Well-known artists: Pink Floyd, The Doors, Can, Iron Butterfly… At that time a Hammond/Leslie combo was as expensive as a family car. But there were alternatives: transistor organs made by Vox, Farfisa and others. The above mentioned bands helped these organs to gain a psychedelic underground reputation. Indian Harmonium Well-known artists: Nitin Sawhney, Panjabi MC, Nusrat Fateh Ali Khan, The Harmonium has a big role in Indian music. You can hear it all over the place from classical Raga music to modern Bollywood/Bhangra productions. B4 II – 83 Appendix C: The B4 Signal Flow 84 – B4 II Index A ASIO.................................. 19, 22 AU........................................... 20 Audio + MIDI Settings................ 25 Audio Input............................... 53 Audio input............................... 50 Audio Interface.......................... 25 Audio Units......................... 20, 31 Plug-in Installation.................... 9 Authorization............................... 9 Key.......................................... 9 B B4IIFX...................................... 50 Balance.................................... 66 Bank........................................ 41 bank switch............................ 60 selection................................ 41 Bass rotor................................. 72 buffer....................................... 22 C Cabinets................................... 64 AC Box.................................. 65 Bass VT................................. 65 Citrus..................................... 65 Direct.................................... 65 Jazz....................................... 65 Lead 800............................... 65 Plexi...................................... 65 Rotator 122 Closed................. 64 Rotator 122 Open................... 64 Rotator 147 Open................... 64 selection................................ 64 Twang.................................... 65 Tweedman.............................. 65 Complete button........................ 13 Control Center........................... 40 Controllers assigning................................ 51 cc dump.......................... 52, 53 export controller map............... 52 import controller map.............. 52 interactive assignment............. 52 invert drawbars....................... 53 MIDI learn.............................. 52 Mode..................................... 51 Rig-Kontrol 2.......................... 53 toggle or switch....................... 51 Xk3....................................... 53 Core Audio................................ 20 Cubase..................................... 29 D Delete keyboard split.................. 47 Different Types Of ASIO.............. 23 Digital Performer....................... 33 DirectSound.............................. 20 Drawbars display options........................ 54 editing................................... 74 Fundamental.......................... 74 lower manual drawbars............ 58 pedal drawbars....................... 57 pipe length............................. 75 position.................................. 54 upper manual drawbars............ 58 Drive.................................. 59, 63 DXi2................................... 20, 35 Plug-in Setup............................ 8 B4 II – 85 E Effect plugin............................. 49 Expert View......................... 39, 67 Expression pedal....................... 61 F Fill Out Form button................... 16 Full screen mode....................... 55 G Garage Band............................. 34 H Harmonics................................ 74 I Interface................................... 25 K Keyboard delete keyboard split................ 47 set lower keyboard split.......47, 55 set upper keyboard split......47, 55 split....................................... 46 transposition..................... 48, 55 Keyboard split........................... 46 Keyclick amount........................ 63 L Latency.................................... 20 latency...................................... 21 Leakage.................................... 63 Logic........................................ 31 Low-Latency Drivers................... 21 M Manuals MIDI channel.......................... 54 Manual View . ........................... 38 Microphone 86 – B4 II angle..................................... 72 balance.................................. 66 distance................................. 72 Pan....................................... 66 rotator mix.............................. 65 Separation.............................. 66 spread................................... 72 stereo.................................... 66 MIDI......................................... 28 MIDI channels........................... 46 Manuals................................. 54 MIDI Controller reception............ 48 MIDI file................................... 44 MIDI interface........................... 28 MIDI note reception................... 46 MIDI velocity....................... 48, 63 Minimizing Latency.................... 24 MME........................................ 20 N Nuendo..................................... 30 O Open File button........................ 15 Organ View.......................... 38, 62 Output Device........................... 26 Output Latency.......................... 26 P Pan.......................................... 66 Pedal........................................ 61 Percussion................................ 58 decay............................... 59, 69 harmonics.............................. 59 harmonic selection.................. 69 volume............................. 59, 69 Pipe organ................................ 75 Plug-In............................... 18, 29 Preset Keys............................... 46 Preset number........................... 40 Presets banks.................................... 41 export all................................ 45 export single........................... 45 import all............................... 45 program change...................... 46 renaming................................ 44 selection.......................... 41, 60 store...................................... 41 store to…............................... 44 Preset selection......................... 60 Presets Menu...................... 40, 43 Preset storage........................... 42 Presets View.............................. 43 Program Change........................ 46 Pro Tools................................... 36 R Register Now............................. 11 Registration Tool.................... 9, 10 Reverb...................................... 70 amount.................................. 59 pre-delay................................ 70 reverb pre/post....................... 70 reverb size.............................. 70 reverb time............................. 70 signal flow.............................. 70 spring length.......................... 70 spring reverb........................... 70 studio reverb........................... 70 Rotator..................................... 71 acceleration............................ 72 bass rotor............................... 72 brake..................................... 61 single/dual............................. 72 speed.............................. 61, 72 treble rotor............................. 72 Routing..................................... 28 RTAS.................................. 20, 25 Plug-in installation.................... 9 S Sample rate............................... 26 Samples and Buffers.................. 22 Save Registration File...................... 14 Set lower keyboard split.........47, 55 Set upper keyboard split........47, 55 Setup View................................ 51 Sine wave................................. 74 Single/dual................................ 72 software modeling........................ 6 Sonar....................................... 35 Soundcard................................ 25 Split points............................... 46 Stand-alone Application.............. 18 Standalone................................ 25 Store........................................ 41 String mode.............................. 63 Sustain..................................... 63 Swell pedal............................... 61 System ID................................. 10 System Requirements................... 8 T Tonewheels............................... 67 age........................................ 68 change................................... 67 Continental............................. 68 Farfisa................................... 68 Harmonium............................ 68 sets....................................... 67 tunings.................................. 68 Transposition....................... 48, 55 Treble rotor............................... 72 Tube amp bass...................................... 64 drive...................................... 63 equalizer................................ 64 treble..................................... 64 volume................................... 64 B4 II – 87 V Velocity............................... 63, 78 Vibrato................................ 56, 70 depth..................................... 70 mix........................................ 70 View Menu................................ 37 VST.......................................... 20 VST 2.0 Plug-In......................... 29 W What is the Product Authorization?9 88 – B4 II