1
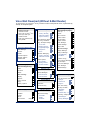
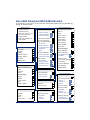
MITEL
®
Inter-Tel Voice Mail
User Guide
Notice
This user guide is released by Inter-Tel (Delaware), Incorporated and provides information
necessary to use Inter-Tel Basic Voice Mail (BVM) and Enterprise® Messaging (EM) voice
mail on an Inter-Tel Axxess®/5000 system. The guide contents, which reflect current InterTel standards, are subject to revision or change without notice.
Some features or applications mentioned may require a future release and are not
available in this release. Future product features are subject to availability and cost.
Some features may require additional hardware and/or specific software.
The contents of this guide may include technical or other inaccuracies. Inter-Tel reserves
the right to make revisions or changes without prior notice. Software packages released
after the publication of this guide will be documented in addenda to the guide or
succeeding issues of the guide.
For sales, service, or technical support, contact your local authorized
Inter-Tel provider:
Enter provider information above.
If you have any questions or comments regarding this guide or other technical
documentation, contact the Technical Publications Department (USA) at:
[email protected]
Mitel® is a registered trademark of Mitel Networks Corporation.
Inter-Tel® is a registered trademark of Inter-Tel (Delaware), Incorporated.
All other trademarks mentioned in this document are the property of their respective owners, including
Mitel Networks Corporation and Inter-Tel, (Delaware) Incorporated. All rights reserved.
© 2008 Inter-Tel (Delaware), Incorporated
Personal use of this material is permitted. However, permission to reprint/republish this material for
advertising or promotional purposes or for creating new collective works for resale or redistribution to
servers or lists, or to reuse any copyrighted component of this work in other works must be obtained
from Inter-Tel (Delaware), Incorporated.
Contents
About Voice Mail . . . . . . . . . . . . . . . . . . . . . . . . . . . . . . . . . . . . . . . . . . . . . . . . . . . . . . . . . . 1
Automatic Speech Recognition (ASR) . . . . . . . . . . . . . . . . . . . . . . . . . . . . . . . . . . . . . . . . 1
Mailbox Access . . . . . . . . . . . . . . . . . . . . . . . . . . . . . . . . . . . . . . . . . . . . . . . . . . . . . . . . . . 2
Recording Personal Greetings . . . . . . . . . . . . . . . . . . . . . . . . . . . . . . . . . . . . . . . . . . . . 3
Recording Your Directory Name. . . . . . . . . . . . . . . . . . . . . . . . . . . . . . . . . . . . . . . . . . . 4
Understanding Mailbox Messages . . . . . . . . . . . . . . . . . . . . . . . . . . . . . . . . . . . . . . . . . 4
Message Features . . . . . . . . . . . . . . . . . . . . . . . . . . . . . . . . . . . . . . . . . . . . . . . . . . . . . . . . 5
Listening to Messages . . . . . . . . . . . . . . . . . . . . . . . . . . . . . . . . . . . . . . . . . . . . . . . . . . 5
Recovering Deleted Voice Messages. . . . . . . . . . . . . . . . . . . . . . . . . . . . . . . . . . . . . . . 6
Canceling Unheard Voice Messages . . . . . . . . . . . . . . . . . . . . . . . . . . . . . . . . . . . . . . . 6
Recording and Sending Voice Messages. . . . . . . . . . . . . . . . . . . . . . . . . . . . . . . . . . . . 7
Using Remote Messaging . . . . . . . . . . . . . . . . . . . . . . . . . . . . . . . . . . . . . . . . . . . . . . . 8
Mailbox Preferences . . . . . . . . . . . . . . . . . . . . . . . . . . . . . . . . . . . . . . . . . . . . . . . . . . . . . 10
Changing Your Mailbox Password . . . . . . . . . . . . . . . . . . . . . . . . . . . . . . . . . . . . . . . . 10
Programming a Fax Destination . . . . . . . . . . . . . . . . . . . . . . . . . . . . . . . . . . . . . . . . . . 10
Changing the Call Screening Transfer Method . . . . . . . . . . . . . . . . . . . . . . . . . . . . . . 11
Receiving Screened Calls . . . . . . . . . . . . . . . . . . . . . . . . . . . . . . . . . . . . . . . . . . . . . . 11
Changing the Message Envelope. . . . . . . . . . . . . . . . . . . . . . . . . . . . . . . . . . . . . . . . . 12
Changing the Message Search Order . . . . . . . . . . . . . . . . . . . . . . . . . . . . . . . . . . . . . 13
Voice Mail Directory . . . . . . . . . . . . . . . . . . . . . . . . . . . . . . . . . . . . . . . . . . . . . . . . . . . . . . 14
E-Mail Reader . . . . . . . . . . . . . . . . . . . . . . . . . . . . . . . . . . . . . . . . . . . . . . . . . . . . . . . . . . . 16
Entering Your E-Mail Password . . . . . . . . . . . . . . . . . . . . . . . . . . . . . . . . . . . . . . . . . . 16
Using Main Menu E-Mail Reader Count . . . . . . . . . . . . . . . . . . . . . . . . . . . . . . . . . . . . 19
Listening to Fax Message Notifications . . . . . . . . . . . . . . . . . . . . . . . . . . . . . . . . . . . . 20
Troubleshooting Tips . . . . . . . . . . . . . . . . . . . . . . . . . . . . . . . . . . . . . . . . . . . . . . . . . . . . . 21
Voice Mail Flowchart (Without E-Mail Reader) . . . . . . . . . . . . . . . . . . . . . . . . . . . . . . . . 23
Voice Mail Flowchart (With E-Mail Reader) . . . . . . . . . . . . . . . . . . . . . . . . . . . . . . . . . . . 24
Inter-Tel® Voice Mail User Guide
iii
About Voice Mail
Inter-Tel voice mail is an integrated component of the Inter-Tel Axxess/5000 phone system.
This user guide provides feature instructions for Basic Voice Mail (BVM) and Enterprise
Messaging (EM) voice mail system features. Use this guide as a supplement to your
endpoint user guide. Contact your voice mail administrator for more information.
NOTE
Some features described in this user guide may or may not be enabled for your
system. Contact your voice mail administrator for more information.
Your voice mail account is an electronic mailbox that usually corresponds to your
extension. However, you can have a mailbox that does not correspond to an extension.
Your mailbox may also include E-Mail Reader and Automatic Speech Recognition (ASR),
which are advanced voice mail features. See the following section “Automatic Speech
Recognition (ASR)“ and “E-Mail Reader” on page 16 for more information. For quick
reference, you can use the voice mail flowcharts on page 23 (for systems without E-Mail
Reader) and on page 24 (for systems with E-Mail Reader).
Automatic Speech Recognition (ASR)
You can use ASR to issue voice commands instead of pressing dialpad buttons for voice
mail options. ASR commands are included in the feature instructions.1 When using ASR,
follow these guidelines for best results:
• Use the handset for voice commands. External microphones pick up background
noise, which may cause misinterpreted voice commands.
• Do not say “Pound” to activate features when using ASR. The silence that follows
your voice command functions as the # button.
• Use the dialpad buttons to select menu options when recording messages. Because
ASR is automatically disabled, recorded messages include any attempted voice
commands.
• Use the dialpad buttons when entering mailbox and E-Mail Reader passwords. This
prevents your password from being heard by others, you cannot use ASR.
NOTE
If the system fails to understand an ASR command three times in a row,
you are prompted to press * to transfer to the dialpad button menu.
To temporarily disable ASR:
1.
Access your mailbox (see page 2).
2.
In the Main menu, press 8 or say “Disable” to disable ASR for the current call.
To enable ASR after disabling it:
1.
Press * until you return to the Main menu.
2.
Press 8 to enable ASR.
1.
This feature may or may not be enabled for your system.
Inter-Tel® Voice Mail User Guide
1
Mailbox Access
This section explains how to access and set up your voice mail account. If necessary,
contact your voice mail administrator for the voice mail extension number and password.
To access voice mail:
NOTE
Press # or say “Skip” to select an option or advance to the next step. Press * or
say “Cancel” to cancel an option or return to the previous menu.
1.
Dial the voice mail extension number. You hear the Main menu.
2.
During or after the greeting, press * or say “Login” to identify yourself as a
subscriber.
3.
Enter the default password (your mailbox number).
4.
Do one of the following:
• If this is an existing account, enter your mailbox password (if programmed),
and then press #. If you do not have a password, press # to bypass the
password prompt. See page 10 for information about programming your
mailbox password.
• If this is a new account, use the following steps to set up your voice mail
account.
To set up your voice mail account:
1.
Follow steps 1 to 3 in the preceding section.
2.
Do one of the following:
• If you want to use a password, enter a new password using digits 0 to 9 (up to
12 digits), and then press #. The messaging system plays back your
password.
• If you do not want to use a password, press # or say “Skip.”
3.
Press # or say “Accept” to accept the entry, or press 3 or say “Erase” to erase and
re-enter your password. After accepting the new password, the system prompts you
to record your directory name.
4.
After the tone, record your first and last names for the directory. When prompted,
select one of the following options:
• Press # or say “Accept” to accept the name.
• Press 1 or say “Replay” to replay the recorded name.
• Press 2 or say “Append” to add to your name.
• Press 3 or say “Rerecord” to erase and rerecord your name.
See page 4 to rerecord or change your directory name.
After recording your name, the system plays a message that introduces you to voice mail
features. To skip the introduction, press # or say “Skip.”
2
Inter-Tel® Voice Mail User Guide
Recording Personal Greetings
You may want to include the following information when recording your personal greeting:
• Whether you are in the office and where you can be reached.
• When you will be returning calls.
• How to exit voice mail (for callers who do not want to leave a message). For example,
“Press 0 to return to the operator.”
The following are sample greetings to help you plan your message:
• Hello, this is __________. I am either on another line or away from my desk and
cannot take your call at this time. If you need to speak to someone immediately,
please dial zero now. Otherwise, leave a detailed message, and I will return your call
as soon as possible. Thank you.
• Hello, this is __________. I will be away from the office from day/date until day/date.
If you need to speak to someone immediately, please dial zero now. Otherwise, leave
a detailed message, and I will return your call when I return. Thank you.
If you do not record a personal greeting, the default system greeting is used. Following is a
sample default system greeting.
__________ is not availble. After the tone please record your message. When finished
leaving your message, hang up, or press # for more options.
To record or change your personal greeting:
1.
Access your mailbox as described on page 2.
2.
Press 4 or say “Personal” to select the Personal Options menu.
3.
Press 1 or say “Greeting” to record or change your personal greeting.
4.
Do one of the following:
• Press 1 or say “Primary” to record or enable your primary greeting.
• Press 2 or say “Alternate” to record or enable your alternate greeting.
• Press 3 or say “System” to enable the system default mailbox greeting.
5.
Do one of the following:
• If you selected the system greeting option, hang up.
• If you already have a primary or alternate greeting, it is played when you
select primary or alternate.
6.
Do one of the following:
• Press # or say “Accept” to accept the greeting.
• Press 1 or say “Replay” to replay the greeting.
• Press 2 or say “Append” to add to the greeting.
• Press 3 or say “Erase” to erase and rerecord the greeting.
• Press * or say “Cancel” to exit without changing your greeting.
Inter-Tel® Voice Mail User Guide
3
Recording Your Directory Name
Your directory name is used to identify you in the voice mail directory and to verify your
mailbox number when messages are addressed to you. You can change your directory
name at any time.
To record your directory name:
1.
Access your mailbox as described on page 2.
2.
Press 4 or say “Personal” to select the Personal Options Menu.
3.
Press 2 or say “Name.” Your recorded name is played.
4.
Do one of the following:
• Press # or say “Accept” to accept your recorded name.
• Press 1 or say “Replay” to replay your recorded name.
• Press 2 or say “Append” to add to your name.
5.
Press 3 or say “Erase” to erase and rerecord your name. When you hear a tone,
record your first and last name. Then say “Accept” or press # to accept your
recorded name.
Understanding Mailbox Messages
When accessing your mailbox, you may hear one of the following messages:
• Mailbox almost full or full: If your mailbox is full, no new messages can be received
until you delete waiting or saved messages.
• Quota grace limit reached: If enabled, a mailbox can “overfill” beyond its normal
capacity. When the quota grace limit is reached, this announcement is played.
• Message count and type: The system announces the number of new and saved
messages. The system also informs you if the messages are priority messages.
If E-Mail Reader is enabled, the message media type (voice, e-mail, or fax) is
indicated. See “E-Mail Reader” on page 16.
• Remote Messaging: The system indicates if the Remote Messaging feature is
enabled. See “Using Remote Messaging” on page 8.
Contact your voice mail administrator for more information about these and other features.
4
Inter-Tel® Voice Mail User Guide
Message Features
The following are mailbox message features.
Listening to Messages
To listen to messages:
1.
Access your mailbox as described on page 2. If E-Mail Reader is enabled for your
mailbox, press 1 or say “Voice Mail.”
2.
Do one of the following:
• Press 1 or say “New” to listen to new messages.
• Press 3 or say “Saved” to listen to saved messages.
3.
While you are listening to a voice message, you can use the following options:
• Press # or say “Skip” to skip to the end of the recording.
• Press 1 or say “Back Up” to rewind three seconds and replay the message.
• Press 2 or say “Pause” to pause. Press # or say “Continue” to continue.
• Press 3 or say “Forward” to skip ahead three seconds.
• Press 4 or say “Lower” to lower the volume.
• Press 5 or say “Envelope” to play the message envelope.
• Press 6 or say “Higher” to raise the volume.
• Press 7 or say “Save” to save the new message in your mailbox.
• Press 9 or say “Delete Message” to delete the message.
After listening to a message, you have the following options:
• Press 1 or say “Replay” to replay the message from the beginning.
• Press 2 or say “Reply” to reply to the message. Then do one of the following:
o
Press 1 or say “Voice Mail” to leave a voice message for the subscriber (you
cannot leave messages for outside callers).
o
Press 2 or say “Callback” to place a return call. If the number is available, your call
is transferred to the caller’s extension or telephone number.
• Press 3 or say “Forward” to forward a copy of the message to another subscriber. If
you want to include an introduction, press 1 or say “Record.” Otherwise, press # or
say “Accept” to forward the message without additional comments.
• Press 4 or say “Previous” to listen to the previous message.
• Press 5 or say “Envelope” to play the introductory message envelope. See “Changing
the Message Envelope” on page 12 for more information.
• Press 6 or say “Next” to listen to the next message.
• Press 7 or say “Save” to save the new message in your mailbox.
• Press 9 or say “Delete Message” to delete the message.
Inter-Tel® Voice Mail User Guide
5
Recovering Deleted Voice Messages
You can recover deleted voice messages within a specific time frame before they are
erased from the system. The time frame can be up to 24 hours and is programmed by your
voice mail administrator. Any recovered messages are restored as saved messages in your
mailbox. If E-Mail Reader is enabled for your mailbox, you can also recover deleted e-mail
and fax messages. See “E-Mail Reader” on page 16.
To recover deleted voice messages:
1.
Access your mailbox as described on page 2.
2.
Press 5 or say “Options” to select the Message Options menu.
3.
Press 2 or say “Recover” to select the Recover Deleted Messages menu.
4.
Do one of the following:
• Press 1 or say “Listen” to listen to your deleted messages. After each
message you can:
o
Press 1 or say “Replay” to replay the message.
o
Press 2 or say “Reply” to reply to the message.
o
Press 3 or say “Forward” to forward the message.
o
Press 4 or say “Previous” to listen to the previous message.
o
Press 5 or say “Envelope” to play the message envelope.
o
Press 6 or say “Next” to listen to the next message.
o
Press 7 or say “Recover” to recover the message.
• Press 2 or say “Recover” to recover all deleted messages.
• Press 3 or say “Purge” to permanently delete all deleted messages.
Canceling Unheard Voice Messages
You can cancel unretrieved messages that you have sent to other subscribers. You cannot
cancel messages that you have sent to group lists.
To cancel unheard voice messages:
6
1.
Access your mailbox as described on page 2.
2.
While listening to the voice mail main menu, press 5 or say “Options” to select the
Message Options menu.
3.
Press 1 or say “Unheard” to select unheard messages.
4.
When prompted, enter or say the mailbox number containing the unheard message.
5.
Press # or say “Yes” to confirm the mailbox number. The system tells you how many
messages you have in the mailbox and then plays them for you.
Inter-Tel® Voice Mail User Guide
Recording and Sending Voice Messages
You can record and send voice messages to other mailbox extensions in your voice mail
system.
To record and send voice messages:
1.
Access your mailbox as described on page 2.
2.
Press 2 or say “Record.”
3.
Say or enter the mailbox number or group list number. The system announces the
name assigned to the number. You have the following options:
• Press # or say “Yes” to accept the subscriber’s name.
• Press * or say “No” to start over.
4.
Record your message after the tone. While recording, you can:
• Press 2 to pause while recording. Press # or say “Continue” to continue.
• Press 3 to erase and rerecord your message.
5.
When finished recording, do one of the following:
• Press # or say “Send” to send the message and return to the voice mail
options.
• Press * or say “Cancel” to cancel the recording.
• Press 1 or say “Replay” to replay your message.
• Press 2 or say “Append” to add to your message.
• Press 3 or say “Erase” to erase and rerecord your message.
• Press 4 or say “Copy” to copy your message to other mailboxes. Press * when
you are finished adding mailboxes.
NOTE
6.
7.
Depending on your voice mail system version, you may be
required to copy messages to additional mailboxes after sending
the message to the first recipient. If so, after sending the first
message, press #, and then enter the additional recipient’s
mailbox number. Press # to send the message.
Press # or say “Send” to send the message and return to voice mail options, or
press 9 or say “Options” to use one of the following special delivery options:
o
Press 1 or say “Private.” This prevents the recipient from forwarding the
message to other subscribers.
o
Press 2 or say “Certified.” When the recipient listens to the message, you
will receive a receipt notice.
o
Press 3 or say “Priority.” This places your message ahead of all other
waiting messages in the receiving mailbox.
Press # or say “Send” to send the message with the special delivery option, or
press * or say “Cancel” to cancel delivery options.
Inter-Tel® Voice Mail User Guide
7
Using Remote Messaging
You can use Remote Messaging to call you when your mailbox receives new voice
messages2. Using “cascade levels” of up to nine phone numbers, the voice mail system
calls each number until it successfully connects to a device (for example, your home
phone, a mobile phone, or a pager).
You can use primary and alternate cascades to program messages for different time
periods. For example, you can use a primary cascade to notify you of new messages from
5:00 P.M. to 10:00 P.M. on weekdays. You can also use an alternate cascade to notify you
of new messages on weekends. See the Remote Messaging example below. See page 9
to set up Remote Messaging.
Voice mail
records the
message.
Depending on when the
message was received,
voice mail calls either your
primary or alternate
cascade.
The cascade
level 1 number
(for example,
your home
phone) receives the call
from voice mail.
There is no answer, so
voice mail places another
call to the cascade level 2
number.
The cascade
level 2 number
(for example,
your mobile
phone) receives the call
from voice mail, and you
answer the call.
You are notified of the
new message (“You have
a voice message from...”).
NOTE
2.
8
If the system cannot reach you, you receive a voice message stating that
notification could not be completed. You cannot use Remote Messaging for EMail Reader e-mail and fax messages (see page 16).
This feature may or may not be enabled for your system.
Inter-Tel® Voice Mail User Guide
To set up Remote Messaging:
1.
Access your mailbox as described on page 2.
2.
Press 4 or say “Personal” to select the Personal Options Menu.
3.
Press 5 or say “Remote” to select Remote Messaging.
4.
Press 1 or say “Primary” to set up a primary cascade, or press 2 or say “Alternate”
to set up an alternate cascade.
5.
Press 1 or say “Level,” and then enter or say the number (1 to 9) of the level that
you want to program. Then select one of the following options:
• To send notifications to a phone number:
Press 2 or say “Number,” and then select one of the following options:
o
Press 1 or say “Internal” for an extension number, and then say or
enter the number.
o
Press 2 or say “Outside” for an outside number, and then say or enter
the number.
• To send notifications to a pager:
o
Press 1 or say “Pager.”
o
Press 2 or say “Personal.”
6.
Press 1 or say “Change” to save the setting.
7.
Press 3 or say “Days,” and then select one of the following:
• Press 1 or say “Weekdays” for Monday through Friday.
• Press 2 or say “Days” for all days.
• Press 3 or say “Day” to select individual days. You are prompted to press or
say numbers 1 to 7, which correspond to the days Sunday through Saturday.
8.
Press 2 or say “Time.” Then say or enter the times you want the message
notification to start and stop. Enter or say the times as two digits for the hour and
two digits for the minutes (for example, 0900 = 9:00 A.M.). If you are entering the
time in a 12-hour format:
• Press 1 or say “AM” for A.M.
• Press 2 or say “PM” for P.M.
If you want to have 24-hour notification, program the starting and ending times to the
same time (for example, enter 0900 for the starting time and 0900 for the ending
time).
9.
Press 4 or say “Category.” Then select one of the following options:
• Press 1 or say “All Messages” for all messages.
• Press 2 or say “Priority” for priority messages only.
10.
Press # or hang up to save the settings and exit.
Inter-Tel® Voice Mail User Guide
9
Mailbox Preferences
You can use the following features to customize voice mail options.
Changing Your Mailbox Password
You can change your mailbox password at any time. The new password can be up to 12
digits long and must be numeric. It cannot contain letters or characters.
To change your mailbox password:
1.
Access your mailbox as described on page 2.
2.
Press 4 or say “Personal” to select the Personal Options Menu.
3.
Press 3 or say “Password.”
4.
Do one of the following:
• If you want to use a password, enter a new password using digits 0 to 9 (up to
12 digits), and then press #. The system plays back your password.
• If you do not want to use a password, press # or say “Skip.”
5.
Press # or say “Accept” to accept the password as entered, or press 3 or say
“Re-enter” to erase and re-enter your password.
Programming a Fax Destination
You can specify a fax destination number for your mailbox, so callers can send a fax to
your fax machine through your mailbox.3
To enter a fax destination number:
3.
10
1.
Access your mailbox as described on page 2.
2.
Press 4 or say “Personal” to select the Personal Options menu.
3.
Press 9 or say “More” for the More Options menu.
4.
Press 1 or say “Number” to select Fax Number.
5.
Enter or say the fax destination number. If you use the dialpad to enter the number,
press # when you are done.
6.
Press # or say “Accepted” to accept the number, or press 3 or say “Re-enter” to
erase and re-enter the number.
This feature may or may not be enabled for your system.
Inter-Tel® Voice Mail User Guide
Changing the Call Screening Transfer Method
You can use the following Call Screening Transfer options to apply conditions to outside
calls that are transferred to your extension from the system Auto Attendant.4
• Unannounced Calls: Calls are sent directly to your extension.
• Announce-Only Calls: Before Auto Attendant transfers a call to you, a prompt asks
the caller to record his or her name. When you answer, you hear “You have a call
from (caller’s name).” Then the call is sent to your extension.
• Screened Calls: Before Auto Attendant transfers a call to you, a prompt asks the
caller to record his or her name. When you answer, you hear “You have a call from
(caller’s name).” You can then choose whether or not to accept the call.
To change the Call Screening Transfer method:
1.
Access your mailbox as described on page 2.
2.
Press 4 or say “Personal” to select the Personal Options Menu.
3.
Press 9 or say “More” for the More Options menu.
4.
Press 5 or say “Transfer” to select the Transfer Method menu. Then select one of
the following:
• Press 1 or say “Unannounced” to select unannounced transfers.
• Press 2 or say “Screened” to select screened transfers.
• Press 3 or say “Announce” to select announce-only transfers.
• Press * or say “Cancel” to return to the Personal Options menu changes.
Receiving Screened Calls
You have the following options when you receive a screened call:
• Press # or say “Accept” to accept the call.
• Press 1 or say “Replay” to replay the announcement.
• Press 2 or say “Voice Mail” to send the call to voice mail.
• Press 3 or say “Forward,” and then enter the extension number to forward the call to
another extension.
• Press * or say “Refuse” to refuse the call.
4.
This feature may or may not be enabled for your system.
Inter-Tel® Voice Mail User Guide
11
Changing the Message Envelope
When you listen to voice messages (or e-mail or fax messages if E-Mail Reader is
enabled), an “envelope” is played for each message. By default, the envelope contains the
following information:
• Time and Date: The time and date the message was received.
• Source: The source of the voice, e-mail, or fax message.
• Length: The length of the message (voice messages only).
• Subject: The text in the subject field (e-mail messages only).
• Pages: The number of pages included (faxes only).
You can change your envelope options or turn off the message envelope.
To change envelope options:
1.
Access your mailbox as described on page 2.
2.
Press 4 or say “Personal” to select the Personal Options menu.
3.
Press 4 or say “Envelope” to select the Message Envelope Options menu. You have
the following options:
• Press 1 or say “Time, Date” to enable or disable the time and date options.
• Press 2 or say “Source” to enable or disable the message source option.
• Press 3 or say “Length” to enable or disable the message length option.
• Press 4 or say “All Options” to enable all options.
• Press 5 or say “None” to turn off the envelope.
• Press # or say “Accept” to accept the changes.
• Press * or say “Cancel” to return to the Personal Options Menu.
12
Inter-Tel® Voice Mail User Guide
Changing the Message Search Order
You can change the order in which you retrieve your new and saved messages based on
the date and time they are received. When more than one message is left in your mailbox,
the search order can be configured as first in/first out (the oldest message is played first) or
last in/first out (the newest message is played first). If E-Mail Reader is enabled for your
mailbox, changing the message search order applies to your voice, e-mail, and fax
messages.
To change the message search order:
1.
Access your mailbox as described on page 2.
2.
Press 4 or say “Personal” to select the Personal Options menu.
3.
Press 9 or say “More” to select the More Options menu.
4.
Press 2 or say “Order” for the Message Search Order menu.
5.
Select one of the following options:
• Press 1 or say “New” to change the search order for new messages.
• Press 2 or say “Saved” to change the search order for saved messages.
6.
Your current message search order is played. Select one of the following options:
• Press 1 or say “First” to retrieve messages as first in/first out.
• Press 2 or say “Last” to retrieve messages as last in/first out.
• Press * or say “Cancel” to return to the Personal Options menu without
making changes.
Inter-Tel® Voice Mail User Guide
13
Voice Mail Directory
Subscribers or non-subscribers can use dialpad buttons or ASR (if enabled, see page 1) to
search for directory names. ASR may not be able to locate names that are pronounced
differently than they are spelled. For these types of names, spell the name using the
dialpad buttons (see the table below).
When one to 10 matches are located, you can browse the list of returned names. The
Directory lists are circular. That is, when the end of the list is reached, the next name
played is the first name in the Directory. When the correct name is played, say “Yes” or
press # to select it.
If the system locates more than 10 matches, you can either browse the list using the
options mentioned above, or filter the list by responding to the filtering questions generated
by the system. Based on your responses, the system filters the list to include first or last
name matches only. If the system cannot locate an exact match, it returns the closest
match found.
To use the dialpad buttons to spell a name:
When prompted, press the appropriate dialpad buttons to spell the name. The
number of times a button is pressed determines which character is entered, as
shown in the following table.
Number of Times Button is Pressed
14
Button
1
2
3
4
5
1
-
&
(
)
1
2
A
B
C
‘
2
3
D
E
F
!
3
4
G
H
I
*
4
5
J
K
L
#
5
6
M
N
O
ñ
6
7
P
Q
R
S
7
8
T
U
V
?
8
9
W
X
Y
Z
9
0
@
:
.
,
0
Inter-Tel® Voice Mail User Guide
To search the Directory:
1.
Dial the voice mail number.
2.
Press # or say “Directory.”
3.
Press the appropriate dialpad buttons to spell the name or say the last name of the
person (see the table on page 14). For example, if you say “John,” the system
locates all of the subscribers with the first or last name of John.
If 10 or fewer matches are found, you have the following options:
• Press # or say “Yes” to accept the name that is played.
• Press 1 or say “Previous” to browse to the previous name in the list.
• Press 2 or say “More” to hear more information about the subscriber.
• Press 3 or say “Next” to browse to the next name in the list.
• Press 4 or say “New” to search for a new name.
• Press * or say “Cancel” to exit the directory.
If more than 10 matches are found, the system prompts you to browse or filter the
list. Do one of the following:
• Press 1 or say “Yes” to browse the list (see step 3 for options).
• Press 2 or say “No” to select the filter option, and then respond to one of the
following filter questions:
o
The system begins by asking you if the name you are searching for is the
last name. If it is, press 1 or say “Yes,” say the last name, or spell the last
name.
o
If you did not respond to the first question, the system asks if the name you
are searching for is the first name. If it is, press 1 or say “Yes,” say the first
name, or spell the first name.
After the list has been filtered by first or last name, a smaller list of names is returned.
You can then browse the list and select the appropriate name.
Inter-Tel® Voice Mail User Guide
15
E-Mail Reader
You can use E-Mail Reader to listen to e-mail messages and fax message envelopes from
your mailbox5. E-Mail Reader uses Text-to-Speech (TTS) to convert e-mail text into an
audio file. After you listen to your message, you have the same options to save, forward,
delete, and so on, as in voice mail.
When you reply to an e-mail message, you are prompted to record a message. Your reply
is then sent as an audio file attachment in an e-mail to the receiver. If the e-mail has
multiple recipients, you have the option of replying to just the sender or to all of the
recipients. When you forward an e-mail message, the e-mail is converted to a fax and
forwarded to the fax destination number you specify.
E-Mail Reader does not distinguish between e-mail messages and meeting invitations and
responses. Therefore, e-mail messages and meeting messages (including invitations,
cancellations, and responses) can be accessed from your mailbox.
NOTES
You cannot forward an e-mail message to a voice mailbox or group list. When
you forward an e-mail message, the e-mail is converted to a fax and forwarded
to the fax destination number that you specify.
If an e-mail message includes a hyperlink, E-Mail Reader reads the hyperlink
as text.
Entering Your E-Mail Password
You may be prompted to enter your E-Mail Reader account password (usually your network
password) whenever you or your voice mail administrator set up your e-mail account
mailbox or change your e-mail password.
Use the following tips when entering your e-mail password:
• Do not use Automatic Speech Recognition (ASR). To prevent others from overhearing
your password, use the dialpad buttons on your handset to set up your e-mail
password.
• Enter password characters correctly. E-mail passwords are case-sensitive and can
contain special characters. Your entry must exactly match the case and characters. If
necessary, contact your voice mail administrator for assistance.
5.
16
This feature may or may not be enabled for your system.
Inter-Tel® Voice Mail User Guide
To enter your e-mail password:
To repeat menu instructions, say “Help” or press 0 at any time.
NOTES
1.
If you enter an incorrect password or if you choose not to enter a new E-Mail
Reader password, the Main Menu E-Mail Reader Count option (see page 19)
is automatically disabled. This prevents having to hear the invalid password
prompt for each subsequent login, and to protect against being locked out
from your e-mail account.
Access your mailbox as described on page 2. The system announces that it was
unable to retrieve your e-mail and fax messages, and provides the following options:
• Press # or say “Continue” to access your mailbox without access to your
e-mail messages.
• Press 1 or say “Password” to enter your new e-mail password.
2.
When prompted, enter your e-mail password using the dialpad buttons (see the
following table), and then press #.
NOTE
3.
For a description of special character locations, press 2.
Your new password is played. You have the following options:
• Press # or say “Accept” to accept the password.
• Press 3 or say “Re-enter” to erase and re-enter the password.
Number of Times Button is Pressed
Button
1
2
3
4
5
6
7
1
1
-
&
(
)
_
space
2
a
b
c
2
‘
A
B
C
3
d
e
f
3
!
D
E
F
4
g
h
i
4
*
G
H
I
5
j
k
l
5
#
J
K
L
6
m
n
o
6
M
N
O
7
p
q
r
s
7
P
Q
R
8
t
u
v
8
?
T
U
V
9
w
x
y
z
9
W
X
Y
0
0
@
:
.
,
/
+
Inter-Tel® Voice Mail User Guide
8
9
S
Z
17
To use E-Mail Reader to access your e-mail account:
1.
Access your mailbox as described on page 2.
2.
Press 3 or say “E-Mail.” Then select one of the following:
• Press 1 or say “New” to listen to new messages.
• Press 3 or say “Saved” to listen to saved messages.
3.
After the e-mail envelope is played, E-Mail Reader reads the body text of the e-mail
message. While you are listening to a message, you can use the following options:
• Press # or say “Skip” to skip to the end of the recording.
• Press 1 or say “Back Up” to rewind a few seconds and replay the message.
• Press 2 or say “Pause” to pause. Press # or say “Continue” to continue.
• Press 3 or say “Forward” to skip ahead.
• Press 4 or say “Lower” to lower the volume.
• Press 5 or say “Envelope” to play the message envelope.
• Press 6 or say “Higher” to raise the volume.
• Press 9 or say “Delete Message” to delete the message.
• Press * or say “Cancel” to return to the previous menu.
4.
When E-Mail Reader has finished reading the e-mail you have the following options:
• Press 1 or say “Replay” to replay the message from the beginning.
• Press 2 or say “Reply” to reply to the message. If the e-mail message had
more than one recipient, you have the following options:
o
Press 1 or say “Everyone” to reply to all recipients.
o
Press 2 or say “Sender” to reply to the sender.
o
Press 3 or say “Hear” to hear all recipients.
• Press 3 or say “Forward” to forward a copy of the message to a fax
destination. Then say or enter the fax destination number. The system plays
the fax destination number. Select one of the following:
o
Press # or say “Yes” to verify the number. The system announces that the
fax is scheduled for delivery.
o
Press * or say “No” to start over.
• Press 4 or say “Previous” to listen to the previous message.
• Press 5 or say “Envelope” to play the introductory message envelope. See
page 12 for information about the message envelope.
• Press 6 or say “Next” to listen to the next message.
• Press 7 or say “Save” to save the message.
• Press 9 or say “Delete Message” to delete the message.
18
Inter-Tel® Voice Mail User Guide
Using Main Menu E-Mail Reader Count
After you set up your E-Mail Reader account, the system announces the number of voice,
e-mail, and fax messages you have each time you access your mailbox before you can
listen to your messages. The voice prompt that indicates the number of e-mail and fax
messages is the “Main Menu E-Mail Reader Count” option. Voice message prompts are not
included in Main Menu E-Mail Reader Count and are always played when you access your
mailbox.
You can disable the Main Menu E-Mail Reader Count option. Disabling the Main Menu
E-Mail Reader Count option defers e-mail and fax prompts until you select the E-Mail or
Fax message option from the main menu. Disabling Main Menu E-Mail Reader Count does
not disable E-Mail Reader. It only defers the voice prompts until the appropriate option is
selected.
To disable or enable the Main Menu E-Mail Reader Count option:
1.
Access your mailbox as described on page 2.
2.
Press 4 or say “Personal” to select the Personal Options menu.
3.
Press 9 or say “More” to select More Options.
4.
Press 4 or say “E-Mail Reader Count” to select the E-Mail Reader Count toggle
option.
5.
Do one of the following:
• If E-Mail Reader Count is enabled, press 1 or say “Disable” to disable.
• If E-Mail Reader Count is disabled, press 1 or say “Enable” to enable.
Inter-Tel® Voice Mail User Guide
19
Listening to Fax Message Notifications
Using E-Mail Reader, you can listen to fax message notifications. When you access a fax
message, E-Mail Reader announces the fax message according to the envelope option
(see page 12).
Because a fax message is received by your e-mail account as an image attachment, E-Mail
Reader cannot translate the text in a fax. To view the fax and read it, you must access it
from your e-mail account; however, you can save, delete, and forward a fax to a fax
number that you specify.
To listen to a fax message notification:
1.
Access your mailbox as described on page 2.
2.
Press 6 or say “Facsimile” to access your fax messages. Then select one of the
following:
• Press 1 or say “New” to listen to new messages.
• Press 3 or say “Saved” to listen to saved messages.
3.
After the fax envelope is played, you have the following options:
• Press 3 or say “Forward” to forward a copy of the message to a fax
destination. Then say or enter the fax destination number. The system plays
the fax destination number. Select one of the following:
o
Press # or say “Yes” to verify the number. The system announces that the
fax is scheduled for delivery.
o
Press * or say “No” to start over.
• Press 4 or say “Previous” to listen to the previous message.
• Press 5 or say “Envelope” to play the introductory message envelope. See
page 12 for information about the message envelope.
• Press 6 or say “Next” to listen to the next message.
• Press 7 or say “Save” to save the message.
• Press 9 or say “Delete Message” to delete the message.
20
Inter-Tel® Voice Mail User Guide
Troubleshooting Tips
The following table contains troubleshooting tips for basic voice mail features. Contact your
voice mail administrator for additional help.
Problem
Possible Solution
I do not know my voice mail
password.
Try using the extension number, which is the default password.
If your mailbox does not have an assigned password, pressing #
will allow you to access your mailbox. If these options do not
work, contact your voice mail administrator for assistance.
I cannot change the system
greeting.
Only your voice mail administrator can change the system
greeting.
I cannot use one or more of the
voice mail features described in
this guide.
Your system may not support the feature, or your voice mail
administrator may not have enabled the feature. Contact your
voice mail administrator for more information.
I get a “Mailbox almost full or full” No new messages can be received until waiting or saved
message.
messages are deleted.
I get a “Mailbox quota grace limit The voice mail system grace limit has reached its capacity. This
reached” message.
feature allows a mailbox to “overfill” beyond normal capacity.
When the quota grace limit has been reached, this
announcement is played. Contact your voice mail administrator
for assistance.
My e-mail password has expired If you change your e-mail password, you are prompted to
for my e-mail client and I have to update it for E-Mail Reader. See page 16 for additional
change it. Do I also have to
information about entering your e-mail password.
update it for my mailbox?
I cannot retrieve deleted
messages.
Voice mail may have erased your message. After a
programmed amount of time has lapsed, voice mail
automatically erases all deleted messages (see page 6). If you
attempt to recover a deleted voice message within this time
frame but you are unsuccessful, your voice mail system may not
have sufficient space available to store deleted messages.
I do not have e-mail and fax
messages in my mailbox.
If your mailbox does not have E-Mail Reader (see page 16) you
will not receive e-mail and fax messages. Contact your voice
mail administrator to determine if E-Mail Reader is enabled for
your mailbox.
I get the wrong response when I Several factors affect the system response to voice commands.
say a command.
It is possible that Automatic Speech Recognition (ASR) is not
enabled on your system. If your system does not prompt you to
“say” a command, ASR is not enabled. See page 1 for
additional ASR guidelines.
Inter-Tel® Voice Mail User Guide
21
Problem
I cannot use ASR to enter my
E-Mail Reader password.
Possible Solution
To prevent others from overhearing your password, you must
use the dialpad buttons to enter your password.
I cannot set the number of rings This feature is set by the voice mail administrator.
before a call is sent to voice mail.
The system does not recognize
my cell phone digits.
22
You may need to enable dual tone multi-frequency (DTMF) on
your cell phone.
Inter-Tel® Voice Mail User Guide
Voice Mail Flowchart (Without E-Mail Reader)
In most menus, you can press * or say “Cancel” to return to the previous menu, or press # or say
“Accept” to accept the option.
Accessing Messages
Mailbox Access
Personal Options
1. Dial the voice mail
extension number.
2. Say “Login” or press *, and
then say or enter your
mailbox number.
3. Enter your password, and
then press #.
While message is playing:
Record “Greeting”
1
1
“Primary” Greeting
“Alternate” Greeting 2
3
“System” Greeting
“New” Message
1
“Record”
2
“Saved”
3
“Personal” Options
4
Message “Options”
5
“Disable” ASR
8
5
3
“Higher” Volume
6
4
“Time, Date”
Message “Source”
Length/Subj./Pages
“All Options”
“None”
“Save” Message
7
1
“Delete” Message
9
2
“Skip” to End
#
3
After the message:
4
“Replay” Message
5
“Remote” Messaging
5
“Primary” Cascade 1
“Alternate” Cascade 2
“More” Options
2
“Continue”
#
“New” Messages
“Erase”
3
“Saved” Messages
9
1
2
5
First In/First Out
Last In/First Out
“Forward” a Copy
3
Go to “Previous” Message 4
Play “Envelope”
5
Go to “Next” Message
6
“Save” Message
7
“Delete Message”
9
Remote Messaging
2
Program Cascade “Level”
Erase,” rerecord
3
“Copy”
4
“Unannounced”
1
Delivery “Options”
9
“Screened”
2
“Announce” Only
3
1
Enter cascade level, then:
Transfer Method
Message Options
“Private”
1
Cancel “Unheard” Msgs.
1
“Certified”
2
“Recover”Del. Msgs.
2
“Priority”
3
Inter-Tel® Voice Mail User Guide
2
2
2
#
2
1
1
“Append”
Hang Up
“VoiceMail”Msg.
“Call Back”
1
1
Send and Exit
1
“Reply” to Message
Message Order
“Replay”
“Send”
4
Rec./Chg. “Password”
Pause
Delivery Options
3
“Lower” Volume
Play “Envelope”
While recording the msg:
After recording:
2
Move “Forward”
2
Fax “Number”
Message “Order”
“Transfer” Method
Recording Options
1
“Pause”
Record Directory “Name”
Chg. “Envelope” Settings
Subscriber Mailbox Menu
“Back Up”
“Voice Mail”
“E-Mail”
“Facsimile”
1
2
3
“Change”
“Personal” #
“Pager” #
1
2
3
Enter “Time” of Day
2
Set “Days” of Week
3
1
“Weekdays”
2
All “Days”
Individual “Day” 1–7 3
Select Msg. “Category”
“All Messages”
“Priority” Messages
4
1
2
23
Voice Mail Flowchart (With E-Mail Reader)
In most menus, you can press * or say “Cancel” to return to the previous menu, or press # or say
“Accept” to accept the option.
Mailbox Access
Accessing Messages
Personal Options
1. Dial the voice mail
extension number.
Record “Greeting”
2. Say “Login” or press *, and
then say or enter your
mailbox number.
3. Enter your password, and
then press #.
Subscriber Mailbox Menu
“Voice Mail”
1
“Record”
2
“E-Mail”
3
“Personal” Options
4
Message “Options”
5
“Facsimile”
6
“Disable” ASR
8
Recording Options
1
1
“Primary” Greeting
“Alternate” Greeting 2
3
“System” Greeting
Record Directory “Name”
2
Rec./Chg. “Password”
3
Chg. “Envelope” Settings
4
“Time, Date”
Message “Source”
Length/Subj./Pages
“All Options”
“None”
1
2
3
#
“New” Messages
“Erase”
3
“Saved” Messages
After recording:
24
“Lower” Volume
4
Play “Envelope”
5
“Higher” Volume
6
“Save” Message
7
“Delete” Message
9
“Skip” to End
#
2
“VoiceMail”Message 1
2
“Call Back”
9
“Forward” a Copy
3
1
Go to “Previous” Message 4
2
Play “Envelope”
5
4
Go to “Next” Message
6
5
“Save” Message
7
“Delete Message”
9
Message Order
First In/First Out
Last In/First Out
1
2
1
1
2
Erase,” rerecord
3
“Copy”
4
“Unannounced”
1
Delivery “Options”
9
“Screened”
2
“Announce” Only
3
2
Remote Messaging
Program Cascade “Level”
1
Enter cascade level, then:
Transfer Method
Message Options
“Private”
1
Cancel “Unheard” Msgs.
1
“Certified”
2
“Recover”Del. Msgs.
2
“Priority”
3
“Send”
#
Hang Up
3
“Reply” to Message
5
“Append”
Send and Exit
Move “Forward”
1
“Replay”
Delivery Options
2
“Replay” Message
While recording the msg:
“Continue”
“Pause”
After the message:
“More” Options
2
1
5
“Primary” Cascade 1
“Alternate” Cascade 2
Pause
“Back Up”
4
“Remote” Messaging
Fax “Number”
Message “Order”
“E-Mail Rdr. Count”
“Transfer” Method
While message is playing:
“Voice Mail”
“E-Mail”
“Facsimile”
“Change”
“Personal” #
“Pager” #
2
3
Enter “Time” of Day
2
Set “Days” of Week
3
1
“Weekdays”
2
All “Days”
Individual “Day” 1–7 3
1
Select Msg “Category”
2
“All Messages”
“Priority” Messages
3
1
4
1
2
Inter-Tel® Voice Mail User Guide
Part No. 835.3205
Issue 1, May 2008
A946/4316A