1
704 47 0099.A3
54 MZ-4i
01.02.2007
13:41 Uhr
Seite 1
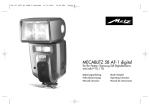
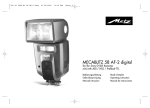
MECABLITZ 54 MZ-4/4i
Bedienungsanleitung
Gebruiksaanwijzing
Manuale istruzioni
Mode d’emploi
Operating instruction
Manual de instrucciones
704 47 0099.A3
1.
2.
2.1
2.2
2.2.1
2.2.2
2.3
2.4
2.4.1
54 MZ-4i
01.02.2007
13:41 Uhr
Seite 2
Ķ
Sicherheitshinweise . . . . . . . . . . . . . . . . . . . . . . . . . . . . . . . . . . .5
Vorbereiten des Blitzgerätes . . . . . . . . . . . . . . . . . . . . . . . . . . . . .6
Befestigen des Blitzgerätes an der Kamera . . . . . . . . . . . . . . . . . . .6
Stromversorgung . . . . . . . . . . . . . . . . . . . . . . . . . . . . . . . . . . . . .6
Batterien- bzw. Akkuauswahl . . . . . . . . . . . . . . . . . . . . . . . . . . . .6
Batterien austauschen . . . . . . . . . . . . . . . . . . . . . . . . . . . . . . . . . .6
Ein- und Ausschalten des Blitzgerätes . . . . . . . . . . . . . . . . . . . . . .7
Bedienphilosophie . . . . . . . . . . . . . . . . . . . . . . . . . . . . . . . . . . . .7
Auswahl und Einstellung der Blitzbetriebsart TTL / A / M /
Stroboskop . . . . . . . . . . . . . . . . . . . . . . . . . . . . . . . . . . . . . . . . .7
2.4.2 Auswahl und Einstellung der Sonderfunktionen . . . . . . . . . . . . . . . .7
2.4.3 Einstellung von ISO / Zoom / Blende / Teillichtleistung „P“
und „EV“ (Blitzbelichtungskorrektur) . . . . . . . . . . . . . . . . . . . . . . .7
3.
Der TTL-Blitzbetrieb . . . . . . . . . . . . . . . . . . . . . . . . . . . . . . . . . . .8
3.1 Unterbetriebsarten des TTL-Blitzbetriebes . . . . . . . . . . . . . . . . . . . .9
4.
Der Automatik-Blitzbetrieb . . . . . . . . . . . . . . . . . . . . . . . . . . . . . .9
4.1 Unterbetriebsarten des Automatik-Blitzbetriebes . . . . . . . . . . . . . .10
5.
Der manuelle Blitzbetrieb . . . . . . . . . . . . . . . . . . . . . . . . . . . . . .10
5.1 Unterbetriebsart des manuellen Blitzbetriebs . . . . . . . . . . . . . . . . .12
6.
Indirektes Blitzen . . . . . . . . . . . . . . . . . . . . . . . . . . . . . . . . . . . .12
6.1 Indirektes Blitzen mit eingeschaltetem Zweitreflektor . . . . . . . . . . .12
6.2 Indirektes Blitzen im Automatik- und TTL–Blitzbetrieb . . . . . . . . . . .13
6.3 Indirektes Blitzen im manuellen Blitzbetrieb . . . . . . . . . . . . . . . . .13
7.
Der drahtlose Remote-Betrieb . . . . . . . . . . . . . . . . . . . . . . . . . . .13
7.1 Der drahtlose Metz TTL-Remote-Betrieb . . . . . . . . . . . . . . . . . . . .13
7.2 Der drahtlose Metz A-Remote-Betrieb . . . . . . . . . . . . . . . . . . . . .14
7.3 Beurteilung der Gesamtlichtverhältnisse im Remote-Betrieb . . . . . .15
8.
Aufhellblitzen bei Tageslicht . . . . . . . . . . . . . . . . . . . . . . . . . . . .15
8.1 Aufhellblitzen im TTL-Betrieb . . . . . . . . . . . . . . . . . . . . . . . . . . . .15
8.2 Aufhellblitzen im Automatik-Betrieb . . . . . . . . . . . . . . . . . . . . . . .15
2
9.
Der Stroboskop-Betrieb . . . . . . . . . . . . . . . . . . . . . . . . . . . . . . .16
10. Die Belichtungskontrollanzeige . . . . . . . . . . . . . . . . . . . . . . . . . .17
11. Der AF-Messblitz . . . . . . . . . . . . . . . . . . . . . . . . . . . . . . . . . . . .18
12. Sonderfunktionen . . . . . . . . . . . . . . . . . . . . . . . . . . . . . . . . . . .18
12.1 Alarm- / Beep-Funktion . . . . . . . . . . . . . . . . . . . . . . . . . . . . . . .18
12.2 Ver- und Entriegeln der Bedienelemente . . . . . . . . . . . . . . . . . . . .19
12.3 Automatische Geräteabschaltung / Auto-Off . . . . . . . . . . . . . . . .19
12.4 Synchronisation auf den 2.Verschlussvorhang (REAR) . . . . . . . . . .20
12.5 Einstelllicht / Modelling-Light
. . . . . . . . . . . . . . . . . . . . . . . .20
12.6 Anpassung der Brennweite an das Kameraformat . . . . . . . . . . . .21
12.7 Blitzbelichtungsreihe „Fb“ (flash-bracketing) . . . . . . . . . . . . . . . . .21
12.8 Zurück zur Grundeinstellung . . . . . . . . . . . . . . . . . . . . . . . . . . . .22
12.9 Motor-Zoom-Reflektor . . . . . . . . . . . . . . . . . . . . . . . . . . . . . . . .23
12.10 m - ft Umschaltung . . . . . . . . . . . . . . . . . . . . . . . . . . . . . . . . . . .23
13. Weitwinkelstreuscheibe . . . . . . . . . . . . . . . . . . . . . . . . . . . . . . .24
14. Manuelle Blitzbelichtungskorrekturen . . . . . . . . . . . . . . . . . . . . .24
15. Wartung und Pflege . . . . . . . . . . . . . . . . . . . . . . . . . . . . . . . . .25
16. Technische Daten . . . . . . . . . . . . . . . . . . . . . . . . . . . . . . . . . . . .25
17. Fachchinesisch . . . . . . . . . . . . . . . . . . . . . . . . . . . . . . . . . . . . . .26
18. Sonderzubehör . . . . . . . . . . . . . . . . . . . . . . . . . . . . . . . . . . . . .27
19. Hilfe bei Störungen . . . . . . . . . . . . . . . . . . . . . . . . . . . . . . . . . .28
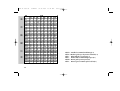
Tabelle 1: Leitzahlen bei maximaler Lichtleistung (P 1) . . . . . . . . . . . . . .192
Tabelle 2: Blitzleuchtzeiten in den Teillichtleistungsstufen . . . . . . . . . . . .193
Tabelle 3: Kameraverschlusszeiten im Stroboskop-Betrieb . . . . . . . . . . .194
Tabelle 4: Blitzfolgezeiten und Blitzanzahl bei den versch. Batterietypen . .195
Tabelle 5: Maximale Leitzahlen im HSS-Betrieb . . . . . . . . . . . . . . . . . .195
Tabelle 6: Remote-Betrieb . . . . . . . . . . . . . . . . . . . . . . . . . . . . . . . . . .196
704 47 0099.A3
54 MZ-4i
01.02.2007
13:41 Uhr
Seite 3
Vorwort
Vielen Dank, dass Sie sich für ein Metz Produkt entschieden haben. Wir
freuen uns, Sie als Kunde begrüßen zu dürfen.
Natürlich können Sie es kaum erwarten, das Blitzgerät in Betrieb zu nehmen.
Es lohnt sich aber, die Bedienungsanleitung zu lesen, denn nur so lernen Sie,
mit dem Gerät problemlos umzugehen.
Die folgende Bedienungsanleitung ist so verfasst, dass sie die Bedienung des
Systems Kamera-Blitzgerät mit einem Standardfuß 301 und einem SCA 3xx2
Adapter beschreibt.
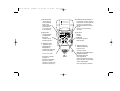
☞ Schlagen Sie bitte auch die Bildseiten des Umschlages
am Ende der Anleitung auf.
Dieses Blitzgerät ist geeignet für:
• alle Kameras mit Blitzschuh und Mittenkontakt.
• alle Kameras mit Blitzschuh ohne Mittenkontakt, unter Verwendung eines
Synchronkabels (siehe Sonderzubehör).
• Systemkameras.
Die optimale Anpassung an Ihre System-Kamera erreichen Sie durch die
Verwendung eines SCA 3xx2- bzw. 3xx-Adapters. Welchen Adapter Sie
für Ihre Kamera benötigen, entnehmen Sie bitte der beiliegenden SCA–Tabelle. Hier können Sie auch die jeweiligen Blitzsonderfunktionen erkennen,
die das System dann ausführt.
Für weitere Informationen können Sie uns auch auf unserer Homepage unter
www.metz.de besuchen.
Wir wünschen Ihnen viel Freude mit dem neuen Blitzgerät.
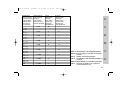
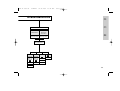
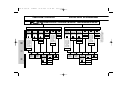
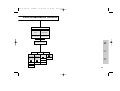
Übersicht der Betriebsarten • und Sonderfunktionen ◊
54 MZ-.. mit SCA 3xx2-Adapter:
Beim Betrieb eines mecablitz 54 MZ-.. mit einem SCA-Adapter 3xx2 sind
zahlreiche zusätzliche Blitz-Sonderfunktionen verfügbar. Es werden nahezu
der derzeit bekannten Blitzsonderfunktionen namhafter KameraherstelǺ alle
ler unterstützt! Die Verfügbarkeit der einzelnen Sonderfunktionen hängt jedoch vom jeweiligen Kamerasystem (Kamerahersteller) und dem speziellen
Kameratyp ab. Nähere Informationen finden Sie in der SCA-Übersichtstabelle bzw. den einzelnen SCA-Adapter-Bedienungsanleitungen!
• TTL-Blitzbetrieb1)
- Metz-TTL-Remote-Betrieb1)
- Canon-ETTL-Blitzbetrieb1)
- Canon-ETTL-HSS-Blitzbetrieb1) 2)
- Minolta-TTL-HSS-Blitzbetrieb1) 2)
- Nikon Matrixgesteuerter Aufhellblitzbetrieb
- Nikon 3D-Multi-Sensor-Aufhellblitzbetrieb
- Nikon D-TTL-Blitzbetrieb3)
- Nikon D-TTL-3D Blitzbetrieb
- Nikon i-TTL-Blitzbetrieb4)
- Nikon i-TTL-BL-Blitzbetrieb4)
- Olympus TTL-Blitzbetrieb5) für Digitalkameras
• Manueller Blitzbetrieb mit Teillichtleistungen
• Manueller HSS-Blitzbetrieb 2) bei Canon, Minolta, Nikon
• Automatik-Blitzbetrieb
- Metz Automatik-Remote-Betrieb
• Stroboskop-Betrieb
◊ Manuelle Blitzbelichtungskorrektur im TTL1)- und A-Betrieb
◊ Blitzbelichtungsreihen Fb im TTL- und A-Betrieb
◊ Synchronisation auf den 1. oder 2. Verschlussvorhang
◊ Automatische Motor-Zoom-Steuerung
◊ Automatische AF-Messblitzsteuerung
3
Ķ
704 47 0099.A3
Ķ
54 MZ-4i
01.02.2007
13:41 Uhr
Seite 4
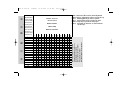
◊ Automatsiche Blitzreichweitenanzeige
◊ Automatsiche Blitzsynchronzeitsteuerung
◊ Wake-up Funktion
◊ Blitzbereitschaftsanzeige im Kamerasucher
◊ Belichtungskontrollanzeige im Kamerasucher
◊ Zündungssteuerung (Pentax, Minolta)
◊ Vorblitz gegen rote Augen (Nikon)
◊ Einstelllicht-Funktion
1) nur möglich, wenn von Kamera unterstützt
2) HSS = High Speed Synchronisation = Kurzzeitsynchronisation
3) nur bei 54 MZ-4
4) nur bei 54 MZ-4i mit Nikon SCA-Adapter 3402-M3
5) Olympus E-1 nur mit 54 MZ-4i und SCA-Adapter 3202-M3
54 MZ-.. mit SCA 3xx-Adapter:
Beim Betrieb des mecablitz mit einem SCA 3xx-Adapter sind die zusätzlichen Blitz-Sonderfunktionen eingeschränkt! Die Verfügbarkeit der einzelǺ nen Sonderfunktionen hängt hier vom jeweiligen Kamerasystem (Kamerahersteller) und dem speziellen Kameratyp ab. Nähere Informationen
finden Sie in der SCA–Übersichtstabelle bzw. den einzelnen SCA–Adapter-Bedienungsanleitungen!
• TTL-Blitzbetrieb1)
- Metz-TTL-Remote-Betrieb1)
• Manueller Blitzbetrieb mit Teillichtleistungen
• Automatik-Blitzbetrieb
- Metz Automatik-Remote-Betrieb
• Stroboskop-Betrieb
◊ Manuelle Blitzbelichtungskorrektur im A-Betrieb
◊ Blitzbelichtungsreihen Fb im A-Betrieb
4
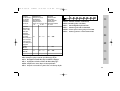
◊ Automatische Blitzsynchronzeitsteuerung
◊ Wake-up Funktion
◊ Blitzbereitschaftsanzeige im Kamerasucher
◊ Belichtungskontrollanzeige im Kamerasucher
◊ Einstelllicht-Funktion
1) nur möglich, wenn von Kamera unterstützt
54 MZ-.. mit Standardfuß 301 (Steuerung nur über Mittenkontakt oder
Synchronkabel):
• Manueller Blitzbetrieb mit Teillichtleistungen
• Automatik-Blitzbetrieb
- Metz Automatik-Remote-Betrieb
• Stroboskop-Betrieb
◊ Manuelle Blitzbelichtungskorrektur im A-Betrieb
◊ Blitzbelichtungsreihen Fb im A-Betrieb
◊ Einstelllicht-Funktion
704 47 0099.A3
54 MZ-4i
01.02.2007
13:41 Uhr
Seite 5
1. Sicherheitshinweise
• Das Blitzgerät ist ausschließlich zur Verwendung im fotografischen Bereich vorgesehen und zugelassen!
• In Umgebung von entflammbaren Gasen oder Flüssigkeiten (Benzin,
Lösungsmittel etc.) darf das Blitzgerät keinesfalls ausgelöst werden!
EXPLOSIONSGEFAHR!
• Auto-, Bus-, Fahrrad-, Motorrad-, oder Zugfahrer etc. niemals während
der Fahrt mit einem Blitzgerät fotografieren. Durch die Blendung kann
der Fahrer einen Unfall verursachen!
• Lösen Sie in unmittelbarer Nähe der Augen keinesfalls einen Blitz aus!
Ein Blitzlicht direkt vor den Augen von Personen und Tieren kann zur
Netzhautschädigung führen und schwere Sehstörungen verursachen - bis
hin zur Blindheit!
• Nur die in der Bedienungsanleitung bezeichneten und zugelassene
Stromquellen verwenden!
• Batterien/Akkus nicht übermäßiger Wärme wie Sonnenschein, Feuer
oder dergleichen aussetzen!
• Verbrauchten Akku nicht ins Feuer werfen!
• Aus verbrauchten Batterien kann Lauge austreten, was zur Beschädigung
der Kontakte führt. Verbrauchte Batterien deshalb immer aus dem Gerät
entnehmen.
• Trockenbatterien dürfen nicht geladen werden.
• Blitz- und Ladegerät nicht Tropf- und Spritzwasser aussetzen!
• Schützen Sie Ihr Blitzgerät vor großer Hitze und hoher Luftfeuchtigkeit!
Blitzgerät nicht im Handschuhfach des Autos aufbewahren!
• Beim Auslösen eines Blitzes darf sich kein lichtundurchlässiges Material
unmittelbar vor oder direkt auf der Reflektorscheibe befinden. Die Reflektorscheibe darf nicht verunreinigt sein. Bei Nichtbeachtung kann es,
durch die hohe Energie des Blitzlichtes, zu Verbrennungen des Materials
bzw. der Reflektorscheibe führen.
• Nach mehrfachem Blitzen nicht die Reflektorscheibe berühren.
Verbrennungsgefahr!
• Blitzgerät nicht zerlegen! HOCHSPANNUNG!
Im Geräteinneren befinden sich keine Bauteile, die von einem Laien
repariert werden können.
• Bei Serienblitzaufnahmen mit voller Lichtleistung und den kurzen Blitzfolgezeiten des NC-Akku-Betriebes ist darauf zu achten, dass nach jeweils 15 Blitzen eine Pause von mindestens 10 Minuten eingehalten
wird. Somit vermeiden Sie eine Überlastung des Gerätes.
Ķ
5
704 47 0099.A3
54 MZ-4i
01.02.2007
13:41 Uhr
Seite 6
2. Vorbereiten des Blitzgerätes
Befestigen des Blitzgerätes an der Kamera
Ķ 2.1
☞
Kamera und mecablitz vor der Montage oder Demontage ausschalten.
Der mecablitz kann nur mit dem Standardfuß 301 oder mit einem SCA 3xxbzw. SCA 3xx2-Adapter (Sonderzubehör) auf der Kamera befestigt werden.
Der mecablitz ist standardmäßig mit dem Standardfuß 301 für einfache
Blitzsynchronisation ausgestattet. Die Verschlusszeit muss dabei gleich oder
länger als die Kamerasynchronzeit sein. Bei Set-Geräten liegt anstatt des
Standardfußes 301 der entsprechende SCA-Adapter bei.
Montage des Standardfußes oder SCA-Adapters:
☞ Vor der Montage oder Demontage von Standardfuß oder SCA–Adapter muss der mecablitz mit dem Haupschalter ausgeschaltet werden.
• Abdeckplatte (nur bei Verwendung des SCA 3xx2-Adapters) in der Mitte
fassen und ausklipsen.
• SCA-Adapter oder Standardfuß 301 bis zum Anschlag einschieben.
Demontage des Standardfußes oder SCA-Adapters:
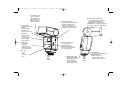
• mecablitz mit dem Hauptschalter (Bild 1) ausschalten.
• Den Batteriefachdeckel (Bild 3) nach unten schieben und aufklappen.
• Farbigen Entriegelungsknopf (Bild 3) drücken und gleichzeitig den
SCA–Adapter bzw. Standardfuß nach hintenn abziehen.
mecablitz montieren:
mecablitz in den Zubehörschuh der Kamera schieben und mit der Klemmmutter festklemmen.
6
2.2 Stromversorgung
2.2.1 Batterien- bzw. Akkuauswahl
Der mecablitz kann wahlweise betrieben werden mit:
• 4 NC-Akkus Typ IEC KR 15/51,
sie bieten sehr kurze Blitzfolgezeiten und sparsamen Betrieb, da sie wiederaufladbar sind.
• 4 Nickel-Metall-Hydrid Akkus,
deutlich höhere Kapazität als NC-Akku und weniger umweltschädlich, da
cadmiumfrei.
• 4 Alkali-Mangan-Trockenbatterien Typ IEC LR6,
wartungsfreie Stromquelle für gemäßigte Leistungsanforderungen.
• Power Pack P 40 (Sonderzubehör),
bietet mikroprozessorgesteuerte Akkuüberwachung und Ladezustandsanzeige (mit Discharge-Funktion).
• Power Pack P 50 (Sonderzubehör),
bietet mikroprozessorgesteuerte Akkuüberwachung und Ladezustandsanzeige (mit Discharge-Funktion).
2.2.2 Batterien austauschen
• mecablitz mit dem Hauptschalter (Bild 1) ausschalten.
• Den Batteriefachdeckel (Bild 3) nach unten schieben und aufklappen.
• Batterien oder Akkus in Längsrichtung entsprechend den angegebenen
Batteriesymbolen einsetzen und Batteriedeckel schließen.
☞ Achten Sie beim Einsetzen der Batterien bzw. Akkus auf die richtige
Polarität gemäß den Symbolen auf dem Batteriefachdeckel .
Verbrauchte Akkus gehören nicht in den Hausmüll! Leisten Sie einen
Beitrag zum Umweltschutz und geben Sie verbrauchte Akkus bei entsprechenden Sammelstellen ab!
704 47 0099.A3
54 MZ-4i
01.02.2007
13:41 Uhr
Seite 7
2.3 Ein- und Ausschalten des Blitzgerätes
Das Blitzgerät wird mit dem Hauptschalter (Bild 1) eingeschaltet. In der oberen Stellung On ist das Blitzgerät permanent6) eingeschaltet - die Blitzbereitschaftsanzeige (Bild 1) leuchtet.
6) siehe auch „12.3 Automatische Geräteabschaltung“
☞ Wenn im LC-Display ein Schlüsselsymbol erscheint, dann die Bedienhinweise unter „12.2 Ver- u. Entriegeln der Bedienelemente“ beachten.
Zum Ausschalten den Hauptschalter (Bild 1) in die untere Position schieben. Wird das Blitzgerät längere Zeit nicht gebraucht, so empfehlen wir:
- Blitzgerät mit dem Hauptschalter (Bild 1) ausschalten;
- Stromquellen (Batterien, Akkus) entnehmen.
2.4 Bedienphilosophie
2.4.1 Auswahl und Einstellung der Blitzbetriebsart TTL / A / M /
(Stroboskop)
Die Blitzbetriebsart TTL, A (Automatik-Blitzbetrieb), M (manueller Blitzbetrieb) oder
(Stroboskop-Betrieb) wird mit der Taste Mode (Bild 1) gewählt, dazu die
Mode Taste so oft drücken, bis die gewünschte Betriebsart durch das jeweils blinkende Symbol angezeigt wird. Zum Speichern das Einstellrad (Bild 1) in Pfeilrichtung drücken.
Wird das Einstellrad (Bild 1) nicht gedrückt, so wird die gewählte
Betriebsart nach ca. 5 s automatisch gespeichert. Nach dem Speichern wird
das Symbol für die Betriebsart im Display stetig (ohne Blinken) angezeigt!
Hinweis: Die einzelnen Blitzbetriebsarten werden jeweils in einem
extra Kapitel erklärt!
2.4.2 Auswahl und Einstellung der Sonderfunktionen
Ȅ
Mit der Taste Select (Bild 1) können in jeder Blitzbetriebsart zusätzliche
Sonderfunktionen angewählt werden:
Durch Drücken der Taste Select (Bild 1) werden die Sonderfunktionen
„Beep“ ( ), automatische Geräteabschaltung
, REAR7) (Synchronisation
auf den 2. Verschlussvorhang), Einstelllicht (
) , Zoomformate und Blitzbelichtungsreihe „Fb“ aufgerufen.
7) nur mit SCA-Adapter und Kamera, welche diese Funktion unterstützen
Nach Aufrufen der Sonderfunktionen blinkt das Symbol der jeweiligen
Funktion und der Funktionsstatus (OFF oder On) wird im LC-Display angezeigt!
Durch Drehen des Einstellrades (Bild 1) wird die angewählte Funktion einoder ausgeschaltet.
Durch Drücken des Einstellrades (Bild 1) wird die eingestellte Funktion
gespeichert.
Hinweis: Die einzelnen Blitzsonderfunktionen werden jeweils in einem extra
Kapitel erklärt!
2.4.3 Einstellung von ISO / Zoom / Blende
und „EV“ (Blitzbelichtungskorrektur)
/„P“ (Teillichtleistung)
Durch Drehen des Einstellrades (Bild 1) die gewünschte Funktion (ISO /
Zoom / Blende / Teillichtleistung „P“ / Belichtungskorrektur „EV“) auf der
rechten Seite des LC-Displays anwählen. Die angewählte Funktion wird durch
einen Pfeil ı gekennzeichnet.
Zur Verstellung der Funktion das Einstellrad (Bild 1) in Pfeilrichtung drükken. Der Pfeil ı im LC-Display blinkt. Durch Drehen des Einstellrades den
Wert verändern. Zum Speichern das Einstellrad in Pfeilrichtung drücken.
Wird das Einstellrad nicht gedrückt, so wird die Einstellung nach ca. 5 s
automatisch gespeichert. Nach dem Speichern blinkt der Pfeil in der angewählten Position nicht mehr.
☞ Beim Betrieb des mecablitz mit einem SCA–Adapter 3xx2 ist es möglich, dass sich der Blendenwert im LC-Display nicht verändern lässt
(abhängig vom Kameratyp und SCA-Adapter)!
Beim Betrieb des mecablitz mit einem SCA–Adapter 3xx2 ist es möglich, dass sich der ISO-Wert für die Filmempfindlichkeit nicht verändern lässt bzw. nicht angezeigt wird (abhängig vom Kameratyp und
SCA-Adapter)!
Hinweis: Die Einstellungen zu den einzelnen Positionen werden jeweils in
einem extra Kapitel erklärt!
7
Ķ
704 47 0099.A3
Ķ
54 MZ-4i
01.02.2007
13:41 Uhr
Seite 8
3. Der TTL-Blitzbetrieb
Im TTL-Blitzbetrieb erreichen Sie auf einfache Art sehr gute Blitzlichtaufnahmen.
☞ Für den TTL-Blitzbetrieb muss der mecablitz mit einem geeigneten
SCA–Adapter ausgerüstet sein. Der TTL-Blitzbetrieb kann nur mit solchen Kameras ausgeführt werden, die den TTL-Blitzbetrieb auch unterstützen! Mit dem Standardfuß SCA 301 (nur Mittenkontakt bzw. Synchronkabel-Buchse) ist kein TTL-Blitzbetrieb möglich! Wenn der
mecablitz mit einer Kamera bzw. einem SCA-Adapter betrieben wird,
die den TTL–Betrieb nicht unterstützt, werden beim Betätigen des Kameraauslösers ungeregelte Blitze mit voller Lichtleistung abgegeben!
Zum Testen der TTL-Funktion muss sich ein Stück Film in der Kamera
befinden!
In dieser Betriebsart wird die Belichtungsmessung von einem Fotosensor in
der Kamera vorgenommen. Dieser Sensor misst das durch das Objektiv auf
den Film auftreffende und reflektierte Licht. Beim Erreichen der für eine korrekt belichtete Aufnahme erforderlichen Lichtmenge sendet die Kameraelektronik ein Stopp-Signal an den SCA-Adapter (Sonderzubehör) und die Lichtabstrahlung des mecablitz wird sofort unterbrochen.
Der Vorteil dieses Blitzbetriebes liegt darin, dass alle Faktoren, welche die
Belichtung des Films beeinflussen (Aufnahmefilter, Blenden- und Brennweitenänderungen bei Zoom-Objektiven, Auszugsverlängerungen für Nahaufnahmen usw.), automatisch bei der Regelung des Blitzlichtes berücksichtigt werden.
Bei einer korrekt belichteten Blitzlichtaufnahme leuchtet für ca. 3 s am mecablitz die „ok“-Anzeige.
☞ Am mecablitz kann zusätzlich eine akustische Meldung aktiviert werden, siehe dazu “12.1 Beep-Funktion“.
Einstellvorgang für den TTL-Blitzbetrieb:
• Den mecablitz mit einem geeigneten SCA-Adapter ausrüsten und auf die
Kamera montieren.
• Die Kamera gemäß den Angaben ihrer Bedienungsanleitung einstellen.
8
• mecablitz mit dem Hauptschalter (Bild 1) einschalten.
• Taste Mode (Bild 1) so oft drücken, bis im Display TTL blinkt. Einstellrad
(Bild 1) in Pfeilrichtung drücken und Einstellung damit speichern. Wird
das Einstellrad nicht gedrückt, wird die Einstellung nach ca. 5 s automatisch gespeichert. Das Symbol TTL erscheint nach dem Speichern stetig und
blinkt nicht mehr.
• Je nach Kameratyp und SCA-Adapter kann es möglich sein, dass die Werte für ISO (Filmempfindlichkeit), Zoom und Blende nicht automatisch von
der Kamera an den mecablitz übertragen werden. In diesem Fall die entsprechenden Werte von Hand am mecablitz einstellen. Die Einstellung von
ISO und Blende ist für eine korrekte Entfernungs- bzw. Reichweitenanzeige
am LC-Display erforderlich. Die Belichtung selbst wird dadurch nicht beeinflusst. Diese Einstellungen müssen daher nicht unbedingt vorgenommen
werden.
• Die Einstellung der Zoomreflektor-Position ist wichtig für eine korrekte Ausleuchtung des gesamten Bildes! Die Zoomreflektor-Position sollte daher immer
der Objektivbrennweite angepasst werden, siehe dazu auch Kap. 12.9.
Tipp:
Wenn Sie ein Zoom-Objektiv benutzen und nicht unbedingt immer die volle
Leitzahl und Reichweite des mecablitz benötigen, können Sie die Zoomreflektor-Position auf der Anfangsbrennweite des Zoomobjektives belassen.
Damit ist garantiert, dass Ihr Bild immer vollständig ausgeleuchtet wird. Sie
sparen sich damit die fortwährende Anpassung an die Objektivbrennweite.
Beispiel:
Sie benutzen ein Zoom-Objektiv mit einem Brennweitenbereich von 28 mm bis
80 mm. In diesem Beispiel stellen Sie die Position des Zoomreflektors auf 28 mm!
☞ Beim Betrieb des mecablitz mit einem SCA 3xx2–Adapter und einer Kamera, welche Daten an den mecablitz überträgt, kann es vorkommen,
dass der ISO-Wert nicht angezeigt wird (kameratypabhängig); siehe Bedienungsanleitung des SCA-Adapters. Die Werte für Filmempfindlichkeit
ISO und Blende können unter Umständen nicht verändert werden! Bei
starken Kontrastunterschieden, z.B. dunkles Objekt im Schnee, kann eine
Belichtungskorrektur erforderlich sein (siehe Kapitel 14.).
704 47 0099.A3
54 MZ-4i
01.02.2007
13:41 Uhr
Seite 9
3.1 Unterbetriebsarten des TTL-Blitzbetriebes
Am mecablitz können in der Blitzbetriebsart TTL verschiedene Unterbetriebsarten dieses Blitzbetriebes eingestellt werden.
☞ Die Anzahl und die möglichen Unterbetriebsarten sind vom SCA-Adapter und der verwendeten Kamera abhängig:
• TTL-Remote mit Adresse „Ad1“
(siehe Kapitel „7.1 Der drahtlose Metz TTL-Remote-Betrieb“)
• TTL-Remote mit Adresse „Ad2“
(siehe Kapitel „7.1 Der drahtlose Metz TTL-Remote-Betrieb“)
• E-TTL-Blitzbetrieb (nur mit SCA 3102 und einer geeigneten Canon-Kamera, siehe Bedienungsanleitung des SCA-Adapters und der Kamera)
• E-TTL-HSS-Blitzbetrieb; Kurzzeitsynchronisation (nur mit SCA 3102 und
einer geeigneten Canon-Kamera, siehe Bedienungsanleitung des
SCA–Adapters und der Kamera)
• Matrix-gesteuertes Aufhellblitzen
(nur mit SCA 3402 und einer geeigneten Nikon-Kamera, siehe Bedienungsanleitung des SCA-Adapters und
der Kamera)
• 3D-Multisensor-Aufhellblitzen
(nur mit SCA 3402 und einer geeigneten Nikon-Kamera, siehe Bedienungsanleitung des SCA-Adapters und der
Kamera)
(nur mit SCA 3302 und einer geeigneten Minolta• TTL-HSS-Blitzbetrieb
Kamera, siehe Bedienungsanleitung des SCA-Adapters und der Kamera).
Einstellen einer Unterblitzbetriebsart des TTL-Blitzbetriebes:
• Taste Mode (Bild 1) drücken, bis TTL im Display blinkt. Sollte TTL nicht
mehr blinken, dann einmal auf die Mode Taste drücken.
• Einstellrad (Bild 1) drehen und die gewünschte Unterblitzbetriebsart einstellen.
• Einstellrad (Bild 1) in Pfeilrichtung drücken und Einstellung speichern. Wenn
das Einstellrad nicht gedrückt wird, wird die gewählte Unterblitzbetriebsart nach
5 s automatisch gespeichert. Das Symbol TTL hört nach dem Speichern auf zu blinken.
4. Der Automatik-Blitzbetrieb
Im Automatik-Blitzbetrieb misst ein Fotosensor (Bild 2) im mecablitz das
vom Motiv reflektierte Licht. Der mecablitz unterbricht die Blitzlichtabstrahlung beim Erreichen der für eine korrekt belichtete Aufnahme erforderlichen
Lichtmenge. Dadurch muss bei einer Entfernungsänderung keine neue
Blendenberechnung und Einstellung vorgenommen werden, solange sich das
Objekt nicht außerhalb der angezeigten max. Reichweite befindet.
Der Fotosensor (Bild 2) des mecablitz muss auf das Motiv gerichtet sein,
gleichgültig wohin der Hauptreflektor geschwenkt ist. Der Fotosensor hat
einen Messwinkel von 25° und misst nur während der eigenen
Lichtabstrahlung des mecablitz.
Bei einer korrekt belichteten Aufnahme leuchtet am mecablitz für ca. 3 s die
„ok“ Anzeige.
Der Automatik-Blitzbetrieb ist mit einem SCA-Adapter oder auch mit dem
Standardfuß SCA 301 möglich.
☞ Verschiedene Kameras unterstützen den mecablitz im Automatik-Blitzbetrieb mit einem SCA-Adapter nicht (siehe Bedienungsanleitung von
Kamera und SCA-Adapter). In diesem Fall sollte der mecablitz mit
dem Standardfuß SCA 301 ausgerüstet werden.
Einstellvorgang für den Automatik-Blitzbetrieb:
• mecablitz mit SCA-Adapter oder Standardfuß SCA 301 ausrüsten und auf
die Kamera montieren.
• Kamera gemäß den Angaben ihrer Bedienungsanleitung einstellen.
• mecablitz mit dem Hauptschalter (Bild 1) einschalten.
• Taste Mode (Bild 1) so oft drücken, bis im Display A blinkt. Einstellrad
(Bild 1) in Pfeilrichtung drücken und Einstellung damit speichern. Wird
das Einstellrad nicht gedrückt, wird die Einstellung nach ca. 5 s automatisch gespeichert. Das Symbol A erscheint nach dem Speichern stetig und
blinkt nicht mehr.
• Wenn der mecablitz mit einem Adapter SCA 3xx2 und einer Kamera
betrieben wird, welche die Daten für Filmempfindlichkeit ISO, Zoomre9
Ķ
704 47 0099.A3
Ķ
54 MZ-4i
01.02.2007
13:41 Uhr
Seite 10
flektor-Position und Blende automatisch überträgt, sind keine weiteren
Einstellungen erforderlich. Der mecablitz stellt sich gemäß den übertragenen Kameradaten ein.
☞ Beim Betrieb des mecablitz mit einer Kamera, welche Daten an den
mecablitz überträgt, kann es vorkommen, dass der ISO-Wert nicht
angezeigt wird (kameratypabhängig); siehe Bedienungsanleitung des
SCA-Adapters. Die Werte für Filmempfindlichkeit ISO und Blende können u.U. nicht verändert werden!
Automatik-Blitzbetrieb mit einem SCA 3xx-Adapter bzw. einem Standardfuß SCA 301:
In diesem Fall müssen die entsprechenden Werte für die Filmempfindlichkeit
ISO, die Zoom-Position des Reflektors und die Blende von Hand am mecablitz eingestellt werden. Dies ist für eine korrekte Blitzbelichtung unbedingt
erforderlich, da der mecablitz mit diesen Daten die Lichtregelung selbstständig durchführen muss!
Tipp:
Wenn Sie ein Zoom-Objektiv benutzen und nicht unbedingt immer die volle
Leitzahl und Reichweite des mecablitz benötigen, können Sie die Zoom-Reflektor-Position auf der Anfangsbrennweite des Zoomobjektives belassen.
Damit ist garantiert, dass Ihr Bild immer vollständig ausgeleuchtet wird. Sie
sparen sich damit die fortwährende Anpassung an die Objektivbrennweite.
Beispiel:
Sie benutzen ein Zoom-Objektiv mit einem Brennweitenbereich von 28 mm
bis 80 mm. In diesem Beispiel stellen Sie die Position des Zoom-Reflektors des
mecablitz auf 28 mm!
☞ Das Motiv sollte sich im Bereich von etwa 40 % bis 70 % des im LC-Dis-
play angezeigten maximalen Entfernungswertes befinden. Damit wird
der Elektronik genügend Spielraum zum Ausgleich gegeben.
Vorsicht bei Zoom-Objektiven!
Diese können bauartbedingt einen Lichtverlust von bis zu einer Blendenstufe verursachen. Sie können auch bei unterschiedlichen Brennweiteneinstellungen verschiedene effektive Blendenwerte haben. Dies können
10
Sie gegebenenfalls durch manuelle Korrektur der Blendeneinstellung
bzw. durch eine manuelle Blitzbelichtungskorrektur (siehe Kapitel 14.)
kompensieren!
4.1 Unterbetriebsarten des Automatik-Blitzbetriebes
Am mecablitz können in der Blitzbetriebsart A verschiedene Unterbetriebsarten dieses Blitzbetriebes eingestellt werden:
• Automatik-Remote mit Adresse „Ad1“
(siehe Kapitel „7.1 Der drahtlose Metz Automatik-Remote-Betrieb“)
• Automatik-Remote mit Adresse „Ad2“
(siehe Kapitel „7.1 Der drahtlose Metz Automatik-Remote-Betrieb“)
Einstellen einer Unterblitzbetriebsart des Automatik-Blitzbetriebes:
• Taste Mode (Bild 1) des mecablitz drücken, bis A im Display blinkt.
• Einstellrad (Bild 1) drehen und die gewünschte Unterblitzbetriebsart einstellen.
• Zum Speichern das Einstellrad (Bild 1) in Pfeilrichtung drücken.
Wenn das Einstellrad nicht gedrückt wird, wird die gewählte Unterblitzbetriebsart nach 5 s automatisch gespeichert. Das Symbol A hört nach
dem Speichern auf zu blinken.
5. Der manuelle Blitzbetrieb
In dieser Betriebsart wird vom Blitzgerät die volle Energie abgestrahlt, sofern
keine Teillichtleistung eingestellt ist. Der mecablitz muss mit einem SCA-Adapter oder dem Standardfuß 301 ausgestattet sein. Die Anpassung an die Aufnahmesituation kann durch die Blendeneinstellung an der Kamera und durch
die Wahl einer Teillichtleistung durchgeführt werden.
Im LC-Display des mecablitz wird die Entfernung vom Blitzgerät zum Motiv
angezeigt, die für eine korrekte Blitzbelichtung einzuhalten ist. Daher ist auf
eine korrekte Einstellung des mecablitz zu achten. Die Werte für die Blende
und die Filmempfindlichkeit ISO müssen an der Kamera und am mecablitz
übereinstimmen! Die Zoom-Position des Blitzreflektors muss auf die ObjektivBrennweite abgestimmt sein!
704 47 0099.A3
54 MZ-4i
01.02.2007
13:41 Uhr
Seite 11
Einstellvorgang für den manuellen Blitzbetrieb:
Einstellbeispiel:
Beleuchtungsabstand: 6 m, Zoom 50 mm, ISO 100/21°.
• Kamera gemäß den Angaben ihrer Bedienungsanleitung einstellen.
• Blitzgerät mit Standardfuß 301 oder SCA-Adapter ausrüsten und auf die
Kamera montieren.
• Blitzgerät mit dem Hauptschalter (Bild 1) einschalten.
• Taste Mode (Bild 1) so oft drücken, bis im Display M blinkt. Einstellrad
(Bild 1) in Pfeilrichtung drücken und Einstellung damit speichern. Wird
das Einstellrad nicht gedrückt, wird die Einstellung nach ca. 5 s automatisch gespeichert. Das Symbol M erscheint nach dem Speichern stetig und
blinkt nicht mehr.
• Nach dem Speichern wird im Display die Teillichtleistung „P 1/1“ (= volle
Lichtleistung) angezeigt. Beim Betätigen der Handauslösetaste (Bild 1)
am mecablitz bzw. des Kameraauslösers wird ein Blitz mit voller
Lichtleistung abgegeben!
☞ Verschiedene Kameras unterstützen den mecablitz im manuellen Blitzbetrieb mit einem SCA-Adapter nicht (siehe Bedienungsanleitung von
Kamera und SCA-Adapter). In diesem Fall sollte der mecablitz mit
dem Standardfuß SCA 301 ausgerüstet werden (siehe auch die Bedienungsanleitung der Kamera).
Manueller Blitzbetrieb des mecablitz mit einem Adapter SCA 3xx2:
Wenn der mecablitz mit einem Adapter SCA 3xx2 und einer Kamera betrieben
wird, welche die Daten für Filmempfindlichkeit ISO, Zoom-Reflektor-Position
und Blende automatisch überträgt, sind keine weiteren Einstellungen erforderlich. Der mecablitz stellt sich gemäß den übertragenen Kameradaten ein.
☞ Beim Betrieb des mecablitz mit einer Kamera, welche Daten an den
mecablitz überträgt, kann es vorkommen, dass der ISO-Wert nicht
angezeigt wird (kameratypabhängig); siehe Bedienungsanleitung des
SCA-Adapters. Beim Betrieb des mecablitz mit einer Kamera, welche
Daten an den mecablitz überträgt, können die Werte für Filmempfindlichkeit ISO und die Blendenwerte nicht verändert werden! In diesem
Fall ist der Blendenwert an der Kamera so lange zu verändern, bis im
LC-Display des mecablitz die gewünschte Entfernung angezeigt wird.
Manueller Blitzbetrieb mit einem SCA 3xx-Adapter bzw. dem Standardfuß
SCA 301:
In diesem Fall müssen die entsprechenden Werte für die Filmempfindlichkeit
ISO, die Zoom-Position des Reflektors und die Blende von Hand am mecablitz eingestellt werden. Dies ist für eine korrekte Blitzbelichtung unbedingt
erforderlich, da der mecablitz mit diesen Daten den Abstand vom Motiv zum
Blitzgerät für eine korrekte Blitzbelichtung errechnet und an seinem Display
anzeigt.
Einstellen einer Teillichtleistung:
Um die Entfernungsanzeige für eine korrekte Blitzbelichtung zu ändern und
der Aufnahmesituation individuell anzupassen, kann am mecablitz eine Teillichtleistung eingestellt werden:
• Einstellrad (Bild 1) drehen, bis das Pfeilsymbol am Display neben P
steht.
• Einstellrad (Bild 1) in Pfeilrichtung drücken. Das Pfeilsymbol blinkt.
• Einstellrad (Bild 1) drehen und die gewünschte Teillichtleistung einstellen. Zum Speichern der Teillichtleistung das Einstellrad in Pfeilrichtung
drücken. Wird das Einstellrad nicht gedrückt, so wird die Teillichtleistung
nach 5 s automatisch gespeichert. Nach dem Speichern blinkt das
Pfeilsymbol nicht mehr.
Um den Entfernungswert zu ändern und der Aufnahmesituation individuell
anzupassen, kann auch der Blendenwert der Kamera verändert werden. Beachten Sie jedoch, dass eine Veränderung des Blendenwertes der Kamera
auch die Schärfentiefe der Aufnahme beeinflusst!
Löschen der eingestellten Teillichtleistung:
• Einstellrad (Bild 1) drehen, bis das Pfeilsymbol am Display neben P
steht.
• Einstellrad (Bild 1) in Pfeilrichtung drücken. Das Pfeilsymbol blinkt.
• Einstellrad (Bild 1) drehen, um die Anzeige für die Teillichtleistung auf
11
Ķ
704 47 0099.A3
Ķ
54 MZ-4i
01.02.2007
13:41 Uhr
Seite 12
P 1/1 zu stellen. Zum Speichern das Einstellrad in Pfeilrichtung drücken.
Wird das Einstellrad nicht gedrückt, so wird nach 5 s automatisch gespeichert. Nach dem Speichern blinkt das Pfeilsymbol nicht mehr. Die
Teillichtleistung wird beim Wechseln zu einer anderen Blitzbetriebsart auf
P 1/1 gestellt!
5.1 Unterbetriebsart des manuellen Blitzbetriebs
☞ Der mecablitz muss mit einem Adapter SCA 3xx2 ausgerüstet sein!
Verschiedene Kameras bieten die Möglichkeit einer Kurzzeitsynchronisation
(FP- bzw. HSS-Blitzbetrieb) in der manuellen Betriebsart M des Blitzgerätes
(siehe Bedienungsanleitung der Kamera und des SCA-Adapters).
Einstellen der Unterblitzbetriebsart „M-HSS“ des manuellen Blitzbetriebes:
• Taste Mode (Bild 1) drücken, bis M im Display blinkt.
• Einstellrad (Bild 1) drehen und HSS einstellen.
• Zum Speichern das Einstellrad (Bild 1) in Pfeilrichtung drücken.
Wenn das Einstellrad nicht gedrückt wird, wird HSS nach 5 s automatisch
gespeichert. Das Symbol M hört nach dem Speichern auf zu blinken.
Ausschalten des “HSS”-Blitzbetriebes:
• Taste Mode (Bild 1) drücken, bis M im Display blinkt.
• Einstellrad (Bild 1) drehen und HSS ausblenden.
• Zum Speichern das Einstellrad (Bild 1) in Pfeilrichtung drücken.
Wenn das Einstellrad nicht gedrückt wird, wird nach 5 s automatisch gespeichert. Das Symbol M hört nach dem Speichern auf zu blinken.
6. Indirektes Blitzen
Direkt geblitzte Bilder sind nicht selten an ihrer typisch harten und ausgeprägten Schattenbildung zu erkennen. Oft wirkt auch der physikalisch bedingte Lichtabfall vom Vordergrund zum Hintergrund störend.
Durch indirektes Blitzen können diese Erscheinungen weitgehend vermieden
werden, weil das Objekt und der Hintergrund mit zerstreutem Licht weich
und gleichmäßig ausgeleuchtet werden kann. Der Reflektor wird dabei so
12
geschwenkt, dass er geeignete Reflexflächen (z.B. Decke oder Wände des
Raumes) beleuchtet.
Der Reflektor des Blitzgerätes ist vertikal und horizontal schwenkbar.
Vertikal:
-7°, 0°, 60°, 75°, 90°
Horizontal: -180°, -150°, -120°, -90°, -60°, -30°, 0°, 30°, 60°, 90°.
In der Grundposition ist der Reflektorkopf mechanisch verriegelt. Zum Verdrehen des Reflektorkopfes den Entriegelungsknopf drücken.
☞ Beim vertikalen oder horizontalen Schwenken des Reflektors ist darauf zu achten, dass um einen genügend großen Winkel geschwenkt
wird, damit kein direktes Licht vom Reflektor auf das Motiv fallen
kann. Deshalb mindestens bis zur 60° Rastposition schwenken.
Im LC-Display erlöschen die Entfernungsangaben. Der Motivabstand,
vom Blitzgerät über Decke oder Wand zum Motiv, ist jetzt eine unbekannte Größe.
Das von den Reflexflächen zerstreut reflektierte Licht ergibt eine weiche Ausleuchtung des Objektes.
Die reflektierende Fläche muss farbneutral bzw. weiß sein und sollte keine
Strukturen aufweisen (z. B. Holzbalken an der Decke), die zu Schattenbildung führen können. Für Farbeffekte wählt man Reflexflächen in der entsprechenden Farbe.
Um beim indirekten Blitzen Schatten zu vermeiden, die z.B. bei Portraitaufnahmen unter der Nase und in den Augenhöhlen entstehen, ist die Verwendung des Zweitreflektors vorteilhaft.
6.1 Indirektes Blitzen mit eingeschaltetem Zweitreflektor
Der Zweitreflektor (Bild 2) ermöglicht beim indirekten Blitzen eine
Frontalaufhellung.
☞ Der Betrieb mit dem Zweitreflektor ist prinzipiell nur bei indirektem
Blitzen sinnvoll.
Mit dem Schalter
(Bild 2) kann der Zweitreflektor ein- und ausgeschaltet werden. Wenn das Symbol
im LC–Display des mecablitz blinkt, ist
dies lediglich ein Hinweis dafür, dass der Hauptreflektor noch nicht
704 47 0099.A3
54 MZ-4i
01.02.2007
13:41 Uhr
Seite 13
geschwenkt ist.
Bei aktivem Zweitreflektor teilt sich das Licht des Gerätes zu ca. 85 % auf den
Reflektor und zu ca. 15 % auf den Zweitreflektor auf. Beim Blitzbetrieb mit
Teillichtleistung und eingeschaltetem Zweitreflektor können die angegebenen
%-Werte etwas abweichen.
Ist die Lichtmenge des Zweitreflektors zu groß, kann die Lichtmenge mit der
Reduzierscheibe um ca. 50 % verringert werden. Die Reduzierscheibe dazu
seitlich nach rechts verschieben, vom mecablitz abnehmen und um 180° drehen.
☞ Die Unterbetriebsarten ADI, Stroboskop, E-TTL, E-TTL-HSS, D-TTL,
3D-Multi-Sensor, TTL-HSS und Remote sind in Verbindung mit dem
Zweitreflektor nicht möglich.
6.2 Indirektes Blitzen im Automatik- und TTL–Blitzbetrieb
Es ist zweckmäßig, vor der eigentlichen Aufnahme zu prüfen, ob das Licht
für die gewählte Blende ausreichend ist. Verfahren Sie hierzu, wie in Kapitel
„10. Belichtungskontrollanzeige“ beschrieben.
6.3 Indirektes Blitzen im manuellen Blitzbetrieb
Im manuellen Blitzbetrieb wird die erforderliche Kamerablende am zweckmäßigsten mit einem Blitzbelichtungsmesser ermittelt. Steht kein Blitzbelichtungsmesser zur Verfügung, kann man sich mit der Faustformel
Leitzahl
Kamerablende = ———————————————
Beleuchtungsabstand x 2
einen Blendenrichtwert ermitteln, den man bei der Aufnahme noch um ±1 Blendenstufe variieren sollte.
7. Der drahtlose Remote-Betrieb
Allgemeines
Unter „Remote-Betrieb“ versteht man die drahtlose Fernsteuerung von zusätzlichen Blitzgeräten. Dabei steuert das Kamera-Blitzgerät (Controller) die zusätzlichen Blitzgeräte (Slaves) so, dass sich die automatische Belichtungs-
steuerung des Remote–Blitzbetriebs auf alle Slave-Blitzgeräte erstreckt.
Der Metz Remote–Betrieb ermöglicht die gemeinsame Blitzsteuerung mehrerer
Blitzgeräte der Typen 54 MZ-.., 34 CS-2, 28 CS-2, 40 MZ-. ., 50 MZ-5 und
70 MZ-.. ohne Kabel. Zur Durchführung dieser Betriebsart müssen alle zusätzlichen Blitzgeräte 54 MZ-.., 70 MZ-4 (Slaves) mit einem Slave Adapter SCA
3083 (Sonderzubehör) und alle 40 MZ-. . mit einem Slave Adapter SCA 3080
oder 3082 (Sonderzubehör) ausgerüstet werden. Die Slave-Blitzgeräte können
auf den beim Slave Adapter mitgelieferten Standfuß oder einem Stativ montiert
werden.
Die Slave-Blitzgeräte 34 CS-2, 28 CS-2, 50 MZ-5 Slave und 70 MZ-5 benötigen keinen Slave Adapter.
☞ Im Remote-Betrieb erfolgt keine Reichweiten- bzw. Entfernungsanzeige im LC-Display des mecablitz. Der Zweitreflektor des mecablitz
muss ausgeschaltet sein!
Damit sich zwei Remote-Systeme in einem Raum nicht gegenseitig stören,
sind am Controller- und am Slave-Gerät zwei verschiedene Adressen Ad1
und Ad2 wählbar.
7.1 Der drahtlose Metz TTL-Remote-Betrieb
☞ Metz-TTL-Remote-Betrieb ist nur mit Kameras möglich, welche über die
TTL-Blitzsteuerung verfügen! Hier erfolgt die Sensorsteuerung über die
Kamera.
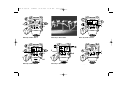
Einstellvorgang für den Metz TTL-Remote-Controller-Betrieb (Bild 4):
1 Blitzgerät auf der Kamera mit geeignetem SCA-Adapter ausrüsten und mit
dem Hauptschalter einschalten.
2 Mode Taste (Bild 1) so oft drücken, bis im Display TTL blinkt.
3 Während die Betriebsartanzeige TTL blinkt, das Einstellrad (Bild 1) drehen und die Controller-Betriebsart Co mit der Adresse Ad1 oder Ad2 wählen. Sollte TTL nicht mehr blinken, dann einmal auf die Mode Taste drücken. Zum Speichern dieser Einstellung das Einstellrad kurz in Pfeilrichtung
drücken. Wird das Einstellrad nicht gedrückt, so wird nach 5 s die gewählte Einstellung automatisch gespeichert und TTL wird stetig (ohne Blinken)
13
Ķ
704 47 0099.A3
Ķ
54 MZ-4i
01.02.2007
13:41 Uhr
Seite 14
zusammen mit Co und der Slave-Adresse Ad1 oder Ad2 angezeigt.
Einstellvorgang für den Metz TTL-Remote-Slave-Betrieb (Bild 5):
• Slave-Blitzgeräte 54 MZ-.., 70 MZ-4 mit einem Slave Adapter SCA 3083
ausrüsten. Slave-Blitzgeräte 40 MZ-. . mit einem Slave Adapter SCA 3080
bzw. 3082 ausrüsten.
1 mecablitz mit dem Hauptschalter (Bild 1) einschalten. Der mecablitz
schaltet automatisch auf die Betriebsart TTL. Im LC-Display erscheint die
Anzeige SL (Slave-Betrieb). Die Slave-Adresse Ad1 (bzw. die zuletzt
gewählte Adresse) wird eingestellt.
2 Zum Wechseln der Slave-Adresse die Mode Taste (Bild 1) drücken Betriebsartanzeige TTL blinkt.
3 Einstellrad (Bild 1) drehen und Slave-Adresse Ad2 einstellen. Einstellrad
in Pfeilrichtung drücken und Einstellung speichern.
☞ Im Remote-Betrieb wird der Motor-Zoom-Reflektor des mecablitz automatisch auf die Position 24 mm gestellt, um eine möglichst großflächige Ausleuchtung zu erzielen. Diese Reflektor-Position lässt sich manuell verändern (siehe Kapitel 12.).
• Bei Blitzbereitschaft des Slave-Blitzgerätes leuchtet dessen Blitzbereitschaftsanzeige und der AF-Messblitz blinkt. Zusätzlich kann ein akustisches
Signal (Beep) beim Erreichen der Blitzbereitschaft eingestellt werden (siehe
Kapitel 12.). Dies ist sinnvoll, wenn kein Sichtkontakt zum AF-Messblitz
bzw. der Blitzbereitschaftsanzeige besteht.
4 Am mecablitz-Controller auf der Kamera die Handauslösetaste drücken
und einen Probeblitz auslösen.
• Das Slave-Blitzgerät antwortet mit einem zeitverzögerten Blitz und zeigt
damit an, dass es betriebsbereit ist. Werden mehrere Slave–Blitzgeräte
gleichzeitig betrieben, so erfolgt die Quittierung aller Slave–Blitzgeräte zeitgleich. Gibt ein Slave-Blitzgerät keinen zeitverzögerten Blitz ab, so hat der
Foto-Sensor im Slave-Adapter keinen Lichtimpuls empfangen. Drehen Sie
den Sensor in Richtung Controller und wiederholen Sie Arbeitgang Nr. 4.
☞ Bei besonders kurzem Abstand zwischen Controller- und Slave-Blitz14
gerät kann u.U. die Kameraelektronik die Lichtabstrahlung unterbrechen, bevor der Slave seine Information erhalten hat. Vergrößern Sie
dann den Abstand zwischen Controller und Slave oder wählen eine
größere Blendenzahl und wiederholen Sie Arbeitsgang Nr. 4.
Ausschalten des Metz TTL–Remote–Betriebs:
• Am Controller die Taste Mode ( Bild 1) drücken und mit dem Einstellrad
(Bild 1) die Controller-Betriebsart abwählen.
• Am Slave–Blitzgerät:
Blitzgerät ausschalten, Slave Adapter SCA 3083 abnehmen und Blitzgerät
wieder einschalten.
7.2 Der drahtlose Metz A-Remote-Betrieb
☞ Der Metz Automatik-Remote-Betrieb kann mit System-, Standard-, mit
mechanischen und Mittelformat-Kameras durchgeführt werden. Bedingung für alle Kameras ist ein Synchronkontakt bzw. Anschluss und die
Ausrüstung des Blitzgerätes mit einem Standardfuß 301 bzw.
SCA–Adapter.
Die Belichtung wird dabei vom Foto-Sensor des Controller-Blitzgeräts
an der Kamera gesteuert.
Einstellvorgang für den Metz Automatik-Remote-Controller-Betrieb:
• mecablitz mit SCA-Adapter oder Standardfuß SCA 301 ausrüsten und einschalten.
• Kamera gemäß den Angaben ihrer Bedienungsanleitung in den manuellen
Betrieb schalten.
☞ Nicht alle Kameras unterstützen zusammen mit einem SCA-Adapter
den Automatik-Blitzbetrieb bzw. den Automatik-Remote-Blitzbetrieb
(siehe die Bedienungsanleitung der Kamera und des SCA-Adapters).
Wenn die Kamera den Automatik-Blitzbetrieb mit einem SCA-Adapter
nicht unterstützt, so rüsten Sie den mecablitz mit dem Standardfuß
SCA 301 aus! Vergessen Sie in diesem Fall nicht, die Kameraeinstellungen (ISO, Blende und Zoom-Position) von Hand am mecablitz einzustellen!
704 47 0099.A3
54 MZ-4i
01.02.2007
13:41 Uhr
Seite 15
• Kameraverschlusszeit auf 1/60 Sek. oder länger einstellen.
• mecablitz auf der Kamera mit dem Hauptschalter einschalten.
• Mode Taste (Bild 1) so oft drücken, bis im Display A angezeigt wird.
• Während die Betriebsartanzeige A blinkt, das Einstellrad (Bild 1) drehen und die Controller-Betriebsart Co mit der Adresse Ad1 oder Ad2 wählen. Sollte A nicht mehr blinken, dann einmal auf die Mode Taste drücken.
Zum Speichern dieser Einstellung das Einstellrad (Bild 1) kurz in
Pfeilrichtung drücken. Wird das Einstellrad nicht gedrückt, so wird nach 5 s
die gewählte Einstellung automatisch gespeichert, und A wird stetig (ohne
Blinken) zusammen mit Co und der Slave-Adresse Ad1 oder Ad2 angezeigt.
Einstellvorgang für den Metz Automatik-Remote-Slave-Betrieb:
Der Einstellvorgang ist der gleiche wie beim Metz TTL-Remote-Slave-Betrieb.
Der Slave-Blitz arbeitet auch beim A-Remote-Betrieb in der TTL-Betriebsart.
7.3 Beurteilung der Gesamtlichtverhältnisse im Remote-Betrieb
Zur Beurteilung der Gesamtlichtverhältnisse im A- und TTL-Remote–Betrieb
kann ein Einstelllicht aller beteiligten Blitzgeräte ausgelöst werden.
Zur Auslösung des Einstelllichts muss am 54 MZ-.. auf der Kamera die
Handauslösetaste (Bild 1) für diese Funktion programmiert werden.
Dazu die Taste Select (Bild 1) so oft hintereinander drücken, bis die
Betriebsartanzeige
leuchtet. Einstellrad (Bild 1) drehen und die
Funktion Einstelllicht auf On oder OFF stellen. Mit der Handauslösetaste (Bild 1) kann das Einstelllicht ausgelöst werden, siehe dazu auch Kapitel 12.
8. Aufhellblitzen bei Tageslicht
Der mecablitz kann auch zum Aufhellblitzen bei Tageslicht verwendet werden, um Schatten zu beseitigen und eine ausgeglichene Belichtung auch bei
Gegenlichtaufnahmen zu erreichen. Hierzu stehen verschiedene Möglichkeiten zur Auswahl.
8.1 Aufhellblitzen im TTL-Betrieb
Der mecablitz muss mit einem geeigneten SCA-Adapter ausgerüstet sein. Die
Kamera muss den TTL-Aufhell-Blitzbetrieb unterstützen.
• Mode Taste (Bild 1) so oft drücken, bis im Display TTL angezeigt wird.
Bei den meisten Kameratypen wird in der Vollprogramm-Automatik, Programmautomatik P und den Kreativ-Motiv-Programmen bei Tageslicht automatisch der Aufhellblitzbetrieb aktiviert (siehe dazu die Bedienungsanleitung
der Kamera und des SCA-Adapters). Die Kamera sorgt hierbei automatisch
für eine ausgewogene Belichtung zwischen Motiv und Bildhintergrund.
Darüber hinaus bieten einige Kameras ein spezielles Aufhellblitz-Programm,
das bei Bedarf vom Benutzer gezielt eingestellt werden kann. Die Aktivierung
erfolgt je nach Kameratyp an der Kamera oder am mecablitz (siehe dazu die
Bedienungsanleitung der Kamera und des SCA–Adapters).
Beispiel: Matrixgesteuertes Aufhellblitzen (nur für bestimmte Nikon-Kameras)
Der mecablitz muss mit dem Adapter SCA 3402 (Nikon) ausgerüstet sein!
Verschiedene Nikon-Kameras unterstützen den „Matrix-gesteuerten TTL-Aufhellblitzbetrieb“ (siehe Bedienungsanleitung der Kamera und des SCA-Adapters). Diese Blitzbetriebsart ist eine Unterbetriebsart des TTL-Blitzbetriebes.
Die Einstellung ist im Kapitel 3.1 beschrieben!
Beispiel: 3D Multisensor-Aufhellblitzen (nur für bestimmte Nikon-Kameras)
Der mecablitz muss mit dem Adapter SCA 3402 (Nikon) ausgerüstet sein!
Verschiedene Nikon-Kameras unterstützen den „3D-Multisensor-Aufhellblitzbetrieb“ (siehe Bedienungsanleitung der Kamera und des SCA-Adapters).
Diese Blitzbetriebsart ist eine Unterbetriebsart des TTL-Blitzbetriebes. Die
Einstellung wird im Kapitel 3.1 beschrieben!
8.2 Aufhellblitzen im Automatik-Betrieb
• mecablitz mit dem Hauptschalter (Bild 1) einschalten.
• Taste Mode (Bild 1) so oft drücken, bis im Display A blinkt. Einstellrad
(Bild 1) in Pfeilrichtung drücken und Einstellung damit speichern. Wird
das Einstellrad nicht gedrückt, wird die Einstellung nach ca. 5 s automa15
Ķ
704 47 0099.A3
Ķ
54 MZ-4i
01.02.2007
13:41 Uhr
Seite 16
tisch gespeichert. Das Symbol A erscheint nach dem Speichern stetig und
blinkt nicht mehr.
☞ Im Automatik-Blitzbetrieb erfolgt die Regelung des Blitzlichtes durch
den Foto-Sensor des mecablitz. Achten Sie darauf, dass die Gegenlichtquelle nicht direkt auf den Foto-Sensor des mecablitz scheint. Die
Elektronik des Blitzgerätes würde dadurch getäuscht!
Ermitteln Sie mit dem Kamerabelichtungsmesser oder einem externen Handbelichtungsmesser die notwendige Blende und die Verschlusszeit für eine normale Belichtung. Dabei ist darauf zu achten, dass die Kameraverschlusszeit
gleich oder länger der kürzesten Blitzsynchronzeit (kameratypabhängig;
siehe Kamerabedienungsanleitung) der Kamera ist.
Beispiel:
Ermittelte Blende = 8;
Ermittelte Kameraverschlusszeit = 1/60 Sek.
Blitzsynchronzeit der Kamera z. B. 1/100 Sek. (siehe Kameraanleitung).
Die beiden ermittelten Werte für Blende und Verschlusszeit können an der
Kamera eingestellt werden, da die Kameraverschlusszeit länger ist als die
Blitzsynchronzeit der Kamera.
Um eine abgestufte Aufhellung zu erreichen, um z. B. den Charakter der
Schatten zu erhalten, empfiehlt sich, die am Blitzgerät eingestellte Automatikblende um eine Stufe niedriger zu wählen als die an der Kamera eingestellte
Blendenzahl. Im Beispiel wurde die Kamerablende 8 eingestellt. Wir empfehlen Ihnen, die Blende am Blitzgerät auf 5,6 einzustellen.
Wenn der mecablitz mit einem Adapter SCA 3xx2 ausgerüstet ist und die
Kamera automatisch den Blendenwert an den mecablitz überträgt, so ist eine
manuelle Verstellung des Blendenwertes nicht möglich! In diesem Fall kann
im Automatik-Blitzbetrieb des mecablitz eine manuelle Blitzbelichtungskorrektur (siehe Kapitel 14.) eingestellt werden!
Eine manuelle Blitzbelichtungskorrektur im Automatik-Blitzbetrieb kann auch
dann eingestellt werden, wenn die Kamera keine Daten an den mecablitz
überträgt.
Eine zusätzliche Korrektur des Blendenwertes ist dann nicht mehr erforderlich!
16
Tipp:
Wenn möglich, messen Sie den Motiv-Hintergrund getrennt vom Motiv mit dem
Belichtungsmesser an. Ein Korrekturwert von -1EV (Blendenwert) bis -1 2/3 EV
für die Automatikblende am mecablitz führt erfahrungsgemäß zu den besten
Aufnahmeergebnissen im Aufhellblitzbetrieb!
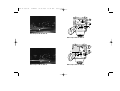
9. Der Stroboskop-Betrieb (Bild 6)
In dieser Betriebsart können mehrere Blitzbelichtungen auf einem Bild gemacht werden. Das ist besonders interessant bei Bewegungsstudien und
Effektaufnahmen (Bild 6). Beim Stroboskop-Betrieb werden mehrere Blitze mit
einer bestimmten Blitzfrequenz abgegeben. Die Funktion ist daher nur mit
einer Teillichtleistung von max. 1/4 oder weniger realisierbar.
Für eine Stroboskop-Aufnahme kann die Blitzfrequenz (Blitze pro Sekunde)
von 1 ... 50 Hz in 1 Hz-Schritten und die Anzahl der Blitze von 2 ... 50 in
1er Schritten gewählt werden.
In der Stroboskop-Betriebsart wird kein Wert für die Filmempfindlichkeit ISO
angezeigt! Beim Betrieb des mecablitz mit einem Adapter SCA 3xx2 und
einer Kamera, welche die Daten für die Filmempfindlichkeit automatisch an
das Blitzgerät überträgt, stellt der mecablitz die Filmempfindlichkeit automatisch ein (siehe Bedienungsanleitung der Kamera und des SCA-Adapters)!
Beim Betrieb des mecablitz mit einem Adapter SCA 3xx, dem Standardfuß
SCA 301 oder einer Kamera, die keine Daten für die Filmempfindlichkeit
überträgt, muss die Filmempfindlichkeit vor der Anwahl des Stroboskop-Betriebes in der Betriebsart TTL, A oder M eingestellt werden. Der mecablitz
übernimmt dann die Einstellung auch in den Stroboskop-Blitzbetrieb.
Die maximal mögliche Teillichtleistung stellt sich im Stroboskop–Betrieb automatisch ein. Sie können zur Erzielung von kurzen Blitzleuchtzeiten die Teillichtleistung manuell bis auf den Minimalwert von 1/256 einstellen. Im
LC–Display wird die zu den eingestellten Parametern gültige Entfernung angezeigt. Durch Verändern des Blendenwertes oder der Teillichtleistung kann
der angezeigte Entfernungswert an die Aufnahmeentfernung angeglichen
werden. An der Kamera ist der am Blitzgerät eingestellte Blendenwert zu
704 47 0099.A3
54 MZ-4i
01.02.2007
13:41 Uhr
Seite 17
übernehmen. Durch Verwendung von Filmen mit höherer ISO-Zahl kann die
Entfernungsreichweite vergrößert werden.
☞ Bei eingeschaltetem Zweitreflektor ist kein Stroboskop-Betrieb möglich.
Einstellungen für den Stroboskop-Betrieb (Bild 7):
• Kamera gemäß ihrer Bedienungsanleitung in die manuelle Betriebsart
schalten und passende Verschlusszeit wählen.
1 Blitzgerät mit einem SCA-Adapter oder Standardfuß 301 ausrüsten und
mit dem Hauptschalter (Bild 1) einschalten.
2 Mode Taste (Bild 1) so oft drücken, bis im Display
blinkt. Zum
Speichern der Betriebsart das Einstellrad (Bild 1) in Pfeilrichtung drükken. Wird das Einstellrad nicht gedrückt, so wird die Betriebsart nach 5 s
automatisch gespeichert. Das Symbol
blinkt nach dem Speichern nicht
mehr.
Stroboskop-Blitzbetrieb des mecablitz mit einem Adapter SCA 3xx2:
Wenn der mecablitz mit einem Adapter SCA 3xx2 und einer Kamera betrieben wird, welche die Daten für Filmempfindlichkeit ISO, Zoom-ReflektorPosition und Blende automatisch überträgt, sind keine weiteren Einstellungen
erforderlich. Der mecablitz stellt sich gemäß den übertragenen Kameradaten
ein. Die Blitzanzahl und die Blitzfrequenz müssen wie bei Punkt 3 und 4
(siehe unten) eingestellt werden.
☞ Beim Betrieb des mecablitz mit einer Kamera, welche Daten an den
mecablitz überträgt, können die Werte für Filmempfindlichkeit ISO
und die Blendenwerte nicht verändert werden.
Stroboskop-Blitzbetrieb mit einem SCA 3xx-Adapter, dem Standardfuß
SCA 301 oder einer Kamera, welche keine Daten überträgt (Bild 7):
In diesem Fall müssen die entsprechenden Werte für die Filmempfindlichkeit
ISO, die Zoom-Position des Reflektors und die Blende von Hand am mecablitz eingestellt werden. Dies ist für eine korrekte Blitzbelichtung unbedingt
erforderlich, da der mecablitz mit diesen Daten den Abstand vom Motiv zum
Blitzgerät für eine korrekte Blitzbelichtung errechnet und an seinem Display
anzeigt.
3 Blitzanzahl N einstellen. Dazu am Blitzgerät das Einstellrad (Bild 1) drehen, bis der Pfeil auf der oberen Position steht. Einstellrad (Bild 1)
drücken, durch Verdrehen die gewünschte Blitzanzahl N einstellen und
durch erneuten Druck auf das Einstellrad speichern.
4 Blitzfrequenz f(Hz) einstellen. Dazu das Einstellrad (Bild 1) gegen den
Uhrzeigersinn drehen, bis neben dem Pfeil f(Hz) steht. Einstellrad drücken,
durch Verdrehen die gewünschte Blitzfrequenz f(Hz) einstellen und durch
erneuten Druck auf das Einstellrad speichern.
☞ Als Entfernungswert wird der Abstand zum bewegten Objekt verwendet.
Um eine Überbelichtung des unbewegten Hintergrundes zu vermeiden,
sollte dieser Bildteil sehr dunkel oder sehr weit vom bewegten Objekt entfernt sein. Die besten Bildergebnisse werden bei geringem Umgebungslicht
erreicht.
Bei der Einstellung der Kamera ist auf eine ausreichend lange Verschlusszeit
zu achten.
In der Tabelle 3 sind die kürzesten Kameraverschlusszeiten für die N – f(Hz)
Kombinationen angegeben.
10. Die Belichtungskontrollanzeige
Die Belichtungskontrollanzeige o.k. (Bild 1) leuchtet nur auf, wenn die
Aufnahme im Automatik- oder TTL-Blitzbetrieb richtig belichtet wird/wurde.
Damit haben Sie im Automatik–Blitzbetrieb die Möglichkeit, besonders bei
indirektem Blitzen mit schwer vorausbestimmbaren Reflexionsverhältnissen
durch einen von Hand ausgelösten Probeblitz die passende Blende zu ermitteln.
Der Probeblitz kann mit der Handauslösetaste (Bild 1) ausgelöst werden,
sofern diese Taste nicht mit „Einstelllicht“ programmiert wurde (siehe Kap.
12.).
Bleibt die Belichtungskontrollanzeige o.k. (Bild 1) nach dem Probeblitz
dunkel, müssen Sie die nächstkleinere Blendenzahl einstellen oder die
Entfernung zur Reflexfläche bzw. zum Objekt verkleinern und den Probeblitz
wiederholen.
17
Ķ
704 47 0099.A3
Ķ
54 MZ-4i
01.02.2007
13:41 Uhr
Seite 18
Der so ermittelte Blendenwert ist auch an der Kamera einzustellen.
☞ Halten Sie beim Probeblitz das Blitzgerät mit Fotosensor (Bild 2)
wie bei der späteren Aufnahme.
Diese Möglichkeit kann auch für den TTL-Blitzbetrieb genutzt werden, ohne
dass Testaufnahmen gemacht werden müssen. Man stellt das Blitzgerät auf
Automatik–Blitzbetrieb ein und ermittelt, wie vorher beschrieben, den passenden Blendenwert durch Probeblitzen. Diesen ermittelten Blendenwert stellt
man an der Kamera ein und stellt danach das Blitzgerät wieder auf TTL–Blitzbetrieb zurück.
Dieses Verfahren funktioniert bei mittleren Brennweiten von ca. 28 mm bis
85 mm relativ genau. In Grenzfällen kann jedoch bei der anschließenden
TTL–Belichtung dennoch eine Unterbelichtung erfolgen. Die Belichtungskontrollanzeige o.k. bleibt in solchen Fällen nach dem Auslösen der Kamera
dunkel. Wiederholen Sie dann die Aufnahme mit der nächstkleineren einstellbaren Blendenzahl ( z.B. anstatt Blende 11 die Blende 8).
11. Der AF-Messblitz
☞ Der AF-Messblitz (Bild 2) des mecablitz kann nur von solchen
Autofokus-Kameras aktiviert werden, die den AF-Messblitz im
Blitzgerät unterstützen! Verschiedene Autofokus-Kameras unterstützen
nur ihren eigenen, eingebauten AF-Messblitz (siehe auch die
Bedienungsanleitung der Kamera). Der mecablitz muss mit einem
Adapter SCA 3xx2 ausgerüstet sein!
Beachten Sie bei der Wahl der Autofokus-Betriebsart der Kamera, dass die
meisten Kameras den AF-Messblitz nur in der Betriebsart „Single-AF“ bzw.
„One-Shot-AF“unterstützen (siehe auch die Bedienungsanleitung der Kamera)!
Sobald die Umlichtverhältnisse für eine automatische Fokussierung nicht
mehr ausreichen, wird von der Kameraelektronik der Autofokus-Messblitz
aktiviert. Der Autofokusscheinwerfer strahlt dabei ein Streifenmuster ab, welches auf das Motiv projiziert wird. Auf dieses Streifenmuster kann dann die
Autofokus-Kamera automatisch scharfstellen. Die Reichweite des AF-Messblitzes beträgt ca. 9 m (bei Standardobjektiv 1,7/50 mm). Zoomobjektive
18
mit geringer Anfangsblendenöffnung schränken die Reichweite des AF-Messblitzes zum Teil erheblich ein.
☞ Verschiedene Autofokus-Kameras haben neben dem zentralen
AF–Messfeld im Kamerasucher noch weitere AF-Messfelder. Das
Streifenmuster des AF-Messblitzes unterstützt nur den zentralen
AF–Sensor der Kamera. Unter Umständen muss an der Kamera der
zentrale AF-Sensor manuell eingestellt werden (siehe
Bedienungsanleitung der Kamera und des SCA-Adapters).
12. Sonderfunktionen
Die Sonderfunktionen des mecablitz können durch Drücken der Taste Select
(Bild 1) nacheinander aufgerufen und mit dem Einstellrad (Bild 1) einoder ausgeschaltet und gespeichert werden.
12.1 Alarm- / Beep-Funktion
Mit der Beep-Funktion kann sich der Benutzer einige Gerätefunktionen des
mecablitz akustisch mitteilen lassen. Dadurch kann sich der Fotograf voll auf
Motiv und Aufnahme konzentrieren und muss nicht auf zusätzliche optische
Statusanzeigen achten!
Die Beep-Funktion signalisiert akustisch ...
• das Erreichen der Blitzbereitschaft
• die richtige Blitzbelichtung
• die automatische Geräteabschaltung
• eine Fehlbedienung.
Akustische Meldung nach dem Einschalten des mecablitz:
• Ein kurzes (ca. 2 s) ununterbrochenes Beep-Signal nach dem Einschalten
zeigt die Blitzbereitschaft des mecablitz an.
Beep-Signale nach der Aufnahme:
• Ein kurzes (ca. 2 s) ununterbrochenes Beep-Signal direkt nach der Aufnahme zeigt an, dass die Aufnahme richtig belichtet wurde und die Blitzbereitschaft weiter fortbesteht. Erfolgt direkt nach der Aufnahme kein Beep-
704 47 0099.A3
54 MZ-4i
01.02.2007
13:41 Uhr
Seite 19
Ȅ
Ausschalten der Automatischen Geräteabschaltung:
1 Select Taste (Bild 1) so oft drücken, bis das Symbol
blinkt.
Einstellrad (Bild 1) drehen, bis „OFF“ angezeigt wird.
2 Zum Speichern dieser Einstellung das Einstellrad kurz in Pfeilrichtung
drücken. Wird das Einstellrad nicht gedrückt, so wird nach 5 s die gewählte Einstellung automatisch gespeichert. Im LC-Display des mecablitz wird
das Symbol
gelöscht.
Ȅ
Mit der Key-Funktion lassen sich die Tasten Mode, Select und das Einstellrad
gegen unbeabsichtigte Verstellung verriegeln.
Zum Verriegeln die Tasten Mode und Select für ca. 3 Sekunden gleichzeitig
drücken, bis im Display das Symbol
erscheint.
Zum Entriegeln die Tasten Mode und Select für ca. 3 Sekunden gleichzeitig
drücken, bis im Display das Symbol
erlischt.
Der mecablitz kann wahlweise so eingestellt werden, dass er 1 Minute oder
10 Minuten nach der letzten Aktion (Blitzaufnahme oder Einstellvorgang
bzw. Antippen des Kameraauslösers) automatisch abschaltet, um die Stromquellen gegen unbeabsichtigtes Entladen zu schützen.
Die zuletzt benutzte Betriebseinstellung bleibt nach der automatischen Abschaltung erhalten und steht nach dem Einschalten sofort wieder zur Verfügung.
Wenn der mecablitz mit einem SCA-Adapter SCA 3xx2 ausgerüstet ist, kann
er durch Antippen des Kameraauslösers wieder eingeschaltet werden.
Wenn der mecablitz mit einem SCA 3xx-Adapter oder dem Standardfuß
SCA 301 ausgerüstet ist, kann er durch Betätigen des Einstellrades wieder
eingeschaltet werden.
Einstellen der Automatischen Geräteabschaltung (Bild 8):
1 Am mecablitz die Select Taste (Fig. 1) so oft drücken, bis das Symbol
blinkt.
2 Einstellrad (Bild 1) drehen und die gewählte „Auto-Off-Zeit“ 1m (1 Minute)
oder 10m (10 Minuten) wählen. Zusätzlich wird im Display „On“ angezeigt.
Zum Speichern dieser Einstellung das Einstellrad (Bild 1) kurz in
Pfeilrichtung drücken. Wird das Einstellrad nicht gedrückt, so wird nach 5 s
die gewählte Einstellung automatisch gespeichert. Im LC-Display des mecablitz wird nach dem Speichern zusätzlich das Symbol
angezeigt.
Wenn
Sie
den
mecablitz
längere
Zeit
nicht
benutzen,
dann schalten
☞
Sie ihn mit dem Hauptschalter aus!
Ȅ
12.2 Ver- und Entriegeln der Bedienelemente (Key-Funktion)
12.3 Automatische Geräteabschaltung / Auto-Off (Bild 8)
Ȅ
Signal, wurde die Aufnahme unterbelichtet.
• Ein intermittierendes Beep-Signal direkt nach der Aufnahme ist das Zeichen für eine korrekt belichtete Blitzlicht-Aufnahme. Die Blitzbereitschaft
besteht aber erst wieder nach einem folgenden (3 s) Dauerton (Beep).
Beep-Signale bei den Einstellungen im Automatik-Blitzbetrieb „A“:
• Ein kurzes Beep-Signal als Alarm erfolgt, wenn im Automatik-Blitzbetrieb des
mecablitz die Blenden- und ISO-Einstellung zu einer Überschreitung des zulässigen Lichtregelbereiches führen würde. Die Automatik-Blende des mecablitz
wird automatisch auf den nächstliegenden zulässigen Wert geändert.
Einstellen der Beep-Funktion (Bild 9):
1 Select Taste (Bild 1) so oft drücken, bis das Symbol blinkt.
2 Einstellrad (Bild 1) drehen und die Beep-Funktion einschalten. Im
LC–Display des mecablitz erscheint „On“. Zum Speichern dieser Einstellung
das Einstellrad kurz in Pfeilrichtung drücken. Wird das Einstellrad nicht
gedrückt, so wird nach 5 s die gewählte Einstellung automatisch gespeichert.
Ausschalten der Beep-Funktion (Bild 9):
1 Select Taste (Bild 1) so oft drücken, bis das Symbol blinkt.
2 Einstellrad (Bild 1) drehen und die Beep-Funktion ausschalten. Im
LC–Display des mecablitz erscheint „OFF“. Zum Speichern dieser
Einstellung das Einstellrad kurz in Pfeilrichtung drücken. Wird das
Einstellrad nicht gedrückt, so wird nach 5 s die gewählte Einstellung automatisch gespeichert.
19
Ķ
704 47 0099.A3
Ķ
54 MZ-4i
01.02.2007
13:41 Uhr
Seite 20
12.4 Synchronisation auf den 2.Verschlussvorhang (REAR) (Bild 10/11)
Die Synchronisation auf den zweiten Verschlussvorhang (REAR) ist vor allem
bei Belichtungen mit langen Verschlusszeiten (länger als z.B. 1/30 Sekunde)
und bewegten Motiven mit eigener Lichtquelle von Vorteil, weil bewegte
Lichtquellen dann einen Lichtschweif hinter sich herziehen, anstatt ihn - wie
beim Synchronisieren auf den 1. Verschlussvorhang - vor sich aufzubauen.
Mit dem Synchronisieren auf den 2. Verschlussvorhang wird somit bei bewegten Lichtquellen eine „natürlichere“ Wiedergabe der Aufnahmesituation
bewirkt!
☞ Die REAR-Funktion ist nur anwähl- und einstellbar, wenn der mecablitz mit einem geeigneten SCA-Adapter ausgerüstet und auf einer
Kamera montiert ist, welche diese Betriebsart unterstützt. Die Kamera
muss zum Aufrufen und Einstellen dieser Funktion eingeschaltet sein!
Durch kurzes Antippen des Kameraauslösers muss mindestens einmal
ein Datenaustausch zwischen Kamera und mecablitz bzw. SCA–Adapter stattgefunden haben.
Ob Ihre Kamera bzw. der SCA-Adapter die REAR-Funktion unterstützen, entnehmen Sie der jeweiligen Bedienungsanleitung.
Bei einigen Kameras ist in bestimmten Betriebsarten die REAR-Funktion nicht
möglich. Die REAR-Funktion lässt sich dann nicht anwählen, bzw. die REARFunktion wird automatisch gelöscht. Siehe dazu die Bedienungsanleitung der
Kamera und des SCA-Adapters!
Einschalten der REAR-Funktion :
• Taste Select (Bild 1) so oft drücken, bis im LC-Display „REAR“ erscheint.
Mit dem Einstellrad „On“ einstellen. Das Einstellrad in Pfeilrichtung drücken
und damit die REAR-Funktion speichern. Wird das Einstellrad nicht
gedrückt, so wird die REAR-Funktion nach 5 s automatisch gespeichert.
Das Symbol „REAR“ für die Synchronisation auf den zweiten Verschlussvorhang bleibt nach der Einstellung im LC-Display des mecablitz angezeigt!
Tipp:
Verwenden Sie in dieser Betriebsart sicherheitshalber ein Stativ für Ihre
Kamera, um bei langen Verschlusszeiten Verwackelungen zu vermeiden!
20
☞ Diese Funktion nach der Aufnahme wieder ausschalten, da sich sonst
auch für die „normalen“ Blitzlichtaufnahmen u.U. in der Kamerabetriebsart P bzw. den Kreativprogrammen der Kamera durch unerwünscht lange Verschlusszeiten verwackelte Aufnahmen ergeben.
Die „REAR“-Funktion kann bei einigen Kameras selbst eingestellt werden. Am
mecablitz wird dann jedoch kein „REAR“ angezeigt.
Abschalten der REAR-Funktion:
• Taste Select (Bild 1) so oft drücken, bis im LC-Display das Symbol „REAR“
erscheint. Mit dem Einstellrad „OFF“ einstellen. Das Einstellrad in Pfeilrichtung drücken und damit speichern. Wird das Einstellrad nicht gedrückt, so
wird nach ca. 5 s automatisch gespeichert. Das Symbol „REAR“ am LC-Display des mecablitz wird gelöscht.
12.5 Einstelllicht / Modelling-Light
Beim Einstelllicht handelt es sich um ein Stroboskop-Blitzlicht mit hoher Frequenz. Bei einer Dauer von ca. 4 Sekunden entsteht der Eindruck eines
Quasi-Dauerlichtes. Mit dem Einstelllicht kann die Lichtverteilung und Schattenbildung bereits vor einer Aufnahme beurteilt werden.
Einschalten der Einstelllicht-Funktion:
• Taste Select (Bild 1) so oft drücken, bis im LC-Display das Symbol
blinkt. Mit dem Einstellrad „On“ einstellen. Das Einstellrad in Pfeilrichtung
drücken und damit die Einstelllicht-Funktion speichern. Wird das Einstellrad
nicht gedrückt, so wird die Einstelllicht-Funktion nach 5 s automatisch
gespeichert.
Am mecablitz blinkt bei Verwendung eines SCA 3xx2-Adapters die Blitzbereitschaftsanzeige (Bild 1). Damit wird angezeigt, dass die
Einstelllicht-Funktion aktiviert ist. Nach der Drücken der Taste löst der
mecablitz sein Einstelllicht aus.
Im Metz-REMOTE-Betrieb (TTL- und Automatik-REMOTE) wird durch das Einstelllicht des Controllers auch bei allen SLAVES gleichzeitig ein Einstelllicht
abgegeben (bei 40 MZ-... mit SCA 3080-Adapter ab Version M1 oder
einem 3083-Adapter).
704 47 0099.A3
54 MZ-4i
01.02.2007
13:41 Uhr
Seite 21
Ein vollgeladener Akkusatz (600 mAh) reicht für ca. 60 Auslösungen des
Einstelllichtes. Mit herkömmlichen Trockenbatterien ist der Einstelllicht-Betrieb
nicht sinnvoll, weil durch deren höheren Innenwiderstand die Energie für den
Blitzkondensator während der Lichtabgabe nicht schnell genug zur Verfügung gestellt werden kann.
Abschalten der Einstelllicht-Funktion:
• Taste Select (Bild 1) so oft drücken, bis im LC-Display das Symbol
blinkt. Mit dem Einstellrad „OFF“ einstellen. Das Einstellrad in Pfeilrichtung
drücken und damit die Einstelllicht-Funktion speichern. Wird das Einstellrad
nicht gedrückt, so wird die Einstelllicht-Funktion nach 5 s automatisch
gespeichert.
Am mecablitz leuchtet die Blitzbereitschaftsanzeige (Bild 1) wieder stetig.
12.6 Anpassung der Brennweite an das Kameraformat
Diese Funktion gibt dem Benutzer die Möglichkeit, die Anzeige der jeweiligen Reflektorposition des mecablitz dem Kameraformat anzupassen. Dadurch können die Objektiv-Brennweiten von Mittelformat-Kameras (4,5x6,
6x6, 6x7 und 6x9) oder APS-Kameras mit der Anzeige am mecablitz in
Übereinstimmung gebracht werden. Für das Kleinbild-Format (35 mm) steht
zusätzlich der Extended-Zoom-Betrieb zur Auswahl.
Beim Extended-Zoom-Betrieb wird die Brennweite des mecablitz um eine
Stufe gegenüber der Objektiv-Brennweite der Kamera reduziert! Die resultierende großflächigere Ausleuchtung sorgt in Räumen für zusätzliches Streulicht (Reflexionen) und damit für eine weichere Blitzlicht-Ausleuchtung.
Beispiel für den Extended-Zoom-Betrieb:
Die Objektiv-Brennweite an der Kamera beträgt 50 mm.
Im Extended-Zoom-Betrieb steuert der mecablitz auf die Reflektor-Position
35 mm.
Einstellungsvorgang für die Anpassung der Brennweite an das Kamerasystem (Bild 12):
1 Taste Select (Bild 1) so oft drücken, bis im Display „Zoom“ erscheint.
2 Durch Drehen des Einstellrades (Bild 1) die gewünschte Anpassung der
Brennweitenanzeige an das Kamerasystem vornehmen:
Anzeigen im Display:
Zoom ohne zusätzliche Anzeige = Einstellung für Kleinbildformat (= normale
Einstellung)
Auto Zoom mit folgenden zusätzlichen Anzeigen:
E
Extended-Zoom-Betrieb (nur für Kleinbild-Format-Kameras) (Bild 12)
APS
Anpassung an eine APS-Kamera
F1
Anpassung an eine Mittelformat-Kamera 4,5x6
F2
Anpassung an eine Mittelformat-Kamera 6x6, 6x7 oder 6x9
Hinweis für eingeschalteten Extended-Zoom-Betrieb
• Nach der Auswahl das Einstellrad (Bild 1) in Pfeilrichtung drücken, um
die Einstellung zu speichern. Wird das Einstellrad nicht gedrückt, so wird
die gewählte Einstellung nach 5 s automatisch gespeichert. Diese
Einstellung bleibt auch nach dem Ausschalten des mecablitz gespeichert.
Das
im LC-Display des Blitzgerätes nach dem Speichern weist darauf hin,
dass eine der oben genannten Brennweitenanpassungen eingestellt ist.
12.7 Blitzbelichtungsreihe „Fb“ (flash-bracketing) (Bild 13)
Mit dem mecablitz 54 MZ-.. kann in den Betriebsarten TTL und A eine Blitzbelichtungsreihe (flash-bracketing / flash-exposure-bracketing) ausgeführt
werden.
Eine Blitzbelichtungsreihe besteht aus drei aufeinanderfolgenden Blitzlichtaufnahmen mit unterschiedlichen Blitzbelichtungskorrekturwerten. Die erste
Blitzlichtaufnahme in der Belichtungsreihe wird ohne Korrekturwert ausgeführt. Die zweite Blitzlichtaufnahme wird mit Minuskorrektur und die dritte
Blitzlichtaufnahme mit Plus-Korrektur durchgeführt. Nach der dritten Aufnahme wird diese Betriebsart wieder automatisch gelöscht.
Blitzbelichtungsreihe „Fb“ im TTL-Blitzbetrieb:
Eine Blitzbelichtungsreihe im TTL-Betrieb kann nur dann erfolgen, wenn der
mecablitz mit einem geeigneten SCA-Adapter (SCA 3xx2) ausgerüstet ist und
die Kamera eine Blitzbelichtungskorrektur durch den mecablitz unterstützt.
21
Ķ
704 47 0099.A3
Ķ
54 MZ-4i
01.02.2007
13:41 Uhr
Seite 22
Wenn die Kamera eine Blitzbelichtungskorrektur nicht unterstützt, so kann am
mecablitz zwar ein Korrekturfaktor für die Blitzbelichtungsreihe eingestellt
werden, die Kamera belichtet die Aufnahmen jedoch ohne Korrektur. Beachten Sie hierzu die Bedienungsanleitung der Kamera und des SCA-Adapters!
Blitzbelichtungsreihe „Fb“ im A-Blitzbetrieb:
Für eine Blitzbelichtungsreihe im A-Betrieb genügt bereits die Ausrüstung des
mecablitz mit einem Standardfuß SCA 301. Es ist jedoch auch durchaus möglich, eine Blitzbelichtungsreihe im Automatik-Blitzbetrieb mit einem SCA-Adapter durchzuführen!
☞ Bei einigen Kameras ist eine Blitzbelichtungsreihe im A-Blitzbetrieb
technisch nicht möglich!
Bei einigen Kameras ist eine Blitzbelichtungsreihe im Automatik-Blitzbetrieb
technisch nicht möglich, wenn der mecablitz nicht mit einem Standardfuß
SCA 301 betrieben wird!
Siehe hierzu die Bedienungsanleitung der Kamera bzw. des SCA-Adapters.
Einschalten einer Blitzbelichtungsreihe “Fb” (Bild 13):
1 Taste Select (Bild 1) so oft drücken, bis im Display „Fb“ erscheint.
2 Durch Drehen des Einstellrades (Bild 1) den gewünschten
Korrekturfaktor für die Blitzbelichtungsreihe anwählen. Im Display blinkt
währenddessen „EV“ und der Wert für den Korrekturfaktor. Die Einstellung
durch Drücken des Einstellrades in Pfeilrichtung speichern. Wenn das
Einstellrad nicht gedrückt wird, so wird die Einstellung nach ca. 5 s automatisch gespeichert.
Im Display des mecablitz erscheint „Fb 1“. Dies weist auf die erste Aufnahme
der Blitzbelichtungsreihe hin. Die folgende Aufnahme wird ohne Korrekturfaktor ausgeführt.
Nach der ersten Aufnahme wechselt die Displayanzeige auf „Fb 2”. Im Display erscheint zusätzlich „EV“ und der Minus-Korrekturfaktor, mit dem die
zweite Aufnahme erfolgt.
Nach der zweiten Aufnahme wechselt die Displayanzeige auf „Fb 3“. Im
Display wird außerdem der Plus-Korrekturfaktor für die dritte Aufnahme
22
angezeigt.
Nach der dritten Aufnahme werden die „Fb“-Anzeige, sowie die „EV“-Anzeige und der Wert für den Korrekturfaktor gelöscht.
☞ Für eine weitere Blitzbelichtungsreihe muss der Einstellvorgang zum
Einschalten einer Blitzbelichtungsreihe wiederholt werden.
Soll die Blitzbelichtungsreihe vorzeitig abgebrochen werden, so schalten Sie
den mecablitz mit dem Hauptschalter kurzzeitig aus.
12.8 Zurück zur Grundeinstellung
Der mecablitz kann mit einem Tastendruck von mindestens 3 Sekunden auf
die Mode Taste (Bild 1) zu einer Grundeinstellung zurückgesetzt werden.
Die eingestellte Betriebsart bleibt erhalten.
Folgende Einstellungen werden gelöscht:
• TTL-Unterbetriebsarten „HSS“, „ETTL“, „3D“ und Remote-Betriebsarten
• manuelle Unterbetriebsart „HSS“
• manuell eingegebene Teillichtleistungen
• Flash-Bracketing “Fb”
• Brennweitenanpassungen „E“, „APS“, „F1“ und „F2“
• Synchronisation auf den 2. Vorhang (REAR)
• Einstelllicht-Funktion
• Verriegelung der Bedienelemente.
Folgende Einstellungen werden gesetzt:
• automatische Geräteabschaltung nach 10 Minuten
• „Beep-Funktion“ ein
• „AutoZoom“ ein.
704 47 0099.A3
54 MZ-4i
01.02.2007
13:41 Uhr
Seite 23
12.9 Motor-Zoom-Reflektor
Wenn der mecablitz mit einem SCA-Adapter 3xx2 ausgerüstet ist und mit
einer Kamera betrieben wird, welche die Daten für die Objektiv-Brennweite
an das Blitzgerät meldet, passt sich seine Zoom-Reflektor-Position automatisch der Objektivbrennweite an. Im Display des mecablitz wird „AutoZoom“
angezeigt.
Wird der mecablitz mit einem SCA 3xx-Adapter oder dem Standardfuß
SCA 301 oder einer Kamera ohne Möglichkeit der Übertragung der Brennweitendaten benutzt, muss die Zoom-Position des Blitzreflektors manuell eingestellt werden:
• Einstellrad (Bild 1) drehen, bis sich das Pfeilsymbol auf dem Display
neben „Zoom“ befindet.
• Einstellrad (Bild 1) in Pfeilrichtung drücken. Das Pfeilsymbol blinkt.
• Einstellrad drehen und die gewünschte Reflektoreinstellung wählen.
• Zum Speichern das Einstellrad (Bild 1) in Pfeilrichtung drücken. Wird
das Einstellrad nicht gedrückt, so wird die Einstellung nach 5 s automatisch
gespeichert! Das Pfeilsymbol blinkt dann nicht mehr.
Wenn Sie ein Zoom-Objektiv benutzen und nicht unbedingt immer die volle
Leitzahl und Reichweite des mecablitz benötigen, können Sie die Zoom-Reflektor-Position auf der Anfangsbrennweite des Zoomobjektives belassen.
Damit ist garantiert, dass Ihr Bild immer vollständig ausgeleuchtet wird. Sie
sparen sich damit die fortwährende Anpassung an die Objektivbrennweite.
Beispiel:
Sie benutzen ein Zoom-Objektiv mit einem Brennweitenbereich von 28 mm
bis 80 mm. In diesem Beispiel stellen Sie die Position des Zoom-Reflektors des
mecablitz auf 28 mm!
Verändern der Zoom-Position bei SCA 3xx2-Adapter und einer Kamera,
die Daten überträgt:
Die Zoom-Position der Reflektors kann auch beim Betrieb des mecablitz mit
einem SCA 3xx2-Adapter und einer Kamera, die Daten überträgt, verändert
werden:
Anwahl der gewünschten Zoom-Position siehe oben.
Nach dem Speichern wird statt „AutoZoom“ nur noch „Zoom“ angezeigt.
Die gewählte Zoomposition des Reflektors blinkt im Display des mecablitz.
Dies weist darauf hin, dass die gewählte Zoomposition von Hand verstellt
wurde.
Rückstellung auf „AutoZoom“-Betrieb:
• Einstellrad (Bild 1) drehen, bis sich das Pfeilsymbol auf dem Display
neben „Zoom“ befindet.
• Einstellrad in Pfeilrichtung drücken. Das Pfeilsymbol blinkt.
• Einstellrad drehen, bis auf dem Display „AutoZoom“ erscheint!
• Zum Speichern das Einstellrad in Pfeilrichtung drücken. Wird das Einstellrad nicht gedrückt, so wird die Einstellung nach 5 s automatisch gespeichert! Das Pfeilsymbol blinkt dann nicht mehr.
☞ Das Blitzgerät muss sich dabei auf der eingeschalteten Kamera befinden!
12.10 m - ft Umschaltung
• mecablitz mit dem Hauptschalter (Bild 1) ausschalten.
• Taste Select (Bild 1) drücken und gleichzeitig den Hauptschalter (Bild
1) auf “On” stellen.
23
Ķ
704 47 0099.A3
Ķ
54 MZ-4i
01.02.2007
13:41 Uhr
Seite 24
13. Weitwinkelstreuscheibe
Weitwinkelstreuscheibe (Bild 2) unter dem Hauptreflektor nach vorne bis
zum Anschlag herausziehen und loslassen. Der Hauptreflektor fährt automatisch auf die Zoomposition 20 mm. Die Weitwinkelstreuscheibe klappt automatisch nach oben. Am LC–Display werden die Entfernungsangaben und der
Zoomwert korrigiert.
Zum Einschieben die Weitwinkelstreuscheibe (Bild 2) um 90° nach unten
klappen und vollständig einschieben.
Beim Einsatz der Weitwinkelstreuscheibe sowie bei Reflektorvorsätzen wie
Farbfilter, Graufilter, Mecabounce etc. dürfen keine Betriebsarten verwendet
werden, die mit Messvorblitz oder Kurzzeitsynchronisation (HSS) arbeiten.
14. Manuelle Blitzbelichtungskorrekturen
☞ Eine manuelle Blitzbeleuchtungskorrektur ist nur unter Verwendung
eines SCA 3xx2-Adapters möglich.
☞ Im A-Betrieb ist eine manuelle Blitzbeleuchtungskorrektur mit einem
SCA 3xx und SCA 3xx2-Adapter möglich.
Die Blitzbelichtungsautomatik des mecablitz und der meisten Kameras ist auf
einen Reflexionsgrad des Motives von 25 % (durchschnittlicher Reflexionsgrad von Blitzmotiven) abgestimmt. Ein dunkler Hintergrund, der viel Licht
absorbiert, oder ein heller Hintergrund, der stark reflektiert (z.B. Gegenlichtaufnahmen), können zu Über- bzw. Unterbelichtung des Motivs führen.
Um den oben genannten Effekt zu kompensieren, kann die Blitzbelichtung
manuell mit einem Korrekturwert der Aufnahmesituation angepasst werden.
Die Höhe des Korrekturwertes ist vom Kontrast zwischen Motiv und Bildhintergrund abhängig! Am mecablitz können im TTL–Blitzbetrieb und A-Blitzbetrieb manuelle Korrekturfaktoren für die Blitzbelichtung von -3 EV (Blendenwerte) bis + 3EV (Blendenwerte) in Drittel-Stufen eingestellt werden.Viele
Kameras haben ein Einstellelement für Belichtungskorrekturen, welches auch
bei TTL-Blitzbetrieb verwendbar ist.
Beachten Sie die Angaben in der Kamerabedienungsanleitung oder des
24
SCA-Adapters.
Eine Belichtungskorrektur durch Verändern der Objektivblende ist hier nicht
möglich, da die Belichtungsautomatik der Kamera die geänderte Blende
wiederum als normale Arbeitsblende betrachtet.
☞ Dunkles Motiv vor hellem Hintergrund: Positiver Korrekturwert (etwa
1 bis 2 Blendenwerte EV)
Helles Motiv vor dunklem Hintergrund: Negativer Korrekturwert (etwa
-1 bis -2 Blendenwerte EV)
Beim Einstellen eines Korrekturwertes kann sich die Reichweitenanzeige im
LC-Display des mecablitz ändern und dem Korrekturwert angepasst werden
(abhängig von Kameratyp und SCA-Adapter)!
Einstellen einer manuellen Blitzbelichtungskorrektur:
• Der mecablitz arbeitet im TTL-Blitzbetrieb oder im A–Blitzbetrieb.
• Einstellrad (Bild 1) drehen, bis das Symbol „EV“ am LC-Display
erscheint. Das Pfeil-Symbol neben „EV“ zeigt, dass die Position zum
Einstellen eines Korrekturwertes für die Blitzbelichtung angewählt ist.
• Einstellrad in Pfeilrichtung drücken. Das Pfeilsymbol neben „EV“ blinkt.
• Durch Drehen des Einstellrades einen geeigneten Korrekturwert einstellen.
Der Korrekturwert wird im LC–Display des mecablitz angezeigt.
• Zum Speichern des Korrekturwertes das Einstellrad in Pfeilrichtung drücken. Wird das Einstellrad nicht gedrückt, so wird der Korrekturwert nach
5 s automatisch gespeichert. Das Pfeilsymbol neben „EV“ hört auf zu blinken. Der eingestellte Korrekturwert wird im LC–Display des mecablitz angezeigt.
Abschalten einer manuellen Blitzbelichtungskorrektur:
• Das Einstellrad (Bild 1) drehen, bis sich am LC–Display das Pfeilsymbol
neben „EV“ befindet.
• Einstellrad drücken. Das Pfeilsymbol neben „EV“ blinkt.
• Das Einstellrad drehen, bis die Anzeige des Korrekturwertes im Display verlischt.
• Einstellrad in Pfeilrichtung drücken und damit die Einstellung speichern.
704 47 0099.A3
54 MZ-4i
01.02.2007
13:41 Uhr
Seite 25
Wird das Einstellrad nicht gedrückt, so wird der Korrekturwert nach 5 s
automatisch gespeichert. Das Pfeilsymbol neben „EV“ hört auf zu blinken.
☞ Eine manuelle Blitzbelichtungskorrektur kann nur dann erfolgen,
wenn die Kamera diese Funktion unterstützt! Wenn die Kamera diese
Funktion nicht unterstützt, so kann am mecablitz zwar ein Korrekturwert eingestellt werden, dieser wird jedoch nicht wirksam!
Die Übertragung eines Korrekturwertes für die Blitzbelichtung vom mecablitz
zur Kamera ist nur im TTL–Betrieb mit einem Adapter SCA 3xx2 möglich, der
diese Funktion unterstützt!
Bei verschiedenen Kameras muss eine manuelle Blitzbelichtungskorrektur an
der Kamera selbst eingestellt werden (siehe Bedienungsanleitung der Kamera). In diesem Fall wird am mecablitz kein Korrekturwert angezeigt.
Bei verschiedenen Kameras kann eine manuelle Blitzbelichtungskorrektur an
der Kamera oder am Blitzgerät eingestellt werden. Welche Einstellung Vorrang hat, entnehmen Sie der Bedienungsanleitung der Kamera oder des
SCA-Adapters.
15. Wartung und Pflege
Entfernen Sie Schmutz und Staub mit einem weichen, trockenen oder siliconbehandelten Tuch. Verwenden Sie keine Reinigungsmittel - die Kunststoffteile
könnten beschädigt werden.
Formieren des Blitzkondensators
Der im Blitzgerät eingebaute Blitzkondensator erfährt eine physikalische
Veränderung, wenn das Gerät längere Zeit nicht eingeschaltet wird. Aus diesem Grund ist es notwendig, das Gerät im vierteljährlichen Abstand für ca.
10 Min. einzuschalten. Der Akku muss dabei so viel Energie liefern, dass die
Blitzbereitschaft längstens 1 Min. nach dem Einschalten aufleuchtet.
16. Technische Daten
Ķ
max. Leitzahl bei ISO 100/21°, Zoom 105 mm:
im Metersystem: 54
im Feet-System: 177
12 Automatikblenden bei ISO 100/21°:
1 - 1,4 - 2 - 2,8 - 4 - 5,6 - 8 - 11 - 16 - 22 - 32 - 45
Blitzleuchtzeiten:
• ca. 1/200 . . . 1/20.000 Sekunde
• im M-Betrieb ca. 1/200 Sek. bei voller Lichtleistung
• bei 1/2 Lichtleistung ca. 1/600 Sekunde
• bei 1/4 Lichtleistung ca. 1/1400 Sekunde
Fotosensor-Messwinkel: ca. 25°
Farbtemperatur:
ca. 5600 K
Filmempfindlichkeit:
ISO 6 bis ISO 6400
Synchronisation:
Niederspannungszündung
ca. Blitzanzahlen:
60* mit NC-Akku (600 mAh)
180* mit Hochleistungs Alkali-Mangan-Batterien
Blitzfolgezeit:
• mit NC-Akku
5 Sek. (im M-Betrieb)*
0,1 . . 5 Sek. (im A-/TTL-Betrieb)
• mit Hochleistungs-Alkali-Mangan-Batterien
6 Sek. (im M-Betrieb)*
0,1 . . 6 Sek (im A-/TTL-Betrieb)
* bei voller Lichtleistung
25
704 47 0099.A3
Ķ
54 MZ-4i
01.02.2007
13:41 Uhr
Seite 26
Schwenkbereiche und Raststellungen des Reflektors:
nach oben/unten
60° 75° 90° / -7°
gegen den Uhrzeigersinn 30° 60° 90° 120° 150° 180°
im Uhrzeigersinn
30° 60° 90°
Abmaße ca. in mm (B x H x T):
75 x 125 x 108
Gewicht:
Blitzgerät mit Stromquellen:
ca. 480 Gramm
Auslieferungsumfang:
Blitzgerät, Tasche T54, Standardfuß 301*, Abdeckplatte*,
Bedienungsanleitung, SCA 300/3002 Tabelle.
* (nicht bei Set-Geräten)
Änderungen und Irrtümer vorbehalten !
17. Fachchinesisch
• Belichtungskontrollanzeige im Kamerasucher
Im Automatik- und TTL-Blitzbetrieb wird die richtige Belichtung oder die
Unterbelichtung des Films bei vielen Kameras durch ein Signal im Sucher angezeigt.
• Automatische Blitzsynchronzeitsteuerung
Gleichzeitig mit Eintreten der Blitzbereitschaft wird bei den meisten Systemkameras die Verschlusszeit aus der eingestellten Betriebsart automatisch
auf die Blitzsynchronzeit umgeschaltet. Bei manchen Kameras bleiben längere Verschlusszeiten erhalten. Erlischt die Blitzbereitschaftsanzeige nach
einem ausgelösten Blitz oder wird das Blitzgerät ausgeschaltet, stellt die
Kamera automatisch die vorherige Verschlusszeit wieder ein.
• Zündungssteuerung
Ergibt sich für die am Objektiv eingestellte Blende mit der vorhandenen
Beleuchtung bereits eine Verschlusszeit, die gleich oder kürzer als die Blitzsynchronzeit ist, so wird bei der Auslösung der Kamera der Blitz nicht gezündet. Die Aufnahme erfolgt dann mit dem vorhandenen Umlicht, dadurch wird eine Überbelichtung vermieden.
26
• Wahlweise Synchronisation auf den 1. oder 2. Verschlussvorhang
(siehe Bild 10 und 11)
Dabei werden zwei Möglichkeiten für die Blitzsynchronisation geboten:
- auf den Moment der erfolgten Öffnung des ersten Verschlussvorhangs oder
- kurz vor Ablauf des zweiten Verschlussvorhangs.
Am jeweiligen SCA-Adapter wird die gewünschte Synchronisation vorgewählt. Die Synchronisation auf den zweiten Verschlussvorhang ist vor allem
bei Belichtungen mit langer Verschlusszeit und bewegten Motiven mit eigener Lichtquelle von Vorteil.
• Autofokus-Messblitz
Sobald die Umlichtverhältnisse für eine automatische Fokussierung nicht
mehr ausreichen, wird von der Kameraelektronik der Autofokus-Messblitz
aktiviert. Der Autofokus-Scheinwerfer strahlt dabei ein Streifenmuster ab,
das auf das Motiv projiziert wird. Auf dieses Streifenmuster kann dann die
Kamera automatisch fokussieren. Bei Verwendung eines SCA 3xx-Autofokus-Adapters wird ausschließlich der im Adapter eingebaute AutofokusMessblitz aktiviert.
• Programm-Blitzautomatik
Einige Kameras mischen in Stellung „Programm“ Umlicht- und Blitzbeleuchtung. Die Kamera stellt automatisch eine Zeit-Blenden-Kombination
ein und steuert den Blitz im TTL-Modus. Damit ist eine sehr einfache Bedienung der Gerätekombination möglich.
• TTL-Aufhellblitzsteuerung
Einige Systemkameras bieten neben der TTL-Blitzsteuerung noch die Möglichkeit der TTL-Aufhellblitzsteuerung. Diese Betriebsart wird speziell für
Tageslichtaufnahmen zum Aufhellen der Schatten oder bei Gegenlichtaufnahmen benötigt. Die Kamera steuert aufgrund der Sensormessung im
Kamerainneren und der nachfolgenden Auswertung durch die Kameraelektronik immer die richtige Blitzlichtmenge für eine ausgewogene Belichtung. Dabei wird für Aufhellaufnahmen automatisch von der Kamera
eine Blitzbelichtungskorrektur durchgeführt.
704 47 0099.A3
54 MZ-4i
01.02.2007
13:41 Uhr
Seite 27
• TTL-Blitzbelichtungskorrektur
Bei bestimmten Aufnahmesituationen besteht die Möglichkeit, dass die
Sensormessung im Kamerainneren getäuscht wird. Dies tritt vor allem bei
sehr dunklen Motiven vor besonders hellem Hintergrund (Motiv unterbelichtet) oder besonders hellen Motiven vor sehr dunklem Hintergrund (Motiv
überbelichtet) auf. Mit Hilfe der Blenden- und Verschlusszeitensteuerung,
Filmempfindlichkeitsänderung oder der +/- Korrektur an der Kamera kann
eine normale Belichtungskorrektur durchgeführt werden. Dabei werden
jedoch sämtliche Anteile an einer Aufnahme beeinflusst. Aus diesem Grund
ist bei einigen Kameras eine spezielle Blitzbelichtungskorrektur möglich.
Mit dieser Blitzbelichtungskorrektur bleibt die Gesamtbelichtung erhalten
und lediglich die dunkleren, abgeschatteten Partien werden mit dem Blitzgerät aufgehellt. Weitere Einzelheiten können Sie dazu aus der jeweiligen
Bedienungsanleitung des Adapters und der Kamera entnehmen.
• Vorblitz gegen rote Augen (nur mit Nikon SCA 3402 Adapter)
Beim Rote-Augen-Effekt handelt es sich grundsätzlich um einen physikalischen Effekt. Dieser Effekt tritt immer dann auf, wenn die aufzunehmende
Person mehr oder weniger voll in die Kamera blickt, das Umlicht relativ
dunkel ist und das Blitzgerät sich auf oder unmittelbar neben der Kamera
befindet. Das Blitzgerät hellt dabei den Augenhintergrund auf, die blutgefüllte Netzhaut wird durch die Pupille hindurch sichtbar und von der Kamera als roter Fleck oder Punkt aufgezeichnet.
Die Funktion zur Verringerung des Rote Augen-Effektes bringt hier eine
deutliche Verbesserung. Bei Verwendung dieser Funktion zündet der mecablitz vor dem Verschlussablauf und vor den Messblitzen für den Multi-Sensor drei sichtbare, schwache Vorblitze (falls mit Blitzgerät bzw. Kamera
möglich), denen der Hauptblitz folgt.
Diese drei Vorblitze führen dazu, dass sich die Pupillen der Personen weiter schließen und damit den Effekt der roten Augen verringern. Diese Funktion steht mit jedem Belichtungsprogramm zur Verfügung. Weitere Einzelheiten siehe Kamera-Bedienungsanleitung.
• TTL-HSS-Betrieb
Diese Steuerung ermöglicht den Blitzlichteinsatz auch bei kürzeren Verschlusszeiten als die Kamerasynchronzeit. Interessant bei Portraitaufnahmen in sehr hellem Umgebungslicht, wenn bei einer weit geöffneten Blende
die Schärfentiefe begrenzt werden soll.
• ETTL-Blitzbetrieb (nur mit Canon SCA 3102)
Bei dieser Betriebsart werden unmittelbar vor der eigentlichen Aufnahme
die Reflexionseigenschaften des Motivs durch einen Vorblitz ermittelt.
• ETTL-HSS-Betrieb
Diese Steuerung ermöglicht den Blitzlichteinsatz auch bei kürzeren Verschlusszeiten als der Kamerasynchronzeit.
• 3D-TTL-Blitzsteuerung (nur mit Nikon SCA 3402 möglich)
Bei dieser Betriebsart werden unmittelbar nach dem Druck auf den Auslöser und vor dem Verschlussablauf kaum sichtbare Messblitze ausgesandt,
die der Kamera Informationen über Helligkeit und Kontrast geben.
18. Sonderzubehör
☞ Für Fehlfunktionen und Schäden am mecablitz, verursacht durch die
Verwendung von Zubehör anderer Hersteller, wird keine Gewährleistung übernommen.
• Adapter des Systems SCA-3xx
für den Blitzbetrieb mit Systemkameras. Siehe separate Bedienungsanleitung.
• Adapter des Systems SCA-3xx2
für den Blitzbetrieb mit Systemkameras mit digitaler Datenübertragung der
SCA-Funktionen. Funktionserweiterung gegenüber dem SCA-3xx-System.
Siehe separate Bedienungsanleitung.
• Farb-Filter-Set 44-32
(Bestellnr. 00004432A)
umfasst 4 Farbfilter für Effektbeleuchtung und einen klaren Filter zur Aufnahme von Farbfolien beliebiger Farbe.
27
Ķ
704 47 0099.A3
Ķ
54 MZ-4i
01.02.2007
13:41 Uhr
Seite 28
• Mecabounce 44-90
(Bestellnr. 000044900)
Mit diesem Diffusor erreichen Sie auf einfachste Weise eine weiche Ausleuchtung. Die Wirkung ist großartig, weil die Bilder einen softartigen Effekt erhalten. Die Gesichtsfarbe von Personen wird natürlicher wiedergegeben. Die Grenzreichweiten verringern sich entsprechend dem Lichtverlust
um den Faktor 2.
• Power-Pack P50
(Bestellnr. 00012950A)
für hohe Blitzzahlen und kurze Blitzfolgezeiten (etwa 300 Vollblitze).
Verbindungskabel V54-50 (Bestellnr. 000054505) mitbestellen.
• Power Pack P40
(Bestellnr. 000129405)
Durch wesentlich höhere Kapazität gegenüber herkömmlichen NC-Akkus
der Größe IEC KR 15/51 (Mignon) wird eine größere Blitzanzahl erreicht.
Verbindungskabel V54-40 (Bestellnr. 000054400) mitbestellen.
• Reflexschirm 54-23
(Bestellnr. 000054236)
mildert durch sein weiches, gerichtetes Licht harte Schlagschatten.
• Kameraschiene 40-36/2
(Bestellnr. 000040363)
zum seitlichen Anbringen des Blitzgerätes an der Kamera.
• Slave Adapter 3083
(Bestellnr. 000330838)
ermöglicht die drahtlose TTL-Blitzsteuerung mit mecablitz 54 MZ-.. und
70 MZ-4.
28
19. Hilfe bei Störungen
(Ca)= nur Canon-System;
Betrieb des mecablitz mit SCA 3102
(Mi)= nur Minolta-System;
Betrieb des mecablitz mit SCA 3302
(Ni)= nur Nikon-System;
Betrieb des mecablitz mit SCA 3402
(Pe)= nur Pentax-System;
Betrieb des mecablitz mit SCA 3702
Sollte es einmal vorkommen, dass im LC-Display unsinnige Anzeigen erscheinen oder das Blitzgerät funktioniert nicht so, wie es in den einzelnen
Betriebsarten soll, so verfahren Sie wie folgt:
• Schalten Sie das Blitzgerät mit dem Hauptschalter aus.
• Nehmen Sie die Batterien oder Akkus aus dem Blitzgerät heraus.
• Schalten Sie das Blitzgerät für ca. 1 Sekunde ein und wieder aus.
• Legen Sie die gebrauchten oder neue Batterien oder Akkus wieder ein.
Am mecablitz lässt sich die Synchronisation auf den zweiten Verschlussvorhang (REAR-Betrieb) nicht einstellen.
• Die Synchronisation auf den zweiten Verschlussvorhang (REAR) lässt sich nur
dann am mecablitz einstellen, wenn dieser mit einem geeigneten SCA 3xx2Adapter ausgerüstet (siehe SCA-Adapter Bedienungsanleitung) und auf einer
eingeschalteten Kamera montiert ist. Es muss mindestens einmal ein Datenaustausch zwischen Kamera und SCA-Adapter stattgefunden haben (dazu
reicht es, den Kameraauslöser kurz anzutippen, ohne auszulösen). Die Kamera muss die Synchronisation auf den zweiten Verschlussvorhang unterstützen (siehe Kamera- und SCA-Adapter-Bedienungsanleitung)!
• (Ni) Am mecablitz ist der Nikon "3D-Multisensor-Aufhellblitz" aktiviert; im
Display wird das Symbol
angezeigt. Der Nikon 3D-Multisensor-Aufhellblitz lässt sich nicht mit dem REAR-Betrieb kombinieren.
Mögliche Abhilfe: 3D-Betrieb erst deaktivieren, dann REAR einschalten.
704 47 0099.A3
54 MZ-4i
01.02.2007
13:41 Uhr
Seite 29
• (Ni) An der Nikon-Kamera ist die Vorblitzfunktion zur Verringerung des
Rote-Augen-Effektes aktiviert. Im LC–Display des mecablitz wird das Symbol
angezeigt. Die Vorblitzfunktion lässt sich nicht mit dem REAR-Betrieb kombinieren.
Mögliche Abhilfe: Erst Rote-Augen-Vorblitzfunktion an der Kamera deaktivieren, dann REAR anwählen.
• (Mi) Bei Minolta-Kameras muss die Synchronisation auf den zweiten Verschlussvorhang (REAR-Betrieb) grundsätzlich an der Kamera selbst eingestellt werden! Am mecablitz erfolgt keine Anzeige für die Synchronisationsart! Ob der REAR-Betrieb mit der jeweiligen Kamera möglich ist, sowie
den erforderlichen Einstellvorgang entnehmen Sie der Kamerabedienungsanleitung.
Am mecablitz lässt sich der TTL-HSS-Blitzbetrieb bzw. E-TTL-HSS-Blitzbetrieb
nicht einstellen.
Der (E-) TTL-HSS-Blitzbetrieb (Kurzzeitsynchronisation) ist z. Zt. nur mit dem
mecablitz 54 MZ-.. möglich!
• Der (E-) TTL-HSS-Blitzbetrieb lässt sich nur dann am mecablitz einstellen,
wenn dieser mit einem geeigneten SCA 3xx2-Adapter ausgerüstet (siehe
SCA-Adapter-Bedienungsanleitung) und auf einer eingeschalteten Kamera
montiert ist. Es muss mindestens einmal ein Datenaustausch zwischen Kamera und SCA-Adapter stattgefunden haben (dazu reicht es, den Kameraauslöser kurz anzutippen, ohne auszulösen). Die Kamera muss den (E-)
TTL-HSS-Blitzbetrieb in der gewählten Blitzbetriebsart (Manuell M oder TTL)
unterstützen (siehe Kamera- und SCA-Adapter-Bedienungsanleitung)!
• Eine Kombination des (E-) TTL-HSS-Blitzbetriebs mit dem drahtlosen MetzRemote-Blitzsystem ist nicht möglich.
• Der (E-) TTL-HSS-Blitzbetrieb lässt sich am mecablitz 54 MZ-.. je nach Kamerasystem in der manuellen Blitzbetriebsart M (Ca, Mi, Ni) oder in der
Blitzbetriebsart TTL ( Ca, Mi) aktivieren!
• Damit der (E-) TTL-HSS-Blitzbetrieb aktiviert werden kann, darf der Zweitreflektor des mecablitz nicht zugeschaltet sein!
• (Mi) Bei abgeschwenktem Hauptreflektor wird der (E-) TTL-HSS-Blitzbetrieb
nicht ausgeführt. Die Kameraverschlusszeit wird auf die Kamerasynchronzeit begrenzt. Im Kamerasucher verlischt die Anzeige (H) für den (E-) TTLHSS-Blitzbetrieb!
(Ni) Am mecablitz lässt sich im TTL-Betrieb kein 3D–Multisensor-Aufhellblitzbetrieb zuschalten.
• Am mecablitz ist der REAR-Betrieb eingeschaltet; im Display wird "REAR"
angezeigt.
Mögliche Abhilfe: REAR-Betrieb erst ausschalten, dann 3D–MultisensorAufhellblitzbetrieb zuschalten.
• Der mecablitz muss mit einem Adapter SCA 3402 ausgerüstet sein. Der
3D–Multisensor-Aufhellblitzbetrieb lässt sich nur dann am mecablitz einstellen, wenn dieser auf einer eingeschalteten Kamera montiert ist, welche
den 3D–Multisensor-Aufhellblitzbetrieb auch unterstützt. Es muss mindestens einmal ein Datenaustausch zwischen Kamera und SCA-Adapter stattgefunden haben (dazu reicht es, den Kameraauslöser kurz anzutippen,
ohne auszulösen).
• Der 3D–Multisensor-Aufhellblitzbetrieb wird nicht unterstützt, wenn der
mecablitz nicht blitzbereit ist, wenn der Reflektor aus der Normalposition
geschwenkt ist oder wenn der Zweitreflektor des mecablitz zugeschaltet ist!
• Im drahtlosen Metz-Remote-Betrieb ist kein 3D–Multisensor-Aufhellblitzbetrieb möglich!
• Der 3D–Multisensor-Aufhellblitzbetrieb ist nur mit den Geräten mecablitz
40 MZ-3(i), 50 MZ-5, 54 MZ-.. und 70 MZ-... möglich!
(Ca) Der E-TTL-Betrieb lässt sich nicht aktivieren.
• Der mecablitz muss mit einem Adapter SCA 3102 ausgerüstet sein. Der E-TTL-Betrieb lässt sich nur dann am mecablitz einstellen, wenn dieser auf einer eingeschalteten Kamera montiert ist, welche den E-TTL-Betrieb auch unterstützt. Es muss
mindestens einmal ein Datenaustausch zwischen Kamera und SCA-Adapter stattgefunden haben (dazu reicht es,den Kameraauslöser kurz anzutippen, ohne auszulösen).
29
Ķ
704 47 0099.A3
Ķ
54 MZ-4i
01.02.2007
13:41 Uhr
Seite 30
• Der E-TTL-Blitzbetrieb wird nicht unterstützt, wenn der Zweitreflektor des
mecablitz zugeschaltet ist!
• Wenn der Zweitreflektor des mecablitz zugeschaltet wird, wird der E-TTL-Betrieb auf den normalen TTL–Betrieb umgeschaltet!
Problem EOS D30: Im TTL–Betrieb lässt sich der mecablitz nicht mehr auslösen; ggfs. auf "Automatik" umschalten!
• Im drahtlosen Metz-Remote-Betrieb ist kein E-TTL-Blitzbetrieb möglich!
• Der E-TTL-Betrieb ist nur mit den Geräten mecablitz 40 MZ-3i, 40 MZ-1i
und 54 MZ-.. möglich!
mecablitz wird im Remote-Betrieb nicht blitzbereit.
• Am mecablitz ist der Zweitreflektor zugeschaltet; Symbol im Display wird
angezeigt.
Mögliche Abhilfe: Zweitreflektor ausschalten.
Blitzbereitschaftsanzeige am mecablitz blinkt.
• Am mecablitz ist die Einstelllichtfunktion aktiviert.
Abhilfe: Einstelllichtfunktion am mecablitz deaktivieren.
Am mecablitz lässt sich die Filmempfindlichkeit ISO nicht verstellen.
• Der mecablitz ist mit einem Adapter SCA 3xx2 ausgerüstet und wird mit
einer Kamera betrieben, welche Daten für die Filmempfindlichkeit an den
mecablitz sendet. In diesem Fall ist die Verstellung der Filmempfindlichkeit
ISO verriegelt.
Am mecablitz lässt sich die Blende nicht verstellen.
• Der mecablitz ist mit einem Adapter SCA 3xx2 ausgerüstet und wird mit
einer Kamera betrieben, welche Daten für die Blende an den mecablitz
sendet. In diesem Fall ist die Verstellung der Blende verriegelt.
Im LC-Display des mecablitz wird anstelle des Entfernungswertes nur "-"
angezeigt.
• Der Reflektor des mecablitz ist aus seiner Grundposition abgeschwenkt. Eine
Entfernungsangabe wird nur dann angezeigt, wenn sich der Reflektor in seiner
Grundposition befindet, d.h. weder horizontal noch vertikal abgeschwenkt ist.
30
Im LC-Display des mecablitz blinkt das Symbol für den Zeitreflektor.
Die Blitzbereitschaftsanzeige am mecablitz leuchtet.
• Der Zweitreflektor ist zugeschaltet, obwohl sich der Hauptreflektor in seiner
Grundposition befindet, d.h. nicht abgeschwenkt ist. Der Einsatz des Zweitreflektors ist jedoch nur dann sinnvoll, wenn er eine Aufhellfunktion bei abgeschwenktem Hauptreflektor übernimmt. Das Blinken des Zweitreflektorsymbols weist darauf hin, dass der Zweitreflektor abgeschaltet werden soll.
Wenn der Zweitreflektor abgeschaltet wird, verlischt das Symbol im Display. Wenn der Hauptreflektor abgeschwenkt wird, erscheint das Symbol
stetig.
Im LC-Display des mecablitz blinkt das Symbol für den Zweitreflektor. Die
Blitzbereitschaftsanzeige am mecablitz leuchtet nicht.
• Der mecablitz wurde in den Remote-Controller-Betrieb geschaltet. Im LC-Display wird "Co" angezeigt. Der Remote-Betrieb wird jedoch nur vom Hauptreflektor alleine unterstützt. Da keine Blitzbereitschaft angezeigt wird, löst der
mecablitz bei einer Aufnahme nicht aus.
Abhilfe: Deaktivieren Sie den Remote-Controller-Betrieb oder schalten Sie
den Zweitreflektor aus.
Im Display des mecablitz wird statt des Entfernungswertes "Co" angezeigt.
• Der mecablitz befindet sich in der Remote-Controller-Betriebsart. In dieser
Betriebsart erfolgt grundsätzlich keine Entfernungsangabe.
In der Remote-Controller-Betriebsart des mecablitz kann mit dem Einstellrad
keine Blitzbelichtungskorrektur angewählt bzw. nicht eingestellt werden.
☞ Im Automatik-Remote-Betrieb wird grundsätzlich keine Blitzbelichtungskorrektur wirksam.
• Im TTL-Remote-Betrieb kann eine Blitzbelichtungskorrektur aktiviert werden,
wenn diese eingestellt wird, bevor der mecablitz in den Controller-Betrieb geschaltet wird. Der Korrekturwert wird im Remote-Controller-Betrieb nicht angezeigt, bleibt jedoch wirksam. Anstelle des Korrekturwertes wird im LC-Display
des mecablitz die Remote-Adresse (Remote-Kanal) "Ad1" bzw. "Ad2" angezeigt.
704 47 0099.A3
54 MZ-4i
01.02.2007
13:41 Uhr
Seite 31
(Ni) Am mecablitz lässt sich die Nikon-Aufhellblitzfunktion "Matrixgesteuertes Aufhellblitzen" bzw. "3D-Multisensor-Aufhellblitzen" nicht einstellen.
• Die jeweilige Aufhell-Blitzbetriebsart lässt sich nur dann am mecablitz einstellen, wenn dieser mit einem SCA 3402-Adapter ausgerüstet und auf
einer eingeschalteten Kamera montiert ist, welche die genannte Aufhellblitzfunktion unterstützt. Es muss mindestens einmal ein Datenaustausch
zwischen Kamera und SCA-Adapter stattgefunden haben (dazu reicht es,
den Kameraauslöser kurz anzutippen, ohne auszulösen).
• Im Remote-Betrieb, bei abgeschwenktem Hauptreflektor oder bei zugeschaltetem Zweitreflektor wird "3D-Multisensor-Aufhellblitzen" (Nikon)
nicht unterstützt; diese Funktion kann unter den o.g. Bedingungen daher
auch nicht aktiviert werden.
• Die jeweils eingesteuerte Nikon-Aufhellblitzbetriebsart ist abhängig vom
Kameratyp.
Im LC-Display des mecablitz blinkt das Blendensymbol
und der Blendenwert.
• Der Lichtregelbereich des mecablitz im Automatik-Blitzbetrieb A wird unter
den gegebenen Aufnahmebedingungen bzw. Kameraeinstellungen überschritten.
Mögliche Abhilfe: Dunkeln Sie die Aufnahmeumgebung ab, verwenden Sie
weniger empfindliches Filmmaterial oder stellen Sie einen höheren Blendenwert an der Kamera bzw. am mecablitz ein.
Der AF-Rotlichtscheinwerfer des mecablitz wird nicht aktiviert.
Mögliche Ursachen:
• Die Umgebungshelligkeit reicht dem AF-Sensor der Kamera zum Scharfstellen aus.
• Die Kamera aktiviert bei Bedarf ihr eigenes AF-Hilfslicht.
• Es ist eine andere AF-Betriebsart als Single-AF (S) aktiviert.
• Es ist ein dezentrales AF-Messfeld an der Kamera aktiviert.
Mögliche Abhilfe:
• Schalten Sie auf die Kamera-AF-Betriebsart Single-AF bzw. S (Näheres
siehe Kamerabedienungsanleitung).
• Aktivieren Sie den zentralen AF-Sensor im Kamerasucher.
Probleme mit Remote-Controller-Betrieb und Flash-Bracketing.
• Im Remote-Controller-Betrieb ist keine Blitzbelichtungsreihe möglich! Wird
eine Blitzbelichtungsreihe eingestellt und anschließend der mecablitz auf
den Remote-Betrieb geschaltet, so wird die Blitzbelichtungsreihe nicht mehr
angezeigt und auch nicht ausgeführt!
Remote-Controller-Betrieb und Blitzbelichtungskorrektur.
• Wird am mecablitz eine Blitzbelichtungskorrektur angewählt und anschließend auf den Remote-Controller-Blitzbetrieb gewechselt, so werden die folgenden Aufnahmen mit diesem Korrekturwert belichtet. Im Display des
mecablitz wird jedoch kein (!) Korrekturwert angezeigt!
(Ni) Keine Nikon-Unterbelichtungsanzeige im Remote-Betrieb.
• Bei einigen Nikon-Kameras erfolgt im Falle einer Unterbelichtung durch
das Blitzlicht eine Warnanzeige (-EV) auf dem LC-Display des mecablitz.
Im Remote-Betrieb wird diese Funktion vom mecablitz nicht unterstützt.
Kein REAR-Betrieb beim E-TTL-HSS-Blitzbetrieb.
• Wenn am mecablitz der E-TTL-HSS-Blitzbetrieb aktiviert ist, lässt sich der
REAR-Betrieb (Synchronisation auf den 2.Verschlussvorhang) nicht einstellen.
• Wird bei eingestelltem REAR-Betrieb der E-TTL-HSS-Blitzbetrieb zugeschaltet, so wird der REAR-Betrieb deaktiviert!
Im Display des mecablitz wird die Filmempfindlichkeit ISO nicht angezeigt.
• Der mecablitz befindet sich im Remote-Betrieb ("Co" bzw. "SL") oder Stroboskop-Betrieb. In diesen Betriebsarten wird im LC-Display des mecablitz
grundsätzlich kein ISO-Wert angezeigt!
• Bei den Kamerasystemen Canon und Minolta wird grundsätzlich kein ISOWert im LC-Display angezeigt!
31
Ķ
704 47 0099.A3
Ķ
54 MZ-4i
01.02.2007
13:41 Uhr
Seite 32
Nikon-3D-Blitzlichtimpulse steuern unkontrolliert den Slave.
☞ Wenn der Fotosensor im Slave-Adapter SCA 3083 das Licht eines
Blitzgerätes empfängt, das im Nikon-3D-Blitzbetrieb arbeitet, wird der
Slave-mecablitz unkontrolliert ausgelöst!
• Abhilfe ist nur dadurch möglich, dass vom 3D-Blitzbetrieb auf den normalen TTL-Blitzbetrieb (ohne 3D) umgeschaltet wird.
Belichtungskorrekturwert blinkt im Display des mecablitz.
Am mecablitz wird z.B. im TTL-Blitzbetrieb ein Blitzbelichtungskorrekturwert
(EV) eingestellt. Nachdem der Korrekturwert gespeichert wurde, blinkt der
Korrekturwert im LC-Display des mecablitz.
Mögliche Ursache:
Das Kamerasystem lässt die Einstellung eines Korrekturwertes am mecablitz
nicht zu! Gegebenenfalls muss der gewünschte Korrekturwert an der Kamera
selbst eingestellt werden (siehe Kamerabedienungsanleitung). Der blinkende
Korrekturwert im LC-Display des mecablitz beeinflusst die Aufnahme nicht!
Achtung: Der Warnhinweis durch Blinken des Korrekturwertes wird nicht bei
allen Kamerasystemen unterstützt! Bei den meisten Kamerasystemen ist eine
Blitzbelichtungskorrektur im Automatik-Betrieb A des mecablitz einstellbar
und ausführbar (Ausnahme z.B. Minolta!).
Im TTL-Betrieb lässt sich keine Blitzbelichtungsreihe einstellen.
Mit der Taste "Select" des mecablitz kann die Funktion einer Blitzbelichtungsreihe "Fb" (flash-bracketing) z.B. im TTL-Blitzbetrieb nicht aufgerufen werden.
Mögliche Ursache:
Verschiedene Kameras bzw. Kamerasysteme unterstützen die Einstellung für
eine Blitzbelichtungskorrektur am mecablitz im TTL-Blitzbetrieb nicht. Da eine
Blitzbelichtungsreihe jedoch mit Korrekturwerten arbeitet, wird die Einstellbarkeit einer Blitzbelichtungsreihe bei den betroffenen Kameras im Menü des
mecablitz von vorneherein unterdrückt. Bei den meisten Kamerasystemen ist
jedoch eine Blitzbelichtungsreihe "Fb" im Automatik-Betrieb A des mecablitz
einstellbar und ausführbar (Ausnahme z.B. Minolta!). Am mecablitz 70 MZ-4
ist grundsätzlich keine Blitzbelichtungsreihe "Fb" einstellbar!
32
(Pe) Im Kamerasucher wird keine Blitzbereitschaft angezeigt, obwohl die
Blitzbereitschaftsanzeige des mecablitz leuchtet. Bei der Aufnahme wird
der mecablitz nicht gezündet.
• Der mecablitz arbeitet im Spot-Beam-Betrieb, wobei nur der AF-Messblitz
des mecablitz unterstützt wird. Der Betriebsartenschalter des Adapters
SCA 3702 befindet sich in der Position "SB".
Mögliche Abhilfe: Schalten Sie den Betriebsartenschalter des Adapters
SCA 3702 in die äußerste linke Position
(Synchronisation auf den
1. Verschlussvorhang).
(Pe) Im Kamerasucher erscheint die Belichtungskontrollanzeige (Blitzbereitschaftssymbol blinkt), obwohl keine Aufnahme erfolgt ist.
• Es handelt sich um eine Warnanzeige. Die Reflektorposition des Zoomreflektors reicht nicht aus, um das Motiv vollständig auszuleuchten. Möglicherweise wurde am mecablitz die automatische Brennweitenanpassung
(AUTO-ZOOM; CZ) deaktiviert und eine Reflektorbrennweite gewählt, die
größer als die Objektivbrennweite ist. Beispiel: Objektivbrennweite 70 mm,
Reflektorbrennweite 85 mm.
Mögliche Abhilfe:
Aktivieren Sie am mecablitz die automatische Brennweitenanpassung
(AUTO-ZOOM bzw .CZ) oder sorgen Sie dafür, dass die Reflektorbrennweite gleich bzw. kleiner als die Objektivbrennweite ist. Beispiel: Objektivbrennweite 70 mm, Reflektorbrennweite 70 mm, 50 mm oder kleiner! Einstellhinweise entnehmen Sie bitte der Bedienungsanleitung des mecablitz!
(Pe) Der Motor-Zoom-Reflektor des mecablitz nimmt automatisch die 35 mmReflektorposition ein, obwohl ein Objektiv mit anderer Brennweite eingesetzt
wird. Im LC-Display des mecablitz erscheint die Anzeige "AutoZoom".
• Es wird ein Non-AF-Objektiv bzw. ein Objektiv verwendet, welches keine
Daten für die Brennweite an die Kamera überträgt! Der mecablitz nimmt
dann automatisch die 35 mm-Reflektorposition ein.
Mögliche Abhilfe: Passen Sie die Reflektorposition des mecablitz von Hand
der Objektivbrennweite an (siehe Bedienungsanleitung des mecablitz)!
704 47 0099.A3
54 MZ-4i
01.02.2007
13:41 Uhr
Seite 33
Hinweis: Evtl. blinkt im Kamerasucher die Blitzbereitschaftsanzeige bei
Reflektorbrennweiten von größer als 35 mm, dies ist jedoch ohne Bedeutung
für die anschließende Belichtung der Aufnahme. Beachten Sie in diesem Fall
nach der Aufnahme die Belichtungskontrollanzeige des mecablitz!
Der mecablitz blitzt nicht.
• Der mecablitz hat sich automatisch abgeschaltet.
• Nach dem Einschalten des mecablitz und nach der automatischen Geräteabschaltung den Kameraauslöser kurz antippen, ohne auszulösen, damit
sich die beteiligten Geräte auf den gegebenen Betriebszustand einstellen
können.
Im LC-Display des mecablitz erscheint "ZE" anstelle der Zoomposition.
Der mecablitz konnte nicht in einer Zoomposition verriegeln. Unter Umständen sind die Batterien fast leer und der Strom reicht für den mechanischen
Fahrvorgang nicht mehr aus.
Mecablitz aus- und wieder einschalten oder/und verbrauchte Batterien durch
neue ersetzen.
Batterie-Entsorgung
Batterien/Akkus gehören nicht in den Hausmüll!
Bitte bedienen Sie sich bei der Rückgabe verbrauchter Batterien/Akkus eines
vorhandenen Rücknahmesystems.
Bitte geben Sie nur entladene Batterien/Akkus ab.
Batterien/Akkus sind in der Regel dann entladen, wenn das damit betriebene
Gerät
- abschaltet und signalisiert „Batterien leer“
- nach längerem Gebrauch der Batterien nicht mehr einwandfrei funktioniert.
Zur Kurzschlusssicherheit sollten die Batteriepole mit einem Klebestreifen
überdeckt werden.
Deutschland: Als Verbraucher sind Sie gesetzlich verpflichtet, gebrauchte Batterien zurückzugeben.
Sie können Ihre alten Batterien überall dort unentgeltlich abgeben, wo die
Batterien gekauft wurden. Ebenso bei den öffentlichen Sammelstellen in Ihrer
Stadt oder Gemeinde.
Diese Zeichen finden Sie auf schadstoffhaltigen Batterien:
Pb
= Batterie enthält Blei
Cd
= Batterie enthält Cadmium
Hg
= Batterie enthält Quecksilber
Li
= Batterie enthält Lithium
33
Ķ
704 47 0099.A3
54 MZ-4i
01.02.2007
13:41 Uhr
Seite 34
Ķ Garantiebestimmungen
Bundesrepublik Deutschland
1. Die Garantiebestimmungen gelten ausschließlich für Käufe in der
Bundesrepublik Deutschland ab 01.01.2002.
2. Im Ausland gelten die Gewährleistungsregelungen des jeweiligen Landes
bzw. die Garantieregelungen des Verkäufers.
3. Die nachfolgenden Bestimmungen haben nur für den privaten Gebrauch
Gültigkeit.
4. Die Garantiezeit - 24 Monate - beginnt mit dem Abschluß des
Kaufvertrages bzw. mit dem Tag der Auslieferung des Gerätes an den
Käufer (Endverbraucher).
5. Garantieansprüche können nur unter Nachweis des Kaufdatums durch
Vorlage des vom Verkäufer maschinell erstellten Original-Kaufbeleges geltend gemacht werden.
6. Beanstandete Geräte bitten wir zusammen mit dem Kaufbeleg entweder
über den Fachhändler oder direkt an die Firma Metz-Werke GmbH & Co
KG - Zentralkundendienst - Ohmstrasse 55, 90513 Zirndorf, transportsicher verpackt unter genauer Schilderung der Beanstandung einzusenden.
Sie können unter den gleichen Bedingungen auch an die autorisierten
Kundendienststellen der Firma Metz-Werke GmbH & Co KG eingesandt
werden. Hin- und Rücksendung erfolgen auf Gefahr des Käufers.
7. Die Garantie besteht darin, daß Geräte, die infolge eines anerkannten
Fabrikations- oder Materialfehlers defekt geworden sind, kostenlos repariert
oder, soweit eine Reparatur unverhältnismäßig ist, ausgetauscht werden.
Eine weitergehende Haftung, insbesondere für Schäden, die nicht am Gerät
selbst entstanden sind, ist ausgeschlossen. Dies gilt nicht, soweit im Falle des
Vorsatzes oder der groben Fahrlässigkeit zwingend gehaftet wird.
Garantieleistungen bewirken weder eine Verlängerung der Garantiezeit,
noch wird für die ersetzten oder nachgebesserten Teile eine neue
Garantiezeit begründet.
34
TV. VIDEO. AUDIO. MECABLITZ
8. Unsachgemäße Behandlung und Eingriffe durch den Käufer oder Dritte
schließen die Garantieverpflichtungen sowie alle weiteren Ansprüche aus.
Ausgenommen von der Garantie sind ferner Schäden oder Fehler, die
durch Nichtbeachtung der Gebrauchsanleitung, mechanische
Beschädigung, ausgelaufene Batterien oder durch höhere Gewalt, Wasser,
Blitz etc. entstanden sind.
Ferner sind Verschleiß, Verbrauch sowie übermäßige Nutzung von der
Garantie ausgenommen. Hiervon sind vor allem folgende Teile betroffen:
Blitzröhre, fest eingebaute Akkus, Kontakte, Verbindungskabel.
9. Durch diese Garantiebestimmungen werden die
Gewährleistungsansprüche des Käufers gegenüber dem Verkäufer nicht
berührt.
Metz-Werke GmbH & Co KG
704 47 0099.A3
54 MZ-4i
01.02.2007
13:41 Uhr
Seite 35
Ķ
35
704 47 0099.A3
ĸ
1.
2.
2.1
2.2
2.2.1
2.2.2
2.3
2.4
2.4.1
54 MZ-4i
01.02.2007
13:41 Uhr
Seite 36
ĸ
Consignes de sécurité . . . . . . . . . . . . . . . . . . . . . . . . . . . . . . . .39
Préparatifs . . . . . . . . . . . . . . . . . . . . . . . . . . . . . . . . . . . . . . . .40
Fixation du flash sur l’appareil . . . . . . . . . . . . . . . . . . . . . . . . . .40
Alimentation . . . . . . . . . . . . . . . . . . . . . . . . . . . . . . . . . . . . . . .40
Choix des piles ou accus . . . . . . . . . . . . . . . . . . . . . . . . . . . . . .40
Mise en place de piles ou accus . . . . . . . . . . . . . . . . . . . . . . . . .40
Mise en marche et coupure du flash . . . . . . . . . . . . . . . . . . . . . .41
Philosophie d’utilisation . . . . . . . . . . . . . . . . . . . . . . . . . . . . . . .41
Sélection et réglage des modes TTL / A / M /
(stroboscope) . . . . . . . . . . . . . . . . . . . . . . . . . . . . . . . . . . .41
2.4.2 Sélection et réglage des fonctions spéciales . . . . . . . . . . . . . . . . .41
2.4.3 Réglage de ISO / Zoom / diaph. , „P“ (puissance part.)
et „EV“ (correction d’exposition au flash) . . . . . . . . . . . . . . . . . . .41
3.
Mode flash TTL . . . . . . . . . . . . . . . . . . . . . . . . . . . . . . . . . . . . .42
3.1 Sous-modes du mode flash TTL . . . . . . . . . . . . . . . . . . . . . . . . . .43
4.
Mode automatique non TTL . . . . . . . . . . . . . . . . . . . . . . . . . . . .43
4.1 Sous-modes du mode automatique non TTL . . . . . . . . . . . . . . . . .44
5.
Mode manuel . . . . . . . . . . . . . . . . . . . . . . . . . . . . . . . . . . . . . .44
5.1 Sous-modes du mode flash manuel . . . . . . . . . . . . . . . . . . . . . . .46
6.
Eclairage indirect au flash . . . . . . . . . . . . . . . . . . . . . . . . . . . . .46
6.1 Flash indirect avec réflecteur secondaire . . . . . . . . . . . . . . . . . . .46
6.2 Flash indirect en mode automatique et TTL . . . . . . . . . . . . . . . . . .47
6.3 Flash indirect en mode manuel . . . . . . . . . . . . . . . . . . . . . . . . . .47
7.
Mode multi-flash sans fil (mode Remote) . . . . . . . . . . . . . . . . . . .47
7.1 Mode multi-flash TTL Metz sans fil . . . . . . . . . . . . . . . . . . . . . . . .47
7.2 Mode multi-flash automatique Metz . . . . . . . . . . . . . . . . . . . . . . .48
7.3 Appréciation des conditions d’éclairage globales
en mode multi-flash sans fil . . . . . . . . . . . . . . . . . . . . . . . . . . . . .49
8.
Fill-in au flash . . . . . . . . . . . . . . . . . . . . . . . . . . . . . . . . . . . . . .49
8.1 Fill-in au flash en mode TTL . . . . . . . . . . . . . . . . . . . . . . . . . . . . .49
36
8.2 Fill-in au flash en mode automatique non TTL . . . . . . . . . . . . . . . .50
9.
Le mode stroboscope . . . . . . . . . . . . . . . . . . . . . . . . . . . . . . . . .50
10. Témoin de bonne exposition . . . . . . . . . . . . . . . . . . . . . . . . . . .52
11. Illuminateur AF . . . . . . . . . . . . . . . . . . . . . . . . . . . . . . . . . . . . .52
12. Fonctions spéciales . . . . . . . . . . . . . . . . . . . . . . . . . . . . . . . . . .52
12.1 Fonction Bip
. . . . . . . . . . . . . . . . . . . . . . . . . . . . . . . . . . . . .52
12.2 Verrouillage et déverrouillage des éléments de commande . . . . . .53
12.3 Coupure automatique du flash . . . . . . . . . . . . . . . . . . . . . . . . . .53
12.4 REAR - Synchronisation sur le second rideau . . . . . . . . . . . . . . . .54
12.5 Lumière pilote / Modelling Light
. . . . . . . . . . . . . . . . . . . . .55
12.6 Adaptation de la focale au format de l’appareil photo . . . . . . . . .55
12.7 Séquence de bracketing au flash „Fb“ . . . . . . . . . . . . . . . . . . . . .56
12.8 Réinitialisation sur les réglages de base . . . . . . . . . . . . . . . . . . . .56
12.9 Tête zoom motorisée . . . . . . . . . . . . . . . . . . . . . . . . . . . . . . . . .57
12.10 Commutation m - ft . . . . . . . . . . . . . . . . . . . . . . . . . . . . . . . . . .57
13. Diffuseur grand angle . . . . . . . . . . . . . . . . . . . . . . . . . . . . . . . .58
14. Correction manuelle d’exposition au flash . . . . . . . . . . . . . . . . .58
15. Entretien . . . . . . . . . . . . . . . . . . . . . . . . . . . . . . . . . . . . . . . . . .59
16. Caractéristiques techniques . . . . . . . . . . . . . . . . . . . . . . . . . . . .59
17. Terminologie . . . . . . . . . . . . . . . . . . . . . . . . . . . . . . . . . . . . . . .60
18. Accessoires en option . . . . . . . . . . . . . . . . . . . . . . . . . . . . . . . .61
19. Remèdes en cas de mauvais fonctionnement . . . . . . . . . . . . . . . .62
Tableau 1 : Nombres-guides pour la puissance maximale (P 1) . . . . . . .192
Tableau 2 : Durée de l’éclair pour les différents niveaux de puissance . .193
Tableau 3 : Vitesses d’obturation du reflex en mode stroboscope . . . . . .194
Tableau 4 : Temps de recyclage et autonomie pour différents types de piles .195
Tableau 5 : Nombres-guides en mode HSS . . . . . . . . . . . . . . . . . . . . .195
Tableau 6 : Mode multi-flash . . . . . . . . . . . . . . . . . . . . . . . . . . . . . . .196
704 47 0099.A3
54 MZ-4i
01.02.2007
13:41 Uhr
Seite 37
Avant-propos
Nous vous félicitons de l’achat de ce flash et vous remercions de la confiance
que vous témoignez aux appareils METZ.
Nous savons que vous brûlez d’envie d’essayer votre flash. Prenez tout de
même le temps de lire le mode d’emploi. C’est la seule manière de découvrir
les potentialités de votre flash et d’apprendre à les utiliser.
Le présent mode d'emploi est rédigé pour pouvoir s'appliquer à un ensemble
appareil photo + flash, que ce dernier soit équipé du sabot standard 301 ou
d'un adaptateur SCA 3xx2.
☞
Pour la lecture, dépliez le rabat en dernière page.
Le flash est compatible avec
• tous les appareils avec griffe porte-accessoires et contact central,
• tous les appareils avec griffe porte-accessoires, sans contact central, moyennant un câble de synchronisation,
• les appareils des systèmes reflex.
Vous obtiendrez une adaptation optimale à votre appareil photo en vous
procurant un adaptateur SCA 3xx2 ou 3xx. Pour savoir quel adaptateur
choisir pour votre appareil, veuillez consulter le tableau SCA ci-joint. Ce
tableau précise aussi les fonctions spéciales de flash et les couplages appareil-flash réalisables avec l’adaptateur.
Pour plus d'informations, visitez notre site Internet à l'adresse www.metz.de
Nous vous souhaitons beaucoup de plaisir avec votre nouveau flash.
Survoi des modes • et fonctions spéciales ◊
54 MZ-.. avec adaptateur SCA 3xx2 :
L’association du mecablitz 54 MZ-.. et d’un adaptateur SCA 3xx2 offre
de nombreuses fonctions spéciales de flash. Elle permet de couvrir la
totalité des fonctions de flash proposées actuellement par les granǺ quasi
des marques de reflex. La disponibilité de l’une ou l’autre fonction
dépend encore de la marque du reflex et aussi de son type. Vous trouverez de plus amples informations dans le tableau d’ensemble du système
SCA et dans les notices des adaptateurs SCA respectifs.
• Mode flash TTL1)
- mode multi-flash TTL Metz1)
- mode flash ETTL de Canon1)
- mode flash ETTL-HSS de Canon1) 2)
- mode flash TTL-HSS de Minolta1) 2)
- dosage auto flash/ambiance à mesure matricielle de Nikon
- dosage auto flash/ambiance par multi-capteur 3D de Nikon
- mode flash D-TTL de Nikon3)
- mode flash D-TTL-3D de Nikon3)
- mode flash i-TTL de Nikon4)
- mode flash i-TTL-BL de Nikon4)
- mode flash TTL de Olympus5) pour digital appareils
• Mode flash manuel avec puissances partielles
• Mode flash manuel HSS2) chez Canon, Minolta, Nikon
• Mode flash automatique non TTL
- mode multi-flash Metz automatique
• Mode stroboscope
◊ Correction manuelle d’exposition flash en mode TTL1) et A
◊ Bracketing au flash Fb en mode TTL et A
◊ Synchronisation sur le 1er ou 2ème rideau
◊ Asservissement automatique de la tête zoom motorisée
◊ Commande automatique de l’illuminateur AF
37
ĸ
704 47 0099.A3
ĸ
54 MZ-4i
01.02.2007
13:41 Uhr
Seite 38
◊ Affichage automatique de la portée de l’éclair
◊ Commande automatique de la vitesse synchro-flash
◊ Fonction réveil
◊ Témoin de disponibilité du flash dans le viseur du reflex
◊ Témoin de bonne exposition au flash dans le viseur du reflex
◊ Commande d’amorçage (Pentax, Minolta)
◊ Eclair anti-yeux rouges (Nikon)
◊ Fonction de lumière pilote
1) possible uniquement si réglage sur le reflex
2) HSS = High Speed Synchronisation = synchronisation en vitesse rapide
3) uniquement avec 54 MZ-4
4) uniquement avec 54 MZ-4i avec adaptateur Nikon SCA 3402-M3
5) Olympus E-1 avec 54 MZ-4i et SCA-Adapter 3202-M3
54 MZ-.. avec adaptateur SCA 3xx :
L’association du mecablitz 54 MZ-.. et d’un adaptateur SCA 3xx offre un
réduit de fonctions spéciales de flash. La disponibilité de l’une ou
Ǻ nombre
l’autre fonction dépend encore de la marque du reflex et aussi de son type.
Vous trouverez de plus amples informations dans le tableau d’ensemble du
système SCA et dans les notices des adaptateurs SCA respectifs.
• Mode flash TTL1)
- mode multi-flash TTL Metz1)
• Mode flash manuel avec puissances partielles
• Mode flash automatique non TTL
- mode multi-flash Metz automatique
• Mode stroboscope
◊ Correction manuelle d’exposition flash en mode A
◊ Bracketing au flash Fb en mode A
◊ Commande automatique de la vitesse synchro-flash
38
◊ Fonction réveil
◊ Témoin de disponibilité du flash dans le viseur du reflex
◊ Témoin de bonne exposition au flash dans le viseur du reflex
◊ Fonction de lumière pilote
1) possible uniquement si réglage sur le reflex
54 MZ-.. avec sabot standard 301 (commande uniquement par contact
central ou câble de synchronisation) :
• Mode flash manuel avec puissances partielles
• Mode flash automatique non TTL
- mode multi-flash Metz automatique
• Mode stroboscope
◊ Correction manuelle d’exposition flash en mode A
◊ Bracketing au flash Fb en mode A
◊ Fonction de lumière pilote
704 47 0099.A3
54 MZ-4i
01.02.2007
13:41 Uhr
Seite 39
1. Consignes de sécurité
• Le flash est conçu et agréé pour l’emploi exclusif en photographie.
• Ne déclenchez en aucun cas un éclair à proximité de gaz ou de liquides
inflammables (essence, diluants, ...). Risque d’explosion et/ou d’incendie !
• Ne photographiez jamais au flash le conducteur d’un bus, d’un train,
d’une voiture, d’une moto ni un cycliste, car sous le coup de l’éblouissement il risque de provoquer un accident.
• Ne déclenchez jamais le flash à proximité des yeux !
L’amorçage d’un éclair directement devant les yeux de personnes ou
d’animaux peut entraîner une lésion de la rétine et occasionner de
graves troubles visuels pouvant aller jusqu’à l’aveuglement.
• Utilisez exclusivement les sources d’énergie autorisées mentionnées dans
le mode d’emploi.
• N’exposez pas les piles ou accus à une trop grande chaleur, par ex. au
soleil, aux flammes ou autre.
• Ne jetez pas au feu les piles ni les accus usés !
• Sortez immédiatement les piles usées du flash !
En effet, les piles usées peuvent „couler“ et provoquer une dégradation
du flash.
• Ne rechargez pas les piles sèches !
• Maintenez votre flash et le chargeur à l’abri de l’eau tombant en gouttes
et des projections d’eau !
• Ne soumettez pas le flash à une trop grande chaleur ni à une trop forte
humidité de l’air ! Ne conservez pas le flash dans la boîte à gants de
votre voiture !
• Au moment de déclencher un éclair, il ne doit pas se trouver de matière
opaque directement devant ni sur la glace du réflecteur. La glace du réflecteur ne doit pas non plus être souillée. En cas de non-respect de cette
consigne de sécurité, l’énergie de l’éclair peut provoquer des brûlures
sur la matière opaque ou sur la glace du réflecteur.
• Après une séquence d’éclairs, la glace du réflecteur est très chaude. Ne
la touchez pas, risque de brûlure!
• Ne pas démonter le flash ! DANGER HAUTE TENSION ! Le flash ne renferme pas de pièces susceptibles de pouvoir être réparées par un nonspécialiste.
• Si vous êtes amené à faire des séries de photos au flash à pleine puissance en bénéficiant du recyclage rapide procuré par le fonctionnement
sur accus NiCd, veillez à faire une pause d’au moins 10 minutes après
15 éclairs pour éviter de surcharger le flash.
39
ĸ
704 47 0099.A3
54 MZ-4i
01.02.2007
13:41 Uhr
Seite 40
2. Préparatifs
2.2 Alimentation
2.1 Fixation du flash sur l’appareil
2.2.1 Choix des piles ou accus
☞ Avant le montage et le démontage, coupez l’appareil photo et le
flash.
ĸ
Le mecablitz ne peut être monté sur l’appareil photo que moyennant le sabot
standard 301 ou un adaptateur SCA 3xx ou SCA 3xx2 (options).
Le mecablitz est équipé en standard du sabot standard 301 pour une simple
synchronisation du flash. La vitesse d’obturation doit être plus lente ou au
plus égale à la vitesse de synchro-flash. Les flashes vendus en „set“ sont fournis avec l’adaptateur SCA approprié au lieu du sabot standard 301.
Montage du sabot standard ou de l’adaptateur SCA :
☞ Avant le montage ou le démontage du sabot standard ou de l’adaptateur SCA, il faut couper le flash avec l’interrupteur général.
• Saisissez la plaque de recouvrement en son milieu (uniquement pour adaptateurs SCA 3xx2) et déboîtez-la.
• Engagez le sabot ou l’adaptateur SCA à fond, jusqu’à son encliquetage.
Démontage du sabot standard ou de l’adaptateur SCA :
• Coupez le mecablitz par l’interrupteur général (Fig. 1).
• Repousser le couvercle du compartiment des piles (Fig. 3) vers le bas et
le rabattre.
• Appuyez sur le bouton de déverrouillage (Fig. 3) en couleur tout en
tirant sur l’adaptateur SCA ou le sabot standard.
Mise en place du mecablitz :
Engagez le mecablitz dans la griffe porte-accessoires de l’appareil et bloquez-le avec l’écrou moleté.
40
Le mecablitz peut fonctionner sur :
• 4 accus NiCd type IEC KR 15/51 ;
ils procurent des temps de recyclage très courts et sont économiques à
l’usage car rechargeables.
• 4 accus nickel-hydrure métallique ;
capacité nettement supérieure à celle des accus NiCd et moins nuisibles à
l’environnement car sans cadmium.
• 4 piles alcalines au manganèse type IEC LR6 ;
sources sans entretien pour exigences de performances moyennes.
• Power Pack P 40 (option) ;
offre la surveillance d’accu et l’affichage de l’état de charge gérés par microprocesseur (avec fonction de décharge).
• Power Pack P 50 (option) ;
offre la surveillance d’accu et l’affichage de l’état de charge gérés par microprocesseur (avec fonction de décharge).
2.2.2 Mise en place des piles ou accus
• Couper le mecablitz avec l’interrupteur général (Fig. 1).
• Repousser le couvercle du compartiment des piles (Fig. 3) vers le bas et
le rabattre.
• Introduire les piles ou les accus dans le sens de la longueur en vous conformant aux symboles de piles.
☞ A la mise en place des piles ou accus, respecter la polarité (voir les
symboles de piles figurant dans le compartiment des piles).
Pensez à la protection de l’environnement ! Ne jetez pas les piles ou
accus à la poubelle, mais apportez-les à un point de collecte !
704 47 0099.A3
54 MZ-4i
01.02.2007
13:41 Uhr
Seite 41
2.3 Mise en marche et coupure du flash
La mise en marche du flash s’effectue par l’interrupteur général (Fig. 1).
Sur la position supérieure On, le flash est en permanence6) en service, le
témoin de fonctionnement est allumé.
6) voir aussi „12.3 Coupure automatique du flash“
☞ Si une clé est affichée sur l’écran ACL, procéder comme indiqué sous
„12.2 Verrouillage et déverrouillage des éléments de commande“ !
Pour couper le flash, repoussez l’interrupteur général (Fig. 1) sur la position
inférieure. Si le flash reste inutilisé pendant une période prolongée, nous
recommandons :
- de couper le flash avec l’interrupteur général (Fig. 1),
- de retirer les piles ou accus.
2.4 Philosophie d’utilisation
2.4.1 Sélection et réglage des modes TTL / A / M /
(stroboscope)
Le mode TTL, A (automatique non TTL), M (manuel) ou
(stroboscope) est
sélectionné avec la touche Mode (Fig. 1) ; pour cela, répéter l’appui sur la
touche Mode jusqu’à ce que le pictogramme du mode voulu s’affiche en clignotant. Pour le sauvegarder, appuyer sur la molette dans le sens de la flèche.
Si l’on n’appuie pas sur la molette (Fig. 1), le mode sélectionné est sauvegardé automatiquement après 5 s. Après sauvegarde, le pictogramme du
mode cesse de clignoter.
Remarque : les différents modes sont expliqués plus loin.
2.4.2 Sélection et réglage des fonctions spéciales
2.4.3 Réglage de ISO / Zoom / diaph. , „P“ (puissance partielle)
et „EV“ (correction d’exposition au flash)
Tourner la molette (Fig. 1) pour sélectionner la fonction voulue (ISO /
zoom / diaphragme / correction d’exposition „EV“) du côté droit de l’écran
ACL. La fonction sélectionnée est pointée par une flèche ı.
Pour modifier la fonction, appuyer sur la molette (Fig. 1) dans le sens de
la flèche. La flèche ı sur l’écran ACL se met à clignoter. Modifier la fonction
en tournant la molette. Pour sauvegarder le nouvel état, appuyer sur la
molette dans le sens de la flèche. Si l’on n’appuie pas sur la molette, le réglage est sauvegardé automatiquement après 5 s. Après sauvegarde, la flèche
pointant sur la fonction cesse de clignoter.
☞ Lorsque le mecablitz est associé à un adaptateur SCA 3xx2, il peut
arriver (suivant le type d’appareil photo et d’adaptateur SCA) qu’il ne
soit pas possible de modifier la valeur d’ouverture sur l’écran du
flash !
Lorsque le mecablitz est associé à un adaptateur SCA 3xx2, il peut
arriver (suivant le type d’appareil photo et d’adaptateur SCA) qu’il ne
soit pas possible de modifier le réglage de la sensibilité ISO du film ou
qu’elle ne soit pas affichée !
Remarque : les réglages pour les différentes positions sont expliqués plus
loin.
Ȅ
La touche Select (Fig. 1) permet de sélectionner des fonctions spéciales
dans chaque mode du flash.
L’appui sur la touche Select (Fig. 1) appelle successivement les fonctions
spéciales „bip“ ( ), coupure automatique du flash ( ), REAR7) (synchronisation sur le 2e rideau), lumière pilote (
), formats zoom et séquence de
bracketing au flash „Fb“.
Après sélection de la fonction spéciale, son pictogramme clignote et l’état de
la fonction (OFF ou On) est affiché sur l’écran ACL.
La fonction sélectionnée est activée (On) et désactivée (OFF) en tournant la
molette (Fig. 1).
La fonction activée est sauvegardée en appuyant sur la molette (Fig. 1).
Remarque : les fonctions spéciales de flash sont expliquées plus loin.
7) uniquement avec adaptateur SCA et appareil photo qui supportent cette fonction
41
ĸ
704 47 0099.A3
54 MZ-4i
01.02.2007
13:41 Uhr
Seite 42
3. Mode flash TTL
ĸ
La mesure TTL au flash vous permet de réussir sans peine vos photos au flash.
☞ Pour son contrôle TTL, le mecablitz doit être muni de l’adaptateur SCA
approprié. Le contrôle TTL du flash ne peut être utilisé que sur les appareils qui supportent ce mode de contrôle. Le sabot standard SCA 301
(uniquement contact central ou liaison par prise de synchronisation) ne
permet pas le mode TTL au flash. Si le mecablitz est utilisé avec un appareil photo ou un adaptateur SCA qui ne supporte pas la mesure TTL,
on déclenchera des éclairs incontrôlés à pleine puissance ! Pour tester le
mode TTL, il faut qu’un film soit chargé dans l’appareil photo !
Dans ce mode, la mesure de l’exposition est effectuée par la cellule dans le
reflex. Cette cellule mesure la lumière pénétrant par l’objectif et qui vient
frapper la surface du film. Lorsque la quantité de lumière nécessaire pour
une lumination correcte du film est atteinte, l’électronique de l’appareil photo
envoie un signal au flash qui provoque l’interruption immédiate de l’éclair.
L’avantage du mode TTL réside dans le fait que tous les facteurs exerçant une
influence sur la lumination sont automatiquement pris en compte, tels les filtres, les modifications d’ouverture et de couverture des zooms, l’augmentation du tirage en macrophotographie, etc.
Lorsque l’exposition au flash a été correcte, le témoin „ok“ s’allume pour 3 s
sur le mecablitz.
☞ Il est possible d’activer en plus une alarme sonore, voir à cet effet
„12.1 Fonction Bip“.
Procédure de réglage pour le mode TTL:
• Equiper le mecablitz de l’adaptateur SCA approprié, et le placer sur l’appareil photo.
• Effectuer sur l’appareil les réglages spécifiés dans son mode d’emploi.
• Mettre le flash en service par l’interrupteur général (Fig. 1).
• Répéter l’action sur la touche Mode (Fig. 1) jusqu’à faire apparaître TTL
sur l’écran du flash. Appuyer sur la molette (Fig. 1) dans le sens de la
flèche pour sauvegarder le réglage. Si l’on n’appuie pas sur la molette, le
42
réglage est sauvegardé automatiquement après 5 s. Après sauvegarde, le
pictogramme TTL cesse de clignoter.
• Suivant le type d’appareil photo et d’adaptateur SCA, il se peut que les
valeurs de sensibilité du film (ISO), de zoom et d’ouverture ne soient pas
transmises automatiquement par l’appareil photo au mecablitz. Dans ce
cas, régler manuellement ces valeurs sur le mecablitz. Le réglage de la sensibilité et de l’ouverture ne présente de l’intérêt que pour l’affichage des
informations correctes de distance et de portée sur l’écran ACL mais pas
pour la prise de vue au flash TTL en soi. Il n’est donc pas impératif d’effectuer ces réglages.
• Le réglage de la position de la tête zoom est importante pour l’éclairage
correct de la scène complète. Il importe par conséquent de toujours adapter la position de la tête zoom à la distance focale de l’objectif.
Conseil :
Si vous utilisez un objectif zoom et que vous n’ayez pas toujours besoin de la
pleine puissance et de la portée maximale du mecablitz, vous pouvez laisser
la tête zoom sur la position correspondant à la plus petite focale de l’objectif
zoom. Vous avez ainsi la garantie que votre image sera toujours éclairée
plein cadre et vous vous économisez l’adaptation permanente au changement de focale.
Exemple :
Vous utilisez un objectif zoom 28 - 80 mm. Dans ce cas, vous réglez la tête
zoom sur la position 28 mm !
☞ Lorsque le mecablitz est utilisé avec un adaptateur SCA 3xx2 sur un
appareil photo communiquant avec le flash, il peut arriver que la sensibilité ISO ne soit pas affichée (suivant le type d’appareil photo) ; voir
mode d’emploi de l’adaptateur SCA. Il peut arriver que les valeurs de
sensibilité ISO et d’ouverture ne puissent pas être modifiées. Dans le
cas d’une image très contrastée, par exemple sujet sombre sur un
fond de piste de neige, il peut s’avérer nécessaire de corriger l’exposition en mode TTL (voir chapitre 14.).
704 47 0099.A3
54 MZ-4i
01.02.2007
13:41 Uhr
Seite 43
3.1 Sous-modes du mode flash TTL
Il est possible de régler sur le mecablitz en mode flash TTL différents sous-modes.
☞ Le nombre de sous-modes possibles dépend de l’adaptateur SCA et
du type d’appareil photo :
• Multi-flash TTL avec adresse „Ad1“
(voir chapitre „7.1 Mode multi-flash TTL Metz sans fill“)
• Multi-flash TTL avec adresse „Ad2“
(voir chapitre „7.1 Mode multi-flash TTL Metz sans fill“)
• Mode flash E-TTL (uniquement avec SCA 3102 et un appareil photo Canon
approprié ; voir mode d’emploi de l’adaptateur SCA et de l’appareil photo)
• Mode flash E-TTL-HSS ; synchronisation en vitesse rapide (uniquement avec
SCA 3102 et un appareil photo Canon approprié ; voir mode d’emploi de
l’adaptateur SCA et de l’appareil photo)
• Dosage automatique flash/ambiance avec mesure matricielle
(uniquement avec SCA 3402 et un appareil photo Nikon approprié ; voir mode
d’emploi de l’adaptateur SCA et de l’appareil photo)
• Dosage automatique flash/ambiance par multi-capteur 3D
(uniquement avec SCA 3402 et un appareil photo Nikon approprié ; voir mode
d’emploi de l’adaptateur SCA et de l’appareil photo)
• Mode flash TTL-HSS
(uniquement avec SCA 3302 et un appareil
photo Minolta approprié ; voir mode d’emploi de l’adaptateur SCA et de
l’appareil photo).
Réglage d’un sous-mode du mode flash TTL :
• Répéter l’action sur la touche Mode (Fig. 1) jusqu’à ce que TTL clignote
sur l’écran du flash. Si TTL s’arrête de clignoter, appuyer une fois sur la
touche Mode.
• Tourner la molette (Fig. 1) pour sélectionner le sous-mode désiré.
• Appuyer sur la molette (Fig. 1) dans le sens de la flèche pour sauvegarder le réglage. Si l’on n’appuie pas sur la molette, le mode sélectionné est
sauvegardé automatiquement après 5 s. Après sauvegarde, le pictogramme TTL cesse de clignoter.
4. Mode automatique non TTL
En mode automatique non TTL, le senseur (Fig. 2) incorporé au mecablitz
mesure la lumière réfléchie par le sujet et commande l’interruption de l’éclair
dès que la quantité de lumière est suffisante pour une exposition correcte.
Ceci évite d’avoir à recalculer l’ouverture et à corriger les réglages à chaque
modification de l’éloignement du sujet, tant que ce dernier se situe dans la
zone de portée affichée en automatique.
Le senseur (Fig. 2) du mecablitz doit toujours être dirigé sur le sujet, quelle
que soit la direction d’émission de l’éclair. Le senseur a un angle de mesure
de 25° et n’effectue la mesure que pendant l’émission de l’éclair par le flash.
Lorsque l’exposition au flash a été correcte, le témoin „ok“ s’allume pour 3 s
sur le mecablitz.
Le mode automatique non TTL est possible avec un adaptateur SCA mais
aussi avec le sabot standard SCA 301.
☞ Certains appareils photo ne supportent pas le mecablitz en mode
automatique non TTL en liaison avec un adaptateur SCA (voir mode
d’emploi de l’appareil et de l’adaptateur SCA). Dans ce cas, il convient d’équiper le mecablitz du sabot standard SCA 301.
Procédure de réglage pour le mode automatique non TTL :
• Equiper le mecablitz de l’adaptateur SCA ou sabot standard SCA 301, et
le placer sur l’appareil photo.
• Effectuer sur l’appareil les réglages spécifiés dans son mode d’emploi.
• Mettre le flash en service par l’interrupteur général (Fig. 1).
• Répéter l’action sur la touche Mode (Fig. 1) jusqu’à faire apparaître A
sur l’écran du flash. Appuyer sur la molette (Fig. 1) dans le sens de la
flèche pour sauvegarder le réglage. Si l’on n’appuie pas sur la molette, le
réglage est sauvegardé automatiquement après 5 s. Après sauvegarde, le
pictogramme A cesse de clignoter.
• Lorsque le mecablitz est utilisé avec un adaptateur SCA 3xx2 sur un appareil photo qui transmet automatiquement les paramètres sensibilité du
film ISO, position de la tête zoom et ouverture, il est inutile de procéder à
43
ĸ
704 47 0099.A3
ĸ
54 MZ-4i
01.02.2007
13:41 Uhr
Seite 44
d’autres réglages. Le mecablitz se règle en fonction des paramètres transmis par l’appareil photo.
☞ Lorsque le mecablitz est utilisé avec un adaptateur SCA 3xx2 sur un
appareil photo qui est capable de communiquer avec le flash, il peut arriver que la sensibilité ISO ne soit pas affichée (suivant le type d’appareil
photo) ; voir mode d’emploi de l’adaptateur SCA. Il peut arriver que les
valeurs de sensibilité ISO et d’ouverture ne puissent pas être modifiées.
Mode automatique avec un adaptateur SCA 3xx ou le sabot standard SCA 301 :
Dans ce cas, régler manuellement sur le mecablitz la valeur de sensibilité
ISO, la position de la tête zoom et l’ouverture. Ceci est indispensable pour
une exposition correcte au flash, car le mecablitz réalise le dosage automaique de la lumière sur la base de ces valeurs.
Conseil :
Si vous utilisez un objectif zoom et que vous n’ayez pas toujours besoin de la
pleine puissance et de la portée maximale du mecablitz, vous pouvez laisser
la tête zoom sur la position correspondant à la plus petite focale de l’objectif
zoom. Vous avez ainsi la garantie que votre image sera toujours éclairée
plein cadre, et vous vous économisez l’adaptation permanente au changement de focale.
Exemple :
Vous utilisez un objectif zoom 28 - 80 mm. Dans ce cas, vous réglez la tête
zoom sur la position 28 mm !
☞ Le sujet devrait se situer dans le tiers médian (entre 40 et 70 %) de la
zone de portée affichée sur l’écran du mecablitz. L’électronique disposera ainsi d’une marge d’adaptation suffisante dans les situations
où cela est nécessaire.
Les zooms demandent une attention particulière !
Suivant leur construction, ils peuvent occasionner une perte de lumière
pouvant atteindre une valeur équivalente à une division du diaphragme. De plus, l’ouverture réelle peut varier avec la distance focale. Le
cas échéant, vous pourrez compenser cette dérive par une correction
manuelle de l’ouverture ou par une correction manuelle de l’exposition au flash (voir chap. 14.).
44
4.1 Sous-modes du mode automatique non TTL
Il est possible de régler sur le mecablitz en mode A différents sous-modes :
• Multi-flash en mode automatique avec adresse „Ad 1“
(voir chapitre „7.1 Mode multi-flash automatique Metz“)
• Multi-flash en mode automatique avec adresse „Ad 2“
(voir chapitre „7.1 Mode multi-flash automatique Metz“)
Réglage d’un sous-mode du mode flash automatique non TTL :
• Répéter l’action sur la touche Mode (Fig. 1) jusqu’à ce que A clignote
sur l’écran du flash.
• Tourner la molette (Fig. 1) pour sélectionner le sous-mode désiré.
• Appuyer sur la molette (Fig. 1) dans le sens de la flèche pour sauvegarder le réglage. Si l’on n’appuie pas sur la molette, le mode sélectionné est
sauvegardé automatiquement après 5 s. Après sauvegarde, le pictogramme A cesse de clignoter.
5. Mode manuel
Dans le mode manuel, le flash émet toujours la pleine puissance dans la mesure où l'on n'a pas sélectionné de puissance partielle. Le mecablitz doit être
muni d'un adaptateur SCA ou du sabot standard SCA 301. L'adaptation à
la situation considérée s'opère en agissant sur l'ouverture du diaphragme sur
l'appareil et en choisissant un niveau de puissance partielle.
L’écran du mecablitz affiche la distance flash-sujet qui donne une exposition
au flash correcte. Il faut par conséquent veiller au réglage correct du mecablitz. L’ouverture et la sensibilité du film doivent être réglées sur les mêmes
valeurs sur l’appareil photo et le mecablitz. La position zoom de la tête du
flash doit coïncider avec la distance focale de l’objectif.
704 47 0099.A3
54 MZ-4i
01.02.2007
13:41 Uhr
Seite 45
Procédure de réglage pour le mode manuel :
Exemple de réglage :
Distance flash-sujet 6 m, zoom 50 mm, 100 ISO/21°.
• Effectuer sur l’appareil les réglages spécifiés dans son mode d’emploi.
• Equiper le mecablitz de l’adaptateur SCA approprié, et le placer sur l’appareil photo.
• Mettre le flash en service par l’interrupteur général (Fig. 1).
• Répéter l’action sur la touche Mode (Fig. 1) jusqu’à faire apparaître M
sur l’écran du flash. Appuyer sur la molette (Fig. 1) dans le sens de la
flèche pour sauvegarder le réglage. Si l’on n’appuie pas sur la molette, le
réglage est sauvegardé automatiquement après 5 s. Après sauvegarde, le
pictogramme M cesse de clignoter.
• Après la sauvegarde, l’écran ACL affiche la puissance partielle „P 1/1“
(= pleine puissance). En actionnant le déclencheur sur le mecablitz ou sur
l’appareil photo, un éclair à pleine puissance est émis.
☞ Certains appareils photo ne supportent pas le mecablitz en mode manuel en liaison avec un adaptateur SCA (voir mode d’emploi de l’appareil et de l’adaptateur SCA). Dans ce cas, il convient d’équiper le
mecablitz du sabot standard SCA 301 (voir aussi le mode d’emploi de
l’appareil photo).
Mode flash manuel du mecablitz avec un adaptateur SCA 3xx2 :
Lorsque le mecablitz est utilisé avec un adaptateur SCA 3xx2 sur un appareil
photo qui transmet automatiquement les paramètres sensibilité du film ISO,
position de la tête zoom et ouverture, il est inutile de procéder à d’autres réglages. Le mecablitz se règle en fonction des paramètres transmis par l’appareil photo.
☞ Si le mecablitz est utilisé sur un appareil qui est capable de communiquer avec le mecablitz, il peut arriver que la sensibilité ISO ne soit pas
affichée (suivant le type d’appareil photo) ; voir mode d’emploi de
l’adaptateur SCA. Si le mecablitz est utilisé avec un appareil photo qui
communique avec le flash, les valeurs de sensibilité ISO et d’ouverture
ne peuvent pas être modifiées. Dans ce cas, il faut modifier la valeur
d’ouverture sur l’appareil photo jusqu’à ce que l’écran du mecablitz
affiche la distance voulue.
Mode automatique avec un adaptateur SCA 3xx ou le sabot standard SCA 301 :
Dans ce cas, régler manuellement sur le mecablitz la valeur de sensibilité
ISO, la position de la tête zoom et l’ouverture. Ceci est indispensable pour
une exposition correcte au flash, car le mecablitz, sur la base de ces valeurs,
calcule et affiche la distance requise flash-sujet qui donne une exposition correcte au flash.
Réglage d’un niveau de puissance partielle :
Pour modifier la distance affichée donnant une exposition correcte au flash et
pour l’adapter à la situation de prise de vue, on pourra régler sur le mecablitz un niveau de puissance partielle.
• Tourner la molette (Fig. 1) pour amener la flèche de pointage sur P.
• Appuyer sur la molette (Fig. 1) dans le sens de la flèche. La flèche de
pointage se met à clignoter.
• Tourner la molette (Fig. 1) pour sélectionner le niveau de puissance voulu. Appuyer sur la molette dans le sens de la flèche pour sauvegarder le
réglage. Si l’on n’appuie pas sur la molette, le niveau de puissance partielle est sauvegardé automatiquement après 5 s. Après sauvegarde, la flèche
cesse de clignoter.
Pour modifier la portée de l’éclair en vue de l’adapter à la situation de prise
de vue, on peut aussi modifier l’ouverture sur l’appareil photo. A noter cependant que la modification de l’ouverture du diaphragme sur l’appareil
photo a une influence sur la profondeur de champ !
Annulation du niveau de puissance partielle réglé :
• Tourner la molette (Fig. 1) pour amener la flèche de pointage sur P.
• Appuyer sur la molette dans le sens de la flèche. La flèche de pointage se
met à clignoter.
• Tourner la molette (Fig. 1) pour sélectionner le niveau de puissance
P 1/1. Appuyer sur la molette dans le sens de la flèche pour sauvegarder
le réglage. Si l’on n’appuie pas sur la molette, la sauvegarde intervient
45
ĸ
704 47 0099.A3
54 MZ-4i
01.02.2007
13:41 Uhr
Seite 46
automatiquement après 5 s. Après sauvegarde, la flèche cesse de clignoter. Le niveau de puissance partielle est réglé automatiquement sur P 1/1
lors du passage à un autre mode du flash.
5.1 Sous-modes du mode flash manuel
☞ Le mecablitz doit être muni d’un adaptateur SCA 3xx2 !
ĸ
Certains appareils photo modernes offrent la possibilité de synchronisation
en vitesse rapide (mode FP ou HSS) lorsque le flash est en mode manuel M
(voir mode d’emploi de l’appareil photo et de l’adaptateur SCA).
Réglage du sous-mode „M-HSS“ du mode flash manuel :
• Répéter l’action sur la touche Mode (Fig. 1) jusqu’à ce que M clignote
sur l’écran du flash.
• Tourner la molette (Fig. 1) pour sélectionner HSS.
• Appuyer sur la molette (Fig. 1) dans le sens de la flèche pour sauvegarder
le réglage. Si l’on n’appuie pas sur la molette, le mode HSS est sauvegardé
automatiquement après 5 s. Après sauvegarde, le pictogramme M cesse de
clignoter.
Désactivation du sous-mode „HSS“ :
• Répéter l’action sur la touche Mode (Fig. 1) jusqu’à ce que M clignote
sur l’écran du flash.
• Tourner la molette pour désélectionner HSS.
• Appuyer sur la molette (Fig. 1) dans le sens de la flèche pour sauvegarder
le réglage. Si l’on n’appuie pas sur la molette, le réglage est sauvegardé
automatiquement après 5 s. Après sauvegarde, le pictogramme M cesse de
clignoter.
6. Eclairage indirect au flash
Les photos prises au flash direct sont presque toutes caractérisées par des
ombres portées souvent inesthétiques. Et sur une grande profondeur de
champ, les lois de la physique font que l’arrière-plan reste souvent dans la
pénombre.
46
Ces phénomènes pourront être évités par l’éclairage indirect qui donne une
lumière diffuse pour un éclairage doux et régulier du sujet et de l’arrièreplan. Le réflecteur est dirigé vers une surface réfléchissante (p. ex. le plafond
ou les murs de la pièce).
A cet effet, le réflecteur du flash est orientable dans le sens vertical et horizontal.
Vertical:
-7°, 0°, 60°, 75°, 90°
Horizontal: -180°, -150°, -120°, -90°, -60°, -30°, 0°, 30°, 60°, 90°.
En position de base, le réflecteur est verrouillé mécaniquement. Pour le déverrouiller, enfoncer le bouton et tourner le réflecteur.
☞ On veillera à pivoter le réflecteur d’un angle suffisant dans le sens
vertical ou horizontal pour empêcher que de la lumière directe ne
vienne frapper le sujet. On pivotera donc au moins jusqu’à la position
de crantage à 60°.
Les indications de distance disparaissent de l’écran ACL. La distance
flash-sujet en passant par le plafond est maintenant une grandeur inconnue.
La lumière diffuse renvoyée par la surface réfléchissante donne un éclairage
doux du sujet.
La surface réfléchissante devra être de teinte neutre pour éviter des retours de
couleurs, à moins que l’on recherche des effets de couleurs, auquel cas elle
pourra avoir la teinte voulue. On évitera aussi les surfaces anguleuses (par
ex. poutres au plafond) qui risquent de placer dans l’ombre une partie de la
scène.
Pour éviter la formation d’ombres en flash indirect, par exemple sous le nez ou
dans les orbites des yeux, on a avantage à activer le réflecteur secondaire.
6.1 Flash indirect avec réflecteur secondaire
En flash indirect, le réflecteur secondaire (Fig. 2) permet un éclairage frontal
d’appoint.
☞ L’utilisation du réflecteur secondaire ne se justifie que pour les prises
de vues avec flash indirect.
704 47 0099.A3
54 MZ-4i
01.02.2007
13:41 Uhr
Seite 47
Le réflecteur secondaire peut être mis en service et coupé au moyen de l’interrupteur
(Fig. 2). Le clignotement du pictogramme
sur l’écran
de contrôle ACL du mecablitz signale que le réflecteur principal n’est pas
basculé.
Lorsque le réflecteur secondaire est en service, le sujet est éclairé à 85 % en
indirect par la lumière du réflecteur principal et à 15 % en direct par le réflecteur secondaire. En puissance partielle, la répartition de lumière entre réflecteur principal et réflecteur secondaire peut s’écarter légèrement des pourcentages précités.
Si la quantité de lumière délivrée par le réflecteur secondaire est trop grande,
on pourra l’atténuer de 50 % au moyen du filtre réducteur de lumière. A cet
effet, repousser sur le côté à droite le filtre réducteur, le détacher du mecablitz,
le tourner de 180°.
☞ Les sous-modes ADI, stroboscope, E-TTL, E-TTL-HSS, D-TTL, multi-capteur 3D, TTL-HSS et Remote ne sont pas possibles en liaison avec le
réflecteur secondaire.
7. Mode multi-flash sans fil (mode Remote)
6.2 Flash indirect en mode automatique et TTL
Généralités
Ce mode désigne la télécommande sans cordon de flashes supplémentaires
avec mesure TTL. L’éclair du flash maître monté sur l’appareil photo commande les flashes additionnels (esclaves) de manière que la commande d’exposition en mode TTL s’étende à tous les flashes en présence.
Le mode Remote de Metz permet le contrôle de plusieurs flashes 54 MZ-.., 34
CS-2, 28 CS-2, 40 MZ-.., 50 MZ-5 et 70 MZ-.., sans les relier par des cordons. Les flashes supplémentaires 54 MZ-.., 70 MZ-4 (esclaves) doivent être
montés sur l’adaptateur esclave SCA 3083 (option) et les flashes 40 MZ-.. doivent être montés sur des adaptateurs esclaves SCA 3080 ou 3082 (option). Les
flashes esclaves peuvent être placés sur le support joint à la livraison ou sur un
trépied.
Les flashes esclaves 34 CS-2, 28 CS-2, 50 MZ-5 et 70 MZ-5 n’exigent pas
d’adaptateur esclave.
☞ En mode multi-flash, la portée ou la distance ne sont pas affichées sur l’écran du mecablitz. Le réflecteur secondaire du mecablitz doit rester éteint !
Avant de prendre la photo, il est conseillé de vérifier si la lumière est suffisante pour l’ouverture sélectionnée. A cet effet, procéder comme décrit au
chapitre „10. Témoin de bonne exposition“.
Afin que deux configurations multi-flash sans fil ne se gênent pas mutuellement lorsqu’elles sont utilisées dans la même pièce, on pourra régler sur les
flashes maître et esclave deux adresses différentes Ad1 et Ad2.
6.3 Flash indirect en mode manuel
7.1 Mode multi-flash TTL Metz sans fil
Lorsque le flash est utilisé en mode manuel, il est conseillé de déterminer l’ouverture requise au moyen d’un posemètre/flashmètre. Si on n’en dispose
pas, on pourra utiliser la formule
nombre-guide
Ouverture sur reflex = ———————————————
distance d’éclairage x 2
pour calculer une valeur d’ouverture du diaphragme que vous devriez encore corriger de ± 1 division pour la prise de vue.
☞ Le mode multi-flash TTL Metz n’est possible qu’avec des appareils
photo disposant du contrôle de flash TTL. Procédure de réglage du
maître pour le mode multi-flash TTL Metz.
Procédure de réglage du maître pour le mode multi-flash TTL Metz (Fig. 1) :
1 Equiper le mecablitz monté sur l’appareil de l’adaptateur SCA approprié,
et le mettre en service par l’interrupteur général.
2 Répéter l’action sur la touche Mode (Fig. 1) jusqu’à faire clignoter TTL
sur l’écran.
3 Pendant le clignotement de TTL, tourner la molette (Fig. 1) et sélectionner
47
ĸ
704 47 0099.A3
ĸ
54 MZ-4i
01.02.2007
13:41 Uhr
Seite 48
le mode maître Co (contrôleur) avec l’adresse Ad1 ou Ad2. Si TTL s’arrête de
clignoter, appuyer une fois sur la touche Mode. Appuyer sur la molette dans
le sens de la flèche pour sauvegarder le réglage. Si l’on n’appuie pas sur la
molette, le réglage est sauvegardé automatiquement après 5 s ; TTL s’arrête
alors de clignoter et est affiché en même temps que Co et que l’adresse d’esclave Ad1 ou Ad2.
Procédure de réglage de l’esclave pour le mode multi-flash TTL Metz (Fig. 2) :
• Monter les flashes esclaves 54 MZ-.., 70 MZ-4 sur des adaptateurs esclaves SCA 3083 ; les flashes esclaves 40 MZ-.. seront montés sur des
adaptateurs esclaves SCA 3080 ou 3082.
1 Mettre les flashes en service par l’interrupteur général (Fig. 1). Le mecablitz se met automatiquement en mode TTL. Il apparaît SL (slave = esclave)
sur l’écran ACL. L’adresse d’esclave Ad1 (ou l’adresse sélectionnée en dernier) est réglée.
2 Pour modifier l’adresse d’esclave, appuyer sur la touche Mode (Fig. 1); le
pictogramme de mode TTL clignote.
3 Tourner la molette (Fig. 1) et sélectionner l’adresse d’esclave Ad2.
Appuyer sur la molette dans le sens de la flèche pour sauvegarder le réglage.
☞ En mode multi-flash, la tête zoom motorisée du mecablitz est positionnée automatiquement sur 24 mm pour assurer une couverture maximale de l’éclair. Cette position de la tête zoom peut être modifiée manuellement (voir chapitre 12.).
• Lorsque le flash esclave est disponible, son témoin de recyclage s’allume et
l’illuminateur AF clignote. On peut aussi activer en plus la signalisation
acoustique de la disponibilité du flash (voir chapitre 12.). Ceci est recommandé lorsque l’illuminateur AF et le témoin de recyclage est caché à la vue.
4 Appuyer sur le bouton d’essai (Fig. 1) du flash maître pour déclencher un éclair de test.
• Les flashes esclaves répondent à retardement par un éclair signalant ainsi
qu’ils sont prêts au service. En présence de plusieurs flashes esclaves, leur
réponse intervient en même temps.
Si un flash esclave ne répond pas en délivrant un éclair, le senseur de son
48
adaptateur esclave n’a pas été frappé par l’impulsion lumineuse du flash
maître. Dirigez le senseur vers le flash maître, et répétez l’opération n° 4.
☞ Si le flash maître et le flash esclave sont très rapprochés, l’électronique de l’appareil photo peut interrompre l’éclair avant que l’esclave
n’ait reçu l’information de déclenchement. Dans ce cas, éloignez le
flash esclave du maître, ou sélectionner une plus petite ouverture, et
répétez l’opération n° 4.
Désactivation du mode multi-flash TTL Metz :
• sur le flash maître, appuyer deux fois sur la touche Mode (Fig. 1) et
désélectionner le mode maître avec la molette (Fig. 1) de réglage.
• sur le flash esclave :
couper le flash, détacher l’adaptateur SCA 3083 et remettre le flash en
marche.
7.2 Mode multi-flash automatique Metz
☞ Le mode multi-flash automatique Metz est réalisable avec tous les
reflex ainsi qu’avec les anciens appareils mécaniques et à moyen format. La condition pour tous ces appareils est qu’ils disposent d’un
contact ou d’une prise de synchronisation et que le flash soit équipé
du sabot standard 301 ou d’un adaptateur SCA.
L’exposition est contrôlée par le senseur du flash maître monté sur
l’appareil photo.
Procédure de réglage du flash maître pour le mode multi-flash automatique Metz :
• Equiper le mecablitz avec l’adaptateur SCA ou le sabot standard SCA 301
et le mettre en marche.
• Mettre l’appareil en mode manuel comme indiqué dans son mode d’emploi.
☞ Le mode flash ou multi-flash automatique n’est pas supporté par tous
les appareils photo en liaison avec un adaptateur SCA (voir les modes
d’emploi de l’appareil photo et de l’adaptateur SCA). Si l’appareil ne
supporte pas le mode multi-flash automatique avec un adaptateur
SCA, équiper le mecablitz avec le sabot standard SCA 301 ! Dans ce
cas, ne pas oublier de reporter à la main sur le mecablitz les valeurs
704 47 0099.A3
54 MZ-4i
01.02.2007
13:41 Uhr
Seite 49
de réglage de l’appareil photo (ISO, ouverture, position du zoom).
• Sélectionnez sur l’appareil une vitesse de synchro flash de 1/60e ou plus
longue.
• Mettez le flash en service par l’interrupteur général.
• Répéter l’appui sur la touche Mode (Fig. 1) jusqu’à faire apparaître un
A sur l’écran.
• Pendant le clignotement de A, tourner la molette (Fig. 1) et sélectionner
le mode maître Co (contrôleur) avec l’adresse Ad1 ou Ad2. Si A s’arrête
de clignoter, appuyer une fois sur la touche Mode. Appuyer sur la molette
(Fig. 1) dans le sens de la flèche pour sauvegarder le réglage. Si l’on
n’appuie pas sur la molette, le réglage est sauvegardé automatiquement
après 5 s ; A s’arrête alors de clignoter et est affiché en même temps que
Co et que l’adresse d’esclave Ad1 ou Ad2.
Procédure de réglage du flash esclave pour le mode multi-flash automatique Metz :
La procédure est la même que pour l’esclave en mode multi-flash TTL Metz.
Même en mode multi-flash automatique, le flash esclave fonctionne en mode TTL.
7.3 Appréciation des conditions d’éclairage globales en mode
multi-flash sans fil
Pour apprécier les conditions d’éclairage globales en mode multi-flash TTL et
automatique, il est possible de faire émettre une lumière pilote par tous les
flashes impliqués.
Pour déclencher la lumière pilote, la bouton d’essai (Fig. 1) du 54 MZ.. monté sur l’appareil photo doit être programmée pour cette fonction. A cet
effet, répéter l’action sur la touche Select (Fig. 1) pour appeler la fonction
lumière pilote
. Tourner ensuite la molette pour activer (On) ou désactiver
(OFF). La bouton d’essai (Fig. 1) permet de déclencher la lumière pilote
(voir aussi chapitre 12.).
8. Fill-in au flash
Le mecablitz peut aussi être utilisé en flash d’appoint pour la technique du
„fill-in“, c’est-à-dire pour délivrer en plein jour un éclair d’appoint pour déboucher les ombres et obtenir un éclairage plus équilibré dans les contrejours. Vous disposez de diverses possibilités.
8.1 Fill-in au flash en mode TTL
Le mecablitz doit être équipé de l’adaptateur SCA approprié. L’appareil
photo doit supporter le fill-in au flash TTL.
• Répéter l’action sur la touche Mode (Fig. 1) jusqu’à faire clignoter TTL
sur l’écran.
Sur la plupart des appareils photo, le fill-in au flash est activé automatiquement en lumière du jour dans les modes „tout automatique“, programme P et
les modes résultats (voir à ce sujet le mode d’emploi de l’appareil photo et de
l’adaptateur SCA). L’appareil photo assure automatiquement une répartition
équilibrée de l’éclairage du sujet et du fond.
Certains reflex offrent en plus un programme spécial de fill-in au flash qui
permet une mise en œuvre ciblée du fill-in. Suivant le type de reflex, l’activation se fait sur le reflex ou sur le mecablitz (voir à ce sujet le mode d’emploi
de l’appareil photo et de l’adaptateur SCA).
Exemple : dosage auto flash/ambiance avec mesure matricielle (uniquement sur certains appareils Nikon)
Le mecablitz doit être muni de l’adaptateur SCA 3402 (Nikon) !
Certains reflex Nikon supportent le „dosage auto flash/ambiance avec mesure matricielle“ (voir le mode d’emploi de l’appareil photo et de l’adaptateur SCA). Il s’agit d’un sous-mode du mode flash TTL. Le réglage est décrit
au chapitre 3.1.
Exemple : dosage auto flash/ambiance par multi-capteur 3D (uniquement
sur certains appareils Nikon)
Le mecablitz doit être muni de l’adaptateur SCA 3402 (Nikon) !
Certains reflex Nikon offrent la fonction de „dosage auto flash/ambiance
49
ĸ
704 47 0099.A3
54 MZ-4i
01.02.2007
13:41 Uhr
Seite 50
par multi-capteur 3D“ (voir le mode d’emploi de l’appareil photo et de
l’adaptateur SCA). Il s’agit d’un sous-mode du mode flash TTL. Le réglage est
décrit au chapitre 3.1.
8.2 Fill-in au flash en mode automatique non TTL
ĸ
• Mettre le flash en service par l’interrupteur général (Fig. 1) .
• Répéter l’action sur la touche Mode (Fig. 1) jusqu’à faire clignoter A sur l’écran du flash. Appuyer sur la molette (Fig. 1) dans le sens de la flèche pour
sauvegarder le réglage. Si l’on n’appuie pas sur la molette, le réglage est sauvegardé automatiquement après 5 s. Après sauvegarde, le pictogramme A cesse
de clignoter.
☞ En mode automatique non TTL, l’éclair du flash est dosé par le senseur
du mecablitz. Veiller à ce que la source de lumière de contre-jour ne
rayonne pas directement sur le senseur du mecablitz, car cela fausserait la mesure.
Déterminez à l’aide de l’appareil photo ou d’un posemètre l’ouverture et la
vitesse requises pour une exposition normale. Veillez à ce que cette vitesse ne
soit pas supérieure à la vitesse de synchro-flash (elle varie d’un appareil à
l’autre ; voir mode d’emploi de l’appareil photo).
Exemple :
Ouverture et vitesse déterminée par la mesure : f/8 ; 1/60e
Vitesse de synchro-flash de l’appareil p.ex. 1/100e (voir notice de l’appareil).
Les valeurs d’ouverture et de vitesse ainsi déterminées peuvent être réglées
sur l’appareil puisque la vitesse reste en deçà de la vitesse de synchronisation de l’appareil.
Pour obtenir un éclairage d’appoint réduit, par exemple pour conserver le caractère des ombres, il est recommandé de régler sur le flash un diaphragme
automatique fermé d’une division par rapport à l’ouverture réglée sur l’appareil. Dans notre exemple (8 sur l’appareil), on règlera donc le flash sur 5,6.
Si le mecablitz est muni de l’adaptateur SCA 3xx2 et que l’appareil photo
transmet automatiquement la valeur d’ouverture au mecablitz, une modification manuelle du réglage de l’ouverture n’est pas possible. Dans ce cas, on
50
pourra utiliser dans le mode automatique non TTL la correction manuelle
d’exposition au flash (voir chapitre 14.).
On pourra aussi recourir à la correction manuelle d’exposition au flash en
mode automatique non TTL lorsque l’appareil photo ne communique pas
avec le mecablitz.
Une correction supplémentaire de la valeur d’ouverture n’est alors plus nécessaire.
Conseil :
Si possible, utiliser le posemètre pour mesurer séparément le fond et le sujet.
L’expérience montre qu’une valeur de correction de -1IL (1 division de diaph.)
à -1 2/3 IL de l’ouverture automatique sur le mecablitz donne les meilleurs
résultats en fill-in au flash.
9. Le mode stroboscope (Fig. 6)
Dans ce mode, il est possible de déclencher plusieurs éclairs sur la même
vue. Cette fonction est particulièrement intéressante pour l’étude de mouvements et les effets spéciaux (Fig. 6). En mode stroboscope, un nombre prédéterminé d’éclairs sont délivrés avec une fréquence également réglable.
Cette fonction n’est donc possible qu’avec un niveau de puissance d’au maximum 1/4.
Pour la stroboscopie au flash, on peut régler la fréquence des éclairs de 1 à
50 Hz par pas de 1 Hz et le nombre d’éclairs entre 2 et 50 par pas de 1 éclair.
En mode stroboscope, la valeur de sensibilité du film n’est pas affichée ! Si le
mecablitz est muni de l’adaptateur SCA 3xx2 et que l’appareil photo transmet automatiquement la sensibilité au mecablitz, ce dernier se positionne
automatiquement sur la sensibilité du film (voir le mode d’emploi de l’appareil photo et de l’adaptateur SCA).
Si le mecablitz est muni d’un adaptateur SCA 3xx ou du sabot standard
SCA 301 ou si l’appareil photo ne transmet pas au mecablitz la sensibilité
du film, cette dernière doit être réglée avant la sélection du mode stroboscope dans les modes TTL, A ou M. Le mecablitz reprend alors le réglage,
même mode stroboscope.
704 47 0099.A3
54 MZ-4i
01.02.2007
13:41 Uhr
Seite 51
En mode stroboscope, le niveau de puissance maximal possible se règle de
lui-même. Pour obtenir de courtes durées d’éclair, vous pouvez réduire
manuellement le niveau de puissance jusqu’à 1/256. L’écran de contrôle
ACL affiche la distance correspondant aux paramètres réglés. En jouant sur
l’ouverture du diaphragme ou sur le niveau de puissance, la distance affichée pourra être ramenée à la valeur de la distance réelle de prise de vue.
L’ouverture réglée sur le flash devra être reportée sur l’appareil photo. La
portée pourra être augmentée en utilisant de films de haute sensibilité.
☞ Le mode stroboscope n’est pas possible lorsque le réflecteur secondaire est activé.
Procédure de réglage pour le mode stroboscope (Fig. 7):
• Mettre l’appareil en mode manuel comme spécifié dans le mode d’emploi
et sélectionner une vitesse d’obturation appropriée.
1 Equiper le flash d’un adaptateur SCA ou du sabot standard SCA 301 et le
mettre en service par l’interrupteur général (Fig. 1).
2 Répéter l’action sur la touche Mode (Fig. 1) jusqu’à faire clignoter
sur l’écran du flash. Appuyer sur la molette (Fig. 1) dans le sens de la
flèche pour sauvegarder le réglage. Si l’on n’appuie pas sur la molette, le
réglage est sauvegardé automatiquement après 5 s. Après sauvegarde, le
pictogramme
cesse de clignoter.
Mode stroboscope du mecablitz sur adaptateur SCA 3xx2 :
Lorsque le mecablitz est utilisé avec un adaptateur SCA 3xx2 sur un appareil
photo qui transmet automatiquement les paramètres sensibilité du film ISO,
position de la tête zoom et ouverture, il est inutile de procéder à d’autres réglages. Le mecablitz se règle en fonction des paramètres transmis par l’appareil photo. On réglera le nombre et la fréquence des éclairs comme indiqué aux points 3 et 4 ci-dessous.
☞ Lorsque le mecablitz est utilisé avec un appareil photo qui communique avec le mecablitz, les valeurs de sensibilité ISO et d’ouverture
ne sont pas modifiables sur le flash.
Mode stroboscope avec un adaptateur SCA 3xx, le sabot standard SCA 301
ou un appareil qui ne communique pas avec le flash (Fig. 7):
Dans ce cas, régler manuellement sur le mecablitz la valeur de sensibilité
ISO, la position de la tête zoom et l’ouverture. Ceci est indispensable pour
une exposition correcte au flash, car le mecablitz, sur la base de ces valeurs,
calcule et affiche la distance requise flash-sujet qui donne une exposition correcte au flash.
3 Régler le nombre d’éclairs. Tourner la molette (Fig. 1) pour amener la
flèche de pointage sur la position supérieure. Appuyer sur la molette, puis
tourner la molette pour sélectionner le nombre d’éclairs N et appuyer une
nouvelle fois sur la molette pour sauvegarder la valeur.
4 Régler la fréquence des éclairs f(Hz). Tourner la molette (Fig. 1) dans le
sens antihoraire pour amener la flèche de pointage sur f(Hz). Appuyer sur
la molette, puis tourner la molette pour sélectionner la fréquence voulue et
appuyer une nouvelle fois sur la molette pour sauvegarder la valeur.
☞ La valeur de distance est celle au sujet en mouvement. Pour éviter une
surexposition de l’arrière-plan, cette partie de l’image devrait être
très sombre et être très éloignée du sujet en mouvement. On obtient
les meilleurs résultats pour un faible niveau de lumière ambiante.
En ce qui concerne les réglages à effectuer sur l’appareil photo, veiller à
choisir un temps de pose suffisamment long.
Le tableau 3 donne les vitesses d’obturation maximales pour les différentes
combinaisons N - f(Hz).
51
ĸ
704 47 0099.A3
54 MZ-4i
01.02.2007
13:41 Uhr
Seite 52
10. Témoin de bonne exposition
ĸ
L’allumage du exposition o.k. (Fig. 1) signale en mode automatique ou
TTL que le film a été correctement exposé.
En déclenchant un éclair d’essai, vous disposez ainsi en mode automatique
non TTL d’un moyen de déterminer la bonne ouverture, notamment en flash
indirect avec des conditions de réflexion difficiles à apprécier.
L’éclair de test peut être déclenché au moyen du bouton d’essai (Fig. 1) si
ce bouton n’a pas été configuré par la „lumière pilote“ (voir chap. 12.).
Si le témoin de bonne exposition o.k. (Fig. 1) ne s’allume pas, il faudra
sélectionner une plus grande ouverture du diaphragme ou rapprocher le
flash de la surface réfléchissante ou du sujet et effectuer un nouvel essai.
La valeur d’ouverture ainsi déterminée sera ensuite reportée sur l’appareil.
☞ Orientez l’appareil et le flash comme plus tard lors de la prise de vue.
Cette possibilité est aussi utilisable en mode TTL pour éviter d’avoir à faire
des prises de vues d’essai. Mettez le flash en mode automatique et déterminez l’ouverture correcte comme précédemment, par des éclairs de test. Reportez sur l’appareil la valeur d’ouverture ainsi déterminée et remettez ensuite le flash en mode TTL.
Ce procédé donne des résultats relativement précis pour les focales moyennes de 28 mm à 85 mm env. Dans les cas limites, ce réglage peut cependant
donner une sous-exposition en mode TTL. Dans ce cas, le témoin de bonne
exposition reste alors éteint après la prise de vue. Répétez la photo en ouvrant le diaphragme d’une division (par ex. f/8 au lieu de f/11).
11. Illuminateur AF
☞ L’illuminateur AF
(Fig. 2) du mecablitz ne peut être activé que par
les reflex autofocus qui supportent un illuminateur AF sur le flash !
Certains reflex autofocus ne peuvent fonctionner qu’avec leur propre
illuminateur AF intégré (voir mode d’emploi de l’appareil photo). Le
mecablitz doit être muni d’un adaptateur SCA 3xx2 !
Lors du choix du mode autofocus sur l’appareil photo, sachez que la plupart
des appareils ne connaissent que le mode AF „One Shot“ ou „Single-AF“
(voir mode d’emploi de l’appareil photo).
Lorsque la lumière ambiante est insuffisante pour permettre une mise au
point automatique, l’électronique de l’appareil photo active l’illuminateur AF.
Celui-ci émet un réseau de bandes qu’il projette sur le sujet. Le système autofocus du boîtier utilise ces bandes pour réaliser la mise au point automatique. La portée de l’illuminateur AF est d’environ 9 m (pour un objectif standard f1,7/50 mm). Les objectifs zoom peu lumineux réduisent sensiblement
la portée de l’illuminateur AF.
☞ Certains reflex autofocus disposent de collimateurs AF supplémentaires à côté du collimateur AF central. Le réseau de bandes projeté
n’est exploitable que par le collimateur central du reflex. Le cas échéant, il faudra donc sélectionner manuellement le collimateur AF central (voir mode d’emploi de l’appareil et de l’adaptateur SCA).
12. Fonctions spéciales
Les fonctions spéciales du mecablitz peuvent être appelées successivement en
appuyant sur la touche Select (Fig. 1) et être activées, désactivées et sauvegardées en manœuvrant la molette (Fig. 1).
12.1 Fonction Bip
(avertisseur sonore)
La fonction bip permet d’obtenir une signalisation acoustique de quelques
fonctions du flash. Le photographe peut ainsi se concentrer pleinement sur le
sujet et la prise de vue sans être obligé constamment d’observer des signalisations visuelles.
52
704 47 0099.A3
54 MZ-4i
01.02.2007
13:41 Uhr
Seite 53
La fonction bip signale acoustique ment :
• la disponibilité/le recyclage du flash
• la bonne exposition
• la coupure automatique du flash
• les erreurs de manipulation.
Signalisation acoustique après mise en marche du mecablitz :
• Un bip court ininterrompu (2 s env.) après la mise en marche signale la
disponibilité du flash.
Signalisation acoustique après la prise de vue :
• Un bip ininterrompu (2 s env.) immédiatement après la prise de vue signale
que l’exposition a été correcte et que le flash est de nouveau disponible. Si
la prise de vue n’est pas suivie immédiatement du signal bip, c’est que la
photo est sous-exposée.
• Un bip intermittent immédiatement après la prise de vue signale que l’exposition a été correcte mais que le flash n’est pas encore disponible. La
disponibilité du flash sera signalée par un signal bip ininterrompu (3 s).
Signalisation acoustique lors des réglages en mode automatique non TTL „A“ :
• Une alarme sous forme de bip court signale en mode automatique non TTL
qu’un dosage correct de l’éclair n’est pas possible pour les réglages choisis
d’ouverture et de sensibilité. Le diaphragme automatique du mecablitz est
corrigé automatiquement sur la valeur admissible la plus proche.
Réglage de la fonction de signalisation acoustique (Fig. 9):
1 Répéter l’action sur la touche Select (Fig. 1) jusqu’à faire clignoter le pictogramme .
2 Tourner la molette (Fig. 1) et activer la fonction bip. „On“ s’affiche sur
l’écran du flash. Pour sauvegarder ce réglage, appuyer brièvement sur la
molette dans le sens de la flèche. Si l’on n’appuie pas sur la molette, le
réglage est sauvegardé automatiquement après 5 s.
Désactivation de la fonction de signalisation acoustique (Fig. 9)
1 Répéter l’action sur la touche Select (Fig. 1) jusqu’à faire clignoter le pic-
togramme .
2 Tourner la molette (Fig. 1) et désactiver la fonction bip. „OFF“ s’affiche
sur l’écran du flash. Pour sauvegarder ce réglage, appuyer brièvement sur
la molette dans le sens de la flèche. Si l’on n’appuie pas sur la molette, le
réglage est sauvegardé automatiquement après 5 s.
12.2 Verrouillage et déverrouillage des éléments de commande
La fonction de verrouillage permet de bloquer les touches Mode, Select et la
molette pour en interdire la manœuvre intempestive.
Pour verrouiller, enfoncer simultanément les touches Mode et Select pendant
environ 3 secondes jusqu’à ce que le pictogramme
apparaisse à
l’écran.
Pour déverrouiller, enfoncer simultanément les touches Mode et Select pendant environ 3 secondes pour faire disparaître le pictogramme
de
l’écran.
12.3 Coupure automatique du flash (Fig. 8)
Vous pouvez faire en sorte que le mecablitz s’éteigne automatiquement 1 ou
10 minutes environ après la dernière action (éclair, réglage ou enfoncement
du déclencheur à mi-course), pour empêcher les piles de se décharger inutilement.
Les réglages utilisés en dernier lieu restent conservés après la coupure du
flash et sont immédiatement rétablis à la remise en service.
Si le mecablitz est monté sur un adaptateur SCA 3xx2, il peut être réactivé
en enfonçant à mi-course le déclencheur de l’appareil photo.
Si le mecablitz est monté sur un adaptateur SCA 3xx ou sur le sabot standard SCA 301, il peut être réactivé en actionnant la molette.
53
ĸ
704 47 0099.A3
54 MZ-4i
01.02.2007
13:41 Uhr
Seite 54
Ȅ
Activation de la coupure automatique du flash (Fig. 8):
1 Répéter l’action sur la touche Select (Fig. 1) jusqu’à faire clignoter le
pictogramme
.
2 Tourner la molette pour sélectionner la temporisation de coupure automatique 1m (1 minute) ou 10m (10 minutes). „On“ s’affiche sur l’écran du
flash. Pour sauvegarder ce réglage, appuyer brièvement sur la molette (Fig. 1) dans le sens de la flèche. Si l’on n’appuie pas sur la molette, le réglage est sauvegardé automatiquement après 5 s. Après sauvegarde, le pictogramme
apparaît sur l’écran du flash.
Si
le
mecablitz
reste inutilisé pendant une longue période, coupez-le
☞
au moyen de l’interrupteur général.
Ȅ
ĸ
Ȅ
Désactivation de la coupure automatique du flash :
1 Répéter l’action sur la touche Select (Fig. 1) jusqu’à faire clignoter le
pictogramme „horloge“.
2 Tourner la molette pour faire apparaître „OFF“ sur l’écran du flash. Pour
sauvegarder ce réglage, appuyer brièvement sur la molette (Fig. 1)
dans le sens de la flèche. Si l’on n’appuie pas sur la molette, le réglage est
sauvegardé automatiquement après 5 s. Le pictogramme
disparaît de
l’écran du flash.
12.4 REAR - Synchronisation sur le second rideau (Fig. 10 et 11)
La synchronisation sur le second rideau ne produit de l’effet que pour les
prises de vue avec temps de pose long (supérieurs à 1/30e de seconde) et
pour des sujets animés portant une source lumineuse, car la source lumineuse mobile laisse alors derrière elle une traînée, contrairement à ce qui est
le cas pour la synchronisation sur le premier rideau où la „traînée“ précède
la source lumineuse. La synchronisation sur le second rideau permet donc de
rendre avec naturel les sujets lumineux animés.
☞ La fonction REAR n’est utilisable que si le mecablitz est muni d’un adaptateur SCA approprié et est monté sur un appareil photo qui supporte
cette fonction. L’appareil photo doit être en service pour pouvoir appeler et régler cette fonction ! Et il faudra enfoncer à mi-course le déclen54
cheur de l’appareil pour qu’il se produise au moins une fois une communication entre appareil photo et mecablitz ou adaptateur SCA.
Consultez les modes d’emploi respectifs pour savoir si votre appareil photo
ou adaptateur SCA supporte la synchronisation sur le second rideau.
Sur certains appareils photo, la fonction REAR n’est pas possible dans certains modes. Dans ce cas, il ne sera pas possible de la sélectionner, ou si elle
était sélectionnée auparavant elle sera désactivée automatiquement. Voir le
mode d’emploi de l’appareil et de l’adaptateur SCA !
Activation de la fonction REAR :
• Répéter l’action sur la touche Select (Fig. 1) jusqu’à faire apparaître
„REAR“ sur l’écran du flash. Tourner la molette pour mettre sur „On“.
Sauvegarder la fonction „REAR“ en appuyant brièvement sur la molette
dans le sens de la flèche. Si l’on n’appuie pas sur la molette, le réglage est
sauvegardé automatiquement après 5 s.
Après sauvegarde, le pictogramme „REAR“ de synchronisation sur le second
rideau reste affiché sur l’écran du flash.
Conseil :
Considérant les temps de pose relativement longs pour ce genre de prise de
vue, monter votre appareil sur un trépied pour éviter les bougés.
☞ Désactivez la fonction lorsque vous n’en avez plus besoin, sans quoi
les prises de vue „normales“ au flash par ex. dans les modes P ou
créatifs (priorité diaph ou vitesse) donneraient des photos bougées en
raison du temps de pose prolongé.
La fonction „REAR“ peut aussi être réglée directement sur certains appareils
photo, auquel cas „REAR“ n’est pas affiché sur l’écran du mecablitz.
Désactivation de la fonction REAR :
• Répéter l’action sur la touche Select (Fig. 1) jusqu’à faire apparaître
„REAR“ sur l’écran du flash. Tourner la molette pour faire apparaître „OFF“.
Sauvegarder ce réglage en appuyant sur la molette dans le sens de la flèche.
Si l’on n’appuie pas sur la molette, le réglage est sauvegardé automatiquement après 5 s. Le pictogramme „REAR“ disparaît de l’écran du flash.
704 47 0099.A3
54 MZ-4i
01.02.2007
13:41 Uhr
Seite 55
12.5 Lumière pilote / Modelling Light
12.6 Adaptation de la focale au format de l’appareil photo
La lumière pilote est une séquence d’éclairs stroboscopiques à haute fréquence d’une durée de 4 s donnant l’impression d’une lumière continue. La
lumière pilote permet de mieux apprécier la répartition de la lumière et des
ombres avant même la prise de vue.
Activation de la fonction Lumière pilote :
• Répéter l’action sur la touche Select (Fig. 1) jusqu’à faire clignoter le
pictogramme
. Tourner la molette pour faire apparaître „On“.
Sauvegarder la fonction Lumière pilote en appuyant sur la molette dans le
sens de la flèche. Si l’on n’appuie pas sur la molette, le réglage est sauvegardé automatiquement après 5 s.
Lors de l’utilisation d’un adaptateur SCA 3xx2, le témoin de disponibilité
clignote sur le mecablitz. Enfoncer la touche (Fig. 1)pour déclencher
l’émission de la lumière pilote par le mecablitz.
En mode multi-flash Metz ( TTL ou automatique), le déclenchement de la lumière pilote sur le flash maître déclenche aussi la lumière pilote sur tous les
flashes esclaves (pour 40 MZ-... monté sur adaptateur SCA 3080 à partir de
la version M ou sur un adaptateur SCA 3082).
Avec des accus à pleine capacité (600 mAh), l’autonomie est de 60 éclairages en lumière pilote. L’emploi de piles sèches courantes n’est pas recommandé pour la lumière pilote car leur résistance interne plus élevée empêche
une mise à disposition suffisamment rapide de l’énergie par le condensateur
de flash pour la séquence d’éclairs.
Désactivation de la fonction Lumière pilote :
• Répéter l’action sur la touche Select (Fig. 1) jusqu’à faire clignoter le
pictogramme
. Tourner la molette pour faire apparaître „OFF“ sur l’écran du flash. Pour sauvegarder ce réglage, appuyer brièvement sur la
molette dans le sens de la flèche. Si l’on n’appuie pas sur la molette, le
réglage est sauvegardé automatiquement après 5 s.
Le témoin de recyclage (Fig. 1) du mecablitz reste allumé sans clignoter.
Cette fonction permet d’adapter la position affichée de la tête zoom du mecablitz au format de l’appareil photo. Ceci permet de faire coller les distances
focales des objectifs d’appareils moyen format (4,5x6, 6x6, 6x7 et 6x9) et
des appareils APS avec la valeur affichée sur le mecablitz. Pour les reflex
35 mm (24x36), on dispose en plus de la fonction Extended Zoom.
La fonction Extended Zoom a pour effet de réduire la distance focale du
mecablitz d’un cran par rapport à la focale de l’objectif. Il en résulte une
plus grande couverture qui, en intérieur, procure un supplément de lumière
diffuse, donnant ainsi un éclairage plus doux en lumière flash.
Exemple d’emploi de la fonction Extended Zoom :
L’objectif monté sur le boîtier a une focale fixe de 50 mm.
En mode Extended Zoom, le mecablitz positionne sa tête zoom sur 35 mm.
Procédure de réglage pour adapter la focale au format de l’appareil
photo (Fig. 12):
1 Répéter l’action sur la touche Select (Fig. 1) jusqu’à faire apparaître
„Zoom“ sur l’écran du flash.
2 Tourner la molette (Fig. 1) pour sélectionner l’adaptation voulue entre
focale affichée et format d’appareil photo.
Affichage sur le flash :
Zoom sans indication complémentaire = réglage pour le format standard
24x36.
Auto Zoom avec une des indications complémentaires suivantes :
E
mode Extended Zoom (uniquement pour le format 24x36) (Fig. 12)
APS
adaptation à un appareil photo APS
F1
adaptation à un appareil moyen format 4,5x6
F2
adaptation à un appareil moyen format 6x6, 6x7 ou 6x9
remarque concernant la fonction Extended Zoom activée
• Après sélection, sauvegarder le réglage en appuyant sur la molette (Fig.
1) dans le sens de la flèche. Si l’on n’appuie pas sur la molette, le réglage
55
ĸ
704 47 0099.A3
54 MZ-4i
01.02.2007
13:41 Uhr
Seite 56
est sauvegardé automatiquement après 5 s. Ce réglage reste conservé
après la coupure du flash mecablitz.
Le symbole
sur l’écran du flash signale que l’une des adaptations de focale précitées est active.
12.7 Séquence de bracketing au flash „Fb“ (Fig. 13)
ĸ
Dans les modes TTL et A, le mecablitz 54 MZ-.. permet de réaliser un bracketing
au flash, c’est-à-dire une séquence automatique à exposition différenciée.
Le bracketing au flash consiste en une séquence de 3 photos successives exposées avec des valeurs de correction d’exposition différentes. La première
photo de la séquence est prise sans correction d’exposition, la seconde avec
une correction négative et la troisième avec une correction positive. Après la
séquence de 3 photos, le mode est annulé automatiquement.
Bracketing au flash „Fb“ en mode TTL :
Le bracketing au flash en mode TTL n’est possible que si le mecablitz est muni
d’un adaptateur SCA approprié (SCA 3xx2) et que l’appareil photo supporte
une correction manuelle d’exposition sur le flash.
Si l’appareil photo ne supporte pas la correction manuelle d’exposition sur le
flash, on pourra certes régler une valeur de correction pour la séquence de
bracketing, mais l’appareil photo exposera les photos sans correction. Voyez
à ce sujet les modes d’emploi de l’appareil et de l’adaptateur SCA !
Bracketing au flash „Fb“ en mode A :
Pour un bracketing au flash en mode A, il suffit que le flash soit monté sur un
sabot standard SCA 301. La séquence de bracketing au flash en mode automatique non TTL est aussi possible avec un adaptateur SCA.
☞ Sur certains appareils photo, des raisons techniques interdisent le
bracketing au flash „Fb“ en mode A !
Sur certains appareils photo, des raisons techniques interdisent le bracketing
au flash „Fb“ en mode A si le flash mecablitz n’est pas monté sur le sabot
standard SCA 301.
Voyez à ce sujet les modes d’emploi de l’appareil et de l’adaptateur SCA !
56
Activation du bracketing au flash “Fb” (Fig. 13):
1 Répéter l’action sur la touche Select (Fig. 1) jusqu’à faire apparaître
„Fb“ sur l’écran du flash.
2 Tourner la molette (Fig. 1) pour sélectionner le facteur de correction voulu pour la séquence de bracketing. Durant le réglage, „EV“ et la valeur du
facteur de correction clignotent sur l’écran. Sauvegarder le réglage en
appuyant sur la molette dans le sens de la flèche. Si l’on n’appuie pas sur
la molette, le réglage est sauvegardé automatiquement après 5 s.
L’écran du mecablitz affiche „Fb 1“ signalant par là la première photo de la
séquence qui sera prise sans tenir compte du facteur de correction.
Après avoir pris la première photo, l’écran affiche „Fb 2“ avec en plus „EV“
et le facteur de correction négatif qui sera pris en compte pour la deuxième
photo.
Après la deuxième photo, l’écran affiche „Fb 3“ avec en plus „EV“ et le facteur de correction positif qui sera pris en compte pour la deuxième photo.
Après la troisième photo, les affichages „Fb“, „EV“ et la valeur de correction
disparaissent de l’écran.
☞ Pour une nouvelle séquence de bracketing au flash, il faut reprendre
la procédure d’activation du bracketing depuis le début.
Pour interrompre la séquence de bracketing avant la troisième photo, couper
passagèrement le mecablitz au moyen de l’interrupteur général.
12.8 Réinitialisation sur les réglages de base
En maintenant enfoncé la touche Mode (Fig. 1) pendant au moins 3
secondes, le mecablitz reprendra ses valeurs de réglage de base. Le mode
sélectionné reste conservé.
Les réglages suivants sont effacés :
• sous-modes TTL „HSS“, „ETTL“, „3D“ et les modes multi-flash
• sous-mode manuel „HSS“
• niveaux de puissance partielle introduits manuellement
• bracketing au flash “Fb”
704 47 0099.A3
54 MZ-4i
01.02.2007
13:41 Uhr
Seite 57
• adaptation de focale „E“, „APS“, „F1“ et „F2“
• synchronisation sur le second rideau (REAR)
• fonction lumière pilote
• verrouillage des éléments de commande
Les réglages suivants sont activés :
• coupure automatique du flash après 10 minutes
• fonction bip active
• „Auto Zoom“ actif
12.9 Tête zoom motorisée
Lorsque le mecablitz est utilisé avec un adaptateur SCA 3xx2 sur un appareil
photo qui transmet automatiquement la distance focale de l’objectif au mecablitz, la position de la tête zoom motorisée du mecablitz est asservie automatiquement à la distance focale de l’objectif. „Auto Zoom“ s’affiche sur l’écran
du mecablitz.
Lorsque le mecablitz est monté sur un adaptateur SCA 3xx ou sur le sabot
standard SCA 301, la position de la tête zoom du flash doit être adaptée à
la main.
• Tourner la molette (Fig. 1) pour amener la flèche de pointage sur
„Zoom“.
• Appuyer sur la molette (Fig. 1) dans le sens de la flèche : la flèche de
pointage se met à clignoter.
• Tourner la molette pour sélectionner la position voulue de la tête zoom.
• Appuyer sur la molette (Fig. 1) dans le sens de la flèche pour sauvegarder le réglage. Si l’on n’appuie pas sur la molette, le réglage est sauvegardé automatiquement après 5 s. Après sauvegarde, la flèche de pointage
cesse de clignoter.
Si vous utilisez un objectif zoom et que vous n’ayez pas toujours besoin de la
pleine puissance et de la portée maximale du mecablitz, vous pouvez laisser
la tête zoom sur la position correspondant à la plus petite focale de l’objectif
zoom. Vous avez ainsi la garantie que votre image sera toujours éclairée
plein cadre et vous vous économisez l’adaptation permanente au changement de focale.
Exemple :
Vous utilisez un objectif zoom 28 - 80 mm. Dans ce cas, vous réglez la tête
zoom sur la position 28 mm !
Modification de la position de la tête zoom avec un adaptateur SCA 3xx2
et un appareil photo qui communique avec le flash :
La position de la tête zoom peut être modifiée même si le mecablitz est utilisé
avec un adaptateur SCA 3xx2 sur un appareil photo qui communique avec
le flash :
sélection de la position désirée de la tête zoom, voir ci-dessus.
Après sauvegarde, l’écran n’affiche plus „AutoZoom“ mais uniquement
„Zoom“. La position sélectionnée de la tête zoom est affichée sur l’écran du
mecablitz, signalant ainsi que cette position a été réglée à la main.
Retour au mode „AutoZoom“ :
• Tourner la molette (Fig. 1) pour amener la flèche de pointage sur
„Zoom“.
• Appuyer sur la molette dans le sens de la flèche : la flèche de pointage se
met à clignoter.
• Tourner la molette (Fig. 1) pour faire apparaître sur l’écran
„AutoZoom“.
• Appuyer sur la molette dans le sens de la flèche pour sauvegarder le réglage. Si l’on n’appuie pas sur la molette, le réglage est sauvegardé automatiquement après 5 s. Après sauvegarde, la flèche de pointage cesse de
clignoter.
☞ Le flash doit être monté sur l’appareil photo en marche !
12.10 Commutation m - ft
• Couper le mecablitz avec l’interrupteur général (Fig. 1).
• Maintenez l’appui sur la touche Select (Fig. 1) pendant que vous
repoussez l’interrupteur général de OFF sur “On”.
57
ĸ
704 47 0099.A3
54 MZ-4i
01.02.2007
13:41 Uhr
Seite 58
13. Diffuseur grand angle
ĸ
Tirer vers l’avant, jusqu’en butée, le diffuseur grand angle (Fig. 2) se trouvant sous le réflecteur principal et le relâcher. La tête zoom se positionne automatiquement sur 20 mm, et le diffuseur grand angle se relève automatiquement pour venir se placer devant le réflecteur principal. Les valeurs de distance
et de zoom affichées sur l’écran du mecablitz sont corrigées.
Pour escamoter le diffuseur grand angle (Fig. 2), le rabattre de 90° vers le
bas et le repousser entièrement dans son logement.
En liaison avec le diffuseur grand angle ou avec d'autres compléments optiques tels que filtres colorés, filtres gris neutre, Mecabounce, etc., on ne pourra pas utiliser les modes de fonctionnement qui mettent en œuvre un pré-éclair
de mesure ou la synchronisation en vitesse rapide (HSS).
14. Correction manuelle d’exposition au flash
☞ La correction manuelle d’exposition au flash n’est possible qu’avec un
adaptateur SCA 3xx2.
☞ En mode automatique A, la correction manuelle d’exposition au flash
est possible avec un adaptateur SCA 3xx et SCA 3xx2.
L’automatisme d’exposition du mecablitz et de la plupart des appareils photo
est calibré pour une réflectance de 25 % (réflectance moyenne des sujets pris
au flash). Les fonds sombres qui absorbent beaucoup de lumière ou les fonds
clairs très réfléchissants (par ex. contre-jour) peuvent se traduire respectivement par une sous-exposition ou une surexposition.
On rattrapera l’erreur d’exposition mentionnée, l’exposition peut être corrigée
manuellement d’une valeur adaptée à la situation de prise de vue. La valeur de
la correction dépend du contraste entre le sujet et le fond. On peut entrer sur le
mecablitz en mode TTL et automatique non TTL des valeurs de correction d’exposition au flash -3 IL à +3 IL (divisions de diaphragme) par incréments de
1/3 IL. De nombreux appareils disposent d’un élément de réglage de la correction d’exposition, qui peut aussi être utilisé pour le flash TTL.
58
Respecter les indications du mode d’emploi de l’appareil photo et de l’adaptateur SCA.
Dans le cas présent, on ne pourra pas corriger l’exposition en jouant sur l’ouverture de l’objectif car l’automatisme d’exposition de l’appareil interprèterait
l’ouverture modifiée comme un diaphragme de travail tout à fait normal.
☞ Sujet sombre sur fond clair : valeur de correction positive
(1 à 2 IL env.)
Sujet clair sur fond sombre : valeur de correction négative
(1 à 2 IL env.)
Le réglage d’une valeur de correction peut entraîner la modification de la
portée affichée sur l’écran du mecablitz et son adaptation à la valeur de correction (fonction du type d’appareil et de l’adaptateur SCA).
Réglage d’une correction d’exposition manuelle au flash :
• Le mecablitz se trouve en mode TTL ou A.
• Tourner la molette (Fig. 1) pour faire apparaître „EV“ à l’écran. La flèche pointant sur „EV“ signale que la position permettant d’entrer une
valeur de correction d’exposition au flash est sélectionnée.
• Appuyer sur la molette dans le sens de la flèche : la flèche de pointage se
met à clignoter.
• Tourner la molette pour sélectionner une valeur de correction appropriée.
La valeur de correction est affichée sur l’écran du mecablitz.
• Appuyer sur la molette dans le sens de la flèche pour sauvegarder la valeur de correction. Si l’on n’appuie pas sur la molette, le réglage est sauvegardé automatiquement après 5 s. Après sauvegarde, la flèche pointant
sur „EV“ cesse de clignoter et la valeur de correction réglée est affichée sur
l’écran du mecablitz.
Annulation d’une correction d’exposition manuelle au flash :
• Tourner la molette (Fig. 1) pour amener la flèche de pointage sur „EV“.
• Appuyer sur la molette dans le sens de la flèche : la flèche de pointage se
met à clignoter.
704 47 0099.A3
54 MZ-4i
01.02.2007
13:41 Uhr
Seite 59
• Tourner la molette pour faire disparaître de l’écran la valeur de correction.
• Appuyer sur la molette dans le sens de la flèche pour sauvegarder le réglage. Si l’on n’appuie pas sur la molette, le réglage est sauvegardé automatiquement après 5 s. Après sauvegarde, la flèche de pointage cesse de
clignoter.
☞ La correction manuelle d’exposition au flash n’est possible que si l’appareil photo supporte cette fonction. Si ce n’est pas le cas, on pourra
certes régler une valeur de correction sur le mecablitz, mais elle restera sans effet pour la prise de vue.
La transmission du mecablitz à l'appareil photo d'une valeur de correction d'exposition au flash n'est possible qu'en mode TTL avec un adaptateur SCA 3xx2
qui supporte cette fonction.
Sur de nombreux appareils photo, la correction manuelle d’exposition au
flash doit être réglée sur l’appareil photo même (voir le mode d’emploi de
l’appareil photo). Dans ce cas, la valeur de correction n’est pas affichée sur
le mecablitz.
Certains appareils photo permettent de régler la correction manuelle d’exposition au flash sur l’appareil photo même ou sur le flash. Pour savoir quel réglage est prioritaire, veuillez consulter le mode d’emploi de l’appareil photo
ou de l’adaptateur SCA.
15. Entretien
Eliminez la poussière et la saleté au moyen d’un chiffon doux, sec ou siliconé.
N’utiliser pas de détergent sous risque d’endommager la matière plastique.
Formation du condensateur de flash :
Si le flash reste longtemps sans être mis sous tension, le condensateur de
flash subit une modification physique. Pour éviter ce phénomène, il est nécessaire de mettre le flash en marche pendant 10 minutes env. à intervalles de
trois mois environ. La charge de l’accu doit être suffisante pour que le témoin
de recyclage s’allume au plus tard 1 minute après la mise en marche.
16. Caractéristiques techniques
Nombre-guide max. pour ISO 100/21°, Zoom 105 mm :
pour mètres : 54
pour pieds : 177
12 diaphragmes auto pour ISO 100/21° :
1 -1,4 - 2 - 2,8 - 4 - 5,6 - 8 - 11 - 16 - 22 - 32 - 45
Durées de l’éclair :
• 1/200 ... 1/20 000 seconde
• en mode M, env. 1/200 s à pleine puissance
• 1/600 s env. à 1/2 puissance
• 1/1400 s env. à 1/4 de puissance
25° env.
Champ de mesure du senseur :
Température de couleur :
5600 K env.
Sensibilité du film :
ISO 6 à ISO 6400
Synchronisation :
amorçage à très basse tension
Autonomie approx. :
60*
avec accus NiCd
180* avec piles alcalines au manganèse hautes performances
Temps de recyclage :
• avec accus NiCd
5 s (en mode M)*
0,1 . . 5 s (en mode A/TTL)
• avec piles alcalines au manganèse hautes performances
6 s (en mode M)*
0,1 . . 6 s (en mode mode A/TTL)
* à pleine puissance
59
ĸ
704 47 0099.A3
ĸ
54 MZ-4i
01.02.2007
13:41 Uhr
Seite 60
Orientation et crantages de la tête zoom :
vers le haut/bas
60° 75° 90° / -7°
vers la gauche
30° 60° 90° 120° 150° 180°
vers la droite
30° 60° 90°
Dimensions en mm (H x L x P) :
75 x 125 x 108
Poids :
flash avec piles/accus : 480 grammes env.
Fourniture :
Flash, Etui T54, sabot standard 301*, plaquette de recouvrement*, mode
d’emploi, tableau SCA 300/3002.
* (sauf pour flashes en set)
Sous réserve de modifications et d’erreus !
17. Terminologie
• Témoin de bonne exposition dans le viseur
En mode TTL ou automatique non TTL, l’exposition correcte ou la sous-exposition du film sont signalées par un témoin lumineux dans le viseur de
nombreux appareils reflex.
• Commande automatique de la vitesse de synchro-flash
Sur la plupart des reflex système, la disponibilité du flash s’accompagne
de la commutation sur la vitesse de synchro-flash. Sur certains appareils,
les vitesses plus lentes restent conservées. L’appareil recommute automatiquement sur la vitesse réglée auparavant si le témoin de disponibilité du
flash reste éteint après un éclair ou après coupure du flash.
• Commande d’amorçage
Si pour l’ouverture réglée sur l’objectif et pour la lumière ambiante existante,
on obtient une vitesse égale ou supérieure à la vitesse de synchro-flash, le
60
déclenchement de l’appareil photo ne s’accompagne pas de l’amorçage
d’un éclair. La photo est prise avec la lumière ambiante, évitant ainsi une
surexposition.
• Synchronisation sur le premier ou le second rideau (voir Fig. 10 et 11)
On dispose de deux possibilités pour la synchronisation du flash :
- sur l’instant d’ouverture du premier rideau, ou
- sur l’instant précédant de peu le démarrage du second rideau.
Le mode de synchronisation est sélectionné sur l’appareil photo SCA. La
synchronisation sur le second rideau donne le meilleur effet pour la photographie en vitesse lente de sujets mobiles portant une source lumineuse.
• Illuminateur AF
Lorsque la lumière ambiante est insuffisante pour permettre une mise au
point automatique, l’électronique de l’appareil photo active l’illuminateur
AF. Celui-ci émet un réseau de bandes qu’il projette sur le sujet. Le système
autofocus du boîtier utilise ces bandes pour réaliser la mise au point automatique. En liaison avec un adaptateur autofocus SCA 3xx, seul est activé
l’illuminateur AF incorporé dans l’adaptateur.
• Automatisme programmé du flash
En mode „Programme“, certains appareils photo gèrent l’éclairage mixte
par lumière ambiante et flash. L’appareil photo sélectionne automatiquement le couple vitesse-ouverture et dose l’éclair du flash en mode TTL. Ceci
facilite énormément l’utilisation de la combinaison appareil photo et flash.
• Fill-in au flash
Certains reflex système offrent non seulement le contrôle TTL du flash mais
aussi le contrôle TTL du fill-in au flash. Ce mode est réservé aux prises de
vue en plein jour pour déboucher les ombres ou en contre-jour. Sur la base
de la mesure fournie par sa cellule et de son traitement interne, l’appareil
photo dose l’intensité de l’éclair pour un éclairage équilibré du sujet et du
fond. En fill-flash, l’appareil photo effectue toujours une correction d’exposition au flash.
704 47 0099.A3
54 MZ-4i
01.02.2007
13:41 Uhr
Seite 61
• Correction d’exposition au flash TTL
Certaines situations de prise de vue peuvent fausser la mesure effectuée
par la cellule interne de l’appareil photo. C’est ainsi qu’un sujet sombre
devant un fond clair sera sous-exposé, et inversement, que le sujet clair devant un arrière-plan sombre sera surexposé. On pourra obtenir une exposition correcte en jouant sur la combinaison ouverture-vitesse, en modifiant
la sensibilité du film ou en introduisant une correction en +/- sur l’appareil.
Ceci a cependant pour effet d’influencer tous les éléments de l’image. C’est
pourquoi certains appareils offrent une correction spéciale de l’exposition
au flash. Dans ce cas, la lumination globale reste conservée et l’on se contente d’utiliser l’éclair du flash pour sortir de l’ombre les zones sombres.
Vous trouverez de plus amples informations dans le mode d’emploi de
l’adaptateur et de l’appareil photo.
• Pré-éclairs anti-yeux rouges
(uniquement avec adaptateur SCA 3402 Nikon)
Les yeux rouges sont un effet purement physiologique. Cet effet se présente
toujours lorsque la personne photographiée regarde plus ou moins directement en direction de l’appareil photo, lorsque la lumière ambiante est faible et que le flash est monté directement sur l’appareil photo ou à sa proximité directe. L’éclair vient alors frapper le fond des yeux, et la rétine, qui
présente une forte irrigation sanguine, devient visible à travers la pupille
dilatée du fait de l’obscurité. C’est ce qui forme la tache rouge sur la pellicule.
La fonction anti-yeux rouges apportent une amélioration sensible. Elle consiste à déclencher, avant l’ouverture du premier rideau et avant les éclairs
de mesure pour le multi-capteur, trois éclairs visibles de faible intensité (si
le flash et l’appareil photo le permettent) qui seront ensuite suivis de l’éclair
principal.
Les pré-éclairs ont pour objet de provoquer un rétrécissement de la pupille
au moment de l’éclair principal ; atténuant ainsi l’effet d’yeux rouges. Cette
fonction est disponible dans tous les programmes d’exposition. Pour de
plus amples informations, voir le mode d’emploi de l’appareil photo.
• Mode TTL-HSS
Ce mode de contrôle permet d’utiliser le flash avec des vitesses supérieures
à la vitesse de synchro-flash de l’appareil photo. Il présente de l’intérêt
pour le portrait dans des conditions de lumière ambiante très intense, si
l’on veut réduire la profondeur de champ tout en gardant une ouverture
relativement grande.
• Mode flash ETTL (uniquement avec Canon SCA 3102)
Dans ce mode, la prise de vue est précédée par un pré-éclair ayant pour
objet de déterminer les propriétés réfléchissantes du sujet.
• Mode ETTL-HSS
Ce mode de contrôle permet d’utiliser le flash avec des vitesses supérieures
à la vitesse de synchro-flash de l’appareil photo.
• Contrôle de flash 3D TTL (uniquement avec Nikon SCA 3402)
Dans ce mode de contrôle, l’action sur le déclencheur est suivie, avant
même le départ du premier rideau, de l’émission d’éclairs de mesure à
peine visibles qui permettent à l’appareil photo d’obtenir des informations
sur la luminosité et le contraste.
18. Accessoires en option
☞ Nous déclinons toute responsabilité pour le mauvais fonctionnement
et l’endommagement du mecablitz dus à l’utilisation d’accessoires
d’autres constructeurs.
• Adaptateurs du système SCA 3xx
Pour utilisation du flash en mode spécifique. Voir mode d’emploi séparé.
• Adaptateurs du système SCA 3xx2
Pour utilisation du flash en mode spécifique avec transmission numérique
des informations par le système SCA. Extension fonctionnelle par rapport
au système SCA 3xx. Voir mode d’emploi séparé.
• Assortiment de filtres 44-32
(réf. 00004432A)
comprenant 4 filtres colorés pour effets et un filtre transparent pouvant
recevoir des films colorés de toute couleur.
61
ĸ
704 47 0099.A3
ĸ
54 MZ-4i
01.02.2007
13:41 Uhr
Seite 62
• Mecabounce 44-90
(réf. 000044900)
Ce diffuseur permet de réaliser en toute simplicité un éclairage doux. L’effet
adoucissant est fabuleux et procure aux images un certain flou artistique.
La peau est reproduite avec une teinte plus naturelle. Les valeurs de portée
sont réduites du facteur 2 dans le rapport de la perte de lumière.
• Bloc-batterie Power-Pack P50
(réf. 00012950A)
pour plus d’autonomie et un recyclage plus court du flash (env. 300 éclairs
à pleine puissance). Prière de commander aussi le câble de liaison
(réf. 000054505).
• Bloc-batterie Power-Pack P40
(réf. 000129405)
Sa capacité nettement supérieure aux accus usuels AA/Mignon garantit
une plus grande autonomie. Prière de commander aussi le câble de liaison
(réf. 000054400).
• Ecran réfléchissant 54-23
(réf. 000054236)
renvoie une lumière diffuse pour atténuer les ombres portées.
• Barrette 40-36/2
(réf. 000040363)
pour fixier le flash sur le côté du reflex.
• Adaptateur esclave 3083
(réf. 000330838)
permet le pilotage sans fill de flashes 54 MZ-.. ou 70 MZ-4 avec contrôle
d’exposition TTL.
62
19. Remèdes en cas de mauvais fonctionnement
(Ca) = système Canon ;
utilisation du mecablitz avec SCA 3102
(Mi) = système Minolta ;
utilisation du mecablitz avec SCA 3302
(Ni) = système Nikon ;
utilisation du mecablitz avec SCA 3402
(Pe) = système Pentax ;
utilisation du mecablitz avec SCA 3702
S’il devait arriver que l’écran de contrôle ACL affiche des valeurs aberrantes ou que le flash ne fonctionne pas comme il le devrait dans les différents modes, procédez comme suit :
• coupez le flash au moyen de l’interrupteur général ;
• sortez les piles ou accus du flash ;
• remettez l’interrupteur général sur On pendant env. 1 seconde, puis de
nouveau sur OFF.
• remettez en place les piles ou remplacez-les par des piles fraîches ou des
accus rechargés.
Impossibilité de sélectionner sur le mecablitz la synchronisation sur le
deuxième rideau (mode REAR).
• La synchronisation sur le deuxième rideau (REAR) ne peut être sélectionnée
sur le mecablitz que si ce dernier est équipé d'un adaptateur SCA 3xx2
approprié (voir le mode d'emploi de l'adaptateur SCA) et s'il est monté sur
un appareil en marche. Il faut qu'il y ait eu au moins un échange de données entre l'appareil photo et l'adaptateur SCA (il suffit à cet effet d'enfoncer légèrement le déclencheur sans prendre la photo). L'appareil photo
doit posséder la fonction de synchronisation sur le deuxième rideau (voir le
mode d'emploi de l'appareil et de l'adaptateur SCA) !
704 47 0099.A3
54 MZ-4i
01.02.2007
13:41 Uhr
Seite 63
• (Ni) Le mode flash 3D Nikon est activé sur le mecablitz; le symbole
s'affiche sur l'écran ACL. Le mode flash 3D Nikon ne peut pas être utilisé
conjointement avec le mode REAR.
Remède possible : désactiver d'abord le mode 3D, puis activer le mode
REAR.
• (Ni) La fonction de pré-éclairs anti-yeux rouges est activée sur le reflex Nikon.
Le symbole s'affiche sur l'écran de contrôle ACL du mecablitz. La fonction de
pré-éclairs ne peut pas être utilisée conjointement avec le mode REAR.
Remède possible : désactiver d'abord la fonction de pré-éclairs anti-yeux
rouges sur le reflex, puis activer le mode REAR.
• (Mi) En liaison avec les reflex Minolta, la synchronisation sur le deuxième
rideau (mode REAR) doit toujours être réglée sur le reflex lui-même ! Le
mode de synchronisation n'est pas signalé sur le mecablitz ! Pour savoir si
le mode REAR est possible avec le reflex considéré et comment procéder
au réglage, prière de consulter le mode d'emploi de l'appareil photo.
Impossibilité de régler le mode HSS TTL (E-TTL) sur le mecablitz.
Le mode HSS (synchronisation en vitesse rapide) TTL (E-TTL) n'est possible
pour l'instant qu'avec le mecablitz 54 MZ-.. !
• Le mode de synchronisation HSS TTL (E-TTL) n'est réglable sur le mecablitz
que si celui-ci est équipé d'un adaptateur SCA 3xx2 approprié (voir le
mode d'emploi de l'adaptateur SCA) et s'il est monté sur un appareil photo
en marche. Il faut qu'il y ait eu au moins un échange de données entre
l'appareil photo et l'adaptateur SCA (il suffit à cet effet d'enfoncer légèrement le déclencheur sans prendre la photo). L'appareil photo doit supporter la synchronisation en vitesse rapide HSS TTL (E-TTL) dans le mode flash
sélectionné (manuel M ou TTL) (voir le mode d'emploi de l'appareil et de
l'adaptateur SCA) !
• La combinaison de la synchronisation en vitesse rapide HSS TTL (E-TTL) et
du mode multi-flash Metz sans cordon n'est pas possible.
• Suivant le type d'appareil photo, la synchronisation en vitesse rapide HSS
TTL (E-TTL) peut être activée sur le mecablitz 54 MZ-.. en mode flash manuel M (Ca, Mi, Ni) ou en mode flash TTL ( Ca, Mi) !
• Pour pouvoir activer la synchronisation en vitesse rapide HSS TTL (E-TTL), il
faut que le réflecteur secondaire du mecablitz soit coupé !
• (Mi) Lorsque le réflecteur principal est pivoté ou basculé, la synchronisation
en vitesse rapide HSS TTL (E-TTL) n'est pas réalisée. La vitesse d'obturation
de l'appareil photo est limitée à la vitesse de synchro-flash. Le témoin (H)
de synchronisation en vitesse rapide HSS TTL (E-TTL) s'éteint dans le
viseur !
(Ni) Impossibilité d'activer le mode 3D sur le mecablitz en mode TTL.
• Le mode REAR est activé sur le mecablitz ; l'écran ACL affiche "REAR".
Remède possible : désactiver d'abord le mode REAR, puis activer le mode 3D.
• Le mecablitz doit être équipé de l'adaptateur SCA 3402. Le mode 3D-TTL
ne peut être sélectionné sur le mecablitz, que si celui-ci est monté sur un
appareil photo en marche qui supporte le mode 3D. Il faut qu'il y ait eu au
moins un échange de données entre l'appareil photo et l'adaptateur SCA
(il suffit à cet effet d'enfoncer légèrement le déclencheur sans prendre la
photo).
• Le mode flash TTL 3D n'est pas supporté si le mecablitz n'est pas disponible (pas recyclé), si le réflecteur ne se trouve pas en position normale (s'il a
été pivoté ou basculé) ou si le réflecteur secondaire des mecablitz est
activé !
• En mode multi-flash Metz sans cordon, le mode flash TTL 3D n'est pas possible !
• Le mode flash TTL 3D n'est possible qu'avec les flashes mecablitz 40 MZ-3(i),
50 MZ-5, 54 MZ-.. et 70 MZ-... !
(Ca) Impossibilité d'activer le mode E-TTL.
• Le mecablitz doit être équipé de l'adaptateur SCA 3102. Le mode E-TTL ne
peut être sélectionné sur le mecablitz que si celui-ci est monté sur un appareil photo en marche qui supporte le mode E-TTL. Il faut qu'il y ait eu au
moins un échange de données entre l'appareil photo et l'adaptateur SCA
(il suffit à cet effet d'enfoncer légèrement le déclencheur sans prendre la
photo).
63
ĸ
704 47 0099.A3
ĸ
54 MZ-4i
01.02.2007
13:41 Uhr
Seite 64
• Le mode flash E-TTL n'est pas supporté si le réflecteur secondaire du mecablitz est activé !
• L'activation du réflecteur secondaire du mecablitz provoque la commutation du mode E-TTL sur le mode TTL normal ! Problème sur l'EOS D30 : en
mode TTL, il n'est plus possible de déclencher le mecablitz ; le cas échéant,
sélectionner le mode "Automatique" !
• Le mode flash E-TTL n'est pas possible en mode multi-flash Metz sans cordon !
• Le mode E-TTL n'est possible qu'avec les flashes mecablitz 40 MZ-3i,
40 MZ-1i et 54 MZ-.. !
Indisponibilité permanente du mecablitz en mode multi-flash sans cordon.
• Le réflecteur secondaire est activé sur le mecablitz ; le symbole correspondant apparaît sur l'écran ACL.
Remède possible : couper le réflecteur secondaire.
Clignotement du témoin de disponibilité sur le mecablitz.
• La fonction de lumière pilote est activée sur le mecablitz.
Remède : désactiver la fonction de lumière pilote sur le mecablitz.
Impossibilité de modifier le réglage de la sensibilité ISO sur le mecablitz.
• Le mecablitz est équipé d'un adaptateur SCA 3xx2 et est utilisé en liaison
avec un appareil photo qui transmet au mecablitz l'information sur la sensibilité du film. Dans ce cas, la modification de la sensibilité ISO est verrouillée.
Impossibilité de modifier le réglage du diaphragme sur le mecablitz.
• Le mecablitz est équipé d'un adaptateur SCA 3xx2 et est utilisé en liaison
avec un appareil photo qui transmet au mecablitz l'information sur l'ouverture du diaphragme. Dans ce cas, la modification du diaphragme est verrouillée.
64
Affichage de "-" sur l'écran de contrôle ACL du mecablitz au lieu de la
distance.
• Le réflecteur du mecablitz n'occupe pas sa position de base normale. L'information de distance flash-sujet n'est affichée que si le réflecteur se trouve
dans sa position normale, c'est-à-dire lorsqu'il n'est pivoté ni dans le sens
horizontal ni dans le sens vertical.
Clignotement du symbole du réflecteur secondaire sur l'écran de contrôle
ACL du mecablitz. Le témoin de disponibilité est allumé sur le mecablitz.
• Le réflecteur secondaire est activé bien que le réflecteur principal occupe sa
position de base normale, c'est-à-dire qu'il n'est ni pivoté ni basculé. L'utilisation du réflecteur secondaire ne se justifie cependant que pour déboucher les ombres lorsque le réflecteur principal est pivoté hors de sa position
normale. Le clignotement du symbole de réflecteur secondaire signale qu'il
faut couper le réflecteur secondaire. La coupure du réflecteur secondaire
s'accompagne de l'extinction du symbole sur l'écran ACL. Lorsque le réflecteur principal est pivoté, le symbole s'affiche en feu continu.
Clignotement du symbole du réflecteur secondaire sur l'écran de contrôle
ACL du mecablitz. Le témoin de disponibilité n'est pas allumé sur le mecablitz.
• La fonction maître a été sélectionnée sur le mecablitz en mode multi-flash
(Remote). "Co" s'affiche sur l'écran ACL. Le mode multi-flash n'est supporté
que par le réflecteur principal seul. Etant donné que la disponibilité du
flash n'est pas signalée, le mecablitz ne se déclenche pas à la prise de vue.
Remède : il faut désactiver la fonction maître en mode multi-flash ou couper le réflecteur secondaire.
Affichage de "Co" au lieu de la distance sur l'écran ACL du mecablitz.
• Le mecablitz a été réglé sur la fonction maître en mode multi-flash. Dans ce
mode de fonctionnement, il n'y a jamais affichage de la distance flashsujet.
704 47 0099.A3
54 MZ-4i
01.02.2007
13:41 Uhr
Seite 65
Impossibilité de sélectionner ou de régler une correction d'exposition au
flash avec la molette sur le mecablitz assurant la fonction maître en mode
multi-flash.
☞ Remarque : la correction d'exposition au flash n'est jamais effective
en mode multi-flash automatique.
• En mode multi-flash TTL, il est possible d'activer une correction d'exposition
au flash si celle-ci est réglée avant la sélection de la fonction maître sur le
mecablitz. La valeur de correction n'est pas affichée dans la fonction maître en mode multi-flash, mais est effective. A la place de la valeur de correction, l'écran de contrôle ACL du mecablitz affiche l'adresse (canal) de
télécommande "Ad1" ou "Ad2".
(Ni) Impossibilité de régler sur le mecablitz la fonction Nikon de fill-in au
flash "dosage flash-ambiance avec mesure matricielle" ou "dosage flashambiance par multi-capteur 3D".
• Le mode voulu de fill-in au flash ne peut être sélectionné sur le mecablitz
que si celui-ci est équipé d'un adaptateur SCA 3402 et s'il est monté sur
un appareil photo en marche qui supporte cette fonction de fill-in au flash.
Il faut qu'il y ait eu au moins un échange de données entre l'appareil photo et l'adaptateur SCA (il suffit à cet effet d'enfoncer légèrement le déclencheur sans prendre la photo).
• En mode multi-flash (Remote), lorsque le réflecteur principal est pivoté ou
lorsque le réflecteur secondaire est activé, le "dosage flash-ambiance par
multi-capteur 3D" (Nikon) n'est pas supporté ; cette fonction ne peut donc
pas être activée dans les conditions précitées.
• Le mode de dosage flash-ambiance qui sera retenu pour la photo dépend
de l'appareil photo.
Clignotement du symbole de diaphragme
et de la valeur d'ouverture
sur l'écran de contrôle ACL du mecablitz.
• Dans les conditions de prise de vue ou pour les réglages momentanés sur
l'appareil photo, on se trouve en dehors de la plage de dosage de la lumière du mecablitz en mode Automatique.
Remède possible : il faut soit diminuer la lumière ambiante de la scène, soit
utiliser un film moins sensible, soit choisir un plus grand indice d'ouverture
de diaphragme sur l'appareil photo et/ou le mecablitz.
Non activation de l'illuminateur AF du mecablitz.
Causes possibles :
• La luminosité ambiante suffit au capteur AF pour réaliser la mise au point.
• L'appareil photo active au besoin son propre illuminateur d'assistance AF.
• Un mode autofocus autre que le mode Single-AF (S) est activé.
• On a sélectionné sur l'appareil photo un collimateur AF décentré.
Remèdes possibles :
• Sélectionnez sur l'appareil photo le mode autofocus Single-AF (S) (pour
plus de détails, voir le mode d'emploi de l'appareil photo.).
• Activer le collimateur AF central dans le viseur de l'appareil photo.
Problèmes avec la fonction maître en mode multi-flash et le bracketing au
flash.
• La séquence de bracketing au flash n'est pas possible sur le flash maître en
mode multi-flash ! Si on règle une séquence de bracketing au flash et que
l'on commute ensuite le mecablitz sur la fonction maître en mode multi-flash,
le bracketing au flash n'est plus signalé et n'est pas exécuté !
Fonction maître en mode multi-flash et correction d'exposition au flash.
• Si l'on sélectionne une correction d'exposition au flash sur le mecablitz et
que l'on commute ensuite le mecablitz sur la fonction maître en mode multi-flash, les prises de vue suivantes seront effectuées avec cette valeur de
correction. L'écran ACL du mecablitz n'affiche cependant pas (!) de valeur
de correction !
(Ni) Pas de signalisation de sous-exposition Nikon en mode multi-flash.
• Certains appareils Nikon donnent un signal d'avertissement (-EV) sur
l'écran de contrôle ACL du mecablitz en cas de sous-exposition à la lumière flash. En mode multi-flash, cette fonction n'est pas supportée par le
mecablitz.
65
ĸ
704 47 0099.A3
ĸ
54 MZ-4i
01.02.2007
13:41 Uhr
Seite 66
Pas de mode REAR en synchronisation HSS.
• Si la synchronisation en vitesse rapide HSS est activée sur le mecablitz, il
n'est pas possible de sélectionner le mode REAR (synchronisation sur le
deuxième rideau).
• Si l'on active la synchronisation en vitesse rapide HSS alors que le mode
REAR est déjà sélectionné, le mode REAR sera désactivé !
Non-affichage de la sensibilité ISO sur l'écran de contrôle ACL du mecablitz.
• Le mecablitz se trouve en mode multi-flash sans cordon ("Co" ou "SL") ou
en mode stroboscope. Dans ces modes de fonctionnement, il n'y a jamais
affichage de la sensibilité ISO sur l'écran de contrôle ACL du mecablitz !
• Avec les reflex système Canon et Minolta, la sensibilité ISO n'est de toute
façon pas affichée sur l'écran de contrôle ACL du mecablitz !
Déclenchement incontrôlé du flash esclave par des éclairs en mode 3D Nikon.
☞ Attention : lorsque la cellule photo de l'adaptateur esclave SCA 3083
reçoit la lumière d'un flash qui fonctionne en mode flash 3D Nikon, le
mecablitz esclave est déclenché de façon incontrôlé !
• Le remède ne peut consister qu'à passer du mode flash 3D au mode flash
TTL normal (sans 3D).
Clignotement de la valeur de correction d'exposition sur l'écran ACL du
mecablitz.
On règle sur le mecablitz, par exemple en mode flash TTL, une valeur de correction d'exposition au flash (EV). Après validation de la valeur de correction, la valeur de correction se met à clignoter sur l'écran de contrôle ACL du
mecablitz.
Cause possible : le reflex ne tolère pas le réglage d'une valeur de correction
sur le mecablitz ! Le cas échéant, il faut régler la valeur de correction voulue
directement sur l'appareil photo (voir le mode d'emploi de l'appareil photo).
La valeur de correction clignotante sur l'écran de contrôle ACL du mecablitz
n'exerce pas d'influence sur la prise de vue ! Attention : l'avertissement par
clignotement de la valeur de correction n'est pas réalisé par tous les appa66
reils reflex ! Avec la plupart des appareils reflex, il est possible de régler et
d'exécuter une correction d'exposition au flash en mode automatique A du
mecablitz (exception : par exemple Minolta !).
Impossibilité de régler une séquence de bracketing au flash en mode TTL.
Il n'est pas possible, avec la touche "Select" du mecablitz, de sélectionner la
fonction de bracketing au flash "Fb", par exemple en mode flash TTL.
Cause possible : certains appareils et reflex système ne supportent pas le réglage d'une correction d'exposition au flash sur le mecablitz en mode flash
TTL. Etant donné que la fonction de bracketing au flash fonctionne sur la
base de valeurs de correction, la possibilité de réglage d'une séquence de
bracketing au flash sur le mecablitz est bloquée dès le départ. La plupart des
reflex système permettent cependant le réglage et l'exécution d'une séquence
de bracketing au flash "Fb" en mode automatique A du mecablitz (exception : par exemple Minolta !). Le mecablitz 70 MZ-4 ne permet de toute façon pas le réglage d'une séquence de bracketing au flash "Fb" !
(Pe) Non-affichage de la disponibilité du flash dans le viseur, bien que le
témoin de disponibilité du mecablitz soit allumé. Pas d'amoráage du
mecablitz à la prise de vue.
• Le mecablitz fonctionne en mode Spot-Beam, auquel cas seul l'illuminateur AF
du mecablitz est supporté. Le sélecteur de mode de l'adaptateur SCA 3702 se
trouve sur la position "SB".
Remède possible : placer le sélecteur de mode de l'adaptateur SCA 3702 sur
la position extrême de gauche (
: 1er rideau), c'est-à-dire sur la synchronisation sur le premier rideau.
(Pe) Allumage dans le viseur du témoin de bonne exposition (clignotement
du symbole de disponibilité) bien qu'aucune photo n'ait été prise.
• Il s'agit d'une signalisation d'avertissement. La position du réflecteur de la
tête zoom ne suffit pas pour assurer la couverture complète du sujet. Il se
peut que l'adaptation automatique à la distance focale (AUTO-ZOOM;
CZ) soit désactivée sur le mecablitz et que l'on ait choisi sur le réflecteur
une distance focale qui est supérieure à celle de l'objectif. Exemple : distance focale de l'objectif 70 mm, distance focale du réflecteur 85 mm.
704 47 0099.A3
54 MZ-4i
01.02.2007
13:41 Uhr
Seite 67
Remède possible : activer sur le mecablitz l'adaptation automatique à la
distance focale (AUTO-ZOOM ou CZ) ou faire en sorte que la distance focale du réflecteur soit inférieure ou égale à la distance focale de l'objectif.
Exemple : distance focale de l'objectif 70 mm, distance focale du réflecteur
70 mm, 50 mm ou moins ! Pour la procédure de réglage, veuillez vous référer au mode d'emploi du mecablitz !
(Pe) Positionnement automatique de la tête zoom motorisée du mecablitz
sur 35 mm, bien que l'on utilise un objectif ayant une autre distance focale. Affichage de "Auto-Zoom" sur l'écran de contrôle ACL du mecablitz.
• L'objectif utilisé est un objectif non-AF ou ne transmet pas d'information de
focale au boîtier de l'appareil photo ! Dans ce cas, la tête zoom du mecablitz adopte automatiquement la position 35 mm.
Remède possible : adapter à la main la position de la tête zoom du mecablitz à la distance focale de l'objectif (voir le mode d'emploi du mecablitz)!
Remarque : pour les positions de la tête zoom supérieures à 35 mm, il se
peut que le témoin de disponibilité clignote dans le viseur de l'appareil
photo ; cela n'a cependant aucune incidence sur la prise de vue. Dans ce
cas, observez le témoin de bonne exposition des mecablitz après la prise
de vue !
Le mecablitz n'émet pas d'éclair.
• Le mecablitz s'est coupé de lui-même.
• Après la mise en marche du mecablitz et après la coupure automatique du
flash, enfoncer à mi-course le déclencheur de l'appareil photo sans déclencher, afin de pouvoir procéder aux réglages exigés par la situation.
Affichage de "ZE" au lieu de la position de la tête zoom sur l'écran de contrôle ACL du mecablitz.
Le mecablitz n'a pas pu se verrouiller dans une position zoom définie. Il se
peut que les piles soient déchargées et que l'énergie ne soit plus suffisante
pour réaliser l'opération de réglage mécanique.
Couper et remettre en marche le mecablitz et/ou remplacer les piles.
Elimination des batteries
Ne pas jeter les batteries dans les ordures ménagères.
Veuillez rendre vos batteries usées là où elles sont éventuellement reprises
dans votre pays.
Veillez à ne rendre que des batteries/accus déchargés.
En règle générale, les batteries/accus sont déchargés lorsque l’appareil
qu’elles alimentaient :
- arrête de fonctionner et signale « batteries vides »
- ne fonctionne plus très bien au bout d’une longue période d’utilisation des
batteries.
Pour éviter les courts-circuits, il est recommandé de couvrir les pôles des batteries de ruban adhésif.
67
ĸ
704 47 0099.A3
ń
1.
2.
2.1
2.2
2.2.1
2.2.2
2.3
2.4.
2.4.1
2.4.2
2.4.3
3.
3.1
4.
4.1
5.
5.1
6.
6.1
6.2
6.3
7.
7.1
7.2
7.3
8.
8.1
68
54 MZ-4i
01.02.2007
13:41 Uhr
Seite 68
ń
Veiligheidsaanwijzingen . . . . . . . . . . . . . . . . . . . . . . . . . . . . . 71
De flitser gereedmaken . . . . . . . . . . . . . . . . . . . . . . . . . . . . . . 72
De flitser op de camera bevestigen . . . . . . . . . . . . . . . . . . . . . . 72
Voeding . . . . . . . . . . . . . . . . . . . . . . . . . . . . . . . . . . . . . . . . . 72
Keuze van batterijen, c.q. accu’s. . . . . . . . . . . . . . . . . . . . . . . . 72
Batterijen verwisselen. . . . . . . . . . . . . . . . . . . . . . . . . . . . . . . . 72
In- en uitschakelen van de flitser . . . . . . . . . . . . . . . . . . . . . . . . 73
Filosofie van de bediening . . . . . . . . . . . . . . . . . . . . . . . . . . . . 73
Kiezen en instellen van de flitsfunctie TTL / A / M /
(stroboscoop) . . . . . . . . . . . . . . . . . . . . . . . . . . . . . . . . . . 73
Kiezen en instellen van de bijzondere functies . . . . . . . . . . . . . . 73
Instelling van ISO / zoom / diafragma / ”P” (deelvermogen)
en „EV“ (correctie op de flitsbelichting) . . . . . . . . . . . . . . . . . . . 73
De TTL-flitsfunctie . . . . . . . . . . . . . . . . . . . . . . . . . . . . . . . . . . 74
Verdere TTL-flitsfuncties . . . . . . . . . . . . . . . . . . . . . . . . . . . . . . 75
De automatisch-flitsenfunctie . . . . . . . . . . . . . . . . . . . . . . . . . . 75
Verdere automatisch-flitsfuncties . . . . . . . . . . . . . . . . . . . . . . . . 76
Flitsen met handbediening. . . . . . . . . . . . . . . . . . . . . . . . . . . . 76
Verdere, met de hand in te stellen flitsfuncties. . . . . . . . . . . . . . . 78
Indirect flitsen . . . . . . . . . . . . . . . . . . . . . . . . . . . . . . . . . . . . . 78
Indirect flitsen met ingeschakelde hulpreflector . . . . . . . . . . . . . . 78
Indirect flitsen in de automatisch-flitsenfunctie en de TTL-flitsfunctie. 79
Indirect flitsen met handinstelling. . . . . . . . . . . . . . . . . . . . . . . . 79
Flitsen met bediening op afstand . . . . . . . . . . . . . . . . . . . . . . . 79
De draadloze Metz TTL-flitsfunctie met bediening op afstand. . . . 79
De draadloze Metz A bediening op afstand . . . . . . . . . . . . . . . 80
Beoordeling van de totale verlichtingsverhouding bij flitsen met
bediening op afstand. . . . . . . . . . . . . . . . . . . . . . . . . . . . . . . . 81
Invulflitsen bij daglicht . . . . . . . . . . . . . . . . . . . . . . . . . . . . . . 81
Invulflitsen bij de TTL-flitsfunctie. . . . . . . . . . . . . . . . . . . . . . . . . 81
8.2
9.
10.
11.
12.
12.1
12.2
12.3
12.4
12.5
12.6
Invulflitsen bij de automatisch-flitsenfunctie . . . . . . . . . . . . . . . . 81
De stroboscoopisch-flitsenfunctie . . . . . . . . . . . . . . . . . . . . . . . 82
Aanduiding van de belichtingscontrole . . . . . . . . . . . . . . . . . . 83
De AF-meetflits . . . . . . . . . . . . . . . . . . . . . . . . . . . . . . . . . . . . 84
Bijzondere functies . . . . . . . . . . . . . . . . . . . . . . . . . . . . . . . . . 84
Beep-functie . . . . . . . . . . . . . . . . . . . . . . . . . . . . . . . . . . . . . . 84
Ver- en ontgrendelen van de bedieningselementen (Key-functie) . 85
Automatische uitschakeling van het apparaat / Auto-Off . . . . . . 85
REAR - synchronisatie bij het dichtgaan van de sluiter . . . . . . . . 86
Instellicht / Modelling-Light ML
. . . . . . . . . . . . . . . . . . . . . 86
Aanpassing van de verlichtingshoek aan de brandpuntsafstand
van het opnameformaat . . . . . . . . . . . . . . . . . . . . . . . . . . . . . . 87
12.7 Flitsbelichtingstrapje „Fb“ (Flash bracketing) . . . . . . . . . . . . . . . 87
12.8 Terug naar basisinstellingen . . . . . . . . . . . . . . . . . . . . . . . . . . . 88
12.9 Motor-zoomreflector . . . . . . . . . . . . . . . . . . . . . . . . . . . . . . . . 89
12.10 Omschakeling van m - ft . . . . . . . . . . . . . . . . . . . . . . . . . . . . . 89
13.
Groothoekdiffusor. . . . . . . . . . . . . . . . . . . . . . . . . . . . . . . . . . 90
14.
Flitsbelichting met de hand corrigeren . . . . . . . . . . . . . . . . . . . 90
15.
Onderhoud en verzorging . . . . . . . . . . . . . . . . . . . . . . . . . . . . 91
16.
Technische gegevens . . . . . . . . . . . . . . . . . . . . . . . . . . . . . . . . 91
17.
Vaktermen . . . . . . . . . . . . . . . . . . . . . . . . . . . . . . . . . . . . . . . 92
18.
Bijzondere toebehoren . . . . . . . . . . . . . . . . . . . . . . . . . . . . . . 93
19.
Troubleshooting . . . . . . . . . . . . . . . . . . . . . . . . . . . . . . . . . . . 94
Tabel 1: Richtgetallen bij vol vermogen (P 1) . . . . . . . . . . . . . . . . . . . . 192
Tabel 2: Flitsduur en deelvermogensstappen. . . . . . . . . . . . . . . . . . . . . 193
Tabel 3: Belichtingstijden bij de stroboscoopfunctie. . . . . . . . . . . . . . . . 194
Tabel 4: Flitsvolgtijden en aantallen flitsen bij de verschillende voedingstypes 195
Tabel 5: Max. richtgetallen bij het HSS functie . . . . . . . . . . . . . . . . . . . 195
Tabel 6: Afstandsfunctie . . . . . . . . . . . . . . . . . . . . . . . . . . . . . . . . . . . 196
704 47 0099.A3
54 MZ-4i
01.02.2007
13:41 Uhr
Seite 69
Voorwoord
Wij danken u, dat u uw keuze op een Metz product hebt laten vallen. Wij
verheugen ons er over, dat wij u als klant te mogen begroeten.
Natuurlijk kunt u het nauwelijks afwachten uw flitser in gebruik te nemen. Het
is echter zeker aan te bevelen, deze gebruiksaanwijzing te lezen want alleen
zo leert u zonder problemen met het apparaat om te gaan.
De navolgende gebruiksaanwijzing is zodanig opgesteld dat het de bediening
van het systeem camera-flitser met een standaardvoet 301 en een SCA 3xx2
adapter beschrijft.
☞
Sla s.v.p. ook de afbeeldingen op het omslang van de
gebruiksaanwijzing open !
Deze flitser is geschikt voor:
• Alle camera’s met flitsschoen en middencontact;
• Alle camera’s met flitsschoen zonder middencontact, zij het met gebruik
van een flitskabel (zie bijzondere toebehoren);
• Systeemcamera’s
de optimale aanpassing aan uw systeemcamera bereikt u door het gebruik
van een SCA 3xx2, c.q. SCA 3xx adapter. Welke adapter u voor uw camera nodig heeft, vindt u in de bijgevoegde SCA-tabel. Daarin kunt u tevens de bijzondere flitsfuncties vinden die het systeem dan uitvoert.
Voor meer informatie kunt u ons op onze website onder www.metz.de
bezoeken.
Wij wensen u veel plezier van uw nieuwe flitser.
Overzicht van de flitsfuncties • en bijzondere flitsfuncties ◊
54 MZ-.. met SCA 3xx2 adapter:
Bij het werken met de mecablitz 54 MZ-.. en een SCA 3xx2 adapter zijn
talrijke extrafuncties beschikbaar. Nagenoeg alle van de momenteel
Ǻ bekende flitsfuncties van de bekende camerafabrikanten worden ondersteund! De beschikbaarheid van elke functie hangt echter van het betreffende camerasysteem (camerafabrikant) en type camera af. Nadere
details vindt u in de SCA-overzichtstabel, c.q. de gebruiksaanwijzingen
van de betreffende SCA-adapters!
• TTL-flitsfunctie1)
- Metz TTL-flitsen met bediening op afstand1)
- Canon ETTL- flitsfunctie1)
- Canon ETTL-HSS-flitsfunctie1) 2)
- Minolta TTL-HSS flitsfunctie1) 2)
- Nikon matrixgestuurde invulflitsregeling
- Nikon 3D Multi-Sensor invulflitsregeling
- Nikon D-TTL-flitsfunctie3)
- Nikon D-TTL-3D flitsfunctie3)
- Nikon i-TTL-flitsfunctie4)
- Nikon i-TTL-BL-flitsfunctie4)
- Olympus TTL-flitsfunctie5) met Digitalcamera
• Flitsen met deelvermogen via instelling met de hand
• HSS-flitsfunctie2) met handinstelling bij Canon, Minolta en Nikon
• Automatisch flitsen
- Metz automatische bediening op afstand
• Stroboscopisch flitsen
◊ Met de hand ingestelde correctie op de flitsbelichting bij
de TTL- en A-functies1)
◊ Flitsbelichtingstrapje Fb bij de TTL- en A-functies
◊ Alleen mogelijk indien instelbaar op de camera
◊ Synchronisatie bij het open- of dichtgaan van de sluiter
69
ń
704 47 0099.A3
ń
54 MZ-4i
01.02.2007
13:41 Uhr
Seite 70
◊ Autom. sturing van de motor-zoomreflector
◊ Autom. sturing van de AF-meetflits
◊ Autom. aanduiding van de flitsreikwijdte
◊ Autom. sturing naar de flitssynchronisatietijd
◊ Wake-up functie
◊ Aanduiding flitsparaatheid in de zoeker van de camera
◊ Aanduiding van belichtingscontrole in de zoeker van de camera
◊ Ontsteeksturing (Pentax, Minolta)
◊ Flits vooraf tegen rode ogen (Nikon)
◊ Instellicht-functie
1) alleen mogelijk indien in te stellen op de camera
2) HSS = High Speed Synchronization = synchronisatie op korte tijden
3) alleen bij 54 MZ-4
4) alleen mogelijk met 54 MZ-4i en Nikon SCA-Adapter 3402-M3
5) Olympus E-1 alleen mogelijk met 54 MZ-4i en SCA-Adapter 3202-M3
54 MZ-.. met SCA 3xx adapter:
Bij het gebruik van de mecablitz met een SCA 3xx adapter zijn de extra
beperkt! De beschikbaarheid van elke flitsfunctie hangt hier af
Ǻ flitsfuncties
van het gebruikte camerasysteem (camerafabrikant) en het speciale type
camera. Nadere details vindt u in de SCA-overzichtstabel, c.q. de betreffende gebruiksaanwijzing van de SCA adapter.
• TTL-flitsfunctie1)
- Metz TTL flitsfunctie met bediening op afstand1)
• Flitsen met handinstelling en deelvermogen
• Automatisch-flitsenfunctie
- Metz automatisch-flitsenfunctie met bediening op afstand
• Stroboscopisch flitsen
◊ Met handinstelling corrigeren van de flitsbelichting in de A-functie
◊ Flitsbelichtingstrapje Fb in de A-functie
70
◊ Autom. sturing naar de flitssynchronisatietijd
◊ Wake-up functie
◊ Aanduiding flitsparaatheid in de zoeker van de camera
◊ Aanduiding van belichtingscontrole in de zoeker van de camera
◊ Instellicht-functie
1) alleen mogelijk indien in te stellen op de camera
54 MZ-.. met standaardvoet 301 (sturing alleen via middencontact of
flitskabel):
• Flitsen met handinstelling en deelvermogen
• Automatisch-flitsenfunctie
- Metz automatisch-flitsenfunctie met bediening op afstand
• Stroboscopisch flitsen
◊ Met de hand ingestelde correctie op de flitsbelichting bij de TTL- en A-functies
◊ Flitsbelichtingstrapje Fb bij de TTL- en A-functies
◊ Instellicht-functie
704 47 0099.A3
54 MZ-4i
01.02.2007
13:41 Uhr
Seite 71
1. Veiligheidsaanwijzingen
• De flitser is alleen bedoeld en toegelaten voor gebruik op fotografisch
gebied.
• De flitser mag nooit worden ontstoken in de omgeving van licht ontvlambare stoffen (benzine, oplosmiddelen, enz)! GEVAAR VOOR EXPLOSIES!
• Auto-, bus-, fiets-, motorfiets- of treinbestuurders enz. nooit met de flitser
fotograferen. Door verblinding kan de bestuurder een ongeluk veroorzaken!
• Nooit dicht bij de ogen een flits ontsteken! Een flits, vlak voor de ogen
van personen en dieren kan leiden tot beschadiging van het netvlies en
andere zware zichtstoringen - tot blindheid aan toe!
• Gebruik alleen de in de gebruiksaanwijzing aangegeven en toegelaten
voedingsbronnen!
• Batterijen en accu’s niet blootstellen aan overmatige warmte als zonneschijn, vuur en dergelijke!
• Lege accu niet in vuur werpen!
• Uit lege batterijen kan loog komen wat tot beschadiging van de contacten in het apparaat leidt. Lege batterijen dus onmiddellijk uit het apparaat halen.
• Droge batterijen mogen niet worden opgeladen.
• Flitser en oplaadapparaat niet blootstellen aan drup- en spatwater!
• Bescherm uw flitser tegen grote hitte en hoge luchtvochtigheid! Bewaar
de flitser niet in het handschoenvakje van de auto !
• Bij het ontsteken van een flits mag er zich geen lichtondoorlatend object
vlak voor of op het venster van de flitskop bevinden. Het venster van de
flitskop mag niet verontreinigd zijn. Indien u hier niet op let kan door de
grote energie van het flitslicht verbranding van het materiaal, c.q. het
venster van de reflector optreden.
• Na meerdere flitsen niet het venster van de reflector aanraken. Gevaar
voor verbranding!
• De flitser niet uit elkaar nemen! HOOGSPANNING! In het interieur van
de flitser bevinden zich geen onderdelen die door een leek gerepareerd
kunnen worden.
• Bij serieopnamen met volle energie en de korte flitspauzes die de
NiCd–accu mogelijk maken moet u er op letten steeds na 15 flitsen een
pauze van minstens 10 minuten in te lassen. U voorkomt dan overbelasting van het apparaat.
ń
71
704 47 0099.A3
54 MZ-4i
01.02.2007
13:41 Uhr
Seite 72
2. De flitser gereedmaken
2.2 Voeding
2.1 De flitser op de camera bevestigen
2.2.1 Keuze van batterijen, c.q. accu’s
☞ Flitser en camera uitschakelen voor het opzette of afnemen.
ń
De mecablitz kan alleen met de standaardvoet 301 of met een SCA 3xx, c.q.
SCA 3xx2 adapter (accessoire) worden bevestigd.
De mecablitz wordt standaard met de standaardvoet 301 voor eenvoudig
flitsen afgeleverd. De belichtingstijd moet daarbij gelijk aan of langer zijn
dan de kortste flitssynchronisatietijd van de camera. Bij set-apparaten wordt,
in plaats van de standaardvoet, de betreffende SCA-adapter meegeleverd.
Aanbrengen van de standaardvoet of de SCA-adapter:
☞ Alvorens de standaardvoet of SCA-adapter op de flitser te monteren
of demonteren dient de flitser uitgeschakeld te zijn door middel van
de hoofdschakelaar.
• Afdekplaat (alleen bij gebruik van de SCA 3xx2 adapter) in het midden
oppakken en uitnemen.
• De SCA-adapter of standaardvoet 301 tot de aanslag inschuiven.
Demontage van de standaardvoet of SCA-adapter:
• Mecablitz uitschakelen met de hoofdschakelaar (Afb. 1).
• Deksel (Afb. 3) van het batterijvak naar onder schuiven en openklappen.
• Op de gekleurde ontgrendelknop (Afb. 3) drukken en tegelijkertijd de
SCA-adapter, c.q. standaardvoet afnemen.
mecablitz opzetten:
Mecablitz in de accessoireschoen van de camera schuiven en met de kartelmoer vastklemmen.
72
De mecablitz kan naar keuze worden gevoed uit:
• 4 Nikkel-cadmiumaccu’s, type IEC KR 15/51,
deze bieden zeer korte flitspauzes ze zijn zuinig omdat ze oplaadbaar
zijn.
• 4 Nikkel-metaalhydride accu’s,
met een duidelijk hogere capaciteit dan NiCd. Accu’s en minder belastend
voor het milieu omdat ze geen cadmium bevatten.
• 4 Alkali-mangaanbatterijen, type IEC LR6,
onder houdsvrije voedingsbron voor gematigde prestaties.
• Power Pack P 40 (accessoire),
biedt microprocessor gestuurde accucontrole en aanduiding van de laadtoestand (met ontlaadfunctie).
• Power Pack P 50 (accessoire),
biedt microprocessor gestuurde accucontrole en aanduiding van de laadtoestand (met ontlaadfunctie).
2.2.2 Batterijen verwisselen
• mecablitz uitschakelen met de hoofdschakelaar (Afb. 1).
• Deksel (Afb. 3) van het batterijvak naar onder schuiven en openklappen.
• Batterijen of accu’s in de lengte, overeenkomstig de aangegeven batterijsymbolen inzetten en het batterijvak sluiten.
☞ Let bij het inzetten van de batterijen op de juiste polariteit, volgens de
batterijsymbolen op het deksel van het batterijvak .
Lege accu’s horen niet thuis in het huisafval! Lever ze in bij de betreffende verzamelstations!
704 47 0099.A3
54 MZ-4i
01.02.2007
13:41 Uhr
Seite 73
2.3 In- en uitschakelen van de flitser
De flitser wordt ingeschakeld via zijn hoofdschakelaar (Afb. 1). In de
bovensts stand On is de flitser permanent6) ingeschakeld - de flitsfunctie verschijnt in het LC-display.
6)Zie ook „12.3 Automatisch uitschakeling van het apparaat“
☞ Als in het LC-display een sleutel verschijnt dan de bedieningsaanwij-
zingen van „12.2 Ver- en ontgrendelen van de bedieningselementen“
uitvoeren.
Om de flitser uit te schakelen de hoofdschakelaar (Afb. 1) naar beneden
schuiven. Als u denkt, de flitser gedurende langere tijd niet te gebruiken,
bevelen wij aan:
- de flitser uit te schakelen via zijn hoofdschakelaar (Afb. 1);
- de voedingsbronnen (batterijen, accu’s) eruit te nemen.
2.4 Filosofie van de bediening
2.4.1 Kiezen en instellen van de flitsfunctie TTL / A / M /
(stroboscoop)
De flitsfunctie TTL, A (automatisch flitsen), M (flitserinstelling met handbediening of stroboscoopfunctie) wordt met de toets Mode (Afb. 1) gekozen,
druk daarvoor zo vaak op de Mode toets, dat de gewenste flitsfunctie door
het knipperende symbool wordt aangegeven. Voor het opslaan het instelwiel
(Afb. 1) in de richting van de pijl drukken. Als het instelwiel niet wordt
ingedrukt wordt de gekozen functie na ong. 5 s. automatisch opgeslagen.
Na het opslaan wordt het symbool voor de functie in het display constant
(zonder knipperen) aangegeven!
Aanwijzing: Elke flitsfunctie wordt in een apart hoofdstuk besproken!
2.4.2 Kiezen en instellen van de bijzondere functies
Ȅ
Met de toets Select (Afb. 1) kunnen in elke flitsfunctie bijzondere extrafuncties worden gekozen:
Door op de Select toets (Afb. 1) te drukken worden achtereenvolgens de
bijzondere functies „Beep“( ), automatische uitschakeling ( ), REAR7)
(synchronisatie bij het dichtgaan van de sluiter), instellicht (
maat een flitsbelichtingstrapje „Fb“ opgeroepen.
), zoomfor-
7)alleen met SCA adapter en camera die deze functie ondersteunen
Na het oproepen van een bijzondere functie knippert het symbool van die
functie en de functiestatus (OFF of On) wordt in het LC-display aangegeven.
Door het instelwiel (Afb. 1) te draaien wordt de gekozen de functie in- of
uitgeschakeld.
Door op het instelwiel (Afb. 1) te drukken wordt de ingestelde functie
opgeslagen.
Aanwijzing: Elke bijzondere flitsfunctie wordt in een apart hoofdstuk besproken.
2.4.3 Instelling van ISO / zoom / diafragma , „P“ (deelvermogen) en „EV“ (correctie op de flitsbelichting)
Door aan het instelwiel (Afb. 1) te draaien de gewenste functie (ISO / zoom
/ diafragma / correctie op de flitsbelichting „EV”) op de rechterzijde van het
LC-display kiezen. De gekozen functie wordt door een pijl ı gekenmerkt.
Voor het verstellen van de functie in de pijlrichting drukken. De pijl ı in het
LC-display knippert. Om de toestand te wijzigen aan het instelwiel (Afb.
1) in de richting van de pijl draaien. Voor het opslaan op het instelwiel drukken. Als u het instelwiel niet in de richting van de pijl drukt, wordt de instelling na ong. 5 seconden automatisch opgeslagen. Na het opslaan knippert
de pijl in de gekozen positie niet meer.
☞ Bij het werken met de mecablitz samen met een SCA 3xx2 adapter is
het mogelijk dat de diafragmawaarde zich niet laat veranderen (afhankelijk van type camera en SCA-adapter)!
Bij het werken met de mecablitz samen met een SCA 3xx2 adapter is
het mogelijk dat de ISO-waarde voor de filmgevoeligheid zich niet
laat veranderen, c.q. niet wordt aangegeven (afhankelijk van type
camera en SCA-adapter)!
Aanwijzing: Elke instelling voor een positie worden in een extra hoofdstuk
besproken!
73
ń
704 47 0099.A3
54 MZ-4i
01.02.2007
13:41 Uhr
Seite 74
3. De TTL-flitsfunctie
ń
Met gebruik van de TTL-flitsfunctie krijgt u op eenvoudige wijze zeer goede
flitsfoto’s.
☞ Voor de TTL-flitsfunctie moet de mecablitz met een geschikte SCA-adapter uitgerust zijn. De TTL-flitsfunctie kan alleen met camera’s worden uitgevoerd die deze TTL-flitsfunctie meterdaad ondersteunen! Met de standaardvoet SCA 301 (alleen middencontact, c.q. flitskabelaansluiting) is
TTL flitsen niet mogelijk. Als met de mecablitz samen met een camera,
c.q. een SCA-adapter wordt gewerkt, worden bij het bedienen van de
ontspanknop op de camera niet-geregelde flitsen met volle energie afgegeven! Voor het testen van de TTL-functie moet er een film in de camera zitten!
Bij deze functie wordt de meting van de belichting door een sensor in de camera uitgevoerd. Deze sensor meet de hoeveelheid gereflecteerd, door het
objectief op de film vallende licht. Bij het bereiken van de voor een goed belichte opname vereiste hoeveelheid licht zendt de elektronica in de camera
een stopsignaal naar de SCA-adapter (accessoire) en de lichtuitstraling van
de mecablitz wordt onmiddellijk verbroken.
Het voordeel van deze flitsfunctie ligt in het feit, dat alle factoren die van invloed zijn op de belichting van de film (opnamefilters, veranderingen van
diafragmawaarde en brandpuntsafstand bij zoomobjectieven, extra balguittrek voor dichtbijopnamen enz.) automatisch bij de regeling van het flitslicht
worden meegerekend.
Bij een correct belichte flitsopname licht gedurende ongeveer 3 seconden de
„ok“ aanduiding op.
☞ Op de mecablitz kan bovendien een akoes tische melding worden
geactiveerd, zie daarvoor „12.1 Beep-functie“.
Het instellen van de TTL-flitsfunctie:
• De mecablitz voorzien van de geschikte SCA-adapter en op de camera
zetten.
• De camera volgens de aanwijzingen in de gebruiksaanwijzing instellen.
74
• mecablitz via de hoofdschakelaar (Afb. 1) inschakelen.
• Zo vaak op de Mode toets (Afb. 1) drukken, dat de TTL in het
LC–display knippert. Instelwiel in de richting van de pijl drukken en daarmee de instelling opslaan. Als u het instelwiel niet in de richting van de pijl
drukt, wordt de instelling na ong. 3 seconden automatisch opgeslagen. Het
symbool TTL verschijnt na het opslaan continu en knippert niet meer.
• Afhankelijk van het type camera en de SCA-adapter kan het mogelijk zijn,
dat de waarden voor ISO (filmgevoeligheid), zoomstand en diafragma niet
automatisch door de camera worden doorgegeven. In dat geval moet u de
waarden met de hand op de mecablitz instellen. De instelling van e ISOwaarde is alleen van belang voor de correcte opgave van de flitsreikwijdte
in het LC-display en daarom voor de eigenlijke TTL flitsopnamen van geen
belang. Deze gegevens hoeven daarom niet absoluut te worden ingesteld.
• De instelling van de zoomreflector is belangrijk voor het correct uitlichten
van het totale onderwerp! De stand van de zoomreflector moet daarom
altijd worden aangepast aan de brandpuntsafstand van het objectief.
Tip:
Als u een zoomobjectief gebruikt en niet absoluut altijd het volle vermogen
van de flitser nodig heeft, kunt u de stand van de zoomreflector op de aanvangsbrandpuntsafstand van het objectief laten staan. Daardoor wordt gegarandeerd, dat het onderwerp altijd volledig wordt uitgelicht en bespaart u
zich het telkens moeten bijstellen van de zoomstand op de flitser.
Voorbeeld:
U gebruikt een zoomobjectief met een bereik van f = 28 tot 80 mm. In dit
voorbeeld stelt u de zoomreflector in op 28 mm!
☞ Bij het werken met de mecablitz samen met een SCA 3xx2 adapter en
een camera die gegevens naar de mecablitz zendt kan het voorkomen, dat de ISO-waarde niet aangegeven wordt (hangt van het type
camera af); zie de gebruiksaanwijzing van de SCA-adapter. De waarden voor filmgevoeligheid en ISO en diafragma kunnen onder bepaalde omstandigheden niet worden veranderd! Bij grote contrastverschillen, bijv. een donker onderwerp in een sneeuwlandschap, kan
een correctie op de belichting nodig zijn (zie hoofdstuk 14.).
704 47 0099.A3
54 MZ-4i
01.02.2007
13:41 Uhr
Seite 75
3.1 Verdere TTL-flitsfuncties
Op de mecablitz kunnen in de flitsfunctie TTL verdergaande functies worden
ingesteld.
☞ Het aantal en de mogelijke verdergaande functies zijn afhankelijk van
het type SCA-adapter en de gebruikte camera:
• TTL op afstand met adres „Ad1“
(zie hoofdstuk „7.1 De draadloze Metz TTL-flitsfunctie met bediening op
afstand“)
• TTL op afstand met adres „Ad2“
(zie hoofdstuk „7.1 De draadloze Metz TTL-flitsfunctie met bediening op
afstand“)
• ETTL flitsfunctie (alleen met SCA 3102 en de geschikte Canon camera (zie
de gebruiksaanwijzingen van SCA-adapter en camera)
• ETTL-HSS flitsfunctie; synchronisatie met korte tijden (alleen met SCA 3102 en
de geschikte Canon camera, zie de gebruiksaanwijzingen van SCA-adapter
en camera)
• Matrix gestuurde invulflits
(alleen met SCA 3402 en de geschikte
Nikon camera, zie de gebruiksaanwijzingen van SCA-adapter en camera)
• 3D multisensor invulflits
(alleen met SCA 3402 en de geschikte Nikon
camera, zie de gebruiksaanwijzingen van SCA-adapter en camera)
• TTL-HSS flitsfunctie (alleen met SCA 3302 en de geschikte Minolta camera,
zie de gebruiksaanwijzingen van SCA-adapter en camera).
Het instellen van een verdergaande TTL-flitsfunctie:
• Druk op de Mode toets (Afb. 1) tot TTL in het LC-display knippert. Als
TTL niet meer knippert dan een keer op de Mode toets drukken.
• Instelwiel draaien en de gewenste flitsfunctie instellen.
• Instelwiel (Afb. 1) in de richting van de pijl drukken en de instelling opslaan. Als het instelwiel niet wordt gedrukt, wordt de gewenste flitsfunctie na
5 s. automatisch opgeslagen. Het symbool TTL zal na het opslaan niet
meer knipperen.
4. De automatisch-flitsenfunctie
Bij de automatisch-flitsenfunctie meet een sensor (Afb. 2) in de mecablitz
de door het onderwerp gereflecteerde hoeveelheid licht. De mecablitz onderbreekt de lichtafgifte zodra de voor een correcte belichting benodigde hoeveelheid licht is bereikt. Daardoor hoeft er bij verandering van de flitsafstand
geen nieuwe diafragmawaarde te worden berekend en ingesteld, zolang het
onderwerp zich maar niet buiten de aangegeven max. flitsreikwijdte bevindt.
De sensor (Afb. 2) van de mecablitz moet op het onderwerp gericht
staan, waarheen de hoofdreflector verder ook is gezwenkt. De sensor heeft
een meethoek van 25° en meet alleen gedurende het door de eigen mecablitz afgegeven flitslicht.
Bij een correct belichte opname verschijnt op de mecablitz geurende 3 s. de
„ok“ aanduiding.
De automatisch-flitsenfunctie is zowel met een SCA-adapter als met de standaardvoet SCA 301 mogelijk.
☞ Sommige camera’s ondersteunen de mecablitz in de automatisch-flitsenfunctie met een SCA-adapter niet (zie de gebruiksaanwijzing van
camera en SCA-adapter). In dat geval moet de mecablitz van de standaardvoet SCA 301 worden voorzien.
Het instellen van de automatisch-flitsenfunctie:
• Voorzie de mecablitz van de SCA-adapter of standaardvoet SCA 301 en
zet hem op de camera.
• Stel de camera in volgens de opgaven in zijn gebruiksaanwijzing.
• Schakel de mecablitz via zijn hoofdschakelaar (Afb. 1) in.
• Druk zo vaak op de Mode toets (Afb. 1), dat de A in het display knippert. Druk het instelwiel in de richting van de pijl om de instelling op te
slaan. Als u het instelwiel niet in de richting van de pijl drukt, wordt de
instelling na 5 s. automatisch opgeslagen. Na het opslaan verschijnt het
symbool A continu en houdt het op te knipperen.
75
ń
704 47 0099.A3
54 MZ-4i
01.02.2007
13:41 Uhr
Seite 76
• Als de mecablitz met een SCA 3xx2 samen met een camera wordt gebruikt
die de gegevens voor filmgevoeligheid ISO, stand van de zoomreflector en
diafragma automatisch doorgeeft zijn er verder geen instellingen nodig.
De mecablitz stelt zichzelf in op de overgebrachte camerawaarden.
☞ Bij het werken met een mecablitz, samen met een camera die de gegevens op de mecablitz overbrengt kan het voorkomen, dat (afhankelijk van de camera) de ISO-waarde niet wordt aangegeven; zie de
gebruiksaanwijzing van de SCA-adapter. De waarden voor filmgevoeligheid ISO en diafragma kunnen soms niet worden veranderd!
ń
De automatisch-flitsenfunctie met een SCA 3xx adapter, c.q. een standaardvoet SCA 301:
In dit geval moeten de betreffende waarden voor de filmgevoeligheid ISO, de
stand van de zoomreflector en de diafragmawaarde met de hand op de mecablitz worden ingesteld. Dit is absoluut vereist om tot goed belichte flitsopnamen te
komen, omdat de mecablitz op basis van deze gegevens zijn lichtafgifte regelt!
Tip:
Als u een zoomobjectief gebruikt en niet absoluut altijd het volle vermogen
van de flitser nodig heeft, kunt u de stand van de zoomreflector op de aanvangsbrandpuntsafstand van het objectief laten staan. Daardoor wordt gegarandeerd, dat het onderwerp altijd volledig wordt uitgelicht en bespaart u
zich het telkens moeten bijstellen van de zoomstand op de flitser.
Voorbeeld:
U gebruikt een zoomobjectief met een bereik van f = 28 tot 80 mm. In dit
voorbeeld stelt u de zoomreflector in op 28 mm!
☞ Het onderwerp moet zich in het bereik van ongeveer 40 % tot 70 %
van het in het LC-display aangegeven afstandsgebied bevinden. Zo
wordt de elektronica voldoende speelruimte geboden.
Voorzichtig bij gebruik van zoomobjectieven!
Deze kunnen, afhankelijk van hun bouw een verlies aan doorgelaten
licht van zelfs een hele stop veroorzaken. Ze kunnen ook bij verschillende brandpuntsafstanden verschillende effectieve diafragmawaarden hebben. Dit kunt u eventueel door met de hand de diafragmawaarde te corrigeren, compenseren (zie hoofdstuk 14.).
76
4.1 Verdere automatisch-flitsenfuncties
Op de mecablitz kunnen in de flitsfunctie A verschillende verdergaande flitsfuncties worden ingesteld:
• Flitssturing op afstand met adres „Ad1“
(zie hoofdstuk „7.1 De draadloze Metz A bediening op afstand“)
• Flitssturing op afstand met adres „Ad2“
(zie hoofdstuk „7.1 De draadloze Metz A bediening op afstand“)
Het instellen van een verdere automatisch-flitsenfunctie:
• Druk zo vaak op de Mode toets, dat A in het display knippert.
• Draai het instelwiel en kies de gewenste flitsfunctie.
• Om de instelling op te slaan drukt u op het instelwiel. Al u het instelwiel
niet in de richting van de pijl drukt, wordt de instelling na 5 s. automatisch
opgeslagen. De A verschijnt continu en knippert niet meer.
5. Flitsen met handbediening
In deze stand wordt het volle flitsvermogen afgegeven, voor zover geen deelvermogen ingesteld is. De mecablitz moet met een SCA-adapter of standaardvoet uitgerust zijn. Een aanpassing aan de opnamesituatie kan door de diafragma-instelling op de camera en/of door instelling van een deelvermogen
gemaakt worden.
In het LC-display van de mecablitz wordt de afstand van de flitser tot het
onderwerp, die tot een goed belicht resultaat zal leiden, aangegeven. Let
daarom op correcte instelling aan de mecablitz. De waarden voor diafragma en filmgevoeligheid ISO op camera en flitser moeten met elkaar overeenkomen! De zoomstand van de reflector moet afgestemd zijn op de brandpuntsafstand van het objectief!
Het instellen voor flitsen met handbediening:
Instelvoorbeeld:
Flitsafstand: 6 m, zoom 50 mm, ISO 100/21°.
• Camera volgens de opgaven van zijn gebruiksaanwijzing instellen.
704 47 0099.A3
54 MZ-4i
01.02.2007
13:41 Uhr
Seite 77
• Flitser voorzien van standaardvoet SCA 301 of SCA-adapter en op de
camera zetten.
• Flitser via zijn hoofdschakelaar (Afb. 1) inschakelen.
• Zo vaak op de Mode toets (Afb. 1) drukken, dat de M in het display
knippert. Druk het instelwiel (Afb. 1) in de richting van de pijl om de
instelling op te slaan. Als u het instelwiel niet in de richting van de pijl
drukt, wordt de instelling na 5 s. automatisch opgeslagen. Het symbool M
verschijnt na het opslaan continu en knippert niet meer.
• Na het opslaan wordt in het display het deelvermogen „P 1/1“ (= vol vermogen) aangegeven. Bij het bedienen van de ontspanknop (Afb. 1) aan
de mecablitz, c.q. die van de camera, wordt een flits met vol vermogen
ontstoken.
☞ Sommige camera’s ondersteunen de mecablitz bij handinstelling met een
SCA adapter niet (zie de gebruiksaanwijzing van camera en SCA adapter). In dat geval moet de mecablitz met de standaardvoet SCA 301
worden uitgerust (zie ook de gebruiksaanwijzing van de camera).
Flitsen met mecablitz in instelling met de hand en een adapter SCA 3xx2:
Als de mecablitz, voorzien van een SCA 3xx2 adapter samen met een camera wordt gebruikt die de gegevens voor filmgevoeligheid ISO, stand van
de zoomreflector en de diafragmawaarde automatisch doorgeeft, hoeven er
verder geen instellingen te worden gedaan. De mecablitz stelt zich in op basis van de door de camera overgebrachte gegevens.
☞ Bij het werken met een mecablitz, samen met een camera die de gegevens aan de mecablitz doorgeeft kan het voorkomen, dat (afhankelijk van het type camera) de ISO-waarde niet wordt aangegeven; zie
de gebruiksaanwijzing van de SCA-adapter. Bij het werken met de
mecablitz ene een camera die gegevens naad de mecablitz doorgeeft
kunnen de waarden van de filmgevoeligheid ISO en de diafragmawaarden niet worden veranderd! In dit geval moet de diafragmawaarde op de camera zo worden veranderd, dat in het LC-display
van de mecablitz de gewenste afstand wordt aangegeven.
Flitsen met handinstelling met een SCA 3xx adapter, c.q. de standaardvoet
SCA 301:
In dit geval moeten de betreffende waarden voor filmgevoeligheid ISO, de
stand van de zoomreflector en de diafragmawaarde met de hand op de
mecablitz worden ingesteld. Dit is voor een correcte belichting absoluut
noodzakelijk, daar de mecablitz op basis van deze gegevens de flitsafstand
tot het onderwerp berekent en in het display aangeeft.
Het instellen van een deelvermogen:
Om de afstandsaanduiding ter wille van een correcte flitsbelichting te veranderen en individueel aan te passen aan de opnameomstandigheden kan op
de mecablitz een deelvermogen worden ingesteld:
• Draai het instelwiel (Afb. 1) tot het pijlsymbool in het LC-display naast
de P staat.
• Druk het instelwiel (Afb. 1) in de richting van de pijl. Het pijlsymbool
knippert.
• Draai het instelwiel (Afb. 1) en stel het gewenste vermogen in. Druk het
instelwiel in de richting van de pijl om het gekozen deelvermogen op te
slaan. Als u het instelwiel niet in de richting van de pijl drukt, wordt het
deelvermogen na 5 s. automatisch opgeslagen. Na het opslaan knippert
het pijlsymbool niet meer.
Voor het veranderen van de afstandswaarde en individueel aan te passen
aan de opnamesituatie, kan ook de diafragmawaarde op de camera worden
veranderd. Let er echter wel op, dat veranderen van de diafragmawaarde
op de camera de scherptediepte beïnvloedt!
Het uitschakelen van een deelvermogen:
• Draai het instelwiel (Afb. 1) tot het pijlsymbool in het LC-display naast
de P staat.
• Druk het instelwiel in de richting van de pijl. Het pijlsymbool knippert.
• Draai het instelwiel tot de aanduiding van het deelvermogen op P 1/1
staat. Druk het instelwiel (Afb. 1) in de richting van de pijl om deze
instelling op te slaan. Als u het instelwiel niet in de richting van de pijl
77
ń
704 47 0099.A3
54 MZ-4i
01.02.2007
13:41 Uhr
Seite 78
drukt, wordt na 5 s. automatisch opgeslagen. Na het opslaan knippert het
pijlsymbool niet meer. Het deelvermogen wordt, bij instelling op een andere flitsfunctie op P 1/1 gezet!
5.1 Verdere, met de hand in te stellen flitsfuncties
☞ De mecablitz moet uitgerust zijn met een SCA 3xx2 adapter!
ń
Sommige camera’s bieden de mogelijkheid van synchronisatie bij een korte
belichtingstijd (de FP, c.q. HSS-flitsfunctie) in de instelling M die met de hand
moet worden uitgevoerd (zie hiervoor de gebruiksaanwijzing van de camera
en de SCA-adapter).
Het instellen van de flitsfunctie „M-HSS“ onder de M-flitsfunctie:
• Druk op de Mode toets (Afb. 1) tot de M in het display knippert.
• Draai het instelwiel (Afb. 1) en stel HSS in.
• Druk het instelwiel (Afb. 1) in de richting van de pijl om deze instelling
op te slaan.
Als u het instelwiel niet in de richting van de pijl drukt, wordt HSS na 5 s.
automatisch opgeslagen. Na het opslaan knippert het M symbool niet meer.
Uitschakelen van de “HSS”-flitsfunctie:
• Druk op de Mode toets (Afb. 1) tot de M in het display knippert.
• Draai het instelwiel (Afb. 1) en stel HSS uit.
• Druk het instelwiel in de richting van de pijl om deze instelling op te slaan.
Als u het instelwiel niet in de richting van de pijl drukt, wordt na 5 s. automatisch opgeslagen. Na het opslaan knippert het M symbool niet meer.
6. Indirect flitsen
Rechtstreeks geflitste opnamen zijn vaak te herkennen aan de typisch harde
en nadrukkelijke schaduwen. Vaak werkt ook de natuurkundig bepaalde
lichtafval van voorgrond naar achtergrond storend.
Door indirect te flitsen kunnen deze verschijnselen sterk worden verminderd,
omdat het onderwerp en de achtergrond met verstrooid licht zacht en gelijkmatig verlicht worden. De reflector van de flits wordt hierbij zo gezwenkt,
78
dat hij op een geschikt reflecterend vlak (bijv. wanden of plafond van de
ruimte) gericht staat.
De reflector is horizontaal zowel als verticaal te zwenken.
Verticaal: -7°, 0°, 60°, 75°, 90°
Horizontaal: -180°, -150°, -120°, -90°, -60°, -30°, 0°, 30°, 60°, 90°.
In de uitgangspositie in de kop mechanisch vergrendeld. Druk voor het ontgrendelen op de drukknop en draai de flitskop.
☞ Bij verticaal of horizontaal zwenken van de reflector moet er op worden gelet, dat hij voldoende ver wordt uitgezwenkt, zodat er geen
rechtstreeks flitslicht vanuit de reflector meer op het onderwerp kan
vallen. Daarom moet er minsten tot in de klikstand van 60° worden
gezwenkt. In het LC-display doven de afstandsaanduidingen.
De onderwerpsafstand van flitser via plafond of wand tot het onderwerp is nu immers een onbekende grootheid.
Het door het reflectievlak verstrooid gereflecteerde licht geeft een zachte verlichting van het onderwerp.
Het reflecterend vlak moet neutgraal van kleur, c.q wit zijn en mag geen
structuur hebben. (bijv. houten balken tegen het plafond), die schaduwen
kunnen vormen. Voor kleureffecten kiest men een reflecterend vlak in de gewenste kleur.
Om bij het indirect flitsen schaduwen te vermijden, die bijvoorbeeld bij portretopnamen onder de neus en in de oogkassen ontstaan, wordt het gebruik
van de tweede reflector aanbevolen.
6.1 indirect flitsen met ingeschakelde hulpreflector
De hulpreflector (Afb. 2) maakt bij indirect flitsen frontale opheldering
mogelijk.
☞ Werken met de hulpreflector is alleen zinvol bij indirect flitsen.
Met de schakelaar
(Afb. 2) kan de hulpreflector in- en uitgeschakeld
worden. Als het symbool
in het LC-display van de mecablitz knippert, is
dat alleen maar een aanwijzing, da de hoofdreflector nog niet is uitgezwenkt.
704 47 0099.A3
54 MZ-4i
01.02.2007
13:41 Uhr
Seite 79
Bij geactiveerde hulpreflector wordt het vermogen van de flitser verdeeld:
85 % er van komt via de hoofdreflector en 15 % via de hulpreflector. Bij het
flitsen met deelvermogen en ingeschakelde hulpreflector kunnen de aangegeven %-waarden iets afwijken.
Als de hoeveelheid licht van de hulpreflector te groot is, kan deze met behulp
van het grijsfilter met ong. 50 % worden verminderd. Het grijsfilter daarvoor
opzij schuiven, van de mecablitz afnemen, 180° draaien.
☞ Flitsfuncties als ADI, stroboscoop, E-TTL, E-TTL-HSS, D-TTL, 3D MultiSensor, TTL-HSS en Remote zijn niet tegelijk met inzet van de hulpreflector mogelijk.
6.2 Indirect flitsen in de automatisch-flitsenfunctie en de TTL-flitsfunctie
Aanbevolen wordt, vóór de eigenlijke opname te controleren, of de flitser
voor de ingestelde diafragmawaarde voldoende licht afgeeft. Ga hiervoor te
werk als aangegeven in hoofdstuk „10. Aanduiding van de belichtingscontrole“.
6.3 Indirect flitsen met handinstelling
Bij flitsen met handinstelling wordt de benodigde diafragmawaarde op de
camera het beste met een flitsbelichtingsmeter vastgesteld. Als u niet over
zo’n meer beschikt kunt u met de vuistregel:
richtgetal
Diafragmawaarde op de camera = ———————————————
verlichtingsafstand x 2
een diafragmawaarde bepalen, die u bij het opnemen ook met ± 1 stop zou
kunnen variëren.
7. Flitsen met bediening op afstand
Algemeen
Onder „bediening op afstand“ verstaan we de draadloze besturing op afstand van extra flitsers. Daarbij stuurt de cameraflitser (Controller) de extra
flitsers (Slaves) zo, dat de automatische belichtingsregeling van de flitsfunctie
met bediening op afstand zich ook over de extraflitsers uitstrekt.
De Metz flitsfunctie met bediening op afstand maakt het zonder kabelverbinding werken met deflitsregeling met meerdere flitsers van de typen 54 MZ-.., 34
CS-2, 28 CS-2, 40 MZ- ..., 50 MZ-5 en 70 MZ-. . mogelijk. Om deze functie
uit te voeren moeten alle extraflitsers 54 MZ-.., 70 MZ-4 (Slaves) met een Slaveadapter 3083 (accessoire) en alle 40 MZ- ... met een Slave-adapter SCA 3080
of SCA 3082 (accessoire) worden uitgerust. De Slave-flitsers kunnen op de met
de Slave-adapter meegeleverde standvoet of een statief worden gemonteerd.
De Slave-flitsers 34 CS-2, 28 CS-2, 50 MZ-5 Slave en 70 MZ-5 hebben
geen Slave-adapter nodig.
☞ In de functies met bediening op afstand verschijnt er geen aanduiding
van de flitsreikwijdte, c.q. afstandsaanduiding in het LC-display van de
mecablitz. De hulpreflector van de mecablitz moet uitgeschakeld zijn!
Om het mogelijk te maken, twee systemen met bediening op afstand in één
ruimte te laten functioneren en zich niet aan elkaar storen, kunnen op de
Controller en de Slave-flitsers twee verschillende adressen Ad1 en Ad2 worden gekozen.
7.1 De draadloze Metz TTL-flitsfunctie met bediening op afstand
☞ De Metz-TTL-flitsfunctie met bediening op afstand is alleen mogelijk
met een camera die over een TTL-flitsregeling beschikt!
Instellingen van de Controller voor de Metz TTL-flitsfunctie met bediening
op afstand (Afb. 4):
1 Voorzie de flitser op de camera van de geschikte SCA-adapter en schakel
hem via zijn hoofdschakelaar in.
2 Druk zo vaak op de Mode toets (Afb. 1) dat in het display TTL knippert.
3 Draai het instelwiel (Afb. 1) terwijl de functieaanduiding TTL knippert en
kies de controllerfunctie Co met adres Ad1 of Ad2. Zou TTL niet meer knipperen, druk dan één keer op de Mode toets Druk het instelwiel in de richting van de pijl om deze instelling op te slaan. Als u het instelwiel niet in de
richting van de pijl drukt, wordt de gekozen instelling na 5 s. automatisch
opgeslagen. Na het opslaan knippert TTL niet meer maar is het samen met
Co en het Slave-adres Ad1 of Ad2 continu zichtbaar.
79
ń
704 47 0099.A3
ń
54 MZ-4i
01.02.2007
13:41 Uhr
Seite 80
Instellingen van de Slave voor de Metz TTL-flitsfunctie met bediening op
afstand (Afb. 5):
• Voorzie de Slave-flitser 54 MZ-.., 70 MZ-4 van een Slave-adapter 3083.
Slave-flitsers 40 MZ- ... van een Slave-adapter 3080 of 3082.
1 Schakel de mecablitz via de hoofdschakelaar (Afb. 1) in. De mecablitz
stelt zich automatisch in de TTL flitsfunctie in en in het LC-display verschijnt
de aanduiding SL (Slave-functie). Het Slave-adres Ad1 (c.q. het laatst
gekozen adres) wordt ingesteld.
2 Druk, om het Slave-adres te wisselen, op de Mode toets (Afb. 1) de
functieaanduiding TTL knippert.
3 Draai het instelwiel (Afb. 1) en stel Slave-adres Ad2 in. Druk het instelwiel in de richting van de pijl en sla de instelling op.
☞ In de bediening op afstand wordt de motor-zoomreflector van de
mecablitz automatisch in de stand 24 mm gezet om een zo groot mogelijk vlak geheel te kunnen verlichten. Deze reflectorstand is eventueel met de hand te veranderen (zie hoofdstuk 12.).
• Als de Slave-flitser opgeladen is, licht zijn aanduiding voor flitsparaatheid
op en de AF-meetflits knippert. Bovendien kan een akoestisch signaal (Beep)
bij het bereiken van de flitsparaatheid worden ingesteld (zie hoofdstuk 12.).
Dit is zinvol, als er geen zichtcontact met de AF-meetflits, c.q. de aanduiding
voor de flitsparaatheid bestaat.
4 Druk op de handontspanknop (Afb. 1) van de mecablitz Controller
en ontsteek een proefflits.
• De Slave-flitser antwoordt met een in tijd vertraagde flits en geeft daarmee
aan, dat hij paraat is. Zijner meerdere Slave-flitsers tegelijkertijd in bedrijf,
dan volgt het bevestigingssignaal van alle Slave-flitsers tegelijk.
Als een Slave-flitser geen in tijd vertraagde flits afgeeft, dan heeft de sensor van de Slave-adapter geen schakelimpuls ontvangen. Draai dan de
sensor in de richting van de Controllerflitser en herhaal stap 4.
☞ Bij bijzonder kleine afstand tussen Controller- en Slave-flitser kan on-
der bepaalde omstandigheden de elektronica in de camera de lichtaf-
80
gifte onderbreken voordat de Slave zijn informatie heeft gekregen.
Vergroot dan de afstand tussen Controller en Slave of kies een hoger
diafragmagetal en herhaal stap 4.
Uitschakelen van de Metz-TTL-flitsfunctie met bediening op afstand:
• Druk op de Mode toets (Afb. 1) van de Controllerflitser en kies met het
instelwiel (Afb. 1) de Controller-functie.
• Op de Slave-flitser:
Flitser uitschakelen, Slave-adapter SCA 3083 afnemen en de flitser weer
inschakelen.
7.2 De draadloze Metz A-flitsfunctie met bediening op afstand
☞ De Metz automatische flitsenfunctie met bediening op afstand kan met
systeem-, standaard-, met mechanische en met middenformaatcamera’s worden uitgevoerd. Voorwaarde voor alle camera’s is een flitscontact, c.q. -aansluiting en een mecablitz met standaardvoet 301 of
SCA-adapter.
Hierbij wordt de belichting door de fotosensor van de controllerflitser
op de camera geregeld.
Het instellen voor de Controller met de Metz automatisch-flitsenfunctie:
• Voorzie de mecablitz van een SCA-adapter of standaardvoet 301 en schakel hem in.
• Schakel de camera in volgens de gebruiksaanwijzing in de instelling voor
handbediening.
☞ Niet elke camera ondersteunt samen met een SCA-adapter de automatisch-flitsenfunctie, c.q. de automatisch-flitsenfunctie met bediening op
afstand. (zie de gebruiksaanwijzing van camera en SCA-adapter). Als
de camera de automatisch-flitsenfunctie met een SCA-adapter niet
ondersteunt, rust de camera dan uit met de standaardvoet 301! Vergeet
in dat geval niet, de instellingen op de camera (ISO, diafragmawaarde
en brandpuntsafstand van het objectief) op de flitser over te brengen!
• Stel op de camera een belichtingstijd van 1/60 s. of langer in.
• Schakel de mecablitz op de camera in.
704 47 0099.A3
54 MZ-4i
01.02.2007
13:41 Uhr
Seite 81
• Druk zo vaak op de Mode toets (Afb. 1) dat de A knipperend in het
display wordt aangegeven.
• Draai zolang de A knippert het instelwiel (Afb. 1) en kies de
Controllerfunctie Co met adres Ad1 of Ad2. Als A niet meer knipperen, druk
dan één keer op de Mode toets Druk het instelwiel in de richting van de pijl
om deze instelling op te slaan. Als u het instelwiel niet in de richting van de
pijl drukt, wordt de gekozen instelling na 5 s. automatisch opgeslagen. Na
het opslaan knippert A niet meer maar is het samen met Co en het Slaveadres Ad1 of Ad2 continu zichtbaar.
Het instellen voor de Metz automatisch-flitsenfunctie met bediening op
afstand:
Hier gelden dezelfde instelregels als voor de Metz TTL flitsfunctie met bediening op afstand.
De slaveflitser werkt, ook bij A-Remote in de TTL-functie.
7.3 Beoordeling van de totale verlichtingsverhouding bij flitsen met
bediening op afstand
Voor het beoordelen van de totale verlichtingsverhouding bij het A- en TTL
flitsen met bediening op afstand kan de instelverlichting van alle aangesloten
flitsers worden ontstoken.
Voor het ontsteken van het instellicht moet op de 54 MZ-.. op de camera de
handontspanknop (Afb. 1) voor deze functie worden geprogrammeerd. Druk daartoe de toets Select (Afb. 1) zo vaak, dat de functieaanduiding
oplicht. Draai aan het instelwiel (Afb. 1) en stel de functie
instellicht in op On of OFF. Met de handontspanknop (Afb. 1) kan dan
het instellicht ontstoken worden, zie hiervoor ook hoofdstuk 12.
8. Invulflitsen bij daglicht
De mecablitz kan ook worden ingezet voor het invullen van schaduwpartijen
bij daglicht en zo, ook bij tegenlichtopnamen voor een uitgebalanceerde verlichting zorgen. Er staan hiervoor verschillende mogelijkheden naar keuze
ter beschikking.
8.1 Invulflitsen bij de TTL-flitsfunctie
De mecablitz moet van een geschikte SCA-adapter worden voorzien. De
camera moet de functie van TTL-invulflitsen ondersteunen.
• Druk zo vaak op de Mode toets (Afb. 1), dat in het display TTL wordt
aangegeven.
Bij de meeste cameratypen wordt bij geheel geprogrammeerde automatiek,
programautomatiek P en de onderwerpprogramma’s bij daglicht automatisch
het invulflitsen geactiveerd (zie hiervoor de gebruiksaanwijzing van camera
en SCA-adapter). De camera zorgt hierbij automatisch voor een uitgebalanceerde belichting tussen onderwerp en achtergrond.
Sommige camera’s bieden bovendien een speciaal invulflitsprogramma, dat
indien nodig bewust door de gebruiker kan worden ingesteld. Het activeren
vindt, afhankelijk van de camera op de camera zelf plaats of op de mecablitz (zie hiervoor de gebruiksaanwijzing van camera en SCA-adapter).
Voorbeeld: matrixgestuurd invulflitsen (alleen bij bepaalde Nikon camera’s)
De mecablitz moet voorzien zijn van de SCA-adapter 3402 (Nikon)!
Verschillende Nikon camera’s ondersteunen de functie „matrixgestuurd invulflitsen“ (zie de gebruiksaanwijzing van camera en SCA-adapter). Deze bedrijfsfunctie is een verdergaande functie onder de TTL-flitsfunctie. De instelling hiervan werd in hoofdstuk 3.1 beschreven!
Voorbeeld: 3D Multisensor- invulflitsen (alleen met bepaalde Nikon-camera's)
De mecablitz moet voorzien zijn van adapter SCA 3402 (Nikon)!
Sommige Nikon-camera's ondersteunen de "3D-Miltisensor-invulflitsfunctie"
(zie de gebruiksaanwijzingen van camera en SCA-adapter). Deze flitsfunctie
is een meer doorgevoerde functie onder de TTL-flitsfunctie. Het instellen daarvan is in hoofdstuk 3.1 beschreven!
8.2 Invulflitsen in de automatisch-flitsenfunctie
• Mecablitz via zijn hoofdschakelaar (Afb. 1) inschakelen.
• Druk zo vaak op de Mode toets (Afb. 1), dat de A knippert. Druk het
instelwiel in de richting van de pijl en sla daarmee de instelling op. Als u
81
ń
704 47 0099.A3
ń
54 MZ-4i
01.02.2007
13:41 Uhr
Seite 82
het instelwiel niet in de richting van de pijl drukt, wordt de instelling na 5 s.
automatisch opgeslagen. Het symbool A verschijnt nu constant en het knippert niet meer.
☞ In de automatisch-flitsenfunctie wordt de hoeveelheid flitslicht geregeld door de sensor van de mecablitz Let er daarom op, dat de bron
van het tegenlicht niet rechtstreeks op de sensor van de mecablitz
valt. De elektronica van de flitser zou daardoor in de war gebracht
kunnen worden.
mecablitz stuurt.
Correctie van de diafragmawaarde is dan niet meer nodig!
Tip:
Meet, indien mogelijk, de belichting van onderwerp en achtergrond apart.
Een correctiewaarde van -1 EV (= stop) tot -1 2/3 EV voor de diafragmawaarde op de mecablitz, leidt naar ervaring tot de beste opnameresultaten
bij het invulflitsen!
Bepaal met de belichtingsmeer van de camera of met een losse belichtingsmeer de voor een normale belichting benodigde diafragmawaarde en belichtingstijd. Let er daarbij op, dat de belichtingstijd op de camera gelijke
aan of langer is dan de kortste flitssynchronisatietijd.van de camera (hangt
van het type camera af: zie de gebruiksaanwijzing van de camera).
Voorbeeld:
Gevonden diafragmawaarde = 8;
Gevonden belichtingstijd = 1/60 s.
Flitssynchronisatietijd van de camera bijv. 1/100 s.
(zie gebruiksaanwijzing van de camera).
Beide gevonden waarden voor diafragma en belichtingstijd kunnen op de
camera worden ingesteld, daar de belichtingstijd langer is dan de flitssynchronisatietijd.
Voor het bereiken van een plezierige opheldering van de schaduwen te krijgen,
wordt aanbevolen op de flitser een één stop lagere diafragmawaarde in te stellen dan de op de camera ingestelde. In het voorbeeld wordt op de camera diafragmawaarde 8 ingesteld, op de flitser zou dat dus 5,6 moeten worden.
Als de mecablitz met een SCA 3xx2 adapter is uitgerust, en de camera automatisch de diafragmawaarde naar de mecablitz overbrengt is met de hand
verstellen van de diafragmawaarde niet mogelijk! In dat geval kan in de
automatisch-flitsenfunctie met de hand een correctie op de flitsbelichting worden ingesteld (zie hoofdstuk 14.).
Een correctie met de hand op de flitsbelichting bij de automatisch-flitsenfunctie kan ook dan worden ingesteld, als de camera geen gegevens naar de
9. De stroboscopisch-flitsenfunctie (Afb. 6)
82
Bij deze functie kunnen op één enkele opname meerdere flitsbelichtingen
worden gemaakt. Dit is vooral interessant bij bewegingsstudies en effectopnamen (Afb. 6). Bij de functie van stroboscopisch flitsen worden meerdere
flitsen met een bepaalde flitsfrequentie afgegeven. De functie is daarom
alleen met een deelvermogen van maximaal 1/4 of minder te realiseren.
Voor een stroboscoopopname kan de flitsfrequentie (aantal flitsen per seconde) van 1 ... 50 Hz in stappen van 1 Hz en het aantal flitsen van 2 ... 50 in
stappen van 1 flits worden gekozen.
In de stroboscoopfunctie wordt geen waarde voor de filmgevoeligheid ISO
aangegeven. Bij het gebruik van de mecablitz met een adapter SCA 301 of
een camera die gegevens naar de mecablitz zendt, stelt de mecablitz deze
filmgevoeligheid automatisch in (zie gebruiksaanwijzing van camera en
SCA-adapter)!
Bij het gebruik van de mecablitz met een adapter SCA 3xx, de standaardvoet SCA 301 of met een camera die geen gegevens voor de filmgevoeligheid zendt, moet de filmgevoeligheid voordat u voor de stroboscoopfunctie
kiest in de functies TTL, A of M worden ingesteld. De mecablitz neemt die
instelling dan ook over voor de stroboscoopfunctie.
Het maximaal mogelijke deelvermogen stelt zich in de stroboscoopfunctie
automatisch in. U kunt, ter wille van zeer korte flitstijden met de hand een
deelvermogen van tot 1/256 instellen. In het LC-display wordt de bij de
ingestelde parameers behorende geldige afstandswaarde aangegeven. Door
de diafragmawaarde of de opnameafstand te veranderen kunt u de aange-
704 47 0099.A3
54 MZ-4i
01.02.2007
13:41 Uhr
Seite 83
geven afstandswaarde op de opnameafstand aanpassen. Op de camera
moeten dan de diafragmawaarden van de mecablitz worden ingesteld. Door
het gebruiken van films met een hogere gevoeligheid, kan de afstandswaarde worden vergroot.
☞ Bij ingeschakelde hulpreflector is stroboscopisch flitsen niet mogelijk.
Instellingen voor de stroboscoopfunctie (Afb. 7):
• Zet de camera overeenkomstig de gebruiksaanwijzing in de functie van
handinstelling en kies een passende belichtingstijd.
1 Rust de mecablitz met een SCA-adapter of standaardvoet SCA 301 uit en
schakel hem via de hoofdschakelaar (Afb. 1) in.
2 Druk zo vaak op de Mode toets (Afb. 1), dat in het display
knippert. Druk het instelwiel (Afb. 1) in de richting van de pijl om de instelling op te slaan. Als u het instelwiel niet in de richting van de pijl drukt,
wordt de instelling na 5 s. automatisch opgeslagen. Het symbool
verschijnt nu constant en knippert niet meer.
De stroboscopisch-flitsenfunctie met de mecablitz en een SCA 3xx2 adapter:
Als de mecablitz met een adapter SCA 3xx2 samen wordt gebruikt met een
camera die gegevens voor filmgevoeligheid ISO, stand van de zoomreflector
en diafragmawaarde automatisch doorgeeft, zijn verdere instellingen op de
mecablitz overbodig. De mecablitz stelt zich automatisch in op de van de camera ontvangen gegevens. Het aantal flitsen en de flitsfrequentie moeten, als
onder de punten 3 en 4 beschreven (zie hieronder), worden ingesteld.
☞ Bij het gebruik van de mecablitz met een camera die gegevens aan
de mecablitz doorgeeft, kunnen de waarden van filmgevoeligheid ISO
en diafragma niet worden veranderd.
Stroboscopisch flitsen met een SCA 3xx adapter, de standaardvoet SCA 301
of met een camera die geen gegevens doorgeeft (Afb. 7):
In dit geval moeten de betreffende waarden voor filmgevoeligheid ISO de
stand van de zoomreflector en de diafragmawaarde met de hand op de
mecablitz worden ingesteld. Dis is absoluut noodzakelijk, daar de mecablitz
vanuit deze waarden de afstand van onderwerp tot flitser voor een correcte
belichting berekent en in zijn display aangeeft.
3 Aantal flitsen instellen. Hiervoor het instelwiel (Afb. 1) op de flitser draaien tot de pijl in de bovenste positie staat Druk het instelwiel, door het te
draaien het gewenste aantal (N) flitsen instellen en opslaan door opnieuw
op het instelwiel te drukken.
4 De flitsfrequentie instellen. Hiervoor het instelwiel (Afb. 1) tegen de richting van de wijzers van de klok in draaien tot naast de pijl f(Hz) staat.
Druk het instelwiel en draai het om de gewenste flitsfrequentie in te stellen.
Door opnieuw op het instelwiel te drukken wordt de instelling opgeslagen.
☞ Als afstandswaarde wordt de afstand tot het bewegende object gebruikt. Om overbelichting van de onbewegelijke achtergrond te vermijden. Moet dit deel van het beeld zeer donker zijn of zich zeer ver
achter het bewegende object bevinden. De beste resultaten worden
verkregen bij weinig omgevingslicht.
Bij het instellen van de camera moet op een voldoend lange belichtingstijd
worden gelet.
In de tabel 3 worden de kortste belichtingstijden voor de N = f(Hz) combinaties aangegeven.
10. Aanduiding van de belichtingscontrole
De aanduiding van de belichtingscontrole „ok“ (Afb. 1) licht alleen op als
de opname in de automatisch-flitsen- of TTL-flitsfunctie correct werd belicht.
Hierdoor heeft u bij de automatisch-flitsenfunctie de mogelijkheid om, vooral
bij indirect flitsen met moeilijk vooraf in te schatten reflectieverhoudingen
door een met de hand ontstoken proefflits de passende diafragmawaarde te
bepalen.
De proefflits kan met de handontspanknop (Afb. 1) worden ontstoken,
voor zover u deze toets niet voor het instellicht hebt geprogrammeerd (zie
hoofdstuk 12.).
Blijft de aanduiding van de belichtingscontrole „ok“ (Afb. 1) na de proefflits donker, dan moet u de eerstvolgend lagere diafragmawaarde instellen
83
ń
704 47 0099.A3
54 MZ-4i
01.02.2007
13:41 Uhr
Seite 84
of de afstand naar het reflecterende vlak, c.q. het onderwerp verkleinen en
de proefflits herhalen.
De op deze wijze verkregen diafragmawaarde moet u ook op de camera
instellen.
☞ Houd bij de proefflits de flitser en de sensor (Afb. 2) als bij de latere opname.
ń
Deze mogelijkheid kan ook bij de TTL-flitsfunctie worden toegepast, zonder
dat een proefflits moet worden ontstoken. Zet de flitser in de automatisch-flitsenfunctie en bepaal, op de manier die hierboven werd beschreven de passende diafragmawaarde, stel die op de camera in, waarna u de flitser weer
in de TTL-flitsfunctie terugzet.
Deze methode functioneert ook relatief exact bij de gemiddelde brandpuntsafstanden van 28 - 85 mm. In grensgevallen kan echter bij de navolgende
TTL-flitsbelichting tóch onderbelichting optreden. De aanduiding van de belichtingscontrole „ok“ blijft in die gevallen na het ontspannen van de camera
donker. Herhaal dan de opname met de eerstvolgend lagere diafragmawaarde (bijv. in plaats van diafragma 11 diafragma 8).
11. De AF-meetflits
☞ De AF-meetflits (Afb. 2) van de mecablitz kan alleen door autofocu-
scamera’s worden geactiveerd die een AF-meetflits ondersteunen!
Sommige autofocuscamera’s ondersteunen alleen hun eigen, ingebouwde AF-meetflits (zie hiervoor ook de gebruiksaanwijzing van de
camera). De mecablitz moet van een adapter SCA 3xx2 zijn voorzien!
Let er bij de keuze van de autofocusfunctie van de camera op, dat de meeste
camera’s de AF-meetflits slechts in de functie „Single AF“ c.q. „One Shot AF“
ondersteunen (zie de gebruiksaanwijzing van de camera).
Zodra er niet meer genoeg omgevingslicht is voor het automatisch scherpstellen, wordt door de elektronica van de camera de autofocus-meetflits geactiveerd. De autofocusschijnwerper straalt een streeppatroon uit dat op het onderwerp wordt geprojecteerd. Op dit streeppatroon kan de autofocuscamera
dan automatisch scherpstellen. De reikwijdte van de AF-meetflits bedraagt
84
ongeveer 9 m (bij standaardobjectief 1,7/50 mm). Zoomobjectieven met een
lagere lichtsterkte kunnen de reikwijdte van de AF-meetflits soms behoorlijk
beperken.
☞ Sommige autofocuscamera’s hebben, behalve het centrale AF-meetveld in de camerazoeker nog andere AF-meetvelden. Het streeppatroon van de AF-meetflits ondersteunt alleen de centrale AF-sensor
van de camera. Soms moet op de camera de centrale AF-sensor met
de hand worden ingesteld (zie gebruiksaanwijzing van camera en
SCA-adapter).
12. Bijzondere functies
De bijzondere functies van de mecablitz kunnen door op de Select toets (Afb. 1) na elkaar worden opgeroepen en met het instelwiel (Afb. 1) in- of
uitgeschakeld worden.
12.1 Beep-functie
Met de Beep-functie kan de gebruiker sommige functies van de mecablitz
zich akoestisch laten melden. Daardoor kan de fotograaf zich geheel op het
onderwerp en opname concentreren en hoeft hij zich niet om de optische
statusaanduidingen te bekommeren!
De Beep-functie signaleert akoestisch ...
• het bereiken van de flitsparaatheid;
• de juiste flitsbelichting;
• de automatische uitschakeling van de flitser en
• een bedieningsfout.
Akoestische melding na inschakelen van de mecablitz:
• Een kort (ong. 2 s.) ononderbroken beep-signaal direct na de opname
geeft aan, dat de flitser paraat is.
Beep-signalen na de opname:
• Een kort (ong. 2 s.) ononderbroken beep-signaal direct na de opname
geeft aan, dat de opname correct werd belicht en de flitser nog, c.q. weer
704 47 0099.A3
54 MZ-4i
01.02.2007
13:41 Uhr
Seite 85
paraat is. Als er direct na de opname geen signaal klinkt, werd de opname onderbelicht.
• Een intermitterend beep-signaal direct na de opname is het teken voor een
correct belichte flitsopname. De flitser is echter pas na een volgende (3 s.)
continu-beep weer paraat.
Beep-signalen bij de instellingen in de automatisch-flitsenfunctie „A“:
• Een kort beep-signaal als alarm klinkt als in de automatisch-flitsenfunctie
de mecablitz de instellingen van diafragmawaarde en filmgevoeligheid
ISO tot overschrijding van het toelaatbare lichtregelbereik zouden leiden.
Het werkdiafragma op de mecablitz wordt automatisch in de eerstvolgend
toelaatbare waarde veranderd.
Inschakelen van de Beep-functie (Afb. 9):
1 Druk zo vaak op de Select toets (Afb. 1), dat het symbool knippert.
2 Draai het instelwiel (Afb. 1) en de Beep-functie inschakelen. In het
LC–display van de mecablitz verschijnt „On“. Voor het opslaan van de
functie het instelwiel kort in de richting van de pijl drukken. Als het instelwiel niet wordt gedrukt, wordt de gekozen instelling na 5 s. automatisch
opgeslagen.
Uitschakelen van de Beep-functie (Afb. 9):
• Druk zo vaak op de Select toets (Afb. 1), dat het symbool knippert.
• Draai het instelwiel (Afb. 1) en de Beep-functie uitschakelen. In het
LC–display van de mecablitz verschijnt „OFF“. Voor het opslaan van de
functie het instelwiel kort in de richting van de pijl drukken. Als het instelwiel niet wordt gedrukt, wordt de gekozen instelling na 5 s. automatisch
opgeslagen.
Voor het ontgrendelen gedurende 3 s. tegelijk op de toetsen Mode en Select
drukken tot in het display het symbool
verdwijnt.
12.2 Ver- en ontgrendelen van de bedieningselementen (Key-functie)
Uitschakelen van de automatisch uitschakeling:
1 Druk zo vaak op de Select toets (Afb. 1) van de mecablitz, dat het symbool (klokje) knippert.
2 Draai het instelwiel (Afb. 1) tot in het LC-display „OFF“ aangegeven
wordt. Voor het opslaan van deze instelling het instelwiel kort in de richting
De mecablitz kan naar keuze zo worden ingesteld, dat hij na 1 minuut of na
10 minuten na het laatste gebruik (flitsopname, of instelling, c.q. aantippen van
de ontspanknop op de camera) zich automatisch uitschakelt om de stroombronnen tegen onbedoeld verbruik te beschermen.
De laatst gebruikte functie-instelling blijft na het automatisch uitschakelen behouden en staat na herinschakelen onmiddellijk weer ter beschikking.
Als de mecablitz met een SCA 3xx2 adapter is uitgerust, kan hij door aantippen van de ontspanknop op de camera weer worden geactiveerd.
Als de mecablitz met een SCA 3xx adapter of met de standaardvoet SCA 301
is uitgerust kan hij door het instelwiel te bedienen, weer worden geactiveerd.
Inschakelen van de automatische uitschakeling (Afb. 8):
1 Druk zo vaak op de Select toets (Afb. 1) van de mecablitz, dat het symbool
knippert.
2 Draai het instelwiel (Afb. 1) en kies de gewenste „Auto-off-tijd“ 1 m
(1 minuut) of 10 m (10 minuten). In het display wordt bovendien „On“
aangegeven. Voor het opslaan van deze instelling het instelwiel kort in de
richting van de pijl drukken, Als u het instelwiel niet in de richting van de
pijl drukt, wordt de instelling na 5 s. automatisch opgeslagen. In het
LC–display van de mecablitz wordt na het opslaan het symbool
aangegeven.
☞ Als u denkt, de mecablitz gedurende langere tijd niet te gebruiken,
schakel hem dan met behulp van de hoofdschakelaar uit!
Ȅ
Ȅ
Met de key-functie zijn de toetsen Mode, Select en het instelwiel tegen onbedoeld verstellen te vergrendelen.
Voor het vergrendelen gedurende 3 s. tegelijk op de toetsen Mode en Select
drukken tot in het display het symbool
verschijnt.
12.3 Automatische uitschakeling van het apparaat / Auto-Off (Afb. 8)
85
ń
704 47 0099.A3
54 MZ-4i
01.02.2007
13:41 Uhr
Seite 86
Ȅ
van de pijl drukken, Als u het instelwiel niet in de richting van de pijl drukt,
wordt de instelling na 5 s. automatisch opgeslagen. Uit het LC-display van
de mecablitz verdwijnt na het opslaan het symbool
.
12.4 REAR - synchronisatie bij het dichtgaan van de sluiter (Afb. 10/11)
ń
De synchronisatie bij het dichtgaan van de sluiter (REAR) is vooral bij belichtingen met lange belichtingstijden (langer dan bijv. 1/30 seconde) en bewegende onderwerpen met een eigen lichtbron van belang. Bewegende lichtbronnen
trekken dan een lichtveeg achter zich in plaats van - zoals bij synchronisatie
zodra de sluiter openstaat- deze voor zich uit te duwen. Met synchronisatie bij
het dichtgaan van de sluiter wordt daarom bij bewegende lichtbronnen een
„natuurlijker“ weergave van de opnamesituatie verkregen.
☞ De REAR-functie is alleen te kiezen en in te stellen als de mecablitz
van de geschikte SCA-adapter is voorzien en oip een camera is aangebracht, die deze functie ondersteunt. De camera moet voor het
oproepen van deze functie ingeschakeld zijn! Door kort aantippen
van de ontspanknop van de camera moet minstens éénmaal een
gegevensoverdracht tussen camera en mecablitz, c.q. SCA-adapter
hebben plaatsgevonden.
Of uw camera, c.q. de SCA-adapter de REAR-functie ondersteunt vindt u in
de betreffende gebruiksaanwijzingen.
Bij sommige camera’s is in bepaalde functies de REAR-functie niet mogelijk
De REAR-functie is niet te kiezen c.q. de REAR-functie wordt automatisch uitgezet. Zie daarvoor de gebruiksaanwijzingen van camera en SCA-adapter!
Inschakelen van de REAR-functie:
• Druk zo vaak op de Select toets (Afb. 1), dat in het LC-display „REAR“
verschijnt Met het instelwiel „On“ instellen. Het instelrad in de richting van
de pijl drukken om de instelling op te slaan. Als u het instelwiel niet in de
richting van de pijl drukt, wordt de REAR-functie na 5 s. automatisch
opgeslagen.
Het symbool „REAR“ voor synchronisatie bij het dichtgaan van de sluiter blijft
na de instelling in het LC-display staan!
86
Tip:
Gebruik bij deze functie veiligheidshalve een statief om bij langere belichtingstijden bewegingsonscherpte te vermijden.
☞ Deze functie na de opname weer uitschakelen, daar zich voor de
„normale“ flitsopnamen onder sommige omstandigheden bij camerafunctie P, c.q. de onderwerpsprogramma’s ongewenst lange belichtingstijden kunnen ontstaan.
De REAR-functie kan op sommige camera’s zelf worden ingesteld. Op de
mecablitz wordt dan echter geen „REAR“ aangegeven.
Uitschakelen van de REAR-functie:
• Druk zo vaak op de Select toets (Afb. 1), dat in het LC-display „REAR“
verschijnt Met het instelwiel „OFF“ instellen. Het instelrad in de richting van
de pijl drukken om de instelling op te slaan. Als u het instelwiel niet in de
richting van de pijl drukt, wordt de instelling na 5 s. automatisch opgeslagen. Het symbool „REAR“ voor synchronisatie bij het dichtgaan van de sluiter in het LC-display zal verdwijnen.
12.5 Instellicht / Modelling-Light ML
Bij het instellicht gaat het om een stroboscopisch flitslicht met hoge frequentie.
Bij een tijdsduur van ong. 4 seconden ontstaat de indruk van continulicht.
Met het instellicht kan de lichtverdeling kan de lichtverdeling en schaduwvorming reeds voorafgaand aan de opname worden beoordeeld.
Het instellen van de instellichtfunctie:
• Druk zo vaak op de Select toets (Afb. 1), dat in het LC-display het symbool
knippert. Met het instelwiel „On“ instellen. Druk het instelwiel in
de richting van de pijl om de instelling op te slaan. Als u het instelwiel niet
in de richting van de pijl drukt, wordt de instelling na 5 s. automatisch
opgeslagen.
Op de mecablitz brandt bij contact met een SCA 3xx2 adapter het „flits gereed“ lampje. Daarmee wordt aangegeven, dat de instellichtfunctie geactiveerd is. Als u op de handontspanknop (Afb. 1) drukt, ontsteekt de
mecablitz zijn instellicht.
704 47 0099.A3
54 MZ-4i
01.02.2007
13:41 Uhr
Seite 87
Bij de Metz TTL- en automatisch flitsenfunctie met bediening op afstand wordt
door het instellicht van de controller ook bij alle SLAVES tegelijkertijd een instellicht afgegeven (bij 40 MZ- ... met SCA 3080 adapter vanaf de versie
M1 of een SCA 3082 adapter).
Een geheel opgeladen accuset (600 mAh) is voldoende voor ong. 60 x ontsteken van het instellicht. Met de gebruikelijke droge batterijen is het gebruik
van instellicht niet zinvol, omdat door hun grotere inwendige weerstand de
energie voor de flitscondensator gedurende de lichtafgifte niet snel genoeg
ter beschikking kan worden gesteld.
Uitschakelen van de instellichtfunctie:
• Druk zo vaak op de Select toets (Afb. 1), dat in het LC-display het symbool
knippert. Met het instelwiel „OFF“ instellen. Druk het instelwiel in
de richting van de pijl om de instelling op te slaan. Als u het instelwiel niet
in de richting van de pijl drukt, wordt de instelling na 5 s. automatisch
opgeslagen.
Op de mecablitz verschijnt de aanduiding voor flitsparaatheid (Afb. 1)
weer continu.
12.6 Aanpassing van de verlichtingshoek aan de brandpuntsafstand van het opnameformaat
Deze functie biedt de gebruiker de mogelijkheid, de aanduiding van de
stand van de zoomreflector van de mecablitz aan het opnameformaat van
de camera aan te passen. Daardoor kunnen de brandpuntsafstanden van
middenformaatcamera’s (4,5 x 6, 6 x 6, 6 x 7, en 6 x 9) of APS-camera’s
met de aanduidingen op de mecablitz in overeenstemming worden gebracht.
Voor het kleinbeeldformaat 35 mm kan bovendien de extended-zoomfunctie
worden gekozen.
Bij de extended-zoomfunctie wordt de verlichtingshoek van de mecablitz ten
opzichte van de brandpuntsafstand van het toegepaste objectief een stap
vergroot! De daaruit resulterende, grotere verlichtingshoek zorgt binnenshuis
voor extra strooilicht (reflecties) en daardoor voor een zachter flitslicht.
Voorbeeld voor de extended-zoomfunctie:
De brandpuntsafstand van het objectief op de camera is 50 mm.
In de extended-zoomfunctie stuurt de mecablitz de reflectorstand op die van
35 mm.
Het instellen voor het aanpassen van de verlichtingshoek aan de brandpuntsafstand van het opnameformaat (Afb. 12):
1 Druk zo vaak op de Select toets (Afb. 1), dat in het display „Zoom“ verschijnt.
2 Door het instelwiel (Afb. 1) te draaien, de gewenste aanpassing van de
aanduiding van de brandpuntsafstanden van het opnameformaat instellen.
Aanduidingen in het display:
Zoom zonder extra aanduiding = instelling voor kleinbeeldformaat (= normale instelling)
Auto Zoom met de volgende extra aanduidingen:
E
Extended zoomfunctie (alleen voor kleinbeeldcamera’s) (Afb. 12)
APS
Aanpassing aan een APS-camera
F1
Aanpassing aan een middenformaatcamera 4,5x6
F2
Aanpassing aan een middenformaatcamera 6x6, 6x7 of 6x9
Aanduiding voor ingeschakelde Extended-Zoom functie
• Na de keuze het instelwiel (Afb. 1) in de richting van de pijl drukken
om de instelling op te slaan. Als u het instelwiel niet in de richting van de
pijl drukt, wordt de instelling na 5 s. automatisch opgeslagen. Deze instelling blijft ook na het uitschakelen van de mecablitz ingesteld staan!
Het
in het LC-display van de flitser na het opslaan wijst er op, dat een
van de bovengenoemde aanpassingen aan de brandpuntsafstanden staat
ingesteld.
12.7 Flitsbelichtingstrapje „Fb“(flash bracketing) (Afb. 13)
Met de mecablitz 54 MZ-.. kan in de functies TTL en A een flitsbelichtingstrapje (flash bracketing / flash-exposure-bracketing) worden gemaakt.
Een flitsbelichtingstrapje bestaat uit drie na elkaar volgende flitsopnamen
met verschuillende correctiewaarden op de flitsbelichting. De eerste flitsopna87
ń
704 47 0099.A3
ń
54 MZ-4i
01.02.2007
13:41 Uhr
Seite 88
me in deze reeks wordt zonder correctiewaarde uitgevoerd. De tweede flitsopname wordt met een minuscorrectie en de derde met een pluscorrectie gemaakt. Na de derde opname wordt deze functie weer automatisch uitgeschakeld.
Flitsbelichtingstrapje „Fb“ bij de TTL-flitsfunctie:
Een belichtingstrapje bij de TTL-flitsfunctie kan alleen dan worden gemaakt,
als de mecablitz van een daarvoor geschikte SCA-adapter (SCA 3xx2) is
voorzien en de camera flitsbelichting met handinstelling door de mecablitz,
ondersteunt.
Als de camera flitsbelichting met handinstelling niet ondersteunt dan kan op de
mecablitz weliswaar een correctiefactor voor het flitsbelichtingstrapje worden
ingesteld, maar zal de camera de belichtingen toch zonder die correctie uitvoeren. Zie hiervoor de gebruiksaanwijzingen van camera en SCA-adapter!
Flitsbelichtingstrapje „Fb“ bij de A-flitsfunctie:
Voor een belichtingstrapje bij de A-flitsfunctie is de uitrusting van de mecablitz
met een standaardvoet SCA 301 reeds voldoende. Het blijft echter mogelijk,
een flitsbelichtingstrapje in de automatisch-flitsenfunctie met een SCA-adapter
uit te voeren!
☞ Bij sommige camera’s is een belichtingstrapje in de A-flitsfunctie technisch niet mogelijk!
Bij sommige camera´s is een flitstrapje in de automatisch-flitsenfunctie niet
moglijk als de mecablitz vann een andere dan de standaardvoet SCA 301 is
voorzien!
Zie hervoor de gebruiksaanwijzing van de camera, c.q. die van de SCA-adapter.
Het inschakelen van een flitsbelichtingstrapje “Fb” (Afb. 13):
1 Druk zo vaak op de Select toets (Afb. 1), dat in het display „Fb“ verschijnt.
2 Door het instelwiel (Afb. 1) te draaien de gewenste correctiefactor voor
het flitsbelichtingstrapje kiezen. In het display knippert intussen „EV“ en de
waarde van de correctiefactor. Druk het instelwiel in de richting van de pijl
om de instelling op te slaan. Als u het instelwiel niet in de richting van de
88
pijl drukt, wordt de instelling na 5 s. automatisch opgeslagen.
In het display van de mecablitz verschijnt „Fb 1“. Dit wijst op de eerste opname van het flitsbelichtingstrapje. Deze eerste opname wordt dan zonder correctie uitgevoerd.
Na de eerste opname wisselt de aanduiding in het display naar „Fb 2“. In
het display verschijnen bovendien „EV“ en de minuscorrectiefactor waarmee
deze tweede opname wordt gemaakt.
Na de tweede opname wisselt de aanduiding in het display naar „Fb 3“. In
het display verschijnen bovendien „EV“ en de pluscorrectiefactor waarmee
deze derde opname wordt gemaakt.
Na de derde opname verdwijnen de aanduidingen „Fb“ en „EV“ alsmede de
waarde voor de correctiefactor.
☞ Voor een volgend flitsbelichtingstrapje moeten de instellingsstappen
voor het inschakelen weer opnieuw worden doorlopen.
Als het flitsbelichtingstrapje voortijdig moet worden afgebroken, schakelt u
de mecablitz met behulp van de hoofdschakelaar even uit.
12.8 Terug naar basisinstellingen
De mecablitz kan, door minstens 3 seconden op de Mode toets (Afb. 1) te
drukken in zijn basisinstelling worden teruggezet. De ingestelde bedrijfsfunctie blijft behouden. De volgende instellingen worden uitgeschakeld.
De verdergaande functies onder de TTL-flitsfunctie:
• „HSS“, „ETTL“, „3D“ en de functies met bediening op afstand
• De met de hand in te stellen functie „HSS“
• De met de hand ingevoerde deelvermogens
• Flash bracketing “Fb”
• Aanpassingen van de verlichtingshoek aan de brandpuntsafstanden van
het opnameformaat „E“, „APS“, „F1“, en „F2“
• Synchronisatie op het dichtgaan van de sluiter (REAR)
• De instellichtfunctie
704 47 0099.A3
54 MZ-4i
01.02.2007
13:41 Uhr
Seite 89
• De vergrendeling van de bedieningselementen.
De volgende instellingen worden gedaan:
• De automatische uitschakeling van het apparaat na 10 minuten
• De „Beep“-functie aan
• „Auto-Zoom“ aan.
12.9 Motor-zoomreflector
Als de mecablitz met een adapter SCA 3xx2 is uitgerust en gebruikt wordt
op een camera die gegevens voor de brandpuntsafstand van het objectief
aan de flitser doorgeeft, past de stand van de zoomreflector zich daar automatisch op aan. In het display van de mecablitz wordt „Auto-Zoom“ aangegeven.
Wordt de mecablitz met een SCA 3xx adapter of de standaardvoet SCA 301
uitgerust, met de stand van de zoomreflector met de hand worden ingesteld.
• Draai het instelwiel (Afb. 1) tot het pijlsymbool zich op het display naast
„Zoom“ bevindt.
• Druk het instelwiel (Afb. 1) in de richting van de pijl. Het pijlsymbool
knippert.
• Draai het instelwiel en kies de stand van de zoomreflector.
• Om de instelling op te slaan het instelwiel in de richting van de pijl drukken.
Als u het instelwiel niet in de richting van de pijl drukt, wordt de instelling na
5 s. automatisch opgeslagen! Het pijlsymbool knippert dan niet meer.
Als u een zoomobjectief gebruikt, en niet steeds het gehele richtgetal en de
max. reikwijdte van de mecablitz gebruikt, kunt u de stand van de zoomreflector ook op de aanvangsbrandpuntsafstand van het objectief laten staan.
Daardoor wordt gegarandeerd, dat uw opname altijd geheel uitgelicht
wordt. U bespaart zich daarmee het steeds weer moeten aanpassen aan de
brandpuntsafstand van het objectief.
Voorbeeld:
U gebruikt een zoomobjectief met een brandpuntsafstand van 28 - 80 mm.
In dit voorbeeld stelt u de stand van de zoomreflector dan in op 28 mm!
Het veranderen van de stand van de zoomreflector bij een SCA 3xx2
adapter en een camera die gegevens doorgeeft:
De stand van de zoomreflector kan ook bij het gebruik van de mecablitz met
een SCA 3xx2 adapter en een camera die gegevens doorgeeft, worden veranderd:
Het kiezen van de gewenste stand van de zoomreflector, zie hierboven.
Na het opslaan wordt in plaats van „Autozoom“ wordt alleen nog „Zoom“
aangegeven. De gekozen stand van de zoomreflector knippert in het display
van de mecablitz. Dit wijst er op, dat de gekozen stand van de zoomreflector
met de hand werd versteld.
Terugzetten in de „Auto-Zoom“ functie:
• Draai het instelwiel (Afb. 1) tot het pijlsymbool op het display zich naast
„Zoom“bevindt.
• Druk het instelwiel in de richting van de pijl. Het pijlsymbool knippert.
• Draai het instelwiel tot op het display „Autozoom“ verschijnt!
• Druk het instelwiel in de richting van de pijl om de instelling op te slaan.
Als u het instelwiel niet in de richting van de pijl drukt, wordt de instelling
na 5 s. automatisch opgeslagen. Het pijlsymbool knippert niet meer.
☞ De flitser moet zich hierbij op de ingeschakelde camera bevinden!
12.10 Omschakeling van m - ft
• mecablitz uitschakelen met de hoofdschakelaar (Afb. 1).
• Op de toets Select (Afb. 1) drukken en tegelijkertijd de hoofdschakelaar
(Afb. 1) van “OFF” naar “On” schuiven.
89
ń
704 47 0099.A3
54 MZ-4i
01.02.2007
13:41 Uhr
Seite 90
13. Groothoekdiffusor
Trek de groothoekdiffusor (Afb. 2) onder de hoofdreflector tot de aanslag
naar voren uit en laat hem los. De hoofdreflector gaat nu automatisch naar
de zoomstand van 20 mm. De groothoekdiffusor klapt automatisch naar
boven. Op het LC-display worden de afstandsaanduidingen en de zoomwaarde gecorrigeerd.
Voor het weer inschuiven van de groothoekdiffusor (Afb. 2) deze 90°
naar beneden klappen en geheel inschuiven.
Bij het gebruik van het groothoekvoorzetvenster, alsmede bij het gebruiken
van al dan niet gekleurde voorzetfilters, Mecabounces enz. mogen geen
functies worden gebruikt die met een vooraf te ontsteken meetflits of met synchronisatie op korte belichtingstijden (HSS) werken.
ń 14. Flitsbelichting met de hand corrigeren
☞ Een manuele belichtingscorrectie is alleen mogelijk met de SCA 3xx2
adapter.
☞ In de A-mode iss een manuele belichtingscorrectie mogelijk met de
SCA 3xx of de SCA 3xx2 adapter.
De flitsbelichtingsautomatiek van de mecablitz en de meeste camera’s zijn
afgestemd op een reflectiegraad van 25 % (de gemiddelde reflectiegraad
van flitsonderwerpen) Een donkere achtergrond die veel licht absorbeert of
een lichte achtergrond die veel licht reflecteert (bijv. tegenlichtopnamen) kunnen tot over-, c.q. onderbelichting van het onderwerp leiden.
Om bovengenoemd effect te compenseren, kan de flitsbelichting met de hand
via een correctiefactor worden aangepast aan de opnamesituatie. De hoogte
van de correctiewaarde hangt af n het contrast tussen onderwerp en achtergrond! Op de mecablitz kunnen bij de TTL-flitsfunctie en de A-flitsfunctie correctiefactoren voor de flitsbelichting van -3 EV (stops) tot + 3 EV (stops) in
derden van een stop worden ingesteld. Veel camera’s hebben een instelelement voor belichtingscorrecties dat ook in de TTL-flitsfunctie inzetbaar is.
90
Let hiervoor op de opgaven in de gebruiksaanwijzing van camera of
SCA–adapter.
Een belichtingscorrectie door het veranderen van de diafragmawaarde op
het objectief is hier niet mogelijk, daar de belichtingsautomatiek van de
camera de veranderde diafragmawaarde weer als normaal werkdiafragma
ziet.
☞ Donker onderwerp voor lichte achtergrond: positieve correctiewaarde
(ong. 1 tot 2 stops EV)
Licht onderwerp voor donkere achtergrond: negatieve correctiewaarde (ong. -1 tot -2 stops EV)
Bij het instellen van een correctiewaarde kan de aanduiding voor de flitsreikwijdte in het LC-display veranderen en aan de correctiewaarde worden aangepast (afhankelijk van type camera en SCA-adapter)!
Het met de hand instellen van een correctie op de flitsbelichting:
• De mecablitz werkt in de TTL-flitsfunctie of in de A-flitsfunctie.
• Draai het instelwiel (Afb. 1) tot het symbool „EV“ in het LC-display verschijnt, Het pijlsymbool naast „EV“ toont, dat de stand voor het instellen
van een correctiewaarde voor de flitsbelichting is gekozen.
• Draai het instelwiel in de richting van de pijl. Het pijlsymbool naast „EV“
knippert.
• Stel door het instelwiel te draaien een geschikte correctiewaarde in. De
correctiewaarde wordt in het LC-display van de mecablitz aangegeven.
• Draai het instelwiel in de richting van de pijl om de correctiewaarde op te
slaan. Als u het instelwiel niet in de richting van de pijl drukt, wordt de instelling na 5 s. automatisch opgeslagen. Het pijlsymbool naast „EV“ houdt
op te knipperen. De ingestelde correctiewaarde wordt in het LC-display
aangegeven.
Het uitschakelen van een correctiewaarde op de flitsbelichting:
• Draai het instelwiel (Afb. 1) tot het pijlsymbool zich in het LC-display
naast „EV“ bevindt.
• Het pijlsymbool naast „EV“ knippert.
704 47 0099.A3
54 MZ-4i
01.02.2007
13:41 Uhr
Seite 91
• Het instelwiel draaien tot de aanduiding voor de correctiewaarde in het
display verdwijnt.
• Draai het instelwiel in de richting van de pijl om de instelling op te slaan.
Als u het instelwiel niet in de richting van de pijl drukt, wordt de instelling
na 5 s. automatisch opgeslagen. Het pijlsymbool naast „EV“ houdt op te
knipperen.
☞ Een met de hand ingestelde correctiewaarde op de flitsbelichting kan
alleen dan worden uitgevoerd, als de camera deze functie ondersteunt! Als de camera deze functie niet ondersteunt kan weliswaar op
de mecablitz een correctiewaarde worden ingesteld, maar deze werkt
dan niet!
Het doorgeven van een correctiewaarde voor de flitsintensiteit op de flitser naar
de camera is alleen mogelijk in de TTL functie met een adapter SCA 3xx2, die
deze functie ondersteunt.
Bij sommige camera’s moet een correctie op de flitsbelichting op de camera
zelf worden ingesteld (zie de gebruiksaanwijzing van de camera). In dat geval wordt op de mecablitz geen correctiewaarde aangegeven.
Bij sommige camera’s kan een correctie op de flitsbelichting op de camera of
op de flitser worden ingesteld. Welke instelling voorrang heeft vindt u in de
gebruiksaanwijzing van de camera of van de SCA-adapter.
15. Onderhoud en verzorging
Verwijder vuil en stof met een zachte, met siliconen behandelde doek. Gebruik nooit schoonmaakmiddelen die kunststof onderdelen zouden beschadigd kunnen worden.
Formeren van de flitscondensator
De in de flitser ingebouwde flitscondensator ondergaat een natuurkundige
verandering, als de flitser gedurende langere tijd niet wordt ingeschakeld.
Om deze reden is het noodzakelijk, het apparaat elk kwartaal ongeveer
gedurende 10 minuten in te schakelen. De accu moet daarbij zoveel energie
leveren, dat de flitsparaatheid binnen 1 minuut na het inschakelen is bereikt.
16. Technische gegevens
Max. Richtgetal bij ISO 100/21°, Zoom 105 mm:
In het meersysteem: 54
in het feetsysteem 177
12 automatiek werkdiafragma’s bij ISO 100/21°:
1 - 1,4 - 2 - 2,8 - 4 - 5,6 - 8 - 11 - 16 - 22 - 32 - 45
Flitstijden:
• ong. 1/200 ... 1/20.000 seconde
• in de M-functie ong. 1/200 s. bij vol vermogen
• bij 1/2 vermogen ong. 1/600 seconde
• bij 1/4 vermogen ong. 1/1400 seconde
Meethoek sensor: ong. 25°
Kleurtemperatuur:
ong. 5600 K
Filmgevoeligheid:
ISO 6 tot ISO 6400
Synchronisatie:
laagspanningsonstekiing
Aantal flitsen (ong.):
60* NiCd-accu
180* met super-alkalimangaanbatterijen
Flitspauzes:
• bij NiCd-accugebruik
5 s. (in M-functie)*
0,1 . . 5 s. (in A-/TTL-functie)
• met super-alkalimangaanbatterijen
6 s. (in M-functie)*
0,1 . . 6 s. (in A-/TTL-functie)
ń
* bij vol vermogen
91
704 47 0099.A3
ń
54 MZ-4i
01.02.2007
13:41 Uhr
Seite 92
Zwenkbereiken en klikstanden van de reflector:
naar boven/beneden
60° 75° 90° / -7°
tegen de richting van de
wijzers van de klok in
30° 60° 90° 120° 150° 180°
met de wijzers van de klok mee 30° 60° 90°
Afmetingen in mm ong. ( B x H x D):
75 x 125 x 108
Gewicht:
Flitser met stroombronnen: ong. 480 gram
De levering omvat:
Flitser, Tas T54, standaard voet 301*, afdekplaat*, gebruiksaanwijzing,
SCA 300/3002 tabel.
* (niet bij set-apparaten)
Onder voorbehoudvan wijzigingen en vergissingen!
17. Vaktermen
• Aanduiding van de belichtingscontrole in de zoeker van de camera
In de automatisch-flitsenfunctie of de TTL-flitsfunctie wordt de juiste belichting of de onderbelichting van de film bij veel camera’s door een signaal in
de zoeker aangegeven.
• Automatische sturing van de flitssynchronisatietijd
Tegelijk met het paraat zijn van de flitser wordt bij de meeste systeemcamera’s de belichtingstijd vanuit de ingestelde functie automatisch naar de
flitssynchronisatietijd omgeschakeld. Bij sommige camera’s blijven langere
belichtingstijden behouden. Als de paraatheidsaanduiding na een flitsopname dooft, of als de flitser wordt uitgeschakeld, stelt de camera automatisch weer de vorige belichtingstijd in.
• Ontsteeksturing
Is er voor het op het objectief al een diafragma met de aanwezige verlichting
reeds een belichtingstijd die gelijk aan, of korter is dan de flitssynchronisatietijd, dan wordt bij de opname de flitser niet ontstoken. De opname wordt dan
gemaakt met het aanwezige licht, waardoor overbelichting wordt voorkomen.
92
• Naar keuze synchronisatie bij het open zijn of het dichtgaan van de sluiter
(zie Afb. 10 en 11)
hierbij worden twee mogelijkheden voor de flitssynchronisatie geboden:
- op het moment dat de sluiter net geheel openstaat of
- kort voor het moment dat de sluiter weer begint dicht te gaan.
Op de betreffende SCA-adapter wordt de gewenste synchronisatie gekozen. De synchronisatie bij het dichtgaan van de sluiter is vooral van belang
bij belichtingen met langere belichtingstijden en van bewegende objecten
met eigen lichtbron.
• Autofocus-meetflits
Zodra er voor automatische scherpstelling niet meer voldoende omgevingslicht is, wordt door de elektronica van de camera de AF-meetflits geactiveerd. De autofocusschijnwerper projecteert daarbij een streeppatroon op
het onderwerp waarop de camera dan automatisch de afstand kan instellen. Bij gebruik van een SCA 3xx autofocusadapter wordt uitsluitend de in
de adapter ingebouwde autofocusmeetflits geactiveerd.
• Program-flitsautomatiek
Sommige camera’s mixen in de stand „Program“ flitslicht en omgevingslicht. De camera stelt automatisch een combinatie van tijd en diafragma in
en stuurt de flits in de TTL-modus. Daarmee is zeer eenvoudige bediening
van de combinatie van apparaten mogelijk.
• TTL-invulflitssturing
Sommige systeemcamera’s bieden naast de TTL-flitssturing ook nog de mogelijkheid van de TTL-invulflitssturing. Deze functie wordt speciaal voor
daglicht- en tegenlichtopnamen gebruikt om schaduwpartijen op te helderen. De camera stuurt op basis van de meting van de sensor in de camera
zelf en de berekeningen daarbij, door de elektronica van de camera altijd
de juiste hoeveelheid flitslicht voor een uitgebalanceerde belichting. Daarbij wordt voor invulflitsopnamen automatisch door de camera een correctie
op de flitsbelichting uitgevoerd.
704 47 0099.A3
54 MZ-4i
01.02.2007
13:41 Uhr
Seite 93
• Correctie op de TTL-flitsbelichting
In bepaalde opnamesituaties bestaat de mogelijkheid dat de meting door
de sensor in de camera wordt misleid. Dat treedt vooral op bij zeer donkere
onderwerpen tegen een lichte achtergrond (onderwerp onderbelicht) of bij
zeer lichte onderwerpen tegen een donkere achtergrond (onderwerp overbelicht). Met behulp van de diafragma- en tijdregeling, verandering van de
filmgevoeligheid of de +/- correctie op de camera kan een normale belichtingscorrectie worden uitgevoerd. Daarbij worden echter alle delen van de
opname beïnvloed. Daarom is er bij sommige camera’s een speciale correctie op de flitsbelichting mogelijk. Bij deze correctie blijft de totale bellichting
behouden en worden alleen de donkere partijen in de schaduw door het
flitslicht opgehelderd. Verdere details kunt u vinden in de gebruiksaanwijzingen van camera en adapter.
• Flits vooraf tegen rode ogen (alleen met Nikon 3402 adapter)
Bij het rode ogen-effect gaat het in principe om een natuurkundig effect,
Dit effect treedt altijd op als de te fotograferen persoon meer of minder
recht in de camera kijkt, er niet te veel omgevingslicht heerst en de flitser
zich op of vlak naast de camera bevindt. De flitser schijnt hierbij door de
ogen op het netvlies, dat doorbloede netvies wordt dan door de pupil heen
zichtbaar en door de camera als rode vlek geregistreerd.
De functie ter vermindering van het rode ogen-effect brengt hier duidelijk
verbering in aan. Bij het gebruik van deze functie ontsteekt de mecablitz
vooraf aan de flitsbelichting en de meetflitsen voor de multi-sensor drie
zichtbare, maar zwakke flitsen (voor zover met flitser, c.q. camera mogelijk), waarna de hoofdflits volgt.
Deze drie flitsen vooraf leiden ertoe, dat de pupillen van de persoon zich
wat meer sluiten en daardoor het effect van de rode ogen wat verminderen. Deze functie staat in elk belichtingsprogramma ter beschikking. Voor
verdere details kunt u de gebruiksaanwijzing van de camera raadplegen.
• ETTL-flitsfunctie (alleen met Canon SCA 3102)
Bij deze functie worden de reflecterende eigenschappen van het onderwerp vlak voor de eigenlijke opname door een flits vooraf bepaald.
• ETTL-HSS functie
Deze sturing maakt het mogelijk de flitser ook bij kortere belichtingstijden
dan de flitssynchronisatietijd te gebruiken.
• 3D-TTL-flitsregeling (alleen met Nikon SCA 3402 mogelijk)
Bij deze functie worden onmiddellijk na drukken op de ontspanknop en
voor het opengaan van de sluiter, nauwelijks zichtbare meetflitsen ontstoken, die de camera informatie verschaffen over helderheid en contrast in
het onderwerp.
ń
18. Bijzondere toebehoren
☞ Voor foute werking van en schades aan de mecablitz, veroorzaakt
door het gebruik van accessoires van andere fabrikanten, zijn wij niet
aansprakelijk.
• Adapters van het systeem SCA 3xx
voor het flitsen met systeemcamera’s. Zie de separate gebruiksaanwijzing.
• Adapters van het SCA 3xx2 systeem
voor het flitsen met systeemcamera’s met digitale gegevensoverdracht van
de SCA-functies. Meer functies dan die met het SCA 3xx systeem. Zie de
separate gebruiksaanwijzing.
• Filter-Set 44-32
(Bestelnr. 00004432A)
omvat 4 kleurenfilters voor effectverlichting en een helder filter voor het
opnemen van folies in elke gewenste kleur.
• Mecabounce 44-90
(Bestelnr. 000044900)
Met deze diffusor krijgt u op de eenvoudigste manier een zachte verlichting. De
werking is groots omdat de foto’s een zacht effect verkrijgen. De gezichtstint
van personen wordt natuurlijker weergegeven. Vanwege het verlies aan licht
worden de grenzen van de flitsreikwijdte worden met een factor 2 verkleind.
93
704 47 0099.A3
ń
54 MZ-4i
01.02.2007
13:41 Uhr
Seite 94
• Power-Pack P50
(Bestelnr. 00012950A)
voor grote aantallen flitsen en korte flitspauzes (ongeveer 300 flitsen met volle energie). S.v.p. tevens verbindingskabel V54-50 (Bestelnr. 000054505)
bestellen.
• Power-Pack P40
(Bestelnr. 000129405)
Door de duidelijk grotere capaciteit ten opzichte van de gebruikelijke NiCdaccu’s in formaat IEC KR 15/51 (penlight) wordt een groter aantal flitsen
verkregen. S.v.p. tevens verbindingskabel V54-40 (Bestelnr. 000054400)
bestellen.
• Reflectiescherm 54-23
(Bestelnr. 000054236)
verzacht harde slagschaduwen door zijn zacht gerichte licht.
• Camerabeugel 40-36/2
(Bestelnr. 000040363)
voor het opzijn van de camera aanbrengen van de flitser.
• Slave adapter 3083
(Bestelnr. 000330838)
maakt draadloze TTL-flitsregeling mogelijk met 54-MZ .. en 70 MZ-4.
94
19. Troubleshooting
(Ca) = Canonsysteem;
werken met de mecablitz met SCA 3102
(Mi) = Minoltasysteem;
werken met de mecablitz met SCA 3302
(Ni) = Nikonsysteem;
werken met de mecablitz met SCA 3402
(Pe) = Pentaxsysteem;
werken met de mecablitz met SCA 3702
Als het ooit eens voorkomt, dat in het LC-display onzinnige aanduidingen
verschijnen of de flitser niet werkt zoals redelijkerwijs van hem mag worden verwacht, ga dan als volgt te werk:
• schakel de flitser uit met de hoofdschakelaar;
• neem de batterijen of de accu’s uit de flitser;
• schakel de flitser ong. een seconde in en dan weer uit;
• leg de gebruikte - of nieuwe - batterijen of accu’s weer in.
Op de mecablitz is synchronisatie bij het dichtgaan van de sluiter (REARfunctie) niet in te stellen.
• De synchronisatie bij het dichtgaan van de sluiter (REAR) is op de mecablitz alleen in te stellen als deze van de bedoelde SCA 3xx2 adapter is
voorzien (zie de gebruiksaanwijzing van de SCA-adapter) en op een ingeschakelde camera is geplaatst. Er moet minstens eenmaal een uitwisseling
van gegevens tussen camera en SCA-adapter hebben plaatsgevonden
(daarvoor is het voldoende om even de ontspanknop van de camera aan
te tippen zonder de sluiter te ontspannen). De camera moet de functie van
synchronisatie bij het dichtgaan van de sluiter ondersteunen (zie de gebruiksaanwijzingen van camera en SCA-adapter)!
704 47 0099.A3
54 MZ-4i
01.02.2007
13:41 Uhr
Seite 95
• (Ni) Op de mecablitz is de Nikon 3D multisensor invulflits geactiveerd; in
het display wordt het symbool
aangegeven. De Nikon 3D multisensor
invulflits is niet met de REAR-functie te combineren.
Mogelijke remedie: eerst de 3D-functie uitschakelen, dan REAR inschakelen.
• (Ni) Op de Nikon-camera is de functie van vooraf flitsen ter vermindering
van het rode ogen-effect geactiveerd. In het LC-display van de mecablitz
wordt het symbool
aangegeven. De functie van vooraf flitsen is niet te
combineren met die van de REAR-functie.
Mogelijke remedie: eerst op de camera de functie van vooraf flitsen tegen
het rode ogen-effect uitschakelen, dan REAR kiezen.
• (Mi) Bij Minolta-camera’s moet de synchronisatie bij het dichtgaan van de
sluiter (REAR-functie) in principe op de camera zelf worden ingesteld! Op
de mecablitz verschijnt geen aanduiding voor de synchronisatie! Of de
REAR-functie met de bedoelde camera mogelijk is, alsmede de vereiste instellingen daarvoor, vindt u in de gebruiksaanwijzing van de camera.
Op de mecablitz is de TTL-HSS flitsfunctie of de E–TTL-HSS flitsfunctie niet in
te stellen.
De (E-) TTL-HSS-functie van flitsen (synchronisatie op korte belichtingstijden)
is momenteel alleen met de mecablitz 54 MZ-.. mogelijk!
• De (E-) TTL-HSS-functie van flitsen is alleen op de mecablitz in te stellen, als
deze van de bedoelde SCA 3xx2-adapter is voorzien (zie de gebruiksaanwijzing van de SCA-adapter) en op een ingeschakelde camera is aangebracht. Er moet minstens eenmaal een uitwisseling van gegevens tussen camera en SCA-adapter hebben plaatsgevonden (daarvoor is het voldoende
om even de ontspanknop van de camera aan te tippen zonder de sluiter te
ontspannen). De camera moet de (E-) TTL-HSS-functie in de gekozen flitsfunctie (met de hand of TTL) ondersteunen (zie de gebruiksaanwijzingen
van camera en SCA-adapter)!
• Een combinatie van de (E-) TTL-HSS- functie, samen met de draadloze
Metz-Remote-flitsfunctie is niet mogelijk.
• De (E-) TTL-HSS-functie is op de mecablitz 54 MZ-.. kan worden geactiveerd, afhankelijk van het camerasysteem in de functie van flitsen met
handinstelling M (Ca, Mi, Ni) of in de flitsfunctie TTL (Ca, Mi)!
• Om de (E-) TTL-HSS-functie te kunnen activeren mag de hulpreflector van
de mecablitz niet ingeschakeld zijn!
• (Mi) Bij een uit de normale stand weggezwenkte hoofdreflector wordt de
(E-) TTL-HSS-functie niet uitgevoerd. De belichtingstijd van de camera
wordt in dat geval begrensd tot de normale flitssynchronisatietijd. In de
zoeker van de camera dooft de aanduiding (H) voor de functie van lineair
flitsen (HSS)!
(Ni) Op de mecablitz is in de TTL-functie geen 3D-functie in te schakelen.
• Op de mecablitz is de REAR-functie ingeschakeld; in het display wordt
"REAR" aangegeven.
Mogelijke remedie: eerst de REAR-functie uitschakelen, dan de 3D-functie
inschakelen.
• De mecablitz moet van een adapter SCA 3402 zijn voorzien. De 3D multisensor invulflits functie kan alleen op de mecablitz worden ingesteld als
deze is aangebracht op een ingeschakelde camera welke de 3D multisensor invulflits functie ook ondersteunt. Er moet minstens eenmaal een uitwisseling van gegevens tussen camera en SCA-adapter hebben plaatsgevonden (daarvoor is het voldoende om even de ontspanknop van de camera
aan te tippen zonder de sluiter te ontspannen).
• De 3D multisensor invulflits wordt niet ondersteund als de mecablitz niet
opgeladen is, als de reflector uit de normale stand is gezwenkt of als de
hulpreflector van de mecablitz ingeschakeld is!
• In de draadloze Metz-Remote-flitsfunctie is geen 3D multisensor invulflits
mogelijk!
• De 3D multisensor invulflits is alleen mogelijk met de flitsers mecablitz
40 MZ-3(i), 50 MZ-5, 54 MZ-.. en 70 MZ-...!
95
ń
704 47 0099.A3
ń
54 MZ-4i
01.02.2007
13:41 Uhr
Seite 96
(Ca) De E-TTL-functie is niet te activeren.
• De mecablitz moet van een adapter SCA3102 zijn voorzien. De E-TTL-functie is alleen op de mecablitz in te stellen als deze op een ingeschakelde camera is aangebracht die de E-TTL-functie ook ondersteunt. Er moet minstens
eenmaal een uitwisseling van gegevens tussen camera en SCA-adapter hebben plaatsgevonden (daarvoor is het voldoende om even de ontspanknop
van de camera aan te tippen zonder de sluiter te ontspannen).
• De E-TTL-flitsfunctie wordt niet ondersteund als de hulpreflector van de
mecablitz ingeschakeld is!
• Als de hulpreflector van de mecablitz ingeschakeld is, wordt de E-TTL-functie naar de normale TTL-functie omgeschakeld! Probleem EOS D30: als in
de TTL-functie de mecablitz zich niet meer laat ontsteken; schakel dan
eventueel naar "Automatisch" om!
• In de draadloze Metz-Remote-flitsfunctie is geen E-TTL-flits mogelijk!
• De E-TTL-functie is alleen mogelijk met de flitsers mecablitz 40 MZ-3i,
40 MZ-1i en 54 MZ-..!
De mecablitz laadt in de Remotefunctie niet op.
• Op de mecablitz is de hulpreflector ingeschakeld; het symbool in het
display wordt aangegeven.
Mogelijke remedie: hulpreflector uitschakelen.
De aanduiding voor flitsparaatheid op de mecablitz knippert.
• Op de mecablitz is de instelllichtfunctie geactiveerd.
Remedie: instelllichtfunctie op de mecablitz uitschakelen.
Op de mecablitz is de filmgevoeligheid ISO niet te verstellen.
• De mecablitz is van een adapter SCA 3xx2 voorzien en wordt gebruikt met
een camera die de gegevens voor de filmgevoeligheid aan de mecablitz
doorgeeft. In dat geval is de verstelling van de filmgevoeligheid ISO vergrendeld.
96
Op de mecablitz is de diafragmawaarde niet te verstellen.
• De mecablitz is van een adapter SCA 3xx2 voorzien en wordt gebruikt met
een camera die de gegevens van het ingestelde diafragma aan de mecablitz doorgeeft. In dat geval is de verstelling van de diafragmawaarde vergrendeld.
In het LC-display van de mecablitz wordt in plaats van de afstandswaarde
slechts "-" aangegeven.
• De reflector van de mecablitz is uit zijn normale stand gezwenkt. Een afstandsopgave wordt alleen aangegeven als de reflector zich in zijn normale stand bevindt en dus horizontaal noch verticaal gezwenkt is.
In het LC-display van de mecablitz knippert het symbool van de hulpreflector. De aanduiding dat de mecablitz is opgeladen licht op.
• De hulpreflector staat ingeschakeld, hoewel de hoofdreflector zich in zijn
normale stand bevindt dus niet gezwenkt is. Het inzetten van de hulpreflector is echter alleen zinvol als deze een invul-flitsfunctie bij afgezwenkte
hoofdreflector kan vervullen. Het knipperen van het symbool van de hulpreflector wijst er op, dat de hulpreflector uitgeschakeld moet worden. Als
de hulpreflector uitgeschakeld wordt, dooft het symbool in het display. Als
de hoofdreflector uitgezwenkt is, staat het symbool continu in het display.
In het LC-display van de mecablitz knippert het symbool van de hulpreflector. De aanduiding dat de flitser is opgeladen licht niet op.
• De mecablitz werd in de Remote-Controllerfunctie gezet. In het LC-display
wordt "Co" aangegeven. De Remote-functie wordt echter slechts door de
hoofdreflector alleen ondersteund. Daar niet wordt aangegeven dat de flitser opgeladen is, ontsteekt de mecablitz bij een opname geen flits.
Remedie: schakel de Remote-Controllerfunctie uit of schakel de hulpreflector uit.
704 47 0099.A3
54 MZ-4i
01.02.2007
13:41 Uhr
Seite 97
In het display van de mecablitz wordt in plaats van een afstandswaarde
"Co" aangegeven.
• De mecablitz staat in de Remote-Controllerfunctie geschakeld. In deze
functie vindt in principe geen aanduiding van een afstandswaarde plaats.
In de Remote-Controllerfunctie van de mecablitz kan met het instelwiel
geen correctie op de flitsbelichting gekozen, c.q. ingesteld worden.
☞ In de automatische Remotefunctie kan in principe geen correctie op de
flitsbelichting worden ingesteld.
• In de TTL-Remotefunctie kan een correctie op de flitsbelichting worden
ingesteld, als deze maar wordt ingesteld alvorens de mecablitz in de
Controllerfunctie wordt geschakeld. De waarde van de correctie wordt in
de Remote-Controllerfunctie niet aangegeven, hij blijft weliswaar werkzaam. In plaats van de waarde van de correctie wordt in het LC-display
van de mecablitz het Remote-Adres (Remote-kanaal) "Ad1", c.q. "Ad2"
aangegeven.
(Ni) Op de mecablitz is de Nikon-invulflitsfunctie "matrixgestuurd invulflitsen", c.q. "3D-Multisensor-invulflitsen" niet in te stellen.
• De bedoelde invulflits is alleen op de mecablitz in te stellen als deze van
een adapter SCA 3402 is voorzien en aangebracht is op een ingeschakelde camera die de bedoelde invulflitsfunctie ondersteunt. Er moet minstens
eenmaal een uitwisseling van gegevens tussen camera en SCA-adapter
hebben plaatsgevonden (daarvoor is het voldoende om even de ontspanknop van de camera aan te tippen zonder de sluiter te ontspannen).
• In de Remotefunctie, bij weggezwekte hoofdreflector of bij ingeschakelde
hulpreflector wordt "3D-Multisensor-invulflitsen" (Nikon) niet ondersteund;
deze functie kan onder de bovengenoemde omstandigheden dus ook niet
worden uitgevoerd.
• De Nikon-invulflitsregeling die aangestuurd wordt is afhankelijk van het
type camera.
In het LC-display van de mecablitz knippert het symbool van diafragma
en diafragmawaarde.
• Het lichtregelbereik van de mecablitz in de automatisch-flitsenfunctie A
wordt onder de gegeven opnameomstandigheden, c.q. de instelling op de
camera overschreden.
Mogelijke remedie: de omgeving van de opname donkerder maken, gebruik een lager gevoelige film of stel op de camera, c.q. op de mecablitz
een hogere diafragmawaarde in.
De AF-roodlichtschijnwerper van de mecablitz wordt niet geactiveerd.
Mogelijke oorzaken:
• De omgeving is helder genoeg voor de AF-sensor om de camera zelf te
laten scherpstellen.
• De camera activeert indien nodig zijn eigen AF-hulplicht.
• Er is een andere dan de AF-functie Single-AF (S) geactiveerd.
• Er is een gedecentraliseerd AF-meetveld op de camera geactiveerd.
Mogelijke remedie:
• schakel de camera in de AF-functie "Single-AF", c.q. S (zie verder de
gebruiksaanwijzing van de camera).
• Activeer de centrale AF-sensor in de zoeker van de camera.
Problemen met de Remote-Controllerfunctie en een flitsbelichtingstrapje.
• In de Remote-Controllerfunctie is een flitsbelichtingstrapje niet mogelijk! Als
er een flitsbelichtingstrapje wordt ingesteld en daarna de mecablitz in de
Remotefunctie wordt geschakeld, dan wordt het flitsbelichtingstrapje niet
meer aangegeven en ook niet uitgevoerd!
Remote-Controllerfunctie en een correctie op de flitsbelichting.
• Als op de mecablitz een correctie op de flitsbelichting wordt gekozen en
daarna naar de Remote-Controllerfunctie wordt omgeschakeld, dan worden de volgende opnamen eveneens met deze correctiewaarde belicht. In
het display van de mecablitz wordt echter geen (!) correctiewaarde aangegeven!
97
ń
704 47 0099.A3
ń
54 MZ-4i
01.02.2007
13:41 Uhr
Seite 98
(Ni) Geen Nikon-onderbelichtingswaarschuwing in de Remotefunctie.
• Bij sommige Nikon camera’s vindt er in het geval van een onderbelichting
door de flitsbelichting een waarschuwingsaanduiding (-EV) op het LC-display van de mecablitz plaats. In de Remotefunctie wordt deze functie niet
door de mecablitz ondersteund.
Geen REAR-functie bij E-TTL-HSS-flitsfunctie.
• Als op de mecablitz de synchronisatie bij korte belichtingstijden HSS is geactiveerd, is deze REAR-functie (synchronisatie bij het dichtgaan van de
sluiter) niet in te stellen.
• Wordt bij ingestelde REAR-functie de synchronisatie bij korte belichtingstijden HSS ingeschakeld, dan wordt de REAR-functie opgeheven!
In het display van de mecablitz wordt de filmgevoeligheid ISO niet aangegeven.
• De mecablitz bevindt zich in de Remotefunctie ("Co" c.q. "SL") of de stroboscoopfunctie. In deze functie wordt in het LC-display van de mecablitz in
principe geen ISO-waarde aangegeven!
• Bij de camerasystemen van Canon en Minolta wordt in principe geen ISOwaarde in het LC-display aangegeven!
Nikon-3D-flitsimpulsen sturen de slave ongecontroleerd.
☞ Als de sensor in de Slave-adapter SCA 3083 het licht van een flitser
ontvangt die in de Nikon-3D-flitsfunctie werkt, dan wordt de slavemecablitz ongecontroleerd ontstoken!
• Remedie is alleen mogelijk door van de 3D-flits naar de normale TTL-flits
(zonder 3D) om te schakelen.
98
In het display van de mecablitz knippert de correctiewaarde op de flitsbelichting.
Op de mecablitz wordt bijv. bij de TTL-flitsfunctie een correctiewaarde op de
flitsbelichting (EV) ingesteld. Nadat de correctiewaarde is opgeslagen knippert deze waarde in het LC-display van de mecablitz.
Mogelijke oorzaak:
het camerasysteem laat het instellen van een correctiewaarde op de mecablitz niet toe! In dat geval moet de gewenste correctiewaarde op de camera
zelf worden ingesteld (zie de gebruiksaanwijzing van de camera). De knipperende correctiewaarde in het LC-display van de mecablitz beinvloedt de
opname niet! Opgelet: de waarschuwingsaanduiding door het knipperen
van de correctiewaarde wordt niet bij alle camera’s ondersteund! Bij de
meeste camerasystemen is een correctie op de flitsbelichting in de functie van
automatisch-flitsen A van de mecablitz instelbaar en uit te voeren (uitgezonderd bijv. bij Minolta!).
In de TTL-functie kan geen flitsbelichtingstrapje worden ingesteld.
Met de toets "Select" op de mecablitz kan de functie van een flitsbelichtingstrapje "Fb" (flash-bracketing) bijv. in de TTL-flitsfunctie niet worden opgeroepen.
Mogelijke oorzaak:
sommige camera’s, c.q. camerasystemen ondersteunen de instelling voor een
correctie op de flitsbelichting op de mecablitz in de TTL-flitsfunctie niet. Omdat de flitser echter met correctiewaarden zal werken, wordt de instelbaarheid van een flitsbelichtingstrapje bij de betreffende camera’s in het menu
van de mecablitz vanaf het begin onderdrukt. Bij de meeste camerasystemen
is echter tóch een flitsbelichtingstrapje "Fb" in de automatisch-flitsenfunctie A
van de mecablitz instelbaar en uit te voeren (uitgezonderd bijv. bij Minolta!).
Met de mecablitz 70 MZ-4 is in principe een flitsbelichtingstrapje "Fb" niet
uit te voeren!
704 47 0099.A3
54 MZ-4i
01.02.2007
13:41 Uhr
Seite 99
(Pe) In de zoeker van de camera wordt niet aangeduid dat de flitser opgeladen is, hoewel de aanduiding voor flitsparaatheid op de mecablitz oplicht. Bij de opname wordt de mecablitz niet ontstoken.
• De mecablitz werkt in de Spot-Beam-functie, waarbij alleen de AF-roodlichtschijnwerper van de mecablitz wordt ondersteund. De functie van de
adapter SCA 3702 staat in de stand "SB".
Mogelijke remedie: zet de schakelaar op de adapter SCA 3702 in de uiterst linker stand
(Synchronisatie naar keuze op het 1e sluitergordijn,
dus op synchronisatie bij het opengaan van de sluiter.
(Pe) In de zoeker van de camera verschijnt de controleaanduiding van de
flitsbelichting (de aanduiding van flitsparaatheid knippert) hoewel er geen
opname is gemaakt.
• Hierbij gaat het om een waarschuwingsaanduiding. De stand van de zoomreflector zal het onderwerp niet geheel uitlichten. Misschien werd op de
mecablitz de automatische aanpassing aan de brandpuntsafstand van het
objectief (AUTO-ZOOM; CZ) uitgeschakeld en een brandpuntsafstand van
de reflector uitgekozen die groter is dan de brandpuntsafstand van het objectief. Voorbeeld: brandpuntsafstand van het objectief 70 mm, reflectorbrandpuntsafstand 85 mm.
Mogelijke remedie:
activeer op de mecablitz de automatische aanpassing aan de brandpuntsafstand (AUTO-ZOOM, c.q. CZ) of zorg er voor, dat de brandpuntsafstand
van de reflector gelijk aan of kleiner is dan de brandpuntsafstand van het
objectief. Voorbeeld: brandpuntsafstand van het objectief 70 mm, brandpuntsafstand van de reflector 70 mm, 50 mm of kleiner! Aanwijzingen voor
het instellen vindt u in de gebruiksaanwijzing van de mecablitz!
(Pe) De Motor-zoomreflector van de mecablitz neemt automatisch de
35 mm-reflectorstand in, hoewel er een objectief met een andere brandpuntsafstand wordt gebruikt. In het LC-display van de mecablitz verschijnt
de aanduiding "Auto-Zoom".
• Er werd een Non-AF-objectief, c.q. een objectief gebruikt, dat geen gegevens over zijn brandpuntsafstand naar de camera overbrengt! De mecablitz neemt dan automatisch de 35 mm-reflectorstand in.
Mogelijke remedie: pas de stand van de reflector op de mecablitz met de
hand aan de brandpuntsafstand van het objectief aan (zie de gebruiksaanwijzing van de mecablitz)!
Aanwijzing: evt. knippert in de zoeker van de camera de aanduiding van
flitsparaatheid bij reflektorbrandpuntsafstanden van meer dan 35 mm, dit
is echter van geen betekenis voor de komende beliuchting van de opname.
Let in dit geval na de opname op de controleaanduiding van de belichting
op de mecablitz!
De mecablitz flitst niet.
• De mecablitz heeft zich automatisch uitgeschakeld.
• Na het inschakelen van de mecablitz en na de automatische uitschakeling
van het apparaat de ontspanknop op de camera kort aantippen zonder de
sluiter te ontspannen, zodat de apparaten zich weer op de ingestelde functies kunnen instellen.
In het LC-display van de mecablitz verschijnt "ZE" in plaats van de zoomstand.
De mecablitz kon niet in een zoomstand worden vergrendeld. Soms zijn de
batterijen bijna leeg en hebben ze niet voldoende energie meer om de motorische sturing van de reflector van stroom te voorzien.
Zet de mecablitz uit en weer aan en/of vervang de verbruikte batterijen door
nieuwe.
Afvoeren van de batterijen
Batterijen horen niet bij het huisvuil.
S.v.p. de batterijen bij een daarvoor bestemd inzamelpunt afgeven.
S.v.p. alleen ontladen batterijen / accu’s afgeven.
Batterijen / accu’s zijn in de regel ontladen wanneer het daarvoor gebruikte
apparaat
- uitschakelt en aangeeft „batterijen leeg“
- de batterijen na langer gebruik niet meer goed functioneren.
Om kortsluiting te voorkomen, moeten de batterijpolen met plakband worden
afgeplakt.
99
ń
704 47 0099.A3
1.
2.
2.1
2.2
2.2.1
2.2.2
2.3
2.4
2.4.1
2.4.2
2.4.3
ķ
3.
3.1
4.
4.1
5.
5.1
6.
6.1
6.2
6.3
7.
7.1
7.2
7.3
8.
8.1
8.2
100
54 MZ-4i
01.02.2007
13:41 Uhr
Seite 100
ķ
Safety instructions. . . . . . . . . . . . . . . . . . . . . . . . . . . . . . . . . 103
Preparing the flash unit for use . . . . . . . . . . . . . . . . . . . . . . . 104
Mounting the flash unit on the camera. . . . . . . . . . . . . . . . . . . 104
Power supply . . . . . . . . . . . . . . . . . . . . . . . . . . . . . . . . . . . . 104
Suitable batteries . . . . . . . . . . . . . . . . . . . . . . . . . . . . . . . . . . 104
Exchanging batteries . . . . . . . . . . . . . . . . . . . . . . . . . . . . . . . 104
Switching the flash unit on and off . . . . . . . . . . . . . . . . . . . . . 105
Operating concept. . . . . . . . . . . . . . . . . . . . . . . . . . . . . . . . . 105
Selecting and setting the flash mode TTL / A / M / (stroboscopic) . 105
Selecting and setting the special functions:. . . . . . . . . . . . . . . . 105
Setting ISO / Zoom / Aperture , “P” Partial Light Output
and EV (flash exposure correction) . . . . . . . . . . . . . . . . . . . . . 105
TTL flash mode . . . . . . . . . . . . . . . . . . . . . . . . . . . . . . . . . . . 105
Sub-modes of TTL flash mode . . . . . . . . . . . . . . . . . . . . . . . . . 106
Automatic flash mode . . . . . . . . . . . . . . . . . . . . . . . . . . . . . . 107
Sub-modes of the automatic flash mode . . . . . . . . . . . . . . . . . 108
Manual flash mode . . . . . . . . . . . . . . . . . . . . . . . . . . . . . . . . 108
Sub-mode of the manual flash mode . . . . . . . . . . . . . . . . . . . . 109
Bounce flash . . . . . . . . . . . . . . . . . . . . . . . . . . . . . . . . . . . . . 110
Bounce flash with secondary reflector . . . . . . . . . . . . . . . . . . . 110
Bounce flash in automatic and TTL flash mode . . . . . . . . . . . . . 110
Bounce flash in manual flash mode . . . . . . . . . . . . . . . . . . . . . 110
Remote mode . . . . . . . . . . . . . . . . . . . . . . . . . . . . . . . . . . . . 111
Metz cordless TTL remote mode . . . . . . . . . . . . . . . . . . . . . . . 111
Metz cordless auto remote mode. . . . . . . . . . . . . . . . . . . . . . . 112
Assessing the overall lighting conditions in remote mode . . . . . 112
Fill-in flash in daylight. . . . . . . . . . . . . . . . . . . . . . . . . . . . . . 112
Fill-in flash in TTL mode . . . . . . . . . . . . . . . . . . . . . . . . . . . . . 113
Fill-in flash in automatic mode . . . . . . . . . . . . . . . . . . . . . . . . 113
9.
10.
11.
12.
12.1
12.2
12.3
12.4
12.5
12.6
12.7
12.8
12.9
12.10
13.
14.
15.
16.
17.
18.
19.
Stroboscopic mode . . . . . . . . . . . . . . . . . . . . . . . . . . . . . . . . 114
Correct exposure indication. . . . . . . . . . . . . . . . . . . . . . . . . . 115
AF measuring beam . . . . . . . . . . . . . . . . . . . . . . . . . . . . . . . 115
Special functions . . . . . . . . . . . . . . . . . . . . . . . . . . . . . . . . . . 116
Bleep function (acoustic alarm) . . . . . . . . . . . . . . . . . . . . . . 116
Locking and unlocking the controls (key function) . . . . . . . . . . . 116
Automatic shut-off . . . . . . . . . . . . . . . . . . . . . . . . . . . . . . . . . 116
REAR - Second curtain synchronisation . . . . . . . . . . . . . . . . . . 117
Modelling light ML
. . . . . . . . . . . . . . . . . . . . . . . . . . . . . 118
Adapting the focal length to the camera format . . . . . . . . . . . . 118
Flash bracketing “Fb” . . . . . . . . . . . . . . . . . . . . . . . . . . . . . . 119
Re-establishing the basic setting . . . . . . . . . . . . . . . . . . . . . . . 119
Power-zoom reflector. . . . . . . . . . . . . . . . . . . . . . . . . . . . . . . 120
m - ft changeover . . . . . . . . . . . . . . . . . . . . . . . . . . . . . . . . . 120
Wide-angle diffuser . . . . . . . . . . . . . . . . . . . . . . . . . . . . . . . 120
Manual flash exposure correction . . . . . . . . . . . . . . . . . . . . . 121
Maintenance and care . . . . . . . . . . . . . . . . . . . . . . . . . . . . . 122
Technical data. . . . . . . . . . . . . . . . . . . . . . . . . . . . . . . . . . . . 122
Glossary. . . . . . . . . . . . . . . . . . . . . . . . . . . . . . . . . . . . . . . . 123
Optional extras. . . . . . . . . . . . . . . . . . . . . . . . . . . . . . . . . . . 124
Troubleshooting hints . . . . . . . . . . . . . . . . . . . . . . . . . . . . . . 125
Table 1: Guide numbers at maximum light output (P 1) . . . . . . . . . . . . . 192
Table 2: Flash durations at the individual partial light output levels . . . . 193
Table 3: Camera shutter speeds in stroboscopic mode . . . . . . . . . . . . . 194
Table 4: Recycling times and number of flashes with different battery types . 195
Table 5: Maximum guide numbers at HSS mode . . . . . . . . . . . . . . . . . 195
Table 6: Remote control . . . . . . . . . . . . . . . . . . . . . . . . . . . . . . . . . . . 198
704 47 0099.A3
54 MZ-4i
01.02.2007
13:41 Uhr
Seite 101
Foreword
We congratulate you on purchasing this flash unit and thank you for your
confidence in Metz products.
It is only natural that you should want to use your flash unit straight away.
However, we recommend that you study these operating instructions beforehand to be able to fully exploit and utilize all the capabilities offered.
The following operating instructions are conceived such that they describe a
camera + flashgun system combined with the standard foot 301 or an
SCA 3xx2 adapter.
☞ Please also open the back cover page with the illustrations.
This flash unit is compatible with:
• all cameras that have a hot shoe contact
• all cameras that have an accessory shoe without hot-shoe contact, and use
a synch cable (see Optional Extras)
•system cameras
Optimal adaptation to your camera is achieved by using an SCA adapter.
The enclosed SCA 3xx2/3xx Table will indicate the adapter you require for
your particular camera. This table also indicates the special flash functions
that can then be performed.
For more information, visit our web site at www.metz.de
We wish you great pleasure with this new flash unit.
Survey of the operating modes • and special functions ◊:
54 MZ-.. with SCA 3xx2 adapter:
Numerous additional special flash functions are available when the mecablitz 54 MZ-.. is operated with an SCA 3xx2 adapter. It supports virtually
special flash functions offered by prominent camera manufacturers! The
Ǻ all
availability of individual special functions, however, depends on the given
camera system (camera manufacturer) and the specific camera type. For
more detailed information please refer to the SCA Survey Table and the
operating instructions for the individual SCA adapters.
• TTL flash mode1)
- Metz TTL remote mode1)
- Canon ETTL flash mode1)
- Canon ETTL HSS flash mode1) 2)
- Minolta TTL HSS flash mode1) 2)
- Nikon matrix-controlled fill-in flash mode
- Nikon 3D multi-sensor fill-in flash mode
- Nikon D-TTL flash mode3)
- Nikon D-TTL-SD flash mode3)
- Nikon i-TTL-flash mode4)
- Nikon i-TTL-BL-flash mode4)
- Olympus TTL-flash modeflash mode5) with digitalcameras
• Manual flash mode with partial light output levels
• Manual HSS flash mode2) with Canon, Minolta, Nikon
• Automatic flash mode
- Metz auto remote mode
• Stroboscopic mode
◊ Manual flash exposure correction in TTL1) and A mode
◊ Flash bracketing series Fb in TTL and A mode
◊ 1st or 2nd curtain synchronisation
◊ Automatic power-zoom control
◊ Automatic AF measuring beam control
101
ķ
704 47 0099.A3
54 MZ-4i
01.02.2007
13:41 Uhr
Seite 102
◊ Automatic maximum flash range indication
◊ Automatic flash synch speed control
◊ Wake-up function
◊ Flash readiness indication in camera’s viewfinder
◊ Correct exposure indication in camera’s viewfinder
◊ Triggering control (Pentax, Minolta)
◊ Anti-red eye preflash (Nikon)
◊ Modelling light function
1) only possible if it can be set on the camera
2) HSS = high speed synchronisation
3) only with 54 MZ-4
4) only with 54 MZ-4i and Nikon SCA-adapter 3402-M3
5) Olympus E-1 only with 54 MZ-4i and SCA-adapter 3202-M3
ķ
54 MZ-.. with SCA 3xx adapter:
The additional special flash functions are restricted when the mecablitz
54 MZ-.. is used with an SCA 3xx adapter! The availability of individual
Ǻ special functions then depends on the given camera system (camera manufacturer) and the special camera type. For more detailed information
please refer to the SCA Survey Table and the operating instructions for
the individual SCA adapters.
• TTL flash mode1)
- Metz TTL remote mode1)
• Manual flash mode with partial light output levels
• Automatic flash mode
- Metz auto remote mode
• Stroboscopic mode
◊ Manual flash exposure correction in A mode
◊ Flash bracketing Fb in A mode
102
◊ Automatic flash synch speed control
◊ Wake-up function
◊ Flash readiness indication in camera’s viewfinder
◊ Correct exposure indication in camera’s viewfinder
◊ Modelling light function
1) only possible if it can be set on the camera
54 MZ-.. with standard foot 301 (control only via hot shoe or synch cable):
• Manual flash mode with partial light output levels
• Automatic flash mode
- Metz auto remote mode
• Stroboscopic mode
◊ Manual flash exposure correction in A mode
◊ Flash bracketing Fb in A mode
◊ Modelling light function
704 47 0099.A3
54 MZ-4i
01.02.2007
13:41 Uhr
Seite 103
1. Safety Instructions
• The flash unit is exclusively intended and approved for photographic
use!
• Never fire a flash in the vicinity of flammable gases or liquids (petrol,
solvents, etc.) - DANGER OF EXPLOSION!
• Never take flash shots of car, bus or train drivers, or of motorcycle and
bicycle riders, whilst they are travelling. They could be blinded by the
light and cause an accident!
• Never fire a flash in the immediate vicinity of the eyes! Flash fired directly in front of the eyes of a person or animal can damage the retina and
lead to severe visual disorders - even blindness!
• Only use the approved power sources listed in the operating instructions!
• Do not expose batteries to excessive heat, sunshine, fire and the like!
• Never throw exhausted batteries on to a fire!
• Exhausted batteries should be immediately removed from the flash unit!
Lye leaking out of spent batteries will damage the unit.
• Never recharge dry-cell batteries!
• Do not expose the flash unit or battery charger to dripping or splashing
water!
• Protect the flash unit from excessive heat and humidity! Do not store the
flash unit in the glove compartment of a car!
• Never place material that is impervious to light in front of, or directly on,
the reflector screen. The reflector screen must be perfectly clean when a
flash is fired. The high energy of the flash light will burn the material or
damage the reflector screen if this is not observed.
• Do not touch the reflector screen after a series of flash shots. Danger of
burns!
• Never disassemble the flashgun! DANGER: HIGH VOLTAGE!
• There are no components inside the flashgun that can be repaired by a
layperson.
• When taking a series of flash shots at full light output and fast recycling
times as provided by NiCad battery operation, make sure to observe an
interval of at least 10 minutes after 15 flashes, otherwise the flash unit
will be overloaded.
ķ
103
704 47 0099.A3
54 MZ-4i
01.02.2007
13:41 Uhr
Seite 104
2. Preparing the flash unit for use
2.2 Power supply
2.1 Mounting the flash unit on the camera
2.2.1 Suitable batteries
☞ Before mounting or removing the flash unit, switch off both the camera and the flash unit!
The mecablitz can only be mounted on the camera with the SCA 301 standard
foot or an SCA 3xx/SCA 3xx2 adapter (optional extra).
As standard, the mecablitz is fitted with the SCA 301 foot for simple flash synchronisation. The shutter speed must be the same or slower than the X synch
speed. The „Set“ version is supplied with the corresponding SCA adapter in
place of the SCA 301 standard foot.
Mounting the standard foot or SCA adapter:
☞ Be sure to switch off the mecablitz by its main switch prior to mounting or removing the standard foot or SCA adapter.
ķ
• Hold the cover plate (only when using the SCA 3xx2 adapter) in the middle
and withdraw.
• Push the SCA adapter or the SCA 301 standard foot all the way in.
Removing the standard foot or SCA adapter:
• Turn off the mecablitz with its main switch (Fig. 1).
• Push the battery compartment lid (Fig. 3) down and fold open.
• Press the coloured unlocking button (Fig. 3) and simultaneously withdraw
the SCA adapter or standard foot.
Mounting the mecablitz:
Insert the mecablitz in the camera’s accessory shoe and lock into position
with the locking screw.
104
The mecablitz can be operated with any of the following batteries:
• 4 NiCad batteries, type IEC KR 15/51.
They permit fast recycling and are economical in use because they are
rechargeable.
• 4 nickel-metal-hydride batteries.
Significantly higher capacity than NiCad batteries and less harmful to the
environment (no cadmium).
• 4 alkaline-manganese batteries, type IEC LR6.
Maintenance-free power source for moderate power requirements.
• Power Pack P 40 (optional accessory)
Offers microprocessor-controlled battery monitoring and charge level indication (with discharge function).
• Power Pack P 50 (optional accessory)
Offers microprocessor-controlled battery monitoring and charge level indication (with discharge function).
2.2.2 Exchanging batteries
• Switch off the mecablitz with its main switch (Fig. 1).
• Push the battery compartment lid (Fig. 3) down and fold open.
• Insert the batteries in conformity with the indicated battery symbols and
close the battery compartment cover.
☞ CAUTION: When loading batteries ensure correct polarity as indicated
by the symbols on the battery compartment lid .
Exhausted batteries must not be thrown in the dustbin! Help protect
the environment and dispose of exhausted batteries at the appropriate collecting points.
704 47 0099.A3
54 MZ-4i
01.02.2007
13:41 Uhr
Seite 105
2.3 Switching the flash unit on and off
The flash unit is switched on with the main switch (Fig. 1). In the upper On
position, the flash unit is permanently6) on and the flash ready (Fig. 1)
indicator is lit.
6) see also „12.3 Automatic shut-off“
☞ When a key appears on the LC display, please refer to „12.2 Locking
and unlocking the controls“.
To turn off the flash unit push the main switch (Fig. 1) down to the bottom
position. If your mecablitz is not going to be used for an extended period of
time, we recommend the following:
- Switch off the flash unit with the main switch (Fig. 1).
- Remove the power source (batteries).
2.4 Operating concept
2.4.1Selecting and setting the flash mode TTL / A / M /
(stroboscopic)
Select the flash mode TTL, A (Auto), M (Manual) or
(stroboscopic) by
depressing the Mode button (Fig. 1) repeatedly until the icon of the required mode flashes on the display. Push the setting disk (Fig. 1) in the direction of the arrow for storage.
The selected operating mode will be automatically stored after approx. 5
seconds if the setting disk (Fig. 1) is not pressed. After storage the icon of
the selected mode will be continuously displayed (without flashing).
Note: The individual flash modes are explained in a separate chapter!
The icon of the given function flashes after the special function has been set,
and the functional status (OFF or On) is shown on the LC display.
The selected function is switched on or off by turning the setting disk (Fig. 1).
The set function is stored by pressing the setting disk (Fig. 1).
Note: The individual flash modes are explained in a separate chapter!
2.4.3 Setting ISO / Zoom / Aperture , „P“ Partial Light Output
and EV (flash exposure correction)
Turn the setting disk (Fig. 1) to select the required function (ISO / Zoom /
Flash Exposure Correction „EV“) on the right-hand side of the LC display. The
selected function is indicated by an arrow ı.
Push the setting disk (Fig. 1) in the direction of the arrow to change the
function. The arrow ı on the LC display will flash. Change the status by turning
the setting disk. To store press the setting disk in the direction of the arrow. The
selected setting will be automatically stored after approx. 5 seconds if the setting disk is not pressed. The arrow at the selected position will stop flashing
after storage.
☞ When operating the mecablitz with an SCA 3xx2 adapter it may not
be possible to change the f–stop (depending on the camera type and
SCA adapter)!
When operating the mecablitz with an SCA 3xx2 adapter it may not
be possible to change the ISO film speed, or the ISO film speed may
not be displayed (depending on the camera type and SCA adapter)!
Note: The individual settings are explained in a separate chapter!
3. TTL flash mode
Additional special functions can be selected in each flash mode with the
Select button (Fig. 1).
By depressing the Select button you can call the special functions "Bleep" ( ),
automatic switch-off
, REAR7) (second-curtain synchronisation), modelling light
, zoom formats and flash bracketing "Fb".
The TTL flash mode is a very simple way to achieve excellent flash shots.
☞ The mecablitz must be fitted with a suitable SCA adapter for TTL flash
mode. TTL flash mode is only possible with cameras supporting this
mode! The SCA 301 standard foot (only hot-shoe contact or synch
cord socket) does not permit TTL flash mode! If the mecablitz is used in
conjunction with a camera or SCA adapter that does not support the
Ȅ
2.4.2 Selecting and setting the special functions
7) only with SCA adapter and camera which support this function
105
ķ
704 47 0099.A3
54 MZ-4i
01.02.2007
13:41 Uhr
Seite 106
TTL function, then uncontrolled full-power flashes will be fired when
the shutter release is pressed! The TTL function can only be tested if a
film has been loaded in the camera!
In TTL mode, the exposure readings are taken by a sensor built into the camera. This sensor measures the light reaching the film through the camera
lens. An electronic control circuit within the camera transmits a stop signal to
the SCA adapter (optional extra) as soon as the film has been exposed by
the correct amount of light, thereby instantly interrupting the flash.
The advantage of this flash mode is that all factors influencing correct exposure of the film (filters, change of aperture and focal length with zoom lenses, extensions for close-ups, etc.) are automatically taken into account.
The „ok“ display on the mecablitz lights up for approx. 3 sec. when flash exposure was correct.
☞ An additional acoustic signal can be activated on the mecablitz; see
„12.1 Bleep function“.
ķ
Setting procedure for the TTL flash mode:
• Equip the mecablitz with a suitable SCA adapter and mount on the camera.
• Adjust the camera as described in its operating manual.
• Switch on the mecablitz with the main switch (Fig. 1).
• Depress the Mode button (Fig. 1) repeatedly until TTL flashes on the
display. Push the setting disk (Fig. 1) in the direction of the arrow to store this setting. The selected operating mode will be automatically stored
after approx. 5 seconds if the setting disk is not pressed. The TTL icon will
stop flashing and will be continuously displayed after storage.
• It is possible that ISO film speed, zoom and f-stop will not be automatically
transmitted from the camera to the mecablitz, depending upon the camera
type and SCA adapter. In this case simply set the corresponding values
manually on the mecablitz. ISO film speed and f-stop are only required for
correct distance and flash range indication on the LC display and are
therefore irrelevant for TTL flash shots. Consequently, it is not imperative to
set them.
106
• Zoom reflector positioning is important for the correct illumination of the
entire subject. It should therefore always be adapted to the focal length of
the lens.
Tip:
If you are using a zoom lens and do not constantly need the full power and
maximum flash range of the mecablitz, you can leave the zoom reflector at
the shortest focal length of the zoom lens. In this manner the entire subject
will be uniformly illuminated, thereby also eliminating the need to constantly
adapt the zoom reflector position to the given focal length.
Example:
Let us assume that you are using a 28 mm - 80 mm zoom lens. In this case
you set the zoom reflector to position 28 mm!
☞ If the mecablitz is used with an SCA 3xx2 adapter on a camera that
transmits data to the flash unit, it can happen that the ISO speed
rating is not displayed (depending on the camera model); see the
operating instructions for the SCA adapter. It may then be impossible
to change the ISO film speed and aperture! With wide differences in
contrast, e.g. a dark object in the snow, corresponding exposure corrections may be necessary in TTL mode (see Chapter 14.).
3.1 Sub-modes of TTL flash mode
Different flash sub-modes can be set when the mecablitz is in TTL mode.
☞ The number of possible sub-modes depends on the SCA adapter and
the given camera:
• TTL-remote with address „Ad1“
(see Chapter „7.1 Metz cordless TTL remote mode“).
• TTL-remote with address „Ad2”
(see Chapter „7.1 Metz cordless TTL remote mode“).
• E-TTL flash mode (only with SCA 3102 and a suitable Canon camera; see
operating instructions for the SCA adapter and the camera).
• E-TTL-HSS flash mode; high-speed synchronisation (only with SCA 3102
and a suitable Canon camera; see operating instructions for the SCA
704 47 0099.A3
54 MZ-4i
01.02.2007
13:41 Uhr
Seite 107
adapter and the camera).
• Matrix-controlled fill-in flash
(only with SCA 3402 and a suitable
Nikon camera; see operating instructions for the SCA adapter and the
camera).
• 3D multi-sensor fill-in flash
(only with SCA 3402 and a suitable
Nikon camera; see operating instructions for the SCA adapter and the
camera).
• TTL-HSS flash mode; high-speed synchronisation
(only with SCA 3302
and a suitable Minolta camera; see operating instructions for the SCA adapter and the camera).
Setting a sub-mode of TTL flash mode:
• Depress the Mode button (Fig. 1) repeatedly until TTL flashes on the
display. In the event that TTL no longer flashes, just press the Mode button
once.
• Turn the setting disk (Fig. 1) and select the required sub-mode.
• Push the setting disk (Fig. 1) in the direction of the arrow for storage.
The selected sub-mode will be automatically stored after 5 seconds if the
setting disk is not pressed. The TTL icon will stop flashing after storage.
4. Automatic flash mode
In the auto flash mode a sensor (Fig. 2) built into the mecablitz measures
the light reflected off the subject. The flash is cut off as soon as sufficient light
has been emitted for correct exposure. This eliminates the need to recalculate
and reset the aperture each time the distance is changed, provided that the
subject remains within the indicated maximum flash range.
The sensor (Fig. 2) of the mecablitz must be directed at the subject,
regardless of the direction in which the main reflector is pointing. The sensor
has a coverage of 25°, and only measures during light emission by the
mecablitz.
The „ok“ display on the mecablitz lights up for approx. 3 sec. when flash
exposure was correct.
The automatic flash mode is possible with an SCA adapter and with the
SCA 301 standard foot.
☞ Some cameras will not support the mecablitz in automatic flash mode
when an SCA adapter is used (see operating instructions for the given
camera and SCA adapter). In this case the mecablitz should be fitted
with the SCA 301 standard foot.
Setting procedure for automatic flash mode:
• Equip the mecablitz with an SCA adapter or the SCA 301 standard foot
and mount on the camera.
• Adjust the camera as described in its operating manual.
• Switch on the mecablitz with the main switch (Fig. 1).
• Depress the Mode button (Fig. 1) repeatedly until A flashes on the
display. Push the setting disk (Fig. 1) in the direction of the arrow for
storage. The selected operating mode will be automatically stored after
approx. 5 seconds if the setting disk is not pressed. The A icon will stop
flashing and remain permanent after storage.
• If the mecablitz is used with an SCA 3xx2 adapter and a camera that automatically transmits the data for ISO film speed, zoom reflector position
and aperture, then no further settings are required. The mecablitz will automatically adjust itself in conformity with the transmitted camera data.
☞ When the mecablitz is operated with a camera that transmits data to
the mecablitz, it can happen that the ISO film speed will not be displayed (depends on the camera type); see operating instructions for
the SCA adapter. It may then be impossible to change the ISO film
speed and aperture setting!
Automatic flash mode with an SCA 3xx adapter or the SCA 301 standard foot:
In this case ISO film speed, zoom reflector position and aperture must be
manually set on the mecablitz. This is indispensable for correct flash exposure because the mecablitz automatically controls the light on the basis of
these data.
107
ķ
704 47 0099.A3
54 MZ-4i
01.02.2007
13:41 Uhr
Seite 108
Tip:
If you are using a zoom lens and do not constantly need the full power and
maximum flash range of the mecablitz, you can leave the zoom reflector at
the shortest focal length position of the zoom lens. In this manner the entire
subject will be uniformly illuminated, thereby eliminating the need to constantly adapt the zoom reflector position to the given focal length.
Example:
Let us assume that you are using a 28 mm – 80 mm zoom lens. In this case
you set the zoom reflector to position 28 mm!
☞ The subject should be located within about 40 % and 70 % of the
distance range indicated on the mecablitz LC display. This gives the
electronic system sufficient leeway for compensation.
Caution with zoom lenses!
Depending on their design, zoom lenses can cause a loss of light in
the order of up to one f-stop. Moreover, the effective aperture may
vary with the focal length settings. This can be compensated by correcting the aperture value on the flashgun manually or by manual
flash exposure correction (see Chapter 14.).
ķ 4.1 Sub-modes of the automatic flash mode
Different sub-modes can be set when the mecablitz is in auto flash mode A:
• Auto-remote with address „Ad1“
(see Chapter „7.1 Metz cordless auto remote mode“)
• Auto-remote with address „Ad2“
(see Chapter „7.1 Metz cordless auto remote mode“)
Setting a sub-mode of the automatic flash mode:
• Depress the Mode button (Fig. 1) repeatedly until A flashes on the
display.
• Turn the setting disk (Fig. 1) to set the desired sub-mode.
• Push the setting disk (Fig. 1) in the direction of the arrow for storage.
The selected sub-mode will be automatically stored after approx. 5 seconds if
the setting disk is not pressed. After storage, icon A will stop flashing.
108
5. Manual flash mode
In this mode, the flash unit will emit the full light energy if partial light output
has not been set. The mecablitz must be fitted with an SCA adapter or the
301 standard foot. Adaptation to the given photographic situations is by setting the corresponding aperture on the camera and by selecting a partial
light output level.
The LC display of the mecablitz indicates the flash-to-subject distance for correct flash exposure. It is therefore necessary to ensure that the mecablitz is
correctly adjusted. The aperture and ISO film speed set on the camera must
be identical to the aperture and ISO film speed setting on the mecablitz! The
flash reflector’s zoom position must be adapted to the focal length of the lens!
Setting procedure for manual flash mode:
Setting example:
Flash-to-subject distance: 6 m; zoom 50 mm; film speed ISO 100/21°.
• Adjust the camera as indicated in the operating instructions.
• Equip the flash unit with the SCA 301 standard foot or the SCA adapter
and mount on the camera.
• Switch on the mecablitz with the main switch (Fig. 1).
• Depress the Mode button (Fig. 1) repeatedly until M flashes on the
display. Push the setting disk (Fig. 1) in the direction of the arrow for storage. The selected operating mode will be automatically stored after approx.
5 seconds if the setting disk is not pressed. After storage the M icon will stop
flashing and remain permanent.
• The display indicates the light output „P 1/1“ (= full light output) after storage. A full-power flash is fired when pressing the firing button (Fig. 1)
on the mecablitz or the camera’s shutter release.
☞ Some cameras will not support the mecablitz with an SCA adapter
when it is in manual mode (see operating instructions for the given
camera and SCA adapter). In this event the mecablitz should be
equipped with the SCA 301 standard foot (see also operating instructions for the given camera).
704 47 0099.A3
54 MZ-4i
01.02.2007
13:41 Uhr
Seite 109
Manual flash mode of the mecablitz with an SCA 3xx2 adapter:
If the mecablitz is operated with an SCA 3xx2 adapter and a camera that
automatically transmits the parameters for ISO film speed, zoom reflector
position and aperture, then no further settings are required. The mecablitz
will automatically adjust itself in conformity with the data transmitted by the
camera.
☞ If the mecablitz is used on a camera that transmits data to the mecablitz,
it can happen that the ISO film speed will not be displayed (depends on
the camera type); see the operating instructions for the SCA adapter. If
the mecablitz is being operated with a camera that transmits data to the
flash unit, it is impossible to change the values for ISO film speed and
aperture! In this event continue changing the f-number on the camera
until the required distance is indicated on the LC display of the mecablitz.
Manual flash mode with the SCA 3xx adapter or the SCA 301 standard foot:
In this case the corresponding ISO film speed, zoom reflector position and
aperture parameters must be manually set on the mecablitz. This is indispensable for correct flash exposure because the mecablitz calculates and displays the flash-to-subject distance required for a correct exposure on the basis of these data.
Setting partial light output:
Partial light output can be set on the mecablitz if you wish to change the distance range given for correct flash exposure in order to adapt it to the existing picture-shooting situation:
• Continue turning the setting disk (Fig. 1) until the arrow symbol appears
next to P on the display.
• Push the setting disk (Fig. 1) in the direction of the arrow. The arrow
symbol starts flashing.
• Turn the setting disk to set the required partial light output level. Press the
setting disk in the direction of the arrow for storage. The selected partial
light output will be automatically stored after approx. 5 seconds if the setting disk is not pressed. After storage the arrow symbol stops flashing.
Another possibility to modify the distance range for adaptation to the individual picture shooting situation is to change the aperture on the camera. You
must, however, take into account that a change of the camera’s aperture also
influences the picture’s depth-of-field.
Deleting the set partial light output:
• Turn the setting disk (Fig. 1) until the arrow symbol appears next to P on
the display.
• Push the setting disk (Fig. 1) in the direction of the arrow. The arrow
symbol starts flashing.
• Turn the setting disk (Fig. 1) to select partial light output P 1/1. Push the
setting disk in the direction of the arrow for storage. Storage is automatic
after 5 seconds if the setting disk is not pressed. The arrow symbol will stop
flashing after storage. The partial light output is set to P 1/1 when changing to another flash mode.
5.1 Sub-mode of the manual flash mode
☞ The mecablitz must be fitted with an SCA 3xx2 adapter!
Various cameras offer the possibility of high-speed synchronisation (FP and
HSS flash mode) when the mecablitz is in manual flash mode M (see operating instructions of the given camera and SCA adapter).
Setting the „M-HSS“ sub-mode of the manual flash mode:
• Continue depressing the Mode button (Fig. 1) until M flashes on the
display.
• Turn the setting disk (Fig. 1) to set HSS.
• Push the setting disk in the direction of the arrow for storage. HSS will be
automatically stored after approx. 5 seconds if the setting disk is not pressed.
The M icon will stop flashing after storage.
Deactivating the “HSS” mode:
• Press the Mode button (Fig. 1) repeatedly until M flashes on the display.
• Turn the setting disk (Fig. 1) to cancel HSS.
• Press the setting disk in the direction of the arrow for storage. Storage will
109
ķ
704 47 0099.A3
54 MZ-4i
01.02.2007
13:41 Uhr
Seite 110
be automatic after 5 seconds if the setting disk is not pressed. The M icon
will stop flashing after storage.
6. Bounce flash
ķ
Photos shot with full frontal flash are easily recognized by their harsh, dense
shadows. This is often associated with a sharp drop in light from the foreground to the background.
This phenomenon can be avoided with bounce flash because the diffused
light will produce a soft and uniform rendition of both the subject and the
background. For this situation the reflector is turned in such a manner that
the flash is bounced off a suitable reflective surface (e.g. ceiling or walls of
the room).
The reflector can be turned vertically and horizontally.
Vertikal positions:
-7°, 0°, 60°, 75°, 90°
Horizontal positions: -180°, -150°, -120°, -90°, -60°, -30°, 0°, 30°, 60°, 90°.
The reflector head is mechanically interlocked in its basic position. Press the
pushbutton to unlock and turn the reflector head.
☞ When turning the reflector vertically or horizontally, it is essential to
ensure that it is moved by a sufficiently wide angle so that direct light
can no longer fall on the subject. Consequently, always turn the reflector at least to the 60° lock-in position. The distance readings on the LC
display will disappear. The flash-to-subject distance via the ceiling or
wall is an unknown magnitude.
The light bounced off the reflecting surfaces produces a soft and uniform illumination of the subject.
The reflecting surface must be white or have a neutral colour, and it must not
be structured, e.g. wooden beams in a ceiling, as these might cast shadows.
For colour effects just select the reflective surface in the desired colour.
Use the secondary reflector to avoid disturbing dense shadows that are
formed by bounce flash, for instance under the nose and in the eye sockets
for portraiture.
110
6.1 Bounce flash with secondary reflector
The secondary reflector (Fig. 1) produces frontal fill-in light when the flash
is bounced.
☞ Use of the secondary reflector is only meaningful in bounce flash
photography.
The secondary reflector is switched on and off with switch
(Fig. 2). A
flashing
symbol on the LC display of the mecablitz merely indicates that
the main reflector has not yet been turned.
Activation of the secondary reflector assigns approx. 85 % of the emitted
light to the main reflector and 15 % to the secondary reflector. These %-values can differ somewhat when shooting with partial light output and secondary reflector.
The light output of the secondary reflector can be reduced by approx. 50 %
with a light reducing filter if it is too bright. For this purpose shift the light reducing filter sideways, remove from the mecablitz, turn by 180°, place over the
secondary reflector and push down until it audibly clicks into position.
☞ The sub-modes ADI, stroboscope, E-TTL, E-TTL-HSS, D-TTL, 3D multi-sensor
and TTL-HSS are not possible in conjunction with the secondary reflector.
6.2 Bounce flash in automatic and TTL flash mode
Prior to picture taking it is advisable to check whether sufficient light is available for the selected aperture. For this purpose proceed in the manner described in Chapter „10. Correct exposure indication“.
6.3 Bounce flash in manual flash mode
The required aperture on the camera in the manual flash mode is best established with a flash meter. If a flash meter is not available, observe the following rule of thumb
guide number
Camera aperture = —————————————————
flash-to-subject distance x 2
to establish a guide value for the aperture that can then be varied by ±1 f-stop
for the shot to be taken.
704 47 0099.A3
54 MZ-4i
01.02.2007
13:41 Uhr
Seite 111
7. Remote mode
General
In the remote mode, additional flash units (slaves) are fired under the cordless control of the master flash unit (controller) mounted on the camera. The
controller extends TTL automatic exposure control to all slaves.
The Metz TTL remote mode enables joint cordless TTL flash control of several
flash units of the types 54 MZ-.., 34 CS-2, 28 CS-2, 40 MZ-.., 50 MZ-5 and
70 MZ-... For this mode all additional 54 MZ-.. and 70 MZ-4 flash units (slaves) must be fitted with an SCA 3083 slave adapter (optional extra), and all
40 MZ-.. slaves with the SCA 3080 or 3082 slave adapter. The slave flash
units can be mounted on the foot supplied with the slave adapter or on a tripod.
The slave flash units 34 CS-2, 28 CS-2, 50 MZ-5 Slave and 70 MZ-5 do not
require a slave adapter.
☞ The LC display of the mecablitz does not indicate the maximum flash
range when in remote mode. The secondary reflector of the mecablitz
must be switched off!
To ensure that two TTL remote systems in neighbouring rooms do not interfere
with each other, two different addresses - Ad1 and Ad 2 - can be selected on
the controller (master) and the slave unit.
7.1 Metz cordless TTL remote mode
☞ The Metz TTL remote mode is only possible with cameras featuring TTL
flash control!
Setting procedure for Metz TTL remote controller operation (Fig. 4):
1 Equip the flash unit mounted on the camera with the appropriate SCA adapter and turn on with the main switch.
2 Depress the Mode button (Fig. 1) repeatedly until TTL flashes on the
display.
3 While the TTL mode is flashing, turn the setting disk (Fig. 1) and select
the address Ad1 or Ad2 for the Co controller mode. Depress the Mode but-
ton in the event that TTL is no longer flashing. Briefly press the setting disk
in the direction of arrow for storage. The selected setting will be automatically stored after 5 seconds if the setting disk is not pressed. TTL will then
be permanently displayed (without flashing), together with Co and the slave address Ad1 or Ad2.
Setting procedure for Metz TTL remote slave operation (Fig. 5):
• Equip the 54 MZ-.., 70 MZ-4 slave flash units with an SCA 3083 slave
adapter, and the 40 MZ-.. slave flash unit with an SCA 3080 or 3082 slave adapter.
1 Switch on the mecablitz with the main switch (Fig. 1). The mecablitz is
automatically set to TTL mode, and SL (slave mode) is indicated on the
LC display. The adjusted slave address is Ad1 (or the last selected address).
2 If you wish to change the slave address, press the Mode button (Fig. 1).
The TTL mode icon will then flash.
3 Turn the setting disk (Fig. 1) and select Ad2. Push the setting disk in the
direction of the arrow for storage.
☞ When in remote mode, the power zoom reflector of the mecablitz is
automatically adjusted to the 24 mm position in order to achieve the
widest possible illumination. This reflector position can be manually
changed (see Chapter 12.).
• When flash readiness is reached, the flash-ready indicator of the slave
lights up and the AF measuring beam starts flashing. An additional acousstic signal (bleep) can be activated to indicate flash readiness (see Chapter 12.). This is useful when there is no visual contact with the AF measuring beam or the flash-ready indicator.
4 Press the manual firing button (Fig. 1) of the mecablitz controller
mounted on the camera to fire a test flash.
• The slave will respond with a delayed flash to indicate that it is ready for
operation. When several slave units are operated, then all slaves will
acknowledge flash readiness simultaneously.
If a slave does not respond by firing a delayed flash, then this means that
the sensor in the adapter did not receive the light pulse. Turn the sensor in
111
ķ
704 47 0099.A3
54 MZ-4i
01.02.2007
13:41 Uhr
Seite 112
the direction of the controller and repeat the procedure described in step 4.
☞ A particularly short distance between controller and slave unit may
cause the camera’s electronic system to cut off the flash before the
slave has received its light pulse. In such an event widen the distance
between the controller and slave or select a higher f-number and
repeat procedure No. 4.
Deactivating the Metz TTL remote mode:
• Press the Mode button (Fig. 1) on the controller and deactivate the controller mode with the setting disk (Fig. 1).
• On the slave:
Switch off the flash unit, remove the SCA 3083 slave adapter, and finally
switch on the flash unit again.
7.2 Metz cordless auto remote mode
☞ The Metz auto remote mode can be used with system, standard, old
mechanical and medium-format cameras. The only precondition is
that all cameras feature a synch contact/socket and that the flash unit
is equipped with an SCA 301 standard foot or SCA adapter.
The exposure is controlled by the sensor of the controller flash unit
(master) mounted on the camera.
ķ
Setting procedure for the Metz auto remote controller mode:
• Equip the mecablitz with an SCA adapter or the SCA 301 standard foot,
and switch on.
• Switch the camera to manual mode as described in the camera’s operating
instructions.
☞ Automatic flash mode or auto remote flash mode are not supported
by all cameras in conjunction with an SCA adapter (see operating
instructions of the camera and the SCA adapter). If a camera, in combination with an SCA adapter, does not support the automatic flash
mode, then equip the mecablitz with the SCA 301 standard foot. In
this event do not forget to manually transfer the camera settings (ISO,
f-stop and zoom position) to the mecablitz!
112
• Set a shutter speed of 1/60th sec. or slower.
• Switch on the mecablitz on the camera with the main switch (Fig. 1).
• Depress the Mode button (Fig. 1) repeatedly until A appears on the
display.
• While the A mode is flashing, turn the setting disk (Fig. 1) and select the
address Ad1 or Ad2 for the Co controller mode. Depress the Mode button
in the event that A no longer flashes. To store, briefly press the setting disk
in the direction of the arrow. The selected setting will be automatically stored after 5 seconds if the setting disk is not pressed. A will then be continuously displayed (without flashing), together with Co and the slave address
Ad1 or Ad2.
Setting procedure for Metz auto remote slave mode:
The setting procedure is the same as for Metz TTL remote slave mode.
The slave flash unit also operates in the TTL mode in the auto remote mode.
7.3 Assessing the overall lighting conditions in remote mode
A modelling light beam of all participating flash units can be fired to assess
the overall lighting conditions in A (auto) and TTL remote mode.
For this purpose, the firing button (Fig. 1) of the 54 MZ-.. mounted on
the camera must be programmed. Press the Select button (Fig. 1) repeatedly until the mode display
lights up. Turn the setting disk (Fig. 1) to
set the modelling light function to On or OFF. The modelling light can then be
fired with the firing button (Fig. 1) ; see also Chapter 12.
8. Fill-in flash in daylight
The mecablitz can also be used for fill-in flash in daylight to soften harsh shadows and diminish the contrast, thereby producing a more balanced exposure when shooting against the light (contre-jour). Various possibilities are
open to the user for fill-in flash.
704 47 0099.A3
54 MZ-4i
01.02.2007
13:41 Uhr
Seite 113
8.1 Fill-in flash in TTL mode
The mecablitz must be equipped with a suitable SCA adapter. The camera
must be able to support TTL fill-in flash.
• Press the Mode button (Fig. 1) repeatedly until TTL appears on the
display.
Most cameras automatically activate fill-in flash when in Full Auto Mode, Intelligent Program AE P, and in Programmmed Image Control Modes during
daylight (see also operating instructions of camera and SCA adapter). The
camera will then automatically ensure a well-balanced illumination of subject
and background.
Moreover, some cameras offer a special fill-in flash program which permits
pin-pointed use whenever required. Depending upon the camera type, activation is either on the camera or mecablitz (see operating instructions of camera and SCA adapter).
Example: Matrix-controlled fill-in flash (only for certain Nikon cameras)
The mecablitz must be equipped with the SCA 3402 adapter (Nikon)!
Various Nikon cameras support the „Matrix-controlled TTL fill-in flash mode“
(see operating instructions of the given camera and the SCA adapter). This flash
mode is a sub-mode of TTL flash mode. Chapter 3.1 describes how it is set.
Example: 3D multi-sensor fill-in flash (only for certain Nikon cameras)
The mecablitz must be equipped with the SCA 3402 adapter (Nikon)!
Various Nikon cameras support the „3D multi-sensor fill-in flash mode“ (see
operating instructions of the given camera and the SCA adapter). This flash
mode is a sub-mode of TTL flash mode. Chapter 3.1 describes how it is set.
8.2 Fill-in flash in automatic mode
• Switch on the mecablitz with the main switch (Fig. 1).
• Depress the Mode button (Fig. 1) repeatedly until A flashes on the
display. Push the setting disk (Fig. 1) in the direction of the arrow to store this setting. The selected operating mode will be automatically stored
after approx. 5 seconds if the setting disk is not pressed. The A symbol will
remain permanent and stop flashing after storage.
☞ In automatic mode the flash is controlled by the sensor built into the
mecablitz. Ensure that backlight does not shine directly on to the sensor as this will confuse the electronics of the flash unit.
Use the camera’s or a hand-held exposure meter, to establish the required
aperture and shutter speed for a normal exposure. Ensure that the shutter
speed either equals, or is slower than the fastest flash synch speed (varies
with different camera models).
Example:
Established aperture = f/8;
Established shutter speed = 1/60th sec.
Flash synch speed of the camera e.g. 1/100th sec.
(see operating instructions for the given camera).
The two established values for aperture and shutter speed can be set on the
camera because the camera’s shutter speed is slower than the camera’s flash
sync speed.
To obtain a balanced fill-in light, for instance in order to retain the character
of the shadows, it is advisable to select on the flashgun an auto aperture that
is one increment lower than the aperture set on the camera. In our example
f/8 was set on the camera. Consequently, we advise you to set f/5.6 on the
flash unit.
If the mecablitz is fitted with an SCA 3xx2 adapter and the camera automatically transmits the f-stop values to the mecablitz, then manual aperture setting
is no longer possible! In this case manual flash-exposure correction can be
used in the automatic flash mode (see Chapter 14.).
Manual flash-exposure correction in automatic mode can also be used if the
camera does not transmit any data to the mecablitz.
Additional correction of the aperture value is then no longer necessary!
Tip:
If possible, take a meter reading of the subject’s background separately from the
actual subject. Experience has shown that a correction value of -1 EV (f-stop) to
113
ķ
704 47 0099.A3
54 MZ-4i
01.02.2007
13:41 Uhr
Seite 114
1 2/3 EV for the auto aperture on the mecablitz produces the best results in fillin flash mode.
9. Stroboscopic mode (Fig. 6)
ķ
Stroboscopic flash mode makes several images of a moving object appear in
the same picture. This is particularly interesting for motion studies and for
special effects (Fig. 6). In stroboscopic mode, a predetermined number of
flashes are fired at a certain flash frequency. Consequently, only a partial
light output is available, with a maximum of 1/4 power.
For stroboscopic exposures you can select a flash frequency (flashes per second) of 1...50 Hz in 1 Hz increments, and a number of flashes between
2...50 in single increments.
No ISO film speed is displayed in stroboscopic mode. When using the mecablitz with an SCA 3xx2 adapter and a camera that automatically transmits
the speed rating to the flash unit, the mecablitz will automatically adjust the
film speed (see operating instructions for camera and the SCA adapter).
When using the mecablitz with an SCA 3xx adapter, the SCA 301 standard
foot or a camera that does not transmit film speed data, the speed of the loaded
film must be set in TTL, A or M mode before selecting stroboscopic mode. The
mecablitz will then take over this setting for the stroboscopic mode.
The maximum possible partial light output level in stroboscopic mode is automatically adjusted. To achieve short flash durations, the partial light output
level can be adjusted manually to a minimal value of 1/256. The LC display
indicates the shooting distance for correct exposure at the set parameters.
You can adjust the displayed distance to the actual shooting distance by varying the f-stop or the partial light output level. The aperture selected on the
flash unit must be set on the camera lens. By using faster films (higher ISO
number) the shooting distance can be increased.
☞ The stroboscopic mode cannot be used when the secondary reflector
is switched on.
114
Setting procedure for stroboscopic mode (Fig. 7):
• Adjust the camera to manual mode, as explained in the manufacturer’s
operating instructions, and select the corresponding shutter speed.
1 Equip the flash unit with an SCA adapter or the SCA 301 standard foot,
and switch on with the main switch (Fig. 1).
2 Depress the Mode button (Fig. 1) repeatedly until
flashes on the
display. Press the setting disk (Fig. 1) in the direction of the arrow to store
this setting. The selected operating mode will be automatically stored after
approx. 5 seconds if the setting disk is not pressed. The
icon will stop
flashing after storage.
Stroboscopic mode when the mecablitz is fitted with an SCA 3xx2 adapter:
If the mecablitz is operated with an SCA 3xx2 adapter and a camera that
automatically transmits the ISO film speed, zoom reflector position and aperture parameters, then no further settings will be necessary. The mecablitz will
automatically adjust itself according to the data transmitted by the camera.
The number of flashes and the flash frequency must be set as explained in
Sections 3 and 4 (see below).
☞ If the mecablitz is operated with a camera that transmits data to the
mecablitz, then the ISO film speed and the aperture cannot be changed.
Stroboscopic mode with an SCA 3xx adapter, the SCA 301 standard foot
or a camera that does not transmit data (Fig. 7):
In this case the corresponding values for ISO film speed, zoom position of the
reflector and the aperture must be manually adjusted on the mecablitz. This
is indispensable for correct flash exposure because the mecablitz uses these
data to calculate and display the flash-to-subject distance required for correct
flash exposure.
3 Determine the N number of flashes. To do so, turn the setting disk (Fig.
1) until the arrow is in top position. Depress the setting disk and turn to
adjust the required N number of flashes. Store this setting by renewed
depression of the setting disk.
704 47 0099.A3
54 MZ-4i
01.02.2007
13:41 Uhr
Seite 115
4 Select the flash frequency f(Hz). Turn the setting disk (Fig. 1) anti-clokkwise until the arrow is next to f(Hz). Depress the setting disk and turn to
select the required flash frequency f(Hz). Store this setting by renewed
depression of the setting disk.
☞ The distance to the moving subject is used as distance value. To prevent overexposure of the static this part of the picture should either be
very dark or far behind the moving subject. Best results are achieved
with a low ambient light level.
then readjusted to TTL mode.
This procedure is relatively accurate with lenses of medium focal length of
between 28 mm and 85 mm. However, in borderline cases, underexposure
may result in TTL mode. In such an event the o.k. exposure indicator will remain dark after the shutter has been released. Select the next larger aperture
(e.g. f/8 instead of f/11) and have another try.
Ensure that a sufficiently slow shutter speed is set on the camera.
Table 3 specifies the fastest camera shutter speeds for the N - f(Hz) combinations.
☞ The AF measuring beam (Fig. 2) can only be activated by autofocus
10. Correct exposure indication
The correct exposure indicator ”o.k.” (Fig. 1) only lights up if the picture
was correctly exposed in automatic or TTL flash mode.
This gives the user the opportunity to fire a test flash while in automatic flash
mode so that the correct aperture can be established beforehand. This is particularly valuable with bounce flash when reflection conditions are difficult to
judge. A test flash cannot be fired in TTL mode.
The test flash can be triggered with the manual firing button (Fig. 1) provided that this button has not been programmed for „Modelling Light“ (see
Chapter 12.).
If the o.k. exposure indicator (Fig. 1) remains dark after the test flash was
fired, then adjust the next lower f-number, or diminish the distance to the
reflecting surface or subject, and repeat the test flash.
The f-stop established in this manner must also be set on the camera.
☞ To trigger a test flash, hold the camera and flash unit in the same
manner as for the actual shot!
11. AF measuring beam
cameras that support the AF measuring beam of the flash unit! Some
autofocus cameras only support their own built-in AF illuminator (refer
to the operating instructions for the given camera). The mecablitz must
be fitted with an SCA 3xx2 adapter!
Please note when selecting the camera’s autofocus mode that most cameras
only support the AF measuring beam in the „Single AF“ or „One-Shot AF“
mode (see operating instructions for the camera)!
The AF measuring beam is activated by the camera electronics when the ambient lighting conditions are insufficient for automatic focusing. The AF beam
projects a striped pattern on to the subject, and the camera uses this pattern to
focus automatically. The AF beam has a range of 9 m (with a 50 mm f/1.7
standard lens). Low-speed zoom lenses can significantly curtail the range of
the AF measuring beam.
☞ Some autofocus cameras have several AF metering fields in addition
to the central AF metering area in the camera’s viewfinder. The striped
pattern of the AF measuring beam only supports the camera’s central
AF sensor. Consequently it may be necessary to adjust the central AF
sensor manually on the camera (see the operating instructions for the
given camera and the SCA adapter).
This facility can also be used with TTL mode without having to produce test
exposures. The flash unit is adjusted to automatic mode, and the correct
aperture is then determined with a test flash in the previously described manner. The established aperture is transferred to the camera and the flash unit is
115
ķ
704 47 0099.A3
54 MZ-4i
01.02.2007
13:41 Uhr
Seite 116
12. Special functions
The special functions of the mecablitz can be called, one after the other, by
depressing the Select button (Fig. 1), and they can be set, switched off
and stored with the setting disk (Fig. 1).
12.1 Bleep function
ķ
(acoustic alarm)
The bleep function is used to acoustically indicate certain mecablitz functions. It enables the photographer to concentrate fully on the subject without
being distracted by the need to observe additional visual status displays!
The bleep function acoustically indicates the following:
• Flash readiness
• Correct flash exposure
• Automatic shut-off of the flash
• Incorrect operation
Acoustic signal after the mecablitz has been switched on:
• A brief (approx. 2 sec.) uninterrupted bleep signal after the mecablitz has
been switched on indicates flash readiness.
Bleep signals after exposure:
• A brief (approx. 2 sec.) uninterrupted bleep signal immediately after shooting indicates that exposure was correct and that flash readiness continues.
If there is no bleep signal immediately after shooting the picture was underexposed.
• An intermittent bleep signal immediately after shooting confirms correct
flash exposure, but flash readiness will only be re-established after a subsequent (3 sec.) continuous bleep.
Bleep signals associated with settings in „A“ automatic mode:
• A short bleep as an acoustic alarm is generated in the auto flash mode of
the mecablitz if the selected aperture and ISO setting exceed the permissible light control range. The auto aperture of the mecablitz is then automatically adjusted to the next permissible value.
116
Setting the bleep function (Fig. 9):
1 Press the Select button (Fig. 1) repeatedly until the icon flashes.
2 Turn the setting disk (Fig. 1) and switch on the bleep function. „On“
appears on the LC display of the mecablitz. This setting will be stored when
the setting disk is briefly pushed in the direction of the arrow. The selected
setting will be automatically stored after 5 seconds if the setting disk is not
pushed.
Deactivating the bleep function (Fig. 9):
1 Press the Select button (Fig. 1) repeatedly until the icon flashes.
2 Turn the setting disk (Fig. 1) and switch off the bleep function. „OFF“
will then appear on the LC display of the mecablitz. Push the setting disk
briefly in the direction of the arrow to store this setting. The selected setting
is automatically stored after 5 seconds if the setting disk is not pushed.
12.2 Locking and unlocking the controls (key function)
The key function locks the Mode and Select buttons, as well as the setting
disk, from inadvertent resetting.
To lock the Mode and Select buttons press them simultaneously for approx. 3 seconds until the
key icon appears on the display.
To unlock the Mode and Select buttons press them simultaneously for approx.
3 seconds until the
key icon disappears from the display.
12.3 Automatic shut-off (Afb. 8)
To protect the batteries from unintentional discharge, the mecablitz can be set
to automatically switch off 1 minute or 10 minutes after the flash was activated for the last time (flash shot, setting procedure or tripping the camera’s
shutter release).
The last used mode is retained after automatic shut-off so that it becomes
instantly available when the flash unit is switched on again.
If the mecablitz is equipped with the SCA 3xx2 adapter, it can be switched
on again merely by touching the camera’s shutter release.
If the mecablitz is equipped with an SCA 3xx adapter or the SCA 301 stand-
704 47 0099.A3
54 MZ-4i
01.02.2007
13:41 Uhr
Seite 117
Ȅ
ard foot, it can be switched on again merely by actuating the setting disk.
Setting automatic shut-off (Fig.8):
1 Press the Select button (Fig. 1) of the mecablitz repeatedly until the clock
icon
flashes.
2 Turn the setting disk (Fig. 1) to select the „Auto shut-off time“ 1m
(1 minute) or 10m (10 minutes). “On” is additionally displayed. Briefly press
the setting disk in the direction of the arrow for storage. The selected setting
will be automatically stored after 5 seconds if the setting disk is not pressed.
The clock icon
will then appear on the LC-display of the mecablitz.
Switch
off
the
mecablitz
by its mains switch if it is not going to be
☞
used for an extended period of time!
Ȅ
Ȅ
Deactivating automatic shut-off:
1 Repeatedly depress the Select button (Fig. 1) until the clock symbol
flashes. Turn the setting disk until “OFF” is displayed. Press the setting disk
briefly in the direction of the arrow to store this setting.
2 The selected setting is automatically stored if the setting disk is not pressed
within 5 seconds. The clock symbol
on the LC display of the mecablitz
is deleted.
Ȅ
12.4 REAR – Second curtain synchronisation (Fig. 10 and 11)
Second curtain synchronization (REAR) is particularly advantageous when
using slow shutter speeds (slower than 1/30 s) or when shooting moving
objects that have their own source of light. Second curtain synchronisation
gives a more realistic impression of movement because the light streaks behind the light source instead of building up in front of the source, as is the
case when the flash is synchronised with the 1st shutter curtain.
☞ The REAR function can only be used if the mecablitz is fitted with an
appropriate SCA adapter and is mounted on a camera that supports
this function. The camera must be switched on to select and set this
function. The camera’s shutter release must be briefly touched at least
once so that the corresponding data can be exchanged between the
camera and the mecablitz and the attached SCA adapter.
Please refer to the respective operating instructions to find out whether or not
the camera and the SCA adapter support the REAR function.
On some cameras the REAR function is not possible in certain operating
modes so that it cannot be selected. It will then be automatically deleted.
Please refer to the respective operating instructions for the given camera and
the SCA adapter!
Switching on the REAR function:
• Press the Select button (Fig. 1) repeatedly until „REAR“ appears on the
LC display. Adjust „On“ with the setting disk. Push the setting disk in the
direction of the arrow to store the REAR function. The selected setting will
be automatically stored after 5 seconds if the setting disk is not pushed.
After the REAR function has been set, the „REAR“ symbol for second curtain
synchronisation will be indicated on the LC display of the mecablitz.
Tip:
Mount the camera on a tripod for this mode to avoid camera shake with slow
shutter speeds.
☞ Turn off this function after shooting, otherwise unwanted slow shutter
speed could result in camera shake with „normal“ flash shots in the P
camera mode or in the programmed image control modes of the camera.
The „REAR“ function can be directly set on some cameras. In this case, however, the mecablitz will not display „REAR“.
Deactivating the REAR function:
• Repeatedly press the Select button (Fig. 1) until „REAR“ appears on the
LC display. Adjust „OFF“ with the setting disk. Press the setting disk in
direction of the arrow for storage. The setting will be automatically stored
after 5 seconds if the setting disk is not pressed. The REAR symbol on the
LC display of the mecablitz is deleted.
117
ķ
704 47 0099.A3
ķ
54 MZ-4i
01.02.2007
13:41 Uhr
Seite 118
12.5 Modelling light ML
12.6 Adapting the focal length to the camera format
The modelling light is a sequence of stroboscopic flashes at high frequency
during approx. 4 seconds which give the impression of permanent light.
Modelling light enables the user to assess light distribution and shadow formation before taking pictures.
Setting the modelling light function:
• Repeatedly depress the Select button (Fig. 1) until the
icon flashes on
the LC display. Select „On“ with the setting disk. Push the setting disk in
direction of the arrow to store the function. The modelling light function will
be automatically stored after 5 seconds if the setting disk is not pressed.
If an SCA 3xx2 adapter is used, the flash ready indicator (Fig. 1) flashes on the mecablitz to indicate that the modelling light function has been
activated. The modelling light is triggered by the mecablitz when the button is pressed.
In Metz REMOTE mode (TTL and Auto REMOTE), triggering the controller’s
modelling light will cause the modelling light on all slaves to be fired simultaneously (with 40 MZ-... in combination with the SCA 3080 adapter as from
version M1 or an SCA 3082 adapter).
A fully charged set of batteries (600 mAh) is sufficient to trigger the modelling
light approx. 60 times. Dry-cell batteries are not recommendable for the modelling light mode because their higher internal resistance impedes the fast
supply of power required by the flash capacitor.
Deactivating the modelling light function:
• Depress the Select button (Fig. 1) repeatedly until the
icon flashes on
the LC display. Select „OFF“ with the setting disk. Press the setting disk (Fig. 1) in direction of the arrow for storage. The setting will be automatically
stored after 5 seconds if the setting disk is not pressed.
The flash ready indicator (Fig. 1) lights permanently on the mecablitz.
This function enables the user to adapt the indicated zoom reflector position
of the mecablitz to the camera format. Consequently, the focal length of lenses of medium-format cameras (4.5x6, 6x6, 6x7 and 6x9) or APS cameras
can be matched to the value displayed on the mecablitz. For 35 mm (24x36)
cameras, the Extended-Zoom function is additionally available.
The Extended-Zoom mode reduces the focal length of the mecablitz by one increment as compared to the focal length of the camera lens. This results in a
wider illumination and additional diffused light (reflections) in rooms, which, in
turn, produces a softer flash illumination.
Example of Extended-Zoom mode:
The focal length of the camera lens is 50 mm.
In the Extended-Zoom mode the mecablitz adjusts the reflector position to 35 mm.
Setting procedure to adapt the focal length to the camera format (Fig. 12):
1 Depress the Select button repeatedly until „Zoom“ appears on the display.
2 Turn the setting disk (Fig. 1) to adapt the focal length to the given camera
format:
Key to the displays:
Zoom without additional display = Setting for 35 mm format (= normal setting).
Auto Zoom with the following additional displays:
E
Extended-Zoom mode (only for 35 mm cameras) (Fig. 12)
APS
Adaptation to APS cameras
F1
Adaptation to medium format cameras: 4.5x6
F2
Adaptation to medium format cameras: 6x6, 6x7 or 6x9
Informs that the Extended Zoom mode has been activated.
• Having selected the required setting, press the setting disk (Fig. 1) in the
direction of the arrow for storage. The selected setting is automatically stored
after 5 seconds if the setting disk is not pressed. The setting is retained after
the mecablitz has been switched off.
The
symbol that appears on the LC display of the flash unit after storage
118
704 47 0099.A3
54 MZ-4i
01.02.2007
13:41 Uhr
Seite 119
indicates that one of the afore-listed focal length adaptations is set.
12.7 Flash bracketing “Fb” (Fig. 13)
A series of flash exposures known as flash bracketing / flash exposure
bracketing can be made with the mecablitz 54 MZ-.. in the TTL and A modes.
A flash bracketing series consists of three successive flash shots with different
flash exposure correction values. The first shot in the series is taken without a
correction value, the second one with a minus correction, and the third one
with a plus correction. The mode is automatically cancelled after the third
shot.
„Fb“ flash bracketing in TTL mode:
Flash bracketing in TTL mode is only possible if the mecablitz is fitted with a
suitable SCA adapter (SCA 3xx2) and if the camera supports manual flash
exposure with the mecablitz.
If the camera does not support manual flash exposure, a correction factor for
flash bracketing can be set on the mecablitz, but the camera will expose the
pictures without such correction. Please refer to the operating instructions for
the given camera and the SCA adapter!
„Fb“ flash bracketing in A mode:
For flash bracketing in A mode, it is sufficient if the mecablitz is equipped
with an SCA 301 standard foot. However, flash bracketing in A mode is also
possible with an SCA adapter!
☞ With some cameras ”Fb” flash bracketing in A mode is not possible
for technical reasons!
With some cameras flash bracketing in the automatic mode is not possible if
the mecablitz is not equipped with an SCA 301 standard foot.
Please refer to the operating instructions for the given camera and SCA
adapter.
Activating “Fb” flash bracketing (Fig. 13):
1 Repeatedly depress the Select button (Fig. 1) until „Fb“ appears on the
display.
2 Turn the setting disk (Fig. 1) to select the required correction factor for
flash bracketing. „EV“ and the selected correction factor will then flash on
the display. Press the setting disk in the direction of the arrow for storage.
The setting will be automatically stored after approx. 5 seconds if the setting
disk is not pressed.
„Fb 1“ appears on the display of the mecablitz to indicate the first shot within
the flash exposure series. This picture is shot without any correction factor.
When the first shot has been taken, the display changes to „Fb 2“. In addition, „EV“ and the minus correction factor for the second picture are indicated.
After the second shot, the display changes to „Fb 3“ and additionally indicates ”EV” and the plus correction factor for the third exposure.
„Fb“, „EV“ and the correction value are all cancelled after the third shot.
☞ The activating procedure must be repeated for a new flash bracketing
sequence.
To abort flash bracketing simply switch off the mecablitz briefly with the main switch.
12.8 Re-establishing the basic setting
Keep the Mode button (Fig. 1) depressed for at least 3 seconds to return
the mecablitz to the basic setting. The adjusted operating mode is retained.
The following settings are cancelled:
• The TTL sub-modes „HSS“,, „ETTL“, „3D“ and the Remote modes
• The manual sub-mode „HSS“
• The manually entered partial light output levels
• Flash bracketing „Fb“
• Focal length adaptations „E“, „APS“, „F1“ and „F2“
• Second-curtain synchronisation (REAR)
119
ķ
704 47 0099.A3
54 MZ-4i
01.02.2007
13:41 Uhr
Seite 120
• The modelling light function
• Locking the controls
The following settings are retained:
• Automatic shut-off after 10 minutes
• The „Bleep“ function On
• „AutoZoom“ On
12.9 Power-zoom reflector
ķ
If the mecablitz is fitted with an SCA adapter 3xx2 and operated with a camera that automatically transmits the focal length of the lens to the flash unit,
then the zoom reflector position of the mecablitz is automatically adjusted to
the focal length of the lens. „Auto Zoom“ is indicated on the display of the
mecablitz.
If the mecablitz is operated with an SCA 3xx adapter or SCA 301 standard
foot, then the zoom position of the flash reflector must be manually set:
• Turn the setting disk (Fig. 1) until the arrow symbol is alongside „Zoom“
on the display.
• Press the setting disk in the direction of the arrow. The arrow symbol will
flash.
• Turn the setting disk and select the required reflector position.
• Press the setting disk (Fig. 1) in the direction of the arrow for storage. The
setting will be automatically stored after 5 seconds if the setting disk is not
pressed. The arrow symbol ceases to flash.
If you are using a zoom lens and do not constantly need the full power and
maximum flash range of the mecablitz, you can leave the zoom reflector at
the shortest focal length position of the zoom lens. In this manner the entire
subject will be uniformly illuminated, thereby also eliminating the need to
constantly adapt the zoom reflector position to the given focal length.
Example:
Let us assume that you are using a 28 mm – 80 mm zoom lens. In this case
set the zoom reflector to the 28 mm position!
120
Changing the zoom position when using an SCA 3xx2 adapter and a datatransmitting camera:
The reflector’s zoom position can also be changed if the mecablitz is operated with an SCA 3xx2 adapter and a data-transmitting camera:
Select the required zoom position as described above.
After storage the display will indicate „Zoom“ instead of „AutoZoom“. The
selected zoom position of the reflector flashes on the mecablitz display signalizing that this position has been manually changed.
Returning to „AutoZoom“ mode:
• Turn the setting disk (Fig. 1) until the arrow symbol appears alongside
„Zoom“ on the display.
• Press the setting disk in the direction of the arrow. The arrow symbol will
flash.
• Turn the setting disk until „AutoZoom“ reappears on the display.
• Press the setting disk (Fig. 1) in the direction of the arrow to store the setting. The setting is automatically stored after 5 seconds if the setting disk is
not pressed. The arrow symbol ceases to flash.
☞ The camera on to which the flash unit is mounted must be switched on!
12.10 m-ft changeover
• Turn off the mecablitz with its main switch (Fig. 1).
• Press the button Select (Fig. 1) and simultaneously slide the main switch
(Fig. 1) from OFF to “On”.
13. Wide-angle diffuser
Pull the wide-angle diffuser (Fig. 2) out from underneath the main reflector
until the stop point is reached and then release. The main reflector automatically moves to 20 mm zoom position and the wide-angle diffuser automatically folds upwards. The distances and the zoom value are corrected on the
LC display.
704 47 0099.A3
54 MZ-4i
01.02.2007
13:41 Uhr
Seite 121
To insert the wide-angle diffuser (Fig. 2) turn it 90° down, and push in
entirely.
Modes that operate with measuring pre-flash or high-speed synchronisation
(HSS) must not be set when working with wide-angle diffuser or reflector
attachments such as colour filters, neutral density filter, Mecabounce, etc.
14. Manual flash exposure correction
☞ Manual flash exposure correction is only possible if an SCA 3xx2
adapter is used.
☞ In the auto mode A, manual flash exposure correction is possible with
an SCA 3xx and SCA 3xx2 adapter.
The automatic exposure system of the mecablitz and most cameras is based
on a subject reflection factor of 25 % (average reflection of subjects shot with
flash). A dark background that absorbs a great deal of light, or a highly reflective bright background (e.g. when shooting against the light), can result in
overexposure or underexposure.
To compensate for the aforementioned effect, the exposure can be manually
corrected with a correction value adapted to the given photographic situation. This correction value depends on the contrast between subject and
background! In the TTL and A mode of the mecablitz, manual flash exposure
correction factors of -3 EV to +3 EV (f-stops) can be set in one-third increments. Many cameras have a setting element for exposure corrections which
can also be used in the TTL flash mode.
Please refer to the explanations in the operating instructions for the given
camera and the SCA adapter.
Exposure correction by changing the aperture on the lens is not possible in
this instance because the camera’s automatic exposure system will regard the
changed aperture as the normal working aperture.
☞ Dark subject in front of a bright background: Positive correction value
(approx. 1 to 2 f-stops EV)
Bright subject in front of a dark background: Negative correction
value (approx. -1 to -2 f-stops EV)
The entering of a correction value may result in a change of the maximum
flash range indicated on the LC display of the mecablitz and its adaptation to
the correction value (depending upon the camera type and SCA adapter)!
Setting manual flash exposure correction:
• The mecablitz is operating in TTL flash mode or in A flash mode.
• Turn the setting disk (Fig. 1) until the „EV“ symbol appears on the
LC display. The arrow symbol alongside „EV“ indicates that a position has
been reached where you can enter a correction value.
• Press the setting disk in the direction of the arrow. The arrow symbol alongside „EV“ starts to flash.
• Turn the setting disk to set a suitable correction value. The correction value
is shown on the LC display of the mecablitz.
• Press the setting disk in the direction of the arrow for storage. The selected
value is automatically stored after 5 seconds if the setting disk is not
pressed. The arrow symbol alongside „EV“ ceases to flash. The set value is
displayed on the LC display of the mecablitz.
Deactivating manual flash exposure correction:
• Turn the setting disk (Fig. 1) until the arrow symbol appears alongside
„EV“ on the LC display.
• Press the setting disk. The arrow symbol alongside „EV“ starts to flash.
• Turn the setting disk until the displayed correction value is extinguished on
the display.
• Press the setting disk in the direction of the arrow to confirm deactivation. If
the setting disk is not pressed the function is automatically deleted after
5 seconds. The arrow symbol alongside „EV“ ceases to flash.
☞ Manual flash exposure correction is only possible if the camera supports this function! If the camera does not support this function, the
correction value can be adjusted on the mecablitz, but cannot become
effective!
121
ķ
704 47 0099.A3
54 MZ-4i
01.02.2007
13:41 Uhr
Seite 122
Transmission of a correction value for flash exposure from the mecablitz to
the camera is only possible in TTL mode with an SCA 3xx2 adapter which
supports this function.
With some cameras, manual flash exposure corrections must be adjusted on
the camera (see the operating instructions for the given camera). In this event
the mecablitz will not display a correction value.
Some cameras permit manual flash exposure corrections to be completed on
the camera or on the flash unit. Please refer to the operating instructions for
the given camera or the SCA adapter to establish which setting has priority.
15. Maintenance and care
ķ
Remove any grime and dust with a soft, dry or silicon-treated cloth. Never
use detergents that could damage plastic parts.
Forming the flash capacitor
The flash capacitor incorporated in the flashgun undergoes a physical change
when the flashgun is not switched on for prolonged periods of time. For this
reason it is necessary to switch on the flashgun for approx. 10 minutes every
3 months. The battery must supply sufficient power for flash-readiness to be
indicated within one minute after the mecablitz was switched on.
16. Technical data
Guide numbers at ISO 100/21°, zoom 105 mm:
In the metric system: 54
In the imperial system: 177
12 auto apertures at ISO 100/21°:
f/1, f/1.4, f/2, f/2.8, f/4, f/5.6, f/8, f/11, f/16, f/22, f/32, f/45
Flash durations:
• Approx. 1/200th to 1/20,000th sec.
• In M mode approx. 1/200th sec. at full light output
• At 1/2 light output approx. 1/600th sec.
• At 1/4 light output approx. 1/1400th sec.
Sensor measuring angle: approx. 25°
Colour temperature:
approx. 5600 K
Film speed:
ISO 6 to ISO 6400
Synchronisation:
low-voltage ignition
Approx. number of flashes:
60*
with NiCad batteries (600 mAh)
180* with high-capacity alkaline manganese batteries
Recycling time:
• with NiCad batteries (600 mAh)
5 sec. (in M mode)*
0.1 . . 5 sec. (in A-/TTL mode)
• with high-capacity alkaline manganese batteries
6 sec. (in M mode)*
0.1 . . 6 sec. (in A-/TTL mode)
*at full light output
Swivelling range and locking positions of zoom reflector:
Upwards:
60° 75° 90° / -7°
Anti-clockwise
30° 60° 90° 120° 150° 180°
Clockwise
30° 60° 90°
Dimensions approx. in mm (W x H x D):
75 x 125 x 108
Weight:
Flash unit without batteries:
approx. 480 g
Included:
Flash unit, bag T54, Standard foot 301*, cover plate*, Operating Instructions, SCA 300/3002 Table
* (not with „Sets“)
Errors excepted. Subject to changes!
122
704 47 0099.A3
54 MZ-4i
01.02.2007
13:41 Uhr
Seite 123
17. Glossary
• Correct exposure indication in the camera’s viewfinder
When in automatic or TTL mode, many cameras indicate correct exposure
or underexposure of the film by a corresponding signal in the viewfinder.
• Automatic flash synch speed control
When flash readiness is reached, most system cameras automatically change
over to flash synch speed. On some cameras, slower shutter speeds are retained. If flash readiness indication disappears after the flash has been fired,
or when the flash unit is switched off, then the camera will automatically return to the previously set shutter speed.
• Triggering control
If the aperture set on the lens and the prevailing lighting conditions require a
shutter speed that equals or is faster than the flash synch speed, then a flash
will not be fired when the shutter is released on the camera. The shot is then
taken with the existing ambient light, thereby avoiding overexposure.
• Optional 1st or 2nd curtain synchronisation (see Fig. 10 and 11)
Two forms of flash synchronisation are available:
- The moment when the first shutter curtain opens
- The moment just before the second shutter curtain closes
The desired synchronisation is pre-selected on the SCA adapter. Second
curtain synchronisation is particularly advantageous when using slow shutter speeds and shooting moving objects that have their own source of light.
• Autofocus measuring beam
The AF measuring beam is activated by the camera electronics when the
ambient lighting level is no longer sufficient for automatic focusing. The
beam projects a striped pattern on to the subject, and the camera uses this
pattern to focus automatically. If an SCA 3xx autofocus adapter is used, then
only the AF measuring beam integrated in this adapter will be activated.
• Program flash mode
Some cameras merge ambient light and flash illumination in the Program
flash mode. The camera automatically sets the appropriate shutter speed/
aperture combination and controls the flash in TTL mode. This ensures exceptionally simple operation of flash unit and camera.
• TTL fill-in flash
Some system cameras offer the possibility of TTL fill-in flash in addition to
normal TTL flash control. This mode is used for daylight shots to brighten
dense shadows and when shooting against the light. Based on the sensor
measurement conducted inside the camera and the subsequent evaluation
by the camera electronics the correct amount of flash light is used to produce a balanced exposure. In TTL fill-in flash mode, the camera automatically performs a flash exposure correction.
• TTL flash exposure correction
There are certain situations when the sensor inside the camera can be confused. This is the case with very dark subjects in front of a very bright background (resulting in an underexposed subject) or a particularly bright subject
in front of a very dark background (resulting in an overexposed subject).
Normal exposure correction can be completed by way of aperture and shutter
speed control, changing the film speed, or a +/- correction on the camera.
However, this changes all elements involved in an exposure. Consequently, a
special flash exposure correction is possible on some cameras. With such flash
exposure correction the overall exposure is retained, while the dark parts are
brightened with fill-in flash. For further details please refer to the respective
operating instructions for the given camera and the adapter.
• Anti-red eye preflash (only with Nikon 3402 SCA adapter)
Red eyes are a purely physical effect that always arises when people look
directly at the camera, the ambient light is relatively dark, and the flash
unit is mounted on or alongside the camera. The flash lights up the bloodfilled retina at the back of the eye which passes through the pupil and is
recorded by the camera as a red spot.
The red-eye reducing preflash function results in a significant improvement.
In this function the mecablitz fires three visible, weak preflashes, before the
123
ķ
704 47 0099.A3
ķ
54 MZ-4i
01.02.2007
13:41 Uhr
Seite 124
shutter curtain opens and the measuring beam is emitted for the multi-sensor
(if permitted by the flash unit and camera), and only then fires the main
flash.
These three preflashes induce the pupils to close further, thereby diminishing the red-eye effect. This function is available in any exposure programme. For further details please refer to the operating instructions for the
given camera.
• TTL-HSS mode
This mode permits the use of flash at shutter speeds faster than the camera’s flash synch speed. This is useful for portraiture in very bright ambient
light and a wide aperture to limit the depth-of-field.
• ETTL flash mode (only with Canon SCA 3102)
In this mode the reflecting properties of the subject are established by a
preflash before shooting.
• ETTL-HSS mode
This mode permits the use of flash at shutter speeds faster than the camera’s flash synch speed.
• 3D-TTL flash control (only with Nikon SCA 3402)
In this mode hardly visible measuring beams are emitted as the shutter release is depressed, before the shutter curtain opens. They supply the camera with the necessary information regarding brightness and contrast.
18. Optional extras
☞ Metz does not accept any liability or grant a guarantee for faulty
functions or damage to the mecablitz caused by the use of accessories
from other manufacturers.
• SCA 3xx system adapters
For flash operation with system cameras; see separate operating instructions.
• SCA 3xx2 system adapters
For flash operation with system cameras with digital data transmission of
the SCA functions. Extends the number of functions compared with the
SCA 3xx system; see separate operating instructions.
124
• Colour Filter set 44-32
(Item No. 00004432A)
Consists of 4 colour effect filters, and a clear filter for colour foils.
• Mecabounce 44-90
(Item No. 000044900)
A diffuser for soft illumination. Has a tremendous effect because the pictures are given a soft artistic quality. The complexion is more natural. The
maximum flash ranges are reduced by the factor 2 in conformity with the
loss of light.
• Power Pack P50
(Item No. 00012950A)
For a high number of flashes and short recycle times (approx. 300 full flashes).
Please also order connecting cable V54-50 (Item No. 000054505).
• Power Pack P40
(Item No. 000129405)
A much higher capacity than conventional IEC KR 15/51 NiCad batteries
to achieve a higher number of flashes. Please also order connecting cable
V54-40 (Item No. 000054400).
• Bounce diffuser 54-23
(Item No. 000054236)
The soft directed light diminishes dense shadows.
• Bracket 40-36/2
(Item No. 000040363)
To attach the flashgun to the side of the camera.
• Slave-Adapter SCA 3083
(Item No. 000330838)
Enables cordless TTL flash control with mecablitz 54 MZ-3 and 70 MZ-4.
704 47 0099.A3
54 MZ-4i
01.02.2007
13:41 Uhr
Seite 125
19. Troubleshooting hints
(Ca) = Canon System;
using the mecablitz with SCA 3102 adapter
(Mi) = Minolta System;
using the mecablitz with SCA 3302 adapter
(Ni) = Nikon System;
using the mecablitz with SCA 3402 adapter
(P) = Pentax System;
using the mecablitz with SCA 3702 adapter
Should the LC display indicate meaningless information or should the flashgun not work properly in the individual modes, then proceed as follows:
• Switch off the flashgun by its main switch.
• Remove the batteries.
• Switch on the flashgun for approximately 1 second and then switch it off
again.
• Reload the used or new batteries.
Second-curtain synchronisation (REAR mode) cannot be set on the mecablitz.
• Second-curtain synchronisation (REAR) can only be set on the mecablitz if
the latter is fitted with a suitable SCA 3xx2 adapter (see SCA adapter operating onstructions) and is mounted on the switched-on camera. Data
exchange between camera and SCA adapter must have taken place at
least once (simply tap the camera release lightly without tripping the shutter). The camera must be able to support second-curtain synchronisation
(see Camera and SCA adapter operating instructions)!
• (Ni) The Nikon 3D flash mode has been activated on the mecablitz and the
symbol is indicated on the display. The Nikon 3D flash mode cannot be
combined with second-curtain synchronisation (REAR mode).
Remedy: First deactivate the 3D mode, then switch on REAR.
• (Ni) The pre-flash function to diminish the red-eye effect has been activated
on the Nikon camera and the
symbol is indicated on the LC-display.
The pre-flash function cannot be combined with second-curtain synch
(REAR mode).
Remedy: First deactivate the red-eye pre-flash function on the camera, then
select REAR mode.
• (Mi) With Minolta cameras, second-curtain synchronisation (REAR mode)
must always be set on the camera! The mecablitz does not indicate the synchronisation mode! Refer to the camera's operating instructions to establish
whether REAR mode is possible with the given camera, and how to proceed.
TTL (E-TTL) high-speed synchronisation (HSS) cannot be set on the mecablitz.
TTL (E-TTL) high-speed synchronisation (HSS) is currently only possible with
the mecablitz 54 MZ-..!
• TTL (E-TTL) high-speed synchronisation (HSS) can only be set on the mecablitz if the latter is fitted with a suitable SCA 3xx2 adapter (see SCA adapter operating instructions) and is mounted on the switched-on camera.
Data exchange between camera and SCA adapter must have taken place
at least once (simply tap the camera's release button lightly without tripping the shutter). The camera must be able to support TTL (E-TTL) highspeed synchronisation in the selected flash mode (Manual M or TTL) (see
camera and SCA adapter operating Instructions)!
• TTL (E-TTL) high-speed synchronisation (HSS) cannot be combined with the
Metz cordless remote flash system.
• Depending upon the given camera system, TTL (E-TTL) high-speed synchronisation (HSS) can be activated on the mecablitz 54 MZ-.. in the M manual
flash mode (Ca, Mi, Ni) or in the TTL mode (Ca, Mi)!
• To activate TTL (E-TTL) high-speed synchronisation (HSS) ensure that the
secondary reflector of the mecablitz is not switched on!
• (Mi) TTL (E-TTL) high-speed synchronisation (HSS) is not possible when the
main reflector is swivelled or tilted. The shutter speed is limited to the camera's flash synch speed. The display (H) for TTL (E-TTL) high-speed synchronisation (HSS) is extinguished in the camera's viewfinder!
125
ķ
704 47 0099.A3
ķ
54 MZ-4i
01.02.2007
13:41 Uhr
Seite 126
(Ni) The 3D mode cannot be set on the mecablitz when in TTL mode.
• REAR mode has been set on the mecablitz and "REAR" is indicated on the
display.
Remedy: First switch on REAR mode and then 3D mode.
• The mecablitz must be fitted with the SCA 3402 adapter. The 3D TTL mode
can only be set on the mecablitz if it is mounted on a switched-on camera
that supports the 3D mode. Data exchange between camera and SCA adapter must have taken place at least once (simply tap the camera release lightly
without tripping the shutter).
• The 3D TTL mode is not supported if the mecablitz is not ready for firing, if
the reflector has been swivelled out of its normal position or if the secondary reflector of the mecablitz has been switched on!
• 3D TTL flash operation is not possible in the Metz cordless remote mode!
• 3D TTL mode is only possible with the mecablitz 40 MZ-3(i), 50 MZ-5,
54 MZ-.. and 70 MZ-... flash units!
(Ca) The E-TTL mode cannot be activated.
• The mecablitz must be fitted with the SCA 3102 adapter. The E-TTL mode can
only be set on the mecablitz if it is mounted on a switched-on camera that
supports the E-TTL mode. Data exchange between camera and SCA adapter
must have taken place at least once (simply tap the camera release lightly
without tripping the shutter).
• The E-TTL mode is not supported if the secondary reflector of the mecablitz
has been switched on!
• The E-TTL mode is switched over to normal TTL mode when the secondary
reflector of the mecablitz is activated
Problem EOS D30: The mecablitz can no longer be triggered when in TTL
mode; change over to "Automatic"!
• The E-TTL flash mode is not possible in the Metz cordless remote flash
mode!
• The E-TTL mode is only possible with the mecablitz 40 MZ-3i, 40 MZ-1i
and 54 MZ-.. flash units!
126
Flash readiness is not achieved on the mecablitz when in remote flash
mode.
• The secondary reflector of the mecablitz has been switched on; the symbol
is indicated on the display.
Remedy: Switch off the secondary reflector.
Flash readiness indicator on the mecablitz is flashing.
• The modelling light function has been activated on the mecablitz.
Remedy: Deactivate the modelling light function on the mecablitz.
The ISO film speed cannot be adjusted on the mecablitz.
• The mecablitz has been fitted with an SCA 3xx2 adapter and is operated
with a camera that transmits the film speed data to the mecablitz. In this
case the ISO film speed setting is blocked.
The aperture cannot be adjusted on the mecablitz.
• The mecablitz has been fitted with an SCA 3xx2 adapter and is operated
with a camera that transmits the aperture data to the mecablitz. In this case
aperture setting is blocked.
The LC-display of the mecablitz displays "-" in place of the distance.
• The reflector of the mecablitz has been swivelled out of its basic position.
The distance can only be displayed if the reflector is in its basic position,
i.e. it has not been swivelled either horizontally or vertically.
The symbol for the secondary reflector on the LC-display of the mecablitz is
flashing. The flash readiness symbol on the mecablitz lights up.
• The secondary reflector has been activated even though the main reflector
is in its basic position, i.e. it has not been swivelled out of its basic position.
However, the use of a secondary reflector only makes sense if it takes over
the fill-in flash function when the main reflector has been swivelled or tilted.
The flashing secondary reflector symbol indicates that the secondary reflector must be switched off. The flashing symbol on the display disappears as
soon as the secondary reflector is switched off. The symbol appears permanently when the main reflector is swivelled out of its basic position.
704 47 0099.A3
54 MZ-4i
01.02.2007
13:41 Uhr
Seite 127
The symbol for the secondary reflector on the LC–display of the mecablitz
is flashing. The flash readiness indicator on the mecablitz does not light up.
• The mecablitz has been set for remote controller operation. "Co" is indicated on the LC-display. However, remote mode is only supported by the
main reflector. The mecablitz does not fire a flash because flash readiness
is not indicated.
Remedy: Either deactivate the remote controller mode or switch off the secondary reflector.
The LC-display of the mecablitz displays "Co" in place of the distance.
• The mecablitz is in remote controller mode. Distances are never indicated
in this mode.
Flash exposure correction cannot be selected with the setting disk when the
mecablitz is in remote controller mode.
☞ Flash exposure correction is never effective when in automatic remote
mode.
• Flash exposure correction can only be activated in TTL remote mode when
this is set before the mecablitz is set for controller mode. The correction
value is not indicated in remote controller mode, but it does remain effective. The LC display of the mecablitz indicates the remote address (remote
channel) "Ad1" or "Ad2" instead of the correction value.
(Ni) The Nikon fill-in flash function "Matrix-controlled fill-in flash" or "3D
multi-sensor fill-in flash" cannot be set on the mecablitz.
• The given fill-in flash mode can only be set on the mecablitz if the latter has
been fitted with an SCA 3402 adapter and mounted on a switched-on camera that supports the given fill-in flash function. Data exchange between
camera and SCA adapter must have taken place at least once (simply tap
the camera release lightly without tripping the shutter).
• "3D multisensor fill-in flash" (Nikon) is not supported in remote mode,
when the main reflector is swivelled out of its basic position or when the
secondary reflector has been switched on. Consequently, this function cannot be activated under the above conditions.
• The given controlled Nikon fill-in flash mode depends on the given camera
model.
The aperture symbol
and stop value flash on the LC display of the
mecablitz.
• The light-controlling range of the mecablitz in automatic flash mode is
being exceeded under the given picture-shooting conditions or with the
given camera settings.
Remedy: Darken the ambient area of the shot; load a less sensitive film; or
set a smaller aperture opening on the camera or mecablitz.
The AF red-light emitter of the mecablitz is not activated.
Possible causes:
• Ambient light is sufficient for the camera's AF sensor to enable focusing.
• If necessary the camera will activate its own AF illuminator.
• An AF mode other than Single-AF (S) has been activated.
• A decentral AF metering area has been activated on the camera.
Remedy:
• Set the Single-AF or S camera AF operating mode (see the operating
instructions for the given camera).
• Activate the central AF sensor in the camera's viewfinder.
Problems with the remote controller mode and flash bracketing.
• A flash bracketing sequence is not possible in remote controller mode! If
flash bracketing has been set and the mecablitz is then set for remote
mode, flash bracketing will no longer be displayed, nor is it carried out!
Remote controller mode with flash exposure correction.
• If flash exposure correction is set on the mecablitz, followed by a change to
remote controller mode, then the subsequent shots will be exposed with this
correction value, but the mecablitz display will not (!) indicate the correction value!
127
ķ
704 47 0099.A3
ķ
54 MZ-4i
01.02.2007
13:41 Uhr
Seite 128
(Ni) No Nikon underexposure display in remote mode.
• Some Nikon cameras indicate a warning signal (-EV) on the LC display of
the mecablitz if a shot is underexposed by flash. The mecablitz does not
support this function in remote mode.
No REAR mode with HSS high-speed synchronisation.
• REAR mode (second-curtain synchronisation) cannot be set when HSS
high-speed synchronisation has been activated on the mecablitz.
• Setting HSS high-speed synchronisation when REAR mode is set deactivates the REAR mode!
The ISO film speed is not indicated on the display of the mecablitz.
• The mecablitz is either in remote mode ("Co" or "SL") or in stroboscope
mode. The ISO value is never indicated on the LC display of the mecablitz
when these operating modes have been set.
• The Canon and Minolta system cameras do not indicate the ISO value on
the LC display!
Nikon 3D flashlight pulses cause uncontrolled slave operation.
☞ The mecablitz slave is triggered in an uncontrolled manner when the
sensor in the SCA 3083 slave adapter receives the light from a flash
unit operating in Nikon 3D mode!
• This can only be remedied by changing from 3D mode to normal TTL flash
mode (without 3D).
The exposure correction value flashes on the mecablitz display.
A flash exposure correction value (EV) is set on the mecablitz, e.g. in TTL
flash mode. The correction value flashes on the mecablitz LC-display after it
has been stored.
Possible cause:
The camera system does not allow the setting of a correction value on the
mecablitz! If necessary, the required correction value must be set on the
camera (see operating instructions for the given camera). The correction
value flashing on the mecablitz LC-display does not influence the exposure!
128
NOTE: The flashing correction value as a warning signal is not supported by all
camera systems! Flash exposure correction in "A" automatic mode of the mecablitz can be set and executed with most system cameras (Minolta is the exception!).
Flash bracketing cannot be set in TTL mode.
The "Fb" flash bracketing function cannot be selected in the TTL mode with
the "Select" key of the mecablitz.
Possible cause:
Various cameras and camera systems do not support the mecablitz flash
exposure correction setting when in TTL mode. Since flash bracketing operates with exposure correction values, selection of flash bracketing is suppressed right from the outset in the mecablitz menu. However, "Fb" flash
bracketing in "A" automatic mode of the mecablitz can be set and executed
with most system cameras (Minolta is the exception!). "Fb" flash bracketing is
not adjustable on the mecablitz 70 MZ-4!
(Pe) No flash readiness is indicated in the camera's viewfinder even though
the mecablitz flash ready signal is illuminated. The mecablitz is not triggered
when the picture is shot.
• The mecablitz operates in spot-beam mode; only the AF red-light emitter of
the mecablitz is supported. The operating mode selector of the SCA 3702
adapter is in the "SB" position.
Remedy: Set the operating mode selector of the SCA 3702 adapter to the
extreme left-hand position
, i.e. first-curtain synchronisation.
(Pe) Correct exposure confirmation is given in the camera's viewfinder
(flash ready symbol flashes) even though no picture was shot.
• This is a warning signal. The position of the zoom reflector is not sufficient
to ensure complete illumination of the entire subject. Automatic focal length
adaptation (AUTO-ZOOM, CZ) may have been deactivated on the mecablitz, and a reflector focal length has been selected that is longer than the
focal length of the lens. Example: Focal length of the lens: 70 mm; focal
length of the reflector: 85 mm.
704 47 0099.A3
54 MZ-4i
01.02.2007
13:41 Uhr
Seite 129
Remedy: Activate automatic focal length adaptation on the mecablitz
(AUTO-ZOOM or CZ) or ensure that the reflector focal length is identical
with, or shorter than, the focal length of the lens.
Example: Focal length of the lens: 70 mm; reflector focal length: 70 mm,
50 mm or shorter! Please refer to the mecablitz operating instructions for
setting details!
(Pe) The power zoom reflector of the mecablitz automatically assumes the
35 mm position, even though a lens with a different focal length is being
used. "Auto-Zoom" is indicated on the mecablitz LC display.
• A non-AF lens, or a lens that does not transmit focal length data to the
camera, is being used. Consequently, the mecablitz automatically assumes
the 35 mm reflector position.
Remedy: Adjust the reflector position of the mecablitz manually to the focal
length of the given lens (see mecablitz operating instructions).
The flash ready indicator in the camera's viewfinder may flash with reflector focal lengths that are longer than 35 mm, but this is of no consequence
for the subsequent exposure. In this instance please observe the correct
exposure confirmation given by the mecablitz!
The mecablitz does not fire flashes.
• The mecablitz has automatically switched itself off.
• After the mecablitz has been switched on and after automatic switch-off,
tap the camera release button lightly without tripping the shutter to permit
an adaption of the settings required for the picture shooting situation.
The mecablitz was unable to lock into a zoom position and “ZE” is indicated on the mecablitz LC display.
The batteries may be almost exhausted or the power is no longer sufficient to
drive the mechanical operations.
Switch the mecablitz off and then on again and/or replace the exhausted
batteries.
Disposal of batteries
Do not dispose of spent batteries with domestic rubbish.
Please return spent batteries to collecting points should they exist in your
country!
Please return only fully discharged batteries.
Normally, batteries are fully discharged if:
- the device they powered switches itself off and indicates "Spent Batteries".
- they no longer function properly after prolonged use.
To ensure short-circuit safety please cover the battery poles with adhesive
tape.
ķ
129
704 47 0099.A3
1.
2.
2.1
2.2
2.2.1
2.2.2
2.3
2.4
2.4.1
2.4.2
2.4.3
ƴ
3.
3.1
4.
4.1
5.
5.1
6.
6.1
6.2
6.3
7.
7.1
7.2
7.3
8.
8.1
8.2
130
54 MZ-4i
01.02.2007
13:41 Uhr
Seite 130
ƴ
Per la vostra sicurezza . . . . . . . . . . . . . . . . . . . . . . . . . . . . . 133
Preparazione del flash all’uso . . . . . . . . . . . . . . . . . . . . . . . . 134
Fissaggio del flash alla camera. . . . . . . . . . . . . . . . . . . . . . . . 134
Alimentazione . . . . . . . . . . . . . . . . . . . . . . . . . . . . . . . . . . . . 134
Scelta delle pile o delle batterie . . . . . . . . . . . . . . . . . . . . . . . 134
Sostituzione delle batterie. . . . . . . . . . . . . . . . . . . . . . . . . . . . 134
Accensione e spegnimento del flash . . . . . . . . . . . . . . . . . . . . 134
Filosofia di azionamento . . . . . . . . . . . . . . . . . . . . . . . . . . . . 135
Selezione e regolazione dei modi flash TTL / A / M / (strobo) . 135
Selezione e regolazione delle funzioni speciali . . . . . . . . . . . . 135
Regolazione di ISO / Zoom / diaframma , “P” (potenza
ridotta) e “EV”(compensazione esposizione flash) . . . . . . . . . . 135
Modo flash TTL . . . . . . . . . . . . . . . . . . . . . . . . . . . . . . . . . . . 135
Sotto-modi del modo flash TTL . . . . . . . . . . . . . . . . . . . . . . . . 136
Modo flash Auto . . . . . . . . . . . . . . . . . . . . . . . . . . . . . . . . . . 137
Sotto-modi del Modo flash Auto . . . . . . . . . . . . . . . . . . . . . . . 138
Modo flash Manuale . . . . . . . . . . . . . . . . . . . . . . . . . . . . . . . 138
Sotto-modi del Modo flash Manuale . . . . . . . . . . . . . . . . . . . . 139
Lampo riflesso . . . . . . . . . . . . . . . . . . . . . . . . . . . . . . . . . . . 140
Lampo riflesso con parabola ausiliaria attivata . . . . . . . . . . . . 140
Lampo riflesso nei Modi flash TTL e Auto . . . . . . . . . . . . . . . . . 141
Lampo riflesso nel Modo flash Manuale . . . . . . . . . . . . . . . . . 141
Controllo Metz a distanza . . . . . . . . . . . . . . . . . . . . . . . . . . . 141
Controllo Metz a distanza senza cavi in Modo TTL . . . . . . . . . . 141
Controllo Metz a distanza senza cavi in Modo Auto. . . . . . . . . 142
Valutazione della luminosità generale nel Controllo a distanza . 143
Lampo di schiarita in luce diurna . . . . . . . . . . . . . . . . . . . . . . 143
Lampo di schiarita nel Modo TTL. . . . . . . . . . . . . . . . . . . . . . . 143
Lampo di schairita nel Modo Auto . . . . . . . . . . . . . . . . . . . . . 143
9.
Modo flash stroboscopico . . . . . . . . . . . . . . . . . . . . . . . . . . . 144
10.
Indicatore di corretta esposizione . . . . . . . . . . . . . . . . . . . . . 145
11.
Illuminatore di assistenza AF . . . . . . . . . . . . . . . . . . . . . . . . . 146
12.
Funzioni speciali . . . . . . . . . . . . . . . . . . . . . . . . . . . . . . . . . . 146
12.1 Funzione Beep. . . . . . . . . . . . . . . . . . . . . . . . . . . . . . . . . . . . 146
12.2 Blocco e sblocco dei comandi. . . . . . . . . . . . . . . . . . . . . . . . . 147
12.3 Spegnimento automatico del flash /Auto-Off. . . . . . . . . . . . . . 147
12.4 REAR - Sincronizzazione sulla seconda tendina . . . . . . . . . . . . 147
12.5 Luce pilota / Modelling Light ML
. . . . . . . . . . . . . . . . . . . 148
12.6 Adattamento della distanza focale al formato della camera . . . 149
12.7 Sequenza di esposizioni flash “Fb” (flash-bracketing). . . . . . . . 149
12.8 Ritorno alle impostazioni di base . . . . . . . . . . . . . . . . . . . . . . 150
12.9 Parabola zoom motorizzata . . . . . . . . . . . . . . . . . . . . . . . . . . 150
12.10 Indicazione metri - piedí . . . . . . . . . . . . . . . . . . . . . . . . . . . . 151
13.
Diffusore grandangolare . . . . . . . . . . . . . . . . . . . . . . . . . . . . 151
14.
Compensazione dell‘esposizione manuale . . . . . . . . . . . . . . . 151
15.
Manutenzione e cura . . . . . . . . . . . . . . . . . . . . . . . . . . . . . . 152
16.
Dati tecnici . . . . . . . . . . . . . . . . . . . . . . . . . . . . . . . . . . . . . . 153
17.
Terminologia. . . . . . . . . . . . . . . . . . . . . . . . . . . . . . . . . . . . . 153
18.
Accessori opzionali . . . . . . . . . . . . . . . . . . . . . . . . . . . . . . . . 155
19.
Cosa fare in caso di anomalie . . . . . . . . . . . . . . . . . . . . . . . . 156
Tabella 1: Numeri guida a potenza piena (P 1) . . . . . . . . . . . . . . . . . . 192
Tabella 2: Durate del lampo ai vari livelli di potenza flash . . . . . . . . . . 193
Tabella 3: Tempi di posa per il modo stroboscopico . . . . . . . . . . . . . . . 194
Tabella 4: Tempi di ricarica e numero lampi con i diversi tipi di batterie. 195
Tabella 5: Potenza piena a numeri guida per il modo HSS . . . . . . . . . . 195
Tabella 6: Controllo a distanza . . . . . . . . . . . . . . . . . . . . . . . . . . . . . . 198
704 47 0099.A3
54 MZ-4i
01.02.2007
13:41 Uhr
Seite 131
Premessa
Vi ringraziamo vivamente per aver acquistato un prodotto Metz e siamo lieti
di poterVi accogliere come nostri Clienti.
Comprendiamo il vostro desiderio di provare subito il nuovo lampeggiatore.
Prima di utilizzarlo, Vi consigliamo tuttavia di leggere con attenzione queste
istruzioni: sarà ben speso il tempo che trascorrerete ad approfondire questo
manuale. Esso vi metterà infatti nelle condizioni di utilizzare il flash correttamente e senza problemi e di sfruttarne appieno l‘enorme potenziale.
Le seguenti istruzioni d'uso descrivono le modalità d'impiego del sistema
camera-flash con base standard 301 e adattatore SCA 3xx2.
☞ Aprite il risvolto di copertina con le ilustrazioni.
Questo lampeggiatore può essere impiegato con:
• tutte le camere dotate di slitta accessori con contatto sincro
• tutte le camere con slitta accessori priva di contatto sincro, ma con attacco
per cavo di sincronizzazione (vedi accessori opzionali)
• le camere a sistema
con l‘impiego di un adattatore SCA-3xx2 si ottiene un interfacciamento
ottimale con una camera a sistema. La tabella SCA acclusa vi indicherà
l‘adattatore specifico richiesto dalla vostra camera. La tabella evidenzia
inoltre tutte le funzioni flash ottenibili nella configurazione indicata.
Per ulteriori informazioni potete visitarci all’indirizzo www.metz.de
Ci auguriamo che il nuovo lampeggiatore sia di Suo gradimento.
Panoramica dei tipi di funzionamento • e delle funzioni speciali ◊
54 MZ-.. con adattatore SCA 3xx2 :
L‘impiego del mecablitz 54 MZ-.. con l‘adattatore SCA 3xx2 prevede
numerose funzioni flash speciali. Quasi tutte le funzioni flash speciali, attuǺ almente note, di rinomati produttori di camere sono possibili su questo
flash. La disponibilità delle singole funzioni dipende tuttavia dal sistema
della camera (costruttore della camera) e dal modello. Per maggiori informazioni vi preghiamo di consultare la tabella panoramica degli adattatori
SCA oppure le singole istruzioni d‘uso dei diversi adattatori SCA!
• Modo flash TTL1)
- Controllo Metz a distanza TTL1)
- Modo flash ETTL della Canon1)
- Modo flash ETTL-HSS della Canon1) 2)
- Modo flash TTL-HSS della Minolta1) 2)
- Modo lampo di schiarita con controllo a matrice della Nikon
- Modo lampo di schiarita con multisensore 3D della Nikon
- Modo flash D-TTL della Nikon3)
- Modo flash D-TTL-3D della Nikon3)
- Modo flash i-TTL della Nikon4)
- Modo flash i-TTL-BL della Nikon4)
- Modo flash TTL-3D della Olympus5) con camere digital
• Modo flash manuale con potenza ridotta
• Modo flash manuale HSS2) con Canon, Minolta, Nikon
• Mode flash Auto
- controllo Metz a distanza in Modo Auto
• Modo stroboscopico
◊ Compensazione manuale dell‘esposizone flash in Modo TTL1) e A
◊ Flash-Bracketing Fb in Modo TTL e A
◊ Sincronizzazione su 1° o 2° tendina
◊ Controllo automatico zoom motorizzato
◊ Controllo automatico illuminatore AF
131
ƴ
704 47 0099.A3
54 MZ-4i
01.02.2007
13:41 Uhr
Seite 132
◊ Indicazione del campo di utilizzo flash automatica
◊ Controllo automatico del tempo di sincronizzazione
◊ Funzione wake up
◊ Indicatzione di stato di carica del flash nel mirino
◊ Indicazione del controllo dell‚esposizione nel mirino
◊ Controllo accensione (Pentax, Minolta)
◊ Prelampo contro gli occhi rossi (Nikon)
◊ Funzione luce pilota
1) possibile solo se regolabile sulla camera
2) HSS= High Speed Syncronisation= sincronizzazione rapida
3) solo con 54 MZ-4
4) solo con 54 MZ-4i con Nikon SCA-Adapter 3402-M3
5) Olympus E-1 solo con 54 MZ-4i e SCA-Adapter 3202-M3
ƴ
54 MZ-.. con adattatore SCA 3xx:
Utilizzando il mecablitz con un adattatore SCA 300 le funzioni flash spesono limitate! La disponibilità delle singole funzioni speciali dipende
Ǻ ciali
dal sistema della camera (costruttore) e dal modello. Per maggiori informazioni consultate la tabella SCA o le singole istruzioni d‘uso dei vari
adattatori SCA!
• Modo flash TTL1)
- controllo Metz TTL a distanza1)
• modo flash Manuale con potenza ridotta
• Modo flash Auto
- Controllo Metz a distanza Auto
• Modo stroboscopico
◊ Compensazione dell‚esposizione flash manuale in Modo A
◊ Sequenza esposizione flash Fb in Modo A
◊ Controllo automatico del tempo di sincronizzazione
132
◊ Funzione wake up
◊ Indicazione dello stato di carica del flash nel mirino
◊ Indicazione del controllo dell‚esposizione nel mirino
◊ Funzione luce pilota
1) possibile solo se regolabile sulla camera
54 MZ-.. con base standard 301 (controllo solo tramite contatto sincro o
attacco per cavo di sincronizzazione):
• Modo flash Manuale con potenza ridotta
• Modo flash Auto
- Controllo Metz a distanza in Modo Auto
• Modo stroboscopico
◊ Compensazione manuale dell‘esposizione flash in Modo A
◊ Flash-bracketing Fb in Modo A
◊ Funzione luce pilota
704 47 0099.A3
54 MZ-4i
01.02.2007
13:41 Uhr
Seite 133
1. Per la vostra sicurezza
• Il lampeggiatore deve essere utilizzato esclusivamente per il settore fotografico.
• Non scattare il fash in prossimità di gas o liquidi infiammabili (benzina,
solventi ecc.)! PERICOLO DI ESPLOSIONE!
• Non fotografare mai con il lampeggiatore il conducente di un‘auto, di un
autobus, di una bicicletta, di un motorino o di un treno ecc. durante la
guida. A causa dell‘abbagliamento il guidatore potrebbe provocare un
incidente!
• Non scattare flash direttamente negli occhi ad una distanza particolarmente ridotta! Il lampo diretto negli occhi di persone e animali può provocare danni alla retina e gravi danni alla vista, in alcuni casi addirittura
la cecità!
• Utilizzare esclusivamente le fonti di energia descritte e ammesse nelle
istruzioni d‘uso.
• Non esporre le pile o le batterie a fonti di calore eccessive come il sole, il
fuoco o simili!
• Non gettare nel fuoco le batterie esaurite!
• Un‘eventuale fuoriuscita di acido dalle batterie esaurite può provocare
danni al flash. Rimuovete subito le batterie esaurite dall‘apparecchio!
• Le batterie a secco non possono essere ricaricate!
• Non esporre il flash a gocce o spruzzi d‘acqua!
• Proteggete il vostro flash dal calore eccessivo o dall‘umidità elevata e
non conservatelo nel cassetto portaoggetti della vostra automobile!
• Prima di scattare un flash, accertatevi che non vi sia del materiale opaco
davanti alla parabola o direttamente a contatto con il riflettore e che il
vetro di quest‘ultimo sia pulito. Trascurando i suddetti accorgimenti l‘elevata energia sprigionata dal lampo potrebbe incendiare il materiale o
danneggiare il riflettore.
• Non toccare la parabola dopo aver scattato diversi flash. Pericolo di
ustione!
• Non smontare il lampeggiatore! ALTA TENSIONE!
Le riparazioni devono essere effettuate esclusivamente da personale
esperto e autorizzato.
• Quando si scattano fotografie in serie con flash a piena potenza, vista la
brevità dei tempi di ricarica delle batterie NiCd, dopo ogni 15 scatti è
opportuno far riposare il flash per circa 10 minuti in modo da non sottoporlo a sollecitazioni eccessive.
ƴ
133
704 47 0099.A3
54 MZ-4i
01.02.2007
13:41 Uhr
Seite 134
2. Preparazione del flash all‘uso
2.1 Fissaggio del flash alla camera
☞ Spegnere la camera e il mecablitz prima del montaggio o dello smontaggio.
Il mecablitz può essere fissato sulla camera solo con la base standard 301 o
con un adattatore SCA 3xx o SCA 3xx2 (accessori opzionali).
Il mecablitz è dotato di serie di base standard 301 per sincronizzazioni flash
semplici. Il tempo di posa deve essere identico o più lungo del tempo di sincronizzazione della camera. Nei flash venduti in “set” è accluso l‘adattatore
SCA al posto della base standard 301.
Montaggio della base standard o dell‘adattatore SCA:
☞ Prima di montare o smontare la base standard o l'adattatore SCA
spegnere il mecablitz con l'interruttore principale.
ƴ
• afferrate al centro la lastrina di copertura e rimuovetela (solo per l‘utilizzo
dell‘adattatore SCA 3xx2).
• spingete fino in fondo l‘adattatore SCA o la base standard 301.
Smontaggio della base standard o dell‘adattatore SCA:
• spegnete il mecablitz con l‘interruttore principale (Fig. 1).
• Spingete il coperchio vano batteria (Fig. 3) verso il basso e apritelo.
• premete il pulsante di sblocco (Fig. 3) colorato ed estraete contemporaneamente l‘adattatore SCA o la base standard.
Montaggio del mecablitz:
spingete il mecablitz nella slitta accessori e fissatelo con il dado di fissaggio.
2.2 Alimentazione
2.2.1 Scelta delle pile o delle batterie
Il mecablitz può essere alimentato a scelta con:
• 4 batterie al NiCd, formato IEC KR 15/51, offrono il vantaggio di tempi di
ricarica più brevi e consentono un certo risparmio in quanto ricaricabili.
134
• 4 batterie al nichel metallidruro, capacità nettamente superiore rispetto alle
batterie NiCd e maggiore compatibilità ambientale poiché privi di Cd.
• 4 batterie alcaline al manganese del tipo IEC LR6, una fonte di energia che
non richiede manutenzione, adatta per un impiego generico.
• Power Pack P 40 (accessorio opzionale), con controllo della batteria gestito da microprocessore e spia di stato di carica (con funzione di scarica).
• Power Pack P 50 (accessorio opzionae), con controllo della batteria gestito
da microprocessore e spia di stato di carica (con funzione di scarica).
2.2.2 Sostituzione delle batterie
• Spegnete il mecablitz con l‘interruttore principale (Fig. 1).
• Spingete il coperchio vano batteria (Fig. 3) verso il basso e apritelo.
• Inserite le batterie nel senso della lunghezza all‘interno del vano come
indicato dai simboli e chiudete il coperchio.
☞ Assicuratevi che le polarità (+ e -) siano orientate correttamente, come
indicato dai simboli all‘interno del vano stesso.
Non gettate mai le batterie esaurite nei rifiuti domestici, ma portatele
nei contenitori appositi previsti per il riciclaggio.
2.3 Accensione e spegnimento del flash
Il flash si accende tramite l‘interruttore principale (Fig. 1). Quando l‘interruttore principale è posizionato in alto su On il flash rimane continuamente
accesso6) – l‘indicatore di pronto lampo (Fig. 1).
6) vedi anche “12.3 Spegnimento automatico del flash”
☞ Se nel display LC compare una chiave, osservate le avvertenze riportate al capitolo “12.2 Blocco e sblocco dei comandi”.
Per spegnere il flash spingete l‘interruttore principale (Fig. 1) verso il basso. Se non si utilizza il flash per lungo tempo, si consiglia di:
- pegnere il flash con l‘interruttore principale (Fig. 1).
- rimuovere le fonti di corrente (pile, batterie).
704 47 0099.A3
54 MZ-4i
01.02.2007
13:41 Uhr
Seite 135
2.4 Filosofia di azionamento
2.4.1 Selezione e regolazione dei Modi flash TTL / A / M /
(stroboscopico)
I modi flash TTL, A (Modo Auto), M ( Modo Manuale) o
(stroboscopico)
si selezionano tramite il tasto Mode. Premete il tasto Mode (Fig. 1) finché
non compare il modo desiderato con il simbolo lampeggiante. Per memorizzarlo premete la manopola di regolazione (Fig. 1) in direzione della freccia.
Se non premete la manopola (Fig. 1), il modo selezionato viene automaticamente memorizzato dopo circa 5 sec. Una volta memorizzato, il simbolo
del modo selezionato rimane illuminato senza lampeggiare.
Avvertenza: Le spiegazioni sui singoli modi sono riportate in un capitolo a
parte!
2.4.2 Selezione e regolazione delle funzioni speciali
Ȅ
Il tasto Select (Fig. 1) permette la selezione di funzioni speciali in qualsiasi
modalità di funzionamento.
Premendo il tasto Select (Fig. 1) vengono richiamate le funzioni speciali
"beep" , lo spegnimento automatico del flash
, REAR7) (sincronizzazione sulla seconda tendina), la luce pilota
, i formati zoom e la sequenza
di esposizioni flash (flash-bracketing) "Fb".
7 )solo con adattatore SCA e camera che supportano tale funzione
Richiamando la funzione desiderata, il simbolo lampeggia e lo stato della
funzione (OFF o On) viene visualizzato sul display LC.
Ruotando la manopola di regolazione (Fig. 1) si può attivare (On) o
disattivare (OFF) la funzione selezionata.
Premendo la manopola di regolazione (Fig. 1) la funzione selezionata
viene memorizzata.
Nota: Le spiegazioni delle funzioni speciali sono riportate in un capitolo a
parte.
2.4.3 Regolazione di ISO / Zoom / diaframma , “P” (potenza
ridotta) e “EV” (compensazione esposizione flash)
Ruotando la manopola di regolazione (Fig. 1) selezionate la funzione
desiderata (ISO/Zoom/diaframma/compensazione esposizione “EV”) sul
lato destro del display LC. La funzione selezionata viene indicata da una
freccia ı.
Per modificare la funziona, premete la manopola (Fig. 1) nella direzione
della freccia. La freccia ı lampeggia sul display LC. Ruotando la manopola
modificate lo stato. Per memorizzare le nuove impostazioni premete la
manopola in direzione della freccia. Se non premete la manopola, l‘impostazione viene memorizzata automaticamente dopo ca. 5 sec. Una volta effettuata la memorizzazione la freccia della posizione selezionata non lampeggia più.
☞ Se si usa il mecablitz con un adattatore SCA 3xx2 è possibile che non si
possa modificare o non si possa visualizzare il valore della sensibilità
della pellicola ISO (a seconda del tipo di camera e dell‘adattatore SCA)!
Se si usa il mecablitz con un adattatore SCA 3xx2 è possibile che non si
possa modificare o che non possa essere visualizzato il valore della sensibilità della pellicola (ISO) (a seconda del tipo di camera e dell’adattatore SCA)!
Nota: Le spiegazioni delle impostazioni relative alle singole posizioni sono
riportate in un capitolo a parte!
3. Mode flash TTL
Con il Modo TTL si possono fare delle riprese di elevata qualità in modo molto semplice.
☞ Per il Modo flash TTL, il mecablitz deve essere dotato di un adattatore
SCA adeguato. L‘esposizione nel Modo flash TTL è possibile soltanto
se il lampeggiatore viene impiegato con una fotocamera che supporta
il Modo flash TTL. Con la base standard SCA 301 (solo contatto sincro
o presa – cavo di sincronizzazione) non è possible il Modo flash TTL!
Se il mecablitz viene utilizzato con una camera o un adattatore SCA
che non supportano il Modo TTL, azionando il pulsante di scatto ven135
ƴ
704 47 0099.A3
54 MZ-4i
01.02.2007
13:41 Uhr
Seite 136
gono emessi lampi irregolari a potenza piena! Per testare la funzione
TTL sulla camera deve essere montata una pellicola.
La misurazione dell‘esposizione nel Modo TTL viene effettuata da un sensore
incorporato nella fotocamera. Questo sensore rileva l‘intensità che raggiunge la pellicola attraverso l‘obiettivo e la luce riflessa. Non appena l‘erogazione luminosa è sufficiente per una corretta esposizione, il circuito di controllo elettronico della fotocamera trasmette all‘adattatore SCA (accessori
opzionali) un segnale di stop che interrompe istantaneamente l‘emissione del
lampo.
Questo tipo di funzionamento è vantaggioso poiché per la regolazione del
lampo tiene conto automaticamente di tutti i fattori che influiscono sull‘esposizione, (presenza di filtri, variazioni di diaframma o di focale con obiettivi
zoom, l‘uso di dispositivi di prolunga nelle riprese macro).
Quando l‘esposizione è corretta, la spia “ok” si illumina sul mecablitz per
circa 3 sec.
☞ E‘ possibile anche attivare un allarme sonoro sul mecablitz, vedi
“12.1 Funzione Beep”.
ƴ
Regolazione del Modo TTL:
• Applicate sul mecablitz l‘adattatore specifico SCA e montate il tutto sulla
fotocamera.
• Regolate la camera come indicato nel relativo libretto di istruzioni.
• Accendete il flash con l‘interruttore principale (Fig. 1).
• Premete il tasto Mode (Fig. 1) finché sul display non lampeggia il simbolo TTL. Premete la manopola (Fig. 1) in direzione della freccia per
memorizzare la regolazione. Se non premete la manopola, la regolazione
viene memorizzata automaticamente dopo circa 5 sec. Una volta memorizzata la regolazione, il simbolo TTL smette di lampeggiare.
• A seconda del tipo di camera e dell‘adattatore SCA è possibile che i valori
della sensibilità della pellicola (ISO), dello zoom e dell‘apertura del diaframma non si trasmettano automaticamente dalla camera al mecablitz. In
questo caso regolate i valori manualmente sul mecablitz. Le regolazioni
136
della sensibilità ISO e del diaframma sono importanti soltanto per una corretta indicazione della distanza e del campo di utilizzo sul display LC e
quindi non tanto per la ripresa con il flash TTL. Non è pertanto indispensabile impostare tali regolazioni.
• La regolazione della posizione della parabola zoom è importante per una
corretta illuminazione della foto completa. Di conseguenza la posizione
della parabola zoom dovrebbe essere adattata sempre alla distanza focale
dell‘obiettivo.
Consiglio:
se utilizzate un obiettivo zoom e non avete bisogno sempre del numero guida completo e del massimo campo d‘utilizzo del mecablitz, potete lasciare la
posizione della parabola zoom sulla distanza focale iniziale dell‘obiettivo
zoom. Ciò garantisce una corretta esposizione e vi risparmia il continuo
adattamento alla distanza focale dell‘obiettivo.
Esempio:
utilizzate un obiettivo zoom con una distanza focale di 28 mm – 80 mm. In
questo caso impostate la posizione della parabola zoom su 28 mm!
☞ Quando utilizzate un mecablitz con un adattatore SCA 3xx2 e una
camera che trasmette i dati al mecablitz, può succedere che il valore
ISO non venga visualizzato (a seconda del tipo della camera); vedi le
istruzioni d‘uso dell‘adattatore SCA. E‘ possibile che in alcuni casi i
valori della sensibilità della pellicola (ISO) e del diaframma non si
possano modificare. Per forti contrasti, ad es. oggetto scuro nella neve, può essere necessario effettuare una correzione dell‘esposizione
(vedi capitolo 14.).
3.1 Sotto-modi del Modo flash TTL
Sul mecablitz si possono impostare diversi sotto-modi del Modo flash TTL.
☞ Il numero dei sotto-modi possibili dipende dall‘adattatore SCA e dal
tipo di camera:
• TTL a distanza con canale „Ad1“
(vedi capitolo „7.1 Controllo Metz a distanza senza cavi in Modo TTL“)
704 47 0099.A3
54 MZ-4i
01.02.2007
13:41 Uhr
Seite 137
• TTL a distanza con canale „Ad2“
(vedi capitolo „7.1 Controllo Metz a distanza senza cavi in Modo TTL“)
• Modo flash E-TTL (solo con adattatore SCA 3102 e con camera adatta
Canon; vedi istruzioni d‘uso dell‘adattatore SCA e della camera)
• Modo flash E-TTL-HSS; sincronizzazioni rapida (sono con SCA 3102 e con
camera adatta Canon, vedi istruzioni d‘uso dell‘adattatore SCA e della
camera)
• Lampi di schiarita con controllo a matrice
(solo con SCA 3402 e con
camera adatta Nikon, vedi istruzioni d‘uso dell‘adattatore SCA e della
camera)
• Lampi di schiarita multisensore 3D
(solo con SCA 3402 e con camera
adatta Nikon, vedi istruzioni d‘uso dell‘adattatore SCA e della camera)
• Modo flash TTL-HSS
(solo con SCA 3302 e con camera adatta
Minolta, vedi istruzioni d‘uso dell‘adattatore SCA e della camera).
Regolazione dei sotto-modi del Modo flash TTL:
• Premete il tasto Mode (Fig. 1) finché il simbolo TTL non lampeggia sul
display. Se TTL non dovesse più lampeggiare premete una volta il tasto
Mode.
• Ruotate la manopola (Fig. 1) per selezionare il sotto-modo desiderato.
• Premete la manopola (Fig. 1) in direzione della freccia per memorizzare l‘impostazione. Se non premete la manopola, il sotto-modo selezionato
viene memorizzato automaticamente dopo circa 5 sec. Una volta memorizzata l‘impostazione, il simbolo TTL smette di lampeggiare.
4. Modo flash Auto
Nel Modo flash Auto il mecablitz misura la luce riflessa dal soggetto tramite il
fotosensore (Fig. 2) incorporato nel flash e interrompe il lampo non appena
l‘emissione risulta corretta per l‘esposizione. Grazie a questa caratteristica,
non è più necessario ripetere il calcolo del diaframma ad ogni variazione della distanza finché il soggetto si trova all‘interno del massimo campo d‘utilizzo
indicato.
Il fotosensore (Fig. 2) del mecablitz deve rimanere puntato sul soggetto,
qualunque sia la direzione in cui viene orientata la parabola del flash. Il sensore ha un‘angolo di misurazione di 25° e misura esclusivamente la luce
emessa dal flash.
Se l‘esposizione è corretta, la spia “ok” sul mecablitz si illumina per circa 3 sec.
Il Modo flash Auto è disponibile con l‘adattatore SCA o anche con la base
standard SCA 301.
☞ Alcune camere non supportano il mecablitz nel Modo flash Auto con
adattatore SCA (vedi istruzioni d‘uso della camera e dell‘adattatore).
In questo caso il mecablitz dovrebbe essere dotato della base standard SCA 301.
Regolazione del Modo flash Auto:
• Dotate il mecablitz dell‘adattatore SCA o della base standard SCA 301 e
applicatelo sulla camera.
• Regolate la camera come indicato nel relativo libretto di istruzioni.
• Accendete il flash con l‘interruttore principale (Fig. 1).
• Premete il tasto Mode (Fig. 1) finché il simbolo A non lampeggia sul
display. Premete la manopola in direzione (Fig. 1) della freccia per
memorizzare la regolazione. Se non premete la manopola, la regolazione
viene memorizzata automaticamente dopo circa 5 sec. Una volta memorizzata, il simbolo A smette di lampeggiare.
• Se il mecablitz viene utilizzato con un adattatore SCA 3xx2 e con una camera che trasmette automaticamente al flash i dati della sensibilità della
pellicola (ISO), della posizione della parabola zoom e del diaframma, non
sono necessarie ulteriori impostazioni. Il mecablitz si regola in funzione dei
dati trasmessi dalla camera.
☞ Quando utilizzate un mecablitz con una camera che trasmette i dati al
flash, può succedere che il valore ISO non venga visualizzato (in funzione del tipo di camera); vedi istruzioni d‘uso dell‘adattatore SCA. E‘ possibile che in alcuni casi i valori della sensibilità ISO e del diaframma
non si possano modificare.
137
ƴ
704 47 0099.A3
54 MZ-4i
01.02.2007
13:41 Uhr
Seite 138
Modo flash Auto con adattatore SCA o base standard SCA 301:
In questo caso si devono impostare manualmente sul mecabltiz la sensibilità
ISO, la posizione della parabola zoom e l‘apertura del diaframma. Ciò è
indispensabile per una corretta esposizione, poiché il mecablitz dosa automaticamente la luce sulla base di questi dati.
Consiglio :
se utilizzate un obiettivo zoom e non avete bisogno sempre del numero guida completo e del massimo campo d‘utilizzo del mecablitz, potete lasciare la
posizione della parabola zoom sulla distanza focale iniziale dell‘obiettivo
zoom. Ciò garantisce una corretta esposizione e vi risparmia il continuo
adattamento alla distanza focale dell‘obiettivo.
Esempio:
utilizzate un obiettivo zoom con una distanza focale di 28 mm – 80 mm. In
questo caso impostate la posizione della parabola zoom su 28 mm!
☞ Il soggetto si dovrebbe trovare in un campo compreso tra il 40 e il
70 % del valore della distanza indicato sul display LC. In questo modo
l‘elettronica ha la possibilià di operare la compensazione.
Gli obiettivi zoom richiedono un‘attenzione particolare!
Al variare della lunghezza focale, possono infatti variare la loro luminosità anche di un intero diaframma. E‘ possibile ovviare a questo
problema correggendo manualmente il diaframma o l‘esposizione
(vedi capitolo 14.).
ƴ 4.1 Sotto-modi del Modo flash Auto
Sul mecablitz si possono impostare diversi sotto-modi del Modo flash A:
• Auto a distanza con canale „Ad1“
(vedi capitolo „7.1 Controllo Metz a distanza senza cavi in Modo Auto“).
• Auto a distanza con canale „Ad2“
(vedi capitolo „7.1 Controllo Metz a distanza senza cavi in Modo Auto“).
Regolazione dei sotto-modi del Modo flash Auto:
• Premete il tasto Mode (Fig. 1) del mecablitz, finché il simbolo A non
lampeggia sul display.
138
• Ruotate la manopola (Fig. 1) per selezionare il sotto-modo desiderato.
• Premete la manopola (Fig. 1) in direzione della freccia per memorizzare l‘impostazione. Se non premete la manopola, il sotto-modo selezionato
viene memorizzato automaticamente dopo circa 5 sec. Una volta memorizzata l‘impostazione, il simbolo A smette di lampeggiare.
5. Modo flash Manuale
Nel Modo flash Manuale il lampo viene emesso sempre a piena potenza, se
non è stata preimpostata una potenza ridotta. Il mecablitz deve essere dotato
di un adattatore SCA o di una base standard 301. Per ottenere l'esposizione
corretta è quindi necessario modificare l'impostazione del diaframma in relazione alla distanza del soggetto e selezionare una potenza ridotta.
Sul display LC del mecablitz compare la distanza del soggetto dal flash che
deve essere rispettata per una corretta esposizione. Per questo si deve prestare attenzione ad una corretta regolazione del mecablitz. I valori di diaframma e di sensibiltà ISO sulla camera e sul flash devono coincidere. La
posizione zoom della parabola deve essere adattata alla distanza focale
dell‘obiettivo.
Regolazione per il Modo flash Manuale:
Esempio di regolazione:.
Distanza flash-soggetto 6 m, zoom 50 mm, 100 ISO/21°
• Regolate la camera come indicato nel relativo libretto di istruzioni.
• Dotate il mecablitz della base standard 301 o dell‘adattatore SCA e applicatelo sulla camera.
• Accendete il flash con l‘interruttore principale (Fig. 1).
• Premete il tasto Mode (Fig. 1), finché il simbolo M non lampeggia sul
display. Premete la manopola (Fig. 1) in direzione della freccia per
memorizzare l‘impostazione. Se non premete la manopola, il sotto-modo
selezionato viene memorizzato automaticamente dopo circa 5 sec. Una volta
memorizzata l‘impostazione, il simbolo M smette di lampeggiare.
• Una volta effettuata la memorizzazione, sul display compare la potenza
704 47 0099.A3
54 MZ-4i
01.02.2007
13:41 Uhr
Seite 139
ridotta „P 1/1“ (= piena potenza). Azionando il pulsante di scatto del
mecablitz o della camera viene emesso un lampo a potenza piena.
☞ Alcune camere non supportano il mecablitz nel Modo flash Manuale
con l‘adattatore SCA (vedi istruzioni d‘uso della camera e dell‘adattatore). In questo caso il mecablitz dovrebbe essere dotato della base
standard SCA 301(vedi anche le istruzioni d‘uso della camera).
Modo flash Manuale con adattatore SCA 3xx2:
Se il mecablitz viene utilizzato con un adattatore SCA 3xx2 e con una camera che trasmette automaticamente al flash i dati della sensibilità della pellicola (ISO), della posizione della parabola zoom e del diaframma, non sono necessarie ulteriori impostazioni. Il mecablitz si regola in funzione dei
dati trasmessi dalla camera.
☞ Quando utilizzate un mecablitz con una camera che trasmette i dati al
mecablitz, può succedere che il valore ISO non venga visualizzato (a
seconda del tipo della camera); vedi le istruzioni d‘uso dell‘adattatore
SCA. In abbinamento ad una camera che trasmette al flash i dati, i
valori di sensibilità ISO e del diaframma non si possono modificare.
In questo caso è necessario variare l‘apertura del diaframma direttamente sulla camera fino a quando il display LC del mecablitz non segnalerà la distanza richiesta.
Modo flash Manuale con adattatore SCA 3xx o base standard SCA 301:
In questo caso è necessario impostare manualmente la sensibilità ISO, la posizione della parabola zoom e l‘apertura del diaframma direttamente sul
mecablitz. Ciò è indispensabile per una corretta esposizione, poiché il mecablitz calcola con questi dati la distanza tra il soggetto e il flash necessaria
per una corretta esposizione, e la visualizza sul display.
Regolazione della potenza ridotta:
Per modificare l‘indicazione della distanza per una corretta esposizione e
adattarla alla situazione individuale di ripresa, è possibile impostare sul
mecablitz una potenza ridotta:
• Ruotate la manopola finché il simbolo della freccia non si trovi accanto a P
sul display.
• Premete la manopola (Fig. 1) in direzione della freccia. Il simbolo con
la freccia comincia a lampeggiare.
• Ruotate la manopola e impostate la potenza ridotta desiderata. Premete la
manopola in direzione della freccia per memorizzarla. Se non premete la
manopola, la potenza ridotta viene memorizzata automaticamente dopo
5 sec. Una volta effettuata la memorizzazione la freccia non lampeggia più.
Per modificare il valore delle distanza e adattarlo alla situazione individuale di
ripresa, si può modificare l‘apertura del diaframma anche direttamente sulla
camera. Bisogna tuttavia tener conto che un‘eventuale modifica dell‘apertura del
diaframma sulla camera influenzerà anche la profondità di campo della foto!
Cancellazione della potenza ridotta impostata:
• Ruotate la manopola finché la freccia sul display non si trovi accanto a P.
• Premete la manopola (Fig. 1) in direzione della freccia. La freccia
comincia a lampeggiare.
• Ruotate la manopola finché l‘indicazione della potenza ridotta non si trovi
su P 1/1. Per memorizzarla premete la manopola in direzione della freccia. Se non premete la manopola, l‘impostazione viene memorizzata automaticamente dopo 5 sec. Una volta effettuata la memorizzazione la freccia
non lampeggia più. Cambiando su un altro Modo di funzionamento la potenza ridotta si imposta automaticamente su P 1/1.
5.1 Sotto-modi del Modo flash Manuale
☞ Il mecablitz deve essere dotato di un adattatore SCA 3xx2!
Alcune camere offrono la possibilità di una sincronizzazione rapida (modo
FP o HSS) nel Modo flash Manuale M (vedi istruzioni d‘uso della camera e
dell‘adattatore SCA).
Regolazione del sotto-modo „M-HSS“ del Modo flash Manuale:
• Premete il tasto Mode (Fig. 1) finché sul display non lampeggia il simbolo M.
• Ruotate la manopola fino a far scomparire HSS
• Per memorizzare premere la manopola (Fig. 1) in direzione della frec139
ƴ
704 47 0099.A3
54 MZ-4i
01.02.2007
13:41 Uhr
Seite 140
cia. Se non premete la manopola, il modo HSS viene memorizzato automaticamente dopo 5 sec.Una volta effettuata la memorizzazione il simbolo
M smette di lampeggiare.
Disattivazione del sotto-modo „HSS“:
• Premete il tasto Mode (Fig. 1) finché sul display non lampeggia il simbolo M
• Ruotate la manopola fino a che non scompare HSS.
• Per memorizzare la regolazione premete la manopola (Fig. 1) in direzione della freccia. Se non premete la manopola, il sotto-modo HSS viene
memorizzato automaticamente. Dopo aver effettuato la memorizzazione il
simbolo M smette di lampeggiare.
6. Lampo riflesso
ƴ
In molti casi la luce diretta del flash sul soggetto produce ombre troppo dure.
Anche la naturale caduta di luce dal primo piano sullo sfondo provoca spesso un effetto poco gradevole.
Ciò può essere evitato dirigendo il lampo verso una superficie riflettente, che
a sua volta lo devierà, ampliato e ammorbidito, in direzione del soggetto e
dello sfondo. A questo scopo è necessario orientare la parabola principale
del flash verso una superficie riflettente adatta (ad es. il soffitto o la parete di
una stanza).
La parabola del flash è orientabile sia in verticale che in orizzontale.
Verticale:
-7°, 0°, 60°, 75°, 90°.
Orizzontale: -180°, -150°, -120°, -90°, -60°, -30°, 0°, 30°, 60°, 90°.
In posizione base la testa della parabola è bloccata meccanicamente. Per
sbloccarla premete l‘apposito pulsante e orientate la testa della parabola.
☞ Quando la parabola viene orientata verticalmente o orizzontalmente
per il lampo riflesso, è essenziale verificare che sia inclinata o ruotata
di un angolo sufficientemente ampio, in modo che il soggetto non
venga parzialmente raggiunto da luce diretta. Il riflettore, quindi, si
deve trovare almeno a 60° con fermo a scatto. Sul display LC i valori
140
della distanza vengono cancellati. La distanza dal flash al soggetto
passando per il soffitto o la parete è ora una grandezza sconosciuta.
La luce diffusa rinviata dalla superficie riflettete offre un‘illuminazione tenue
del soggetto.
La superficie riflettente deve essere bianca o di colore neutro nonché priva di
rilievi (ad esempio le travi in legno di un soffitto) che possono produrre ombre indesiderate. Può invece essere del colore desiderato se si vogliono ottenere effetti creativi.
L‘impiego del lampo diretto di bassa intensità prodotto dalla parabola ausiliaria può risultare vantaggioso per evitare la formazione di ombre, ad
esempio sotto il naso o gli occhi nei primi piani.
6.1 Lampo riflesso con parabola ausiliaria attivata
La parabola ausiliaria produce nelle riprese con lampo riflesso una luce
frontale di schiarita.
☞ L‘uso della prabola ausiliaria è indicato soltanto nelle riprese effettuate con la tecnica del lampo riflesso.
La parabola ausiliaria (Fig. 2) viene attivata e disattivata tramite il selettore
(Fig. 2). Se il simbolo
lampeggia nel display LC del mecablitz,
significa che la parabola principale non è stata inclinata.
Con la parabola ausiliaria in funzione, la luce viene emessa per l‘85 % circa
dalla parabola principale e per il restante 15 % da quella ausiliaria. Le percentuali indicate possono subire leggere variazioni se la parabola ausiliaria
viene impiegata con il flash regolato su una potenza ridotta.
Nel caso in cui l‘intensità del lampo prodotto dalla parabola ausiliaria fosse
eccessiva, è possibile attenuarne l‘effetto di circa il 50 % applicando un filtro
riduttore di luce. Spostate il filtro riduttore lateralmente, estraetelo dal mecablitz, giratelo di 180° posizionandolo sopra la parabola ausiliaria e premete
su entrambi i lati fino a quando non sentire lo scatto di arresto.
☞ I sotto-modi ADI, stroboscopici, E-TTL, E-TTL-HSS, D-TTL, multi-sensore
3D e TTL-HSS non sono possibili con la parabola ausiliaria.
704 47 0099.A3
54 MZ-4i
01.02.2007
13:41 Uhr
Seite 141
6.2 Lampo riflesso nei Modi flash TTL e Auto
Prima di ripetere la ripresa, è opportuno verificare che la luce sia sufficiente
per una corretta esposizione rispetto al valore di diaframma selezionato. Per
le procedure da seguire consultate il capitolo “10. Indicatore di corretta esposizione”.
6.3 Lampo riflesso nel Modo flash Manuale
☞ Nel controllo a distanza non vengono visualizzate sul display LC la
distanza e il campo d‘utilizzo. La parabola ausiliaria del mecablitz
deve essere spenta!
Per evitare che due sistemi di controllo TTL a distanza nello stesso ambiente si
disturbino a vicenda, sul flash principale e sugli asserviti possono essere selezionati due diversi canali : Ad1 e Ad2.
Per trovare la corretta apertura di diaframma fotografando con un lampo riflesso
e flash in Manuale, è opportuno affidarsi ad un esposimetro per luce flash (flashmeter). Nel caso ciò non fosse possibile, fare uso dellla seguente formula pratica
7.1 Controllo Metz a distanza senza cavi in Modo TTL
numero guida
Diaframma = ——————————————————
distanza d’illuminazione x 2
Regolazione del controllo Metz a distanza TTL sul flash principale (Fig. 4):
1 Applicate sulla camera un adattatore adatto SCA e accendete con l‘interrutore principale.
2 Premete il tasto Mode (Fig. 1) finché non lampeggia sul display il simbolo TTL.
3 Mentre il TTL lampeggia, ruotate la manopola e selezionate il modo Co
(flash principale) con i canali Ad1 o Ad2. Se TTL smette di lampeggiare
premete una volta il tasto Mode. Per memorizzare questa regolazione premete brevemente la manopola in direzione della freccia. Se non premete
la manopola, la regolazione selezionata viene automaticamente memorizzata dopo 5 sec; TTL smette di lampeggiare e si illumina insieme a Co e ad
canale asservito Ad1 o Ad2.
Regolazione del controllo Metz a distanza TTL sul flash asservito (Fig. 5)
• Dotate i flash asserviti 54 MZ-.., 70 MZ-4 con un adattatore asservito
SCA 3083. I flash asserviti 40 MZ-.. con gli adattatori asserviti SCA 3080
o 3082.
1 Accendete il mecablitz con l‘interruttore principale (Fig. 1). Il mecablitz
si accende automaticamente sul Modo TTL. Sul display appare SL (slave =
asservito). Il canale asservito Ad1 (o il canale selezionato per ultimo) viene
regolato.
2 Per modificare il canale asservito premere il tasto Mode (Fig. 1); il simbolo TTL comincia a lampeggiare.
Il valore ottenuto serve come riferimento. Per la ripresa si dovrebbe variare il
valore ancora di ± 1 grado di diaframma.
7. Controllo Metz a distanza
Considerazione generali
Per “controllo a distanza senza cavi” (remote) si intende l‘attivazione automatica sincronizzata di lampeggiatori aggiuntivi non collegati via cavo. Il
flusso luminoso del lampeggiatore collegato alla fotocamera (flash principale
o “Controller”) comanda tramite un impulso l‘innesco dei flash aggiuntivi
(asserviti o “slave”) in modo che l‘esposizione TTL venga estesa a tutti i lampeggiatori.
Il controllo TTL a distanza permette il comando senza cavi di più flash del
tipo 54 MZ-.., 34 CS-2, 28 CS-2, 40 MZ-.., 50 MZ-5 e 70 MZ-... Per effettuare questa modalità tutti i lampeggiatori 54 MZ-.., 70 MZ-4 (asserviti) devono essere provvisti di servo-adattatori SCA 3083 (accessorio opzionale) e
tutti i 40 MZ-.. di servo-adattatori SCA 3080 o 3082 (accessorio opzionale)
e spossono essere montati sul supporto in dotazione oppure su uno stativo.
I lampeggiatori asserviti 34 CS-2, 28 CS-2, 50 MZ – 5 e 70 MZ-5 non
necessitano di servo-adattatori.
☞ Il controllo Metz a distanza senza cavi è possibile solo con camere che
dispongono di controllo del flash TTL.
141
ƴ
704 47 0099.A3
54 MZ-4i
01.02.2007
13:41 Uhr
Seite 142
3 Ruotate la manopola (Fig. 1) e regolate il canale asservito Ad2.
Premete la manopola in direzione della freccia e memorizzate la regolazione.
☞ Con il controllo a distanza la parabola zoom motorizzata del mecablitz si imposta automaticamente sulla posizione 24 mm per ottenere
la più ampia superficie di illuminazione possibile. La posizione della
parabola può essere modificata manualmente (vedi capitolo 12.).
ƴ
• Quando il flash dell‘apparecchio asservito è pronto, la spia di carica flash
si illumina e il lampo di misurazione AF comincia a lampeggiare. E‘ possibile inoltre impostare un segnale acustico (beep) per l‘indicazione di carica del flash. (vedi cap. 12.). Ciò è vantaggioso quando il lampo di misurazione AF e l‘indicatore di carica flash non sono visibili.
4 Premete sul mecablitz principale disposto sulla camera il tasto di scatto manuale e scattate un flash di prova.
• Il flash asservito risponde con un lampo ritardato per segnalare che è pronto. Se si usano più flash asserviti contemporaneamente, questi rispondono
tutti insieme emettendo un lampo contemporaneamente.
Se un flash asservito non risponde e quindi non emette un lampo ritardato,
significa che il sensore dell‘adattatore asservito non ha ricevuto l‘impulso
luminoso del flash principale. Ruotate il sensore verso il flash principale e
ripetete l‘operazione n. 4.
☞ Se la distanza tra il flash principale e il flash asservito è molto ridotta,
i circuiti elettronici della camera potrebbero in alcuni casi interrompere l‘emissione di luce prima che il flash aservito abbia ricevuto le informazioni necessarie. Se ciò si verifica aumentate la distanza tra i
lam peggiatori oppure selezionate un valore di dia-framma più grande e ripetete il passaggio n. 4.
Come disattivare il Controllo Metz TTL a distanza:
• Premete il tasto Mode (Fig. 1) del flash principale e deselezionate il
modo flash principale con la manopola (Fig. 1).
• Sul flash asservito:
spegnete il flash, togliete l‘adattatore asservito SCA 3083 e riaccendete il flash.
142
7.2 Controllo Metz a distanza senza cavi in Modo Auto
☞ Il controllo Metz a distanza in Modo Auto piò essere utilizzato con le più
recenti fotocamere a sistema, come quelle delle precedenti generazioni,
con gli apparecchi a funzionamento meccanico e con quelli di medio formato. L‘unica condizione è che la fotocamera impiegata disponga di un
contatto di sincronizzazione (nella slitta o tramite terminale per cavetto)
e che venga impiegata una base standard 301 o un adattatore SCA.
L’esposizione viene controllata in questo caso dal fotosensore del
Controller sulla camera.
Regolazione del flash principale per il controllo Metz a distanza in modo Auto:
• Dotate il mecablitz dell‘adattatore SCA o della base standard SCA 301 e
accendetelo.
• Regolate la camera sul modo Manuale come indicato nel relativo libretto di
istruzioni.
☞ Il Modo flash Auto o il Controllo a distanza in Modo Auto non sono
supportati da tutte le camere insieme all‘adattatore SCA (vedi istruzioni
d‘uso della camera e dell‘adattatore SCA). Se la camera non supporta
con l‘adattatore SCA il Modo flash Auto, dotate il mecablitz della base
standard SCA 301. In questo caso non dimenticate di impostare manualmente le regolazioni della camera sul mecablitz (ISO, diaframma,
posizione zoom).
• Selezionate sulla camera un tempo di posa di 1/60 sec o più lento.
• Accendete il mecablitz collegato alla camera con l‘interruttore principale.
• Premete il tasto Mode (Fig. 1) finché sul display non lampeggia il simbolo A.
• Mentre il simbolo A lampeggia ruotate la manopola (Fig. 1) e selezionate il modo del flash principale Co (Controller) con i canali Ad1 o Ad2.
Se A dovesse smettere di lampeggiare premete una volta il tasto Mode. Per
memorizzare questa regolazione premete la manopola brevemente in
direzione della freccia. Se non premete la manopola, la regolazione selezionata viene memorizzata automaticamente dopo 5 sec, e A si illumina
(senza lampeggiare) insieme a Co e al canale asservito Ad1 o Ad2.
704 47 0099.A3
54 MZ-4i
01.02.2007
13:41 Uhr
Seite 143
Regolazione del flash asservito per il controllo Metz a distanza in modo Auto:
La regolazione è la stessa valida per il flash asservito nel Modo Controllo
Metz a distanza in Modo TTL.
7.3 Valutazione della luminosità generale nel Controllo a distanza
Per valutare le condizioni di luce generale nel Controllo a distanza in Modo
Auto e in Modo TTL si può emettere una luce pilota per tutti i flash interessati.
Per attivare la luce pilota bisogna programmare il tasto (Fig. 1) per
questa funzione sul flash 54 MZ-.. disposto sulla camera. Per far ciò premete
il tasto Select (Fig. 1) finché non appare l‘indicazione
. Ruotate la
manopola per attivare (On) o disattivare (OFF) la funzione luce pilota. Con il
tasto è possibile emettere la luce pilota, vedi anche capitolo 12.
8. Lampo di schiarita in luce diurna
Il mecablitz può essere impiegato anche in luce diurna per schiarire le ombre
(fill-in flash) o per ottenere un‚esposizione più equilibrata nel contro luce. A
questo scopo sono disponibili varie possibilità.
8.1 Lampo di schiarita nel Modo flash TTL
Il mecablitz deve essere dotato di un adattatore SCA adatto. La camera deve
supportare il lampo di schiarita nel Modo flash TTL.
• Premete il tasto Mode (Fig. 1) finché non appare sul display il simbolo
TTL.
Sulla maggior parte delle camere, il lampo di schiarita si attiva automaticamente nel programma “completamente automatico”, nel programma Auto P,
e nel programma creativo dell‘oggetto in luce diurna (vedi istruzioni d‘uso
della camera e dell‘adattatore SCA). La camera provvede in questi casi automaticamente ad una esposizione equilibrata tra soggetto e fondo.
Inoltre alcune camere prevedono un programma speciale di lampo di schiarita, che può essere impostato dall‘utente in modo mirato. L‘attivazione ha
luogo, a seconda del tipo di camera, sulla camera stessa o sul mecablitz
(vedi istruzioni d‘uso della camera e dell‘adattatore SCA).
Esempio: lampo di schiarita con controllo a matrice (solo per determinate
camere Nikon)
Il mecablitz deve essere equipaggiato con l‘adattatore SCA 3402 (Nikon).
Diverse camera Nikon supportano il “Lampo di schiarita nel Modo flash TTL
con controllo a matrice” (vedi istruzioni d‘uso della camera e dell‘adattatore
SCA). Questo Modo è un sotto-modo del Modo flash TTL. La regoalzione è
descritta nel capitolo 3.1.
Esempio: Lampo di schiarita multisensore 3D (solo per determinate camere
Nikon)
Il mecablitz deve essere dotato dell‘adattatore SCA 3402 (Nikon).
Diverse camere Nikon supportano il “Lampo di schiarita multisensore 3D”
(vedi istruzioni d‘uso della camera e dell‘adattatore SCA). Questo Modo è un
sotto-modo del Modo flash TTL. La regolazione è descritta nel capitolo 3.1.
8.2 Lampo di schiarita nel Modo Auto
• Accendete il mecablitz con l‘interruttore principale.
• Premete il tasto Mode (Fig. 1) finché non lampeggia nel display il simbolo A. Premete la manopola (Fig. 1) in direzione della freccia e
memorizzate così la regolazione. Se non premete la manopola, la regolazione viene memorizzata automaticamente dopo 5 sec. Il simbolo A smette
di lampeggiare.
☞ Nel Modo flash Auto il sensore del mecablitz regola la luce automaticamente. Accertatevi che la fonte di controluce non appaia direttamente sul sensore del mecablitz. Il sistema elettronico del flash potrebbe confondersi!
Determinate con l‘esposimetro della camera o con un esposimetro manuale
esterno l‘apertura del diaframma e il tempo di posa necessari per ottenere
una corretta esposizione. Accertatevi che il tempo di posa della camera sia
uguale o più lungo del massimo tempo di sincronizzazione (in funzione della
camera; vedi istruzioni d‘uso della camera).
Esempio:
Diaframma selezionato: 8;
143
ƴ
704 47 0099.A3
ƴ
54 MZ-4i
01.02.2007
13:41 Uhr
Seite 144
Tempo di posa della camera: 1/60 sec;
Tempo di sincronizzazione della camera, ad es. 1/100 sec
(vedi istruzioni d‘uso della camera).
I due valori rilevati per il diaframma e il tempo di posa possono essere impostati sulla camera, poiché il tempo calcolato è più lungo del tempo di sincronizzazione della camera.
Per ottenere una schiarita corretta tale, ad esempio, da conservare la tridimensionalità delle ombre, è consigliabile regolare sul flash un diaframma
più aperto di un valore rispetto a quello selezionato sulla camera. Nell‘esempio sopra l‘apertura del diaframma della camera è stata impostata su f/8.
Sul flash si raccomanda di selezionare f/5,6.
Se il mecablitz è dotato dell‘adattatore SCA 3xx2 e la camera trasmette automaticamente l‘apertura del dia-framma al mecablitz, non è possibile modificare manualmente il valore del diaframma. In questo caso è possibile impostare nel Modo flash Auto del mecablitz una correzione manuale dell‘esposizone
(vedi capitolo 14.).
La correzione dell‘esposizone manuale nel Modo flash Auto può essere impostata anche quando la camera non trasmette alcun dato al mecablitz.
Una correzione supplementare dell‘apertura di diaframma non si rende più
necessaria.
Consiglio:
Se possibile, misurate con l‘esposimetro il fondo e il soggetto separatamente.
L‘esperienza ha mostrato che un valore di correzione compreso tra -1 EV
(1 apertura di diaframma.) e -1 2/3 EV dell‘apertura automatica sul mecablitz porta ai migliori risulati nel Modo con Lampo di schiarita.
144
9. Modo flash stroboscopico (fig. 6)
In questa modalità vengono emessi diversi lampi sullo stesso fotogramma.
Questa funzione è particolarmente interessante per lo studio di soggetti in
movimento o per effetti particolari (Fig. 6). Nel funzionamento stroboscopico
vengono emessi parecchi lampi ad una determinata frequenza. Pertanto
questa funzione è attuabile soltanto con un livello di potenza ridotta pari a
1/4 o inferiore.
Per la ripresa stroboscopica è necessario selezionare la frequenza di emissione (lampi al secondo) tra 1 e …50 Hz, a incrementi di 1 Hz, ed il numero
dei lampi compreso tra 2 e 50 ad incrementi di 1.
Nel Modo stroboscopico non viene visualizzato alcun valore per la sensibilità della pellicola (ISO). Se il mecablitz è dotato di adattatore SCA 3xx2 e di
una camera che trasmette automaticamente la sensiblità della pellicola al
flash, il mecablitz imposta automaticamente la sensibilità (vedi istruzioni
d‘uso della camera e dell‘adattatore SCA).
Se il mecablitz è dotato di adattatore SCA 3xx, di base standard SCA 301 o
di una camera che non trasmette i dati della sensibilità, quest‘ultima deve
essere impostata nel Modo falsh TTL, A o M prima di selezionare il Modo
stroboscopico. Il mecablitz riprenderà quindi le regolazioni impostate anche
nel Modo stroboscopico.
Il massimo valore di potenza ridotta utilizzabile nel modo stroboscopico viene impostato automaticamente. Per ottenere durate del tempo particolarmente brevi è possibile regolare manualmente la potenza ridotta fino al valore
minimo di 1/256. Il display LC visualizza la distanza applicabile in base ai
parametri selezionati. Il valore di distanza indicato può essere regolato in
accordo con l‘effettiva distanza di ripresa variando il diaframma o il livello
di potenza ridotta. Il valore di diaframma visualizzato sull‘unità di controllo
va impostato sulla fotocamera. La gamma di distanze utili può essere estesa
con l‘utilizzo di pellicole di sensibilità più elevata.
☞ Con la parabola ausiliaria attiva, il funziona-mento stroboscopico non
è possibile.
704 47 0099.A3
54 MZ-4i
01.02.2007
13:41 Uhr
Seite 145
Regolazione del Modo flash stroboscopico (Fig. 7)
• Regolate la camera per il modo di esposizione manuale come indicato nel
relativo libretto di istruzioni, e selezionate il tempo di posa adeguato.
1 Dotate il flash di un adattatore SCA o di una base standard 301 e accendetelo con l‘interruttore principale (Fig. 1).
2 Premete il tasto Mode (Fig. 1) finché sul display non lampeggia
.
Per memorizzare il Modo selezionato premete la manopola (Fig. 1) in
direzione della freccia. Se la manopola non viene memorizzata, il Modo
selezionato viene automaticamente memorizzato dopo 5 sec. Il simbolo
smette di lampeggiare.
Modo stroboscopico del mecablitz con adattatore SCA 3xx2:
Se il mecablitz viene utilizzato con un adattatore SCA 3xx2 e una camera
che trasmette automaticamente i dati relativi alla sensiblità della pellicola
(ISO), alla posizione della parabola zoom e al diaframma, non è necessario
impostare altre regolazione. Il mecablitz si imposta automaticamente in base
ai dati trasmessi dalla camera. Il numero di lampi e la frequenza devono
essere impostati come indicato nei punti 3 e 4 (vedi sotto).
☞ Quando il mecablitz viene utilizzato con una camera che trasmette i
dati al mecablitz, i valori della sensibilità della pellicola (ISO) e del
diaframma non possono essere modificati.
Modo stroboscopico con adattatore SCA 3xx, con base standard SCA 301
o con una camera che trasmette i dati (Fig. 7):
In questo caso i valori della sensiblità, della posizione zoom della parabola
e del diaframma devono essere impostati manualmente sul mecablitz. Ciò è
assoultamente necessario per una corretta esposizione, poiché il mecablitz
con questi dati calcola la distanza del soggetto dal flash per ottenere una
corretta esposizione e la indica sul display.
3 Impostate il numero di lampi N. Ruotate la manopola sul flash finché la
freccia non si trova nella sua massima posizione superiore. Premete la
manopola, ruotate e impostate il numero di lampi desiderato N. Per
memorizzare il valore selezionato premete di nuovo la manopola.
4 Regolate la frequenza del lampo f(Hz). Ruotate la manopola in senso antiorario, fino a quando non si trova accanto alla freccia. Premete la manopola, ruotate e impostate la frequenza desiderata f(Hz) e premete di nuovo
la manopola per memorizzare la frequenza selezionata.
☞ Il valore di distanza si riferisce a soggetti in movimento. Per non risultare sovraesposto, lo sfondo deve essere molto scuro e/o molto distante dal soggetto. I risultati migliori si ottengono con luce ambiente
molto bassa.
Assicuratevi che la camera sia regolata su un tempo di posa sufficientemente
lento.
Nella tabella 3 sono specificati i tempi di posa più brevi utilizzabili in base
alla combinazione N – f(Hz).
10. Indicatore di corretta esposizione
L‘indicatore di corretta esposizione “ok” (Fig. 1) si accende soltanto quando nei modi di funzionamento Auto o TTL il lampo emesso è/è stato sufficiente per una corretta esposizione.
Grazie a questa funzione avete quindi la possibilità, specialmente se effettuate riprese con la tecnica del lampo riflesso e flash in automatico, di determinare in precedenza la corretta apertura del diaframma facendo scattare manualmente un lampo di prova. Nel Modo TTL non è possibile effettuare il
lampo di prova.
Il lampo di prova viene emesso premendo il pulsante di scatto, sempre che
questo non sia stato programmato come “Luce pilota” (vedi cap. 12.).
Se dopo il lampo di prova la spia “ok” non si accende, aprite il diaframma
di un valore, oppure riducete la distanza tra flash e superficie riflettente o
soggetto, quindi ripetete il lampo di prova.
L‘apertura di diaframma rilevata con questa procedura deve essere impostata anche sulla camera.
☞ Durante l‘emissione del lampo di prova tenete la torcia flash con il
sensore (Fig. 1) orientato come se scattaste effettivamente la fotografia.
145
ƴ
704 47 0099.A3
54 MZ-4i
01.02.2007
13:41 Uhr
Seite 146
Questa possibilità può essere utilizzata anche con il modo TTL, senza dovere
necessariamente scattare una fotografia di prova. Si imposta il flash sul funzionamento Auto e si determina il valore di diaframma nel modo descritto
sopra. Il diaframma rilevato va quindi riportato sulla fotocamera e infine si
seleziona nuovamente il funzionamento TTL.
Questo procedimento è valido con le lunghezze focali più comunemente utilizzate, comprese tra 28 mm e 85 mm. Con lunghezze focali estreme il successivo uso in TTL potrebbe essere causa di una sottoesposizione. In tal caso
dopo lo scatto l‘indicatore di corretta esposizione rimane spento. Aprite il
diaframma di un valore (ad esempio f/8 invece di f/11) e ripetete la ripresa.
11. Illuminatore di assistenza AF
☞ L‘illuminatore di assistenza AF del mecablitz può essere attivato solo
da determinate camere autofocus, che supportano l‘illuminatore AF
nel flash. Alcune camere autofocus supportano soltanto il proprio illuminatore AF incorporato (vedi istruzioni d‘uso della camera). Il mecablitz deve essere dotato di un adattatore SCA 3xx2.
ƴ
Quando selezionate l‘autofocus sulla camera, tenete presente che la maggior
parte delle camere supportano l‘illuminatore AF solo nei Modi “Single-AF” o
“One-Shot-AF” (vedi istruzioni d‘uso della camera).
Quando la luce ambiente è insufficiente per permettere una messa a fuoco
automatica, il sistema elettronico della camera attiva l‘illuminatore di assistenza AF. Il proiettore autofocus proietta un fascio di raggi luminosi sul soggetto, la cui riflessione consente alla camera di operare la messa a fuoco. Il
campo di utiizzo dell‘illuminatore AF è di ca. 9 m (con obiettivo standard
1,7/50 mm). Obiettivi zoom con un‘apertura del diaframma iniziale limitano in parte notevolmente il campo dell‘illuminatore AF.
☞ Diverse camere autofocus dispongono di altre aree di misurazione AF
oltre a quella centrale nel mirino. Il fascio di raggi luminosi del liminatore AF supporta solo il sensore centrale AF della camera. In alcuni
casi il sensore centrale AF della camera deve essere impostato manualmente (vedi istruzioni d‘uso dela camera e dell‘adattatore SCA).
146
12. Funzioni speciali
Le funzioni speciali del mecablitz possono essere richiamate successivamente
premendo il tasto Select (Fig. 1) e attivate, disattivate e memorizzate
mediante la manopola (Fig. 1) di regolazione.
12.1 Funzione Beep
(avvisatore acustico)
L‘avvisatore acustico può essere impiegato per segnalare alcuni stati di
funzionamento del flash. Il fotografo si può così concentrare completamente
sul soggetto e sulla fotografia e non è costretto a prestare attenzione alle spie
ottiche.
Il segnale acustico della funzione beep indica:
• Flash carico
• Esposizione corretta
• Spegnimento automatico del flash
• Irregolarità di funzionamento
Segnali acustici dopo l‘accensione del mecablitz:
• Un beep continuo (2 s circa) dopo aver scattato la foto segnala che il flash
è carico.
Avvisatore acustico dopo la ripresa:
• Un beep continuo (3 s circa) immediatamente dopo aver scattato la foto
indica che l‘esposizione era corretta e che il flash è pronto per scattare
una nuova foto. Se dopo la ripresa non scatta alcun segnal acustico, significa che la foto era sottoesposta.
• Un beep intermittente dopo aver scattato la foto indica che l‘esposizone
era corretta, ma che il flash non è ancora carico e sarà pronto per scattare
un‘altra foto solo quando si sentirà un suono continuo (3 sec).
Signale acustico nelle regolazioni in Modo flash Auto „A“:
• La funzione di allarme attiva il segnale acustico (beep) nel caso in cui nel
Modo flash Auto i valori di regolazione del diaframma e della sensibilità
ISO fossero fuori dal campo di controllo ammesso. Il diaframma automati-
704 47 0099.A3
54 MZ-4i
01.02.2007
13:41 Uhr
Seite 147
Ȅ
Se il mecablitz è dotato di adattatore SCA 3xx2, può essere riacceso toccando leggermente il tasto di scatto della camera.
Se il mecablitz è dotato di adattatore SCA 3xx o di base standard SCA 301,
può essere riacceso azionando la manopola.
Attivazione dello spegnimento automatico del flash:
1 Premete sul mecablitz il tasto Select (Fig. 1) finché non lampeggia il simbolo
dell‘ “orologio”
.
2 Ruotate la manopola e selezionate il tempo di spegnimento automatico
“Auto-Off” di 1 m (1 minuto) o di 10 m (10 minuti). Sul display appare
“On”. Per memorizzare questa regolazione premete la manopola in direzione della freccia. Se non premete la manopola, la regolazione selezionata viene memorizzata automaticamente dopo 5 sec. Nel display LC compare il simbolo
dopo aver effettuato la memorizzazione.
Se
prevedete
che il flash rimarrà inutilizzato per lungo tempo, speg☞
netelo con l‘interruttore principale.
Ȅ
co del mecablitz viene quindi regolato automaticamente al valore ammissibile più prossimo.
Attivazione della funzione beep (Fig. 9):
• Premete il tasto Select finché non lampeggia il simbolo .
• Ruotate la manopola e attivate la funzione beep. Sul display LC del mecablitz appare „On“. Per memorizzare questa regolazione, premete la manopola brevemente in direzione della freccia. Se la manopola non viene
premuta, la regolazione selezionata viene memorizzata automaticamente
dopo 5 sec.
Disattivazione della funzione beep (Fig. 9):
1 Premete il tasto Select (Fig. 1) finché non lampeggia il simbolo .
2 Ruotate la manopola e spegnete la funzione beep. Sul display LC del mecablitz appare “OFF”. Per memorizzare questa regolazione premete la manopola brevemente in direzione dela freccia. Se non premete la manopola, la
regolazione selezionata viene memorizzata automaticamente dopo 5 sec.
12.3 Spegnimento automatico del flash / Auto-Off (Fig. 8)
12.4 REAR – Sincronizzazione sulla seconda tendina (Fig. 10 e 11)
Potete impostare il mecablitz in modo tale che si spenga automaticamente a
distanza di 1 minuto o di 10 minuti dall‘ultima operazione (foto con flash,
regolazione o attivazione del pulsante di scatto della camera) per evitare un
inutile spreco delle batterie.
Quando il flash viene spento con il dispositivo di spegnimento automatico, i
valori di regolazione impostati per ultimi rimangono in memoria e vengono
ripristinati automaticamente all‘accensione successiva.
Ȅ
La funzione key permette di bloccare i tasti Mode, Select e la manopola impedendo che si possano variare le regolazioni inavvertitamente.
Per effettuare il blocco, premere i i tasti Mode e Select contemporaneamente
per circa 3 sec, finché sul display non compare il simbolo
.
Per lo sblocco, premere contemporaneamente i tasti Mode e Select per circa
3 sec., finché sul display non compare il simbolo
.
Disattivazione dello spegnimento automatico del flash:
1 Premete il tasto Select (Fig. 1) finché non lampeggia il simbolo
dell‘ “orologio”.
2 Ruotate la manopola finché non compare “OFF”. Per memorizzare questa
regolazione, premete la manopola brevemente in direzione della freccia.
Se non premete la manopola di regolazione, la regolazione selezionata
viene memorizzata automaticamente dopo 5 sec. Sul display LC compare
il simbolo
.
12.2 Blocco e sblocco dei comandi
La sincronizzazione sulla seconda tendina (REAR) è vantaggiosa soprattutto
nelle esposizioni con lunghi tempi di posa (più lunghi di 1/30 secondo) e
con soggetti in movimento con fonte di luce propria, poiché la fonte di luce
in movimento lascia dietro di sé una scia luminosa, contrariamente a quanto
avviene con la sincronizzazione sulla prima tendina, in cui la scia precede la
fonte luminosa. Con la sincronizzazione sulla seconda tendina e con fonte di
147
ƴ
704 47 0099.A3
ƴ
54 MZ-4i
01.02.2007
13:41 Uhr
Seite 148
luce in movimento si avrà l‘effetto di una riproduzione “naturale” della situazione di ripresa.
☞ La funzione REAR è selezionabile e regolabile solo se il mecablitz è
dotato di adattatore SCA ed è montato su una camera che supporta
questo Modo. La camera deve essere accesa per richiamare e regolare questa funzione. Premendo leggermente il pulsante di scatto della
camera deve aver luogo almeno una volta uno scambio di dati tra la
camera e il mecablitz o l‘adattatore SCA.
Disattivazione della funzione REAR:
• Premete il tasto Select (Fig. 1) finché sul display LC non compare il simbolo “REAR”. Impostate “OFF” con la manopola. Premete la manopola in
direzione della freccia per memorizzare la regolazione. Se non premete la
manopola, la regolazione selezionata viene automaticamente memorizzata
dopo 5 sec. Il simbolo “REAR” sul display LC del mecablitz scompare.
Consultate le relative istruzioni d‘uso per accertarvi che la camera o l‘adattatore SCA supportino la funzione REAR.
Su alcune camere la funzione REAR non è possibile in determinati Modi. La
funzione REAR non si può in questo caso selezionare. Vedi al proposito le
istruzioni d‘uso della camera o dell‘adattatore.
Attivazione dela funzione REAR:
• Premete il tasto Select (Fig. 1) finché sul display LC non compare “REAR”.
Impostate “On” con la manopola. Premete la manopola in direzione della
freccia per memorizzare la funzione REAR. Se non premete la manopola, la
funzione REAR viene memorizzata automaticamente dopo 5 s.
Dopo aver effettuato la memorizzazione, il simbolo „REAR“ per la sincronizzazione sulla seconda tendina rimane visualizzato sul display LC del
mecablitz.
Consiglio:
Utiizzate in questo Modo per maggior sicurezza uno stativo, per evitare di
ottenere una foto mossa con tempi di posa prolungati.
☞ Disattivare questa funzione una volta scattata la foto, per evitare che
anche nelle riprese con flash “normali” nel Modo flash P o nei programmi creativi si possano in alcuni casi verificare foto mosse a causa
di tempi di posa lunghi indesiderati.
La luce pilota è una lampo stroboscopico ad alta frequenza. Con una durata
di circa 4 secondi si ricava l‘impressione di una luce quasi continua. Con la
luce di regolazione è possibile giudicare la distribuzione della luce e la formazione di ombre già prima della ripresa.
Attivazione della funzione luce pilota:
• Premete il tasto Select (Fig. 1) finché non lampeggia sul display LC il
simbolo
. Impostate “On” con la manopola. Premete la manopola in
direzione della freccia per memorizzare la funzione luce pilota. Se non
premete la manopola, la funzione selezionata viene memorizzata dopo
circa 5 sec.
Sul mecablitz lampeggia la spia di carica del flash quando si utilizza un adattatore SCA 3xx2. Dopo aver premuto il tasto il mecablitz attiva la sua luce pilota.
Nel Controllo Metz a distanza senza cavi (in Modo TTL e in Modo Auto a
distanza) con la luce pilota del flash principale viene emessa contemporaneamente su tutti i flash asserviti una luce pilota (su 40 MZ-.. con adattatore
SCA 3080 a partire dalla versione M1 o con SCA 3082).
Un set di batterie completamente cariche (600 mAh) è sufficiente per circa
60 attivazioni di luce pilota. Con le tradizionali batterie a secco il funzionamento con luce pilota non ha senso poiché l‘energia per il condensatore del
flash non può essere messa a disposizione con sufficiente rapidità durante
l‘emissione della luce a causa dell‘elevata resistenza interna.
Disattivazione della funzione luce pilota:
• Premete il tasto Select (Fig. 1) finché sul display LC non lampeggia il
simbolo
. Impostate “OFF ” con la manopola. Premete la manopola in
Su certe camere la funzione “REAR” si può impostare direttamente. Sul mecablitz non compare in questo caso il simbolo “REAR”.
148
12.5 Luce pilota / Modelling Light
704 47 0099.A3
54 MZ-4i
01.02.2007
13:41 Uhr
Seite 149
direzione della freccia per memorizzare la funzione luce pilota. Se non
premete la manopola la funzione luce pilota viene memorizzata automaticamente dopo 5 sec.
Sul mecablitz la spia di carica flash rimane accesa senza lampeggiare.
12.6 Adattamento della distanza focale al formato della camera
Questa funzione offre la possibilità di adattare l‘indicazione della rispettiva
posizione della parbola del mecablitz al formato della camera. In questo
modo è possibile far coincidere le distanza focali dell‘obiettivo di camere di
formato medio (4,5x6, 6x6, 6x7 et 6x9) o di camere APS con l‘indicazione
riportata sul mecablitz. Per il formato da 35 mm (24x36), è disponibile anche la funzione “Extended-Zoom” (zoom ampio).
La funzione “Extended Zoom” consente di ridurre la distanza focale del mecablitz di un grado rispetto a quella dell‘obiettivo della camera. Ne risulta una
illuminazione più ampia che, negli interni, provvede ad assicurare una luce
diffusa supplementare e quindi un‘illuminazione della luce del flash più morbida.
Esempio della funzione “Extended Zoom”:
La distanza focale dell‘obiettivo sulla camera è di 50 mm.
Con la funzione “Extended Zoom” il mecablitz porta la posizione del riflettore su 35 mm.
Regolazione per l‘adattamento della distanza focale al sistema della camera
(Fig. 12):
1 Premete il tasto Select (Fig. 1) finché non compare sul display “Zoom”.
2 Ruotando la manopola adattate l‘indicazione della distanza focale al sistema della camera.
Indicazioni sul display:
Zoom senza indicazione supplementare = regolazione per i formati da
24x36 (regolazione normale).
Auto Zoom con le seguenti indicazioni aggiuntive :
E
Modo Extended Zoom (solo per formati 24x36) (Fig. 12)
Adattamento ad una camera APS
Adattamento ad una camera formato 4,5x6
Adattamento ad una camera formato 6x6, 6x7 o 6x9
Avvertenza per il Modo Extended Zoom attivato
• Una volta effettuata la selezione, premete la manopola (Fig. 1) in direzione della freccia per memoirzzare la selezione. Se non premete la
manopola la regolazione selezionata viene memorizzata automaticametne
dopo 5 sec. Questa regolazione rimane memorizzata anche dopo lo spegnimento del mecablitz.
Il simbolo
sul display del flash indica, dopo aver effettuato la memorizzazione, che uno degli adattamenti suddetti è stata attivato.
APS
F1
F2
12.7 Sequenza di esposizioni flash „Fb“ (flash-bracketing) (Fig. 13)
Nei Modi TTL e A, il mecablitz 54 MZ-.. consente di realizzare una sequenza automatica a esposizione differenti (flash-bracketing/flash-exposurebracketing).
Il flash-bracketing consiste in una sequenza di 3 foto successive con valori di
compensazione della esposizione flash differenti. La prima foto della serie
viene scattata senza valore di compensazione. La seconda con una compensazione negativa e la terza con una compensazione positiva. Dopo avere
scattato la terza foto questa funzione viene cancellata automaticamente.
Sequenza di esposizioni flash „Fb“ in Modo TTL:
Il flash-bracketing con Modo TTL può aver luogo solo se il mecablitz è dotato
di un adattatore SCA adeguato (SCA 3xx2) e la camera supporta uan compensazione manuale dell‘esposizione sul flash.
Se la camera non supporta una compensazione manuale dell‘esposizione, si
può impostare sul mecablitz un fattore di compensazione per il bracketing,
ma la camera espone le foto senza compensazione. Osservare le istruzioni
d‘uso della camera e dell‘adattatore SCA.
Sequenza di esposizioni flash „Fb“ in Modo A:
Per il flash-bracketing in Modo A, è sufficiente che il flash sia montato su una
149
ƴ
704 47 0099.A3
54 MZ-4i
01.02.2007
13:41 Uhr
Seite 150
base standard SCA 301. Il flash-bracketing è possibile tuttavia anche in Modo
Auto con un adattatore SCA.
☞ Su alcune camere il flash-bracketing nel Modo A non è tecnicamente
possibile!
ƴ
Su alcune camere il flash-bracketing nel Modo A nonè tecnicamente possibile, se il mecablitz non è dotato di base standard SCA 301.
Consultate le istruzioni d‘uso della camera e dell‘adattatore SCA.
Attivazione del flash-bracketing “Fb” (Fig. 13):
1 Premete il tasto Select (Fig. 1) finché sul display non compare “Fb”.
2 Ruotando la manopola selezionate il fattore di compensazione desiderato
per la sequenza del bracketing. Durante la regolazione, „EV“ e il valore
del fattore di compensazione lampeggiano sul display. Premete la manopola in direzione della freccia per memorizzare la regolazione. Se non
premete la manopola, la regolazione selezionata viene memorizzata automaticamente dopo 5 sec.
Sul display del mecablitz compare „Fb 1“ che indica la prima foto della sequenza. La foto seguente verrà scattata senza fattore di compensazione.
Dopo la prima foto l‘indicatore sul display commuta su “Fb 2”. Sul display
compare anche “EV” e il fattore di compensazione negativo con cui verrà
scattata la seconda foto.
Dopo la seconda foto l‘indicatore sul display commuta su “Fb 3”. Sul display
compare anche il fattore di compensazione positivo per la terza foto.
Dopo la terza foto, le indicazioni “Fb”, “EV” e il valore per il fattore di compensazione vengono cancellati.
☞ Per una nuova sequenza di flash-bracketing si deve ripetere la regolazione per l‘attivazione di questa funzione.
Per interrompere la sequenza in anticipo, spegnete il mecablitz con l‘interruttore principale.
12.8 Ritorno alle impostazioni di base
Se si tiene premuto il tasto Mode (Fig. 1) per almeno 3 secondi, viene
150
risettata l‘impostazione di base sul mecablitz. Il modo selezionato rimane
impostato.
Vengono cancellate le seguenti regolazioni:
• Sotto-modi TTL „HSS“, „ETTL“, „3D“ e i controllo a distanza senza cavi
• Sotto-modo manuale „HSS“
• Livelli di potenza ridotta introdotti manualmente
• Flash-bracketing” Fb”
• Adattamento delle distanze focali „E“, „APS“, „F1“ et „F2“
• Sincronizzazione sulla seconda tendina (REAR)
• Funzione luce pilota
• Blocco dei comandi.
Rimangono attive le seguenti regolazioni:
• Spegnimento automatico dell‘apparecchio dopo 10 minuti
• “Funzione Beep” On
• „Auto Zoom“ On.
12.9 Parabola zoom motorizzata
Se il mecablitz è dotato di adattatore SCA 3xx2 ed è montato su una camera
che invia i dati per la distanza focale dell‘obiettivo al flash, la posizione della parabola zoom si adatta automaticamente alla distanza focale dell‘obiettivo. Sul display del mecablitz compare “AutoZoom”.
Se il mecablitz è dotato di adattatore SCA 3xx o di un base standard SCA 301,
la posizione zoom della parabola del flash deve essere impostata manualmente.
• Ruotate la manopola finché il simbolo con la freccia non si trova sul display accanto a “Zoom”.
• Premete la manopola (Fig. 1) in direzione della freccia. Il simbolo con
la freccia lampeggia.
• Ruotate la manopola e selezionate la posizione desiderata per la parabola.
704 47 0099.A3
54 MZ-4i
01.02.2007
13:41 Uhr
Seite 151
• Per memorizzare la regolazione premete la manopola in direzione della
freccia. Se non premete la manopola, la regolazione viene memorizzata
automaticamente dopo 5 sec. Il simbolo con la freccia non lampeggia più.
Se utilizzate un obiettivo zoom e non avete bisogno sempre del numero guida completo e del massimo campo d‘utilizzo del mecablitz, potete lasciare la
posizione della parabola zoom sulla distanza focale iniziale dell‘obiettivo
zoom. Ciò garantisce una corretta esposizione e vi risparmia il continuo
adattamento alla distanza focale dell‘obiettivo.
Esempio:
utilizzate un obiettivo zoom con una distanza focale di 28 mm – 80 mm. In
questo caso impostare la posizione della parabola zoom su 28 mm!
Come modificare la posizione zoom con l‘adattatore SCA 3xx2 e con una
camera che trasmette i dati:
La posizione zoom della parabola può essere modificata anche se il mecablitz è dotato di un adattatore SCA 3xx2 e di una camera che trasmette i
dati:
per la selezione della posizione zoom desiderata vedi sopra.
Dopo aver memorizzato la regolazione selezionata, sul display compare
“Zoom” anziché “AutoZoom”. La posizione zoom selezionata della parabola
lampeggia sul display. Ciò significa che la posizione zoom selezionata è stata impostata manualmente.
Reset su Modo “AutoZoom”:
• Ruotate la manopola finché il simbolo con la freccia si trova sul display
accanto a “Zoom”.
• Premete la manopola in direzione della freccia. Il simbolo con la freccia
lampeggia.
• Ruotate la manopola finché sul display compare “AutoZoom”.
• Per memorizzare la regolazione premete la manopola in direzione della
freccia. Se non premete la manopola, la regolazione selezionata viene
memorizzata automaticamente dopo 5 sec. Il simbolo con la freccia smette
a questo punto di lampeggiare.
☞ Il flash deve essere montato su una camera accesa!
12.10 Indicazione metri - piedí
• Spegnete il mecablitz con l‘interruttore principale (Fig. 1).
• Premete il tasto Select (Fig. 1) spostando contemporaneamente l’interruttore principale (Fig. 1) a da OFF a “On”.
13. Diffusore grandangolare
Estraete il diffusore grandangolare (Fig. 2) disposto sotto la parabola
principale fino ad arresto. La parabola principale si dispone automaticamente sulla posizione zoom 20 mm. Il diffusore grandangolare si ribalta automaticamente verso l‘alto. Sul display LC vengono corretti i dati riguardanti la
distanza e il valore zoom.
Per reinserire il diffusore grandangolare (Fig. 2) ribaltate il diffusore di
90° ed inseritelo completamente.
Se si impiega un diffusore grandangolare o altri tipi di diffusori come i filtri
colorati, i friltri grigi, il mecabounce ecc. non si possono utilizzare i Modi
che funzionano con il prelampo di misurazione o con la sincronizzazione di
breve durata (HSS).
14. Compensazione dell‘esposizione manuale
☞ Una compensazione dell’esposizione manuale è possibile solo con
l’impiego di un adattatore SCA 3xx2.
☞ Nel Modo Auto (A)
la compensazione dell’esposizione manuale è
possibile con un adattatore SCA 3xx e SCA 3xx2.
I sistemi di esposizione automatica del mecablitz e della maggior parte della
camere sono regolati per un fattore di riflessione pari al 25 %, il fattore medio di riflessione per i soggetti ripresi con il flash. Uno sfondo scuro, che assorbe molta luce, o uno chiaro che invece la riflette (ad esempio riprese in
controluce) possono provocare rispettivamente una sovraesposizone o una
sottoesposizione del soggetto.
Per correggere l‘effetto descritto sopra, è possibile compensare l‘esposizione
151
ƴ
704 47 0099.A3
54 MZ-4i
01.02.2007
13:41 Uhr
Seite 152
manualmente selezionando un valore di compensazione in base alla situazione di ripresa. Il valore della compensazione dipende dal contrasto tra il
soggetto e lo sfondo. Nei Modo TTL e Auto è possibile impostare manualmente fattori di compensazione per l‘esposizione da -3 EV (valori del diaframma) a +3 EV (valori del diaframma) ad incrementi di 1/3. Molte camere
sono dotate di una funzione di compensazione dell‘esposizione che può
essere utilizzata anche nel Modo TTL.
Seguite le indicazioni fornite nelle istruzioni d‘uso della camera o dell‘adattatore SCA.
Con questa modalità non è possible correggere l‘esposizione modificando
l‘apertura di diaframma sull‘obiettivo, in quanto il sistema di esposizione
automatica della fotocamera considererebbe il nuovo valore come il normale
diaframma di lavoro.
☞ Soggetto scuro davanti a sfondo chiaro: valore di compensazione
positivo (da 1 a 2 valori di diaframma EV)
Soggetto chiaro davanti a sfondo scuro: valore di compensazione
negativo (da 1 a 2 valori di diaframma EV)
ƴ
Impostando un valore di compensazione l‘indicazione del campo d‘utilizzo
sul display LC può variare e adattarsi al valore di compensazione (in funzione del tipo della camera e del‘adattatore SCA)!
Regolazione di una compensazione manuale dell‘esposizione:
• Il mecablitz funziona nel Modo TTL o nel Modo A.
• Ruotate la manopola finché non compare il simbolo “EV” sul display LC. Il
simbolo con la freccia accanto a “EV” indica che è stata selezionata la posizione per impostare il valore di compensazione dell‘esposizione.
• Premete la manopola in direzione della freccia. Il simbolo con la freccia
accanto a “EV” lampeggia.
• Ruotate la manopola per selezionare un valore di compensazione adatto.
Il valore di compensazione viene visualizzato sul display LC del mecablitz.
• memorizzare il valore di compensazione premete la manopola in direzione della freccia. Se non premete la manopola il valore di compensazione
152
viene memorizzato automaticamente dopo 5 sec. Il simbolo con la freccia
accanto a “EV” smette di lampeggiare. Il valore di compensazione impostato viene visualizzato sul display LC del mecablitz.
Spegnimento di una compensazione manuale dell‘esposizione:
• Ruotate la manopola finché sul display LC il simbolo con la freccia non si
trova accanto a “EV”.
• Premete la manopola. Il simbolo con la freccia accanto a “EV” lampeggia.
• Ruotate la manopola finché l‘indicazione del valore di compensazione non
scompare dal display.
• Premete la manopola in direzione della freccia per memorizzare la regolazione. Se non premete la manopola il valore di compensazione viene memorizzato automaticamente dopo 5 sec.Il simbolo della freccia accanto a
“EV” smette di lampeggiare.
☞ La compensazione manuale dell‘esposizione è possibile solo se la camera supporta questa funzione. Se la camera non supporta questa
funzione, sul mecablitz si può impostare una compensazione, ma
quest‘ultima non avrà effetto.
Il trasferimento del valore di compensazione per l'esposizione flash del
mecablitz alla camera è possibile solo nel Modo TTL con un adattatore
SCA 3xx2 che supporta tale funzione.
Su alcune camere la compensazione manuale dell‘esposizione deve essere
regolata sulla camera stessa (vedi istruzioni d‘uso della camera). In questo
caso sul mecablitz non viene visualizzato nessun valore di compensazione.
Su alcune camere la compensazione manuale dell‘esposizone può essere
regolata sulla camera o sul flash. Per sapere quale regolazione ha priorità,
consultate le istruzione d‘uso della camera o dell‘adattatore SCA.
15. Manutenzione e cura
Eliminate la sporcizia e la polvere con un panno morbido e asciutto. Si consiglia di evitare l‘uso di prodotti detergenti, in quanto potrebbero provocare
danni alle parti in plasitica.
704 47 0099.A3
54 MZ-4i
01.02.2007
13:41 Uhr
Seite 153
Manutenzione del condensatore elettronico
Il condensatore incorporato nel flash tende a deformarsi qundo il lampeggiatore resta inutilizzato. E‘ quindi opportuno attivare il flash almeno ogni
3 mesi, tenendolo acceso per circa 10 minuti. Se le batterie hanno energia
sufficiente, la spia di pronto lampo impiega circa n minuto ad accendersi.
16. Dati tecnici
Numeri-guida per ISO 100/21°, Zoom 105 mm:
in metri : 54
in piedi: 177
12 diafr. automatici con ISO 100/21°:
1 -1,4 - 2 - 2,8 - 4 - 5,6 - 8 - 11 - 16 – 22 - 32 - 45
Durata del lampo:
• 1/200 ... 1/20 000 secondi
• nel Modo M, circa 1/200 s a potenza piena
• 1/600 s circa. a 1/2 potenza
• 1/1400 s circa a 1/4 di potenza
Angolo di rilevazione del sensore: 25° circa
Temperatura di colore :
5600 K circa
Sensibilità della pellicola :
ISO 6 - ISO 6400
Sincronizzazione :
scarica basso voltaggio
Numero lampi approssimativo:
60* con batterie NiCd (600 mAh)
180* con batterie alcaline al manganese di elevata capacità
Tempi di ricarica:
• con batterie NiCd (600 mAh)
5 s (nel Modo M)*
0,1 . . 5 s (nel Modo A e TTL)
• con batterie alcaline al manganese di elevata capacità
6 s (nel Modo M)*
0,1 . . 6 s (nel Modo A e TTL)
*a piena potenza
Orientabilità della parabola zoom:
verso l‘alto
60° 75° 90° / -7°
in senso antiorario 30° 60° 90° 120° 150° 180°
in senso orario
30° 60° 90°
Dimensioni (appros.) in mm:
75 x 125 x 108
Peso:
flash senza batterie:
480 g circa
Dotazione standard:
Lampeggiatore, custodia T54, base standard 301*, piastra di copertura*,
manuale istruzioni, tabelle SCA 300/3002.
*(non con i set specifici)
Riserva di modifiche e disponibilità di fornitura
17. Terminologia
• Indicazione di corretta esposizione nel mirino della camera
Nel Modo Auto o TTL la corretta esposizione o la sottoesposizione della
pellicola viene indicata in molte camere con un segnale nel mirino.
• Controllo automatico del tempo di sincronizzazione
Quando appare lo stato di carica del flash, la maggior parte delle camere
a sistema commuta automaticamente il tempo di posa adattandolo al tempo di sincronizzazione. Alcune camere conservano tempi di posa più lunghi. Quando l‘indicazione di stato di carica del flash scompare o dopo
che è stato emesso un lampo, la camera imposta automaticamnte il tempo
di posa precedente.
• Controllo dell‘accensione
Se per l‘apertura del diaframma impostata sull‘obiettivo e per la luce am153
ƴ
704 47 0099.A3
ƴ
54 MZ-4i
01.02.2007
13:41 Uhr
Seite 154
biente esistente si è ottenuto un tempo di posa uguale o superiore al tempo
di sincronizzazione, l‘accensione del lampo non avrà luogo quando si
scatta la foto. La foto viene effettuata in questo caso con la luce ambiente
per evitare una sovraesposizione.
• Sincronizzazione sulla prima o sulla seconda tendina (vedi Fig. 10 e 11)
In questo caso esistono due possibilità per la sincronizzazione :
- nel momento dell‘avvenuta apertura della prima tendina, o
- appena prima della chiusura della seconda tendina.
La sincronizzazione desiderata viene selezionata sull‘adattatore SCA. La sincronizzazione sulla seconda tendina è vantaggiosa soprattutto nelle esposizioni con lunghi tempi di posa e soggetti in movimento con luce propria.
• Illuminatore di assistenza AF
Se la luce ambiente è insufficiente per una messa a fuoco automatica, il
sistema elettronico della camera attiva l‘illuminatore AF (Autofocus). Il proiettore autofocus proietta un fascio di raggi luminosi sul soggetto, la cui
riflessione consente alla camera di operare la messa a fuoco. Utilizzando
un adattatore autofocus SCA 3xx viene attivato soltanto l‘illuminatore AF
incorporato nell‘adattatore.
• Modo autoprogrammato del flash
Nel modo „Programma“, alcune camere mischiano la luce ambiente con la
luce del flash. La camera seleziona automaticamente la corretta combinazione tempo-apertura del diaframma e controlla il flash nel modo TTL. Ciò
facilita l‘uso di tutte le camere.
• Controllo lampo di schiarita in TTL
Alcune camere a sistema presentano oltre al modo flash TTL anche il controllo
del lampo di schiarita in TTL. Questa funzione è utile soprattutto per le riprese
in luce diurna per schiarire le ombre o per riprese in controluce. Grazie alla
misurazione del sensore incorporato nella camera e alla successiva valutazione del sistema elettronico, la camera calcola sempre la quantità di luce corretta per un‘esposizone equilibrata. Per le riprese con lampo di schiarita la camera effettua automaticamente una compensazione dell‘esposizione.
• Compensazione dell‘esposizone in TTL
In alcune riprese può capitare che il sensore incorporato nella camera ef154
fettui una misurazione sbagliata. Ciò accade soprattutto nelle riprese con
soggetti molto scuri davanti a sfondi molto chiari (soggetto sottoesposto) o
viceversa nelle riprese con soggetti molto chiari davanti a sfondi molto scuri (soggetto sovraespsoto). Con il controllo diaframma/tempi di posa, modificando la sensibilità della pellicola o grazie alla compensazione +/- sulla camera è possibile realizzare una compensazione dell‘esposizione
normale. Ciò influenza però tutte le sezioni di una foto. Per questo motivo
è possibile su alcune camere effettuare una compensazione speciale
dell‘esposizione, che consente di mantenere inalterata l‘esposizione generale e di schiarire solo le parti scure e in ombra. Per ulteriori dettagli al
proposito consultare i libretti d‘istruzione della camera e dell‘adattatore.
• Prelampo contro gli occhi rossi (solo con adattatore SCA 3402 Nikon)
L‘effetto degli occhi rossi è un fatto puramente fisico. Questo effetto ha luogo
quando la persona da fotografare guarda più o meno direttamente nella direzione della camera, la luce ambiente è bassa e il flash si trova sulla camera o
nelle sue immediate vicinanze. In questo caso il flash schiarisce il fondo
dell‘occhio e la retina, che presenta una forte irrigazione sanguigna, diventa
visibile attraverso la pupilla e la camera la riconosce come punto rosso. La
funzione contro gli occhi rossi riduce questo effetto. Con questa funzione il
mecablitz accende tre prelampi tenui (a condizione che questa funzione sia
presente sul flash e sulla camera) prima dell‘attivazione della tendina e prima
dei lampi di misurazione per il multisensore seguiti dal lampo principale. I tre
lampi provocano un restringimento della pupilla al momento del lampo principale e quindi un‘attenuazione dell‘effetto degli occhi rossi. Questa funzione è
disponibile con qualsiasi programma di esposizione. Per ulteriori informazioni
al riguardo consultate il libretto di istruzioni della camera.
• Modo TTL-HSS
Questa funzione permette di utilizzare il flash con tempi di posa più rapidi
di quelli di sincronizzazione della camera. E‘ interessante nei primi piani
con luce ambiente molto chiara, quando la profondità di campo deve essere limitata con aperture del diaframma relativamente grandi.
• Modo flash ETTL (solo con Canon SCA 3102)
Questa funzione serve per determinare le caratteristiche di riflessione del
704 47 0099.A3
54 MZ-4i
01.02.2007
13:41 Uhr
Seite 155
soggetto con un prelampo appena prima di scattare la foto.
• Modo ETTL-HSS (solo con Canon SCA 3102)
Questa funzione permette di utilizzare il flash con tempi di posa più rapidi
di quelli di sincronizzazione della camera.
• Controllo del flash 3D TTL (solo con Nikon SCA 3402)
Con questa funzione vengono inviati lampi di misurazione appena visibili
subito dopo aver premuto il pulsante di scatto della camera e prima dell‘attivazione della tendina. Questi lampi permettono alla camera di ottenere
informazioni sulla luminosità e sul contrasto.
18. Accessori opzionali
☞ Il cattivo funzionamento e i danni eventualmente provocati al meca-
blitz dall‘utilizzo di accessori non prodotti dalla Metz non sono coperti
dalla nostra garanzia.
• Adattatore del sistema SCA 3xx
per l‘uso del flash con fotocamere predisposte. Vedi relativo foglio di istruzioni per l‘uso separato.
• Adattatore del sistema SCA 3xx2
per l‘uso del flash con le fotocamere predisposte alla trasmissione digitale
dei dati. E‘ in grado di eseguire un maggior numero di funzioni rispetto al
sistema SCA. Vedi foglio di istruzioni per l‘uso separato.
• Set di filtri 44-32
(art. N° 00004432A)
comprende 4 filtri a colori per illuminazioni d‘effetto e un filtro trasparente
per la ripresa di pellicole colorate di qualsiasi colore.
• Mecabounce 44-90
(art. N° 000044900)
questo diffusore permette di realizzare con estrema semplicità un‘illuminazione tenue. L‘effetto che se ne ricava è straordinario poiché crea un‘immagine artistica. Il colore della pelle delle persone risulta molto naturale. I
valori di portata si riducono del fattore 2 in rapporto alla perdita di luce.
• Power-Pack P50
(art. N° 00012950A)
per un numero di lampi maggiore e tempi di ricarica più brevi (circa
300 lampi a piena potenza). Si prega di ordinare anche il cavo V54-50
(art. N° 000054505) di connessione.
• Power-Pack P40
(art. N° 000129405)
per un numero di lampi maggiore grazie alla maggiore capacità rispetto
alle batterie tradizionali NiCd del tipo IEC KR 15/51 (Mignon). Si prega
di ordinare anche il cavo V54-40 (art. N° 000054400) di connessione.
• Schermo riflettente 54-23
(art. N° 000054236)
riflette una luce diffusa per ammorbidire le ombre.
• Staffa per fotocamera 40-36/2
(art. N° 000040363)
per fissare lateralmente il flash sulla fotocamera.
•Adattatore slave SCA 3083
(art. N° 000330838)
permette il comando senza cavi di più flash del tipo 54 MZ-.. e 70 MZ-4.
ƴ
155
704 47 0099.A3
54 MZ-4i
01.02.2007
13:41 Uhr
Seite 156
19. Cosa fare in caso di anomalie
ƴ
(Ca) = sistema Canon; utilizzo del mecablitz con SCA 3102
(Mi) = sistema Minolta; utilizzo del mecablitz con SCA 3302
(N) = sistema Nikon; utilizzo del mecablitz con SCA 3402
(Pe) = sistema Pentax; utilizzo del mecablitz con SCA 3702
Se nel display LC compaiono informazioni incomprensibili, o se il flash non
funziona come previsto nelle varie modalità, procedete come segue:
• spegnete il flash con l’interruttore principale.
• togliete le batterie o gli accumulatori.
• accendete il flash per circa 1 secondo, quindi spegnetelo subito.
• inserite nuovamente le batterie (quelle precedentemente utilizzate o altre
nuove o accumulatori).
Impossibile selezionare sul mecablitz la sincronizzazione sulla seconda tendina (modo REAR).
• La sincronizzazione sulla seconda tendina (REAR) può essere selezionata
sul mecablitz solo se questo è equipaggiato con un adattatore adeguato
SCA 3xx2 (vedi libretto d’istruzioni dell’adattatore SCA) e montato su una
camera attivata. Tra la camera e l’dattatore SCA deve aver avuto luogo
almeno una volta uno scambio di dati (perché ciò accada, è sufficiente
premere brevemente il pulsante di scatto della camera, senza effettuare lo
scatto). La camera deve supportare la sincronizzazione sulla seconda tendina (vedi istruzioni per l’uso della camere e dell’adattatore SCA)!
• (Ni) sul mecablitz è attivato il modo flash 3D Nikon; sul display compare il simbolo . Il modo flash 3D Nikon non può essere combinato con il modo REAR.
Rimedio possibile: disattivare il modo 3D, quindi accendere il modo REAR.
• (Ni) sulla camera Nikon è attiva la funzione prelampo per ridurre l’effetto
"occhi rossi". Sul display LC del mecablitz compare il simbolo . La funzione prelampo non può essere combinata con il modo REAR.
Rimedio possibile: disattivare sulla camera la funzione prelampo contro
l’effetto "occhi rossi", quindi selezionare REAR.
156
• (Mi) sulle camere Minolta la sincronizzazione sulla seconda tendina (REAR)
deve essere generalmente impostata sulla camera stessa! Sul mecablitz non
compare alcuna indicazione del tipo di sincronizzazione! Per sapere se il
modo REAR è disponibile con la camera e per conoscere la procedura necessaria per l’installazione, consultare le istruzioni d’uso della camera.
Impossibile selezionare sul mecablitz il modo flash lineare HSS.
Il modo flash (E-) TTL-HSS (sincronizzazione di breve durata) è disponibile al
momento solo con il mecablitz 54 MZ-..!
• Il modo flash può essere selezionato sul mecablitz solo se questo è equipaggiato con un adattatore adeguato SCA 3xx2 (vedi libretto d’istruzioni
dell’adattatore SCA) e montato su una camera attivata. Tra la camera e
l’dattatore SCA deve aver avuto luogo almeno una volta uno scambio di
dati (perché ciò accada, è sufficiente premere brevemente il pulsante di
scatto della camera, senza effettuare lo scatto). La camera deve supportare
il modo flash (E-) TTL-HSS nel modo flash selezionato (Manuale M o TTL)
(vedi istruzioni per l’uso della camera e dell’adattatore SCA)!
• Non è possibile combinare il modo flash (E-) TTL-HSS con il Modo flash
Metz a distanza senza cavi.
• Il modo flash (E-) TTL-HSS può essere attivato sul mecablitz 54 MZ-.. nel
modo Manuale M (Ca, Mi, Ni) o nel modo flash TTL (Ca, Mi), in funzione
del tipo di camera!
• Perché il modo flash (E-) TTL-HSS possa essere attivato, la seconda parabola del mecablitz non deve essere accesa!
• (Mi) Se la parabola principale è inclinata, il modo flash (E-) TTL-HSS non
può avere luogo. Il tempo di otturazione della camera viene limitato al
tempo sincro flash della camera. Nel mirino della camera scompare l’indicazione (H) per il modo flash (E-) TTL-HSS!
(Ni) Impossibile attivare sul mecablitz il modo 3D nel modo TTL.
• Sul mecablitz è attivato il modo REAR; nel display compare l’indicazione
"REAR".
Rimedio possibile: spegnere il modo REAR, quindi accendere il modo 3D.
704 47 0099.A3
54 MZ-4i
01.02.2007
13:41 Uhr
Seite 157
• Il mecablitz deve essere equipaggiato con l’adattatore SCA 3402. Il modo
3D TTL può essere installato sul mecablitz solo se questo è montato su una
camera attivata che supporta il modo 3D. Tra la camera e l’adattatore
SCA deve aver avuto luogo almeno una volta uno scambio di dati (perché
ciò accada, è sufficiente premere brevemente il pulsante di scatto della
camera, senza effettuare lo scatto).
• Il modo flash 3D TTL non viene supportato se il mecablitz non ha il flash
carico, se la parabola non si trova nella posizione normale o se la seconda parabola del mecablitz è accesa!
• Nel Modo Metz a distanza senza cavi non è disponibile il modo flash 3D
TTL!
• Il modo 3D TTL è disponibile solo con i mecablitz 40 MZ-3(i), 50 MZ-5,
54 MZ-.. und 70 MZ-...!
(Ca) Impossibile attivare il modo E-TTL.
• Il mecablitz deve essere equipaggiato con un adattatore SCA 3102. Il modo E-TTL può essere impostato sul mecablitz, solo se questo è montato su
una camera attivata che supporta anche il modo E-TTL. Tra la camera e
l’dattatore SCA deve aver avuto luogo almeno una volta uno scambio di
dati (perché ciò accada, è sufficiente premere brevemente il pulsante di
scatto della camera, senza effettuare lo scatto).
• Il modo flash E-TTL non viene supportato se la seconda parabola del mecablitz è attiva!
• L’attivazione della seconda parabola del mecablitz provoca la commutazione del modo E-TTL sul modo normale TTL! Problema con EOS D30: nel
modo TTL non è più possibile attivare il mecablitz; eventualmente, commutare su "Automatico"!
• Il modo E-TTL non è disponibile nel Modo Metz a distanza senza cavi!
• Il modo E-TTL è disponibile solo con i mecablitz 40 MZ-3i, 40 MZ-1i e 54 MZ-..!
Impossibile caricare il mecablitz nel Modo a distanza.
• Sul mecablitz la seconda parabola è attiva; nel display compare il simbolo.
Rimedio possibile: spegnere la seconda parabola.
La spia di carica del flash sul mecablitz lampeggia.
• Sul mecablitz è attivata la funzione luce pilota.
Rimedio: disattivare la funzione luce pilota sul mecablitz.
Impossibile modificare sul mecablitz la sensibilità della pellicola ISO.
• Il mecablitz è equipaggiato con un adattatore SCA 3xx2 e viene utilizzato
con una camera che invia al mecablitz i dati per la sensibilità della pellicola.
In questo caso la modifica della sensibiltà della pellicola ISO è bloccata.
Impossibile modificare sul mecablitz l’apertura del diaframma.
• Il mecablitz è equipaggiato con un adattatore SCA 3xx2 e viene utilizzato
con una camera che invia al mecablitz i dati per l’apertura del diaframma.
In questo caso la modifica dell’apertura del diaframma è bloccata.
Nel display LC del mecablitz viene visualizzata solo l’indicazione "-" invece del valore della distanza flash-soggetto.
• La parabola del mecablitz non si trova nella sua posizione base. La distanza flash-soggetto viene indicata solo se la parabola si trova nella sua posizione base, ciò significa che la parabola non deve essere orientata né in
senso orizzontale né in quello verticale.
Nel display LC del mecablitz lampeggia il simbolo della seconda parabola.
La spia di carica del flash sul mecablitz si accende.
• La seconda parabola è accesa, anche se la parabola principale si trova
nella sua posizione base, cioè non è orientata. L’impiego della seconda
parabola è giustificato solo se questa assume la funzione di schiarita
quando la parabola principale non si trova nella sua posizione base. Il
simbolo della seconda parabola lampeggia per indicare la necessità di
spegnimento della seconda parabola. Se si spegne la seconda parabola, il
simbolo nel display scompare. Se la parabola principale non si trova nella
sua posizione normale, il simbolo si illumina in modo permanente.
Nel display LC del mecablitz lampeggia il simbolo della seconda parabola.
La spia di carica del flash sul mecablitz non si accende.
• Il mecablitz è stato attivato nel modo Controller a distanza. Sul display LC
compare il simbolo "Co". Il modo a distanza viene supportato tuttavia solo
157
ƴ
704 47 0099.A3
54 MZ-4i
01.02.2007
13:41 Uhr
Seite 158
dalla parabola principale. Poiché la spia di carica flash non si accende, il
mecablitz non emette alcun flash per la ripresa.
Rimedio: disattivare il modo Controller a distanza o spegnere la seconda
parabola.
Nel display del mecablitz compare il simbolo "Co" al posto del valore della distanza flash-soggetto.
• Il mecablitz si trova nel Modo Controller a distanza. In questa modalità
generalmene non viene indicata mai la distanza flash-soggetto.
Impossibile selezionare o regolare la correzione dell’esposizione flash con
la manopola nel modo Controller a distanza del mecablitz.
☞ Nota: la correzione dell’esposizione flash non è mai efficace nel modo
Automatico a distanza.
ƴ
• Nel modo TTL a distanza è possibile attivare la correzione dell’esposizione
flash, se questa viene impostata prima che il mecablitz venga impostato nel
modo Controller. Il valore di compensazione non viene indicato nel modo
Controller a distanza, ma rimane attivo. Al posto del valore di compensazione,
nel display LC del mecablitz viene indicato il canale remoto "Ad1" o "Ad2".
(Ni) Impossibile impostare sul mecablitz la funzione Nikon "Lampo di schiarita con controllo a matrice" o "Lampo di schiarita con multisensore 3D".
• Il Modo di schiarita, quale dei due esso sia, può essere impostato sul mecablitz solo se questo è equipaggiato con un adattatore SCA 3402 ed è montato su una camera attivata che supporta la suddetta funzione di lampo di
schiarita. Tra la camera e l’dattatore SCA deve aver avuto luogo almeno una
volta uno scambio di dati (perché ciò accada, è sufficiente premere brevemente il pulsante di scatto della camera, senza effettuare lo scatto).
• Nel Modo a distanza, con la parabola principale orientata o la seconda
parabola attiva, la funzione "Lampo di schiarita con multisensere 3D"
(Nikon) non viene supportata; pertanto tale funzione non può essere attivata anche alle condizioni suddette.
• Quale delle funzioni "Lampo di schiarita" Nikon debba essere attivata, dipende dal tipo di camera.
158
Nel display LC del mecablitz lampeggiano il simbolo del diaframma
e
il valore di apertura.
• Date le condizioni di ripresa o data la regolazione della camera, nel modo Automatico, ci si trova al di fuori dal campo di regolazione della luce
del mecablitz.
Rimedio possibile: riducete la luminosità ambiente, utilizzate una pellicola
meno sensibile o impostate un valore di apertura del diaframma maggiore
sulla camera o sul mecablitz.
Il riflettore luce rossa AF del mecablitz non si attiva.
Possibili cause:
• La luminosità ambiente è sufficiente al sensore AF della camera per la
messa a fuoco.
• La camera attiva, in caso di necessità, il proprio illuminatorre ausilare AF.
• attivato un altro modo AF al posto del modo Single-AF (S).
• attivato sulla camera un campo di misurazione AF decentrale.
Possibile rimedio:
• Selezionate sulla camera il modo AF Single-AF (S) (per maggiori informazioni, consultate il libretto di istruzioni della camera).
• Attivare nel mirino della camera il sensore AF centrale.
Problemi con il Modo Controller a distanza e con il Flash-Bracketing.
• Nel Modo Controller a distanza non è disponibile la sequenza di esposizioni flash! Se si imposta una sequenza di esposizioni flash e il mecablitz
viene regolato sul Modo a distanza, la sequenza di esposizioni flash non
viene più indicata e neppura eseguita!
Modo Controller a distanza e correzione dell’esposizione flash.
• Se si seleziona sul mecablitz la correzione dell’esposizione e si commuta
sul Modo Controller a distanza, le riprese successive saranno effettuate con
il valore di compensazione impostato. Sul display del mecablitz non compare tuttavia nessun (!) valore di compensazione!
704 47 0099.A3
54 MZ-4i
01.02.2007
13:41 Uhr
Seite 159
(Ni) Nessuna indicazione di sottoesposizione Nikon nel Controllo a distanza.
• Alcune camere Nikon emettono un segnale di avvertimento (-EV) sul display
LC del mecablitz in caso di sottoesposizione dovuta al lampo flash. Nel
Controllo a distanza questa funzione non viene supportata dal mecablitz.
Nessun Modo REAR con la sincronizzazione HSS.
• Se sul mecablitz è attivata la sincronizzazione di breve durata HSS, non è
possibile impostare il Modo REAR (sincronizzazione sulla seconda tendina).
• Se si attiva la sincronizzazione di breve durata HSS con il Modo REAR
inserito, il Modo REAR viene disattivato!
Sul display del mecablitz non viene indicata la sensibilità della pellicola ISO.
• Il mecablitz si trova nel Controllo a distanza ("Co" o "SL") o nel Modo
Stroboscopico. In queste modalità generalmente non viene indicato sul
display del mecablitz alcun valore ISO!
• Sulle camere Canon e Minolta non viene generalmente indicato il valore
ISO nel display LC!
Gli impulsi luminosi del flash nel Modo 3D Nikon attivano il flash asservito
(Slave) in modo incontrollato.
☞ Se il fotosensore nell’adattatore asservito (Slave) SCA 3083 capta la
luce di un lampeggiatore che funziona nel Modo 3D Nikon, il mecablitz
asservito (Slave) viene attivato in modo incontrollato!
• L’unico rimedio possibile è quello di commutare il Modo 3D sul normale
Modo TTL (senza 3D).
Il valore di compensazione dell’esposizione lampeggia nel display del
mecablitz.
Sul mecablitz viene impostato, per esempio nel modo TTL, un valore di compensazione dell’esposizione (EV). Una volta memorizzato, il valore di compensazione lampeggia sul display LC del mecablitz.
Possibili cause:
la camera non consente l’impostazione di un valore di compensazione sul
mecablitz! Eventualmente il valore di compensazione desiderato deve essere
impostato sulla camera stessa (vedi libretto di istruzioni della camera). Il va-
lore di compensazione che lampeggia nel display LC del mecablitz non influisce affatto sulla ripresa!
Attenzione: L’avvertimento segnalato con il lampeggio del valore di compensazione non viene supportato da tutte le camere! Sulla maggior parte delle
camere la correzione dell’esposizione flash può essere impostata ed attivata
nel Modo Automatico del mecablitz (eccezione: per esempio Minolta!).
Nel Modo TTL non è possibile impostare la sequenza di esposizioni flash.
Con il tasto "Select" del mecablitz non si può richiamare la funzione della
sequenza di esposizioni flash "Fb" (flash-bracketing) per esempio nel Modo TTL.
Possibili cause: alcune camere o sistemi di camere non supportano la regolazione di una correzione dell’esposizione sul mecablitz nel Modo TTL. Tuttavia, siccome la sequenza di esposizioni flash funziona sulla base dei valori
di compensazione, la possibilità di impostazione della sequenza di esposizioni flash viene soppressa sin dall’inizio nel menu del mecablitz. Nella
maggior parte delle camere tuttavia la sequenza di esposizioni flash "Fb"
può essere impostata ed attivata nel Modo Automatico (A) del mecablitz
(eccezione: per esempio Minolta!). Sul mecablitz 70 MZ-4 non si può impostare di base alcuna sequenza di esposizioni flash "Fb"!
(Pe) Nel mirino della camera non viene indicato lo stato di carica del flash,
nonostante la spia di carica del mecablitz sia illuminata. Al momento della
ripresa il mecablitz non si accende.
• Il mecablitz funziona nel Modo Spot-Beam, in questo caso viene supportato
solo il riflettore luce rossa AF del mecablitz. Il selettore del Modo di funzionamento dell’adattatore SCA 3702 si trova nella posizione "SB".
Possibile rimedio: Spostare il selettore del Modo di funzionamento dell’adattatore SCA 3702 nella posizione sinistra più estrema
, ossia sulla posizione di sincronizzazione sulla prima tendina.
(Pe) Nel mirino compare l’indicazione del controllo dell’esposizione (la spia
di carica del flash lampeggia), ma non segue alcuna ripresa.
• Si tratta di un’indicazione di avvertimento. La posizione della parabola
zoom non è sufficiente per poter illuminare completamente il soggetto. Probabilmente l’adattamento automatico della focale sul mecablitz (AUTO159
ƴ
704 47 0099.A3
ƴ
54 MZ-4i
01.02.2007
13:41 Uhr
Seite 160
ZOOM; CZ) è stato disattivato ed è stata selezionata una focale della parabola maggiore della focale dell’obiettivo. Per esempio: focale obiettivo
70 mm, focale parabola 85 mm.
Possibile rimedio: attivare l’adattamento automatico della focale sul mecablitz (AUTO-ZOOM; CZ) o impostare una focale per la parabola uguale o
inferiore alla focale dell’obiettivo. Esempio: focale obiettivo 70 mm, focale
parabola 70 mm, 50 mm o inferiore! Per la procedura di impostazione
consultare il libretto d’istruzioni del mecablitz!
(Pe) La parabola zoom motorizzata del mecablitz si posiziona automaticamente su 35 mm, nonostante l’impiego di un obiettivo con un’altra focale.
Nel display LC del mecablitz compare l’indicazione "Auto-Zoom".
• L’obiettivo utilizzato è un obiettivo Non-AF o un obiettivo che non trasmette
i dati per la focale alla camera! Pertanto la parabola zoom del mecablitz
si posiziona automaticamente sul 35 mm.
Possibile rimedio: adattate manualmente la posizione della parabola del
mecablitz alla focale dell’obiettivo (vedi libretto d’istruzioni del mecablitz)!
Nota: può succedere che la spia di carica del flash lampeggi nel mirino
della camera se la focale della parabola è maggiore di 35 mm, ma ciò
non ha alcuna ripercussione sull’illuminazione della ripresa. Dopo la ripresa, osservare in questo caso la spia di controllo dell’esposizione del mecablitz!
Il mecablitz non emette alcun lampo.
• Il mecablitz si è spento automaticamente.
• Dopo l’accensione del mecablitz e lo spegnimento automatico del flash premere leggermente il pulsante di scatto della camera senza effettuare lo scatto, in modo gli apparecchi interessati si possano regolare in base alla situazione data.
Sul display LC del mecablitz compare "ZE" al posto della posizione zoom.
Non è stato possibile bloccare il mecablitz nella posizione zoom. In alcuni
casi le batterie sono quasi scariche e l’energia non è sufficiente per realizzare l’operazione di regolazione meccanica.
Spegnere e riaccendere il mecablitz o/e sostituire le batterie esaurite.
160
Smaltimento delle batterie
Le batterie non vanno gettate insieme ai rifiuti domestici.
Si prega di utilizzare un sistema di smaltimento adeguato, p. es. portandole
al negozio dove le si è acquistate o ad un centro di raccolta apposito.
Si prega di effettuare lo smaltimento soltanto di batterie scariche.
Le batterie sono scariche, quando l’apparecchio, alimentato dalle stesse,
- si spegne e segnala „batteria vuota“
- non funziona regolarmente dopo un uso prolungato delle batterie.
Per una protezione contro il cortocircuito si consiglia di coprire i poli della
batteria con del nastro autoadesivo.
704 47 0099.A3
54 MZ-4i
01.02.2007
13:41 Uhr
Seite 161
ƴ
161
704 47 0099.A3
1.
2.
2.1
2.2
2.2.1
2.2.2
2.3
2.4
2.4.1
2.4.2
2.4.3
į
3.
3.1
4.
4.1
5.
5.1
6.
6.1
6.2
6.3
7.
7.1
7.2
7.3
8.
8.1
8.2
162
54 MZ-4i
01.02.2007
13:41 Uhr
Seite 162
į
Indicaciones de seguridad . . . . . . . . . . . . . . . . . . . . . . . . . . . 165
La preparación del flash . . . . . . . . . . . . . . . . . . . . . . . . . . . . 165
La sujeción del flash en la cámara . . . . . . . . . . . . . . . . . . . . . 165
Fuentes de energía . . . . . . . . . . . . . . . . . . . . . . . . . . . . . . . . 166
Elección de las fuentes de energía. . . . . . . . . . . . . . . . . . . . . . 166
Cambio de las fuentes de energía. . . . . . . . . . . . . . . . . . . . . . 166
Conexión y desconexión del flash . . . . . . . . . . . . . . . . . . . . . . 166
Filosofía de manejo . . . . . . . . . . . . . . . . . . . . . . . . . . . . . . . . 166
Selección y ajuste de los funcionamientos TTL / A / M /
(Estroboscópico) . . . . . . . . . . . . . . . . . . . . . . . . . . . . . . . . . . 166
Selección y ajuste de las funciones especiales . . . . . . . . . . . . . 166
Ajustes ISO / Zoom / Diafragma , “P” (Potencia parcial
de luz) y ”EV” (Corrección de exposición) . . . . . . . . . . . . . . . . 167
El funcionamiento TTL. . . . . . . . . . . . . . . . . . . . . . . . . . . . . . . 167
Funcionamientos adicionales en TTL . . . . . . . . . . . . . . . . . . . . 168
El funcionamiento automático . . . . . . . . . . . . . . . . . . . . . . . . 168
Funcionamientos adicionales en Automático . . . . . . . . . . . . . . 169
El funcionamiento manual . . . . . . . . . . . . . . . . . . . . . . . . . . . 169
Funcionamientos adicionales en Manual . . . . . . . . . . . . . . . . . 171
Destellos indirectos . . . . . . . . . . . . . . . . . . . . . . . . . . . . . . . . 171
Destellos indirectos con reflector adicional conectado . . . . . . . . 171
Destellos indirectos en Automático y TTL . . . . . . . . . . . . . . . . . 172
Destellos indirectos en Manual . . . . . . . . . . . . . . . . . . . . . . . . 172
El funcionamiento Remoto . . . . . . . . . . . . . . . . . . . . . . . . . . . 172
El funcionamiento Remoto TTL sin cable de Metz . . . . . . . . . . . 172
El funcionamiento Remoto A sin cable de Metz . . . . . . . . . . . . 173
Valoración de las condiciones de luz en Remoto . . . . . . . . . . . 174
Destellos de aclaración con luz diurna . . . . . . . . . . . . . . . . . . 174
Destellos de aclaración en TTL . . . . . . . . . . . . . . . . . . . . . . . . 174
Destellos de aclaración en Automático . . . . . . . . . . . . . . . . . . 174
9.
El funcionamiento estroboscópico . . . . . . . . . . . . . . . . . . . . . 175
10.
La indicación de control de exposición . . . . . . . . . . . . . . . . . . 176
11.
El destello de medición AF . . . . . . . . . . . . . . . . . . . . . . . . . . . 176
12.
Funciones especiales . . . . . . . . . . . . . . . . . . . . . . . . . . . . . . . 177
12.1 Función Beep (señal acústica) . . . . . . . . . . . . . . . . . . . . . . . . . 177
12.2 Bloqueo y desbloqueo de los elementos de manejo (Función Key) 178
12.3 Desconexión automática de flash / Auto-Off . . . . . . . . . . . . . . 178
12.4 REAR – Sincronización a la 2ª cortinilla . . . . . . . . . . . . . . . . . 178
12.5 Luz de ajuste / Modelling Light
. . . . . . . . . . . . . . . . . . . . 179
12.6 Adaptación a la distancia focal del formato de cámara . . . . . . 179
12.7 Serie de destellos ”Fb” (flash-bracketing). . . . . . . . . . . . . . . . . 180
12.8 Retorno a los ajustes básicos . . . . . . . . . . . . . . . . . . . . . . . . . 181
12.9 Reflector con Zoom por motor . . . . . . . . . . . . . . . . . . . . . . . . 181
12.10 Indicación m - pies . . . . . . . . . . . . . . . . . . . . . . . . . . . . . . . . 182
13.
Difusor gran angular. . . . . . . . . . . . . . . . . . . . . . . . . . . . . . . 182
14.
Correcciones de exposición manuales . . . . . . . . . . . . . . . . . . 182
15.
Mantenimiento . . . . . . . . . . . . . . . . . . . . . . . . . . . . . . . . . . . 183
16.
Datos técnicos. . . . . . . . . . . . . . . . . . . . . . . . . . . . . . . . . . . . 184
17.
Terminología. . . . . . . . . . . . . . . . . . . . . . . . . . . . . . . . . . . . . 184
18.
Accesorios opcionales . . . . . . . . . . . . . . . . . . . . . . . . . . . . . . 186
19.
En caso de problemas . . . . . . . . . . . . . . . . . . . . . . . . . . . . . . 186
Tabla 1: Números-guía con máxima potencia de luz (P 1) . . . . . . . . . . 192
Tabla 2: Duraciones de destellos en los escalones de potencias
parciales de luz . . . . . . . . . . . . . . . . . . . . . . . . . . . . . . . . . . 193
Tabla 3: Velocidades de obturación en el funcionamiento estrob. . . . . . 194
Tabla 4: iempos de secuencias de dest. y núm. de dest. con los dist.
tipos de pilas . . . . . . . . . . . . . . . . . . . . . . . . . . . . . . . . . . . . 195
Tabla 5: Números-guía max. en el funcionamiento HSS . . . . . . . . . . . . 195
Tabla 6: Funcionamiento remoto . . . . . . . . . . . . . . . . . . . . . . . . . . . . . 198
704 47 0099.A3
54 MZ-4i
01.02.2007
13:41 Uhr
Seite 163
Preámbulo
Le agradecemos que se haya decidido por un producto de Metz y nos complace saludarle como usuario de nuestra marca.
Seguramente deseará conectarlo cuanto antes, pero le recomendamos leer
estas instrucciones para que su flash funcione correctamente.
Estas instrucciones de manejo describen el uso de un flash dedicado con un
pie estándar 301 y un adaptador SCA 3xx2.
☞
Por favor abra la doble página con el dibujo al final de las
instrucciones.
Este flash es apropiado para:
• todas las cámaras con pie estándar y contacto central.
• todas las cámaras con pie estándar sin contacto central, pero utilizando un
cable sincro (vea accesorios opcionales).
• todas las cámaras del sistema.
Conseguirá la mejor adaptación a su cámara de sistema utilizando un
SCA 3xx2 o 3xx. La tabla SCA le ayuda a encontrar el adaptador correspondiente a su cámara. Además encontrará las funciones especiales que
realizará con este adaptador.
Para más información, visite www.metz.de en Internet
Le deseamos muchas satisfacciones con su nuevo flash.
Resumen de modos de funcionamiento • y funciones especiales ◊
54 MZ-.. con adaptador SCA 3xx2:
Cuando utilice un mecablitz 54 MZ-.. con el adaptador SCA 3xx2 podrá
varias funciones adicionales. Casi todas las funciones especiales
Ǻ realizar
de los fabricantes de cámara son factibles con este flash! Todo depende
del modelo de la cámara y su sistema. Para más información consulte la
tabla SCA o las instrucciones de los adaptadores SCA que use.
• Funcionamiento TTL1)
- Funcionamiento Remoto TTL de Metz1)
- Funcionamiento ETTL Canon1)
- Funcionamiento ETTL-HSS Canon1) 2)
- Funcionamiento TTL-HSS Minolta1) 2)
- Funcionamiento de destello de aclaración matricial Nikon
- Funcionamiento de destello de aclaración Multi-Sensor 3D Nikon
- Funcionamiento D-TTL Nikon3)
- Funcionamiento D-TTL-3D Nikon3)
- Funcionamiento i-TTL Nikon4)
- Funcionamiento i-TTL-BL Nikon4)
- Funcionamiento TTL Olympus3) con cámaras digitales
• Funcionamiento manual con potencias parciales de luz
• Funcionamiento2) manual HSS con Canon, Minolta, Nikon
• Funcionamiento automático
- Funcionamiento Remoto Automático de Metz
• Funcionamiento Estroboscópico
◊ Corrección de exposición manual en TTL1) y A
◊ Series de destellos Fb en TTL y A
◊ Sincronización a la 1ª o 2ª cortinilla
◊ Control automático del zoom por motor
◊ Control automático de destello de medición AF
◊ Indicación automática de alcance
163
į
704 47 0099.A3
54 MZ-4i
01.02.2007
13:41 Uhr
Seite 164
◊ Control automático de sincronización de flash
◊ Función despertador / Wake –up
◊ Indicación de disposición en el visor de la cámara
◊ Indicación de control de exposición en el visor de la cámara
◊ Control de ignición (Pentax, Minolta)
◊ Predestello contra ojos rojos (Nikon)
◊ Función de luz de ajuste
1) solo, si el ajuste existe en la cámara
2) HSS = High Speed Synchronisation = sincronización rápida
3) solo con 54 MZ-4
4) solo con 54 MZ-4i con Nikon SCA adapter 3402-M3
5) Olympus E-1 solo con 54 MZ-4i con SCA adapter 3202-M3
į
54 MZ-.. con adaptador SCA 3xx:
¡Cuando utilice este flash con un SCA 3xx las funciones especiales estaǺ rán limitadas! La disponibilidad de las funciones depende del sistema de
cámara y el modelo. ¡Para más información vea la tabla SCA o las instrucciones del adaptador SCA correspondiente!
• Funcionamiento TTL1)
- Funcionamiento Remoto TTL de Metz1)
• Funcionamiento Manual con potencias parciales de luz
• Funcionamiento Automático
- Funcionamiento Automático Remoto de Metz
• Funcionamiento Estroboscópico
◊ Corrección de exposición Manual en A
◊ Series de destellos Fb en A
◊ Control de sincronización automática
◊ Función despertador / Wake-up
◊ Indicación de disposición en el visor de la cámara
164
◊ Indicación de control de exposición en el visor de la cámara
◊ Función de luz de ajuste
1) solo, si el ajuste existe en la cámara
54 MZ-.. con pie estándar 301 (control a través del contacto central o cable
sincro):
• Funcionamiento Manual con potencias parciales de luz
• Funcionamiento Automático
- Funcionamiento Automático Remoto de Metz
• Funcionamiento Estroboscópico
◊ Corrección de exposición manual en A
◊ Series de destellos Fb en A
◊ Función de luz de ajuste
704 47 0099.A3
54 MZ-4i
01.02.2007
13:41 Uhr
Seite 165
1. Indicaciones de seguridad
2. La preparación del flash
• El flash solo se debe usar para fotografiar.
• No dispare el flash cerca de gases o líquidos inflamables (gasolina, etc.)
¡PELIGRO DE EXPLOSION!
• No fotografíe con flash a conductores de coche, autobús, bicicleta, moto
o tren. ¡Puede deteriorar la vista y producir accidentes!
• ¡No dispare el flash directamente a los ojos de personas o animales, ya
que puede producir defectos en la retina y causar graves deterioros a la
vista – hasta la ceguera!
• ¡Solo debe utilizar las fuentes de energía recomendadas y permitidas!
• ¡No exponga pilas o baterías a calor excesivo como sol, fuego, etc.!
• ¡No tire pilas gastadas al fuego!
• Las pilas gastadas pueden soltar ácido, el cual puede dañar los contactos del flash. Quite siempre las pilas gastadas del flash.
• Las pilas secas no se pueden recargar.
• ¡No exponga el flash o cargador a gotas o salpicaduras de agua!
• ¡Proteja su flash del calor fuerte y alta humedad del aire! ¡No guarde su
flash en la guantera del coche!
• Al efectuar un destello no debe haber ningún cuerpo opaco delante del
reflector. El cristal del reflector debe estar limpio. En caso contrario
podría provocar quemaduras del material o del reflector.
• Después de varios destellos no debe tocar el reflector. ¡Peligro de quemadura!
• No abra el aparato. ¡ALTA TENSION!
• Los componentes en su interior deben ser reparados por un técnico formado.
• En series de destellos a plena potencia y con intervalos cortos usando
baterías NC, tiene que observar, que después de cada 15 destellos hace
falta una pausa de 10 minutos para evitar una sobre-carga del flash.
2.1 La sujeción del flash en la cámara
☞ Antes del montaje o desmontaje desconectar siempre la cámara y el
flash.
El mecablitz solo puede ser colocado en la cámara con pie estándar 301 o
un adaptador SCA 3xx o SCA 3xx2 (accesorio opcional).
El mecablitz se suministra con el pie estándar 301 para simple sincronización de flash. La velocidad debe ser igual o más lenta que la de la cámara.
Los flashes que vienen en Set llevan el adaptador SCA dedicado en vez del
pie estándar 301.
Montaje del pie estándar o adaptador SCA:
☞ Antes de montar o desmontar el pie estándar o el adaptador SCA hay
que desconectar el mecablitz con el interruptor principal.
• Coger por el centro la tapa de protección (solo usando un adaptador 3xx2)
y sacarla.
• Introducir el adaptador SCA o pie estándar 301 hasta el tope.
Desmontaje del pie estándar o adaptador SCA:
• Desconectar el mecablitz con el interruptor principal (Grab. 1).
• Mover la tapa del compartimento de pilas (Grab. 3) hacia abajo y
abrirla.
• Presionar el botón de desbloqueo (Grab. 3) de color y extraer simultáneamente el pie estándar o adaptador SCA.
Montaje del mecablitz:
Montar el mecablitz en la zapata de la cámara y sujetarlo con la tuerca ribeteada.
165
į
704 47 0099.A3
54 MZ-4i
01.02.2007
13:41 Uhr
Seite 166
☞ Si en el display LC aparece una llave, vea el capítulo ”12.2 Bloqueo y
2.2 Fuentes de energía
2.2.1 Elección de las fuentes de energía
Puede usar el flash con:
• 4 elementos NC tipo IEC KR 15/51,
que ofrecen intervalos cortos entre destellos y economía, por ser recargables.
• 4 elementos NiMH,
más capacidad que NC y más ecológico, ya que carecen de cadmio.
• 4 pilas alcalino-manganesas tipo IEC LR6,
pilas sin mantenimiento para rendimientos módicos.
• Power Pack P 40 (accesorio opcional),
ofrece control por microprocesador e indicación de estado de carga (con
función descarga).
• Power Pack P 50 (accesorio opcional),
ofrece control por microprocesador e indicación de estado de carga (con
función descarga).
2.2.2 Cambio de las fuentes de energía
į 2.3 Conexión y desconexión del flash
El flash se conecta con el interruptor principal (Grab. 1). En la posición
superior On está siempre6) conectado – la indicación de funcionamiento (Grab. 1) se ilumina.
6) vea ”12.3 Desconexión automática de flash”
166
Para desconectar mover el interruptor principal (Grab. 1) a la posición
inferior. Si no va usar el flash durante un tiempo, le recomendamos:
- Desconectar el flash con el interruptor principal (Grab. 1).
- Extraer las fuentes de energía (pilas, baterías).
2.4 Filosofía de manejo
2.4.1 Selección y ajuste de los funcionamientos TTL / A / M /
(Estroboscópico)
Seleccionar los funcionamientos TTL, A (Automático), M (Manual) o
(Estroboscópico) con la tecla Mode (Grab. 1). Pulsar esta tecla tantas
veces hasta que aparezca el funcionamiento deseado indicado por el símbolo que parpadea. Para memorizarlo presionar sobre la rueda en el sentido
de la flecha. Si no presiona la rueda de ajuste, el funcionamiento quedará
automáticamente memorizado después de 5 segundos. ¡Una vez memorizado, el símbolo del funcionamiento se indica con luz continua en el display
(sin parpadear)!
Ayuda: La descripción de cada funcionamiento sigue en los capítulos siguientes!
2.4.2 Selección y ajuste de las funciones especiales
Puede seleccionar funciones especiales adicionales con la tecla Select (Grab. 1) en cualquier modo de funcionamiento:
Al presionar la tecla Select aparecen las funciones especiales "Beep" ,
desconexión automática
, REAR7) (sincronización a la 2ª cortinilla), luz de ajuste
, formato zoom y serie de destellos "Fb".
Ȅ
• Desconectar el mecablitz con el interruptor principal (Grab. 1).
• Mover la tapa del compartimento de pilas (Grab. 3) hacia abajo y
abrirla.
• Introducir las pilas o elementos NC en sentido longitudinal según los símbolos indicados y cerrar la tapa.
☞ Al colocar las pilas o baterías observe la polaridad correcta según los
símbolos en la tapa. ¡No tire pilas gastadas a la basura!
¡Contribuya a la protección del medio ambiente y entregue pilas o
baterías gastadas en los lugares de recogida!
desbloqueo de los elementos de manejo”.
7) sólo con adaptador SCA y cámaras que apoyan esta función
¡Al seleccionar una de estas funciones el símbolo de la función y su estado
(OFF/On) parpadearán en el display LC!
Si gira la rueda de ajuste (Grab. 1) la función seleccionada se conecta o
desconecta.
704 47 0099.A3
54 MZ-4i
01.02.2007
13:41 Uhr
Seite 167
Si presiona sobre la rueda de ajuste (Grab. 1) la función será memorizada.
Ayuda: ¡Las distintas funciones especiales se describen en los capítulos siguientes!
2.4.3 Ajustes ISO / Zoom / Diafragma , ”P” (Potencia parcial de
luz) y ”EV” (Corrección de exposición)
Al girar la rueda de ajuste (Grab. 1) la función deseada (ISO / Zoom /
Diafragma / Corrección de exposición ”EV”) aparecen a la derecha en el
display LC. La función seleccionada llevará una flecha ı.
Para cambiar la función, presionar la rueda (Grab. 1) en el sentido de la
flecha. La flecha ı parpadea en el display LC. Girando la tuerca cambia su
estado. Para memorizar presionar la rueda en el sentido de la flecha. Si no
presiona la rueda, el ajuste deseado quedará memorizado después de
aprox. 5 segundos. Ahora la flecha dejará de parpadear.
☞ ¡Al usar este flash con un adaptador SCA 3xx2 es posible, que no pueda modificar el diafragma (según el tipo de cámara y adaptador SCA)!
¡Al usar este flash con un adaptador SCA 3xx2 es posible que no se
pueda modificar el valor ISO para la sensibilidad de la película o bien
que éste no sea indicado (según el tipo de cámara y adaptador SCA)!
Ayuda: ¡En otro capítulo se describen los ajustes de cada posición!
3. El funcionamiento TTL
En el funcionamiento TTL conseguirá fácilmente buenas fotografías con flash.
☞ Para trabajar con TTL el flash debe llevar un adaptador SCA. ¡El funcionamiento TTL solo se puede realizar con cámaras que apoyen el
TTL! Con el pie estándar 301 (solo contacto central o con cable sincro)
no es posible el TTL. ¡En el caso de que la cámara no apoye el TTL, al
accionar el disparador de la cámara se emitirán destellos irregulares
a plena potencia! ¡Para probar el TTL la cámara debe llevar una película!
En este funcionamiento la medición de exposición se efectúa por un sensor
en la cámara. Este sensor mide la luz que llega a la película a través del
objetivo y es reflejada. Para alcanzar la dosis de luz precisa para una exposición correcta, la electrónica de la cámara emite una señal de parada al
adaptador SCA (accesorio opcional) e interrumpe la emisión de luz del
flash.
La ventaja de este funcionamiento es que todos los factores que influyen en
la exposición de la película como filtros, variaciones de diafragma o distancias focales con objetivos zoom, extensiones en primeros planos, etc) son
tenidas en cuenta automáticamente.
Si la toma fue correctamente expuesta, la indicación ”ok” aparecerá durante
aprox. 3 segundos en el flash.
☞ Si además desea activar una señal acústica en el mecablitz, vea
”12.1 Función Beep”.
Ajustes para el funcionamiento TTL:
• Montar el mecablitz y el adaptador SCA correspondiente sobre la cámara.
• Realizar los ajustes en la cámara según sus instrucciones.
• Conectar el mecablitz con el interruptor principal (Grab. 1).
• Pulsar la tecla Mode (Grab. 1) tantas veces, hasta que en el display
parpadee TTL. Presionar sobre la rueda de ajuste (Grab. 1) en el sentido de la flecha y memorizar. Si no presiona la rueda, su elección será
memorizada automáticamente después de 5 segundos. Una vez memorizada el símbolo TTL aparece de forma continua, ya no parpadea.
• Según el tipo de cámara y el adaptador SCA es posible que los valores
ISO (sensibilidad de película), Zoom y diafragma no sean transmitidos por
la cámara automáticamente al flash. En este caso debe ajustar estos valores manualmente en el flash. Los ajustes de ISO y diafragma solo sirven
para una indicación de distancia y alcance en el display LC y no tienen
mayor importancia para la toma con TTL. No es imprescindible realizar
estos ajustes.
• ¡La posición del reflector zoom si es importante para una exposición correcta de toda la toma! Esta posición del reflector zoom se debe adaptar
siempre a la distancia focal del objetivo.
167
į
704 47 0099.A3
54 MZ-4i
01.02.2007
13:41 Uhr
Seite 168
Ayuda:
Si utiliza un objetivo zoom y no necesita disponer del número-guía y alcance
del mecablitz completos, puede dejar la posición del reflector zoom sobre la
distancia focal inicial del objetivo zoom. Así se garantiza que la toma queda
correctamente expuesta y se ahorra tener que ajustarse siempre a la distancia focal del objetivo.
Ejemplo:
Si Vd. utiliza un objetivo zoom con distancias focales entre 28 mm y 80 mm,
coloque la posición del reflector zoom en 28 mm!
☞ Cuando utilice el mecablitz con un adaptador SCA 3xx2 y una cámara, que transmita datos al flash, puede suceder que el valor ISO no se
indique (según tipo de cámara); vea las instrucciones del adaptador
SCA. ¡Los valores de sensibilidad, ISO y diafragma quizás no se puedan modificar! Con fuertes contrastes, p.e. un objeto oscuro en la nieve, puede que precise una corrección de exposición (vea capítulo 14.).
• Destellos de aclaración multi-sensor 3D
(solo con SCA 3402 y la cámara Nikon adecuada, vea las instrucciones del adaptador SCA y la cámara).
• TTL-HSS
(solo con SCA 3302 y la cámara Minolta adecuada, vea
las instrucciones del adaptador SCA y la cámara).
Ajustes de funcionamiento TTL adicionales:
• Pulsar la tecla Mode (Grab. 1) hasta que en el display parpadee TTL.
Cuando TTL ya no parpadea presionar una vez sobre la tecla Mode.
• Girar la rueda de ajuste (Grab. 1) y seleccionar el funcionamiento
deseado.
• Presionar sobre la rueda de ajuste (Grab. 1) en el sentido de la flecha y
memorizar el ajuste. Si no presiona sobre la rueda, quedará memorizado
automáticamente después de 5 segundos. Una vez memorizado el símbolo
TTL ya no parpadeará.
3.1 Funcionamientos adicionales a TTL
4. El funcionamiento automático
Dentro del funcionamiento TTL del flash puede ajustar otros adicionales.
☞ Cuantos y de que tipo depende del adaptador SCA y la cámara que
use:
į
• TTL-Remoto con la dirección ”Ad1”
(vea el capítulo „7.1 El funcionamiento Remoto TTL sin cable de Metz“).
• Remoto TTL con dirección ”Ad2”
(vea el capítulo „7.1 El funcionamiento Remoto TTL sin cable de Metz“).
• E-TTL (solo con SCA 3102 y la cámara Canon adecuada, vea las instrucciones del adaptador SCA y de la cámara).
• E-TTL-HSS; sincronización rápida (solo con SCA 3102 y la cámara Canon
adecuada, vea las instrucciones del adaptador SCA y la cámara).
• Destellos de aclaración por control matricial
(solo con SCA 3402 y la
cámara Nikon adecuada, vea las instrucciones del adaptador SCA y la
cámara).
168
Con el funcionamiento automático un sensor (Grab. 2) del mecablitz mide
la luz reflejada por el objeto. El mecablitz interrumpe la emisión de luz
cuando alcanza la dosis de luz necesaria para una toma bien expuesta.
Aunque modifique la distancia no tiene que variar el diafragma u otros,
mientras el objeto no se encuentre fuera del alcance máximo indicado.
Dirija siempre el sensor (Grab. 2) del mecablitz al objeto, independientemente de la posición del reflector principal. El sensor tiene un ángulo de
medición de 25º y solo mide mientras el flash emita luz.
Si la toma fue correctamente expuesta, la indicación ”ok” (Grab. 1) aparecerá durante aprox. 3 segundos en el flash.
El funcionamiento automático se puede realizar con un adaptador SCA o un
pie estándar SCA 301.
☞ Hay cámaras que no apoyan el funcionamiento automático del flash
con un adaptador SCA (vea las instrucciones de la cámara y del
adaptador SCA). En este caso debe colocar un pie estándar SCA 301
en el mecablitz.
704 47 0099.A3
54 MZ-4i
01.02.2007
13:41 Uhr
Seite 169
Ajustes para el funcionamiento automático:
• Montar sobre la cámara el mecablitz con un adaptador SCA o pie estándar SCA 301.
• Efectuar los ajustes en la cámara según sus instrucciones.
• Conectar el mecablitz con el interruptor principal (Grab. 1).
• Pulsar tantas veces la tecla Mode (Grab. 1) hasta que en el display parpadee A. Presionar sobre la rueda de ajuste (Grab. 1) en el sentido de
la flecha y memorizar la selección. Si ni presiona sobre la rueda, el ajuste
quedará automáticamente memorizado después de aprox. 5 segundos.
Entonces el símbolo A ya no parpadeará.
• Cuando utilice el mecablitz con el adaptador SCA 3xx2 y una cámara que
transmite los datos de sensibilidad ISO, posición de reflector zoom y diafragma automáticamente, no son precisos otros ajustes. El mecablitz actuará según los datos transmitidos.
☞ Al usar el mecablitz con una cámara, que transmite datos al flash,
puede ocurrir, que el valor ISO no se indique (según tipo de cámara),
vea las instrucciones del adaptador SCA. ¡Es posible que no pueda
modificar la sensibilidad ISO y el diafragma!
Funcionamiento automático con un adaptador SCA 3xx o pie estándar
SCA 301:
En este caso debe ajustar de manera manual en el mecablitz los valores ISO,
posición del reflector zoom y el diafragma. Esto es preciso para una exposición correcta, ya que el mecablitz deberá regular la luz con estos datos:
Ayuda:
Si utiliza un objetivo zoom y no necesita el número-guía y alcance máximo,
deje la posición zoom del reflector en el valor de distancia focal inicial del
objetivo zoom. Queda garantizado que la toma esté bien expuesta y ahorra
la constante adaptación a la distancia focal del objetivo.
Ejemplo:
Si utiliza un objetivo zoom con una distancia focal desde 28 mm hasta
80 mm, ajuste la posición del reflector zoom del mecablitz a 28 mm.
☞ El objeto debe estar situado en un área entre el 40 % y 70 % del valor
de distancia indicado en el display LC. De esta manera la electrónica tiene suficiente flexibilidad para actuar.
¡Atención con objetivos zoom!
Según su construcción puede provocar una pérdida de luz de hasta
1 escalón de diafragma. Diferentes ajustes de distancia focal pueden
tener distintos valores de diafragma efectivos. Se puede compensar corrigiendo manualmente el diafragma o la exposición (vea capítulo 14.).
4.1 Funcionamientos adicionales en Automático
En funcionamiento A puede ajustar diferentes modos de funcionamiento adicionales:
• Remoto automático con dirección ”Ad1”
(vea el capítulo „7.2 El funcionamiento Remoto A sin cable de Metz“).
• Remoto automático con dirección ”Ad2”
(vea el capítulo „7.2 El funcionamiento Remoto A sin cable de Metz“).
Ajustes de los funcionamientos adicionales en A:
• Pulse la tecla Mode (Grab. 1) del mecablitz hasta que en el display parpadee A.
• Para memorizar presione la rueda de ajuste (Grab. 1) en el sentido de
la flecha.
• Si no presiona sobre la rueda de ajuste (Grab. 1), el funcionamiento
seleccionado quedará memorizado automáticamente después de 5 segundos. El símbolo A ya no parpadeará.
5. El funcionamiento manual
En este funcionamiento el flash utiliza toda su energía, siempre que no haya
ajustado ninguna potencia parcial de luz. El mecablitz debe estar equipado
con un pie estándar 301 o un adaptador SCA. Para una toma adecuada según la luz ambiente utilice los ajustes de diafragma aprovechando las potencias parciales de luz.
169
į
704 47 0099.A3
54 MZ-4i
01.02.2007
13:41 Uhr
Seite 170
El display LC del mecablitz muestra la distancia entre el flash y el objeto para una exposición correcta. Por este motivo es importante el ajuste correcto
en el mecablitz. ¡Los valores de diafragma y sensibilidad ISO deben coincidir en el flash y la cámara! ¡La posición zoom del reflector del flash debe
adaptarse a la distancia focal del objetivo!
Ajustes para el funcionamiento manual:
Ejemplo de ajustes:
Distancia de iluminación: 6 m, Zoom 50 mm, ISO 100/21º.
• Ajustar la cámara según indican las instrucciones.
• Montar el flash y el adaptador SCA o pie estándar 301 sobre la cámara.
• Conectar el flash con el interruptor principal (Grab. 1).
• Pulsar la tecla Mode (Grab. 1) hasta que en el display parpadee M.
Presionar sobre la rueda de ajuste (Grab. 1) en el sentido de la flecha y
memorizar. Si no presiona sobre la rueda de ajuste, el funcionamiento
quedará memorizado después de aprox. 5 segundos. El símbolo M aparece sin parpadear.
• Después de memorizado el display indica la potencia parcial de luz ”P 1/1”
(= plena potencia). ¡Al disparar el mecablitz o la cámara con la tecla de
disparo manual (Grab. 1) se emitirá un destello con plena potencia!
☞ Hay cámaras que no apoyan en el funcionamiento manual al mecablitz con adaptador SCA (vea las instrucciones de la cámara y del
adaptador SCA). En este caso debe colocar un pie estándar 301 al
mecablitz (vea las instrucciones de la cámara).
į
Funcionamiento manual del mecablitz con un adaptador SCA 3xx2:
Cuando utilice el mecablitz con un adaptador SCA 3xx2 y una cámara, que
transmite automáticamente datos de sensibilidad ISO, posición de reflector
zoom y diafragma, no hacen falta otros ajustes. El mecablitz trabaja con los
datos transmitidos.
☞ Cuando la cámara transmite los datos al flash, puede ocurrir que el
valor ISO no se indique (depende del tipo de cámara; vea las instrucciones del adaptador SCA). ¡Si la cámara transmite al flash valores de
170
sensibilidad ISO y diafragma, estos no se pueden modificar! En este
caso cambie el diafragma en la cámara hasta que en el display LC
del flash consiga la distancia deseada.
Funcionamiento manual con un adaptador SCA 3xx o pie estándar 301:
En este caso debe ajustar manualmente los valores de sensibilidad ISO, posición del reflector zoom y diafragma en el mecablitz. Esto es necesario para
una exposición correcta, ya que el mecablitz calcula con estos datos la distancia entre objeto y flash y lo indica en su display.
Ajuste de potencia parcial de luz:
Para modificar la indicación de distancia para una exposición correcta y
adaptarse individualmente a cada situación de toma, puede ajustar una
potencia parcial de luz:
• Gire la rueda de ajuste (Grab. 1) hasta que el símbolo de la flecha en
el display se coloque al lado de P.
• Presione sobre la rueda de ajuste. El símbolo de la flecha parpadea.
• Gire la rueda de ajuste (Grab. 1) hasta ver la potencia parcial de luz
deseada. Para memorizar presione sobre la rueda de ajuste en el sentido
de la flecha. Si no presiona sobre la rueda de ajuste, la potencia parcial
de luz quedará automáticamente memorizada después de 5 segundos y
dejará de parpadear.
Para modificar el valor de distancia y adaptarse a cada situación individual,
puede cambiar el diafragma en la cámara. Tenga en cuenta que cualquier
cambio de diafragma en la cámara influye sobre la profundidad de campo
de la toma!
Borrar la potencia parcial de luz ajustada:
• Girar la rueda de ajuste (Grab. 1) hasta que el símbolo de la flecha en
el display se coloque al lado de P.
• Presione sobre la rueda de ajuste en el sentido de la flecha. El símbolo
parpadeará.
• Girar la rueda de ajuste (Grab. 1) hasta que la indicación de potencia
parcial de luz se coloque en P 1/1. Para memorizar presionar sobre la
704 47 0099.A3
54 MZ-4i
01.02.2007
13:41 Uhr
Seite 171
rueda de ajuste en el sentido de la flecha. Si no presiona sobre la rueda
de ajuste, memorizará automáticamente después de 5 segundos. Ahora el
símbolo de la flecha ya no parpadea. Para cambiar a otro modo de funcionamiento colocar la potencia parcial de luz siempre en P 1/1.
5.1 Funcionamientos adicionales en manual
☞ ¡El mecablitz debe llevar un adaptador SCA 3xx2!
Diferentes cámaras ofrecen la posibilidad de sincronización rápida (FP o
HSS) en el modo manual M del flash (vea las instrucciones de la cámara y
del adaptador SCA).
Ajuste del funcionamiento adicional ”M-HSS” en el funcionamiento manual:
• Pulse la tecla Mode (Grab. 1) hasta que en el display parpadee M.
• Gire la rueda de ajuste (Grab. 1) y seleccione HSS.
• Para memorizar presionar sobre la rueda de ajuste (Grab. 1) en el sentido de la flecha. Si no presiona sobre la rueda, HSS quedará memorizado automáticamente después de 5 segundos. El símbolo M dejará de parpadear.
Desconectar el funcionamiento HSS:
• Pulse la tecla Mode (Grab. 1) hasta que en el display parpadee M.
• Girar la rueda de ajuste (Grab. 1) hasta llegar a HSS.
• Para memorizar presionar sobre la rueda de ajuste (Grab. 1). Si no la
presiona, HSS quedará memorizado automáticamente después de 5 segundos. El símbolo M ya no parpadea.
6. Destellos indirectos
Las imágenes con destellos directos se reconocen generalmente por la típica
formación de sombras duras y molestas. Con frecuencia, también molesta la
caída de luz entre el primer plano y el fondo, condicionado físicamente.
Estos fenómenos pueden evitarse en buena manera con una iluminación
indirecta, ya que el objeto y el fondo se iluminan de una forma suave y uniforme con luz difusa. Para ello se gira el reflector de forma que ilumine una
superficie de reflexión apropiada (p.e. techo o paredes).
El reflector del flash es giratorio vertical y horizontalmente.
Vertical:
-7°, 0°, 60°, 75°, 90°
Horizontal: -180°, -150°, -120°, -90°, -60°, -30°, 0°, 30°, 60°, 90°.
En su posición básica la cabeza del reflector está mecánicamente bloqueada. Para desbloquearla presione sobre la tecla y gire la cabeza del reflector.
☞ Al girar el reflector en vertical y horizontal tenga en cuenta girarlo en
un ángulo suficientemente grande para que no pueda llegar luz directa al objeto. La posición mínima es de 60º. En el display LC se borran
las indicaciones sobre la distancia. La distancia al objeto desde el
flash al techo o desde la pared al objeto es ahora desconocida.
La luz difusa reflejada desde las superficies de reflexión ofrece una iluminación suave del objeto.
La superficie reflectante ha de ser neutra o blanca y no debe tener estructuras (p.e. maderas en el techo), que podrían producir sombras. Para efectos
de colores, se elige una superficie de reflexión del color correspondiente.
Para evitar sombras en retratos con destellos indirectos, p.e. debajo de la
nariz o en los ojos, es una ventaja conectar el reflector adicional.
6.1 Destellos indirectos con reflector adicional conectado
El reflector adicional (Grab. 2) permite una aclaración frontal en destellos
indirectos.
☞ Trabajar con el reflector adicional solo tiene sentido en iluminaciones
indirectas.
Con el interruptor
(Grab. 2) puede conectar y desconectar el reflector
adicional. Cuando en el display LC del mecablitz parpadee el símbolo
,
esto solo significa que el reflector principal no está girado.
Con el reflector adicional activado la luz se reparte en un 85 % sobre el principal y
un 15 % sobre el reflector adicional. Si trabaja con potencias parciales de luz o
con el reflector adicional conectado estos porcentajes pueden variar levemente.
Si la dosis de luz del reflector adicional resulta demasiada, puede disminuir171
į
704 47 0099.A3
54 MZ-4i
01.02.2007
13:41 Uhr
Seite 172
la en un 50 % con ayuda de un filtro reductor de luz. Extraer lateralmente
este filtro reductor, girar 180º, posicionar sobre el reflector adicional y presionar a ambos lados hasta que encaje.
☞ Los funcionamientos adicionales ADI, Estroboscópico, E-TTL,
E-TTL-HSS, D-TTL, Multi-Sensor 3D y TTL-HSS no son realizables
con el reflector adicional.
6.2 Destellos indirectos en Automático y TTL
Es conveniente comprobar antes de la toma, si la luz es suficiente para el
diafragma elegido. Proceda según lo descrito en el capítulo ”10. Indicación
de control de exposición“.
6.3 Destellos indirectos en Manual
En el funcionamiento manual el diafragma de la cámara necesario se determina convenientemente con un fotómetro. Si no dispone de el, puede encontrar un valor orientativo según la formula:
número - guía
Diafragma de cámara = —————————————————
distancia de iluminación x 2
Este valor debería variarse para la fotografía en ±1 escalón de diafragma.
7. El funcionamiento Remoto
į
En general
Funcionamiento Remoto quiere decir: control remoto sin cable de flashes adicionales. El flash montado en la cámara (controller) controla los flashes adicionales (esclavos) de forma que el control automático de la exposición del
funcionamiento TTL es ampliado a todos los flashes adicionales.
El funcionamiento remoto TTL de Metz permite el control conjunto de destellos TTL de varios flashes del tipo 54 MZ-.., 34 CS-2, 28 CS-2, 40 MZ-..., 50
MZ-5 y 70 MZ-.. sin cable. Para realizar este funcionamiento, todos los flashes adicionales 54 MZ-.., 70 MZ-4 (esclavos) deben ser equipados con un
adaptador esclavo SCA 3083 (accesorio opcional) y todos los 40 MZ-... con
un adaptador esclavo SCA 3080 o 3082 (accesorio opcional). Los flashes
esclavos pueden montarse sobre el pie que se suministra con el adaptador
172
esclavo o sobre un trípode.
Los flashes esclavos 34 CS-2, 28 CS-2, 50 MZ-5 Esclavo y 70 MZ-5 no precisan de un adaptador esclavo.
☞ En el funcionamiento Remoto el display LC del flash no indica alcance
ni distancia. ¡El reflector adicional tiene que estar desconectado!
Para que no interfieran dos sistemas remotos TTL en una sala, en el Controller y en los esclavos puede elegir dos señales diferentes que son Ad1 y
Ad2.
7.1 El funcionamiento Remoto TTL sin cable de Metz
☞ ¡El funcionamiento Remoto TTL de Metz solo se puede realizar con cámaras que dispongan de control de destello TTL!
Ajustes en el Controller para el funcionamiento Remoto TTL de Metz (Grabado 4):
1 Colocar el flash con el adaptador SCA apropiado sobre la cámara y
conectarlo.
2 Pulsar la tecla Mode (Grab. 1) varias veces hasta que en el display parpadee TTL.
3 Mientras parpadea TTL girar la rueda de ajuste (Grab. 1) y seleccionar
en el funcionamiento del Controller Co las señales Ad1 o Ad2. Cuando TTL
deje de parpadear pulsar una vez la tecla Mode. Para memorizar presionar sobre la rueda de ajuste en el sentido de la flecha. Si no la presiona,
memorizará automáticamente después de 5 segundos y las señales TTL,
Co, Ad1 y Ad2 dejarán de parpadear.
Ajustes para el funcionamiento Remoto esclavo TTL de Metz (Grabado 5):
• Equipar los flashes esclavos 54 MZ-.. con el adaptador esclavo SCA 3083.
Los del tipo 40 MZ-... deben ser equipados con el adaptador esclavo
SCA 3080 o 3082.
1 Conectar el mecablitz con el interruptor principal (Grab. 1). El mecablitz conmuta automáticamente a TTL. En el display LC aparece SL (funcionamiento esclavo). Se ajustará la señal esclava Ad1 (o la última que fue
seleccionada).
704 47 0099.A3
54 MZ-4i
01.02.2007
13:41 Uhr
Seite 173
2 Para cambiar la señal esclava pulse la tecla Mode (Grab. 1) y la indicación TTL parpadeará.
3 Gire la rueda de ajuste (Grab. 1) y fije la señal esclava Ad2. Presione
sobre la rueda de ajuste en el sentido de la flecha y memorice este ajuste
en el flash.
☞ En el funcionamiento Remoto el reflector con zoom por motor del
mecablitz se ajusta automáticamente a la posición 24 mm para alcanzar el mayor aérea de iluminación posible. Esta posición del reflector
se puede modificar manualmente (vea capítulo 12.).
• Cuando el flash esclavo está dispuesto se enciende la indicación de disposición y el destello de medición AF parpadea. También puede ajustar una
señal acústica (Beep) cuando el flash alcanza su disposición (vea capítulo 12.). Esto es una ventaja cuando los indicadores ópticos no están visibles.
4 En el controlador colocado sobre la cámara pulse la tecla de disparo manual (Grab. 1) y efectúe un destello de prueba.
• El flash esclavo responde con un destello retardado avisando así que está
dispuesto. Si utiliza varios flashes esclavos a la vez, estos lanzan los destellos simultáneamente.
Si un flash esclavo no emite el destello retardado, el sensor en el adaptador esclavo no recibirá el impulso de luz. Gire el sensor en dirección del
Controller y repita el proceso nº 4.
☞ En caso de distancias extremadamente cortas entre el Controller y el
flash esclavo es posible que la electrónica de la cámara interrumpa la
emisión de luz antes de que el esclavo reciba la información. Aumente entonces la distancia entre el Controller y el esclavo o seleccione un
diafragma más abierto y repita el proceso nº 4.
Desconectar el funcionamiento Remoto TTL de Metz:
• Pulse la tecla Mode (Grab. 1) en el Controller y seleccione con la rueda
de ajuste (Grab. 1) el funcionamiento Controller.
• En el flash esclavo:
desconectar el flash, quitar el adaptador esclavo SCA 3083 y volver a conectar el flash.
7.2 El funcionamiento Remoto A sin cable de Metz
☞ El funcionamiento Remoto automático de Metz se puede realizar con
cámaras de sistema, estándar, mecánicas o de formato medio. La única
condición es que lleven un contacto de sincronización y estén equipadas con el pie estándar 301 o el adaptador SCA. La exposición es controlada entonces por el fotosensor del flash Controller en la cámara.
Ajustes para el funcionamiento Remoto automático del Controller:
• Equipar el mecablitz con el adaptador SCA o pie estándar SCA 301 y
conectar el flash.
• Ajustar la cámara a manual según sus instrucciones.
☞ No todas las cámaras con un adaptador SCA apoyan el funcionamiento automático o remoto automático (vea las instrucciones de la
cámara y del adaptador SCA). ¡Si su cámara no lo realiza, equipe su
flash con el pie estándar SCA 301! ¡No olvide ajustar los valores (ISO,
diafragma y posición zoom) de la cámara igualmente en el flash de
manera manual!
• Ajuste la velocidad de la cámara a 1/60 seg. o más lenta.
• Conectar el mecablitz sobre la cámara con el interruptor principal.
• Pulsar la tecla Mode (Grab. 1) varias veces hasta que en el display
aparezca A.
• Mientras parpadea la indicación A girar la rueda de ajuste y seleccionar
el funcionamiento del Controller Co con la señal Ad1 o Ad2. Cuando A
deje de parpadear pulsar una vez la tecla Mode. Para memorizar este
ajuste presionar sobre la rueda de ajuste (Grab. 1) en el sentido de la
flecha. Si no presiona sobre la rueda de ajuste, quedará automáticamente
memorizado después de 5 seg. y quedará indicado A (sin parpadear) junto con Co y la señal Ad1 o Ad2.
Ajustes para el funcionamiento Remoto automático esclavo de Metz:
El procedimiento es el mismo que en el funcionamiento Remoto TTL esclavo de Metz.
El flash esclavo también trabaja en modo TTL durante el funcionamiento Remoto automático.
173
į
704 47 0099.A3
54 MZ-4i
01.02.2007
13:41 Uhr
Seite 174
7.3 Valoración de las condiciones de luz en Remoto
Para valorar las condiciones de luz en Remoto A y TTL puede disparar una
luz de ajuste de todos los flashes implicados.
Para disparar esta luz de ajuste en el 54 MZ-.. sobre la cámara pulse la tecla (Grab. 1) para programar esta función. Además pulse la tecla
Select (Grab. 1) tantas veces hasta que aparezca la indicación
. Gire
la rueda de ajuste (Grab. 1) y coloque la función luz de ajuste en On u
OFF. Puede disparar la luz de ajuste con la tecla , vea capítulo 12.
8. Destellos de aclaración con luz diurna
Puede utilizar el mecablitz para destellos de aclaración con luz diurna, para
quitar sombras e iluminar uniformemente incluso en tomas a contraluz. Para
ello tiene varias opciones.
8.1 Destellos de aclaración en TTL
į
El mecablitz debe llevar un adaptador SCA apropiado y la cámara debe
apoyar el funcionamiento de destello de aclaración TTL.
• Pulsar la tecla Mode (Grab. 1) hasta que en el display aparezca TTL.
En muchos tipos de cámara el destello de aclaración se activa automáticamente en los automatismos de Programa total, P y programas creativos de
objetos (vea las instrucciones de la cámara y del adaptador SCA). La cámara se ocupa de obtener una luz uniforme entre el objeto y el fondo.
Algunas cámaras además tienen un programa especial para destellos de
aclaración del que puede disponer cuando lo desee. Se puede activar en la
cámara (según el tipo) o en el mecablitz (vea las instrucciones de la cámara
y del adaptador SCA).
Ejemplo: Destellos de aclaración por control matricial (solo para algunas
cámaras Nikon)
Algunas cámaras Nikon efectúan el funcionamiento ”destellos de aclaración
TTL por control matricial” (vea las instrucciones de la cámara y del adaptador SCA). Este es un funcionamiento adicional dentro de TTL. ¡Los ajustes se
describen en el capítulo 3.1!
174
Ejemplo: Destellos de aclaración multisensor 3D (solo para algunas cámaras Nikon)
¡El mecablitz debe estar equipado con el adaptador SCA 3402 (Nikon)!
Varias cámaras Nikon apoyan el funcionamiento de ”destellos de aclaración
multisensor 3D” (vea las instrucciones de la cámara y del adaptador SCA).
Este funcionamiento es adicional al TTL. ¡Vea los ajustes en el capítulo 3.1!
8.2 Destellos de aclaración en automático
• Conectar el mecablitz con el interruptor principal (Grab. 1).
• Pulsar la tecla Mode (Grab. 1) tantas veces hasta que en el display parpadee A. Presionar sobre la rueda de ajuste (Grab. 1) y memorizar. Si
no presiona sobre la rueda de ajuste, quedará memorizado automáticamente después de 5 seg. y el símbolo A queda de forma continúa, ya no
parpadea.
☞ El sensor del mecablitz regula la luz en el funcionamiento automático.
¡Tenga en cuenta que la fuente de contraluz no esté dirigida directamente al sensor del mecablitz, porque podría confundir a la electrónica del flash!
Mida con el fotómetro de la cámara o uno externo el diafragma y la velocidad
necesarios para una exposición normal. Tenga en cuenta que la velocidad
ajustada en la cámara sea igual o más lenta que la velocidad más rápida de
sincronización de la cámara (según tipo de cámara; vea las instrucciones).
Ejemplo:
Diafragma seleccionado: 8;
Velocidad en la cámara: 1/60 seg.
Sincronización de flash en la cámara p.e. 1/100 seg.
(vea las instrucciones de la cámara).
Los valores de diafragma y velocidad se pueden ajustar en la cámara, ya
que la velocidad es más lenta que la de sincronización de la cámara.
Para conseguir una aclaración escalonada, p.e. para conservar una sombra, recomendamos, cambiar el diafragma automático del flash en un escalón menos que el de la cámara. Como en el ejemplo el diafragma de la
704 47 0099.A3
54 MZ-4i
01.02.2007
13:41 Uhr
Seite 175
cámara era 8, en el flash tendría que ajustar 5,6.
Si el flash está equipado con un adaptador SCA 3xx2 y la cámara transmite
automáticamente el diafragma al flash, ¡no es posible modificar este valor
manualmente! En este caso tendría que utilizar la corrección de exposición
en el funcionamiento automático del mecablitz (vea capítulo 14.).
También puede realizar manualmente una corrección de exposición en funcionamiento automático aunque la cámara no transmita datos al mecablitz.
¡De este modo ya no es necesaria una corrección adicional del valor de diafragma!
Ayuda:
Si es posible, mida con un fotómetro el fondo detrás del objeto por separado
de la medición del objeto. ¡Un valor de corrección desde -1 EV (diafragma)
hasta -1 2/3 EV para el diafragma automático en el mecablitz da los mejores resultados según nuestra experiencia en el funcionamiento de destellos
de aclaración!
9. El funcionamiento estroboscópico (Grabado 6)
En este funcionamiento se realizan varios destellos en una misma toma. Esto
interesa sobre todo para objetos en movimiento y con efectos (Grabado 6).
Los destellos se emiten con una frecuencia concreta. Esta función solo se puede realizar con una potencia parcial de luz de máx. 1/4 o menor.
Para una toma estroboscópica puede elegir entre una frecuencia (destellos
por segundo) de 1 .... 50 Hz en pasos de 1 Hz y cantidad de destellos entre
2 .... 50 en pasos de 1.
¡El funcionamiento estroboscópico no indica ningún valor de sensibilidad
ISO! ¡Cuando utilice un mecablitz con el adaptador SCA 3xx2 y una cámara, que transmite los datos de sensibilidad automáticamente al flash, el
mecablitz ajusta esta sensibilidad automáticamente (vea las instrucciones de
la cámara y del adaptador SCA)!
Si utiliza un mecablitz con un adaptador SCA 3xx, un pie estándar 301 o
una cámara que no transmite los datos de sensibilidad, debe ajustar este
valor antes de seleccionar el funcionamiento estroboscópico en TTL, A o M.
El valor se conservará durante el funcionamiento estroboscópico.
La máxima potencia parcial de luz posible es ajustada automáticamente en
el funcionamiento estroboscópico. Para conseguir secuencias cortas de destellos ajuste la potencia parcial de luz manualmente hasta un valor mínimo
de 1/256. El display LC mostrará la distancia válida según los parámetros
ajustados. Si modifica el diafragma o la potencia parcial de luz el valor de
distancia se adapta a la distancia de la toma. El diafragma ajustado en el
flash debe ser fijado también en la cámara. Para aumentar el alcance del
valor de distancia puede usar películas de mayor sensibilidad.
☞ El funcionamiento estroboscópico no es posible con el reflector adicional conectado.
Ajustes para el funcionamiento estroboscópico (Grabado 7):
• Conmutar la cámara según las instrucciones al funcionamiento manual y
seleccionar la velocidad adecuada.
1 Colocar un adaptador SCA o pie estándar 301 al flash y conectarlo con el
interruptor principal (Grab. 1).
2 Pulse la tecla Mode (Grab. 1) tantas veces hasta que en el display aparezca
. Para memorizar presionar sobre la rueda de ajuste (Grab.
1) en el sentido de la flecha. Si no presiona sobre la rueda de ajuste, el
funcionamiento quedará memorizado automáticamente después de 5 seg.
y el símbolo
dejará de parpadear.
Funcionamiento estroboscópico del mecablitz con un adaptador SCA 3xx2:
Cuando utilice un mecablitz con un adaptador SCA 3xx2 y una cámara que
transmite automáticamente los datos sobre sensibilidad ISO, posición de reflector zoom y diafragma no hacen falta más ajustes. El mecablitz se adapta
a los valores transmitidos. Solo debe ajustar la cantidad de destellos y la frecuencia como en los puntos 3 y 4 (vea a continuación).
☞ Cuando utilice un mecablitz con una cámara que transmite los datos
al flash, no podrá modificar los valores ISO y diafragma.
175
į
704 47 0099.A3
54 MZ-4i
01.02.2007
13:41 Uhr
Seite 176
Funcionamiento estroboscópico con un adaptador SCA 3xx, pie estándar
SCA 301 o una cámara sin transmisión de datos (Grabado 7):
En este caso ajuste manualmente en el flash los valores correspondientes a la
sensibilidad ISO, posición zoom del reflector y diafragma. Esto es necesario
para una exposición correcta, ya que el mecablitz calcula con estos datos la
distancia del objeto al flash y lo indica en su display.
3 Ajuste la cantidad de destellos N. Para ello gire la rueda de ajuste (Grab. 1), hasta que la flecha se coloque en la posición superior. Presione
sobre la rueda de ajuste, gire para ajustar la cantidad de destellos N
deseada y vuelva a presionar para memorizar.
4 Ajuste la frecuencia de destellos f(Hz) girando la rueda de ajuste (Grab.
1) en el sentido contrario a las agujas del reloj, hasta que f (Hz) esté colocado al lado de la flecha. Presione sobre la rueda de ajuste, gírela hasta
ajustar la frecuencia f(Hz) deseada y vuelva a presionarla para memorizar.
☞ Como valor de distancia se usa la distancia al objeto en movimiento.
Para evitar la sobre-exposición del fondo estático, esta parte de la
imagen debe estar muy oscura o muy lejos del objeto en movimiento.
Los mejores resultados se obtienen con poca luz alrededor.
Cuando ajuste la cámara tenga en cuenta que la velocidad sea suficientemente lenta.
En la tabla 3 de los datos técnicos encontrará las velocidades más cortas
para las combinaciones de N – f (Hz).
10. La indicación de control de exposición
į
La indicación de control de exposición o.k. (Grab. 1)solo se ilumina,
cuando la toma fue correctamente expuesta en los funcionamientos TTL o
Automático.
De este modo tiene la opción en automático de encontrar el diafragma adecuado realizando manualmente un destello de prueba, sobre todo con destellos indirectos en condiciones de reflexión difícilmente previsibles. En TTL
no es posible realizar un destello de prueba.
176
El destello de prueba se realiza con la tecla de disparo (Grab. 1) manual,
siempre que esta tecla no esté programada como ”luz de ajuste” (vea capítulo 12.).
Si la indicación de control de exposición o.k. (Grab. 1) queda oscura
después del destello de prueba, tendrá que ajustar el siguiente diafragma
más pequeño o reducir la distancia a la superficie de reflexión o al objeto y
volver a realizar un destello de prueba.
El diafragma que resulta de estos valores debe ser ajustado también en la
cámara.
☞ Mientras realice el destello de prueba mantenga el flash con el sensor
en la misma posición como cuando efectúe la toma definitiva.
Esta opción también se puede aprovechar en el funcionamiento TTL sin tener
que hacer tomas de prueba. Ajuste el flash a automático y obtenga el valor
de diafragma gracias al destello de prueba como descrito anteriormente.
Ajustar este valor de diafragma en la cámara y volver a conmutar el flash al
funcionamiento TTL.
Este procedimiento funciona con bastante exactitud en distancias focales entre aprox. 28 mm y 85 mm. En casos limitados es posible que en la exposición TTL quede subexpuesta. En estos casos la indicación de control de exposición o.k. después del disparo se mantiene oscura. Entonces debe repetir la
toma ajustando el siguiente valor de diafragma más pequeño (p.e. en vez de
11 – ajustar 8).
11. El destello de medición AF
☞ ¡El destello de medición AF (Grab. 2) del mecablitz solo se puede
activar por cámaras autofoco que apoyen esta función en el flash!
Algunas cámaras autofoco solo apoyan su propio destello de medición
AF integrado (vea las instrucciones de la cámara). ¡El mecablitz debe
llevar un adaptador SCA 3xx2!
¡En el funcionamiento autofoco de la cámara, la mayoría de las cámaras solo emiten el destello de medición AF en los modos ”Single – AF” o ”One – Shot – AF”
(vea las instrucciones de la cámara)!
704 47 0099.A3
54 MZ-4i
01.02.2007
13:41 Uhr
Seite 177
Cuando la luz ambiente no es suficiente para un enfoque automático, la
electrónica de la cámara activa el destello de medición AF. Este emisor lanza
una franja de luz que se proyecta sobre el objeto y la cámara enfoca automáticamente con esta franja de luz. El alcance del destello de medición AF
es de aprox. 9 m (con objetivo estándar 1,7/50 mm). Objetivos zoom con
una apertura de diafragma pequeña limitan este alcance en parte.
☞ Varias cámaras autofoco disponen de otras áreas de medición AF
aparte del área central. La franja de luz de destello de medición AF
solo actúa el sensor AF central de la cámara. En algunos casos el sensor AF central de la cámara tiene que ser ajustado manualmente (vea
las instrucciones de la cámara y del adaptador SCA).
12. Funciones especiales
Las funciones especiales del mecablitz se ajustan mediante la tecla Select (Grab. 1). Se conectan, desconectan y memorizan mediante la rueda de ajuste (Grab. 1).
12.1 Función Beep
(señal acústica)
Esta función Beep informa al usuario de manera acústica sobre algunas
funciones del mecablitz. ¡El fotógrafo se concentra totalmente en el objeto y
la toma y no tiene que desviar la vista para confirmar las indicaciones!
Los sonidos de la función Beep señalizan ...
• la disposición de disparo.
• la exposición correcta.
• la desconexión automática.
• un error de manejo.
Aviso acústico al conectar el mecablitz:
• Una señal corta Beep ininterrumpida (aprox. 2 seg.) después de una toma
indica la disposición de disparo del mecablitz.
Señal Beep después de la toma:
• Una señal corta Beep ininterrumpida (aprox. 2 seg.) directamente después
de la toma indica, que la exposición fue correcta y la disposición de disparo sigue. Si no oye esta señal Beep, la toma fue subexpuesta.
• Si después de la toma la señal Beep es intermitente, la exposición fue correcta. La disposición de disparo para la próxima toma estará lista cuando
la señal Beep sea de tono continuo después de 3 segundos.
Señales Beep en los ajustes del funcionamiento ”A”:
• Oirá una señal Beep corta como alarma cuando en A el mecablitz haya
ajustado los valores de diafragma e ISO de manera que sobrepase el área
de regulación de luz permitido. El diafragma automático cambia automáticamente al próximo valor permitido.
Ajuste de la función Beep (Grabado 9):
1 Pulse la tecla Select (Grab. 1) tantas veces hasta que el símbolo parpadee.
2 Gire la rueda de ajuste (Grab. 1) y conecte la función Beep. En el
display del mecablitz aparecerá ”On”. Para memorizar este ajuste presione sobre la rueda de ajuste en el sentido de la flecha. Si no presiona sobre
la rueda, el ajuste quedará memorizado automáticamente después de 5
segundos.
Desconexión de la función Beep (Grabado 9):
1 Pulse la tecla Select (Grab. 1) tantas veces hasta que el símbolo parpadee.
2 Gire la rueda de ajuste (Grab. 1) y desconecte la función Beep. En el
display del mecablitz aparecerá ”OFF”. Para memorizar este ajuste presione sobre la rueda en el sentido de la flecha. Si no la presiona, el ajuste
quedará memorizado automáticamente después de 5 segundos.
177
į
704 47 0099.A3
54 MZ-4i
01.02.2007
13:41 Uhr
Seite 178
12.3 Desconexión automática de flash / Auto–Off (Grabado 8)
Ȅ
El mecablitz se puede ajustar de tal manera, que se desconecta automáticamente 1 minuto o 10 minutos después de la última toma (toma con flash o
ajuste o bien pulsar levemente el disparador de la cámara) para proteger las
fuentes de energía de una descarga.
El último ajuste utilizado se mantiene después de la desconexión automática
y está disponible en cuanto se vuelve a conectar.
Si el mecablitz lleva un adaptador SCA 3xx2, se puede volver a conectar
solo con pulsar levemente el disparador de la cámara.
Si por el contrario el mecablitz lleva un adaptador SCA 3xx o el pie estándar
SCA 301, se puede conectar nuevamente al presionar la rueda de ajuste.
Ajuste de la desconexión automática del flash:
1 Pulsar la tecla Select (Grab. 1) tantas veces, hasta que el símbolo
parpadea.
2 Girar la rueda de ajuste (Grab. 1) y elegir el ”tiempo Auto-Off” 1
minuto o 10 minutos, deseado. Además se indica en el Display ”On”. Para
memorizar este ajuste presionar la rueda de ajuste levemente en dirección
de la flecha. Si la rueda de ajuste no es presionada, entonces queda
memorizado automáticamente después de 5 seg. el ajuste elegido. En el
display LC del mecablitz se indica después del almacenamiento el símbolo
.
☞ ¡Si durante algún tiempo no utiliza el mecablitz, entonces desconéctelo con el interruptor principal!
Ȅ
178
Ȅ
Con la función Key puede bloquear las teclas Mode, Select y la rueda de
ajustes para evitar errores.
Para bloquear las teclas Mode y Select debe pulsarlas simultáneamente durante 3 seg. hasta que en el display vea el símbolo
.
Para desbloquear las teclas Mode y Select vuelva a pulsarlas durante 3 seg.
simultáneamente, hasta que en display desaparezca el símbolo
.
į
Desconexión de la desconexión automática de flash:
1 Pulsar la tecla Select (Grab. 1) tantas veces hasta que parpadea
.
Girar la rueda de ajuste (Grab. 1) hasta que se indica ”OFF”.
2 Para memorizar este ajuste (Grab. 1) presionar levemente la rueda de
ajuste en dirección a la flecha. Si la rueda de ajuste no es presionada,
entonces el ajuste elegido queda automáticamente memorizado después
de 5 seg. En el display LC del mecablitz se borra el símbolo
.
Ȅ
12.2 Bloqueo y desbloqueo de los elementos de manejo
(Función Key)
12.4 REAR – Sincronización a la 2ª cortinilla (Grabado 10 y 11)
La sincronización a la 2ª cortinilla (REAR) es una ventaja sobre todo en exposiciones con velocidades de obturación lentas (más lenta que p.e. 1/30 seg.) y
objetos en movimiento con fuente de luz propia, ya que las fuentes de luz en
movimiento dejan tras de sí una franja en vez de delante, como en la sincronización a la 1ª cortinilla. Con la sincronización a la 2ª cortinilla y con fuentes de
luz movidas conseguirá una reproducción más natural de la situación de toma.
☞ La función REAR solo se puede elegir y ajustar si el mecablitz está
equipado con un adaptador SCA adecuado y montado sobre una cámara, la cual apoya este tipo de funcionamiento. ¡La cámara tiene
que estar conectada para ajustar esta función! Al pulsar levemente el
disparador de la cámara tiene que haberse realizado como mínimo
un intercambio de datos entre la cámara y el flash o bien el adaptador SCA.
Si su cámara o bien el adaptador SCA apoyan la función REAR, véalo en las
instrucciones correspondientes.
En algunas cámaras la función REAR no es posible. La función REAR no se
puede elegir o bien se borra automáticamente. ¡Vea las instrucciones de la
cámara y del adaptador SCA!
Conexión de la función REAR:
• Pulse la tecla Select (Grab. 1) tantas veces, hasta que aparezca en el
display LC ”REAR”. Con la rueda de ajuste ajustar ”On”. Presionar la rueda de ajuste en dirección a la flecha y así memorizar la función REAR. Si
no se presiona la rueda de ajuste, entonces la función REAR es memoriza-
704 47 0099.A3
54 MZ-4i
01.02.2007
13:41 Uhr
Seite 179
da automáticamente después de 5 seg.
¡El símbolo ”REAR” para la sincronización a la 2ª cortinilla queda indicado
en el display LC después del ajuste!
Consejo:
¡Utilice en este funcionamiento un trípode para su cámara para evitar movimientos con velocidades de obturación lentas!
☞ Desconectar esta función después de la toma, ya que se pueden producir tomas movidas en las tomas normales con flash, incluso en los
funcionamientos P o bien en los programas creativos de la cámara
por velocidades de obturación más lentas no deseadas.
La función ”REAR” se puede ajustar en algunas cámaras. Entonces en el
mecablitz no se indicará ”REAR”.
Desconexión de la función REAR:
• Pulsar la tecla Select (Grab. 1) tantas veces hasta que aparece el símbolo ”REAR” en el display LC. Con la rueda de ajuste seleccionar ”OFF”.
Presionar la rueda de ajuste en dirección a la flecha y así memorizar. Si
no se presiona la rueda de ajuste entonces queda memorizado automáticamente después de aprox. 5 seg. El símbolo ”REAR” en el display LC del
mecablitz se borra.
de disposición de disparo del flash . Con esto se indica que la función luz de ajuste
está activada. Después de pulsar la tecla el mecablitz dispara la luz de ajuste.
En el funcionamiento REMOTO (REMOTE TTL y Automatismo) a través de la
luz de ajuste del Controller, también en todos los SLAVES (esclavos), es emitida una luz de ajuste (en el 40 MZ-... con el adaptador SCA 3080 a partir
de la versión M1 o un adaptador 3082).
Una batería completa (600 mAh) totalmente cargada es suficiente para
aprox. 60 disparos de luz de ajuste. Con pilas secas tradicionales el funcionamiento de luz de ajuste no tiene sentido, ya que por su mayor resistencia
interna la energía para el condensador de flash durante la cantidad de luz
emitida no está disponible con la rapidez suficiente.
Desconexión de la función luz de ajuste:
• Pulsar la tecla Select (Grab. 1) tantas veces, hasta que parpadea el símbolo
en el display LC. Con la rueda de ajuste seleccionar ”OFF”.
Presionar la rueda de ajuste en la dirección de la flecha y así memorizar la
función luz de ajuste. Si no se presiona la rueda de ajuste entonces la función luz de ajuste queda memorizada automáticamente después de 5 seg.
En el mecablitz se ilumina la indicación de disposición de disparo (Grab.
1) constantemente.
12.5 Luz de ajuste / Modelling Light
12.6 Adaptación a la distancia focal del formato de cámara
La luz de ajuste es una luz de flash estroboscópica de alta frecuencia. Con
una duración de aprox. 4 seg. da la impresión como si fuera casi una luz
continua. Con la luz de ajuste se puede valorar antes de la toma la distribución de luz y la formación de sombras.
Conexión de la función luz de ajuste:
• Pulsar la tecla Select (Grab. 1) tantas veces, hasta que parpadea el símbolo
en el display LC. Con la rueda de ajuste seleccionar ”On”.
Presionar la rueda de ajuste en dirección de la flecha y así memorizar la
función luz de ajuste. Si no se presiona la rueda de ajuste entonces la función luz de ajuste queda automáticamente memorizada después de 5 seg.
En el mecablitz, cuando se emplea un adaptador SCA 3xx2, parpadea la indicación
Esta función da opción al usuario de adaptar la indicación de la posición
correspondiente del reflector del mecablitz al formato de cámara. Con ello
se puede hacer coincidir las distancias focales del objetivo de cámaras de
formato medio (4,5x6, 6x6, 6x7 y 6x9) o cámaras APS con la indicación en
el mecablitz. Para el formato de 35 mm puede elegir además el funcionamiento Extended-Zoom (zoom extendido).
En el funcionamiento Extended-Zoom (zoom extendido) la distancia focal del
mecablitz se reduce un escalón en comparación a la distancia focal del objetivo de la cámara. Como resultado da una iluminación muy amplia la cual
en salas con luz difusa adicional consigue una iluminación de luz de flash
más suave.
179
į
704 47 0099.A3
į
54 MZ-4i
01.02.2007
13:41 Uhr
Seite 180
Ejemplo para funcionamiento Extended-Zoom:
La distancia focal del objetivo en la cámara es de 50 mm.
En el funcionamiento Extended-Zoom el mecablitz coloca la posición del
reflector en 35 mm.
Proceso de ajuste para la adaptación de la distancia focal al sistema de
cámara (Grabado 12):
1 Pulse la tecla Select (Grab. 1) tantas veces, hasta que aparece en el
display ”Zoom”.
2 Al girar la rueda de ajuste (Grab. 1) proceder a la adaptación deseada
de la indicación de la distancia focal al sistema de cámara:
Indicaciones en el display:
Zoom sin indicación adicional = Ajuste para formato 35 mm (ajuste normal).
Si no se presiona la rueda de ajuste entonces queda memorizado automáticamente después de 5 seg. (= ajuste normal).
Auto Zoom con las siguientes indicaciones adicionales:
E
Funcionamiento Extended-Zoom (solo para cámaras de formato
35 mm (Grabado 12)
APS Adaptación a una cámara APS
F1
Adaptación a una cámara de formato medio 4,5x6
F2
Adaptación a una cámara de formato medio 6x6, 6x7 o 6x9
Advertencia para cuando está conectado el modo de funcionamiento
del zoom extendido.
• Después de la elección presionar la rueda de ajuste (Grab. 1) en dirección de la flecha para memorizar el ajuste. Si no se presiona la rueda de
ajuste entonces el ajuste elegido queda memorizado automáticamente
después de 5 seg. Este ajuste también queda memorizado después de la
desconexión del mecablitz.
El
en el display LC del flash indica después del almacenamiento que una
de las distancias focales arriba mencionadas está ajustada.
180
12.7 Serie de destellos ”Fb” (flash-bracketing) (Grabado 13)
Con el mecablitz 54 MZ-.. es posible realizar en los tipos de funcionamiento
TTL y A una serie de destellos (flash-blacketing / flash-exposure-bracketing).
Una serie de destellos se compone de tres tomas con flash seguidas con valores de correcciones de exposiciones de flash diferentes. La primera toma
con exposiciones de serie se efectúa sin valor de corrección. La segunda toma con flash se lleva a cabo con corrección – y la tercera con corrección +.
Después de la tercera toma este funcionamiento queda borrado automáticamente.
Serie de destellos ”Fb” en el funcionamiento TTL:
Una serie de destellos en el funcionamiento TTL solo es posible si el mecablitz
lleva el adaptador SCA apropiado (SCA 3xx2) y si la cámara apoya una
exposición de flash manual por el mecablitz.
Si la cámara no apoya una exposición de flash manual, se puede ajustar en
el mecablitz un factor de corrección para la serie de destellos, sin embargo
la cámara expone las tomas sin corrección. ¡Para ello tenga en cuenta las
instrucciones de la cámara y del adaptador SCA!
Serie de destellos ”Fb” en el funcionamiento A:
Para la serie de destellos en el funcionamiento A es suficiente el equipamiento del mecablitz con un pie estándar SCA 301. Sin embargo es posible realizar una serie de destellos en el funcionamiento automático con un adaptador SCA!
☞ ¡En algunas cámaras no es posible, por cuestiones técnicas, una serie
de destellos en el funcionamiento automático!
¡En algunas cámaras no es posible, por cuestiones técnicas, una serie de destellos en el funcionamiento automático, si el mecablitz no es accionado con
un pie estándar SCA 301!
Vea las instrucciones de la cámara o del adaptador SCA.
704 47 0099.A3
54 MZ-4i
01.02.2007
13:41 Uhr
Seite 181
Conexión de una serie de destellos “Fb” (Grabado 13):
1 Pulsar la tecla Select (Grab. 1) tantas veces hasta que aparece en el
display ”Fb”.
2 Al girar la rueda de ajuste (Grab. 1) elegir el factor de corrección deseado para la serie de destellos. Entretanto en el display parpadea ”EV” y el
valor para el factor de corrección. Al presionar la rueda de ajuste en
dirección a la flecha, este memoriza el ajuste. Si no se presiona la rueda
de ajuste entonces queda memorizado automáticamente después de 5 seg.
En el display del mecablitz aparece ”Fb 1”. Este indica la primera toma de
la serie de destellos. La siguiente toma se realiza sin factor de corrección.
Después de la primera toma la indicación del display cambia a ”Fb 2”. En el
display aparece además ”EV” y el factor de corrección- con el que se realiza
la segunda toma.
Después de la segunda toma cambia la indicación del display a ”Fb 3”. En
el display se indica además el factor de corrección + para la tercera toma.
Después de la tercera toma la indicación ”Fb” así como ”EV” y el valor para
el factor de corrección se borran.
☞ Para otra serie de destellos el proceso de ajuste para conectar la serie
de destellos tiene que volver a repetirse.
Si se interrumpe la serie de destellos antes de tiempo, entonces desconecte el
mecablitz con el interruptor principal por algún tiempo.
12.8 Retorno a los ajustes básicos
Pulsando la tecla Mode (Grab. 1) durante 3 seg. el mecablitz puede
retornar a los ajustes básicos. El tipo de funcionamiento ajustado se mantiene.
Los siguientes ajustes se borran:
• Subfuncionamientos TTL ”HSS”, ”ETTL”, ”3D” y funcionamiento Remote.
• Subfuncionamiento manual ”HSS”.
• Potencias parciales de luz introducidas manualmente.
• Flash-Bracketing “Fb”.
• Adaptación de distancias focales ”E”, ”APS”, ”F1” y ”F2”.
• Sincronización a la 2ª cortinilla (REAR).
• Función de luz de ajuste.
• Potencias parciales de luz introducidas manualmente.
• Bloqueo de los elementos de manejo.
Los siguientes ajustes quedan disponibles:
• Desconexión automática del aparato después de 10 minutos.
• Función ”Beep”.
• ”AutoZoom”.
12.9 Reflector con Zoom por motor
Si el mecablitz está equipado con un adaptador SCA 3xx2 y se utiliza con una
cámara, la cual informa sobre los datos para la distancia focal del objetivo al
flash, la posición Zoom del reflector se adapta automáticamente a la distancia
focal del objetivo. En el display del mecablitz se indica ”Auto-Zoom”.
Si el mecablitz funciona con un adaptador SCA 3xx o el pie estándar SCA 301,
entonces la posición Zoom del reflector del flash se ajusta manualmente:
• Girar la rueda de ajuste (Grab. 1) hasta que el símbolo de la flecha en
el display se encuentra al lado de ”Zoom”.
• Presionar la rueda de ajuste (Grab. 1) en dirección de la flecha. El símbolo de la flecha parpadea.
• Girar la rueda de ajuste (Grab. 1) y elegir el ajuste del reflector deseado.
• Para memorizar presionar la rueda de ajuste en dirección de la flecha. Si
no se presiona la rueda de ajuste, el ajuste queda memorizado automáticamente después de 5 seg. El símbolo de la flecha ya no parpadea.
Si utiliza un objetivo Zoom y no siempre necesita el número-guía completo y
el alcance del mecablitz, entonces puede dejar la posición zoom del reflector
en la distancia focal inicial del objetivo zoom. Esto le garantiza que la foto
siempre quede totalmente iluminada. Se ahorrará la adaptación continua a
la distancia focal del objetivo.
181
į
704 47 0099.A3
54 MZ-4i
01.02.2007
13:41 Uhr
Seite 182
Ejemplo:
Usted utiliza un objetivo zoom con un alcance de distancia focal de 28 hasta
80 mm. ¡En este ejemplo coloque la posición zoom del reflector del mecablitz a 28 mm!
Variar la posición zoom con un adaptador SCA 3xx2 y una cámara que
transmita datos:
La posición zoom del reflector se puede variar también en el funcionamiento
del mecablitz con adaptador SCA 3xx2 y una cámara que transmite datos:
Véase arriba para la elección de la posición zoom deseada.
Después de memorizar se indica ”Zoom” en vez de ”AutoZoom”. La posición
zoom del reflector elegida parpadea en el display del mecablitz. Esto significa que la posición zoom elegida se ajustó manualmente.
Retorno al funcionamiento ”AutoZoom”:
• Girar la rueda de ajuste (Grab. 1) hasta que el símbolo de la flecha del
display aparezca al lado de ”Zoom”.
• Presionar la rueda de ajuste en dirección a la flecha. El símbolo de la flecha parpadea.
• Girar la rueda de ajuste hasta que aparezca en el display ”AutoZoom”!
• Para memorizar presionar la rueda de ajuste en dirección de la flecha. ¡Si
no se presiona la rueda de ajuste, entonces el ajuste queda automáticamente memorizado después de 5 seg.! El símbolo de la flecha ya no parpadea.
☞ ¡El flash debe estar montado sobre la cámara conectada!
12.10 Indicación m - pies
į
• Desconectar el mecablitz con el interruptor principal (Grab. 1).
• Pulsar la tecla Select (Grab. 1) y ajustar simultáneamente el interruptor
principal (Grab. 1) de OFF a “On”.
182
13. Difusor gran angular
Extraer el difusor gran angular (Grab. 2) debajo del reflector principal
hacia delante hasta el tope y soltar. El reflector principal llega automáticamente a la posición zoom 20 mm. El difusor gran angular se cierra automáticamente hacia arriba. En el display LC se corrigen los datos de distancia y
valor zoom.
Para guardar, plegar el difusor 90º hacia abajo e introducir completamente.
Cuando se utilizan difusores gran angular o con otros complementos ópticos,
como filtros de colores o grises, Mecabounce, etc. no se ha de aplicar ningún modo de funcionamiento que opere con predestellos de medición o con
sincronización en velocidad rápida (HSS).
14. Correcciones de exposición manuales
☞ La corrección manual de la exposición del flash únicamente es posible
cuando se utiliza un adaptador SCA 3xx2.
☞ Con funcionamiento A, la corrección manual de la exposición del
flash es posible con un adaptador SCA 3xx y SCA 3xx2.
El automatismo de exposición del mecablitz y de la mayoría de las cámaras
se basan en un grado de reflexión del objeto de un 25 % (grado de promedio de reflexión de objetos con flash). Un fondo oscuro, que absorbe mucha
luz, o un fondo claro que refleja fuertemente (p.e. contraluces), pueden producir sobreexposiciones o faltas de luz del objeto.
Para compensar el efecto arriba mencionado, la exposición se puede adaptar
manualmente con un valor de corrección a la situación de la toma.¡ La modificación del valor de corrección depende del contraste entre el objeto y el
fondo de la imagen! En el mecablitz se pueden ajustar en los funcionamientos
TTL y A factores de corrección manuales para la exposición desde -3 EV (valores de diafragma) hasta +3 EV (valores de diafragma) en escalones de 1/3.
Muchas cámaras poseen un elemento de ajuste para correcciones de la exposición que puede servir también en el funcionamiento TTL.
Observe las indicaciones en las instrucciones de la cámara o del adaptador SCA.
704 47 0099.A3
54 MZ-4i
01.02.2007
13:41 Uhr
Seite 183
Una corrección de la exposición por variación del diafragma del objetivo no
es posible, puesto que el automatismo de exposición de la cámara considera
el diafragma modificado como diafragma de trabajo normal.
☞ Objeto oscuro sobre fondo claro: Valor de corrección positivo (aprox.
1 a 2 valores de diafragma EV).
Objeto claro sobre fondo oscuro: Valor de corrección negativo (aprox.
–1 a –2 valores de diafragma EV).
¡Al ajustar un valor de corrección la indicación de alcance en el display LC
del mecablitz puede variar y adaptarse al valor de corrección (dependiendo
del tipo de cámara y adaptador SCA)!
Ajuste de una corrección de exposición manual:
• El mecablitz trabaja en el funcionamiento TTL o A.
• Girar la rueda de ajuste (Grab. 1) hasta que aparezca el símbolo ”EV”
en el display LC. El símbolo-flecha junto a ”EV” indica que la posición
para el ajuste de un valor de corrección para la exposición está seleccionada.
• Presionar la rueda de ajuste (Grab. 1) en dirección de la flecha. El símbolo-flecha junto a ”EV” parpadea.
• Al girar la rueda de ajuste ajustar un valor de exposición apropiado. El
valor de corrección se indica en el display LC del mecablitz.
• Para memorizar el valor de corrección presionar la rueda de ajuste en la
dirección de la flecha. Si no se presiona la rueda de ajuste, el valor de
corrección queda memorizado automáticamente después de 5 seg.
El símbolo-flecha junto a ”EV” deja de parpadear. El valor de corrección
ajustado se indica en el display LC del mecablitz.
Desconexión de una corrección de exposición manual:
• Girar la rueda de ajuste (Grab. 1) hasta que el símbolo-flecha aparezca en el display LC junto a ”EV”.
• Presionar la rueda de ajuste. El símbolo-flecha junto a ”EV” parpadea.
• Girar la rueda de ajuste hasta que la indicación del valor de corrección
desaparece en el display.
• Presionar la rueda de ajuste en dirección de la flecha y memorizar el ajuste. Si no se presiona la rueda de ajuste, el valor de corrección queda automáticamente memorizado después de 5 seg. El símbolo-flecha junto a
”EV” deja de parpadear.
☞ Una corrección de exposición manual se lleva a cabo si la cámara
apoya esta función. ¡Si la cámara no apoya esta función, en el mecablitz es posible ajustar un valor de corrección, sin embargo no tiene
efecto!
La transmisión de un valor de corrección para la exposición desde el mecablitz a la cámara solo es posible en funcionamiento TTL con un adaptador
SCA 3xx2, el cuál efectúe esta función.
En varias cámaras hay que ajustar una corrección de exposición manual en
la misma cámara (vea las instrucciones de la cámara). En este caso no se
indica el valor de corrección en el mecablitz.
Con algunas cámaras se puede ajustar una corrección de exposición manual
en la cámara o en el flash. Para saber cual de los ajustes prevalece, lea las
instrucciones de la cámara o del adaptador.
15. Mantenimiento
Quite la suciedad o polvo con un pañuelo suave, seco o tratado con silicona.
No utilice detergentes que pudieran deteriorar la carcasa de plástico.
Formar el condensador de destello
El condensador de destello incorporado en el mecablitz se deforma físicamente, si el aparato no es conectado durante períodos largos. Por este motivo es
necesario conectar el flash en intervalos de 3 meses durante unos 10 minutos.
Las pilas han de tener la suficiente capacidad, para que la indicación de
disposición de disparo se encienda lo más tarde un minuto después de la
conexión.
183
į
704 47 0099.A3
54 MZ-4i
01.02.2007
13:41 Uhr
Seite 184
16. Datos técnicos
į
Número-guía con ISO 100/21º, zoom 105 mm:
En metros: 54
en pies: 177
12 diafragmas automáticos con ISO 100/21º:
1 – 1,4 – 2 – 2,8 – 4 – 5,6 – 8 – 11 – 16 – 22 – 32 – 45
Duraciones de destellos:
• Aprox. 1/200 ..... 1/20.000 seg.
• En el funcionamiento M aprox. 1/200 seg. con plena potencia de luz
• Con 1/2 potencia de luz aprox. 1/600 seg.
• Con 1/4 potencia de luz aprox. 1/1400 seg.
Angulo de medición del sensor: aprox. 25º
Temperatura de color:
aprox. 5600 K
Sensibilidad de película:
ISO 6 hasta ISO 6400
Sincronización:
Ignición de bajo voltaje
Número de destellos aprox.:
60* con batería NC (600 mAh)
180* con pilas alcalino-manganesas de gran capacidad
Secuencia de destellos:
• con batería NC (600 mAh)
5 seg. (en el funcionamiento M)*
0,1 . . 5 seg. (en el funcionamiento A y TTL)
• con pilas alcalino-manganesas de gran capacidad
6 seg. (en el funcionamiento M)*
0,1 . . 6 seg. (en el funcionamiento A y TTL)
* con plena potencia de luz
184
Reflector giratorio:
En vertical con escalones en 60º 75º 90º / -7°
En el sentido contrario al reloj
en escalones en
30º 60º 90º 120° 150° 180º
En el sentido del reloj en
escalones en
30º 60º 90º
Dimensiones en mm. aprox. (A x A x F):
75 x 125 x 108
Peso:
Flash sin pilas:
aprox. 480 grs.
Volumen de suministro:
Flash, estuche T54, pie estandar 301*, tapa protectora*, instrucciones,
tabla SCA 300/3002.
* (no en los Sets)
Con reserva de modificaciones y posibilidades de entrega.
17. Terminología
• Indicación de control de exposición en el visor de la cámara
En el funcionamiento automático o TTL la exposición correcta o la subexposición de la película se indica en muchas cámaras por una señal en el visor.
• Control de velocidad de sincronización de flash automática
Al mismo tiempo que aparece la disposición de disparo, la mayoría de
cámaras de sistema conmutan la velocidad de funcionamiento ajustado a
la velocidad de sincronización de flash. Algunas cámaras conservan velocidades más lentas. Cuando la indicación de disposición de disparo se
borra después de un destello o por desconectar el flash, la cámara vuelve
a ajustar la velocidad de obturación anterior.
• Control de ignición
Si con el diafragma ajustado en el objetivo y la luz ambiente existente ha
obtenido una velocidad, que es igual o más rápida que la de sincronización, al disparar la cámara no se realizará ningún destello. La toma se
efectuará con la luz ambiente y se evitará una sobreexposición.
704 47 0099.A3
54 MZ-4i
01.02.2007
13:41 Uhr
Seite 185
• Elección de sincronización a la 1ª o 2ª cortinilla (vea Grabado 10 y 11)
Aquí existen dos opciones para sincronización de flash:
- En el momento de la apertura de la 1ª cortinilla o
- justo antes de cerrar la 2ª cortinilla.
En el adaptador SCA debe preseleccionar la sincronización deseada. La
sincronización a la 2ª cortinilla es una ventaja sobre todo en exposiciones
con velocidades lentas u objetos en movimiento.
• Destello de medición Autofoco
Si la luz ambiente no es suficiente para un enfoque automático, la electrónica de la cámara activa un destello de medición autofoco. El emisor lanza
una franja de luz que se proyecta sobre el objeto. Sobre esta franja la cámara enfoca automáticamente. Si utiliza un adaptador SCA 3xx autofoco
solo se activa el destello de medición autofoco integrado en el adaptador.
• Automatismo de programa
Algunas cámaras mezclan en ”Program” la luz ambiente y la luz de flash.
La cámara ajusta automáticamente una combinación de velocidad-diafragma y controla al flash en el modo TTL. Esto facilita el manejo de todos
los aparatos.
• Control de destello de aclaración TTL
Algunas cámaras de sistema ofrecen, además del control de destello TTL,
la posibilidad de un control de destello de aclaración TTL. Este funcionamiento es preciso durante tomas de día para aclarar sombras o para contraluces. La cámara calcula siempre la cantidad de luz precisa para una
buena exposición gracias a la medición del sensor en el interior de la
cámara y la posterior valoración de la electrónica. Para las tomas que
precisan de aclaración la cámara realiza una corrección de la exposición.
• Corrección de exposición TTL
En algunas situaciones es posible que la medición del sensor en el interior
de la cámara sea confundida. En casos de objetos oscuros ante fondos
claros (objeto subexpuesto) u objetos claros ante fondos oscuros (objeto
sobre-expuesto). Con ayuda del control de diafragma y velocidad, modificando la sensibilidad o la corrección +/- en la cámara, puede realizar
una corrección de exposición normal. Esto influye sobre todas las partes
de la toma. Algunas cámaras pueden realizar correcciones de exposición
especiales. Con estas correcciones la exposición total se mantiene y solo
las partes oscurecidas por sombras se aclaran con el flash. Para más detalles vea las instrucciones de la cámara y del adaptador.
• Predestello contra ojos rojos (solo con adaptador SCA 3402 Nikon)
El efecto ojos rojos es un efecto físico. Este efecto aparece cuando la persona a retratar mira directamente a la cámara, la luz ambiente es relativamente oscura y el flash se encuentra sobre o muy cerca de la cámara. El
flash aclara el fondo de ojo, la retina se vuelve visible a través de la pupila
y la cámara lo reconoce como punto rojo.
La función para reducir el efecto ojos rojos ayuda a mejorar este efecto,
ya que el mecablitz emite tres predestellos suaves (sí la función existe en la
cámara y en el flash) antes del destello principal.
Estos tres predestellos provocan que las pupilas de los ojos se cierren y disminuye el efecto de ojos rojos. Cualquier programa de exposición ofrece
esta función. Para más detalles vea las instrucciones de la cámara.
• Funcionamiento TTL-HSS
Este control permite usar el flash incluso con velocidades más cortas que la
sincronización de la cámara. Es interesante para retratos con una luz ambiente muy clara, cuando desee limitar la profundidad de campo con un
diafragma muy abierto.
• Funcionamiento ETTL (solo con SCA 3102 Canon)
Este funcionamiento realiza un predestello para determinar las características de reflexión del objeto antes de la toma definitiva.
• Funcionamiento ETTL-HSS
Este funcionamiento permite utilizar luz de flash incluso con velocidades
más cortas que la de sincronización de la cámara.
• Control de destello TTL 3D (solo con Nikon SCA 3402)
Inmediatamente después de pulsar el disparador y antes de concluir la obturación este funcionamiento emite destellos de medición apenas visibles
que transmiten a la cámara información sobre luz y contraste.
185
į
704 47 0099.A3
54 MZ-4i
01.02.2007
13:41 Uhr
Seite 186
18. Accesorios opcionales
☞ No se garantizan malfunciones y averías en el mecablitz, causadas
por utilizar accesorios de otros fabricantes.
į
• Adaptadores Sistema SCA-3xx
Para el funcionamiento de flash con las cámaras de sistema. Vea las
instrucciones correspondientes.
• Adaptadores Sistema SCA-3xx2
Para el uso con cámaras de sistema con transmisión digital de datos de las
funciones SCA. Ampliación de funciones frente al Sistema SCA-3xx. Vea
instrucciones correspondientes.
• Juego de filtros 44-32
(Código 00004432A)
Contiene 4 filtros de colores para iluminación de efectos y un filtro claro
para tomas de folios en color.
• Difusor Mecabounce 44-90
(Código 000044900)
Con este difusor conseguirá obtener una iluminación suave. Produce un
efecto muy suave y agradable. El color de la piel de las personas resulta
muy natural. Los alcances disminuyen según la pérdida de luz alrededor
del factor 2.
• Power-Pack P50
(Código 00012950A)
Para más cantidad de destellos y secuencias más cortas (aprox. 300 destellos). Por fovor, pida también el cable de connexión V54-50 (Código
000054505).
• Power-Pack P40
(Código 000129405)
Conseguirá más cantidad de destellos por una capacidad superior comparada con baterías NC del tipo IEC KR 15/51. Por fovor, pida también el
cable de connexión V54-40 (Código 000054400).
186
• Paraguas de reflexión 54-23
(Código 000054236)
Disminuye sombras duras dirigiendo una luz suave.
• Regleta de cámara 40-36/2
(Código 000040363)
Para la colocación lateral del flash junto a la cámara.
• Adaptador esclavo 3083
(Código 0033083A)
Permite el control de destellos TTL de flashes del tipo 54 MZ-.. y 70 MZ-4
sin cable.
19. En caso de problemas
(Ca) = Sistema Canon;
funcionamiento del mecablitz con SCA 3102
(Mi = Sistema Minolta;
funcionamiento del mecablitz con SCA 3302
(Ni) = Sistema Nikon;
funcionamiento del mecablitz con SCA 3402
(Pe) = Sistema Pentax;
funcionamiento del mecablitz con SCA 3702
Si ocurriese una vez que en el display LC aparezcan indicaciones imposibles o el flash no funcione debidamente en los diferentes tipos de funcionamiento, proceda como sigue:
• Desconecte el flash con el interruptor principal.
• Saque las pilas o elementos NC del flash.
• Conecte el flash durante aprox. 1 segundo y vuelva a desconectarlo.
• Vuelva a colocar las mismas o nuevas pilas o elementos NC.
704 47 0099.A3
54 MZ-4i
01.02.2007
13:41 Uhr
Seite 187
En el mecablitz no se puede ajustar la sincronización en la segunda cortinilla (modo REAR).
• La sincronización en la segunda cortinilla (REAR) solamente se puede ajustar entonces en el mecablitz, cuando éste está equipado con un adaptador
apropiado SCA 3xx2 (véanse las instrucciones de uso del adaptador SCA)
y está montado sobre una cámara conectada. Al menos ha de haber habido un intercambio de datos entre cámara y adaptador SCA (para ello es
suficiente pulsar brevemente el disparador de la cámara, sin sacar la foto).
¡La cámara debe soportar la función de sincronización a la segunda cortinilla (véanse las instrucciones de uso de la cámara y del adaptador SCA)!
• (Ni) en el mecablitz está activado el modo flash 3D de Nikon; en el display
se visualiza el símbolo . El modo flash 3D Nikon no se puede combinar
con el modo REAR.
Posible solución: primero desactivar el modo 3D y luego conectar REAR.
• (Ni) en la cámara Nikon está activada la función de predestello para reducir el efecto de ojos rojos. En el display LC del mecablitz se visualiza el
símbolo
. La función predestellos no se puede combinar con el modo
REAR.
Posible solución: desactivar primeramente la función predestellos anti-ojos
rojos en la cámara, luego seleccionar REAR.
• (Mi) con las cámaras Minolta, por principio, ¡se ha de ajustar automáticamente la sincronización a la segunda cortinilla (modo REAR) en la misma
cámara! ¡En el mecablitz no se indica el modo de sincronización! Por las
instrucciones de uso de la respectiva cámara se puede saber si es posible
con ella la función REAR, así como el necesario proceso de ajuste.
En el mecablitz no se puede ajustar el modo de flash TTL-HSS o E-TTL-HSS..
El modo de flash (E-) TTL-HSS (sincronización en velocidad rápida) ¡de
momento sólo es posible con el mecablitz 54 MZ-..!
• El modo de flash (E-) TTL-HSS solamente se puede ajustar en el mecablitz,
cuando éste está equipado con un adaptador apropiado SCA 3xx2 (véanse las instrucciones de uso del adaptador SCA) y está montado sobre una
cámara conectada. Al menos ha de haber habido un intercambio de datos
entre cámara y adaptador SCA (para ello es suficiente pulsar brevemente
el disparador de la cámara, sin sacar la foto). ¡La cámara debe soportar
el modo de flash (E-) TTL-HSS en el modo de funcionamiento seleccionado:
manual M o TTL (véanse las instrucciones de uso de la cámara y del adaptador SCA)!
• La combinación del modo de flash (E-) TTL-HSS con el sistema, sin cable,
Metz remoto no es posible.
• El modo de flash (E-) TTL-HSS se puede activar en el mecablitz 54 MZ-.. en
modo de flash manual M (Ca, Mi, Ni) o en el modo TTL (Ca, Mi), ¡según
el sistema de la cámara!
• ¡Para que se pueda activar el modo de flash (E-) TTL-HSS, el reflector
secundario del mecablitz no debe estar conectado!
• (Mi) cuando el reflector principal está girado o inclinado, no se lleva a
cabo el modo de flash (E-) TTL-HSS. La velocidad de obturación de la
cámara está limitada a la velocidad de sincronización de la misma. ¡En el
visor de la cámara se apaga la indicación (H), para el modo de flash (E-)
TTL-HSS!
(Ni) Con el mecablitz en modo TTL, no se puede activar el modo 3D.
• En el mecablitz está conectado el modo REAR; en el display se visualiza
"REAR".
Posible solución: desactivar primeramente el modo REAR y después activar
el modo 3D.
• El mecablitz debe estar equipado con un adaptador SCA 3402. El modo
3D-TTL sólo se puede ajustar en el mecablitz, cuando éste está montado
sobre una cámara conectada, que también soporta el modo 3D. Al menos
ha de haber habido un intercambio de datos entre cámara y adaptador
SCA (para ello es suficiente pulsar brevemente el disparador de la cámara, sin sacar la foto).
• ¡No se podrá disponer del modo de flash TTL 3D, cuando el mecablitz no
está en posición de disparo, cuando el reflector está girado o basculado
respecto de la posición normal o cuando el reflector secundario del mecablitz está conectado!
187
į
704 47 0099.A3
į
54 MZ-4i
01.02.2007
13:41 Uhr
Seite 188
• ¡En modo Metz remoto sin cable no es posible el modo de flash TTL 3D!
• ¡El modo TTL 3D sólo es posible con los aparatos mecablitz 40 MZ-3(i),
50 MZ-5, 54 MZ-.. y 70 MZ-...!
(Ca) El modo E-TTL no se puede activar.
• El mecablitz debe estar equipado con un adaptador SCA 3102. El modo ETTL sólo se puede ajustar en el mecablitz, cuando éste está montado sobre
una cámara conectada, que también soporta el modo E-TTL. Al menos ha de
haber habido un intercambio de datos entre cámara y adaptador SCA
(para ello es suficiente pulsar brevemente el disparador de la cámara, sin
sacar la foto).
• No se podrá disponer del modo de flash E-TTL cuando el reflector secundario del mecablitz está conectado!
• ¡Cuando el reflector secundario del mecablitz está conectado, el modo E-TTL
se conmuta al normal modo TTL! ¡Problema con EOS D30: ¡en el modo TTL,
el mecablitz ya no se puede disparar; o, en caso dado, conmutar a "automático"!
• ¡En funcionamiento Metz remoto sin cable no es posible el modo de flash
E-TTL!
• ¡El modo E-TTL sólo es posible con los aparatos mecablitz 40 MZ-3i, 40 MZ-1i
y 54 MZ-..!
En funcionamiento Remoto, el mecablitz no está en disposición de disparo.
• En el mecablitz, el reflector secundario está conectado; en el display se
visualiza el símbolo.
Posible solución: desconectar el reflector secundario.
La indicación de disposición de disparo en el mecablitz parpadea.
• En el mecablitz la función de luz piloto está activada.
Solución: desactivar la función de luz piloto en el mecablitz.
En el mecablitz no se puede reajustar la sensibilidad ISO de la película.
• El mecablitz está equipado con un adaptador SCA 3xx2 y se acciona con
una cámara, cuyos datos para la sensibilidad de la película los envía al
188
mecablitz. En este caso, la modificación de la sensibilidad ISO de la película está bloqueada.
En el mecablitz no se puede reajustar el diafragma.
• El mecablitz está equipado con un adaptador SCA 3xx2 y se acciona con
una cámara, cuyos datos para el diafragma los envía al mecablitz. En este
caso, la modificación del diafragma está bloqueada.
En el display LC del mecablitz se visualiza solamente "-", en lugar del
valor de la distancia.
• El reflector del mecablitz no ocupa su posición de base normal. La indicación de la distancia sólo se visualiza cuando el reflector se encuentra en su
posición básica, es decir, no está girado ni en horizontal ni en vertical.
En el display LC del mecablitz parpadea el símbolo del reflector secundario. La indicación de disposición de disparo en el mecablitz luce.
• El reflector secundario está conectado, a pesar de que el reflector principal
se encuentra en su posición básica, es decir, no está girado. La aplicación
del reflector secundario, sin embargo, tiene sentido solamente cuando asume una función de aclaración, estando el reflector principal girado. Si
parpadea el símbolo del reflector secundario, significa que se debe desconectar el reflector secundario. Cuando se desconecta el reflector secundario, se apaga el símbolo en el display. Cuando se gira el reflector principal, se visualiza permanentemente el símbolo.
En el display LC del mecablitz parpadea el símbolo del reflector secundario. La indicación de disposición de disparo en el mecablitz no luce.
• El mecablitz se ha conmutado al modo de controlador remoto. En el
display LC se visualiza "Co". Sin embargo, el funcionamiento remoto solamente se soporta por el reflector principal. Dado que no se visualiza ninguna disponibilidad del flash, el mecablitz no dispara al efectuar una
toma.
Solución: desactivar el modo de controlador remoto o desconectar el
reflector secundario.
704 47 0099.A3
54 MZ-4i
01.02.2007
13:41 Uhr
Seite 189
En el display del mecablitz se visualiza "Co", en lugar del valor de la distancia.
• El mecablitz se encuentra en el modo de controlador remoto. En este modo
de funcionamiento, por principio no se realiza ninguna indicación de la
distancia.
En el modo de controlador Remoto del mecablitz, con la rueda de ajuste no
se puede seleccionar o ajustar ninguna corrección de la exposición del flash.
☞ En modo automático Remoto, por principio, ninguna corrección de la
exposición del flash es efectiva.
• En modo automático remoto TTL se puede activar una corrección de la exposición del flash, siempre y cuando se ajuste antes de que el mecablitz se
conmute a la función de controlador. El valor de corrección no se visualiza
en modo de controlador remoto, aunque permanezca efectiva. En el display LC del mecablitz, en lugar del valor de corrección, se visualiza la dirección remota (canal remoto) "Ad1" o "Ad2".
(Ni) En el mecablitz no se pueden ajustar las funciones de Nikon "destellos
de aclaración con control matricial" o "destellos de aclaración por multisensor 3D".
• El respectivo modo de destellos de luz de relleno o aclaración solamente se
puede ajustar en el mecablitz, cuando éste está equipado con un adaptador SCA 3402 y montado sobre una cámara conectada, que soporta esta
función de destellos de aclaración. Al menos ha de haber habido un intercambio de datos entre cámara y adaptador SCA (para ello es suficiente
pulsar brevemente el disparador de la cámara, sin sacar la foto).
• En el modo de funcionamiento remoto, con el reflector principal girado, o
con el reflector secundario conectado, no se soportan los "destellos de
aclaración por multisensor 3D" (Nikon); por lo tanto, esta función tampoco
se puede activar bajo las condiciones arriba indicadas.
• El respectivo modo controlado Nikon de destellos de aclaración, depende
del tipo de cámara.
En el display LC del mecablitz parpadea el símbolo
y el valor del diafragma.
• El ámbito de regulación de la luz del mecablitz en modo automático A del
flash queda sobrepasado bajo las condiciones de la toma o los ajustes de
la cámara, ya indicados.
Posible solución: oscurecer el entorno de la toma, utilizar material de filmación con menos sensibilidad o ajustar un valor más alto de diafragma
en la cámara o en el mecablitz.
El proyector de luz roja AF del mecablitz no está activado.
Posibles causas:
• La luminosidad ambiente es suficiente al sensor AF de la cámara para
ajustar la nitidez.
• En caso de necesidad, la cámara activa su propia luz auxiliar AF.
• Se ha activado otro modo de funcionamiento AF distinto del Single-AF (S).
• Se ha activado en la cámara un campo de medida AF descentralizado.
Posibles soluciones:
• Seleccionar el modo de la cámara Single AF o S (más detalles en las instrucciones de la cámara).
• Activar el sensor central AF en el visor de la cámara.
Problemas con el modo de controlador remoto y Flash-Bracketing.
• ¡En modo de controlador remoto no son posibles las exposiciones en serie
del flash! ¡Si se ajusta una serie de exposiciones y, seguidamente, se conmuta el mecablitz a la función remota, entonces las exposiciones en serie
de flash ya no se visualizan más y tampoco se ejecutan!
Modo de controlador remoto y corrección de la exposición del flash.
• Si se selecciona en el mecablitz una corrección de la exposición del flash
y, seguidamente, se conmuta al modo del flash de controlador remoto,
entonces las tomas subsiguientes se exponen con ese valor de corrección.
¡Sin embargo, en el display del mecablitz no se visualiza ningún (!) valor
de corrección!
189
į
704 47 0099.A3
54 MZ-4i
01.02.2007
13:41 Uhr
Seite 190
(Ni) Ninguna indicación de subexposición Nikon en funcionamiento remoto.
• En algunas cámaras Nikon, en caso de una subexposición por la luz de
flash, tiene lugar una indicación de aviso (-EV) en el display LC del mecablitz. En modo remoto esta función no es soportada por el mecablitz.
Ningún modo REAR con (E-) TTL-HSS.
• Cuando en el mecablitz la sincronización en velocidad rápida (E-) TTL-HSS
está activada, no es posible seleccionar el modo REAR (sincronización a la
2ª cortinilla).
• Si cuando se ha activado el modo REAR, se conecta la sincronización en
velocidad rápida (E-) TTL-HSS, ¡entonces se desactiva el modo REAR!
En el display del mecablitz no se visualiza la sensibilidad ISO de la película.
• El mecablitz se encuentra en modo remoto ("Co" o "SL") o en modo estroboscópico. En estos funcionamientos, por principio, en el display LC del
mecablitz ¡no se indica ningún valor ISO!
• Con los sistemas de las cámaras Canon y Minolta, ¡por principio no se
indica ningún valor ISO en el display LC!
Los impulsos de luz de flash Nikon-3D activan sin control el flash esclavo.
☞ Cuando el fotosensor en el adaptador esclavo SCA 3083 recibe la luz
de un flash que funciona en modo de flash Nikon 3D, ¡el mecablitz
esclavo se dispara incontroladamente!
į
• Solución: sólo es posible, cuando se conmuta del modo de flash 3D al
modo normal TTL (sin 3D).
El valor de corrección de la exposición parpadea en el display del mecablitz.
En el mecablitz se ha ajustado, por ej., en modo TTL un valor de corrección de
la exposición del flash (EV). Después de que se haya memorizado el valor de
corrección, parpadea el valor de corrección en el display LC del mecablitz.
Posible causa:
¡El sistema de la cámara no permite el ajuste de un valor de corrección en el
mecablitz! Caso dado, hay que ajustar el valor de corrección deseado, directamente en la cámara (véanse las instrucciones de uso de la cámara). El
valor de corrección que parpadea en el display LC del mecablitz ¡no influye
190
en la toma! Atención: ¡el aviso preventivo, al parpadear el valor de corrección, no es asumido por todos los sistemas de cámaras! En la mayor parte
de los sistemas de cámaras, se puede ajustar y llevar a cabo una corrección
de la exposición del flash, en modo automático A del mecablitz (¡excepción
por ej. Minolta!).
En modo TTL no se puede ajustar ninguna serie de exposiciones en el flash.
Mediante la tecla "Select" del mecablitz no se puede activar la función de
exposiciones en serie del flash "Fb" (flash-bracketing), por ej. con funcionamiento TTL del flash.
Posible causa:
Diversas cámaras o sistemas de cámaras no soportan el ajuste para una corrección de la exposición del flash en el modo TTL del mecablitz. Sin embargo, dado que las series de exposiciones del flash operan con valores de corrección, la posibilidad de ajuste de una serie de exposiciones del flash en las
cámaras afectadas, se suprime desde un principio en el menú del mecablitz.
Sin embargo, en la mayor parte de los sistemas de cámaras, se puede ajustar y llevar a cabo, en modo automático A del mecablitz, unas exposiciones
en serie del flash "Fb" (excepción por ej. Minolta!). En el mecablitz 70 MZ-4
¡por principio no se puede ajustar ninguna serie de exposiciones "Fb" del
flash!
(Pe) En el visor de la cámara no se visualiza ninguna disponibilidad del
flash, a pesar de que luce la indicación de disposición de disparo del
mecablitz. En la toma no se enciende el mecablitz.
• El mecablitz opera en modo Spot-Beam, en cuyo caso se soporta únicamente el proyector de luz roja AF del mecablitz. El interruptor de modo de funcionamiento del adaptador SCA 3702 se encuentra en la posición "SB".
Posible solución:
conmutar el interruptor de modo de funcionamiento del adaptador SCA 3702
a la posición extrema izquierda
, es decir, a la sincronización a la primera cortinilla.
704 47 0099.A3
54 MZ-4i
01.02.2007
13:41 Uhr
Seite 191
(Pe) En el visor de la cámara se visualiza el control de la exposición (el
símbolo de disposición del flash parpadea), aunque no se ha realizado
ninguna toma.
• Se trata de una indicación de aviso. La posición del reflector del zoom no
es suficiente para iluminar plenamente el sujeto. Posiblemente en el mecablitz se ha desactivado la adaptación automática a la distancia focal
(AUTO-ZOOM; CZ) y se ha seleccionado una distancia focal del reflector,
mayor que la del objetivo. Ejemplo: distancia focal del objetivo 70 mm,
distancia focal del reflector 85 mm.
Posible solución:
Activar en el mecablitz la adaptación automática a la distancia focal
(AUTO-ZOOM o CZ) o procurar que la distancia focal del reflector sea
igual o inferior a la distancia focal del objetivo. Ejemplo: distancia focal
del objetivo 70 mm, distancia focal del reflector 70 mm, ¡50 mm o menos!
Para proceder al ajuste, consultar las instrucciones de uso del mecablitz!
(Pe) El reflector zoom por motor del mecablitz se posiciona automáticamente en 35 mm, aunque se ha aplicado un objetivo con otra distancia focal. En el display LC del mecablitz aparece la indicación "AutoZoom".
• Se ha empleado un objetivo Non-AF o un objetivo ¡que no transmite ningún dato para la distancia focal a la cámara! El mecablitz adopta entonces automáticamente la posición de 35 mm para el reflector.
Posible solución:
¡adaptar manualmente la posición del reflector del mecablitz a la distancia
focal del objetivo (véanse las instrucciones de uso des mecablitz)!
Advertencia: eventualmente parpadea en el visor de la cámara la indicación de disposición de disparo, con distancias focales del reflector superiores a 35 mm, lo que no tiene ninguna incidencia para la exposición de la
toma subsiguiente. ¡En este caso, después de la toma, observar la indicación del control de la exposición del mecablitz!
El mecablitz no destella.
• El mecablitz se ha desconectado automáticamente.
• Tras poner en funcionamiento el mecablitz y después de la desconexión
automática del aparato, pulsar brevemente el disparador de la cámara,
sin llegar a disparar, y así poder ajustar los aparatos implicados, según la
situación originada.
En el display LC del mecablitz aparece "ZE" en lugar de la posición del zoom.
El mecablitz no ha podido enganchar en una posición zoom. Puede ocurrir
que las pilas estén casi descargadas y su energía ya no sea suficiente para
el recorrido mecánico.
Desconectar y volver a conectar el mecablitz o/y sustituir las pilas gastadas
por unas nuevas.
Eliminación de las baterías
No se deben tirar las baterías a la basura casera.
Para la devolución de sus baterías gastadas, sírvase utilizar uno de los sistemas de reciclaje existente eventualmente en su país.
Sírvase devolver unicamente baterías descargadas.
Por regla general, las baterías están descargadas cuando el aparato alimentado por ellas
- se apaga y señala „baterías gastadas“
- no funciona bien despues de un largo período de uso de las baterías.
Para evitar cortocircuitos, es recomendable cubrir los polos de las baterías
con cinta adhesiva.
191
į
704 47 0099.A3
54 MZ-4i
01.02.2007
ISO
Ķ
ĸ
ń
ķ
ƴ
į
6/9°
8/10°
10/11°
12/12°
16/13°
20/14°
25/15°
32/16°
40/17°
50/18°
64/19°
80/20°
100/21°
125/22°
160/23°
200/24°
250/25°
320/26°
400/27°
500/28°
650/29°
800/30°
1000/31°
1250/32°
1600/33°
2000/34°
2500/35°
3200/36°
4000/37°
5000/38°
6400/39°
192
20
5,5
6
7
8
9
10
11
12
13
15
17
19
22
24
28
31
35
39
44
49
56
62
70
79
88
99
112
125
141
158
177
24
7
8
9
10
11
12
14
15
17
19
22
25
28
31
35
39
44
50
56
63
70
79
89
100
112
126
141
159
178
200
224
28
7,5
9
9,5
10,5
12
13
15
17
19
21
24
27
31
34
39
43
49
55
62
69
78
87
98
110
124
139
156
175
196
220
248
Zoom
35
8,5
9,5
10
12
13
15
17
19
21
24
27
30
34
38
43
48
54
60
68
76
86
96
108
121
136
153
172
193
216
242
272
50
10
11
12
14
15
17
20
22
25
28
31
35
40
44
50
56
63
71
80
89
100
113
126
142
160
179
200
226
254
284
320
13:41 Uhr
70
11
12
13
15
17
19
22
24
27
31
34
39
44
49
55
62
69
78
88
98
110
124
139
156
176
197
220
248
278
312
352
85
11
12
14
16
18
20
23
25
28
32
36
41
46
51
57
64
73
81
92
103
115
130
145
163
184
206
230
260
292
326
368
Seite 192
105
13
15
17
19
21
24
27
30
33
38
42
48
54
60
68
76
85
96
108
120
136
152
171
192
216
242
272
304
342
384
432
Tabelle 1: Leitzahlen bei maximaler Lichtleistung (P 1)
Tableau 1: Nombres-guides pour la puissance maximale (P 1)
Tabel 1: Richtgetallen bij vol vermogen (P 1)
Table 1: Guide numbers at maximum light output (P 1)
Tabella 1: Numeri guida a potenza piena (P 1)
Tabla 1: Números-guía con máxima potencia de luz (P 1)
704 47 0099.A3
54 MZ-4i
Teillichtleistung
Niveaux de puissance
Deelvermogensstappen
Partial light output
Livello di potenza
Potencia parcial
(P=Flash Power)
1
1/2 + 2/3
1/2 + 1/3
1/2
1/4 + 2/3
1/4 + 1/3
1/4
1/8 + 2/3
1/8 + 1/3
1/8
1/16 + 2/3
1/16 + 1/3
1/16
1/32 + 2/3
1/32 + 1/3
1/32
1/64 + 2/3
1/64 + 1/3
1/64
1/128 + 2/3
1/128 + 1/3
1/128
1/256 + 2/3
1/256 + 1/3
1/256
01.02.2007
Blitzleuchtzeit (s)
Durée d’éclair (s)
Flitsdur (s)
Flash duration
Durata del lampo
Duración de destello
1/200
13:41 Uhr
Leitzahl
Nombre-guide
Richtgetal
Guide number
Numero guida
Número-guía
ISO 100/50 mm
40
Seite 193
Leitzahl
Nombre-guide
Richtgetal
Guide number
Numero guida
Número-guía
ISO 100/105 mm
54
1/600
28
38
1/1500
20
27
1/3000
14
19
1/5000
10
13,5
1/8000
7
9,5
1/13000
5
6,5
1/20000
3,5
5
1/26000
2,5
3
Ķ
ĸ
ń
ķ
Tabelle 2: Blitzleuchtzeiten in den Teillichtleistungsstufen
Tableau 2: Durée de l’éclair pour les différents niveaux de
puissance
Tabel 2: Flitsduur en deelvermogensstappen
Table 2: Flash durations at the individual partial light output levels
Tabella 2: Durata del lampo ai vari livelli di potenza flash
Tabla 2: Duraciones de destellos en los escalones de
potencias parciales de luz
193
ƴ
į
Ķ
ĸ
ń
54 MZ-4i
01.02.2007
Blitzfrequenz
f(Hz) (Blitze/Sek.)
13:41 Uhr
Seite 194
Nombre d’éclairs
Fréquence f(Hz)
(éclairs/seconde)
Aantal flitsen
Flitsfrequentie
f(Hz) (Flitsen/sec.)
Number of flashes
Flash frequency
f(Hz) (Flashes/sec.)
Numero lampi
Freq. di emissione
f(Hz) (lampi al sec.)
Números de destellos
Frecuencia f(Hz)
(destellos/seg.)
1
2
3
4
5
6
7
8
9
10
15
20
25
30
35
40
45
50
ķ
ƴ
į
194
Tabelle 3: Kameraverschlusszeiten im Stroboskop-Betrieb
Tableau 3:Vitesses d’obturation du reflex en mode stroboscope
Tabel 3: Belichtingstijden bij de stroboscoopfunctie
Table 3: Camera shutter speeds in stroboscopic mode
Tabella 3: Tempi di posa per il modo stroboscopico
Tabla 3: Velocidades de obturación en el funcionamiento
estroboscópico
Blitzanzahl
2
2
1
1
1/2
1/2
1/2
1/2
1/4
1/4
1/4
1/4
1/8
1/8
1/15
1/15
1/15
1/15
1/15
3
4
2
1
1
1
1/2
1/2
1/2
1/2
1/2
1/4
1/4
1/8
1/8
1/8
1/8
1/15
1/15
4
4
2
2
1
1
1
1
1/2
1/2
1/2
1/2
1/4
1/4
1/4
1/8
1/8
1/8
1/8
5
8
4
2
2
1
1
1
1
1
1/2
1/2
1/4
1/4
1/4
1/4
1/8
1/8
1/8
6
8
4
2
2
2
1
1
1
1
1
1/2
1/2
1/4
1/4
1/4
1/4
1/4
1/8
7
8
4
4
2
2
2
1
1
1
1
1/2
1/2
1/2
1/4
1/4
1/4
1/4
1/4
8
8
4
4
2
2
2
2
1
1
1
1
1/2
1/2
1/2
1/4
1/4
1/4
1/4
9
15
8
4
4
2
2
2
2
1
1
1
1/2
1/2
1/2
1/2
1/4
1/4
1/4
10
15
8
4
4
2
2
2
2
2
1
1
1/2
1/2
1/2
1/2
1/4
1/4
1/4
15
15
8
8
4
4
4
4
2
2
2
1
1
1
1/2
1/2
1/2
1/2
1/2
20
30
15
8
8
4
4
4
4
4
2
2
1
1
1/2
1
1/2
1/2
1/2
25
30
15
15
8
8
8
4
4
4
4
2
2
1
1
1
1
1
1/2
30
30
15
15
8
8
8
8
4
4
4
2
2
2
1
1
1
1
1
40
60
30
15
15
15
8
8
8
8
4
4
2
2
2
2
1
1
1
50
60
30
30
15
15
15
8
8
8
8
4
4
2
2
2
2
2
1
Kameraverschlusszeit in Sekunden
Vitesses d’opturation du reflex en s
Belichtingstijden in seconden
Camera shutter speed in seconds
Tempo di posa in secondi
Velocidad de opturación en segundos
704 47 0099.A3
704 47 0099.A3
54 MZ-4i
Batterietyp
Type de pile/accu
Type voeding
Battery type
Tipo batterie
Tipo de pila
01.02.2007
Blitzfolgezeiten
Temps de recyclage
Flitsvolgtijden
Recycling times
Tempi di ricarica
Tiempo de secuencia de dest.
M
A / TTL
High Power
Alkali-Mangan
Alcaline au Mg
hautes perf.
High Power
alkalimangaan
High-power
6s
alkaline-manganese
Alcal. al mangan.
ad alta capacità
Alcalino-Manganesas
High power
NC-Akku
5s
600 mAh
NiMh-Akku
5s
1200 mAh
ower Pack P 50
0
0,1 . . . 6 s
13:41 Uhr
Seite 195
Blitzanzahl
Nombre d’éclairs
Aantal flitsen
Number of flashes
Numero ampi
Número de destellos
min. /max.
20
––
Tabelle 5:
Tableau 5:
Tabel 5:
Table 5:
Tabella 5:
Tabla 5:
24
13
28
14
Zoom
35
50
14,5 18
70
20
85
21
Ķ
105
24
Maximale Leitzahlen* im HSS-Betrieb
Nombres-guides en mode HSS
Max. Richtgetallen bij de HSS functie
Maximum guide numbers at HSS-Mode
Potenza piena a numeri guida per il modo HSS
Números-guía max. en el funcionamiento HSS
ĸ
ń
180 . . . 3000
ķ
0,1 . . . 5 s
60 . . . 1200
0,1 . . . 5 s
100 . . . 2000
ƴ
Tabelle 4: Blitzfolgezeiten und Blitzanzahl bei den versch. Batterietype
Tableau 4: Temps de recyclage et autonomie pour différents types de piles
Tabel 4: Flitsvolgtijden en aantallen flitsen bij de verschillende voedingstypes
Table 4: Recycling times and number of flashes with different battery types
Tabella 4: Tempi di ricarica e numero lampi con i diversi tipi di batterie
Tabla 4: Tiempos de secuencias de dest. y núm. de dest. con los dist. tipos de pilas
į
195
704 47 0099.A3
54 MZ-4i
01.02.2007
13:41 Uhr
Seite 196
Remote-Betrieb
Ķ
Mode multi flash
Remote-Betrieb / Mode multi flash / Afstandsfunctie
Controller
70 MZ-. .
50 MZ-5
54 MZ-. .
TTL
40 MZ-. .
TTL
40 MZ-. .
TTL
70 MZ-. .
50 MZ-5
70 MZ-. .
50 MZ-5
54 MZ-. .
A
40 MZ-. .*
A
40 MZ-. .*
A
Steuergerät
Boîtier cde
Regelunit
TTL
Steuergerät
Boîtier cde
Regelunit
TTL
Steuergerät
Boîtier cde
Regelunit
TTL
SCA 3xx
SCA 300 D
+
SCA 3xx1
Steuergerät
Boîtier cde
Regelunit
A
Steuergerät
Boîtier cde
Regelunit
A
Steuergerät
Boîtier cde
Regelunit
A
SCA 3xx
oder/ou/of
SCA 300 D
+
SCA 3xx1
oder/ou/of
SCA 300 D
+
SCA 3xx2
SCA 3xx1
SCA 300 D
+
SCA 3xx2
SCA 3xx1
SCA 312/2AF
SCA 332/2AF
SCA 333/2AF
SCA 346/2AF
SCA 356
SCA 374/2AF
SCA 381/2AF
34 CS-2,
SLAVE 2-Betrieb
28 CS-2
196
A-Remote-Betrieb / Mode multi-flash Auto / A-afstansfunctie
70 MZ-. .
50 MZ-5
SCA 312/2AF
SCA 332/2AF
SCA 333/2AF
SCA 346/2AF
SCA 356
SCA 374/2AF
SCA 381/2AF
SCA 3xx2
oder/ou/of
SCA 3xx2
oder/ou/of
SCA 3xx2
SCA 3xx
SCA 3xx
Slave
ń
TTL-Remote-Betrieb / Mode multi-flash TTL / TTL-afstansfunctie
SCA 312/2AF
SCA 332/2AF
SCA 333/2AF
SCA 346/2AF
SCA 356
SCA 374/2AF
SCA 381/2AF
SCA 312/2AF
SCA 332/2AF
SCA 333/2AF
SCA 346/2AF
SCA 356
SCA 374/2AF
SCA 381/2AF
SCA 3xx2
oder/ou/of
SCA 3xx2
oder/ou/of
SCA 3xx2
SCA 3xx
SCA 3xx
70 MZ-5
50 MZ-5
Slave
70 MZ-4
Slave
40 MZ-. .
TTL
54 MZ-. .
TTL
34 CS-2,
SLAVE 2-Betrieb
28 CS-2
70 MZ-5
50 MZ-5
Slave
70 MZ-4
Slave
40 MZ-. .
TTL
SCA 3080
oder/ou/of
Steuergerät
Boîtier cde
Regelunit
TTL
SCA 3082
SCA 3083
SCA 3082
Steuergerät
Boîtier cde
Regelunit
TTL
SCA 3080
SCA 3083
SCA 3083
oder/ou/of
54 MZ-. .
TTL
SCA 3083
* mit 40 MZ-2 nicht möglich
* non réalisable avec 40MZ-2
* met 40 MZ-2 niet mogelijk
ĸ
704 47 0099.A3
54 MZ-4i
01.02.2007
13:41 Uhr
Seite 197
Afstandsfunctie
Ķ
ĸ
Minolta
Minolta
Blitz/flash/flitser
Minolta
Kamera-Blitz
appareil flash
camera flitser
Minolta
Remote Flash Controller
Minolta
Remote Flash Controller
ń
Minolta xi / si
Kamera/appareil/camera
40 MZ-. .
50 MZ-5
70 MZ-. .
Steuergerät
Boîtier cde
Regelunit
TTL
Steuergerät
Boîtier cde
Regelunit
TTL
SCA 3301
SCA 3301
SCA 3302
SCA 3302
TTL
54 MZ-. .
TTL
SCA 3302
oder/ou/of
oder/ou/of
SCA 3302
197
704 47 0099.A3
54 MZ-4i
01.02.2007
13:41 Uhr
Seite 198
Remote control
Controllo a distanza
Remote control / Controllo a distanza / Funcionamiento remoto
70 MZ-. .
50 MZ-5
70 MZ-. .
50 MZ-5
ķ
Controller
Control unit
Control unit
Control unit
Unità di contr. Unità di contr. Unità di contr.
Mando de contr. Mando de contr. Mando de contr.
TTL
TTL
TTL
SCA 3xx2
SCA 312/2AF
SCA 332/2AF
SCA 333/2AF
SCA 346/2AF
SCA 356
SCA 374/2AF
SCA 381/2AF
40 MZ-. .
TTL
40 MZ-. .
TTL
SCA 3xx
SCA 300 D
+
SCA 3xx1
or/e/y
SCA 3xx2
SCA 3xx1
oder/ou/of
SCA 3xx2
SCA 312/2AF
SCA 332/2AF
SCA 333/2AF
SCA 346/2AF
SCA 356
SCA 374/2AF
SCA 381/2AF
or/e/y
SCA 3xx2
SCA 3xx
SCA 3xx
ƴ
34 CS-2
SLAVE 2
28 CS-2
Slave
į
SCA 300 D
+
54 MZ-. .
TTL
198
„A“ remote control / Contr. a distanza „A“ / Funcionamiento remoto A
70 MZ-. .
50 MZ-5
70 MZ-. .
50 MZ-5
Control unit
Control unit
Control unit
Unità di contr. Unità di contr. Unità di contr.
Mando de contr. Mando de contr. Mando de contr.
A
A
A
SCA 300 D
+
SCA 3xx2
SCA 312/2AF
SCA 332/2AF
SCA 333/2AF
SCA 346/2AF
SCA 356
SCA 374/2AF
SCA 381/2AF
54 MZ-. .
A
40 MZ-. .*
A
40 MZ-. .*
A
SCA 3xx
SCA 300 D
+
SCA 3xx1
or/e/y
SCA 3xx2
SCA 3xx1
oder/ou/of
SCA 3xx2
SCA 312/2AF
SCA 332/2AF
SCA 333/2AF
SCA 346/2AF
SCA 356
SCA 374/2AF
SCA 381/2AF
or/e/y
SCA 3xx2
SCA 3xx
SCA 3xx
70 MZ-5
50 MZ-5
Slave
70 MZ-4
Slave
40 MZ-. .
44 MZ-2
TTL
Steuergerät
Boîtier cde
Regelunit
TTL
SCA 3082
SCA 3083
54 MZ-. .
TTL
34 CS-2
SLAVE 2
28 CS-2
70 MZ-5
50 MZ-5
Slave
70 MZ-4
Slave
40 MZ-. .
44 MZ-2
TTL
SCA 3082
oder/ou/of
Steuergerät
Boîtier cde
Regelunit
TTL
SCA 3083
SCA 3083
SCA 3083
SCA 3083
oder/ou/of
54 MZ-. .
TTL
SCA 3083
*not possible with 40 MZ-2
*funzione non previste con 40MZ-2
*no es posible con el 40 MZ-2
TTL remote control / Contr. TTL a distanza / Funcionamiento remoto TTL
704 47 0099.A3
54 MZ-4i
01.02.2007
13:41 Uhr
Seite 199
Funcionamiento remoto
Minolta
Minolta
Flash
Minolta
Camera-Flash
Minolta
Remote Flash Controller
Minolta
Remote Flash Controller
ķ
Minolta xi / si
Camera / fotocamer / Cámera
ƴ
50 MZ-5
70 MZ-. .
Control unit
Control unit
Unità di contr. Unità di contr.
Mando de contr. Mando de contr.
TTL
TTL
SCA 3301
SCA 3302
40 MZ-. .
TTL
54 MZ-. .
TTL
į
SCA 3302
SCA 3301
oder/ou/of
SCA 3302
or/e/y
SCA 3302
199
704 47 0099.A3
Ķ
Ķ
ĸ
ń
ĸ
ķ
ƴ
į
ń
200
54 MZ-4i
01.02.2007
13:41 Uhr
Seite 200
Ihr Metz Produkt wurde entworfen und hergestellt mit qualitativ
hochwertigen Materialien und Komponenten, die recycelt und
wiederverwendet werden können.
Dieses Symbol bedeutet, dass elektrische und elektronische
Geräte am Ende ihrer Nutzungsdauer vom Hausmüll getrennt zu
entsorgt werden sollen.
Bitte entsorgen Sie dieses Gerät bei ihrer örtlichen kommunalen
Sammelstelle oder im Recycling Centre.
Helfen Sie uns bitte, die Umwelt zu erhalten, in der wir leben.
Votre produit Metz a été conçu et fabriqué avec des matériaux et
composants de haute qualité, susceptibles d'être recyclés et réutilisés.
Ce symbole signifie que les appareils électriques et électroniques,
lorsqu'ils sont arrivés en fin de vie, doivent être éliminés séparément des ordures ménagères.
Veuillez rapporter cet appareil à la déchetterie communale ou à
un centre de recyclage.
Vous contribuez ainsi à la préservation de l'environnement.
Uw Metz product is ontworpen voor en opgebouwd uit kwalitatief
hoogwaardige materialen en componenten die gerecycled en
opnieuw gebruikt kunnen worden.
Dit symbool betekent, dat elektrische en elektronische apparaten
aan het eind van hun levensduur gescheiden van het huisvuil bij
het afval moeten worden afgegeven.
Lever dit apparaat af bij de plaatselijke verzamelplaats of in een
kringloopwinkel.
Help ons alstublieft het milieu waarin we leven, te behouden.
ķ
ƴ
į
Your Metz product is designed and manufactured with high quality materials and components which can be recycled and reused.
This symbol means that electrical and electronic equipment, at
their end-of-life, should be disposed of seperately from your household waste.
Please, dispose of this equipment at your local community waste
collection/recycling centre.
Please, help us to conserve the environment we live in!
Il vostro prodotto Metz è stato progettato e realizzato con materiali e componenti pregiati che possono essere riciclati e riutilizzati.
Questo simbolo significa che gli apparecchi elettrici ed elettronici
devono essere smaltiti separatamente dai rifiuti domestici alla fine
del loro utilizzo.
Vi preghiamo di smaltire questo apparecchio presso gli appositi
punti di raccolta locali o nei centri per il riciclaggio.
Contribuite anche voi a tutelare l’ambiente nel quale viviamo.
Su producto Metz ha sido concebido y fabricado con materiales
y componentes de alta calidad, que pueden ser reciclados y reutilizados.
Este símbolo significa que los aparatos eléctricos y electrónicos,
al fin de su vida útil, deberán ser separados de la basura doméstica y eliminados.
Rogamos se sirva llevar este aparato a su punto local de recogida de desperdicios o a un centro de reciclaje.
Así puede Vd. contribuir también a conservar el medio ambiente.
704 47 0099.A3
54 MZ-4i
Hinweis:
01.02.2007
Ķ
Im Rahmen des CE-Zeichens wurde bei
der EMV-Prüfung die korrekte
Belichtung ausgewertet.
SCA-Kontakte nicht berühren !
In Ausnahmefällen kann eine Berührung zur Beschädigung des Gerätes
führen.
ĸ
Remarque:
L’exposition correcte a été évaluée
lors des essais de CEM dans le
cadre de la certification CE.
Ne pas toucher les contacts du
SCA !
Il paut arriver que le contact avec
les doigts provoque la dégradation
de l’appareil.
13:41 Uhr
Seite 201
ń
Opmerking:
In het kader de CE-markering werd
bij de EMV-test de correcte be-lichting bepaald.
ƴ
Avvertenza:
Nell’ambito delle prove EMV per il
segno CE è stata valutata la corretta
esposizione.
SCA Contacten niet aanraken !
Non toccate mai i contatti SCA !
In uitzonderlijke gevallen kan aanraken leiden.
In casi eccezionali il toccare può
causare danni all’apparecchio.
ķ
Note:
Within the framework of the CE approval symbol, correct exposure was
evaluated in the course of the electromagnetic compatibility test.
Do not touch the SCA contacts !
In exceptional cases the unit can be
damaged if these contacts are touched.
į
Atención:
El símbolo CE significa una valoración da exposición correcta con la
prueba EMV (prueba de tolerancia
electromagnética).
No tocar los contactos SCA !
En algunos casos un contacto puede producir daños en el aparato.
704 47 0099.A3
54 MZ-4i
01.02.2007
13:41 Uhr
Seite 202
Betriebsartenwahl
Sélecteur de mode
Functieschakelaar
Mode selector
Selettore del modo
di funzionamento
Selección de modos
de funcionamiento
Vorwahltaste für Sonderfunktionen
Présélection des fonctions spéciales
Voorkeuzetoets voor bijzond. functies
Preselector for special functions
Tasto di preselezione delle funzioni
speciali
Tecla de selección de funciones
especiales
Hauptschalter
Interrupteur général
Hoofdschakelaar
Main switch
Interruttore princip.
Interruptor principal
Einstellrad
Molette
Instelwiel
Setting disk
Manopola di regolazione
Rueda de ajuste
Displaybeleuchtung
Eclàirage de l’écran
Diaplayverlichting
Display lighting
Tasto di illumin. del display
Iluminación del display
und / et / voor / and / e
Belichtungs o.k. Anzeige
Exposition o.k.
Belichting o.k.-aanduiding
Exposure ok indicator
Indicazione di corretta espos.
Indicación de exposición o.k.
Bild 1
Fig. 1
Afb. 1
Grab. 1
Handauslösetaste und
Blitzbereitschaftsanzeige
Bouton d’essai et
témoin de recyclage
Ontspanknop voor handbediening en
flitsaparaat-aanduiding
Manual firing button and
flash-ready indicator
Pulsante test (emissione manuale del
lampo) e indicazione di “pronto lampo”
Tecla de disparo manual e
indicación de disposición de disparo
704 47 0099.A3
54 MZ-4i
01.02.2007
13:41 Uhr
Weitwinkelstreuscheibe
Diffuseur grand angle
Groothoekdiffusorschijf
Wide-angle diffuser
Diffusore grandangolare
Difusor gran angular
Seite 203
Entriegelungsknopf Hauptreflektor
Bouton de déverrouillage pour réflecteur
Ontgrendelingsknop Hoofdreflector
Unlocking button for the main reflector
Pulsante di sblocco della parabola principale
Botón de desbloqueo del reflector principal
Schalter für Zweitreflektor
Interrupteur pour réflecteur secondaire
Schakelaar voor tweede reflector
Switch for secondary reflector
Interruttore per la parabola ausiliaria
Interruptor para reflector adicional
Lichtreduzierfilter
Filtre réducteur de lumière
Grijsfilter
Light-reducing filter
Filtro riduttore luce
Filtro de reducción de luz
Zweitreflektor
Réflecteur secondaire
Tweede reflector
Secondary reflector
Parabola ausiliaria
Reflector adicional
AF-Messblitz
Illuminateur AF
AF-meetflits
AF measuring beam
Illuminatore di assist. AF
Destello de medición AF
Foto-Sensor
Senseur
Sensor
Fotosensore
Sensor
Anschlussbuchse P40 / P50
Prise pour P40 / P50
Aansluiting P40 / P50
Connecting socket P40 / P50
Presa di collegamento P40 / P50
Conector para P40 / P50
Bild 2
Fig. 2
Afb. 2
Grab. 2
Entriegelungsknopf SCA
Bouton de déverrouillage de SCA
Ontgrendelingsknop SCA
SCA unlocking button
Pulsante di sblocco SCA
Botón de desbloqueo SCA
Bild 3
Fig. 3
Afb. 3
Grab. 3
Batteriefachdeckel
Couvercle du compartiment des piles
Deksel batterijvak
Battery compartment lid
Coperchio del vano batteria
Tapa del compartimento de pilas
704 47 0099.A3
54 MZ-4i
2
01.02.2007
13:41 Uhr
Seite 204
1
2
3
1
Bild 6 / Fig. 6 / Afb. 6 / Grab. 6
Bild 4 / Fig. 4 / Afb. 4 / Grab. 4
2
3
2
Bild 8 / Fig. 8 / Afb. 8 / Grab. 8
1
3+4
2
1
1
4
Bild 5 / Fig. 5 / Afb. 5 / Grab. 5
Bild 7 / Fig. 7 / Afb. 7 / Grab. 7
Bild 9 / Fig. 9 / Afb. 9 / Grab. 9
704 47 0099.A3
54 MZ-4i
01.02.2007
13:41 Uhr
Seite 205
1
2
Bild 10 / Fig. 10 / Afb. 10 / Grab. 10
Bild 12 / Fig. 12 / Afb. 12 / Grab. 12
1
Bild 11 / Fig. 11 / Afb. 11 / Grab. 11
Bild 13 / Fig. 13 / Afb. 13 / Grab. 13
2
704 47 0099.A3
54 MZ-4i
01.02.2007
13:41 Uhr
Seite 206
Metz - Werke GmbH & Co KG • Postfach 1267 • D-90506 Zirndorf • [email protected] • www.metz.de
Consumer electronics
Photoelectronics
Plastics technology
Industrial electronics
704 47 0099.A3
Metz. Always first class.
Ķĸńķƴį