1
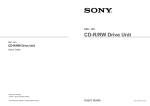
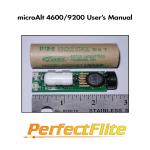
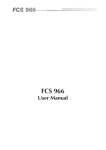
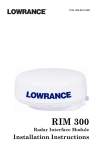
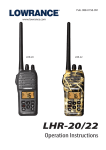
LDT-3003
Installation and Operation
Instructions
The LDT-3003 combines a clock, hour meter, voltmeter, and up to three
temperature sensors in one housing. (Since the LDT-3003 is packed
with different options, you may not have all three temp sensors.) It
shows the temperature in either °F or °C, selectable by the user. This
unit fits in a standard 2 1/8" (54 mm) hole used by most marine equipment manufacurers.
Mounting
The LDT-3003 mounts in any dash or flat panel that's at least 2 1/2" (64
mm) in diameter. To mount the unit, first make certain there is at least
3 3/4" (95 mm) from the front of the dash to any obstruction behind the
dash. Also, be sure there is room to route the power and sensor cables.
The maximum usable dash thichness is 1 1/8" (28.5 mm).
3 3/4" minimum
1234567
1234567
1234567
1234567
1234567
1234567
1234567
1234567
1234567
1234567
1234567
1234567
1234567
1234567
1234567
1234567
1234567
1234567
1234567
1234567
1234567
1234567
1234567
1234567
1234567
1234567
1234567
1234567
1234567
1234567
1234567
1234567
1234567
1234567
1234567
1234567
1234567
1234567
1234567
1234567
1234567
1234567
1234567
TIGHTEN
THESE
SCREWS
DASH
When you determine the location for the LDT-3003, drill a 2 1/8" (54
mm) hole in the dash. Slide the LDT-3003 through the hole from the
front of the dash. Align it so that it's straight, then tighten the two
screws with a phillips-head screwdriver.
Place the pushbuttons into the holes in the bezel and snap it on to the
LDT-3003. The unit is now ready for wiring.
1
DASH
BLACK
ORANGE
RED
WHITE
ACCESSORY
SWITCH
BLACK
YELLOW
RED
BLUE
TO TACH
SPEAKER
TO
GREEN
2-AMP
TEMPERATURE
FUSE
SENSORS
12-VOLT
BATTERY
DASH
ACCESSORY
SWITCH
RED
ORANGE
WHITE
RED
BLACK
SPEAKER
LIGHT
SWITCH
YELLOW
BLUE
GREEN
TO TACH
BLACK
TO
TEMPERATURE
SENSORS
2
2-AMP
FUSE
12-VOLT
BATTERY
WIRING
Connect the wires as shown in the diagrams on the opposite page. The
LDT-3003 operates from 10 to 15 vdc (12-volt system). You can connect
the wires as shown in the diagram at the top of the page using only one
accessory switch (not included), which switches the unit's lights on at the
same time the unit is turned on, or you can wire the lights to a separate
switch as shown at the bottom of the page. Regardless of which wiring
method you use, the LDT-3003 must be wired to a 2-amp fuse! Failure to
fuse this product will void the warranty and could result in damage to the
unit or your boat.
The unit won't be harmed if the power wires are connected backwards,
however, it won't work until they're properly connected.
Make certain to connect the green wire to unswitched +12 volts. This
keeps power on to the unit's memory so that the clock will keep running
even when the unit is switched off.
Find a location for the speaker that is protected from the elements, but
still lets you hear it. The typical mounting location is behind the dash. If the
LDT-3003's wires won't reach the speaker, splice ordinary speaker wire
to them.
SENSORS
The LDT-3003 can use the following sensors:
TS-W2BK
Two temperature sensors - Water and Temp 2.
TS-3BK
One temperature sensor - Temp 3 only.
We reccommend you use the LDT-3003 with the above sensors in the
following combination:
One TS-W2BK. This gives you two temperature displays - Water and T2.
or
One TS-W2BK and one TS-3BK. This gives you three temperature displays - Water, T2, and T3.
For example, you can connect the TS-W2BK temperature sensors and
mount the sensor labeled "water" on the transom to measure surface
water temperature and the sensor labeled "T2" in the live well or on the
hull for outside air temp. The TS-W3BK has an extra connector so you
can attach the TS-2BK temperature sensor to it, then attach the TS-3BK's
connect to the LDT-3003 and have three separate temperature displays.
3
The temperature sensors can be mounted in any convenient location.
Use #8 stainless steel screws to attach the sensor to the hull. (Screws not
included.) When mounting the water temperature sensor as shown above,
make certain to place it on the transom where it will be in contact with the
water at all times, if possible.
OPERATION
Modes
The LDT-3003 has a clock,a clock alarm, up to three temperature displays, an alarm for each temperature sensor, an engine hour meter, and a
voltmeter. To switch between these modes, simply press the mode key.
Clock
When the unit is turned on, the clock appears as
shown at right. A dot in the upper left corner of the
screen is for a.m. or p.m. - it's your choice when
you set the clock. The clock will continue to run
even when the unit is turned off.
MODE
Water Temperature
The first temperature to appear after pressing the
MODE key is the water temperature. This sensor
is mounted on the transom.
MODE
T2 Temperature
The second temperature to appear is T2. This sensor can be mounted in a live well, on the hull to
measure outside air temperature, or just about any
other location.
4
MODE
T3 Temperature
If you have the T3 temperature sensor installed, it
appears after T2. This sensor can also be mounted
in a live well, on the hull to measure outside air
temperature, or just about any other location.
MODE
Engine Hour Meter
This shows the total number of hours the engine
has operated. It senses the engine operation from
the tachometer. The LDT-3003 must be turned on,
however to record engine time. The engine hour
meter cannot be reset. (Note: The engine must be
running in order to view the hour meter.)
MODE
Voltmeter
The voltmeter shows the current electrical system
voltage.
Setting the LDT-3003
The clock can be set to the correct time, alarms can be set to desired time
and/or temperature (for each temperature probe), and the temperature
displays can be set to °F or °C. The LDT-3003 has a "set" mode that
cycles through all of these settings, starting with the clock. To set any of
these features, simply press the SET key repeatedly until the desired
function appears that you wish to change, then press
the MODE key to change it.
Set Clock
The first time the unit is turned on, the clock appears. In this example, 12:00 is showing. To set the
clock, first press the SET key once. The colon between the 2 and first 0 begins flashing. Now press
the MODE key. The "12" begins flashing with the colon.
5
Press the SET key to change the hours. (Note: A dot
may appear in the upper left corner of the display
while you're setting the clock. This can signify either a.m. or p.m. - it's your choice.) When the hours
number is correct, press the MODE key again. The
minutes start flashing. Press the SET key until the
minutes show the correct time. When the correct
time shows, press the MODE key. The clock is now
set.
Set Clock Alarm
To set the clock alarm, press the SET key until the clock
alarm similar to the one at right appears. The colon
between the 5 and first 0 begins and the letters "ALM"
begin flashing. Now press the MODE key. The "12"
begins flashing with the colon. Press the SET key
to change the hours. (Note: The dot that appears
in the upper left corner of the display signifys either a.m. or p.m. - make certain you set the alarm
the same as the clock.) When the hours number is
correct, press the MODE key again. The minutes start
flashing. Press the SET key until the minutes show the correct time. When
the correct time shows, press the MODE key. The clock alarm is now set.
You can turn the clock alarm off by pressing the SET key until the clock
alarm appears, then press the MODE key once, then press the SET key
again. The word "OFF" appears on the display. Press the SET key to exit
the set clock alarm.
Set Temperature Alarm
To set the temperature alarm, press the SET key until the alarm screen
similar to the one at right appears. The word "WATER" begin flashing at the bottom of the screen. Now press
the MODE key. The letters "ALM" at the top of the
screen begins flashing along with "WATER". Press
the MODE key to select the first number in the temperature. (In this example, the "8". Press the "SET"
key to change it. When this number is correct, press
the MODE key again. The second number begins
flashing. Press the SET key until this number is correct. Continue this sequence until the temperature alarm
is set. When it is correct, press the SET key to switch to the next temperature alarm (T2 and T3).
6
You can turn the temperature alarm off by pressing the SET key until the
temperature alarm appears, then press the MODE key once, then press
the SET key again. The word "OFF" appears on the display. Press the
SET key to exit the set clock alarm.
Set Fahrenheit or Celsius
To change the temperature displays from Fahrenheit to Celsius, press the SET key until the °F and
the letter "F" flashes on the screen. Now press the
MODE key to switch it to °C. Press the SET key
twice to exit.
The clock should now be showing on your screen. If it
isn't, or if you get lost in any of these menus, simply turn the unit off and
back on again. Then begin pressing the SET key until you reach the alarm
or time that you wish to change.
7
Lowrance's UPS Return Service - U.S.A. Only
Lowrance Electronics and United Parcel Service (UPS) are proud to offer
all of our customers free shipping for all units sent to us for repair or
service. If you have to send this unit to the factory, and you are in the
continental United States, use the enclosed UPS shipping label for easy,
free shipping to our factory customer service department. There are six
easy steps:
1. Call Lowrance at the toll-free number on the front of this flyer for a
Return Authorization (RA) number and instructions about what accessories to return. Do not return a product to the factory without a
Return Authorization (RA) Number!
2. Pack your unit and any accessories in the original shipping container,
if possible. Be sure to include proof of purchase for warranty verification!
3. Write a brief note detailing the problem you're having with the unit.
Please include your name, address, and daytime telephone number.
4. Please include payment for non-warranty repairs. Check, money order,
Visa, or MasterCard may be used.
5. Fill in your name, address, zip code, date, and RA number in the blanks
provided on the UPS form included with your unit.
6. Attach the label to the shipping box, tear off the tab for your receipt
and give the package to any UPS driver or take the package to any
UPS Customer Center. You will not be charged for this shipment.
That's it! Your unit will be shipped to Lowrance's customer service department at no charge to you. Our normal in-plant turnaround on repairs is 3
working days. Units under warranty will be returned to you at no charge.
NOTE!
Lowrance will pay UPS surface shipping charges both to and from the
factory for this unit in the event it needs repair. Your unit is insured against
loss or shipping damage when you use the enclosed UPS label.
This UPS shipping offer is good only in the continental United States (excludes Alaska and Hawaii).
8
KEEP THIS LABEL!
YOU WILL NEED IT IF YOU EVER NEED TO RETURN YOUR UNIT TO
THE FACTORY FOR REPAIR.
Accessory Ordering Information
To order accessories such as power cables or transducers, please contact:
1) Your local marine dealer. Most quality dealers that handle marine electronic equipment should be able to assist you with these items. Consult
your local telephone directory for listings.
2) LEI Extras, Inc. P.O. Box 129 Catoosa, OK 74015-0129
or call
800-324-0045
(USA orders only.)
Lowrance Electronics may find it necessary to change or end our shipping policies, regulations, and special offers at any time. We reserve the
right to do so without notice.
9
LOWRANCE ELECTRONICS
FULL ONE-YEAR WARRANTY
“We", “our”, or “us” refers to LOWRANCE ELECTRONICS, INC., the manufacturer of this
product. “You” or “your” refers to the first person who purchases this product as a consumer item for personal, family, or household use.
We warrant this product against defects or malfunctions in materials and workmanship,
and against failure to conform to this product’s written specifications, all for one year (1)
from the date of original purchase by you. WE MAKE NO OTHER EXPRESS WARRANTY
OR REPRESENTATION OF ANY KIND WHATSOEVER CONCERNING THIS PRODUCT.
Your remedies under this warranty will be available so long as you can show in a reasonable manner that any defect or malfunction in materials or workmanship, or any nonconformity with the product’s written specifications, occurred within one year from the date
of your original purchase, which must be substantiated by a dated sales receipt or sales
slip. Any such defect, malfunction, or non-conformity which occurs within one year from
your original purchase date will either be repaired without charge or be replaced with a
new product identical or reasonably equivalent to this product, at our option, within a reasonable time after our receipt of the product. If such defect, malfunction, or non-conformity
remains after a reasonable number of attempts to repair by us, you may elect to obtain
without charge a replacement of the product or a refund for the product. THIS REPAIR,
REPLACEMENT, OR REFUND (AS JUST DESCRIBED) IS THE EXCLUSIVE REMEDY
AVAILABLE TO YOU AGAINST US FOR ANY DEFECT, MALFUNCTION, OR NON-CONFORMITY CONCERNING THE PRODUCT OR FOR ANY LOSS OR DAMAGE RESULTING FROM ANY OTHER CAUSE WHATSOEVER. WE WILL NOT UNDER ANY CIRCUMSTANCES BE LIABLE TO ANYONE FOR ANY SPECIAL, CONSEQUENTIAL, INCIDENTAL, OR OTHER INDIRECT DAMAGE OF ANY KIND.
Some states do not allow the exclusion or limitation of incidental or consequential damages, so the above limitations or exclusions may not apply to you.
This warranty does NOT apply in the following circumstances: (1) when the product has
been serviced or repaired by anyone other than us, (2) when the product has been connected, installed, combined, altered, adjusted, or handled in a manner other than according to the instructions furnished with the product, (3) when any serial number has been
effaced, altered, or removed, or (4) when any defect, problem, loss, or damage has resulted from any accident, misuse, negligence, or carelessness, or from any failure to provide reasonable and necessary maintenance in accordance with the instructions of the
owner’s manual for the product.
We reserve the right to make changes or improvements in our products from time to time
without incurring the obligation to install such improvements or changes on equipment or
items previously manufactured.
This warranty gives you specific legal rights and you may also have other rights which may
vary from state to state.
REMINDER: You must retain the sales slip or sales receipt proving the date of your original purchase in case warranty service is ever required.
LOWRANCE ELECTRONICS
12000 E. SKELLY DRIVE TULSA, OK 74128
(800) 324-1356
10
How to Obtain Service
(Canadian Customers Only)
We back your investment in quality products with quick, expert service and genuine
Lowrance replacement parts. If you need service or repairs, contact the Lowrance
Factory Customer Service Department at the toll-free number listed below. A technician may be able to solve the problem and save you the inconvenience of returning your
unit. You will be asked for your unit's serial number.
800-324-1356
Canada Only. Monday through Friday 8:00 A.M. - 8:00 P.M. Central Time.
When sending a product for repair, please do the following:
1. Always use the original shipping container and filler material the product was packed
in when shipping your product.
2
Always insure the parcel against damage or loss during shipment. Lowrance does
not assume responsiblity for goods lost or damaged in transit.
3.
For proper testing, repair, and service, send a brief note with the product describing
the problem. Be sure to include your name, return shipping address, and a daytime
telephone number.
How to Obtain Service
(International Customers Only - Except Canada)
If you need service or repairs, contact the dealer in the country you purchased your
unit.
WARRANTY REPAIR WILL BE HONORED ONLY IN THE
COUNTRY UNIT WAS PURCHASED.
Please follow the shipping instructions shown below on this page if you have to mail
your unit to the dealer. For proper testing, repair, and service, send a brief note with the
product describing the problem. Be sure to include your name, return shipping address, and a daytime telephone number.
Accessory Ordering Information - All Countries
To order accessories such as power cables or transducers, please contact:
1. Your local marine dealer. Most quality dealers that handle marine electronic equipment should be able to assist you with these items. Consult your local telephone
directory for listings.
2. Canadian customers only can write:
Lowrance/Eagle Canada, 919 Matheson Blvd., E. Mississauga, Ontario L4W2R7
or fax 416-629-3118
11
Your unit's serial number
How to Obtain Service - U.S.A. Only
We back your investment in quality products with quick, expert service
and genuine Lowrance® replacement parts. If you're in the United States
and you have questions, please contact the Factory Customer Service
Department using our toll-free number listed below. You must send the
unit to the factory for warranty service or repair. Please call the factory
before sending the unit. You will be asked for your unit's serial number
(shown above). Use the following toll-free number:
800-324-1356
U.S.A.only. Monday through Friday 8:00 A.M. - 8:00 P.M. Central time, except holidays.
Your unit is covered by a full one-year warranty. (See page 10 for complete warranty details.) If your unit fails and the failure is not covered by
the original warranty, Lowrance has a flat-rate repair policy that covers
your unit and accessories packed with the unit at the factory. There is a
180-day warranty on all non-warranty repairs from the factory, which is
similar to the original warranty, but is for 180 days rather than one year.
For further details, please call us at the above number.
On factory repairs, we guarantee your unit will be repaired in three working days from the time it is received. This does not include shipping time.
If for some reason we cannot meet this commitment, we will extend your
warranty for another full year, free of charge, from the date of repair.
Lowrance also gives you free UPS shipping from anywhere in the continental United States both to and from the factory for all warranty repairs.
You can also use the enclosed UPS shipping label for non-warranty shipments. See the inside of this flyer for more information.Remember, nonwarranty repairs are subject to Lowrance's published flat-rate charges
and 180-day warranty. A 3 working day turnaround time at the factory
repair center is guaranteed. (Does not include shipping time.)
Copyright © 1996, Lowrance Electronics, Inc. All rights reserved.
LITHO IN U.S.A.
988-0099-05
12