1
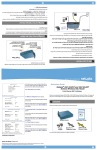
HomeLink™ Series
Phoneline 10M USB
Network Adapter
Model No.: USB200HA
User Guide
COPYRIGHT & TRADEMARKS
Copyright © 2000 Linksys, All Rights Reserved. Phoneline 10M USB Network Adapter
is a registered trademark of Linksys. Microsoft, Windows, and the Windows logo are
registered trademarks of Microsoft Corporation. All other trademarks and brand names
are the property of their respective proprietors.
LIMITED WARRANTY
Linksys guarantees that every Phoneline 10M USB Network Adapter is free from physical defects in material and workmanship under normal use for one (1) year from the
date of purchase. If the product proves defective during this warranty period, call
Linksys Customer Support in order to obtain a Return Authorization number. BE SURE
TO HAVE YOUR PROOF OF PURCHASE AND A BARCODE FROM THE PRODUCT’S
PACKAGING ON HAND WHEN CALLING. RETURN REQUESTS CANNOT BE
PROCESSED WITHOUT PROOF OF PURCHASE. When returning a product, mark the
Return Authorization number clearly on the outside of the package and include your
original proof of purchase.
IN NO EVENT SHALL LINKSYS’ LIABILITY EXCEED THE PRICE PAID FOR THE PRODUCT FROM DIRECT, INDIRECT, SPECIAL, INCIDENTAL, OR CONSEQUENTIAL DAMAGES RESULTING FROM THE USE OF THE PRODUCT, ITS ACCOMPANYING SOFTWARE, OR ITS DOCUMENTATION. LINKSYS DOES NOT OFFER REFUNDS FOR ANY
PRODUCT. Linksys makes no warranty or representation, expressed, implied, or statutory, with respect to its products or the contents or use of this documentation and all
accompanying software, and specifically disclaims its quality, performance, merchantability, or fitness for any particular purpose. Linksys reserves the right to revise or
update its products, software, or documentation without obligation to notify any individual or entity. Please direct all inquiries to:
Linksys P.O. Box 18558, Irvine, CA 92623.
FCC STATEMENT
The Phoneline 10M USB Network Adapter has been tested and found to comply with
the limits for a Class B digital device, pursuant to Part 15 of the FCC Rules. These limits are designed to provide reasonable protection against harmful interference in a residential installation. This equipment generates, uses, and can radiate radio frequency
energy and, if not installed and used according to the instructions, may cause harmful
interference to radio communications. However, there is no guarantee that interference
will not occur in a particular installation. If this equipment does cause harmful interference to radio or television reception, which is found by turning the equipment off and
on, the user is encouraged to try to correct the interference by one or more of the following measures:
•
•
•
•
Reorient or relocate the receiving antenna
Increase the separation between the equipment or device
Connect the equipment to an outlet other than the receiver’s
Consult a dealer or an experienced radio/TV technician for assistance
005
Linksys HomeLink™ Series
Table of Contents
Phoneline 10M USB Network Adapter
Introduction
Introduction
Package Contents
Windows & Computer Compatibility
1
2
2
Getting to Know the Phoneline 10M USB
Network Adapter
The Adapter’s Ports
The Adapter’s LEDs
The USB Icon
USB Cabling
Modem and Fax Compatibility
3
Installing the Phoneline 10M USB
Network Adapter
Installing the USB Network Adapter & Cabling
Connecting to a Phoneline Network
Connecting to an Ethernet or Fast Ethernet Network
6
Windows 98 Installation & Setup
Installing the USB Network Adapter’s Driver
Network Component Configuration
Sharing Your Files & Printers
9
9
13
18
3
4
4
5
5
6
7
8
Windows 2000 Installation & Setup
Installing the USB Network Adapter’s Driver
20
20
Troubleshooting
23
Appendix
Client For Microsoft Setup for Windows 98
Novell NetWare 3.x Client Setup for Windows 98
Starting Over in Windows 98
Starting Over in Windows 2000
Manually Installing Network Components in Windows 98
Open Source & Beta Operating Systems
Telephone Cabling
Specifications
Customer Support
26
26
27
28
32
34
35
38
39
40
HomeLink Phoneline 10M USB Network Adapter
Congratulations on your purchase of the Linksys HomeLink Phoneline 10M
USB Network Adapter. Now you’ll be able to instantly connect
multiple PCs over your telephone wiring and talk on the phone at the same
time. There's no need for extra hubs or cables. The network runs on standard
home-grade telephone lines, just like the ones you use every day.
The HomeLink Phoneline 10M USB Network Adapter allows your phone line
to carry network data at the same time it carries your regular telephone voice
service. The USB device is equipped with two standard telephone ports and
one USB port, which you can use to connect to any 1Mbps or 10Mbps
HomeLink network without swapping devices or running multiple adapters.
The Adapter connects to your Windows 98 or Windows 2000 PC’s USB port.
Plug the HomeLink Phoneline 10M USB Network Adapter into any standard
wall jack, and you’re networked.
Features
• Network Your Computers Using Your Existing Telephone Line
• Easy Plug-and-Play Installation- Installs Without Opening Your PC Case
• Works with Windows 98 or Windows 2000 PCs With a USB Port
• 10Mbps Transfer Rate Over Telephone Lines
• External USB Network Adapter with two RJ-11 Modular Telephone Ports
• USB Cable and Phone Cable Included—Nothing More to Buy
• 4 Easy-to-Read LED Status Indicators
• HomePNA-Compatible Technology
• Connect Up to 30 PCs Together On Your HomeLink 10M Phoneline
Network
• Backward Compatible with 1Mbps HomePNA-Compatible Hardware
• No Hubs or Switches Required - Data Travels Over Your Phone Lines
• Share High-Speed Internet Access with Your Phoneline Network Users
• Free 24-Hour Technical Support (North America Only)
• 1-Year Limited Warranty
1
Linksys HomeLink™ Series
Package Contents for the Phoneline 10M USB
Network Adapter
Phoneline 10M USB Network Adapter
Getting to Know Your Phoneline 10M
USB Network Adapter
The Adapter’s Ports
• One HomeLink Phoneline 10Mbps USB Network Adapter
• One Standard USB Cable
• One Standard Telephone Cable
• One Driver Disk
• One User Guide and Registration Card
Windows & Computer Compatibility
To use this device, you must have Microsoft Windows 98 or
Windows 2000 installed on your PC. If you do not have Windows
98 or Windows 2000, this device will not work.
Also, the device requires that a USB port is installed and enabled on your PC.
Some PCs have a disabled USB port. If your port doesn’t seem to be working, there may be jumpers on the motherboard or a menu option in the BIOS
that will enable a PC’s USB port. Consult your computer’s user guide.
USB
This USB port, which is a Type B port, is where you connect your HomeLink Phoneline 10M USB Network Adapter
externally to your PC. Use the USB cable provided in the
package contents.
HomeLink
The Adapter’s HomeLink port connects your PC to the
phone jack, using regular phone cables.
Phone
The Phone port connects your PC’s HomeLink Adapter to
another HomeLink PC through the second PC’s HomeLink
port. See page 7 on how to daisy-chain your PCs.
Or, you can use the Phone port to connect a telephone at
the end of your HomeLink network. The Phone port will
only carry phone service if your HomeLink network plugs
into a phone jack.
Some motherboards have USB interfaces, but no ports. You should be able to
install your own USB port and attach it to your PC’s motherboard using hardware purchased at any computer store. Consult your computer’s user guide.
2
3
Linksys HomeLink™ Series
The Adapter’s LEDs
Phoneline 10M USB Network Adapter
USB Cabling
The HomeLink Phoneline 10M USB Network Adapter comes with one USB
cable. One end of the USB cable has a rectangular connector called a Type A
connector. The other end of the cable has a square Type B connector.
Type A
POWER
The Power LED will light up green when your USB
Network Adapter is connected to a power source.
TX
The TX LED will light up green if your HomeLink
10Mbps USB Adapter is successfully sending data over a
phoneline network.
Link
The Link LED will light up green if your PC’s adapter is
actively connected to a phoneline network.
RX
The RX LED will light up green if your HomeLink 10M
USB Network Adapter is successfully receiving,
or downloading, network data.
Type B
The USB cable’s Type B tip connects to the USB device, that is, your USB
Network Adapter. The Type A end connects to a computer’s USB port.
The picture below shows two USB ports as they might appear on your computer. Note the two USB icons marking the ports.
Modem and Fax Compatibility
The USB Icon
The USB icon shown below marks a USB port on a PC or device.
If you want to have a phoneline network and a phone in one room with just
one phone jack, you can still attach your phone to the jack by using a telephone jack splitter.
Plug your telephone or fax machine into one of the splitter’s ports, and your
HomeLink phoneline 10M USB Network Adapter into the other.
4
5
Linksys HomeLink™ Series
Installing the HomeLink Phoneline
10M USB Network Adapter
Overview
Phoneline 10M USB Network Adapter
Connecting to a Phoneline Network
Computers on a HomeLink network can be connected in one of two ways.
They can be daisy chained through their HomeLink port to another
HomeLink PC in a string, or they can be connected directly to a phone jack.
The diagram below shows a HomeLink phoneline network that uses both
types of connections.
The following instructions show you how to attach your Phoneline 10M USB
Network Adapter to your PC. After you install the adapter, you must install
the adapter’s driver software on your PC and configure your PC to access
your HomeLink phoneline network.
Driver installation and PC configuration instructions follow these hardware
installation instructions.
Installing the USB Network Adapter & Cabling
1. Insert the cable’s Type B connector into the USB Adapter’s Type B port.
2. Insert the other end of the USB cable with the Type A connector into
the USB port on your PC or your USB hub.
Your USB Network Adapter is now connected to your PC. Continue on to
the next page to connect your PCs as a HomeLink phoneline network.
Note: Details on USB cabling and ports information can be found on page 5.
To connect your HomeLink PCs together in your HomeLink network:
1. Connect one end of your telephone cabling to your Phoneline 10M
USB Network Adapter’s HomeLink port.
2. Connect the other end of that telephone cable into another computer’s
HomeLink port or directly into a phone jack.
Your computer is now connected to your Phoneline network.
• If your computer runs Windows 98, go to page 8 now for instructions on
installing your Windows 98 driver.
• If your computer runs Windows 2000, go to page 19 now for instructions
on installing your Windows 2000 driver.na
6
7
Linksys HomeLink™ Series
Windows 98 Driver Installation
Phoneline 10M USB Network Adapter
4. Select “Search for the best driver for your device (Recommended).” Click
Next.
Overview
After installing your Phoneline 10M USB Network Adapter in your computer,
follow these instructions to install the network driver. The installation procedure for the network driver will vary slightly depending on which version of
Windows 98 you are using and your current system configuration. If you
encounter problems during the installation, consult the Troubleshooting section on page 22 in the Appendix.
Installing the USB Network Adapter’s Driver
After installing the HomeLink Phoneline 10M USB Network Adapter, follow
the instructions below to install the adapter’s software into your Windows 98
computer.
5. Select “Floppy disk drives.” Click Next.
1. Start up your PC if you haven’t already done so.
2. Windows 98 will automatically detect the presence of the Linksys
Phoneline USB Adapter hardware in your PC.
3. Slide the Linksys Driver Disk into your floppy drive when the
Add New Hardware Wizard window is displayed. Click Next.
8
9
Linksys HomeLink™ Series
6. Windows will display a window announcing that it is ready to install the
Linksys Phoneline 10M USB Network Adapter. Click Next.
7. Windows will start copying the files to your hard drive.
See the chart below to guide you through the process.
Under no circumstance are you to click Cancel or Skip File!
• If your PC asks for the Linksys
Setup or Driver Disk...
1. Click OK.
2. Make sure that the Linksys Driver Disk is in
your PC’s floppy drive.
3. Type “a:\” in the “Copy files from:” field.
4. Click OK.
• If you are asked to supply
your Windows 98 Installation
Files or Disks...
1. Click OK.
2. If you have a Windows 98 CD-ROM, type
“d:\win98” in the “Copy files from:” box, where
“d:” is your CD-ROM drive.
3. If you don’t have a Windows 98 CD-ROM,
type: “c:\windows\options\cabs.”
4. Click OK.
• If you are asked for a file that
includes “USB200HA” or
“BCM” in its name...
• If you receive a Version
Conflict error...
10
1. Insert the Linksys Driver Disk into your PC’s
floppy drive.
2. Type “a:\” in the “Copy files from:” prompt.
3. Click OK
1. Choose to keep the newest version of the file
by clicking Yes.
Phoneline 10M USB Network Adapter
8. A window will appear to tell you that Windows has finished installing the
new hardware device. Click Finish.
Note: If Windows 98 asks you for a Computer Name or Workgroup name, skip
ahead to the instructions on page 14. Once you have chosen your Computer and
Workgroup names, go back to where you left off and continue the installation.
9. A Systems Settings Change window will ask you if you want to restart your
computer. Remove your driver disk from its drive and click Yes. If
Windows does not ask you to restart your PC, click the Start button.
Choose Shut Down, choose Restart, then click Yes.
The Windows 98 driver installation is now complete.
Go now to page 12 for instructions on configuring Windows 98’s network
protocols. Consult your Microsoft documentation for information on your
network configuration, if needed.
Note: From this point on, you must provide a User Name and
Password every time Windows requests them. Remember to
click OK to properly log on to Windows. If you click Cancel or
Esc, your attempt to log on to Windows will fail.
11
Linksys HomeLink™ Series
Network Component Configuration
Phoneline 10M USB Network Adapter
3. Click the File and Print Sharing button to bring up the File and Print
Sharing window.
1. Once you are back at the Windows 98 Desktop, click on your Taskbar's
Start button, then Settings, then Control Panel, then double-click the
Network icon.
2. When the Network window appears, click on the Configuration tab. A
window like the one below will appear. There may be extra components
listed in addition to the ones listed below, which is normal.
• Client for Microsoft Networks
• Linksys Phoneline 10M USB Network Adapter
• IPX/SPX-compatible protocol
• NetBEUI
• TCP/IP
4. If you want to give others access to files on your PC's hard drive,
select I want to be able to give others access to my files.
5. If you'd like to share your printer with other users on the network,
select I want to be able to allow others to print to my printer.
Note: If you do not enable File and Print Sharing, your PC will be
invisible on the network and inaccessible to other network users.
6. Click OK. File and Printer Sharing for Microsoft Networks now
appears in the list of installed components.
7. After making sure that all the listed network components are installed
on your system, select Client for Microsoft Networks in the Primary
Network Logon field.
If any of the components shown above are missing, you must manually
install them. See the section Manually Installing Network Components in
Windows 98 on page 33 for instructions.
12
13
Linksys HomeLink™ Series
8. Click on the Identification tab. Type your Computer Name in the
Computer Name field. Make sure you choose a name that is unique from
the other computer names on the network, e.g., Dad, Upstairs_PC, etc.
Note: Your Computer Name and Workgroup Name must both be less than
15 characters, and must only consist of numbers and letters. Every
Computer Name for each PC on the network must be different from all the
other PCs’ Computer Names on the network.
Phoneline 10M USB Network Adapter
10. Optional: Enter a description of your computer in the Computer
Description field. You may leave this field blank if you wish.
11. Optional: Choose the Access Control tab. Make sure that Shared-level
access control is selected. If the setting is on User-level access control
and you can’t change it, see Troubleshooting problem 4 on page 22.
12. Click OK. Your PC may ask for your Windows 98 CD-ROM or the location of the Windows 98 installation files. If it does, direct Windows to the
appropriate location, e.g., D:\win98 if you have the Windows 98 CDROM, or C:\windows\options\cabs if you don’t.
9. Type your Workgroup Name in the Workgroup field. The Workgroup
name must be the same Workgroup Name used by all the other PCs on
the network. Do not click OK when you are done.
14
13. Once Windows has copied those files, the System Settings Change window appears. Remove your driver disk from the floppy drive and click
Yes to restart your PC. If you don't see this window, click on your Start
button, then choose Shut Down, select Restart, and click OK to restart
your PC.
15
Linksys HomeLink™ Series
Phoneline 10M USB Network Adapter
14. A Logon window will appear, requiring you to enter a User Name and
Password. Choose a user name and password if you haven’t already and
click OK. Do not click the Cancel button or Escape [ESC] key. Clicking
either of these buttons will prevent you from logging onto the network. If
the Logon window does not appear or if it does not allow you to log on,
see problem 3 in the Troubleshooting section on page 22.
Sharing Your Files and Printers in Windows 98
15. Once you are at the Windows 98 Desktop, double-click on the Network
Neighborhood icon. You should see one icon for the entire network and
the names of the other PCs on the network.
Before sharing your files and printers, you must set up your PC to be used
with any file servers on the network. If you are not using Windows 98 with
an NT or NetWare file server, or if you are not sure if you have a file server,
continue below.
• If you can see your computer along with all the other computers on
the network in Network Neighborhood, then your Windows 98 network configuration is complete.
Overview
By “sharing” your files and printers, other PCs on your HomeLink network
will be able to access those resources on your PC.
If you are using a NT or NetWare file server, go to page 25 for Client Setup.
Enabling File Sharing
Continue with Sharing Your Files and Printers in Windows 98 on the
next page if you want data from your PC to be available to others
on the network. However, you may stop here if you want to configure File and Print Sharing later.
1. Double-click on your My Computer icon to bring up a window of available disk drives.
2. Right-click on the drive or folder that you want to share with other users.
• If you don't see anything in Network Neighborhood, press the F5 key
on your keyboard a few times to refresh the screen. If that doesn’t work,
go to Troubleshooting problem 9 on page 24.
3. Click on Sharing, then the Sharing tab. Click on Share As.
• If you only see your own PC in Network Neighborhood, see
Troubleshooting problem 5 on page 22.
4. In the Share Name field, enter a name for the drive or folder you are sharing. This can be any drive on your PC— a floppy drive, hard drive, CD
drive, zip drive, etc.
• If you see all the computers on the network except yours, press the F5
key a few times. If, after a minute or so, you still can’t see your own
PC, see Troubleshooting problem 8 on page 24.
5. Choose the type of access that you want to give other users.
• If you only see PCs that are running the same operating system as you,
and you don’t see any other PCs, go to problem 7 on page 23.
• Read-Only access allows other users to view the files on the selected
drive or folder.
• Full access allows other users to create, change, or delete files on the
selected drive or folder.
• Depends on Password allows other users to have Read-Only and/or Full
Access to the selected drive or folder, depending on the password that
you decide to give them.
Note: If you are using your PC to access the Internet, it is highly recommended that you create passwords for your shared access.
16
17
Linksys HomeLink™ Series
6. If you want to assign access passwords, type the passwords into the
Password fields.
7. When you're done, click on the Apply button, followed by OK. Repeat
steps 1-7 for any drive or folder you want to share on the network.
You have successfully enabled File Sharing on your PC. Your selected
drives or folders can now be accessed by other network users. If a user
tries to access one of your password-protected drives or folders, he or she
will be asked for the appropriate Read-Only or Full-Access password.
Below are the instructions to share your PC’s printer over the network.
Enabling Printer Sharing
1. Double-click on the My Computer icon.
2. Double-click the Printers folder. A window of available printers will
appear.
Phoneline 10M USB Network Adapter
Windows 2000 Driver Installation
Overview
After installing the Phoneline 10M USB Network Adapter on your PC, follow
these instructions to install the HomeLink Windows 2000 driver. The installation procedure for the network driver could vary slightly depending on which
version of Windows 2000 you are using, and on your current system configuration. If you encounter problems during the installation, see the
Troubleshooting section on page 22.
Installing the Network Adapter’s Driver
1. Start your PC in Windows 2000, if you haven’t already.
2. Windows will display the Welcome to the Found New Hardware Wizard
window. Click Next.
3. Right-click on the printer that you want to share with other users. Click on
Sharing, then the Sharing tab.
4. Click on Share As. In the Share Name field, name the printer you want to
share. If you want to assign a password to the printer so that only certain
users can access it, type a password in the Password field.
5. Click on the Apply button, then OK. Your printer(s) are now shared.
Note: Some printers cannot be shared on the network. Others may require
special instructions. Refer to your printer’s user guide or contact your printer
manufacturer if you think this may be the case with your printer.
The Printer Sharing setup and installation is complete. Your printer can
now be accessed by other network users. The printer’s driver may have to
be installed on other PCs. Consult your printer’s documentation.
18
19
Linksys HomeLink™ Series
3. The Install Hardware Device Drivers window will appear. When Linksys
USB Adapter is displayed, select “Search for a suitable driver for my device
(Recommended).” Click Next.
4. The Locate Driver Files window will appear. Select the “Floppy disk
drives” option and insert the driver disk into your floppy drive. Click
Next.
Phoneline 10M USB Network Adapter
5. The Driver File Search Results window will appear. Click Next.
6. The Completing the Found New Hardware Wizard window will appear
with the name of your adapter, Linksys Phoneline 10M USB Network
Adapter. Click Finish.
7. Remove the driver disk from your floppy drive.
The Windows 2000 HomeLink driver installation is now complete. If you
want to share files or printers, see your Microsoft documentation or ask
your network administrator.
20
21
Linksys HomeLink™ Series
Troubleshooting
1. Windows doesn't detect new hardware when the HomeLink Adapter hardware
is installed, or it continues to detect the adapter each time I restart the PC.
• You may not have installed the adapter correctly or securely into the
appropriate port of your PC. Check that the adapter is securely inserted
into the appropriate port.
• The system BIOS may not be USB-compatible, your PC’s USB settings
may be disabled, or the motherboard may have USB options not supported by Windows 98 or Windows 2000. If you are not sure, contact your
PC’s manufacturer.
2. Windows can't locate the driver for the HomeLink Adapter device.
• You may have inserted the wrong disk into your PC’s disk drive.
• The disk may be defective, files may be missing, or you may be pointing
Windows to the wrong directory or drive.
• You can download the correct driver from our website www.linksys.com.
3. The Windows Logon screen does not appear after I restart my PC.
• Click on Start, then Log Off. Log back in. If this doesn't solve the problem, your PC’s manufacturer may have disabled Windows' networking.
Contact your computer's manufacturer for help. If using Windows 2000,
refer to your Microsoft documentation.
4. On the Access Control Tab, User Level Access is selected, but Shared Level
Access is grayed out and not accessible.
• You previously had your primary network logon set to Client for NetWare
Networks. On the Configuration tab of the Network Properties window,
make sure that your primary network logon is set to Client for Microsoft
Networks.
• Your personal web server PC or Microsoft Front Page may require you to
choose a user level for security reasons.
5. In Network Neighborhood, I can only see my own PC and no other PCs on
the network.
• Make sure that the cables are connected correctly. Make sure your Link
and TX LEDs on your HomeLink Adapter are lit up. Swap your cable for
a new cable that you know is working.
• Verify that the HomeLink Adapter’s Phoneline configuration is set to
Auto Configuration.
22
Phoneline 10M USB Network Adapter
• Try connecting your PCs using only the phone cable provided with the
HomeLink adapter. Disconnect your PCs from any phone jacks and
remove any telephone, modem, or other device that you have connected
to the HomeLink adapters.
• If the PCs are far away from each other, bring them close to each other
and try connecting them directly together. This test will determine
whether your phone line or your HomeLink hardware is causing your network to malfunction.
• Make sure the other PC is turned on!
• Choose Start, Find, and Computer. Type the name of the computer in
the window that comes up, and click Find Now.
6. I’ve decided that I don’t want to share a drive or printer anymore, or I want
to physically remove a drive or printer from my network.
• You must reconfigure your File and Printer Sharing settings manually. To
do so, double-click on your My Computer icon. Click on the Printers
folder. A window of available printers will appear. Right-click on the
printer that you want to disable on the network. Click on Sharing, followed by the Sharing tab. Click on Not Shared. When you're done, click
on the Apply button, followed by OK.
• You can disable shared drives in the same way. In Windows Explorer,
right-click on the drive you want to stop sharing. Click on Sharing, followed by the Sharing tab. Click on Not Shared. When you're done, click
on the Apply button, followed by OK.
7. In Network Neighborhood, you can only see computers running the same
operating system as your PC. For example, if you are running Windows 98, you
can only see other Windows 98 PCs and no PCs running Windows 95.
• Click Start, Find, then Computer and type the name of any other computer in the window that comes up. Click Find Now.
• Make sure that you are using the same protocols and workgroup names
on the computers. To do this, click on Start, Settings, Control Panel,
then double-click on the Network icon. Click on the Configuration tab
and verify your protocol settings. If any protocols are missing, add any
needed protocol(s) using the Add button in the Network window. Next,
click on the Identification tab for Workgroup settings. Make sure they
are consistent with your other PCs.
• If all computers are using the same protocol(s) and Workgroup name, and
Windows 95 computers can't see Windows 98 computers, enable
NetBIOS on all the computers using Windows 95 and 98.
• IPX/SPX-compatible protocol should be installed on all computers.
• Bring up the properties of the IPX/SPX-compatible protocol. To do so,
23
Linksys HomeLink™ Series
click on Start, Settings, Control Panel, then open Network and click on
the Configuration tab. Highlight IPX/SPX-compatible Protocol (only
one of them) and click on Properties.
• Click on the NetBIOS tab. Put a check next to I want to enable NetBIOS
over IPX/SPX and click OK. Click OK again.
• After Windows finishes copying the appropriate files, restart your computer. When you’ve returned to the Desktop, open Network
Neighborhood or my network places and look for the other PCs on your
network.
8. In Network Neighborhood, I can only see some of the computers.
• Choose Start, Find, and Computer. Type the name of the computer in
the window that comes up, and click Find Now.
• Now make sure that the you are using the same protocol(s) and workgroup name on computers. To do this, click Start, Settings, Control
Panel on two computers running different Windows operating systems.
Click on the Network icon, choose the Configuration tab, then click on
the Identification tab for Workgroup name. Compare the protocols on
both computers and make sure that they are the same. If any protocols are
missing, see page 33 to install any protocol(s) you need.
• Make sure that File & Print sharing is enabled on every computer.
9. Network Neighborhood is empty.
• Verify that your Microsoft Client is installed. See the Windows 98 setup
instructions for directions.
• Verify that you have logged in correctly. Refresh the screen by pressing
F5 several times.
Phoneline 10M USB Network Adapter
Appendix
Client for Microsoft Setup for Windows 98
If you are installing the Phoneline 10M USB Network Adapter in a Windows
98 PC that you plan on logging onto a NT domain server, follow the directions below.
1. Start up Windows. Click on Start, Settings, then Control Panel. Doubleclick on Network to bring up the Network window. Click on the
Configuration tab.
2. In the Primary Logon field, you have two choices. Choose one Client for
Microsoft Networks, which instructs your PC to log onto an NT 4.0 or
Windows 2000 server where you already have a username and password
set up.
3. Under the The following network components are installed field, highlight
Client for Microsoft Networks and click on the Properties button.
4. The Client for Networks Properties window will appear. Under the Logon
Validation window, make sure that Log on to Windows NT domain is
checked. Enter the name of your domain into the Windows NT Domain
field.
5. Optional: Click on the Access Control tab. Make sure that Share-level
access control is selected; do not choose User-level access control. If
Access Control is greyed out and cannot be selected, refer to Problem 5 in
the Troubleshooting section on page 22.
6. When you’re done, click OK. When asked if you want to restart your PC,
choose to do so.
The Microsoft Client portion of the Windows setup is now complete.
24
25
Linksys HomeLink™ Series
Phoneline 10M USB Network Adapter
Novell NetWare 3.x Client Setup for Windows 98
Starting Over in Windows 98
The instructions below explain how to set up the regular Novell NetWare 3.x
client for use on a Windows 98 PC.
If you experience installation difficulties, you may need to reinstall all of the
Windows networking components from scratch. The instructions below
explain how to give your PC a clean sweep so you can retry the HomeLink
Phoneline 10M USB Network Adapter’s driver installation.
1. Follow the Windows 98 setup instructions.
2. Start up Windows 98. Click on Start, Settings, then Control Panel.
Double-click on Network. The Network window appears. Click on the
Configuration tab.
1. On your Desktop, click on the Start Button, highlight Settings, and click
on Control Panel.
2. Double-click on the Network icon.
3. In the Primary Logon field, choose Client for NetWare Networks. If you
don’t see this option, see page 25 to install this component.
3. If the Configuration field has a component called Dial-Up Adapter, skip
forward to step 5. If it doesn’t, continue with step 4.
4. Under the The following network components are installed window, highlight Client for NetWare Networks and click on the Properties button.
5. The Client for NetWare Networks Properties window appears. Under the
General tab, enter the name of your network’s Preferred Server. Assign the
First Network Drive Letter; the default is F. Make sure the Enable logon
script processing is checked.
6. Click OK. Click on the Access Control tab. Make sure the Share-level
access control option is selected; do not select User-level access control.
7. When you’re done, click OK to restart your PC.
The NetWare Client portion of your Windows setup is now complete.
26
27
Linksys HomeLink™ Series
4. Remove any instance of the name Linksys in the field, including
IPX/SPX…Linksys, NetBEUI…Linksys, and TCP/IP…Linksys. Also
remove Client for Microsoft Networks, Client for NetWare Networks, and
File and Printer Sharing for Microsoft Networks.
Phoneline 10M USB Network Adapter
5. For PCs with Dial-Up Networking and/or an AOL adapter, remove any
instance of the name Linksys, all IPX/SPX protocols, all NetBEUI, all
Clients, and File and Printer Sharing for Microsoft Networks. Do not
remove Dial-Up Adapter, AOL Adapter, TCP/IP-Compatible ProtocolAOL Adapter or TCP/IP-Compatible Protocol-Dial-Up Adapter.
In some cases, removing one of these components may automatically
remove other components as well. If this happens, skip to step 6.
Note: The above screen shot should appear with a scrolling
button on the side of the window. This picture has been modified to show you all of the components that should be listed.
6. When you have removed all unnecessary components, click OK. When
asked to restart, click No.
7. Return to the Windows Control Panel. Double-click on the System icon.
The System Properties window will appear. Click on the Device Manager
tab.
28
29
Linksys HomeLink™ Series
8. If Network adapters is listed, then expand it by clicking on the plus [+]
sign and remove all devices with the name Linksys in its description.
If at any point you are asked to restart the computer, click No.
Phoneline 10M USB Network Adapter
Starting Over in Windows 2000
1. Click the Start button, choose Settings, choose Control Panel, then double-click the System icon. The System Properties window will open.
2. Choose the Hardware tab.
3. Click the Device Manager button. The Device Manager window will
open.
9. If Other Devices is listed, click the plus [+] sign next to it. Remove
Linksys Phoneline 10M USB Network Adapter.
4. Click the plus sign (+) beside Network Adapters. The Linksys Phoneline
10M USB Network Adapter listing should appear.
10. Click the OK button, shut down Windows, and restart your computer.
11. After your computer has restarted, turn to page 8 for Windows 98 and follow the setup instructions.
30
31
Linksys HomeLink™ Series
5. Right-click on Linksys Phoneline 10M USB Network Adapter to bring
up a context menu like the one shown below.
Phoneline 10M USB Network Adapter
Manually Installing Network Components in Windows 98
Sometimes, you may have to manually install missing Windows networking
components. For manually installing network components in Windows 2000,
see your network adminstrator or your Microsoft documentation.
1. Click on Start, Settings, then Control Panel.
2. Double-click the Network icon. The Network window appears.
Note: You will probably need your Windows CD-ROM
to install network components. If your CD-ROM isn’t
available, direct Windows to windows\options\cabs”
when asked for a file location.
3. Click the Configuration tab. Check to see that the following network components are installed.
6. Choose Disable from the context menu first.
7. When asked if you want to disable the device, click Yes.
8. Right-click on Linksys Phoneline 10M USB Network Adapter again.
This time, select Uninstall.
9. The Network Adapters category should no longer be listed.
10. Click the OK button, restart your computer, and go to page 19 to install
the Windows 2000 driver.
• Client for Microsoft Networks
• Linksys HomeLink 10M USB Network Adapter
• IPX/SPX-compatible protocol
• NetBEUI
• TCP/IP
There may be other components listed in addition to the ones shown above. If
any of the above components are missing, add them as follows.
Client for Microsoft Networks
If you plan on connecting to an NT file server or peer-to-peer network, click
on the Add button. Highlight Client and click on Add. Choose Microsoft as
the manufacturer in the Network Client field. Highlight Client for Microsoft
Networks and click OK. Click OK again. The PC will begin copying the
files it needs. When the installation is complete, you will be asked if you
want to reboot. Click Yes.
Client for NetWare Networks
If you plan to connect to a Novell NetWare server (3.x), click on the Add
button. Highlight Client and click Add. In the Network Client window, select
Manufacturer and choose Microsoft. Highlight Client for Microsoft
Networks. Click OK again. The computer will begin copying files to your
system. When the installation is complete, you will be asked if you want to
reboot. Click Yes.
32
33
Linksys HomeLink™ Series
IPX/SPX-compatible protocol
Click the Add button. Choose Protocol and click the Add button. Select
Manufacturer and choose Microsoft. Under the Network Protocol box, highlight IPX/SPX-compatible protocol. Click OK. Click OK again. The computer will begin copying files to your system. When the installation is complete, you will be asked if you want to reboot. Click Yes.
NetBEUI
Click the Add button. Select Protocol, then click Add. Under Manufacturer,
highlight Microsoft. Under Network Protocol, highlight NetBEUI. Click
OK, then OK again. The computer will begin copying files to your system.
When the installation is complete, you will be asked if you want to reboot.
Click Yes.
TCP/IP
Click the Add button. Select Protocol, then click Add. Under Manufacturer,
highlight Microsoft. Under Network Protocol, highlight TCP/IP. Click OK,
then click OK again. The computer will begin copying files to your system.
When the installation is complete, you will be asked if you want to reboot.
Click Yes.
34
Phoneline 10M USB Network Adapter
Open Source and Beta Operating Systems
Linksys does not provide technical support for FreeBSD or other freeware
and open source operating systems. Although many Linksys products have
been proven to perform well under freeware and open source OSes, technical
support for setup and troubleshooting is not provided. For information on
where to find device drivers and setup instructions for freeware OSes, visit
the support pages and FAQ files on the Linksys website at www.linksys.com.
Linksys does not provide technical support for beta operating systems.
Telephone Cabling
The telephone cables you use can be either crossover or straight-through
cables. Standard telephone cables like the ones you use every day in your
home should do the job.
Phone cables have connectors at each end with RJ-11 tips, with four wires
inside.
35
Linksys HomeLink™ Series
Customer Support
Specifications
Model Number
Standards
Protocol
Ports
Speed
Cabling
Topology
Bus Speed
LEDs
Phoneline 10M USB Network Adapter
USB200HA
HomePNA Version 2.0-Compatible,
USB Version 1.0 or higher
CSMA/CD
1 USB Type-B Port
2 Standard Modular RJ-11 Telephone Ports
With Pass-Through Feature
10Mbps or 1Mbps
Standard Copper Telephone Cable with RJ-11 tips
Daisy Chain
12Mbps (Buffered) Universal Serial Bus
Power, TX, Link, RX
For help with the installation or operation of your HomeLink Phoneline 10M
USB Network Adapter, contact Linksys Technical Support at one of the
phone numbers or Internet addresses below.
Customer Support
Fax
E-mail
Web Site
FTP Site
800-326-7114
949-261-1288
949-261-8868
[email protected]
http://www.linksys.com
ftp.linksys.com
Environmental Specifications
36
Dimensions
Unit Weight
Power
Certifications
3.8" x 2.6" x 1.2" (97 mm x 66 mm x 30 mm)
5.0 oz. (156 g)
5V, Bus Powered from PC
FCC Class B, CE Mark Commercial
Operating Temperature
Storage Temperature
Operating Humidity
Storage Humidity
32ºF to 122ºF (0ºC to 49ºC)
-4ºF to 158ºF (-20ºC to 70ºC)
10% to 85%, Non-Condensing
5% to 90%, Non-Condensing
37
http://www.linksys.com
© Copyright 2000 Linksys, All Rights Reserved.