1
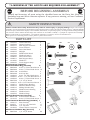
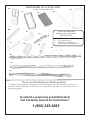
6/30/2006
®
VISIT THE LIFETIME WEB SITE:
WWW.LIFETIME.COM
** Do Not Contact the Store **
For Assistance, including missing or broken parts,
Call Customer Service at:
1 (800) 225-3865
30” Shed Extension Kit w/ Two Windows
MODEL #6425
ASSEMBLY
INSTRUCTIONS AND
OWNER’S MANUAL
Save this instruction in the event that the manufacturer has to be contacted for replacement parts.
INSTRUCTION #1016066
**A MINIMUM OF TWO ADULTS ARE REQUIRED FOR ASSEMBLY**
BEFORE BEGINNING ASSEMBLY
Identify and inventory all parts using the checklist boxes on the Parts List. Keep the
hardware bags and their contents separate. If any parts are missing, call our Customer
Service Department.
SAFETY INSTRUCTIONS
Failure to follow these safety instructions may result in serious injury or property damage. Proper and complete
assembly, use and supervision is essential for proper operation and to reduce the risk of accident or injury. A high probability
of serious injury exists if this display is not installed, maintained, or operated properly. • If using a ladder during assembly,
use extreme caution. Follow all warnings and cautions on the ladder carefully. • 2 people are required for assembly. •
Misuse could result in system failure. • If technical assistance is required, contact the manufacturer.
Most injuries are caused by misuse and/or failure to follow instructions.
PARTS LIST
AA 1007995 Center Roof Cap
1
AB 1007984 Gutter Channel
2
AC 1007977 Wall Support Channel
2
AD 1007988 Truss Channel
1
AE 1007996 Inner Roof Panel
2
AG 1009232 Skylight
1
AH 1007998 Window Wall Panel
2
AI
1007999 Window Frame C
4
AJ 1008000 Inner Floor Panel
2
AK 1008001 Roof Support Strip
4
AL 1013660 Window C
4
AM 1009156 Truss Support Strip
2
Shed Parts Box [1016073]
Window Hardware Bag [1011813]
2
CA BS05800 #10 x 3/4” Pan-Head Screw 5
CB BS05900 #10 x 1/2” Pan Head Screw 16
CC BW01300 #10 Washer
4
CD BN01600 #10 Cap Nut
2
CE 1005984 #10 x .38” Flat Head Screw 2
CF 1005981 #10 x 1 1/4” Pan Head Screw4
CG 1005982 #10 x 1/2” Pan Head Screw 6
SS BS07500 1/4” x 5/8” Screw
4
CI
1008533 #10 x 5/16” Pan Head Screw 2
CJ 1009211 Window Stay Bracket
2
CK 1009212 Mounted Window Stay 2
CL 1009213 Sliding Window Stay
2
CM 1009214 Window Latch Bearing
4
CN 1009215 Window Latch
4
CO 1004592 Window Hinge
4
Skylight Hardware Bag [1011616]
1
LA BW01200 #10-1” Fender Washer
7
LB 1010132 #10 x 5/8” Pan Head Screw 7
Truss Extension Hardware Bag [1016014] 1
FA 1009117 Floor Bracket
2
FB 300072
1/4” x 1 1/2” Hex Bolt
11
FC BN00300 1/4” Cap Nut
11
FD 1012933 Center Gutter Connector
1
Shed Screw Hardware Bag [1011615]
1
SS BS07500 1/4” x 5/8” Screw
60
CB
CA
CE
LB
CD
CG
CF
SS
FB
CC
CI
LA
FC
AA
AE
FA
AG
FD
HARDWARE IS ACTUAL SIZE
AH
(unless otherwise indicated)
AI
AJ
AK
AM
CJ
CL
CM
AL
Tools and Materials
Required for Assembly
(Not Included)
CK
1.
2.
3.
CN
7/16” Wrenches (2)
3/8” Wrenches (2)
#2 Phillips screwdriver or
Electric drill with pillips head
CO
AB
AC
AD
If you are Extending an Existing Shed
1. To obtain instructions for extending a shed that has previously been assembled, contact our
Customer Service Department. If you have not yet assembled your shed, use the instructions on
the following pages.
To extend a previously assembled shed,
Call Customer Service for Instructions:
1 (800) 225-3865
Add Extension Kit During Shed Assembly
1. Check contents of boxes and compare to parts listed on the Parts List.
2. Follow instructions that came with your shed, but when you come to the following sections of
your Owner’s Manual assemble the additional floor, wall, window and truss parts that are included
in this kit.
Site Selection
a.
Add 30” to the site or platform length. (width will remain the same). This may require the
use of additional lumber or other materials.
Assemble Floor
a.
Follow Owner’s Manual instructions to install the additional Inner Floor Panels (AE)
included in this kit, along with those that came with your shed.
Assemble Wall (Right or Left)
a.
Add the two Window Wall Panels (AH) from this kit to both sides of the shed.
Remember that Window Wall Panels can be inserted into any position on either side of the
shed.
Assemble Windows
a.
Follow Owner’s Manual instructions to assemble the windows in the Window Wall Panels
included in this kit, along with those that came with your shed.
Assemble Truss Frames
a.
Follow Owner’s Manual instructions to assemble the Truss Frames included in this kit,
along with those that came with your shed.
Install Truss Assemblies
a.
Follow Owner’s Manual instructions to install the Truss Frames included in this kit, along
with those that came with your shed.
Install Center Roof Sections
a.
Follow Owner’s Manual instructions to install the additional Inner Roof Panels, Roof Caps
and Skylights included in this kit, along with those that came with your shed.