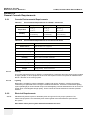
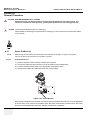
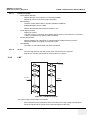
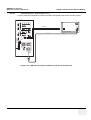
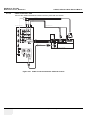
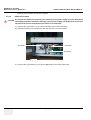
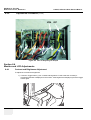
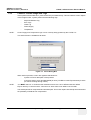
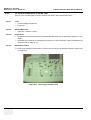
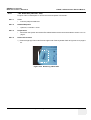
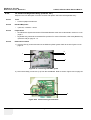
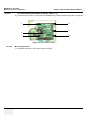
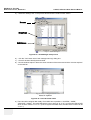
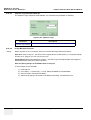
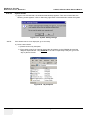
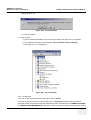
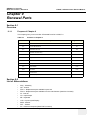
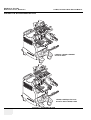
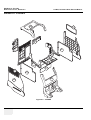
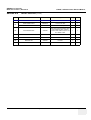
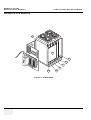
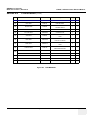
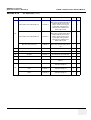
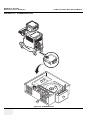
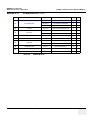
1
GE Medical Systems
Technical
Publication
Direction 2395907
Revision 2
GE Medical Systems
LOGIQ™5 Expert Basic Service Manual
Operating Documentation
Copyright© 2004 by General Electric Co.
GE MEDICAL SYSTEMS
DIRECTION 2395907, REVISION 2
Page 1-2
LOGIQ™ 5 EXPERT BASIC SERVICE MANUAL
-
GE MEDICAL SYSTEMS
GE Medical Systems:
Telex 3797371
P.O. Box 414; Milwaukee, Wisconsin 53201, U.S.A.
(Asia, Pacific, Latin America, North America)
GE Ultraschall:Tel: +49 (0) 212 28 02 207
Deutschland GmbH & Co KG
Beethovenstrabe 239, Postfach 11 05 60
D-42655 Solingen, Germany
GE MEDICAL SYSTEMS
DIRECTION 2395907, REVISION 2
LOGIQ™ 5 EXPERT BASIC SERVICE MANUAL
Revision History
Revision
Date
Reason for change
0
2003.10.10
R3.0.0 Initial Release
1
2004.03.27
R3.0.2 Software Release
2
2004.05.19
Updated Spare Parts Information on Chapter 9
List of Effected Pages
PAGES
REVISION
PAGES
REVISION
PAGES
REVISION
Title Page
2
1-1 to 1-14
2
Back Cover
N/A
Warnings
i to iv
2
2-1 to 2-10
2
Rev Hist/LOEP
A-v to A-vi
2
3-1 to 3-28
2
Table of Contents
i to viii
2
4-1 to 4-26
2
5-1 to 5-44
2
6-1 to 6-14
2
7-1 to 7-44
2
8-1 to 8-118
2
9-1 to 9-20
2
10-1 to 10-32
2
-
Page A-3
GE MEDICAL SYSTEMS
DIRECTION 2395907, REVISION 2
Page A-4
LOGIQ™ 5 EXPERT BASIC SERVICE MANUAL
-
GE MEDICAL SYSTEMS
DIRECTION 2395907, REVISION 2
LOGIQ™ 5 EXPERT BASIC SERVICE MANUAL
Table of Contents
CHAPTER 1
Introduction
Overview . . . . . . . . . . . . . . . . . . . . . . . . . . . . . . . . . . . . . . . . . . . . . . . . . . . . . . . . .1 - 1
Purpose of Chapter 1 . . . . . . . . . . . . . . . . . . . . . . . . . . . . . . . . . . . . . . . . . .1 - 1
Purpose of Service Manual . . . . . . . . . . . . . . . . . . . . . . . . . . . . . . . . . . . . .1 - 1
Typical Users of the Basic Service Manual . . . . . . . . . . . . . . . . . . . . . . . . .1 - 2
LOGIQ™ 5 Models Covered by this Manual . . . . . . . . . . . . . . . . . . . . . . . .1 - 2
Purpose of Operator Manual(s) . . . . . . . . . . . . . . . . . . . . . . . . . . . . . . . . . .1 - 2
Important Conventions. . . . . . . . . . . . . . . . . . . . . . . . . . . . . . . . . . . . . . . . . . . . . . .1 - 3
Conventions Used in Book . . . . . . . . . . . . . . . . . . . . . . . . . . . . . . . . . . . . . .1 - 3
Product Icons . . . . . . . . . . . . . . . . . . . . . . . . . . . . . . . . . . . . . . . . . . . . . . . .1 - 5
Introduction . . . . . . . . . . . . . . . . . . . . . . . . . . . . . . . . . . . . . . . . . . . . . . . . .1 - 7
Human Safety . . . . . . . . . . . . . . . . . . . . . . . . . . . . . . . . . . . . . . . . . . . . . . .1 - 7
Mechanical Safety . . . . . . . . . . . . . . . . . . . . . . . . . . . . . . . . . . . . . . . . . . . .1 - 7
Electrical Safety . . . . . . . . . . . . . . . . . . . . . . . . . . . . . . . . . . . . . . . . . . . . . .1 - 8
Lockout/Tagout Requirements (For USA Only) . . . . . . . . . . . . . . . . . . . . . .1 - 12
Electromagnetic Compatibility . . . . . . . . . . . . . . . . . . . . . . . . . . . . . . . . . . .1 - 13
Electrostatic Discharge (ESD) Prevention . . . . . . . . . . . . . . . . . . . . . . . . . .1 - 13
CE Compliance . . . . . . . . . . . . . . . . . . . . . . . . . . . . . . . . . . . . . . . . . . . . . .1 - 13
Customer Assistance . . . . . . . . . . . . . . . . . . . . . . . . . . . . . . . . . . . . . . . . . . . . . . . .1 - 14
System Manufacture . . . . . . . . . . . . . . . . . . . . . . . . . . . . . . . . . . . . . . . . . .1 - 14
Contact Information . . . . . . . . . . . . . . . . . . . . . . . . . . . . . . . . . . . . . . . . . . .1 - 14
CHAPTER 2
Overview . . . . . . . . . . . . . . . . . . . . . . . . . . . . . . . . . . . . . . . . . . . . . . . . . . . . . . . . .2 - 1
Purpose of chapter 2 . . . . . . . . . . . . . . . . . . . . . . . . . . . . . . . . . . . . . . . . . .2 - 1
General Console Requirements. . . . . . . . . . . . . . . . . . . . . . . . . . . . . . . . . . . . . . . .2 - 2
Console Environmental Requirements . . . . . . . . . . . . . . . . . . . . . . . . . . . . .2 - 2
Page 5
Table of Contents
GE MEDICAL SYSTEMS
DIRECTION 2395907, REVISION 2
LOGIQ™ 5 EXPERT BASIC SERVICE MANUAL
Electrical Requirements . . . . . . . . . . . . . . . . . . . . . . . . . . . . . . . . . . . . . . . .2 - 3
EMI Limitations . . . . . . . . . . . . . . . . . . . . . . . . . . . . . . . . . . . . . . . . . . . . . . .2 - 4
Scan Probe Environmental Requirements . . . . . . . . . . . . . . . . . . . . . . . . . .2 - 5
Facility Needs . . . . . . . . . . . . . . . . . . . . . . . . . . . . . . . . . . . . . . . . . . . . . . . . . . . . .2 - 6
Purchaser Responsibilities . . . . . . . . . . . . . . . . . . . . . . . . . . . . . . . . . . . . . .2 - 6
Required Features . . . . . . . . . . . . . . . . . . . . . . . . . . . . . . . . . . . . . . . . . . . .2 - 7
Desirable Features . . . . . . . . . . . . . . . . . . . . . . . . . . . . . . . . . . . . . . . . . . . .2 - 7
Recommended and Alternate Ultrasound Room Layout . . . . . . . . . . . . . . .2 - 8
CHAPTER 3
Overview . . . . . . . . . . . . . . . . . . . . . . . . . . . . . . . . . . . . . . . . . . . . . . . . . . . . . . . . .3 - 1
Purpose of Chapter 3 . . . . . . . . . . . . . . . . . . . . . . . . . . . . . . . . . . . . . . . . . .3 - 1
Installation Reminders . . . . . . . . . . . . . . . . . . . . . . . . . . . . . . . . . . . . . . . . . . . . . . .3 - 1
Average Installation Time . . . . . . . . . . . . . . . . . . . . . . . . . . . . . . . . . . . . . . .3 - 1
Installation Warnings . . . . . . . . . . . . . . . . . . . . . . . . . . . . . . . . . . . . . . . . . .3 - 2
Moving into Position . . . . . . . . . . . . . . . . . . . . . . . . . . . . . . . . . . . . . . . . . . .3 - 9
Adjusting System Clock . . . . . . . . . . . . . . . . . . . . . . . . . . . . . . . . . . . . . . . .3 - 9
Product Locator Installation Card . . . . . . . . . . . . . . . . . . . . . . . . . . . . . . . . .3 - 9
Preparing for Installation . . . . . . . . . . . . . . . . . . . . . . . . . . . . . . . . . . . . . . . . . . . . .3 - 10
Verify Customer Order . . . . . . . . . . . . . . . . . . . . . . . . . . . . . . . . . . . . . . . . .3 - 10
Physical Inspection . . . . . . . . . . . . . . . . . . . . . . . . . . . . . . . . . . . . . . . . . . .3 - 10
EMI Protection . . . . . . . . . . . . . . . . . . . . . . . . . . . . . . . . . . . . . . . . . . . . . . .3 - 10
Completing the Installation. . . . . . . . . . . . . . . . . . . . . . . . . . . . . . . . . . . . . . . . . . . .3 - 11
Power On/Boot Up . . . . . . . . . . . . . . . . . . . . . . . . . . . . . . . . . . . . . . . . . . . .3 - 11
Power Off/ Shutdown . . . . . . . . . . . . . . . . . . . . . . . . . . . . . . . . . . . . . . . . . .3 - 14
Transducer Connection . . . . . . . . . . . . . . . . . . . . . . . . . . . . . . . . . . . . . . . .3 - 14
System Specifications . . . . . . . . . . . . . . . . . . . . . . . . . . . . . . . . . . . . . . . . .3 - 15
Electrical Specifications . . . . . . . . . . . . . . . . . . . . . . . . . . . . . . . . . . . . . . . .3 - 18
On-Board Optional Peripherals . . . . . . . . . . . . . . . . . . . . . . . . . . . . . . . . . .3 - 19
External I/O Connector Panel . . . . . . . . . . . . . . . . . . . . . . . . . . . . . . . . . . .3 - 20
Video Specification . . . . . . . . . . . . . . . . . . . . . . . . . . . . . . . . . . . . . . . . . . . .3 - 23
Software/Option Configuration. . . . . . . . . . . . . . . . . . . . . . . . . . . . . . . . . . . . . . . . .3 - 23
Loading Base System Software. . . . . . . . . . . . . . . . . . . . . . . . . . . . . . . . . . . . . . . .3 - 25
Before You Load Software . . . . . . . . . . . . . . . . . . . . . . . . . . . . . . . . . . . . . .3 - 25
Page 6
-
GE MEDICAL SYSTEMS
DIRECTION 2395907, REVISION 2
LOGIQ™ 5 EXPERT BASIC SERVICE MANUAL
Managing Data, Presets and Images . . . . . . . . . . . . . . . . . . . . . . . . . . . . .
Save Connectivity Settings . . . . . . . . . . . . . . . . . . . . . . . . . . . . . . . . . . . . .
Possible GE USB Control Panel Driver Loss . . . . . . . . . . . . . . . . . . . . . . .
Possible Behavior of the First Power Up After Application Load . . . . . . . .
GE USB Control Panel Driver Loss . . . . . . . . . . . . . . . . . . . . . . . . . . . . . .
Restore Patient, Report, and User-Defined Presets . . . . . . . . . . . . . . . . . .
Product Locator Installation . . . . . . . . . . . . . . . . . . . . . . . . . . . . . . . . . . . .
User Manual(s) . . . . . . . . . . . . . . . . . . . . . . . . . . . . . . . . . . . . . . . . . . . . . .
3 - 25
3 - 25
3 - 28
3 - 35
3 - 35
3 - 38
3 - 39
3 - 39
CHAPTER 4
................................................................
Overview. . . . . . . . . . . . . . . . . . . . . . . . . . . . . . . . . . . . . . . . . . . . . . . . . . . . . . . . . 4 - 1
Purpose for Chapter 4 . . . . . . . . . . . . . . . . . . . . . . . . . . . . . . . . . . . . . . . . 4 - 1
Required Equipment. . . . . . . . . . . . . . . . . . . . . . . . . . . . . . . . . . . . . . . . . . . . . . . . 4 - 1
General Procedure . . . . . . . . . . . . . . . . . . . . . . . . . . . . . . . . . . . . . . . . . . . . . . . . .
Power On/Boot Up . . . . . . . . . . . . . . . . . . . . . . . . . . . . . . . . . . . . . . . . . . .
Power Off / Shutdown . . . . . . . . . . . . . . . . . . . . . . . . . . . . . . . . . . . . . . . . .
System Features . . . . . . . . . . . . . . . . . . . . . . . . . . . . . . . . . . . . . . . . . . . . .
System B/M-Mode Checks . . . . . . . . . . . . . . . . . . . . . . . . . . . . . . . . . . . . .
System CFM and PWD Checks . . . . . . . . . . . . . . . . . . . . . . . . . . . . . . . . .
Basic Measurements . . . . . . . . . . . . . . . . . . . . . . . . . . . . . . . . . . . . . . . . .
Probe/Connectors Usage . . . . . . . . . . . . . . . . . . . . . . . . . . . . . . . . . . . . . .
Using Cine . . . . . . . . . . . . . . . . . . . . . . . . . . . . . . . . . . . . . . . . . . . . . . . . .
Image Management (QG) . . . . . . . . . . . . . . . . . . . . . . . . . . . . . . . . . . . . .
Using the CD-RW / MOD (Magneto-Optical Drive) . . . . . . . . . . . . . . . . . . .
4-2
4-3
4-4
4-5
4-8
4-9
4 - 10
4 - 11
4 - 12
4 - 13
4 - 14
Software Configuration Checks . . . . . . . . . . . . . . . . . . . . . . . . . . . . . . . . . . . . . . . 4 - 22
Operator I/O Movement . . . . . . . . . . . . . . . . . . . . . . . . . . . . . . . . . . . . . . . 4 - 24
Software Configuration Checks . . . . . . . . . . . . . . . . . . . . . . . . . . . . . . . . . . . . . . . 4 - 26
CHAPTER 5
Overview. . . . . . . . . . . . . . . . . . . . . . . . . . . . . . . . . . . . . . . . . . . . . . . . . . . . . . . . .
Purpose of Chapter 5 . . . . . . . . . . . . . . . . . . . . . . . . . . . . . . . . . . . . . . . . .
Block Diagram . . . . . . . . . . . . . . . . . . . . . . . . . . . . . . . . . . . . . . . . . . . . . .
Front End . . . . . . . . . . . . . . . . . . . . . . . . . . . . . . . . . . . . . . . . . . . . . . . . . .
-
5-1
5-1
5-3
5-5
Page 7
GE MEDICAL SYSTEMS
DIRECTION 2395907, REVISION 2
LOGIQ™ 5 EXPERT BASIC SERVICE MANUAL
Backend Processor . . . . . . . . . . . . . . . . . . . . . . . . . . . . . . . . . . . . . . . . . . .5 - 16
Patient I/O (Option) . . . . . . . . . . . . . . . . . . . . . . . . . . . . . . . . . . . . . . . . . . .5 - 18
External I/O (Rear Panel) . . . . . . . . . . . . . . . . . . . . . . . . . . . . . . . . . . . . . . .5 - 21
Peripherals . . . . . . . . . . . . . . . . . . . . . . . . . . . . . . . . . . . . . . . . . . . . . . . . . .5 - 22
Interconnect Cabling . . . . . . . . . . . . . . . . . . . . . . . . . . . . . . . . . . . . . . . . . .5 - 23
Power Diagrams . . . . . . . . . . . . . . . . . . . . . . . . . . . . . . . . . . . . . . . . . . . . . . . . . . .5 - 24
Overview . . . . . . . . . . . . . . . . . . . . . . . . . . . . . . . . . . . . . . . . . . . . . . . . . . .5 - 24
AC Power . . . . . . . . . . . . . . . . . . . . . . . . . . . . . . . . . . . . . . . . . . . . . . . . . . .5 - 24
DC Power (Low Voltage) . . . . . . . . . . . . . . . . . . . . . . . . . . . . . . . . . . . . . . .5 - 25
Air Flow Control . . . . . . . . . . . . . . . . . . . . . . . . . . . . . . . . . . . . . . . . . . . . . . . . . . . .5 - 28
Air Flow Distribution . . . . . . . . . . . . . . . . . . . . . . . . . . . . . . . . . . . . . . . . . . .5 - 28
Filters . . . . . . . . . . . . . . . . . . . . . . . . . . . . . . . . . . . . . . . . . . . . . . . . . . . . . .5 - 28
Fans . . . . . . . . . . . . . . . . . . . . . . . . . . . . . . . . . . . . . . . . . . . . . . . . . . . . . . .5 - 29
Service Platform. . . . . . . . . . . . . . . . . . . . . . . . . . . . . . . . . . . . . . . . . . . . . . . . . . . .5 - 30
Introduction . . . . . . . . . . . . . . . . . . . . . . . . . . . . . . . . . . . . . . . . . . . . . . . . .5 - 30
Calibration . . . . . . . . . . . . . . . . . . . . . . . . . . . . . . . . . . . . . . . . . . . . . . . . . .5 - 38
Utilities . . . . . . . . . . . . . . . . . . . . . . . . . . . . . . . . . . . . . . . . . . . . . . . . . . . . .5 - 39
Replacement . . . . . . . . . . . . . . . . . . . . . . . . . . . . . . . . . . . . . . . . . . . . . . . .5 - 39
PM . . . . . . . . . . . . . . . . . . . . . . . . . . . . . . . . . . . . . . . . . . . . . . . . . . . . . . . .5 - 40
CHAPTER 6
Overview . . . . . . . . . . . . . . . . . . . . . . . . . . . . . . . . . . . . . . . . . . . . . . . . . . . . . . . . .6 - 1
Purpose of this chapter 6 . . . . . . . . . . . . . . . . . . . . . . . . . . . . . . . . . . . . . . .6 - 1
Regulatory . . . . . . . . . . . . . . . . . . . . . . . . . . . . . . . . . . . . . . . . . . . . . . . . . . . . . . . .6 - 1
Power Supply Adjustment . . . . . . . . . . . . . . . . . . . . . . . . . . . . . . . . . . . . . . . . . . . .6 - 2
LV Unit Disassembly . . . . . . . . . . . . . . . . . . . . . . . . . . . . . . . . . . . . . . . . . .6 - 2
Adjustments Procedures . . . . . . . . . . . . . . . . . . . . . . . . . . . . . . . . . . . . . . .6 - 4
Reloading the Probe Data . . . . . . . . . . . . . . . . . . . . . . . . . . . . . . . . . . . . . . . . . . . .6 - 5
Monitor and LCD Adjustments . . . . . . . . . . . . . . . . . . . . . . . . . . . . . . . . . . . . . . . . .6 - 8
Contrast and Brightness Adjustment . . . . . . . . . . . . . . . . . . . . . . . . . . . . . .6 - 8
LCD Adjustment . . . . . . . . . . . . . . . . . . . . . . . . . . . . . . . . . . . . . . . . . . . . . .6 - 9
Page 8
-
GE MEDICAL SYSTEMS
DIRECTION 2395907, REVISION 2
LOGIQ™ 5 EXPERT BASIC SERVICE MANUAL
CHAPTER 7
Diagnostics/Troubleshooting
Overview. . . . . . . . . . . . . . . . . . . . . . . . . . . . . . . . . . . . . . . . . . . . . . . . . . . . . . . . . 7 - 1
Purpose of Chapter 7 . . . . . . . . . . . . . . . . . . . . . . . . . . . . . . . . . . . . . . . . . 7 - 1
Network Connectivity Troubleshooting . . . . . . . . . . . . . . . . . . . . . . . . . . . . . . . . . .
Overview . . . . . . . . . . . . . . . . . . . . . . . . . . . . . . . . . . . . . . . . . . . . . . . . . . .
Collect Vital System Information . . . . . . . . . . . . . . . . . . . . . . . . . . . . . . . . .
Check and Record the P4 Key Function . . . . . . . . . . . . . . . . . . . . . . . . . . .
Setting the P4 Key to Screen Capture . . . . . . . . . . . . . . . . . . . . . . . . . . . .
Reset the P4 Key to Customer’s Functionality . . . . . . . . . . . . . . . . . . . . . .
Utilities . . . . . . . . . . . . . . . . . . . . . . . . . . . . . . . . . . . . . . . . . . . . . . . . . . . .
7-1
7-2
7-2
7-4
7-5
7-7
7-9
CHAPTER 8
Replacement Procedures
Overview. . . . . . . . . . . . . . . . . . . . . . . . . . . . . . . . . . . . . . . . . . . . . . . . . . . . . . . . .
Purpose of Chapter 8 . . . . . . . . . . . . . . . . . . . . . . . . . . . . . . . . . . . . . . . . .
................................................................
SEMBLY/RE-ASSEMBLY . . . . . . . . . . . . . . . . . . . . . . . . . . . . . . . . . . . . . . . . . . .
Monitor . . . . . . . . . . . . . . . . . . . . . . . . . . . . . . . . . . . . . . . . . . . . . . . . . . . . . . . . . .
CRT Assy (FRU No. 100) . . . . . . . . . . . . . . . . . . . . . . . . . . . . . . . . . . . . . .
Monitor Cable Assy (FRU No. 101) . . . . . . . . . . . . . . . . . . . . . . . . . . . . . .
Monitor Cover Set (FRU No. 102) . . . . . . . . . . . . . . . . . . . . . . . . . . . . . . .
Monitor S/W Assy (FRU No. 103) . . . . . . . . . . . . . . . . . . . . . . . . . . . . . . . .
Speaker Assy (FRU No. 104) . . . . . . . . . . . . . . . . . . . . . . . . . . . . . . . . . . .
Task Lamp Assy (FRU No. 105) . . . . . . . . . . . . . . . . . . . . . . . . . . . . . . . . .
Keyboard Block . . . . . . . . . . . . . . . . . . . . . . . . . . . . . . . . . . . . . . . . . . . . . . . . . . .
KeyBoard Assy (FRU No. 200) . . . . . . . . . . . . . . . . . . . . . . . . . . . . . . . . . .
KeyBoard Front Grip (FRU No. 201) . . . . . . . . . . . . . . . . . . . . . . . . . . . . .
Probe Holder (FRU No. 202) . . . . . . . . . . . . . . . . . . . . . . . . . . . . . . . . . . .
ECG Cable Hook (FRU No. 203) . . . . . . . . . . . . . . . . . . . . . . . . . . . . . . . .
OP Panel Encoder Assy (FRU No. 204) . . . . . . . . . . . . . . . . . . . . . . . . . . .
OP Panel TGC Assy (FRU No. 205) . . . . . . . . . . . . . . . . . . . . . . . . . . . . . .
TGC Knob Set (FRU No. 206) . . . . . . . . . . . . . . . . . . . . . . . . . . . . . . . . . .
OP Panel A/N Keyboard Assy (FRU No. 207) . . . . . . . . . . . . . . . . . . . . . .
OP Panel Trackball Assy (FRU No. 208) . . . . . . . . . . . . . . . . . . . . . . . . . .
OP Panel HUB board Assy (FRU No. 209) . . . . . . . . . . . . . . . . . . . . . . . .
OP Panel LCD Assy (FRU No. 210) . . . . . . . . . . . . . . . . . . . . . . . . . . . . . .
-
8-1
8-1
DISAS8-1
8-2
8-2
8-4
8-6
8-7
8-9
8 - 11
8 - 13
8 - 13
8 - 15
8 - 16
8 - 17
8 - 18
8 - 20
8 - 21
8 - 22
8 - 24
8 - 25
8 - 27
Page 9
GE MEDICAL SYSTEMS
DIRECTION 2395907, REVISION 2
LOGIQ™ 5 EXPERT BASIC SERVICE MANUAL
OP Panel LCD Encoder Assy (FRU No. 211) . . . . . . . . . . . . . . . . . . . . . . .8 - 29
Covers . . . . . . . . . . . . . . . . . . . . . . . . . . . . . . . . . . . . . . . . . . . . . . . . . . . . . . . . . . .8 - 31
Left Cover (FRU No. 300) . . . . . . . . . . . . . . . . . . . . . . . . . . . . . . . . . . . . . .8 - 31
Right Cover (FRU No. 301) . . . . . . . . . . . . . . . . . . . . . . . . . . . . . . . . . . . . .8 - 32
Rear Cover (FRU No. 302) . . . . . . . . . . . . . . . . . . . . . . . . . . . . . . . . . . . . .8 - 33
Rear Door Cover (FRU No. 303) . . . . . . . . . . . . . . . . . . . . . . . . . . . . . . . . .8 - 34
Top Cover (FRU No. 304) . . . . . . . . . . . . . . . . . . . . . . . . . . . . . . . . . . . . . .8 - 35
Front Base Cover (FRU No. 305) . . . . . . . . . . . . . . . . . . . . . . . . . . . . . . . . .8 - 37
Front Cover (FRU No. 306) . . . . . . . . . . . . . . . . . . . . . . . . . . . . . . . . . . . . .8 - 39
OP Side L Cover (FRU No. 307) . . . . . . . . . . . . . . . . . . . . . . . . . . . . . . . . .8 - 40
OP Side R Cover (FRU No. 308) . . . . . . . . . . . . . . . . . . . . . . . . . . . . . . . . .8 - 42
OP Rear Cover (FRU No. 309) . . . . . . . . . . . . . . . . . . . . . . . . . . . . . . . . . .8 - 44
OP Bottom Cover (FRU No. 310) . . . . . . . . . . . . . . . . . . . . . . . . . . . . . . . . .8 - 45
OP Curtain Cover (FRU No. 311) . . . . . . . . . . . . . . . . . . . . . . . . . . . . . . . .8 - 46
EMI Cover L (FRU No. 312) . . . . . . . . . . . . . . . . . . . . . . . . . . . . . . . . . . . . .8 - 48
EMI Cover R (FRU No. 313) . . . . . . . . . . . . . . . . . . . . . . . . . . . . . . . . . . . .8 - 49
Side Cap (FRU No. 314) . . . . . . . . . . . . . . . . . . . . . . . . . . . . . . . . . . . . . . .8 - 50
Side Fringe (FRU No. 315) . . . . . . . . . . . . . . . . . . . . . . . . . . . . . . . . . . . . .8 - 51
Body Block . . . . . . . . . . . . . . . . . . . . . . . . . . . . . . . . . . . . . . . . . . . . . . . . . . . . . . . .8 - 52
Rear Handle (FRU No. 400) . . . . . . . . . . . . . . . . . . . . . . . . . . . . . . . . . . . . .8 - 52
Rear Panel Assy (FRU No. 401) . . . . . . . . . . . . . . . . . . . . . . . . . . . . . . . . .8 - 54
Gas Spring Assy (FRU No. 402) . . . . . . . . . . . . . . . . . . . . . . . . . . . . . . . . .8 - 56
Front Caster (FRU No. 403) . . . . . . . . . . . . . . . . . . . . . . . . . . . . . . . . . . . . .8 - 58
Rear Caster (FRU No. 404) . . . . . . . . . . . . . . . . . . . . . . . . . . . . . . . . . . . . .8 - 59
Bumper Set (FRU No. 405) . . . . . . . . . . . . . . . . . . . . . . . . . . . . . . . . . . . . .8 - 60
Air Filter Set (FRU No. 406) . . . . . . . . . . . . . . . . . . . . . . . . . . . . . . . . . . . . .8 - 61
PCB Boards . . . . . . . . . . . . . . . . . . . . . . . . . . . . . . . . . . . . . . . . . . . . . . . . . . . . . . .8 - 62
RLY Assy (FRU No. 500) . . . . . . . . . . . . . . . . . . . . . . . . . . . . . . . . . . . . . . .8 - 62
LMT Assy (FRU No. 501) . . . . . . . . . . . . . . . . . . . . . . . . . . . . . . . . . . . . . . .8 - 64
BackPlane (FRU No. 502) . . . . . . . . . . . . . . . . . . . . . . . . . . . . . . . . . . . . . .8 - 66
PCB Boards (FRU No. 503, 505~510) . . . . . . . . . . . . . . . . . . . . . . . . . . . . .8 - 68
DC Fan Assy(FRU No. 504) . . . . . . . . . . . . . . . . . . . . . . . . . . . . . . . . . . . . .8 - 70
PC Block . . . . . . . . . . . . . . . . . . . . . . . . . . . . . . . . . . . . . . . . . . . . . . . . . . . . . . . . .8 - 71
BEP (Back End Processor) ASSY(FRU No. 600) . . . . . . . . . . . . . . . . . . . .8 - 71
SMPS Assy, Hard Disk, CD R/W (FRU No. 601, 602, 603) . . . . . . . . . . . . .8 - 72
Power Block . . . . . . . . . . . . . . . . . . . . . . . . . . . . . . . . . . . . . . . . . . . . . . . . . . . . . . .8 - 73
AC Power Assy (FRU No. 700) . . . . . . . . . . . . . . . . . . . . . . . . . . . . . . . . . .8 - 73
LV Unit (FRU No. 701) . . . . . . . . . . . . . . . . . . . . . . . . . . . . . . . . . . . . . . . . .8 - 75
JPC Assy (FRU No. 702) . . . . . . . . . . . . . . . . . . . . . . . . . . . . . . . . . . . . . . .8 - 77
Transformer (FRU No. 703) . . . . . . . . . . . . . . . . . . . . . . . . . . . . . . . . . . . . .8 - 79
AC Power Box (FRU No. 704) . . . . . . . . . . . . . . . . . . . . . . . . . . . . . . . . . . .8 - 81
Fuse Set (FRU No. 705) . . . . . . . . . . . . . . . . . . . . . . . . . . . . . . . . . . . . . . .8 - 83
Page 10
-
GE MEDICAL SYSTEMS
DIRECTION 2395907, REVISION 2
LOGIQ™ 5 EXPERT BASIC SERVICE MANUAL
Manpower . . . . . . . . . . . . . . . . . . . . . . . . . . . . . . . . . . . . . . . . . . . . . . . . . .
Tools . . . . . . . . . . . . . . . . . . . . . . . . . . . . . . . . . . . . . . . . . . . . . . . . . . . . . .
Preparations . . . . . . . . . . . . . . . . . . . . . . . . . . . . . . . . . . . . . . . . . . . . . . . .
Base Load Software Load Procedure . . . . . . . . . . . . . . . . . . . . . . . . . . . . .
Optional Manual Configurations . . . . . . . . . . . . . . . . . . . . . . . . . . . . . . . . .
Loading Applications Software . . . . . . . . . . . . . . . . . . . . . . . . . . . . . . . . . .
Final System Setup . . . . . . . . . . . . . . . . . . . . . . . . . . . . . . . . . . . . . . . . . . .
Manpower . . . . . . . . . . . . . . . . . . . . . . . . . . . . . . . . . . . . . . . . . . . . . . . . . .
Tools . . . . . . . . . . . . . . . . . . . . . . . . . . . . . . . . . . . . . . . . . . . . . . . . . . . . . .
Preparations . . . . . . . . . . . . . . . . . . . . . . . . . . . . . . . . . . . . . . . . . . . . . . . .
Image Management Guide . . . . . . . . . . . . . . . . . . . . . . . . . . . . . . . . . . . . .
Loading Applications Software . . . . . . . . . . . . . . . . . . . . . . . . . . . . . . . . . .
System Setup . . . . . . . . . . . . . . . . . . . . . . . . . . . . . . . . . . . . . . . . . . . . . . .
Installation an Optional USB Line Printer . . . . . . . . . . . . . . . . . . . . . . . . . .
8 - 84
8 - 84
8 - 84
8 - 84
8 - 87
8 - 92
8 - 93
8 - 99
8 - 99
8 - 99
8 - 99
8 - 105
8 - 108
8 - 109
CHAPTER 9
Renewal Parts
Overview. . . . . . . . . . . . . . . . . . . . . . . . . . . . . . . . . . . . . . . . . . . . . . . . . . . . . . . . . 9 - 1
Purpose of Chapter 9 . . . . . . . . . . . . . . . . . . . . . . . . . . . . . . . . . . . . . . . . . 9 - 1
List of Abbreviations . . . . . . . . . . . . . . . . . . . . . . . . . . . . . . . . . . . . . . . . . . . . . . . . 9 - 1
Renewal Parts Lists . . . . . . . . . . . . . . . . . . . . . . . . . . . . . . . . . . . . . . . . . . . . . . . . 9 - 2
Equipment Models Covered in this Chapter . . . . . . . . . . . . . . . . . . . . . . . . 9 - 2
CHAPTER 10
Periodic Maintenance
Overview. . . . . . . . . . . . . . . . . . . . . . . . . . . . . . . . . . . . . . . . . . . . . . . . . . . . . . . . . 10 - 1
Purpose of Chapter 10 . . . . . . . . . . . . . . . . . . . . . . . . . . . . . . . . . . . . . . . . 10 - 1
Why do Periodic Maintenance . . . . . . . . . . . . . . . . . . . . . . . . . . . . . . . . . . . . . . . . 10 - 2
Keeping Records . . . . . . . . . . . . . . . . . . . . . . . . . . . . . . . . . . . . . . . . . . . . 10 - 2
Quality Assurance . . . . . . . . . . . . . . . . . . . . . . . . . . . . . . . . . . . . . . . . . . . . 10 - 2
Periodic Maintenance Schedule . . . . . . . . . . . . . . . . . . . . . . . . . . . . . . . . . . . . . . . 10 - 2
How often should PMs be performed? . . . . . . . . . . . . . . . . . . . . . . . . . . . . 10 - 2
Special Tools, Supplies and Equipment . . . . . . . . . . . . . . . . . . . . . . . . . . . 10 - 4
-
Page 11
GE MEDICAL SYSTEMS
DIRECTION 2395907, REVISION 2
LOGIQ™ 5 EXPERT BASIC SERVICE MANUAL
Preliminary Checks . . . . . . . . . . . . . . . . . . . . . . . . . . . . . . . . . . . . . . . . . . .10 - 5
Input Power . . . . . . . . . . . . . . . . . . . . . . . . . . . . . . . . . . . . . . . . . . . . . . . . .10 - 7
Cleaning . . . . . . . . . . . . . . . . . . . . . . . . . . . . . . . . . . . . . . . . . . . . . . . . . . . .10 - 7
Physical Inspection . . . . . . . . . . . . . . . . . . . . . . . . . . . . . . . . . . . . . . . . . . .10 - 8
Probe Maintenance . . . . . . . . . . . . . . . . . . . . . . . . . . . . . . . . . . . . . . . . . . .10 - 9
Using a Phantom . . . . . . . . . . . . . . . . . . . . . . . . . . . . . . . . . . . . . . . . . . . . . . . . . . .10 - 10
Electrical Safety Tests . . . . . . . . . . . . . . . . . . . . . . . . . . . . . . . . . . . . . . . . . . . . . . .10 - 10
Safety Test Overview . . . . . . . . . . . . . . . . . . . . . . . . . . . . . . . . . . . . . . . . . .10 - 10
Grounding Continuity . . . . . . . . . . . . . . . . . . . . . . . . . . . . . . . . . . . . . . . . .10 - 12
Isolated Patient Lead (Source) Leakage–Lead to Ground . . . . . . . . . . . . . .10 - 16
Isolated Patient Lead (Source) Leakage–Lead to Lead . . . . . . . . . . . . . . . .10 - 17
Isolated Patient Lead (Sink) Leakage-Isolation Test . . . . . . . . . . . . . . . . . .10 - 18
Page 12
-
GE MEDICAL SYSTEMS
DIRECTION 2395907, REVISION 2
LOGIQ™ 5 EXPERT BASIC SERVICE MANUAL
Chapter 1
Introduction
Section 1-1
Overview
1-1-1
Purpose of Chapter 1
This chapter describes important issues related to safely servicing the LOGIQ™ 5 scanner. The service
provider must read and understand all the information presented in this manual before installing or
servicing a unit.
Table 1-1
Contents in Chapter 1
Section
1-1-2
Description
Page Number
1-1
Overview
1-1
1-2
Important Conventions
1-3
1-3
Safety Considerations
1-7
1-4
EMC, EMI, and ESD
1-12
1-5
Customer Assistance
1-14
Purpose of Service Manual
This Service Manual provides installation and service information for the LOGIQ™ 5 Ultrasound
Scanning System and contains the following chapters:
1.) Chapter 1 - Introduction: Contains a content summary and warnings.
2.) Chapter 2 - Pre-Installation: Contains pre-installation requirements for the LOGIQ™ 5.
3.) Chapter 3 - Installation: Contains installation procedures.
4.) Chapter 4 - Functional Checks: Contains functional checks that are recommended as part of the
installation, or as required during servicing and periodic maintenance.
5.) Chapter 5 - Components and Functions (Theory): Contains block diagrams and functional
explanations of the electronics.
6.) Chapter 6 - Service Adjustments: Contains instructions on how to make available adjustments to
the LOGIQ™ 5.
7.) Chapter 7 - Diagnostics/Troubleshooting: Provides procedures for running diagnostic or related
routines for the LOGIQ™ 5.
8.) Chapter 8 - Replacement Procedures: Provides disassembly procedures and reassembly
procedures for all changeable Field Replaceable Units (FRU).
9.) Chapter 9 - Renewal Parts: Contains a complete list of field replaceable parts for the LOGIQ™ 5.
10.)Chapter 10 - Periodic Maintenance: Provides periodic maintenance procedures for the LOGIQ™
5.
Chapter 1 Introduction
1-1
GE MEDICAL SYSTEMS
DIRECTION 2395907, REVISION 2
1-1-3
1-1-4
Typical Users of the Basic Service Manual
•
Service Personnel (installation, maintenance, etc.).
•
Hospital’s Service Personnel
•
Contractors (Some parts of Chapter 2 - Pre-Installation)
LOGIQ™ 5 Models Covered by this Manual
Table 1-2
1-1-5
LOGIQ™ 5 EXPERT BASIC SERVICE MANUAL
LOGIQ™ 5 Model Designations
Part Number
Description
2332322
LOGIQ™ 5 Console for Japan
2353367
LOGIQ™ 5 Console for USA 1
2355478
LOGIQ™ 5 Console for Europe
2328016
LOGIQ™ 5 Console for Korea
2353367
LOGIQ™ 5 Console for USA 2
2394622
LOGIQ™ 5 Console for South America 1
2394621
LOGIQ™ 5 Console for South America 2
2394620
LOGIQ™ 5 Console for South America 3
Purpose of Operator Manual(s)
The Operator Manual(s) should be fully read and understood before operating the LOGIQ™ 5 and also
kept near the unit for quick reference.
1-2
Section 1-1 - Overview
GE MEDICAL SYSTEMS
DIRECTION 2395907, REVISION 2
LOGIQ™ 5 EXPERT BASIC SERVICE MANUAL
Section 1-2
Important Conventions
1-2-1
Conventions Used in Book
Icons
Pictures, or icons, are used wherever they reinforce the printed message. The icons, labels and
conventions used on the product and in the service information are described in this chapter.
Safety Precaution Messages
Various levels of safety precaution messages may be found on the equipment and in the service
information. The different levels of concern are identified by a flag word that precedes the precautionary
message. Known or potential hazards are labeled in one of following ways:
DANGER
DANGER IS USED TO INDICATE THE PRESENCE OF A HAZARD THAT WILL
CAUSE SEVERE PERSONAL INJURY OR DEATH IF THE INSTRUCTIONS ARE
IGNORED.
WARNING
WARNING IS USED TO INDICATE THE PRESENCE OF A HAZARD THAT CAN CAUSE
SEVERE PERSONAL INJURY AND PROPERTY DAMAGE IF INSTRUCTIONS ARE
IGNORED.
CAUTION Caution is used to indicate the presence of a hazard that will or can cause minor personal injury
and property damage if instructions are ignored.
NOTICE Equipment Damage Possible
Notice is used when a hazard is present that can cause property damage but has absolutely no
personal injury risk.
Example: Disk drive will crash.
NOTE:
Notes provide important information about an item or a procedure.
Information contained in a NOTE can often save you time or effort.
Chapter 1 Introduction
1-3
GE MEDICAL SYSTEMS
DIRECTION 2395907, REVISION 2
1-2-2
LOGIQ™ 5 EXPERT BASIC SERVICE MANUAL
Standard Hazard Icons
Important information will always be preceded by the exclamation point contained
within a triangle, as seen throughout this chapter. In addition to text, several
different graphical icons (symbols) may be used to make you aware of specific types
of hazards that could cause harm.
Table 1-3
Standard Hazard Icons
ELECTRICAL
MECHANICAL
RADIATION
LASER
HEAT
PINCH
LASER
LIGHT
Other hazard icons make you aware of specific procedures that should be followed.
Table 1-4
Standard Icons Indicating a Special Procedure Be Used
AVOID STATIC ELECTRICITY
TAG AND LOCK OUT
WEAR EYE PROTECTION
TAG
&
LOCKOUT
Signed
1-4
Date
Section 1-2 - Important Conventions
EYE
PROTECTION
GE MEDICAL SYSTEMS
DIRECTION 2395907, REVISION 2
1-2-3
LOGIQ™ 5 EXPERT BASIC SERVICE MANUAL
Product Icons
The following table describes the purpose and location of safety labels and other important information
provided on the equipment.
Table 1-5
LABEL/SYMBOL
Product Icons
PURPOSE/MEANING
Manufacturer's name and address
Identification and Rating Plate
Date of manufacture
Model and serial numbers
Electrical ratings
Device Listing/Certification Labels
Type/Class Label
IP Code (IPX8)
Laboratory logo or labels denoting
conformance with industry safety standards
such as UL or IEC.
LOCATION
Rear of console near power inlet
Under monitor
On each probe
Rear of console
Under front of monitor
Used to indicate the degree of safety or protection.
Indicates the degree of protection provided by
the enclosure per IEC 529. IPX8 indicates drip
proof.
Equipment Type BF (man in the box symbol)
IEC 878-02-03 indicates B Type equipment
having even more electrical isolation than
standard Type B equipment because it is
intended for intimate patient contact.
Equipment Type CF (heart in the box symbol)
IEC 878-02-05 indicates equipment having a
high degree of protection suitable for direct
cardiac contact.
Footswitch
Probe connectors
PCG connector
or Rear of Console
ECG connector
Surgical probes
"CAUTION" The equilateral triangle is usually
used in combination with other symbols to
advise or warn the user.
Various
ATTENTION - Consult accompanying
documents " is intended to alert the user to
refer to the operator manual or other
instructions when complete information cannot
be provided on the label.
Various
Chapter 1 Introduction
1-5
GE MEDICAL SYSTEMS
DIRECTION 2395907, REVISION 2
Table 1-5
LOGIQ™ 5 EXPERT BASIC SERVICE MANUAL
Product Icons (Continued)
LABEL/SYMBOL
PURPOSE/MEANING
LOCATION
"CAUTION - Dangerous voltage" (the lightning
flash with arrowhead in equilateral triangle) is
used to indicate electric shock hazards.
Various
"Mains OFF" Indicates the power off position of
the mains power switch.
Rear of system adjacent to mains switch
"OFF/Standby" Indicates the power off/
standby position of the power switch.
CAUTION
This Power Switch DOES NOT ISOLATE
Mains Supply
Adjacent to On-Off/Standby Switch
"Mains ON" Indicates the power on position of
the mains power switch.
"ON" Indicates the power on position of the
power switch.
Front Panel Switch
CAUTION
This Power Switch DOES NOT ISOLATE
Mains Supply
1-6
"Protective Earth" Indicates the protective
earth (grounding) terminal.
Internal
"Equipotentiality" Indicates the terminal to be
used for connecting equipotential conductors
when interconnecting (grounding) with other
equipment.
Rear of console
Section 1-2 - Important Conventions
GE MEDICAL SYSTEMS
DIRECTION 2395907, REVISION 2
LOGIQ™ 5 EXPERT BASIC SERVICE MANUAL
Section 1-3
Safety Considerations
1-3-1
Introduction
The following safety precautions must be observed during all phases of operation, service and repair of
this equipment. Failure to comply with these precautions or with specific warnings elsewhere in this
manual, violates safety standards of design, manufacture and intended use of the equipment.
1-3-2
Human Safety
Operating personnel must not remove the system covers.
Servicing should be performed by authorized personnel only.
Only personnel who have participated in a LOGIQ™ 5 Training are authorized to service the equipment.
1-3-3
Mechanical Safety
WARNING
WHEN THE UNIT IS RAISED FOR A REPAIR OR MOVED ALONG ANY INCLINE, USE
EXTREME CAUTION SINCE IT MAY BECOME UNSTABLE AND TIP OVER.
WARNING
ULTRASOUND PROBES ARE HIGHLY SENSITIVE MEDICAL INSTRUMENTS THAT
CAN EASILY BE DAMAGED BY IMPROPER HANDLING. USE CARE WHEN
HANDLING AND PROTECT FROM DAMAGE WHEN NOT IN USE. DO NOT USE A
DAMAGED OR DEFECTIVE PROBE. FAILURE TO FOLLOW THESE PRECAUTIONS
CAN RESULT IN SERIOUS INJURY AND EQUIPMENT DAMAGE.
WARNING
NEVER USE A PROBE THAT HAS FALLEN TO THE FLOOR. EVEN IF IT LOOKS OK,
IT MAY BE DAMAGED.
CAUTION
Always lower and center the Opertaor I/O Panel before moving the scanner.
CAUTION
The LOGIQ™ 5 weighs 180 kg or more, depending on installed peripherals, (500 lbs., or more)
when ready for use. Care must be used when moving it or replacing its parts. Failure to follow
the precautions listed could result in injury, uncontrolled motion and costly damage.
ALWAYS:
Be sure the pathway is clear.
Use slow, careful motions.
Use two people when moving on inclines or lifting more than 16 kg (35 lbs).
Chapter 1 Introduction
1-7
GE MEDICAL SYSTEMS
DIRECTION 2395907, REVISION 2
1-3-3
NOTE:
CAUTION
1-3-4
LOGIQ™ 5 EXPERT BASIC SERVICE MANUAL
Mechanical Safety (cont’d)
Special care should be taken when transporting the unit in a vehicle:
•
Secure the unit in an upright position.
•
Lock the wheels (brake)
•
DO NOT use the Control Panel as an anchor point.
•
Place the probes in their carrying case.
•
Eject any Magneto Optical disk or CD from their drive.
Keep the heat venting holes on the monitor unobstructed to avoid overheating of the
monitor.
Electrical Safety
To minimize shock hazard, the equipment chassis must be connected to an electrical ground. The
system is equipped with a three-conductor AC power cable. This must be plugged into an approved
electrical outlet with safety ground. If an extension cord is used with the system, make sure that the total
current rating of the system does not exceed the extension cord rating.
The power outlet used for this equipment should not be shared with other types of equipment.
Both the system power cable and the power connector meet international electrical standards.
WARNING
1-8
DO NOT SERVICE OR DISASSEMBLE PARTS UNDER FRU UNIT LEVEL AT ANY
CIRCUMSTANCES.
Section 1-3 - Safety Considerations
GE MEDICAL SYSTEMS
DIRECTION 2395907, REVISION 2
1-3-5
NOTE:
LOGIQ™ 5 EXPERT BASIC SERVICE MANUAL
Label Locations
For the symbols shown in the illustration below, refer to previous pages in this chapter.
(1)
(2)
(3)
Figure 1-1 OUTSIDE MARKINGS OF LOGIQ™ 5 (Monitor)
1.) Caution for Possible injury : “Never put any device onto the Monitor”
2.) Caution for Hazardous movement : (Inside of the OP rear Cover)
3.) Defibrillator Label ““Do not use with Defibrillator”(On optional ECG Module)
Chapter 1 Introduction
1-9
GE MEDICAL SYSTEMS
DIRECTION 2395907, REVISION 2
LOGIQ™ 5 EXPERT BASIC SERVICE MANUAL
1-3-5Label Locations (cont’d).
(1)
(2)
(3)
(4)
(5)
(6)
(7)
220-240V 500VA Max
Including front printer panel
Europe/USA Console (220V)
100~120V 500VA Max
Including front printer panel
Japan/USA/Asia Console (100~120V)
(9)
(8)
Circuit Breaker
I
On
AC Line Input
Circuit Breaker
or
I
On
AC Line Input
100-120V~ 50/60Hz
1250VA Max
220-240V~ 50/60Hz
1250VA Max
Off
Off
Figure 1-2 OUTSIDE MARKINGS OF LOGIQ™ 5 (Rear)
1.) Possible Shock Hazard
2.) Label -”Do not use the following devices near this equipment.”
3.) Label - “The equipment weighs approximately 180kg.
4.) Prescription Devices
5.) CE Mark Label
6.) CISPR Label
7.) Voltage Range Indication Label
8.) Power Indication Label
9.) Grounding reliability Label.
1-10
Section 1-3 - Safety Considerations
GE MEDICAL SYSTEMS
DIRECTION 2395907, REVISION 2
LOGIQ™ 5 EXPERT BASIC SERVICE MANUAL
1-3-5Label Locations (cont’d)
GE ULTRASOUND KOREA LTD.
LOGIQ 5
1250VA
(2)
LOGIQ 5
GE ULTRASOUND KOREA
(1)
1250VA
(3)
5
1250VA
120V
GE ULTRASOUND Korea
(6)
(4)
(5)
(7)
China 220V Console
Korea 220V Console
Figure 1-3 OUTSIDE MARKINGS OF LOGIQ™ 5
1.) UL Label
2.) Identification and Rating Plate - USA/Asia 120V Console
3.) Identification and Rating Plate - Europe/Asia/Latin America 220V Console
4.) Identification and Rating Plate - Japan 100V Console
5.) Identification and Rating Plate - Korea 220V Console
6.) Caution EIAJ Label
Chapter 1 Introduction
1-11
GE MEDICAL SYSTEMS
DIRECTION 2395907, REVISION 2
1-3-6
LOGIQ™ 5 EXPERT BASIC SERVICE MANUAL
Dangerous Procedure Warnings
Warnings, such as the examples below, precede potentially dangerous procedures throughout this
manual. Instructions contained in the warnings must be followed.
DANGER
DANGEROUS VOLTAGES, CAPABLE OF CAUSING DEATH, ARE PRESENT
IN THIS EQUIPMENT. USE EXTREME CAUTION WHEN HANDLING, TESTING
AND ADJUSTING.
WARNING
EXPLOSION WARNING
DO NOT OPERATE THE EQUIPMENT IN AN EXPLOSIVE ATMOSPHERE.
OPERATION OF ANY ELECTRICAL EQUIPMENT IN SUCH AN ENVIRONMENT
CONSTITUTES A DEFINITE SAFETY HAZARD.
WARNING
DO NOT SUBSTITUTE PARTS OR MODIFY EQUIPMENT
BECAUSE OF THE DANGER OF INTRODUCING ADDITIONAL HAZARDS, DO NOT
INSTALL SUBSTITUTE PARTS OR PERFORM ANY UNAUTHORIZED MODIFICATION
OF THE EQUIPMENT.
1-3-7
Lockout/Tagout Requirements (For USA Only)
Follow OSHA Lockout/Tagout requirements by ensuring you are in total control of the electrical Mains
plug.
Section 1-4
EMC, EMI, and ESD
1-4-1
Electromagnetic Compatibility (EMC)
Electromagnetic compatibility describes a level of performance of a device within its electromagnetic
environment. This environment consists of the device itself and its surroundings including other
equipment, power sources and persons with which the device must interface. Inadequate compatibility
results when a susceptible device fails to perform as intended due interference from its environment or
when the device produces unacceptable levels of emission to its environment. This interference is often
referred to as radio–frequency or electromagnetic interference (RFI/EMI) and can be radiated through
space or conducted over interconnecting power of signal cables. In addition to electromagnetic energy,
EMC also includes possible effects from electrical fields, magnetic fields, electrostatic discharge and
disturbances in the electrical power supply.
1-4-2
CE Compliance
The LOGIQ™ 5 unit conforms to all applicable conducted and radiated emission limits and to immunity
from electrostatic discharge, radiated and conducted RF fields, magnetic fields and power line transient
requirements.
For applicable standards refer to the Safety Chapter in the Basic User Manual.
NOTE:
1-12
For CE Compliance, it is critical that all covers, screws, shielding, gaskets, mesh, clamps, are in
good condition, installed tightly without skew or stress. Proper installation following all
comments noted in this service manual is required in order to achieve full EMC performance.
Section 1-4 - EMC, EMI, and ESD
GE MEDICAL SYSTEMS
DIRECTION 2395907, REVISION 2
1-4-3
WARNING
LOGIQ™ 5 EXPERT BASIC SERVICE MANUAL
Electrostatic Discharge (ESD) Prevention
DO NOT TOUCH ANY BOARDS WITH INTEGRATED CIRCUITS PRIOR TO TAKING
THE NECESSARY ESD PRECAUTIONS:
1.ALWAYS CONNECT YOURSELF, VIA AN ARM-WRIST STRAP, TO THE ADVISED
ESD CONNECTION POINT LOCATED ON THE REAR OF THE SCANNER (TO THE
RIGHT OF THE POWER CONNECTOR).
2.FOLLOW GENERAL GUIDELINES FOR HANDLING OF ELECTROSTATIC
SENSITIVE EQUIPMENT.
Chapter 1 Introduction
1-13
GE MEDICAL SYSTEMS
DIRECTION 2395907, REVISION 2
LOGIQ™ 5 EXPERT BASIC SERVICE MANUAL
Section 1-5
Customer Assistance
1-5-1
Contact Information
If this equipment does not work as indicated in this service manual or in the User Manual, or if you
require additional assistance, please contact the local distributor or appropriate support resource, as
listed below.
Prepare the following information before you call:
-
System ID serial number.
-
Software version.
Table 1-6
Phone Numbers for Customer Assistance
Location
Phone Number
1-800–437–1171
USA/ Canada
GE Medical Systems
Ultrasound Service Engineering
4855 W. Electric Avenue
Milwaukee, WI 53219
1-800-682-5327
Customer Answer Center
1-262-524-5698
Fax: +1-414-647-4125
1-262-524-5300
Latin America
GE Medical Systems
Ultrasound Service Engineering
4855 W. Electric Avenue
Milwaukee, WI 53219
1-262-524-5698
Customer Answer Center
Fax: +1-414-647-4125
Europe
Tel: +49 212 2802 208
GE Ultraschall Deutschland GmbH& Co. KG
+49 212 2802 207
BeethovenstraBe 239
Postfach 11 05 60, D-42665 Solingen
Germany
Fax: +49 212 2802 431
Tel: +65 291-8528
Asia (Singapore/ Japan)
+81 426-482950
GE Ultrasound Asia
Service Department - Ultrasound
298 Tiong Bahru Road #15-01/06
Central Plaza
Singapore 169730
1-14
Fax: +65 272-3997
+81 426-482902
Section 1-5 - Customer Assistance
GE MEDICAL SYSTEMS
DIRECTION 2395907, REVISION 2
1-5-2
LOGIQ™ 5 EXPERT BASIC SERVICE MANUAL
System Manufacturer
Table 1-7
System Manufacturer
Manufacturer
GE Ultrasound Korea
462-120 65-1, Sangdaewon-dong, Joong-won-Gu,
Seongnam-Si, Gyeonggi-do,
Korea
Chapter 1 Introduction
FAX Number
82-31-740-6436
1-15
GE MEDICAL SYSTEMS
DIRECTION 2395907, REVISION 2
LOGIQ™ 5 EXPERT BASIC SERVICE MANUAL
This page was intentionally left blank.
1-16
Section 1-5 - Customer Assistance
GE MEDICAL SYSTEMS
DIRECTION 2395907, REVISION 2
LOGIQ™ 5 EXPERT BASIC SERVICE MANUAL
Chapter 2
Pre-Installation
Section 2-1
Overview
2-1-1
Purpose of chapter 2
This chapter provides the information required to plan and prepare for the installation of a LOGIQ™ 5.
Included are descriptions of the facility and electrical needs to be met by the purchaser of the unit. A
checklist is also provided at the end of this section to help determine whether the proper planning and
preparation is accomplished before the actual equipment installation is scheduled.
Table 2-8
Contents in Chapter 2
Section
Description
Page Number
2-1
Overview
2-1
2-2
General Console Requirements
2-2
2-3
Facility Needs
2-5
Chapter 2 Pre-Installation
2-1
GE MEDICAL SYSTEMS
DIRECTION 2395907, REVISION 2
LOGIQ™ 5 EXPERT BASIC SERVICE MANUAL
Section 2-2
General Console Requirements
2-2-1
Console Environmental Requirements
Table 2-9
Environmental Requirements for LOGIQ™ 5 Scanners
Operational
10 - 30 oC
Temperature
50 - 104
Storage
-10 - 60 oC
oF
14 - 140
-40 - 60 oC
oF
-40 - 140 oF
Humidity
30 - 85%
non-condensing
30 - 90%
non-condensing
30 - 90%
non-condensing
Pressure
700 - 1060hPa
700 - 1060hPa
700 - 1060hPa
Table 2-10
Environmental Requirements for an Ultrasound Room
Item
Values
Power Source
Refer to Table 2-11 on page 2-3.
Current Rating
15A (120V-100V); 8A (220-240V) CIRCUIT BREAKER
Radiation Shielding
Temperature
Humidity
Floor Landing
Floor Condition
Weight
NONE REQUIRED for ULTRASOUND ENERGY
20-26 DEG. C (68-79 DEG F) for PATIENT COMFORT
50% to 70% for PATIENT COMFORT
Heat Dissipation
2-2-1-1
Transport
2000 BTU/Hr.
Approximately 680 - 800 kg/m2 without Accessories
Gradient: WITHIN 5 degrees
180 kg (397lbs) without Accessories
Cooling
The cooling requirement for the LOGIQ™ 5 is 3500 BTU/hr. This figure does not include cooling needed
for lights, people, or other equipment in the room. Each person in the room places an additional 300
BTU/hr. demand on the cooling system.
2-2-1-2
Lighting
Bright light is needed for system installation, updates and repairs. However, operator and patient
comfort may be optimized if the room light is subdued and indirect. Therefore a combination lighting
system (dim/bright) is recommended. Keep in mind that lighting controls and diameters can be a source
of EMI which could degrade image quality. These controls should be selected to minimize possible
interface.
2-2-2
NOTE:
Electrical Requirements
GE Medical Systems requires a dedicated power and ground for the proper operation of its
Ultrasound equipment. This dedicated power shall originate at the last distribution panel before
the system.
Sites with a mains power system with defined Neutral and Live:
2-2
Section 2-2 - General Console Requirements
GE MEDICAL SYSTEMS
DIRECTION 2395907, REVISION 2
LOGIQ™ 5 EXPERT BASIC SERVICE MANUAL
The dedicated line shall consist of one phase, a neutral (not shared with any other circuit), and a full
size ground wire from the distribution panel to the Ultrasound outlet.
Sites with a mains power system without a defined Neutral:
The dedicated line shall consist of one phase (two lines), not shared with any other circuit, and a full
size ground wire from the distribution panel to the Ultrasound outlet.
NOTE:
2-2-2-1
Please note that image artifacts can occur, if at any time within the facility, the ground from the
main facility's incoming power source to the Ultrasound unit is only a conduit.
LOGIQ™ 5 Power Requirements
The following power line parameters should be monitored for one week before installation. We
recommend that you use an analyzer Dranetz Model 606-3 or Dranetz Model 626:
Table 2-11
Electrical Specifications for LOGIQ™ 5
PARAMETER
LIMITS
100V
100 VAC ±10% (90-110 VAC)
220V
220-240 VAC ±10% (198-264 VAC)
115V
115 VAC ±10% (103-127 VAC)
Power
All applications
MAX. 1250 VA
Line Frequency
All applications
50/60Hz (±2Hz)
Power Transients
All applications
Less than 25% of nominal peak voltage
for less than 1 millisecond for any type of
transient, including line frequency,
synchronous, asynchronous, or
aperiodic transients.
Decaying Oscillation
All applications
Less than 15% of peak voltage for less
than 1 millisecond.
Voltage Range
2-2-2-2
AREA
Inrush Current
Inrush Current is not a factor to consider due to the inrush current limiting properties of the power
supplies.
2-2-2-3
Site Circuit Breaker
It is recommended that the branch circuit breaker for the machine be ready accessible.
CAUTION POWER OUTAGE MAY OCCURE.
The LOGIQ™ 5 requires a dedicated single branch circuit. To avoid circuit overload and possible
loss of critical care equipment, make sure you DO NOT have any other equipment operating on
the same circuit.
2-2-2-4
Site Power Outlets
A desiccated AC power outlet must be within reach of the unit without extension cords. Other outlets
adequate for the external peripherals, medical and test equipment needed to support this unit must also
be present within 1 m (3.2 ft.) of the unit. Electrical installation must meet all current local, state, and
national electrical codes.
2-2-2-5
Unit Power Plug
If the unit arrives without the power plug, or with the wrong plug, you must contact your GE dealer or
the installation engineer must supply what is locally required.
Chapter 2 Pre-Installation
2-3
GE MEDICAL SYSTEMS
DIRECTION 2395907, REVISION 2
2-2-2-6
LOGIQ™ 5 EXPERT BASIC SERVICE MANUAL
Power Stability Requirements
Voltage drop-out
Max 10 ms.
Power Transients
(All applications)
Less than 25% of nominal peak voltage for less than 1 millisecond for any type of transient, including
line frequency, synchronous, asynchronous, or aperiodic transients.
2-2-3
EMI Limitations
Ultrasound machines are susceptible to Electromagnetic Interference (EMI) from radio frequencies,
magnetic fields, and transient in the air wiring. They also generate EMI. The LOGIQ™ 5 complies with
limits as stated on the EMC label. However there is no guarantee that interface will not occur in a
particular installation.
Possible EMI sources should be identified before the unit is installed.
Electrical and electronic equipment may produce EMI unintentionally as the result of defect.
These sources include:
•
medical lasers,
•
scanners,
•
cauterizing guns,
•
computers,
•
monitors,
•
fans,
•
gel warmers,
•
microwave ovens,
•
light dimmers,
•
portable phones.
The presence of broadcast station or broadcast van may also cause interference. See for EMI
Prevention tips.
See Table 2-12 for EMI Prevention tips.
Table 2-12
EMI Prevention/abatement
EMI Rule
2-4
Details
Be aware of RF sources
Keep the unit at least 5 meters or 15 feet away from other EMI sources. Special shielding
may be required to eliminate interference problems caused by high frequency, high
powered radio or video broadcast signals.
Ground the unit
Poor grounding is the most likely reason a unit will have noisy images. Check grounding of
the power cord and power outlet.
Replace all screws, RF
gaskets, covers, cores
After you finish repairing or updating the system, replace all covers and tighten all screws.
Any cable with an external connection requires a magnet wrap at each end. Install the
shield over the front of card cage. Loose or missing covers or RF gaskets allow radio
frequencies to interface with the ultrasound signals.
Replace broken RF gaskets
If more than 20% or a pair of fingers on the RF gaskets are broken, replace the gaskets.
Do not turn on the unit until any loose metallic part is removed.
Section 2-2 - General Console Requirements
GE MEDICAL SYSTEMS
DIRECTION 2395907, REVISION 2
Table 2-12
LOGIQ™ 5 EXPERT BASIC SERVICE MANUAL
EMI Prevention/abatement
EMI Rule
Details
Do not place labels where RF Never place a label where RF gaskets meet the unit. Otherwise, the gap created will permit
gaskets touch metal
RF leakage. Or, if a label has been found in such a position, move the label.
Use GE specified harnesses
and peripherals
The interconnect cables are grounded and require ferrite beads and other shielding. Also,
cable length, material, and routing are all important; do not change from what is specified.
Take care with cellular phones Cellular phones may transmit a 5 V/m signal; that could cause image artifacts.
Properly dress peripheral
cables
2-2-4
Do not allow cables to lie across the top of the card cage or hang out of the peripheral bays.
Loop the excess length for peripheral cables inside the peripheral bays. Attach the monitor
cables to the frame.
Scan Probe Environmental Requirements
Operation:10° to 30° C
Storage:--10° to 60° C
NOTE:
Temperature in degrees C. Conversion to Degrees F = (Degrees C * 9/5) + 32).
NOTICE SYSTEMS AND ELECTRONIC PROBES ARE DESIGNED FOR STORAGE TEMPERATURES
OF -20 TO + 50 degrees C. WHEN EXPOSED TO LARGE TEMPERATURE VARIATIONS, THE
PRODUCT SHOULD BE KEPT IN ROOM TEMPERATURE FOR 10 HOURS BEFORE USE.
Section 2-3
Facility Needs
2-3-1
Purchaser Responsibilities
The work and materials needed to prepare the site is the responsibility of the purchaser. Delay,
confusion, and waste of manpower can be avoided by completing pre installation work before delivery.
User the Pre Installation checklist to verify that all needed steps have been taken,
Purchaser reasonability includes:
NOTE:
•
Procuring the materials required.
•
Completing the preparations before delivery of the ultrasound system.
•
Paying the costs for any alternations and modifications not specifically provided in the sales
contract.
All electrical installation that are preliminary to the positioning of the equipment at the site
prepared for the equipment must be performed by licensed electrical contractors. Other
connections between pieces of electrical equipment, products involved (and the accompanying
electrical installations) are highly sophisticated and special engineering competence is
required. All electrical work on these product must comply with the requirements of applicable
electrical codes. The purchaser of GE equipment must only utilize qualified personnel to
perform electrical servicing on the equipment.
The desire to use a non-listed or customer provided product or to place an approved product further
from the system than the interface kit allows presents challenges to the installation team. To avoid
delays during installation, such variances should be made known to the individuals or group performing
the installation at the earliest possible date (preferable prior to purchase).
The ultrasound suite must be clean proof to delivery of the machine. Carpet is not recommended
Chapter 2 Pre-Installation
2-5
GE MEDICAL SYSTEMS
DIRECTION 2395907, REVISION 2
LOGIQ™ 5 EXPERT BASIC SERVICE MANUAL
because it collects dust and creates static. Potential sources of EMI (electromagnetic interference)
should also be investigated before delivery. Dirt, static, and EMI can negatively impact system.
2-3-2
NOTE:
Required Features
GE Medical Systems requires a dedicated power and ground for the proper operation of its
Ultrasound equipment. This dedicated power shall originate at the last distribution panel before
the system.
Sites with a mains power system with defined Neutral and Live:
The dedicated line shall consist of one phase, a neutral (not shared with any other circuit), and a full
size ground wire from the distribution panel to the Ultrasound outlet.
Sites with a mains power system without a defined Neutral:
The dedicated line shall consist of one phase (two lines), not shared with any other circuit, and a full
size ground wire from the distribution panel to the Ultrasound outlet.
Please note that image artifacts can occur, if at any time within the facility, the ground from the main
facility's incoming power source to the Ultrasound unit is only a conduit.
NOTE:
2-3-3
2-6
•
Dedicated single branch power outlet of adequate amperage meeting all local and national codes
which is located less than 2.5 m (8 ft.) from the unit’s proposed location
•
Door opening is at least 76 cm (30 in) wide
•
Proposed location for unit is at least 0.3 m (1 ft.) from the wall for cooling
•
Power outlet and place for any external peripheral are within 2 m (6.5 ft.) of each other with
peripheral within 1 m of the unit to connect cables.
The LOGIQ™ 5 has four outlets inside the unit. One is for the monitor and three for on board peripherals.
•
Power outlets for other medical equipment and gel warmer
•
Power outlets for test equipment and modem within 1 m (3.2 ft.) of unit
•
Clean and protected space to store transducers (in their cases or on a rack)
•
Material to safely clean probes (done with a plastic container, never metal)
Desirable Features
•
Door is at least 92 cm (3 ft.) wide
•
Circuit breaker for dedicated power outlet is easily accessible
•
Sink with hot and cold water
•
Receptacle for bio–hazardous waste, like used probe sheaths
•
Emergency oxygen supply
•
Storage for linens and equipment
•
Nearby waiting room, lavatory, and dressing room
•
Dual level lighting (bright and dim)
•
Lockable cabinet ordered by GE for its software and proprietary manuals.
Section 2-3 - Facility Needs
GE MEDICAL SYSTEMS
DIRECTION 2395907, REVISION 2
Recommended and Alternate Ultrasound Room Layout
Recommended standard floor plan and a minimal floor plan for ultrasound equipment:
DEDICATED ALALOG TELEPHONE
LINE FOR CONNECTION TO INSITE
18 IN.
(46 CM)
FOOT
SW
STOOL
SINK
EXAMINATION
TABLE
COUNTER TOP
LINEN SUPPLY
CONSOLE
COUNTER
TOP
FILM
PROCESSING
ROOM,
DEDICATED
POWER
RECEPTACLE
FILM VIEWER
FILE
CABINET
2-3-4
LOGIQ™ 5 EXPERT BASIC SERVICE MANUAL
76 IN.
(193 CM)
SUCTION LINE
EMERGECY
OXYGEN
SECRETARYS OR
DOCTOR'S DESK
24 IN.
(61 CM)
OVERHEAD
LIGHTS DIMMER
PATIENT
TOILET
FACILITY
DOOR
42 IN.
(107 CM)
A 14 by 17 foot Recommended Floor Plan
Scale : Each square equals one square foot
FILM VIEWER
LINEN SUPPLY
SINK
PROBES/SUPPLIES
FILM SUPPLIES
EXTERNAL
PERIPHERALS
FOOT
SW
STOOL
24 IN.
(61 CM)
DOOR
30 IN.
(76 CM)
DEDICATED POWER
OUTLETS
LOGIQ 5
CONSOLE
EXAMINARION
TABLE
76 IN.
(193 CM)
DEDICATED ANALOG TELEPHONE
LINE FOR CONNECTION TO INSITE
GE CABINET
FOT SOFTWARE
AND MANUALS
An 8 by 10 foot Minimal Floor Plan
Figure 2-4 RECOMMENDED ULTRASOUND ROOM LAYOUT
Chapter 2 Pre-Installation
2-7
GE MEDICAL SYSTEMS
DIRECTION 2395907, REVISION 2
2-3-5
2-3-5-1
LOGIQ™ 5 EXPERT BASIC SERVICE MANUAL
Networking Pre-installation Requirements
Purpose of DICOM Network Function
DICOM services provide the operator with clinically useful features for moving images and patient
information over a hospital network. Examples of DICOM services include the transfer of images to
workstations for viewing or transferring images to remote printers. As an added benefit, transferring
images in this manner frees up the on-board monitor and peripherals, enabling viewing to be done while
scanning continues. With DICOM, images can be archived, stored, and retrieved faster, easier, and at
a lower cost.
2-3-5-2
DICOM Option Pre-installation Requirements
To configure the LOGIQ™ 5 to work with other network connections, the site’s network administrator
must provide some necessary information.
Information must include:
2-8
•
A host name, local port number, AE Title, IP address and Net Mask for the LOGIQ™ 5.
•
The IP addresses for the default gateway and other routers at the site for ROUTING
INFORMATION.
•
The host name, IP address, port and AE Title for each device the site wants connected to the
LOGIQ™ 5 for DICOM APPLICATION INFORMATION. A field for the make (manufacturer) and
the revision of the device, is also included. This information may be useful for solving errors.
Section 2-3 - Facility Needs
GE MEDICAL SYSTEMS
DIRECTION 2395907, REVISION 2
2-3-5-2
LOGIQ™ 5 EXPERT BASIC SERVICE MANUAL
DICOM Option Pre-installation Requirements (cont’d)
.
.
LOGIQ™ 5
Host Name
Local Port
AE Title
ROUTING INFORMATION
IP Address
.
.
.
Net Mask
.
.
.
GATEWAY IP Addresses
Destination
IP Addresses
Default
.
.
.
ROUTER1
.
.
.
.
.
.
ROUTER2
.
.
.
.
.
.
ROUTER3
.
.
.
.
.
.
DICOM APPLICATION INFORMATION
NAME
MAKE/REVISION
AE TITLE
IP ADDRESSES
PORT
Store 1
.
.
.
Store 2
.
.
.
Store 3
.
.
.
Store 4
.
.
.
Store 5
.
.
.
Store 6
.
.
.
Worklist
.
.
.
Storage
Commit
.
.
.
.
.
.
MPPS
Figure 2-5 Worksheet for DICOM Network Information
Chapter 2 Pre-Installation
2-9
GE MEDICAL SYSTEMS
DIRECTION 2395907, REVISION 2
LOGIQ™ 5 EXPERT BASIC SERVICE MANUAL
This page was intentionally left blank.
2 - 10
Section 2-3 - Facility Needs
GE MEDICAL SYSTEMS
DIRECTION 2395907, REVISION 2
LOGIQ™ 5 EXPERT BASIC SERVICE MANUAL
Chapter 3
Installation
Section 3-1
Overview
3-1-1
Purpose of Chapter 3
This chapter contains information needed to install the unit. Included are references to a procedure that
describes how to receive and unpack the equipment and how to file a damage or loss claim.
How to prepare the facility and unit of the actual installation, and how to check and test the unit, probes,
and external peripherals for electrical safety are included in this procedure. Also included in this section
are guidelines for transporting the unit to a new site.
Table 3-1
Contents in Chapter 3
Section
Description
Page Number
3-1
Overview
3-1
3-2
Installation Reminders
3-1
3-3
Receiving and Unpacking Equipemnt
3-4
3-4
Preparing for Installation
3-9
3-5
Completing the Installation
3-10
3-5
System Configuration
3-14
3-6
Installation Paperwork
3-21
Section 3-2
Installation Reminders
3-2-1
Average Installation Time
Table 3-2
Average Installation Time
Description
Average Installation Time
Comments
Unpacking the scanner
0.5 hour
Scanner wo/options
0.5 hour
Dependant on the configuration that is required
DICOM Option
0.5 hour
Dependant on the amount of configuration
InSite Option
0.5 hour
The LOGIQ™ 5 has been designed to be installed and checked out by an experienced service
technician in approximately four hours. LOGIQ™ 5 consoles with optional equipment may take slightly
longer.
Chapter 3 Installation
3-1
GE MEDICAL SYSTEMS
DIRECTION 2395907, REVISION 2
3-2-2
LOGIQ™ 5 EXPERT BASIC SERVICE MANUAL
Installation Warnings
1.) Since the LOGIQ™ 5 weighs approximately 180 kg. (397 lb) without options, preferably two people
should unpack it. Two people are also preferable for installing any additional bulky items.
2.) There are no operator serviceable components. To prevent shock, do not remove any covers or
panels. Should problems or malfunctions occur, unplug the power cord. Only qualified service
personnel should carry out servicing and troubleshooting.
NOTE:
For information regarding packing labels, refer to LABELS ON PACKAGE.
3.) After being transported, the unit may be very cold or hot. If this is the case, allow the unit to
acclimate before you turn it on. It requires one hour for each 2.5°C increment it's temperature is
below 10°C or above 40°C.
CAUTION Equipment damage possibility. Turning the system on without acclimation after arriving at site
may cause the system to be damaged.
Table 3-3
°C
60
40
35
30
25
20
15
10
5
0
-5
-10
-15
-20
-25
-30
-35
-40
°F
140 131 122 113 104
96
86
77
68
59
50
41
32
23
14
5
-4
-13
-22
-31
-40
0
0
0
0
0
0
2
4
6
8
10
12
14
16
18
20
hrs
3-2
Acclimation Time
8
55
6
50
4
45
2
0
Section 3-2 - Installation Reminders
GE MEDICAL SYSTEMS
DIRECTION 2395907, REVISION 2
3-2-3
LOGIQ™ 5 EXPERT BASIC SERVICE MANUAL
Safety Reminders
DANGER
WHEN USING ANY TEST INSTRUMENT THAT IS CAPABLE OF OPENING THE
AC GROUND LINE (I.E., METER’S GROUND SWITCH IS OPEN), DON’T TOUCH
THE UNIT!
CAUTION
Two people should unpack the unit because of its weight. Two people are required whenever
a part weighing 19kg (35 lb.) or more must be lifted.
CAUTION
If the unit is very cold or hot, do not turn on its power until it has had a chance to acclimate
to its operating environment.
CAUTION
To prevent electrical shock, connect the unit to a properly grounded power outlet. Do not use
a three to two prong adapter. This defeats safety grounding.
CAUTION
Do NOT wear the ESD wrist strap when you work on live circuits and more than 30 V peak is
present.
CAUTION
Do not use a 20 Amp to 15 Amp adapter on the 120 Vac unit’s power cord. This unit requires
a dedicated 20 A circuit and can have a 15A plug if the on board peripherals do not cause the
unit to draw more than 14.0 amps.
CAUTION
Do not operate this unit unless all board covers and frame panels are securely in place.
System performance and cooling require this.
CAUTION
OPERATOR MANUAL(S)
The User Manual(s) should be fully read and understood before operating the LOGIQ™ 5 and
kept near the unit for quick reference.
CAUTION
ACOUSTIC OUTPUT HAZARD
Although the ultrasound energy transmitted from the LOGIQ™ 5 probe is within FDA limits,
avoid unnecessary exposure. Ultrasound energy can produce heat and mechanical damage.
Figure 3-6 Environmental Labels
Chapter 3 Installation
3-3
GE MEDICAL SYSTEMS
DIRECTION 2395907, REVISION 2
LOGIQ™ 5 EXPERT BASIC SERVICE MANUAL
Section 3-3
Receiving and Unpacking the Equipment
When a new system arrives, check that any components are not damaged and are not in short supply.
If shipping damage or shortage occurs, contact the address shown in Chapter 1.
CAUTION Do not lift the unit by the Keyboard. Equipment damage may result.
CAUTION The crate with the LOGIQ™ 5 weighs approximately 180 kg. (397 lb) Be prepared for a sudden
shift of weight as the unit is removed from its base (pallet)
1.) Cut the three PLASTIC BANDs.
Plastic Bands
Figure 3-7 Cutting the Plastic Bands.
3-4
Section 3-2 - Installation Reminders
GE MEDICAL SYSTEMS
DIRECTION 2395907, REVISION 2
Section 3-3
LOGIQ™ 5 EXPERT BASIC SERVICE MANUAL
Receiving and Unpacking the Equipment (cont’d)
2.) Lift the TOP COVER up and off.
Top Cover
Figure 3-8 Removing the top Cover
Chapter 3 Installation
3-5
GE MEDICAL SYSTEMS
DIRECTION 2395907, REVISION 2
Section 3-3
LOGIQ™ 5 EXPERT BASIC SERVICE MANUAL
Receiving and Unpacking the Equipment (cont’d)
3.) Remove the MONITOR CAP up and off..
Monitor Cap
Figure 3-9 Removing the monitor cap
3-6
Section 3-2 - Installation Reminders
GE MEDICAL SYSTEMS
DIRECTION 2395907, REVISION 2
Section 3-3
LOGIQ™ 5 EXPERT BASIC SERVICE MANUAL
Receiving and Unpacking the Equipment (cont’d)
4.) Remove the three PLASTIC JOINTs from the OUTER SLEEVE
5.) Remove the OUTER SLEEVE.
6.) Remove the INNER SLEEVE.
Inner Sleeve
Plastic Joint
Outer Sleeve
Palette Assy
Monitor Supporter
Figure 3-10 Removing Plastic Joints and Sleeves
Chapter 3 Installation
3-7
GE MEDICAL SYSTEMS
DIRECTION 2395907, REVISION 2
Section 3-3
LOGIQ™ 5 EXPERT BASIC SERVICE MANUAL
Receiving and Unpacking the Equipment (cont’d)
7.) Remove the PLASTIC BAG.
8.) Lift the Monitor up by pressing the UP/Down Release Button.
9.) Remove the MONITOR SUPPORTER.
10.)Pull the Bottom Plate from the bottom so that it can be used as a ramp.
11.)Unlock the front caster and carefully put the console off the PALETTE.
PLASTIC BAG
Console
Monitor
Supporter
Palette Base Assy
Bottom Plate
Figure 3-11 Moving the LOGIQ™ 5 from the crate
3-8
Section 3-2 - Installation Reminders
GE MEDICAL SYSTEMS
DIRECTION 2395907, REVISION 2
3-3-1
LOGIQ™ 5 EXPERT BASIC SERVICE MANUAL
Moving into Position
CAUTION Do not lift the unit by the Keyboard.
Do not tilt the unit more than 5 degrees to avoid tipping it over.
To avoid injury by tipping over. Set the monitor to the lowest position before moving.
CAUTION Equipment Damage Possibility. Lifting the console by holding covers may damage the covers.
Do not lift the console by holding any covers.
In general, a single adult can move the LOGIQ™ 5 along an even surface with no steep grades. At least
two people should move the machine when large humps, grooves, or grades will be encountered. (It is
better to pull from the rear rather than push from the front of the unit). Before moving, store all loose
parts in the unit. Wrap transducers in soft cloth or foam to prevent damage.
Although LOGIQ™ 5 is a compact and mobile machine, two people should move it over rough surfaces
or up and down grades.
3-3-2
Adjusting System Clock
Set the system clock for the LOGIQ™ 5 to the local time. For procedure of adjusting the system clock,
refer to section 3-6-1-1 on page 15.
Fill out proper customer Information the Product Locator Installation Card. Mail this Installation Card
“Product Locator” to the address corresponding to your pole.
3-3-3
NOTE:
Product Locator Installation Card
The Product Locator Installation Card shown may not be same as the provided Product Locator
card.
Figure 3-12 Product Locator Installation Card
Section 3-4
Preparing for Installation
3-4-1
Verify Customer Order
Compare items received by the customer to that which is listed on the delivery order. Report any items
that are missing, back ordered or damaged.
Chapter 3 Installation
3-9
GE MEDICAL SYSTEMS
DIRECTION 2395907, REVISION 2
3-4-2
3-4-2-1
LOGIQ™ 5 EXPERT BASIC SERVICE MANUAL
Physical Inspection
System Voltage Settings
Verify that the scanner is set to the correct voltage.
The Voltage settings for the LOGIQ™ 5 Scanner is found on a label to the right of the Power switch and
External I/O, on the rear of the system.For the Rating Plate example, refer to Figure 1-3 "OUTSIDE
MARKINGS OF LOGIQ™ 5" on page 1-11
WARNING
3-4-2-2
Connecting a LOGIQ™ 5 scanner to the wrong voltage level will most likely destroy the
scanner.
Video Formats
Check that the video format is set to the locally used video standard, NTSC or PAL.
3-4-3
EMI Protection
This Unit has been designed to minimize the effects of Electro Magnetic Interference (EMI). Many of the
covers, shields, and screws are provided primarily to protect the system from image artifacts caused by
this interference. For this reason, it is imperative that all covers and hardware are installed and secured
before the unit is put into operation.
Section 3-5
Completing the Installation
3-5-1
NOTE:
3-5-1-1
Power On/Boot Up
After turning off the system, wait at least ten seconds before turning it on again. The system
may not be able to boot if power is recycled too quickly.
Scanner Power On
1.) Connect the Main Power Cable at the rear of the System.
WARNING
Protective earth must be taken when connecting AC power cable (200V) without its plug
to wall outlet.
2.) Connect the Main Power cable to an appropriate mains power outlet.
3.) Switch ON the Main Circuit Breaker at the rear of the System.
3 - 10
Section 3-5 - Completing the Installation
GE MEDICAL SYSTEMS
DIRECTION 2395907, REVISION 2
3-5-1
LOGIQ™ 5 EXPERT BASIC SERVICE MANUAL
Power On/Boot Up (cont’d)
Main Circuit Breaker
Main Power Cable
Figure 3-13 Circuit Breaker
When power is applied to the Scanner, and the Rear Circuit breaker is turned ON, Power is distributed
to the Fans, Control panel, Monitor, Internal and External I/O’s, Cage Boards, Peripherals and the
Backend Processor. When the Power ON/OFF key is pressed once, the Backend Processor starts and
its software code is distributed to initiate the scanner.
4.) Press the ON/OFF key at the front of the System once.
Chapter 3 Installation
3 - 11
GE MEDICAL SYSTEMS
DIRECTION 2395907, REVISION 2
3-5-1
LOGIQ™ 5 EXPERT BASIC SERVICE MANUAL
Power On/Boot Up (cont’d)
Composite
B/W
B/W Printer
Power
220-240V 500VA Max
Including rear panel
Figure 3-14 Power On/Off Standby Switch Location
3-5-1-2
Power Up Sequence
1.) The Start Up Screen will be shown on the Monitor display when the system is turned ON.
Figure 3-15 Start Up Screen Display
2.) After initialization is complete, all lighted buttons on the Control Panel light and the default B-Mode
screen or Patient screen (no probes are connected) is displayed on the monitor display.
3 - 12
Section 3-5 - Completing the Installation
GE MEDICAL SYSTEMS
DIRECTION 2395907, REVISION 2
3-5-1-3
LOGIQ™ 5 EXPERT BASIC SERVICE MANUAL
Power Up Sequence
1.) The Start Up Screen will be shown on the Monitor display when the system is turned ON.
2.) Then Start Loader display will be shown on the Monitor display. Then the scanner is booted up
automatically.
NOTE:
To enter the Maintenance Mode, select Maintenance button.
NOTE:
Figure 8-4 displays when Service Dongle inserted in Rear Panel.
Figure 3-16 Start Application Window
NOTE:
3-5-2
NOTE:
3-5-2-1
Start is selected automatically when it time out.
Power Off/ Shutdown
After turning off a system, wait at least ten seconds before turning it on again. The system may
not be able to boot if power is recycled too quickly.
Power Shutdown
1.) Press the ON/OFF key at the front of the System for about two (2) seconds. Refer to Figure 3-14
on page 3-12 .
2.) Switch OFF the Main Circuit Breaker at the rear of the system Refer to Figure 3-13 on page 3-11 .
3.) Disconnect the Main Power Cable is necessary. For example : Relocating the scanner.
NOTICE Disconnecting the Mains Power Cable before switching OFF the Circuit Breaker will activate the
uninterruptible power system (UPS) in the backend processor, forcing an ordered shutdown of the
system.
NOTICE The UPS serves only as a battery backup that allows for a soft shut-down of the scanner to prevent file
corruption. IT DOES NOT REGULATE INCOMING VOLTAGE.
Chapter 3 Installation
3 - 13
GE MEDICAL SYSTEMS
DIRECTION 2395907, REVISION 2
3-5-3
LOGIQ™ 5 EXPERT BASIC SERVICE MANUAL
Transducer Connection
1.) Connect a transducer to one of the three rightmost transducer receptacle as follows:
A.) Ensure that the transducer twist lock lever to the horizontal position.
B.) Insert the transducer connector on the receptacle guide pin until it touches the receptacle
mating surface.
C.) Twist the transducer twist lock lever to vertical position to lock it in place. Twist the lever
to the horizontal position to disconnect the transducer.
NOTE:
3 - 14
It is not necessary to turn OFF power to connect or disconnect a transducer.
Section 3-5 - Completing the Installation
GE MEDICAL SYSTEMS
DIRECTION 2395907, REVISION 2
LOGIQ™ 5 EXPERT BASIC SERVICE MANUAL
Section 3-6
System Configuration
3-6-1
3-6-1-1
System Specifications
System Settings
Table 3-1
System Configuration
Configuration Category
Description
Settings
Enables the user or service personnel to set the
date, time, unit, language, basic information about
the organization such as the institution name and
department.
1.) Power OFF the scanner.
2.) The SYSTEM EXIT window appears. Click on Logoff.
Figure 3-17 System EXIT window
3.) The message window appears. Click on OK.
4.) The OPERATOR LOGIN window appears.
Change the User level to Admin, then enter Password. Then click on Log on.
Figure 3-18 Operator LOGIN window
Chapter 3 Installation
3 - 15
GE MEDICAL SYSTEMS
DIRECTION 2395907, REVISION 2
3-6-1-1
LOGIQ™ 5 EXPERT BASIC SERVICE MANUAL
System Settings (cont’d)
5.) Select Utility > System.
6.) Set the Hospital name, Department, Date and Time, Language, and Units.
Figure 3-19 Setting Display
Click on Utilities to terminate the utility function.
3 - 16
Section 3-5 - Completing the Installation
GE MEDICAL SYSTEMS
DIRECTION 2395907, REVISION 2
3-6-1-2
LOGIQ™ 5 EXPERT BASIC SERVICE MANUAL
Physical Dimensions
The physical dimensions of the LOGIQ™ 5 unit are summarized in Table 3-2 on page 3-17 .
The Size of LOGIQ™ 5, with monitor and peripherals
Table 3-2
Width
Depth
Unit
135 - 145
52.0
99.0
cm
53.1 - 57.08
20.47
38.9
inches
990
800~900
1350~1450
:
180Kg (397lbs)
including Monitor
Length is in mm
Variation +/- 10%
520
Height
WEIGHT :
NOTE
Physical Dimensions of LOGIQ™ 5
Figure 3-20 Overall Dimensions
Chapter 3 Installation
3 - 17
GE MEDICAL SYSTEMS
DIRECTION 2395907, REVISION 2
3-6-1-3
LOGIQ™ 5 EXPERT BASIC SERVICE MANUAL
Weight without Monitor and Peripherals
Table 3-3
Weight of LOGIQ™ 5 With Monitor and Without Other Peripherals
Model
Weight [kg]
LOGIQ™ 5
3-6-1-4
Weight [lbs]
Approximately 180 Approximately 397
Acoustic Noise Output:
Less than 70dB (A) according to DIN 45635 - 19 - 01 - KL2.
3-6-2
Electrical Specifications
Table 3-4
3-6-3
Electrical Specifications for LOGIQ™ 5
System
Voltage
Current
Frequency
1
110 ~ 120 VAC
10~12A
50~60Hz
2
220 ~ 240 VAC
5~5.5A
50~60Hz
On-Board Optional Peripherals
Table 3-5
List of Recording Devices
Device
Manufacturer
Model
Video Signal
B/W Video Printer
SONY
UP-895MDW
NTSC/PAL
B/W Video Printer
Mitsubishi
P-91(AP9500)
P91W
P91E
NTSC
NTSC/PAL
NTSC/PAL
Video Cassette Recorder
SONY
SVO-9500MD
SVO-9500-MDP
NTSC
PAL
Video Cassette Recorder
Panasonic
AG-MD835
AG-MD835P
AG-MD835E
NTSC
NTSC
PAL
A6 Color Video Printer
SONY
UP-21MD
UP-21MDS
NTSC/PAL
NTSC
A6 Color Video Printer
Mitsubishi
CP-900
CP900UM
CP-900E
A5 Color Video Printer
SONY
UP-50
UP51MD
A5 Color Printer
Mitsubishi
CP-800
CP-800UM
CP800E
NTSC
NTSC/PAL
See each option installation instructions for installation and connection procedures.
NOTE:
3-6-4
There are no external peripheral options for the LOGIQ™ 5
External I/O Connector Panel
Located on the rear panel are video input and output connectors, audio input and output, camera
expose connectors, footswitch connector power connector and control connections for VCR, printer,
and service tools.
3 - 18
Section 3-5 - Completing the Installation
GE MEDICAL SYSTEMS
DIRECTION 2395907, REVISION 2
3-6-4
LOGIQ™ 5 EXPERT BASIC SERVICE MANUAL
External I/O Connector Panel (cont’d)
This section indicates the pin assignment for each connector.
1
2
Serial
1
2
220-240V 500VA Max
Including front printer panel
Figure 3-21 Rear Connector Panel
NOTE:
Each outer (case) ground line of peripheral/accessory connectors are protectively grounded.
Signal ground lines are not isolated, except the Service port (3). All of signal lines (include signal
GND) of the Service port are isolated.
Chapter 3 Installation
3 - 19
GE MEDICAL SYSTEMS
DIRECTION 2395907, REVISION 2
3-6-4-1
External I/O Pin Outs
Pin No.
Signal
Pin No.
Signal
1
N/A
6
DSR
2
RXD
7
RTS
3
TXD
8
GTS
4
DTR
9
N/A
5
GND
Table 3-6
Pin Assignments of RS232C for Remote 1 and Remote 2
Pin No.
Signal
Pin No.
Signal
1
NC
6
NC
2
RXD
7
NC
3
TXD
8
NC
4
NC
9
RI
5
GND
Table 3-7
Pin Assignments of RS232C for Service
Pin No.
Signal
Pin No.
Signal
1
RED
9
N/A
2
GREEN
10
SGND
3
BLUE
11
N/A
4
N/A
12
N/A
5
GND
13
HSYNC
6
RGND
14
VSYNC
7
GGND
15
N/A
8
BGND
Table 3-8
3 - 20
LOGIQ™ 5 EXPERT BASIC SERVICE MANUAL
Pin Assignments of DB15 connector for External VGA
Section 3-5 - Completing the Installation
GE MEDICAL SYSTEMS
DIRECTION 2395907, REVISION 2
3-6-4-1
LOGIQ™ 5 EXPERT BASIC SERVICE MANUAL
External I/O Pin Outs (cont’d)
Pin No.
Signal
Pin No.
Signal
1
+5 VDC
3
DATA +
2
DATA -
4
GND
Table 3-9
Pin Assignments of USB
Pin No.
Signal
Pin No.
Signal
1
TX+
5
NC
2
TX-
6
RX-
3
RX+
7
NC
4
NC
8
NC
Table 3-10
Pin Assignments of InSite - RJ45 Male Connector
Pin No.
Signal
Pin No.
Signal
1
TX+
5
NC
2
TX-
6
RX-
3
RX+
7
NC
4
NC
8
NC
Table 3-11
Pin Assignments of Ethernet
Pin No.
Output Signal
1
PRINT*1
2
Signal GND
Table 3-12
Pin Assignment of Mini-Jack for Controlling B/W Printer
Pin No.
Output Signal
1
SHUTTER*2
2
Signal GND
Table 3-13
Pin Assignment of Mini-Jack for Controlling Color
Chapter 3 Installation
3 - 21
GE MEDICAL SYSTEMS
DIRECTION 2395907, REVISION 2
3-6-5
LOGIQ™ 5 EXPERT BASIC SERVICE MANUAL
Video Specification
Video specifications may be needed to be able to connect laser cameras or other devices to the
LOGIQ™ 5.
Table 3-14
3 - 22
Video Specifications
Timing Parameter
1024x768
75Hz
768x576
50Hz
640x480
60Hz
800x600
60Hz
800x600
75Hz
1024x768
60Hz
Horizontal Rate [kHz]
60.02
31.25
31.47
37.88
46.88
48.36
Horizontal Period [µs]
16.66
32.00
31.78
26.40
21.33
20.68
Pixel Clock [MHz]
78.75
29.50
24.55
40.00
49.50
65.00
H Blank Width [µs]
3.66
5.97
5.70
6.40
5.17
4.92
H Sync Width [µs]
1.22
2.34
2.36
3.20
1.62
2.09
H Front Porch [µs]
0.20
0.75
0.73
1.00
0.32
0.37
Active Horizontal Period [µs]
13.00
26.03
26.07
20.00
16.16
15.75
Vertical Rate [Hz]
75.03
50.00
59.94
60.32
75.00
60.00
Vertical Period [ms]
13.33
20.00
16.68
16.58
13.33
16.67
V Sync Width [lines=ms]
32=0.53
49=1.57
45=1.43
28=0.74
25=0.53
38=0.79
V Front Porch [lines=µs]
3=50.00
5=160.00
6=190.70
4=105.60
3=64.00
6=124.10
Equalization Gate [lines=µs]
1=16.66
5=160.0
6=190.7
1=26.4
1=21.3
3=62.00
Lines: Field/Frame
800
625/625
525/525
628
625
806
Active Lines/Frame
768
576
480
600
600
768
Section 3-5 - Completing the Installation
GE MEDICAL SYSTEMS
DIRECTION 2395907, REVISION 2
LOGIQ™ 5 EXPERT BASIC SERVICE MANUAL
Section 3-7
Available Probes
See Specifications in the LOGIQ™ 5 User Reference Manual for probes and intended use.
See Chapter 9, for part numbers to be used when ordering new or replacement probes.
Section 3-8
Software/Option Configuration
Refer to the LOGIQ™ 5 Basic User Manual, Chapter 16, Customizing Your System for information on
configuring items like Hospital, Department, Language, Units (of measure), Date, Time and Date
Format.
For information on configuring Software Options, Refer to the LOGIQ™ 5 Basic User Manual, Chapter
16, Customizing Your System.
For information on configuring DICOM Connectivity, Refer to the LOGIQ™ 5 Basic User Manual,
Chapter 16, Customizing Your System.
Chapter 3 Installation
3 - 23
GE MEDICAL SYSTEMS
DIRECTION 2395907, REVISION 2
LOGIQ™ 5 EXPERT BASIC SERVICE MANUAL
Section 3-9
Connectivity Installation Worksheet
Site System Information
Comments:
Floor:
Site:
Dept:
Room:
Type:
LOGIQ SN:
REV:
CONTACT INFORMATION
Name
Title
Phone
E-Mail Address
TCP/IP Settings
Name - AE Title:
IP Settings
Remote Archive Setup
IP Address:
Remote Archive IP:
Subnet Mask:
Remote Archive Name:
Default Gateway:
Services (Destination Devices)
Device Type
1
2
3
4
5
6
7
8
9
10
11
12
3 - 24
Manufacturer
Name
IP Address
Section 3-8 - Software/Option Configuration
Port
AE Title
GE MEDICAL SYSTEMS
DIRECTION 2395907, REVISION 2
LOGIQ™ 5 EXPERT BASIC SERVICE MANUAL
Section 3-10
Loading Base System Software
3-10-1
Loading Base system Software
For more information on loading base system software, refer to 8-11-1 "Installing Base Software Load
Image CD" on page 8-94.
Chapter 3 Installation
3 - 25
GE MEDICAL SYSTEMS
DIRECTION 2395907, REVISION 2
LOGIQ™ 5 EXPERT BASIC SERVICE MANUAL
Section 3-11
System Setup
3-11-1
System Setup
For more information on System setup, refer to section 8-11-1 on page 94.
3 - 26
Section 3-10 - Loading Base System Software
GE MEDICAL SYSTEMS
DIRECTION 2395907, REVISION 2
LOGIQ™ 5 EXPERT BASIC SERVICE MANUAL
Section 3-12
Paperwork
NOTE:
3-12-1
NOTE:
During and after installation, the documentation (i.e. User Manuals, Installation Manuals...) for the
peripheral units must be kept as part of the original system documentation. This will ensure that all
relevant safety and user information is available during the operation and service of the complete
system.
Product Locator Installation
The Product Locator Installation Card shown may not be same as the provided Product Locator
card.
Figure 3-22 Product Locator Installation Card
3-12-2
User Manual(s)
User Check that the correct User Manual(s) for the system and software revision, is included with the
installation. Specific language versions of the User Manual may also be available. Check with your GE
Sales Representative for availability.
3-12-2-1
Reference off-board peripherals and options
None.
Chapter 3 Installation
3 - 27
GE MEDICAL SYSTEMS
DIRECTION 2395907, REVISION 2
LOGIQ™ 5 EXPERT BASIC SERVICE MANUAL
This page was intentionally left blank.
3 - 28
Section 3-10 - Loading Base System Software
GE MEDICAL SYSTEMS
DIRECTION 2395907, REVISION 2
LOGIQ™ 5 EXPERT BASIC SERVICE MANUAL
Chapter 4
Functional Checks
Section 4-1
Overview
4-1-1
Purpose of Chapter 4
This chapter provides procedures for quickly checking major functions of the LOGIQ™ 5 scanner
diagnostics by using the built-in service software, and power supply adjustments.
Table 4-15
Contents in Chapter 4
Section
Description
Page Number
4-1
Overview
4-1
4-2
Required Equipment\
4-1
4-3
General Procedure
4-2
4-4
Software Configuration Checks
4-21
4-5
Peripheral Checks
4-22
4-7
Mechanical Function Checks
4-23
4-8
Site Log
4-24
4-8
Software Configuration Checks
4-25
4-9
Peripheral Checks
4-25
\
NOTICE Most of the information pertaining to this Functional Checks chapter is found in the LOGIQ™ 5 Quick
Guide (Direction Number 2300003-100).
Section 4-2
Required Equipment
•
An empty (blank) CD-R Disk.
•
At least one transducer. See “Probe/Connectors Usage” on page 10. for an overview.
(normally you should check all the transducers used on the system.)
Chapter 4 Functional Checks
4-1
GE MEDICAL SYSTEMS
DIRECTION 2395907, REVISION 2
LOGIQ™ 5 EXPERT BASIC SERVICE MANUAL
Section 4-3
General Procedure
CAUTION SYSTEM REQUIRES ALL COVERS
Operate this unit only when all board covers and frame panels are securely in place. The
covers are required for safe operation, good system performance and cooling purposes.
NOTICE Lockout/Tagout Requirements (For USA only)
Follow OSHA Lockout/Tagout requirements by ensuring you are in total control of the Power Cable
on the system.
TAG
&
LOCKOUT
Signed
Date
4-3-1
NOTE:
4-3-1-1
Power On/Boot Up
After turning off the system, wait at least ten seconds before turning it on again. The system
may not be able to boot if power is recycled too quickly.
Scanner Power On
1.) Connect the Main Power Cable to the back of the System.
2.) Ensure the Cable Clip slips securely over the shoulders on the molded plug.
3.) Connect the Main Power cable to an appropriate mains power outlet.
4.) Switch ON the Main Circuit Breaker at the rear of the System.
Main Circuit Breaker
Main Power Cable
Figure 4-24 Circuit Breaker
When power is applied to the Scanner, and the Rear Circuit breaker is turned ON, Power is distributed
to the JPC assy in AC power assy and BEP. When the power on/off switch is pressed once, DC power
is turned on and distributed to the Fans, Monitor, Nest boards, peripherals.
4-2
Section 4-3 - General Procedure
GE MEDICAL SYSTEMS
DIRECTION 2395907, REVISION 2
4-3-1-1
LOGIQ™ 5 EXPERT BASIC SERVICE MANUAL
Scanner Power On (cont’d)
5.) Press the ON/OFF key at the front of the System once.
Composite
B/W
B/W Printer
Power
220-240V 500VA Max
Including rear panel
Figure 4-25 Power On/Off Standby Switch Location
4-3-2
NOTE:
4-3-2-1
Power Off / Shutdown
After turning off a system, wait at least ten seconds before turning it on again. The system may not be
able to boot if power is recycled too quickly.
Scanner Shutdown
1.) Press the On/Off Key at the front of the System once to display the SYSTEM - EXIT menu.
2.) Select Shutdown from the SYSTEM - EXIT menu.
Figure 4-26 System Exit Menu for Power Down
4-3-2-2
Switch off the System
1.) Switch OFF the Circuit Breaker at the back of the scanner.
Chapter 4 Functional Checks
4-3
GE MEDICAL SYSTEMS
DIRECTION 2395907, REVISION 2
LOGIQ™ 5 EXPERT BASIC SERVICE MANUAL
2.) Disconnect the Mains Power Cable is necessary. For example: Servicing or relocating the scanner.
NOTICE Disconnecting the Mains Power Cable before switching OFF the Circuit Breaker will activate the
uninterruptible power system (UPS) in the Back End Processor, forcing an ordered shutdown of the
system.
4-3-3
4-3-3-1
System Features
Control Panel
3
1
17
1
2
9
5
8
16
2
PW
Patient
PDI
M
7
Depth
10
Body Pattern
Ellipse
4
Measure
Zoom
12
M/D Cursor
Comment
Auto
Scan Area
Clear
15
B Pause
Set
L
R
6
11
13
Figure 4-27 Control Panel Tour
1.) Touch Panel and Controls
2.) Additional Touch Panel and Controls
3.) Touch Panel Brightness Control
4.) Video
5.) Audio On/Off and Volume
6.) TGC
7.) Reverse
8.) Additional Feature Keys
9.) Alphanumeric Keyboard
10.)Mode/Gain Keys
11.)Imaging/Measurement Keys
12.)Depth
4-4
Section 4-3 - General Procedure
14
GE MEDICAL SYSTEMS
DIRECTION 2395907, REVISION 2
LOGIQ™ 5 EXPERT BASIC SERVICE MANUAL
13.)Imaging Feature Keys
14.)Freeze and Print Keys
15.)Probe and Cord Holder
16.)Gel Holder
4-3-3-2
Power On/Off SwitchTouch Panel
6
7
1
2
3
4
5
Figure 4-28 Touch Panel Display Tour
1.) Patient: Enter Patient screen
2.) Scan: Enter scanning mode screen
3.) Reports: Activates default report and Touch Panel of report choices.
4.) End Exam: Activates Image Management and Touch Panel with end of exam options.
5.) Utility: Activates the configuration system.
6.) Preset: Select the application to use.
7.) Probe Indicator: Indicates and selects the probes.
NOTE:
Different menus are displayed depending on which Touch Panel Menu is selected.
At the bottom of the Touch Panel, there are five combination rotary dials/push buttons. The functionality
of these rotaries changes, depending upon the currently displayed menu. Press the button to switch
between controls (as with Focus Position/Number), or rotate the dial to adjust the value.
Chapter 4 Functional Checks
4-5
GE MEDICAL SYSTEMS
DIRECTION 2395907, REVISION 2
4-3-3-3
LOGIQ™ 5 EXPERT BASIC SERVICE MANUAL
Monitor Display
1
3
2
4
5
12
13
6
7
8
14
15
16
9
10
17
11
18
20
19
21
22
Figure 4-29 Monitor Display Tour
Table 4-16
4-6
Monitor Display Features
1. Institution/Hospital Name, Date, Time, Operator
Identification
2. Probe Identifier, Exam Study
3. Patient Name, Patient Identification
4. GE Symbol : Probe Orientation Marker. Coincides with a
probe orientation marking on the probe.
5. Image Preview
6. Gray/Color Bar
7. Cine Guage
8. Measurement selection Menu
9. Image
10. Measurement
11. Result window
12. Imaging Paramenters by mode
13. Power Output Readout, system status
14. Focal Zone
15. Depth Scale
16. Body Pattern
17. TGC
18. Image Management Menu : Menu, Delete, and Image
Manager
19. Image Palette
20. System Messages Display
21. System Messages Display
22. Trackball Fucntionality Status
Section 4-3 - General Procedure
GE MEDICAL SYSTEMS
DIRECTION 2395907, REVISION 2
4-3-4
LOGIQ™ 5 EXPERT BASIC SERVICE MANUAL
System B/M-Mode Checks
For a basic functional check of the system’s different modes, the Quick Guide will familiarize you with
image optimization for B-Mode, M-Mode, Color Flow, and Doppler.
Figure 4-30 System B/M-Mode Checks
Table 4-17
B/M-Mode Functions
Power Output (Acoustic Power)
Optimizes image quality and allows user to reduce beam
intensity. 10% increments between 0-100%. Values greater
than 0.1 are displayed
Dynamic Range
Dynamic Range controls how echo intensities are converted to
shades of gray, thereby increasing the adjustable range of
contrast.
Focus Number and Position
Increases the number of transmit focal zones or moves the
focal zone(s) so that you can tighten up the beam for a specific
area. A graphic caret corresponding to the focal zone
position(s) appears on the right edge of the image.
Rejection
Selects a level below which echoes will not be amplified (an
echo must have a certain minimum amplitude before it will be
processed).
Edge Enhance
Edge Enhance brings out subtle tissue differences and
boundaries by enhancing the gray scale differences
corresponding to the edges of structures. Adjustments to M
Mode's edge enhancement affects the M Mode only.
Frame Average
Temporal filter that averages frames together. This has the
effect of presenting a smoother, softer image.
Colorize
Enables gray scale image colorization. To deactivate, reselect
a Gray Map.
Gray Map
Determines how the echo intensity levels received are
presented as shades of gray.
Rotation (Up/Down)
Rotates the image by selecting the value from the pop up menu.
Frequency
Multi Frequency mode lets you
downshift to the probe's next lower
frequency or shift up to a higher
frequency.
Chapter 4 Functional Checks
4-7
GE MEDICAL SYSTEMS
DIRECTION 2395907, REVISION 2
Table 4-17
4-3-5
LOGIQ™ 5 EXPERT BASIC SERVICE MANUAL
B/M-Mode Functions
Frame Rate/Resolution
Optimizes B Mode frame rate or spatial resolution for the best
possible image.
B Flow
Provides intuitive representation of non-quantitative
hemodynamics in vascular structures.
Sensitivity/PRI
Adjusts the sample rate for the flow signal.
Background On/Off
Background On lets you view the anatomy roadmap;
Background Off lets you view just flow information.
Sweep Speed
Changes the speed at which the timeline is swept.
System CFM and PWD Checks
Figure 4-31 CFM and PWD Functions
Table 4-18
4-8
CFM and PWD Functions
Baseline
Adjusts the baseline to accommodate faster or slower blood
flows to eliminate aliasing.
PRF/Wall Filter
Velocity scale determines pulse repetition frequency. If the
sample volume gate range exceeds single gate PRF capability,
the system automatically switches to high PRF mode. Multiple
gates appear, and HPRF is indicated on the display.
Angle Correct
Estimates the flow velocity in a direction at an angle to the
Doppler vector by computing the angle between the Doppler
vector and the flow to be measured
Threshold
Threshold assigns the gray scale level at which color
information stops.
Map
Allows a specific color map to be selected. After a selection has
been made, the color bar displays the resultant map.
Invert
Allows blood flow to be viewed from a different perspective, i.e.
red away (negative velocities) and blue toward (positive
velocities). The real-time or frozen image can be inverted.
Packet Size
Controls the number of samples gathered for a single color flow
vector.
Section 4-3 - General Procedure
GE MEDICAL SYSTEMS
DIRECTION 2395907, REVISION 2
Table 4-18
LOGIQ™ 5 EXPERT BASIC SERVICE MANUAL
CFM and PWD Functions
Quick Angle Correct
Quickly adjusts the angle by 60 degrees
Display layout can be preset to have B-Mode and Time-motion
side-by-side or over-under.
In the side-by-side layout, there are three display alternatives
defined: equal priority, time-motion priority or time-motion with
B-Mode reference.
Doppler Display Formats
In the over-under layout, there are three display alternatives
defined: time-motion priority, B Mode priority or equal priority.
4-3-6
NOTE:
4-3-6-1
Sample Volume Gate Length
Sizes the sample volume gate
Scan Area
Slants the B-Mode or Color Flow linear image left or right to get
more information without moving the probe
Basic Measurements
The following instructions assume that you first scan the patient and then press Freeze.
Distance and Tissue Depth Measurements
1.) Press MEASURE once; an active caliper displays.
2.) To position the active caliper at the start point (distance) or the most anterior point (tissue
depth), move the TRACKBALL.
3.) To fix the start point, press Set. The system fixes the first caliper and displays a second active
caliper.
4.) To position the second active caliper at the end point (distance) or the most posterior point
(tissue depth), move the TRACKBALL.
5.) To complete the measurement, press SET. The system displays the distance or tissue depth
value in the measurement results window.
Before you complete a measurement:
To toggle between active calipers, press MEASURE.
To erase the second caliper and the current data measured and start the measurement again, press
CLEAR once.
NOTE:
To rotate through and activate previously fixed calipers, turn CURSOR SELECT.
NOTE:
After you complete the measurement, to erase all data that has been measured to this point,
but not data entered onto worksheets, press CLEAR.
4-3-6-2
Circumference/Area (Ellipse) Measurement
1.) Press MEASURE once; an active caliper displays.
2.) To position the active caliper, move the TRACKBALL.
3.) To fix the start point, press SET. The system fixes the first caliper and displays a second active
caliper.
4.) To position the second caliper, move the TRACKBALL.
5.) Turn the ELLIPSE control; an ellipse with an initial circle shape appears.
Chapter 4 Functional Checks
4-9
GE MEDICAL SYSTEMS
DIRECTION 2395907, REVISION 2
4-3-6-2
NOTE:
LOGIQ™ 5 EXPERT BASIC SERVICE MANUAL
Circumference/Area (Ellipse) Measurement (cont’d)
Be careful not to press the Ellipse control as this activates the Body Pattern.
6.) To position the ellipse and to size the measured axes (move the calipers), move the
TRACKBALL.
7.) To increase the size, turn the ELLIPSE control in a clockwise direction. To decrease the size,
turn the ELLIPSE control in a counterclockwise direction.
8.) To toggle between active calipers, press MEASURE.
9.) To complete the measurement, press SET. The system displays the circumference and area
in the measurement results window.
Before you complete a measurement:
4-3-6-3
-
To erase the ellipse and the current data measured, press CLEAR once. The original caliper
is displayed to restart the measurement.
-
To exit the measurement function without completing the measurement, press CLEAR a
second time.
Worksheets
Measurement/Calculation worksheets are available to display and edit measurements and calculations.
There are generic worksheets as well as Application specific worksheets. The worksheets are selected
from the Measurement Touch Panel.
4-3-6-4
Report Pages
Measurements/Calculations that are included on the worksheet can also be displayed on Report Pages.
Report Pages can be customized to meet the appropriate needs of the user.
4-3-7
4-3-7-1
Probe/Connectors Usage
Connecting a probe
1.) Place the probe's carrying case on a stable surface and open the case.
2.) Carefully remove the probe and unwrap the probe cable.
3.) DO NOT allow the probe head to hang free. Impact to the probe head could result in irreparable
damage.
4.) Turn the connector locking handle counterclockwise.
5.) Align the connector with the probe port and carefully push into place.
6.) Turn the connector locking handle clockwise to secure the probe connector.
7.) Carefully position the probe cable in the probe cord holder spot so it is free to move, but not
resting on the floor.
4-3-7-2
Activating the probe
Select the appropriate probe from the probe indicators on the Touch Panel.
The probe activates in the currently-selected operating mode. The probe's default settings for the mode
and selected exam are used automatically.
4 - 10
Section 4-3 - General Procedure
GE MEDICAL SYSTEMS
DIRECTION 2395907, REVISION 2
4-3-7-3
LOGIQ™ 5 EXPERT BASIC SERVICE MANUAL
Deactivating the probe
When deactivating the probe, the probe is automatically placed in standby mode.
1.) Press the Freeze key.
2.) Gently wipe the excess gel from the face of the probe. (Refer to the Basic User Manual for
complete probe cleaning instructions.)
3.) Carefully slide the probe around the right side of the keyboard, toward the probe holder.
Ensure that the probe is placed gently in the probe holder.
4-3-7-4
Disconnecting the probe
Probes can be disconnected at any time. However, the probe should not be selected as the active
probe.
1.) Move the probe locking handle counterclockwise. Pull the probe and connector straight out of
the probe port.
2.) Carefully slide the probe and connector away from the probe port and around the right side of
the keyboard. Ensure the cable is free.
3.) Be sure that the probe head is clean before placing the probe in its storage box.
4-3-8
4-3-8-1
Using Cine
Activating CINE
Press FREEZE, then roll the TRACKBALL to activate CINE. To start CINE Loop playback, press Run/
Stop. To stop CINE Loop playback. press Run/Stop.
4-3-8-2
Quickly Move to Start/End Frame
Press FIRST to move to the first CINE frame; press LAST to move to the last CINE frame.
4-3-8-3
Start Frame/End Frame
Turn the START FRAME dial to the left to move to the beginning of the CINE Loop. Turn the dial to the
right to move forward through the CINE Loop.
Turn the END FRAME dial to the right to move to the end of the CINE Loop. Turn the dial to the left to
move backward through the CINE Loop.
Chapter 4 Functional Checks
4 - 11
GE MEDICAL SYSTEMS
DIRECTION 2395907, REVISION 2
4-3-8-4
LOGIQ™ 5 EXPERT BASIC SERVICE MANUAL
Adjusting the CINE Loop Playback Speed
Turn the LOOP SPEED dial right/left to increase/decrease the CINE Loop playback speed.
4-3-8-5
Disconnecting B-Mode CINE from Timeline CINE
To review the B-Mode CINE Loop only, press CINE MODE SELECTION and select B ONLY.
To review the Timeline CINE Loop only, press CINE MODE SELECTION and select TL ONLY.
To return to linked B-Mode and Timeline CINE Loop review, press CINE MODE SELECTION and select
B/TL.
4-3-8-6
Moving through a CINE Loop Frame By Frame
Turn FRAME BY FRAME to move through CINE memory one frame at a time.
4-3-9
Image Management (QG)
For Image Management functionality refer to the LOGIQ™ 5 Quick Guide. It talks about several topics:
•
Clipboard
•
Printing Images
•
Browsing and Managing an Exam’s Stored Image
•
Connectivity, and Dataflow Concept and Creation
•
Starting an Exam
•
Configuring Connectivity
•
TCP/IP
•
Services (Destinations)
•
Buttons
•
Views
Verifying and Pinging a Device
4-3-10
4-3-10-1
NOTICE
Using the CD-RW / MOD (Magneto-Optical Drive)
Using the CD-RW
Never move the unit with a disk in the CD-RW because the drive actuator will not be locked
and the CD-RW could break.
1.) Push the EJECT button, the disk tray will appear.
2.) Put the disk onto the disk tray.
3.) Press the EJECT button to insert the disk into the CD-RW device.
4.) There are a number of methods to eject a disk from the CD-RW. Ejection is automatic in some
cases. Manual ejection methods, listed in preferred order of use, are:
a.) Press EJECT button on the CD-RW while system is ON.
b.) Press and hold EJECT button while the system is booting.
c.) Mechanical ejection. Insert the end of a paper clip into the hole next to the EJECT button while
system power is OFF.
NOTICE
4 - 12
Avoid mechanical ejection whenever possible. Mechanical ejection leaves the actuator
unlocked and the MOD susceptible to damage if moved. If forced to use this method, reboot
the system, then insert and eject a known good disk using one of the other methods.
Section 4-3 - General Procedure
GE MEDICAL SYSTEMS
DIRECTION 2395907, REVISION 2
LOGIQ™ 5 EXPERT BASIC SERVICE MANUAL
CD-RW Drive
Eject Button
Figure 4-32 CD-RW drives
4-3-10-2
Using the MOD (Magneto-Optical Drive)
The 3.5 inch Magneto-Optical disk drive supports the following densities:
Standard: 640MB; 540MB; 230MB; and 128MB
Overwrite: 640MB; and 540MB
1.) Before installing an MO disk in the MOD, check the MO disk for loose hardware or damaged labels
which could jam inside the MOD. Also, ensure that the slide switch in one corner of the disk is set
so that the disk is write enabled (disk hole closed).
2.) Insert the disk into the MOD with the label facing up.
NOTICE Never move the unit with a disk in the MOD because the drive actuator will not be locked and
the MOD could break.
3.) There are different methods to eject a disk from the MOD. In some cases disk ejection is automatic.
Manual ejection methods are listed below in preferred order from best (1) to worst (4).
a.) When in Archive Menu, use the softkey choice –or– click Image Presets up, then click the left
softkey switch up for ARCHIVE, then toggle the switch under EJECT MOD.
b.) Press the EJECT switch on the MOD while system is ON.
c.) Press and hold the EJECT switch while the system is booting.
d.) Mechanical ejection. Insert the end of a paper clip into the hole next to the EJECT switch while
system power is OFF.
Chapter 4 Functional Checks
4 - 13
GE MEDICAL SYSTEMS
DIRECTION 2395907, REVISION 2
4-3-11
LOGIQ™ 5 EXPERT BASIC SERVICE MANUAL
Backup and Restore Database, Preset Configurations and Images
NOTICE Avoid mechanical ejection whenever possible. Mechanical ejection leaves the actuator
unlocked and the MOD susceptible to damage if moved. If forced to use this method, reboot the
system, then insert and eject a known good disk using one of the other manual ejection
methods.
4-3-11-1
Formatting Media
1.) To format the backup media, CD-ROM or MOD, select the UTILITY tab on the Touch Panel.
2.) Select CONNECTIVITY, then TOOLS. Properly label and Insert the backup media.
3.) Select the media type from the drop down menu.
4.) Enter the label for the media as shown in Figure 4-33. It is best to use all capital letters with no
spaces or punctuation marks.
Verify Format
Media Selection
Media Label
Format
Figure 4-33 Format and Verify Media
5.) The Ultrasound system displays a pop-up menu, as shown in Figure 4-34. When the formatting
has been completed, press OK to continue.
6.) If desired, verify that the format was successful by returning to Utility>Connectivity>Tools and
selecting VERIFY as shown in Figure 4-33.
4 - 14
Section 4-3 - General Procedure
GE MEDICAL SYSTEMS
DIRECTION 2395907, REVISION 2
LOGIQ™ 5 EXPERT BASIC SERVICE MANUAL
Figure 4-34 Format Successful Pop-up Menu
Chapter 4 Functional Checks
4 - 15
GE MEDICAL SYSTEMS
DIRECTION 2395907, REVISION 2
4-3-11-2
NOTE:
LOGIQ™ 5 EXPERT BASIC SERVICE MANUAL
Backup System Presets and Configurations
Always backup any preset configurations before a software reload. This ensures that if the presets need
to be reloaded, after the software update, they will be the same ones the customer was using prior to
service.
1.) Insert a formatted MOD (Magneto-Optical Disk) or CD-R into the drive.
2.) On the Touch Panel, press UTILITY.
3.) On the Utility Touch Panel, press SYSTEM.
4.) On the monitor display, select BACKUP/RESTORE.
NOTE:
If you are not logged in as GE Service or with administrator privileges, the Operator Login
window is displayed. Log on with administrator privileges.
5.) In the Backup list, select Patient Archive, Report Archive, System Configuration and User Defined
Configuration.
6.) In the Media field, select MO or CD-RW.
7.) Select BACKUP.
The system performs the backup. As it proceeds, status information is displayed on the Backup/Restore
screen.
Check here to
backup presets
and configurations
Figure 4-35 Backup/Restore Menu
4 - 16
Section 4-3 - General Procedure
GE MEDICAL SYSTEMS
DIRECTION 2395907, REVISION 2
4-3-11-3
LOGIQ™ 5 EXPERT BASIC SERVICE MANUAL
Restore System Presets and Configurations
CAUTION The restore procedure overwrites the existing database on the local hard drive. Make sure to insert
the correct MOD or CD-R.
1.) Insert the Backup/Restore MOD (Magneto-Optical Disk) or CD-R into the drive.
2.) On the Touch Panel, press UTILITY.
3.) On the Utility Touch Panel, press SYSTEM.
4.) On the monitor display, select BACKUP/RESTORE.
NOTE:
If you are not logged in with administrator privileges, the Operator Login window is displayed.
Log on with administrator privileges.
5.) In the Restore list, select Patient Archive, Report Archive, System Configuration and User Defined
Configuration.
6.) In the Media field, select the Backup/Restore MOD or CD-RW.
7.) Select RESTORE.
The system performs the restore. As it proceeds, status information is displayed on the Backup/Restore
screen.
Check here to
restore presets
and configurations
Figure 4-36 Backup/Restore Menu
Chapter 4 Functional Checks
4 - 17
GE MEDICAL SYSTEMS
DIRECTION 2395907, REVISION 2
4-3-11-4
LOGIQ™ 5 EXPERT BASIC SERVICE MANUAL
Archiving Images
1.) Insert the archive media. To format the archive media, CD-ROM or MOD, select the Utility tab
on the Touch Panel.
2.) Select Connectivity, then Tools.
3.) Format the MOD/CD-ROM. Verify the format if desired.
4.) Images will be moved from the hard drive by date. Therefore, the best way is to label media by
date.
NOTE:
Images will be moved from the hard drive by date. Therefore, the best way to label media is by
date. When images are moved to the archive media, they will be deleted from the system hard
drive. However, the patient database (backed up earlier) maintains pointers to the location of
the images on the archive media.
Verify Format
Media Selection
Media Label
Format
Figure 4-37 Format MOD/CD-ROM Screen
5.) Press PATIENT and set the Dataflow to store images directly to MOD or CD-ROM.
6.) From the image screen, press MORE, then select Move Images. The Move Images pop-up
appears.
4 - 18
Section 4-3 - General Procedure
GE MEDICAL SYSTEMS
DIRECTION 2395907, REVISION 2
4-3-11-4
LOGIQ™ 5 EXPERT BASIC SERVICE MANUAL
Archiving Images (cont’d)
Figure 4-38 Image Archive Move Pop-up Menu
7.) Fill in the From Date and To Date. Specify to Keep days together.
8.) Press RECALCULATE.
9.) Press OK. An in-progress message appears. The archive operation is complete when you
receive the message shown in Figure 4-39.
Figure 4-39 Archive Operation Complete Message
10.)Repeat the image move steps until all images have been archived.
All databases, presets and images should now be saved to removable media.
Chapter 4 Functional Checks
4 - 19
GE MEDICAL SYSTEMS
DIRECTION 2395907, REVISION 2
4-3-12
LOGIQ™ 5 EXPERT BASIC SERVICE MANUAL
ECG Check Out (this option is currently not available on the LOGIQ™ 5
Connect the ECG Harness and check:
Table 4-19
Step
1.
4 - 20
ECG Harness Check
Task to do
Connect the ECG at the Connector on the Front of the
scanner.
Expected Result(s)
It will display a curve along the bottom edge of the image
sector
Section 4-3 - General Procedure
GE MEDICAL SYSTEMS
DIRECTION 2395907, REVISION 2
LOGIQ™ 5 EXPERT BASIC SERVICE MANUAL
Section 4-4
Application Turnover Checklist
Complete these checks before returning the scanner to customer for use:
1.) TBD
Section 4-5
Software Configuration Checks
Table 4-20
Step
Software Configuration Checks
Task to do
Expected Result(s)
1.
Check Date and Time setting
Date and Time are correct
2.
Check that Location (Hospital Name) is correct
Location Name is correct
3.
Check Language settings
Desired Language is displayed
4.
Check assignment of Printer Keys
Print1-4 Keys are assigned as desired by the customer
5.
Check that all of the customer’s options are set up correct All authorized functions are enabled
Chapter 4 Functional Checks
4 - 21
GE MEDICAL SYSTEMS
DIRECTION 2395907, REVISION 2
LOGIQ™ 5 EXPERT BASIC SERVICE MANUAL
Section 4-6
Peripheral Checks
Check that peripherals work as described below:
Table 4-21
Step
Peripheral Checks
Task to do
Expected Result(s)
1.
Press (FREEZE)
2.
Press (PRINT 1) or (PRINT 2) on the Control The image displayed on the screen is printed on B&W or Color printer,
Panel
depending on the key assignment configuration
3.
Press VIDEO on the Control Panel.
4.
Press UPDATE MENU in the Trackball area. The Video Set Counter / Search Dialog window is displayed
5.
Use the alphanumeric keyboard to enter
the counter number in the counter field.
Number appears
6.
Press SET COUNTER to save the change.
Number is saved
7.
Press VIDEO on the Control Panel
to return to the scanning mode
8.
Press REC/PAUSE on the Control panel.
9.
Press REC/PAUSE on the Control panel.
10.
Press VIDEO on the Control Panel and the
assignable play
11.
Use the Assignable keys on the Control
Panel
Stop image acquisition.
To start the video counter at a different point:
to Start Recording
4 - 22
A red dot is displayed in the VCR status area on the Title bar to indicate
that recording has begun
To Stop recording
The video status icon is changed to (Pause)
To start, Play back an examination
to perform actions on the recorded session, such as stop, pause, rewind
or fast forward.
The video status icon in updated accordingly.
12.
While in playback mode, use the
TRACKBALL to adjust the video playback
speed and scroll through the record.
To search on the tape
13.
Press the assignable PAUSE
to stop the tape at the desired frame.
14.
When playing back an examination
part of it can be stored on the computer’s memory as a cineloop.The
cineloop enables the user to perform further operations on the stored
section (see for further information on cineloop operation).
15.
Press (FREEZE) while playing back a
recorded session.
To store a recorded sequence as a cineloop. The last few seconds are
stored as a cineloop.
Section 4-5 - Software Configuration Checks
GE MEDICAL SYSTEMS
DIRECTION 2395907, REVISION 2
LOGIQ™ 5 EXPERT BASIC SERVICE MANUAL
Section 4-7
Mechanical Function Checks
4-7-1
Operator I/O Movement
Table 4-22
Step
1.
Display platform Maneuverability check
Task to do
Pull keyboard lever under the OP Panel to
release the lock.
Composite
B/W
Expected Result(s)
The height of the Monitor and OP Panel will
be maneuverable.
B/W Printer
Power
220-240V 500VA Max
Including rear panel
Keyboard Lever
Figure 4-40 Keyboard Lever
WARNING
Probes can be connected at any time, whether the unit is on or off
Do NOT touch the patient and any of the connectors on the ultrasound unit simultaneously, including
ultrasound probe connectors.
WARNING
Take the following precautions with the probe cables: Keep free from the wheels. Do
not bend.Do not cross cables between probes.
Chapter 4 Functional Checks
4 - 23
GE MEDICAL SYSTEMS
DIRECTION 2395907, REVISION 2
LOGIQ™ 5 EXPERT BASIC SERVICE MANUAL
Section 4-8
Site Log
Table 4-23
Date
4 - 24
Site Log
Service person
Problem
Section 4-5 - Software Configuration Checks
Comments
GE MEDICAL SYSTEMS
DIRECTION 2395907, REVISION 2
LOGIQ™ 5 EXPERT BASIC SERVICE MANUAL
Section 4-9
Software Configuration Checks
Refer to Chapter 3, Section 3-6 - System Configuration for setting procedures.
Table 4-24
Software Configuration Checks
Step
Task to do
Expected Result(s)
1.
Check Date and Time setting
Date and Time are correct
2.
Check that Location (Hospital Name and
Department) is correct
Location Name is correct
3.
Check Language setting
Language is proper
4.
Check Units setting
Units are proper
Section 4-10
Peripheral Checks
Check that peripherals work as described below:
Table 4-25
Peripheral checks
Step
Task to do
Expected Result(s)
1.
Press Freeze
Stop image acquisition.
2.
Press (P1) or (P4) on the Control panel
The image displayed on the screen is printed
on B&W or Color printer depending on the
key assignment configuration.
Chapter 4 Functional Checks
4 - 25
GE MEDICAL SYSTEMS
DIRECTION 2395907, REVISION 2
4 - 26
LOGIQ™ 5 EXPERT BASIC SERVICE MANUAL
Section 4-9 - Software Configuration Checks
GE MEDICAL SYSTEMS
DIRECTION 2395907, REVISION 2
LOGIQ™ 5 EXPERT BASIC SERVICE MANUAL
Chapter 5
Components and Functions (Theory)
Section 5-1
Overview
5-1-1
Purpose of Chapter 5
This chapter explains LOGIQ™ 5’s system concepts, component arrangement, and subsystem
function. It also describes the Power Distribution System (PDS) and probes.
Table 5-26
Contents in Chapter 5
Section
Description
Page Number
5-1
Overview
5-1
5-2
General Information
5-2
5-3
Block Diagram
5-3
5-4
Front End
5-5
5-5
Back End Processor
5-13
5-6
Top Console
5-15
5-7
External I/O
5-16
5-8
Power Diagram
5-25
5-9
Air Flow
5-29
5-10
Service Platform
5-31
Chapter 5 Components and Functions
5-1
GE MEDICAL SYSTEMS
DIRECTION 2395907, REVISION 2
LOGIQ™ 5 EXPERT BASIC SERVICE MANUAL
Section 5-2
General Information
LOGIQ™ 5 is a phased and linear array ultrasound imaging scanner. It has provisions for analog input
sources like ECG and Phono. A Doppler probe may also be connected and used.
The system can be used for:
-
2D Gray Scale and 2D Color Flow Imaging
-
M-Mode Gray Scale Imaging
-
Color M-Mode
-
Doppler
-
Different combinations of the above modes
LOGIQ™ 5 is a digital beamforming system.
Signal flow travels from the Probe Connector Panel to the Front End Electronics, to the Back-End
Processor, and finally displayed on the monitor and peripherals.
System configuration is stored on the hard drive and all necessary software is loaded from the hard drive
on power up.
Name Plate
Monitor
Monitor Controls
Task Lamp
Touch Panel Screen/Display
Power On/Off Switch
Operator Console
TGC Slidepot Knobs
Keyboard Lever
B/W Printer
Front Cover
CD-ROM
MOD
Probe Connector
ECG Module
Front Bumper
Swivel Lock & Brake Release
Figure 5-1 LOGIQ™ 5 Major Components
5-2
Section 5-1 - Overview
GE MEDICAL SYSTEMS
DIRECTION 2395907, REVISION 2
LOGIQ™ 5 EXPERT BASIC SERVICE MANUAL
Section 5-3
Block Diagram
SIG Assy
PMT Assy
VCA2613
ATD Assy
CWDOP
Assy
VCA2613
(option)
TPG2
TxPulse Driver X16
TPG2
TxPulse Driver X16
VCA2613
VCA2613
VCA2613
TxPulse Driver X16
TxPulse Driver X16
TPG2
LMT Assy
TPG2
RLY Assy(Prb VF)
TXIC
FPGA
VCA2613
Probe
Connector
Probe
Connector
R
E
L
A
Y
M
U
X
Probe
Connector
PLY Control
R
R
R
R
R
R
R
R
TEST
SIGNAL
TGC
DRIVER
THV
Switch
JUSC
Buffer
Clock
Switch
JUSC Buffer
BackPanel
VGA from BEP
AC Power Assy
Key Board
A/D Board
for VGA
LV Power Supply
Main
Controller
USC
Controller
AC
INPUT
Isolation Transformer
6.4" LCD
Touch
Screen
USB
Power Shut Down Control
(SSR)
Power Control From VIC in BEP
Figure 5-2 LOGIQ™ 5 System Block Diagram
Chapter 5 Components and Functions
5-3
GE MEDICAL SYSTEMS
DIRECTION 2395907, REVISION 2
Section 5-3
LOGIQ™ 5 EXPERT BASIC SERVICE MANUAL
Block Diagram (cont’d)
SIG Assy
12 Bits ADC
Buffer
12 Bits ADC
Buffer
12 Bits ADC
Buffer
12 Bits ADC
Buffer
12 Bits ADC
Buffer
12 Bits ADC
Buffer
12 Bits ADC
FEC Assy
FLASH
Memory
ADDER
Memory
16MB
Control
Harmonic Filter
Data
Line Buffer
&
Memory
Controller
COMSO
Conrtol
FPGA
JUSC
CONTROL
JUSC
Buffer
SH4
for
Scan Control
PCI MF for SH4
OQCARD
12 Bits ADC
OQCARD
Buffer
RDS Assy
OQCARD
(Option)
Buffer
OQCARD
CWDOP
Assy
Memory
PCI BUS
JUSC
BUS
Voltage
Reference
Power
Check
HV
Control
PGC Siginal
Gen
Clock Gen. Circuit
Backplane
PC2IP Board
HV Assy
RS232
AGP Video Card
MODEM
VIC Card
Main Memory
512MB
Sound Card
ECC
RJ45
MOD
CDRW
LAN
Chipset
Chipset
EIDE
HDD
CPU
P4
USB Battery
USB
ATX Power Supply
PC BackEnd
Figure 5-3 LOGIQ™ 5 System Block Diagram (cont’d)
5-4
1960
for
PCI I/F
Memory
Section 5-3 - Block Diagram
GE MEDICAL SYSTEMS
DIRECTION 2395907, REVISION 2
LOGIQ™ 5 EXPERT BASIC SERVICE MANUAL
Section 5-4
Front End
SIG
Rx Signal
LMT
RLY
PMP
ATD
FEC
HV
RDS
SHV
Tx Pulse
THV
BACKPLANE
Control Signal
THV
&
SHV
Figure 5-4 The Front End
The Front End generates the strong burst transmitted by the probes as ultrasound into the body. It also
receives weak ultrasound echoes from blood cells and body structure, amplifies these signals and
converts them to an digital signal.
The digital representation of this signal is presented to the Mid Processor section.
•
RLY(Relay) : RLY Assy contains 3 connectors for probe interface and arrays of relays for switchable
connection. High voltage multiplexer provide connection between 128 signal of probe and
selectable 64 channels transmit/receive signal
•
LMT (Limiter) : This has transmit/receiving switch to isolate rx signal circuit from transmit pulse.
•
PMP(Preamplifier) : The preamplifier amplifies 64 echo signals. The amplified receiving signals are
sent to RDS.
•
ATD (Advanced Transmit Driver) :This has 64 channel Transmit pulse generator, bipolar pulse
drivers, delay controller.
•
RDS (Receiving Delay Summing) : Cascading two receiving beam formers (two RDSs) allows the
system to achieve 64ch delay summing.
•
FEC (Front End Control) : FEC control scan operation and transfer the scan parameters to others
board, ATD,RDS,RLY,PMP. Proper signal processing for tissue and dop are done in FEC
•
HV(High Voltage) : Generates THV and SHV for transmit pulse driver and High voltage mux.
•
SIG(Signal) : Receiving echo signal from PMP is transfer to RDS through this SIG
Chapter 5 Components and Functions
5-5
GE MEDICAL SYSTEMS
DIRECTION 2395907, REVISION 2
5-4-1
Probe A
LOGIQ™ 5 EXPERT BASIC SERVICE MANUAL
RLY
128
RELAY
128
Probe B
Probe C
RELAY
128
128
MUX
128
To LMT
SHV
Probe ID
I/F
DCWD
Probe I/F
64
Control
Circuit
Control
FPGA
Temperature
Sensor
JUSC I/F
Figure 5-5 RLY Block Diagram
RLY ASSY contains of 3 phased array probe connectors and provides switchable connection between
probes and 64ch transmitters/receivers.
NOTE:
There is no numeric order in the probe port, system recognizes the first probe slotted on the
port as the probe #1, regardless of the probe port location.
This board also has interface for a single CWD probe connector.
The main function of RLY ASSY is as follows.
5-6
-
3-to-1 selectors for three probes.
-
Interface with JUSC bus (control bus)
-
Interface with FEC ASSY for IIC bus.
-
Interface with DCWD Connector.
-
Supply/Cut control and failure detection of supply voltage for Mux circuit in a Probe.
-
Device: Mechanical Relay
-
Switch: 128ch 3:1 selector
-
Temperature sensor in this assy detects temperature of RLY assy.
Section 5-4 - Front End
GE MEDICAL SYSTEMS
DIRECTION 2395907, REVISION 2
5-4-1-1
Interface to Probe
•
•
•
Probe Status detection
-
Detects whether or not a probe is connected.(POPEN)
-
Detects ID code of a connected probe.(PCODE)
Mux Interface
-
Transfers control data of Mux to a probe.(CONSYS,CONSTA)
-
Enables/Disables control of data.
-
Detects whether Mux data setting is finished or not.
Power Supply for Mux
-
•
•
Detects resistance of a thermistor in a probe head as voltage when the probe is
selected.(PTEMP) This signal is connected to FEC.
LED Blinking
-
5-4-2
Supply/Cut control:
+5V and +15V on a connector are supplied while a probe is connected to the connector.
+/-SHV are supplied only while a probe is selected.
Surface temperature
-
5-4-1-2
LOGIQ™ 5 EXPERT BASIC SERVICE MANUAL
The LED in a probe blinks when the probe is selected.
IIC bus
-
Connects signals of IIC bus with a relay when IIC bus access is required.
-
Selects one of thress probes that IIC access with 3-to-1 switch.
LMT
64
From RLY
From ATD
To PMP
64
64
Figure 5-6 LMT Block Diagram
The main function of LMT ASSY is as follows.
-
64ch transmit/receiving switches protect a Pre-amp from a high voltage transmit pulse
-
All control signal and DC power for RLY pass thorugh this LMT Assy
Chapter 5 Components and Functions
5-7
GE MEDICAL SYSTEMS
DIRECTION 2395907, REVISION 2
5-4-3
5-4-3-1
LOGIQ™ 5 EXPERT BASIC SERVICE MANUAL
PMP
Overview
PGC Analog Sig
From FEC
Test Sig. From FEC
For Assy Diagnositic
Rx Ch#0
Rx Ch#32
Rx Ch#1
Rx Ch#33
Rx Ch#2
Rx Ch#34
Rx Ch#3
Rx Ch#35
Rx Ch#28
Rx Ch#60
Rx Ch#29
Rx Ch#61
Rx Ch#30
Rx Ch#62
Rx Ch#31
Rx Ch#63
32
64
PGC
Signal
Buffer
STCW Sig[31:0]
To CWDOP Assy
Rx Sig[61:0]
To RDS Assy
Test
Signal
Buffer
Figure 5-7 PMP Block Diagram For a Channel
The PMP (Pre-Amplifier) board receives and amplifies each 64 echo signals. Then, all 64 echo signals
(from 0 to 63ch) are outputted to the RDS sub-system (two RDS ASSYs) and following 32 echo signals
(from 32 to 63ch) are simultaneously outputted to the CWDOP ASSY via the SIG ASSY.
The PMP ASSY can amplify 64 echo signals. So, the echo signals are received by a PMP ASSY under
appropriate control. The PMP ASSY are inserted into Nest box, which is composed of BACKPLANE
board and other several daughter boards.
The PMP ASSY have main three blocks: Pre-amp and Gain Control and Mode control block.
the PMP ASSY amplifies the echo signals. The mode control block selects a maximum gain code via
dedicated control signals from FEC.
The analog signal provided by Gain Control block gives total amplified gain.
The block diagram above of the PMP ASSY for a received signal is given. Actually, there are 64
channels equivalent to figure above for a PMP ASSY.
The Pre-amp block consists of Low Noise Amplifier (LNA) and Variable Gain Amplifier (VGA). A
received signal is amplified by LNA (fixed gain), then amplified by VGA (variable gain).
5-8
Section 5-4 - Front End
GE MEDICAL SYSTEMS
DIRECTION 2395907, REVISION 2
5-4-4
LOGIQ™ 5 EXPERT BASIC SERVICE MANUAL
ATD
THV High
HV Switch
Circuit
THV Low
ECL CLK 40M Q1
ECL CLK 40MQ2
TPG2
TPG1
ECL to TIL
+TxP[15:0]
CLKQ2
-TxP[15:0]
CS
CLMP[15:0]
ADDR
FET Driver x 16ch
Tx Pulse[63:48]
FET Driver x 16ch
FET Driver x 16ch
DATA[15:0]
TPG2
TPG1
FPGA
+TxP[15:0]
CLKQ2
-TxP[15:0]
CS
JUSC Address
CLMP[15:0]
ADDR
FET Driver x 16ch
Tx Pulse[47:32]
FET Driver x 16ch
FET Driver x 16ch
DATA[15:0]
Address
Controller
TPG2
TPG1
+TxP[15:0]
CLKQ2
JUSC Data
-TxP[15:0]
CS
CLMP[15:0]
ADDR
FET Driver x 16ch
Tx Pulse[31:16]
FET Driver x 16ch
FET Driver x 16ch
DATA[15:0]
TPG2
Buffer
Controller
Board Select
TPG1
CLKQ2
CS
ADDR
+TxP[15:0]
-TxP[15:0]
CLMP[15:0]
FET Driver x 16ch
Tx Pulse[15:00]
FET Driver x 16ch
FET Driver x 16ch
DATA[15:0]
Figure 5-8 ATD Block Diagram
5-4-4-1
Overview
The ATD ASSY (Advanced Transmit Driver) generate bipolar transmit pulse for probe. This ASSY has
64 channels transmit signal drivers, Transmit Pulse Generator ASIC, control FPGA and so on. Transmit
pulse are generated by TPG2 ASIC. Each TPG2 ASIC makes 16 channels signals, so total 4 ASIC are
used in ATD assy. All of control informations for pulse generation, pulse width, time delay of each
channel are come from FEC in real time via backplane. The control FPGA, TXIC FPGA provide interfcae
between FEC and TPG2 ASICs and control operation condition of ATD assy
Main items are
*
TXIC FPGA : Interface and controller FPGA. This FPGA provide the interface with FEC
assy that master of scan control.
*
TPG2 ASIC: A TPG2 ASIC can generate 16 channels logic level transmit pulse signal.
This ASIC use 2 phase 40MHz clocks for transmit delay control and pulse generation.
40Mhz operation clocks are come from FEC assy via backplane.
*
Transmit Pulse Driver : TPG2 ASIC generated logic level signal for transmit pulse. So this
signal need to be expanded to high voltage signal. Driver circuit make logic level signal to
high voltage level signal.
*
THV Switch : LOGIQ5 system use dual transmit high voltage for transmit driver because
B mode and CFM mode use differnet voltage level of transmit pulse. So in duplex of trplex
mode, B/CFM or B/DOP, Low THV and High THV are switched in ATD assy in real time.
Chapter 5 Components and Functions
5-9
GE MEDICAL SYSTEMS
DIRECTION 2395907, REVISION 2
5-4-5
5-4-5-1
LOGIQ™ 5 EXPERT BASIC SERVICE MANUAL
RDS
Overview
Channel 0
BUF
12 Bits
ADC
x8
Channel 7
BUF
12 Bits
ADC
Channel 8
BUF
12 Bits
ADC
x8
Channel 15
BUF
12 Bits
ADC
Channel 16
BUF
12 Bits
ADC
x8
Channel 23
BUF
12 Bits
ADC
Channel 24
BUF
12 Bits
ADC
x8
Channel 31
BUF
OQCARD
BIC
FPGA
OQCARD
OQCARD
JUSC BUS
8M Byte FLASH
for RX Delay
OQCARD
12 Bits
ADC
To FEC
Test
Signal
Buffer
Test Sig.
From FEC
Reference
Voltage
Generator
Figure 5-9 RDS Block Diagram
The RDS sub-system is the receive beam former and consist of 2 RDS assys. Each RDS assy have
capability of 32 channels digital receive beamforming. The each digital beamforming output data of the
RDS assy are sent to FEC. FEC add each other and makes final 64 channel beamforming data
Delay control data for recevie beamforming are contained in Flash memory. Typically 2 or 3 probes data
are saved in flash memory. If new probe is connected, additional probe data will be downloaded from
HDD in BEP to Flash memory
Main items are
5 - 10
-
BICTOP FPGA : Provide innterfaces with FEC through JUSC Bus. This fpga control all
OQCARD asic for receive beamforming. All of parameter information for asic operation are
loaded into OQCARD asic from FEC through this fpga.
-
OQCARD :Digital receive beamforming ASIC. Ecah OQCARD have capability of 8 channel
receiving data inputs. Each input data can be 12 bits. Operation clock is 40 MHz. 4 OQCARD
asics are used in a RDS board and each OQCARD summing data output are cascaded to next
OQCARD asic. So the last summing output of the last OQCARD are transferred to FEC for
adding two summing data of each RDS board. The receve beamforming contrlo logic in
OQCARD asic need delay information data for each channel’s control logic. This delay
information data are downloaded into asic from flash memory by BICTOP fpga.
-
Flash Memory : Flash memory keep the receive delay data for OQCARD asic. During scan
time, these data are downloaded into OQCARD asic by bictop fpga. Memory capacity is
8MBytes each board, typically 2 or 3 probes data .
Section 5-4 - Front End
GE MEDICAL SYSTEMS
DIRECTION 2395907, REVISION 2
5-4-5-2
5-4-6
LOGIQ™ 5 EXPERT BASIC SERVICE MANUAL
RDS (cont’d)
-
Reference Voltage Generator : This mode is for imaging. The parameters specific to scan line
number are sent to OQCARDs and the start triger for receiving signals is generated.
-
Access Mode:
This mode is for accessing flash memories and OQCARDs.
FEC
FEC ASSY
Memory
16 MB
Control
ADDER
Harmonic Filter
SH-4
for
Scan Control
JUSC
CONTROL
COMSO
Memory
PCI I/F for SH-4
Memory
JUSC
BUS
Power
Check
HV
Control
Data
Line Buffer
&
Memory
Controller
PGC, Test Sig
Gen
I960
for
PCI I/F
Clock Gen, Circuit
Figure 5-10 FEC Block Diagram
5-4-6-1
Overview
•
CHAF:
Three CHAFs have functions of coded excitation decorder and 2nd harmonic filter.
•
BIPC and RIF:
Have functions of RF memory controller.
The RIF mainly controls RF memory data bus, RF data flow pass, and RF gain.
The BIPC, which is interface of JUSC bus, mainly controls CHAF and RF memory address bus.
•
COMSO:
Has functions of detector, B/M mode edge enhance, Log compression, and dynamic range control.
•
PCI IF:
Converts JUSC bus in FEC board. The local bus is connected to each block. It transfers B/M mode
data to PACO FPGA via the COMSO data bus.
•
USC IF:
Has functions of generation to JUSC bus, generation of TGC signal and test signal for selfdiagnostics, COMSO control.
Chapter 5 Components and Functions
5 - 11
GE MEDICAL SYSTEMS
DIRECTION 2395907, REVISION 2
5-4-6
FEC (cont’d)
•
CLK Generator Block:
Generates 40MHz (two phases), and 26.6MHz clock using 160MHz master clock.
•
Real Time Controller (RTCL):
The TRIG cyclical Real Time Control is done by SH4 RISC processor. SH4 is a one of MID BUS
agent through SH-PCI bridge.
•
PCI - PCI Bridge:
It Bridges between Mid bus and host side PCI bus by using i960RP. Mid bus is basically compliant
to CompactPCI. Primary side PCI is connected to Host PC through PCIcable and PC2IP which is
mounted on PCI slot of PC-motherboard.
•
Image Data Transferring:
It receives image data from COMSO, and send them to Host side. Data are buffered when receiving
on COMSO data bus. After buffered, data are stored and handled on Local side of i960. And DMA
function of i960RP perform data transferring to host PC memory.
-
5-4-7
LOGIQ™ 5 EXPERT BASIC SERVICE MANUAL
Peripheral Control:
The SH4 or i960RP also performs other functions like safety observation, HV Control and so
on.
HV Power(Tx Power)
PWM 1
(HVH)
PWM 2
(HVL)
PWM 3
( V)
(SH
DROPPER1
+HVH
(0 ~ 60V)
DROPPER1
-HVH
(0 ~ -60V)
DROPPER2
+HVL
(0 ~ 30V)
DROPPER2
-HVL
(0 ~ -30V)
DROPPER3
+SHV
(0 ~ 80V)
DROPPER3
-SHV
(0 ~ -80V)
Figure 5-11 HV Unit Block Diagram
5-4-7-1
Overview
AC110V is supplied to the HV unit via AC Box > Transformer > SSR. This is applied to the PFC, inside
the HV unit. The PFC convert AC100V to DC400V, and DC voltage is applied to DC/DC, then to HVH,
HVL, and SHV using dropper. They convert DC voltage to proper voltage to be outputted.
5-4-7-2
Specifications
DC Output Capacity:
5 - 12
•
HVH : +/- 0V to +/- 60V variable, Max. 110W, Max. 2A
•
HVL : +/-0V to +/- 30V variable, Max, 70W, 1A
•
+SHV: +80V +/- 5%, 80mA
•
-SHV: -80V +/- 5%, 80mA
Section 5-4 - Front End
GE MEDICAL SYSTEMS
DIRECTION 2395907, REVISION 2
5-4-7-3
LOGIQ™ 5 EXPERT BASIC SERVICE MANUAL
Output Signal to FEC
The following signals are sent to FEC via BACKPLANE board.
•
5-4-7-4
OV(Over Voltage), OC(Over Current) of each power source : HV tests in itself. The result transmits
the FEC via BACKPLANE ASSY.
Input Signal from FEC
The following signals are sent to HV unit via FEC > BACKPLANE board.
•
+5V, +/- 15V, HV STOP: These signals are sent to PFC to control DC voltage output of HVH, HVL,
and -SHV. Normally HVSTOP is ON
-
HVH Ref, HVL Ref: These are the digital signals (8 bits) sent to the DAC of HVH or HVL from
FEC. Consequently, The DC Voltage (0 - 60V) is outputted from HV unit.
Chapter 5 Components and Functions
5 - 13
GE MEDICAL SYSTEMS
DIRECTION 2395907, REVISION 2
LOGIQ™ 5 EXPERT BASIC SERVICE MANUAL
Section 5-5
Backend Processor
5-5-1
BEP2 with Intel Motherboard
Figure 5-12 BEP2 with Intel Motherboard
The Backend Processor processes the data from front end block and stores it in
The main memory and performs scan image reconstruction to display on monitor
Backend Processor(BEP) include ATX smps and UPS battery, motherboard for P4
And Pentium 4 CPU. Main memory capacity is 512Mbytes and the type of memory is
DDR266. The BEP motherboard have capability of AGP graphic functionality and sound and
Ethernet functionality in itself. So this motherboard no need additional AGP video
Card and sound card, Ethernet card. So each slot on motherboard are used for followings
-
-AGP card Slot : Open
-
-PCI Slot #1 : Open
-
-PCI Slot #2 : VIC Card
-
-PCI Slot #3 : Open
-
-PCI Slot #4 : PC2IP Card
-
-PCI Slot #5 : Open
-
-PCI Slot #6 : Open (Option for Flock of Bird 3D card in future)
-
Storage Device :
-
Hard Disk Drive
-
CD R/W Drive
-
5 - 14
Optional MO Drive
Section 5-5 - Backend Processor
GE MEDICAL SYSTEMS
DIRECTION 2395907, REVISION 2
5-5-2
LOGIQ™ 5 EXPERT BASIC SERVICE MANUAL
BEP with Supermicro Motherboard
To Monitor
Patient IO
(Option)
To RAI B'D, RDI B'D in Rear Panel
Open Slot
Open Slot
VIC Card
Open Slot
PC2IP Card
Open Slot
3D Card(Option)
TBD
Battery
ATX
Power
Supply
On B'D
AGP
PCI Slots
F
A
N
512MB
PC2100(266MHz)
DDR RAM
P4
2.0GHz
RS232
Intel Motherboard
EIDE
HDD
CDRW
Drive
Sound
MOD
(Option)
LAN
HDD
LED
PWR
ON
moderm
for
insite
USB
To Rear Panel
OPIO Panel(Keyboard)
Digital BW Printer
Figure 5-13 BEP with Supermicro Motherboard
The Back End Processor grabs the data from the Front End, stores it in a main memory, performs scan
conversion to pixel domain and drives the system RGB monitor. Back End Processor software is also
providing B mode, M mode, CFM, Doppler processing
BEP Box include ATX smps and UPS battery, ATX type P4 motherboard and P4 CPU. Memory capacity
is 512MB minimum.
AGP and PCI slots on motherboard contains followings
•
AGP video card display image on monitor and operation menu on LCD. AGP video card have dual
VGA port for monitor display and LCD display. Both port can display different resolution. Monitor
disply resolution is 800 x 600, 75Hz, but LCD display resolution is 640 x 480 60Hz.
•
PCI Slot #1 VIC Card: Video Converter Board for VCR playback and VCR recording and analog
video image printing
•
PCI Slot #2 : Open slot
•
PCI Slot #3 PC2IP card
•
PCI Slot #4 Sound Card
•
PCI Slot #5 Ethernet Card
•
PCI Slot #6 : Open slot for 3D sensor card option
Storage Devices:
•
Hard Disk Drive (HD Drive) (Inside the BEP Chassi)
•
CD R/W Drive (Mounted at front of BEP Chassi, User can access).
•
Optional Magneto Optical Drive (MO Drive) (Mounted at front of BEP Chassi,user can access)).
Chapter 5 Components and Functions
5 - 15
GE MEDICAL SYSTEMS
DIRECTION 2395907, REVISION 2
5-5-3
LOGIQ™ 5 EXPERT BASIC SERVICE MANUAL
VIC Card
50p Connector
2 ports of rs232
Patient IO Interface
IIC BUS Signal
LV Power on/off sig.
To Rear Panel for remote control of VCR
To Patient IO module in BEP Box
To Rear Panel for EEPROM I/F
To Console
Monitor
External VGA Port
in Rear Panel
Buffer
BW Image Printer
Color Image Printer
VGA to TV
Converter
S-VHS / Composite
For VCR Recording
Shutter
Control
Shutter Sig. for BW/CL Printer
Video
Decoder
&
PCI I/F
S-VHS / Composite
from Rear panel for
VCR Playback
PCI Slot In
BEP Assy
IIC BUS
VGA Signal
(R/G/B/Sync)
VGA to TV
Converter
Control
FPGA
Live DC 5V Power
from JPC in AC
Power Assy
Power On/Off signal
from Keyboard assy
Connect to power
on/off pin on
motherboard
Figure 5-14 VIC Card
VIC Card perform video conversion operations and Power on/off control.
5-5-4
•
Video Decoder : Video decoder convert S-VHS or composite video analog signal to digital RGB data
and send the RGB digital data into BEP main memory on motherboard through PCI bus. And then
this video digital data is displayd on console monitor. Video analog signal comes from rear panel.
This video decoder also have IIC bus interface logic.
•
VGA to TV Convertor : This device convert the VGA display signal to TV display signal for B/W
printer and color printer and VCR recording.
•
Shutter Control CPLD : Shutter signals for analog B/W printer and color printer are generated by
this CPLD. And this CPLD is controlled by video decoder via IIC bus.
•
Power Control FPGA : This FPGA generates power on/off signal. This device is alive always by live
DC power which comes from JPC assy in AC Power Assy. So this device monitor the ststus of
power on/off switch on the keyboard. If power switch will be pushed once, this device turn on the
LV power supply in AC power assy and after few seconds, turn on the BEP assy.
Patient I/O (Option)
The optional Patient I/O is mounted at the front of the BEP chassi.
Available inputs:
5 - 16
•
PCG
•
ECG
•
AUX1
•
AUX2
Section 5-5 - Backend Processor
GE MEDICAL SYSTEMS
DIRECTION 2395907, REVISION 2
LOGIQ™ 5 EXPERT BASIC SERVICE MANUAL
Section 5-6
Top Console
The Top Console includes a On/off switch, a keyboard, different controls for manipulating the picture
quality, controls for use in Measure & Analyze (M&A), and loudspeakers for stereo sound output (used
during Doppler scanning, inside the CRT monitor cover).
5-6-1
KEYBOARD
USB from BEP
USB
MICOM
With HUB
A/N Key Assy
Function Key Arrys
A/N Matrix
Interface
USB HUB
USB
Track Ball
Down #1
USB I/F
USB I/F
Encoders
Keyboard
Control
MICOM
USB
MICOM
TGC SLide POT
RS232
LEDs for Key
backlight
Down #2
Foot Switch I/F
Down #4
Touch Screen
Interface
Down #4
USB I/F
USB#1, #2 From
Rear Panel
RAM
USB I/F
LCD Assy
VGA Display from BEP
AD
Board
Inverter
6.4"
TFT LCD
Touch
Sensor
Figure 5-15 Keyboard
Keyboard assy provide all of operator interface for scan.Keyabord assy consist of several pieces of main
function assembly.
•
HUB Assy : The HUB assy have usb interface for upstream usb port which comes from BEP. HUB
assy also have alpha numeric key interface and control functions and usb hub. So usb trakcball and
the usb of main assy and additional 2 usb ports in rear panel are connected to
•
MAIN Assy : Main assy have usb micom for interface between main assy and usb hub assy. All of
function key and encoders interface and controls are done by additional control on chip
microcomputer
•
LCD Assy : LCD Assy displays menu screen and touch sensor recognize of touch.
Chapter 5 Components and Functions
5 - 17
GE MEDICAL SYSTEMS
DIRECTION 2395907, REVISION 2
5-6-2
LOGIQ™ 5 EXPERT BASIC SERVICE MANUAL
MONITOR
15 inch high resolution RGB monitor with non interlace scan includes loudspeakers for stereo sound
output and microphone to record talking of operator. Monitor have also task lamp to light up the A/N key
on keyboard assy
Figure 5-16 LOGIQ 5 Monitor
Section 5-7
External I/O (Rear Panel)
The External I/O is the interface between the scanner and all external items, located at the rear side of
the scanner.
Examples: InSite, TCP/IP network, Printer, etc.
Rear Panel assy consist of 2 assy, RAI and RDI. RAI means Rear Analog Interface and RDI means
Rear Digital Interface.
5 - 18
Section 5-7 - External I/O (Rear Panel)
GE MEDICAL SYSTEMS
DIRECTION 2395907, REVISION 2
5-7-1
LOGIQ™ 5 EXPERT BASIC SERVICE MANUAL
Input/Output Signals for peripheral
Table 5-27
Input Output signals for peripherals
Signal Name
Description
Connection from/via/to
R/G/B/Sync for Color
Printer
RGB and Sync signal output for analog color
printer. 1.0Vp-p, 75ohms, unbalanced
VIC -> RAI-> BNC Connector
Cmpsit In for Color
Printer
Composite input from Color printer for diagnostic
BNC connector -> RAI -> VIC
purpose(TBD)
Shutter output for Color
printer
Exposure control signal for color printer
VIC -> RDI -> Mono jack
Remote
RS232 port for remote control of Color printer
PC2IP -> VIC -> RDI -> 9P
DSUB connector
Composite In / S-VHS In Composite VCR input and S-VHS input signal for
BNC connectror-> RAI -> VIC
for VCR
VCR playback
Audio L In/Audio R In for
VCR
Stereo audio input from VCR for VCR playback
RCA Jack-> RAI -> Sound
card in BEP
Composite Out / S-VHS
out for VCR
Composite VCR output and S-VHS output signal
for VCR Recording
VIC -> RAI -> SVHS
connector
Audio L Out/Audio R Out
for VCR
Stereo audio out for VCR Recording
Sound card in BEP -> RAI ->
RCA Jack
Remote
RS232 port for remote control of VCR operation
PC2IP -> VIC -> RDI -> 9P
DSUB connector
Composite out for BW
printer
Composite video signal output for BW printer
1.0Vp-p, 75ohms, unbalanced
VIC -> RAI -> BNC connector
BW Shutter
Shutter control signal for BW printer
External -> RAI -> Mono Jack
Foot Switch
Foot switch is mechanical switch that connect a
signal to ground
Foot switch connector-> RDI > Keyboard
External VGA
VGA singal output for external VGA monitor
Graphic card in BEP -> VIC > RAI -> RDI -> 15P DSUB
connector
Ethernet
Standard TCP/IP Ethernet
BEP -> RDI -> RJ45 conn.
Phone Line
Telephone line of Modem for insite
Phone jack -> RDI -> Modem
Chapter 5 Components and Functions
5 - 19
GE MEDICAL SYSTEMS
DIRECTION 2395907, REVISION 2
5-7-2
LOGIQ™ 5 EXPERT BASIC SERVICE MANUAL
Peripherals and Cable connection
A VCR, a Black & White Video Printer and a Color Printer may be installed onboard the scanner. These
devices are connected to the External I/O (Rear Panel) or Front Panel in the case of B/W Printer.
5-7-2-1
B/W Printer Cable Connection (Analog and Digital)
Connect the Power cable, mini plug cable, and the BNC-BNC cable between the B/W Video Printer and
the console as shown in on page 5-20 .
Front Panel of JUPITER
100~120V 500VA Max
Composite
B/W
B/W Pr inte r
BNC- BNC CABLE
MINI PLU G CABLE
Rear Panel of B/W Pr inte r
REMOTE GAMMA
I
II
I
III
PAPER
TYPE
II IV
DI P SW
IN
OUT
OFF
ON
VEDEO
DI P SW FUN CTION TABLE
~A C IN
POWER CABLE
Analog Cable Connection
SYNC
S- VIDEO
VIDEO
SYNC
S- VIDEO
VIDEO
Front Panel of JU PITER
100~120V 500VA Max
Composite
B/W
B/W Pr inte r
USB Cable
Power Cable
Digital (USB) Cable Connection
Figure 5-17 Cable Connection - Analog Connection Method
5 - 20
Section 5-7 - External I/O (Rear Panel)
GE MEDICAL SYSTEMS
DIRECTION 2395907, REVISION 2
5-7-2-2
LOGIQ™ 5 EXPERT BASIC SERVICE MANUAL
Cable Connection - Color Printer
Connect the cables listed below between the Color Printer and the console.
BNC CABLE for VID EO SI GNAL
(supp l ied with c olor vid eo print er )
Rear Panel of JUPIT ER
SYNC
S- VIDEO
VIDEO
SYNC
S- VIDEO
VIDEO
MINI PL UG CABLE
ON
OFF
~AC IN
Rear Panel of UP-2950 SERIES
COLOR VID EO PR INT ER
POWER CABLE
Figure 5-18 Cable Connection between Color Printer and Console
NOTE:
Equipment damage possibly. Be sure to use the following recommended connecting cables to
connect recording devices and a network with LOGIQ™ 5 console.
Chapter 5 Components and Functions
5 - 21
GE MEDICAL SYSTEMS
DIRECTION 2395907, REVISION 2
5-7-2-2
LOGIQ™ 5 EXPERT BASIC SERVICE MANUAL
Cable Connection - Color Printer (cont’d)
Connect the cables listed below between the Color Printer and the console.
BNC C ABLE for VIDEO SI GNAL
(supp l ied with c olor vid eo print er )
Rear Panel of
JUPITER
S- VIDEO
VIDEO
DIP S W
SYNC
ON
OFF
S- VIDEO
VIDEO
DIP S W FUNCTION T ABLE
~AC IN
SYNC
Rear Panel of UP-2950
SERIES
COLOR VIDEO PRINTER
SYNC
S- VIDEO
VIDEO
SYNC
S- VIDEO
VIDEO
ON
OFF
~AC IN
Rear Panel of UP-2950
SERIES
COLOR VIDEO PRINTER
Figure 5-19 Cable Connection between Color Printer and Console
5 - 22
Section 5-7 - External I/O (Rear Panel)
GE MEDICAL SYSTEMS
DIRECTION 2395907, REVISION 2
5-7-2-2
LOGIQ™ 5 EXPERT BASIC SERVICE MANUAL
Cable Connection - Color Printer (cont’d)
Connect USB cable listed below between the SONY UP-D21MD Color Printer and the console.
Rear Panel of JU PIT ER
USB cable
SONY UP-D21MD
POWER CABLE
Figure 5-20 USB Cable Connection between Color Printer and Console
Chapter 5 Components and Functions
5 - 23
GE MEDICAL SYSTEMS
DIRECTION 2395907, REVISION 2
5-7-2-3
LOGIQ™ 5 EXPERT BASIC SERVICE MANUAL
Cable Connection- VCR
Connect the cables listed below between the Sony VCR and the console.
RS232C CABLE
Rear Pan el of JU PITER
S. Video CABLE for VID EO SIGN AL
(supplied with VCR)
AUDIO
IN
AUDIO
OUT
VIDEO IN
CH- 1/L
MONITOR
OUT
VIDEO
OUT
CH- 1/L
S. VIDEO
S. VIDEO
CH- 2/R
OFF
ON
OFF
ON
CH- 2/R
INDICATE
~AC IN
POWER CABLE
REAR PANEL of VID EO CASSE TT E REC ORDER
Figure 5-21 Cable Connection between VCR and Console
5 - 24
Section 5-7 - External I/O (Rear Panel)
GE MEDICAL SYSTEMS
DIRECTION 2395907, REVISION 2
5-7-2-3
LOGIQ™ 5 EXPERT BASIC SERVICE MANUAL
Cable Connection- VCR (cont’d)
Connect the cables listed below between the Pansonic VCR and the console.
RS232C CABLE
Rear Pan el of JU PIT ER
VIDEO IN
AUDIO
IN
VIDEO OUT
AUDIO
OUT
REAR PANEL of Panasonic VCR
POWER CABLE
Figure 5-22 Cable Connection between VCR and Console
Equipment damage possibly. Be sure to use the following recommended connecting cables to connect
recording devices and a network with LOGIQ™ 5 console.
Chapter 5 Components and Functions
5 - 25
GE MEDICAL SYSTEMS
DIRECTION 2395907, REVISION 2
5-7-3
LOGIQ™ 5 EXPERT BASIC SERVICE MANUAL
Interconnect Cabling
Figure 5-23 Cable Interconnect Diagram
5 - 26
Section 5-7 - External I/O (Rear Panel)
GE MEDICAL SYSTEMS
DIRECTION 2395907, REVISION 2
LOGIQ™ 5 EXPERT BASIC SERVICE MANUAL
Section 5-8
Power Diagrams
5-8-1
Overview
The AC Power assy’s main tasks are to supply the various internal subsystems and to galvanically
isolate the scanner from the on site Mains Power System and to control power on/off . The voltage to
peripherals can be confederated to either 110 VAC or 220 VAC.
5-8-2
AC Power
Figure 5-24 AC Power Distribution Block Diagram
The mains cord has plugs in one side end. A male plug connects to the mains outlet on site.
The mains voltage is routed to the Main Circuit Breaker, located on the rear of the system.
The Main Circuit Breaker is of the auto fuse type, if for some reason the current grows to high, the switch
will automatically break the power.
From the Main Circuit Breaker, the AC power is routed via an Inrush Current Limiter to a internal outlet
connector for the Mains Transformer.
Chapter 5 Components and Functions
5 - 27
GE MEDICAL SYSTEMS
DIRECTION 2395907, REVISION 2
5-8-2
LOGIQ™ 5 EXPERT BASIC SERVICE MANUAL
AC Power (cont’d)
The Transformer is the galvanic barrier between the rest of the scanner and the on site AC Mains. Input
voltage to the transformer can be either 220 VAC or 110 VAC.
AC output of transformer is supplied to the ATX PS (BEP Power supply, located on the BEP chassi)
directly , but to the HV unit and CRT Monitor and LV unit and peripheral outlet via SSR.
SSR for AC power net are controlled by JPC assy in AC POWER assy and VIC assy in BEP assy.
5-8-3
DC Power (Low Voltage)
DC Power are supplied by LV unit in AC Power assy. DC Power of LV unit are power source of
all assys in nest and nest fan, etc
JPC assy in AC power assy is DC power source also. DC power of JPC is for on/off control circuit
of VIC assy in BEP assy
DC Output Capacity:
5 - 28
•
+3.3V, 5.6A
•
+5V, 7A
•
+6V, 8.7A
•
+6V, 8.7A
•
-6V, 3.4A
•
+15V, 8A
•
-15V, 1A
Section 5-8 - Power Diagrams
GE MEDICAL SYSTEMS
DIRECTION 2395907, REVISION 2
5-8-4
5-8-4-1
LOGIQ™ 5 EXPERT BASIC SERVICE MANUAL
Rear Panel
Block Diagram
Figure 5-25 Rear Panel Block Diagram
The REAR ASSY and REAR CONN 220V ASSY are the rear-panel assemblies which interconnect
external signals and power with the LOGIQ 5 system. Both of the assemblies are the same except the
circuit breaker’s current ratings depending on voltage of the system power source (See Safety
described below).
Chapter 5 Components and Functions
5 - 29
GE MEDICAL SYSTEMS
DIRECTION 2395907, REVISION 2
5-8-4-2
Safety
•
Circuit Breaker
Table 5-28
Circuit Breaker Specification
Power Voltage Rating
(V)
Peripheral Current
Rating (A)
Trip Time
Reset Time
REAR CONN
110
5.0
1 hour max. @ 5.4A, 25
degreeC
60 seconds
REAR CONN 220V
220
3.0
1 hour max. @ 3.5A, 25
degreeC
180 seconds
Assembly
•
5-8-4-3
LOGIQ™ 5 EXPERT BASIC SERVICE MANUAL
Electrical Isolation
The rear-panel's Insite (modem) interface is electrically isolated from the system's internal circuit.
The isolator's dielectric strength should be 500VAC RMS or higher within 1 minute (in compliance
with IEC60601-1-1).
Camera (Printer) Remote Control Interface
The Rear-panel has two remote control interface terminals for B/W and color printers.
Table 5-29
5 - 30
Camera (Printer) Remote Control Interface Specifications
Level (V)
Active Polarity
Retention Time
Color camera (shutter) control
H:2.0/L:0.8
L
60 msec
B/W camera (printer) control
H:2.0/L:1.0
L
100 msec
Section 5-8 - Power Diagrams
GE MEDICAL SYSTEMS
DIRECTION 2395907, REVISION 2
LOGIQ™ 5 EXPERT BASIC SERVICE MANUAL
Section 5-9
Air Flow
5-9-1
Air Flow Distribution
A
B
C
D
Figure 5-26 Air Flow Inside the Scanner
The four air flow passes allow the scanner to be cooled down as shown in the figure above.
5-9-2
•
Pass A (Bottom right> BEP Assy> Rear upper left) for BEP Assy cooling.
•
Pass B (Front lower left > Filter > LV unit > Rear lower left) for HV unit cooling.
•
Pass C (Bottom left> RLY Box Assy > Rear upper right) for RLY Box Assy cooling.
•
Pass D (Bottom left> Filter >Nest Assy> Rear upper right) for Nest Assy cooling.
Filters
The scanner contains the four filters located at:
-
Front bottom for air flow of the BEP Assy and Nest Assy.
-
Rear bottom for air flow of BEP Assy.
-
Left and Right side for airflow of the AC power Assy.
Chapter 5 Components and Functions
5 - 31
GE MEDICAL SYSTEMS
DIRECTION 2395907, REVISION 2
5-9-3
LOGIQ™ 5 EXPERT BASIC SERVICE MANUAL
Fans
Fan for PC Box
Fans for Nest Assy
Fans for AC Power Assy
Figure 5-27 Fans
The scanner contains the eight fans at the following positions for producing an air flow.
5 - 32
-
One fan: Insde the LV unit for air flow pass C
-
One fan: On the BEP assy for air flow pass B
-
Four fans: At the top of the NEST Assy for air flow pass A, C.
-
Two fans: at the top of the AC Power assy for air flow pass A, C
Section 5-9 - Air Flow
GE MEDICAL SYSTEMS
DIRECTION 2395907, REVISION 2
LOGIQ™ 5 EXPERT BASIC SERVICE MANUAL
Section 5-10
Service Platform
5-10-1
Introduction
The Service Platform contains a set of software modules that are common to all ultrasound and
cardiology systems containing a PC backend. This web-enabled technology provides linkage to eServices, e-Commerce, and the iCenter, making GE’s scanners more e-enabled than ever. The Service
Platform will increase service productivity and reduce training and service costs.
Chapter 5 Components and Functions
5 - 33
GE MEDICAL SYSTEMS
DIRECTION 2395907, REVISION 2
5-10-2
5-10-2-1
LOGIQ™ 5 EXPERT BASIC SERVICE MANUAL
Global Service User Interface (GSUI)
Internationalization
The user interface provided by the service platform is designed for GE personnel and as such is in
English only. There is no multi-lingual capability built into the Service Interface.
5-10-2-2
Service Login
Select the wrench icon in the status bar at the bottom of the scan display screen.
This icon links the user to the service login screen.
Figure 5-28 Login Screen for Global Service User Interface
5-10-2-3
Access / Security
The service interface has different access and security user levels. Each user is only granted access to
the tools that are authorized for their use.
Table 5-30
Service Login User Levels
User Level
Access Authorization
Operator
Administrator
Password
uls
Authorized acccess to specified diagnostics, error logs and utilities. Same
acquisition diagnostic tests as GE Service.
External Service
uls
gogems
Every access request, whether successful or not, will be logged into a service access log that is
viewable to authorized users.
5 - 34
Section 5-10 - Service Platform
GE MEDICAL SYSTEMS
DIRECTION 2395907, REVISION 2
5-10-3
LOGIQ™ 5 EXPERT BASIC SERVICE MANUAL
Service Home Page
The navigation bar at the top of the screen allows the user to select from several tools and utilities.
Figure 5-29 Customer Service Home Page
Chapter 5 Components and Functions
5 - 35
GE MEDICAL SYSTEMS
DIRECTION 2395907, REVISION 2
5-10-4
LOGIQ™ 5 EXPERT BASIC SERVICE MANUAL
Error Logs Tab
From the Error Logs Tab the Log Viewer displays four categories with pull-down sub-menus and an Exit
selection. The Service Interface allows scanner logs to be viewed by all service users.
The Filter Error log is not available to customer level analysis.
The log entries are color-coded to identify the error level severity at a glance.
Table 5-31
Log Entry Key
Severity
Error Level
Color Code
1
Information
Green
2
Warning
Blue
3
Error
Red
The Service Interface supports the transfer of these logs to local destinations such as the MOD, and
CD-ROM drive.
Figure 5-30 Log Viewer / Logs / Log Entries
5 - 36
Section 5-10 - Service Platform
GE MEDICAL SYSTEMS
DIRECTION 2395907, REVISION 2
5-10-4-1
LOGIQ™ 5 EXPERT BASIC SERVICE MANUAL
Logs
The seven sub-menus of the Logs category are System, Power, Infomatics, Temperature, Probe,
Board, and DICOM.
NOTE:
Figure 5-30 provides a graphical example of the log entries for the System Logs.
Log table headings for the differrent logs are as follows:
•
System
Log entry headings include Time Stamp; Error Level; Package; and Error Message.
•
Power
Log entry headings include Time Stamp; Error Level; Package; and Error Message.
•
Infomatics
Log entry headings include TimeStamp, Revision, PtID, PtDOB, PtSex, PtWeight, PtHeight,
ExamID, Exam Category, ExamCurDate, and ExamStartTime.
•
Temperature
Log entry headings include Time Stamp; Error Level; Package; Upper FEC Sensor; and Lower FEC
Sensor.
•
Probe
Log entry headings include Time Stamp; Error Level; Package; Error Message; Severity; Revision;
and three (3) new labels that have not yet been named.
•
Board
Log entry headings include Time Stamp; Error Level; Package; Board; Severity; and two (2) new
labels that have yet been named.
•
DICOM
Log entry headings include Time Stamp; Error Level; Package; and Error Message.
Chapter 5 Components and Functions
5 - 37
GE MEDICAL SYSTEMS
DIRECTION 2395907, REVISION 2
5-10-4-2
LOGIQ™ 5 EXPERT BASIC SERVICE MANUAL
Utilities
The two sub-menus of the Utilities category are Plot Log, and Plot Page.
Plot Log
Plot Page
Figure 5-31 Utilities Sub-Menus
•
Plot Log
Allows for the color coded plot of all Log contents with the package on the ‘x’ axis and incident count
on the ‘y’ axis.
•
Plot Page
Allows for the color coded plot of all Page contents with the package on the ‘x’ axis and incident
count on the ‘y’ axis.
5-10-4-3
Search
On the Text Search sub-menu of the Search category, users enter case-sensitive text they wish to find.
This filter field works well for filtering the Sys log file for the word “fail”.
Figure 5-32 Search Sub-Menu
5 - 38
Section 5-10 - Service Platform
GE MEDICAL SYSTEMS
DIRECTION 2395907, REVISION 2
5-10-4-4
LOGIQ™ 5 EXPERT BASIC SERVICE MANUAL
Exit
The sub-menu, Exit Log Viewer, returns the user to the Service Desktop home page.
Figure 5-33 Exit Log Sub-Menu
Chapter 5 Components and Functions
5 - 39
GE MEDICAL SYSTEMS
DIRECTION 2395907, REVISION 2
5-10-5
LOGIQ™ 5 EXPERT BASIC SERVICE MANUAL
Diagnostics
Detailed Diagnostic information is found in 7 Diagnostics/Troubleshooting.
Figure 5-34 User Diagnostic Page
5-10-5-1
Diagnostics Execution
Diagnostic tests are executable by both local and remote users. The Service Platform provides top-level
diagnostic selection based on the user’s level and login access permissions. Remote access will require
disruptive diagnostic permissions to run Acquisition diagnostics.
5-10-5-2
Diagnostic Reports
Diagnostic tests return a report to the Service Platform. The platform retains the report and allows for
future viewing of the diagnostic logs.
5 - 40
Section 5-10 - Service Platform
GE MEDICAL SYSTEMS
DIRECTION 2395907, REVISION 2
5-10-6
LOGIQ™ 5 EXPERT BASIC SERVICE MANUAL
Image Quality
The Image Quality page is intended to contain tools for troubleshooting image quality issues.
Figure 5-35 Image Quality Page
5-10-7
Calibration
The Calibration page is intended to contain the tools used to calibrate the system.
Figure 5-36 Calibration Page
Chapter 5 Components and Functions
5 - 41
GE MEDICAL SYSTEMS
DIRECTION 2395907, REVISION 2
5-10-8
LOGIQ™ 5 EXPERT BASIC SERVICE MANUAL
Configuration
The Configuration page is intended to be used to setup various configuration files on the system.
The Service Platform is the access and authorization control for remote access to the configuration
subsystem.
The enable/disable of software options can be done from this Configuration page.
Figure 5-37 Configuration Page
5-10-9
Utilities
The Utilities page contains several miscellaneous tools.
Figure 5-38 Customer Utilities Page
5-10-10
Replacement
The Replacement page is intended to contain the tools used to track replacement parts used in the
system.
5 - 42
Section 5-10 - Service Platform
GE MEDICAL SYSTEMS
DIRECTION 2395907, REVISION 2
LOGIQ™ 5 EXPERT BASIC SERVICE MANUAL
Figure 5-39 Part Replacement Page
5-10-11
PM
The PM page is intended to contain the tools used in periodic maintenance of the system.
Figure 5-40 Planned Maintenance Page
Chapter 5 Components and Functions
5 - 43
GE MEDICAL SYSTEMS
DIRECTION 2395907, REVISION 2
LOGIQ™ 5 EXPERT BASIC SERVICE MANUAL
This page was intentionally left blank.
5 - 44
Section 5-10 - Service Platform
GE MEDICAL SYSTEMS
DIRECTION 2395907, REVISION 2
LOGIQ™ 5 EXPERT BASIC SERVICE MANUAL
Chapter 6
Service Adjustments
Section 6-1
Overview
6-1-1
Purpose of this chapter 6
This section describes how to test and adjust the scanner. These tests are optional. You may use them
to check the system for errors.
Table 6-32
Contents in chapter
Section
Description
Page Number
6-1
Overview
6-1
6-2
Regulatory
6-1
6-3
Power Supply Adjustment
6-1
6-4
Reloading the Probe Data
6-4
6-5
Monitor and LCD Adjustment
6-7
Section 6-2
Regulatory
Verify, where applicable, that any regulatory information or tests required by national law are present
and accounted for, and any regulatory tests required by national law are performed and documented.
Section 6-3
Power Supply Adjustment
6-3-1
LV Unit Disassembly
This system contains three power supply modules; HV unit, LV unit, and ATX PS. However, the LV unit
only can be adjusted.
6-3-1-1
6-3-1-2
Tools
•
Common pillips screwdrivers
•
Allen/Unbraco wrench
•
Long-nose gripper
Needed Manpower
•
6-3-1-3
1 person, 15 minutes + travel
Preparations
•
Shut Down the System and switch off the Main Breaker at the rear as described in section 4-2-2 on
page 5.
Chapter 6 Service Adjustment
6-1
GE MEDICAL SYSTEMS
DIRECTION 2395907, REVISION 2
•
6-3-1-4
LOGIQ™ 5 EXPERT BASIC SERVICE MANUAL
Remove the AC Power assy from the System
Removal Procedure
CAUTION Do not wear the ESD wrist strap when you remove a part of power supply unit. Turn OFF power
and unplug the power cord before removing a part of power supply unit. However be sure to turn
off power and wear the strap before you remove a circuit boards.
1.) Unscrew four (4) screws (1-4) to remove Left side cover of AC Power assy.
2.) Disconnect three (3) connectors from the rear side of the LV Unit. Refer to .
Connector
Connector
Connector
Figure 6-1 Disconnect 3 connectors
3.) Unscrew four (4) screws (8-11) to remove Right side cover of AC Power assy.
6-2
Section 6-3 - Power Supply Adjustment
GE MEDICAL SYSTEMS
DIRECTION 2395907, REVISION 2
6-3-1-4
LOGIQ™ 5 EXPERT BASIC SERVICE MANUAL
Removal Procedure (cont’d)
4.) Unscrew four 4 screws and disconnect twenty (20) connectors from the front side of the LV unit
using long-nose gripper.
Screw
Screw
20 Connectors
Screw
Screw
Figure 6-2 Disconnect 20 connectors
5.) Remove the LV unit.
6-3-2
Adjustments Procedures
1.) Using the following VRs, DC output can be adjusted.
Table 6-33
DC Output Specification for LV Unit
VR
Specifications
VR1
6V
VR2
3.3V
VR3
6V
VR4
-6V
VR5
-15 V
VR6
5V
VR7
15V
Chapter 6 Service Adjustment
6-3
GE MEDICAL SYSTEMS
DIRECTION 2395907, REVISION 2
6-3-2
LOGIQ™ 5 EXPERT BASIC SERVICE MANUAL
Adjustments Procedures (cont’d)
VR6
VR1
VR2
VR3
VR7
VR4
VR5
Figure 6-3 VRs for Adjusting DC Output
Section 6-4
Monitor and LCD Adjustments
6-4-1
Contrast and Brightness Adjustment
To adjust the contrast and brightness:
1.) Press the Toggle button (1) for contrast and brightness. Confirm that the contrast (or
brightness) indicator is displayed on the monitor. If the brightness is displayed, press the toggle
button again.
Figure 6-4 Monitor
6-4
Section 6-4 - Monitor and LCD Adjustments
GE MEDICAL SYSTEMS
DIRECTION 2395907, REVISION 2
LOGIQ™ 5 EXPERT BASIC SERVICE MANUAL
2.) Press the Adjustment button (+, 2) to increase contrast (or brightness).
3.) Press the Adjustment button (-, 3) to decrease contrast (or brightness).
The amount of contrast (or brightness) is shown on a slide bar on the screen. Refer the
following table for the setting.
Table 6-34
Contrast and Brightness Recommended Setting
Monitor Adjustment
Room Condition
Contrast
Brightness
Dark room
50
40
Dim room
60
35
Bright room
70
30
room for Cardiology
80
20
Record the final brightness and contrast settings and leave this information withe the system. Generally
speaking, do not change the controls once they have been set, the display becomes the reference for
the hard copy device(s).
NOTE:
6-4-2
6-4-2-1
6-4-2-2
After readjusting the monitor’s Contrast and Brightness, readjust all preset and peripheral
settings.
LCD Adjustment
Tools
•
Common pillips screwdrivers
•
Allen/Unbraco wrench
•
Long-nose gripper
Needed Manpower
•
6-4-2-3
6-4-2-4
1 person, 15 minutes + travel
Preparations
•
Shut Down the System and switch off the Main Breaker at the rear as described in section 4-2-2 on
page 5.
•
Remove the Keyboard Assy from the System. For more information, refer to the Chapter 8,
Replacement Procedure
Removal Procedure
CAUTION Do not wear the ESD wrist strap when you remove a part of power supply unit. Turn OFF power
and unplug the power cord before removing a part of power supply unit. However be sure to turn
off power and wear the strap before you remove a circuit boards.
1.) Remove the OP side R Cover to access. Refer to Figure 8-25 on page 53 .
Chapter 6 Service Adjustment
6-5
GE MEDICAL SYSTEMS
DIRECTION 2395907, REVISION 2
LOGIQ™ 5 EXPERT BASIC SERVICE MANUAL
2.) Access to the OSD Menu display button located at backside of the LCD.
Increase +
Move Right
Power On/Off
Decrease -
OSD Menu Display
Move Left
Menu Selection
Figure 6-5 OSD Control
6-6
Section 6-4 - Monitor and LCD Adjustments
GE MEDICAL SYSTEMS
DIRECTION 2395907, REVISION 2
6-4-2-4
LOGIQ™ 5 EXPERT BASIC SERVICE MANUAL
Removal Procedure (cont’d)
3.) OSD Menu is shown on the LCD screen. Refer to Figure 6-6 on page 6-7 .
Contrast
Adjust Menu
Color Adjust Menu
Brightness
Control Menu
Adjust Menu
Position
Auto Adjust
Menu
Advanced
Exit
Information
Language
Figure 6-6 OSD Menu Display
4.) Move the Cursor using Move Right or Left button to adjust the Brightness of the LCD.
5.) Press the Menu Selection button with the yellow cursor on Brightness icon.
Chapter 6 Service Adjustment
6-7
GE MEDICAL SYSTEMS
DIRECTION 2395907, REVISION 2
6-4-2-4
LOGIQ™ 5 EXPERT BASIC SERVICE MANUAL
Removal Procedure (cont’d)
6.) Use Increase or Decrease button to adjust the Brightness. Refer to Figure 6-7 on page 6-8 .
Figure 6-7 Brightness Adjustment
7.) Move the cursor to execute Auto Adjust.
8.) Make sure that the Auto Adjust is selected, then the Menu Selection Button.
9.) LCD display Auto Adjustment procedures will be started automatically.
10.)After finishing the Auto Adjustment procedures, the following menu is displayed on the LCD.
Figure 6-8 Auto Adjustment
11.)Make sure that the LCD displacement is fixed and shown at the center location.
12.)If it is fixed appropriately, go on to the next step.
If the display is not adjusted yet, go back and repeat the adjustment procedures form step 7.
6-8
Section 6-4 - Monitor and LCD Adjustments
GE MEDICAL SYSTEMS
DIRECTION 2395907, REVISION 2
LOGIQ™ 5 EXPERT BASIC SERVICE MANUAL
This page was intentionally left blank.
Chapter 6 Service Adjustment
6-9
GE MEDICAL SYSTEMS
DIRECTION 2395907, REVISION 2
6 - 10
LOGIQ™ 5 EXPERT BASIC SERVICE MANUAL
Section 6-4 - Monitor and LCD Adjustments
GE MEDICAL SYSTEMS
DIRECTION 2395907, REVISION 2
LOGIQ™ 5 EXPERT BASIC SERVICE MANUAL
Chapter 7
Diagnostics/Troubleshooting
Section 7-1
Overview
7-1-1
Purpose of Chapter 7
This section describes how to setup and run the tools and software that help maintain image quality and
system operation. Basic host, system, and board level diagnostics are run whenever power is applied.
Some Service Tools may be run at the application level.
Table 7-1
Contents in Chapter 7
Section
Description
Page Number
7-1
Overview
7-1
7-2
Network Connectivity Trouble Shooting
7-1
7-3
Gathering Trouble Data
7-2
7-4
Screen Captures
7-4
7-5
Diagnostics
7-8
7-6
Common Diagnostics
7-15
Section 7-2
Network Connectivity Troubleshooting
There is a troubleshooting tool available that the customer can use as a first step to investigate network
connectivity issues. It gives the current status of network and provides the option to restart the network
components in the Back End Processor.
Activate the tool by pressing ALT+N and follow the choices displayed.
Chapter 7 Diagnostics/Troubleshooting
7-1
GE MEDICAL SYSTEMS
DIRECTION 2395907, REVISION 2
LOGIQ™ 5 EXPERT BASIC SERVICE MANUAL
Section 7-3
Gathering Trouble Data
7-3-1
Overview
There may be a time when it would be advantageous to capture trouble images and system data (logs)
for acquisition through remote diagnostics (InSite) or to be sent back to the manufacturer for analysis.
There are different options to acquire this data that would give different results.
7-3-2
Collect Vital System Information
The following information is necessary in order to properly analyze data or images being reported as a
malfunction or being returned to the manufacturer:
-
Product Name = LOGIQ™ 5
From the Utility>System>About screen:
Applications Software
-
Software Version
-
Software Part Number
System Image Software
7-2
-
Image Revision
-
Image Part Number
Section 7-3 - Gathering Trouble Data
GE MEDICAL SYSTEMS
DIRECTION 2395907, REVISION 2
7-3-3
LOGIQ™ 5 EXPERT BASIC SERVICE MANUAL
Collect a Trouble Image with Logs
If the system should malfunction, press the Alt-D keys simultaneously. This will collect a screen capture
of the image monitor, system presets and the following logs:
NOTE:
-
Keyboard Shadow Log
-
Error Logs
-
Crash Log
-
Power Supply
-
Temperature
Power Supply and Temperature logs are not currently being updated by the LOGIQ™ 5.
This Alt-D function is available at all times.
Figure 7-1 ALT-D Dialog Box
When Alt-D is pressed, a menu box appears that allows for:
NOTE:
-
A place to enter a description of the problem
-
A choice to store to a pre-formatted MOD (H: drive), CD-RW or to the Export directory D: drive
(for remote viewing through InSite).
You MUST select H: or CD-RW as the destination device if it is to be different than the default
Export directory on the hard drive. Choose the H: drive which is the MOD or the CD-RW.
The subsequent file is compressed and time stamped. The screen capture is a bitmap which eliminates
the possibility of artifacts from compression.
Chapter 7 Diagnostics/Troubleshooting
7-3
GE MEDICAL SYSTEMS
DIRECTION 2395907, REVISION 2
LOGIQ™ 5 EXPERT BASIC SERVICE MANUAL
Section 7-4
Screen Captures
There may be times when the customer or field engineer will want to capture a presentation on the
screen so it may be recovered by the OnLine Center through InSite. This is accomplished by first saving
the image(s) to the clipboard using a Print Key.
The P4 key is the factory default print key to accomplish a secondary screen capture. However, the
default is for the video area only or the customer may have customized the P4 Key function. Therefore,
screen capture should involve the following steps:
1.) Check and record any custom settings for the Print4 button.
2.) Set the Print4 button to Whole Screen, Secondary Capture.
3.) Capture the required screens to the Hard Drive, MOD or CD-R.
4.) Restore the Print4 button to it’s original settings.
7-4-1
Check and Record the P4 Key Function
Check the function of the Print 4 Key in the event that the customer may have made some custom
settings.
1.) Select Utility from the Touch Panel.
2.) Select Connectivity from the Utilities Menu.
3.) Select the Buttons tab on the Connectivity screen.
4.) In the Button field, select Print4.
The Connectivity/Buttons Screen will be displayed like the one shown in Figure 7-2 on page 7-4 .
Figure 7-2 Buttons Set Up Screen
7-4
P4 is the factory default Screen Capture Key. If it is not set to Whole Screen or Screen Capture, as
shown in Figure 7-2, proceed to step 5 to record the customer’s custom settings.
Section 7-4 - Screen Captures
GE MEDICAL SYSTEMS
DIRECTION 2395907, REVISION 2
7-4-1
LOGIQ™ 5 EXPERT BASIC SERVICE MANUAL
Check and Record the P4 Key Function (cont’d)
5.) In the Destinations section, record the service that is displayed. The destinations list displays
the following information:
*
Name: user defined during service configuration
*
Type: the type of service
*
Server: the device for which the service was configured
*
Dir: direction: output, input, or both (I+O)
6.) In the Image generated section, record the parameters related to the service.
7-4-2
Setting the P4 Key to Screen Capture
If the P4 Key is not set to screen capture:
1.) While on the Connectivity screen, with the Buttons tab displayed, go to the drop down selection
menu in the Destinations section.
2.) From the drop down menu select CopyToWflow_01>Image to Buffer>MyComputer>Out.
3.) Ensure that the Image generated section for capture Area is set to Whole Screen, secondary
Capture and No Image Compression.
4.) The P4 Key should now be set up for whole screen capture, sending the screens to the image
buffer (clipboard).
Chapter 7 Diagnostics/Troubleshooting
7-5
GE MEDICAL SYSTEMS
DIRECTION 2395907, REVISION 2
7-4-3
LOGIQ™ 5 EXPERT BASIC SERVICE MANUAL
Capturing a Screen
The following is a generic process to capture any screen from the scanner:
1.) Navigate to and display the image/screen to be captured.
2.) Press P4. This will place a snapshot of the screen on the “clipboard” displayed at the bottom
of the scan image display.
Menu
Clipboard
Thumbnails
Figure 7-3 Select Image to Capture
3.) Select SCAN from the touch panel to view the image screen and the snapshots displayed on
the bottom.
4.) Highlight the snapshot to be stored to the system hard drive, MOD or CD-R.
5.) Select Menu on the right side of the image screen, then highlight and select SAVE AS.
Save As
Figure 7-4 Menu > Save As
7-6
Section 7-4 - Screen Captures
GE MEDICAL SYSTEMS
DIRECTION 2395907, REVISION 2
7-4-3
LOGIQ™ 5 EXPERT BASIC SERVICE MANUAL
Capturing a Screen (cont’d)
Figure 7-5 Save Dialog Box
6.) A Save dialog box will be opened. Choose d:\export folder as the archive location to save the
image on the hard disk, MOD or CD-R.
7-4-4
Reset the P4 Key to Customer’s Functionality
If the customer had programmed the P4 Key to a function other than screen capture, restore that
functionality recorded in section 7-4-1 on page 4. Refer to Figure 7-2.
1.) Select Utility from the Touch Panel.
2.) Select Connectivity from the Utilities Menu.
3.) Select the Buttons tab on the Connectivity screen.
4.) In the Button field, select Print4.
5.) In the Destinations section, select the service(s) recorded in step 5, Section 7-4-1. The
destinations list displays the following information:
NOTE:
*
Name: user defined during service configuration
*
Type: the type of service
*
Server: the device for which the service was configured
*
Dir: direction: output, input, or both (I+O)
Only output services can be associated to the print keys.
6.) In the Image generated section, select the parameters related to the service recorded in step
6, Section 7-4-1.
Chapter 7 Diagnostics/Troubleshooting
7-7
GE MEDICAL SYSTEMS
DIRECTION 2395907, REVISION 2
LOGIQ™ 5 EXPERT BASIC SERVICE MANUAL
Section 7-5
Diagnostics
As described in - Components and Functions (Theory), the service platform uses a web-based user
interface (UI) to provide access to common service components.
The Diagnostic home page displays a listing of test categories consisting of Common Diagnostics, and
LOGIQ5 Diagnostics. Expand the desired main category to select groups or individual tests.
7-8
Section 7-5 - Diagnostics
GE MEDICAL SYSTEMS
DIRECTION 2395907, REVISION 2
LOGIQ™ 5 EXPERT BASIC SERVICE MANUAL
Section 7-6
Common Diagnostics
Common Diagnostics is the first main heading under the GSUI heading of Diagnostics.
Figure 7-6 shows the top level menu choices under Common Diagnostics. The subheadings and their
respective diagnostic/troubleshooting menu choices are called out and described in the sections below.
Figure 7-6 Common Diagnostics
7-6-1
Utilities
Provides two selections:
7-6-1-1
Disruptive Mode
7-6-1-2
Allows you to enable or disable disruptive mode troubleshooting. System Shutdown
Allows for system shutdown from the diagnostic menu. Select to Restart System or Shutdown System.
Also, select to retain Disruptive Mode or Not.
After submitting to restart or shutdown a confirmation screen gives one last chance to confirm or cancel
the request.
Chapter 7 Diagnostics/Troubleshooting
7-9
GE MEDICAL SYSTEMS
DIRECTION 2395907, REVISION 2
7-6-2
7-6-2-1
7 - 10
LOGIQ™ 5 EXPERT BASIC SERVICE MANUAL
PC Diagnostics (Non-Interactive Tests)
CPU Tests
Section 7-6 - Common Diagnostics
GE MEDICAL SYSTEMS
DIRECTION 2395907, REVISION 2
7-6-2-2
Hard Drive Tests
7-6-2-3
Memory Tests
LOGIQ™ 5 EXPERT BASIC SERVICE MANUAL
Chapter 7 Diagnostics/Troubleshooting
7 - 11
GE MEDICAL SYSTEMS
DIRECTION 2395907, REVISION 2
7-6-2-4
CD/DVD Drive Test
7-6-2-5
Video Test
7 - 12
LOGIQ™ 5 EXPERT BASIC SERVICE MANUAL
Section 7-6 - Common Diagnostics
GE MEDICAL SYSTEMS
DIRECTION 2395907, REVISION 2
LOGIQ™ 5 EXPERT BASIC SERVICE MANUAL
7-6-2-6
USB Test
7-6-2-7
PCI Board Configuration Test
7-6-2-8
AGP Video Card Test
7-6-2-9
Network Test
Chapter 7 Diagnostics/Troubleshooting
7 - 13
GE MEDICAL SYSTEMS
DIRECTION 2395907, REVISION 2
7-6-3
PC Diagnostics (Interactive Tests)
7-6-3-1
Keyboard Test
7-6-3-2
Audio Test
7-6-3-3
Monitor Test
7 - 14
LOGIQ™ 5 EXPERT BASIC SERVICE MANUAL
Section 7-6 - Common Diagnostics
GE MEDICAL SYSTEMS
DIRECTION 2395907, REVISION 2
Section 7-7
LOGIQ™ 5 EXPERT BASIC SERVICE MANUAL
LOGIQ5 Diagnostics (cont’d)
When you select a test to run, the display changes as shown in Figure 7-10 on page 7-18 .
13.)Instructions Frame
-
Displays either a test-specific text or the default instructions.
14.)Status Frame
-
Initially displays the last known status for a selected diagnostic. Once the diagnostic starts,
the frame displays the “current” status of all test results.
-
The Status Frame also contains the user interface elements used for Diagnostic Control and
Operator Feedback.
15.)Execute Button
-
This switch has two modes - each with appropriate text:
-
Execute - to start the diagnostic
-
Abort - to stop a diagnostic
16.)Loop Count
-
This is an editable text field that will only accept numeric values of 4 digits or less. When the
switch is configured as an “execute” switch and pressed, the loop count field will be queried
to determine the number of times to execute the diagnostic.
17.)Progress Indicator
-
Displays a graphical progress indicator for the user.
18.)Short Text Message
-
Displays brief messages about the test’s progress during execution.
19.)Status Frame Background Color
-
Initially gray, the Status Frame background color changes upon completion of a diagnostic to
indicate completion status.
-
Code Status Fail = Red
-
Code Status Pass = Green
-
Code Status neither Pass nor Fail (Example: Aborted) = Gray (default color).
Chapter 7 Diagnostics/Troubleshooting
7 - 15
GE MEDICAL SYSTEMS
DIRECTION 2395907, REVISION 2
•
LOGIQ™ 5 EXPERT BASIC SERVICE MANUAL
Cable to RDi board in Rear Panel and Keyboard for Power switch.
Figure 7-7 Diagnostic Group Selections - SCB Tests
7 - 16
•
Connect J4 connector in RDi board with CON4 connector in keyboard.
•
Cable to RDi assy to AC Power Assy. - Connect J6 connector in RDi board with CON1 connector
in AC Power Assy.
•
Cable to RDi board to BEP assy. - Connect J5 connector to CON17 connector in BEP.
Section 7-6 - Common Diagnostics
GE MEDICAL SYSTEMS
DIRECTION 2395907, REVISION 2
LOGIQ™ 5 EXPERT BASIC SERVICE MANUAL
Chapter 7 Diagnostics/Troubleshooting
7 - 17
GE MEDICAL SYSTEMS
DIRECTION 2395907, REVISION 2
LOGIQ™ 5 EXPERT BASIC SERVICE MANUAL
Chapter 8
Replacement Procedures
Section 8-1
Overview
8-1-1
Purpose of Chapter 8
This chapter describes replacement procedures for the following modules and subsystems.
Section
Description
Page Number
8-1
Overview
8-1
8-2
Disassembly / Reassembly
8-1
8-3
Monitor
8-2
8-4
Keyboard Block
8-13
8-5
Covers
8-31
8-6
Body Block
8-52
8-7
PCB Boards
8-62
8-8
PC Block
8-71
8-9
Power Block
8-73
8-10
Base S/W Load
8-84
8-11
Loading Application S/W
8-100
Table 8-1
Contents in Chapter 8
Section 8-2 DISASSEMBLY/RE-ASSEMBLY
WARNING
ONLY QUALIFIED SERVICE PERSONNEL SHOULD REMOVE ANY COVERS OR
PANELS. ELECTRICAL HAZARDS EXISTS AT SEVERAL POINTS INSIDE. BECOME
THOROUGHLY FAMILIAR WITH ALL HAZARDOUS VOLTAGES AND HIGH CURRENT
LEVELS TO AVOID ACCIDENTAL CONTACT
CAUTION Do not wear the ESD wrist strap when you remove a part of power supply unit. Turn OFF power
and unplug the power cord before removing a part of power supply unit. However be sure to turn
off power and wear the strap before you remove a circuit boards.
WARNING
DO NOT SERVICE OR DISASSEMBLE PARTS UNDER FRU UNIT LEVEL AT ANY
CIRCUMSTANCES.
Chapter 8 - Replacement Procedures
8-1
GE MEDICAL SYSTEMS
DIRECTION 2395907, REVISION 2
LOGIQ™ 5 EXPERT BASIC SERVICE MANUAL
Section 8-3
Monitor
8-3-1
CRT Assy (FRU No. 100)
Purpose: This is a description on how to remove and replace the CRT Assy.
8-3-1-1
8-3-1-2
Tools
•
Common pillips screwdrivers
•
Allen/Unbraco wrench
Needed Manpower
•
8-3-1-3
8-3-1-4
2 persons, 5 minutes + travel
Preparations
•
Shut Down the System and switch off the Main Breaker at the rear as described in section 4-3-2 on
page 3.
•
Maneuver Control Console to a suitable position for removing the monitor.
Removal procedure
1.) Remove the OP Rear Cover. Refer to 8-10-10 on page 8-46
2.) Unscrew one screw cap located at (1)
(1)
Figure 8-1 Removing OP rear Cover and Unscrew screw
8-2
Section 8-3 - Monitor
GE MEDICAL SYSTEMS
DIRECTION 2395907, REVISION 2
8-3-1
LOGIQ™ 5 EXPERT BASIC SERVICE MANUAL
CRT Assy (FRU No. 100) (cont’d)
3.) Remove 3Connectors (CN1 - CN3) from the Monitor. Refer to 3.) on page 8-3 .
CN1
CN2
CN3
Three Connectors
Figure 8-2 Disconnect three(3) connectors
4.) Lift the Monitor Assy upward. Refer to 5.) on page 8-3 .
1
CN1
CN2
CN3
Figure 8-3 Lifting the Monitor Assy Upward
5.) Remove the Monitor Cover set. Refer to section 8-8-3 on page 7.
8-3-1-5
Mounting procedure
1.) Install the new parts in the reverse order of removal.
8-3-1-6
Monitor Calibration
Purpose: This procedure describe the monitor calibation procedure for newly installed monitor or CRT
assembly. The newly installed monitor should be adjusted the gain uniformity for each RGB
analog singal which come from VGA port of BEP assy.
Chapter 8 - Replacement Procedures
8-3
GE MEDICAL SYSTEMS
DIRECTION 2395907, REVISION 2
8-1-6-0-1
LOGIQ™ 5 EXPERT BASIC SERVICE MANUAL
Enable test pattern for calibration
1.) Set the display screen to reference for monitor calibration.
•
Select the "utility" button on LCD -> Select the "Test Pattern" button on LCD. -> Move the trackball
cursor to the "White" button on monitor screen. Then calibration reference screen would be show
up on monitor screen.
Figure 8-4 Reference Screen for Monitor Calibration
2.) Monitor OSD Menu selection
Left Button : Move the OSD cursor to left direction
Center Button : Turn on OSD menu Or enable highlighted menu
Right Button : Move the OSD cursor to left direction
Figure 8-5
•
push the center button for more 4 seconds untilOSD menu is turned on. Push the right button 4
times to move to "RGB" icon. If the "RGB" icon become highlight, push the Center button to go
into sub menu.
•
Move the cursot to "calibration" menu and push center button to activate calibration. wait until
monitor finish the calibration procedure. Monitor display color would be changed during Calibration
•
Figure 8-6 OSD Menu for calbration
8-4
Section 8-3 - Monitor
GE MEDICAL SYSTEMS
DIRECTION 2395907, REVISION 2
8-8-2
LOGIQ™ 5 EXPERT BASIC SERVICE MANUAL
Monitor Cable Assy (FRU No. 101)
Purpose: This is a description on how to remove and replace the Monitor Assy.
8-8-2-1
8-8-2-2
Tools
•
Common pillips screwdrivers
•
Cutter
Needed Manpower
•
8-8-2-3
8-8-2-4
1person, 5 minutes + travel
Preparations
•
Shut Down the System and switch off the Main Breaker at the rear as described in section 4-3-2 on
page 3.
•
Maneuver Control Console to a suitable position for removing the monitor.
Removal procedure
1.) Remove the OP Rear Cover. Refer to 8-10-10 on page 8-46 .
2.) Remove the Monitor Covers. For more information, refer to Monitor Cover Set (FRU No. 102) on
page 8 - 7.
3.) Disconnect two connectors (1-2) and cut the tie wrap in the location (3). Refer to
4.) Figure 8-4 on page 4 .
Connector 1
Connector 2
Tie wrap
Figure 8-7 Disconnect Connectors and Cut the tiewrap
Chapter 8 - Replacement Procedures
8-5
GE MEDICAL SYSTEMS
DIRECTION 2395907, REVISION 2
8-8-2
LOGIQ™ 5 EXPERT BASIC SERVICE MANUAL
Monitor Cable Assy (FRU No. 101) (cont’d)
5.) Disconnect two connectors on the other end (4-5). Refer to Figure 8-8 on page 8-6 .
5
4
Figure 8-8 Disconnect two(2) Connectors (5-6)
6.) Pull the Cable Assy out from the OP Rear Cover.
8-8-2-5
Mounting procedure
1.) Install the new parts in the reverse order of removal.
8-6
Section 8-3 - Monitor
GE MEDICAL SYSTEMS
DIRECTION 2395907, REVISION 2
8-8-3
LOGIQ™ 5 EXPERT BASIC SERVICE MANUAL
Monitor Cover Set (FRU No. 102)
Purpose: This is a description on how to remove the Monitor Cover Set.
8-8-3-1
Tools
•
8-8-3-2
Common pillips screwdrivers
Needed Manpower
•
8-8-3-3
1person, 10 minutes + travel
Preparations
•
8-8-3-4
Shut Down the System and switch off the Main Breaker at the rear as described in section 4-3-2 on
page 3.
Removal Procedure
1.) Remove the Tasklamp Assy, For more information, refer to section 8-8-6 on page 12
2.) Unscrew three screws (1-2,6) to remove the Monitor Cover left.
3.) Unscrew three screws (3-5) to remove the Monitor Cover right
4.) Unscrew four screws (7-10) to remove the Monitor Cover front.
5.) Monitor Cover Top can be removed without unscrewing.:
3
4
1
2
5
9
10
7
8
6
Figure 8-9 MONITOR COVER SET DISASSEMBLY
8-8-3-5
Mounting procedure
1.) Install the new parts in the reverse order of removal.
Chapter 8 - Replacement Procedures
8-7
GE MEDICAL SYSTEMS
DIRECTION 2395907, REVISION 2
8-8-4
LOGIQ™ 5 EXPERT BASIC SERVICE MANUAL
Monitor S/W Assy (FRU No. 103)
Purpose: This is a description on how to remove and replace the Monitor S/W Assy.
8-8-4-1
Tools
•
8-8-4-2
Common pillips screwdrivers
Needed Manpower
•
8-8-4-3
1person, 10 minutes + travel
Preparations
•
8-8-4-4
Shut Down the System and switch off the Main Breaker at the rear as described in section 4-3-2 on
page 3.
Removal Procedure
1.) Remove the Monitor Cover Front. Refer to 8-8-3 on page 8-7 .
2.) Disconnect two connectors (1-2). Refer to Figure 8-10 on page 8-8 .
1
2
Figure 8-10 Disconnecting 2 cables
3.) Unscrew two screws (3-4) from the Monitor Cover Front. Refer to Figure 8-11 on page 8-8 .
3
4
Figure 8-11 Unscrew 2 screws
8-8
Section 8-3 - Monitor
GE MEDICAL SYSTEMS
DIRECTION 2395907, REVISION 2
8-8-4
LOGIQ™ 5 EXPERT BASIC SERVICE MANUAL
Monitor S/W Assy (FRU No. 103) (cont’d)
4.) Remove the Monitor S/W Assy.Refer to Figure 8-12 on page 8-9 .
4
3
Figure 8-12 Removing Monitor S/W Assy
8-8-4-5
Mounting procedure
1.) Install the new parts in the reverse order of removal.
Chapter 8 - Replacement Procedures
8-9
GE MEDICAL SYSTEMS
DIRECTION 2395907, REVISION 2
8-8-5
LOGIQ™ 5 EXPERT BASIC SERVICE MANUAL
Speaker Assy (FRU No. 104)
Purpose: This is a description on how to remove and replace the Speaker Assy.
8-8-5-1
Tools
•
8-8-5-2
Common pillips screwdrivers
Needed Manpower
•
8-8-5-3
1person, 10 minutes + travel
Preparations
8-8-5-4
•
Shut Down the System and switch off the Main Breaker at the rear as described in section 4-3-2 on
page 3.
•
Monitor Cover Set should be removed before proceed. For more information Refer to section 8-83 on page 7.
Removal Procedure
1.) Disconnect two connectors (1-2) from the rear side of the Monitor. Refer to Figure 8-13 on page 810 .
2
1
Figure 8-13 Disconnect two connectors
8 - 10
Section 8-3 - Monitor
GE MEDICAL SYSTEMS
DIRECTION 2395907, REVISION 2
8-8-5
LOGIQ™ 5 EXPERT BASIC SERVICE MANUAL
Speaker Assy (FRU No. 104) (cont’d)
2.) Unscrew four screws (3-6) on the right side and (7-10) on the left to remove the speakers. Refer to
Figure 8-14 on page 8-11 .
7
8
9
10
2
1
3
5
4
6
Figure 8-14 Speaker Assy Disassembly
3.) Unscrew four screws (7-10) to remove the speaker on the right.
8-8-5-5
Mounting procedure
1.) Install the new parts in the reverse order of removal.
Chapter 8 - Replacement Procedures
8 - 11
GE MEDICAL SYSTEMS
DIRECTION 2395907, REVISION 2
8-8-6
LOGIQ™ 5 EXPERT BASIC SERVICE MANUAL
Task Lamp Assy (FRU No. 105)
Purpose: This is a description on how to remove and replace the Task Lamp Assy.
8-8-6-1
Tools
•
8-8-6-2
Needed Manpower
•
8-8-6-3
8-8-6-4
Common pillips screwdrivers
1person, 5 minutes + travel
Preparations
•
Shut Down the System and switch off the Main Breaker at the rear as described in section 4-3-2 on
page 3.
•
Monitor Cover Set should be removed before proceed. For more information Refer to section 8-83 on page 7.
Removal Procedure
1.) Unscrew two (1-2) screws to remove the TaskLamp Cover. Refer to Figure 8-15 on page 8-12 .
1
2
Figure 8-15 Removing Task Lamp Cover
8 - 12
Section 8-3 - Monitor
GE MEDICAL SYSTEMS
DIRECTION 2395907, REVISION 2
8-8-6
LOGIQ™ 5 EXPERT BASIC SERVICE MANUAL
Task Lamp Assy (FRU No. 105) (cont’d)
2.) Disconnect two (3-4) connectors. Refer to Figure 8-16 on page 8-13 .
3
4
Figure 8-16 Disconnect two connectors
3.) Unscrew two (5-6) screws to remove the TaskLamp Assy. Refer to Figure 8-17 on page 8-13
6
5
Figure 8-17 Unscrew two screws
8-8-6-5
Mounting procedure
1.) Install the new parts in the reverse order of removal.
Chapter 8 - Replacement Procedures
8 - 13
GE MEDICAL SYSTEMS
DIRECTION 2395907, REVISION 2
LOGIQ™ 5 EXPERT BASIC SERVICE MANUAL
Section 8-9
Keyboard Block
8-9-1
KeyBoard Assy (FRU No. 200)
Purpose: This is a description on how to remove and replace the Keyboard Assy
8-9-1-1
Tools
•
8-9-1-2
Needed Manpower
•
8-9-1-3
1person, 15 minutes + travel
Preparations
•
8-9-1-4
Common pillips screwdrivers.
Shut Down the System and switch off the Main Breaker at the rear as described in section 4-3-2 on
page 3.
Removal Procedure
1.) Remove the Probe Holder (FRU No.202). Refer to 8-9-3 on page 8-18 .
2.) Unscrew two screws (1-2) from the upper side of the keyboard. Refer to Figure 8-18 on page 8-14 .
1
2
Figure 8-18 Unscrew two screws on the shoulder
3.) Unscrew three screws (3-5) from the bottom of the keyboard. Refer to Figure 8-19 on page 8-14 .
3
4
5
Figure 8-19 Unscrew 3 screws from the bottom
8 - 14
Section 8-9 - Keyboard Block
GE MEDICAL SYSTEMS
DIRECTION 2395907, REVISION 2
8-9-1
LOGIQ™ 5 EXPERT BASIC SERVICE MANUAL
KeyBoard Assy (FRU No. 200) (cont’d)
4.) Disconnect three connectors (6-8) from the HUB board. Refer to Figure 8-20 on page 8-15 .
HUB Board
6
7 8
Figure 8-20 Disconnect 3 connectors from the HUB
5.) Disconnect two connectors (9-10). Refer to Figure 8-21 on page 8-15 .
9
10
Figure 8-21 Disconnect two connectors
6.) Carefully lift the Keyboard assy from the system.
8-9-1-5
Mounting procedure
1.) Confirm the configuration jumper setting
The new keyboard with engineering assy P/N rev ”-7” have a jumper for USB device power configuration
for keyboard function keys. Before install the new keyboard , the jumper cap should be attached in
proper place. The engineering assy P/N label of the keyboard is attached on the metal chassi of the
keyboard assy. If the engineering assy number rev of new keybaord is less then “-7” then move to next
installation step.
Chapter 8 - Replacement Procedures
8 - 15
GE MEDICAL SYSTEMS
DIRECTION 2395907, REVISION 2
LOGIQ™ 5 EXPERT BASIC SERVICE MANUAL
Figure 8-22 Power Configuration Jumper in Keyboard Assy
Figure 8-19 Jumper in main board of rev “-7” keybaord assy
- If the defect keyboard assy rev is same or greater then “-7” , set the jumper cap of new keyboard as
same as defect keyboard.
UV
5V
UV
5V
JP21
For L5BT03
production
JP21
For L5
Production
Figure 8-23 Cap Position for L5BT03 Production System and L5
1.) Install the new parts in the reverse order of removal.
8 - 16
Section 8-9 - Keyboard Block
GE MEDICAL SYSTEMS
DIRECTION 2395907, REVISION 2
8-9-2
LOGIQ™ 5 EXPERT BASIC SERVICE MANUAL
KeyBoard Front Grip (FRU No. 201)
Purpose: This is a description on how to remove and replace the Keyboard Front Grip.
8-9-2-1
Tools
•
8-9-2-2
Needed Manpower
•
8-9-2-3
8-9-2-4
Common pillips screwdrivers
1person, 25 minutes + travel
Preparations
•
Shut Down the System and switch off the Main Breaker at the rear as described in section 4-3-2 on
page 3.
•
Remove the Keyboard Assy before proceed. For more information on Keyboard removal, refer to
section 8-9-1 on page 14.
Removal Procedure
1.) Unscrew fourteen (14) screws (1-14). Refer to Figure 8-24 on page 8-17 .
2.) Remove the KeyBoard Front Grip.
7
6
4
1
5
2
3
8
9
10
11
12
13
14
Figure 8-24 Removing Keyboard Front Grip
8-9-2-5
Mounting procedure
1.) Install the new parts in the reverse order of removal.
Chapter 8 - Replacement Procedures
8 - 17
GE MEDICAL SYSTEMS
DIRECTION 2395907, REVISION 2
8-9-3
LOGIQ™ 5 EXPERT BASIC SERVICE MANUAL
Probe Holder (FRU No. 202)
Purpose: This is a description on how to remove and replace the Probe Holder
8-9-3-1
Tools
•
8-9-3-2
Needed Manpower
•
8-9-3-3
Not Required.
1persons, 1 minute + travel
Preparations
none
8-9-3-4
Removal Procedure
1.) Remove PG Rivet from the Probe Holder Assy.
2.) Lift the Probe Holder from the Bracket. Refer to Figure 8-25 on page 8-18 .
Lift
P.G. Rivet
Figure 8-25 PROBE HOLDER DISASSEMBLY
8-9-3-5
Mounting procedure
1.) Install the new parts in the reverse order of remova
8 - 18
Section 8-9 - Keyboard Block
GE MEDICAL SYSTEMS
DIRECTION 2395907, REVISION 2
8-9-4
LOGIQ™ 5 EXPERT BASIC SERVICE MANUAL
ECG Cable Hook (FRU No. 203)
Purpose: This is a description on how to remove and replace the TGC Cable Holder
8-9-4-1
Tools
•
8-9-4-2
Needed Manpower
•
8-9-4-3
1persons, 3 minutes + travel
Preparations
•
8-9-4-4
Common pillips screwdrivers
Shut Down the System and switch off the Main Breaker at the rear as described in section 4-3-2 on
page 3.
Removal Procedure
1.) Turn OFF the system.
2.) Unscrew two(1-2) screws from the bottom of the keyboard. Refer to Figure 8-26 on page 8-19 .
1
2
Figure 8-26 Removing ECG Cable Hook
8-9-4-5
Mounting procedure
1.) Install the new parts in the reverse order of removal.
Chapter 8 - Replacement Procedures
8 - 19
GE MEDICAL SYSTEMS
DIRECTION 2395907, REVISION 2
8-9-5
LOGIQ™ 5 EXPERT BASIC SERVICE MANUAL
OP Panel Encoder Assy (FRU No. 204)
Purpose: This is a description on how to remove and replace OP Panel Encoder Assy..
8-9-5-1
8-9-5-2
Tools
•
Common pillips screwdrivers.
•
Longnose.
Needed Manpower
•
8-9-5-3
8-9-5-4
1persons, 5 minutes + travel
Preparations
•
Shut Down the System and switch off the Main Breaker at the rear as described in section 4-3-2 on
page 3.
•
Keyboard Assy should be removed before proceed. For more information, refer to KeyBoard Assy
(FRU No. 200) on page 8 - 14.
Removal Procedure
1.) Remove the eight(8) encoder knobs (1-8) from the front side of the Keyboard. Refer to Figure 8-27
on page 8-20 .
(1)
(3)
(2)
(7)
(4)
(8)
(5)
(6)
Figure 8-27 Removing 8 encoder knobs
8 - 20
Section 8-9 - Keyboard Block
GE MEDICAL SYSTEMS
DIRECTION 2395907, REVISION 2
8-9-5
LOGIQ™ 5 EXPERT BASIC SERVICE MANUAL
OP Panel Encoder Assy (FRU No. 204) (cont’d)
2.) Using longnose, pull out encoder nuts and encoder washers from each encoder. Refer to Figure 828 on page 8-21 .
Figure 8-28 Pulling Out encoder nuts
3.) Turn the keyboard to back side.
4.) Disconnect each of the encoders from the back side of the keyboard. Refer to Figure 8-29 on page
8-21
back side
Encoder Assy
Figure 8-29 Removing Encoders
8-9-5-5
Mounting procedure
1.) Install the new parts in the reverse order of removal.
Chapter 8 - Replacement Procedures
8 - 21
GE MEDICAL SYSTEMS
DIRECTION 2395907, REVISION 2
8-9-6
LOGIQ™ 5 EXPERT BASIC SERVICE MANUAL
OP Panel TGC Assy (FRU No. 205)
Purpose: This is a description on how to remove and replace OP Panel TGC Assy..
8-9-6-1
Tools
•
8-9-6-2
Needed Manpower
•
8-9-6-3
8-9-6-4
Common pillips screwdrivers.
1persons, 5 minutes + travel
Preparations
•
Shut Down the System and switch off the Main Breaker at the rear as described in section 4-3-2 on
page 3.
•
Keyboard Assy should be removed before proceed. For more information, refer to KeyBoard Assy
(FRU No. 200) on page 8 - 14.
Removal Procedure
1.) Remove eight (8) TGC knobs from the upper side of the Keyboard. Refer to Figure 8-30 on page 822 .
Figure 8-30 Removing TGC Knobs
2.) Disconnect the TGC connector from the back side of the keyboard.
3.) Unscrew four (4) screws and Remove the TGC Assy from the keyboard.
TGC Connector
1
3
2
4
Figure 8-31 Unscrew 4 screws and remove TGC Assy
8 - 22
Section 8-9 - Keyboard Block
GE MEDICAL SYSTEMS
DIRECTION 2395907, REVISION 2
8-9-7
LOGIQ™ 5 EXPERT BASIC SERVICE MANUAL
TGC Knob Set (FRU No. 206)
Purpose: This is a description on how to remove and replace TGC Knobs..
8-9-7-1
Tools
•
8-9-7-2
Needed Manpower
•
8-9-7-3
1persons, 5 minutes + travel
Preparations
•
8-9-7-4
Common pillips screwdrivers.
Shut Down the System and switch off the Main Breaker at the rear as described in section 4-3-2 on
page 3.
Removal Procedure
1.) Remove eight (8) TGC knobs from the upper side of the Keyboard. Refer to Figure 8-30 on page 822 .
Figure 8-32 Removing TGC Knobs
Chapter 8 - Replacement Procedures
8 - 23
GE MEDICAL SYSTEMS
DIRECTION 2395907, REVISION 2
8-9-8
LOGIQ™ 5 EXPERT BASIC SERVICE MANUAL
OP Panel A/N Keyboard Assy (FRU No. 207)
Purpose: This is a description on how to remove and replace OP Panel A/N Keyboard Assy..
8-9-8-1
Tools
•
8-9-8-2
Needed Manpower
•
8-9-8-3
8-9-8-4
Common pillips screwdrivers.
1persons, 5 minutes + travel
Preparations
•
Shut Down the System and switch off the Main Breaker at the rear as described in section 4-3-2 on
page 3.
•
Keyboard Assy should be removed before proceed. For more information, refer to KeyBoard Assy
(FRU No. 200) on page 8 - 14.
Removal Procedure
1.) Unscrew five (5) screws and remove the HUB Assy EMC guard. Refer to section Figure 8-33 on
page 24.
5
1
EMC Guard
3
4
2
Figure 8-33 Removing HUB EMC guard
2.) Disconnect two(2) connectors (1-2) from the HUB Board. Refer to section Figure 8-34 on page 24.
2
1
Figure 8-34 Disconnecting 2 connectors
8 - 24
Section 8-9 - Keyboard Block
GE MEDICAL SYSTEMS
DIRECTION 2395907, REVISION 2
8-9-8
LOGIQ™ 5 EXPERT BASIC SERVICE MANUAL
OP Panel A/N Keyboard Assy (FRU No. 207) (cont’d)
3.) Unscrew eleven (11) screws (1-11) to remove the A/N keyboard prefix bracket. Refer to section
Figure 8-35 on page 25..
(6)
(7)
(5)
(8)
(9)
(10)
(4)
(3)
(2)
(11)
(1)
Figure 8-35 Unscrew 11 screws
4.) Remove the A/N keyboard prefix bracket
5.) Unscrew eight (8) screws (1-8) to remove the the A/N keyboard Assy. Refer to section Figure 8-36
on page 25..
(1)
(2)
(8)
(3)
(7)
(4)
(6)
(5)
Figure 8-36 Unscrew 8 screws
6.) Lift the A/N keyboard Assy Carefully.
8-9-8-5
Mounting procedure
1.) Install the new parts in the reverse order of removal.
Chapter 8 - Replacement Procedures
8 - 25
GE MEDICAL SYSTEMS
DIRECTION 2395907, REVISION 2
8-9-9
LOGIQ™ 5 EXPERT BASIC SERVICE MANUAL
OP Panel Trackball Assy (FRU No. 208)
Purpose: This is a description on how to remove and replace OP Panel Trackball Assy..
8-9-9-1
Tools
•
8-9-9-2
Needed Manpower
•
8-9-9-3
8-9-9-4
Common pillips screwdrivers.
1person, 5 minutes + travel
Preparations
•
Shut Down the System and switch off the Main Breaker at the rear as described in section 4-3-2 on
page 3.
•
Keyboard Assy should be removed before proceed. For more information, refer to KeyBoard Assy
(FRU No. 200) on page 8 - 14.
Removal Procedure
1.) Disconnect two connectors (1-2) from the Trackball Assy. Refer to section Figure 8-37 on page 26.
1
2
Figure 8-37 Disconnect two connectors
2.) Unscrew three screws (3-5) to remove the Trackball Assy. Refer to section Figure 8-38 on page 26..
3
4
5
Figure 8-38 Unscrew 3 screws
8 - 26
Section 8-9 - Keyboard Block
GE MEDICAL SYSTEMS
DIRECTION 2395907, REVISION 2
8-9-10
LOGIQ™ 5 EXPERT BASIC SERVICE MANUAL
OP Panel HUB board Assy (FRU No. 209)
Purpose: This is a description on how to remove and replace HUB board Assy..
8-9-10-1
Tools
•
8-9-10-2
Needed Manpower
•
8-9-10-3
8-9-10-4
Common pillips screwdrivers.
1persons, 5 minutes + travel
Preparations
•
Shut Down the System and switch off the Main Breaker at the rear as described in section 4-3-2 on
page 3.
•
Keyboard Assy should be removed before proceed. For more information, refer to KeyBoard Assy
(FRU No. 200) on page 8 - 14.
Removal Procedure
1.) Unscrew five (5) screws and remove the EMC guard from the HUB Board. Refer to section Figure
8-39 on page 27..
3
4
1
5
2
Figure 8-39 Removing EMC guard
2.) Disconnect six (6) connectors (1-6) from the HUB Board Assy. Refer to section Figure 8-40 on page
27.
1
2
3
5
4
6
Figure 8-40 Disconnect 6 connectors
Chapter 8 - Replacement Procedures
8 - 27
GE MEDICAL SYSTEMS
DIRECTION 2395907, REVISION 2
8-9-10
LOGIQ™ 5 EXPERT BASIC SERVICE MANUAL
OP Panel HUB board Assy (FRU No. 209) (cont’d)
3.) Unscrew six (6) screws (7-12) to remove HUB Board Assy. Refer to section Figure 8-41 on page 28.
10
7
11
8
12
9
Figure 8-41 Unscrew 6 screws
8-9-10-5
Mounting procedure
1.) Install the new parts in the reverse order of removal.
8 - 28
Section 8-9 - Keyboard Block
GE MEDICAL SYSTEMS
DIRECTION 2395907, REVISION 2
8-9-11
LOGIQ™ 5 EXPERT BASIC SERVICE MANUAL
OP Panel LCD Assy (FRU No. 210)
Purpose: This is a description on how to remove and replace LCD Assy..
8-9-11-1
Tools
•
8-9-11-2
Common pillips screwdrivers.
Needed Manpower
•
8-9-11-3
8-9-11-4
1person, 10 minutes + travel
Preparations
•
Shut Down the System and switch off the Main Breaker at the rear as described in section 4-3-2 on
page 3.
•
Keyboard Assy should be removed before proceed. For more information, refer to KeyBoard Assy
(FRU No. 200) on page 8 - 14.
Removal Procedure
Refer to the OP PANEL LCD ASSY DISASSEMBLY on page 8 - 33
1.) Unscrew ten screws (1-10) from the LCD prefix bracket to remove it. Refer to section Figure 8-42
on page 29.
(1)
(2)
(3)
(4)
(8)
(9)
(5)
(10)
(6)
(7)
Figure 8-42 Unscrew 10 screws from the LCD brkt
Chapter 8 - Replacement Procedures
8 - 29
GE MEDICAL SYSTEMS
DIRECTION 2395907, REVISION 2
8-9-11
LOGIQ™ 5 EXPERT BASIC SERVICE MANUAL
OP Panel LCD Assy (FRU No. 210) (cont’d)
2.) Disconnect one connector (11) from the main circuit board in the keyboard. Refer to section Figure
8-43 on page 30.
(11)
Figure 8-43 Disconnect one connector
3.) Unscrew four (4) screws (12-15) from the LCD unit Refer to section Figure 8-44 on page 30..
(14)
(12)
LCD Unit
(15)
(13)
Figure 8-44 Unscrew 4 screws from the LCD unit
4.) Remove the LCD Assy from the Keyboard.
8-9-11-5
Mounting procedure
1.) Install the new parts in the reverse order of removal.
8 - 30
Section 8-9 - Keyboard Block
GE MEDICAL SYSTEMS
DIRECTION 2395907, REVISION 2
8-9-12
LOGIQ™ 5 EXPERT BASIC SERVICE MANUAL
OP Panel LCD Encoder Assy (FRU No. 211)
Purpose: This is a description on how to remove and replace OP panel encoder Assy..
8-9-12-1
Tools
•
8-9-12-2
Needed Manpower
•
8-9-12-3
8-9-12-4
Common pillips screwdrivers.
1person, 15 minutes + travel
Preparations
•
Shut Down the System and switch off the Main Breaker at the rear as described in section 4-3-2 on
page 3.
•
Keyboard Assy should be removed before proceed. For more information, refer to KeyBoard Assy
(FRU No. 200) on page 8 - 14.
Removal Procedure
1.) Pull out five LCD encoder knobs (2-6) and one LCD Brightness Encoder from the front side of the
keyboard. Refer to section Figure 8-45 on page 31..
(1)
(2)
(3) (4) (6)
(5)
Figure 8-45 Pulling out LCD encoder knobs
2.) Turn the Keyboard Assy upside down.
Chapter 8 - Replacement Procedures
8 - 31
GE MEDICAL SYSTEMS
DIRECTION 2395907, REVISION 2
8-9-12
LOGIQ™ 5 EXPERT BASIC SERVICE MANUAL
OP Panel LCD Encoder Assy (FRU No. 211) (cont’d)
3.) Unscrew four (4) screws (7-10) to remove the LCD encoder Assy. Refer to section Figure 8-46 on
page 32.
(9)
(8)
(10)
(7)
LCD Encoder Circuit Board
Figure 8-46 Unscrew 4 screws from LCD Encoder Circuit Board
4.) Disconnect one connector (14) from the HUB Board. and Unscrew three (3) screws (11-13) from
the LCD Brightness Encoder Assy. Refer to section Figure 8-47 on page 32.
HUB Board Assy
(12)
(11)
LCD Brightness
Encoder
(13) (14)
Figure 8-47 Removing LCD Encoder Assy
8-9-12-5
Mounting procedure
1.) Install the new parts in the reverse order of removal.
8 - 32
Section 8-9 - Keyboard Block
GE MEDICAL SYSTEMS
DIRECTION 2395907, REVISION 2
LOGIQ™ 5 EXPERT BASIC SERVICE MANUAL
Section 8-10
Covers
8-10-1
Left Cover (FRU No. 300)
Purpose: This is a description on how to remove and replace the Left Cover.
8-10-1-1
Tools
•
8-10-1-2
Needed Manpower
•
8-10-1-3
1person, 5 minutes + travel
Preparations
•
8-10-1-4
Common pillips screwdrivers
Shut Down the System and switch off the Main Breaker at the rear as described in section 4-3-2 on
page 3.
Removal Procedure
1.) Turn OFF the system.
2.) Unscrew three screws (1-3).
3.) Remove the Left Cover. Refer to section Figure 8-48 on page 33.
1
2
3
Figure 8-48 Removing the Left Cover
8-10-1-5
Mounting procedure
1.) Install the new parts in the reverse order of removal.
Chapter 8 - Replacement Procedures
8 - 33
GE MEDICAL SYSTEMS
DIRECTION 2395907, REVISION 2
8-10-2
LOGIQ™ 5 EXPERT BASIC SERVICE MANUAL
Right Cover (FRU No. 301)
Purpose: This is a description on how to remove and replace the Right Cover.
8-10-2-1
Tools
•
8-10-2-2
Needed Manpower
•
8-10-2-3
1person, 5 minutes + travel
Preparations
•
8-10-2-4
Common pillips screwdrivers
Shut Down the System and switch off the Main Breaker at the rear as described in section 4-3-2 on
page 3.
Removal Procedure
1.) Turn OFF the system.
2.) Unscrew 3 screws (1-3).
3.) Remove the Right Cover. Refer to section Figure 8-49 on page 34.
1
2
3
Figure 8-49 Removing the right cover
8-10-2-5
Mounting procedure
1.) Install the new parts in the reverse order of removal.
8 - 34
Section 8-10 - Covers
GE MEDICAL SYSTEMS
DIRECTION 2395907, REVISION 2
8-10-3
LOGIQ™ 5 EXPERT BASIC SERVICE MANUAL
Rear Cover (FRU No. 302)
Purpose: This is a description on how to remove and replace the Rear Cover.
8-10-3-1
Tools
•
8-10-3-2
Needed Manpower
•
8-10-3-3
1 persons, 15 minutes + travel
Preparations
•
8-10-3-4
Common pillips screwdrivers
Shut Down the System and switch off the Main Breaker at the rear as described in section 4-3-2 on
page 3.
Removal Procedure
1.) Remove the Left Cover (FRU No.300). Refer to 8-10-1 on page 8-33 .
2.) Remove the Right Cover (FRU No.301). Refer to 8-10-2 on page 8-34 .
3.) Unscrew six screws (1-6).
4.) Remove the Rear Cover. Refer to section Figure 8-50 on page 35.
2
1
5
6
6
66
3
4
Figure 8-50 Removing the rear cover
8-10-3-5
Mounting procedure
1.) Install the new parts in the reverse order of removal.
Chapter 8 - Replacement Procedures
8 - 35
GE MEDICAL SYSTEMS
DIRECTION 2395907, REVISION 2
8-10-4
LOGIQ™ 5 EXPERT BASIC SERVICE MANUAL
Rear Door Cover (FRU No. 303)
Purpose: This is a description on how to remove and replace the Rear Door Cover.
8-10-4-1
Tools
•
8-10-4-2
Needed Manpower
•
8-10-4-3
1person, 20 minutes + travel
Preparations
•
8-10-4-4
Common pillips screwdrivers
Shut Down the System and switch off the Main Breaker at the rear as described in section 4-3-2 on
page 3.
Removal Procedure
1.) Remove the Left Cover (FRU No.300). Refer to 8-10-1 on page 8-33 .
2.) Remove the Right Cover (FRU No.301). Refer to 8-10-2 on page 8-34 .
3.) Remove the Rear Cover (FRU No.302). Refer to 8-10-3 on page 8-35 .
4.) Unscrew four screws (1-4). Refer to section Figure 8-51 on page 36.
5.) Remove hinges from the Rear Door Cover.
6.) Remove the Rear Door Cover.
1
2
3
4
Figure 8-51 Removing the Rear Door Cover
8-10-4-5
Mounting procedure
1.) Install the new parts in the reverse order of removal.
8 - 36
Section 8-10 - Covers
GE MEDICAL SYSTEMS
DIRECTION 2395907, REVISION 2
8-10-5
LOGIQ™ 5 EXPERT BASIC SERVICE MANUAL
Top Cover (FRU No. 304)
Purpose: This is a description on how to remove and replace the Top Cover.
8-10-5-1
Tools
•
8-10-5-2
Needed Manpower
•
8-10-5-3
1 person, 20 minutes + travel
Preparations
•
8-10-5-4
Common pillips screwdrivers
Shut Down the System and switch off the Main Breaker at the rear as described in section 4-3-2 on
page 3.
Removal Procedure
1.) Remove the Left Cover (FRU No.300). Refer to 8-10-1 on page 8-33 .
2.) Remove the Right Cover (FRU No.301). Refer to 8-10-2 on page 8-34 .
3.) Remove the Rear Cover (FRU No.302). Refer to 8-10-3 on page 8-35 .
4.) Unscrew two screws (1-2) from the top side of the Top cover. Refer to Figure 8-52 on page 8-37 .
(1)
(2)
Figure 8-52 Unscrew 2 screws from the Top cover
Chapter 8 - Replacement Procedures
8 - 37
GE MEDICAL SYSTEMS
DIRECTION 2395907, REVISION 2
8-10-5
LOGIQ™ 5 EXPERT BASIC SERVICE MANUAL
Top Cover (FRU No. 304) (cont’d)
5.) Unscrew four screws (3-6) from the bottom of the Top cover. Refer to Figure 8-53 on page 8-38 .
(3)
(4)
(5)
(6)
Figure 8-53 Unscrew 4 screws from the bottom
8-10-5-5
Mounting procedure
1.) Install the new parts in the reverse order of removal.
8 - 38
Section 8-10 - Covers
GE MEDICAL SYSTEMS
DIRECTION 2395907, REVISION 2
8-10-6
LOGIQ™ 5 EXPERT BASIC SERVICE MANUAL
Front Base Cover (FRU No. 305)
Purpose: This is a description on how to remove and replace the Front Base Cover.
8-10-6-1
Tools
•
8-10-6-2
Needed Manpower
•
8-10-6-3
1person, 15 minutes + travel
Preparations
•
8-10-6-4
Common pillips screwdrivers
Shut Down the System and switch off the Main Breaker at the rear as described in section 4-3-2 on
page 3.
Removal Procedure
1.) Remove the Left Cover (FRU No.300). Refer to 8-10-1 on page 8-33 .
2.) Remove the Right Cover (FRU No.301). Refer to 8-10-2 on page 8-34 .
3.) Unscrew four screws (1-4). Refer to Figure 8-54 on page 8-39 .
(1)
Right side
(2)
(3), (4) are on the left side
Figure 8-54 Unscrew 2 screws on the Right side
Chapter 8 - Replacement Procedures
8 - 39
GE MEDICAL SYSTEMS
DIRECTION 2395907, REVISION 2
8-10-6
LOGIQ™ 5 EXPERT BASIC SERVICE MANUAL
Front Base Cover (FRU No. 305) (cont’d)
4.) Remove the Front Base Cover. Refer to Figure 8-55 on page 8-40 .
3
4
1
2
Figure 8-55 Removing the Front Base Cover
8-10-6-5
Mounting procedure
1.) Install the new parts in the reverse order of removal.
8 - 40
Section 8-10 - Covers
GE MEDICAL SYSTEMS
DIRECTION 2395907, REVISION 2
8-10-7
LOGIQ™ 5 EXPERT BASIC SERVICE MANUAL
Front Cover (FRU No. 306)
Purpose: This is a description on how to remove and replace the Front Cover.
8-10-7-1
Tools
•
8-10-7-2
Needed Manpower
•
8-10-7-3
1person, 20 minutes + travel
Preparations
•
8-10-7-4
Common pillips screwdrivers
Shut Down the System and switch off the Main Breaker at the rear as described in section 4-3-2 on
page 3.
Removal Procedure
1.) Remove the Left Cover (FRU No.300). Refer to 8-10-1 on page 8-33 .
2.) Remove the Right Cover (FRU No.301). Refer to 8-10-2 on page 8-34 .
3.) Remove the Front Base Cover (FRU No.306). Refer to 8-10-6 on page 8-39 .
4.) Unscrew four screws (1-4). Refer to Figure 8-56 on page 8-41 .
(1)
(2)
Left Side
(3),(4) are on the right side
Figure 8-56 Unscrew 2 screws on the left side
5.) Remove the Front Cover.
8-10-7-5
Mounting procedure
1.) Install the new parts in the reverse order of removal.
Chapter 8 - Replacement Procedures
8 - 41
GE MEDICAL SYSTEMS
DIRECTION 2395907, REVISION 2
8-10-8
LOGIQ™ 5 EXPERT BASIC SERVICE MANUAL
OP Side L Cover (FRU No. 307)
Purpose: This is a description on how to remove and replace the OP Side L Cover.
8-10-8-1
8-10-8-2
Tools
•
Common pillips screwdrivers
•
Allen/Unbraco wrench
Needed Manpower
•
8-10-8-3
Preparations
•
8-10-8-4
1person, 25 minutes + travel
Shut Down the System and switch off the Main Breaker at the rear as described in section 4-3-2 on
page 3.
Removal Procedure
1.) Remove the Left Cover (FRU No.300). Refer to 8-10-1 on page 8-33 .
2.) Remove the Right Cover (FRU No.301). Refer to 8-10-2 on page 8-34 .
3.) Remove the Front Base Cover (FRU No.306). Refer to 8-10-6 on page 8-39 .
4.) Remove the Front Cover (FRU No.306). Refer to 8-10-7 on page 8-41 .
5.) Remove the Keyboard (FRU No.200). Refer to section 8-9-1 on page 14
6.) Unscrew two (2) screws (1-2) and remove OP Curtain L Bracket. Refer to Figure 8-57 on page 8-42 .
OP curtain L BRKT
(1)
(2)
Figure 8-57 Removing OP Curtain L BRKT
8 - 42
Section 8-10 - Covers
GE MEDICAL SYSTEMS
DIRECTION 2395907, REVISION 2
8-10-8
LOGIQ™ 5 EXPERT BASIC SERVICE MANUAL
OP Side L Cover (FRU No. 307) (cont’d)
7.) Unscrew five screws (3-7) and remove OP Side L Cover. Refer to Figure 8-58 on page 8-43 .
(3)
(4)
(5)
(7)
(6)
Figure 8-58 Unscrew 5 screws to remove OP L Cover
NOTE:
8-10-8-5
Different screw in length is used in the location Number (7).
Mounting procedure
1.) Install the new parts in the reverse order of removal.
Chapter 8 - Replacement Procedures
8 - 43
GE MEDICAL SYSTEMS
DIRECTION 2395907, REVISION 2
8-10-9
LOGIQ™ 5 EXPERT BASIC SERVICE MANUAL
OP Side R Cover (FRU No. 308)
Purpose: This is a description on how to remove and replace the OP Side R Cover.
8-10-9-1
8-10-9-2
Tools
•
Common pillips screwdrivers
•
Allen/Unbraco wrench
Needed Manpower
•
8-10-9-3
Preparations
•
8-10-9-4
1person, 25 minutes + travel
Shut Down the System and switch off the Main Breaker at the rear as described in section 4-3-2 on
page 3.
Removal Procedure
1.) Remove the Left Cover (FRU No.300). Refer to 8-10-1 on page 8-33 .
2.) Remove the Right Cover (FRU No.301). Refer to 8-10-2 on page 8-34 .
3.) Remove the Front Base Cover (FRU No.306). Refer to 1.) on page 8-40 .
4.) Remove the Front Cover (FRU No.306). Refer to 8-10-7 on page 8-41 .
5.) Remove the Keyboard Assy (FRU No,200). Refer to section 8-9-1 on page 14.
6.) Unscrew five (5) screws (1-5) and remove the Probe Holder Bracket. Figure 8-59 on page 8-44 .
(3)
(1)
(4)(5)
(2)
Probe Holder Bracket
Figure 8-59 Removing the Probe Holder Bracket
8 - 44
Section 8-10 - Covers
GE MEDICAL SYSTEMS
DIRECTION 2395907, REVISION 2
8-10-9
LOGIQ™ 5 EXPERT BASIC SERVICE MANUAL
OP Side R Cover (FRU No. 308) (cont’d)
7.) Unscrew two (2) screws (6-7) and remove the OP Curtain R Bracket. Figure 8-60 on page 8-45 .
(6)
(7)
OP Curtain R Bracket
Figure 8-60 Removing the OP Curtain R Bracket
NOTE:
Different screw in length is used in the location Number (7).
8.) Unscrew six (6) screws (8-13) and remove the OP Side R Cover. Figure 8-61 on page 8-45 .
(10)
(9)
(8)
(13)
(11)
(12)
Figure 8-61 Removing the OP Side R Cover
8-10-9-5
Mounting procedure
1.) Install the new parts in the reverse order of removal.
Chapter 8 - Replacement Procedures
8 - 45
GE MEDICAL SYSTEMS
DIRECTION 2395907, REVISION 2
8-10-10
LOGIQ™ 5 EXPERT BASIC SERVICE MANUAL
OP Rear Cover (FRU No. 309)
Purpose: This is a description on how to remove and replace the OP Rear Cover.
8-10-10-1
8-10-10-2
Tools
•
Common pillips screwdrivers
•
Allen/Unbraco wrench
Needed Manpower
•
8-10-10-3
Preparations
•
8-10-10-4
1person, 15 minutes + travel
Shut Down the System and switch off the Main Breaker at the rear as described in section 4-2-2 on
page 5.
Removal Procedure
1.) Unscrew two screws (1-2).
NOTE:
A coin can be used for a screwdriver to unscrew.
2.) Remove OP Rear Cover. Refer to Figure 8-62 on page 8-46 .
2
1
Figure 8-62 Removing OP Rear Cover
8-10-10-5
Mounting procedure
1.) Install the new parts in the reverse order of removal.
8 - 46
Section 8-10 - Covers
GE MEDICAL SYSTEMS
DIRECTION 2395907, REVISION 2
8-10-11
LOGIQ™ 5 EXPERT BASIC SERVICE MANUAL
OP Bottom Cover (FRU No. 310)
Purpose: This is a description on how to remove and replace the OP Bottom Cover.
8-10-11-1
8-10-11-2
Tools
•
Common pillips screwdrivers
•
Allen/Unbraco wrench
Needed Manpower
•
8-10-11-3
Preparations
•
8-10-11-4
1 persons, 25 minutes + travel
Shut Down the System and switch off the Main Breaker at the rear as described in section 4-2-2 on
page 5.
Removal Procedure
1.) Remove the Left Cover (FRU No.300). Refer to 8-10-1 on page 8-33 .
2.) Remove the Right Cover (FRU No.301). Refer to 8-10-2 on page 8-34 .
3.) Remove the Front Base Cover (FRU No.305). Refer to 1.) on page 8-40 .
4.) Remove the Front Cover (FRU No.306). Refer to 8-10-7 on page 8-41 .
5.) Remove the OP Side L Cover (FRU No.307). Refer to 8-10-8 on page 8-42 .
6.) Remove the OP Side R Cover (FRU No.308). Refer to 8-10-9 on page 8-44 .
7.) Unscrew four (4) screws (1-4). Refer to Figure 8-63 on page 8-47 .
3
4
1
2
Figure 8-63 Removing the OP Bottom Cover
8.) Remove the OP Bottom Cover.
Chapter 8 - Replacement Procedures
8 - 47
GE MEDICAL SYSTEMS
DIRECTION 2395907, REVISION 2
8-10-12
LOGIQ™ 5 EXPERT BASIC SERVICE MANUAL
OP Curtain Cover (FRU No. 311)
Purpose: This is a description on how to remove and replace the OP Curtain Cover.
8-10-12-1
8-10-12-2
Tools
•
Common pillips screwdrivers
•
Allen/Unbraco wrench
Needed Manpower
•
8-10-12-3
Preparations
•
8-10-12-4
1 person, 25 minutes + travel
Shut Down the System and switch off the Main Breaker at the rear as described in section 4-3-2 on
page 3.
Removal Procedure
1.) Remove the Left Cover (FRU No.300). Refer to 8-10-1 on page 8-33 .
2.) Remove the Right Cover (FRU No.301). Refer to 8-10-2 on page 8-34 .
3.) Remove the Front Base Cover (FRU No.305). Refer to 1.) on page 8-40 .
4.) Remove the Front Cover (FRU No.306). Refer to 8-10-7 on page 8-41 .
5.) Remove the OP Side L Cover (FRU No.307). Refer to 8-10-8 on page 8-42 .
6.) Remove the OP Side R Cover (FRU No.308). Refer to 8-10-9 on page 8-44 .
7.) Remove the OP Bottom Cover (FRU No.310).
8.) Unscrew six screws from the OP Curtain Cover. Refer to Figure 8-64 on page 8-48 .
OP Bottom Cover
(1)
(2)
(3)
OP Curtain Cover
(4)
(5)
(6)
Figure 8-64 Unscrew 6 screws to remove the OP Curtain Cover
8 - 48
Section 8-10 - Covers
GE MEDICAL SYSTEMS
DIRECTION 2395907, REVISION 2
8-10-12
LOGIQ™ 5 EXPERT BASIC SERVICE MANUAL
OP Curtain Cover (FRU No. 311) (cont’d)
9.) Remove the OP Curtain Cover. Refer to Figure 8-65 on page 8-49 .
Figure 8-65 Remove the OP Curtain Cover
8-10-12-5
Mounting procedure
1.) Install the new parts in the reverse order of removal.
Chapter 8 - Replacement Procedures
8 - 49
GE MEDICAL SYSTEMS
DIRECTION 2395907, REVISION 2
8-10-13
LOGIQ™ 5 EXPERT BASIC SERVICE MANUAL
EMI Cover L (FRU No. 312)
Purpose: This is a description on how to remove and replace the EMI Cover L.
8-10-13-1
8-10-13-2
Tools
•
Common pillips screwdrivers
•
Allen/Unbraco wrench
Needed Manpower
•
8-10-13-3
Preparations
•
8-10-13-4
1 person, 5 minutes + travel
Shut Down the System and switch off the Main Breaker at the rear as described in section 4-3-2 on
page 3.
Removal Procedure
1.) Remove the Left Cover (FRU No.300). Refer to 8-10-1 on page 8-33 .
2.) Unscrew seven screws (1-7).
3.) Remove the EMI Cover L. Refer to Figure 8-66 on page 8-50 .
1
2
4
3
5
6
7
Figure 8-66 Removing the EMI Cover L
8-10-13-5
Mounting procedure
1.) Install the new parts in the reverse order of removal.
8 - 50
Section 8-10 - Covers
GE MEDICAL SYSTEMS
DIRECTION 2395907, REVISION 2
8-10-14
LOGIQ™ 5 EXPERT BASIC SERVICE MANUAL
EMI Cover R (FRU No. 313)
Purpose: This is a description on how to remove and replace the EMI Cover R.
8-10-14-1
8-10-14-2
Tools
•
Common pillips screwdrivers
•
Allen/Unbraco wrench
Needed Manpower
•
8-10-14-3
Preparations
•
8-10-14-4
1person, 15 minutes + travel
Shut Down the System and switch off the Main Breaker at the rear as described in section 4-3-2 on
page 3.
Removal Procedure
1.) Remove the Right Cover (FRU No.301). Refer to 8-10-2 on page 8-34
2.) Unscrew seven (7) screws (1-7).
3.) Remove the EMI Cover R. Refer to Figure 8-67 on page 8-51 .
2
1
3
4
5
6
7
Figure 8-67 Removing the EMI Cover R
8-10-14-5
Mounting procedure
1.) Install the new parts in the reverse order of removal.
Chapter 8 - Replacement Procedures
8 - 51
GE MEDICAL SYSTEMS
DIRECTION 2395907, REVISION 2
8-10-15
LOGIQ™ 5 EXPERT BASIC SERVICE MANUAL
Side Cap (FRU No. 314)
Purpose: This is a description on how to remove and replace the Side Cap.
8-10-15-1
Tools
•
8-10-15-2
Not required
Needed Manpower
•
1 persons, 3 minute + travel
8-10-15-3
Preparations
8-10-15-4
Removal Procedure
1.) Remove the Left Cover (FRU No.300). Refer to 8-10-1 on page 8-33 .
2.) Pull the Side Cap upward from the Left Cover.
3.) Remove the Right Cover. Refer to Right Cover (FRU No. 301) on page 8 - 34.
4.) Pull the Side Cap upward from the Right Cover. Refer to Figure 8-68 on page 8-52 .
Figure 8-68 Removing Side Caps
8-10-15-5
Mounting procedure
1.) Install the new parts in the reverse order of removal.
8 - 52
Section 8-10 - Covers
GE MEDICAL SYSTEMS
DIRECTION 2395907, REVISION 2
8-10-16
LOGIQ™ 5 EXPERT BASIC SERVICE MANUAL
Side Fringe (FRU No. 315)
Purpose: This is a description on how to remove and replace the Side Fringe.
8-10-16-1
Tools
•
8-10-16-2
Not required.
Needed Manpower
•
1 persons, 3 minute + travel
8-10-16-3
Preparations
8-10-16-4
Removal Procedure
1.) Remove the Left Cover (FRU No.300). Refer to 8-10-1 on page 8-33 .
2.) Pull the Side Fringe upward from the Left Cover.
3.) Remove the Right Cover. Refer to Right Cover (FRU No. 301) on page 8 - 34.
4.) Pull the Side Fringe upward from the Right Cover. Refer to Figure 8-69 on page 8-53 .
Figure 8-69 Removing the Side Caps
8-10-16-5
Mounting procedure
•
Install the new parts in the reverse order of removal.
Chapter 8 - Replacement Procedures
8 - 53
GE MEDICAL SYSTEMS
DIRECTION 2395907, REVISION 2
LOGIQ™ 5 EXPERT BASIC SERVICE MANUAL
Section 8-11
Body Block
8-11-1
Rear Handle (FRU No. 400)
Purpose: This is a description on how to remove and replace the Rear Handle.
8-11-1-1
8-11-1-2
Tools
•
Common pillips screwdrivers
•
Allen/Unbraco wrench
Needed Manpower
•
8-11-1-3
Preparations
•
8-11-1-4
1person, 25 minutes + travel
Shut Down the System and switch off the Main Breaker at the rear as described in section 4-3-2 on
page 3.
Removal Procedure
1.) Remove the Left Cover (FRU No.300). Refer to 8-10-1 on page 8-33 .
2.) Remove the Right Cover (FRU No.301). Refer to 8-10-2 on page 8-34 .
3.) Remove the Rear Cover (FRU No.302). Refer to 8-10-3 on page 8-35 .
4.) Remove the Top Cover (FRU No.304). Refer to 8-10-5 on page 8-37 .
5.) Unscrew four (4) screws (1-4) to remove peri rear bracket. Refer to Figure 8-70 on page 8-54 .
(3)
(1)
(4)
(2)
Figure 8-70 Removing the Peri Rear Bracket
8 - 54
Section 8-11 - Body Block
GE MEDICAL SYSTEMS
DIRECTION 2395907, REVISION 2
8-11-1
LOGIQ™ 5 EXPERT BASIC SERVICE MANUAL
Rear Handle (FRU No. 400) (cont’d)
6.) Unscrew two (2) screws (5-6) from the rear side of handle. Refer to Figure 8-71 on page 8-55 .
(6)
(5)
Figure 8-71 Unscrew two screws
7.) Unscrew four (4) screws (7-10) above top plate surface on the Rear Handle.
8.) Unscrew four (4) screws (11-14) below top plate surface on the Rear Handle. Refer to Figure 8-72
on page 8-55 .
(7)
(8)
Rear Handle
(9)
(11)
(12)
(10)
Top Plate surface
(13)
(14)
Figure 8-72 Removing the Rear Handle
9.) Remove the Rear Handle.
8-11-1-5
Mounting procedure
1.) Install the new parts in the reverse order of removal.
Chapter 8 - Replacement Procedures
8 - 55
GE MEDICAL SYSTEMS
DIRECTION 2395907, REVISION 2
8-11-2
LOGIQ™ 5 EXPERT BASIC SERVICE MANUAL
Rear Panel Assy (FRU No. 401)
Purpose: This is a description on how to remove and replace the Rear Panel Assy.
8-11-2-1
8-11-2-2
Tools
•
Common pillips screwdrivers
•
Allen/Unbraco wrench
Needed Manpower
•
8-11-2-3
Preparations
•
8-11-2-4
1 persons, 40 minutes + travel
Shut Down the System and switch off the Main Breaker at the rear as described in section 4-3-2 on
page 3.
Removal Procedure
1.) Remove the Left Cover (FRU No.300). Refer to 8-10-1 on page 8-33 .
2.) Remove the Right Cover (FRU No.301). Refer to 8-10-2 on page 8-34 .
3.) Remove the Rear Cover (FRU No.302). Refer to 8-10-3 on page 8-35 .
4.) Unscrew eight (8) screws (5-12) to remove the EMI rear Bracket. Refer to Figure 8-73 on page 856 .
5
1
9
6
2
10
7
3
11
12
8
1
Figure 8-73 Unscrew 8 screws to remove EMI brkt
8 - 56
Section 8-11 - Body Block
GE MEDICAL SYSTEMS
DIRECTION 2395907, REVISION 2
8-11-2
LOGIQ™ 5 EXPERT BASIC SERVICE MANUAL
Rear Panel Assy (FRU No. 401) (cont’d)
5.) Disconnect 8 connectors (1-8) from the left side of the Panel. Refer to Figure 8-74 on page 8-57 .
1
1.
2.
3.
4.
5.
6.
7.
8.
2
3
4
External VGA Connector
Isolated Power Connector
Power Control Connector
Rear Digital Signal Connector
Main S/W and HDD LED Signal Connector
USB Down Stream Connector
InSite Connector
Ethernet Connector
CN1
5
6
7
8
Figure 8-74 Disconnecting 8 Connectors
6.) Disconnect 9 connectors (9-17) from the right side of the Panel. Refer to Figure 8-75 on page 8-57 .
9.
10.
11.
12.
13.
14.
15.
16.
17.
Rear Analog Signal Connector
B/W Printer Power Connector
Line-In Connector
Line-Out Connetor
MIC In Connector
Sound Connector
Foot S/W Connector
Rear Panel Power-In Connector
Rear Panel Power-Out Connector
9
11
12
13
14
10
15
16
17
Figure 8-75 Disconnecting 9 connectors
7.) Remove the Rear Panel Assy.
8-11-2-5
Mounting procedure
1.) Install the new parts in the reverse order of removal.
8-11-2-6
Replace the EEPROM on the RDI Assy in the rear panel assy.
1.) Rear panel assy include the eeprom which have the system serial number information.
Chapter 8 - Replacement Procedures
8 - 57
GE MEDICAL SYSTEMS
DIRECTION 2395907, REVISION 2
LOGIQ™ 5 EXPERT BASIC SERVICE MANUAL
2.) If the rear panel assy would be replaced with other one, the eeprom in the rear panel assy
should be moved to new assy from old one.
3.) This eeprom is very important because the system serial number information in the eeprom is the
key information for system software boot up.
Figure 8-76 EEPROM in the Rear Panel Assy
8-11-2-7
NOTE:
How to Check and write the system serial number on EEPROM
Be cafeful to keep the tap direction of the eeprom when install the eeprom in the socket.
4.) Plug the service dongle on the usb port on rear panel.
5.) Turn on the system.
6.) When the log in dialog box appears, type the service password for maintenance mode.
7.) If the win2000 screen appear, run the window explorer. Move the cursor to bottom of the screen.
8.) If the task bas appear, click the explorer icon.
8 - 58
Section 8-11 - Body Block
GE MEDICAL SYSTEMS
DIRECTION 2395907, REVISION 2
8-11-2-7
LOGIQ™ 5 EXPERT BASIC SERVICE MANUAL
How to Check and write the system serial number on EEPROM (cont’d)
Figure 8-77 Window Explorer on OS screen
9.) Run the "PC2IPIIC.EXE" by double click . This execution file is in "C:\Jupiter\target\bin" directory
Figure 8-78 “PC2IPIIC.EXE”
10.)Write the serial number in eeprom
11.)If double click the "PC2IPIIC.EXE", this dialog box will be appeared.
12.)Move the trackball cursor on the white blank box and click the set key.
13.)Type the system serial number in the box.
14.)And move the trackball cursor on to "Write" button and click the set key.
Chapter 8 - Replacement Procedures
8 - 59
GE MEDICAL SYSTEMS
DIRECTION 2395907, REVISION 2
8-11-2-7
LOGIQ™ 5 EXPERT BASIC SERVICE MANUAL
How to Check and write the system serial number on EEPROM (cont’d)
Figure 8-79 Execute the “PC2IPIIC.EXE”
15.)If the same serial number appear on the next column as below picture, the write procedure
is finished.
8 - 60
Section 8-11 - Body Block
GE MEDICAL SYSTEMS
DIRECTION 2395907, REVISION 2
8-11-3
LOGIQ™ 5 EXPERT BASIC SERVICE MANUAL
Gas Spring Assy (FRU No. 402)
Purpose: This is a description on how to remove and replace the Up/Down Assy.
8-11-3-1
8-11-3-2
Tools
•
Common pillips screwdrivers
•
Allen/Unbraco wrench
•
E-ring gripper
Needed Manpower
•
8-11-3-3
Preparations
•
8-11-3-4
1 person, 45 minutes + travel
Shut Down the System and switch off the Main Breaker at the rear as described in section 4-3-2 on
page 3.
•
Removal of following parts should be proceeded before start.
•
Remove CRT Assy (FRU No. 100), KeyBoard Assy (FRU No. 200), Probe Holder (FRU No.
202),Left Cover (FRU No. 300), Right Cover (FRU No. 301), Front Base Cover (FRU No. 305),
Front Cover (FRU No. 306), OP Side L Cover (FRU No. 307), OP Side R Cover (FRU No. 308), OP
Rear Cover (FRU No. 309), EMI Cover L (FRU No. 312), EMI Cover R (FRU No. 313), BackPlane
(FRU No. 502), and BEP (Back End Processor) ASSY(FRU No. 600).
Removal Procedure
1.) Lower the OP Frame down to its lowest position. Refer to Figure 8-80 on page 8-61 .
Release Button
PRESS
Figure 8-80 Lowering the OP Frame
2.) Unscrew three (3) screws (1-3) to remove the OP push button.
Chapter 8 - Replacement Procedures
8 - 61
GE MEDICAL SYSTEMS
DIRECTION 2395907, REVISION 2
8-11-3
LOGIQ™ 5 EXPERT BASIC SERVICE MANUAL
Gas Spring Assy (FRU No. 402) (cont’d)
3.) Unscrew two (3) screws (4-6) to remove the OP button bracket. Refer to Figure 8-81 on page 8-62 .
(4)
(5)
(6)
OP Button Bracket
(1)
(2)
(3)
Figure 8-81 Unscrew 6 screws to remove BRKT
4.) Unscrew four (4) hexagon screws (7-10). Refer to Figure 8-82 on page 8-62 .
Figure 8-82 Unscrew 4 hexagon screws
5.) Using E-ring gripper, remove E-ring. Refer to section Figure 8-83 on page 62.
E-RING
Figure 8-83 Remove E-Ring
6.) Pull the Gas-spring out upward.
8 - 62
Section 8-11 - Body Block
GE MEDICAL SYSTEMS
DIRECTION 2395907, REVISION 2
8-11-4
LOGIQ™ 5 EXPERT BASIC SERVICE MANUAL
Front Caster (FRU No. 403)
Purpose: This is a description on how to remove and replace the Front Caster.
8-11-4-1
8-11-4-2
Tools
•
Common pillips screwdrivers
•
Allen/Unbraco wrench
•
Lifter (180Kg)
Needed Manpower
•
8-11-4-3
8-11-4-4
1 persons, 15 minutes + travel
Preparations
•
Shut Down the System and switch off the Main Breaker at the rear as described in section 4-3-2 on
page 3.
•
Lift the system before proceed.
Removal Procedure
1.) Unscrew eight (8) hexagonal bolts (1-8).
2.) Remove the Front Caster. Refer to Figure 8-84 on page 8-63 .
5
1
2
3
6
7
8
4
Figure 8-84 Removing the Front Caster
8-11-4-5
Mounting procedure
1.) Install the new parts in the reverse order of removal.
Chapter 8 - Replacement Procedures
8 - 63
GE MEDICAL SYSTEMS
DIRECTION 2395907, REVISION 2
8-11-5
LOGIQ™ 5 EXPERT BASIC SERVICE MANUAL
Rear Caster (FRU No. 404)
Purpose: This is a description on how to remove and replace the Rear Caster.
8-11-5-1
8-11-5-2
Tools
•
Common pillips screwdrivers
•
Allen/Unbraco wrench
•
Lifter (180Kg)
Needed Manpower
•
8-11-5-3
8-11-5-4
1 person, 15 minutes + travel
Preparations
•
Shut Down the System and switch off the Main Breaker at the rear as described in section 4-3-2 on
page 3.
•
Lift the system before proceed.
Removal Procedure
1.) Unscrew eight hexagonal bolts (1-8).
2.) Remove the Rear Caster. Refer to Figure 8-85 on page 8-64 .
5
1
2
3
6
7
8
4
Figure 8-85 Removing the Rear Caster
8-11-5-5
Mounting procedure
1.) Install the new parts in the reverse order of removal.
8 - 64
Section 8-11 - Body Block
GE MEDICAL SYSTEMS
DIRECTION 2395907, REVISION 2
8-11-6
LOGIQ™ 5 EXPERT BASIC SERVICE MANUAL
Bumper Set (FRU No. 405)
Purpose: This is a description on how to remove and replace the Bumper Set.
8-11-6-1
Tools
•
8-11-6-2
Needed Manpower
•
8-11-6-3
1persons, 20 minutes + travel
Preparations
•
8-11-6-4
Common pillips screwdrivers
Shut Down the System and switch off the Main Breaker at the rear as described in section 4-3-2 on
page 3.
Removal Procedure
1.) Remove the Monitor Assy (FRU No.100). Refer to 8-3-1 on page 8-2 .
2.) Remove the Left Cover (FRU No.300). Refer to 8-10-1 on page 8-33 .
3.) Remove the Right Cover (FRU No.301). Refer to 8-10-2 on page 8-34 .
4.) Remove the Front Base Cover (FRU No.305). Refer to 8-10-6 on page 8-39 .
5.) Unscrew two screws (1-2).
6.) Remove the Bumper Set. Refer to Figure 8-86 on page 8-65 .
2
1
Figure 8-86 Removing the Bumper Set
8-11-6-5
Mounting procedure
1.) Install the new parts in the reverse order of removal
Chapter 8 - Replacement Procedures
8 - 65
GE MEDICAL SYSTEMS
DIRECTION 2395907, REVISION 2
8-11-7
LOGIQ™ 5 EXPERT BASIC SERVICE MANUAL
Air Filter Set (FRU No. 406)
Purpose: This is a description on how to remove and replace the Air Filter Set.
8-11-7-1
Tools
•
8-11-7-2
Needed Manpower
•
8-11-7-3
1 person, 5 minutes + travel
Preparations
•
8-11-7-4
Not Required.
Shut Down the System and switch off the Main Breaker at the rear as described in section 4-3-2 on
page 3.
Removal Procedure
1.) Remove Air Filter as illustrated below.Refer to Figure 8-87 on page 8-66 .
Figure 8-87 Removing the Air Filters
8-11-7-5
Mounting procedure
1.) Install the new parts in the reverse order of removal.
8 - 66
Section 8-11 - Body Block
GE MEDICAL SYSTEMS
DIRECTION 2395907, REVISION 2
LOGIQ™ 5 EXPERT BASIC SERVICE MANUAL
Section 8-12
PCB Boards
8-12-1
RLY Assy (FRU No. 500)
Purpose: This is a description on how to remove and replace the RLY Assy.
8-12-1-1
Tools
•
8-12-1-2
Needed Manpower
•
8-12-1-3
1 person, 15 minutes + travel
Preparations
•
8-12-1-4
Common pillips screwdrivers
Shut Down the System and switch off the Main Breaker at the rear as described in section 4-3-2 on
page 3
Removal Procedure
CAUTION An electronic discharge may damage a component. Turn OFF power and wear the wrist strap
before you remove circuit boards. Do not unplug the power cord to keep ground continuity.
Do not bend or flex the boards when mounting/dismounting each boards. Surface mount IC
boards are very susceptible to damage from flex/torque.
1.) Remove the Front Cover. Refer to section 8-10-7 on page 41.
2.) Remove the Front Base Cover. Refer to section 8-10-6 on page 39.
3.) Unscrew five (5) screws (1-5) to remove the EMC Bracket. Refer to Figure 8-88 on page 8-67 .
(1)
EMC Bracket
(2)
(3)
(4)
(5)
Figure 8-88 Unscrew 5 screws to remove EMC BRKT
Chapter 8 - Replacement Procedures
8 - 67
GE MEDICAL SYSTEMS
DIRECTION 2395907, REVISION 2
8-12-1
LOGIQ™ 5 EXPERT BASIC SERVICE MANUAL
RLY Assy (FRU No. 500) (cont’d)
4.) Unscrew nine (9) screws (6-14) to remove the RLY Board Cover. Refer to Figure 8-89 on page 868 .
(7)
(12)
(8)
(13)
(9)
(14)
(10)
(6)
(11)
Figure 8-89 Removing the RLY board Cover
NOTE:
Bind head screw is used at the location number (8).
5.) Unscrew seven (7) screws (15-21) to remove the RLY Board. Refer to Figure 8-90 on page 8-68 .
(15)
(21)
(16)
(20)
Probe Connector
(19)
(17)
(18)
Figure 8-90 Unscrew 7 screws to remove the RLY Board
6.) Get the probe connector and pull the RLY board Out.
8-12-1-5
Mounting procedure
1.) Install the new parts in the reverse order of removal.
8 - 68
Section 8-12 - PCB Boards
GE MEDICAL SYSTEMS
DIRECTION 2395907, REVISION 2
8-12-2
LOGIQ™ 5 EXPERT BASIC SERVICE MANUAL
LMT Assy (FRU No. 501)
Purpose: This is a description on how to remove and replace the LMT Assy.
8-12-2-1
Tools
•
8-12-2-2
Needed Manpower
•
8-12-2-3
1 person, 25 minutes + travel
Preparations
•
8-12-2-4
Common pillips screwdrivers
Shut Down the System and switch off the Main Breaker at the rear as described in section 4-3-2 on
page 3.
Removal Procedure
CAUTION An electronic discharge may damage a component. Turn OFF power and wear the wrist strap
before you remove circuit boards. Do not unplug the power cord to keep ground continuity.
Do not bend or flex the boards when mounting/dismounting each boards. Surface mount IC
boards are very susceptible to damage from flex/torque.
1.) Remove the RLY Assy. Refer to section 8-12-1 on page 67.
2.) Unscrew two (2) screws (1-2) to remove the LMT Board. Refer to Figure 8-91 on page 8-69 .
(1)
(2)
Figure 8-91 Unscrew 2 screws to remove the LMT B’d
Chapter 8 - Replacement Procedures
8 - 69
GE MEDICAL SYSTEMS
DIRECTION 2395907, REVISION 2
8-12-2
LOGIQ™ 5 EXPERT BASIC SERVICE MANUAL
LMT Assy (FRU No. 501) (cont’d)
3.) Pull the LMT Board out. Refer to Figure 8-92 on page 8-70 ..
Figure 8-92 Pulling Out LMT Board
8-12-2-5
Mounting procedure
1.) Install the new parts in the reverse order of removal.
8 - 70
Section 8-12 - PCB Boards
GE MEDICAL SYSTEMS
DIRECTION 2395907, REVISION 2
8-12-3
LOGIQ™ 5 EXPERT BASIC SERVICE MANUAL
BackPlane (FRU No. 502)
Purpose: This is a description on how to remove and replace the Backplane.
8-12-3-1
Tools
•
8-12-3-2
Needed Manpower
•
8-12-3-3
8-12-3-4
Common pillips screwdrivers
1 person, 30 minutes + travel
Preparations
•
Shut Down the System and switch off the Main Breaker at the rear as described in section 4-3-2 on
page 3.
•
Left Cover, Right Cover and Rear Cover should be removed before proceed. Refer to section 8-101 on page 33, section 8-10-2 on page 34, and section 8-10-3 on page 35.
•
It is recommended to remove BEP (Back End Processor) assy before proceed. For more
information refer to BEP (Back End Processor) ASSY(FRU No. 600) on page 8 - 76
Removal Procedure
CAUTION An electronic discharge may damage a component. Turn OFF power and wear the wrist strap
before you remove circuit boards. Do not unplug the power cord to keep ground continuity.
Do not bend or flex the boards when mounting/dismounting each boards. Surface mount IC
boards are very susceptible to damage from flex/torque.
1.) Remove the EMI Cover R (FRU No.313). Refer to 8-10-14 on page 8-51 .
2.) Unscrew the five screws from the Nest EMI Cover.
3.) Remove the Nest EMI Cover.
Chapter 8 - Replacement Procedures
8 - 71
GE MEDICAL SYSTEMS
DIRECTION 2395907, REVISION 2
8-12-3
LOGIQ™ 5 EXPERT BASIC SERVICE MANUAL
BackPlane (FRU No. 502) (cont’d)
4.) From the left view, disconnect eight connectors from the Backplane Assy. Refer to Figure 8-93 on
page 8-72 ..
Figure 8-93 Disconnect 8 connectors from the left
5.) From the right view, disconnect two connectors (9-10).
(11)
(9)
(12)
(10)
(13)
(14)
Figure 8-94 Disconnect 2 connectors from the right
6.) Unscrew four (4) screws (11-14) to remove the Backplane Assy.
7.) Pull the Backplane assy out carefully.
WARNING
8-12-3-5
The weight of the Backplane with PCBs inside is approximately 20 kg. Two person is
needed in the next step.
Mounting procedure
1.) Install the new parts in the reverse order of removal.
8 - 72
Section 8-12 - PCB Boards
GE MEDICAL SYSTEMS
DIRECTION 2395907, REVISION 2
8-12-4
LOGIQ™ 5 EXPERT BASIC SERVICE MANUAL
PCB Boards (FRU No. 503, 505~510)
Purpose: This is a description on how to remove and replace the PCB Boards.
PMP Assy (FRU No.503), SIG Assy (FRU No.505), FEC Assy (FRU No.506), RDS Assy (FRU No.507),
CWDOP Assy (FRU No.508), ATD Assy (FRU No.509) and HV Assy (FRU No.510)
8-12-4-1
8-12-4-2
Tools
•
Common pillips screwdrivers
•
Allen/Unbraco wrench
Needed Manpower
•
8-12-4-3
Preparations
•
8-12-4-4
1 persons, 20 minutes + travel.
Shut Down the System and switch off the Main Breaker at the rear as described in section 4-3-2 on
page 3.
Removal Procedure
CAUTION An electronic discharge may damage a component. Turn OFF power and wear the wrist strap
before you remove circuit boards. Do not unplug the power cord to keep ground continuity.
Do not bend or flex the boards when mounting/dismounting each boards. Surface mount IC
boards are very susceptible to damage from flex/torque.
1.) Remove the Right Cover (FRU No.301). Refer to 8-10-3 on page 8-35 .
2.) Remove the EMI Cover R (FRU No.313). Refer to 8-10-14 on page 8-51 .
3.) Unscrew the five screws from the Nest EMI Cover.
4.) Remove the Nest EMI Cover.
5.) SIG Assy should be removed first before removing PMP, ATD, CWDOP, RDS Assy.
Chapter 8 - Replacement Procedures
8 - 73
GE MEDICAL SYSTEMS
DIRECTION 2395907, REVISION 2
8-12-4
LOGIQ™ 5 EXPERT BASIC SERVICE MANUAL
PCB Boards (FRU No. 503, 505~510) (cont’d)
6.) Disconnect one connector (1) if removing the FEC Assy. Otherwise skip this step. Refer to Figure
8-95 on page 8-74 ..
SIG Board
(1)
Figure 8-95 Disconnecting Cable
7.) Move the upper and lower stopper in the direction indicated by the arrow (1). Refer to Figure 8-96
on page 8-74 .
(1)
(2)
(1)
Figure 8-96 Pulling Out the Board.
8.) Pull out the board in the direction indicated by the arrow (2). do not bend it.
8-12-4-5
Mounting procedure
1.) Install the new parts in the reverse order of removal.
8 - 74
Section 8-12 - PCB Boards
GE MEDICAL SYSTEMS
DIRECTION 2395907, REVISION 2
8-12-5
LOGIQ™ 5 EXPERT BASIC SERVICE MANUAL
DC Fan Assy(FRU No. 504)
Purpose: This is a description on how to remove and replace the DC Fan.
8-12-5-1
Tools
•
8-12-5-2
Needed Manpower
•
8-12-5-3
1 persons, 20 minutes + travel
Preparations
•
8-12-5-4
Common pillips screwdrivers
Shut Down the System and switch off the Main Breaker at the rear as described in section 4-3-2 on
page 3.
Removal Procedure
CAUTION An electronic discharge may damage a component. Turn OFF power and wear the wrist strap
before you remove circuit boards. Do not unplug the power cord to keep ground continuity.
Do not bend or flex the boards when mounting/dismounting each boards. Surface mount IC
boards are very susceptible to damage from flex/torque.
Refer to Figure 8-74 on page 68 .
1.) Remove the Right Cover (FRU No.301). Refer to 8-10-3 on page 8-35 .
2.) Remove the EMI Cover R (FRU No.313). Refer to 8-10-14 on page 8-51 .
3.) Unscrew the five screws from the Nest EMI Cover.
4.) Remove the Nest EMI Cover.
5.) Disconnect one (1) connector (1).
6.) Unscrew two (2) screws (2-3) to remove DC Fan Assy.
Figure 8-97 Removing the DC Fan Assy
8-12-5-5
Mounting procedure
1.) Install the new parts in the reverse order of removal.
Chapter 8 - Replacement Procedures
8 - 75
GE MEDICAL SYSTEMS
DIRECTION 2395907, REVISION 2
LOGIQ™ 5 EXPERT BASIC SERVICE MANUAL
Section 8-13
PC Block
8-13-1
BEP (Back End Processor) ASSY(FRU No. 600)
Purpose: This is a description on how to remove and replace the Parts in the BEP Assy.
8-13-1-1
Tools
•
8-13-1-2
Needed Manpower
•
8-13-1-3
8-13-1-4
Common pillips screwdrivers
2 persons, 15 minutes + travel
Preparations
•
Shut Down the System and switch off the Main Breaker at the rear as described in section 4-3-2 on
page 3.
•
Left Cover, Right Cover and Rear Cover should be removed before proceed. Refer to section 8-101 on page 33, section 8-10-2 on page 34, and section 8-10-3 on page 35.
General Procedures of BEP2 Assy Disassembly.
2.) Open the EMI Cover L Assy (FRU No. 312). .
3.) Open the rear cover and EMI Rear Bracket.
4.) Disconnect all the connectors connected With the BEP.
5.) Unscrew eight (8) screws (1-8) and take out the BEP Power plug( 9 ).
6.) Take out the BEP assy to forward direction.
Figure 1-1 Take out the BEP assy from the console
7.) When replace the BEP assy the option dongle should be moved from old BEP to new one. The FRU
BEP doesn’t have the option dongle.
8 - 76
Section 8-13 - PC Block
GE MEDICAL SYSTEMS
DIRECTION 2395907, REVISION 2
8-13-1-4
LOGIQ™ 5 EXPERT BASIC SERVICE MANUAL
General Procedures of BEP2 Assy Disassembly. (cont’d)
Option Dongle
VGA to VIC Cable
Figure 1-2 Option Dongle replacement
NOTE:
BEP2 FRU include CD set and VGA to VIC cable because the CD set and cable for BEP1 can
not be used for BEP2
NOTE:
If the BEP1 is replaced with BEP2 FRU, the CD set on the EMI metal cover also should be
replaced with new CD set which is included in the BEP2 FRU kits
Chapter 8 - Replacement Procedures
8 - 77
GE MEDICAL SYSTEMS
DIRECTION 2395907, REVISION 2
8-13-1-5
LOGIQ™ 5 EXPERT BASIC SERVICE MANUAL
BEP2 Cable Connection with Console
1.) Push the BEP2 Assy into The System and then Connect PCI Cable.
2.) Check the PCI cable is arranged without short before connecting PCI cable to BEP2.
3.) Connect the PCI cable to the BEP2 assy.
PCI cable
Figure 1-3 PCI cable connection
4.) Connect the J2 Cable connector to the BEP2.
J2 cable connector
Figure 1-4 J2 cable connection
5.) Connect the LCD Connector to BEP2.
LCD connector
Figure 1-5 LCD cable connection
8 - 78
Section 8-13 - PC Block
GE MEDICAL SYSTEMS
DIRECTION 2395907, REVISION 2
8-13-1-5
LOGIQ™ 5 EXPERT BASIC SERVICE MANUAL
BEP2 Cable Connection with Console (cont’d)
6.) Connect LI, LO, MI, ETHERNET Connector to Sound/LAN Port on BEP2.
Ethernet Cable
MI (MIC : Red) cable
LO (Line Out : Green) Cable
LI (Line In : Blue) Cable
Figure 1-6 Connecting Cables
7.) Connect CON17 Connector to BEP2.
CON 17 cable
Figure 1-7 Connecting CON17 cables
8.) Check the CON 17 cable is arranged without short before connecting.
Chapter 8 - Replacement Procedures
8 - 79
GE MEDICAL SYSTEMS
DIRECTION 2395907, REVISION 2
8-13-1-5
LOGIQ™ 5 EXPERT BASIC SERVICE MANUAL
BEP2 Cable Connection with Console (cont’d)
9.) Connect CON21 Connector to BEP2.
CON 21 Cable
Figure 1-8 CON21 cable connection
10.)Connection COM1 Connector to Serial Port on BEP2.
NOTE:
COM1 Cable Connect to Motherboard Serial Port ( D-SUB 9 Pin Male )
COM1 cable
Figure 1-9 COM1 cable connection
8 - 80
Section 8-13 - PC Block
GE MEDICAL SYSTEMS
DIRECTION 2395907, REVISION 2
8-13-1-5
LOGIQ™ 5 EXPERT BASIC SERVICE MANUAL
BEP2 Cable Connection with Console (cont’d)
11.)Connection Keyboard, Printer connector to USB Port on BEP2.
Keyboard
USB Port
Printer
Figure 1-10 Keyboard, Printer connector
12.)Connect ATX Power to BEP2.
ATX Power cable
Figure 1-11 ATX Power cable connector
Chapter 8 - Replacement Procedures
8 - 81
GE MEDICAL SYSTEMS
DIRECTION 2395907, REVISION 2
8-13-1-6
LOGIQ™ 5 EXPERT BASIC SERVICE MANUAL
System Functional Check
Check the system after BEP2 is assembled on the console.
1.) Pull Up Circuit Breaker.
2.) Insert the Service Key to Rear Panel USB Port.
3.) Power on the system.
4.) Check The Logo Image as below. BEP2 Logo Image Is differ from that of BEP1.
Figure 1-12 Logo Display
5.) Press F2 Key
6.) Check the BEP2 BIOS set-up is same as below.Password is jupiter ( lower case )
BIOS Version
RG84510A.86.A.0024.P1
Process Type
Intel ® Pentium ® 4
Process Speed
2Ghz
System Bus Speed
400Mhz
System Memory Speed 266Mhz
Cache RAM
512KB
Total Memory
Memory Bank 0
Memory Bank 1
Language
System time
System Data
511MB
512MB (DDR266)
Not Installed
[ English ]
[ 04:22:55 ] -- Current Time Setting
[ The 03/11/2003 ] -- Current Date Setting
Figure 8-13 Main Menu Screen
8 - 82
Section 8-13 - PC Block
GE MEDICAL SYSTEMS
DIRECTION 2395907, REVISION 2
8-13-1-7
LOGIQ™ 5 EXPERT BASIC SERVICE MANUAL
Advanced Menu
PCI Configuration
PCI Slot 1
PCI Slot 2
PCI Slot 3
PCI Slot 4
PCI Slot 5
PCI Slot 6
IRQ Priority
IRQ Priority
IRQ Priority
IRQ Priority
IRQ Priority
IRQ Priority
[ AUTO]
[ AUTO]
[ AUTO]
[ AUTO]
[ AUTO]
[ AUTO]
Boot Configuration
Plug & Play O/S
Num lock
[ YES ]
[ ON ]
IDE Configuration
Peripheral Configuration
Serial Port A
Parallel Port
Mode
Audio
LAN Device
[ AUTO ]
[ AUTO ]
[ ECP ]
[ Enable ]
[ Enable ]
IDE Controller [ Both]
PCI IDE Bus Master
Hard Disk Pre-Delay
Primary IDE Master
Primary IDE Slave
Secondary IDE Master
Secondary IDE Slave
[ Enable ]
[ Disable ]
: [ ST 380011A ]
: [ Not Detected ]
: [ PX-W241 ]
: [ Not Detected ]
Diskette Configuration
Event Log Configuration
Diskette Controller
Event Logging
[ Disable ]
[ Enable ]
Video Configuration
USB Configuration
AGP Aperture Size
[ 64 MB ]
Primary Video adapter [ AGP ]
Frame Buffer Size
[ 1 MB ]
High – Speed USB [ Disable ]
Legacy USB Support [ Enable ]
Chipset Configuration
Fan Control Configuration
ISA Enable Bit
PCI Latency Time
Extended Configuration
Fan Control
Lowest Fan Speed
[ Enable ]
[ 32 ]
[ Default ]
[ Enable ]
[ Slow ]
Figure 8-14 Advanced Menu
8-13-1-8
Security Menu
Security
Supervisor password
User password
Set Supervisor password
User Access Level
Set User password
Chassis Intrusion
:
:
Installed Lowest Fan
Not Installed
[ No Access ]
[ Disable ]
Figure 8-15 Security Menu
Chapter 8 - Replacement Procedures
8 - 83
GE MEDICAL SYSTEMS
DIRECTION 2395907, REVISION 2
8-13-1-9
LOGIQ™ 5 EXPERT BASIC SERVICE MANUAL
Power Menu
Power
ACPI
ACPI Suspend State
Wake on Lan from S5
After Power Failure
Wake On PCI PME
[ S1 State ]
[ stay off ]
[ Stay OFF ]
[ Stay OFF ]
Figure 8-16 Power Menu
8-13-1-10
Boot Menu
Silent Boot
[ Enable ]
Intel ( R ) rapid BIOS Boot
[ Enable ]
Scan User Flash Area
[ Enable ]
PXT Boot To LAN
[ Disable ]
USB Boot
[ Disable ]
Boot Device Priority
1ST Boot Device [ CD-R PX-W ] *CDRW
2ND Boot Device
[ ST380011A ] *HDD
3 RD Boot Device
[ Disable ]
Figure 8-17 Boot Menu
8 - 84
Section 8-13 - PC Block
GE MEDICAL SYSTEMS
DIRECTION 2395907, REVISION 2
8-13-1-11
LOGIQ™ 5 EXPERT BASIC SERVICE MANUAL
Check the Device Driver Configuration.
After System boot up. confirm the installed device information.
Double click Go Device Manager Icon
Device Manger
Figure 1-18 Device Manager
1.) Check VGA Driver and PCI Video Driver are enrolled on Display adapter section.
Figure 1-19 Display Adapter
2.) Check The PCI Bridge Between FEC Assy and PC2IP Assy under multi function adapters
Figure 1-20 Multi Function Adapter
3.) Check the Sound Driver is On board Sound (Sound Max).
VIC assy
On board sound
Figure 1-21 Sound Driver
4.) Check the VIC Assy Driver is GE Medical SuperSonic Diagnostic Device Driver and GEMSK
Multimedia Device
5.) Check The USB Device Driver.
Chapter 8 - Replacement Procedures
8 - 85
GE MEDICAL SYSTEMS
DIRECTION 2395907, REVISION 2
8-13-1-11
LOGIQ™ 5 EXPERT BASIC SERVICE MANUAL
Check the Device Driver Configuration. (cont’d)
6.) L5 Keyboard Communicates with Jupiter Human Interface by USB Protocol.
Figure 1-22 Jupiter Human Interface Driver
7.) Check The Network Device Driver.
8 - 86
Section 8-13 - PC Block
GE MEDICAL SYSTEMS
DIRECTION 2395907, REVISION 2
8-13-1-12
LOGIQ™ 5 EXPERT BASIC SERVICE MANUAL
Application S/W Install.
After Checking Device Driver and then Install application S/W by inserting CD into CD RW Driver.
Figure 1-23 Installation Application Software
1.) Press the "Y" key to continue. Then the program requests confirmation - "Are you sure?"
then Press the "Y" key again.
2.) The installation process will be started. it will take about 15 minutes.
3.) To apply the preset by region, select one of the below options. Refer to 8-133.
4.) Select fit Region as Below Menu.
Figure 1-24 Select Region
5.) When the process has completed, you will see the following message.
Figure 1-25 Complete message
6.) After the installation is complete, the system will power off automatically.
• If possible remove the CD from the drive while the system is rebooting.
Chapter 8 - Replacement Procedures
8 - 87
GE MEDICAL SYSTEMS
DIRECTION 2395907, REVISION 2
8-13-2
LOGIQ™ 5 EXPERT BASIC SERVICE MANUAL
VIC Assy
Purpose: This is a description on how to remove and replace the VIC assy in the BEP Assy.
8-13-2-1
Tools
•
8-13-2-2
Needed Manpower
•
8-13-2-3
1 persons, 15minutes + travel
Preparations
•
•
8-13-2-4
Common pillips screwdrivers
Shut Down the System and switch off the Main Breaker at the rear as described in section 4-3-2 on
page 3.
Left Cover should be removed before proceed. Refer section 8-10-1 on page 33, section 8-10-13
on page 50.
Removal Procedure
8-2-4-0-1
Mode setting for VIC assy
VIC assy have two jumpers for power control functionality. The cap position depend on BEP assy.
Before replace the VIC assy, this mode jumper shoub be set up.
For BEP1
J 6 Connector
J 11 Connector
J 11 Connector
Figure 8-26 Mode set for VIC assy
8 - 88
Section 8-13 - PC Block
For BEP2
J 6 Connector
GE MEDICAL SYSTEMS
DIRECTION 2395907, REVISION 2
8-2-4-0-2
LOGIQ™ 5 EXPERT BASIC SERVICE MANUAL
Removal of VIC board
1.) Disconnect all of connect in VIC assy. Refer Figure 8-27 on page 8-89
Figure 8-27 Connectors on VIC assy
2.) 5 connectors inside BEP. 14 pins connector to chassi from VIC. 50pin half pitch flat cable connector.
50pin flat cable conntor to PC2IP card. 2 pin connector to motherboard for power control. 3 pin
conntor to motherboard for LED.
3.) Disconnect 2 connectors outside of BEP
Video signal to Rear panel
VGA to VIC
J
2
2309649
Figure 8-28 Video signal to Rear Panel & VGA to VIC
4.) Disconnect 2 connectors to motherboard.
J8 ,
J12
Figure 8-29 Disconnect 2 connectors
8-8-2-5
Mounting procedure
1.) Install the new parts in the reverse order of removal.
Chapter 8 - Replacement Procedures
8 - 89
GE MEDICAL SYSTEMS
DIRECTION 2395907, REVISION 2
8-8-3
LOGIQ™ 5 EXPERT BASIC SERVICE MANUAL
SMPS Assy, Hard Disk, CD R/W (FRU No. 601, 602, 603)
Purpose: This is a description on how to remove and replace the Parts in the BEP Assy.
8-8-3-1
Tools
•
8-8-3-2
Needed Manpower
•
8-8-3-3
1 persons, 15 minutes + travel
Preparations
•
•
8-8-3-4
Common pillips screwdrivers
Shut Down the System and switch off the Main Breaker at the rear as described in section 4-3-2 on
page 3.
Left Cover should be removed before proceed. Refer section 8-10-1 on page 33, section 8-10-13
on page 50.
Removal Procedure
1.) Open front base cover and front cover. Refer section 8-10-6 on page 39, section 8-10-7 on page 41
2.) Remove PC top fix bracket and scan EMC bracket. Refer Table 8-30 on page 90
PC Top Fix Bracket
1
2
3
4
Scan EMC Bracket
5
6
7
8
Figure 8-30 ATX SMPS Replacement
3.) Open the BEP metal cover
8 - 90
Section 8-13 - PC Block
GE MEDICAL SYSTEMS
DIRECTION 2395907, REVISION 2
LOGIQ™ 5 EXPERT BASIC SERVICE MANUAL
Removal Procedure (cont’d)
8-8-3-4
4.) Disconnect all power connector from ATX smps in motherboard and hard disk and CD RW. .
2
Power Bracket Screw
3
1
Cable Tie
4
5
Figure 8-31 Inside of BEP
5.) Unscrew 2 screws on theATX power bracket
6.) Take out the ATX smps
2
1
2
1
3
4
Figure 8-32 Take out the ATX SMPS
7.) To remove Hard disk and CDRW Unplug the IDE cable for HDD or CDRW drive and power
connector.
8.) Unscrew the screws on the chassi for fixture.
9.) Take out CDRW or Hard disk.
Chapter 8 - Replacement Procedures
8 - 91
GE MEDICAL SYSTEMS
DIRECTION 2395907, REVISION 2
8-8-3-4
LOGIQ™ 5 EXPERT BASIC SERVICE MANUAL
Removal Procedure (cont’d)
4 screws for
CDRW
4 screws for
MOD
4 screws for
Patient IO
2 screws for
Hard Disk
Figure 8-33 Screws for Peripheral in BEP
10.)Move the CDRW guide braket to new FRU.
1
3
2
4
Figure 8-34 CDRW Guide bracket
11.)Mode Jumper : Hard disk and CDRW should be set as Master drive. Confirm the mode setting
jumper in hard disk and CDRW.
12.)Enter BIOS set up Mode.(Password : Jupiter)
13.)Change the Diskette configuration of the Advanced Menu Screen in the BIOS set up menu as
follows.
Change the Diskette Controller to [Enable]
Change the FLOPPYA to [Disabled]
Change the Diskette Write Protect [Disabled]
14.)Press "F10 - SAVE AND EXIT" to save the BIOS set up.
8 - 92
Section 8-13 - PC Block
GE MEDICAL SYSTEMS
DIRECTION 2395907, REVISION 2
8-8-3-4
LOGIQ™ 5 EXPERT BASIC SERVICE MANUAL
Removal Procedure (cont’d)
15.)Check if CD R/W is properly installed in the Maintenance Mode. (Check the CR R/W is recognized
by the system in the MS windows navigator)
16.)Press and hold the Power Button for 20 sec. to execute manual system shut down.
17.)Enter BIOS Set up mode again.
18.)Reset the Diskette Controller to [Disable] in the Advanced Menu screen.
19.)Press "F10 - SAVE AND EXIT" to save the BIOS set up.
8-8-3-5
Mounting procedure
1.) Install the new parts in the reverse order of removal
Chapter 8 - Replacement Procedures
8 - 93
GE MEDICAL SYSTEMS
DIRECTION 2395907, REVISION 2
8-8-3-6
LOGIQ™ 5 EXPERT BASIC SERVICE MANUAL
Hard disk copy procedure
This section show the patient data duplication procedure for hard disk replacement The purpose od this
procedure is to copy the patient data in the used hard diks into the newly installed BEP or hard disk assy
Caution : If the new hard disk have the patient data, these data should be back up with CD before data
copy procedure. Since the patient data will be overwritten into the new hard disk from used hard disk.
8-3-6-0-1
Connect HDD
1.) Set the used hard disk as slave mode disk. All the HDD have jumper for mode setting, master mode
or slave mode. For the patient data copy procedure, the both HDD should be set as master and
slave. The HDD in the installed BEP assy is the master. All of the HDD in BEP assy are set to master
in the factory. So the used HDD should be set to slave. Refer the figure of HDD jumper
SLAVE
Mode
Master
Mode
Figure 8-35 HDD Mode Setting Jumper
2.) Connect the IDE cable to HDD
3.) The used HDD should be installed in BEP assy as slave HDD. There are 2 flat cables in the BEP
assy. One is for CDRW drive or MOD and the other is for HDD. The both HDD, used one and new
one should be connected through common flat cable. If the HDD cable is tied by tie wrap, cut the
tie off carefully. The extra connector of HDD cable should be connected to the used HDD as figure
Cut the cable tie
Connect the HDD cable
Figure 8-36
8 - 94
Section 8-13 - PC Block
GE MEDICAL SYSTEMS
DIRECTION 2395907, REVISION 2
8-3-6-0-2
LOGIQ™ 5 EXPERT BASIC SERVICE MANUAL
Data copy to new HDD.
1.) Go into maintenance mode
2.) Plug the USB service dongle into usb port on the rear panel. There are 2 usb ports on the rear panel.
The right side USB port is recommended for service dongle. Turn on the system and key in the
service password
Figure 8-37 maintenance login
8-3-6-0-3
File Copy
1.) The database control software module should be disabled through task manager The task manager
can be activated by following procedure.
2.) -Move the cursor to right-bottom side of screen.
3.) -Click the left trackball key and select task manager.
Figure 8-38 Run Task Manager
4.) - Select then "process" button on the task manager window.
Chapter 8 - Replacement Procedures
8 - 95
GE MEDICAL SYSTEMS
DIRECTION 2395907, REVISION 2
LOGIQ™ 5 EXPERT BASIC SERVICE MANUAL
5.) - Select the "dbeng7.exe" in the process list and click the "End Process" button.
Process
dbeng7.exe
End Process
Fig 6. Task Manager
Figure 8-39 Task Manager with process
6.) - click the "Yes" button when "task manager warning" dialog box .
7.) - Check if windows identify the both HDD.
8.) - Run the window explorer. Move the cursor to bottom of the screen and click the "window explorer"
on the task bar.
Fig 8. Drive configuration
status in explorer
Figure 8-40 Dual Hard disk status
9.) There should be 8 logical disk totally. Each HDD have 4 partitions, "SYSTEM", "USER",
"ARCHIVE", "SWAP". The used HDD which is set to slave is "H" to "K". And the new HDD in BEP
which is set to master is "C" to "F". (If the L5 system have MO drive, the slave drive number can be
"I" to "L")
8 - 96
Section 8-13 - PC Block
GE MEDICAL SYSTEMS
DIRECTION 2395907, REVISION 2
LOGIQ™ 5 EXPERT BASIC SERVICE MANUAL
10.)- The patient data files are in the "Idunn" directory in the "ARCHIVE" disk.
11.)- All of sub directory in the "Idunn" directory of slave HDD should be copy to "Idunn" directory of
master HDD. (In below example, the three sub directory "GEMS_DB", "GEMS_IMG",
"GEMS_REP" in the "Idunn" directory in "J" drive should be copy to "Idunn" drive in "E" drive.)
Figure 8-41 Directory Map in HDD
12.)- If following warning message appear, click the button "Yes to All".
Figure 8-42 Copy confirmation message
13.)- If finish the file copy process, shutdown the system and unplug the service dongle.
Chapter 8 - Replacement Procedures
8 - 97
GE MEDICAL SYSTEMS
DIRECTION 2395907, REVISION 2
8-3-6-0-4
LOGIQ™ 5 EXPERT BASIC SERVICE MANUAL
Check the patient data
1.) - Turn on the system
2.) - If system boot up, select patient menu and confirm that the all of patient data are available.
3.) - The database utility should be enabled by the network IP address setting procedure. If this “save
setting procedure have been missed, the patient data image can not be show up since the database
link error
8-3-6-0-5
1.)
2.)
3.)
4.)
5.)
8 - 98
-Shut down the system.
Turn off the circuit breaker.
Disconnect the slave HDD(used HDD) from HDD cable in BEP assy carefully.
Close the BEP cover and all other cover.
Turn on the system and boot up.
Check the system operation.
Section 8-13 - PC Block
GE MEDICAL SYSTEMS
DIRECTION 2395907, REVISION 2
LOGIQ™ 5 EXPERT BASIC SERVICE MANUAL
Section 8-9
Power Block
8-9-1
AC Power Assy (FRU No. 700)
Purpose: This is a description on how to remove and replace the AC Power Assy.
8-9-1-1
Tools
•
8-9-1-2
Needed Manpower
•
8-9-1-3
2 persons, 15 minutes + travel
Preparations
•
8-9-1-4
Common pillips screwdrivers
Shut Down the System and switch off the Main Breaker at the rear as described in section 4-3-2 on
page 3.
Removal Procedure
CAUTION Do not wear the ESD wrist strap when you remove a part of power supply unit. Turn OFF power
and unplug the power cord before removing a part of power supply unit. However be sure to turn
off power and wear the strap before you remove a circuit boards.
1.) Unscrew two(2) screws (1-2) to remove rear connector bracket Refer to Figure 8-43 on page 8-99 ..
(2)
(1)
Figure 8-43 Removing the Rear Connector Bracket
2.) Disconnect eight (8) connectors (3-10). Refer to Figure 8-44 on page 8-99 ..
(3) (4) (5) (6)
(7) (8) (9) (10)
Figure 8-44 Disconnecting 8 connecotors
Chapter 8 - Replacement Procedures
8 - 99
GE MEDICAL SYSTEMS
DIRECTION 2395907, REVISION 2
8-9-1
LOGIQ™ 5 EXPERT BASIC SERVICE MANUAL
AC Power Assy (FRU No. 700) (cont’d)
3.) Unscrew eight (8) screws (11-18) to remove AC Power assy. Refer to Figure 8-45 on page 8-100 ..
15
16
17
18
11
12
13
14
Figure 8-45 Removing the AC Power Assy
4.) Remove the AC Power Assy.
WARNING
8-9-1-5
The weight of the AC Power Assy is approximately 20 kg. Two person is needed in the
next step.
Mounting procedure
1.) Install the new parts in the reverse order of removal.
8 - 100
Section 8-9 - Power Block
GE MEDICAL SYSTEMS
DIRECTION 2395907, REVISION 2
8-9-2
LOGIQ™ 5 EXPERT BASIC SERVICE MANUAL
LV Unit (FRU No. 701)
Purpose: This is a description on how to remove and replace the LV Unit.
8-9-2-1
Tools
•
•
•
8-9-2-2
Needed Manpower
•
8-9-2-3
1 person, 15 minutes + travel
Preparations
•
8-9-2-4
Common pillips screwdrivers
Allen/Unbraco wrench
Long-nose gripper
Shut Down the System and switch off the Main Breaker at the rear as described in section 4-3-2 on
page 3.
Removal Procedure
CAUTION Do not wear the ESD wrist strap when you remove a part of power supply unit. Turn OFF power
and unplug the power cord before removing a part of power supply unit. However be sure to turn
off power and wear the strap before you remove a circuit boards.
Refer to Figure 8-82 on page 84 .
NOTE:
LV Unit can be removed without disassembling AC Power Assy.
1.) Unscrew four (4) screws (1-4) to remove Left side cover of AC Power assy.
2.) Disconnect three (3) connectors (5-7) from the rear side of the LV Unit. Refer to Figure 8-46 on page
8-101 .
LEFT SIDE VIEW
(5)
(6)
(7)
Figure 8-46 Disconnect 3 connectors
3.) Unscrew four (4) screws (8-11) to remove Right side cover of AC Power assy.
Chapter 8 - Replacement Procedures
8 - 101
GE MEDICAL SYSTEMS
DIRECTION 2395907, REVISION 2
8-9-2
LOGIQ™ 5 EXPERT BASIC SERVICE MANUAL
LV Unit (FRU No. 701) (cont’d)
4.) Unscrew four (4) screws (12-15) and disconnect twenty (20) connectors from the front side of the
LV unit using long-nose gripper. Refer to Figure 8-47 on page 8-102 .
RIGHT SIDE VIEW
(13)
(12)
(15)
(14)
Figure 8-47 Unscrew 4 screws and disconnect 20 connectors
5.) Remove the LV unit.
8-9-2-5
Mounting procedure
1.) Install the new parts in the reverse order of removalT
8 - 102
Section 8-9 - Power Block
GE MEDICAL SYSTEMS
DIRECTION 2395907, REVISION 2
8-9-3
LOGIQ™ 5 EXPERT BASIC SERVICE MANUAL
JPC Assy (FRU No. 702)
Purpose: This is a description on how to remove and replace the JPC Assy.
8-9-3-1
Tools
•
•
8-9-3-2
Needed Manpower
•
8-9-3-3
1 person, 15 minutes + travel
Preparations
•
8-9-3-4
Common pillips screwdrivers
Allen/Unbraco wrench
Shut Down the System and switch off the Main Breaker at the rear as described in section 4-3-2 on
page 3.
Removal Procedure
CAUTION Do not wear the ESD wrist strap when you remove a part of power supply unit. Turn OFF power
and unplug the power cord before removing a part of power supply unit. However be sure to turn
off power and wear the strap before you remove a circuit boards.
1.) Unscrew nine (9) hexagon screws (1-9) to remove the AC Power Top cover.
2.) Unscrew five (5) screws (10-14).
JPC Assy
Figure 8-48 JPC Assy
Chapter 8 - Replacement Procedures
8 - 103
GE MEDICAL SYSTEMS
DIRECTION 2395907, REVISION 2
8-9-3
LOGIQ™ 5 EXPERT BASIC SERVICE MANUAL
JPC Assy (FRU No. 702) (cont’d)
3.) Disconnect all the connectors connected in the JPC Assy. Refer to Figure 8-49 on page 8-104 ..
(10)
J6
(11)
J3
(13)
(14)
Figure 8-49 Disconnecting all connectors
4.) Remove the JPC Assy.
8-9-3-5
Mounting procedure
1.) Install the new parts in the reverse order of removal.Y
8 - 104
(12)
Section 8-9 - Power Block
GE MEDICAL SYSTEMS
DIRECTION 2395907, REVISION 2
8-9-4
LOGIQ™ 5 EXPERT BASIC SERVICE MANUAL
Transformer (FRU No. 703)
Purpose: This is a description on how to remove and replace the Transformer.
8-9-4-1
Tools
•
•
8-9-4-2
Needed Manpower
•
8-9-4-3
1 person, 15 minutes + travel
Preparations
•
8-9-4-4
Common pillips screwdrivers
Allen/Unbraco wrench
Shut Down the System and switch off the Main Breaker at the rear as described in section 4-3-2 on
page 3.
Removal Procedure
CAUTION Do not wear the ESD wrist strap when you remove a part of power supply unit. Turn OFF power
and unplug the power cord before removing a part of power supply unit. However be sure to turn
off power and wear the strap before you remove a circuit boards.
1.) Remove the AC Power top cover. Refer to Figure 8-83 on page 86 .
2.) Remove the AC Power left cover. Refer to Figure 8-82 on page 84 .
3.) Disconnect four (4) connectors (1-4, J3, J6, J9, J11). Refer to Figure 8-50 on page 8-105 ..
(1)
(2)
J11
J9
(3)
(4)
J6
J3
JPC Board
Figure 8-50 Disconnecting 4 connectors
4.) Cut the Cable ties tied to the cables.
5.) Disassemble the AC Power box cover. Refer to Figure 8-85 on page 90 .
Chapter 8 - Replacement Procedures
8 - 105
GE MEDICAL SYSTEMS
DIRECTION 2395907, REVISION 2
8-9-4
LOGIQ™ 5 EXPERT BASIC SERVICE MANUAL
Transformer (FRU No. 703) (cont’d)
6.) Unscrew four (4) ground screws (5-8). Refer to Figure 8-51 on page 8-106 .
(5) (6)
(7) (8)
Figure 8-51 Unscrew 4 screws
7.) Unscrew one nut in the Center top of the Transformer. Refer to Figure 8-52 on page 8-106 .
Figure 8-52 Removing the Transformer
8.) Remove the Transformer Assy.
8-9-4-5
Mounting procedure
1.) Install the new parts in the reverse order of removal.
8 - 106
Section 8-9 - Power Block
GE MEDICAL SYSTEMS
DIRECTION 2395907, REVISION 2
8-9-5
LOGIQ™ 5 EXPERT BASIC SERVICE MANUAL
AC Power Box (FRU No. 704)
Purpose: This is a description on how to remove and replace the AC Power Box.
8-9-5-1
Tools
•
•
8-9-5-2
Needed Manpower
•
8-9-5-3
1 person, 15 minutes + travel
Preparations
•
•
8-9-5-4
Common pillips screwdrivers
Allen/Unbraco wrench
Shut Down the System and switch off the Main Breaker at the rear as described in section 4-3-2 on
page 3.
AC Power Assy should be removed before proceed. Refer to AC POWER ASSY DISASSEMBLY
on page 8 - 82.
Removal Procedure
CAUTION Do not wear the ESD wrist strap when you remove a part of power supply unit. Turn OFF power
and unplug the power cord before removing a part of power supply unit. However be sure to turn
off power and wear the strap before you remove a circuit boards.
1.) Unscrew six screws (1-6) and remove the AC Power Box cover. Refer to Figure 8-53 on page 8-107
..
AC Power Box Cover
Figure 8-53 Unscrew 6 screws to remove AC Power Box
2.) Remove the AC Power left side cover.
Chapter 8 - Replacement Procedures
8 - 107
GE MEDICAL SYSTEMS
DIRECTION 2395907, REVISION 2
8-9-5
LOGIQ™ 5 EXPERT BASIC SERVICE MANUAL
AC Power Box (FRU No. 704) (cont’d)
3.) Disconnect one (1) connector (J1) from the JPC Assy. Refer to Figure 8-54 on page 8-108 ..
J1
Figure 8-54 Disconnect 1 connector
4.) Unscrew two (2) ground screws (7-8). Refer to Figure 8-55 on page 8-108 .
(7)
(8)
AC POWER BOX VIEW
Figure 8-55 Unscrew two ground screws
5.) Remove the AC Power Box.
8-9-5-5
Mounting procedure
1.) Install the new parts in the reverse order of removal
8 - 108
Section 8-9 - Power Block
GE MEDICAL SYSTEMS
DIRECTION 2395907, REVISION 2
8-9-6
LOGIQ™ 5 EXPERT BASIC SERVICE MANUAL
Fuse Set (FRU No. 705)
Purpose: This is a description on how to remove and replace the Fuse Set.
8-9-6-1
Tools
•
•
8-9-6-2
Needed Manpower
•
8-9-6-3
1 person, 15 minutes + travel
Preparations
•
8-9-6-4
Common pillips screwdrivers
Allen/Unbraco wrench
Shut Down the System and switch off the Main Breaker at the rear as described in section 4-3-2 on
page 3.
Removal Procedure
CAUTION Do not wear the ESD wrist strap when you remove a part of power supply unit. Turn OFF power
and unplug the power cord before removing a part of power supply unit. However be sure to turn
off power and wear the strap before you remove a circuit boards.
NOTE:
Fuses can be removed without disassembling AC Power Assy.
1.) Unscrew four (4) screws (1-4) to remove Left side cover of AC Power assy.
2.) Remove the Fuses. Refer to Figure 8-56 on page 8-109 .
220V/3A
110V/5A
3A
10A
Figure 8-56 Removing the Fuse
8-9-6-5
Mounting procedure
Install the new parts in the reverse order of removal
Chapter 8 - Replacement Procedures
8 - 109
GE MEDICAL SYSTEMS
DIRECTION 2395907, REVISION 2
LOGIQ™ 5 EXPERT BASIC SERVICE MANUAL
Section 8-10
Software Loading Procedure
8-10-1
General
This describes a full system software loading (Base Software Load Image + LOGIQ 5 Application)
procedure.
Use this instruction when:
- Performing the HDD with new one (Base Software Load Image + Application)
- Performing the system revision-up (Application)
Reference : The below is the support table between Application Software version and Base System
Software Load Image part number
Table 8-2
Base Software Load Image CD Part Numbers
Base Software Load Image Part P/N
Application
Software Version 23335079-6 (BEP1) 23335079-7 (BEP1) 2377598-2 (BEP2)
R3.X.X
8-10-2
Not supported
Supported
Supported
2393964 (BEP2)
Supported
Parts Required
Base System Software Load Image CD
LOGIQ 5 R3.x.x Application Software
Blank CD-R ( for patient image backup)
Service Dongle
NOTE:
Patient Image Data will be deleted when all the drived are ghosted. Back up them on the CD-R
or MOD before starting software loading
NOTE:
Insert the service dongle into ths service port located at the rear panel before installing the Base
System Software Load image
8-10-3
TimeRequired
Approximately 1 hour
8 - 110
Section 8-10 - Software Loading Procedure
GE MEDICAL SYSTEMS
DIRECTION 2395907, REVISION 2
8-10-4
LOGIQ™ 5 EXPERT BASIC SERVICE MANUAL
Software Loading Steering Guide
Installing Base + Application
Installing Application Only
Section 8-10-5-1 Check Software Version and BEP Type
Section 8-10-5-2 Saving Connectivity
Section 8-10-5-2 Operator Login Password Back-up
Section 8-10-5-3 Image Management Guide
Section 8-10-5-2 Saving Connectivity
Section 8-10-5-2 Operator Login Password Back-up
Section 8-10-5-3 Image Management Guide
Section 8-10-7 Installing Application (R3.X.X)
Section8-10-6-1 Installing Base Software Load Image CD
Section 8-10-8 Standard Confirmation & Functional Checks
Section 8-10-6-2 System Checks
End
Section 8-10-7 Installing Application (R3.X.X)
Section 8-10-8 Standard Confirmation & Functional Checks
End
Figure 8-57 Flow Chart - Installation of Base and Application CD
Chapter 8 - Replacement Procedures
8 - 111
GE MEDICAL SYSTEMS
DIRECTION 2395907, REVISION 2
8-10-5
8-10-5-1
LOGIQ™ 5 EXPERT BASIC SERVICE MANUAL
Before Starting Software Loading
Check Software Version and BEP Type
1.) Turn ON the system
2.) Touch the Utility button on the Touch Panel
Figure 8-58 Touch the Utility
NOTE:
Operator Login Window appears. Select adm(Administrator) for the Operator field.
Adm(Administrator) will be shown in the Operator field as default. Enter password which is
configured already ( or the password might not be necessary). Then click on Log on.
Figure 8-59 Operator Login Window
3.) Touch the Utility button on the Touch Panel
4.) Click on About tab.
5.) Check Image Part Number is 2335079 or 2377598 or 2393964 and then confirm BEP type. Refer
to Figure 8-38 and Table 8-3
Table 8-3 BEP Type
8 - 112
Image Part Number
BEP Type
2335079 Rev7 or below
BEP1
2377598 or 2377598 -2
BEP2 and 40GB HDD
2393964
BEP2 and 80GB HDD
Section 8-10 - Software Loading Procedure
GE MEDICAL SYSTEMS
DIRECTION 2395907, REVISION 2
LOGIQ™ 5 EXPERT BASIC SERVICE MANUAL
Image Part Number
Software version & Part number
Figure 8-60 Check BEP Type and Software Version
Chapter 8 - Replacement Procedures
8 - 113
GE MEDICAL SYSTEMS
DIRECTION 2395907, REVISION 2
8-10-5-2
NOTE:
LOGIQ™ 5 EXPERT BASIC SERVICE MANUAL
Check BEP Type with BIOS Boot Logo Image
On booting the system, BIOS Boot Logo Image shows which BEP type is used. BEP1 system
has a Black and White Boot Logo image, And BEP2 has a Color boot logo image
BEP Type
Boot Logo Image
BEP1 (2335079)
BEP2 (2377598)
BEP2 (2393964)
8 - 114
Section 8-10 - Software Loading Procedure
GE MEDICAL SYSTEMS
DIRECTION 2395907, REVISION 2
8-10-5-3
LOGIQ™ 5 EXPERT BASIC SERVICE MANUAL
Saving Connectivity
Before starting upgrade, write down the Connectivity Setting for back-up.
1.) Touch Utility > Connectivity on the touch panel and click the Tcpip tab.
2.) Write down the following parameters:
Parameters
Descriptions (Entry for Stand-Alone System)
Computer Name
Enable DHCP
IP-Address
Subnet Mask
Default Gateway
Remote Archive IP-Addr
Remote Archive Name
Note : For a stand-alone system, preset values of IP address, subnet mask, and default gateway, shown
above, must entered.
Figure 8-61 Connectivity
Chapter 8 - Replacement Procedures
8 - 115
GE MEDICAL SYSTEMS
DIRECTION 2395907, REVISION 2
8-10-5-4
LOGIQ™ 5 EXPERT BASIC SERVICE MANUAL
Operator Login Password Back-up
The Operator Login Password will be deleted. So, write down the password if necessary.
Figure 8-62 Operator Login
Parameters
Descriptions
Operator Login Password
8-10-5-5
NOTE:
Image Management Guide
Before upgrade to R3.x.x software, perform recommended image backup procedure.
Save As to View on any PC - Use this to save images (Dicom or Raw Dicom) in a computer-friendly
format (.avi or .jpeg) so you can view it on any PC.
Export/Import Data/Images Between Systems - Use this to copy both patient data and images for
specified patient(s) from one system to another.
Save As (Saving Images to CD-ROM to View on Any PC)
To save images to the CD-ROM:
1.)
2.)
3.)
4.)
8 - 116
Insert the CD.
Go to Utility --> Connectivity --> Tools. Select the Media as CD Rewritable.
Press Format to format the CD-ROM.
Select the image(s) to be saved to CD-ROM, press Menu, and select Save As.
Section 8-10 - Software Loading Procedure
GE MEDICAL SYSTEMS
DIRECTION 2395907, REVISION 2
LOGIQ™ 5 EXPERT BASIC SERVICE MANUAL
5.) The SAVE AS menu appears.
Figure 8-63 Save As Menu
6.) Specify Compression and Save As Type and press Save. The image is saved to the CD-ROM.
7.) When you have put all the images you want on the CD, press F3 to eject the CD-ROM. Select
CD Rewritable.
Figure 8-64 Eject Media Menu
8.) Finalize the CD-ROM by selecting Yes. The CD-ROM is ejected from the system.
Figure 8-65 Finalize CD-ROM Menu
Chapter 8 - Replacement Procedures
8 - 117
GE MEDICAL SYSTEMS
DIRECTION 2395907, REVISION 2
LOGIQ™ 5 EXPERT BASIC SERVICE MANUAL
Storing Images with More Resolution
To store images with more resolution than is available with the JPEG selection, select Save As and
select AVI as the Save As Type. You can save single images as .avi files.
Table 8-4
Higher Resolution Store Options
Image Type
Store as Image Only
Store as Secondary Capture
CINE Loop
Gives you a loop of just the image (no title
bar and scan information).
Gives you a single image of the video area.
DO NOT DO THIS BECAUSE YOU DO
NOT KNOW WHICH IMAGE FROM THE
LOOP THAT YOU ARE GETTING.
Still Image
Gives you a single image (no title bar and
scan information).
Gives you a single image of the video area.
Export/Import (Moving Data Between Ultrasound Systems)
To move exams from one Ultrasound system to another, you need to export/import exam information.
NOTE:
Both database information and images are exported. No data is deleted from the local archive
when exporting data.
Exporting Data
To export an exam(s) to a compatible Ultrasound system:
1.) Format the removable media (MOD or CD-ROM). Label the removable media. Answer Yes/OK
to the messages.
2.) Press Patient. Deselect any selected patient(s) in the search portion of the Patient screen.
Press More (located at the lower, right-hand corner of the Patient menu).
3.) Select Export. Specify the type of removable media (MOD or CD-ROM) on the Export pop-up.
Press OK. Then, please wait until the Patient menu is visible.
Figure 8-66 Export Pop-up Message
4.) In the patient list at the bottom of the Patient menu, select the patient(s) you want to export.
You can use Windows commands to select more than one patient.
To select a consecutive list of patients, click the cursor on the first name, move the cursor to
the last name, then press and hold down the Shift+right Set key to select all the names.
To select a non-consecutive list of patients, click the cursor at the first name, move the cursor
to the next name, then press and hold down the Ctrl+right Set key, move the cursor to the next
name, then press and hold down the Ctrl+right Set key again, etc.
8 - 118
Section 8-10 - Software Loading Procedure
GE MEDICAL SYSTEMS
DIRECTION 2395907, REVISION 2
LOGIQ™ 5 EXPERT BASIC SERVICE MANUAL
You can also search for patients via the Search key and string.
Or, Select All from the Select All/Copy Patient Menu:
Figure 8-67 Select All/Copy Patient Menu
NOTE:
You need to use your best judgment when moving patients’ images. If there are lots of images
or loops, then only move a few patients at a time.
5.) Once you have selected all of the patients to export, press Copy Patient from the Select All/
Copy Patient Menu.
6.) Informational status messages appear as the copy is taking place. A final status report pop-up
message appears. Press OK.
Figure 8-68 Export Completion Status Message
7.) Press F3 to eject the media. Specify that you want to finalize the CD-ROM.
Importing Data
To import an exam(s) to another Ultrasound system:
1.) At the other Ultrasound system, insert the MOD or CD-ROM.
Chapter 8 - Replacement Procedures
8 - 119
GE MEDICAL SYSTEMS
DIRECTION 2395907, REVISION 2
LOGIQ™ 5 EXPERT BASIC SERVICE MANUAL
2.) Press Patient, press More, then Import. The Import from pop-up message appears. Press OK.
Figure 8-69 Import Pop-up Message
3.) The Patient menu just shows the patients available for import from the removable media you
just loaded onto the system.
4.) Select the patients to be imported.
5.) Press Copy Patient from the Select All/Copy Patient menu.
6.) Please wait for the patient information to be copied to this Ultrasound system. Informational
messages appear while the import is taking place.
7.) Press F3 to eject the media.
8 - 120
Section 8-10 - Software Loading Procedure
GE MEDICAL SYSTEMS
DIRECTION 2395907, REVISION 2
8-10-6
8-10-6-1
NOTE:
LOGIQ™ 5 EXPERT BASIC SERVICE MANUAL
Installing Base Software Load Image CD
Installing Base Software Load Image CD
While we do not believe it is necessary, It would not hurt to disconnect the system from the
network and remove all transducers.
1.) Power ON the scanner.
2.) Press and hold the DEL key until the following screen appears.Enter jupiter as a password if
the system request a password, then press the Enter key.
E nter C U R R E N T P assw ord: *******
Figure 8-70 BIOS Password
3.) Using arrow keys, select Boot and verify that CDROM is selected as a First Boot Device.
4.) If it is not, using arrow keys, select First Boot Device and press the Enter key. Then select
CDROM and press the Enter key
Figure 8-71 First Boot Device
5.)
6.)
7.)
8.)
Press the ESC key to return to the Setup Utility screen.
Using arrow keys, select Save & Exit Setup and press the Enter key.
Insert the disk labeled “Base System Software Load Image” into the CDROM drive.
Properly Turn Off the scanner. If necessary, hold down the button until the light goes amber.
Chapter 8 - Replacement Procedures
8 - 121
GE MEDICAL SYSTEMS
DIRECTION 2395907, REVISION 2
LOGIQ™ 5 EXPERT BASIC SERVICE MANUAL
Figure 8-72 Shutdown Dialog Box
9.) Turn on the scanner. You will see a screen display referred below as Figure 8-73 "Warning
Screen" on page 8-122. Press any key to continue, to abort reomove the CD-ROM from the
drive and press CTRL-C.
Figure 8-73 Warning Screen
10.)The following screen appears. Refer to Figure 8-74 "Screen" on page 8-122..
Figure 8-74 Screen
NOTICE Select 1 when installing the new HDD (BEP replacement).
Select 2 when replacing C:\Partition only. It means all customer data are NOT deleted. The Ghost
procedure is performed with data of the drives D, E, and F left.
8 - 122
Section 8-10 - Software Loading Procedure
GE MEDICAL SYSTEMS
DIRECTION 2395907, REVISION 2
LOGIQ™ 5 EXPERT BASIC SERVICE MANUAL
Table 8-5 Drive Partition
Drive Partition
Usage
C
System Files and Application
D
User Defined and Preset
E
Patient Archive data
F
Swap
11.)Approx. four minutes later, the following screen appears. Eject the Base Software Load
Image CD from the drive..
Figure 8-75 screen
12.)After removing the CDROM from the drive, properly turn off the scanner.
NOTE:
Remove the CD-ROM from the drive; otherwise you will be repeating the Base System Software
Load process.
NOTE:
Uncover the Left Side Cover and get the Base Image & Application Image CDs out of the vinyl
pocket attached on the Left EMI Cover
Figure 8-76 Location of CD Set
Chapter 8 - Replacement Procedures
8 - 123
GE MEDICAL SYSTEMS
DIRECTION 2395907, REVISION 2
8-10-6-2
LOGIQ™ 5 EXPERT BASIC SERVICE MANUAL
System Checks
1.) Approx. two minutes later, the windows 2000 desktop appears. Then one minutes later, the
following screen appears. Click on Yes using right button of the trackball to restart the system
Figure 8-77 System Setting Change
NOTE:
If the window above is not displayed, go to next step
2.) Drive Letter Checks:
a.) Double click on My Computer
b.) First check to see if you need to change the drive letters on the CDROM drive and the
Magneto Optical drives – they SHOULD be G: and H: respectively.If they are, go to next
step 3.) Driver Checks
Figure 8-78 My Computer
8 - 124
Section 8-10 - Software Loading Procedure
GE MEDICAL SYSTEMS
DIRECTION 2395907, REVISION 2
LOGIQ™ 5 EXPERT BASIC SERVICE MANUAL
c.) Right-click on the “My Computer” icon on the Windows desktop. Select “Manage” you should
see a screen like below. Then left click on the device assigned currently to G:, right click on
Change Drive Letter and Path...
Figure 8-79 Computer Management
d.) Right click on Edit
Figure 8-80 Change Driv Letter
e.) Select the drive other than G: (I: is selected in the window shown below for example.)
Chapter 8 - Replacement Procedures
8 - 125
GE MEDICAL SYSTEMS
DIRECTION 2395907, REVISION 2
LOGIQ™ 5 EXPERT BASIC SERVICE MANUAL
Then click on OK
Figure 8-81 Edit Drive Letter
f.) Right click on Yes
Figure 8-82 Confirm Window
g.) Left-click on CDROM0 Select drive then right click on Change Drive Letter and Path...
Figure 8-83 Change Drive Letter and Path
8 - 126
Section 8-10 - Software Loading Procedure
GE MEDICAL SYSTEMS
DIRECTION 2395907, REVISION 2
LOGIQ™ 5 EXPERT BASIC SERVICE MANUAL
h.) Right click on Edit
Figure 8-84 Change Drive Letter
i.) Select G: then rignt click on OK
Figure 8-85 Edit Drive Letter
j.) Right click on Yes
Figure 8-86 Confirm Window
Chapter 8 - Replacement Procedures
8 - 127
GE MEDICAL SYSTEMS
DIRECTION 2395907, REVISION 2
LOGIQ™ 5 EXPERT BASIC SERVICE MANUAL
k.) Left click on the device which changed the drive number at the step c.). Right click on Change
Drive Letter and Path...
Figure 8-87 Change Drive Letter and Path
l.) Right click on Edit
Figure 8-88 Change Drive Letter and Path
m.)Select H: and then right click on OK
Figure 8-89 Edit Drive Letter and Path
8 - 128
Section 8-10 - Software Loading Procedure
GE MEDICAL SYSTEMS
DIRECTION 2395907, REVISION 2
LOGIQ™ 5 EXPERT BASIC SERVICE MANUAL
n.)Right click on Yes
Figure 8-90 Confirm Window
o.) Close all windows
3.) Driver Checks:
a.) On the window 200 desktop, left click on My Computer then right click on Properties
b.) The System Propertiers window appears. Select Hareware > Device Manager
c.) Verify that X or ! is not displayed
Figure 8-91 Device Manager
If X or ! is displayed:
- Left-click on the device with X mark, then right -click on Enable
- Left-click on the device with ! mark, then right click on Properties to perform the device driver
recognition. When some files are required, designate the file in the directories of C:\WINNT\SYSTEM32
or C:\WINNT\SYSTEM32\DRIVERS. If they are not found, search them using a window search function
Chapter 8 - Replacement Procedures
8 - 129
GE MEDICAL SYSTEMS
DIRECTION 2395907, REVISION 2
8-10-6-3
LOGIQ™ 5 EXPERT BASIC SERVICE MANUAL
USB Printer Checks (USB Printer User Only)
Without any the newly additional user invention, LOGIQ5 will recognize the below 7 kinds of USB printer
Printer Name
Comment
HP 990 cxi, HP 6122 (BEP2 Only),
HP5550 (BEP2 Only)
Standard Printer
EPSON Stylus Color 980H
Standard Printer
Lexmark Z65
Standard Printer
Sony UP-895
Digital BW Printer
Sony UP-D21MD
Mitsubishi P91D
Mitsubishi CP900DW
Digital Color Printer
Digital BW Printer
Digital Color Printer
This procedure assumes that the LOGIQ5 base image software is installed and application software has
been installed and is functioning properly.
1.) Attach the USB cable from the printer to the USB port on assigned position
Table 8-6
USB Port Position
USB Port Position
Peripheral
Right USB Port on Rear Connector Panel
Standard Printer
Left USB Port on Rear Connector Panel:
Digital Color Printer
USB Port on OP Printer Bracket Back Panel
Digital BW Printer
NOTICE If you Plug in USB printer newly, shutdown the system and restart again
NOTICE Once plug in the cable one side of the USB port, do NOT change the cable to another port
8 - 130
Section 8-10 - Software Loading Procedure
GE MEDICAL SYSTEMS
DIRECTION 2395907, REVISION 2
LOGIQ™ 5 EXPERT BASIC SERVICE MANUAL
1
2
Serial
Right
Left
1
2
220-240V 500VA Max
Including front printer panel
Figure 8-92 USB Port - Rear Panel Connector
Figure 8-93 USB Port - OP Printer Bracket Back Panel
2.) Make sure that printer properties are proper. (Image orientation and size). Refer to the latest
Release Notes.
Chapter 8 - Replacement Procedures
8 - 131
GE MEDICAL SYSTEMS
DIRECTION 2395907, REVISION 2
8-10-6-4
LOGIQ™ 5 EXPERT BASIC SERVICE MANUAL
DMC Checks (DMC User Only)
1.) Check DMC Cable (USB to Serial Bridge).
NOTE:
DMC Cable is supplied only as an option.
2.) Plug in the Cable as shown on the right side of the USB port. Refer to Figure 8-94 on page 8-132 .
DMC Cable
Plug on the right
Figure 8-94 DMC Cable
3.) Ensure USB to Serial Bridge port is COM4.
4.) Trackball to My computer icon and left click
5.) Right click on Properties.
6.)
7.)
8.)
9.)
Right click on the hardware tab.
Right click on the device manager in the middle right of the hardware tab window.
Expand ports (COM & LPT), If not COM4, Proceed as followed.
.Double click “USB to Serial Bridge” as shown Figure 8-95 "Device Manager Window" on page 8-
Figure 8-95 Device Manager Window
132
10.)Right click on port settings.
11.)Click on advanced .. button.
8 - 132
Section 8-10 - Software Loading Procedure
GE MEDICAL SYSTEMS
DIRECTION 2395907, REVISION 2
LOGIQ™ 5 EXPERT BASIC SERVICE MANUAL
12.)Specify COM port number is COM4. as shown in figure
Figure 8-96 Advanced Settings for COM4
Chapter 8 - Replacement Procedures
8 - 133
GE MEDICAL SYSTEMS
DIRECTION 2395907, REVISION 2
8-10-7
8-10-7-1
LOGIQ™ 5 EXPERT BASIC SERVICE MANUAL
Installig Application Software(R3.x.x)
Installig Application Software(R3.x.x)
1.) Place the “Application Software” CDROM into the CDROM drive.
2.) Press the Start button on the tool bar at the bottom of the LCD screen and select “Run…”.
Enter “g:\LoadSoftware” into the dialog box as shown in Figure 8-97.
Figure 8-97 Run Load Software
3.) You will see a screen that warns you that you are about to load software, press the Y key to
continue. Then the program requests confirmation “Are you sure ?”, Press the Y key again.
4.) You will see a Command (CMD) window open as shown in Figure 8-98.
Figure 8-98
Command Window
5.) Press the "Y" key to continue. Then the program requests confirmation - "Are you sure?" then Press
the "Y" key again.
6.) The installation process will be started. it will take about 15 minutes.
8 - 134
Section 8-10 - Software Loading Procedure
GE MEDICAL SYSTEMS
DIRECTION 2395907, REVISION 2
LOGIQ™ 5 EXPERT BASIC SERVICE MANUAL
7.) To apply the preset by region, select one of the below options. Refer to 8-99.
Figure 8-99 Region selection
8.) After the installation is completed the system will power off automatically.
NOTE:
Do not operate with using mouse or keyboard during installation procedures.
9.) Turn on the system and immediately eject the button on the CD -R drive to eject the CDROM
10.)Verify that the system boots up no error.(It will take a few minutes)
Chapter 8 - Replacement Procedures
8 - 135
GE MEDICAL SYSTEMS
DIRECTION 2395907, REVISION 2
8-10-8
LOGIQ™ 5 EXPERT BASIC SERVICE MANUAL
Standard Confirmation & Functional Checks
Configure the system settings and perform functional checks after installation of software.
Items for configuration and functional checks include:
-
8-10-8-1
Confirmation of the software version
Setting Computer Name
Functional Checks for ServicePlatform (Diagnostic Program)
Confirmation of Software Version
1.) Touch the Utility button on the Touch Panel
2.) Click on About tab. The software version will be shown on the monitor as shown. Confirm the
following: Refer to figure 2-23
Figure 8-100 Confirmation of software version
3.) Make sure that Software Version: R3.x.x and Software Part Number is described on the Application
CD-ROM.
8-10-8-2
Setting Computer Name
Note: If the "Save" is NOT performed, you can NOT enter Patient screen and NOT perform Export/
Import
1.) Touch Utility-> Connectivity
2.) Operator Login Window appears. Select ADM(Administrator) for operator field.Click OK button
8 - 136
Figure 8-101 Set Computer Name
Section 8-10 - Software Loading Procedure
GE MEDICAL SYSTEMS
DIRECTION 2395907, REVISION 2
LOGIQ™ 5 EXPERT BASIC SERVICE MANUAL
3.) Click on Tcpip tab
Figure 8-102 TCPIP tab
4.)
5.)
6.)
7.)
8.)
8-10-8-3
NOTE:
Check if Computer Name, IP Address, Subnet Mask, and other parameters are proper
Click on Save button
Click OK for confirmation dialog box
The system will power OFF automatically.
Turn on the system for functional checks
Functional Checks for Service Platform (Diagnostic Program)
After perform diagnostics, shut down and restart to make the system working properly.
1.) Make sure that the wrench icon is shown at the bottom of the scan screen. Click on the wrench icon
to activate. It will take about ten (10) seconds for activating.
2.) Make sure that CAPS is not selected (should be dimmed) for password entry performed later.
Should be dimmed.
Chapter 8 - Replacement Procedures
8 - 137
GE MEDICAL SYSTEMS
DIRECTION 2395907, REVISION 2
LOGIQ™ 5 EXPERT BASIC SERVICE MANUAL
CAUTION If the wrench icon is not displayed on the scan screen, the installation of Service Platform had
been failed. Reload the application software. Contact a Technical Support for details.
NOTE:
If the following dialog box is shown on the monitor, select "Do not perform this check in the
future" and click on the Yes button. This dialog box will not be displayed for next time.
Figure 8-103
3.) The Service Login window for Service Platform will be shown on the monitor display.
Figure 8-104
CAUTION If the Login window for Service Platform is not displayed on the monitor, the installation of the
Service Platform has failed. Reload the application software or Base System Software (OS) +
application software. Contact a Technical Support for details.
4.) Select GE Service at the “Select User Level” field.
5.) Enter the password for the Service Platform.
8 - 138
Section 8-10 - Software Loading Procedure
GE MEDICAL SYSTEMS
DIRECTION 2395907, REVISION 2
LOGIQ™ 5 EXPERT BASIC SERVICE MANUAL
6.) Click on Okay.
Figure 8-105
7.) Verify that the following screen (Service Platform) is displayed on the monitor.
NOTICE When the service platform is NOT displayed, check if CAPS lock is selected. The CAPS should not be
selected.
8.) Click on x located at the upper right corner of the service platform screen to close the Service
Platform and return to the scan panel.
Figure 8-106
8-10-8-4
Setting the VCR (if necessary)
1.) Touch Utility > System>Peripheral.
2.) Click on Setup tab.
3.) Set the proper parameters:
PAL or NTSC
VCR type
Chapter 8 - Replacement Procedures
8 - 139
GE MEDICAL SYSTEMS
DIRECTION 2395907, REVISION 2
-
LOGIQ™ 5 EXPERT BASIC SERVICE MANUAL
Source type
Figure 8-107 Utility > System>Peripheral
4.) Click on Save.
5.) Shut down the scanner, then restart the scanner.
6.) Verify that the VCR can be properly operated (remote, play...).
NOTICE Be sure to connect the converter and cablebefore booting up the system. Otherwise the LOGIQ 5
system does not recognize the peripheral devices
8 - 140
Section 8-10 - Software Loading Procedure
GE MEDICAL SYSTEMS
DIRECTION 2395907, REVISION 2
LOGIQ™ 5 EXPERT BASIC SERVICE MANUAL
Chapter 9
Renewal Parts
Section 9-1
Overview
9-1-1
Purpose of Chapter 9
This chapter gives you an overview of Renewal Parts for LOGIQ™ 5.
Table 9-1
Contents in Chapter 9
Section
Description
Page Number
9-1
Overview
9-1
9-2
List of Abbreviations
9-1
9-3
Renewal Parts List
9-2
9-4
Operator Console Assy
9-4
9-5
Monitor
9-5
9-6
Keyboard Block
9-7
9-7
Covers
9-9
9-8
Body Block
9-11
9-9
PCB Boards
9-13
9-10
PC Block
9-15
9-11
Power Block
9-17
9-12
Options, Peripherals, Cables
9-19
Section 9-2
List of Abbreviations
•
•
•
•
•
•
•
•
•
•
•
Assy - Assembly
Ctrl - Control
FRU 1 - Replacement part available in part hub
FRU 2 - Replacement part available from the manufacturer (lead time involved)
Int - Internal
I/O - Input/Output
KB - Keyboard
LCD - Liquid Crystal Display
MON - Monitor
PAT. - Patient
PC - Personal Computer (Back End Processor)
Chapter 9 - Renewal Parts
9-1
GE MEDICAL SYSTEMS
DIRECTION 2395907, REVISION 2
LOGIQ™ 5 EXPERT BASIC SERVICE MANUAL
Section 9-3
Renewal Parts Lists
9-3-1
Equipment Models Covered in this Chapter
Part Name
OPERATOR CONSOLE ASSY
Part Number
2395318
Quantity
1
OPERATOR CONSOLE ASSY
2394621
OPERATOR CONSOLE ASSY
2394620
1
60Hz 120V/120V NTSC
OPERATOR CONSOLE ASSY
2394622
BASIC USER MANUAL
2395904-100
ADV. REFERENCE MANUAL
2395905-100
L5 Expert DOC Kit
2406322
SERVICE MANUAL
2395907
1
1
QUICK GUIDE
2395906-100
1
1
1
60Hz 230/120V NTSC
1
1
1
1
1
1
1
1
1
1
1
H41302LK (2395293) 50Hz 110V/100V NTSC
H41302LL (2395311) 60Hz 120V/120V NTSC
H41302LM (2395312) 60Hz 230/120V NTSC
H41302LN (2395313) 50Hz 230/230V PAL
9-2
Description
50Hz 110V/100V NTSC
Section 9-3 - Renewal Parts Lists
50Hz 230/230V PAL
GE MEDICAL SYSTEMS
DIRECTION 2395907, REVISION 2
LOGIQ™ 5 EXPERT BASIC SERVICE MANUAL
Section 9-4 OPERATOR CONSOLE ASSY
COLOR MONITOR
(FRU 1XX)
See Illustration
KEYBOARD BLOCK
(FRU 2XX)
See Illustration
COVERS
(FRU 3XX)
See Illustration
CABLES, Peripherals, OPTIONS
(FRU 8XX)
See Illustration
BODY BLOCK
(FRU 4XX)
See Illustration
PCB BOARDS
(FRU 5XX)
See Illustration
POWER BLOCK
(FRU 7XX)
See Illustration
Figure 9-1 OPERATOR CONSOLE ASSY
Chapter 9 - Renewal Parts
9-3
GE MEDICAL SYSTEMS
DIRECTION 2395907, REVISION 2
LOGIQ™ 5 EXPERT BASIC SERVICE MANUAL
Section 9-5 MONITOR
102
104
100
105
103
101
Figure 9-2 Monitor
9-4
Section 9-3 - Renewal Parts Lists
GE MEDICAL SYSTEMS
DIRECTION 2395907, REVISION 2
Section 9-5
LOGIQ™ 5 EXPERT BASIC SERVICE MANUAL
MONITOR (cont’d)
Item
Part Name
Part Number
Description
Qty
FRU
100
MONITOR CRT ASSY
2299998-5
CRT ONLY W/O COVERS
1
1
101
MONITOR CABLE ASSY
2299964
CABLE
1
1
102
MONITOR COVER SET
2300006
FOR LOGIQ 5 ONLY
1
1
MONITOR COVER SET
2394781
FOR LOGIQ 5 EXPERT ONLY
1
1
MONITOR COVER SET
2394796
FOR LOGIQ 5 PRO ONLY
1
1
103
MONITOR S/W ASSY
2300008
common with LOGIQ 3
1
1
104
SPEAKER ASSY
2317340
SPEAKER PLUS BRACKET
2
1
105
TASK LAMP
2317347
LOGIQ 3 Common
1
1
Table 9-2
MONITOR
Chapter 9 - Renewal Parts
9-5
GE MEDICAL SYSTEMS
DIRECTION 2395907, REVISION 2
LOGIQ™ 5 EXPERT BASIC SERVICE MANUAL
Section 9-6 KEYBOARD BLOCK
209
210
211
204
207
205
206
500
208
200
212
224
216
215
213
214
202
217
203
201
LOGIQ 5 / LOGIQ 5 EXPERT
Universal Parts
219
209
218
220
223
500
222
LOGIQ 5 PRO Specific Parts
Used for ONLY LOGIQ 5 PRO
9-6
Figure 9-3 KEYBOARD BLOCK
Section 9-3 - Renewal Parts Lists
GE MEDICAL SYSTEMS
DIRECTION 2395907, REVISION 2
Section 9-6
LOGIQ™ 5 EXPERT BASIC SERVICE MANUAL
KEYBOARD BLOCK (cont’d)
Item
Part Name
Part Number
Description
Qty
FRU
200
KB ASSY
2299986-7
INCLUDE LCD COVER
1
1
201
KB FRONT GRIP
2299984-2
1
1
202
PROBE HOLDER
2300010
INCLUDE CUP HOLDER
1
1
203
ECG CABLE HOOK
2283028
PLASTIC HOOK
1
1
204
OP PANEL ENCODER ASSY
2317341
ALL ENCODERS WITH CABLES
1
1
205
OP PANEL TGC ASSY
2317342
TGC board and cables with Plastic
Knobs
1
1
206
TGC KNOB SET
2356244
TGC Plastic Knobs only
1
1
207
OP PANEL A/N KEY BOARD ASSY
2317343-2
PCB board and Alphanumeric
keyboard.
1
1
208
OP PANEL TRACKBALL ASSY
2317344
LOGIQ 3 common
1
1
209
PRO HUB BOARD ASSY
2331557
For LOGIQ 5 PRO only. HUB
CIRCUIT BOARD
1
1
210
OP PANEL LCD ASSY
2317346-2
CIRCUIT BOARD
1
1
211
LCD ENCODER ASSY
2331741
CIRCUIT BOARD
1
1
212
P KEY LABEL
2364143
USER DEFINED KEY LABEL
1
1
213
GEL HOLDER
2384742
1
1
214
ITV BLOCK
2384743
1
1
215
FREEZE KEY
2384744
Freeze Key and PCB and cables
included
1
1
216
KB MAIN BOARD
2384745-2
Keyboard Main PCB
1
1
217
PROBE HOLDER BRKT
2384746
1
1
218
MENU KEY ASSY
2385574
For LOGIQ 5 PRO ONLY
1
1
219
MENU ENCODER ASSY
2385575
For LOGIQ 5 PRO ONLY
1
1
220
HUB ASSY
2385576
For LOGIQ 5 PRO ONLY
1
1
221
HUB ASSY
2385577
For LOGIQ 5 and LOGIQ 5 Expert
1
1
222
KEY BOARD MAIN BOARD
2385578
LOGIQ 5 PRO ONLY
1
1
223
KEYBOARD ASSY
2387540-3
LOGIQ 5 PRO ONLY
1
1
2390710
Plastic Key Cover Cap set - Printer
(P2, P3, P4) , LOGIQ view,
Contrast, 3D, Harmonics, 2 blank
Key cap and 1 pc of B-Flow clear
cap
1
1
224
KEY CAP SET
Table 9-3
KEYBOARD
Chapter 9 - Renewal Parts
9-7
GE MEDICAL SYSTEMS
DIRECTION 2395907, REVISION 2
LOGIQ™ 5 EXPERT BASIC SERVICE MANUAL
Section 9-7 COVERS
304
315
309
303
301
308
302
313
310
307
311
314
300
312
306
305
Figure 9-4 COVERS
9-8
Section 9-3 - Renewal Parts Lists
GE MEDICAL SYSTEMS
DIRECTION 2395907, REVISION 2
Section 9-7
Item
LOGIQ™ 5 EXPERT BASIC SERVICE MANUAL
COVERS (cont’d)
Part Name
Part Number
Description
Qty
FRU
LEFT COVER
2299995
INCLUDE LEFT BOTTOM COVER
& SIDE MOLDING FOR LOGIQ 5
and LOGIQ 5 PRO
1
1
LEFT COVER
2394783
INCLUDE LEFT BOTTOM COVER
& SIDE MOLDING FOR LOGIQ 5
Expert ONLY.
1
1
RIGHT COVER
2300004
INCLUDE RIGHT BOTTOM
COVER & SIDE MOLDING FOR
LOGIQ 5 and LOGIQ 5 PRO
1
1
RIGHT COVER
2394784
INCLUDE RIGHT BOTTOM
COVER & SIDE MOLDING FOR
LOGIQ 5 Expert only.
1
1
302
REAR COVER
2300005
INCLUDE REAR BOTTOM
COVER&SIDE MOLDING
1
1
303
REAR DOOR COVER
2300007
INCLUDE DOOR BOTTOM
COVER
1
1
304
TOP COVER
2299990
PLASTIC COVER
1
1
305
FRONT BASE COVER
2299993
PLASTIC COVER
1
1
306
FRONT COVER
2299991
PLASTIC COVER
1
1
307
OP SIDE L COVER
2300011
PLASTIC COVER
1
1
308
OP SIDE R COVER
2300013
PLASTIC COVER
1
1
309
OP REAR COVER
2300014
PLASTIC COVER
1
1
310
OP BOTTOM COVER
2300009
PLASTIC COVER
1
1
311
OP CURTAIN COVER
2300015
INCLUDE SHEET METAL
1
1
312
EMI COVER L
2300025
METAL PLATE
1
1
313
EMI COVER R
2300026
METAL PLATE
1
1
314
SIDE CAP
2317349
PLASTIC COVER
1
1
315
SIDE FRINGE AB
2303896
COMMON WITH L7
1
1
300
301
Table 9-4
COVERS
Chapter 9 - Renewal Parts
9-9
GE MEDICAL SYSTEMS
DIRECTION 2395907, REVISION 2
LOGIQ™ 5 EXPERT BASIC SERVICE MANUAL
Section 9-8 BODY BLOCK
400
402
405
403
401
404
406
Figure 9-5 BODY BLOCK
9 - 10
Section 9-3 - Renewal Parts Lists
GE MEDICAL SYSTEMS
DIRECTION 2395907, REVISION 2
Section 9-8
LOGIQ™ 5 EXPERT BASIC SERVICE MANUAL
BODY BLOCK (cont’d)
Item
Part Name
Part Number
Description
Qty
FRU
400
REAR HANDLE
2300016
PLASTIC BAR
1
1
REAR PANEL ASSY
2300019-2
110V For US JPN
1
1
REAR PANEL ASSY
2337035-2
220V For Europe
1
1
402
GAS SPRING ASSY
2300020
gas spring including release cable
and mechanical parts. Used for
LOGIQ 5 and LOGIQ 5 Expert. Not
For LOGIQ 5 PRO.
1
1
403
FRONT CASTER
2300021-2
LOGIQ 3 common
2
1
404
REAR CASTER
2300022
LOGIQ 3 common
2
1
405
BUMPER SET
2300024
PLASTIC
2
1
406
AIR FILTER SET
2317724
FILTER
2
1
401
Table 9-5
BODY BLOCK
Chapter 9 - Renewal Parts
9 - 11
GE MEDICAL SYSTEMS
DIRECTION 2395907, REVISION 2
LOGIQ™ 5 EXPERT BASIC SERVICE MANUAL
Section 9-9 PCB BOARDS
502
504
501
500
505
510
506
507
508
503
Figure 9-6 PCB BOARDS
9 - 12
Section 9-3 - Renewal Parts Lists
509
GE MEDICAL SYSTEMS
DIRECTION 2395907, REVISION 2
Section 9-9
LOGIQ™ 5 EXPERT BASIC SERVICE MANUAL
PCB BOARDS (cont’d)
Item
Part Name
Part Number
Description
Qty
FRU
500
RLY ASSY
2299950-5
PROBE INTERFACE RELAY ASSY
1
1
501
LMT ASSY
2324741
LIMITER ASSY
1
1
502
BACKPLANE
2299961
BACKPLANE FOR CONNECTION
OF END ASSYS
1
1
503
PMP ASSY
2299949-2
RECEIVING PREAMP ASSY
1
1
504
DC FAN ASSY
2299988-2
COOLING FAN
1
1
505
SIG ASSY
2299951
Rx/Tx CHANNEL CONNECTION
PCB
1
1
506
FEC ASSY
2299162-6
FRONT END CONTROL ASSY
FOR ALL L5 Series
1
1
507
RDS ASSY
2299947-3
RECEIVE DELAY SUMMING
ASSY
2
1
508
CWDOP ASSY
2324742
STEERING CW DOPPLER
PROCESSIGN ASSY
1
1
ATD ASSY
2299948-3
FOR LOGIQ 5 and LOGIQ 5 PRO
1
1
ATD ASSY
2299948-5
FOR LOGIQ 5 EXPERT ONLY
1
1
510
HV ASSY
2324743-2
HIGH VOLTAGE
1
1
511
VIC CARD
2384747-4
FOR LOGIQ 5
1
1
512
RAIDE ASSY
2408548
1
1
509
Table 9-6
PCB BOARDS
Figure 9-7 PCB BOARDS
Chapter 9 - Renewal Parts
9 - 13
GE MEDICAL SYSTEMS
DIRECTION 2395907, REVISION 2
LOGIQ™ 5 EXPERT BASIC SERVICE MANUAL
Section 9-10 PC BLOCK
600
602
601
603
Figure 9-8 PC BLOCK
9 - 14
Section 9-3 - Renewal Parts Lists
GE MEDICAL SYSTEMS
DIRECTION 2395907, REVISION 2
Section 9-10
Item
LOGIQ™ 5 EXPERT BASIC SERVICE MANUAL
PC BLOCK (cont’d)
Part Name
Part Number
Description
Qty
FRU
2379029-3
FOR LOGIQ 5.
BEP2 ASSY (Intel Moter B’d) WITH
CABLE AND CD (This CD and
cable is needed in servicing the
system BEP1 with supermicro
Motherboard is installed).ATX
SMPS FOR PC BOX
1
1
BEP2 ASSY WITH CABLE AND CD
2379029-4
FOR LOGIQ 5 EXPERT.
BEP2 ASSY (Intel Moter B’d) WITH
CABLE AND CD (This CD and
cable is needed in servicing the
system BEP1 with supermicro
Motherboard is installed).ATX
SMPS FOR PC BOX
1
1
BEP PRO ASSY WITH CD
2388997-2
FOR LOGIQ 5 PRO.
BEP2 ASSY (Intel Moter B’d) WITH
CD
1
1
601
BEP POWER SUPPLY ASSY
2299971
ATX SMPS FOR PC BOX
1
1
602
HARD DISK
2299980-2
Segate 80GB 7200RPM
1
1
603
CD R/W
2399547-2
CD R/W DRIVE Sony CRX 230E
1
1
604
PC2IP CARD
2407863
1
1
605
ATX SMPS ASSY (BEP2, BEP Pro)
2408617
NIPRON UPS ATX POWER
SUPPLY
1
1
CD SET (BASE+APP) For LOGIQ 5
2409453
R2.0.0 Base Image CD + R2.0.4
Application Image CD
1
1
CD SET (BASE+APP) For LOGIQ 5
PRO
2409454-2
R2.0.2 Base Image CD + R2.1.1
Application Image CD
1
1
CD SET (BASE+APP) For LOGIQ 5
Expert
2409455-2
R3.0.2 Base Image CD + R3.0.2
Application Image CD
1
1
BEP2 ASSY WITH CABLE AND CD
600
606
Table 9-7
PC BLOCK
Chapter 9 - Renewal Parts
9 - 15
GE MEDICAL SYSTEMS
DIRECTION 2395907, REVISION 2
LOGIQ™ 5 EXPERT BASIC SERVICE MANUAL
Section 9-11 POWER BLOCK
701
700
703
704
702
Figure 9-9 POWER BLOCK
9 - 16
Section 9-3 - Renewal Parts Lists
GE MEDICAL SYSTEMS
DIRECTION 2395907, REVISION 2
Section 9-11
Item
700
LOGIQ™ 5 EXPERT BASIC SERVICE MANUAL
POWER BLOCK (cont’d)
Part Name
AC POWER ASSY
701
LV UNIT
702
JPC ASSY
Part Number
Description
Qty
FRU
2299962-2
AC POWER FOR JPN USA
1
2
2337036-2
AC POWER FOR EUROPE
1
2
2337037-2
AC POWER FOR KOR CHILE
1
2
2317354
LOW VOLTAGE REGULATOR
1
1
2331746-2
110V FOR JAPAN AND USA
1
2
2337038-2
220V FOR EUROPE
1
2
703
TRANSFORMER
2317356
POWER TRANSFORMER
1
2
704
AC POWER BOX
2317357
METAL BOX AND CABLES
1
2
2317569
FOR 220V
1
2
705
FUSE SET
2337039
FOR 110V
1
2
HARDWARE SET
2331777
BOLT NUT SCREWS
1
2
POWER CORD
2389073
1
2
POWER CORD
2389074
1
2
706
707
Table 9-8
POWER BLOCK
Chapter 9 - Renewal Parts
9 - 17
GE MEDICAL SYSTEMS
DIRECTION 2395907, REVISION 2
LOGIQ™ 5 EXPERT BASIC SERVICE MANUAL
Section 9-12
Options, Peripherals and Cables
Table 9-9
Item
Part Name
Part Number
Description
Qty
FRU
800
OP CABLE ASSY
2331742
BACK FRONT MULTI CABLE (1)
1
2
6
2
801
PC CABLE ASSY
2331743-2
REAR PANEL MULTI CABLE (1),
MODEM PC BOX RS232 CABLE
(1), STEREO SOUND CABLE (1),
,REAR PANEL ANALOGI CABLE
(1), VGA-VIC SIGNAL CABLE (1)
802
PCI CABLE
2363523
PC2IP CABLE only
5
3
2331744-2
DUMMY BRKT PWR CABLE (1),
REAR PANEL PWR CABLE(1), HV
PWR CABLE (1), LV DIGITAL PWR
CABLE(1), ATX PWR CABLE (1),
POWER CODE 110V FOR JAPAN
AND USA (1)
6
2
2356242-3
DUMMY BRKT PWR CABLE (1),
REAR PANEL PWR CABLE(1), HV
PWR CABLE (1), LV DIGITAL PWR
CABLE(1), ATX PWR CABLE
(1),220V FOR EUROPE
6
2
803
9 - 18
CABLES
POWER CABLE ASSY
Section 9-3 - Renewal Parts Lists
GE MEDICAL SYSTEMS
DIRECTION 2395907, REVISION 2
Section 9-12
LOGIQ™ 5 EXPERT BASIC SERVICE MANUAL
Options, Peripherals and Cables (cont’d)
Table 9-10
Option SVC parts
Item
Part Name
Part Number
Description
Qty
FRU
811
Fixture for BW Printer
2355253
OPTION FRU
1
2
812
Fixture for VCR/Color printer, Side
Pocket
2355254-2
OPTION FRU
1
2
813
Fixture for VCR/Color printer, Top
2355255-3
OPTION FRU
1
2
814
Cable set for BW Printer
2355256
OPTION FRU
1
2
815
Cable set Color Printer
2355257
OPTION FRU
1
2
816
Cable set VCR
2355258-2
OPTION FRU
1
2
817
MOD
2355259
OPTION FRU
1
2
818
ECG KIT(ECG+Installation Kit,excluding
ECG Cables)
2355260
OPTION FRU
1
2
819
Insite kit (Modem+Installation kit+SW)
2355261
OPTION FRU
1
2
820
Swivel Lock Option
2355262
OPTION FRU
1
2
821
CWD Kit
2380140
OPTION FRU
1
2
822
CWD Kit with ATD
2381944-2
OPTION FRU
1
2
823
L5 BASIC KIT FOR BEP1
TO R2.1.0
2408331
3.5CS,7S, i12L supported. CHA,
CHI, B_Flow, CE and Report page
designer are not available. PIV
2GHz CPU included.
1
1
824
L5 BASIC KIT FOR BEP2
TO R2.1.0
2408332
3.5CS,7S, i12L supported. CHA,
CHI, B_Flow, CE and Report page
designer are not available .
1
1
825
L5 HORIZON KIT FOR BEP1
TO R3.0.0
2408333
All BT'03 HW + CPU included, CHI
and Report page designer are
included. The other SW option
needs to purchase separately.
1
1
826
L5 HORIZON KIT FOR BEP2
TO R3.0.0
2408334
All BT'03 HW included, CHI and
Report page designer are included.
The other SW option needs to
purchase separately
1
1
827
L5 HORIZON KIT FOR BASIC
TO R 3.0.0
2408335
Upkit for user who had upgraded
with Basic kit, H41342LL or
H41342LM.
1
1
Chapter 9 - Renewal Parts
9 - 19
GE MEDICAL SYSTEMS
DIRECTION 2395907, REVISION 2
Section 9-12
Options, Peripherals and Cables (cont’d)
Table 9-11
9 - 20
LOGIQ™ 5 EXPERT BASIC SERVICE MANUAL
Probes
Item
Part Name
Part Number
Description
Qty
FRU
1
3C PROBE (EXP)
2286354
PROBE
1
1
2
3.5C PROBE (EXP)
2296158
PROBE
1
1
3
5C PROBE (EXP)
2294516
PROBE
1
1
4
E8C PROBE (EXP)
2294641
PROBE
1
1
5
10L PROBE (EXP)
2294523
PROBE
1
1
6
12L PROBE (EXP)
2295377
PROBE
1
1
7
3S PROBE(EXP) T3308LZ
2250695
PROBE
1
1
8
8C PROBE
H79202NL
PROBE
1
1
9
7L PROBE
H41402LF
PROBE
1
1
10
10S PROBE
H4901PC
PROBE
1
1
11
2D PROBE
H4830JE
PROBE
1
1
12
6D PROBE
H4830JG
PROBE
1
1
13
3.5CS PROBE
H40412LK
PROBE
1
1
14
7S PROBE
H40422LB
PROBE
1
1
15
BE9C PROBE
H79272NL
PROBE
1
1
16
i12L PROBE
H4012L
PROBE
1
1
Section 9-3 - Renewal Parts Lists
GE MEDICAL SYSTEMS
DIRECTION 2395907, REVISION 2
Section 9-12
LOGIQ™ 5 EXPERT BASIC SERVICE MANUAL
Options, Peripherals and Cables (cont’d)
Table 9-12
PERIPHERALS
Item
Part Name
Part Number
900
SONY UP-895MDW
901
Qty
FRU
Local
1
2
SONY UP-D895MD
Local
1
2
902
MITSUBISHI P91W
Local
1
2
903
MITSUBISHI P91E
Local
1
2
904
SONY UP-2900MD
Local
1
2
905
SONY UP-21MD
Local
1
2
906
SONY UP-D21MD
Local
1
2
907
SONY UP-51MD
Local
1
2
908
MITSUBISHI CP-900UM
Local
1
2
909
MITSUBISHI CP-900E
Local
1
2
910
SONY SVO-9500MD
Local
1
2
911
SONY SVO-9500MDP
Local
1
2
912
PANASONIC AGM-MD835P
Local
1
2
913
PANASONIC AGM-MD835E
Local
1
2
914
ECG CABLE
Local
1
2
915
PCG MICROPHONE
Local
1
2
916
MITSUBISHI P91D
Local
1
2
917
SONY UP-D21MD
Local
1
2
918
SONY UP-D23MD
Local
1
2
919
MITSUBISHI CP-900D
Local
1
2
Chapter 9 - Renewal Parts
Description
9 - 21
GE MEDICAL SYSTEMS
DIRECTION 2395907, REVISION 2
9 - 22
LOGIQ™ 5 EXPERT BASIC SERVICE MANUAL
Section 9-3 - Renewal Parts Lists
GE MEDICAL SYSTEMS
DIRECTION 2395907, REVISION 2
LOGIQ™ 5 EXPERT BASIC SERVICE MANUAL
Chapter 10
Periodic Maintenance
Section 10-1
Overview
10-1-1
Purpose of Chapter 10
This chapter describes Periodic Maintenance (PM) on the scanner and its peripherals. These PM
procedures are intended to maintain the quality of the ultrasound systems performance. Read this
chapter completely and familiarize yourself with the procedures before starting a PM.
Table 10-1
Contents in Chapter 10
Section
Description
Page Number
10-1
Overview
10-1
10-2
Why do Periodic Maintenance
10-2
10-3
Periodic Maintenance Schedule
10-2
10-4
Tools Required
10-4
10-5
System Periodic Maintenance
10-5
10-6
Using a Phantom
10-10
10-7
Electrical Safety Tests
10-10
10-8
When There's Too Much Leakage Current...
10-23
PM INSPECTION CERTIFICATE
10-24
CAUTION Practice good ESD prevention. Wear an anti–static strap when handling electronic parts and
even when disconnecting/connecting cables.
DANGER
THERE ARE SEVERAL PLACES ON THE BACKPLANE, THE AC DISTRIBUTION,
AND DC DISTRIBUTION THAT ARE DANGEROUS. BE SURE TO DISCONNECT
THE SYSTEM POWER PLUG AND OPEN THE MAIN CIRCUIT BREAKER
BEFORE YOU REMOVE ANY PARTS. BE CAUTIOUS WHENEVER POWER IS
STILL ON AND COVERS ARE REMOVED.
CAUTION Do not pull out or insert circuit boards while power is ON.
CAUTION Do not operate this unit unless all board covers and frame panels are securely in place. System
performance and cooling require this.
Chapter 10 - Periodic Maintenance
10 - 1
GE MEDICAL SYSTEMS
DIRECTION 2395907, REVISION 2
LOGIQ™ 5 EXPERT BASIC SERVICE MANUAL
Section 10-2
Why do Periodic Maintenance
10-2-1
Keeping Records
It is good business practice that ultrasound facilities maintain records of periodic and corrective
maintenance. The Ultrasound Periodic Maintenance Inspection Certificate provides the customer with
documentation that the ultrasound scanner is maintained on a periodic basis.
A copy of the Ultrasound Periodic Maintenance Inspection Certificate should be kept in the same room
or near the scanner.
10-2-2
Quality Assurance
In order to gain accreditation from organizations such as the American College of Radiology (USA), it
is the customer’s responsibility to have a quality assurance program in place for each scanner. The
program must be directed by a medical physicists, the supervising radiologist/physician or appropriate
designee.
Routine quality control testing must occur regularly. The same tests are performed during each period
so that changes can be monitored over time and effective corrective action can be taken.
Testing results, corrective action and the effects of corrective action must be documented and
maintained on the site.
Your GE service representative can help you with establishing, performing and maintaining records for
a quality assurance program.
Section 10-3
Periodic Maintenance Schedule
10-3-1
How often should PMs be performed?
The Periodic Maintenance Schedule specifies how often your LOGIQ™ 5 should be serviced and what
items need attention. It is the customer’s responsibility to ensure the LOGIQ™ 5 periodic maintenance
is performed as scheduled in order to retain its high level of safety, dependability and performance.
Your GE Service Representative knows your LOGIQ™ 5 best and can provide competent, efficient
service. Please contact us for further information and to schedule GE Medical Systems Ultrasound to
perform this service for you.
The services and intervals shown in the maintenance schedule assumes that you use your LOGIQ™ 5
for an average patient load (10-12 per day) and not use it as a primary mobile unit which is transported
between diagnostic facilities.
If conditions exist which exceed typical usage and patient load, then it is recommended to increase the
periodic maintenance frequencies.
Table 10-2
Periodic Maintenance Schedule
Service at Indicated Time
Clean Probes
Clean Probe Holders
10 - 2
Daily
Weekly
Monthly
•*
•
Section 10-2 - Why do Periodic Maintenance
Annually
Notes
* or before each use
GE MEDICAL SYSTEMS
DIRECTION 2395907, REVISION 2
Table 10-2
LOGIQ™ 5 EXPERT BASIC SERVICE MANUAL
Periodic Maintenance Schedule
Service at Indicated Time
Daily
Weekly
Monthly
Annually
•
Clean Air Filter
Notes
more frequently depending on
your environment
Inspect AC Mains Cable
•
Inspect Cables and Connectors
•
Clean Console
•
Clean Monitor and Touch Panel
•
Inspect Wheels, Casters, brakes and
Swivel Locks
•
Mobile Unit Check Daily
Check Control Panel Movement
•
Mobile Unit Check Daily
Mobile Unit Check Weekly
Console Leakage Current Checks
•
also after corrective
maintenance or as required by
your facilities QA program
Peripheral Leakage Current Checks
•
also after corrective
maintenance or as required by
your facilities QA program
Surface Probe Leakage Current Checks
•
also after corrective
maintenance or as required by
your facilities QA program
Twice
Annually
Endocavity Probe Leakage
Current Checks
Transesphongeal Probe Leakage
Current Checks
As Prescribed
in probe manual
Surgical Probe Leakage
Current Checks
As Prescribed
in probe manual
Measurement Accuracy Checks
•
also after corrective
maintenance or as required by
your facilities QA program
Probe/Phantom Checks
•
also after corrective
maintenance or as required by
your facilities QA program
Functional Checks
•
also after corrective
maintenance or as required by
your facilities QA program
Chapter 10 - Periodic Maintenance
10 - 3
GE MEDICAL SYSTEMS
DIRECTION 2395907, REVISION 2
LOGIQ™ 5 EXPERT BASIC SERVICE MANUAL
Section 10-4
Tools Required
10-4-1
10-4-1-1
Special Tools, Supplies and Equipment
Specific Requirements for Periodic Maintenance
Table 10-3
Overview of Requirements for Periodic Maintenance
Tool
Part Number
Comments
Anti Static Kit
46–194427P231
46–194427P279
46–194427P369
46–194427P373
46–194427P370
Kit includes anti–static mat, wrist strap and cables for 200 to 240
V system
3M #2204 Large adjustable wrist strap
3M #2214 Small adjustable wrist strap
3M #3051 conductive ground cord
Anti Static Vacuum Cleaner
46–194427P278
46–194427P279
120V
230V
Air Filter
Section 9-16
Safety Analyzer
46–285652G1
SVHS VCR Cassette
E7010GG
E7010GF
Digital Volt Meter (DVM)
SVHS VCR Head Cleaner
air intake
DALE 600 KIT (or equivalent) for electrical tests
60 minute
120 minute
See VCR user manual for requirements
E8381AA
E8381AB
blank 128 M disk
blank 230 M disk
3.5” MOD Media Cleaner
2117811
cleans the diskettes
3.5” MOD Head Cleaner Kit
2148392
cleans the drive heads
QIQ Phantom
E8370RB
3.5” MOD MEDIA
CD-RW Media
RMI Grayscale Target Model 403GS
For LOGIQ™ 5 ???
B/W Printer Cleaning Sheet
See printer user manual for requirements
Color Printer Cleaning Sheet
See printer user manual for requirements
Disposable Gloves
10 - 4
Section 10-3 - Periodic Maintenance Schedule
GE MEDICAL SYSTEMS
DIRECTION 2395907, REVISION 2
LOGIQ™ 5 EXPERT BASIC SERVICE MANUAL
Section 10-5
System Periodic Maintenance
10-5-1
Preliminary Checks
The preliminary checks take about 15 minutes to perform. Refer to the system user documentation
whenever necessary.
Table 10-4
System Preliminary Checks
Step
Item
Description
1
Ask & Listen
2
Paperwork
Fill in the top of the Periodic Maintenance (PM) Inspection Certificate. Note all probes and system
options.
3
Power up
Turn the system power on and verify that all fans and peripherals turn on. Watch the displays during
power up to verify that no warning or error messages are displayed.
4
Probes
Verify that the system properly recognizes all probes.
5
Displays
Verify proper display on the monitor and touch panel.
6
Presets
Backup all customer presets on an CD-RW.
Ask the customer if they have any problems or questions about the equipment.
Chapter 10 - Periodic Maintenance
10 - 5
GE MEDICAL SYSTEMS
DIRECTION 2395907, REVISION 2
10-5-2
LOGIQ™ 5 EXPERT BASIC SERVICE MANUAL
Functional Checks (See Also Chapter 4)
The functional checks take about 60 minutes to perform. Refer to the system user documentation
whenever necessary.
10-5-2-1
System Checks
Table 10-5
Chec
k
System Functional Checks
Step
Description
B-Mode
Verify basic B-Mode (2D) operation. Check the basic system controls that affect this mode
of operation.
CF-Mode
Verify basic CF-Mode (Color Flow Mode) operation. Check the basic system controls that
affect this mode of operation.
Doppler Modes
Verify basic Doppler operation (PW and CW if available). Check the basic system controls
that affect this mode of operation.
M-Mode
*Applicable Software
Options
Verify the basic operation of all optional modes such as Multi-Image, 3D, Contrast,
Harmonics, Cine, Stress Echo,... etc. Check the basic system controls that affect each
options operation.
Xmit/Recv Elements
Use the Visual Channel Utilityon the 10L probe to verify that all system xmit/recv channels
are functional.
Keyboard Test
Monitor
Touch Panel
Measurements
NOTE:
10 - 6
Verify basic M-Mode operation. Check the basic system controls that affect this mode of
operation.
Perform the Keyboard Test Procedure to verify that all keyboard controls are OK.
Verify basic Monitor display functions. Refer to Chapter 3 of the User Manual.
Verify basic Touch Panel display functions. Refer to Chapter 3 of the User Manual.
Scan a gray scale phantom and use the measurement controls to verify distance and area
calculation accuracy. Refer to the User Manual, Chapter 18, for measurement accuracy
specifications.
* Some software may be considered standard depending upon system model configuration.
Section 10-3 - Periodic Maintenance Schedule
GE MEDICAL SYSTEMS
DIRECTION 2395907, REVISION 2
10-5-2-2
LOGIQ™ 5 EXPERT BASIC SERVICE MANUAL
Peripheral/Option Checks
If any peripherals or options are not part of the system configuration, the check can be omitted. Refer
to the User Manual for a list of approved peripherals/options.
Table 10-6
10-5-3
10-5-3-1
Step
Item
1
VCR
Verify record/playback capabilities of the VCR. Clean heads and covers if necessary.
B/W Printer Verify hardcopy output of the B/W video page printer. Clean heads and covers if necessary.
3
Color Printer Verify hardcopy output of the Color video page printer. Clean heads and covers if necessary.
4
DICOM
5
InSite/iLinq
6
Camera
7
Footswitch
8
ECG
9
3D Probe
Verify that DICOM is functioning properly. Send an image to a DICOM device.
Verify that InSite is functioning properly. Ensure two-way remote communications.
(Warranty & Contract Customers only)
Verify hardcopy output of the film camera. Clean as necessary.
Verify that the footswitch is functioning as programed. Clean as necessary.
Verify basic operation with customer
Ask Engineering about Calibration Check for 3-D
Input Power
Mains Cable Inspection
Step
1
10-5-4-1
Description
2
Table 10-7
10-5-4
GE Approved Peripheral/Hardware Option Functional Checks
Mains Cable Inspection
Item
Description
Unplug Cord Disconnect the mains cable from the wall and system.
2
Inspect
3
Verify
Verify that the LINE, NEUTRAL and GROUND wires are properly attached to the terminals, and that no
strands may cause a short circuit.
4
Verify
Inlet connector retainer is functional.
Inspect it and its connectors for damage of any kind.
Cleaning
General Cleaning
Table 10-8
General Cleaning
Step
Item
1
Console
Description
Use a fluid detergent in warm water on a soft, damp cloth to carefully wipe the entire system. Be careful
not to get the cloth too wet so that moisture does not enter the console.
2
Probe Holder Clean probe holders (they may need to be soaked to remove excess gel).
3
Monitor and
waiting for procedure from engineering
Touch Panel
Chapter 10 - Periodic Maintenance
10 - 7
GE MEDICAL SYSTEMS
DIRECTION 2395907, REVISION 2
10-5-4-2
Air Filter Cleaning
Table 10-9
NOTE:
10-5-5
LOGIQ™ 5 EXPERT BASIC SERVICE MANUAL
Air Filter Cleaning - frequency varies with your environment
Step
Item
Description
1
Remove Filter
Cover
2
Clean Filter
The filters can be cleaned in sprinkling water, or they can be dusted with a vacuum cleaner. If the filter
is metal wash and/or vacuum. If the filter is fiber or plastic vacuum or replace.
3
Install Filter
Install the clean filter.
Refer to Chapter 8 for air filter location and removal instructions.
For your convenience or of the air filter is too dirty, replacement filters are available. Refer to
Chapter 9 for the air filter replacement part number.
Physical Inspection
Table 10-10 Physical Checks
Step
Item
Description
1
Labeling
Verify that all system labeling is present and in readable condition. Refer to the User Manual,..... for
details.
2
10 - 8
Scratches & Dents Inspect the console for dents, scratches or cracks.
3
Control Panel
Inspect keyboard and control panel. Note any damaged or missing items.
4
Control Panel
Movement
Verify ease of control panel (Operator I/O Panel) movement in all acceptable directions. Ensure that
it latches in position as required.
5
Wheels & Brakes
Check all wheels and casters for wear and verify operation of foot brake, to stop the unit from moving,
and release mechanism. Check all caster locks and caster swivel locks for proper operation.
6
Cables &
Connectors
Check all internal cable harnesses and connectors for wear and secure connector seating. Pay
special attention to footswitch assembly and probe strain or bend reliefs.
7
Shielding &
Covers
Check to ensure that all EMI shielding, internal covers, air flow panels and screws are in place.
Missing covers and hardware could cause EMI/RFI problems while scanning.
8
External I/O
Check all connectors for damage and verify that the labeling is good.
9
Op Panel Lights
10
Monitor Light
Check for proper operation of any monitor lights if available.
11
External
Microphone
Check for proper operation of any external microphones by recording an audio test.
Check for proper operation of all operator panel and TCG lights.
Section 10-3 - Periodic Maintenance Schedule
GE MEDICAL SYSTEMS
DIRECTION 2395907, REVISION 2
10-5-6
LOGIQ™ 5 EXPERT BASIC SERVICE MANUAL
Optional Diagnostic Checks
To complete the PM checks, access the diagnostic software as described in Chapters 5 or 7. View the
error logs and run desired diagnostics.
10-5-6-1
View the Logs
1.) Review the system error log for any problems.
2.) Check the temperature log to see if there are any trends that could cause problems in the future.
3.) Check the Configuration Log; update if needed.
10-5-7
10-5-7-1
Probe Maintenance
Probe Related Checks
Table 10-11 Probe Related Checks
10-5-7-2
Step
Item
1
Probe Holder
2
Probes
Description
Clean probe holders (they may need to be soaked to remove excess gel).
Thoroughly check the system probe connectors and remove dust from inside the connector sockets
if necessary. Visually check for bent, damaged or missing pins
Basic Probe Care
The system user manuals and various probe handling cards provide a complete description of probe
care, maintenance, cleaning and disinfection. Ensure that you are completely familiar with the proper
care of GE probes.
Ultrasound probes can be easily damaged by improper handling. See the User Manual and probe care
cards for more details. Failure to follow these precautions can result in serious injury and equipment
damage. Failure to properly handle or maintain a probe may also void its warranty.
Any evidence of wear indicates the probe cannot be used.
Do a visual check of the probe pins and system sockets before plugging in a probe.
TEE and Interoperative probes often have special considerations and individual probe user manuals.
For TEE and Interoperative probes also refer to their separate user manuals.
10-5-7-3
Basic Probe Cleaning
Refer to the User’s Manual for details on probe cleaning.
NOTE:
To help protect yourself from blood borne diseases, wear approved disposable gloves. These are made
of nitrile derived from vegetable starch to prevent allergic latex reactions.
NOTE:
Failure to follow the prescribed cleaning or disinfection procedures will void the probe’s
warranty. DO NOT soak or wipe the lens with any product not listed in the User Manual. Doing
so could result in irreparable damage to the probe. Follow care instructions that came with the
probe.
NOTE:
Disinfect a defective probe before you return it. Be sure to tag the probe as being disinfected.
Chapter 10 - Periodic Maintenance
10 - 9
GE MEDICAL SYSTEMS
DIRECTION 2395907, REVISION 2
LOGIQ™ 5 EXPERT BASIC SERVICE MANUAL
Section 10-6
Using a Phantom
See the Basic User Manual “Customer Maintenance” for information on using a phantom and quality
assurance tests.
Section 10-7
Electrical Safety Tests
10-7-1
Safety Test Overview
The electrical safety tests in this section are based on and conform to NFPA 99 (For USA) and IEC
60601-1 Medical Equipment Safety Standards. They are intended for the electrical safety evaluation of
cord-connected, electrically operated, patient care equipment. If additional information is needed, refer
to the NFPA 99 (For USA) and IEC 60601-1 documents.
WARNING
THE USER MUST ENSURE THAT THE SAFETY INSPECTIONS ARE PERFORMED AT
LEAST EVERY 12 MONTHS ACCORDING TO THE REQUIREMENTS OF THE PATIENT
SAFETY STANDARD IEC-EN 60601-1. ONLY TRAINED PERSONS ARE ALLOWED TO
PERFORM THE SAFETY INSPECTIONS MENTIONED ABOVE.
CAUTION To avoid electrical shock, the unit under test must not be connected to other electrical
equipment. Remove all interconnecting cables and wires. The unit under test must not be
contacted by users or patients while performing these tests.
CAUTION Possible risk of infection. Do not handle soiled or contaminated probes and other components
that have been in patient contact. Follow appropriate cleaning and disinfecting procedures
before handling the equipment.
Test the system, peripherals and probes for leakage current. Excessive leakage current can cause
injury or death in sensitive patients. High leakage current can also indicate degradation of insulation and
a potential for electrical failure. Do not use probes or equipment having excessive leakage current.
To minimize the risk that a probe may shock someone the customer should:
•
Not use a probe that is cracked or damaged in any way
•
Check probe leakage current:
*
*
*
10 - 10
once a year on surface probes
twice a year on endocavitary probes
whenever probe damage is suspected
Section 10-6 - Using a Phantom
GE MEDICAL SYSTEMS
DIRECTION 2395907, REVISION 2
10-7-2
LOGIQ™ 5 EXPERT BASIC SERVICE MANUAL
GEMS Leakage Current Limits
The following limits are summarized for NFPA 99 (For USA) and IEC 60601-1 Medical Equipment
Safety Standards. These limits are GEMS standards and in some cases are lower than the above
standards listed.
Table 10-12 Chassis Leakage Current Limits—Accessible Metal Surfaces
Country
Normal Condition
Open Ground
Reverse Polarity
Open Neutral
USA
N/A
0.3 mA
0.3 mA
N/A
Other
0.1 mA
0.5 mA
0.5 mA
0.5 mA
Table 10-13 Type BF Applied Part Leakage Current Limits - Non-Conductive (Floating) Surface
and Cavity Probes
Country
Normal
Condition
Open Ground
Reverse Polarity
Open Neutral
*Mains Applied
USA
0.05 mA
0.05 mA
0.05 mA
0.05 mA
N/A
Other
0.1 mA
0.5 mA
0.5 mA
0.5 mA
5.0 mA
Table 10-14 Type CF Applied Part Leakage Current Limits - Surgical Probes and ECG
Connections
NOTE:
Country
Normal
Condition
Open Ground
Reverse Polarity
Open Neutral
*Mains Applied
USA
0.01 mA
0.05mA
0.05 mA
N/A
0.025 mA
Other
0.01 mA
0.05 mA
0.05 mA
0.05 mA
0.05 mA
*Mains Applied refers to the sink leakage test where mains (supply) voltage is applied to the
part to determine the amount of current that will pass (or sink) to ground if a patient contacted
mains voltage.
The following tests are performed at the factory and should be performed at the site. These tests are:
grounding continuity, chassis leakage current, probe leakage current, and ECG leakage current. All
measurements are made with an electrical safety analyzer.
Chapter 10 - Periodic Maintenance
10 - 11
GE MEDICAL SYSTEMS
DIRECTION 2395907, REVISION 2
10-7-3
LOGIQ™ 5 EXPERT BASIC SERVICE MANUAL
Outlet Test - Wiring Arrangement - USA & Canada
Test all outlets in the area for proper grounding and wiring arrangement by plugging in the neon outlet
tester and noting the combination of lights that are illuminated. Any problems found should be reported
to the hospital immediately and the receptacle should not be used.
Figure 10-1 Typical Outlet Tester
NOTE:
10-7-4
No outlet tester can detect the condition where the Neutral (grounded supply) conductor and the
Grounding (protective earth) conductor are reversed. If later tests indicate high leakage currents, this
should be suspected as a possible cause and the outlet wiring should be visually inspected.
Grounding Continuity
CAUTION Electric Shock Hazard. The patient must not be contacted to the equipment during this test
Measure the resistance from the third pin of the attachment plug to the exposed metal parts of the case.
The ground wire resistance should be less than 0.2 ohms. Reference the procedure in the IEC 601-1.1.
Figure 10-2 Ground Continuity Test
10 - 12
Section 10-7 - Electrical Safety Tests
GE MEDICAL SYSTEMS
DIRECTION 2395907, REVISION 2
10-7-4-1
LOGIQ™ 5 EXPERT BASIC SERVICE MANUAL
Meter Procedure
Follow these steps to test the ground wire resistance.
1.) Turn the LOGIQ™ 5 unit OFF.
2.) Plug the unit into the meter, and the meter into the tested AC wall outlet.
3.) Plug the black chassis cable into the meter's “CHASSIS” connector and attach the black chassis
cable clamp to an exposed metal part of the LOGIQ™ 5 unit.
4.) Set the meter's “FUNCTION” switch to the RESISTANCE position.
5.) Set the meter's “POLARITY” switch to the OFF (center) position.
6.) Measure and record the ground wire resistance.
Chapter 10 - Periodic Maintenance
10 - 13
GE MEDICAL SYSTEMS
DIRECTION 2395907, REVISION 2
10-7-5
10-7-5-1
LOGIQ™ 5 EXPERT BASIC SERVICE MANUAL
Chassis Leakage Current Test
Definition
This test measures the current that would flow in a grounded person who touched accessible metal
parts of the bedside station if the ground wire should break. The test verifies the isolation of the power
line from the chassis. The meter is connected from accessible metal parts of the case to ground.
Measurements should be made with the unit On and Off, with the power line polarity Normal and
Reversed. Record the highest reading.
CAUTION Electric Shock Hazard. When the meter's ground switch is OPEN, don't touch the unit!
CAUTION Equipment damage possibility. Never switch the Polarity and the status of Neutral when the unit
is powered ON. Be sure to turn the unit power OFF before switching them using the POLARITY
switch and/or the NEUTRAL switch. Otherwise, the unit may be damaged.
10-7-5-2
Generic Procedure
The test verifies the isolation of the power line from the chassis. The testing meter is connected from
accessible metal parts of the case to ground. Measurements should be made with the unit ON and OFF,
with the power line polarity Normal and Reversed. Record the highest reading of current.
Figure 10-3 Set Up for Chassis Source Leakage Current, IEC 601-1 Clause 19 - Continuos Leakage Currents
and Patient, Auxiliary Currents
When using the Microguard or a similar test instrument, its power plug may be inserted into the wall
outlet and the equipment under test is plugged into the receptacle on the panel of the meter. This places
the meter in the grounding conductor and the current flowing from the case to ground will be indicated
in any of the current ranges. The maximum allowable limit for chassis source leakage is shown in Table
10-12.
7.) Follow the test conditions described for respective test points shown in Table 10-15.
Table 10-15 Chassis Leakage Current Test Condition
TEST
10 - 14
CONDITION
1
Mounting screw for probe receptacle
2
caster support
Section 10-7 - Electrical Safety Tests
GE MEDICAL SYSTEMS
DIRECTION 2395907, REVISION 2
LOGIQ™ 5 EXPERT BASIC SERVICE MANUAL
Table 10-15 Chassis Leakage Current Test Condition
TEST
CONDITION
3
Mounting screw for CRT housing
4
Mounting screw for peripheral plugged into unit
5
Mounting screw for other peripheral powered by unit
8.) Keep a record of the results with other hard copies of PM data kept on site.
Chapter 10 - Periodic Maintenance
10 - 15
GE MEDICAL SYSTEMS
DIRECTION 2395907, REVISION 2
10-7-5-3
LOGIQ™ 5 EXPERT BASIC SERVICE MANUAL
Data Sheet for Chassis Source Leakage Current
The test passes when all readings measure less than the value shown in Table 10-12. Record all data
on the PM Inspection Certificate.
Table 10-16 Typical Data Sheet for Chassis Source Leakage Current
Unit Power
Tester Polarity
Switch
Tester Neutral
Test 1
or Ground
Probe
Switch
Connector
Test 2
caster
Test 3
CRT
Optional
Test 4
Optional
Test 5
Enter Name of tested peripheral here:
10-7-6
10-7-6-1
ON
NORM
OPEN
ON
NORM
CLOSED
ON
REV
OPEN
ON
REV
CLOSED
OFF
NORM
OPEN
OFF
NORM
CLOSED
OFF
REV
OPEN
OFF
REV
CLOSED
Isolated Patient Lead (Source) Leakage–Lead to Ground
Definition
This test measures the current which would flow to ground from any of the isolated ECG leads. The
meter simulates a patient who is connected to the monitoring equipment and is grounded by touching
some other grounded surface. Measurements should be made with the ground open and closed, with
power line polarity normal and reversed, and with the ultrasound console Off and On. For each
combination the operating controls, such as the lead switch, should be operated to find the worst case
condition.
CAUTION Equipment damage possibility. Never switch the Polarity when the unit is powered ON. Be sure
to turn the unit power OFF before switching the polarity using the POLARITY switch. Otherwise,
the unit may be damaged.
10 - 16
Section 10-7 - Electrical Safety Tests
GE MEDICAL SYSTEMS
DIRECTION 2395907, REVISION 2
10-7-6-2
LOGIQ™ 5 EXPERT BASIC SERVICE MANUAL
Generic Procedure
Measurements should be made with the ground open and closed, with power line polarity normal and
reversed, and with the unit Off and On. For each combination, the operating controls such as the lead
switch should be operated to find the worst case condition.
The connection is at service entrance
or on the supply side of a separately
derived system
H (Black)
POWER
OUTLET
Appliance power switch
(use both "off" and "on" positions)
Polarity reversing switch
(use both positions)
Patient lead selector switch (if any)
(activated as required)
Patient connected leads
Appliance
H
N
N (White)
Internal
circuitry
G
Between each patient
lead and ground
G (Green)
Insulating surface
Building
ground
Grounding contact switch (use in both
"open" and "closed" positions)
Current meter
H = Hot
N = Neutral (grounded)
G = Grounding conductor
Figure 10-4 Test Circuit for Measuring Non-Isolated Patient Leads
Table 10-17
10-7-7
Testing Power Conditions
ECG Power
Meter’s Polarity Switch
Meter’s Neutral Switch
ON
NORM
CLOSED
ON
NORM
OPEN
ON
REVERSE
CLOSED
ON
REVERSE
OPEN
OFF
NORM
CLOSED
OFF
NORM
OPEN
OFF
REVERSE
CLOSED
OFF
REVERSE
OPEN
Isolated Patient Lead (Source) Leakage–Lead to Lead
Reference the procedure in the IEC 60601-1. When using the Dale 600, switch the meter’s function
selector to the LEAD-LEAD position. Select and test each of the five ECG lead positions (except ALL)
on the LEAD selector, testing each to the power condition combinations found in the table. Record the
highest leakage current measured.
Chapter 10 - Periodic Maintenance
10 - 17
GE MEDICAL SYSTEMS
DIRECTION 2395907, REVISION 2
10-7-8
LOGIQ™ 5 EXPERT BASIC SERVICE MANUAL
Isolated Patient Lead (Sink) Leakage-Isolation Test
Reference the procedure in the IEC 60601-1. When using the Dale 600, switch the meter’s function
selector to the LEAD-ISO. Select the ALL position on the lead selector. Depress the rocker switch to
ISO TEST to test lead isolation.
CAUTION Line voltage is applied to the ECG leads during this test. To avoid possible electric shock
hazard, the system being tested must not be touched by patients, users or anyone while the ISO
TEST switch is depressed.
NOTE:
10 - 18
It is not necessary to test each lead individually or power condition combinations as required in
previous tests.
Section 10-7 - Electrical Safety Tests
GE MEDICAL SYSTEMS
DIRECTION 2395907, REVISION 2
10-7-8-1
LOGIQ™ 5 EXPERT BASIC SERVICE MANUAL
Data Sheet for ECG Leakage Current
The test passes when all readings measure less than the value shown in the table below. Record all
data on the PM Inspection Certificate.
Table 10-18 Maximum Allowance Limit for ECG Leakage Current
Maximum
Allowance Limit
Patient Lead to Ground Leakage Current Test
and
Patient Lead to Lead Leakage Current Test
AC Power
Source
GROUND OPEN
GROUND
CLOSED
115V
10uA
10uA
220/240V
500uA
10uA
Table 10-19 Maximum Allowance Limit for ECG Leakage Current
Patient Lead Isolation Current Test
AC Power
Source
Maximum
Allowance Limit
115V
20uA
220/240V
5mA
Table 10-20 Typical Data Sheet for ECG Leakage Current
ECG
Power
Tester
Polarity
Switch
Tester
Ground
Switch
ON
NORM
CLOSED
ON
REVERSE
CLOSED
ON
NORM
OPEN
ON
REVERSE
OPEN
OFF
NORM
CLOSED
OFF
REVERSE
CLOSED
OFF
NORM
OPEN
OFF
REVERSE
OPEN
Tester Lead Selector
RL
RA
Chapter 10 - Periodic Maintenance
LA
LL
C
10 - 19
GE MEDICAL SYSTEMS
DIRECTION 2395907, REVISION 2
10-7-9
10-7-9-1
LOGIQ™ 5 EXPERT BASIC SERVICE MANUAL
Probe Leakage Current Test
Definition
This test measures the current that would flow to ground from any of the probes through a patient who
is being scanned and becomes grounded by touching some other grounded surface.
10-7-9-2
Generic Procedure
Measurements should be made with the ground open and closed, with power line polarity normal and
reversed, and with the unit Off and On. For each combination, the probe must be active to find the worst
case condition.
POLARITY REVERSING SWITCH
H (BLACK)
POWER
OUTLET
PROBE
CONSOLE
N (WHITE)
G (GREEN)
MOMENTARY
SWITCH
LEAKAGE TEST
METER
Figure 10-5 Set Up for Probe Leakage Current
NOTE:
10 - 20
Each probe will have some amount of leakage current, dependent on its design. Small variations in
probe leakage currents are normal from probe to probe. Other variations will result from differences in
line voltage and test lead placement.
Section 10-7 - Electrical Safety Tests
GE MEDICAL SYSTEMS
DIRECTION 2395907, REVISION 2
10-7-9-3
LOGIQ™ 5 EXPERT BASIC SERVICE MANUAL
No Meter Probe Adapter Procedure
Figure 10-6 Check Without Probe Adapter
Follow these steps to test each transducer for leakage current.
1.) Turn the LOGIQ™ 5 unit OFF.
2.) Plug the unit into the test meter, and the meter into the tested AC wall outlet.
3.) Plug the external probe into the meter's “EXTERNAL” connector.
4.) Set the meter's “FUNCTION” switch to EXTERNAL position.
5.) Connect the probe for test with the connector of the console.
6.) Add the saline probe and the imaging area of the probe into the saline bath.
7.) Have unit power ON for the first part; turn it OFF for the second half.
8.) Depress the ISO TEST rocker switch and record the highest current reading.
9.) Follow the test conditions described in Table 10-21 for every transducer.
10.)Keep a record of the results with other hand copies of PM data.
Chapter 10 - Periodic Maintenance
10 - 21
GE MEDICAL SYSTEMS
DIRECTION 2395907, REVISION 2
10-7-9-4
LOGIQ™ 5 EXPERT BASIC SERVICE MANUAL
Data Sheet for Transducer Source Leakage Current
The test passes when all readings measure less than the values shown in Table 10-13 and Table 1014. Record all data on the PM Inspection Certificate.
CAUTION Equipment damage possibility. Never switch the Polarity and the status of Neutral when the unit
is powered ON. Be sure to turn the unit power OFF before switching them using the POLARITY
switch and/or the NEUTRAL switch. Otherwise, the unit may be damaged
.
Table 10-21 Typical Data Sheet For Transducer Source Leakage Current
Transducer Tested:
10 - 22
Unit Power
Tester Power Polarity
Switch
Tester GROUND or
NUETRAL Switch
ON
NORM
OPEN
ON
NORM
CLOSED
ON
REV
OPEN
ON
REV
CLOSED
OFF
NORM
OPEN
OFF
NORM
CLOSED
OFF
REV
OPEN
OFF
REV
CLOSED
Section 10-7 - Electrical Safety Tests
Measurement
GE MEDICAL SYSTEMS
DIRECTION 2395907, REVISION 2
LOGIQ™ 5 EXPERT BASIC SERVICE MANUAL
Section 10-8
When There's Too Much Leakage Current...
CHASSIS FAILS
Check the ground on the power cord and plug for continuity. Ensure the ground is not broken, frayed,
or intermittent. Replace any defective part.
Tighten all grounds. Ensure star washers are under all ground studs.
Inspect wiring for bad crimps, poor connections, or damage.
Test the wall outlet; verify it is grounded and is free of other wiring abnormalities. Notify the user or
owner to correct any deviations. As a work around, check the other outlets to see if they could be used
instead.
NOTE:
No outlet tester can detect the condition where the white neutral wire and the green grounding
wire are reversed. If later tests indicate high leakage currents, this should be suspected as a
possible cause and the outlet wiring should be visually inspected.
PROBE FAILS
Test the probe in another connector to isolate if the fault lies with the probe or the scanner.
NOTE:
Each probe will have some amount of leakage, dependent on its design. Small variations in
probe leakage currents are normal from probe to probe. Other variations will result from
differences in line voltage and test lead placement. The maximum allowable leakage current for
body surface contact probe differs from inter-cavity probe. Be sure to enter the correct probe
type in the appropriate space on the check list.
If excessive leakage current is slot dependent, inspect the system connector for bent pins, poor
connections, and ground continuity.
If the problem remains with the probe, replace the probe.
PERIPHERAL FAILS
Tighten all grounds. Ensure star washers are under all ground studs.
Inspect wiring for bad crimps, poor connections, or damage.
STILL FAILS
If all else fails, begin isolation by removing the probes, external peripherals, then the on board ones,
one at a time while monitoring the leakage current measurement.
NEW UNIT
If the leakage current measurement tests fail on a new unit and if situation can not be corrected, submit
a Safety Failure Report to document the system problem. Remove unit from operation.
ECG FAILS
Inspect cables for damage or poor connections.
Chapter 10 - Periodic Maintenance
10 - 23
GE MEDICAL SYSTEMS
DIRECTION 2395907, REVISION 2
LOGIQ™ 5 EXPERT BASIC SERVICE MANUAL
PM INSPECTION CERTIFICATE
Customer Name:
System ID:
Dispatch Number / Date
Performed:
Warranty/Contract/HBS
System Type
Model Number:
Serial Number:
Manufacture Date:
Probe 1:
Frequency:
Scan Format*:
Model Number:
Serial Number:
Probe 2:
Frequency:
Scan Format*:
Model Number:
Serial Number:
Probe 3:
Frequency:
Scan Format*:
Model Number:
Serial Number:
Probe 4:
Frequency:
Scan Format*:
Model Number:
Serial Number:
Probe 5:
Frequency:
Scan Format*:
Model Number:
Serial Number:
Probe 6:
Frequency:
Scan Format*:
Model Number:
Serial Number:
Probe 7:
Frequency:
Scan Format*:
Model Number:
Serial Number:
Probe 8:
Frequency:
Scan Format*:
Model Number:
Serial Number:
Probe 9:
Frequency:
Scan Format*:
Model Number:
Serial Number:
* Scan Format: Phased Array, Linear Array, Curved Array, Mechanical Array or Other
FUNCTIONAL CHECKS
PHYSICAL INSPECTION AND CLEANING
Functional Check (if applicable)
OK? or
N/A
Physical Inspection and
Cleaning
(if applicable)
B-Mode Function
Console
Doppler Modes Function
Monitor
CF-Mode Function
Touch Panel
M-Mode Function
Air Filter
Applicable Software Options
Probe Holders
Applicable Hardware Options
External I/O
Control Panel
Wheels, Brakes & Swivel Locks
Monitor
Cables and Connectors
Touch Panel
GE Approved Peripherals (VCR, CDRW, MOD, Printers)
Inspect
Clean
Measurement Accuracy
GE Approved Peripherals
COMMENTS:
______________________________________________________________________________
______________________________________________________________________________
10 - 24
Section 10-7 - Electrical Safety Tests
GE MEDICAL SYSTEMS
DIRECTION 2395907, REVISION 2
LOGIQ™ 5 EXPERT BASIC SERVICE MANUAL
______________________________________________________________________________
______________________________________________________________________________
ELECTRICAL SAFETY
Electrical Test Performed
Max Value
Allowed
Value
Measured
OK?
Comments
OK?
Comments
Outlet (correct ground &wiring
config.)
System Ground Continuity
Chassis Source Leakage Current Probe
Chassis Source Leakage Current Caster
Chassis Source Leakage Current CRT
Patient Lead Source Leakage
(Lead to Ground)
Patient Lead Source Leakage
(Lead to Lead)
Patient Lead Source Leakage
(Isolation)
Peripheral 1 Leakage Current
Peripheral 1Ground Continuity
Peripheral 2 Leakage Current
Peripheral 2Ground Continuity
Peripheral 3 Leakage Current
Peripheral 3Ground Continuity
PROBES
Probe Number
(from previous page)
Max Value
Allowed
Max Value
Measured
Probe 1:
Probe 2:
Probe 3:
Probe 4:
Probe 5:
Probe 6:
Chapter 10 - Periodic Maintenance
10 - 25
GE MEDICAL SYSTEMS
DIRECTION 2395907, REVISION 2
LOGIQ™ 5 EXPERT BASIC SERVICE MANUAL
Probe 7:
Probe 8:
Probe 9:
Final Check. All system covers are in place. System scans with all probes as expected.
Accepted by: ______________________________________________________________________
10 - 26
Section 10-7 - Electrical Safety Tests
GE MEDICAL SYSTEMS
DIRECTION 2395907, REVISION 2
LOGIQ™ 5 EXPERT LOGIQ™ 5 EXPERT BASIC SERVICE
INDEX
A
D
Abbreviations, 9-1
AC Box Assy, 8-50
AC Power, 5-12
AC Transformer, 8-56
Acoustic Noise Output, 3-8
Air Filter Cleaning, 10-8
Air Flow Control, 5-21
Archiving Presets, 4-10
Available Probes, 3-14
DC Power, 5-13
DDBF, 6-10
DICOM Network Function, 2-9
Dimensions, 3-7
Display platform Maneuverability check, 4-17
B
Back End Processor, 5-6
Backend Processor Checks, 4-16
Basic Measurements, 4-15
Block Diagrams, 5-2
Boards in the NEST Assy, 8-32
Boot Up, 4-2
Brake Function Adjustment, 6-4
Brakes and Direction Locks Checks, 4-19
C
Cables, 9-16
Caster Link Assy, 8-66
Casters and Pedals, 9-5
CD-RW Drive, 4-6
CD-RW, MO, or ECG, 8-60
Chassis Leakage Current Test, 10-14
Cine, 4-15
Circuit Board Assemblies, 9-11
Circuit Breaker, 4-2
Common Service Platform, 5-16
CONN Box Assy, 8-36
Connecting Cables, 3-12
Console Requirements, 2-2
Contact Information, 1-13
Contrast and Brightness Adjustment, 6-6
Conventions, 1-3
CPU, 5-6
Customer Assistance, 1-13
A-1
E
ECG Checks, 4-16
Electrical Requirements, 2-3
Electrical Safety, 1-8
Electrical Safety Tests, 10-10
Electrical Specifications, 3-8
EMC, 1-12
EMI, 1-12
EMI Limitations, 2-4
Environmental Requirements, 2-2
Equipment, 10-4
Equipment Models, 9-2
ESD, 1-12
External I/O, 5-7
F
Facility Needs, 2-6
FAN Assy, 8-54
Fans, 5-22
Front Cover, 8-6
Front End, 5-4
FRU Replacement Procedures, 8-18
Functional Checks, 4-15,, 10-6
Fuse, 8-34
G
General Cleaning, 10-7
General Procedure, 4-2
Global Service User Interface, 5-17
GSUI, 5-17
Index
GE MEDICAL SYSTEMS
DIRECTION 2395907, REVISION 2
LOGIQ™ 5 EXPERT LOGIQ™ 5 EXPERT BASIC SERVICE
INDEX
H
MOTHER Board, 8-46
Handle, 8-10
Hazard Icons, 1-4
HDD and Battery, 9-12
Human Safety, 1-7
HV Power, 5-14
HV Unit Assy, 8-48
O
I
iLinq, 5-16
Image Management, 4-15
Input Power, 10-7
Installation of Option Software, 8-81
Installation of Software, 8-71
Interconnect Cabling, 5-8
J
Jumper and Dip Switch Setting, 6-9
L
Label Locations, 1-9
Leakage Current Limits, 10-11
Loading Presets, 4-11
Lockout/Tagout Requirements, 4-14
Low Voltage, 5-13
LV Unit, 8-52
M
MDBRG, 6-11
MDCON Board, 8-46
Mechanical Safety, 1-7
Mid Processors, 5-5
MOD Drive, 4-7
Monitor, 8-18,, 9-4
Monitor Cover, 8-16
Monitor Shelf Assy, 8-22
Monitor Shelf Cover, 8-12
A-2
OP Panel and Keys, 9-10
Operation Panel Assy, 8-28
Operation Panel Bottom Cover, 8-14
Optional Peripherals, 3-11
Options, 9-16
Outlet Test, 10-12
P
Patient I/O (Option), 5-7
PC Box Assy, 8-38
Periodic Maintenance Schedule, 10-2
Peripheral Checks, 4-18
Peripheral Connection, 3-11
Peripheral/Option Checks, 10-7
Peripherals, 9-16
Phantom, 10-10
Physical Inspection, 10-8
Plastic Covers, 9-6
Plastic Kit Replacement, 8-2
Power Diagrams, 5-12
Power On, 4-2
Power On/Off Standby Switch, 4-3
Power Shutdown, 4-5
Power Supply Adjustments, 6-2
Power Units, 9-14
PREA, 6-9
Preliminary Checks, 10-5
Probe (Transducer) Connection, 3-8
Probe Connector Cleaning, 10-9
Probe Holder, 9-9
Probe Leakage Current Test, 10-20
Probe Maintenance, 10-9
Probe/Connectors Usage, 4-15
Probes, 9-17
Product Icons, 1-5
PROMP, 6-10
Index
GE MEDICAL SYSTEMS
DIRECTION 2395907, REVISION 2
LOGIQ™ 5 EXPERT LOGIQ™ 5 EXPERT BASIC SERVICE
INDEX
R
U
REAR CONN Assy, 8-45
Rear Cover, 8-4
Rear Panel, 5-7
Rear Panel Connector, 3-17
Recording Devices, 3-11,, 9-8
Required Features, 2-7
Requirements for Periodic Maintenance, 10-4
Restarting System, 4-5
Ultrasound Room Layout, 2-8
Unpacking the Equipment, 3-3
V
Video Specifications, 3-15
W
S
Safety, 1-7
SCSI ID Number, 4-12
Service Login, 5-17
Side Cover, 8-2
Software Configuration Checks, 4-17
Speaker Assy, 8-21
Special Tools, 10-4
Supplies, 10-4
Swivel Function Adjustment, 6-5
System Clock, 3-5
System Configuration, 3-9
System Features, 4-15
System Maintenance, 10-5
System Manufacture, 1-13
System Mode Checks, 4-15
System Settings, 3-9
System Specifications, 3-7
Weight, 3-8
When There's Too Much Leakage Current...,
10-23
T
Theory, 5-2
Top Console, 5-7
Top Cover, 8-8
Trackball Assy, 8-30
Transducers, 3-14
TRAP, 6-9
TX Power, 5-14
A-3
Index
GE MEDICAL SYSTEMS
DIRECTION 2395907, REVISION 2
LOGIQ™ 5 EXPERT LOGIQ™ 5 EXPERT BASIC SERVICE
INDEX
A-4
Index