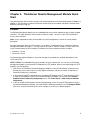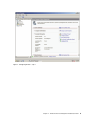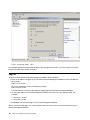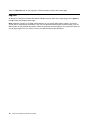
1
ThinkServer Management Module
User Guide
ThinkServer RD330, RD430, RD530, and RD630
Note:
Before using the information and the product it supports, ensure that you read and understand the following:
•
“Safety information” on page 1
• Appendix B “Notices” on page 31
First Edition (August 2012)
© Copyright Lenovo 2012.
LIMITED AND RESTRICTED RIGHTS NOTICE: If data or software is delivered pursuant a General Services Administration
“GSA” contract, use, reproduction, or disclosure is subject to restrictions set forth in Contract No. GS-35F-05925.
Contents
Chapter 1. Introduction . . . . . . . .
1
Terminology . . . . . . . . . . . . . . . .
Safety information . . . . . . . . . . . . .
1
1
Chapter 2. Overview of the Lenovo
ThinkServer Management Module . .
3
Features of the ThinkServer Remote Management
Module . . . . . . . . . . . . . . . . .
3
Chapter 3. Configuration of the
ThinkServer Remote Management
Module . . . . . . . . . . . . . . . .
5
Chapter 4. ThinkServer Remote
Management Module Quick Start . .
7
Prestart .
Log-on . .
Navigation
Log-out .
.
.
.
.
.
.
.
.
.
.
.
.
.
.
.
.
.
.
.
.
.
.
.
.
.
.
.
.
.
.
.
.
.
.
.
.
.
.
.
.
.
.
.
.
.
.
.
.
.
.
.
.
7
10
11
12
Chapter 5. Remote console (KVM)
operation . . . . . . . . . . . . . . .
13
Start the redirection console . . . . .
Main window of the remote console . .
Menu bar of the remote console . . . .
View menu of the remote console .
Macros menu of the remote console
Tools menu of the remote console .
Power menu of the remote console .
.
.
.
.
.
.
.
.
.
.
.
.
.
.
.
.
.
.
.
.
.
.
.
.
.
.
.
.
.
.
.
.
.
.
.
.
.
.
.
.
Chapter 6. ThinkServer Remote
Management Module Web console
options . . . . . . . . . . . . . . . .
© Copyright Lenovo 2012
13
13
13
13
14
14
14
15
Properties . . . . . . . .
Viewing properties . . .
Server information . . . . .
Viewing sensor readings .
Viewing the System Event Log
Event management . . . . .
Platform Events . . . .
Trap Settings (SNMP) . .
Email Settings (SMTP) . .
Serial Over LAN . . . .
Remote control . . . . . .
Remote management . .
Virtual media . . . . .
Power control . . . . .
Configuration . . . . . . .
Network . . . . . . .
Network security . . . .
Security . . . . . . .
Users . . . . . . . .
Service . . . . . . . .
IPMI . . . . . . . . .
Session. . . . . . . .
LDAP . . . . . . . .
Update . . . . . . . .
Utilities . . . . . . . .
Languages . . . . . . . .
.
.
.
.
.
.
.
.
.
.
.
.
.
.
.
.
.
.
.
.
.
.
.
.
.
.
.
.
.
.
.
.
.
.
.
.
.
.
.
.
.
.
.
.
.
.
.
.
.
.
.
.
.
.
.
.
.
.
.
.
.
.
.
.
.
.
.
.
.
.
.
.
.
.
.
.
.
.
.
.
.
.
.
.
.
.
.
.
.
.
.
.
.
.
.
.
.
.
.
.
.
.
.
.
.
.
.
.
.
.
.
.
.
.
.
.
.
.
.
.
.
.
.
.
.
.
.
.
.
.
.
.
.
.
.
.
.
.
.
.
.
.
.
.
.
.
.
.
.
.
.
.
.
.
.
.
.
.
.
.
.
.
.
.
.
.
.
.
.
.
.
.
.
.
.
.
.
.
.
.
.
.
.
.
.
.
.
.
.
.
.
.
.
.
.
.
.
.
.
.
.
.
.
.
.
.
.
.
15
15
16
16
16
17
17
18
18
18
19
19
20
21
22
22
23
23
23
24
24
25
26
26
27
28
Appendix A. Frequently asked
questions . . . . . . . . . . . . . . .
29
Appendix B. Notices. . . . . . . . . .
31
Trademarks . . . . . . . . . . . . . . . .
32
i
ii
ThinkServer Management Module User Guide
Chapter 1. Introduction
Thank you for ordering and using the Lenovo® ThinkServer® Management Module (TMM), hereinafter
referred to as Remote Management Module.
The User Guide describes how to use the Remote Management Module, the overview of the module
features, and how to set up and operate the module.
The User Guide is for system administrators responsible for installation, troubleshooting, upgrade and
maintenance of the Remote Management Module. As a system administrator, once you are familiar with the
User Guide, you can use Remote Management Module to access remotely from any location to respond for
emergency.
Terminology
The following table lists the terms used in this document and its corresponding descriptions.
Abbreviation
Definition
BMC
System board Management Controller
DHCP
Dynamic Host Configuration Protocol
IPMI
Intelligent Platform Management Interface
KVM
Keyboard, Video, and Mouse
MAC
Media Access Controller
TCP/IP
Transfer Control Protocol/Internet Protocol
Safety information
WARNING
With reference to either the Guide or other documents, you should always pay particular attention
to safety information before operating the ThinkServer. To ensure full compliance with the existing
certification and licensing, you must follow the installation instructions in the Guide.
Power on / off: the power button can not cut off system power or Remote Management Module power.
To cut off the power of Remote Management Module, you must disconnect the ac power cord from the
power outlet. When opening the chassis to install or remove the parts, you should make sure the ac power
cord has been disconnected.
© Copyright Lenovo 2012
1
Dangerous situations, equipment and cables: power, telephones, and signal cables may have the danger
of electric shock. Before opening the device, shut down the server, disconnected the power cord, the
communication system, network and modem connected to the server. Otherwise, it may result in personal
injury or equipment damage.
Electrostatic Discharge (ESD) and ESD protection: Electrostatic Discharge (ESD) can damage disk
drivers, system board and other components. We recommend that you complete all the steps in this Section
only in the ESD protective workstations. If ESD workstation is unavailable, please wear anti-static wrist strap
while holding parts and connect the wrist strap to the ground wire (that is, any unpainted metal surface)
of the server chassis to provide ESD protection.
ESD and holding system boards: be careful when holding the system board. They are extremely sensitive
to ESD. Only touch the edge when holding the system board. Lay the system board with components side
facing upwards after taking the system board out of the protection bag or the sever. Use the conductive
foam pad (if any) rather than the system board package. Do not slide the system board on any surface.
Installing or removing jumper: jumper is a small plastic conductor between two jumper pins. Some jumpers
have a small wing on the top for you to use fingertips or fine needle forceps to clip it. If the jumper has no
such wing, be careful when installing or removing it with needle forceps, and clip the jumper's narrow face
instead of the wide one. Clipping the wide face will damage the contacts inside the jumper, which will lead to
intermittent faults to some functions controlled by the jumper. Clip the jumper carefully with pliers or other
tools and do not squeeze when removing it. Otherwise, pins on the system board may be bent or broken.
2
ThinkServer Management Module User Guide
Chapter 2. Overview of the Lenovo ThinkServer Management
Module
This topic describes the features of the Remote Management Module.
The Remote Management Module runs on the server system as an integrated solution and integrates
the embedded operating system. Independent of the server operating system, the embedded operating
system can provide a whole set of complete, stable and effective solution for the server. As a system
administrator, you can respond anytime and anywhere to emergency failure and take remote control on
the server through the network.
Features of the ThinkServer Remote Management Module
The ThinkServer Remote Management Module is easily accessible by remote KVM and controllable via LAN
or Internet. It will digitize and compress the collected video signal, keyboard, mouse signals and then
send to the remote console. Embedded with remote access and related control software, the module
also allows integrated remote power management via IPMI. Key features of the Remote Management
Module are as follows:
• Embedded Web UI - Remote power on / off, system health, system information, alert notification and
event log.
• USB 2.0 media redirection - boot from remote media
• Security - open source SSL
• Compatible with IPMI V2.0
• KVM - allow remote viewing and configuring in the POST and BIOS setup utility
© Copyright Lenovo 2012
3
4
ThinkServer Management Module User Guide
Chapter 3. Configuration of the ThinkServer Remote
Management Module
This topic describes how to use the server configuration utility to change the Remote Management Module
from the un-configured status to the running status. When first installed, the Remote Management Module
by default will search DHCP server on the network to automatically assign IP address, subnet mask and
gateway. It is recommended that users manually set a fixed IP address in the BIOS.
To set an IP address, do the following:
1. Press F1 as soon as you see the logo screen.
2. From the BIOS setup menu, select Server Management ➙ BMC Network Configuration ➙
Configuration Address Source.
3. From the Configuration option, you can choose STATIC or DHCP to set IP address.
4. When you finish the configuration, save the settings.
Table 1. IPMI 2.0 Configuration submenu
Configuration
Address
Source
STATIC
Static IP configuration. IP and the subnet mask can be set manually.
DHCP
Dynamic IP configuration. The system can obtain IP automatically.
© Copyright Lenovo 2012
5
6
ThinkServer Management Module User Guide
Chapter 4. ThinkServer Remote Management Module Quick
Start
This topic describes how to quickly acquaint with related operations of the Remote Management Module. In
addition, it also describes the advanced features of how to log on the module and options available while
browsing, and how to log out.
Prestart
The Remote Management Module has an embedded Web server and an application with multiple standard
interfaces. This topic describes these interfaces and their usages. You can use the TCP/IP protocol to
access these interfaces.
Note: As the supported functions of the product vary with configurations, refer to the actual product
description.
For more information about the initial settings, see Chapter 3 “Configuration of the ThinkServer Remote
Management Module” on page 5 . The user name in this topic is “lenovo”. Besides “lenovo”, other user
names and passwords are also accepted. The default user name and password are as follows:
• Username = lenovo
• Password = lenovo
The Remote Management Module is accessible through the standard Java-enabled Web browser with
HTTP and HTTPS.
HTTP / HTTPS: The embedded Web server provides full access permission. You can access the Remote
Management Module via encrypted HTTPS protocol or HTTP protocol. When accessing through the HTTP
protocol, note the following:
1. With access to ThinkServer Remote Management Module via the HTTPS protocol, the browser may
prompt you to trust and install the security digital certification, and you just follow the prompts to
import and confirm the certification.
2. In the Internet Explorer® 6 Web browser on the Microsoft® Windows Server® 2003 operating system,
if using HTTPS protocol to access the Remote Management Module, you need to check Internet
Explorer Enhanced Security Configuration item in the Control Panel ➙ Add / Remove Windows
Components.
3. In IE7 on the Microsoft® Windows Server® 2008 operating system, if using HTTPS protocol to access
the Remote Management Module, you need to do the following amendments to the Configure IE ESC
item of the security information of the server manager, as shown in the following figures:
© Copyright Lenovo 2012
7
Figure 1. Configuring IE ESC - setp 1
8
ThinkServer Management Module User Guide
Figure 2. Configuring IE ESC - setp 2
Chapter 4. ThinkServer Remote Management Module Quick Start
9
Figure 3. Configuring IE ESC - setp 3
For making the remote console (KVM) window of the managed server works, you must install Java runtime
environment (JRE) V6.0 Update 24 or later.
Log-on
To log on to the ThinkServer Remote Management Module, do the following:
1. Enter the IP address assigned by the ThinkServer Remote Management Module into the Web browser.
For example:
http://10.223.131.36/
For secure connection, refer to the following example:
https://10.223.131.36/
The Web browser will then be directed to the logon page of the Remote Management Module.
2. On the logon page of the Remote Management Module, enter the user name and password. For
example:
• Username = lenovo
• Password = lenovo
3. Click OK to view the home page of the Remote Management Module.
After a successful initial logon, the system administrator can create new users and has full permission of
Remote Management Module.
10
ThinkServer Management Module User Guide
Navigation
When the ThinkServer Remote Management Module is successfully logged on, the ThinkServer Remote
Management Module home page is displayed.
There are several tabs on the vertical toolbar which is on the left pane of the ThinkServer Remote
Management Module home page. By clicking these tabs, you can get the specific system information and
take the relevant tasks listed in the following table:
Table 2. Tabs on the ThinkServer Remote Management Module home page
Tab
Comments
Properties
System information is shown on the Properties page.
Configuration
This tab contains the following submenus:
• Network
• Network Security
• Security
• Users
• Services
• IPMI
• Sessions
• LDAP
• Update
• Utilities
Server
Information
This tab contains the following submenus:
• Power
• Thermal
System Event
Log
Click this tab to view the system event log (SEL).
Event
Management
This tab contains the following submenus:
• Platform Events
• Trap Settings
• Email Settings
• Serial Over LAN
There also are tabs on the top of the home page:
Table 3. Tabs on the top of the ThinkServer Remote Management Module home page
Tab
Comments
Support
View the contact information about the company of this product.
Help
View the brief description about the current page on the right pane of the browser. By clicking
the “X” on the top right of the pane, you can close the Help window.
About
View the version of the software.
Logout
Terminate the current Web Console session.
Note: If the remote console (KVM) window is active, it will close automatically when you are
logging out. After logout, the Web console will back to logon screen.
Chapter 4. ThinkServer Remote Management Module Quick Start
11
There is a Refresh button on the right pane. Click this button to refresh the current page.
Log-out
To log out the ThinkServer Remote Management Module and turn back to the log on page, click Logout on
the right top of the program home page.
Note: Automatic Timeout: If the Web console detects no user activity within fifteen minutes, the current
session will be automatically terminated. If the user has opened the KVM remote console window, then the
Web session will not automatically timeout. When the automatic timeout happens, the system will inform the
user to log on again if the user wants to access the Web console to take operations.
12
ThinkServer Management Module User Guide
Chapter 5. Remote console (KVM) operation
The remote console is the redirection screen, keyboard, and mouse of the remote host system with a
ThinkServer Remote Management Module installed. If there is a need to use the remote console of the
managed host system, ensure that the server has Java* runtime environment plug-in.
When the remote console is startup, a new window will be opened, showing the screen of the host system.
Operating the remote console is just like an administrator is sitting in front of the screen of the remote
system. This means that the user can use the keyboard and mouse as he or she usually does.
Start the redirection console
The remote console is the redirection keyboard, video, and mouse of the remote host system with a
ThinkServer Remote Management Module installed.
To start the redirection window for remote console KVM, log on to the home page of the ThinkServer Remote
Management Module. On the left pane of the home page, under Serial Over LAN ➙ vKVM & vMedia, click
Launch, the Virtual KVM and Media Launch window is displayed on the right pane of the home page.
Then, click Launch Java KVM Client in the Virtual KVM and Media Launch window to start the redirection
console and carry out remote management for server.
After clicking Launch Java KVM Client, you will be prompted to run and download Java network boot
protocol Jviewer.jnlp document.
Notes:
• Before the JNLP document is booted, Java Runtime Environment (JRE) V6.0 Update 24 or a later version
must be set up on the client.
• The client browser must allow the pop-up windows from the IP address of the ThinkServer Remote
Management Module.
Main window of the remote console
When you start the remote console, the main window of the remote console is displayed.
The remote console main window shows the screen of the remote server. Operating the remote console is
just like you are in front of the remote server. The response speed maybe a little delay, depending on the
bandwidth and the delay between the ThinkServer Remote Management Module and the remote console.
Menu bar of the remote console
There is a menu bar on the top of the remote console main window. You can view the status of the remote
console and configure the setup for local remote console through the items on the menu bar.
View menu of the remote console
By clicking the View option on the menu bar of the remote console, you can take the following operations:
• Hide Status Bar: Hide the KVM status at the bottom of the screen.
• Refresh: Refresh the screen.
• Full Screen: Switch between the window mode and full screen of the remote console.
© Copyright Lenovo 2012
13
• Fit: Fit the window mode.
Macros menu of the remote console
By clicking the Macros option on the menu bar of the remote console, you can take the following operations:
• Hold Ctrl/Alt/Windows keys: Allow simulating to press these special keys on the remote keyboard. On
the local keyboard, these special keys will be carried out through local operating system, rather than
transfer to the remote operation system.
• Alt+Ctrl+Del: Issue Alt+Ctrl+Del command to the remote operation system.
Tools menu of the remote console
By clicking the Tools option on the menu bar of the remote console, you can take the following operations:
• Session options: Set the mouse mode and the video quality.
• Session user list: View the current users.
• Single Cursor: Set cursor in different states.
• States: View the current state of the remote redirection.
Power menu of the remote console
By clicking the Power option on the menu bar of the remote console, you can control the power action.
14
ThinkServer Management Module User Guide
Chapter 6. ThinkServer Remote Management Module Web
console options
This topic describes every page of the Web console and each page is divided into several parts
corresponding separately to the several tabs at the left side of the pane. In each part, there are detailed
illustrations and introductions for each menu option in the left of the pane.
Notes:
• The first menu item of each tab is the default page which will automatically appear when selecting
the corresponding tab.
• Click the Help button on the right horizontal toolbar, and the Web console will show the relevant
information about each page.
Properties
By default, the home page of the ThinkServer Remote Management Module shows the Properties page,
including general information about the server. For more details, read the information in this topic.
Viewing properties
The Platform Information page shows the summary of the general information.
Figure 4. Firmware information
The above page provides the following server information:
Table 4. Platform information page
Product Name
Customizable product name.
Product Information
Customizable product description.
Firmware Version
Firmware version information.
Building Time
Date and time of building the BMC firmware
ASIC Type
The platform of the server.
© Copyright Lenovo 2012
15
Server information
The Server Information page shows the data related to the server health, such as sensor readings and event
logs. Click the Server Information tab on the left pane to show this page.
Viewing sensor readings
The Temperatures and Voltages pages show the system sensor information, including readings and status.
Figure 5. Sensor readings on the Temperatures page
Figure 6. Sensor readings on the Voltages page
Viewing the System Event Log
The System Event Log page shows the event logs.
• To clear the log buffer, click Clear Log.
• To update the log list, click Refresh.
16
ThinkServer Management Module User Guide
Figure 7. System Event Log
Event management
The Event Management tab is used to configure alerts. The following server management options are
included:
• Platform Events
• Trap Settings
• Email Settings
• Serial Over LAN
Platform Events
You can use this function to modify or delete the alert settings, or send a test alert to the destination.
The alerts page lists all the alerts action, including reboot, power cycle, power off, and generate PEF.
If you need to modify the alert settings, you can select an alert action and click the Apply Changes
button to configure it.
Figure 8. Alert list
Chapter 6. ThinkServer Remote Management Module Web console options
17
Trap Settings (SNMP)
Click Trap Settings on the left pane of the home page to set the destination IP address.
Figure 9. Trap Settings
Email Settings (SMTP)
The Email Settings page is used to configure the alert. Users can receive an alert by E-mail when events
occur.
Figure 10. Email Settings
Serial Over LAN
The Serial Over LAN page provides the following settings:
18
ThinkServer Management Module User Guide
Figure 11. Serial Over LAN
Table 5. Serial Over LAN settings
Option
Comments
Enable Serial
Over LAN
Enables the Serial Over LAN function when the checkbox is checked.
Baud Rate
Sets the Serial Over LAN baud rate from a drop-down list (19.2kbps, 38.4 kbps, 57.6 kbps,
or 115.2 kbps).
Channel Privilege
Level Limit
Sets the channel privilege level from a drop-down list (Administrator, Operator, or User).
Remote control
The Remote Console page enables you to execute the following remote operations on the server:
• Remote management
• Server power control
Remote management
The Remote Management Module page will automatically select the Remote Console option by default.
You can open the remote console KVM redirection window from this page.
Chapter 6. ThinkServer Remote Management Module Web console options
19
Figure 12. Remote management configuration
Figure 13. Remote management launch
Click the Launch Java KVM Client button to start the redirection console and remotely manage the server.
Note: Before you start the JNLP file, the client must be installed with Java Runtime Environment (JRE)
V6.0 Update 24 or later.
Virtual media
Click the Launch Java VM Client button to allow the local device redirection. This feature allows starting or
stopping the remote media redirection.
20
ThinkServer Management Module User Guide
Figure 14. Redirecting virtual device
• Redirect CDROM / Redirect ISO: Enables you to redirect the local CD-ROM/DVD drivers or ISO images
in the file system of local client to virtual CD-ROM devices in the remote systems.
• Redirect Floppy/USB Key/Redirect Floppy/USB Key Image: Enables you to redirect the local floppy
device, local USB key device, or the IMG files for floppy disk to the virtual floppy devices in the remote
system.
These virtual devices can read, write (providing the property is not read only), and boot, which are similar
with any other CD-ROMs or floppies in the remote system. But only when certain media redirections are
active, these virtual devices are available in the remote operating system or BIOS setting menu. The setting
is valid after remote system reset or it is power-on or power-off. These devices will not disappear from the
remote system until the relevant check boxes in the remote console window are cleared.
Power control
The Power Control page shows the server power status.
Figure 15. Power control
You can perform the following power control operations:
Chapter 6. ThinkServer Remote Management Module Web console options
21
Table 6. Power control
Option
Comments
Power Status
Shows the current status of the power control (OFF or ON).
Power On System
Turns on the system when it is in the off state.
Power Off
System
Turns off the system when it is in the on state.
Power Cycle
System
Turns off, then reboots the system (cold boot).
Hard Reset
(Restart)
Restarts the system without turning it off (warm boot).
Configuration
The Configuration page is used to configure Network settings, user settings, updates, and so on.
Network
The Network page is used to configure the Network settings. It includes the following options:
• Automatic (Obtain an IP address automatically): Automatically obtain an IP address (use DHCP).
• Manual (Use the following IP addresses): Manually configure IP addresses.
Figure 16. Network settings
You can configure the Network settings by click ncsi0 item.
Table 7. Network settings
Option
Comments
MAC Address
The MAC address of the device (Read Only).
IPv4 Settings
If you want to configure the IP by IPv4 protocol, enable the IPv4 and then set the IP address.
IPv6 Settings
If you want to configure the IP by IPv6 protocol, enable the IPv6 and then set the IP address.
VLAN Settings
When you enable virtual LAN, you have to set the VLAN ID and Priority.
22
ThinkServer Management Module User Guide
Network security
The new values are available to the firewall immediately, but may not be utilized until the next security
event occurs.
Figure 17. Network security settings
Security
This page can be used to upload SSL certificate and private key in order to get access to the device in
safe mode.
• To generate an SSL Certificate, click Generate Certificate.
• To upload an SSL Certificate, click Upload Certificate.
Figure 18. Security settings
Users
The Users page lists all users including configured users, with network permission.
The options included in this page are used to configure the IPMI users for servers and their permissions. To
add a new user, you can select a blank row and click the User ID. If you would like to modify or delete a
user, select the User ID in the list and click Apply Changes or Delete.
Chapter 6. ThinkServer Remote Management Module Web console options
23
Figure 19. Users setting
Notes:
• The user lenovo and three can not be modified or deleted.
• To add a new user, select a blank row from the list and click User ID.
• To modify a user, select this user ID from the list and modify user to the relevant settings, then click
Apply Changes.
• To delete a user, select this user ID from the list and click Delete User.
Service
You can configure the web server parameters (such as HTTP Port Number, HTTPS Port Number, and
Timeout) on a remote computer. By default, the timeout is 1800 seconds; 5 for the Max Sessions.
When you finish the configuration, click Apply Changes.
Figure 20. Service setting
IPMI
This screen contains IPMI Serial and IPMI Settings.
24
ThinkServer Management Module User Guide
The IPMI Serial contains the following options:
Table 8. IPMI Serial
Option
Comments
Connection
Mode Settings
Sets the IPMI serial connection mode from a drop-down list. Available values are Direct Connect
Basic Mode and Direct Connect Terminal Mode.
Baud Rate
Sets the IPMI serial baud rate (data speed) from a drop-down list. Available values are 9600 bps,
19.2 kbps, 38.4 kbps, 57.6 kbps, and 115.2 kbps.
Flow Control
Sets the Flow control value from a drop-down list. Available values are None and RTS/CTS
Flow Control.
Channel Privilege
Level Limit
Sets the channel privilege level from a drop-down list. Available levels are Administrator,
Operator, and User.
The IPMI Settings provides remote configuration over LAN. To activate IPMI remote configuration by
LAN, check the Enable IPMI Over LAN option, define the Channel Privilege Level Limit, and enter the
Encryption Key. When you finish the configuration, click Apply Changes.
Table 9. IPMI Settings
Option
Comments
Enable IPMI Over
LAN
Enables the IPMI Over LAN when the checkbox is checked.
Channel Privilege
Level Limit
Sets the maximum privilege level that can be accepted on the LAN channel. Available levels are
Administrator, Operator, and User.
Encryption Key
Sets the encryption key. This field allows from 0 to 20 two-digit Hex characters and no spaces.
Figure 21. IPMI Serial and IPMI Settings
Session
This page displays the information about Active Sessions. Additionally, the trash icon provides the delete
function for privileged users. Click Refresh to refresh the sessions status.
Chapter 6. ThinkServer Remote Management Module Web console options
25
Figure 22. Session settings
LDAP
The Lightweight Directory Access Protocol (LDAP) is an application protocol for reading and editing
directories over an IP network. A directory is an organized set of records. LDAP directories often use Domain
Name System (DNS) names for the highest levels.
Figure 23. LDAP settings
Update
Select an image and click upload. The upload process will terminate all other sessions including vKVM.
26
ThinkServer Management Module User Guide
Figure 24. Firmware update
Firmware update steps:
1. Browse to or enter the path where the firmware image file resides.
2. Select update type.
3. Click the Upload button. If the file is a valid file, all other sessions will be terminated and the image
upload will begin.
4. For a successful upload, the current firmware version and the version of the new file will be displayed, as
well as the Preserve Configuration checkbox, Update button, and Cancel button.
5. Click the Update button to begin the firmware update process and view the update status. When the
update is completed, the embedded software will reboot automatically. If you click the Cancel button,
the process will be terminated and the embedded software will reboot.
6. Wait for a minute after the firmware is updated, reopen the browser logon page, enter the user name
and password to log on again.
Utilities
Utilities provide BMC reboot and factory default restore functions.
• To reboot the remote management server, click Reboot.
• To reset the setting values to the factory default values, click Factory Default.
Chapter 6. ThinkServer Remote Management Module Web console options
27
Figure 25. Utilities
Languages
The Web UI’s display will according to the browser’s language to decide which language to use in Web UI.
The languages currently offered are Chinese and English.
28
ThinkServer Management Module User Guide
Appendix A. Frequently asked questions
This topic lists the frequently asked questions.
• Question: Log on Remote Management Module failed.
Answer: Check your user name and password.
• Question: Remote Management Module can not be connected.
Answer: Check the hardware
– Whether the host on which the Remote Management Module residents is correctly connected to a
power supply or not.
–
Check your network configuration (IP address, router, and so on).
© Copyright Lenovo 2012
29
30
ThinkServer Management Module User Guide
Appendix B. Notices
Lenovo may not offer the products, services, or features discussed in this document in all countries. Consult
your local Lenovo representative for information on the products and services currently available in your
area. Any reference to a Lenovo product, program, or service is not intended to state or imply that only that
Lenovo product, program, or service may be used. Any functionally equivalent product, program, or service
that does not infringe any Lenovo intellectual property right may be used instead. However, it is the user's
responsibility to evaluate and verify the operation of any other product, program, or service.
Lenovo may have patents or pending patent applications covering subject matter described in this
document. The furnishing of this document does not give you any license to these patents. You can send
license inquiries, in writing, to:
Lenovo (United States), Inc.
1009 Think Place - Building One
Morrisville, NC 27560
U.S.A.
Attention: Lenovo Director of Licensing
LENOVO PROVIDES THIS PUBLICATION “AS IS” WITHOUT WARRANTY OF ANY KIND, EITHER EXPRESS
OR IMPLIED, INCLUDING, BUT NOT LIMITED TO, THE IMPLIED WARRANTIES OF NON-INFRINGEMENT,
MERCHANTABILITY OR FITNESS FOR A PARTICULAR PURPOSE. Some jurisdictions do not allow
disclaimer of express or implied warranties in certain transactions, therefore, this statement may not apply
to you.
This information could include technical inaccuracies or typographical errors. Changes are periodically
made to the information herein; these changes will be incorporated in new editions of the publication.
Lenovo may make improvements and/or changes in the product(s) and/or the program(s) described in this
publication at any time without notice.
The products described in this document are not intended for use in implantation or other life support
applications where malfunction may result in injury or death to persons. The information contained in this
document does not affect or change Lenovo product specifications or warranties. Nothing in this document
shall operate as an express or implied license or indemnity under the intellectual property rights of Lenovo
or third parties. All information contained in this document was obtained in specific environments and is
presented as an illustration. The result obtained in other operating environments may vary.
Lenovo may use or distribute any of the information you supply in any way it believes appropriate without
incurring any obligation to you.
Any references in this publication to non-Lenovo Web sites are provided for convenience only and do not in
any manner serve as an endorsement of those Web sites. The materials at those Web sites are not part of
the materials for this Lenovo product, and use of those Web sites is at your own risk.
Any performance data contained herein was determined in a controlled environment. Therefore, the result
obtained in other operating environments may vary significantly. Some measurements may have been
made on development-level systems and there is no guarantee that these measurements will be the same
on generally available systems. Furthermore, some measurements may have been estimated through
extrapolation. Actual results may vary. Users of this document should verify the applicable data for their
specific environment.
© Copyright Lenovo 2012
31
Trademarks
Lenovo, the Lenovo logo, and ThinkServer are trademarks of Lenovo in the United States, other countries, or
both.
Internet Explorer, Microsoft, Windows, and Windows Server are trademarks of the Microsoft group of
companies.
Other company, product, or service names may be trademarks or service marks of others.
32
ThinkServer Management Module User Guide