1
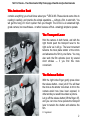
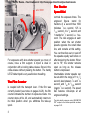
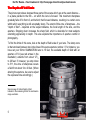
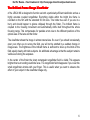
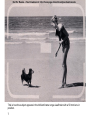
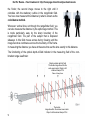
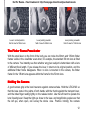
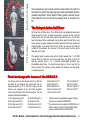
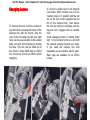
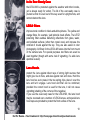
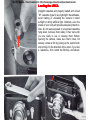
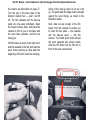
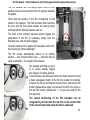
Not For Resale – Free Download at http://homepage.ntlworld.com/joechan/manuals
Not For Resale – Free Download at http://homepage.ntlworld.com/joechan/manuals
This Instruction Book
®
contains everything you should know about your LEICA M3. Please devote some time to
reading it carefully, and practice the simple operations — without a film, to start with. You
will get the hang of it much quicker than you thought. The LEICA is an advanced highgrade camera, but nevertheless - or rather because of that - amazingly simple to operate.
The Transport Lever
Hold the camera in both hands, and with the
right thumb push the transport lever to the
right as far as it will go. The lever movement
tensions the focal plane shutter of the LEICA
and advances the film by one frame. You may
also work the film advance lever by several
short strokes — if you find this more
convenient.
The Release Button
With the right index finger gently press down
the release button - never jerk it! You will hear
the click as the shutter runs down. A film in the
camera would now have been exposed, in
other words you would have taken a picture.
Let go off the release button (lift the finger off),
and you can once more operate the transport
lever to tension the shutter and advance the
film.
® = registered
2
Not For Resale – Free Download at http://homepage.ntlworld.com/joechan/manuals
The Shutter
Speed Dial
For exposures with slow shutter speeds you must, of
course, have a firm support. A tripod is ideal in
conjunction with a locking cable-release. Screw in the
coble-release without pressing the button. The handy
LEITZ table tripod is very useful when travelling.
Counter
nter
The Film Cou
is coupled with the transport lever. If the film was
correctly loaded (see notes on pages 24-26), the film
counter indicates the number of exposures made. The
counter stops at No. 40, and automatically returns to
its initial position when you withdraw the take-up
spool.
3
controls the exposure times. The
engraved figures stand for
fractions of a second thus 1000
1
indicates /1000 second, 125 is
1
1
/125 second, 4 is /4 second, and
1
1 stands for /1 second, i.e. 1 second. The dial engages at each
position when the set shutter
speeds opposite the small index
line, and remains at this setting.
You can therefore set or read off
the speeds equally well before or
after tensioning the shutter. When
set to "B," the shutter remains
open as long as the release
button is depressed.
Intermediate shutter speeds can
1
be set within the range of 1 to /8
1
1
second, also between /15 and /30
1
1
second, and /60 to /1000 second
1
(or to /1000 second). The speed
dial features click-stops at all
engraved settings.
The photo-electric exposure meter LEICAMETER
"MC" couples to the shutter speed dial as shown
on pages 19-21.
Not For Resale – Free Download at http://homepage.ntlworld.com/joechan/manuals
The Iris Diaphragm
Hold the lens of your LEICA up to your eye, and rotate the aperture ring. You can then
see through the lens components how the iris diaphragm opens and closes. It thus works
rather like the iris of your eye which also opens or closes to adapt itself to weaker or
stronger light. The iris diaphragm of the lens has a similar purpose, namely to cut down
very bright light by "stopping down" — i.e. the use of a smaller lens aperture.
Conversely, in poor light the use of a larger aperture admits more light to the film. At the
same time the depth of field changes.
The aperture or f-numbers 1.4—2—2.8—4—5.6—8—11 — 16 — 22 — 32*) are a
measure of the amount of light reaching the film. They are chosen in such a way that
closing down the aperture from
each number to the next
reduces the light by one-half.
Similarly on opening up, each
aperture passes twice the light
of the next smaller one. So
remember: a high aperture
number signifies a small
aperture, and vice-versa.
*) The length of this scale of numbers
depends on the type of lens.
4
Not For Resale – Free Download at http://homepage.ntlworld.com/joechan/manuals
Depth--ofThe Depth
of-Field Scale
The picture reproduces sharpest those parts of the scene which are at the exact distance –
in a plane parallel to the film – on which the lens is focused. This maximum sharpness
gradually falls off in front of, and behind, that focused distance, resulting in a certain zone
within which everything is still acceptably sharp, The extent of this zone of sharpness – the
"depth of field" – depends on the subject distance, the focal length of the lens, and the
aperture. Stopping down increases the sharp field, which is desirable for most subjects
extending appreciably in depth. This also explains the importance of aperture control in
photography.
To find the limits of this zone, look at the depth of field scale of your lens. The sharp zone
is that enclosed between two index lines of the same aperture number. If, for instance, you
have set your 50mm SUMMICRON lens to 15 feet, the available depth of field with an
aperture of f/4 (see red arrows in the
1
illustration) extends from about 12 /2
to 20 feet. If, however, you stop down
to f/11, the zone of sharpness covers
a field from about 9 to 40 feet. (When
altering the aperture, be sure to adjust
the exposure time accordingly.)
See also page 9: Optical Depth-of-field
Indicator in the measuring field of the combination
range-viewfinder.
5
Not For Resale – Free Download at http://homepage.ntlworld.com/joechan/manuals
Brilliant--Frame Range
Range--Viewfinder
The Brilliant
of the LEICA M3 is designed to function as both a particularly efficient viewfinder and as a
highly accurate coupled rangefinder. Everything visible within the bright line frame is
recorded on the film with the standard 50 mm lens. This holds true even if you are in a
hurry and should happen to glance obliquely through the finder. The brilliant frame is
coupled to the focusing movement and automatically shifts itself throughout the whole
focusing range. This compensates for parallax errors due to the different positions of the
optical axes of the lens and the finder.
The viewfinder shows the image in almost natural size. So even if you should occasionally
open your other eye to survey the field, you will not be startled by a sudden change in
image scale. The brightness of the brilliant frame is sufficient to show up the limits of the
field equally clearly with dark subjects. An additional advantage is that the subject remains
visible even during the exposure.
In the center of the finder the sharp rectangular rangefinder field is visible This appears
brighter than surrounding viewfinder area. The rangefinder field disappears if you cover the
small rangefinder window with your finger. This is useful when you want to observe the
effect of your subject in the viewfinder image only.
6
Not For Resale – Free Download at http://homepage.ntlworld.com/joechan/manuals
This is how the subject appears in the brilliant-frame range-viewfinder with a 50 mm lens in
position.
7
Not For Resale – Free Download at http://homepage.ntlworld.com/joechan/manuals
The Distance
can be set on the distance scale engraved on
every lens, or with the aid of the rangefinder
image visible in the finder. Some lenses lock
in the infinity position; for focusing on nearer
distances this lock must be released by
depressing the infinity catch.
Always remember to extend and lock the
barrel of collapsible lenses (see also page
16). If you now rotate the focusing lever or
mount of the lens, a scale of numbers moves
past the fixed focusing index and indicates the
distance in feet and/or metres. This way of
focusing is less important, as you can set the
distance much more accurately with the aid of
the built-in coupled rangefinder. The scale is
useful, however, for reading off the depth-offield available and for special subjects where
the rangefinder cannot be used.
Practice in using the rangefinder is important for developing an efficient focusing technique, and is also great fun. Set the lens to infinity, and observe, say, a window a few
yards away through the rangefinder. You will see a bright sharp rectangle in the centre of
the finder area. Hold the LEICA in such a way that the vertical window bar cuts through this
rectangular rangefinder field. Inside the rangefinder field you will see a double image; i.e.
the window bar appears as a second image to the left of the main one. This indicates that
the lens is not correctly focused on the film. Now adjust the lens while still looking through
8
Not For Resale – Free Download at http://homepage.ntlworld.com/joechan/manuals
the finder; the second image moves to the right until it
coincides with the stationary outline in the rangefinder field.
You have now measured the distance by what is known as the
coincidence method.
Whenever vertical lines cut through the rangefinder field, you
can also measure the distance by the split-image method. This
is mode particularly easy by the sharp boundary of the
rangefinder field. The part of the subject that is displaced
sideways in this field moves across during focusing until the
image becomes continuous across the boundary of the frame.
In measuring the distance you have at the same time set the lens exactly to this distance.
The functioning of the optical depth-of-field indicator in the measuring field of the combination range-viewfinder:
Objects outside depth-of-field
The double image lies within the
wide upper marks: Object is still
rendered sharp at f/16
Plane of sharp focus
9
The double
image lies within the narrow lower marks:
Object is still rendered sharp at f/5.6
Not For Resale – Free Download at http://homepage.ntlworld.com/joechan/manuals
Automatic
Finder
Adjustment
for 90mm
and 135mm
Lenses
90 mm Lenses
Field of view with a 90 mm LEICA lens. The
subject area covered with the longer focal
length is indicated by the additional bright
line frame within the large brilliant frame
showing the field of view of the 50 mm lens,
which remains visible all the time.
Fit a 90mm LEICA lens in your LEICA M3, lock it
in position, and again look through the rangeviewfinder. You will now see on additional bright
line finder frame which indicates the field of view
covered by the 90mm lens within the field of the
standard 50mm lens, and reproduced on the film
with 1.8 times magnification. An important point
is that the surrounding subject area remains
visible in the finder, so that you can easily follow
moving subjects and bring them within the 90mm
finder field. In the same way the finder
automatically indicates the view of the 135mm
lens when you fit the 135mm ELMAR in the
camera. In addition, the parallax error is
10
Not For Resale – Free Download at http://homepage.ntlworld.com/joechan/manuals
automatically compensated during
focusing - just as with the 50mm
lens – over the whole focusing
range. The image frames visible in
the finder also allow for the
reduction of the field of view due to
the fact that the angle covered by
the lens decreases at nearer
distances. The image frames are
designed so as to include the full
field taken in by the film even at the
shortest subject distances that can
be set on the coupled LEICA lenses.
At greater subject distances the lens therefore
covers a slightly larger angle of view than shown
in the finder.
When you fit one of the 35mm wide-angle LEICA
lenses with integral M 3 finder attachment to the
camera, the viewfinder is automatically converted
for wide-angle photography.
Field of view with the 135 mm HEKTOR lens
which yields a magnification of 2.7 times as
compared with the standard 50 mm lens.
11
Not For Resale – Free Download at http://homepage.ntlworld.com/joechan/manuals
Lever in normal position:
field of view for 50mm lens
Lever pointing inwards:
field of view for 90mm lens
Lever pointing outwards:
field of view for 135mm lens
The
Th
e Finder Frame Preselector
With the small lever on the front of the body you can moke the 90mm and 135mm finder
frames visible in the viewfinder even when, for example, the standard 50 mm lens is fitted
to the camera. You instantly see then whether any given subject is better taken with a lens
of different focal length. If you release the lever, it returns to its original position, and the
additional finder frame disappears. When no lens is mounted in the camera, the finder
frame for the 135mm lens appears within the frame for the 50 mm lens.
Holding the Camera
A good camera grip is the best insurance against camera shake. Hold the LEICA M3 so
that the base rests in the palms of both hands, with the thumb against the transport lever,
and the index finger resting lightly on the release button. Use the left hand to operate the
lens focusing lever. Keep the right eye close to the view- and rangefinder eyepiece so that
the left eye, when open, can survey the whole view. Practice holding the camera
12
Not For Resale – Free Download at http://homepage.ntlworld.com/joechan/manuals
so that it is supported as much as possible against the
face; the camera, head, and hands should act as one unit.
The purpose of it all is to ensure a really steady camera
position. This will prevent camera shake, and give you that
high standard of definition which has always been the hallmark of the highly corrected LEICA lenses.
Press the release button smoothly and gently, never jab it.
Move only the index finger, not the whole hand.
At first try exposing with shutter speeds of 1/60 second or
faster; after some practice you will eventually be able to
expose even slower shots without camera shake. If you
find it more convenient, the left eye is just as suitable for
viewing as the right one.
When you want to change from horizontal to vertical shots,
turn the LEICA upright about the optical axis of the rangeviewfinder. The camera hold does not change much. Grip
the LEICA in the same way as for horizontal views.
Alternatively, you can also bring the right hand down for
upright pictures, and release with the thumb. Grip the
camera so that the tip of the thumb rests against the
release button, and the fingers exert a counter-pressure on
the base plate. Focus the lens with the left hand, and
support the upper part of the camera against your forehead. This hold ensures particularly smooth releasing and
film advancing. Whether you take upright or horizontal
shots, you never have to take the eye from the camera, not
even for picture sequences.
13
about 10 seconds delay
Point of release
Close-up pictures can be taken with the camera held in the hand or
mounted on a tripod, the image being focused automatically with the
coupled range-finder. As the depth of field is greatly reduced at such
close distances, the lens should be stopped down to at least f/8 or
f/11.
The Delayed Action SelfSelf-Timer
Pull down the self-timer lever. The LEICA shutter can already be tensioned,
otherwise tension it now. To make the exposure, however, do not press the
release button, but the small button above the self-timer lever. You will then
hear the delayed action mechanism running down while the self-timer lever
slowly swings up again, releasing the shutter just before the lever reaches its
original position. If you watch the lever as it 'returns, you can not only hear the
moment of the exposure, but also see it; this occurs when the lever points
obliquely up to the left.
The delayed action release works with all shutter speeds from 1 to 1/1000
second. With the self-timer lever fully pulled down, the delay is about 10
seconds; halfway down it is 5 seconds. Intermediate positions give
intermediate delay times. You therefore have plenty of time to get into the
picture yourself. The self-timer is also valuable for releasing very long tripodmounted exposures.
Lenses
nses of the LEICA M 3
The Interchangeable Le
You have a choice of focal lengths from 21 to 400 mm
and have at your disposal two lenses with the exceptional aperture of f/1.4. With this range you can
choose your viewpoint at will, and have complete
control over the field of view and perspective. You can
exhaust all pictorial possibilities.
21 mm Super-Angulon f/4
28 mm Summaron f/5.6
35 mm Summaron f/2.8
35 mm Summicron f/2
35 mm Summilux f/1.4
50 mm Elmar f/2.8
50 mm Summicron f/2
50 mm Summilux f/1.4
65 mm Elmar f/3.5**
90 mm Elmar f/4*
90 mm Elmarit f/2.8*
90 mm Summicron f/2*
125 mm Hektor f/2.5**
135 mm Elmar f/4*
200 mm Telyt f/4*
280 mm Telyt f/4.8**
400 mm Telyt f/5**
* These lenses are rangefinder coupled, but they
may also be used with VISOFLEX II.
** These lenses must be used with VISOFLEX I or II
reflex housing, save the 65 mm ELMAR which
can be used only with the VISOFLEX II.
Not For Resale – Free Download at http://homepage.ntlworld.com/joechan/manuals
14
Not For Resale – Free Download at http://homepage.ntlworld.com/joechan/manuals
Changing Lenses
To remove the lens, hold the camera in
your left hand, pressing the button of the
bayonet lock with the thumb. Grip the
.lens by the focusing ring with your right
hand, as close as possible to the camera
body, and turn anti-clockwise to release
the lens. This can now be lifted out of
the mount. Lenses fitted with an infinity
lock should be locked at infinity before
changing.
A red dot is visible next to the bayonet
lock button. When another lens is to be
inserted, place it in position with the red
dot on the lens mount opposite the red
dot on the camera body. Then secure
the lens by turning it clockwise until the
bayonet lock engages with an audible
click.
Avoid changing lenses .in strong direct
light. Turn your back to the sun, and hold
the camera opening towards your body.
If you keep the camera and lens
separately use a protective cap for each.
Rear caps are available for all LEICA
lenses.
The Collapsible Lenses
When not in use, certain LEICA lenses (for
instance the 50 mm ELMAR f/2.8 and the
collapsible 90mm ELMAR f/4) can be
unlocked by slightly turning the front anticlockwise and pushing into the camera
body. For use, fully extend the lens, and
lock by turning to the right. (The collapsible
90 mm ELMAR f/4 can only be focused
when it is properly extended and locked.)
With any lens, always remember to take
off the lens cap.
Lens Coating
Modern coated LEICA lenses show a colored sheen on the surface, due to an antireflection layer which appreciably increases the brilliance and crispness of the image. The
outer surfaces are hard coated and will therefore stand up to careful cleaning.
In addition to its name, every LEICA lens also carries its own "personal" serial number
engraved on the front mount. Make a note of this number, and of the serial number of your
LEICA; they may be prove to be of great help in case of loss.
Lens Care
Any high-quality lens can yield its best performance only if the two outside glass surfaces
are perfect condition. And it is much better to keep them clean than to keep cleaning them.
A light yellow filter (with black-and-white film) or a colourless ultraviolet filter (for colour
shots), left permanently on the lens, will protect the surface against outside influences (e.g.
fine sand at the seaside). The lens hood, too, guards the lens against accidental contact
with your fingers, and against splashes of water in rainy weather. To remove dust from the
lens surface use a soft camel's hair brush, or in an emergency, a clean linen rag previously
washed with pure soap. (Other washing or cleaning agents may leave harmful chemical
residues.)
16
Not For Resale – Free Download at http://homepage.ntlworld.com/joechan/manuals
Dual--Range SUMMICRON
The 50mm Dual
This version of the 50mm SUMMICRON lens has two focusing ranges; 1. The normal
1
range from infinity to 3 /2 feet (1 meter); 2. The close-up range from about 35 to 19 inches
(88 to 48 cm) from the film-plane.
An optical finder attachment fits onto the top of the lens mount for use within the near
range. This adapts the coupled range-viewfinder for close-up focusing. The lens thus acts
at the same time as a close-up focusing mount with parallax compensation. The lens is
inserted into the LEICA M3 — without finder attachment — in the usual way, by aligning
the red dots on mount and body opposite each other, and turning clock-wise to lock.
Focusing between infinity and 31/2, feet (1 meter). Over this range the lens is used like
any other LEICA lens. At 31/2 feet (1 meter) the focusing movement is limited by a stop.
Focusing between 35 and 19 inches (88 and 48 cm). The distances are measured from
the back of the camera to the subject. Set the focusing mount of the lens to its near limit of
3/2 feet (1 meter), as shown in Fig. 1, pull outwards, and move it across the stop into the
35 inch (88 cm) position (Fig. 2). The lens remains locked in this position until the optical
finder attachment is fully pushed home in its special fitting, thus releasing the focusing
movement for the close-up range (Fig. 3).
Fig. 1
Fig. 2
Fig. 3
Not For Resale – Free Download at http://homepage.ntlworld.com/joechan/manuals
Ever--Ready Case
In its Ever
the LEICA M3 is protected against the weather and minor knocks,
yet is always ready for action. The lid of the ever-ready case is
pivoted so that it is well out of the way even for upright shots, and
cannot obstruct the lens.
LEICA filters
improve tonal rendition in black-and-white pictures. The yellow and
orange filters, for example, yield pictorial cloud effects. The LEITZ
polarizing filters subdue disturbing reflections from glass, water,
and polished surfaces (other than metal ones) and increase the
contrast of clouds against the sky. They are also useful in color
photography. All filters for the LEICA M3 screw into the front mount
of the camera lens. For special purposes two filters can even be
used together (though with some risk of vignetting, if a wide lens
aperture is used).
Lens Hoods
protect the lens against direct rays of strong light sources that
might give rise to flare, and also against rain and snow. Hold the
lens hood so as to press in the two spring clips, place it over the
lens and let it engage. Lens hood and filter can be combined;
provided the correct hood is used for the lens, it will not cause
vignetting (shading of the corners of the negative).
If you use the ever-ready case for the LEICA M3, the lens hood
may be reversed over a number of LEICA lenses, and special lens
hood caps are provided to protect the front surface of the lens.
18
Not For Resale – Free Download at http://homepage.ntlworld.com/joechan/manuals
Not For Resale – Free Download at http://homepage.ntlworld.com/joechan/manuals
Before fitting the LEICAMETER
"MC," set the shutter speed dial
of the LEICA M 3 to "B." Then
rotate the milled setting ring of
the exposure meter in the
direction of the arrow as far as it
will go. The index line on the ring
should coincide with the index
line on the meter housing, as
shown clearly in the illustration
at the bottom of page 21. Now
lift up the ring and continue
turning in the direction of the
arrow. The triangular index mark
on top of the meter will then be
opposite one of the figures
between 4 and 120.
The
LEICAMETER "MC"
is a novel type of accessory exposure meter
which couples with the focal plane shutter of
the LEICA M 3. You therefore have the choice
of using your LEICA camera either with the
coupled exposure meter to ensure correct
exposures every time, or without the meter in
the usual way. Full details of the many
applications of the LEICAMETER "MC" are
given in the special instructions issued by the
manufacturers, Metrawott AG. of Nuremberg.
19
Not For Resale – Free Download at http://homepage.ntlworld.com/joechan/manuals
The exposure meter helps you
a great deal in avoiding
incorrect exposures, especially
with color film which needs very
accurate exposure. But the
instrument is equally valuable
for black-and-white films, for it
ensures perfect negatives of
uniform quality that are easy to
enlarge.
Next push the LEICAMETER "MC" into the
accessory shoe of the camera as far as it will go.
Turn the milled setting ring of the exposure meter
backwards again against the direction of the
arrow until it audibly engages in the shutter speed
dial of the camera. The camera is now coupled with
the exposure meter. To remove the LEICAMETER
"MC", uncouple the milled setting ring from the
shutter speed dial by setting it to "B", lifting up, and
turning in the direction of the arrow (see illustration
on the right) until the triangular index mark is
opposite one of the figures between 4 and 120.
20
Not For Resale – Free Download at http://homepage.ntlworld.com/joechan/manuals
The LEICAMETER MC must be set to the speed rating
of the film being used. It has two built-in measuring
ranges (indicated by black and red dots on the
instrument) and a third range, for extremely low
illumination, is obtained by means of an accessory
booster-cell (see special instructions). Direct exposure
readings may be obtained in two different ways: (1) Set
the desired shutter speed opposite the black triangle
on lop of the meter. Observe the aperture indicated by
the moving pointer-needle, and set the lens aperture
scale accordingly. (2) Set the desired lens aperture and
turn the milled meter adjustment wheel until this
aperture on the meter dial appears opposite the moving
pointer-needle;
the correct shutter speed is
automatically set. If there isn't enough light to obtain a
reading on the black aperture scale, set the rangeselector to the red dot and use the red scale of
apertures. Note that the first two openings on the red
scale (f/1.5 and f/2) overlap the last two on the black
scale (f/11 and f/16). The correct value is, determined by
the position of the range selector lever.
The diffuslng-screen for incident-light readings attaches to the front of the
meter and shows its presence by a protruding tab. See special instructions
in the LEICAMETER MC manual before attempting to use this measuring
technique.
For exposure times from 2 to 120 seconds turn the milled meter setting ring
to "B", then lift up to uncouple before turning further in the direction of the
arrow (at the right-hand side of the meter). The reading is made as
described above except that the shutter-release must be held down
(preferably with a locking cable-release) for the total time required. For
booster-cell readings first observe the shutter speed opposite the small
square symbol, then set this speed opposite the black triangle before
exposing. Remember that the black triangle on top of the LEICAMETER
MC always shows the speed at which the shutter is set. In the illustration
above you will notice that the shutter is set at 1/250 sec., while the square
1
symbol appears opposite /60 sec. Had this reading been made with the
booster-cell it would be necessary to transfer the 1/60 sec. to the black
triangle.
21
Not For Resale – Free Download at http://homepage.ntlworld.com/joechan/manuals
Loading the LEICA
Daylight cassettes and properly loaded and closed
"M" cassettes (type N) are light-tight. Nevertheless,
avoid loading or unloading the camera in direct
sunlight or strong artificial light. Outdoors, even the
shade of your body will provide adequate protection.
Also, do not leave exposed or unexposed cassettes
lying about, but keep them safely in their cans until
you are ready to use or develop them. Before
opening the camera, make sure that it does not
already contain a film by pulling up the rewind knob
and turning it in the direction of the arrow. If you feel
a resistance, first rewind the film fully, and unload
Not For Resale – Free Download at http://homepage.ntlworld.com/joechan/manuals
the camera as debscribed on page 27.
Turn the key in the base plate in the
direction marked "auf — open", and lift
off. The film cassette and the take-up
spool are now easily withdrawn. Open
the hinged camera back, and place the
camera in front of you on the table with
the open base upwards, and the lens
facing you.
Hold the take-up spool in the right hand,
and the cassette in the left, both with the
spool knobs pointing up. Now push the
beginning of the film under the clamping
spring of the take-up spool as far as it will
go. The perforated film edge must lie straight
against the spool flange, as shown in the
illustration below.
Next, draw out just enough of the film
leader from the cassette to enable you
to insert the two parts — the cassette
and the take-up spool — into the
camera. The milled spool knobs should
still point upwards and remain visible
while the film slides into the film slot in
front of the open camera back.
Not For Resale – Free Download at http://homepage.ntlworld.com/joechan/manuals
The film cassette and the take-up spool must be fully
pushed home to ensure that the film lies properly between
the guides.
Check that the position of the film corresponds to that
shown in the diagram. The matt emulsion side must face
the lens and the focal plane shutter; the take-up spool
winds up the film with the emulsion side out.
The teeth of the transport sprocket should engage the
perforations of the film (if necessary, slowly work the
transport lever until the teeth engage).
Close the camera back, replace the base plate, and lock it,
thus closing the camera light-tight.
The film counter automatically returns to its starting
position — two divisions before zero — when the take-up
spool is withdrawn. The length of film between
the cassette and take-up spool
is, of course, already fogged
and useless for taking pictures.
It must therefore be advanced inside the closed camera to bring
a fresh, unexposed portion of the film into position for shooting.
Advance the film by stroking the transport lever, and release the
shutter. Repeat these steps, and advance the film once more so
that the film counter indicates No. 1. You are now ready for the
first exposure.
The correct functioning of the film transport can be
recognized by the fact that the red dots on the center shaft
of the rewind knob rotate while the film is advanced.
24
To Set the FilmFilm-Type Indicator
on the camera back, press one finger lightly against the center, and
turn it to the type and speed of the film loaded in the camera. One of
the three pointers next to the appropriate symbol (black-and-white
chevron for black-and-white film, sun on red background for daylight
type color film, or lamp on red background for artificial light type color
film) should point to the required film speed in ASA or DIN. This then
shows at a glance what film is loaded in the camera.
Unloading the Film
When you have exposed the whole film, the transport lever can no
longer be moved; a sign that the film must be rewound into its
cassette. Set the reversing lever on the front of the camera to "R",
pull out the rewind knob (see illustration on page 24), and turn it in
the direction of the arrow until you feel a resistance. Wind past the
resistance, and give the rewind knob about one more turn. The film
will now have come off the take-up spool, but a short piece should
still protrude from the cassette. You can then open the camera (see
page 24), and remove the cassette with the exposed film. It is not
advisable to rewind the film end fully into the cassette, because the
protruding piece makes the cassette more light-tight. Make a note,
however, on this piece that the film is exposed.
You can also partially expose the film, say the first ten frames,
rewind it, and change to another film (e.g. color). When reloading the
first film proceed as with unexposed film, and then keep releasing
the shutter and advancing the film with a lens cap over the lens, until
the film counter indicates No. 12. It is necessary to keep a space of
one full frame in order to avoid overlapping.
25
Not For Resale – Free Download at http://homepage.ntlworld.com/joechan/manuals
Not For Resale – Free Download at http://homepage.ntlworld.com/joechan/manuals
LEICA Films
Double-perforated 35 mm film, as used in the LEICA, is supplied by film manufacturers all
over the world in several packagings and a wide range of black-and-white and color
emulsions. Daylight-loading cassettes consist of a light-tight shell containing a length of
film for 36, 20 or sometimes fewer 24x36 mm negatives or transparencies Daylight refills
(not available in USA) contain the same lengths of film wound onto a spool and protected
against light by a length of paper "leader". They are intended for loading into empty 35 mm
cassettes (or LEICA cassettes), after which they are handled exactly as daylight-loading
cassettes. Bulk-loadings of 35 mm film ore available in various lengths for darkroom
loading into light-tight daylight-loading cassettes or LEICA cassettes.
Color films are either reversal-films, for positive color transparencies, or color-negative
films intended primarily for paper prints. Color reversal films are supplied either for daylight
or various types of artificial light-sources such as flash-bulbs or flood lamps. It is important
to note the type of color film before loading (setting the film-type indicator at the back of the
LEICA accordingly) and to follow the manufacturers instructions relating to exposure and
filtration as color films hove narrow exposure latitude.
Black-and-white films of many types are available for the LEICA, but the most commonly
used b-&-w materials are negative films intended for producing positive enlargements.
These films may be divided into three brood classifications:
1 - Medium-speed films rated from
about 80 to 160 ASA are ideal allaround materials for generalpurpose b-&-w photography. They
yield brilliant images, fine grain,
good resolution and a great amount
of
exposure
latitude.
Their
negatives will yield excellent
enlargements.
2 - High-speed films rated at ASA
250 or higher are special-purpose
materials
for
"available-light"
photography
under
difficult
conditions which sacrifice fine grain
and resolving power to provided
increased film speed. Fine for such
things as night-scenes and dimly
lighted
interiors,
but
not
recommended for general use in
daylight.
3 — Slow films, sometimes called
"thin emulsion films" have ASA
speeds from about 20 to 64, yield
the ultimate in image sharpness
through a combination of high
resolving power, contour-sharpness
and extraordinarily fine grain. Ideal
for great enlargements, copying and
technical
applications,
and
whenever the ultimate reproduction
of fine detail is required.
26
The Flash Table
All electronic flash units and most types of flash bulbs are easily synchronized with the LEICA M 3.
The left-hand socket marked is intended for electronic-flash and type F flash bulbs. With electronicflash you can set any shutter speed between 1 second and the red arrow which stands for 1/50
second. The effective exposure time is governed by the flash-duration of the electronic-flash. (Usually
about 1/1000 sec.)
The right-hand socket is used for synchronizing class M flash bulbs. The use of focal plane type flash
bulbs is recommended because these permit utilization of all shutter speeds up to 1/1000 sec.
Furthermore, both electronic-flash units and flash bulbs can be connected to the M 3 at the same time,
since two circuits function independently from one another.
Protective plugs are available to cover the two flash sockets on the back of the camera. A helpful hint:
only leave the socket in use uncovered at any time. Connection to the wrong flash socket is a frequent
cause of failures in flash pictures.
Using flash
Details about flash bulbs, guide-numbers and suitable shutter speeds are given on the enclosed flash
table for the LEICA M 3.
Note; guide-numbers are only intended as approximate guides. They are based on the use of a fairly flat, matted
reflector and are valid only for subjects of average reflectivity with allowance for some light being reflected from
indoor walls and ceilings.
27
Not For Resale – Free Download at http://homepage.ntlworld.com/joechan/manuals
Not For Resale – Free Download at http://homepage.ntlworld.com/joechan/manuals
Hints
ints for Color Pictures
Practical H
With daylight type reversal color film use only electronic flash or blue coated flash bulbs.
With artificial light type reversal color film use yellow coated flash bulbs.
With negative color film either clear flash bulbs or electronic-flash can be used, as color
correction is possible at the printing stage. Only blue coated flash bulbs or electronic-flash
are, however, suitable as fill-in lighting for color pictures taken in daylight.
Blue coated flash bulbs have a lower guide-number than clear bulbs of the same type.
The wide range of color films available and the need for exact exposure makes it
impossible to give specific guide-numbers. We therefore suggest that you should first make
some trial exposures with the chosen flash and film combination.
Cassettes for the LEICA M 3
In these instructions we show the loading of the camera with a
commercially available daylight cassette. These cassettes are very
convenient, but many photographers prefer to buy their film in bulk
lengths and load it themselves in the special LEITZ cassette. Such
a cassette has the advantage that it is absolutely light-tight, easily
cleaned, and never scratches the film, as it automatically opens
inside the camera. The loading method is described in a special
instruction booklet.
(Design subject to alterations without notice.)
ERNST
LEITZ
GMBH
WETZLAR
GERMANY
Subsidiary: Ernst Leitz (Canada) Ltd., Midland, Ontario.
List 11-3e/Engl.
Printed in Germany
XI/61/FY/SD