1
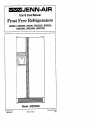
MJENN-AIR
Use & Care Manual
Frost
Free Refrigerators
MODELS JRSD209, JRS229, JRSD2250, JRSD229,
JRSD2460, JRSD2490, JRSD2790
Model
PrintedinU.S.A.
1996Jenn-Air
JRSD2490
partNo. 110303-1
Cat. No. SSU209UA
1/96
Your Jenn-Air
frost-free
refrigerator
was designed,
engineered,
and manufactured
highest standards of quality and performance,
Since this manual
obtain the best use of your Jenn-Air refrigerator,
it is essential
instructions
carefully.
Should you have any questions about using your Jenn-Air appliance,
to provide the model number of your appliance.
Maytag
Customer
Service,
PO Box 2370,
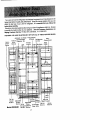
THE MODEL YOU HAVE SELECTED
Jenn-Air
Cleveland,
TN
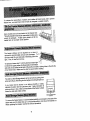
Adjustable
Shelves
JRSD2490
Assistance,
Temp Control
& Drawer
Refrigerator
Dairy
Compartment
Egg
Caddy
Humidity
Controls
Adjustable
Sulk
Glass
Storage Cantilever
Basket
Shelves
Sealed
Crispers
Removable
Base Grille
2
c/o
37320-2370
Light
Freezer
write to us. Be sure
Customer
MAY NOT HAVE ALL OF THESE FEATURES
Automatic Ice Maker
and Automatic
Freezer Dispenser Bin
Model
to the
explains how you can
that you follow
the
Shelves
Retainer
SHOWN
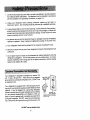
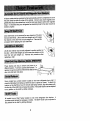
1. Use the three-pronged plug only with a grounding receptacle to provide protection
from electrical shock (see below). This appliance must be installed in accordance
with the installation and grounding instructions on pages 3-4.
2. Unplug your refrigerator before cleaning condenser, replacing a light bulb, or
making any repairs. Any servicing should be performed by a qualified technician.
3. Incaseof powerfailure, minimizedooropenings. If powerfailureisoflongduration,
protect frozen food by placing blocks of dry ice on top of the packages, or check with
a localfrozen foods locker plant about temporary storage. Frozen foods which have
thawed completely should not be refrozen.
4. Any electric service cord that becomes frayed or damaged should be immediately
repaired or replaced. Never unplug your appliance by pulling on the power cord.
5. Your refrigerator should not be operated in the presence of explosive fumes.
6. Removethe doors from any out-of-use refrigerator to prevent child entrapment and
suffocation.
7. Do not place fingers or hands on the automatic ice making mechanism while the
refrigerator is plugged in. This will help protect you from possible injury. It will also
prevent interference with moving parts of the ejector mechanism and the heating
element that releases the cubes.
volt, 15 amp., 60 cycle line. There should be a separate,
grounded circuit, serving this refrigerator only, DO NOT use
Your refrigerator is equipped with a three-pronged grounding plug for your protection against possible electrical shock
hazards. It must be plugged into a grounding receptacle.
Where a standard two prong wall receptacle is encountered,
an
cord.responsibility and obligation of the cusit isextension
the personal
tomer to have it replaced with a properly grounded threeprong wan receptacle. DO NOT, under any circumstances,
cut or remove the third (ground) prong from the power cord.
DO NOT use an adapter plug•
3
,,T__ _o_
_.c,,G ,L_*
_
•
_!_
• LOCATION OF _D_G_
ON F_ER C¢3_O
_,,,_Y,Eo_,,,,_,_,,_o_,
]MAN _K_WN HEK_.
If you are installingyour new refrigerator yourself, please follow these helpfulsuggestions.
1. Remove base skids.
IlllJll I
2. Remove all exterior and interior tape carefully and
retain old tape. Make a small pad of this tape to pick
off any remaining tape residues. This will eliminatethe
need to use dangerous solvents of any kind.
3, Remove and discard the cantilever shelf packing clips
located just above each shelf where they hook onto
the frame. TO remove the red plastic clip, wiggle it
sideways and pull straight out.
4. Select a locationfor your new refrigeratoraway from any heat sources. Allow a free
flow of air through the front base gdfle.
5. Your model should not be installed where the room temperature will go below
55oF. because it will not run frequently enough to maintain proper temperature in
the freezer.
To enhance its appearance, maintain efficient performance and for proper function of
the ice maker, your refdgerator should be level Using a carpenter's level, check your
refrigerator to make sure it is level front to back and side to side. The front wheels were
adjusted at the factory so the cabinet would be level. However, jarring in transit, or
standingthe refrigerator on an uneven floor may causethe doors to shift out of alignment.
If levelingis necessary, remove the base grille and adjust the wheel with a screwdriver
as shown.
TOlock the cabinet in place, turn down one or both
locking feet, located near the front wheels. Rear
leveler feet are not required.
LOWER
¢,o,,Er
CO..E_
7_JRNCOUNTERCLCCKW_
31_RAISECABINEtCORNER
[]
TO CORRECTTHIS
TION, RAISE
COND[-
RIGHT
[]
COR-
TO CORRECT
HER AND fOR LOWER LEFT
I CORNER
'ALIGN
UNTIL
ACROSS
LEFT CORNER
OOORS
TOP
TN(S CONO(T(ON,
AND/OR
CORNERUNTfLDQORSALIGNACROSS
OF
TOP OFCABINET.
CABINET.
4
RAISE
LOWER RIGHT
/
Your new refrigeratorhas two controls. One for
regulatingthe temperaturein the fresh food compartmentand onefor the freezer. Both controls are
located at the upperrear of the refrigerator compartment, just below the light shield.
[
J
.... _:_l%_q_%_ar_
_.
/
_
,_m
.,"-_%_
3;_%_'
:r_.r
Fig. A
FOR MODELS JRSD2250 & JRSD2460:
To start your refrigerator, set the refrigerator control on "F" and set the freezer controlon
"4" (See fig. A).
FOR MODELS JRS229, JRSD209, JRSD229,JRSD2490, JRSD2790:
To startyour refrigerator,set the refrigerator control
B)."6" and set the freezer contr°l °n "D" (See Fig" I _ _o._
°n
Let the refrigerator run at least two hours before
loading it with food.
_ _..,,oo, ]
iMPORTANT: In a day or so, you my decide that one or both compartments should be
colder or warmer. DO NOT change either contro} more than one letter or one number
at a time, AIIow24hoursfortemperaturetostabilizebeforeadjustingthesettingagain.
This does not apply when you first start your refrigerator.
To turn off your refrigerator, set the refrigerator control on OFF.
At times, the front surfaces of your refrigerator cabinet may be warm to the touch. This
is a normal function of your refrigerator, This feature prevents moisture from condensing
on the outside of your refrigerator during humid weather. This condition may be
noticeable when you first start your refrigerator, during hot weather, and during
excessive or lengthy door openings.
For efficient energy use:
1, Be sure the refrigerator is level and ventilation around the front grille is not blocked.
2, Check door seals occasionally for leakage. Check at various places: top, bottom,
and sides,
3, Check the temperature; avoid unnecessary cold settings.
4. Keep the freezer near full capacity; less cold air is lost during door openings.
5, Let hot dishes cool before putting into refrigerator or freezer.
6. Cover liquids; Jfuncovered, the unit must work longer.
7, Clean refrigerator condenser coils at least twice a year.
5
To maintain the naturalflavor, moisture, and nutrition of fresh foods, we recommend that
all dishes, trays, and containers of food be covered.
Adjustable cantilever shelves can be posi_L...___
,'_1
tioned to suit your special needs. To remove
a shelf, lift the rear straight up a fraction of an
inch and pull straight out. To lock into another
position, dtt the shelf with the front up. Insert
hooks into desired frame openings and let the shelf settle into place. Make sure it is
securely locked at the rear, Some models have slide out shelves that ere designed to
contain spills. Height adjustments are made the same way, being careful that the
movable shelf remains fully in the frame.
l
Slide-out shelves move on plastic rails and may be easily pulled forward for access to
foods placed toward the rear. To remove a slide-out shelf, pull it toward you until it stops,
then lift the front edge slightly and pull completely out.
The Temp Control Drawer provides short term storage of fresh meats without freezing.
The shelf with the Temp Control Drawer can be placed in one of three positions. When
adjusting this shelf, remove the drawer and look at the back wall of the drawer. It is
necessary for the air inlet tube at the back of the refrigerator to line up at the top, middle
or bottom of the air slots in the back of the drawer. Set the temperature control to the
coldest position when adjusting the Temp Control Drawer. Once adjustment has been
made, replace the drawer and set the control to the desired setting.
The control knob is located near the refrigerator control. As the knob is turned from the
"Cool" setting toward the "Cold" setting, the temperature will get colder. Select the "Cool"
setting for storage of luncheon meat and cheese. Select the "Cold" setting for storage
of fresh meats.
AI} meats or poultry should be stored in their original store wrappings or in p}astic bags
to reduce the evaporation of moisture from them. Keep your Temp Control Drawer
tightly closed at all times to obtain best results.
6
The Sealed Cdspersare idea}for stodngvegetablesandfruit. Keep yourcrisperstightly
closed to insure freshness. Storing leafy vegetables, suchas celery and lettuce in plastic
bags, reduces moisture evaporation,
The crispers slide out for easy access to foods stored within. They are comp(etely
removable for cleaning (hand wash only) or for use elsewhere in your kitchen.
The top cdsper cover alsoserves as a refdgerator storage shelf, To remove the crisper
cover for cleaning, lift the front edge and pull straight out.
The humidity control leveris located on the shelf above the crisperdrawers. The slide
control should generally be set at the "Low" setting for fruits and the "High" setting for
vegetables,
To use your wine rackfit it along
I_
shelf, engageits rearnotch tothe
shelf back corner. Lay the wine
bottle on the rack.
7
Alldoors containbuilt-inmechanismsthat automaticallypull them completelyshut once
they are closed to within 6 inches of the cabinet. All doors also have magnetic door
gaskets that cling to the cabinet front, once the doors are closed to within their magnetic
range, it is importantthat your refrigerator be reasonably level for the door closures to
function properly.
Door shelf fronts can be removed for easy cleaning of the door _.
liner and shelf fronts. Lift the shelf front straight up until it clears
the retainer on the door liner and pull straight out. Reverse this
procedure when replacing the door shelf front.
_._lii
Lift off door shelves may be easily adjusted to another position on \
__
the'door. Lift the shelf straight up until it clears the retainers on the _._i
door liner and pull straight out. Reverse this procedure when
\
replacing a shelf.
F_%_]I
II
_.=.. _11
_/_L
different location. To remove, pull the shelfforward. To
replace,line up the top of the shelf with the slides on the
door and slide back into place.
These shelves are easy to remove and move to a _il'_
1
Some models have a bottle retainer located on the lower refrigerator door shelf. It
prevents tall bottles from fatting out when the door is opened or closed. To attach the
retainer on the shelf front, have the smooth side facing forward, align the retainer with
the front tfpof the shelf front and snap into position. The bott(e retainer can be adjusted
to any position on the shelf by sliding sideways.
All models have a Shelf Tender located on one of the refrigerator door shelves. It
provides upright storage for packages or bottles. The Shelf Tender can be adjusted to
any position on the shelf by sliding sideways.
8
To maintain the natural flavor, moisture, and nutritionof frozen foods, and to prevent
freezer burn, we recommend that all foods be wrapped or sealed properly.
Some mode}s have a tilt out basket on the freezer door. /_._ll
Tilting the basket forward by its upper edge provides easy
access to packages. A slight push upward will tilt the
basket back to its proper stored position.
The freezer shelves can be adjusted up or down or __
removed to accommodate various sized packages. To
removea shelf, lift up on right side of shelfand push to the
right. Then, tilt shelf and remove.
To replace a freezer shelf: (1) tilt the shelfand insert right
rod ends into upper portion of oblong holes in the freezer
side wall; and (2) lower the left side of the shelfand insert in oblong holes in the left side
of the freezer walL. Make sure the shelf is secure before loading.
The slide-out Bulk Storage drawer can be removed by pulling it out
as far as it will go, then lifting the front edge and pulling straight out.
)f you notice that the drawer is not sliding smoothly or easily,
lubricate the slide rails with petroleum jelly. Apply lubrication to
points as shown. Also, make surethe bottom of the freezer is clean
where the slide rails make contact.
BOTTOM
To remove the freezer basket; (1) pull the basket par_ally out; (2) reach to the back of the
basket and pivot the metal clips up to a horizontal position;and (3) pull the basket out.
When replacing the basket, reverse the removal procedure.
one Pizza and one deep. Each slides out for more _:_:_i_
convenient accessto the frozen food. The Pizza basket is l_-_::_J_
designed with a lower right side for easy storage of frozen __,
pizzas. At, baskets can be removed for cleaning. ,n __(
addition, the shallow and Pizza baskets can be adjusted _-_1_._
up or down to accommodate various sized packages. _
\\
L_
_
To remove the baskets, pullthe baskettoward you until [tstops. Lift the front ofthe basket
and pull until it steps again, then lift it up and over the front tabs.
To replace the basket, reverse the above procedure. To adjust the shallow and Pizza
baskets, remove the basket asdirected previously and place one ofthe bottomtwo heavy
wires in the track and replace it.
The water inlet tubing assembly requiredto complete the water connection to the water
valve is locatedin the crisperdrawer in a bag. Connect the ice maker to the water supply
as instructed in the separate instructions,furnished with the refrigerator.
The automatic ice maker is designed to furnish a continual supply of ice cubes. The
amount of ice produced depends on the temperature in the freezer section of your
refrigerator. The colder the freezer section, the more ice is produced. We suggest you
start with your refrigerator and freezer controls at their mid settings. In most cases, this
is satisfactory. If the door to the refrigerator or freezer is opened frequently or
temperatures in the kitchen are abnormally high, a colder setting may be necessary.
After your model has been installed and the water supply connected to the ice maker,
it may take 8 to 12 hours before the ice maker furnishes any usable ice cubes. The first
one or two harvests will probably contain undersized and irregular cubes because of
air in the supply line. The initial harvestmay also contain impuritiesfrom the new water
supply piping. Therefore, el) cubes from the first two or three harvests should be
discarded.
Under certain rare circumstances, ice cubes may be discolored, usually appearing with
a green-bluish hue. The cause of this unusualdiscolorationisapparently a combination
of factors such as certain characteristics of local waters, household plumbing and the
accumulation of copper salts in an inactive water supply line which feeds the ice maker.
Continued consumptionof such discolored ice cubes may be injurious to health. If such
disco(oration is observed, discard the ice cubes and contact the dealer from whom the
ice maker or refrigerator was purchased.
(ca cubes that have been in the ice storage for a considerable length of time may pick
up off-flavor taste,stick together, and gradually become smaller. We suggest that these
cubes be thrown away. We also suggest using an open box of baking soda in the
refrigerator for food odor absorption.
10
Certain soundsmay accompany thevarious cycles of the ice maker. Examples are: (1)
the motor may have a slighthum, (2) the cubes will rattle as they fall into an empty storage
bin, and (3) the water valve may click or "buzz" occasionally. All of these sounds are
normal and should be ignored.
Note: When dispensingice cubes, it is importantthat you use only the ice supplied by
this ice maker, fcefrom any other source could cause an ice jam. if this happens, remove
and discard all ice from the storage bin and any ice lodged in the ice chute.
AUTOMATIC
ICE MAKER
Your automatic ice maker is located near the top of
the freezer compartment behind the Ice Access
Panel. To gain access to the ice making mechanism, lift the Ice Access Panel.
//
SENSOR
ARM
_-,,..-- / _.'_ o_F
/
The ice maker has a wire sensor arm that is connected to a shut-off switch, This arm stops the
mechanism when the ice cube storage bin is ruff,
and restarts it after several ice cubes have been used. You can use the stop arm to stop
allproduction of ice at anytime, All you needto do is raise the arm into the OFF position.
The ice maker should be turned off (arm up) when:
1. Ice storage bin is to be removed for extended period of time.
2. Refrigeratoris not to be used for a considerable time, such as vacations. Also, turn
off the water supply to the ice maker in this instance, if practical.
3, Water supply is to be shut-off for several hours.
FILL
freezer compartment has cooledto freezing temWater
fillsCold
the empty
cube mold(Fig,
1) the
whenthe
perature.
air is forced
directly over
mold, TU,_e
When frozen, the cubes are rotated up and out of
the
(Fig.
2). The
into mold
the ice
storage
binsweeper
below. arm ejects them
The sensor arm (Fig. 3) senseswhen the bin is full
and signals the ice maker to stop ejecting more
However, the mold has been refilled and cubes
frozen sothe newsupply is readywhenneeded.
As soon as ice is removed from the bin, the
sensor arm signals that more is needed. The
ice maker resumesoperationby ejectingreadyand-waiting frozen cubes.
cubes.
11
.
._.
]F[_.2:i "
""
t-----r
FJ8.
tCE
I-.,_----_
Lift the front of the Automatic Dispenser bin and puff it straight out. Wash the bin
occasionally in mild soap and lukewarm water. To replace the bin, push it all the way
back until the bottom of the bin is behind the raised edge at the front of the shelf it rests
upon. Make sure the tabs, at the back of the bin,that turn the spiral auger are positioned
between the prongs from the auger motor.
Water/Ice Control
For dispensing ice cubes, the slide control must be
moved to the "Cube" position(center). For dispensing
crushed ice, movethe controlto the "Crushed"position
(left)
_E_.
_"
moved completely to the "Water" position (right)•
Water from the dispenser is chJl,ed. For celder water
s,mpi
add
ice
be*ore
diopeoslng
the
water.
Aiso,
the
t I
IllI
first glass of waterdispensed each time may be warmer
than consecutive glasses. It will be cooler if a full glass
of water is dispensed rather than a partial g(ass. Fill a
container with ice before adding liquidto prevent splashing.
Dispensing
To fill a glass,positionthe glass againstthe top portion
ofthe aotuatorpadandpress.Hold theglass high in the
dispenser opening to reduce the ice falling outside
the glass.
_=_'_
_,
_"°*_
..........
Some crushed ice may be dispensed even though you
selected CU BE. This happens occasionally when a few
cubes accidentally get channeled in the crusher.
Whenchanging
some crushed
ice ma_
sized cubes or ice chips are in the storage bin.
There may be a delay when you switch from cubes to crushed ice. It takes a few seconds
for the cubes to be channeled in the crusher. Crushed ice pieces will vary in size and
shape.
12
Ice should not be dispensed directly into thin glasses,fine china or delicate crystal -- they
can crack or chip from the combined pressure of your hand pressing them against the
actuator pad and Ice dropping into the container.
Ice other than that produced by your ice maker should not be added to the ice storage
bin - it may not crush and/or dispense properly.
For large quantities of cubed ice, remove the ice directly from the storage bin. Do not
operate the ice dispenser continuously for more than five minutes.
If the ice dispenser is not used frequently, ice cubes may clump together and may need
to be broken apart or discarded.
Release the pressure on the pad and hold the container in position momentarily to catch
the last pieces of ice or drops of water. The ice delivery door will remain open for a short
time. When it closes you may hear a closing sound.
Do not discard water into the grille at the bottom of the fountain. This is a spill area, not
a drain. Normal spills will be evaporated in the recessed area below the spill shelf grille.
Excessive spills should be removed with an absorbent sponge or cloth. The spill area
should be cleaned occasionally.
The push button light switch is located behind the panel at the top and on the right side
of your fountain. For replacement, use a 120v, 7 watt bulb.
A child proof lock is located behind the panel at the top and on the left side of the
dispenser. This toggle switch will turn your ice and water dispensers on or off.
13
It is recommended that you disconnect the power cord before cleaning.
Your refrigerator can be roiled out for cleaning. Turn the levelers, at each front comer
of the cabinet, counterclockwise until they turn free}y. Then pull the cabinet straight
out. Note: ]f you have an Automatic Ice Maker instal}ed,we recommend that you turn
off the water supply before moving the cabinet.
After cleaning behind your refrigerator, push it back and turn the levelersclockwise until
they touch the floor and lock the cabinet in place.
Use mild soap and water, DO NOT use scouring powders, automobilewax, or furniture
polish. Rinse withclear water.
Door gaskets may be cleaned with soap and water, a baking soda solution, or mild
scouring powder.
Clean both compartments and innerdoor panels with mild soap and water. Do not use
an abrasive powder, solvent, polish cleaner or undiluted detergent.
When cleaning a glass cantilever shelf, you can remove it and submerge the entire
assembly in warm water. Never use hot water. Always allow glass to warm up to room
temperature before immersing in warm water.
14
Defrostwater drains intoa shallowpan beneath the
,_.,'_'_1_ _
humidity, water could remain in the pan. This pan
should be cleaned once a month with a strong
solution of soap and water. It is located behind the
base grille, To remove the base grille, grasp itat
cabinet
and
evaporates.
both ends
and
pull straightDuring
out. periods of high
_{_l-
Liftthe front ofthe defrost panand pull it straight out.
TOshown.replace
the defrost pan, reverse procedure as
,L,o.
_..
"l__•
_l.
_
__;:_'_ _"
To replacethe base grille, line up the springclips
on the base grille withthe squareopeningsin the
cabinet and gentlytap each end in untilthe grille
locks in place.
To allow your refrigeratorto run more efficiently, the base grilleand the area around
the condenser should be cleaned at least
twice a year. The area aroundthe condenser can be cleaned whenever the refrigerator
is moved during routine house-cleaning.
Unplug the refrigerator and move it away
from the wall. Vacuum the condenser and
base grille area and the area where the
cabinet normally sits. Plug in the refrigerator after cleaning,
TO clean the base grille, grasp both ends
and pullstraightout. After cleaning, replace
the base grille.
15
(
=l
.,_F.os_.
P_-."
o_.._,o
¢
_
_GEG,,LLE
It isrecommendedthat you disconnect the powercord before replacing light bulbs.
To replace the upper refrigerator light bulb: (1) graspthe lightshieldneartheendsand
pulloutuntilthe shieldpullsfree of the retainerlugs;(2) unscrewbulband replacewith
a 40 watt appliancebulb(60 watt appliancebulbfor ModelJRSD2250 and JRSD2460);
and (3) hookthe lightshieldoverthe upperretainerlugsand press in at the bottomuntil
the shield snaps in place.
To replace the lower refrigerator light bulb on some models: (1) removetheTemp
Control Drawer;(2) usingtwo hands, spread the topad bottom of the light shield vertically
away from each other and pull to the front to remove; (3) unscrew the bulb and replace
it with a 40 watt showcase bulb; (4) using two hands, spread the top and bottom of the
light shield and pushit intoplace engaging tabs in slots; and (5) replacethe Temp Control
Drawer.
To replace the freezer light bulb: (1) remove the ice cube dispenser bin and the top
freezer shelf; (2) unhook the tabs on the top of the light shield by pressing in with your
thumb on the center top of the light shield; (3) pivot the shield down; (4) unscrew the bulb
when it is cool and replace it with a standard 40 watt appliance bulb; (5) pivot the shield
up into place, snapping the tabs into the slots: (6) replace the freezer shelf and the ice
cube dispenser bin.
if you will be gone for a month or less, leave the control knob at its usual setting.
During longer absences, (a) remove all food, (b) disconnect from electrical outlet, (c)
clean the refrigerator thoroughly, including defrost pan, (d) leave doors open to prevent
odor formation, and e) turn off water supply to ice maker, if practical.
16
Problems? Save yourself the nuisance of unnecessaryservice calls; check these first:
Refrigerator runs too frequently.
• Frequentrunningprovides more stable temperatures.
• Too manydoor openings.
• Prolongeddoor openings.
Refrigerator runs too long.
• Under normalconditions,due to larger size and colder temperatures,modern
refrigeratorsrun a greaterpercentageof the time.
• Prolongedor frequentdoor openings.
• Condenser needs cleaning.
• Poorair circulationaroundcondenser,
Refrigerator won't run.
• Temperaturecontrolturnedto OFF.
• Power cord not pluggedin.
• No power at electricaloutlet.
• House fuse blown or circuit breaker tripped.
Cabinet vibrates.
• Cabinet not level.
• Weak floor.
Warm air from cabinet bottom.
• Normal air flow for condenser circulation.
Front cabinet surface, warm to touch.
• Special design to prevent condensationduringperiodsof high humidity.
Moisture on outside surface.
a Hot,humidweather increasescondensation.When humiditydrops,condensation
disappears.
Red glow visible in freezer.
• Reflectionof defrost mechanismduringnormaldefrost cycle.
Sizzling sound in freezer.
• Normal sound caused by defrost water dripping on defrost mechanism.
17
Water on floor under cabinet.
• Defrost pan missingor not positionedcorrectly.
• Water connectionlooseon water valve.
Noisy operation.
• Fan noise perfectlynormalin frost-freerefrigerators.You may not be usedto this
if previousmodel was manual defrost.
• Cabinet not level.
• Weak floor.
• Defrost pan not positioned correctly.
Odor in cabinet.
• Defrost pan needs cleaning.
• Food left uncovered.
• interior needs cleaning.
Foods dry out (Fresh or Frozen).
a Packages not wrapped or sealed properly.
• Crispernot tightlyclosed.
Fresh food compartment too cold.
• Refrigerator control set too cold.
Fresh food compartment too warm.
• Refrigeratorcontrol set too warm.
• Freezer controlset at coldestposition.
• Prolonged door openings.
Freezer compartment too warm.
• Freezer controlset too warm.
• Prolonged door openings.
Ice cubes evaporate.
• CoLdair movingover ice cubes causes shrinkage.
Automatic ice maker not operating. (Select Models)
• Stop arm in OFF position.
• Water supplyturned off.
• Water pressuretoo low.
• Freezer too warm.
Ice
•
•
•
•
•
Dispenser not operating, (Select Models)
Ice jam in the dispenser. (Clear with pJasticor wooden utensil.)
Ice maker not operating.
The padlockswitch activated. (Toggleswitch to check.)
The ice is clumpedin the bin. (Break up or discard.)
An icejam in the crusher.(Remove ice from storagebin and turn auger by hand.)
18
Water Dispenser not operating. (Select models)
• Water supply turned off.
• Water pressure too low.
Cabinet light not working,
• Bulb burned out.
• No power at outlet.
If You Need Service
• Call the dealer from whom your appliancewas purchasedor the authorized
Jenn.AirServiceContractorlistedin theYellowPages. Your Jenn-AirContractor
can providebetterandfasterserviceifyou canaccuratelydescribeproblemsand
givemodeland serialnumberofthe appliance. Be suretoretain proofofpurchase
to verifywarrantystatus, Refer toWARRANTY forfurtherinformationof owner's
responsibilitiesfor warranty service.
• If the dealer or servicecompany cannot resolvethe problem,write to Jenn- Air
CustomerAssistance,c/o MaytagCustomerService,PO Box 2370, Cleveland,
TN 37320-2370, 1-800-688-1100 (U.S. and Ontario) or 1-423-559-3646.
• Use and care manuals,service manuals,and partscatalogsare availablefrom
Jenn-Air CustomerAssistance,c/o Maytag CustomerService.
Aft specifications subject to change by manufacturer without notice,
19