1
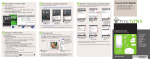
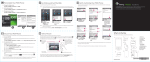
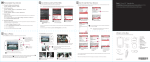
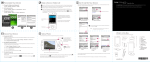
Personalize Your PDA Phone
Go Online and Surf the Web
Go online by turning on Wi-Fi® on your device.
A. Change the Today screen
Tap Start > Settings > Personal tab > Today.
Note
B. Set the date and time
Read Me First
Get E-mail Using Your PDA Phone
Get your e-mail on your device. Set up your device so you can send and receive e-mails using
your favorite e-mail service.
If there is no Wi-Fi hotspot in your area, you can still connect to the Internet by using the GPRS/3G or dial-up
service of your wireless service provider. Refer to the User Manual to learn how to connect using GPRS/3G or dial
up.
This Read Me First will help you get started with using
your Windows Mobile® 6 Professional powered device We
recommend that you have this guide handy when you
start using your device.
For a more complete reference, consult the User Manual
that came with the device.
Tap Start > Settings > System tab > Clock & Alarm > Time tab.
C. Manage power settings
Select this
option
Tap Start > Settings > System tab > Power > Advanced tab.
1
1
A
B
Note
C
Tap Start >
Programs > Comm
Manager and tap
the WLAN button.
2
3
Select the wireless
network you want to
connect to and
tap OK.
Select The Internet
and tap Connect.
Tap Start >
Messaging > New
E-mail Account.
2
Type in your E-mail
address and tap
Next.
3
TyTN II
Tap Next.
If unsuccessful, you
need to manually
enter the settings
in the succeeding
screens.
If you are connecting to a secured wireless network, you may need to enter a Key for that network connection
before you can connect to it.
Use Internet Explorer® Mobile (tap Start > Internet Explorer) to surf the Web.
What’s in the Box
Take a Picture
Secure Your PDA Phone
These are the items that you should find inside the box.
Protect your device from unauthorized access by enabling the SIM PIN and/or Device lock.
Take out your device and capture those precious moments.
A. To enable SIM PIN
The photo is automatically saved in your device after you shoot unless you choose to delete
it in the Review screen. Press
to send the photo via MMS or e-mail. Refer to the User
Manual to learn more about the Camera.
Enabling the SIM PIN requires you to enter a password first before you can use the
phone features of the device.
1
Auto-focus
indicator
You can enable the SIM PIN by tapping Start > Settings > Personal tab > Phone and
selecting Require PIN when phone is used.
1
B. To enable device lock
Enabling the device lock requires you to enter a password to unlock the device after it
has been left idle for a set period of time.
Press the CAMERA button
all the way. The screen
orientation automatically
switches to landscape
mode when you use the
camera.
4
Type in Your Name
and Account display
name. Tap Next.
5
Type in the User name
and Password for the
e-mail account. Tap
Next.
6
3
Select the frequency
to send and receive
e-mail. Tap Finish.
1. PDA phone
6
2. USB Sync Cable
3. AC Adapter
7
4
You can synchronize your device with your company’s Microsoft Exchange server so you get
your company e-mails on your device.
User
Manu
al
4. Stereo Headset
5. Pouch
Read Me First
6. Battery
7. User Manual,
Read Me First
8
Refer to the user manual to learn how to get your company e-mails on your device.
8. Getting Started Disc
1. Tap Start > Settings > Personal tab > Lock.
2. Select the Prompt if device unused for check box and enter the time you want.
3. Select the Password type.
4. Enter and confirm the password, then tap OK.
2
C. To enable key lock
Enabling key lock helps prevent accidental key presses when the device is in your pocket
or bag.
Lock the keys by tapping the Launcher tab (
To unlock, tap Unlock.
) on HTC Home and then tapping
.
Tap to change
camera settings.
2
3
5
Press ENTER to take the shot.
The camera comes with an auto-focus function to let you capture sharp and crisp photos and
videos of your subjects. Depending on the option you have chosen in Shoot Option, you will
need to either press the CAMERA button half-way or all the way to take a photo.
www.htc.com
90H00xxx-xxM Rev.A
Before You Turn On ...
B. Install a microSD™ card (not included in box)
A. Install the SIM Card
1
Slide out the keyboard.
SIM card door
Before opening the SIM card
door, make sure you turn off
the device first. Opening the
SIM card door while the device
is turned on may damage the
device.
LOCK
1
2
Open the rubber cover
D. Charge the battery
The battery is not fully charged out of the box. Charge
the battery by plugging the AC adapter plug to an
electrical outlet and plugging the USB end to the sync
connector port at the bottom of the device. The battery
is fully charged after about 3 hours of charging.
Enter Information
Synchronize Your PDA Phone and PC
The device comes with various onscreen input methods and a slide-out QWERTY keyboard.
Use the preferred input method to enter information and type messages on the device.
Synchronize your PC with your device to keep information such as contacts, tasks, and
appointments up-to-date on your device.
Set up synchronization software on your PC
Depending on the Operating System (OS) of your PC, you will need either Microsoft
ActiveSync® 4.5 (or later) or Windows Mobile® Device Center to synchronize your device with
your PC.
Insert the microSD card
with the gold contacts
facing down and then
close the cover.
Set up ActiveSync on Windows XP
To remove the microSD card, press it to pop it out
of the slot.
1
Install ActiveSync 4.5 on your PC from
the Getting Started Disc.
Set up Windows Mobile Device
Center on Windows Vista®
C. Install the battery
b
2
4
3
Slide the SIM card
door lock to the left
and flip the door
open.
Insert the SIM card.
Second
Camera
E. Turn on/off the device
Press and hold the POWER
button for about 3 to 5 seconds
to turn on or off the device.
When turning off, a message
will appear on the screen. Tap
Yes to turn off the device.
LOCK
Close and lock the
SIM card door.
1
Slide the back cover
upward to remove it.
2
Install the battery and
replace the cover.
HTC Home
The PDA Phone
Earpiece
a
HTC Home™ is a Today screen plug-in that gives you up-to-date
local information at a glance, such as time, day and weather
information, and shows new messages and missed calls.
Power
HTC Home also has 3 other tabs that let you quickly access your
frequently-called contacts, often-used or accessed programs or
device settings, and sound settings.
Send a Text Message
When using the onscreen input method, tap the arrow beside the input method icon to open
a menu where you can select the input method to use.
Make a Voice or Video Call
Send out short text messages to another mobile phone.
To make a voice call
1
Press . On the phone screen, tap the phone number you want to call and press
your device.
Tap Start > Messaging > SMS \ MMS.
1
2
Connect your device to your PC.
The Synchronization Setup Wizard
automatically starts and guides you to
create a synchronization partnership.
Click Next to proceed.
3
To synchronize your device with your
PC, clear the Synchronize directly with
a server running Microsoft Exchange
check box and click Next.
on
Connect your device to your PC.
Windows Mobile Device Center will
open. On the screen, click Set up your
device.
To make a video call
Press . On the phone screen, tap the phone number you want to call and tap
the phone screen. Refer to the User Manual for more details.
Hardware
keyboard
on
2
Select the information you want to
synchronize and click Next.
Touch Screen
Soft Keys
For hands-free operation, connect
your device with the wired headset
or Bluetooth® headset (not included)
to your device.
End
Talk
2
OK
Start
menu
Internet
Explorer
Messaging
Navigation
Control /
ENTER
Tap Menu > New >
SMS.
3
Enter the mobile
phone number* in To
and then write your
message. Tap Send.
* You can also tap To to choose a contact from your SIM card
or Contacts list.
To learn how to connect a Bluetooth
headset to your device, refer to the
User Manual.
4
Select the information types that you
want to synchronize, then click Next.
5
Click Finish.
3
Type in a name for your PDA phone
and click Set Up.