1
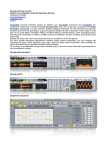
Using SnapVUE™
Set Up Data Connection
SnapVUE™ is an instant-on mode that gives you up-to-date weather information, SMS
messaging, and a Direct Push function that enables you to receive instant work e-mails
(Outlook E-mail) from your company’s Exchange Server mailbox.
Set Up E-mail Accounts in SnapVUE™
In SnapVUE, a 3G or GPRS/EDGE data connection is needed so you can access the Internet and
download the latest weather information, synchronize information with the Exchange Server,
and send and receive e-mails. The Connection Setup wizard automatically sets up the data
connection for you based on the USIM/SIM card that you inserted on your Mobile Computer.
To change to SnapVUE mode, tap the SnapVUE button that is located on the lower left side
of the touch panel. You can switch to SnapVUE mode anytime, whether Windows Vista® is
running or off.
Note
Get e-mail messages anytime in SnapVUE mode. Set up your e-mail account(s) so you can send
and receive e-mail messages using your favorite e-mail service.
Read Me First
This Read Me First will help you get started with using your Mobile Computer. We recommend
that you have this guide handy when you start using your Mobile Computer.
For a more complete reference, consult the User Manual that came with the device.
In order to use a 3G or GPRS/EDGE data connection to connect to the Internet, you need to have a 3G or
2G USIM/SIM card and a data plan from your wireless service provider.
Select this
check box.
1
Tap Add Account on the Home screen.
2
Enter your E-mail address and tap Next.
3
Auto Setup downloads e-mail server
settings automatically to your device.
Tap Next.
4
Enter Your Name and Account display
name. Tap Next.
When you see the notification message from the Connection Setup wizard, tap Yes.
Note
Send Text Messages
1
If your USIM/SIM card supports multiple network operator profiles, a message will appear with
network profile choices. Select the profile you want to use and tap OK.
2
Connection Setup then starts to configure the data connection settings.
3
After the Connection Setup completes the configuration, tap Restart.
The Comm Manager
Note
Comm Manager acts like a central switch that allows you to easily connect and disconnect from
the Internet and to turn on and off Direct Push. To open the Comm Manager, tap the Settings
icon on the Home screen and then tap Comm Manager.
In SnapVUE mode, you can send short text messages (SMS) to other mobile phones or devices.
What’s in the Box
These are the items that you should find inside the box.
If Auto Setup is unsuccessful, you need
to manually enter the settings in the
succeeding screens.
1
5
1. Mobile Computer
2. Battery
3. AC Adapter with
Power Cable
1 Tap to turn on Flight Mode. This disconnects
1
2
3
4
the mobile computer from the network of
your wireless service provider in both the
SnapVUE mode and Windows Vista®.
(To reconnect to your service provider’s
network, tap the Modem button.)
2
Note
3
4. Stereo Headset
Turning on Flight Mode also turns off
Bluetooth and Wi-Fi in Windows Vista®.
2 Tap to connect or disconnect from the
1
2
Tap the SMS icon on the Home screen and
then tap Menu > New.
• To quickly add common messages,
tap Menu > My Text and tap a desired
message.
In the To field, enter the mobile phone number
of the recipient.
Tip
To add more recipients, enter their mobile
phone numbers, separating them with
a semicolon. You can also tap To to add
mobile phone numbers from Contacts.
Enter your message.
• To check the spelling, tap Menu >
Spell Check.
4
Tap Send.
3 Tap to toggle Direct Push on (to instantly
receive Outlook e-mails as they arrive) or off
(to manually retrieve e-mails).
4 Tap to open ActiveSync where you can
manually start or stop synchronization,
change Exchange Server settings, set a
regular sync schedule (if you’re not using
Direct Push), and more.
5
Enter your User name and Password for
the e-mail account. Tap Next.
6
Choose how frequent you want your
device to automatically send and receive
e-mail. Tap Finish.
4
You can also synchronize Outlook E-mail in SnapVUE with your company’s Exchange Server so you
can access your company e-mails.
8
Refer to the User Manual to learn how to get company e-mails in SnapVUE.
www.htc.com
User
Manu
Read Me First
7
network of your wireless service provider.
3
6
al
5. Screen Protection Sheet
6. Read Me First
and User Manual
7. Carrying Case and
Accessory Pouch
8. Extension Kit
C. Install the battery
Before Using Your Mobile Computer
D. Charge the battery
A. Remove the battery cover
1
With the bottom side facing up, turn the
Mobile Computer so that the battery
compartment faces away from you.
2
Press down firmly on the battery cover
and then slide it out.
1
Turn the Mobile Computer so that the
battery compartment faces toward you.
2
With the label facing up, insert the
bottom end of the battery pack first and
then press down the battery.
Adjusting the Touch Panel
New batteries are shipped partially charged. Use
the AC adapter to charge the battery pack fully
before using your Mobile Computer for the first
time. When charging, the battery LED (
) lights
amber. The battery LED lights green when the
battery is fully charged.
A. When sliding out and tilting
E. Attach the screen protection sheet
Use the supplied screen protection sheet to protect the touch screen from scratches, moisture,
or smudges.
3
There are battery latches on the left and right sides of the battery compartment. Slide the latches
inward to lock the battery in place.
1
Peel off a small part of the screen protection
sheet from its left and right corners.
2
Peel off the back sheet and then fix the
whole protection sheet to cover the
touch screen.
3
Attach the screen protection sheet starting
from the top of the touch screen.
B. Insert a USIM/SIM card
The USIM/SIM card slot is inside the battery
compartment.
Note
SIM card
Note
Battery
contacts
Grip
Slide the battery latches outward to
release the battery. Remove the battery by
lifting it up from the protruding grip that is
located beside the battery contacts.
2
Tilt up the touch panel. To do so, press your
left and right thumbs down on the base of the
touch panel and then use your left and right
index fingers to push up the panel.
The Control Center
The Control Center provides a central location for you to quickly turn on and off the Bluetooth,
Wi-Fi and 3G mobile connections, adjust volume and brightness, shut down Windows, and more.
A. Front side
Web
Camera
Hold the Mobile Computer with both hands.
From the base of the touch panel, use your left
and right thumbs to push and slide the touch
panel outward.
Your Mobile Computer comes with PC-cillin
Internet Security which is Trend Micro’s antivirus software. Make sure to run the installer
to install this anti-virus software. See the
user manual for installation instructions.
On the right side of your Mobile Computer, slide
the Power/Hold switch to the right for 1 to 2
seconds to turn on the power.
E. Status indicators
B. Left side
To open and use the Control Center, press the Control Center button on the upper right side of
the touch panel.
microPad
Left/Right Mouse
Buttons
LCD Touch Screen
Light Sensor
1
Headset/MIC
Stylus
Use 3G or GPRS/EDGE
Power/Hold
Switch
Open the Control Center and tap the
Wireless LAN button to turn Wi-Fi on.
2
Wait for the Mobile Computer to connect to
your provider’s network.
2
When Wi-Fi is on, tap Close to exit from the
Control Center.
When connected, you will see one of the
following status icons on the upper-right
corner of the Control Center:
3
Tap Start > Control Panel > Network and
Internet > Network and Sharing Center.
4
Tap Manage wireless networks..
5
Tap Add and then tap Add a network that is
in range of this computer.
6
Select a wireless network and then tap
Connect.
7
If you are connecting to a secured network,
enter the network security key or passphrase
and then tap Connect.
8
Tap Close.
9
Open Internet Explorer® and start browsing
the web.
H : HSDPA
Power
SDIO Card Slot
VGA Port
Keyboard
Battery
DC-In
CAPS Lock
Hard Disk
Activity
Use Wi-Fi
1
3G : UMTS
D. Back side
Microphone
From the upper left and right edges
of the touch panel, push and slide the
touch panel towards you until the panel
is aligned with the base of the keyboard.
Open the Control Center and tap the Modem
button.
USB 2.0 Port
Left/Right Speakers
SnapVUE
2
1
Resolution
Fingerprint
Sensor
Fold down the touch panel by pressing down
on the left and right sides of the panel.
Connect to the Internet
C. Right side
Control Center
1
F. Turn on the power
Insert your USIM/SIM card into the SIM card
slot, with the gold contacts facing down and
the cut-off corner directed toward the slot.
The Mobile Computer
B. When folding down into a tablet
Bluetooth/
Wi-Fi
E: EDGE
G : GPRS
Data
Connection
3
When you see one of the above status icons,
tap Close to exit from the Control Center.
E-mail/SMS
4
Open Internet Explorer® and start browsing
the web.