1
HP Server tc2110
Network Operating System
Installation Guide
For:
Microsoft Windows NT 4.0 Server
Microsoft Windows 2000 Server and Microsoft Small Business Server 2000
Novell NetWare 5.1 and Novell Small Business Suite 5.1
Novell NetWare 6.0 and Novell Small Business Suite 6.0
Red Hat Linux 7.1TurboLinux Server 6.5
HP Part Number P5498-90018
Printed February 2002
Notice
The information contained in this document is subject to change without notice.
Hewlett-Packard makes no warranty of any kind with regard to this material,
including, but not limited to, the implied warranties of merchantability and fitness
for a particular purpose. Hewlett-Packard shall not be liable for errors contained
herein or for incidental or consequential damages in connection with the
furnishing, performance, or use of this material. Hewlett-Packard assumes no
responsibility for the use or reliability of its software on equipment that is not
furnished by Hewlett-Packard.
This document contains proprietary information that is protected by copyright. All
rights are reserved. No part of this document may be photocopied, reproduced, or
translated to another language without the prior written consent of HewlettPackard Company.
Intel is a registered trademark of Intel Corporation. Microsoft and MS-DOS are
U.S. registered trademarks of Microsoft Corporation. Windows and Windows NT
are trademarks of Microsoft Corporation. Linux is a registered trademark of Linus
Torvalds. Novell and NetWare are registered trademarks of Novell, Incorporated.
Red Hat is a registered trademark of Red Hat Software, Incorporated. Adaptec is a
trademark of Adaptec, Incorporated. NVidia is a registered trademark of NVIDIA
Corporation in the United States and/or other countries. Turbolinux is a trademark
of Turbolinux, Inc. All other trademarks are the properties of their respective
holders.
Hewlett-Packard Company
Network Server Division
Technical Communications/MS 45SLE
10955 Tantau Avenue
Cupertino, California 95014 USA
© Copyright 2002, Hewlett-Packard Company.
ii
Contents
1 HP Server tc2110 Installation Highlights for Experts ...................................1
Section 1. Introduction........................................................................................1
Section 2. Installation Highlights ........................................................................1
2 Preparing your HP Server tc2110 for your NOS installation .......................3
Section 1. Hardware Setup ................................................................................3
Preparing your Hard Disk Drives ...................................................................3
Section 2. Updating your Server BIOS...............................................................3
Section 3. Run HP Diagtools..............................................................................4
Section 4. Using the Startup CD ........................................................................4
3 Installing Microsoft Windows NT 4.0 Server .................................................5
Prepare the Installation ......................................................................................5
High Level Process Flow....................................................................................5
Section 1. Create the Drivers Diskettes .............................................................5
Section 2. Create Microsoft Windows NT Installation Diskettes ........................6
Section 3. Perform Windows NT Installation......................................................6
PHASE 1 – Drivers Installation ......................................................................7
PHASE 2 – Hard Drive Preparation ...............................................................7
PHASE 3 - System Configuration Details ......................................................8
PHASE 4 – Configure the Network ................................................................9
PHASE 5 – Completing the Installation .......................................................10
PHASE 6 – Install the Service Pack ............................................................11
PHASE 7 – Install HP Video Driver..............................................................12
Section 4. Initialize Hard disk Drive..................................................................12
Section 5. Perform Hardware Status Check ....................................................13
Section 6. Attach Clients to Network and Test Network Link...........................13
Section 7. Installing Additional Adapters Drivers .............................................14
Ethernet Adapter ..........................................................................................14
HP NetRAID-1M Adapter .............................................................................14
Troubleshooting................................................................................................14
Tip #1. Troubleshooting SCSI Host Bus Adapter Configuration..................15
Tip #2. NT Warning About Drives with More than 1024 Cylinders ..............15
Tip #3. Service Pack Files Replaced Without Feedback .............................16
Tip #4. Using the NT Event Log to Diagnose Network Adapter Problems ..16
iii
Contents
Tip #5. Booting from Another SCSI HDD.....................................................17
Tip #6. Restarting Windows NT installation .................................................17
On-Line Information and Software Sources.....................................................17
4 Installing Microsoft Windows 2000 Server and Small Business Server
2000 .....................................................................................................................19
Prepare the Installation ....................................................................................19
High level process flow ....................................................................................19
Section 1. Create the Drivers Diskettes ...........................................................19
Section 2. Perform Windows 20000 Installation ..............................................20
Section 3. Completing the Installation..............................................................22
PHASE 1 – Install the Service Pack ............................................................22
PHASE 2 – Install the Chipset Driver ..........................................................23
PHASE 3 – Install the HP Video Driver .......................................................23
PHASE 4 – Install the HP LAN driver ..........................................................24
PHASE 5 – Install Windows 2000 Recovery Console .................................24
Section 4. Configure the system ......................................................................24
PHASE 1 – Perform Hardware Status Check..............................................24
PHASE 2 - Initialize Hard Disk Drive ...........................................................25
PHASE 3- Adding Terminal Server Services...............................................26
Section 5. Configure the network .....................................................................28
PHASE 1 -- Configure Server IP Address ...................................................28
PHASE 2 -- Attach Clients to Network and Test Network Link....................28
PHASE 3 -- Domain Controller Setup..........................................................29
Troubleshooting ...............................................................................................30
Tip #1. Upgrading from NT 4.0 to Windows 2000 .......................................31
Tip #2. Windows 2000 Installation halts about three minutes after starting to
boot from CD-ROM ......................................................................................31
Tip #3. Configure the Parallel (LPT) Port for ECP Mode.............................32
Tip #4. Installing HP NetRAID-1M Driver After Windows 2000 is Installed 32
Tip #5. Windows 2000 Drivers Signatures...................................................32
Tip #6. Windows 2000 Recovery Options....................................................33
Tip #7. Restarting Windows 2000 installation..............................................35
On-Line Information and Software Sources.....................................................35
5 Installing Novell NetWare 5.1 and Novell Small Business Suite 5.1 .........37
Prepare the Installation ....................................................................................37
High level process flow ....................................................................................37
Section 1. Run HP Diagtools (optional) ...........................................................37
iv
Contents
Section 2. Create the Drivers Diskettes ...........................................................37
Section 3. Perform NetWare 5.1 or Novell Small Business Suite 5.1 Installation38
PHASE 1 – Start the Installation ..................................................................38
PHASE 2 – Install HP Drivers ......................................................................40
PHASE 3 – Configure the Network ..............................................................41
Section 4 Install the Support Pack ...................................................................42
Troubleshooting................................................................................................43
Tip #1. Restarting NetWare Installation .......................................................44
On-Line Information and Software Sources .....................................................44
6 Installing Novell NetWare 6.0 and Novell Small Business Suite 6.0 .........45
Prepare the Installation ....................................................................................45
High level process flow.....................................................................................45
Section 1. Run HP Diagtools (optional)............................................................45
Section 2. Create the Drivers Diskettes ...........................................................45
Section 3. Perform NetWare 6.0 or SBS 6.0 Installation .................................46
PHASE 1 – Start the Installation ..................................................................46
PHASE 2 – Install HP Drivers ......................................................................48
PHASE 3 – Configure the Network ..............................................................49
Troubleshooting................................................................................................50
Tip #1. Restarting NetWare Installation .......................................................51
On-Line Information and Software Sources .....................................................51
7 Installing Red Hat Linux 7.1 ..........................................................................53
Prepare the Installation ....................................................................................53
High level process flow.....................................................................................53
Perform Red Hat Linux Installation ..................................................................53
PHASE 1 – Launch the Installation..............................................................53
PHASE 2 – Configure the Server.................................................................53
PHASE 3 – Complete the Installation ..........................................................54
On-Line Information and Software Sources .....................................................55
8 Installing TurboLinux Server 6.5 ..................................................................57
Prepare the Installation ....................................................................................57
High level process flow.....................................................................................57
Perform TurboLinux Installation .......................................................................57
PHASE 1 – Launch the Installation..............................................................57
PHASE 2 – Configure the Server.................................................................57
PHASE 3 – Complete the Installation ..........................................................58
v
Contents
On-Line Information and Software Sources.....................................................58
vi
1 HP Server tc2110 Installation
Highlights for Experts
Section 1. Introduction
This chapter is for expert users only, and assumes they are familiar with the
standard installation process of their NOS.
HP recommends taking into account the following specific information in order to
adapt your usual NOS installation to the particularities of your HP server tc2110.
The detailed instructions relative to each specific step (location of drivers,
workarounds) are provided in the respective NOS chapters.
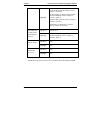
Section 2. Installation Highlights
*Based on your tc2110 configuration
Video driver
Microsoft
Windows NT 4.0
Server
HP drivers
Intel LAN driver
SCSI driver *
Highlights
none
Intel chipset driver
Microsoft
Windows 2000
Server and Small
Business Server
2000
Novell NetWare
5.1 and Novell
Small Business
S i 51
HP drivers
Video driver
Intel LAN driver
SCSI driver *
Highlights
HP drivers
none
Intel LAN driver
SCSI driver *
1
Chapter 1
HP Server tc2110 Installation Highlights for Experts
Suite 5.1
Create NetWare patch file diskette (refer to
Chapter 5 | Section 2)
Highlights
For Novell SBS, use floppy disk to initialize
the NOS installation (refer to Chapter 5 |
Section 3 | Phase 1)
Install NetWare patch file (refer to Chapter 5
| Section 3 | Phase 1)
Install NW 5.1 Support Pack 3 or above
(refer to Chapter 5 | Section 4)
Novell NetWare
6.0 and Novell
Small Business
Suite 6.0
Red Hat Linux
7.1
TurboLinux
Server 6.5
HP drivers
SCSI driver *
Highlights
For Novell SBS, use floppy disk to initialize
the NOS installation (refer to Chapter 6 |
Section 3 | Phase 1)
HP drivers
none
Highlights
none
HP drivers
none
Highlights
none
The HP drivers specific to your server are available on the HP Startup CD-ROM.
2
2 Preparing your HP Server tc2110 for
your NOS installation
Section 1. Hardware Setup
Prepare your HP server following the instructions in the HP Server tc2110
Operations and Maintenance Guide.
It is recommended that you do not install any third party adapter until you verify
that the HP equipment is functioning properly and you complete the NOS
installation.
Preparing your Hard Disk Drives
The HP Tower Server tc2110 comes with new hard disk drive(s) that do not need
specific setup. If you install additional and USED hard disk drives in your new
server:
· Note that most NOS installations remove all data from the hard disk they are
installed on. If you wish to use your additional hard disk drives to access
existing data in you new server, HP recommends that you install and
configure this (these) hard disk drive(s) AFTER completing the NOS
installation.
· If you wish to recycle used hard disk drives:
a. Perform a media check
b. Use a utility such as fdisk to erase all data and partitions from your hard
drive.
Section 2. Updating your Server BIOS
HP recommends that you update your server BIOS with the latest system BIOS
version to enjoy the most recent compatibility fixes.
Insert the HP Startup CD in a Windows PC and follow the on-screen instructions.
NOTE
If the Windows PC does not auto-start the Startup menu, start it
by opening Startup.htm, found at the root level of the Startup
CD.
3
Chapter 2
Preparing your HP Server tc2110 for your NOS installation
Section 3. Run HP Diagtools
To perform HP Diagtools hardware diagnostic on your HP Server tc2110, switch
off your HP server then reboot on the Startup CD and follow the on-screen
instructions. View and save the hardware inventory after the test.
Section 4. Using the Startup CD
The Startup CD included with your HP Server tc2110 system may be used as
follows:
Startup CD Usage
Method 1
Method 2
Method 3
Insert CD in your new
HP server and reboot it.
Insert the CD in a PC
that includes a HTML
browser.
Insert the CD in the server
once the NOS is
running.*
Open the file
startup.htm.
Open the file startup.htm.
This will run HP
Diagtools (a DOS
program)
This allows you create
drivers diskettes (HTML
menus)
This allows you create
drivers diskettes and
provides an automated
installation of Windows
NT or 2000 video drivers
(HTML menus).
* This method is not available on NetWare servers since they don't have an HTML browser.
4
3 Installing Microsoft Windows NT 4.0
Server
Prepare the Installation
Please refer to the Chapter 1 "Preparing your HP Server tc2110 for your NOS
installation" for our recommendations on the server preparation.
Then gather the following material:
· HP Server tc2110 Startup CD
· Microsoft Windows NT4 CD-ROM as well as the latest Microsoft NT
Service Pack (#6a or above)
· Seven blank formatted 3.5-inch diskettes
· Two or more clients for testing purpose (Optional)
To avoid problems use only hardware that appears on the Windows NT Hardware
Compatibility List. (HCL) You can access the latest HCL via Microsoft's Web site
at http://www.microsoft.com/ntworkstation/
High Level Process Flow
1. Create the drivers diskettes using HP Startup CD.
2. Create Microsoft Windows NT installation diskettes.
3. Perform Windows NT installation.
4. Initialize Hard Disk Drives.
5. Perform Hardware status check with "Windows NT Diagnostic Tool".
6. Attach clients to network and test network link.
7. Install additional HP accessories.
Section 1. Create the Drivers Diskettes
1. Locate three blank, formatted 3.5" diskettes.
2. Insert your HP Startup CD in a Windows PC and follow the on-screen
instructions to create the following diskettes:
5
Chapter 3
Installing Microsoft Windows NT 4.0 Server
o
HP Server tc2110 Windows NT SCSI driver (HP disk NT SCSI)
o
HP Server tc2110 Windows NT LAN driver (HP disk NT LAN #1 and #2)
NOTE
If the Windows PC does not auto-start the Startup menu, start it
by opening Startup.htm found at the root level of the Startup
CD.
Section 2. Create Microsoft Windows NT
Installation Diskettes
Three installation diskettes are required to install Microsoft Windows NT 4.0 on
your server. Follow these steps to create these installation diskettes:
1. Locate three blank, formatted 3.5" diskettes.
2. Insert your Microsoft Windows NT 4.0 CD-ROM into a desktop PC.
3. From a DOS prompt, type:
C:\D:\i386\winnt32 /ox
(where D is the drive letter for the CD-ROM)
4. Follow the prompt and insert the diskettes in the order described.
Section 3. Perform Windows NT Installation
The installation of Windows NT contains several phases:
· Phase 1 – Driver(s) Installation
· Phase 2 – Hard Drive Preparation
· Phase 3 – System Configuration Details
· Phase 4 – Configuring the Network
· Phase 5 – Completing the Installation
· Phase 6 – Install the Service Pack
· Phase 7 – Install the HP Video Driver
6
Chapter 3
Installing Microsoft Windows NT 4.0 Server
NOTE
Do not try to install Windows NT 4.0 via booting from the
Windows NT CD-ROM. This method of installation does not
work properly on most servers. The installation procedure will
prompt you to insert the Windows NT CD-ROM at a later
time.
PHASE 1 – Drivers Installation
1. Insert the Windows NT Setup/Boot Diskette #1 and boot the system.
2. Replace the diskette when prompted and press Enter.
3. Once under Windows NT Server Setup menu, press Enter to continue.
4. Press Enter to launch the automatic detection of mass storage device. It will
detect the IDE CD-ROM and propose the appropriate driver.
5. If you have a SCSI model:
a. Press S to to specify additional SCSI adapters. The Windows NT installer
will display a scrolling list of options.
b. Press Enter to select the default option "Other (Requires Disk provided
by a hardware manufacturer)".
c. When prompted to insert the "Manufacturer-supplied hardware support
disk", insert the HP Server tc2110 Windows NT SCSI driver (HP disk NT
SCSI) into floppy drive then press Enter.
d. Press Enter to select the "Adaptec Ultra160 Family PCI SCSI controller".
6. ""Ensure that both the PCI SCSI (if applicable) and CD-ROM IDE
controllers are properly detected by checking the status at the top of the
screen. The installation will not be successful if these two drivers are not
properly installed.
7. If you have any more mass storage device drivers to install, you may do so at
this time by pressing S.
8. When completed, press Enter to continue.
PHASE 2 – Hard Drive Preparation
1. Press Enter to continue if you are warned about your hard disk containing
more than 1024 cylinders. Your HP system can indeed handle this correctly.
2. Press C when prompted, to continue with the installation.
7
Chapter 3
NOTE
Installing Microsoft Windows NT 4.0 Server
Windows NT setup will prompt a different menu if you have
reconfigured your new HP server to use a hard drive already
containing data.
3. Insert the Windows NT CD-ROM when prompted then press Enter.
NOTE
Your CD-ROM drive needs few seconds to detect the newly
inserted CD-ROM. You may need to press Enter again if you
pressed Enter too quickly the first time.
4. Press Page Down to read the Licensing Agreement then F8 to agree and
proceed with the installation.
5. The Windows NT Server Setup screen will display the system hardware and
software components it detected. Press Enter if the configuration matches
your computer.
6. The setup then shows a list of hard drives on your server, along with the
partitions proposed on each drive. The default partition on which to install
Windows NT on the first drive (Drive 0) is highlighted. Select C to create a
partition in the unpartitioned space.
7. Enter the appropriate size for your NOS partition. HP recommends 2000MB.
Press Enter to validate the partition size.
8. Press Enter to Install Windows NT on the "New (Unformatted)" partition.
9. Select a file system format: FAT (DOS type file system) or NTFS (Windows
type file system) for this NOS partition. HP recommends using NTFS. Then
press Enter to proceed with formatting the partition (this operation may take
time, depending on your partition size).
10. Specify the directory for Windows NT (default = \WINNT)then press Enter
11. Press Enter to have Setup examine your hard disks.
12. Insert the HP Server tc2110 Windows NT SCSI driver (HP disk NT SCSI)
when prompted for a disk, then press Enter
13. Remove the above disk and Windows NT CD-ROM from their drives before
pressing Enter to restart your computer.
PHASE 3 - System Configuration Details
1. Insert Windows NT Server CD-ROM when prompted then press Enter.
8
Chapter 3
Installing Microsoft Windows NT 4.0 Server
NOTE
Your CD-ROM drive needs few seconds to detect the newly
inserted CD-ROM. If the window "Files Needed" appears,
press Enter again.
2. Click Next at the Windows NT Server Setup screen to gather information
about your computer.
3. You can now proceed through the customization of your installation using
the graphical interface.
NOTE
You can later promote your "Backup domain controller" to
"Primary domain controller" and vice versa. "Stand Alone
Server" cannot be promoted to "Primary Domain Controller" or
demoted to "Backup Domain Controller".
4. Emergency repair disk: HP recommends you create this disk because it saves
your Windows NT Server Setup configuration. Prepare a blank formatted
floppy diskette to create this disk then click Next. You do not need to insert
the blank floppy diskette at this time as Windows NT Setup will actually
perform the disk creation at the end of you configuration phase.
PHASE 4 – Configure the Network
1. Click Next at the Windows NT Setup screen to install Windows NT
Networking.
2. Click Next at the following window to use the network adapter embedded
with your HP Server tc2110.
3. Click Next to accept installing the Microsoft Internet Information Server.
4. When you reach the Network Adapters screen, do NOT select Start Search.
Instead, click the Select from list… button to load the HP LAN driver:
a. Select the Have Disk button when given a list of Network Adapter
drivers, to use HP specific driver
b. Insert the HP Server tc2110 Windows NT LAN driver (HP disk NT LAN
#1) then press Enter
c. Press Enter to validate the selection of the "Intel® PRO Adapter", then
Enter again to confirm the Network Adapters selection.
d. When prompted, insert the second driver disk (HP disk NT LAN #2).
5. Follow the on-screen instructions to complete the selection of the Network
Protocols and Network Services.
9
Chapter 3
Installing Microsoft Windows NT 4.0 Server
NOTE
The network settings need to be customized to your
environment. Please refer to Microsoft NT Server manuals
should you need further details on the networking settings.
6. Click Next to install all above selected components when prompted by
Windows NT Server Setup.
NOTE
If you choose to specify an IP address and skip the installation
of the DHCP component, Windows NT Server installation will
open Microsoft TCP/IP Properties window where you should
enter your IP address. You may configure this IP address again
after completion of the Windows NT install by selecting Start |
Settings | Control Panel | Network | Protocols | TCP/IP Protocol
Properties.
7. Click Next at the Network Bindings window to keep the default services.
8. Click Next to start the Network.
9. Click Next to confirm the Domain your server will operate in.
PHASE 5 – Completing the Installation
1. Choose Finish to perform the last installation step.
2. Windows NT Server 4.0 will then proceed with the installation of Microsoft
Internet Information Server 2.0:
a. Press Enter to keep default setup options then Enter again to confirm
creating the corresponding installation directory.
b. Press Enter to keep default publishing directories then Enter again to
confirm their creation.
c. Read the information related to setting-up a Internet Domain then press
OK.
d. Select appropriate ODBC drivers (select at least the default SQL Server
Drivers) then press OK
3. Set the Time zone, Date, and Time then select Close.
4. You will be notified that a standard VGA video driver has been installed. Do
not attempt to install the HP high-resolution video driver at this time because
they would be overwritten by the service pack installation. We will help you
perform this operation later. Click OK to leave this window, then OK again
to close the "Display Properties" window.
10
Chapter 3
Installing Microsoft Windows NT 4.0 Server
5. When prompted, insert the blank formatted disk to create the Emergency
Repair Disk then click OK.
6. When prompted, remove the Emergency Repair disk and the Windows NT
Server CD-ROM from their drives and reboot the system by pressing Enter.
7. The Windows NT logon screen will show after the POST, as the basic
Windows NT installation is now complete.
NOTE
Windows NT installation may take a while at this step if you
selected NTFS and the system has to convert the boot partition
from FAT to NTFS.
PHASE 6 – Install the Service Pack
1. How to get a copy of Windows NT 4.0 Service Packs:
o
If your HP server is already connected to internet, you can download the
latest Service Pack from Microsoft website at
http://www.microsoft.com/ntserver/nts/downloads/recommended
o
If you have access to a PC connected to internet and equipped with a
CD-RW drive, you may download the latest Service Pack from Microsoft
website at
http://www.microsoft.com/ntserver/nts/downloads/recommended then
copy the Service Pack on a CD-ROM. It allows you to install the Service
Pack from the CD-ROM drive of your HP server.
o
You may contact Microsoft Support at (800) 936 5900 or (800) 426 9400
to have a Service Pack CD-ROM shipped to you.
2. To install the Service Pack, login on your HP server as the Administrator,
then run the Service Pack.
3. Select "Accept the License Agreement" then click Install.
4. When prompted, click Restart to reboot your system (remember to remove all
diskettes and CD-ROM from their respective drives).
NOTE
When installing the service pack, answer No if prompted to
overwrite drivers files, to keep the HP drivers you have
previously installed.
11
Chapter 3
Installing Microsoft Windows NT 4.0 Server
PHASE 7 – Install HP Video Driver
The Microsoft Windows installation process has installed the standard VGA video
driver. If you would like to make use of the high-resolution video driver, follow
these steps:
1. Ensure Microsoft Windows NT Service Pack (version #6a or above) is
installed. This is a REQUIREMENT.
2. Logon as the Administrator on your HP server then insert HP Startup CD in
the CD-ROM drive. The Startup CD will automatically start and a menu will
display.
NOTE
Your HP server should auto-detect the presence of the Startup
CD and start the Startup menu. If your HP server does not
auto-start the Startup menu, start it by opening Startup.htm
which can be found at the root level of the Startup CD.
3. Select ""the NT 4.0 video driver in the "Drivers summary table / accessing hp
drivers" page.
4. The HP video driver setup program will open. Click Next to start the
installation.
5. Select “NVIDIA Vanta”.
6. Click Finish when prompted to restart your system at the end of the
installation.
7. After your logon, you will be notified that default display resolutions are
being used. Click OK. You can now configure your settings and test them.
Section 4. Initialize Hard disk Drive
To manage your different drives and partitions:
1. Click Start | Programs | Administrative Tools | Disk Administrator.
2. Click OK to proceed when notified you have a new hard disk to configure.
3. Select available hard disk space on the graphic and use menus to create
additional partitions.
4. Exit the Disk Administrator.
5. To complete formatting of new partitions, open My Computer, right click on
a new partition(s) to be formatted and select format.
12
Chapter 3
Installing Microsoft Windows NT 4.0 Server
Section 5. Perform Hardware Status Check
This section will provide a simple way to verify your installation of Windows NT.
Note that Windows NT Resource Guide CD-ROM (available from Microsoft)
provide utilities to generate activities to stress the system. The following steps use
standard tools provided with the Windows NT Server installation.
1. Inspect the error log in the event viewer (Start | Programs | Administrative
Tools | Event Viewer) to verify that no errors were detected. If any errors are
found please refer to the troubleshooting section of this document and
Windows NT Reference Manual for help.
NOTE
Windows NT Event Viewer may have recorded network errors
if your HP server was not connected prior to your login.
If you can not resolve the problem please contact your HP
service representative or use HP website for additional
troubleshooting resources.
2. Run the "Windows NT Diagnostic Tool" (Start | Programs | Administrative
Tools | Windows NT Diagnostic) to gather information about system BIOS,
resources, physical memory and video.
3. Check that your different adapters are correctly installed:
a. Open the control panel (Start | Settings | Control Panel)
b. Check the status of the Network adapter. You may perform the
diagnostics by selecting the Diagnostics tab then click on Run Tests.
Upon completion, close the window (if you performed the diagnostics,
Windows will recommend that you reboot the system).
c. Check the status of your SCSI adapter by selecting SCSI Adapters in the
Control Panel and click Properties for each device.
Section 6. Attach Clients to Network and Test
Network Link
1. Create shares: create a folder on your hard drive then share it (right click on
folder and the select Sharing).
2. Create users using Windows NT utility: Start | Programs | Administrative
Tools | User Manager - DOMAIN
3. Connect clients PC to the network your HP server operates on.
13
Chapter 3
Installing Microsoft Windows NT 4.0 Server
4. Open a command prompt window on your HP server (Start | Program |
Command Prompt) and verify the TCP/IP configuration you have set during
Windows NT installation by entering:
ipconfig /all
5. To verify the server and clients can communicate properly:
a. From one of the clients, open a command prompt and type:
ping computername
Where computername is the server name you entered during Windows
NT installation. You should get four reply's from your new server. If
there is a link problem it must be fixed before going any further.
You may test the link further by doing a ping between two clients at the
same command prompt, type:
ping other_client_IPaddress
You should get four replies from the second client.
b. Copy files back and forth from the clients to the server.
Section 7. Install Additional HP Accessories
The hp server tc2110 Startup CD includes the drivers for the following HP
accessories:
· HP-Intel 10/100 LAN
· HP NetRAID-1M adapter
· HP Surestore DAT24i
Please refer to the product manual enclosed with your accessory for the detailed
installation procedures.
Troubleshooting
This section will help you resolve some of the most common installation
problems.
14
Chapter 3
Installing Microsoft Windows NT 4.0 Server
Tip #1. Troubleshooting SCSI Host Bus Adapter
Configuration
The boot manager for Windows NT contains recovery logic to allow you to return
to the last known good configuration. If you have changed your SCSI host bus
adapter configuration and Windows NT no longer boots, follow these steps to
recover:
1. Undo any hardware changes you have made to the computer since it was last
operational.
2. Reboot the computer. Press the spacebar when the message appears:
Press spacebar NOW to invoke the Last Known Good
menu.
Follow the instructions on the screen to continue booting.
NOTE
Do not log in if you pass the "Press spacebar NOW to invoke
the Last Known Good screen" option, because this will wipe
out the configuration you want.
3. Once your computer is operational again, double check all the hardware and
software configuration changes you wish to make. Look specifically for
conflicts with parts of the existing system configuration that are not being
changed. If you cannot determine the source of the error, contact the host
adapter vendor or HP Technical Support for assistance.
Tip #2. NT Warning About Drives with More than 1024 Cylinders
If the boot drive is new or just initialized, Windows NT may give a warning
message about disk drives having more than 1024 cylinders during the first reboot
from the hard drive. Windows NT may hang just after the SCSI BIOS or Disk
Array BIOS banner. This is a Windows NT limitation, please see Microsoft
TechNet article # Q137474 for details.
In some situations, the Windows NT installation program may detect the hard
drive geometry incorrectly, and thus limit the initial drive partition size to 1024
MB or hang while rebooting. To correct this problem, perform the following
solutions:
In the Windows NT installation program:
1. Partition the primary partition to 1024 MB.
2. Format the primary partition using FAT.
15
Chapter 3
Installing Microsoft Windows NT 4.0 Server
3. Press F3 to quit the installation program.
4. Restart the installation program.
5. At the drive partition screen, delete the 1024 MB primary partition.
6. Partition the primary partition to any desired size up to the drive capacity.
7. Continue with the Windows NT installation program.
Tip #3. Service Pack Files Replaced Without Feedback
Some system configuration changes may ask you to install the original Windows
NT drivers diskette. This may cause some system files to be replaced with the old
version.
It is recommended that you apply the service pack again if you make any changes.
Tip #4. Using the NT Event Log to Diagnose Network Adapter
Problems
If the Network Adapter driver fails to start or does not appear to be working
correctly, examine the Event Log for any driver diagnostic messages.
1. Start the Event Viewer applet in the Administrative Tools group in Program
Manager.
2. Search the Event Log Source column for any entries named "Hptx."
3. Double-click on the entry to examine the Event Detail dialog box. The upper
half of the box gives a short generic description of the error. The lower half
of the box is a hex and ASCII dump of error data.
4. Scroll through the error data in ASCII for any readable strings.
5. If a readable string is present, it will describe the problem in more detail.
6. If no readable string is present, this typically indicates that the driver failed
early in the process of loading-usually due to a resource conflict (for
example, an I/O port conflict).
NOTE
16
Make sure the Network Adapter is connected to a working hub
and verify that the LED is lit. Otherwise, the Network Driver
may not install.
Chapter 3
Installing Microsoft Windows NT 4.0 Server
Tip #5. Booting from Another SCSI HDD
To boot Windows NT from another SCSI hard disk, press Ctrl+A during system
boot to enter SCSI-Select menu. In this menu, configure the SCSI Hard Drive
Priority option in the Boot Device Ordering menu.
Tip #6. Restarting Windows NT installation
If you want to restart Windows NT installation from the very beginning, use a
utility such as fdisk to erase all data and partitions from your hard drive. Then
resume all installation process.
On-Line Information and Software Sources
· HP World Wide Web access: http://www.hp.com
· Microsoft World Wide Web access: http://www.microsoft.com
· Microsoft Product Support Services: http://support.microsoft.com/directory
· Windows NT Automated Database Advanced Systems at (800) 936-4400
17
4 Installing Microsoft Windows 2000
Server and Small Business Server
2000
Prepare the Installation
NOTE
For ease of reading, we will refer to "Windows 2000 Server"
and " Small Business Server 2000" both as "Windows 2000" in
this chapter.
Please refer to the Chapter 1 "Preparing your HP Server tc2110 for your NOS
installation" for our recommendations on the server preparation.
Then gather the following material:
· HP Server tc2110 Startup CD
· Microsoft Windows 2000 CD-ROM as well as the latest Microsoft Windows
2000 Service Pack (#2 or above).
· Six blank, formatted 3.5-inch diskettes
· Two or more clients for testing purpose (Optional)
High Level Process Flow
1. Perform Windows 2000 Server Installation.
2. Complete the Installation (Microsoft Service Pack, Chipset drivers, HP
drivers, Recovery Console).
3. Configure the System.
4. Configure the Network.
5. Install additional HP accessories.
Section 1. Create the Drivers Diskettes
1. Locate one blank, formatted 3.5" diskette.
19
Chapter 4
Installing Microsoft Windows 2000 Server and Small Business Server 2000
2. Insert your HP Startup CD in a Windows PC and follow the on-screen
instructions to create the Windows 2000 SCSI driver diskette (HP disk W2K
SCSI).
NOTE
If the Windows PC does not auto-start the Startup menu, start it
by opening Startup.htm found at the root level of the Startup
CD.
Section 2. Perform Windows 20000 Installation
NOTE
Though you may install Windows 2000 from Setup diskettes or
directly from Windows 2000 CD-ROM, we recommend you
the second method because it is faster.
1. Boot your new server from the Windows 2000 CD-ROM.
2. You will see a message that reads "Setup is inspecting your hardware
configuration". Then the setup screen will be displayed.
3. The system will briefly show at the bottom of the display:
Press F6 if you need to install a third party SCSI
or RAID controller
If you have a SCSI model:
a.
Press S to specify additional SCSI adapters.
b.
When prompted, insert the HP disk W2K SCSI you created from
tc2110 startup CD.
c.
Press Enter to continue.
d.
Select the "Adaptec Ultra 160 Family PCI SCSI Controller Win
2000", then press Enter
NOTE
Unfortunately Windows 2000 setup only gives you a very short
time to press F6. If you missed it, you should reboot your
system and resume from step 1 above.
4. Press Enter to continue at the "Windows 2000 Server Setup - Welcome to
Setup" Screen.
20
Chapter 4
Installing Microsoft Windows 2000 Server and Small Business Server 2000
5. Press C to continue Setup at the "Setup has determined that your computer's
startup hard disk is new…" screen.
6. Press F8 to accept the licensing agreement.
7. At the drives partitioning screen, select the target drive. If you want to use
the entire drive to install Windows 2000 then press Enter. Otherwise, press C
to create a drive a partition.
In this example we will create a 2GB partition. Please note that Windows
2000 does not have the 2GB limitation present on NT 4.0.
a. Press C to create a partition.
b. At the "Create partition size" prompt, type 2048 and press Enter.
c. HP recommends that you create all the partitions needed for each hard
drive present on your system. Select unpartitioned space and press C
again to create additional partitions.
8. Select the target drive to be used to install Windows 2000. Press Enter.
9. Select "Format the partition using the NTFS file system" and press Enter.
10. The installer will format and copy files to the hard drive.
11. The system will reboot and launch Windows 2000 graphic interface. Be sure
to remove the driver diskette before the reboot.
12. At the "Installation Wizard" first dialog box, click Next to continue.
13. The "Installing Devices" screen will be shown with a progress bar on the
display. This may take 10 to 15 minutes.
14. You can now proceed through the customization of your installation using
the graphical interface.
NOTE
The network settings may need to be customized to your
environment. Please refer to Microsoft 2000 manuals should
you need further details on the networking settings.
15. The "Installing Components Display" screen starts with a progress bar. It
takes about 20 minutes to complete this section.
16. The wizard will then automatically start the "Performing Final Tasks" section
to complete the installation. This step may takes a long time too, with the
progress bar apparently not moving.
21
Chapter 4
Installing Microsoft Windows 2000 Server and Small Business Server 2000
NOTE
There may be a period of time with no apparent activity at the
"Saves Settings". Be patient.
17. At the "Completing the Windows 2000 Setup Wizard" screen, remove the
CD-ROM then click Finish. The system will automatically reboot from the
hard drive.
18. Follow screen instructions to logon (press Ctrl+Alt+Del). Enter the
administrator password you have defined earlier.
19. If you installed Windows 2000 Server, "Windows 2000 Configure Your
Server" will launch. Close this window as we will postpone the
customization of your server until completion of all the installation steps.
20. If you installed Microsoft Small Business Server 2000, Click Cancel to close
the "Setup needs the location of the Small Business server 2000 Setup
files…" window.
NOTE
You may open the "Windows 2000 Configure Your Server"
wizard at any point of time by clicking Start | Programs |
Administrative Tools | Configure Your Server.
Section 3. Completing the Installation
PHASE 1 – Install the Service Pack
1. How to get a copy of Windows 2000 Service Packs:
o
If your HP server is already connected to internet, you can download the
latest Service Pack from Microsoft website at
http://www.microsoft.com/windows2000/downloads/
o
If you have access to a PC connected to internet and equipped with a
CD-RW drive, you may download the latest Service Pack from Microsoft
website at http://www.microsoft.com/ntserver/nts/downloads then copy
the Service Pack on a CD-ROM. It allows you to install the Service Pack
from the CD-ROM drive of your HP server.
o
You may contact Microsoft Support at (800) 936 5900 or (800) 426 9400
to have a Service Pack CD-ROM shipped to you.
2. To install the Service Pack, logon on your HP server as the "Administrator",
then run the Service Pack on your system.
3. If prompted, press OK to accept Microsoft 2000 Publisher Certificate.
4. Select "Accept the License Agreement" then click Install.
22
Chapter 4
Installing Microsoft Windows 2000 Server and Small Business Server 2000
5. When prompted, click Restart to reboot your system (remember to remove all
diskettes and CD-ROM from their respective drives).
PHASE 2 – Install the Chipset Driver
1. Insert HP tc2110 Startup CD in the CD-ROM drive. The Startup CD will
automatically start and a menu will display.
NOTE
Your HP server should auto-detect the presence of the Startup
CD and start the Startup menu. If your HP server does not
auto-start the Startup menu, start it by opening Startup.htm
which can be found at the root level of the Startup CD.
2. Select Windows 2000 chipset driver in the page:
Drivers summary table / accessing hp drivers
3. Follow up the installation wizard until you finish the installation.
PHASE 3 – Install the HP Video Driver
The Microsoft Windows installation process has installed the standard VGA video
driver. If you would like to make use of the high resolution video driver, follow
these steps:
1. Ensure Microsoft Windows 2000 Service Pack (version #2 or above) is
installed. This is a REQUIREMENT.
2. Logon as the "Administrator" on your HP Server tc2110 then insert HP
Startup CD in the CD-ROM drive. The Startup CD will automatically start
and a menu will display.
NOTE
Your HP server should auto-detect the presence of the Startup
CD and start the Startup menu. If your HP server does not
auto-start the Startup menu, start it by opening Startup.htm
which can be found at the root level of the Startup CD.
3. Select Windows 2000 video driver in "Drivers summary table / accessing hp
drivers" page.
4. The HP video driver setup program will open. Click Next to start the
installation.
5. Click Finish when prompted to restart your system at the end of the
installation. (remember to remove all diskettes and CD-ROM from their
respective drives).
23
Chapter 4
Installing Microsoft Windows 2000 Server and Small Business Server 2000
6. After your logon, you will be notified that default display resolutions are
being used. Click OK. You can now configure your settings and test them.
PHASE 4 – Install the HP LAN driver
Windows 2000 installation can not detect the embedded HP LAN. The following
procedure will help you install the driver using the HP Startup CD:
1. Insert the HP Startup CD in your new server. If CD-ROM auto-start is
enabled, a menu will display. You may close this menu.
2. Open Start | Settings | Control Panel | System | Hardware | Device Manager.
3. Open the yellow question marked "Other Devices" tree and double-click on
the appropriate "Ethernet Controller" to display its menu.
4. From the "Ethernet Controller Properties" dialog box, click the Driver tab
then Update Driver to open the Update Device Driver Wizard. Click Next.
5. At the prompt "What do you want the wizard to do?", select "Search for a
suitable driver for my device", and click Next.
6. Unselect the "Floppy disk drive" checkbox to keep only the "CD-ROM" and
click Next.
7. Wait for the system to find the appropriate driver, then click Next.
8. Click Finish once the driver has been loaded.
9. Exit all open windows and restart your computer. (This is not required if you
only have one NIC on your system. Otherwise, it is recommended to reboot
to make sure other HP adapters get initialized properly.)
10. After restarting Windows, connect to your network and test for connectivity.
PHASE 5 – Install Windows 2000 Recovery Console
Please refer to Tip#5 in the Troubleshooting section.
Section 4. Configure the System
PHASE 1 – Perform Hardware Status Check
In this section you will run Windows 2000 Device Manager tool to identify any
issues with the installed devices or resource conflicts.
1. Open Start | Settings | Control Panel | System | Hardware | Device
Manager.
24
Chapter 4
Installing Microsoft Windows 2000 Server and Small Business Server 2000
2. Verify that no devices have either a yellow band (!) or question mark (?)
symbol next to it.
o
Yellow (!) means that there is a resource issue with the device.
o
Question (?) means that the device is unknown.
If (!) or (?) symbols are reported then double click on each of the devices
with (!) or (?). Use the "Device Status" message for troubleshooting. Or if a
printer is available, use the View, Print from the menu to get a report.
3. Verify if the installed drivers are digitally signed.
a. In the Device Manager, select the device (e.g HP NetRAID-1M) that you
want to verify.
b. Right click Properties | Driver.
c. Locate the "Digital Signer:" If the driver of that device is digitally signed
then it will display "MS Windows 2000 Publisher" or "Microsoft
Windows Hardware Compatibility Publisher". If the driver of the device
is not digitally signed we recommend that you check the HP Website
www.hp.com to install the latest driver package.
4. Exit the Device manager, System Properties and Control Panel applications.
5. Check the Event viewer to make sure that there are no errors in the log.
Click on Start | Programs | Administrative tools | Event viewer.
NOTE
Windows 2000 Event Viewer may have recorded network
errors because your network is not configured yet. Please
discard these errors.
6. Exit event viewer.
PHASE 2 - Initialize Hard Disk Drive
To manage your different drives and partitions:
1. Click Start | Programs | Administrative Tools | Disk Administrator.
2. Click OK to proceed when notified you have a new hard disk to configure.
3. Select available hard disk space on the graphic and use menus to create
additional partitions.
4. Exit the Disk Administrator.
5. To complete formatting of new partitions, open My Computer, then right
click on the new unformatted partition(s) and select format.
25
Chapter 4
Installing Microsoft Windows 2000 Server and Small Business Server 2000
To start the disk administrator use the following procedure.
1. Click Start | Programs | Administrative Tools | Computer Management.
2. Double click Storage | Disk Management in the tree.
3. The "Write signature and Upgrade" wizard will start if you have new hard
drives with no signatures on them. Follow the on-screen instructions to create
this signature.
4. Select available hard disk space on the graphic and use menus to create
additional partitions.
5. Format all partitions that are not formatted yet.
6. Exit the "Computer Management" tool.
NOTE
There are two types of hard drive configuration: Dynamic
and Basic. You can select the appropriate type by right
clicking on the disk drive icon. Dynamic drives are used to
create volumes, which can contain more than one physical
hard drive. Basic drives are used to create primary or local
partitioned drives.
PHASE 3- Adding Terminal Server Services
1. Open Start | Settings | Control Panel | Add Remove Programs.
2. Click "Add/Remove Windows Components".
3. Scroll to and click "Terminal Services" checkbox then click Next.
4. Select the mode you want to use: "Remote administration mode" or
"Application server mode" then click Next.
NOTE
The following instructions are based on the Application
server mode. Please note the licensing requirement listed on
the screen for this mode. Consult with your Microsoft
representative for setting the licensing server.
5. Select the default permissions for application compatibility then click Next.
6. Click Next to accept support tools and administrator tools settings.
7. If prompted, insert the Windows 2000 CD-ROM.
8. Click Finish to close the Wizard.
26
Chapter 4
Installing Microsoft Windows 2000 Server and Small Business Server 2000
9. Click Yes to restart the system. (Remove the CD-ROM).
10. After the system reboots, login to the system.
11. Open Start | Settings | Control Panel | Administrative Tools. Check that the
following services are now available: "Terminal Services Client Creator",
"Terminal Services Configuration" and "Terminal Services Manager".
Create Client Installation Diskettes
1. Double click Terminal Services Client Creator.
2. Select the appropriate client type for your environment.
3. Click Format disk if needed. Check the number of disks required and label
them as "Terminal Services for [..] Disk [x/y]". Click OK to proceed.
4. Follow on-screen instructions to perform the diskettes copies.
5. Click OK at the screen that reads "[y] floppies were created….".
6. Click Cancel to end the "Create Installation disks" utility.
Install the Client Utility on a Client Workstation
1. Insert diskette 1 in the target client and run
A:\setup.exe
2. Click Continue at the setup screen.
3. Complete the "Name and Organization Information" form. You will be
prompted for this information only the first time the diskettes are used. Click
OK to validate then OK again to confirm.
4. Click “I Agree” to accept the license agreement.
5. Click the Large Icon to start installation.
6. Select the installation mode you feel appropriate: all users (Yes) or current
user only (No).
7. Insert following diskette(s) when prompted and follow screen instructions.
8. Click OK when the installation is completed then shutdown and restart
workstation.
27
Chapter 4
Installing Microsoft Windows 2000 Server and Small Business Server 2000
Section 5. Configure the Network
PHASE 1 -- Configure Server IP Address
During the installation process the system was configured to use DHCP. If no
DHCP server is found on the network the system will auto-configure a random IP
address to start functioning. It is important that you configure the proper IP
address to be able to communicate with the clients:
1. Right click My Network Places | Properties | Local Area Connection on your
HP server.
NOTE
If you HP server host several Network adapters, the window
will show one "Local Area Connection" icon for each
Network adapter present in the system. Identify the proper
adapter by browsing each one.
2. Click Internet Protocol(TCP/IP) | Properties | Use the following IP address.
3. Enter appropriate IP address.
4. Click the OK to continue, then OK again to exit the "Local Area Connection
Properties" window. Click Yes to restart your computer and take this settings
into account.
PHASE 2 -- Attach Clients to Network and Test Network Link
1. Create shares: create a folder on your HP server hard drive then share it (right
click Sharing).
2. Create users using Windows 2000 Computer Management utility: Start |
Programs | Administrative Tools | Computer Management | System tools |
Local Users and Groups | Users.
3. Connect clients PC to the network your HP server operates on.
4. Open a command prompt window to verify the TCP/IP configuration and
enter the command:
ipconfig /all
5. To verify the server and clients can communicate properly:
a. From one of the clients, open a command prompt and type:
ping computername
28
Chapter 4
Installing Microsoft Windows 2000 Server and Small Business Server 2000
where computername is the server name you entered during Windows
2000 installation. You should get four reply's from your new server. If
there is a link problem it must be fixed before going any further.
You may test the link further by doing a ping between two clients: at the
same command prompt, type:
ping other_client_IPaddress
You should get four reply's from the second client.
b. Copy files back and forth from the clients to the server.
Testing the connection using Terminal Services
1. Click Start | Programs | Terminal Services Client | Terminal Services Client
on a client you installed Terminal Services on.
2. Select the target server from the "Available Servers" list provided on the
screen.
3. Click the Connect button.
4. Complete the "UserID, Password" login form.
PHASE 3 -- Domain Controller Setup
The Windows 2000 reference guide calls this process "Promoting the server to a
domain controller".
1. Click Start | Programs | Administrative Tools | Configure Your Server to
open the "Windows 2000 Configure Your Server" window.
2. Select "Active Directory".
3. Scroll down and click "Start the Active Directory wizard".
4. Click Next to continue.
NOTE
The following instructions corresponds to the standard steps
for new domain creation. You may customize the options
proposed by Windows 2000 to match your environment.
5. Click Next at the "Domain Controller Type" to accept the default: "Domain
Controller for a new Domain".
6. Click Next at the "Create Tree or Child Domain" to accept the default:
"Create a new domain tree".
29
Chapter 4
Installing Microsoft Windows 2000 Server and Small Business Server 2000
7. Click Next at the "Create or Join Forest" to accept the default "Create a new
forest of domain trees".
8. At the text box for "Full DNS name for new domain:" type in the assigned
DNS name for your server (for example: mycompany.com).
9. Click Next. The system may take a few minutes before moving to next
screen.
10. Click Next at the "NetBIOS Domain Name" dialog box to accept default
"Domain NetBIOS name:"
11. Click Next to accept "Database and Log Locations" default directories
12. Click Next to accept default "Shared System Volume".
13. The system will display a dialog box that reads "The Wizard can not contact
the DNS Server…." Confirm your DNS configuration, or install and
configure a DNS server on this computer. Click OK.
14. Click Next to accept the installing DNS on your new server.
15. Click Next to accept the default permission value: "Permissions compatible
with pre-Windows2000 Server."
16. Enter and confirm the Administrator password and click Next.
17. Review the "Summary" display and click Next to continue.
18. The system will start configuring the active directory display. It will take a
few minutes to complete.
19. If prompted, insert Windows 2000 CD-ROM and click OK to continue.
20. Configuring active directory display shows again. Click Finish to close the
Wizard utility. This completes the active directory installation.
21. Click "Restart Now" to reboot the system. Remove CD-ROM if present.
22. At the login prompt type in the password. Click the Options button and
verify that the "Log on to: HOST" appears on the dialog box. Click OK to
start the logon process.
Section 6. Install Additional HP Accessories
The hp server tc2110 Startup CD includes the drivers for the following HP
accessories:
· HP-Intel 10/100 LAN
· HP NetRAID-1M adapter
30
Chapter 4
Installing Microsoft Windows 2000 Server and Small Business Server 2000
· HP Surestore DAT24i
Please refer to the product manual enclosed with your accessory for the detailed
installation procedures.
Troubleshooting
This section will help you resolve some of the most common installation
problems.
Tip #1. Upgrading from NT 4.0 to Windows 2000
It is possible to upgrade from any edition of NT 4.0 including Terminal Server to
Windows 2000. Please refer to the readme.doc on the Windows 2000 CD and the
Windows 2000 Setup Guide for information on how to perform the upgrades.
Tip #2. Windows 2000 Installation Halts About Three Minutes After
Starting to Boot from CD-ROM
When installing Windows 2000 on any X86 system with more than one hard drive
it is possible to experience the following error:
Setup has encountered an error and cannot continue. Contact
technical support for assistance. The following status
codes will assist them in diagnosing the problem. (0x4,
0x1, 0x0, 0x0)
The cause of this problem is that the NTLOADER is encountering a duplicate hard
drive signature. This signature is calculated by the NTLOADER code after reading
a specific sector offset from the hard drive. The following list provides some of the
things that can cause hard drive to have duplicate signatures:
1. Low-level formatting the drives. We reproduced this on several systems at
HP.
2. When you have a set of drives previously used with a DAC and move them
to a SCSI adapter.
3. Using a disk imaging utility to duplicate a hard drive will create a duplicate
signature.
At this time, Microsoft has no fix for this problem. For more information please
refer to Microsoft document ID: Q226361.
HP recommends that you use the following workaround for this problem.
31
Chapter 4
Installing Microsoft Windows 2000 Server and Small Business Server 2000
1. If you experiences this problem, remove all drives with the exception of the
target boot drive. Install Windows 2000 and then add the removed hard
drives to the system.
2. Run the Disk Management tool to prepare the remainder of the drives to be
used in the system.
a. Boot the system with a Windows 98SE recovery diskette. (This version
supports FAT32, which works on large hard drives.)
b. Perform an FDISK on each drive.
c. Install Windows 2000.
Tip #3. Configure the Parallel (LPT) Port for ECP Mode
The device manager may not show this port on the list when not configured in
ECP mode.
HP recommends that you systematically configure the LPT port for ECP mode.
Use the following procedure to change the setting:
1. Press F2 during power on self-test.
2. Select Advanced | I/O Device Configuration | Parallel Port | Mode.
3. Press Enter and select "ECP".
4. Press F10 and select yes to confirm to save and exit.
Tip #4. Windows 2000 Drivers Signatures
Windows 2000 checks for digital signatures on driver files to help maintain system
integrity. During the installation or update of a driver, if there is no matching
signature file Windows 2000 displays a "Digital Signature not Found" box.
· To expedite release of new products, drivers may be shipped by HP without
signature files. All Windows 2000 drivers provided by Hewlett-Packard are
submitted to Microsoft for certification testing . Upon completion of testing,
Microsoft produces signature files. HP then posts the revised driver package
at http://www.hp.com.
· If a signature warning is displayed during installation of a driver, you may
override the warning. We recommend that you check the HP Website for the
latest driver package. If available, install the new driver.
· You can elect to have Windows 2000 ignore signatures: Open Start | Settings
| Control Panel | System | Hardware | Driver Signing. This is helpful if you
are setting up multiple systems.
32
Chapter 4
Installing Microsoft Windows 2000 Server and Small Business Server 2000
· Digital signatures are a powerful way to ensure system integrity as you add
drivers to your systems - whether provided by HP or others.
Tip #5. Windows 2000 Recovery Options
In the event that the current installation of Windows 2000 fails to boot (this might
happen after installing a new driver, component, software, etc), Windows 2000
provides the following recovery options to help you gain access to your Windows
2000 installation to replace damaged files and services for troubleshooting
purpose. HP therefore recommends that you install the Recovery Console (see
option 3 below) to enhance the system configuration.
Recovery option #1: Last known good configuration
· Activated by pressing F8 during the system process of Windows 2000 and
selecting "Last Known Good Configuration" from the menu.
· This boot mode is used in the case that the system fails to boot after installing
a new software or driver. The system will use the previous registry setting to
initialize and boot the system.
Recovery option #2: Safe Mode Boot
Activated by pressing F8 during the system boot. It provides minimal
configuration with required drivers and services. The safe mode boot provides
three options:
1. Standard safe mode boot. Provides no network services or drivers.
2. Networking disabled. Includes networks services and drivers.
3. Directory services restore mode. Brings system up with directory services
disabled with the intent of recovering active directory. Safe mode boot is
guided by the registry key hklm\CurrentControlSet\Control\SafeBoot with
the use of the Minimal and Network subkeys. The IOManager and Service
Control Manager look at the registry to load the driver and services. Such
approach avoids loading a problematic driver or service.
4. Command prompt. Provides an alternate command shell CMD.EXE instead
of the explorer. This is dictated by the registry key:
hklm\system\CurrentControlSet\Control\SafeBoot\AlternateShell
There is a Safe-Mode boot loophole. Since NTLDR loads "Boot Load" drivers,
these drivers bypass the IO Manager's Safe Mode check.
33
Chapter 4
Installing Microsoft Windows 2000 Server and Small Business Server 2000
Recovery option #3: Recovery Console (RC) Boot
The Recovery Console (RC) can be used when safe boot fails. You can enter RC:
· either by booting from Windows 2000 CD-ROM
· or by installing the RC boot on your system.
It is recommended to install the RC immediately after installing Windows 2000.
Start RC Booting from Windows 2000 CD-ROM
If you have a need of booting the Windows 2000 recovery console but this feature
is not installed on the system, use the following procedure to boot the RC from the
Windows 2000 CD-ROM.
1. Insert the Windows 2000 CD-ROM and start the reboot sequence.
2. Press any key when prompted to start booting from the Windows 2000 CDROM.
3. Press F10 at the Welcome to Setup screen.
NOTE
This is an undocumented option. The bottom of the display is
asking you to press Enter, R or F3.
4. The system will display a menu asking to select the instance of the NOS you
want to boot. For example:
1: C:\WINNT
5. Type 1 then Enter.
6. Type the administrator password when prompted.
7. At the command prompt type help and proceed to achieve your objective.
8. Type exit when done troubleshooting.
Installing RC
1. Insert Windows 2000 CD-ROM. If CD-ROM auto-start is enabled, click exit
to close the applet.
2. Open a command prompt, and type
D:\I386\WINNT32 /CMDCONS
(Where D: is the CD-ROM drive letter)
3. Follow the screen instructions to complete the RC installation.
34
Chapter 4
Installing Microsoft Windows 2000 Server and Small Business Server 2000
Booting RC
1. Shutdown and Restart system.
2. Select "Windows 2000, Recovery Console" from the boot menu.
3. The system will display a menu asking to select the instance of the NOS you
want to boot. For example it displays:
1: C:\WINNT
4. Type 1 then Enter.
5. Type the administrator password when prompted.
6. At the command prompt type help and proceed to achieve your objective.
7. Type exit when done troubleshooting.
NOTE
The file access security can prevent you from getting to
certain files.
Tip #6. Restarting Windows 2000 installation
If you want to restart Windows 2000 installation from the very beginning, use a
utility such as fdisk to erase all data and partitions from your hard drive. Then
resume all installation process.
Online Information and Software Sources
· HP World Wide Web access: http://www.hp.com
· Microsoft World Wide Web access: http://www.microsoft.com
· Microsoft Product Support Services: http://support.microsoft.com/directory
· Windows NT Automated Database: Advanced Systems at (800) 936-4400
35
5 Installing Novell NetWare 5.1 and
Novell Small Business Suite 5.1
Prepare the Installation
Please refer to the Chapter 1 "Preparing your HP Server tc2110 for your NOS
installation" for our recommendations on the server preparation.
Then gather the following material:
· HP Server tc2110 Startup CD
· Novel NetWare 5.1 or Novell Small Business Suite 5.1 CD-ROM and latest
Support Pack CD-ROM
· NetWare 5.1 or Novell Small Business Suite 5.1 licensing/cryptographic
diskette
· Two or more clients for testing purpose (Optional)
· Two blank diskettes for patch and driver installation
High Level Process Flow
1. Run HP Diagtools (optional - diagnostics).
2. Create the drivers diskette using the hp Startup CD.
3. Perform NetWare or Novell SBS installation.
4. Install the Support Pack.
5. Install additional HP accessories
""Section 1. Run HP Diagtools (optional)
To perform HP Diagtools hardware diagnostic on your HP Server tc2110, switch
off your HP server then reboot on the Startup CD and follow the on-screen
instructions. View and save the hardware inventory after the test.
Section 2. Create the Drivers Diskettes
1. Locate three blank, formatted 3.5" diskettes.
37
Chapter 5
Installing Novell NetWare 5.1 and Novell Small Business Suite 5.1
2. Insert your HP Startup CD in a Windows PC and follow the on-screen
instructions to create the HP Server tc2110 NetWare SCSI drivers (HP disk
NW SCSI).
NOTE
If the Windows PC does not auto-start the Startup menu, start it
by opening Startup.htm found at the root level of the Startup
CD.
3. Create the second diskette for LAN drivers (HP disk NW LAN).
4. Create the third diskette for Novell 5.1 patch (HP disk NW patch).
Please choose the right link for your OS language version:
· For English only version, please click "hp server tc2110 NetWare 5.1
(English only version) Pentium 4 patch".
· For multi-languages or other languages than English version, please click "hp
server tc2110 NetWare 5.1 (Non English only version) Pentium 4 patch".
NOTE
You do have to use this NW 5.1 patch for Intel Pentium 4
platform. HP also recommend you to check Novell website for
the latest patch file update information.
Section 3. Perform NetWare 5.1 or Novell Small
Business Suite 5.1 Installation
The installation of NetWare 5.1 or Novell Small Business Suite 5.1 contains
several phases:
· Phase 1 – Start the Installation
· Phase 2 – Install HP Drivers
· Phase 3 – Configure the Network
PHASE 1 – Start the Installation
NOTE
38
If your hard drive contains data or is not new, HP recommends
to use a utility such as fdisk to erase all data and partitions
from your hard drive.
Chapter 5
Installing Novell NetWare 5.1 and Novell Small Business Suite 5.1
For NetWare 5.1
NOTE
The NetWare NOS installation contains a known software
error (not product-specific) that does not allow you to boot
from CD-ROM. To work around this problem, boot from a
DOS diskette and create a bootable DOS partition on the drive.
1. Insert the Novell NetWare 5.1 CD-ROM and boot the system.
2. Press Enter to read the license agreement then press Esc, and select "Accept
License Agreement".
3. Press Enter to "Create a New Boot Partition".
4. HP recommends creating a 1000MB boot partition, then pressing Enter to
continue.
5. If you accept erasing all data on your disk, select Continue. Your system will
now create the partition, reboot, and format that partition.
For Small Business Suite 5/5.1
1. Boot your HP Server on a DOS bootable utility diskette.
NOTE
You can boot from the NetWare SBS 5 License diskette.
Novell DOS 7 and all required DOS utilities (FDISK,
FORMAT, EDIT) are included on the diskette.
2. Type FDISK to create a 1000 MB primary DOS partition on the primary
drive (C:). Remember to make it the active (bootable) partition. The
computer will restart and boot on the DOS bootable utility diskette again.
3. Format and transfer DOS system files to the partition by typing:
A:\>FORMAT C: /X /S
A:\>FORMAT C: /S
when using NetWare DOS utility
when using MSDOS utility
4. Insert the HP disk NW SCSI (created with the Startup-CD) and type:
A:\>PREPARE
to automatically create new directories, copy the necessary drivers and
configure the DOS boot.
5. Remove the diskette and reboot the server.
39
Chapter 5
Installing Novell NetWare 5.1 and Novell Small Business Suite 5.1
6. Insert the Netware SBS 5.1 CD, then type:
C:\>D:
D:\>INSTALL
7. Select the Appropriate Language if prompted.
8. Press F10 to Accept the License Agreement.
For both NetWare 5.1 and Small Business Suite 5/5.1
6. Press Enter to setup "a new server" then scroll down and make sure
"Continue" is highlighted.
7. At the bottom bar of the screen, you can see the key function tips. Press F3.
8. Insert the HP disk NW patch.
9. Specify the file path "A:\RESPONSE.TXT", press Enter.
10. Press Enter to continue.
11. Modify or accept the server settings, the regional settings, as well as the
mouse and video configuration.
PHASE 2 – Install HP Drivers
1. The installation program then detect your hardware and attempt to match the
drivers to the hardware. It displays a driver summary screen.
2. If you have an IDE system, press Enter to continue. If you have a SCSI
model, you need to install the HP SCSI driver (the SCSI driver proposed by
default by NetWare does not install properly):
a. Scroll down to chose Modify and press Enter.
b. Scroll down to highlight the "Storage Adapters" item and press Enter.
c. The installation program displays the drivers detected: a SCSI driver and
a generic ATA/IDE/ATAPI Adapter driver (IDEATA.HAM). Press
Delete to remove the default SCSI driver. The only remaining driver
should be the IDEATA.HAM driver.
NOTE
Do NOT remove the IDEATA driver because it is used by the
CD-ROM Drive.
d. Insert HP disk NW SCSI (created with the Startup CD) in the floppy
drive.
40
Chapter 5
Installing Novell NetWare 5.1 and Novell Small Business Suite 5.1
e. Press Insert to add a driver, then Insert again to add an unlisted driver.
f. Press F3 and specify the path: A: then press Enter.
g. The installation program takes a few seconds then automatically adds the
HP driver on the driver list.
NOTE
The new HP driver may show the same device name
description but is a more recent version.
h. Scroll down and select "Return to driver summary".
i. Scroll down and select Continue.
3. The next driver summary screen displays storage and network devices. You
need to manually install the HP LAN driver:
a. Scroll down to chose Modify and press Enter.
b. Scroll down to highlight the "Network boards" item and press Enter.
c. ""Insert the HP disk NW LAN (created with the Startup CD) in the floppy
drive.
d. Press Insert to add a driver, then Insert again to add an unlisted driver.
e. Press F3 and specify the path: A: then press Enter.
f. The installation program takes a few seconds then automatically add the
HP driver on the driver list.
g. Scroll down and select "Return to driver summary".
h. Scroll down and keep Continue highlighted (don’t press Enter before you
go to the next step).
4. Remove the HP disk NW LAN, and insert HP disk NW patch.
5. Press Enter to continue.
6. The installation program displays the partitioning properties. HP
recommends to keep the default value by selecting Continue.
7. Wait as the system performs the installation according to your settings.
PHASE 3 – Configure the Network
1. The installation proceeds under a graphical interface. Follow the on-screen
instructions to configure your network: server name, IP address, Host name
and domain, etc.
41
Chapter 5
Installing Novell NetWare 5.1 and Novell Small Business Suite 5.1
NOTE
Some settings can be defined by using the tree icon at the right
side of the field.
The network settings need to be customized to your
environment. Please refer to Novell NetWare manuals should
you need further details on the networking setup fields.
2. Insert and browse the NetWare 5.1 or Novell Small Business Suite 5.1
licensing/cryptographic diskette when prompted.
3. When prompted, click Yes to reboot your system (remember to remove all
diskettes and CD-ROM from their respective drives).
4. The system will load NetWare GUI (Graphic User Interface).
NOTE
Because NW 5.1or SBS 5.1is not very stable without Support
Pack 3 or above installed, the GUI model may not be loaded
properly here.
Section 4 Install the Support Pack
1. You can get the latest copy of NetWare Consolidated Support Pack (CSP)
from NetWare Website at:
http://support.novell.com/tools/csp/
You can either subscribe to the "Novell Support Connection CD" program or
download CSP files individually. You will need to mount the Novell
Consolidated Support Pack as a NetWare volume.
HP does recommend you use NW 5.1 Support Pack 3 or above version,
which is also included in Novell Consolidated Support Pack 5 or above
version.
2. Close the GUI.
NOTE
If your GUI is not loaded properly, press Ctrl+Esc. A selection
screen should come up; select "system console".
3. Insert the NW 5.1 Support Pack CD-ROM.
42
Chapter 5
Installing Novell NetWare 5.1 and Novell Small Business Suite 5.1
4. At the system console prompt enter the command:
cdrom
5. Wait for about 15 seconds for the CD to be automatically mounted as a
volume. Note the volume name (example: “NW51SP1”).
6. Type:
nwconfig
NetWare Configuration Tool will open.
7. Scroll down to select "Product Options".
8. Scroll up to select "Install a Product Not Listed".
9. Press F3 and specify the path, including the volume name
(for example, “NW51SPx:\”, where x = version of support pack).
10. Press F10 to accept the default installation options.
NOTE
If you want to be able to uninstall the Support Pack later, you
must select the option to back up files.
11. Read NetWare warnings (recommends avoiding installation during peak
hours) and follow on screen instructions.
12. The system will automatically restart the GUI upon completion of the
Support Pack installation.
Section 5. Install Additional HP Accessories
The hp server tc2110 Startup CD includes the drivers for the following HP
accessories:
· HP-Intel 10/100 LAN
· HP NetRAID-1M adapter
· HP Surestore DAT24i
Please refer to the product manual enclosed with your accessory for the detailed
installation procedures.
43
Chapter 5
Installing Novell NetWare 5.1 and Novell Small Business Suite 5.1
Troubleshooting
Tip #1. Restarting NetWare Installation
If you want to restart NetWare installation from the very beginning, use a utility
such as fdisk to erase all data and partitions from your hard drive. Then resume all
installation process.
On-Line Information and Software Sources
· HP World Wide Web access: http://www.hp.com
· Novell World Wide Web access: http://www.novell.com
44
6 Installing Novell NetWare 6.0 and
Novell Small Business Suite 6.0
Prepare the Installation
Please refer to the Chapter 1 "Preparing your HP Server tc2110 for your NOS
installation" for our recommendations on the server preparation.
Then gather the following material:
· HP Server tc2110 Startup CD
· Novell NetWare 6.0 or Novell Small Business Suite 6.0 CD-ROM
· Novell NetWare 6.0 or Small Business Suite 6.0 licensing/cryptographic
diskette
· Novell Small Business Suite 6.0 Partner CD (only for SBS 6.0)
· Two or more clients for testing purpose (Optional)
· One diskette for driver installation
High Level Process Flow
1. Run HP DiagTools (optional - diagnostics).
2. Create the drivers diskette using the hp Startup CD.
3. Perform NetWare or SBS installation.
4. Install additional HP accessories.
Section 1. Run HP Diagtools (optional)
To perform HP Diagtools hardware diagnostic on your HP Server tc2110, switch
off your HP server then reboot on the Startup CD and follow the on-screen
instructions. View and save the hardware inventory after the test.
Section 2. Create the Driver’s Diskettes
1. Locate one blank, formatted 3.5" diskette.
45
Chapter 6
Installing Novell NetWare 6.0 and Novell Small Business Suite 6.0
2. Insert your HP Startup CD in a Windows PC and follow the on-screen
instructions to create the HP Server tc2110 NetWare SCSI drivers (HP disk
NW SCSI).
NOTE
If the Windows PC does not auto-start the Startup menu, start it
by opening Startup.htm found at the root level of the Startup
CD.
Section 3. Perform NetWare 6.0 or SBS 6.0
Installation
The installation of NetWare 6.0 or SBS 6.0 contains several phases:
· Phase 1 – Start the Installation
· Phase 2 – Install HP Drivers
· Phase 3 – Configure the Network
PHASE 1 – Start the Installation
NOTE
If your hard drive contains data or is not new, HP recommends
to use a utility such as fdisk to erase all data and partitions
from your hard drive.
For NetWare 6.0
NOTE
The NetWare NOS installation contains a known software
error (not product-specific) that does not allow you to boot
from CD-ROM. To work around this problem, boot from a
DOS diskette and create a bootable DOS partition on the drive.
1. Insert the Novell NetWare 6.0 or SBS 6.0 CD-ROM and boot the system.
2. Press Enter to read the license agreement then press Esc, and select "Accept
License Agreement".
3. Press Enter to "Create a New Boot Partition".
4. HP recommends to modify “Size of boot partition” to create a 1000MB boot
partition.
46
Chapter 6
Installing Novell NetWare 6.0 and Novell Small Business Suite 6.0
5. If you accept erasing all data on your disk, select Continue. Then press any
key for your system to create the partition, reboot, and format that partition.
6. Press F10 to "Accept License Agreement".
For Small Business Suite 6.0
1. Boot your HP Server on a DOS bootable utility diskette.
NOTE
You can boot from the NetWare SBS 6 License diskette.
Novell DOS 7 and all required DOS utilities (FDISK,
FORMAT, EDIT) are included on the diskette.
2. Type FDISK to create a 1000 MB primary DOS partition on the primary
drive (C:). Remember to make it the active (bootable) partition. The
computer will restart and boot on the DOS bootable utility diskette again.
3. Format and transfer DOS system files to the partition by typing:
A:\>FORMAT C: /X /S
A:\>FORMAT C: /S
when using NetWare DOS utility
when using MSDOS utility
4. Insert the HP disk NW SCSI (created with the Startup-CD) and type:
A:\>PREPARE
to automatically create new directories, copy the necessary drivers and
configure the DOS boot.
5. Remove the diskette and reboot the server.
6. Insert the Netware SBS 6.0 CD, then type:
C:\>D:
D:\>INSTALL
7. Select the Appropriate Language if prompted.
8. Press F10 to Accept the License Agreement
For Both NetWare 6.0 and Small Business Suite 6.0
1. Change the prompt from Express to Custom, and keep the default New server
option; scroll down and choose Continue.
47
Chapter 6
Installing Novell NetWare 6.0 and Novell Small Business Suite 6.0
2. Review the Server Settings. If you do not want the "SERVER" to
automatically load after reboot, Modify the “Load Server at reboot”
parameter to NO.
3. Go to the "Server SET Parameters" and Choose Edit. A window will pop-up
and the following should be added:
i. SET MINIMUM PACKET RECEIVE BUFFERS=2500
ii. SET MAXIMUM PACKET RECEIVE BUFFERS=12500
4. Press ESC, save the changes.
5. Scroll down to select Continue.
6. Review the regional settings and modify if necessary.
7. Review the mouse and video settings and modify if necessary.
8. Wait a few minutes while system files are copied from the CD-ROM.
PHASE 2 – Install HP Drivers
1. The installation program then detects your hardware and attempts to match
the drivers to the hardware.
2. If you have an IDE system, press Enter to continue. If you have a SCSI
model, you need to install the HP SCSI driver:
a. Scroll down to chose Modify and press Enter.
b. Scroll down to highlight the "Storage Adapters" item and press Enter.
c. The installation program displays the drivers detected: a SCSI driver and
a generic ATA/IDE/ATAPI Adapter driver (IDEATA.HAM). Press
Delete to remove the default SCSI driver. The only remaining driver
should be the IDEATA.HAM driver.
NOTE
Do NOT remove the IDEATA driver because it is used by the
CD-ROM Drive.
d. Insert HP disk NW SCSI (created with the Startup CD) in the floppy
drive.
e. Press Insert to add a driver, then Insert again to add an unlisted driver.
f. Press F3 and specify the path: A: then press Enter.
48
Chapter 6
Installing Novell NetWare 6.0 and Novell Small Business Suite 6.0
g. The installation program takes a few seconds then automatically adds the
HP driver on the driver list.
NOTE
The new HP driver may show the same device name
description but is a more recent version.
h. Scroll down and select "Return to driver summary".
i. Scroll down and select Continue.
3. The next driver summary screen displays storage and network devices. You
can keep the default Network board (LAN) driver and scroll down to select
Continue.
4. Wait while system loads the new drivers.
5. Review the Volume SYS and Partition Properties Screen. Select Modify if
any changes are necessary, and press the F10 key to save any changes.
6. Select Continue after all changes have been applied.
7. Wait a few minutes while system files are copied and Netware GUI is started.
PHASE 3 – Configure the Network
The installation proceeds under a graphical interface.
NOTE
The network settings need to be customized to your
environment. Please refer to Novell NetWare manuals should
you need further details on the networking setup fields.
1. Enter the server name.
2. Insert the NetWare licensing/cryptographic diskette when prompted, then
click Next.
3. Select Free Space and click create. Type in a Volume name and select a
Volume Type for the first the partition. Click OK. Click Next to proceed.
4. Choose YES, if necessary to mount all volumes when server reboots. Click
Next to proceed.
5. Setup your IP or IPX protocols to match your network environment.
NOTE
NetWare 6. 0 will not proceed if you don't setup an IP address
for at least one of your system network devices (embedded
LAN or added PCI card).
49
Chapter 6
Installing Novell NetWare 6.0 and Novell Small Business Suite 6.0
6. You may then configure the Domain Name Service. Click Next to proceed.
7. Select your time zone then click Next.
8. Select whether to create a New NDS Tree or use an Existing NDS Tree, and
click Next.
9. To create a New NDS Tree, enter the “Tree Name”, the “Context for Server
Object”, and the administrator password and click Next.
10. Click Next to validate the NDS summary.
11. Click Next at the Licenses window to install the license previously detected.
12. If you wish to install other items or products, do so here and clicking Next.
13. Click Next at the Novell Certificate Server 2.21 Objects window.
NOTE
Depending on the options you have chosen, you may receive
additional prompts. Enter the required information and click
Next.
14. Review Summary and click Finish.
15. For Small Business Suite 6.0, after promoted, insert Novell Partner CD, and
click OK to continue.
16. When prompted, remember to remove all diskettes and CD-ROM from their
respective drives, click Yes to reboot your system.
NOTE
If you chose not to load the server on reboot, you can load it
manually. When the computer reboots, change to the startup
directory containing the NetWare server files(C:\NWSERVER)
and enter “server”.
Section 4. Install Additional HP Accessories
The hp server tc2110 Startup CD includes the drivers for the following HP
accessories:
· HP-Intel 10/100 LAN
· HP NetRAID-1M adapter
· HP Surestore DAT24i
50
Chapter 6
Installing Novell NetWare 6.0 and Novell Small Business Suite 6.0
Please refer to the product manual enclosed with your accessory for the detailed
installation procedures.
Troubleshooting
Tip #1. Restarting NetWare Installation
If you want to restart NetWare installation from the very beginning, use a utility
such as fdisk to erase all data and partitions from your hard drive. Then resume all
installation process.
On-Line Information and Software Sources
· HP World Wide Web access: http://www.hp.com
· Novell World Wide Web access: http://www.novell.com
51
7 Installing Red Hat Linux 7.1
Prepare the Installation
Please refer to the Chapter 1 "Preparing your HP Server tc2110 for your NOS
installation" for our recommendations on the server preparation.
Then gather the following material:
· HP Server tc2110 Startup CD
· Red Hat Linux 7.1 CD-ROMs #1 and #2
· Two or more clients for testing purpose (Optional)
High Level Process Flow
1. Perform Linux 7.1 installation.
2. Install additional HP accessories.
Section 1. Perform Red Hat Linux Installation
PHASE 1 – Launch the Installation
1. Turn on the server and insert the Red Hat Linux 7.1 bootable CD-ROM.
2. The system will display a text menu. Press Enter to start installation using the
graphical interface.
PHASE 2 – Configure the Server
The installation program now displays a graphical interface. You can proceed
through the customization of your installation.
Please note the following recommendations:
· Your HP server comes with a Generic 104-key PC keyboard and a 2 Button
Mouse (PS/2).
NOTE
If you wish to change your keyboard type after you have
booted your Red Hat Linux system, you may use the
“/usr/sbin/kbdconfig” command.
53
Chapter 7
Installing Red Hat Linux 7.1
· HP recommends selecting a Custom System installation type, because this
mode includes the X Window graphical interface. ("Install Options" section)
· HP recommends using the default partitioning mode: Automatically partition
and REMOVE DATA ("Disk Partitioning" section)
NOTE
The network settings need to be customized to your
environment. Please refer to Red Hat manuals should you need
further details on the networking settings.
· At the "Selecting Package Groups" Section, HP recommends selecting the X
Window graphical interface package
NOTE
Remember to select an appropriate package group that matches
your network settings (example: the "DNS Name Server"
package may be required if you have set-up your new server to
be the DNS controller).
· Should you select to install a graphical interface, you will be prompted for
your video hardware and monitor references ("X Configuration" section).
o
Red Hat will detect your chip as an nVidia chip.
o
You can find HP monitors references on the back of your monitor.
o
HP recommends selecting login type as "Graphical" ("Custom
Configuration" section).
PHASE 3 – Complete the Installation
1. Upon completion of the customization, the installation program asks for
confirmation before proceeding with the install. Click Next to proceed.
2. The installation may prompt for Red Hat Linux CD-ROM #2, depending on
the packages you choose to install.
3. HP recommends that you create a boot diskette that will allow you to boot
and manage your server when experiencing problems in loading your Red
Hat environment.
4. Click Exit to exit the installation program. Remove the CD from the drive.
5. The system reboots and loads your new Red Hat environment.
54
Chapter 7
Installing Red Hat Linux 7.1
Section 2. Install Additional HP Accessories
The hp server tc2110 Startup CD includes the drivers for the following HP
accessories:
· HP-Intel 10/100 LAN
Please refer to the product manual enclosed with your accessory for the detailed
installation procedures.
On-Line Information and Software Sources
· HP World Wide Web access: http://www.hp.com
· Red Hat World Wide Web access: http://www.Red Hat.com
· Red Hat Errata World Wide Web access: http://www.Red Hat.com/errata
55
8 Installing TurboLinux Server 6.5
Prepare the Installation
Please refer to the Chapter 1 "Preparing your HP Server tc2110 for your NOS
installation" for our recommendations on the server preparation.
Then gather the following material:
· HP Server tc2110 Startup CD
· TurboLinux Server 6.5 CD-ROM
· A blank 3.5-inch diskette, labeled TurboLinux 6.5 Boot Disk (Optional)
· Two or more clients for testing purpose (Optional)
High Level Process Flow
1. Perform TurboLinux 6.5 installation.
2. Install additional HP accessories.
Section 1. Perform TurboLinux Installation
PHASE 1 – Launch the Installation
1. Turn on the server and insert the Turbolinux Server 6.5 CD-ROM.
2. Press Enter to start installation.
3. Wait as the system prepares for the installation.
4. Choose your language then press Enter to proceed with the installation.
PHASE 2 – Configure the Server
The installation program now displays a graphical interface. You can proceed
through the customization of your installation.
Please note the following recommendations:
· HP recommends using the default Install Class, which is Standard Install.
57
Chapter 8
Installing TurboLinux Server 6.5
· Your HP server comes with a Generic 104-key PC keyboard and a 2 Button
Mouse.
· HP recommends using Automatic Partitioning ("Partition Disk" section)
NOTE
The network settings need to be customized to your
environment. Please refer to TurboLinux manuals should you
need further details on the networking settings.
· HP recommends selecting "Everything" for the Installation Type, because
this is the only mode that includes the X Window graphical interface.
· Should you select "Everything" for the Installation Type, you will be
prompted for your monitors and video hardware references.
o You can find HP monitors references on the back of your monitor.
o HP Server tc2110 comes with an nVidia video chip which is
automatically detected by TurboLinux.
· HP recommends selecting login type as "Graphical" ("Configure X" section).
PHASE 3 – Complete the Installation
1. Upon completion of the customization, the installation program asks for
confirmation before proceeding with the install. Click Yes/Next to proceed.
2. You may install additional packages once the above installation is completed.
Additional packages require specific TurboLinux CD-ROMs.
3. HP recommends that you create a boot diskette that will allow you to boot
and manage your server when experiencing problems in loading your
TurboLinux environment.
4. Click Finish to exit the installation program.
5. At the prompt, press Enter to reboot your system and login to your new
TurboLinux environment. Remove the CD from the drive.
Section 2. Install Additional HP Accessories
The hp server tc2110 Startup CD includes the drivers for the following HP
accessories:
· HP-Intel 10/100 LAN
Please refer to the product manual enclosed with your accessory for the detailed
installation procedures.
58
Chapter 8
Installing TurboLinux Server 6.5
On-Line Information and Software Sources
· HP World Wide Web access: http://www.hp.com
· TurboLinux World Wide Web access: http://www.turbolinux.com
59