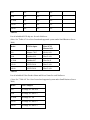
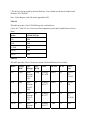
1
Microsoft Small Business Server 2000
Installation Guide for HP NetServers E60,
E800, LC2000, and HP Server tc3100, and
tc4100
NOTICE: The information in this document was last updated for the HP NetServer Navigator CD-ROM version M.04.05.
If you don't have the M.04.05 version CD-ROM and you're obtaining this document from the HP web site as a reference
to install an operating system, be sure to also check the HP web site for the latest available drivers.
©Copyright Hewlett-Packard Company
January 22, 2002
Table of Contents
Introduction
Requirements
Process Flow ( High Level View )
Installation Planning Sheet
Installation Methods
Automatic Installation – Using the HP Navigator CD
Manual Installation
Creating the Drivers Diskettes
Selecting the Manual Installation Method
Installing Small Business Server 2000
Hardware Status Check
Initialize Hard Drives
Configure Server IP Address
Attach Clients to Network
Domain Controller Setup
Troubleshooting Tips
Tip #1. Upgrading from SBS 4.0 to Small Business Server 2000
Tip #2. Using the Small Business Server 2000 integrated backup utility with the HP
NetServer E 60 bundled tape drive
Tip #3. Upgrading Small Business Server 2000 from Uniprocessor HAL to Multiprocessor
HAL
Tip #4. Small Business Server 2000 Driver Signatures
Tip #5. Upgrading D5013B NIC Drivers for Small Business Server 2000
Tip #6. Installation Fails to Boot after First Reboot
Tip #7. Small Business Server 2000 Recovery Options
Tip #8. Terminal Server Service is only support the NetServer L Series
Frequently Asked Questions
APPENDIX
On-Line Information and Software Sources
Introduction
This document was created by Hewlett-Packard for the purpose of helping you install Microsoft
Small Business Server 2000 on your HP NetServer based on procedures tested by HP. The
objective of this document is to provide the information needed to achieve the following tasks.
·
Install Small Business Server 2000 from Diskette or CD-ROM
·
Create boot diskettes from CD-ROM
·
Configure system as Domain Controller and DNS Server
·
Change IP Address
·
Provide installation troubleshooting tips and tricks
Before you start installing or upgrading to Small Business Server 2000 check the following
documents and make sure you develop an action plan to complete the installation. Use the
following informational resources to help you.
·
read1st.txt (Small Business Server 2000 CD-ROM)
·
readme.doc (Small Business Server 2000 CD-ROM)
·
Troubleshooting Tips and Tricks at the end of this document.
Requirements
·
Microsoft Small Business Server 2000 CD-ROM.
·
Target system to be tested with minimum of P166 Processor and 64Meg of RAM (128Meg
Recommended).
·
One or more Network Interface Cards (NIC).
·
One or more hard drives.
·
Latest system BIOS update. (http://www.hp.com)
·
Two or more clients for testing purpose. (Optional)
·
HP Driver's diskette if installing devices that have no drivers included in the Small Business
Server 2000 CD-ROM. Example: HP NetRAID-4M, HP Fiber Channel adapter (Optional),
etc. (This driver's diskette may contain updated Small Business Server 2000 drivers for HP
components.)
Process Flow ( High Level View )
1. Locate and install optional components.
2. Install Small Business Server 2000 on NetServer as stand alone system.
3. Hardware status check with "Device Manager" tool.
4. Prepare all logical drives and shared directories.
5. Configure IP address as needed.
6. Attach clients to network.
7. Test network link using the ping utility.
8. Domain controller setup.
9. Create shared directories.
10. Verify that all clients can access the shared directories.
11. Perform a file copy test.
Installation Planning Sheet
Complete the following table before you begin the installation process. You will need this
information in order to answer questions that you will be asked during the installation process.
Partition Table: ______________________(List target partitions)
User Name: _________________________
Organization: ________________________
Licensing: ___________________________
Computer Name: ______________________
Admin Password: _____________________
Date Time Zone: ______________________
Workgroup or Domain Name: ______________
Registration Key: ____________________________
Installation Methods
There are several ways of installing Small Business Server 2000. The most popular methods are
listed below. Select a method and go to the appropriate section of this guide to begin. Depending
upon your system and its configuration, it may also be necessary to create a drivers diskette.
1. Automatic Installation – boot from the HP Navigator CD and run the
Configuration/Installation utility. (Supported on all HP NetServer systems.)
2. Manual Installation – do the following:
·
Create the HP NetServer Small Business Server 2000 drivers diskettes using the HP
NetServer Navigator CD-ROM.
·
Select one of the following methods for installation:
- Create Small Business Server 2000 Setup diskettes. Use those diskettes to begin the
installation. Insert and use the Small Business Server 2000 CD when prompted.
Or
- Boot directly from the Small Business Server 2000 CD to begin the installation.
Automatic Installation – Using the HP Navigator CD
HP recommends that you follow this method to install Small Business Server 2000. This is the
easiest method because it requires less user intervention. Following are the steps to complete the
installation of Small Business Server 2000 using the HP Navigator CD.
1. Boot the system from the HP Navigator CD.
2. From the "NetServer Navigator Select a NOS" screen, select the operating system that you
will be installing. Then, select "Continue".
3. At the main menu, select "Configure the Server".
4. Then select "Guided Setup" and follow the instructions on the screen.
Manual Installation
Creating the Drivers Diskette
Before you begin, use one of the following two methods that can be used to create the drivers
diskette. One method is to create the drivers diskette using a system booted from the Navigator
CD. The other method is to create the drivers diskette using a system that is running Windows
NT, Small Business Server 2000, or Windows 95/98.
Creating the Drivers Diskette at the server after booting from the Navigator CD
1. Boot the system from the Navigator CD.
2. From the "NetServer Navigator Select a NOS" screen, select the operating system that you
will be installing. Then, select "Continue".
3. From the "Diskette Title" window, select the diskette that you want to create and then select
"Create Diskette(s)". Follow the on-screen instructions to create the desired diskette(s).
Create the Drivers Diskette using a system running Windows NT, Small Business Server
2000, or Windows 95/98
1. Insert the Navigator CD in the CD-ROM drive on the Windows-based system.
NOTE: The system's monitor must be set for at least 800 x 600 resolution.
2. Your system should auto-detect the presence of the CD and start the Navigator process. If
your system does not auto-start the Navigator process, start it by executing LAUNCH32.EXE
which can be found at the root level of the Navigator CD.
3. Once the Navigator process has started, select the target HP NetServer system from the dropdown menu and select "Continue".
4. From the "NetServer Navigator Select a NOS" screen, select the operating system that you
will be installing. Then, select "Continue".
5. At the "NetServer Navigator Main Menu" screen, select "Diskette Library".
6. From the "Diskette Title" window, select the diskette that you want to create and then select
"Create Diskette(s)". Follow the on-screen instructions to create the desired diskette(s).
Selecting the Manual Installation Method
Before using this method of installation, decide whether you want to install Small Business
Server 2000 using Setup Diskettes, or by booting directly from the Small Business Server 2000
CD.
·
If you wish to create Setup Diskettes (perhaps because you have other systems that do not
support booting from CD), proceed to the following section "Creating Setup Diskettes."
·
If you want to start the setup by booting directly off the Small Business Server 2000 CD
(supported for all NetServers), proceed to the following section "Installing Small Business
Server 2000."
Creating Setup Diskettes
If you opt for starting the Small Business Server 2000 installation from Setup Diskettes, do the
following:
1. You need four blank, formatted diskettes. Label them as listed below:
Small Business Server 2000 Setup Boot.
Small Business Server 2000 Setup Disk #2.
Small Business Server 2000 Setup Disk #3.
Small Business Server 2000 Setup Disk#4
2. Place the Small Business Server 2000 CD on a system running Windows NT or Windows 95
or 98.
3. Open a command prompt and change to the d:\bootdisk directory (assuming that D: is your
CD-ROM drive).
4. At the command prompt type:
makebt a: (If using a DOS or a Windows 95 or 98 system)
makebt32 a: (If using an NT system)
5. Follow the on-screen instructions provided by the utility.
Starting the Installation Small Business Server 2000 Using Setup Diskettes
1. Boot from the "Small Business Server 2000 Setup Boot" diskette. Follow instructions
displayed, replacing diskettes as necessary.
2. When prompted for the Small Business Server 2000 CD-ROM, place the CD in the drive and
then proceed to Step 2 in the next section "Installing Small Business Server 2000" to
continue the installation.
Installing Small Business Server 2000
1. If you have opted not to use Setup Diskettes, place the Small Business Server 2000 CD in the
CD-ROM drive. Power off and on to reboot the system. You will see a message that reads
"Setup is inspecting your hardware configuration.". Then the setup screen will be displayed.
NOTE: If you experience any hang or issue during this time, consult the Tips/Tricks
section of this document for help.
2. If you have new drivers to add then press F6 to add OEM SCSI, DAC. Read the message
that shows at the bottom of the display indicating when to press F6.
NOTE: If the boot device driver is not included on the Small Business Server 2000 CDROM, for example the "HP NetRAID-4M", then do the following steps after pressing F6
a) Press S to select additional hardware.
b) Select Other and press Enter.
c) When prompted to insert driver diskette, please insert the target adapter driver's
diskette created with the HP Navigator CD-ROM. Press Enter to continue.
d) Select the target device driver from the list provided on the display. For example, if
you have the "HP NetRAID-4M", select "Hewlett Packard NetRAID-4M RAID
CONTROLLER".
e) If you have no other drivers that you need to install, press Enter to continue with the
installation.
3. Press Enter to continue at the "Small Business Server 2000 Server Setup. Setup
Notification…" screen.
4. Press Enter to continue at the "Small Business Server 2000 Server Setup. Welcome to
Setup…" screen.
5. Press C to continue Setup at the "Setup has determined that your computer's startup hard disk
is new…" prompt.
6. Press F8 to accept the licensing agreement.
7. At the drives partitioning screen, select the target drive. If you want to use the entire drive to
install Small Business Server 2000 then press Enter. Otherwise, press C to create a drive a
partition.
(In this example we will create a 2GB partition. Please note that Small Business Server 2000
does not have the 2GB partition size limitation present on NT 4.0.)
8. Type 2048 and press Enter at the Create partition size prompt.
9. HP recommends that you create all the partitions needed for each hard drive present on your
system at this time.
10. Select the target drive to be used to install Small Business Server 2000. Press Enter.
11. Select Format the partition using the NTFS file system and press Enter.
12. The installer will format and copy files to the hard drive. The system will then reboot.
13. Click Next to continue at the Setup Wizard first dialog box.
14. The Installing Devices screen will be shown with a progress bar on the display. This may
take 10 to 15 minutes.
15. Note: If you see a dialog box titled "Digital Signature Not Found".
Please click "Yes" to continue the installation and read Tip #4 in the troubleshooting section
of this guide.
16. Click Next at the regional Settings screen.
17. At the Personalize Your Software screen, enter a name and organization. Then click Next.
18. Enter the product license key.
19. At the Computer Name and Administrator Password type in your computer name,
administrator password and password confirmation. Then click Next.
20. Click Next at the Small Business Server 2000 Component screen to accept default values.
21. Enter the proper date and time and click Next .
22. The Networking Setting screen starts with a progress bar chart.
23. Click Next to accept the default Typical settings.
24. The Installing Components screen starts with a progress bar chart. It takes about 20 minutes
to complete this section. The wizard will then start the "Performing Final Tasks" section to
complete the installation.
25. Click Finish to complete the installation. Remove the CD from the drive. The system will
then reboot from the hard drive.
NOTE: There may be a period of time with no apparent activity after it displays a
message that reads "OS Loader Version 5.0". Be patient.
26. Follow screen instructions to logon. Enter user-id and password.
27. Click "CANCEL" to close the "Setup needs the location of the Small Business server
2000 Setup files…".
28. Small Business server 2000 has been installed successfully, additional applications can now
be added.
29. Read Tip #7 to install the Small Business Server 2000 Recovery Console to enhance the
system's configuration.
Hardware Status Check
In this section you will run the "Device Manager" tool to identify any issues with the installed
devices or resource conflicts.
1. Right click My Computer.
2. Click Properties. This brings up the "System Properties" panel.
3. Click the Hardware tab.
4. Click the Device Manager… button.
5. Verify that no devices have either a yellow band (!) or question mark (?) symbol next to it.
(See following note for pointer to exceptions)
Yellow (!) means that there is a resource issue with the device.
Question (?) means that the device is unknown.
6. If no (!) or (?) symbols are reported then you are done. Go to step 9. Otherwise, do the next
step.
7. Double click on each of the devices with (!) or (?). Note the "Device Status" message. Or if
a printer is available, use the View, Print from the menu to get a report.
8. See table 5 to verify any errors detected in steps 6 and 7.
9. Verify if the installed drivers are digitally signed.
A. In the Device Manager, click on the device (e.g HP NETRAID 1M/2M) that want to
verify.
B. Right click on that device.
C. Click Properties option.
D. Click on Driver Tab
E. Locate the"Digital Signer:" If the driver of that device is digitally signed then it will
display "MS Windows 2000 Publisher" or "Microsoft Windows Hardware
Compatibility Publisher"
If the driver of the device is not digitally signed we recommend that you check the HP
Website http://www.hp.com/. for the latest driver package. If available, install the new driver.
10. Check the Event viewer to make sure that there are no errors in the log.
Click on Start | Programs | Administrative tools | Event viewer.
NOTE: A warning message with source "DHCP" and errors with sources "W3SVC" and
"SMTPSVC" may appear in the "System Log" of Event Viewer. These warning and
errors will go away after configure all IP addresses for all Ethernet adapters.
11. Exit event viewer.
Initialize Hard Drives
To start the disk administrator use the following procedure.
1. Click Start | Programs | Administrative Tools | Computer Management.
2. If necessary click the + sign next to Storage to open this folder.
3. Double click Disk Management.
4. The "Write signature and Upgrade" wizard will start if you have new hard drives with no
signatures on them.
5. Follow the instructions provided by the wizard to create the new hard drive signature.
6. Perform formatting and partitioning.
NOTE: There are two types of hard drive configuration: Dynamic and Basic. You can
select the appropriate type by right clicking on the drive icon on the screen. Dynamic
drives are used to create volumes which can contain more than one physical hard drive.
Basic drives are used to create primary or local partitioned drives.
Configure Server IP Address
During the installation process the system was configured to use DHCP. Also, when no DHCP
server is found on the network the system will auto-configure a random IP address to start
functioning. It is important that you configure the proper IP address to be able to communicate
with the clients.
Configuring IP Address Steps.
1. Right click My Network Places.
2. Click Properties.
3. Double click Local Area Connection. There is one "Local Area Connection" icon for each
Network Interface Card (NIC) present on the system. Identify the proper NIC by browsing
each one.
4. Click Properties at the Local Area Connection Status screen.
5. Click Internet Protocol(TCP/IP).
6. Click Properties.
7. Click Use the following IP address.
8. Enter appropriate IP address selected on the planning section listed above. For example
100.100.100.1.
9. Click the OK button to continue.
10. Open a command prompt window to verify the TCP/IP configuration. Enter the command:
ipconfig /all
You should get a display showing the configuration information you entered above.
11. Test the link by entering the following at the command prompt:
ping computername
Where computername is the server name. You should get four reply's from 100.100.100.1, if
you don't get this result then there is a link problem which must be fixed before going any
further.
12. Test the link by doing a ping to one of the clients attached to the server, for example:
ping 100.100.100.2
You should get four reply's from the client.
Attach Clients to Network
Follow normal procedure to patch the clients to the proper hub with the server.
Domain Controller Setup
The Small Business Server 2000 reference guide calls this process "Promoting the server to a
domain controller".
1. Click Start | Run and enter the command:
dcpromo
2. Click Next at the "Active Directory Installation Wizard".
3. Click Next at the "Domain Controller Type" to accept default "Domain Controller for a new
Domain" radio button enabled.
4. Click Next at the "Create Tree or Child Domain" to accept default "Create a new domain
tree" radio button enabled.
5. Click Next at the "Create or Join Forest" to accept default "Create a new forest of domain
trees" radio button enabled.
6. At the text box for "Full DNS name for new domain:" type in the assigned DNS name for
your server (for example: hostname.com).
7. Click Next. The system will take a few minutes with the hour clock on the display before
moving to next screen.
8. Click Next at the "NetBIOS Domain Name" dialog box to accept default "Domain NetBIOS
name:"
9. Click Next to accept "Database and Log Locations" default values:
Database Location: C:\WINNT\NTDS
Log Location: C:\WINNT\NTDS
10. Click Next to accept default "Shared System Volume".
Folder Location: C:\WINNT\SYSVOL
11. The system will display a dialog box that reads "The Wizard can not contact the DNS
Server…." Confirm your DNS configuration, or install and configure a DNS server on this
computer. Click OK.
12. Click the Yes, Install and config DNS on this computer radio button for this choice. Click
Next.
13. Click the Permissions compatible with pre Windows2000 Server radio button. Click Next
to continue.
14. Enter the Administrator password and click Next.
15. Review the Summary display and click Next to continue.
16. The system will start configuring the active directory display. It shows an animation of a
pencil writing on a note pad. This will take a few minutes to complete..
17. If prompted, insert Small Business Server 2000 CD-ROM and click OK to continue.
18. Configuring active directory display shows again. Click Finish to close the Wizard utility.
This completes the active directory installation.
19. Click Restart Now to reboot the system. Remove CD-ROM if present.
20. At the login prompt type in the password. Click the Options button and verify that the "Log
on to: HOST" appears on the dialog box. Click OK to start the logon process.
Troubleshooting Tips
This section provides information about known issues, solutions and workaround.
Tip #1. Upgrading from SBS 4.0 to Small Business Server 2000
It is possible to upgrade from any edition of NT 4.0 including Terminal Server to Small Business
Server 2000. Please refer to the readme.doc on the Small Business Server 2000 CD and the
Small Business Server 2000 Setup Guide for information on how to perform the upgrades.
Tip #2. Using the Small Business Server 2000 integrated backup utility with
the HP NetServer E 60 bundled tape drive
The backup utility in w2k has a "Backup Destination" pull down menu with the following
choices:
File
minQIC
Travan
The T20 tape drive shipped with the NetServer E 60 requires that you set this option to minQIC
when using 20GB cartridge. If you plan to use an 8GB cartridge (read-only mode supported)
then change this setting to Travan.
The T4 tape drive shipped with the NetServer E 50 requires that you set this option to Travan.
The T4 tape drive only supports 8GB cartridges.
It you don't set this option properly the backup utility will report that either the tape drive is
broken or the media is full.
Tip #3. Upgrading Small Business Server 2000 from Uniprocessor HAL to
Multiprocessor HAL
If you have a uni-processor system running Small Business Server 2000 and a second processor
is added, the plug and play feature in Small Business Server 2000 will not auto-detect the second
processor.
Fix: Use the following procedure to configure Small Business Server 2000 to use the second
processor .
1. Click Start, select Settings, select Control Panel, and then select System.
2. Click the Hardware tab, and then click Device Manager.
3. Double-click the Computer branch to expand it. Note the type of support you currently have.
4. Double-click the computer type listed under the Computer branch, click the Drivers tab,
click Update Driver, and then click Next.
5. Click "Display a list of known drivers for this device", and then click "Show all hardware of
this device class".
6. Click the appropriate computer type (one that matches your current type, except for multiple
CPUs), click Next, and then click Finish.
Tip #4. Small Business Server 2000 Driver Signatures
Small Business Server 2000 checks for digital signatures on driver files to help maintain system
integrity. During the installation or update of a driver, if there is no matching signature file,
Small Business Server 2000 displays a "Digital Signature not Found" box.
To expedite release of new products, drivers may be shipped by HP without signature files. All
Small Business Server 2000 drivers provided by Hewlett-Packard are submitted to Microsoft for
certification testing . Upon completion of testing, Microsoft produces signature files. HP then
posts the revised driver package at http://www.hp.com/.
If a signature warning is displayed during installation of a driver, you may override the warning.
We recommend that you check the HP Website for the latest driver package. If available install
new driver.
You can elect to have Small Business Server 2000 ignore signatures. Right-click My Computer;
select Properties, Hardware, then Driver Signing. This is helpful if you are setting up multiple
systems.
Digital signatures are a powerful way to ensure system integrity as you add drivers -- whether
provided by Hewlett-Packard or others -- to your system.
Tip #5. Upgrading D5013B NIC Drivers for Small Business Server 2000
Small Business Server 2000 installation automatically detects the HP D5013 NIC and installs the
driver bundled with the Small Business Server 2000 CD-ROM. The following procedure will
help you upgrade the driver using the "Drivers Diskette" created using the HP NetServer
Navigator CD-ROM. ( See Manual Installation section of this document for instructions on how
to create the drivers diskette. )
To update the driver for the adapter:
1. Insert the NIC driver diskette in floppy drive A.
2. From the Control Panel, double-click the System icon, select the Hardware tab, and click
the Device Manager button.
3. Select "Network Adapters" and right-click on the appropriate adapter listing to display its
menu. Then click the Properties menu option.
4. From the Properties dialog box, click the Driver tab and click the Update Driver button.
The Update Device Driver Wizard appears. Click Next.
5. At the prompt "What do you want the wizard to do?", select the "Search for a suitable driver
for my device" radio button, and click Next.
6. Select the appropriate media checkbox and click next.
7. Select the "Install one of the other drivers" check box and click Next.
8. Select the driver on the floppy drive A: and click Next.
9. Restart your computer. (This is not required if you only have one NIC on your system.
Otherwise, it is recommended to reboot to make sure other D5013 adapters get initialized
properly. )
10. After restarting Windows, connect to your network and test for connectivity.
Tip #6. Installation Fails to Boot after First Reboot
Small Business Server 2000 installation fails to boot after the first reboot. with an error
indicating that something is wrong with the disk subsystem. This problem is usually because the
BIOS does not support Int13 extensions to handle drives > 8G.
Workaround: Create a partition of 2G or so to install Small Business Server 2000. For a fix to
this problem check http://www.hp.com to see if a new BIOS is available for the system or
component providing the boot functionality.
Tip #7. Small Business Server 2000 Recovery Options
In the event that the current installation of Small Business Server 2000 fails to boot (this might
happen after installing a new driver, component, software, etc), Small Business Server 2000
provides the following recovery options to help you gain access to your Small Business Server
2000 installation to replace damaged files and services for troubleshooting purpose.
It is recommended that you install the Recovery Console as listed on this document to enhance
the system configuration.
Last known good configuration
Activated by pressing F8 during the system process of Small Business Server 2000 and selecting
"Last Known Good Configuration" from the menu.
This boot mode is used in the case that the system fails to boot after installing a new software or
driver. The system will use the previous registry setting to initialize and boot the system.
Safe Mode Boot
Activated by pressing F8 during the system boot. It provides minimal configuration with
required drivers and services. The safe mode boot provides three options:
1. Standard safe mode boot. Provides no network services or drivers.
2. Networking disabled. Includes networks services and drivers.
3. Directory services restore mode. Brings system up with directory services disabled with the
intent of recovering active directory. Safe mode boot is guided by the registry key
hklm\CurrentControlSet\Control\SafeBoot with the use of the Minimal and Network
subkeys. The IOManger and service control manager looks at the resgistry to load the driver
and services. This way it will avoid loading a problematic driver or service.
4. Command prompt. Provides an alternate command shell CMD.EXE instead of the explorer.
This is dictated by the registry key
hklm\system\CurrentControlSet\Control\SafeBoot\AlternateShell
There is a Safe-Mode boot loophole. Since NTLDR loads "Boot Load" drivers, these drivers
bypass the IO Manager's safe Mode check.
Recovery Console (RC) Boot
Recovery Console can be used when safe boot fails. You can enter RC in two ways booting
from Small Business Server 2000 CD-ROM or by installing the recovery console boot on your
system.
It is recommended to install the recovery console (RC) immediately after installing Small
Business Server 2000.
Start RC Booting from Small Business Server 2000 CD-ROM
If you have a need of booting the Small Business Server 2000 recovery console but this feature is
not installed on the system, use the following procedure to boot the RC from the Small Business
Server 2000 CD-ROM.
1. Insert the Small Business Server 2000 CD-ROM and start the reboot sequence.
2. Press any key when prompted to start booting from the Small Business Server 2000 CDROM.
3. Press F10 at the "Welcome to Setup" screen.
NOTE: This is an undocumented option. The bottom of the display is asking you to press
Enter, R or F3.
4. The system will display a menu asking to select the instance of the NOS you want to boot.
For example it displays:
1: C:\WINNT
5. Type 1 and press Enter.
6. Type the administrator password when prompted.
7. At the command prompt type help and proceed to achieve your objective.
8. Type exit when done troubleshooting.
Installing RC
1. Insert Small Business Server 2000 CD-ROM. If CD-ROM auto-start is enabled, click exit to
close the applet.
2. Open a command prompt and type D:\I386\WINNT32 /CMDCONS and press Enter. (Where
D: is the CD-ROM drive letter.)
3. Follow the screen instructions to complete the RC installation.
Booting RC
1. Shutdown and Restart system.
2. Select "Small Business Server 2000, Recover Console" from the boot menu.
3. The system will display a menu asking to select the instance of the NOS you want to boot.
For example it displays:
1: C:\WINNT
4. Type 1 and press Enter.
5. Type the administrator password when prompted.
6. At the command prompt type help and proceed to achieve your objective.
7. Type exit when done troubleshooting.
NOTE: The file access security can prevent you from getting to files.
Tip #8. Terminal Server Service is only supported on the L Series NetServers
Terminal Server Service is only support the NetServer L Series.
Frequently Asked Questions
Question: What NetServer BIOS version do I need to run Small Business Server 2000?
Answer: Table 5, provided in the appendix of this document provides a list of NetServer and
BIOS versions used to test with Small Business Server 2000. HP recommends that you use the
version provided in this table or a later release.
Question: What HP Disk Array BIOS/Firmware version do I need to run Small Business Server
2000?
Answer: Table 6, provided in the appendix of this document provides a list of Disk Array
BIOS/Firmware versions used to test with Small Business Server 2000. HP recommends that
you use the version indicated in this table or a later release.
Question: Where do I get the driver's required to run Small Business Server 2000?
Answer: The initial release of Small Business Server 2000 includes all the drivers required to
install Small Business Server 2000 on the NetServer's and DAC's listed in table 5 & 7 of the
appendix.
Future driver updates or new adapter driver's will be provided on the Hewlett Packard Navigator
CD. Or check http://www.hp.com.
Question: How do I configure the HP D5013 Network Interface Card for NIC teaming?
Answer: NIC teaming is not supported with the D5013 Driver bundled with Small Business
Server 2000 CD-ROM. You can identify this driver by looking at "Device Manager", driver date
is 10/26/1999 and driver version is 4.1.6.67.0. Hewlett Packard is working on a future driver,
which will support this feature.
Question: Can I upgrade my NetServer running Windows SBS 4.0 to Small Business Server
2000?
Answer: Yes, Hewlett Packard tested with upgrade configurations. However, it is unpredictable
if any application on your system will work after the upgrade.
Question: Where can I get more information on Small Business Server 2000?
Answer: You may also use the following resources:
·
www.hp.com
·
Small Business Server 2000 online help.
APPENDIX
This section provides additional information to help add new components, troubleshoot, etc.
Table #1
List of NetServer platforms supported by the method called "Automatic - Boot from HewlettPackard Navigator CD-ROM" for
( Note: See "Table #6" for a list of tested and supported system under Small Business Server
2000)
Model
HP AutoCD Boot
Install Support Supported?
SBS 2000
Supported?
Also see Tip #
E60
Yes
Yes
Yes
E800
Yes
Yes
Yes
LC2000
Yes
Yes
Yes
tc3100
Yes
Yes
Yes
tc4100
Yes
Yes
Yes
Table #2
List of embedded SCSI chip set for each NetServer.
(Note: See "Table #6" for a list of tested and supported system under Small Business Server
2000)
Model
SCSI Adapter
Ultra SCSI/
Channel A,B
E60
Adaptec 7895
(Wide)/A,B
E800
Symbios 896
Ultra2/ A,B
LC2000
Symbios 897
Ultra2/A,B
tc3100
LSI53C1010
Ultra3/ A,B
tc4100
LSI53C1010
Ultra3/ A,B
Table #3
List of embedded Video Product Name and Driver Name for each NetServer.
( Note: See "Table #6" for a list of tested and supported system under Small Business Server
2000)
Model
Video Adapter
E60
ATIRage IIC 4M AGP
E800
ATIRage XL 8M PCI
LC2000
ATIRage IIC 2M
tc3100
ATIRage XL 8M PCI
tc4100
ATIRage XL 8M PCI
* The driver is not provided by Hewlett-Packard. Users should use the driver bundled with
Windows NT CD-ROM.
Note: Video adapters with 1M can be upgraded to 2M.
Table #4
This table provides a list of CD-ROM type for each NetServer.
( Note: See "Table #6" for a list of tested and supported system under Small Business Server
2000)
Model
CD-ROM Type
E60
IDE
E800
IDE
LC2000
IDE
tc3100
IDE
tc4100
IDE
Table #5
This table provides a list of NetServers tested with Small Business Server 2000.
Model
WHQL
MID
CPU
(Range)
Max
RAM
Video
HP NIC
ACPI
BIOS/
Date
E60
16993
Dual
Pentium
III (450550)
512M
ATIRage
IIC AGP
D5013
Yes
4.06.21
PN
9/16/99
E800
TBD
Dual
Pentium
III (667800)
2G
ATIRage
XL PCI
D5013
Yes
4.06.01
RH
LC2000
N/A
Dual
Pentium
III (533733)
4G
ATIRage
IIC PCI
D5013
Yes
4.06.12
PV
10/28/99
tc3100
N/A
Dual
Pentium
III (1 2
4G
ATIRage
XL PCI
TBD
Yes
TBD
III (1.21.4
GHz)
tc4100
N/A
Dual
Pentium
III (1.21.4
GHz)
4G
ATIRage
XL PCI
TBD
Yes
TBD
Table #6A
This table provides a list of Disk Array Adapters tested with Small Business Server 2000.
Adapter
P/N
BIOS
Firmware Win 2K
Support
Max Boot
Drive Size (1)
NetRaid-4M
D9161A
V2.4-0
N/A
Yes
N/A
NetRaid-2M
P3411A
G.01.02
H.01.07
Yes
N/A
NetRaid-1M
P3410A
G.01.02
H.01.07
Yes
N/A
NetRaid 1Si
D2140A
B.02.01
F.02.02
Yes
N/A
NetRaid 3Si
D5955A
B.02.01
C.02.02
Yes
N/A
NetRaid 1
D4992A
A.04.03
A.04.03
Yes (2)
8G
NetRaid
D4943A
A.04.03
A.04.03
Yes(2)
8G
Mylex DAC
N/A
N/A
N/A
No
N/A
(1) There is no size limitation for non-boot drives.
(2) Must install adapter in BUS 0.
Table #6B
This table indicates Small Business Server 2000 support for HP NetRAID disk array controllers.
Model
NetRAID
1
1Si
3Si
1M
2M
4M
E60
No
No
Yes
Yes
Yes
Yes
No
E800
No
No
Yes
Yes
Yes
Yes
No
LC2000
No
No
Yes
Yes
Yes
Yes
Yes
tc3100
No
No
No
No
Yes
Yes
No
tc4100
No
No
No
No
Yes
Yes
Yes
Table #6C
List of NeRAID-4M, 2M and 1M adapters supported with Small Business Server 2000.
Model
Max 4Ms
Supported
Max 2Ms
Supported
Max 1Ms
Supported
Slotting
preferences
E60
None
3
6
N/A
E800
None
3
6
N/A
LC2000
2
3
6
Slots 5-6 because 56 are 64 bit slots, 1-4
are 32 bit slots, and
3-4 have insufficient
air flow.
tc3100
None
TBD
TBD
TBD
tc4100
None
TBD
TBD
TBD
On-Line Information and Software Sources
Microsoft World Wide Web access: http://www.microsoft.com
HP Internet (World-Wide-Web) site: http://www.hp.com
HP Server Online Documentation CD (included with your system): includes all HP Server
documentation online