1
HP Designjet L65500 Printer
Maintenance and troubleshooting guide (second edition)
Legal notices
Trademarks
© 2009 Hewlett-Packard Development
Company, L.P.
Microsoft® and Windows® are U.S.
registered trademarks of Microsoft
Corporation.
The information contained herein is subject
to change without notice.
The only warranties for HP Products and
services are set forth in the express warranty
statement accompanying such products and
services. Nothing herein should be
construed as constituting an additional
warranty. HP shall not be liable for technical
or editorial errors or omissions contained
herein.
Table of contents
1 Safety precautions
General safety guidelines ..................................................................................................................... 1
Warnings and cautions ......................................................................................................................... 2
Warning labels ...................................................................................................................................... 2
Emergency stop buttons ....................................................................................................................... 4
2 Printer status
Check printer status ............................................................................................................................. 5
Printer alerts ......................................................................................................................................... 5
3 Printer calibration
Align the printheads .............................................................................................................................. 6
Substrate-advance compensation ........................................................................................................ 7
Color calibration ................................................................................................................................... 8
Ink restrictions .................................................................................................................................... 10
Color profiles ...................................................................................................................................... 10
4 Hardware maintenance
Maintain the ink cartridges ................................................................................................................. 11
Maintain the printheads ...................................................................................................................... 11
Maintain the substrates ...................................................................................................................... 11
Check the printheads ......................................................................................................................... 12
Clean the carriage cover .................................................................................................................... 12
Clean the carriage rails ...................................................................................................................... 13
Clean the exterior of the printer .......................................................................................................... 15
Clean the ink deposits ........................................................................................................................ 15
Clean the line sensor and aerosol inlets ............................................................................................ 16
Clean the main roller .......................................................................................................................... 17
Clean the substrate edge holders ...................................................................................................... 17
Clean the pinch wheels ...................................................................................................................... 18
Clean the platen ................................................................................................................................. 18
Clean the printheads .......................................................................................................................... 18
Clean the substrate-advance sensor .................................................................................................. 18
Clean the temperature sensors .......................................................................................................... 19
Maintain the printhead primers ........................................................................................................... 20
Replace the carriage oiler foams ........................................................................................................ 21
Replace the line sensor box ............................................................................................................... 23
ENWW
iii
Replace the printhead cleaning roll and aerosol filters ....................................................................... 24
Move the printer ................................................................................................................................. 27
Printer maintenance kits ..................................................................................................................... 28
Cleaning kit ......................................................................................................................................... 28
5 Software maintenance
Maintain the HP Internal Print Server ................................................................................................. 29
Update the firmware ........................................................................................................................... 30
6 Troubleshoot substrate issues
The substrate cannot be loaded successfully .................................................................................... 31
The substrate has jammed ................................................................................................................. 31
The substrate is not attached to the input core .................................................................................. 32
The substrate sticks to the platen ....................................................................................................... 33
The ink is still wet when the substrate emerges ................................................................................. 33
There are ink marks on the substrate ................................................................................................. 33
7 Troubleshoot print-quality issues
General advice ................................................................................................................................... 34
Banding .............................................................................................................................................. 34
Colors are misaligned ......................................................................................................................... 36
The print is grainy ............................................................................................................................... 37
The print is smudged .......................................................................................................................... 38
The substrate is not flat ...................................................................................................................... 38
Edges of objects are rough or blurred ................................................................................................ 38
Colors look washed out ...................................................................................................................... 38
Colors are inaccurate ......................................................................................................................... 39
8 Troubleshoot ink cartridge and printhead issues
Cannot insert an ink cartridge ............................................................................................................ 40
Cannot insert a printhead ................................................................................................................... 40
The front panel recommends replacing or reseating an ink cartridge ................................................ 40
The front panel recommends replacing or reseating a printhead ....................................................... 40
A printhead has overheated ............................................................................................................... 41
A printhead has damaged the substrate ............................................................................................ 41
Incorrect printhead cleaning roll errors ............................................................................................... 41
9 Troubleshoot other issues
The printer does not print ................................................................................................................... 42
The printer seems slow ...................................................................................................................... 42
The HP Internal Print Server cannot detect the printer ...................................................................... 42
Upgrade the HP Internal Print Server ................................................................................................. 43
Print job files have not been properly deleted .................................................................................... 43
Color calibration fails .......................................................................................................................... 43
iv
ENWW
10 Front-panel error messages
11 When you need help
Documentation ................................................................................................................................... 48
HP Proactive Support ......................................................................................................................... 48
HP Customer Care ............................................................................................................................. 48
Service information ............................................................................................................................. 50
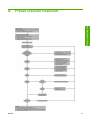
Appendix A Preset creation flowchart
Index ................................................................................................................................................................... 52
ENWW
v
vi
ENWW
Safety precautions
1
Safety precautions
General safety guidelines
WARNING! Internal circuits use hazardous voltage capable of causing death or serious personal
injury.
No operator serviceable parts inside. Refer servicing to qualified service personnel.
The disconnecting devices for servicing are two Branch Circuit Breakers located in the building's Power
Distribution Unit (PDU).
Electric shock hazard
Due to risk of electrical shock, do not attempt the following actions:
●
Dismantle the electrical control cabinet.
●
Dismantle the drying and curing subsystems of the printer.
●
Remove or open any other closed system covers or plugs.
NOTE: Fuses that blow after being replaced may indicate malfunctioning electrical circuits within the
system. Have the system checked by qualified service personnel, and do not attempt to replace the fuse
again.
Mechanical hazard
The printer has moving parts that can cause injury. To avoid personal injury, take the following
precautions when working close to the printer.
●
Keep your clothing and all parts of your body away from the printer's moving parts.
●
Avoid wearing necklaces, bracelets and other hanging objects.
●
If your hair is long, try to secure it so that it will not fall into the printer.
●
Take care that sleeves or gloves do not get caught in the printer's moving parts.
●
Avoid standing close to the fans, which could cause injury and could also affect print quality (by
obstructing the air flow).
Heat hazard
The drying and curing subsystems of the printer operate at high temperatures and can cause burns if
touched. To avoid personal injury, take the following precautions.
ENWW
●
Avoid direct contact with the drying and curing area of the printer.
●
Take special care when accessing the substrate path.
General safety guidelines
1
Safety precautions
Fire hazard
CAUTION:
The drying and curing subsystems of the printer operate at high temperatures.
To avoid the risk of fire, take the following precautions when operating the printer:
●
Do not manipulate the heating modules.
●
Load substrates that withstand temperatures of 125°C.
Heavy substrate hazard
Special care must be taken to avoid personal injury when handling heavy substrates.
●
Handling substrate rolls always requires at least two people. Care must be taken to avoid back
strain and/or injury.
●
Always use a forklift, pallet truck or other handling equipment to lift substrates.
●
Always wear personal protective equipment including boots and gloves.
Ink handling
Your printer does not use solvent inks and does not have the traditional problems associated with them.
However, HP recommends that you wear gloves when handling ink cartridges or printhead cleaner rolls.
Warnings and cautions
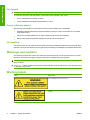
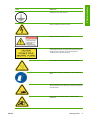
The following symbols are used in this manual to ensure the proper use of the printer and to prevent
the printer from being damaged. Follow the instructions marked with these symbols.
WARNING! Failure to follow the guidelines marked with this symbol could result in serious personal
injury or death.
CAUTION: Failure to follow the guidelines marked with this symbol could result in minor personal injury
or damage to the product.
Warning labels
Label
Explanation
Current leakage may exceed 3.5 mA.
The printer can be connected to power supplies at different
voltages.
2
Chapter 1 Safety precautions
ENWW
Safety precautions
Label
Explanation
Identifies the main earth terminal
Danger of electric shock. Do not touch.
Danger of electric shock. Do not touch.
Danger of electric shock. In case of operation of the fuse, parts
of the printer that remain energized may represent a hazard
during servicing. Therefore, ensure that the printer is
completely turned off before servicing.
Printer parts may sometimes become hot. Do not touch.
Use protective gloves for handling printer parts, supplies or
waste.
When substrate has been loaded, the carriage descends into
its normal position, and could crush your hand or anything else
left underneath it.
Danger that your hands may become trapped between
gearwheels
ENWW
Warning labels
3
Safety precautions
Label
Explanation
When the printer is printing, the printhead carriage travels back
and forth across the substrate.
Beware of this moving part.
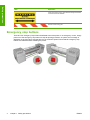
Emergency stop buttons
There are four emergency stop buttons distributed around the printer. If an emergency occurs, simply
push one of the emergency stop buttons to stop all printing processes. A system error message is
displayed on the front panel, and the fans turn at maximum speed. Ensure that all emergency stop
buttons are released before restarting the printer.
4
Chapter 1 Safety precautions
ENWW
2
Printer status
Printer status
Check printer status
You can check the current status of the printer in the following ways:
●
The HP Internal Print Server displays the status of the printer, the loaded substrate and the ink
system. The latest alerts are summarized at the bottom of the main window (see Printer alerts
on page 5).
●
The front panel displays the ink levels by default; otherwise, you can see the ink levels by selecting
the the Ink System icon
. In addition, the most important current alert, if any, is displayed in
the front panel.
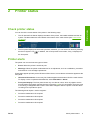
Printer alerts
The printer can communicate two types of alerts:
●
Errors: When the printer is unable to print.
●
Warnings: When the printer needs attention for an adjustment, such as a calibration, preventive
maintenance or ink cartridge replacement.
Printer alerts appear primarily at the HP Internal Print Server, but one alert at a time also appears at the
front panel.
●
HP Internal Print Server: A summary list of alerts appears at the bottom left of the main window.
To display a more complete and detailed list, select Information > Alerts.
●
Front-panel display: The front panel shows only one alert at a time, which is judged to be the
most important. It generally requires the user to press the OK key for confirmation, but in the case
of a warning, it disappears after a while. Some alerts reappear when the printer is idle and there
is nothing more important to report.
The following alerts require a service engineer:
ENWW
●
Preventive maintenance #1 required
●
Preventive maintenance #2 required
●
Preventive maintenance #3 required
●
Preventive maintenance #4 required
Check printer status
5
3
Printer calibration
Align the printheads
Precise alignment between printheads is essential for color accuracy, smooth color transitions and sharp
edges in graphical elements.
To align the printheads, go to the HP Internal Print Server and select Printer > Printhead alignment.
You can select automatic or manual alignment; the HP Internal Print Server will recommend one or the
other, but you can always choose.
Printer calibration
●
Automatic alignment is a fully automated procedure that ensures optimal print quality in most cases.
The printer prints some patterns and scans them with the built-in line sensor. This is the
recommended method for any smooth, high-quality substrates (including vinyl, banners or backlit).
If the printheads have many defective nozzles, automatic alignment may not give good results.
The procedure takes about 14 minutes and consumes 9 inches of substrate.
●
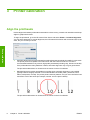
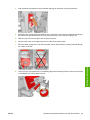
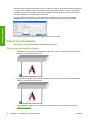
Manual alignment provides reasonable print quality when automatic alignment is not possible,
typically because a highly-textured or non-white substrate is loaded (mesh, perforated, some
fabrics, transparent, colored). The printer prints 8 series of patterns, and you must choose the best
result from each of the series (for example, number 10 in the picture below).
The procedure takes about 15 minutes and consumes 9 inches of substrate.
6
Chapter 3 Printer calibration
ENWW
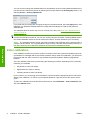
Troubleshoot printhead alignment
Automatic printhead alignment may fail occasionally. In some cases, you may see the front panel error
message "Automatic Printhead Alignment is cancelled because of scanning errors". In other cases,
there is no error message but the print quality is not satisfactory. Here are some possible explanations.
●
There is some problem with substrate advance (see Substrate-advance compensation
on page 7). After fixing any substrate-advance issue, retry automatic printhead alignment.
●
You are using a highly-textured (some banners), non-white or very reflective (some satinated
offset) substrate. Please use manual printhead alignment in these cases.
●
The substrate is wrinkled. Check that the substrate is correctly loaded with uniform tension. If
necessary, try adjusting substrate parameters such as tension or drying and curing temperatures.
●
The substrate is not wide enough. Repeat the alignment process using a substrate roll at least 24
inches (610 mm) wide.
●
The printer window was open during the printhead alignment process.
●
The printheads are not clean. See Clean the printheads on page 18.
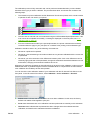
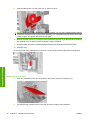
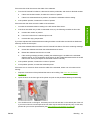
Printhead alignment diagnostic plot
The printer offers a printhead alignment diagnostic plot, to assess the quality of the current printhead
alignment. To print it, start the HP Internal Print Server and select Printer > Printhead alignment >
Diagnostics plot.
1.
The colored crosses on the left side of the plot should show the lines well aligned with each other.
2.
The vertical lines to left of center should be straight, without kinks.
3.
Of the four vertical lines at the top right of the plot, the leftmost two should be straight, without kinks.
Substrate-advance compensation
Accurate substrate advance is important to print quality because it is part of controlling the proper
placement of dots on the substrate. If the substrate is not advanced the proper distance between
printhead passes, light or dark bands appear on the print, and there may be an increase in graininess.
The printer has a substrate-advance sensor and is calibrated to advance correctly with all the substrates
appearing in the front panel. When you select the type of loaded substrate, the printer adjusts the rate
at which to advance the substrate while printing. However, if you are using a custom substrate or not
satisfied with the default calibration of your substrate, you may wish to change the substrate-advance
compensation. See Troubleshoot print-quality issues on page 34 for steps to determine whether
substrate-advance compensation will solve your issue.
ENWW
Substrate-advance compensation
7
Printer calibration
If the problem persists, please try using manual printhead alignment, or call your service representative
(see HP Customer Care Centers on page 49).
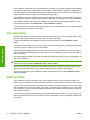
You can view and change the substrate-advance compensation of the currently loaded substrate at any
time from the HP Internal Print Server by selecting the print job and then the Printing Adj. button, or by
selecting Printer > Printing adjustments.
If you prefer the print quality after changing the figure in the Advance field, press the Apply button, and
thereafter your preferred substrate-advance compensation will always be used for that particular
substrate type.
The substrate-advance sensor may not work correctly if it is dirty. See Clean the substrate-advance
sensor on page 18.
NOTE: Some substrates are invisible to the substrate-advance sensor; in which case, the sensor will
not work and should be turned off. You can turn it off by using the Automatic Tracking (OMAS) field in
the Loaded Substrate window of the HP Internal Print Server. An alert will advise you if necessary.
NOTE: The substrate-advance sensor scans the back side of the substrate, which it expects to be of
a single color and shade. It is not guaranteed to work correctly if the back side has been printed on; in
this case, there may be no alert from the printer, but the sensor should be turned off.
Printer calibration
Color calibration
Color calibration enables your printer to produce consistent colors with a particular substrate type, even
if printheads, ink cartridges and environmental conditions change. After color calibration, you can expect
to get prints with the same colors from any two different printers situated in different geographical
locations.
The color calibration test chart is printed using the following print mode, depending on the ink density
used with your substrate.
●
Six passes for 100% ink density
●
Eight passes for 150% ink density
●
Fourteen passes for 250% ink density
For this reason, you are strongly recommended to have fine-tuned the appropriate print mode before
starting color calibration. To fine-tune your substrate preset for a specific print mode, see the User's
guide.
To start color calibration from the HP Internal Print Server, select Substrate > Color calibration, then
click the Calibrate button.
8
Chapter 3 Printer calibration
ENWW
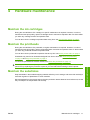
1.
The Closed-Loop Color Calibration and Ink Restriction Test Chart is printed, which contains scales
of patches of each ink used in your printer.
2.
The test chart is scanned and color-measured using the HP Embedded Spectrophotometer. If the
scan cannot be completed successfully, a message is displayed on the front panel; see Color
calibration fails on page 43.
3.
From the measurements made by the spectrophotometer, the printer calculates the necessary
correction tables to apply to your print jobs, for consistent color printing on that substrate type.
Calibration should be done in any of the following circumstances:
●
Whenever a printhead is replaced
●
Whenever a new substrate type is introduced that has not yet been calibrated with the current set
of printheads
●
Whenever you notice excessive color differences between prints. Such color differences can be
caused by aging and wear of the printheads, changes in substrate characteristics between one roll
and another, changing environmental conditions and so on.
Whenever you replace a printhead, an alert will remind you to perform color calibration, unless you have
disabled the alerts. If printhead alignment and/or substrate-advance compensation are also needed,
color calibration should always be the last operation.
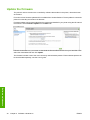
You can check the color calibration status of your substrates with the HP Internal Print Server or the
front panel. In the HP Internal Print Server, select Substrate > Color calibration > Show all.
ENWW
●
Default status indicates that the substrate has never been calibrated. In this case, the factory
default color tables will be applied to print jobs.
●
Done status indicates that a color calibration has been performed successfully on this substrate.
●
Obsolete status indicates that a printhead has been changed since the substrate was last
calibrated, and therefore the substrate should be recalibrated.
Color calibration
9
Printer calibration
The calibration process is fully automatic and can be performed unattended after you have loaded
substrate of the type you wish to calibrate. The process takes about 18 minutes and consists of the
following steps.
Color calibration is based on the color measurement of printed color patches, using the HP Embedded
Spectrophotometer. Some characterisitics of substrates, such as surface roughness or transparency,
may make reflective color measurement of some substrate types very inaccurate. Color calibration of
these substrates will fail or produce unacceptable printing results.
The suitability of particular substrate types for color calibration can be found in the table of supported
substrate types in the User's guide. Only substrates wider than 36 inches (914 mm) can be calibrated.
It is possible to recover from a bad color calibration by restoring the factory default calibration. In the
HP Internal Print Server, select Substrate > Color calibration > Reset.
You should calibrate a substrate type before creating its color profile; however, you can later recalibrate
without needing to recreate the color profile.
Ink restrictions
Ink restrictions allow you to set the maximum amount of each primary ink (cyan, magenta, yellow, black,
light cyan, light magenta) that can be laid down onto a given substrate.
To adjust ink restriction percentages from the HP Internal Print Server, select Substrate > Edit >
Color.
Ink restriction percentages can be set from 50% to 100% for all inks by filling in the appropriate boxes.
In general, a figure of about 80% is recommended.
Printer calibration
High percentage settings (approaching 100%) use more ink and may therefore increase color gamut,
at the cost of leaving less margin for the operation of the color calibration system, which may reduce
color consistency.
Lower percentages use less ink, provide a smaller color gamut and a higher range of compensation for
best color consistency.
NOTE: Ill-defined ink restrictions may lead to unpredictable results. You can restore the default ink
restriction settings by selecting Substrate > Edit > Color > Reset.
The Closed-Loop Color Calibration and Ink Restriction Test Chart contains printed ink ramps in 2%
steps, which can be useful as a visual guide for selecting the ink restriction percentages.
To print the Closed-Loop Color Calibration and Ink Restriction Test Chart, select Substrate > Edit >
Color > Print plot.
Color profiles
Color calibration provides consistent colors, but consistent colors are not necessarily accurate. For
instance, if your printer prints all colors as black, its colors may be consistent but they are not accurate.
In order to print accurate colors, it is necessary to convert the color values in your files to the color values
that will produce the correct colors from your printer, your inks and your substrate. An ICC color profile
is a description of a printer, ink and substrate combination that contains all the information needed for
these color conversions.
These color conversions are performed by your Raster Image Processor (RIP), not by the printer. For
further information on the use of ICC profiles, see the documentation for your application software and
for your RIP.
10
Chapter 3 Printer calibration
ENWW
4
Hardware maintenance
Maintain the ink cartridges
During the normal lifetime of a cartridge, no specific maintenance is required. However, in order to
maintain the best print quality, replace a cartridge when it reaches its expiration date. An alert notifies
you when any cartridge reaches its expiration date.
You can also check a cartridge's expiration date at any time: see Check printer status on page 5.
Maintain the printheads
During the normal lifetime of a printhead, no regular maintenance is required. However, in order to
maintain the best print quality, replace a printhead when it reaches its expiration date. An alert notifies
you when any printhead reaches its expiration date.
You can also check a printhead's expiration date at any time: see Check printer status on page 5.
Printheads may need to be cleaned and aligned from time to time: see Clean the printheads
on page 18 and Align the printheads on page 6.
To check the printheads for blocked nozzles, see Check the printheads on page 12.
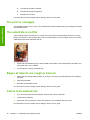
Maintain the substrates
Keep substrates in their sealed wrapping material while they are in storage, and store rolls vertically to
avoid the migration of plasticizers in some materials.
Move substrates from the storage area to the print production area at least 24 hours before use, so that
they can adapt to its temperature and humidity.
ENWW
Maintain the ink cartridges
11
Hardware maintenance
TIP: If you remove an unexpired printhead from the printer, planning to reuse it later, the best way to
protect it is by replacing the protective caps that you removed before inserting it into the printer.
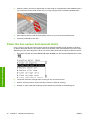
Check the printheads
If you believe that one or more of the printheads is performing poorly:
1.
Go to the HP Internal Print Server and select Printer > Printhead cleaning.
2.
Press the Check button to perform routine cleaning.
3.
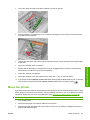
If the problem persists, press the Print button in the same window to print the following display.
Each color is printed by a single printhead and shows the performance of that printhead.
If a significant number of printhead nozzles are blocked, you will see missing lines in this display,
as shown below.
Hardware maintenance
4.
In the same window, select any printheads that are showing missing lines, and press the Hard
clean button.
5.
When the hard clean has finished, press the Print button again to see whether the printheads have
improved.
6.
Check that the printheads' electrical contacts are clean. See The front panel recommends replacing
or reseating a printhead on page 40.
7.
If you still see five or more missing lines in any one color, you are recommended to replace that
printhead. With fewer missing lines, the printer can maintain good quality when printing with four
or more passes.
If the above printout seems blurred or grainy, you may need to change the substrate-advance
compensation (see Substrate-advance compensation on page 7).
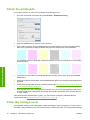
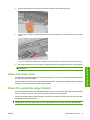
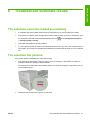
Clean the carriage cover
The printhead carriage cover is designed to reflect the radiation of the drying lamps in order to avoid
overheating the printheads. If the cover becomes dirty, it reflects less heat. To avoid possible damage
12
Chapter 4 Hardware maintenance
ENWW
to the printheads, the carriage cover may need to be cleaned about once every two months, depending
on your use of the printer. An alert is displayed when the cover needs to be cleaned.
1.
Go to the front panel and select Clean carriage cover from the Preventive Maintenance menu
. The carriage moves into the electrical compartment.
2.
Open the printhead access door.
3.
Press the OK key on the front panel.
4.
Clean the carriage cover with a lint-free cloth.
5.
If you find dried ink that you cannot remove with the dry cloth, try dampening the cloth with isopropyl
alcohol. After cleaning, wait for the cover to dry.
6.
Close the door and press the OK key on the front panel.
Clean the carriage rails
1.
Hardware maintenance
The rails along which the carriage moves may need to be cleaned about once every two years,
depending on your use of the printer. An alert is displayed when they need to be cleaned.
Go to the front panel and select Clean carriage rails from the Preventive Maintenance menu
. Press OK to continue.
ENWW
2.
The carriage beam is automatically raised, as when loading substrate.
3.
When the carriage beam has stopped rising, turn off the printer.
Clean the carriage rails
13
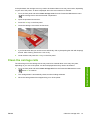
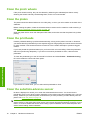
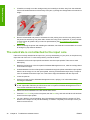
4.
Standing at the front of the printer, clean the front rail using a lint-free cloth dampened with isopropyl
alcohol. You can access the rail from above.
NOTE: If you are in California, instead of isopropyl alcohol please use a VOC-certified cleaner
such as a properly diluted 'Simple Green ® All-Purpose Cleaner'.
Hardware maintenance
14
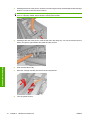
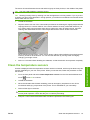
5.
Standing at the rear of the printer, clean the rear rail in the same way. You can access the rail from
below, through the gap between the platen and the pinches.
6.
Wait until the rails are dry.
7.
Move the carriage manually into the electrical compartment.
8.
Turn the printer back on.
Chapter 4 Hardware maintenance
ENWW
9.
Select Carriage beam position > Move to printing (normal) from the front panel's Substrate
menu
to lower the carriage beam into its normal position, close to the substrate. This process
takes about two minutes to complete.
10. Replace the carriage oiler foams (see Replace the carriage oiler foams on page 21). While
replacing the foams, also replace both of the oil wicks.
Clean the exterior of the printer
Clean the outside of the printer and all other parts of the printer that you regularly touch as part of normal
operation with a damp sponge or a soft cloth and a mild household cleaner such as non-abrasive liquid
soap.
WARNING! To avoid an electric shock, make sure that the printer is turned off and unplugged before
you clean it. Do not let water get inside the printer.
CAUTION: Do not use abrasive cleaners on the printer.
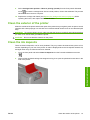
Clean the ink deposits
There are three ink deposits, one for each printhead. They may need to be cleaned every three or four
months, depending on your use of the printer. An alert is displayed when the ink deposits are 85% full,
and again when they are full and need to be cleaned.
1.
Go to the front panel and select Clean ink deposits from the Preventive Maintenance menu
.
Wait until the printhead carriage has stopped moving, then open the printhead access door in the
side of the printer.
Hardware maintenance
2.
ENWW
Clean the exterior of the printer
15
3.
Clean the interior of each ink deposit with a cotton swab or cloth dampened with distilled water. If
you cannot remove the dried ink this way, try using isopropyl alcohol instead of distilled water.
4.
Also clean the area around the ink deposits; but do not try to clean the printhead area.
5.
Close the printhead access door.
Clean the line sensor and aerosol inlets
In the course of normal use, the line sensor becomes gradually blinded by light deposits of dried ink.
An alert is displayed when the line sensor needs to be cleaned, which may be about every two months,
depending on your use of the printer. When you see the alert, follow this procedure to clean the sensor.
1.
Go to the front panel and select Clean line sens. & inlets from the Preventive Maintenance menu
.
Hardware maintenance
16
2.
The printer raises the carriage beam so that you can access the sensor.
3.
Wait for the front panel to announce that the sensor is ready for cleaning.
4.
Dampen a cotton swab with isopropyl alcohol. Swabs are provided in the Cleaning Kit.
Chapter 4 Hardware maintenance
ENWW
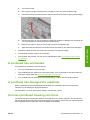
Reach underneath the line sensor and clean it with the cotton swab as shown.
6.
Use a brush to clean accumulated dust from the aerosol inlets. Do not use the brush on any other
parts.
7.
Look for condensation under the carriage, and remove it with a clean lint-free cloth if necessary.
8.
Press the OK button on the front panel. The printer lowers the carriage beam to its normal position.
WARNING! Do not insert your hands or anything else into the printer while the carriage is
descending.
Clean the main roller
The main roller should be cleaned whenever it is visibly dirty, or when you notice that substrate advance
is no longer smooth and regular.
Clean the main roller with a clean cloth dampened with water, and make sure that the roller is dry before
printing. Do not use petroleum-based cleaning liquids.
Clean the substrate edge holders
If you sometimes print with very small side margins, ink may accumulate on the substrate edge holders,
which can cause smears on your prints and blocked nozzles in the printheads.
Check the substrate edge holders monthly for dried ink. If necessary, clean them with a lint-free cloth
dampened with isopropyl alcohol.
TIP: It is not normally necessary to remove the edge holders from the printer, and doing so may
damage them. When not required, they can simply be pushed to the side, away from the substrate.
ENWW
Clean the main roller
17
Hardware maintenance
5.
Clean the pinch wheels
If the pinch wheels are dirty, they can be cleaned by advancing the substrate (less than a meter).
Cleaning the wheels manually could damage them, and is not recommended.
Clean the platen
The platen should be cleaned whenever it is visibly dirty, or when you notice marks on the back of the
substrate.
Before cleaning the platen, locate the substrate-advance sensor and be careful to avoid scratching it
(see Clean the substrate-advance sensor on page 18).
Clean the platen with a clean cloth dampened with water, and make sure that the platen is dry before
printing.
Clean the printheads
Periodic printhead cleaning is performed automatically, as long as the printer is turned on. However,
you should clean the printheads if you are experiencing poor image quality and cannot resolve the issue
by other methods. This ensures that there is fresh ink in the nozzles and helps to prevents clogged
nozzles.
If you have printed the printhead status plot, you know which colors are failing. Clean the printheads
that are not performing adequately. If you are not sure which printheads to clean, clean all of the
printheads.
To clean the printheads, go to the HP Internal Print Server and select Printer > Printhead cleaning.
HP recommends the Check and Clean option.
Hardware maintenance
If you decide on a hard clean, you can select which printheads to clean.
Clean the substrate-advance sensor
No alert is displayed to remind you to clean the substrate-advance sensor. You should clean it
periodically (every one to three months, depending on the printer usage and substrate type—see note
below), whenever you clean the platen, and whenever you have printed by accident directly onto the
platen. See Clean the platen on page 18.
NOTE: Porous substrates or liners can allow small amounts of ink to pass through to the platen and
sensor window, to the extent that a clean sensor can become dirty before finishing a single roll. For this
reason, it is best to disable the sensor when loading a porous substrate, and to clean the platen and
sensor before loading another substrate.
18
Chapter 4 Hardware maintenance
ENWW
The sensor is located between the second and third group of three pinches, in the middle of the platen.
TIP: You may need a ladder to reach the sensor.
TIP: Cleaning is easily done by reaching over the carriage beam in its low position. If you try to do it
by putting your arms below the beam in its high position, you will find it more difficult to access the sensor
and to check that it is clean.
1.
Unload the substrate.
2.
Wipe the sensor with one of the cotton swabs provided in the Cleaning Kit, slightly dampened with
isopropyl alcohol, to remove dried ink. If the sensor window is heavily coated with dried ink, you
may need to apply some pressure while wiping, helping the cotton to absorb the ink. Continue
cleaning with fresh swabs until the cotton stays clean and the sensor window looks clean.
When reflecting ambient light, a clean sensor shows a blue-colored reflection that should extend
uniformly across its whole surface. You can see this reflection by moving closer and slightly
changing your angle of view.
3.
Wait 3 or 4 minutes before reloading the substrate, so that the alcohol can evaporate completely.
An alert is displayed when the temperature sensors need to be cleaned, which may be about every two
months, depending on your use of the printer. When you see the alert, follow this procedure to clean
the sensors.
1.
Go to the front panel and select Clean temperature sensors from the Preventive Maintenance
menu
. Press OK to continue.
2.
Unload the substrate.
3.
When the substrate has finished unloading, press an emergency stop button to turn off the
mechanical and drying components of the printer. This is advisable for your own safety.
4.
Wait until the dryers cool down.
CAUTION: In the following procedure you will be working close to surfaces that are hot during
normal printer operation. Check that they are cool before proceeding.
5.
ENWW
Dampen a cotton swab with distilled water. Swabs are provided in the Cleaning Kit.
Clean the temperature sensors
19
Hardware maintenance
Clean the temperature sensors
6.
Use the swab to clean the lenses of both temperature sensors (drying and curing).
7.
Check that the lenses are clean by looking directly at them from underneath the printer.
Alternatively, continue cleaning until the cotton swab remains clean after cleaning.
8.
Press OK at the front panel to tell the printer that the sensors have been cleaned.
9.
Ensure that the emergency stop buttons are released, then restart the printer.
Maintain the printhead primers
A problem with the printhead primers is indicated by one of the following error codes.
●
The code 46.1:01 indicates a problem with the yellow/magenta primer.
●
The code 46.2:01 indicates a problem with the light cyan/light magenta primer.
●
The code 46.3:01 indicates a problem with the cyan/black primer.
To correct the problem:
Hardware maintenance
20
1.
Go to the front panel and start the process to replace the printhead in question (see the User's
guide).
2.
After lifting the printhead cover, you will see two 'O' rings that seal the joints between the printhead
cover and the printhead. Apply a little oil, grease or water to the 'O' rings to improve their
performance.
3.
Close the printhead cover, the carriage cover and the printhead access door.
4.
Request a hard clean of the printhead (see Check the printheads on page 12).
5.
If the error persists, call your service representative (see HP Customer Care Centers
on page 49).
Chapter 4 Hardware maintenance
ENWW
Replace the carriage oiler foams
The printhead carriage contains two chunks of foam impregnated with oil that continuously lubricate the
carriage rails. They may need to be replaced about every two or three months, depending on your use
of the printer. Replacement foams are available in the Cleaning Kit.
1.
Go to the front panel and select Replace oiler foam from the Preventive Maintenance menu
ENWW
2.
Open the printhead access door.
3.
Slide off the cover of the left oiler foam.
4.
Remove the old foam, insert the new foam, and replace the cover.
Replace the carriage oiler foams
Hardware maintenance
. The carriage moves into the electrical compartment.
21
5.
Open the carriage cover to access the right oiler foam.
6.
Slide off the cover of the right oiler foam.
7.
Remove the old foam.
Hardware maintenance
22
Chapter 4 Hardware maintenance
ENWW
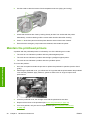
8.
Remove the screws and the oiler foam container, replace the foam, and reattach the container with
the screws.
9.
Close the carriage cover and the printhead access door.
10. Press the OK key when finished.
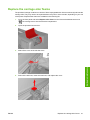
Replace the line sensor box
An alert is displayed when the line sensor box needs to be replaced. The printer moves the carriage to
the right so that the box is easily accessible, and turns off power to the carriage. When you see the alert,
follow this procedure to replace the box.
1.
Go to the front panel and select Replace sensor box from the Preventive Maintenance menu
.
The carriage moves out from the right cover.
3.
Unscrew the three screws of the line sensor box and disconnect the connecting cable.
Hardware maintenance
2.
ENWW
Replace the line sensor box
23
4.
Remove the line sensor box.
5.
Connect the cable to the new line sensor box.
6.
Place the new box into the printer and fix it in place with the screws. No tool is needed.
7.
Press OK at the front panel.
8.
The printer turns on power to the carriage and checks the sensor.
Replace the printhead cleaning roll and aerosol filters
The printhead cleaning roll is used to clean the printheads between printing passes. It must be replaced
periodically in order to maintain print quality. The frequency of replacement depends on your use of the
printer: approximately monthly with average use.
An alert is displayed when 75% of the roll has been used, and again when 95% of it has been used.
You can choose to replace the roll at any time.
If there is not enough of the roll to start a new job, the printer cancels the job.
Hardware maintenance
Whenever you replace the printhead cleaning roll, you should also replace the aerosol filters. The roll
and the aerosol filters are supplied together in the same package.
TIP: You are recommended to wear gloves during these operations.
Replace the printhead cleaning roll
1.
Go to the front panel and select Replace cleaner roll from the Ink System menu
. Any unused
portion of the roll is wound on to the takeup roll at this time. You will be warned if the unused portion
is more than 5% of the whole roll.
TIP: If you forget to select Replace cleaner roll at the start of this procedure, do not attempt to
select it later. Instead, wait until you have replaced the aerosol filters and the cleaning roll, and
then select Check cleaner roll from the Ink System menu.
2.
24
In order to replace the printhead cleaning roll, open the door on the front right of the printer.
Chapter 4 Hardware maintenance
ENWW
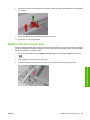
ENWW
Grip the handle and pull the whole printhead cleaning roll assembly out through the door.
4.
Slide both rolls off their axles and dispose of the roll with the used cleaning material according to
the instructions provided with the new roll. Keep the empty core to use as a takeup core.
5.
Slide the new roll onto the upper axle. It clicks into place.
6.
Pull the black knob on the upper left and move the pinch system aside.
7.
Pass the leading edge of the roll over the upper rollers, and thread the cleaning material through
the rollers on the left.
8.
There is a strip of polyester film on the leading edge of the cleaning material. Insert it into the hole
in the takeup core, which takes hold of it.
Replace the printhead cleaning roll and aerosol filters
25
Hardware maintenance
3.
9.
Slide the takeup core onto the lower axle. It clicks into place.
NOTE: If the cleaner roll has not been properly installed, you may see a message about clearing
a printhead cleaning roll jam. Pull the whole assembly out, wind a little of the roll forward, then slide
it back in again. The printer will check the roll again
10. Restore the pinch system by moving the black knob back into place. If you feel resistance because
the cleaning roll is too tight, turn the roll slightly counter-clockwise.
11. Grip the handle and push the whole printhead cleaning roll assembly back into the printer.
12. Close the door.
Do not empty the drain container: this is done by a service engineer during preventive maintenance.
Hardware maintenance
Replace the aerosol filters
26
1.
Open the printhead access door in the side of the printer, and lift the carriage cover.
2.
The aerosol filter containers are on the near and the far sides of the printheads.
Chapter 4 Hardware maintenance
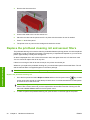
ENWW
Lift up the right-hand side of the filter container; it pivots on the left.
4.
Pull the old filter out of the bottom of its container and dispose of it according to the instructions
provided with the new filter.
5.
Unpack the new filters and ensure that the blue tabs at each end of each filter are at right angles
to the filter.
6.
Insert the new filter into the container.
7.
Ensure that the blue tabs on the filters are correctly engaged with the hooks on the containers,
otherwise the containers may not close completely.
8.
Lower the container into position.
9.
Lower the carriage cover and close the door. Press the OK key on the front panel.
10. If you forgot to select Replace cleaner roll before replacing the printhead cleaning roll, you should
now go to the front panel and select Check cleaner roll from the Ink System menu
.
Move the printer
If you wish to move the printer a short distance on the same site, across a horizontal floor with no steps
and no slopes of more than 5% inclination, see the following instructions. For more difficult movement
operations, please call your service representative (see HP Customer Care Centers on page 49).
CAUTION: Slopes steeper than 5% may cause serious damage to the printer.
ENWW
1.
Turn off the printer.
2.
Disconnect all power and network cables from the printer.
3.
Disconnect all ink cartridges and remove them from the printer. Hold the cartridge connectors in
position with adhesive tape.
Move the printer
27
Hardware maintenance
3.
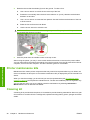
4.
Raise the feet so that the wheels (A) touch the ground. To raise a foot:
a.
Use a 30 mm wrench to unlock the nut at the top of the foot.
b.
Rotate the nut manually down the bolt. Leave about 2 cm (0.8 in) clearance at the bottom
between nut and foot.
c.
Use a 15 mm wrench to rotate the foot upwards. Use the flat faces at the bottom of the bolt
to fit the wrench.
d.
Raise the foot as far as the bolt allows.
e.
Use the 30 mm wrench to relock the nut.
CAUTION: Take care to raise the feet as high as you can. They may break if they touch the
ground while the printer is in motion.
5.
Push the printer from the outside corners of the top covers.
After moving the printer, you may in some cases need an electrician to reconnect the power cables.
You may also need to reconfigure the network: from the front panel, from the HP Internal Print Server
computer, and from the RIP computer. See the Installation guide for more details.
Hardware maintenance
Printer maintenance kits
Maintenance kits contain printer components that may need to be replaced after long use. When one
of them is needed, an alert (such as “Preventive maintenance #2”) is displayed by the HP Internal Print
Server.
When you see the message, you should call your service representative (see HP Customer Care
Centers on page 49) and request the maintenance kit. The kits are installed by service engineers only.
You can see how close you are to needing preventive maintenance by selecting Information >
Maintenance in the HP Internal Print Server.
Cleaning kit
A cleaning kit is provided with the printer; it is intended to provide cleaning materials for about one year
of normal use. It contains oil for the carriage rails, replacement oiling foams, gloves, sponges and cotton
swabs.
28
Chapter 4 Hardware maintenance
ENWW
5
Software maintenance
Maintain the HP Internal Print Server
ENWW
●
The user account should be a Standard account and not an Administrator account.
●
No software should be installed on the computer except the software initially provided by HP.
●
If an antivirus program is installed, it should not be allowed to check the file system constantly.
●
In the Performance tab of the Task Manager, CPU usage should be below 5% (preferably below
3%).
●
Memory usage should be below 1 GB (preferably below 800 MB).
●
Free space on the hard disk should be at least 10 GB.
●
In the Control Panel, Hardware and Sound > Power Options, the high-performance power plan
should be selected and sleep mode disabled.
●
A blank screen saver should be used.
●
Press the start button and right-click Computer. Select Manage > Device Manager > Disk
drives. Right-click the hard disk, and select Properties > Policies. Ensure that Optimize for
performance, Enable write caching on the disk and Enable advanced performance are all
enabled.
●
Ensure that scheduled defragmentation is enabled. Press the start button and right-click
Computer. Select Manage > Disk Management. Right-click the hard disk, and select
Properties > Tools > Defragment Now, and ensure that Run on a schedule is enabled.
●
In the Control Panel, select System > Advanced system settings > Advanced > Performance
> Visual Effects > Custom. Ensure that all effects are disabled except Enable Desktop
composition, Enable transparent glass, Smooth edges of screen fonts and Use visual styles
on windows and buttons.
●
Open Internet Explorer and select Tools > Internet options > Connections > LAN settings. If a
proxy server is used, ensure that Bypass proxy server for local addresses is enabled.
●
Ensure that the computer is connected to the Internet and use Windows Update to ensure that all
available updates (including Windows Service Packs) have been installed successfully.
●
Start the HP Internal Print Server, and use File > Delete job to delete any jobs for which there is
no further use.
Maintain the HP Internal Print Server
29
Software maintenance
The HP Internal Print Server runs under Microsoft Windows on the computer supplied with the printer.
In that operating environment, there are various things you can check in order to maintain optimum
performance. You can make these checks after restarting the computer and before starting the HP
Internal Print Server.
Update the firmware
The printer's various functions are controlled by software that resides in the printer, otherwise known
as firmware.
From time to time firmware updates will be available from Hewlett-Packard. These updates increase the
printer's functionality and enhance its features.
Firmware updates can be downloaded from the Internet and installed in your printer using the HP Internal
Print Server: select Firmware update from the Main tab.
Follow the instructions on your screen to download the firmware file and store it on your hard disk. Then
select the downloaded file and click Update.
The firmware includes a set of the most commonly used substrate presets. Extra substrate presets can
be downloaded separately; see the User's guide.
Software maintenance
30
Chapter 5 Software maintenance
ENWW
Substrate issues
6
Troubleshoot substrate issues
The substrate cannot be loaded successfully
●
A substrate cannot be loaded unless all printer subsystems (e.g. the ink system) are ready.
●
If the printer is unaware of the carriage beam position (after a printer recovery or shutdown), go to
the front panel and select the Substrate Management icon
, then Carriage beam position
> Carriage system recovery.
●
Check that the spindle is correctly inflated.
●
Try using the front panel to advance the substrate at least 10 ft (3 m), then move it back and try to
load it again. If it will not load, perhaps the substrate is not attached to the input core: try a different
roll.
The substrate has jammed
If the printer reports a substrate jam, follow these steps.
1.
If the carriage is still moving or trying to move, press an emergency stop button as quickly as
possible to minimize damage to the printheads.
If the printer shuts itself down automatically before you reach an emergency stop button, turn off
circuit breaker ACB-1.
2.
ENWW
Wait about ten minutes for the printer to cool down.
The substrate cannot be loaded successfully
31
Substrate issues
3.
If feasible, manually move the carriage slowly and carefully to the side, away from the substrate.
If this is not feasible because of the severity of the jam, try raising the carriage beam to its maximum
height.
4.
Remove all substrate and pieces of substrate from the printing zone and from any other parts of
the printer into which they may have fallen. Check the curing zone in particular. If you are unable
to remove them all, please call your service representative (see HP Customer Care Centers
on page 49).
5.
Before restarting the printer and reloading the substrate, check that all circuit breakers are on and
all emergency stop buttons released.
The substrate is not attached to the input core
If the roll is not firmly attached to the input core, you may see banding on your prints, or the printer may
report the end of the roll. To correct the problem, proceed as follows.
1.
Unload the roll from the input spindle and load it onto the output spindle. Take care to avoid
telescoping.
2.
Raise the pinches and, in the front panel's Substrate Management menu, raise the carriage beam
to its maximum height.
3.
Unload substrate from the roll and pass it backwards through the printer towards the input spindle.
Attach it to the empty core on the input spindle, securing it with adhesive tape. Wrap a couple of
turns of substrate around the input core. Take care to align the substrate with the output roll.
4.
Lower the pinches.
5.
At the front panel, exit the Substrate Management menu, replying “Yes” when asked about
checking the substrate.
NOTE: If the substrate check fails, return the roll to the input side and attach it to an empty core
on the output side. Raise the pinches and use the front panel's Substrate Management menu to
move all the substrate onto the output core.
32
6.
Select the correct substrate in the HP Internal Print Server.
7.
Press the Form Feed key on the front panel, then the Back key, and wait until all the roll has been
wound onto the input spindle.
8.
You may decide to cancel rewinding when the substrate is detached from the output roll. Then
attach it to the output core to print immediately, or rewind it completely onto the input core if you
want to remove the roll.
Chapter 6 Troubleshoot substrate issues
ENWW
Substrate issues
The substrate sticks to the platen
When the substrate sticks to the platen, the most likely causes are excessive heat and excessive
vacuum. Therefore, try decreasing the drying temperature or the vacuum.
For information on how to adjust printer settings, see the User's guide.
The ink is still wet when the substrate emerges
1.
Reduce the ink limits.
2.
Increase temperature settings for drying and curing.
For information on how to adjust printer settings, see the User's guide.
There are ink marks on the substrate
This problem can be caused by the carriage touching the substrate and smearing the ink.
1.
If the ink marks occur at the sides of the substrate and not in the center, check that the substrate
edge holders are correctly placed.
2.
Check that the vacuum and tension levels are correct.
3.
If you see large drops of ink, clean the printheads to remove any loose fibers.
For information on how to adjust printer settings, see the User's guide.
ENWW
The substrate sticks to the platen
33
7
Troubleshoot print-quality issues
Print-quality issues
General advice
When you have any print-quality problem:
●
To achieve the best performance from your printer, use only genuine HP supplies and accessories,
whose reliability and performance have been thoroughly tested to give trouble-free performance
and best-quality prints. For details of recommended substrates, see the User's guide.
●
Check that the substrate type selected in the HP Internal Print Server is the same as the substrate
type loaded into the printer.
CAUTION: If you have the wrong substrate type selected, you could experience poor print quality
and incorrect colors, and perhaps even damage to the printheads.
●
Check that your substrate has been color-calibrated.
●
Check that you are using the correct ICC profile for your substrate and print mode.
●
Check that you are using the most appropriate print-quality settings for your purposes (see the
User's guide).
●
Check that the environmental conditions (temperature, humidity) are in the recommended range
(see the User's guide).
●
Check that the printheads have been aligned.
●
Check whether there are any outstanding printer alerts.
●
Avoid touching the substrate while printing is in progress.
Banding
Banding means that your printed image suffers from added horizontal lines as shown (the color of the
lines may vary).
34
Chapter 7 Troubleshoot print-quality issues
ENWW
If there are thin white lines across the width of the substrate:
1.
2.
From the HP Internal Print Server, clean and check the printheads, and check for blocked nozzles.
●
If there are blocked nozzles, increase the number of passes.
●
If there is a substrate-advance problem, decrease the substrate-advance setting.
If the problem persists, increase the number of passes.
1.
Increase the substrate-advance setting in the HP Internal Print Server.
2.
If the lines are visible only in dark or saturated colors, try the following remedies in this order:
a.
Increase the number of passes.
b.
Lower the ink limit for the selected print mode.
c.
Increase the drying temperature.
If you have adjusted the substrate-advance setting but there are still white and dark lines distributed
randomly across the same print:
1.
Check the substrate-advance status in the HP Internal Print Server. If there is a warning message:
a.
Unload the substrate and clean the substrate-advance sensor.
b.
Reload the substrate and check it as usual.
c.
If the warning message persists, probably the substrate type is invisible to the substrateadvance sensor, so you should turn off the sensor (in the Loaded Substrate window in the HP
Internal Print Server) and adjust the substrate advance manually.
2.
If the problem persists, increase the number of passes.
3.
If the problem persists, recreate the substrate preset.
If there are one or more thick lines across the width of the substrate, where one color seems to be
missing:
ENWW
1.
Request a hard clean of the printhead that seems to be failing. See Clean the printheads
on page 18.
2.
Open the door on the front right of the printer and pull out the printhead cleaning roll assembly.
3.
You should see ink on the upper, horizontal part of the roll and also on the vertical part of the roll.
If you see no ink on the vertical part of the roll, there may be a fault in the primer pump. In this case,
please call your service representative (see HP Customer Care Centers on page 49).
Banding
35
Print-quality issues
If there are thin dark lines across the width of the substrate:
If the back side of the substrate varies in color or shade (for instance, if something has been printed on
it), you may see banding in parts of your print because the substrate-advance sensor has become
confused. In this case, turn off the sensor (in the Loaded Substrate window in the HP Internal Print
Server) and adjust the substrate advance manually.
If you see banding while printing on self-adhesive substrate with four or five passes, press the
Change button in the Job Properties window, and try changing the halftoning method to G.N.
Print-quality issues
For information on how to adjust printer settings, see the User's guide.
Colors are misaligned
This problem can have various slightly different visible symptoms.
Colors are misaligned vertically
36
●
If magenta prints higher on the substrate than the other colors, increase the substrate-advance
setting in the HP Internal Print Server.
●
If magenta prints lower on the substrate than the other colors, decrease the substrate-advance
setting in the HP Internal Print Server.
●
If the misalignment appears to be random, try the solutions recommended for banding (see
Banding on page 34).
Chapter 7 Troubleshoot print-quality issues
ENWW
1.
Ensure that the substrate is not skewed. If there is any skew, reload the substrate to correct it.
2.
Check the carriage beam position. If it is high and the substrate type doesn't require a high position,
lower it.
3.
If the problem persists, realign the printheads.
4.
If the problem persists despite automatic printhead alignment, try manual printhead alignment.
5.
If the misalignment appears at the sides of the substrate but not in the center, you have a problem
of substrate expansion.
●
If you are using a plastic substrate, recreate the substrate preset, decreasing the curing and
drying temperatures as much as possible.
●
If you are using a porous, paper-based substrate, recreate the substrate preset, increasing
the drying temperature as much as possible.
●
Some substrate types (especially paper-based substrates) may expand because of the
ambient temperature and humidity. Try using a higher-quality substrate that is less sensitive
to temperature and humidity.
●
If you see the problem in printed black text, check in your application or in the RIP that the
text color is pure black and does not contain other colors.
The print is grainy
ENWW
1.
Check that you are printing on the correct side of the substrate.
2.
Make a diagnostic print and adjust the substrate-advance setting.
3.
If the problem persists, align the printheads.
4.
If the graininess is more visible in dark or saturated colors (coalescence):
The print is grainy
37
Print-quality issues
Colors are misaligned horizontally
a.
Increase the number of passes.
b.
Increase the drying temperature.
c.
Decrease the ink limit.
For information on how to adjust printer settings, see the User's guide.
The print is smudged
Print-quality issues
This indicates that the ink is not dry. The characteristics of the substrate may have changed. Recreate
the substrate preset.
The substrate is not flat
If the substrate does not lie flat when it comes out of the printer, but has shallow waves in it, you are
likely to see defects in the printed image, such as vertical stripes. This can happen when you use thin
substrate that becomes saturated with ink.
1.
Check that the substrate type you have loaded corresponds to the substrate type selected in the
front panel and in your software.
2.
Try changing to a thicker substrate type.
Edges of objects are rough or blurred
1.
Check that the carriage beam position is not high. If it is high, the printheads have to be aligned
manually.
2.
Align the printheads.
3.
Recreate the substrate preset.
For information on how to adjust printer settings, see the User's guide.
Colors look washed out
1.
If you are using fewer than four passes, increase the number of passes.
2.
Increase the ink density.
3.
Check that you are using the correct ICC profile for your substrate and print mode.
For information on how to adjust printer settings, see the User's guide.
38
Chapter 7 Troubleshoot print-quality issues
ENWW
ENWW
1.
Check that the substrate has been correctly loaded.
2.
Check that the loaded substrate is the same as the substrate selected in the HP Internal Print
Server.
3.
Check that the ICC profile used by the RIP is correct for the loaded substrate.
Colors are inaccurate
Print-quality issues
Colors are inaccurate
39
8
Troubleshoot ink cartridge and
printhead issues
Cannot insert an ink cartridge
Ink system issues
1.
Use the correct procedure to change ink cartridges, through the front panel. See the User's
guide.
2.
Check that there is no obstruction in the ink cartridge connector.
3.
Check that the ink cartridge is of the correct color. A connector will refuse to connect to a cartridge
of the wrong color.
4.
Check that the ink cartridge is correctly oriented (compare with the others).
Cannot insert a printhead
1.
Use the correct procedure to change printheads, through the front panel. See the User's guide.
2.
Check that there is no obstruction in the printhead slot.
3.
Check that the printhead is correctly oriented (compare with the others).
4.
Check that you have closed and latched the printhead cover.
The front panel recommends replacing or reseating an ink
cartridge
1.
Disconnect the ink cartridge.
2.
Reconnect the ink cartridge and check the front panel message.
3.
If the problem persists, insert a new ink cartridge.
4.
If the problem still persists, call your service representative (see HP Customer Care Centers
on page 49).
The front panel recommends replacing or reseating a
printhead
40
1.
Remove the printhead.
2.
Reinsert the printhead into the carriage and check the front panel message.
3.
If the problem persists, remove the printhead again. Illuminate the printhead slot in the carriage
and check the electrical connections to the printhead for dirt. If they look dirty, clean them as
follows.
Chapter 8 Troubleshoot ink cartridge and printhead issues
ENWW
Turn off the printer.
b.
Place a piece of paper underneath the carriage to collect any dirt that falls through.
c.
Use the brush from the Cleaning Kit to clean the electrical connections gently but thoroughly.
d.
Use the pneumatic air gun (provided for inflating the spindles) to dislodge any remaining dirt.
You can use paper or cloth to prevent the spread of dirt.
e.
Remove any paper or cloth you have used to prevent the spread of dirt.
f.
Again illuminate the electrical connections and check that they are clean and undamaged.
4.
Reinsert the printhead into the carriage and check the front panel message.
5.
If the problem persists, insert a new printhead.
6.
If the problem still persists, call your service representative (see HP Customer Care Centers
on page 49).
A printhead has overheated
A printhead may overheat for several reasons.
●
The room temperature may be too high.
●
The printhead may be suffering from blocked nozzles. You may be able to cure this problem by
cleaning the printheads (see Clean the printheads on page 18).
●
The printhead may be suffering from an internal failure, in which case it must be replaced.
A printhead has damaged the substrate
When a printhead touches and damages the substrate, the most likely cause is excessive heat.
Therefore, try decreasing the drying temperature.
For information on how to adjust printer settings, see the User's guide.
Incorrect printhead cleaning roll errors
You should not touch the printhead cleaner roll except when you need to replace it. Any interference
with the roll may prevent the printer from keeping track of roll usage, in which case you may see spurious
error messages, and a printing job may be cancelled unnecessarily.
ENWW
A printhead has overheated
41
Ink system issues
a.
9
Troubleshoot other issues
The printer does not print
If all is in order (substrate loaded, all ink components installed and no file errors), there are still reasons
why a file you have sent from your computer may not start printing when expected:
●
You may have an electrical power problem. If there is no activity at all from the printer, and the front
panel does not respond, check that the power cables are connected correctly and that there is
power available at the source.
●
You may be experiencing unusual electromagnetic phenomena, such as strong electromagnetic
fields or severe electrical disturbances, which can cause the printer to behave strangely or even
stop working. In this case, turn off the printer, wait until the electromagnetic environment has
returned to normal, then turn it on again. If you still experience problems, please call your service
representative (see HP Customer Care Centers on page 49).
The printer seems slow
In some circumstances, the printer will deliberately print more slowly than usual to prevent the printheads
from overheating. There are several possible reasons why a printhead may start to overheat.
General printer issues
●
The room temperature is too high.
●
The printhead is suffering from blocked nozzles (see Clean the printheads on page 18).
●
The printhead is faulty and should be replaced.
The HP Internal Print Server cannot detect the printer
If the HP Internal Print Server cannot detect the printer, probably either the printer or the HP Internal
Print Server is wrongly configured.
1.
Check the network configuration of the HP Internal Print Server computer (see the Installation
guide).
2.
Connect the printer to a network that is known to be working correctly for other purposes.
Alternatively, connect the printer to the HP Internal Print Server only.
3.
At the front panel, select the Setup icon
, then Connectivity > Advanced > Restore factory
settings.
42
4.
Turn the printer and the HP Internal Print Server off, then turn them on again.
5.
Wait for the front panel to show an IP address.
6.
Check the printer's network configuration from the HP Internal Print Server (see the Installation
guide).
Chapter 9 Troubleshoot other issues
ENWW
Upgrade the HP Internal Print Server
TIP: When you have to upgrade the firmware and the HP Internal Print Server, first upgrade the
firmware and then the HP Internal Print Server.
To upgrade the HP Internal Print Server, proceed as follows.
1.
First uninstall the current version through the Control Panel. Doing so will delete the current job in
the queue, but not the RIP files.
2.
Unzip the .ZIP 2 file (two files to be extracted: HPIPS.msi and setup.exe) to a location on a physical
hard drive (not to the Desktop).
3.
Run the setup.exe program of the new version of the HP Internal Print Server.
4.
Once installed, open the HP Internal Print Server, and select Tools > Preferences, then enter the
printer's IP address.
Print job files have not been properly deleted
See the User's guide to find out how to delete a job completely.
Color calibration fails
●
Reflective color measurements of the printed target cannot be performed reliably on the current
substrate. Reflective color measurement can be unreliable or impossible on substrates that are
non-white, transparent or translucent, very glossy, or have a very rough or punched surface. For
these substrates, automated color calibration using the HP Embedded Spectrophotometer may
not be possible; see the table of supported substrate types in the User's guide. Adjustment of ink
restrictions is still possible using the HP Internal Print Server.
●
Some of the color measurements of the Closed-Loop Color Calibration and Ink Restriction Test
Chart are defective, or the scanning of the fiducial marks (the big black |\\| marks) has failed. These
problems can be caused by:
●
ENWW
◦
Unwanted stains or printhead crash marks on the substrate, that can be easily seen by visual
inspection of the printed chart. Make sure the substrate has no stains before running color
calibration. Printhead crash marks may occur when the substrate is wrinkled. Try to solve the
problem by adjusting substrate parameters such as tension or drying and curing temperatures.
See A printhead has damaged the substrate on page 41 and There are ink marks on the
substrate on page 33.
◦
Wrinkles or bubbles in the substrate, even when there has been no printhead crash.
◦
Generally poor print quality (such as banding). See Troubleshoot print-quality issues
on page 34.
Either the HP Embedded Spectrophotometer or the line sensor is not working properly. Please
refer to Clean the line sensor and aerosol inlets on page 16. If the problem persists, call your service
representative (see HP Customer Care Centers on page 49).
Upgrade the HP Internal Print Server
43
General printer issues
Automatic color calibration may fail occasionally. You may see the front panel error message Color
calibration cancelled because of scanning errors, which can be caused by various different
problems.
10 Front-panel error messages
Occasionally you may see one of the following messages appear on the front-panel display. If so, please
follow the advice in the Recommendation column.
If you see an error message that does not appear here, and you feel in doubt about the correct response,
or if you have followed the recommendation but the problem persists, call your service representative.
See HP Customer Care Centers on page 49.
Table 10-1 Text messages
Front-panel errors
44
Message
Recommendation
{Color} cartridge is altered
You are advised to replace the ink cartridge. See the User's
guide.
{Color} cartridge is low on ink
Be ready to replace the ink cartridge soon.
{Color} cartridge is missing
Install the correct ink cartridge. See the User's guide.
{Color} cartridge is out of ink
Replace the ink cartridge. See the User's guide.
{Color} cartridge has expired
You are advised to replace the ink cartridge. See the User's .
{Color} printhead is missing
Install the correct printhead. See the User's guide.
Alignment pending
You are advised to perform printhead alignment. See Align the
printheads on page 6.
A wrong printhead has been detected
Check that the correct printheads and the latest firmware
release have been installed.
An error has occurred in printhead detection
Remove the printhead, clean any ink from the electrical
connectors on the printhead (do not try to clean the nozzles),
and reinsert the printhead. See the User's guide.
Clean drop detector spittoon
You are advised to clean the ink deposits. See Clean the ink
deposits on page 15.
Cleaner roll jam. Check cleaner roll module.
Go to the front panel and select the Ink System menu, then
Check cleaner roll. Pull out the printhead cleaning roll
assembly, raise the pinchwheels, wind the roll forward
manually, then lower the pinchwheels and push the assembly
back into the printer.
Color calibration cancelled because of scanning errors
The color calibration chart could not be scanned successfully
with the current substrate. See Color calibration fails
on page 43.
Disconnected
Check the connection to the printer.
Ink system not ready to print
Please wait a while. If the printer does not recover, restart it.
Job canceled due to lack of data received from the IPS
If the problem persists, check the configuration of the HP
Internal Print Server computer.
Line sensor calib. error: substrate too small
Load a larger substrate.
Low cleaner roll
Be ready to replace the printhead cleaning roll soon.
Chapter 10 Front-panel error messages
ENWW
Table 10-1 Text messages (continued)
Recommendation
Lower lever
Lower the substrate pressure handles. See the User's guide.
Maintenance #N advised. Please contact HP
You are advised to contact your service representative. See
HP Customer Care Centers on page 49.
No substrate loaded
Load substrate.
Out of cleaner roll
Replace the printhead cleaning roll. See Replace the printhead
cleaning roll and aerosol filters on page 24.
Printer cannot carry on printing
Check that tri-phase power supply is working and the ambient
temperature is within the normal range. This problem can also
be caused by holes in the substrate, by reflective or
transparent substrates or by a dirty or faulty temperature
sensor.
Printer cannot cool down
If the ambient temperature is within the normal range, this
problem may be caused by removing the substrate too quickly
after printing. Try leaving the substrate in the printer until
temperatures settle down after printing.
Printer cannot warm up
Check that the tri-phase power supply is working. This problem
can also be caused by holes in the substrate, by reflective or
transparent substrates or by a dirty or faulty temperature
sensor.
Printer waiting for rearm. Press the power button
Press the Power Enable button on the lower left of the printer.
See the User's guide.
Remove {color} printhead
Remove the printhead. See the User's guide.
Replace {color} cartridge
Replace the ink cartridge. See The front panel recommends
replacing or reseating an ink cartridge on page 40.
Replace {color} printhead
Replace the printhead. See The front panel recommends
replacing or reseating a printhead on page 40.
Replace aerosol filter
You are advised to replace both aerosol filters. See Replace
the printhead cleaning roll and aerosol filters on page 24.
Reseat {color} cartridge
Reseat the ink cartridge. See The front panel recommends
replacing or reseating an ink cartridge on page 40.
Reseat {color} printhead
Reseat the printhead. See The front panel recommends
replacing or reseating a printhead on page 40..
Select substrate name in the IPS
Select the name of the loaded substrate in the HP Internal Print
Server.
Subs. advance cannot be tracked automatically
The substrate-advance sensor cannot track the substrate, and
should be turned off. See Substrate-advance compensation
on page 7.
Substrate jam: remove substrate
See The substrate has jammed on page 31.
Very low cleaner roll
Be ready to replace the printhead cleaning roll very soon.
Front-panel errors
Message
Table 10-2 Numerical error codes
ENWW
Error code
Recommendation
14.2
Tri-phase power is unexpectedly off. Call your service representative, and be prepared to
answer questions about indicator lights and fuses. See HP Customer Care Centers
on page 49.
14.3
The tri-phase voltage is not set. Set it using the front panel.
14.5:12
Restart the printer.
45
Table 10-2 Numerical error codes (continued)
Front-panel errors
46
Error code
Recommendation
14.8
Emergency stop button pushed. Release all four emergency stop buttons. Turn circuit breaker
ACB-1 off and then on.
14.9
Fuse error. Turn off the printer (see the User's guide). Open the FH11 fuse holders and check
the fuses. Replace any fuse if necessary.
15.1
The printer is unable to warm up to its working temperature. Check that the tri-phase power
supply is working. This problem can also be caused by holes in the substrate, by reflective or
transparent substrates or by a dirty or faulty infrared sensor.
15.2
The printer is unable to cool down to its working temperature. Call your service representative.
See HP Customer Care Centers on page 49.
16.1
The printer is unable to warm up to its working temperature. Check that the tri-phase power
supply is working.
16.2
The printer is unable to cool down to its working temperature. If the ambient temperature is
within the normal range, this problem may be caused by removing the substrate too quickly
after printing. Try leaving the substrate in the printer until temperatures settle down after
printing.
41.1:03, 41.3:10, 41.4:03
Restart the printer.
44.1:03
Possible substrate jam. If there is really a substrate jam, see The substrate has jammed
on page 31. Otherwise, restart the printer.
44.2:10, 44.3:10, 44.4:03
Restart the printer.
45.1:03
Possible substrate jam. If there is really a substrate jam, see The substrate has jammed
on page 31. Otherwise, restart the printer.
45.2:10, 45.3:10, 45.4:03
Restart the printer.
46.1:01
There is a problem with the yellow/magenta printhead primer. See Maintain the printhead
primers on page 20.
46.2:01
There is a problem with the light cyan/light magenta printhead primer. See Maintain the
printhead primers on page 20.
46.3:01
There is a problem with the cyan/black printhead primer. See Maintain the printhead primers
on page 20.
47.1:03
The printhead cleaning advance motor has failed to perfom the wiper advance movement as
expected. The pinch module is not properly closed or the roll path is stuck, the roller can not
move the substrate.
48.1.1
Carriage beam error. Restart the printer, then go to the front panel and select the Substrate
Management icon, then Carriage beam position > Carriage system recovery.
48.1.3
Carriage beam error. Restart the printer. If the error persists, call your service representative
(see HP Customer Care Centers on page 49). If no error is reported but there is still some
problem with substrate advance, go to the front panel and select the Substrate Management
icon, then Carriage beam position > Carriage system recovery.
48.1.4
Carriage beam error. Restart the printer. If the error persists, call your service representative
(see HP Customer Care Centers on page 49). If no error is reported but there is still some
problem with substrate advance, go to the front panel and select the Substrate Management
icon, then Carriage beam position > Carriage system recovery.
48.1.5
Carriage beam error. Restart the printer.
50:01
The substrate-advance sensor cannot track the substrate, either because the sensor is dirty or
faulty, or because the substrate type is incompatible with the sensor. Clean the substrateadvance sensor (see Clean the substrate-advance sensor on page 18). If the error persists,
turn off the substrate-advance sensor for the current substrate type. If the error occurs with all
substrates, call your service representative. See HP Customer Care Centers on page 49.
50:03, 50.1:10, 50.2:10
The substrate-advance sensor is not working. Restart the printer. If the error persists, call your
service representative. See HP Customer Care Centers on page 49. You can print without
the substrate-advance sensor, but print quality may be affected.
Chapter 10 Front-panel error messages
ENWW
Table 10-2 Numerical error codes (continued)
Recommendation
65.04
Restart the printer.
68
This warning message indicates that the printer's internal counters are not functioning correctly.
You are recommended to restart the printer in the near future.
78.1:04
The substrate preset is damaged or missing. Import or create a new preset for the loaded
substrate. See the User's guide.
78.2:01
The substrate may have become detached from the rear spindle, or the core is slipping on the
spindle. This could mean that you have reached the end of the roll, or that the spindle is not
correctly inflated. The substrate will be unloaded.
81:01
Possible substrate jam. If there is really a substrate jam, see The substrate has jammed
on page 31. Otherwise, restart the printer.
Front-panel errors
Error code
ENWW
47
11 When you need help
Help
Documentation
The following documents are provided with your printer, and can also be downloaded from
http://www.hp.com/go/L65500/manuals/.
●
Site preparation guide
●
Site preparation checklist
●
User's guide
●
Maintenance and troubleshooting guide
●
Legal information
HP Proactive Support
HP Proactive Support helps reduce costly printer downtime by preemptively identifying, diagnosing and
resolving printer issues before they become problems for you. HP's Proactive Support tool is designed
to help businesses of all sizes reduce support costs and maximize productivity—all with the click of a
mouse.
A component of the HP Imaging and Printing suite of services, Proactive Support helps you gain control
of your printing environment—with a clear focus on maximizing the value of your investment, increasing
printer uptime and reducing printer management costs.
HP recommends that you enable Proactive Support right away to save you time and prevent problems
before they occur, reducing costly downtime. Proactive Support runs diagnostics and checks for
software and firmware updates.
You can enable Proactive Support in the HP Internal Print Server by selecting Tools > Proactive
Support, where you can specify the frequency of connections between your computer and HP's Web
server, and the frequency of diagnostic checks. You can also choose to run the diagnostic checks at
any time.
If Proactive Support finds any potential problem, it notifies you with an alert, which will explain the
problem and recommend a solution. In some cases, the solution may be applied automatically; in other
cases, you may be asked to perform some procedure to solve the problem.
HP Customer Care
HP Customer Care offers award-winning support to ensure you get the most from your HP Designjet,
providing comprehensive, proven support expertise and new technologies to give you unique end-toend support. Services include setup and installation, troubleshooting tools, warranty upgrades, repair
and exchange services, phone and Web support, software updates and self-maintenance services. To
find out more about HP Customer Care, please visit us at:
http://www.hp.com/go/graphic-arts/
48
Chapter 11 When you need help
ENWW
or call us on the telephone (see HP Customer Care Centers on page 49). To register your warranty:
Help
http://register.hp.com/
HP Customer Care Centers
Help is available to you by telephone. What to do before you call:
●
Review the troubleshooting suggestions in this guide.
●
Review your RIP's documentation, if relevant.
●
Please have the following information available:
◦
The printer you are using: the product number and the serial number, found on the label on
the door of the electrical compartment
◦
If there is an error code on the front panel, note it down; see Front-panel error messages
on page 44
◦
The printer's Service ID
◦
The RIP you are using, and its version number
◦
The software application you are using, and its version number
◦
The text displayed by the HP Internal Print Server when you select Help > About
North America
Tel: 800 925 0563
Fax: 952 943 3695
E-mail: [email protected]
Europe, Middle East and Africa
Tel: +32 2 7283444
Fax: +31 207157536
E-mail: [email protected]
Asia and Pacific
Tel: +852 8103 2666
Tel: 00 801 85 5945 (Taiwan only, toll-free)
Fax: +852 2187 2218
E-mail: [email protected]
Latin America
Please dial Option 2/Option 6 from the selection menu.
Argentina: 5411 470 816 00
Brasil: 52 55 5258-9922
Chile: 562 436-2610 / 800 360 999
ENWW
HP Customer Care
49
Colombia: 571 602 9191 / 01 8000 51 4746 8368
Costa Rica: 0 800 011 0524
Help
Dominican Republic: 1 800 711 2884
Guatemala: 1 800 999 5105
Honduras: 800 0 123 / 1 800 711 2884
Mexico: 52 55 5258-9922
Nicaragua: 1 800 0164 / 800 711 2884
Panama: 001 800 711 2884
Peru: 511 411 2443 / 0 800 10111
El Salvador: 800 6160
Venezuela: 58 212 278 8666 / 0 800 474 68368
CC LAR Nextel: (5255) 1088 0884; ID 52*20115*51
CC LAR e-Mail: [email protected]
CC LAR Fax: +52 55 5258 6377
Service information
The printer can produce on request a list of many aspects of its current status, some of which may be
useful to a service engineer trying to fix a problem. There are two different ways to request this list:
●
In the HP Internal Print Server, select Information > Service information.
●
From any computer with Internet access, enter the URL of your printer into a Web browser, followed
by /hp/device/webAccess/allServicePlot.htm. For instance, if the URL of your printer
is http://123.123.123.123, enter http://123.123.123.123/hp/device/webAccess/
allServicePlot.htm.
You can request the whole list, which takes a significant time to generate; or you can request specific
parts of it. If in doubt, you are recommended to request the whole list (select All pages).
If you need to send the list by e-mail, you can save the page as a file from your Web browser, and later
send the file. Alternatively, from Internet Explorer you can send the page directly: select File > Send
> Page by E-mail.
50
Chapter 11 When you need help
ENWW
Preset creation flowchart
Preset creation flowchart
A
ENWW
51
Index
A
aerosol filters
maintenance 24
alerts
errors 5
alerts, warnings 5
automatic tracking 7
B
banding problems 7
C
calibration
color 8
carriage cover, cleaning 12
carriage oiler foams, replacing 15
carriage rails, cleaning 13
caution 2
clean the printer 15
cleaning kit 28
color calibration 8
color calibration cancelled 9
color profiles 10
colors inaccurate 39
colors washed out 38
Customer Care 48
D
documentation
48
E
electromagnetic disturbances 42
emergency stop buttons 4
error messages
front panel 44
F
files not properly deleted 43
firmware update 30
G
graininess 37
52
Index
H
HP Customer Care 48
HP Internal Print Server
maintenance 29
upgrade 43
HP Proactive Support 48
I
ink cartridge
cannot insert 40
maintenance 11
reseat 40
ink deposits
maintenance 15
ink restrictions 10
L
labels, warning 2
line sensor
cleaning 16
line sensor box
replacing 23
load substrate
cannot load 31
M
main roller
cleaning 17
maintenance kits 28
move the printer 27
O
overheated printhead
41
P
pinch wheels
cleaning 18
platen
cleaning 18
primer maintenance 20
print-quality problems
banding 34
colors inaccurate 39
colors misaligned 36
colors washed out 38
edges rough or blurred 38
general 34
graininess 37
horizontal lines 34
smudged print 38
substrate not flat 38
printer does not print 42
printer not detected 42
printer status 5
printhead
align 6
cannot insert 40
check 11
clean 7
crash 41
damaged substrate 41
maintenance 11
overheated 41
reseat 12
printhead cleaning roll
errors 41
maintenance 24
printhead electrical connections
clean 40
Proactive Support 48
S
safety labels 2
safety precautions 1
service information print 50
slow printing 42
smudged print 38
substrate
advance compensation 7
cannot load 31
detached from core 32
ink marks 33
jammed 31
maintenance 11
not flat 38
sticks to platen 33
wet ink 33
ENWW
substrate edge holders
cleaning 17
substrate-advance sensor
cleaning 8
support services
HP Customer Care 48
HP Proactive Support 48
T
telephone support 7
temperature sensors
cleaning 19
thunderstorm 42
W
warning 2
warning labels 2
ENWW
Index
53