1
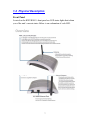
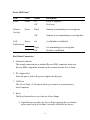
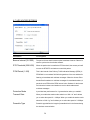
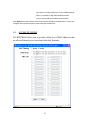
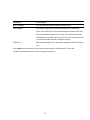
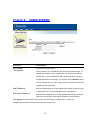
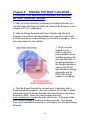
1 CE MARK WARNING This is a Class B product. In a domestic environment, this product may cause radio interference, in which case the user may be required to take adequate measures. LIMITED WARRANTY Hawking Technology guarantees that every HWUR54G Wireless-G Range Extender is free from physical defects in material and workmanship under normal use for two (2) years from the date of purchase. If the product proves defective during this two-year warranty period, call Hawking Customer Service in order to obtain a Return Authorization number. Warranty is for repair or replacement only. Hawking Technology does not issue any refunds. BE SURE TO HAVE YOUR PROOF OF PURCHASE. RETURN REQUESTS CAN NOT BE PROCESSED WITHOUT PROOF OF PURCHASE. When returning a product, mark the Return Authorization number clearly on the outside of the package and include your original proof of purchase. IN NO EVEN SHALL HAWKING TECHNOLOGY’S LIABILTY EXCEED THE PRICE PAID FOR THE PRODUCT FROM DIRECT, INDIRECT, SPECIAL, INCIDENTAL OR CONSEQUENTIAL DAMAGES RESULTING FROM THE USE OF THE PRODUCT, ITS ACCOMPANYING SOFTWARE OR ITS DOCUMENTATION. Hawking Technology makes no warranty or representation, expressed, implied or statutory, with respect to its products or the contents or use of this documentation and all accompanying software, and specifically disclaims its quality, performance, merchantability, or fitness for any particular purpose. Hawking Technology reserves the right to revise or updates its products, software, or documentation without obligation to notify any individual or entity. Please direct all inquiries to:[email protected] TRADEMARKS AND COPYRIGHT Windows 95/98/ME and Windows NT/2000/XP are registered trademarks of Microsoft Corp. All other brands and product names are trademarks of their respective companies. No part of this publication may be reproduced in any form or by any means or used to make any derivative (such as translation, transformation or adaptation) without the express written consent of the manufacturer as stipulated by the United States Copyright Act of 1976. FCC WARNING This equipment has been tested and found to comply with the regulations for a Class B digital device, pursuant to Part 15 of the FCC Rules. These limits are designed to provide reasonable protection against harmful interference when the equipment is operated in a commercial environment. This equipment generates, uses, and can radiate radio frequency energy and, if not installed and used in accordance with this user’s guide, may cause harmful interference to radio communications. Operation of this equipment in a residential area is likely to cause harmful interference, in which case the user will be required to correct the interference at his/her own expense. 2 Contents Chapter 1: Introduction ……………………………………. 3 1.1 Package Contents……………………………… 5 1.2 Features………………………………………... 5 1.3 Specifications…………………………………... 5 1.4 Physical Description…………………………… 7 Chapter 2: Plan Your Wireless Network…………………… 9 Chapter 3: Connecting the Range Extender……………….. 11 Chapter 4: Configuring the Range Extender ……………… 12 4.1 Setup Wizard……………………….……..... 12 4.2 Selecting the Device………….…………….. 13 4.3 Assign An IP Address……….…………….. 14 4.4 Details and Status…………….……………. 15 4.5 Setup Menu…………………….……………16 4.6 Security……………………….…………….. 18 4.7 Admin………………………….…………… 19 4.8 Access Filter………………….…………….. 20 Chapter 5: Status Screen…………………………………….. 22 Chapter 6: Admin Screen……………………………………. 23 Chapter 7: LAN Screen……………………………………….24 Chapter 8: Finding the Right Location………………………26 Chapter 8: Troubleshooting…………………………………..27 3 Chapter 1: Introduction Thank you for purchasing the Hawking Technologies Wireless-G Range Extender. The HWUR54G is compliant with the IEEE 802.11g/b wireless standards. The Wireless-G Range Extender is an innovative addition to Hawking’s Hi-Speed Wireless-G 54Mbps line of wireless 802.11g products. It easily and effectively doubles the operating range of your wireless network. Utilizing the latest in wireless silicon technology the HWUR54G features a plug and play solution for wireless networks that demand a larger operating distance. Whether it’s a specific bedroom in a home or the warehouse of a business, the Hawking Range Extender fills the gap in within wireless networks. The unique Universal Support Technology allows the Range Extender to repeat ANY 802.11b or 802.11g wireless signal, regardless of the brand and make of the product. The HWUR54G solves the compatibility issues that exist in other brands of wireless repeaters. With the Universal Support feature, setup of the HWUR54G is simple. All that is required is the name of your wireless network. The HWUR54G supports the latest in wireless security. Support for 128-Bit WEP encryption and WPA ensure that your wireless network will be safe and secure. The Range Extender features a detachable antenna for compatibility with Hawking’s complete line of Hi-Gain Wi-Fi Range Extending Antennas and devices. 4 1.1 Package Contents The HWUR54G includes the following items: z One HWUR54G Range Extender z One Power Adapter z One Quick Installation Guide z One Setup CD (Hawking WiFi Locator Software Included) z One Dipole Antenna 1.2 Features z Complies with the IEEE 802.11g/b wireless standards. z Extends the range of any wireless 802.11b or 802.11g network. z Universal Support Technology – Works with all 802.11b, 802.11g wireless networks. z 1 Minute installation using the included Setup Wizard. z High speed data rates: 54, 48, 36, 24, 18, 12, 11, 5.5, 2 and 1Mbps network speeds. z Auto rate fallback in case of obstacles or interferences. z Provide 64/128-bit WEP Data Encryption security and the latest WPA Security for protected wireless data transmissions. z Includes Hawking’s Wireless Hot Spot Locator Software z Supports Web-based configuration. 1.3 Specifications z z z z Standards: IEEE 802.11g/b (Wireless), IEEE 802.3 (Wired) Data Rate: 54/48/36/24/18/12/11/5.5/2/1Mbps auto fallback Security: 64/128-bit WEP Data Encryption, WPA Frequency Band: 2.400~2.4835GHz (Industrial Scientific Medical 5 z z z z z z z z Band) Antenna: External detachable dipole antenna (with RP-SMA connector) Connectors: 10/100Mbps RJ-45 x 1 Power: 12VDC, 0.5A Transmit Power: 16dBm (Typical) LEDs: Power, LAN Link/Activity, Wireless Activity Dimension: 30(H) x 127(W) x 87(D) mm Temperature: Operating: 32~131°F (0~55°C) Storage: -4~158°F(-20~70°C) Humidity: 10-90% (Noncondensing) 6 1.4 Physical Description Front Panel Located on the HWUR54G’s front panel are LED status lights that inform you of the unit’s current status. Below is an explanation of each LED. 7 Front LED Panel LED Power Color Green Status Lit Off Description Power is supplied. No Power. Wireless Activity Green Flash Antenna is transmitting or receiving data. Off Antenna is not transmitting or receiving data. On A valid link is established. Flash Off It is transmitting or receiving data. No link is established. LAN Green Link/Activity Back Panel Connectors 1 Antenna Connector This round connection has a standard Reverse SMA connector where any Reverse SMA-compatible antenna can be connected to the Access Point. 2 DC Adapter Port Insert the power jack of the power adapter into this port. 3 LAN Port The Access Point’s LAN port is where you connect to your network or local computers. 4 Reset The Reset button allows you to do one of two things. 1) If problems occur with your Access Point, pressing the reset button with a pencil tip (for less than 5 seconds) will reboot the device, 8 keeping your original configurations intact. 2) If problems continue to persist or you have forgotten your password, pressing the reset button for more than 5 seconds will reset the device back to its factory default settings. (Warning: your original configurations will be replaced with the factory default settings). 9 Chapter 2: Plan Your Wireless Network Before you begin configuring your HWUR54G Wireless Range Extender, it is important that you determine where it fits within your wireless network. A wireless network consists of computers (Desktops or Laptops) with wireless network adapters installed. Computers within a wireless network are connected with a local wireless access point that handles all wireless communications between the computers and the internet. The HWUR54G Wireless Range Extender must be placed within your wireless network. If it is placed too far from your wireless network it will not receive a strong enough signal to repeat properly. Ensure that the selected placement of the Wireless Range Extender is not too far from the original Access Point. (Indoor: approx 50 – 150 feet) This diagram may help you determine how the Wireless Range Extender works within a wireless network. 10 Chapter 3: Connecting the Range Extender 11 You may also connect the HWUR54G to an open LAN port on your network. After you have finished configuring your Range Extender (the following steps will help you configure your Range Extender) you must disconnect it from your network or PC and place it in any location that requires extended wireless coverage (must still be in wireless proximity of your original wireless network): 12 Chapter 4: Configuring the Range Extender 4-1 Ensure that your Range Extender is powered on and correctly connected to your PC. (Note: If you are a more advanced user or you are using a Macintosh computer and wish to skip the Setup Wizard you may do so and use the default IP of the Range Extender to access the Web Based User Interface. The Default IP Address and Login is (SKIP TO PG 15 AFTER YOU HAVE LOGGED IN) : http://192.168.1.235 User Name: admin Password: 1234 -Power On your PC. -Use the included setup CD and insert it into your CD-Rom drive once your computer has completely booted up. -A menu page should automatically load: (If the page does not load Click on the START button on the bottom left hand corner of your screen and then select RUN. In the blank field type in D:\setupwizard\hawking.exe to execute to autoload page.) 13 -In the Setup Menu select SETUP WIZARD using your mouse. 4-2 Selecting the Device -In the empty field you should see the name of the Hawking Range Extender. If you do not, click the REFRESH button to rescan for the Extender. If your Range Extender is not detected, please check to ensure that your device is properly connected to the PC or network. 14 4-3 Assign an IP Address to the Range Extender This section allows you to define the specific IP address of your Wireless Range Extender. Please be sure to save the IP address you choose for your Range Extender for future use. You can assign an IP to your Wireless Range Extender using two options: 1: If your network uses DHCP and automatically assigns an IP address to new devices, please select this option (recommended) 2: If your network uses STATIC IP address assignments, select the MANUAL option and enter in your specific IP address. Select NEXT when you have completed this step. 15 4-4 Details and Status This page will display the IP address information of your Wireless Range Extender. Write this information down and save it in a safe place. You will need it to make any adjustments to the configuration settings in the future. Click NEXT and the Wizard will load the Web Based Configuration panel. 16 4-5 SETUP MENU Before you use the Web Based Configuration Panel you must enter the default login information. User Name: admin Password: 1234 You can change the login information in the ADMIN menu of the Configuration Panel. 17 Parameter Description Original SSID You must enter the SSID of the wireless access point that you wish to repeater. SSID of Extender This is the name of the new extended wireless network. All computers that connect through the Range Extender must use this SSID. Mode 802.11b mode: allows for data transfer rates up to 11Mbps 802.11g mode: allows for data transfer rates up to 54Mbps Mixed mode: provides the best performance for 11g transmission when multiple standards/client cards are present in the network. Broadcast SSID The wireless ID of the Range Extender can be hidden from all wireless computers searching for local wireless networks. Enabling this will make the network ID public. Disabling will hide this information from public users. Channel Select the appropriate channel from the list provided to correspond with your network settings. Your channel number MUST match the channel of the original Access Point that you are extending. Security Disable: Disable the security function. WEP: WEP is an authentication algorithm, which protects authorized Wireless LAN users against eavesdropping. The Authentication type and WEP key of wireless stations must be the same with the Access Point. This Access Point supports 64/128-bit WEP Encryption function. With this function, your data will be transmitted over the wireless network securely. # You can refer to the detail setting from chapter 3.2.6. Advanced setting It provides more powerful features for specific configurations of the Range Extender. Access Filter The Range Extender allows you to provide a Filter List of MAC addresses that are allowed to associate with the Range Extender. Click Apply button at the bottom of the screen to save the above configurations. You can now configure other advance sections or start using the Access Point. 18 4-6 SECURITY SETTINGS Parameter Description WEP Length WEP-64: input 10-digit Hex values (in the “A-F”, “a-f” and “0-9” range) or 5-digit ASCII character as the encryption keys. WEP-128: input 26-digit Hex values (in the “A-F”, “a-f” and “0-9” range) or 13-digit ASCII characters as the encryption keys. Mode HEX: input Hex values (in the “A-F”, “a-f” and “0-9” range) ASCII: input alphanumeric format. Passphrase Enter passphrase and click “Generate”, then the access point will automatically generate WEP keys by the passphrase for you. Key 1 - Key 4 To entry 10 Hex digits for 64 bit key, 26 Hex digits for 128 bit key. Default TX Key Select the WEP key used to encrypt data transmitted in the wireless network. Click Apply button at the bottom of the screen to save the above configurations. You can now configure other advance sections or start using the Access Point. 19 4-7 ADVANCED SETINGS Parameter Description Beacon Interval (20-1000) The period of time that this access point broadcast a beacon. Beacon is used to synchronize the wireless network. RTS Threshold (256-2432) When the packet size is smaller the RTS threshold, the access point will not use the RTS/CTS mechanism to send this packet. DTIM Period (1-255) This is the interval of the Delivery Traffic Indication Message (DTIM). A DTIM field is a countdown field informing stations of the next window for listening to broadcast and multicast messages. When the Access Point has buffered broadcast or multicast messages for associated stations, it sends the next DTIM with a DTIM Interval value. Stations for the Access Point hear the beacons and awaken to receive the broadcast and multicast messages. Protection Mode It provides best performance for 11g transmission when you enable it. Transmit Rate When you enable the station mode selection to “802.11b” and it allows you to select the speed of 1-11Mbps. When you enable the station mode selection to “802.11g” and it allows you to select the speed of 1-54Mbps. Preamble Type Preamble type defines the length of preamble block in the frames during the wireless communication. 20 Auto select: It will auto switch to the more suitable method. Short: It is suitable for high traffic wireless network Long: It can provide more reliable communication Click Apply button at the bottom of the screen to save the above configurations. You can now configure other advance sections or start using the Access Point. 4-8 ACCESS FILTERING The HWUR54G allows you to provide a Filter List of MAC addresses that are allowed/denied access associated with this Extender. 21 Parameter Description MAC Filtering You can enable or disable the MAC Filtering function. Filter Mode If you select “Only deny PCs with MAC listed below to access this device”, then all the PCs in the list will be denied to access and all other PCs will be allowed to access. If you select “Only allow PCs with MAC listed below to access this device”, then all PCs in the list will be allowed to access but all other PCs will be denied to access. Filter List Enter the MAC address of PC that will be managed by the MAC Filtering rule. Click Apply button at the bottom of the screen to save the above configurations. You can now configure other advance sections or start using the Access Point. 22 Chapter 5: STATUS SCREEN The Status Screen displays the current Ethernet and Wireless settings of the Wireless Range Extender. Parameter Description Ethernet It shows the default IP address, Subnet Mask, Gateway and Link status information. Wireless It shows the current Wireless information. 23 Chapter 6: ADMIN SCREEN Parameter Description FW Version It shows current FW version. FW Upgrade This tool allows you to upgrade the Access Point’s system firmware. To upgrade the firmware of your Access Point, you need to download the firmware file to your local hard disk, and enter that file name and path in the appropriate field on this page. You can also use the Browse button to find the firmware file on your PC. Please reset the Access Point when the upgrade process is complete. New Password Enter the password (up to 32-digit alphanumeric string) you want to login to the Access Point. Note that the password is case-sensitive. Reconfirm Password Reconfirm the password (up to 32-digit alphanumeric string) you want to login to the Access Point. Note that the password is case-sensitive. Click Apply button at the bottom of the screen to save the above configurations. You can now configure other advance sections or start using the Access Point. 24 Chapter 7: LAN SCREEN Parameter Description Device Name It shows current name of the device. Automatic IP Selecting this option is not advised unless you have direct access to the device that provides the IP address. Fixed IP Specify IP: Designate the Access Point’s IP Address. This IP Address should be unique in your network. The default IP Address is 192.168.2.1. Subnet Mask: Specify a Subnet Mask for your LAN segment. Gateway: Specify the default gateway IP of this Access Point. Click Apply button at the bottom of the screen to save the above configurations. You can now configure other advance sections or start using the Access Point. 25 Chapter 8: FINDING THE RIGHT LOCATION – PLACING THE WIRELESS RANGE EXTENDER WITHIN YOUR NETWORK 1) After you have completely configured your Range Extender you can disconnect the Ethernet cable that connects the Extender to your network or PC for configuration. 2) Take the Range Extender and Power Adapter and place the Extender in a location half way between your original Access Point and the area that you are extending your wireless coverage to. See the image below for more details: 3) Once you have located a good location, plug the power adapter into an available power outlet and view the LEDs on the Range Extender. If the Range Extender is working the WLAN light should be blinking repeatedly and the PWR LED should remain on constantly. 4) Test the Range Extender by connecting to it wirelessly with a wireless enabled computer. Give the computer 15 seconds to obtain information from the Range Extender after associating to the Range Extender’s SSID. Open your web browser and enter www.hawkingtech.com into the web address bar. If the page loads your Wireless Range Extender is working correctly. If not please check the troubleshooting section or reconfigure your Wireless Range Extender. 26 Chapter 9: TROUBLESHOOTING This chapter provides solutions to problems usually encountered during the installation and operation of the Access Point. 1. How do I manually find the PC’s IP and MAC Address? 1) In Windows, open the Command Prompt program 2) Type Ipconfig /all and Enter 1 Your PC’s IP address is the one entitled IP address 2 Your PC’s MAC Address is the one entitled Physical Address 2. What is BSS ID? A group of wireless stations and an Access Point compose a Basic Service Set (BSS). Computers in a BSS must be configured with the same BSSID. 3. What is ESSID? An Infrastructure configuration could also support roaming capability for mobile workers. More than one BSS can be configured as an Extended Service Set (ESS). Users within an ESS could roam freely between BSSs while maintaining a continuous connection to the wireless network stations and the Wireless LAN Access Points. 4. Can data be intercepted while transmitting through the air? WLAN features two-fold protection in security. On the hardware side, as with Direct Sequence Spread Spectrum technology, it has the inherent scrambling security feature. On the software side, the WLAN series offers the encryption function (WEP) to enhance security and access control. 27 5. What is WEP? WEP stands for Wired Equivalent Privacy, a data privacy mechanism based on a 64(40)-bit shared key algorithm. 6. What is a MAC Address? The Media Access Control (MAC) address is a unique number assigned by the manufacturer to any Ethernet networking device, such as a network adapter, that allows the network to identify it at the hardware level. For all practical purposes, this number is usually permanent. Unlike IP addresses which can change every time a computer logs on to the network, the MAC address of a device stays the same, making it a valuable identifier for the network. 7. I Can’t Pull up the Web Menu Screen? In order to pull up the Web Based Configuration Menu your computer must be in the same IP subnet as your Range Extender. For example, if your PC’s IP configuration is the following: IP: 192.168.0.5 Subnet 255.255.255.0 Gateway: 192.168.0.1 Then your Range Extender LAN IP address must be: IP: 192.168.0.? (any # except 1 and 5) Subnet 255.255.255.0 Gateway: 192.168.0.1 Once these values match you should be able to pull up the Web Menu. 8. I Can’t Connect to the Wireless Repeater or the Internet Make sure that all your settings are correct on the Range Extender. Remember that the Original SSID must match the SSID of your original network. The channel number of the extender must also match that of your original network. For example, if your original network had the following settings: SSID: HawkingAP LAN IP: 192.168.1.2 Channel: 6 SUBNET: 255.255.255.0 Then the settings of your Range Extender must be: Original SSID: HawkingAP 28 Channel: 6 SSID of Range Extender: (any SSID other than HawkingAP) LAN IP: 192.168.1.x (any number other than 2) SUBNET: 255.255.255.0 GATEWAY: 192.168.1.2 After you have matched the settings check if you can connect to the internet through the Wireless Range Extender. If you still cannot access the internet please contact our technical support department using the number below. If you have any further questions please contact our Toll Free Technical Support department at: 800-756-7832 or email [email protected] Thank you for purchasing the Hawking Wireless-G Range Extender. 29