1
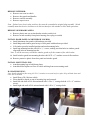
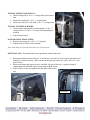
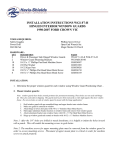
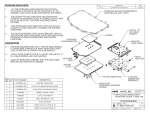
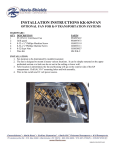
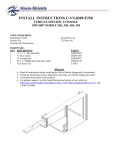
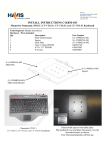
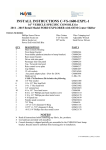
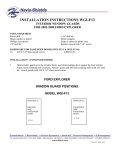
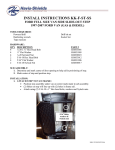
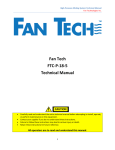
INSTALLATION INSTRUCTIONS KK-K9-D14-K
K-9 TRANSPORTATION SYSTEM
1997-2003 DODGE DURANGO
TOOLS REQUIRED:
Power Drill
Standard And Metric Socket Sets
6” Extension
7/16” Wrench
Drill Bits – 1/8” Through 3/8”
Phillips Screwdriver
Wire Cutters and Crimping Tool
Ratcheting Wrench
HARDWARE: (some hardware included in assembly)
QTY: DESCRIPTION:
10
#10 X ½” Stainless Phillips Flat Head Screw
70
1/4-20 X ½” Stainless Carriage Bolt
96
1/4-20 Serrated Nut
30
#10 X 1/2 Stainless Phillips Screw
15
#10 X 3/4 Stainless Phillips Screw
26
1/4-20 X ¾” Stainless Carriage Bolt
24
#12 X ¾” Stainless Phillips Screw
6
¼” X 1 ¼” Hex Head Lag bolt
2
3/8” X 1 ½” Hex Head Bolt
2
3/8” Flat Washer
2
3/8” Lock Washer
2
3/8” Hex Nut
4
3/8” X ½” Flat Washer
4
Rubber Feet
4
8-32 Keps Nut
4
8-32 X 1” Pem Stud
4
8-32 X 1” Phillips Machine Screws
1
Tube of Silver Silicone
COMPONENTS:
1
K-9 Main Housing
1
Dome Light Kit
1
Rubber Mat
1
Front Mounting Adjustable Legs
1
Set Of Tunnel Assemblies
1
Set Of Hinged Window Guards
1
Set Of Aluminum Door Panels
1
Rubber Edge Molding
SUB ASSEMBLIES:
• Attach dome light with wire to housing ceiling.
• Install rubber edge molding on edges of tunnels
PART #:
GSM34150
GSM32022
GSM30023
GSM34169
GSM34170
GSM32024
GSM34177
GSM33061
GSM33030
GSM31007
GSM31028
GSM30008
GSM31021
PRM97609
GSM30027
GSM32252
GSM33112
PRM97343
REMOVE INTERIOR:
• Remove rear seats in vehicle
• Remove door panels and handles
• Remove seat belt assembly
• Remove carpet in rear.
Note: If doors have electric door switches, they must be reattached to original plug assembly. Switch
assembly must then be wire tied down so it does not interfere with window or door latch operations.
REMOVE OEM DOOR PANELS:
• Remove plastic arm rest section that has window switch in it.
• Remove switch assembly from plastic housing (leave plug on switch)
INSTALL DOOR PANELS AND WINDOW GAURDS:
• Install aluminum door panels with hardware provided
• Install hinge and window guard on top of door panel with hardware provided
• Lift window guard to installed position and mark mounting holes
• Install top mounting bracket with #10 x ½ “ screws, making sure that holes in window guards
align with holes in mounting bracket.
Note: It will be necessary to bend the window guards to fit the contour of the vehicle door.
•
•
Install window guard into mounting bracket with 10/32 x ½” machine screws & flat washers.
Remove protective plastic from door panel and window guard.
INSTALL MOUNTING LEGS:
• Attach mounting legs to hold down plates.
• Attach hold down plates to floor of vehicle utilizing front seat mounting studs
K-9 MAIN HOUSING:
Note: Install sidewalls to floor using #12 X 3/4” stainless screws until roof is in place. Keep all bolts loose until
entire unit is mounted
•
•
•
•
Install floor of K-9 kit into vehicle
Floor should be placed on top of mounting legs and centered.
Install left side wall of K-9 unit and attach with ¼-20 x ½” carriage bolts & #12 x ¾” stainless
screws.
Install right side wall of K-9 unit and attach with ¼-20 x ½” carriage bolts.
2
KK-K9-D14-K-INST-4-05
INSTALL CEILING AND WALLS:
• Install ceiling with ¼-20 x ½” carriage bolts and serrated
nuts.
• Install front wall with ¼-20 x ½” carriage bolts
• Install rear wall of K-9 unit with ¼-20 x ½” carriage bolts.
INSTALL TUNNELS & DOORS:
• Loosely attach side tunnels to main housing 1/4-20 x ½”
carriage bolts or 1/4-20 x ¾”carriage bolts depending on
location.
• Attach step to tunnel.
MAIN HOUSING FINAL STEPS:
• Mount rear housing use ¼-20 x 1-½” lag bolts.
• Tighten all loose bolts in the assembly.
Note: Look under the vehicle & insure there are no obstructions.
OPTIONAL FAN: If optional fan has been purchased, install at this time.
•
•
•
Mount dome light switch as desired. A switch box is provided so switch can be mounted to K9
housing in various locations. (side of tunnel housing at top works very well). Wire to 12 volt
power source.
Sheet metal seams and gaps need to be carefully silicone at floor area. (proper sealing of
compartment will eliminate water from getting under K-9 unit)
Allow silicone to dry overnight before placing in rubber floor
mat.
Switch Box
3
KK-K9-D14-K-INST-4-05