1
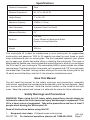
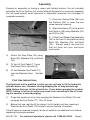
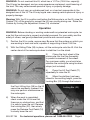
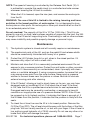
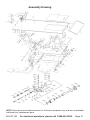
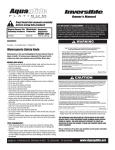
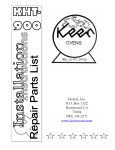
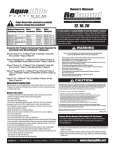
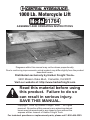
1000 Lb. Motorcycle Lift
91764
ASSEMBLY AND OPERATING INSTRUCTIONS
Diagrams within this manual may not be drawn proportionally.
Due to continuing improvements, actual product may differ slightly from the product
described herein.
Distributed exclusively by Harbor Freight Tools®.
3491 Mission Oaks Blvd., Camarillo, CA 93011
Visit our website at: http://www.harborfreight.com
Read this material before using
this product. Failure to do so
can result in serious injury.
Save this manual.
Copyright© 2004 by Harbor Freight Tools®. All rights
reserved. No portion of this manual or any artwork contained
herein may be reproduced in any shape or form without the
express written consent of Harbor Freight Tools.
For technical questions or replacement parts, please call 1-800-444-3353.
Specifications
General Construction
Steel
Platform Dimensions
86-1/2”L x 26-3/4”W
Height Range
7” to 29--1/2”
Maximum Capacity
1000lbs. (1/2 ton)
Valve Operation
Hydraulic Valve Foot Pedal
Maximum Elevation
31”
Features
Tire Vise
Caster Wheels w/ Mechanical Brake
Position Locking Safety Bar
Weight
350 Lbs.
This motorcycle lift is ideal for maintenance on your motorcycle. Its rugged steel
construction and generous 1000 lb. lift capacity are ideal for most home or small
shop maintenance jobs on motorcycles. The foot operated hydraulic jack allows
you to keep your hands free while lifting or lowering the motorcycle. The ramp is
detachable for flexible use, and includes dual mounting pins to allow to you configure
the lift to best fit your motorcycle. The removable platform panel makes rear wheel
removal easy. The three-position vise opens up to a generous 6-1/8” to accept even
the widest tires. The steel, locking casters allow you to move the motorcycle on the
lift easily around the shop, and lock it into place for maintenance work.
Save This Manual
You will need the manual for the safety warnings and precautions, assembly
instructions, operating and maintenance procedures, parts list and diagram. Keep
your invoice with this manual. Write the invoice number on the inside of the front
cover. Keep the manual and invoice in a safe and dry place for future reference.
Safety Warnings and Precautions
WARNING: When using this lift, basic safety precautions should always be
followed to reduce the risk of personal injury and damage to equipment. This
lift is a heavy piece of equipment. Take extra precautions and use at least 2
people when moving the Motorcycle Lift.
Read all instructions before using this lift!
1. Keep work area clean. Cluttered areas invite injuries.
SKU 91764 For technical questions, please call 1-800-444-3353.
REV 08k
Page 2
2.
Observe work area conditions. Do not use machines or power tools in damp
or wet locations. Don’t expose to rain. Keep work area well lighted.
3.
Keep children away. Children must never be allowed in the work area. Do
not let them handle machines, tools, or extension cords.
4.
Store idle equipment. When not in use, tools must be stored in a dry location
to inhibit rust. Always lock up tools and keep out of reach of children.
5.
Use the right tool for the job. Do not attempt to force a small tool or
attachment to do the work of a larger industrial tool. There are certain
applications for which this tool was designed. It will do the job better
and more safely at the rate for which it was intended. Do not modify this
tool and do not use this tool for a purpose for which it was not intended.
6.
Dress properly. Do not wear loose clothing or jewelry as they can be caught
in moving parts. Protective, clothes and non-skid footwear are recommended
when working. Wear restrictive hair covering to contain long hair.
7.
Use eye and ear protection. Always wear ANSI approved impact safety
goggles. Wear an ANSI approved dust mask or respirator when working around
metal, wood, and chemical dusts and mists.
8.
Do not overreach. Keep proper footing and balance at all times. Do not reach
over or across running machines.
9.
Maintain tools with care. Keep tools sharp and clean for better and safer
performance. Follow instructions for lubricating and changing accessories. The
handles must be kept clean, dry, and free from oil and grease at all times.
10. Remove adjusting keys and wrenches. Check that keys and adjusting
wrenches are removed from the tool or machine work surface before
operating.
11. Avoid unintentional lowering. Keep feet and hands away from the pump
pedal and release pedal when you are not prepared to raise or lower the lift.
Be sure that the Locking Bar (22) is in place during the time that the lift is not
intended to be lowered. Remove the Locking Bar only when you intend to lower
the lift, and it is safe to do so.
12. Stay alert. Watch what you are doing, use common sense. Do not operate any
tool when you are tired.
13. Check for damaged parts. Before using any tool, any part that appears
damaged should be carefully checked to determine that it will operate properly
and perform its intended function. Check for alignment and binding of moving
parts; any broken parts or mounting fixtures; and any other condition that may
affect proper operation. Any part that is damaged should be properly repaired
or replaced by a qualified technician.
SKU 91764
For technical questions, please call 1-800-444-3353.
Page 3
14. Replacement parts and accessories. When servicing, use only identical
replacement parts. Use of any other parts will void the warranty. Only use
accessories intended for use with this tool. Approved accessories are available
from Harbor Freight Tools.
15. Do not operate tool if under the influence of alcohol or drugs. Read warning
labels on prescriptions to determine if your judgment or reflexes are impaired
while taking drugs. If there is any doubt, do not operate the tool.
16. Maintenance. For your safety, service and maintenance should be performed
regularly by a qualified technician.
17. Do not exceed the weight limit of this lift. Overloading the lift may result in
unexpected, rapid lowering of the object being held, as well as damage to the
lift itself; serious injury and property damage may result.
18. Assure that any load being supported by this lift is well balanced.
Unbalanced loads may cause the lift to fall over, potentially causing serious
personal injury or property damage.
19. This lift is not to be used for any aircraft purposes.
20. WARNING: Before standing or working underneath any elevated motorcycle,
be sure that the motorcycle is properly and safely secured. For your safety and
the safety of others, use good professional practice and common sense.
Caution: Always be aware of Dynamic Loading. If you drop a weight on the
Motorcycle Lift. It may create for a brief instant, an excess load. The Motorcycle
Lift is designed for 1,000 lbs. maximum load; do not exceed.
Warning: The warnings, cautions, and instructions discussed in this instruction
manual cannot cover all possible conditions and situations that may occur.
It must be understood by the operator that common sense and caution are
factors which cannot be built into this product, but must be supplied by the
operator.
Unpacking
When unpacking, check to make sure the following parts are included.
Main Lift Assembly
Ramp Lift Foot Pedal Locking Bar
Sliding Plate
Vise Assembly
Release Foot Pedal
Fastener Hardware Kit
If any parts are missing or broken, please call Harbor Freight Tools at the number
on the cover of this manual.
SKU 91764
For technical questions, please call 1-800-444-3353.
Page 4
Assembly
Prepare for assembly by having a clean, well lighted location. You will probably
assemble the lift on the floor, but a work table will be helpful for some sub-assembly.
You will need several small open-end or adjustable wrenches (not included) to
complete assembly.
1) Place the Sliding Plate (36) onto
the Platform (35) to cover the rear
wheel removal opening.
Ramp (37)
2) Attach the Ramp (37) to the end of
the Platform (35) using Washers (23)
and R-Pins (04).
Platform (35)
Sliding Plate (36)
4) Attach the Stop Plate (32) using
Bolts (33), Washers (23), and Nuts
(30).
3) Fit the Front Wheel Vise Assembly
(34) to the front of the platform using
Bolts (33), Washers (23), and Nuts
(30). Always select the position
that will best suit your particular
motorcycle.
Stop Plate (32)
5) Fit the Lift Foot Pedal (11) over
the Pump Piston Spindle (9).
6) Fit the Release Foot Pedal (10)
over the Release Valve Spindle
(5).
First Use Instructions
The Hydraulic unit is prefilled, so that you do not have to fill the hydraulic
cylinder before use. However, during shipping the oil may become agitated. Before first use, let the oil settle for 1 hour before purging the system.
NOTE: Failure to let the oil settle may result in air remaining in the oil, causing the need for a second purging.
1) Purge the system of air by fully pressing the Release Foot Pedal (10) and
pumping the Foot Pedal (11) 15 to 20 times.
2) Before first use, test the lift by raising it to full height and then lowering it.
Depress the Foot Pedal (10) slowly to control the rate of descent.
If the lift does not operate properly, let the oil settle for an additional hour before
repeating the purging process.
SKU 91764
For technical questions, please call 1-800-444-3353.
Page 5
WARNING: Do not overload this lift, which has a 1/2 Ton (1000 Lbs. capacity).
The lift may be damaged, and you may experience unplanned, rapid lowering of
the load. This may cause severe personal injury or property damage.
WARNING: Do not carry an unbalanced load, or a load not appropriate to the
designed use of this lift. The lift may topple over causing serious personal injury or
property damage.
Warning: With the lift in position and before the Motorcycle is on the lift, raise the
Casters (14) off the ground to prevent the lift from moving during use. Raise the
Casters by turning the Adjustment Screw (18) clockwise.
Operation
WARNING: Before standing or working underneath any elevated motorcycle, be
sure that the motorcycle is properly and safely secured. For your safety and the
safety of others, use good professional practice and common sense.
1) Position the lift in a safe, secure area. Be sure that the surface on which you
are working is level and solid, capable of supporting at least 1000 lbs.
2) With the Sliding Plate (36) in place, roll the motorcycle onto the lift. Kick the
center stand of the motorcycle down to stabilize it on the stand.
Vise Assembly
3)
Clamp the front wheel of the
motorcycle into the Vise Assembly
to prevent movement of the wheel.
For maximum safety, you should also
stabilize the motorcycle using tie-down
straps (not included).
4)
Pump the Lift Foot Pedal (11)
repeatedly to raise the lift.
5)
When the platform has been
raised to the working height, pass the
Locking Bar (22) through the holes in
the Front Lifting Arm (38) so the lift
cannot be accidently lowered. You
may now perform maintenance on
the motorcycle.
6) When the work is completed,
check under the Lift to see that
there are no obstructions, and that
it is safe to lower the unit. Remove
the Locking Bar (22), then slowly
press the Release Foot Pedal (10)
to slowly lower the unit.
SKU 91764
Locking Bar (22)
Adjusting Screw (18)
Caster (14)
For technical questions, please call 1-800-444-3353.
Page 6
NOTE: The speed of lowering is controlled by the Release Foot Pedal (10). It
is advisable to operate this pedal slowly in a controlled and safe manner
whenever lowering the Lift and its contents.
7) When the Lift is lowered, open the vise jaws, and remove the motorcycle
from the lift.
WARNING: The use of this lift is limited to the raising, lowering, and transportation in the lowest position, of motorcycles. It is not designed to store
motorcycles or other parts. No motorcycle or other part should be left on the lift
for an extended period of time.
Do not overload. The capacity of this lift is 1/2 Ton (1000 Lbs.). This lift is designed to use only on hard, level surfaces capable of supporting the load, the 350
lb. weight of the Lift and all supporting tools. Overloading or use on other surfaces
may cause instability and possible property damage or personal injury.
Maintenance
1) The hydraulic system is closed and will normally require no maintenance.
2) The mechanical parts of the Lift, such as the pedal lift and release shafts
should be occasionally lubricated with heavy oil or grease.
3) Protect the Lift Cylinder from dirt or grit, when in the raised position. If it
becomes dirty, wipe it off with a clean cloth.
4) Maintain and store the Lift in a reasonably protected environment. Do not
expose to rain or excess moisture. Protect from salt water or other corrosive
materials. If it becomes dirty or contaminated, clean it promptly with clean
water or a suitable detergent. If using a pressure washer, be aware that you
may remove some paint from the outer surface. Never apply a pressure
washer to the seal areas near the pistons or valves. Be sure to lubricate
external moving parts after cleaning.
5) If the lift “fades”, allowing a load to slowly lower on its own, you may have
damaged seals or insufficient lift oil. First check the oil level. If the level
is OK, take the lift to a qualified service technician for seal replacement.
Damaged seals may be caused by overloading, or exposure to harmful
conditions or inappropriate use of a pressure washer. NOTE: If the lift can
be pumped up to its highest position, it indicates that there is enough oil. If
the lift fades from this position, it indicates that the problem is likely with the
seals.
6) To check the oil level, be sure the lift is in its lowest position. Remove the
Oil Filler Plug (P22). The oil level should be even with the bottom of the filler
plug hole. You can visually see the oil, or test with your finger. If the oil level is
low, add any good hydraulic oil of 15/40 viscosity. Do not use any other oil or
brake fluid, which will damage the seals.
SKU 91764 For technical questions, please call 1-800-444-3353. Page 7
Parts List
SKU 91764
For technical questions, please call 1-800-444-3353.
Page 8
Parts List Continued
SKU 91764
For technical questions, please call 1-800-444-3353.
Page 9
Assembly Drawing
NOTE: Some parts are listed and shown for illustration purposes only and are not available
individually as replacement parts.
SKU 91764
For technical questions, please call 1-800-444-3353.
Page 10
LIMITED 90 DAY WARRANTY
Harbor Freight Tools Co. makes every effort to assure that its products
meet high quality and durability standards, and warrants to the original purchaser
that this product is free from defects in materials and workmanship for the period
of 90 days from the date of purchase. This warranty does not apply to damage due
directly or indirectly, to misuse, abuse, negligence or accidents, repairs or alterations outside our facilities, criminal activity, improper installation, normal wear and
tear, or to lack of maintenance. We shall in no event be liable for death, injuries to
persons or property, or for incidental, contingent, special or consequential damages
arising from the use of our product. Some states do not allow the exclusion or limitation of incidental or consequential damages, so the above limitation of exclusion
may not apply to you. This warranty is expressly in lieu of all other
warranties, express or implied, including the warranties of
merchantability and fitness.
To take advantage of this warranty, the product or part must be returned to
us with transportation charges prepaid. Proof of purchase date and an explanation
of the complaint must accompany the merchandise. If our inspection verifies the
defect, we will either repair or replace the product at our election or we may elect
to refund the purchase price if we cannot readily and quickly provide you with a
replacement. We will return repaired products at our expense, but if we determine
there is no defect, or that the defect resulted from causes not within the scope of
our warranty, then you must bear the cost of returning the product.
This warranty gives you specific legal rights and you may also have other
rights which vary from state to state.
3491 Mission Oaks Blvd. • PO Box 6009 • Camarillo, CA 93011 • (800) 444-3353
PLEASE READ THE FOLLOWING CAREFULLY
THE MANUFACTURER AND/OR DISTRIBUTOR HAS PROVIDED THE PARTS DIAGRAM IN THIS MANUAL
AS A REFERENCE TOOL ONLY. NEITHER THE MANUFACTURER NOR DISTRIBUTOR MAKES ANY REPRESENTATION OR WARRANTY OF ANY KIND TO THE BUYER THAT HE OR SHE IS QUALIFIED TO MAKE
ANY REPAIRS TO THE PRODUCT OR THAT HE OR SHE IS QUALIFIED TO REPLACE ANY PARTS OF THE
PRODUCT. IN FACT, THE MANUFACTURER AND/OR DISTRIBUTOR EXPRESSLY STATES THAT ALL REPAIRS
AND PARTS REPLACEMENTS SHOULD BE UNDERTAKEN BY CERTIFIED AND LICENSED TECHNICIANS
AND NOT BY THE BUYER. THE BUYER ASSUMES ALL RISK AND LIABILITY ARISING OUT OF HIS OR HER
REPAIRS TO THE ORIGINAL PRODUCT OR REPLACEMENT PARTS THERETO, OR ARISING OUT OF HIS
OR HER INSTALLATION OF REPLACEMENT PARTS THERETO.
SKU 91764
For technical questions, please call 1-800-444-3353.
Page 11