1
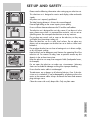
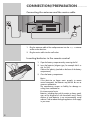
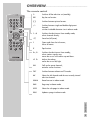
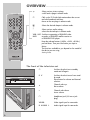
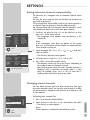
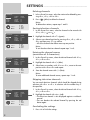
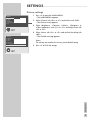
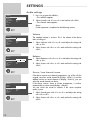
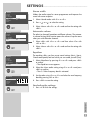
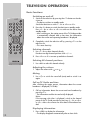
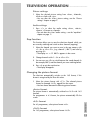
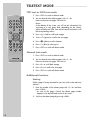
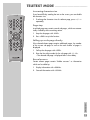
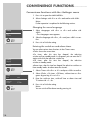
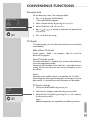
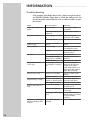
ǵ
COLOR
TELEVISION
SEDANCE 55
ST 55-2502/5 TOP
ENGLISH
DANSK
NORSK
ESPAÑOL
PORTUGUÊS
CONTENTS ____________________________________________
2
3
Set-up and safety
4
Connection/Preparation
4
4
Connecting the antenna and the mains cable
Inserting batteries in the remote control
5-6
Overview
5-6
6
The remote control
The front of the television set
7-11
Settings
7
7-8
9
10-11
Setting television channels automatically
Changing stored channels
Picture settings
Audio settings
12-13
Television operation
12
13
13
Basic functions
Zap function
Changing the picture format
14-15
Teletext mode
14
14
14-15
TOP text or FLOF text mode
Normal text mode
Additional functions
16-18
Convenience functions
16-17
17-18
Convenience functions with the »Settings« menu
TV Guide
19-21
Using external devices
19
19
20
21
Decoder or satellite receiver
Headphones
Video recorder, DVD player or SET-TOP box
Camcorder
22-24
Special settings
22-24
Setting television channels
25-27
Information
25
25
26
27
Technical data
Service information for dealers
Troubleshooting
Additional Information for units sold in the UK
SET-UP AND SAFETY ___________________________
10
cm
10
cm
20 cm
Please note the following information when setting up your television set.
This television set is designed to receive and display video and audio
signals.
Any other use is expressly prohibited.
The ideal viewing distance is 5 times the screen diagonal.
External light falling on the screen impairs picture quality.
Ensure sufficient clearance between the TV and the wall cabinet.
The television set is designed for use in dry rooms. If you do use it in the
open, please ensure that it is protected from moisture, such as rain or
splashing water. Do not expose the television set to any moisture.
Krieg am Golf
VICE
! SER
!
Do not place any vessels such as vases on the television, as they may
spill liquid, thus presenting a safety risk.
Place the television set on a solid, level surface. Do not place any
objects such as newspapers on the television set or cloth or similar items
beneath it.
Do not place the television set close to heating units or in direct sunlight,
as this will impair cooling.
Heat build-up can be dangerous and shortens the operating life of the
television set. For reasons of safety, have a specialist remove any dirt
deposits in the set from time to time.
Keep the television set away from magnetic fields (loudspeaker boxes,
for example).
Do not open the television set under any circumstances. Warranty
claims are excluded for damage resulting from improper handling.
Ensure that the mains cable is not damaged.
Thunderstorms are a danger to all electrical devices. Even if the television set is switched off, it can be damaged by a lightning strike to the
mains or the antenna cable. Always disconnect the mains and antenna
plugs during a storm.
Clean the screen with a soft, damp cloth. Only use plain water.
ENGLISH
20
cm
3
CONNECTION/PREPARATION __________
Connecting the antenna and the mains cable
AV2
AV1
2
1
TV
R
1
Plug the antenna cable of the rooftop antenna into the »Ä« antenna
socket on the television.
2
Plug the mains cable into the wall socket.
Inserting batteries in the remote control
1
Open the battery compartment by removing the lid.
2
Insert the batteries (Mignon type, for example UM-3 or
AA, 2x1,5V).
Observe the polarity (marked on the base of the battery
compartment).
3
Close the battery compartment.
Note:
If the television no longer reacts properly to remote
control commands, the batteries may be flat. Be sure to
remove used batteries.
The manufacturer accepts no liability for damage resulting from used batteries.
Environmental note
Batteries, including those which contain no heavy metal,
may not be disposed of with household waste. Please
dispose of used batteries in an environmentally sound
manner. Find out about the legal regulations which apply
in your area.
4
OVERVIEW ____________________________________________
The remote control
Ǽ
Switches off the television set (stand-by).
PIP
Key has no function.
E
Switches between picture formats.
-/--
Switches between single and double-digit preset
channels;
switches to double character size in teletext mode.
1...0
Switches the television on from standby mode;
selects channels directly.
d
Sound on/off (mute).
i
Opens and closes the info menu;
closes all menus.
Z
Zap function.
P+, P-
Switches the television on from standby;
selects stations step by step;
moves the cursor in the menus up and down.
PIP
z
SCAN
PAP
SIZE
POS
d
VCR
SAT
Tele Pilot 160 C
DVD
Ǹ Ƿ
Adjusts the volume;
moves the cursor left/right.
OK
Calls up the preset channels;
activates various functions.
TXT
Switches between teletext and TV modes.
AV
Selects the AV channels and the most recently viewed
television channel.
SCAN
Reveal answer in teletext mode.
PAP
Page stop in teletext mode.
SIZE
Selects the sub-pages in teletext mode.
POS
Updates a page in teletext mode.
ENGLISH
AV
TXT
5
OVERVIEW ____________________________________________
Selects various picture settings;
scrolls back a page in teletext mode.
z
Ȅ
Calls up the TV Guide (information about the current
and next broadcast) and time.
Moves to the next page in teletext mode.
PIP
Ƿ
Selects the desired chapter in teletext mode.
F
Selects various audio settings;
selects the desired topic in teletext mode
z
TXT
AV
SCAN
POS
PAP
SIZE
VCR, SAT Switches to operating a GRUNDIG video
DVD
recorder, a GRUNDIG satellite receiver or
a GRUNDIG DVD player.
Keep the relevant buttons (»VCR«, »SAT«, »DVD«)
pressed down. Then press the button you require.
d
VCR
SAT
Note:
The functions available to you depend on the model of
the device you are using.
Just try it out.
DVD
Tele Pilot 160 C
The front of the television set
Ȃ
P V
Switches the television on from standby mode.
Preset button for volume and channel
selection.
+
Channel select up.
Raise volume.
–
Channel select down.
Lower volume.
P/ V
P/V
y
AV
Switches the television to standby
mode and off again.
VIDEO
Headphone jack (3.5 mm ø jack
plug).
L
AUDIO
R
6
VIDEO
Video signal input for camcorder.
R AUDIO L
Audio signal input for camcorder.
SETTINGS ______________________________________________
Setting television channels automatically
The television set is equipped with an automatic channel search
system.
You start the search and can then sort the television channels into
your order of preference.
100 preset positions are provided, to which you can assign television channels from the antenna or from the cable connection.
You can also delete television channels from the channel list which
were found more than once or which have poor reception.
1
Language
English
Deutsch
Francais
Italiano
Español
Portuguesa
Eλληvικα
Türkçe
Dutch
OK
İ
Svenska
Dansk
Norsk
Suomi
Slovensko
Polski
Magyar
Pycck
Л¹1
Romaneste
Hirvatski
âe‰tina
Slovenãina
Gjuha Shqipe
Блгapck
Makeдоhckд
Srpski
Hint:
If the »Language« menu does not appear on the screen,
then set it in accordance with the chapter on resetting all television channels on page 24.
Select
OK
İ
Hungary
Ireland
Italia
Netherlands
Norge
Österreich
Polska
Portugal
Schweiz
Suomi
Sverige
Türkiye
U.K.
Ǹ
Ƿ
Ǹ
Ƿ
2
Select language with »P+«, »P-«, » « or » « and press
»OK« to confirm.
– The »Country Selection« menu appears.
3
Select the country using »P+«, »P-«, » « or » «.
4
Press »OK« to start the automatic search.
– The automatic search may last a few minutes, depending on
the number of television channels received.
– After performing the search, the menu »Provider Selection« is
displayed, (only if a provider was found). Kabel 1 in Germany, for example.) Press »P+« or »P-« to select the TV
Guide provider and confirm by pressing »OK«.
Country Selection
Belgium
Czech Rep.
Danmark
Deutschland
Eλλaδa
España
France
Ȃ
Switch on the television with » « on the television set, then
press »P+« on the remote control.
– The »Language« menu appears when the television is first
switched on.
...........
Start Autoprogramming
Changing stored channels
You can delete channels that have been stored more than once
during the automatic search. You can also store channels in a different preset position, change or enter the name of a channel as well
as skip channels.
Picture
Preset list
Channel settings
ǵ
Sound
2
Select »Preset list« with »P+« or »P-« and confirm with »OK«
– The »Preset list« menu appears.
Settings
İ
OK
Select
●i Exit
Note:
Further operation is explained in the following sections.
ENGLISH
Selecting the station list
1 Press »i« to open the »MAIN MENU«.
MAIN MENU
7
SETTINGS ______________________________________________
Deleting channels
Preset list
0
1 ARD
2 RTL
3 SAT1
4 ZDF
OK
İ
5 PRO 7
6 BR3
7 TELE5
8 WDR
9 KABEL1
Select
●i Exit
●
●
●
●
10 VOX
11 SRTL
12
13
14
Skip
Move
Delete
Name
1
In the »Preset list« menu, select the station to be deleted by pressing »P+«, »P-«, » « or » «.
2
Press » « (yellow) to delete the channel.
OK
İ
5 PRO 7
6 BR3
7 TELE5
8 WDR
9 KABEL1
Select
●i Exit
●
●
●
●
10 VOX
11 SRTL
12
13
14
Ƿ
Ƿ
Note:
To delete other stations, repeat steps 1 and 2.
Sorting television channels
1
In the »Preset list« menu, select the channel to be moved with
»P+«, »P-«, » « or » «.
2
Highlight the channel with »
3
Select a new channel position by pressing »P+«, »P-«, » « or
» « and then press » « to confirm.
– All of the channels that follow move up one position.
Preset list
0
1 ARD
2 RTL
3 SAT1
4 ZDF
Ǹ
Skip
Move
Delete
Name
Ǹ
Ƿ
Ȅ « (green).
Ȅ
Ƿ
Ǹ
Note:
To sort the other television channels repeat steps 1 to 3.
Entering the channel names
(maximum of 5 characters)
Preset list
0
1 ARD
2 RTL
3 SAT1
4 ZDF
OK
İ
5 PRO 7
6 BR3
7 TELE5
8 WDR
9 KABEL1
Select
●i Exit
●
●
●
●
10 VOX
11 SRTL
12
13
14
Skip
Move
Delete
Name
1
In the »Preset list« menu, select the desired channel with »P+«,
»P-«, » « or » «.
2
Highlight the channel with »F « (blue).
3
Select letters or numbers with »P+« or »P-«, move to the next
position with » « or » « and repeat.
4
Store the channel name with »F « (blue).
Ǹ
Ƿ
Ǹ
Ƿ
Note:
To enter additional channel names, repeat steps 1 to 4.
Skipping television channels
You can mark television channels which should be skipped during
selection with »P+« or »P-«. A selection with the number keys is
also possible.
Preset list
0
1 ARD
2 RTL
3 SAT1
4 ZDF
OK
İ
5 PRO 7
6 BR3
7 TELE5
8 WDR
9 KABEL1
Select
●i Exit
●
●
●
●
10 VOX
11 SRTL
12
13
14
Skip
Move
Delete
Name
1
In the »Preset list« menu, select the desired channel with »P+«,
»P-«, » « or » «.
2
Highlight the channel with »z « (red).
– The television channel is now displayed against a red background.
– You can deselect the selected channel by pressing the red
button again.
Ǹ
Ƿ
Concluding the settings
1 Press »i« to finish the settings.
8
SETTINGS ______________________________________________
Picture settings
Picture
Brightness
Contrast
Colour
Sharpness
Color temperature Normal
Store
Press »i« to open the »MAIN MENU«.
– The »MAIN MENU« appears.
2
Select »Picture« with »P+« or »P-« and confirm with »OK«.
– The »Picture« menu appears.
3
Select »Brightness«, »Contrast«, »Colour«, »Sharpness« or
»Color temperatur« with »P+« or »P-« and adjust them with
» « or » «.
4
Select »Store« with »P+« or »P-« and confirm the setting with
»OK«.
– The »Stored« message appears.
Ǹ
● Back
●i Exit
Picture
Brightness
Contrast
Colour
Sharpness
Color temperature Normal
Store
OK
İ
Ƿ
Note:
The settings are saved as the »User« picture default setting.
5
Press »i« to finish the settings.
● Back
●i Exit
ENGLISH
OK
İ
1
9
SETTINGS ______________________________________________
Audio settings
Sound
Volume
Balance
Sound type
Sound mode
AVL
Equalizer
Store
OK
İ
Stereo
Normal
Off
1
Press »i« to open the »MENU«.
– The »MENU« appears.
2
Select »Sound« with »P+« or »P-« and confirm with »OK«.
– The »Sound« menu appears.
Note:
Further operation is explained in the following sections.
● Back
●i Exit
Volume
Sound
Volume
Balance
Sound type
Sound mode
AVL
Equalizer
Store
OK
İ
The standard volume is set here. This is the volume of the device
after switching on.
Stereo
Normal
Off
Stereo
Normal
Off
● Back
●i Exit
Select »Store« with »P+« or »P-« and confirm the setting with
»OK«.
Ǹ
Ƿ
● Back
●i Exit
1
Select »Balance« with »P+« or »P-« and adjust the setting with
» « or » «.
2
Select »Store« with »P+« or »P-« and confirm the setting with
»OK«.
Ǹ
Ƿ
Stereo / two channel, mono
Sound
Volume
Balance
Sound type
Sound mode
AVL
Equalizer
Store
10
2
Balance
Sound
OK
İ
Select »Volume« with »P+« or »P-« and adjust the setting with
» « or » «.
● Back
●i Exit
Volume
Balance
Sound type
Sound mode
AVL
Equalizer
Store
OK
İ
1
Stereo
Normal
Off
If the device receives two channel programmes, e.g. a film with the
original sound on sound channel B (display: »Dual II «) and the
dubbed version on sound channel A (display: »Dual I«), you can
select the sound channel you desire.
If the device receives stereo or Nicam programmes, it switches
automatically to stereo sound (display: »Stereo«).
You can switch the sound to »Mono« if the stereo reception
quality is poor.
1
Select »Sound type« with »P+« or »P-« and adjust the setting
with » « or » «.
2
Select »Store« with »P+« or »P-« and confirm the setting with
»OK«.
Ǹ
Ƿ
SETTINGS ______________________________________________
Stereo width
Sound
Volume
Balance
Sound type
Sound mode
AVL
Equalizer
Store
OK
İ
Widens the audio output for stereo programmes and improves the
sound with mono reception.
Stereo
Normal
Off
● Back
●i Exit
Select »Sound mode« with »P+« or »P-«.
2
Press » « or » « to select the setting.
3
Select »Store« with »P+« or »P-« and confirm the setting with
»OK«.
Ǹ
Ƿ
Automatic volume
Sound
Volume
Balance
Sound type
Sound mode
AVL
Equalizer
Store
OK
İ
1
The television channels broadcast at different volumes. The automatic volume limiting (AVL) function means the volume is kept the same
when you switch between channels.
Stereo
Normal
Off
● Back
●i Exit
1
Select »AVL« with »P+« or »P-« and then select »On« with
» « or » «.
2
Select »Store« with »P+« or »P-« and confirm the setting with
»OK«.
Ǹ
Ƿ
Equalizer
The equalizer offers you four preset sound settings (Music, Sports,
Cinema and Speech) and one which you can create yourself (User).
Sound
Volume
Balance
Sound type
Sound mode
AVL
Equalizer
Store
1
Select »Equalizer« by pressing »P+« or »P-« and press »OK«
to confirm.
– The »Equalizer« menu appears.
2
Select the »User« audio setting using »P+« or »P-« and press
»OK« to confirm.
– The »0.1 kHz« frequency band is activated.
3
Set the value using »P+« or »P-« and select the next frequency
band by pressing » « or » «.
4
Press »OK« to save the setting.
Select
● Back
●i Exit
Equalizer
Music
Sports
Cinema
Speech
User
OK
İ
0.10.5 1.5
5
10
Ǹ
Ƿ
Concluding the settings
1 Press »i« to finish the settings.
● Back
●i Exit
ENGLISH
OK
İ
Stereo
Normal
Off
11
TELEVISION OPERATION ___________________
Basic functions
Switching on and off
1
PIP
2
z
3
AV
TXT
SCAN
PAP
SIZE
POS
d
VCR
SAT
Tele Pilot 160 C
DVD
Ȃ
Switch on the television by pressing the » « button on the television set.
– The device switches to standby mode.
Switch the television on with »1…0« or »P+« or »P-«.
Press the »Ǽ« button to switch the television to standby mode.
Press »1…0« or »P+« or »P-« to switch on the device from
standby mode.
– After switching on, the station preset of the TV Guide provider
is automatically selected. After a short time, the information
about the current and upcoming broadcast is displayed.
Ȃ
Completely switch the television off by pressing » « on the
television set.
– This saves electricity.
Selecting channels
1
Use »1…0« to select channels directly.
Preselect two digit channel positions with »–/– – «.
2
Press »P+« or »P-« to move up and down channels.
Selecting AV channel positions
1
Use »AV« to select AV channels directly.
Adjusting the volume
1
Ǹ
Ƿ
Adjust the volume with » « or » «.
Muting
1
Use »p« to switch the sound off (mute) and to switch it on
again.
Call up TV Guide and time.
After switching the station presets, information about the current
broadcast is displayed (TV Guide).
1
Call up information about the current and next broadcast by
pressing » «.
- The information and the time are briefly displayed.
Ȅ
Note:
If the message »No info« is displayed, switch to the channel
preset of the TV Guide provider by pressing »1…0« or »P+«
or »P-«. After a few minutes the new data will have been loaded.
Displaying information
1
12
Press »POS« to display the information.
– The display disappears automatically after a short while.
TELEVISION OPERATION ___________________
Picture settings
1
Select the desired picture setting from »User«, »Natural«,
»Rich« or »Soft« with »z «.
– You can alter the »User« picture setting, see the ”Picture
settings” chapter on page 9.
Audio settings
1
Press »F « to select the audio setting »User«, »Music«,
»Sports«, »Cinema« or »Speech«.
– You can alter the »User« audio setting – see the “equalizer”
chapter on page 11.
Zap function
This function allows you to save the television channel which you
are currently watching and switch to other channels (zapping).
1
Select the channel you want to save in the zap memory with
»1…0« or »P+« »P-«, (e.g. channel 1, BBC 1) and save by
pressing »Z«.
– The display »z –> P1 BBC1« appears in the screen.
2
Change channels with »1…0« or »P+« »P-«.
3
You can now use »Z« to switch between the saved channel (in
the example, BBC1) and the channel you were watching before.
4
Press »i« to quit the zap function.
– The display disappears.
Changing the picture format
The television automatically switches to the 16:9 format, if this
format is recognised by the Euro-AV socket.
1
Select the picture format with »E «. The selected picture
format, for example »16:9«, appears on the screen.
– You can choose between the following picture formats:
»Auto« format
The picture format is automatically switched to »16:9« with 16:9
channels.
For programmes in 4:3 format, the picture automatically fills the
screen.
For 4:3 programmes, select picture format »4:3«.
»16:9« format
For 16:9 programmes, select picture format »16:9«.
ENGLISH
»4:3« format
13
TELETEXT MODE _______________________________
TOP text or FLOF text mode
Press »TXT« to switch to teletext mode.
2
PIP
You can directly select teletext pages with »1...0«.
Return to the overview page 100 with »i«.
z
Note:
At the bottom of the screen, you will see an information line
consisting of a red, green and, depending on the station,
yellow and blue text field. Your remote control has buttons with
the corresponding colours.
AV
TXT
SCAN
1
PAP
SIZE
POS
d
VCR
SAT
3
Press »z « (red) to scroll back a page.
4
Press »
5
Press » « (yellow) to select chapters.
6
Press »F « (blue) to select topics.
7
Press »TXT« to switch off teletext mode.
Ȅ « (green) to scroll to the next page.
Ƿ
DVD
Normal text mode
Tele Pilot 160 C
1
Press »TXT« to switch to teletext mode.
2
You can directly select teletext pages with »1...0«.
Return to the overview page 100 with »i«.
3
Press »P-« to scroll back a page.
4
Press »P+« to scroll to the next page.
5
Press »TXT« to switch off teletext mode.
Additional functions
Waiting
While a page is being searched for, you can switch to the television
channel.
14
1
Enter the number of the teletext page with »1…0« and then
press »POS«.
– As soon as the page is found, the teletext page number
appears in the top left hand corner of the screen.
2
Switch to the teletext page by pressing »POS«.
TELETEXT MODE _______________________________
Increasing character size
If you have difficulty reading the text on the screen, you can double
the character size.
PIP
1
To enlarge the character size of a teletext page, press »–/– – «
repeatedly.
Page stop
A multiple page may contain several sub-pages, which are automatically scrolled by the transmitting station.
z
AV
SCAN
PAP
SIZE
POS
d
VCR
SAT
Tele Pilot 160 C
Stop the sub-pages with »PAP«.
2
Press »PAP« to quit the function.
Calling up a sub-page directly
If the selected teletext page contains additional pages, the number
of the current sub-page as well as the total number of pages is
displayed.
DVD
1
Call up the sub-pages with »SIZE«.
2
Enter the four-digit number for the sub-page with »1…0«.
– The selected sub-page is displayed after a short delay.
Reveal answer
Certain teletext pages contain ”hidden answers” or information
which can be called up.
1
Display information with »SCAN«.
2
Conceal information with »SCAN«.
ENGLISH
TXT
1
15
CONVENIENCE FUNCTIONS______________
Convenience functions with the »Settings« menu
1
2
Press »i« to open the »MAIN MENU«.
Select »Settings« with »P+« or »P-« and confirm with »OK«.
Note:
Further operation is explained in the following sections.
Changing the menu language
Settings
1
Select »Language« with »P+« or »P-« and confirm with
»OK«.
– The »Language« menu appears.
2
Select the language with »P+«, »P-« and press »OK« to confirm.
3
Press »i« to finish the setting.
Language
Timer
TV Guide
OK
İ
Select
● Back
●i Exit
Entering the switch-on and alarm times
You can select various timer functions in the »Timer« menu.
»Clock« shows the current time.
»On time«, after this time has elapsed, the television
switches on from standby mode. In »Program« you can enter the TV
station with which the television switches on.
Settings
»Off time«, after this
switches to standby mode.
Language
Timer
Select
● Back
●i Exit
Clock
On time
Off time
Alarm time
Program
16
elapsed,
the
television
1
Select »Timer« with »P+« or »P-« and press »OK« to confirm.
2
Select »Clock«, »On time«, »Off time«, »Alarm time« or »Program« by pressing »P+« or »P-«.
3
Enter the switch-on time, switch-off time or alarm time and
TV station with »1…0«.
4
Press »i« to finish the setting.
Timer
OK
İ
has
»Alarm time«, after this time has elapsed, the television switches on
from standby mode. An alarm tone also sounds.
TV Guide
OK
İ
time
0-9
● Back
●i Exit
08:24
––:––
––:––
––:––
P1 ARD
Note:
You can switch off the alarm tone by pressing »i«.
CONVENIENCE FUNCTIONS______________
Parental lock
You can block any station. The screen goes black.
Channel settings
System
Channel
Search
Fine Tune
Prog No
Child Lock
Store
Autoprogram
OK
İ
● Back
●i Exit
1
Press »i« to open the »MAIN MENU«.
– The »MAIN MENU« appears.
2
Select »Channel setting« by pressing »P+« or »P-«.
3
Select »Child Lock« with »P+« or »P-«.
4
Press » « or » « to activate or deactivate the parental lock
(On) or (Off).
5
Press »i« to finish the setting.
BG
C 06
<>
0
P1
Off
Ǹ
Ƿ
TV Guide
TV Guide provides you with information about the current and the
next broadcast.
Who offers TV Guide?
Certain stations – Kabel 1, for example – offer this service for
almost all TV programs.
How TV Guide works
The station information is »loaded« once you have selected the preset for the programme provider.
Transferring all information to the television is somewhat time-consuming, but you can call up the most current information in just a
few minutes.
Notes:
Operation with a satellite receiver is not possible with TV Guide.
If you change the station position during the time the device uses for
data transfer, it is possible that not all information will be loaded.
TV Guide settings
Settings
Language
1
Call up the »MAIN MENU« by pressing » i «.
2
Select the line »Settings« and confirm by pressing »OK«.
3
Select the line »TV Guide« by pressing »P+« or »P-« and confirm by pressing »OK«.
Timer
OK
İ
Select
● Back
●i Exit
Note:
Additional operations are explained in the following sections.
ENGLISH
TV Guide
17
CONVENIENCE FUNCTIONS______________
Changing stations
TV Guide
Date
Provider
Station Match
Display Info
OK
İ
10.12.2004
P13 Kabel
ARD
On
● Back
●i Exit
Check to see which television programme (provider) offers service
for TV Guide.
1
Select »Provider« by pressing »P+« or »P-«.
2
Select the television station (provider) by pressing » « or » «
and confirm by pressing »OK«.
3
Exit settings by pressing » i «.
Ǹ
Ƿ
Switching the station, name display on/off
If you switch off the station name display, this information is not
shown when switching the programme presets.
TV Guide
Date
Provider
Station Match
Display Info
OK
İ
10.12.2004
P13 Kabel
ARD
On
● Back
●i Exit
1
Select the line »Display Info« by pressing »P+« or »P-« and
confirm by pressing »OK«.
2
Activate (On) or deactivate (Off) the function by pressing » «
or » «.
3
Exit the setting by pressing » i «.
Ǹ
Ƿ
Assigning television stations (station matching)
You will need to use the station matching function if stations are not
recognised by TV Guide.
In the »Station Match« line these are designated as »None«.
Settings
1
Select the program that you would like to assign by pressing
»P +« or »P -«.
2
Call up the »MAIN MENU« by pressing » i «.
3
Select the line »Settings« and confirm by pressing »OK«.
4
Select the line »TV Guide« by pressing »P+« or »P-« and confirm by pressing »OK«.
5
Select the line »Station Match« by pressing »P +« or »P -«.
6
Select the station ID for the selected television station by
pressing» « or » « .
- If the station ID is not available at the selection, the station is
not supported by the provider.
7
Exit the setting by pressing » i «.
Language
Timer
TV Guide
OK
İ
Select
● Back
●i Exit
TV Guide
Date
Provider
Station Match
Display Info
OK
İ
18
● Back
●i Exit
10.12.2004
P13 Kabel
ARD
On
Ǹ
Ƿ
USING EXTERNAL DEVICES _______________
Decoder or satellite receiver
In order for the television to receive encoded programs from a
privately operated station, a decoder is needed.
Connecting a decoder or satellite receiver
AV2
AV1
PAY-TV
Decoder
1
Connect the »AV1« socket on the television set and the appropriate
socket on the decoder using a EURO-AV cable.
Notes:
A satellite receiver can also be connected to this socket.
If you want to use both a satellite receiver and a decoder, the
decoder must be connected to the satellite receiver.
Using a decoder
1
Switch on the television and the decoder.
2
Select the »AV1« preset channel by pressing »AV« repeatedly
until »AV1« appears on the screen.
Headphones
Connecting headphones
1
AV
Insert the headphone jack (3.5 mm ø jack plug) in the headphone socket on the television.
VIDEO
R
Adjusting the headphone volume
1 Press »p« to mute the television sound.
2
Ǹ
Ƿ
Press » « or » « to adjust the headphone volume.
ENGLISH
L
AUDIO
19
USING EXTERNAL DEVICES _______________
Video recorder, DVD player or SET-TOP box
Connecting the video recorder, DVD player or
SET-TOP box
AV2
AV1
2 EXTERNAL / DEC. - AV 2
L
1
AUDIO
L
O
U
T
I
N
R
R
1 EXTERNAL / EURO - AV 1
ń
Connect the »AV1« or »AV2« television sockets and the corresponding sockets of the video recorder, DVD player or the SETTOP box with a Euro-AV (Scart) cable.
Using a video recorder, DVD player or SET-TOP box
1
Switch on the video recorder, DVD player or SET-TOP box and
select the function you wish to use.
2
Select the »AV1« or »AV2« channel positions with »AV«.
– You can hear and see the video and audio information from
the video recorder or the SET-TOP box on the television set.
Connecting the SVHS video recorder
If you own a SVHS video recorder, you can connect it using a
Euro-AV cable to the »AV2« socket.
Using a SVHS video recorder
20
1
Switch on the video recorder and select the function you wish
to use.
2
Select the »AV2S« preset channel with »AV«.
– You will see the picture and hear the sound of the video
recorder on the television.
USING EXTERNAL DEVICES _______________
Camcorder
Connecting the camcorder
1
Connect the yellow socket (VIDEO – picture signal) on the television and the corresponding socket on the camcorder (VHS,
Video 8) with a cinch cable.
2
Connect the white and red sockets (L AUDIO R – sound signal)
on the television and the corresponding sockets of the camcorder with a cinch cable.
AV
VIDEO
L
AUDIO
R
Note:
If a mono camera is connected, connect the white socket (L)
of the television and the corresponding socket of the camera. Select »MONO« in the »SOUND« menu during mono operation.
1
Switch on the camcorder, insert a cassette and start playback.
2
Select the »AV3« channel by pressing »AV« until »AV3«
appears on the screen.
– You will see the picture and hear the sound of the camcorder
on the television.
ENGLISH
Operating with a camcorder
21
SPECIAL SETTINGS ______________________________
Setting television channels
This setting is only necessary if a new channel comes on air and you
do not want to change the order of your channels. The television
channel can be set directly or using the search.
MAIN MENU
ǵ
Sound
Picture
Preset list
Channel settings
Settings
OK
İ
Channel settings
System
Channel
Search
Fine Tune
Prog No
Child Lock
Store
Autoprogram
Select »Channel settings« with »P+« or »P-« and confirm with
»OK«.
– The »Channel settings« menu appears.
3
Select »Prog No« with »P+« or »P-« and set the preset channel
with » « or » «.
4
Select »Search« with »P+« or »P-« and start the search with
» « or » «.
– If a strong station signal is received, the search is interrupted
and the picture appears. Repeat the search until the channel
you want appears on the screen.
BG
C 06
<>
0
P1
Off
Store
● Back
●i Exit
Ǹ
Ǹ
Ƿ
Ƿ
Note:
The current system is automatically displayed in the »System«
line. Select »System« with »P+« or »P-« if the colour or sound
are incorrect. Select the setting required with » « or » «.
Ǹ
5
Channel settings
22
2
● Back
●i Exit
System
Channel
Search
Fine Tune
Prog No
Child Lock
Store
Autoprogram
OK
İ
– The »MAIN MENU« appears.
Select
●i Exit
OK
İ
Setting channels using the search
1 Press » i« to open the »MAIN MENU«.
BG
C 06
Select »Store« with »P+« or »P-« and confirm with »OK«.
– The »Stored« message appears.
Note:
To set other television stations, repeat steps 3 to 5.
<>
0
P1
Off
6
Ƿ
Press » i« to finish the setting.
SPECIAL SETTINGS ______________________________
Fine tuning television channels
The television automatically tunes itself to the best possible reception. You may need to carry out manual fine tuning in areas where
there is poor reception.
Channel settings
OK
İ
<>
0
P1
Off
● Back
●i Exit
MAIN MENU
ǵ
Sound
Picture
Preset list
Channel settings
Settings
OK
İ
Press » i« to open the »MAIN MENU«.
– The »MAIN MENU« appears.
2
Select »Channel settings« with »P+« or »P-« and confirm with
»OK«.
– The »Channel settings« menu appears.
3
Select »Fine Tune« with »P+« or »P-« and set it with » «
or » «.
4
Select »Store« with »P+« or »P-« and confirm with »OK«.
– The »Stored« message appears.
5
Press » i« to finish the setting.
Channel settings
System
Channel
Search
Fine Tune
Prog No
Child Lock
Store
Autoprogram
BG
C 06
<>
0
P1
Off
– The »MAIN MENU« appears.
2
Select »Channel settings« with »P+« or »P-« and confirm with
»OK«.
– The »Channel settings« menu appears.
3
Select »Prog No« with »P+« or »P-« and set the
channel with » « or » «.
4
Select »Channel« with »P+« or »P-« and confirm with »OK«.
5
Press »OK« to choose between »S« (special channel) and »C«
(channel).
6
Press » « or » « to switch up and down channels or use
»1…0« to enter the channel number directly.
0-9
C/S
● Back
●i Exit
OK
İ
Store
● Back
●i Exit
Ǹ
Ǹ
Ƿ
Ƿ
Note:
The current system is automatically displayed in the »System«
line. Select »System« with »P+« or »P-« if the colour or sound
are incorrect. Select the setting required with » « or » «.
Ǹ
Channel settings
System
Channel
Search
Fine Tune
Prog No
Child Lock
Store
Autoprogram
Ǹ
Ƿ
Setting the television channels by entering the
channel numbers
1 Press » i« to open the »MAIN MENU«.
Select
●i Exit
OK
İ
1
BG
C 06
BG
C 06
7
<>
Ƿ
Select »Store« with »P+« or »P-« and confirm with »OK«.
Note:
To set other television stations, repeat steps 3 to 7.
0
P1
Off
8
Press » i« to finish the setting.
ENGLISH
System
Channel
Search
Fine Tune
Prog No
Child Lock
Store
Autoprogram
23
SPECIAL SETTINGS ______________________________
Re-tuning all television channels
You can re-tune all the television stations, for example if you move
to another town.
Channel settings
System
Channel
Search
Fine Tune
Prog No
Child Lock
Store
Autoprogram
OK
İ
1
Press » i« to open the »MAIN MENU«.
– The »MAIN MENU« appears.
2
Select »Channel settings« with »P+« or »P-« and confirm with
»OK«.
– The »Channel settings« menu appears.
3
Select »Prog No« with »P+« or »P-« and using » « or » «
enter the channel numbers from the point they should be saved.
4
Select »Autoprogram« with »P+« or »P-« and confirm with
»OK«.
– The »Country Selection« menu appears.
5
Select the country using »P+«, »P-«, » « or » « and confirm
with »OK«.
– The automatic search may last a few minutes, depending on
the number of television channels received.
BG
C 06
<>
0
P1
Off
0-9 -/--
● Back
●i Exit
Country Selection
Belgium
Czech Rep.
Danmark
Deutschland
Eλλaδa
España
France
OK
İ
24
Hungary
Ireland
Italia
Netherlands
Norge
Österreich
Polska
Portugal
Schweiz
Suomi
Sverige
Türkiye
U.K.
...........
Start Autoprogramming
● Back
●i Exit
Ǹ
Ǹ
Note:
You can interrupt the search by pressing » i«.
Ƿ
Ƿ
INFORMATION_____________________________________
Technical data
Mains voltage:
230 V, 50/60 Hz
Power consumption: In standby mode 2 W
Switched on 55 W
Sound output:
2x14 Watts music
Reception ranges:
C01 ... C99, special channels S01 ... S41,
frequency band 1 ... 4
Channel positions:
100 und 3 AV
Service information for dealers:
The product complies with the following EU directives:
73/23/EEC directive for electrical equipment to be used within
defined voltage ranges. 89/336/EEC directive on electromagnetic
compatibility.
ENGLISH
The television set complies with the following standards: EN 60065,
EN 55013, EN 55020
25
INFORMATION_____________________________________
Troubleshooting
If the remedies given below do not work, please consult an authorised GRUNDIG dealer. Please bear in mind that malfunctions can
also be caused by external devices such as video recorders or satellite receivers.
Fault
Possible cause
Remedy
Screen lit (snow), but no
station
Antenna cable
Is the antenna cable
connected?
No television station programmed
Start the station search
Picture settings incorrectly
set
Adjust the brightness,
contrast or colour setting
Problem at station
Test with another channel
Interference to picture
and/or sound
Interference from other
devices
Change the position of the
device
Ghosts, reflection
Channel setting
Automatic or manual channel setting/fine tuning
Antenna
Have antenna cable or
system checked
Poor picture contrast
No colour
Colour intensity at minimum Turn up the colour
TV standard setting (if
setting option is available)
Select the correct colour
standard
Problem at station
Test with another channel
Inappropriate colour,
colour spots
Strong magnetic field due,
for example, to loudspeakers
Move the loudspeakers
away from the television.
If colour spots remain,
switch off the television set
at the mains and switch on
again after 10 minutes
Picture but no sound
Volume set to minimum
Turn up or switch on the
volume
Problem at station
Test with another channel
Television station (has no
teletext) or antenna system
Test another channel for
fine tuning and ghosts
Station signal too weak
Check the antenna system
No optical connection
Point the remote control at
the television set
Remote control batteries
Check the batteries, change
if necessary
Teletext missing or faulty
Remote control does not
work
Operating condition unde- Switch off the television
with the main power button
fined
for approximately
2 minutes
The picture is unrecognisa- Parental lock has been
activated
ble after switching on the
television
26
Switch off the parental lock
INFORMATION_____________________________________
Additional Information for units sold in the UK.
Units sold in the UK are suitable for operation from a 240V ac, 50Hz mains
supply.
The range of multi-system receivers is built to work in most European countries. However, the mains plug and socket system for the UK differs from
many European countries.
This appliance has been supplied with a fitted, non-removable, approved
converter plug for use in the UK. This converter plug is fitted with a 5A rated
fuse.
In case this appliance is supplied with a moulded 2-pin Euro plug only,
which is unsuitable for UK operation, this must be cut off and immediately
disposed of. An approved 13A, 3-pin UK plug should then be fitted by a
qualified electrician.
Note:
The severed Euro plug must be destroyed to avoid a possible shock
hazard should it be inserted into a socket elsewhere.
If a non-rewireable 3-pin plug or a rewireable 13A (BS1363) 3-pin plug is
used, it must be fitted with a 5A ASTA or BSI approved BS1362 fuse. If any
other type of plug is used it must be protected by a 5A fuse either in the
plug, or at the distribution board. If this type of plug becomes defective,
ensure that the fuse is removed before disposal, to eliminate potential shock
hazard.
If it is necessary to change the fuse in the non-rewireable plug, the correct
type and rating (5A ASTA or BSI approved BS1362) must be used and the
fuse cover must be refitted. If the fuse cover is lost or damaged, the lead and
plug must not be used until a replacement is obtained. Replacement fuse
covers should be obtained from your dealer.
Important:
The wires in the mains lead are colour coded in accordance with the following code:
BLUE – NEUTRAL
BROWN – LIVE
As the colours of the wires in the mains lead of your appliance may not correspond with the coloured marking identifying terminals in your plug, proceed as follows:
ENGLISH
Connect the BLUE coloured wire to plug terminal marked with the letter “N”
or coloured black.
Connect the BROWN coloured wire to the plug terminal marked with the letter “L” or coloured red.
In no circumstance must any of the wires be connected to the terminal marked with the letter “E”, earth symbol “z”, coloured green, or green & yellow.
27