1
Installation and Operation
Rack Mounting the TSC 100
Connections
In addition to using the TSC 100 on a desktop, it can also be
rack mounted. To rack mount the TSC 100, follow the
installation instructions below.
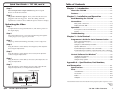
All connections, including power, input and output, and
control, are on the rear panel of the TSC 100. See figure 2.
2
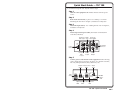
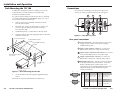
For optional rack mounting, mount the TSC 100 on a standard,
19" 1U Rack Shelf (Extron part #60-190-01) (figure 1) in one of
four locations on the front of the rack.
1.
If feet were previously installed on the bottom of the
TSC 100, remove them.
2.
Mount the TSC on the rack shelf using two 4-40 x 3/16”
screws in opposite (diagonal) corners to secure the
TSC 100 to the shelf.
3.
Install blank panel(s) or other unit(s) to the rack shelf.
4.
Insert the shelf into the rack, aligning the holes in the shelf
with those of the rack.
1U Universal Rack Shelf
1/2 Rack Width Front False
Faceplate
9V
1A MAX
1
(2) 4-40 x 3/16"
Screws
OU
TP
UT
1
2
NT
SC
PA
L
PI
CO CTUR
NT E
RO
LS
CO
LO
AD
TIN R
JU
T
ST
BR
IGH
CO T
NT
RA
ST
TRA
NS
CO
MI
DIN
G STA
ND
AR
TS
DS
C
CO
N/
MA
10 X
0
NV
ER
TER
Use 2 mounting holes on
opposite corners.
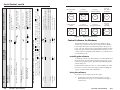
Figure 1 — Rack mounting the TSC 100
5.
5
Secure the shelf to the rack using the supplied machine
screws.
This shelf can only be mounted in the front of the rack.
1
9
6
Female
1
5
6
9
Male
2-2
TSC 100 • Installation and Operation
O
U
T
P
U
T
S
5
COMPOSITE
S-VIDEO
S-VIDEO
6
7
8
RS-232/422
Rear panel connections
Both front false faceplates
use 2 screws.
T
2
I
N
P
U
T
S
Figure 2 — TSC 100 rear panel
1/4 Rack Width Front False
Faceplate
INPU
COMPOSITE
1
POWER
4
3
1
Power connection — Plug the external 9 VDC power
supply into this connector. The power supply is
included with the unit.
2
Input 1 composite BNC connector — Connect one
BNC female connector for composite video input.
3
Input 2 S-video 4-pin mini DIN connector — Connect
one 4-pin mini DIN connector for S-video input.
4
Output composite BNC connector — Connect one
BNC female connector for composite video output.
5
RS-232/422 connector — Use this connector for RS-232
or RS-422 communications and control. Connect an
RS-232 or RS-422 device (control system or PC
computer) for remote switching between inputs and
remote centering control to this female 9-pin D
connector (see below).
Pin
RS-232
Description
RS-422
1
2
3
4
5
6
7
8
9
—
Tx
Rx
—
Transmit data
Receive data
—
TxRx-
—
Transmit data (-)
Receive data (-)
—
Gnd
—
—
—
—
—
Signal ground
—
—
—
—
—
Gnd
—
Rx+
Tx+
—
—
Signal ground
Description
—
Receive data (+)
Transmit data (+)
—
TSC 100 • Installation and Operation
2-3