1
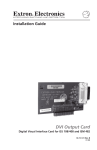
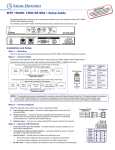
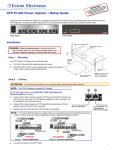
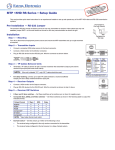
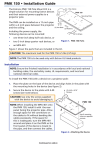
e
NT:
RTA.com for thuide,
O
P
IM
tron
ion g
t
w.ex
ns.
talla
o ww tem ins cificatio
e
Go t
s
y
p
s
s
d
te
n
le
a
p
,
com ructions
inst
PMK 550 • Installation Guide
The Extron PMK 550 Pole Mount Kit, designed for use with the Extron PoleVault™ System, allows for easy mounting of PoleVault
products to a projector pole. The PMK 550 is compatible with both the PVS 204 series and PVS 305 series of PoleVault switchers.
When installed it mounts the PoleVault system switcher, the associated power supply, and an accessory device within an
enclosure below a suspended ceiling.
CAUTION: Maximum load for the PMK 550 is 15 lbs (6.8 kg).
Base Plate
Items included in the kit are:
Covers (2), Base plate (1), Mounting plate (1),
Tie wraps and pads (to secure power supply),
4-40 Screws (to mount devices) (3), Cover Screws, (4)
NOTE: For full device installation, configuration,
menus, connector wiring, and operation
details of the PoleVault switcher, see the
relevant PoleVault System Installation Guide
available at www.extron.com.
PMK Covers (2)
To open, remove 4 cover screws
and slide the covers away.
Mounting Plate (1)
Installation
To install the PMK 550 in a PoleVault system:
1.
Figure 1. PMK 550
Remove the four cover screws from the center (see figure 1).
Slide the two halves apart and remove them from the base plate.
NOTE: If the PoleVault switcher and its power supply are
already installed, go directly to step 5.
2.
To mount the PoleVault switcher, place the mounting plate, with the
raised tabs upwards, on top of the switcher top and pass the two
supplied 4-40 x 3/16 inch screws into the top of the switcher (see
figure 2, top). Secure the mounting plate but do not overtighten.
3.
Hook the combined plate and switcher into the PMK 550 base plate.
Secure it to the base plate with two screws.
NOTES:
• Any installed switcher should be secured to the plate
in an upside down position so that when the plate is
rotated to hang from the ceiling, the device will be in
its correct orientation (see figure 2, bottom).
5
AU
X AU
DIO
• Use only supplied screws to avoid damaging the
switcher.
4.
SE
NS
SIG
OR
NAL
SE
NS
ITIV
ITY
Attach the associated power supply with the supplied tie wraps and
pads, by passing them through the appropriate slots and around the
power supply (see figures 2 and 3). Tighten until snug.
CO
NFI
G
1
2
INPU
T SE
LE
CTI
3
ON
4
5
INPU
AU
X AU
DIO
AU
T
DIO
PE
AK
RM
AL
SIG
LE
PO
VE
NO
L
PV
S3
LE
VA
0
5S
DJU ULT
A
ST SWIT
LA
MIC
NA
AK
ICE
NO
LIF
T
RM
AL
SIG
IP
CH
PE
VO
NA
L
ER
PA
GI
SE NG
NS
OR
SE
NS
ITIV
ITY
Figure 2. Installing the PVS Switcher
PMK 550 • Installation Guide (Continued)
5.
Loosen the four pipe collar set screws, and slide the plate up the pipe until the base plate is touching the suspended ceiling.
6.
Level the plate and secure it by fully tightening the set screws.
NOTE:
7.
At least three set screws must come in contact with the pipe.
Route the signal cables so that they exit the pipe via the cable access slot (see figure 3).
WARNING: Do not thread any high voltage power cabling, such as power supply or projector power cords,
through the projector pipe. This violates National Electrical Code
8.
Attach the cables to the switcher and pull any excess cable back into the ceiling. Feed the output cables to the projector via
the cable access slot to the base of the pipe.
9.
Continue installing the projector and other devices, following the manufacturers directions.
10. Slide the covers onto the base plate, passing the AC power cord out through the slot between the covers (see figure 3).
11. Lock the covers to the plate with the cover screws.
Refer to the relevant PoleVault System Installation Guide to complete the installation and setup.
Power Cord Slot
Pipe Collar Screw
10-32 Set Screws (4)
to attach PMK to a
projector pole.
Power Supply
PVS 305SA IP
Switcher
Cable Access Slot
Projector
Pole
Cable Slot
Cover
Figure 3. Attach the PMK to the pole, cable the PVS switcher (PVS 305SA IP shown) and
then re-attach the two covers.
Extron Headquarters
+800.633.9876 Inside USA/Canada Only
Extron USA - West
Extron USA - East
+1.714.491.1500+1.919.850.1000
+1.714.491.1517 FAX
+1.919.850.1001 FAX
Extron Europe
+800.3987.6673
Inside Europe Only
+31.33.453.4040
+31.33.453.4050 FAX
Extron Asia
+65.6383.4400
+65.6383.4664 FAX
Extron Japan
+81.3.3511.7655
+81.3.3511.7656 FAX
Extron China
+86.21.3760.1568
+86.21.3760.1566 FAX
Extron Middle East
+971.4.299.1800
+971.4.299.1880 FAX
Extron Korea
+82.2.3444.1571
+82.2.3444.1575 FAX
Extron India
1800.3070.3777
(Inside India Only)
+91.80.3055.3777
+91.80.3055.3737 FAX
© 2013 Extron Electronics All rights reserved. All trademarks mentioned are the property of their respective owners. www.extron.com
68-1502-01 Rev. B
08 13