1
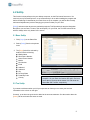
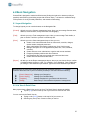
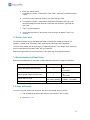
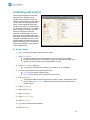
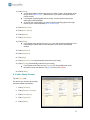
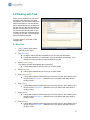
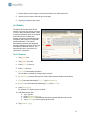
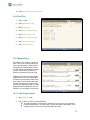
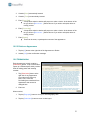
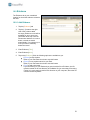
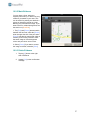
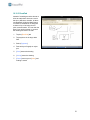
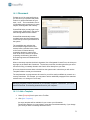
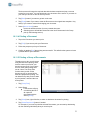
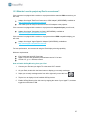
User Manual – Version 1
Table of Contents
1.0 Introduction
2.0 Installation
3.0 Transfering Files
3.1 From computer to iPad
3.2 From iPad to computer
4.0 Starting CounselPad
5.0 SetUp
5.1 Base SetUp
5.2 Tax SetUp
5.3 Account SetUp
5.4 Document Template SetUp
6.0 Basic Navigation
6.1 Layout Navigation
6.2 List View & Detail View
6.3 Record Navigation
6.4 Field Navigation
7.0 Searching
7. 1 Quick Find
7.2 Regular Find
7.3 Search Text Fields
7.4 Search Number and Dates Fields
7. 5 Show all Records
8.0 Working with Contact
8.1 Add a Contact
8. 2 Add a Family Contact
8.3 Add a Contact Biography
8.4 Delete a Contact
9.0 Working with Task
9.1 New Task
9.2 Delete a Task
9.3 List View
9.4 Email
2
10.0 Working with Case
10.1 New Case
10.2 Delete a Case
10.3 Managing the Charge List
10.3.1 Add a Charge
10.3.2 Delete a Charge
10.3.3 Edit a Charge
10.4 Admin
10.4.1 Retainer
10.4.2 Bail Tab
10.5 Appearance
10.5.1 Add an Appearance
10.5.2 Delete an Appearance
10.6 Submission
10.7 Caselaw
10.8 Managing Library
10.8.1 Add a Caselaw
10.8.2 Delete a Caselaw
10.8.3 Edit a Caselaw
10.9 Evidence
10.9.1 Add Evidence
10.9.2 Mark Evidence
10.9.3 Delete Evidence
10.10 Note
10.10.1 Trial Note
10.10.2 Case Note
10.10.3 DrawPad
10.11 Document
10.11.1 Add a Template
10.11.2 Delete a Template
10.11.3 Working with Case Documents
10.11.4 Printing a Document
10.11.5 Printing a Group of Documents
10.11.6 Printing an Envelop
10.11. 7 Emailing a Document
10.11.8 Faxing a Document
11.0 Reports
11.1 Print your Report, Chart or Graph
11.2 Email your Report, Chart or Graph
12.0 Printing & Faxing
12.1 Print
12.2 Print Remotely
12.3 Faxing
13.0 Frequently Asked Questions
3
1.0 Introduction
Welcome
Thank you for purchasing CounselPad, the new software solution for the lawyer on the go.
CounselPad is a ready-to-use application built on the award-winning FileMaker Pro technology.
Notice
This document is constantly reviewed for improvement. Consequently, information in this
document could change without notice. The CounselPad team is dedicated to the satisfaction of
our customers: if you have questions or concerns not addressed by this manual we welcome you
to contact us by phone or email. If your request highlights an improvement that can be made to
the manual or product, we’re more than happy to make that change.
No part of this document may be reproduced or transmitted in any form or by any means,
electronically or mechanically, without the express written permission of CounselPad Inc.
All data used in examples herein is fictitious.
Trademarks
CounselPad is a trademark of CounselPad Inc.
FileMaker and the file folder logo are trademarks of FileMaker Inc., registered in the U.S. and
other countries.
Mac and the Mac logo are trademarks of Apple Inc., registered in the U.S. and other countries.
The Built for Mac OS X logo is a trademark of Apple Inc., used in license.
Microsoft, Windows, and the Windows Vista logo are trademarks of the Microsoft Corporation,
registered in the U.S. and other countries.
Adobe, Acrobat, the Acrobat logo, Acrobat Capture, Acrobat Exchange and Distiller are either
registered trademarks or trademarks of Adobe Systems Inc. in the United States and other
countries.
All other trademarks are the property of their respective owners.
4
2.0 Installation
CounselPad is built with the FileMaker engine, and runs from the FileMaker Go 12 app on your
iPad. On your computer, double-clicking the CounselPad file will open FileMaker 12 and run the
program instantly. Since iTunes is the only program which can interface with an iPad, you’ll need
it to transfer files. Though you may already have an Apple ID and a copy of iTunes on your
computer, this installation guide begins at square one. You will install CounselPad on your
desktop first, and then transfer to iPad.
1. When you purchased CounselPad, you received an email. Follow the link in that email to
download a CounselPad package. Once the package is downloaded,
2. Ensure you have an Apple ID
To obtain an Apple ID log in to:
https://appleid.apple.com/cgi-bin/WebObjects/MyAppleId.woa/
An Apple ID is a user name you need for everything you do with Apple. Shop the
iTunes Store, log in to iChat or iCloud, buy from the Apple Online Store, make a
reservation at an Apple Retail Store, access Apple.com support, and download
apps. You will use your Apple ID to download FileMaker Go.
3. Install iTunes on your computer
To download iTunes go to:
www.apple.com/itunes/download
4. Install FileMaker Pro 12 on your computer
FileMaker Pro 12 is included in the CounselPad Package. Double click the FMP
Trial file to install it. Use the registration code we emailed you to unlock
FileMaker.
5. Install FileMaker Go 12 on your iPad
To download FileMaker Go 12, launch the App Store from your iPad, and do a
search for FileMaker. Tap FileMaker Go 12 for iPad and then tap the rectangle
with reads FREE under the App icon. Enter your Apple ID when prompted.
6. Install CounselPad on your computer
Double click the CounselPad file to open it. Use the registration code we emailed
you to unlock CounselPad.
7. Use iTunes to transfer CounselPad to your iPad.
Transferring with iTunes is simple, but if you’ve never used the program before,
the next section has the process in detail.
5
3.0 Transferring Files using iTunes
You will routinely transfer CounselPad between your computer and your iPad. Data changes
made on your device are not synchronized with the original file, and vice versa. The file
doesn't have to be shared and FileMaker Pro doesn't have to be running. Transferring files is
quick and easy to do.
It is important to close any running versions of CounselPad before initiating a transfer. If you have
it open on your iPad, tap the icon in the top left corner of your screen, then select [Close All]. As
with any app, you can also double tap the iPad home button, hold your finger down on the app
you want to quit, and then tap the close icon.
3.1 To transfer CounselPad to your iPad from your computer
1.
2.
3.
4.
5.
Close CounselPad before beginning transfer.
Connect your iPad to your computer.
In iTunes, select your iPad device, and then click the Apps Tab.
Below File Sharing, select FileMaker Go from the list, and then click Add.
Select the files to transfer (CounselPad), then click Choose.
Alternatively, you can drag and drop the CounselPad to FileMaker Go in iTunes.
3.2 To transfer CounselPad from your iPad to your computer
1.
2.
3.
4.
5.
Connect iPad to your computer.
In iTunes, select your iPad device, and then click the Apps Tab.
Below File Sharing, select FileMaker Go from Apps.
From the list on the right, select the files you want to transfer, then click “Save to.”
Select the destination where you want to copy the file, and then click Choose.
Alternatively, you can drag and drop CounselPad to your desktop.
Wait for any lengthy file operations to complete before closing a transferred file on your iPad.
For example, if you tap the Home button when a progress dialog is being displayed, you may
corrupt the file, making it difficult to open when you transfer it back to your computer.
Upon transferring, you may wish to re-label the CounselPad file with the current date or
another indicator. This way you will always be sure which file is the current one.
6
4.0 Starting CounselPad
To open CounselPad, tap the FileMaker Go app on your iPad and select CounselPad from the list
of files. On your computer, simply double click the CounselPad file.
The first time you tap the CounselPad title screen, you will be prompted to register your program.
Ensure that you enter your first name and last name as you did when you purchased
CounselPad. Check the confirmation email you received from us if you believe there is an error
in spelling and contact us immediately if you have trouble logging in.
Once you have entered your name and the registration key, the license agreement will appear.
Please carefully read the license agreement.
If you agree, tap [Yes] at the bottom of the screen. If you do not agree, tap [No] and uninstall
CounselPad from your computer and your iPad.
7
5.0 SetUp
This function is best performed at your desktop computer, as the iPad cannot format text. You
need only set up CounselPad once, so we recommend you do so after installing the program and
before transferring CounselPad to your iPad. Once set up is complete, you will be able to easily
make small adjustments (such as changing your phone number) on your iPad.
[SetUp] and some other layouts are reached through the Tool Bar which sits atop the Navigation
Bar (where you see Case, Contact, Task and Report). On your iPad, the Tool Bar is the blue bar
which is always at the very bottom of the screen.
5.1 Base SetUp
1. Click [Layout] on the Status Bar
2. Select [SetUp] from the drop-down
menu
3. The [Base] tab will be selected by
default. Enter the following:
Middle Name
Work Phone Number
Home Phone Number
Mobile
Fax Number
Email
Address 1
Address 2
City
Province/State
Postal/Zip Code
Country
Directly above is the Status Bar as it appears on your
computer. On your iPad, the features are split in two bars:
one at the top, and one at the bottom. We call these the
Status Bar and Tool Bar, respectively.
5.2 Tax SetUp
If you want to add taxes when you bill your expenses to clients you can enter your local tax
information in the column on the right.
Currently, up to three tax types can be added to the account statement. See the section about the
[Admin] tab to see how these taxes are used.
8
5.3 Account SetUp
Click on the [Account] tab. User and Password are set by default as they cannot be blank. Feel
free to enter new information, then click on the [Update] button. If you no longer want to be
prompted for a password, simply click the [Reset] button.
We highly recommend you add a password to your iPad for added security. This does not
replace your CounselPad password. From your iPad Settings;
1. Select General
2. Select Passcode lock, follow prompts
5.4 Document Template SetUp
The purpose of this tab is to set the default information for your letters and documents. Once you
set your Header, Footer, Logo and Signature you can include or exclude any of them from your
letters. You can attach images you have already created to some of these fields as well as use
the proprietary formatting tools available in the desktop version of CounselPad.
1. Click on the [Template] tab
2. Enter the [Header] as you would like to see on your letter
3. Format your header using options under [Format] on the Status Bar
If you are planning to use a Logo, move your text to the right to make room for it
4. Enter the [Footer] as you would like to see on your letter
5. Format your footer using options under [Format] on the Status Bar
6. Click on the [Logo] field to insert your logo
Logo will be displayed in the header to the left of your text
7. Click on the [Signature] field to insert your signature
It is simpler to leave this field blank. Once you’ve transferred CounselPad to your
iPad, go to [SetUp] and click on the field and sign on the iPad
8. Enter the [Text Under Signature] information
You can click the [Preview] button at any time to see your work. Click on the [Back] button to
return to the [SetUp] layout.
9
6.0 Basic Navigation
CounselPad is designed to maximize effectiveness (finding the right tool or data as quickly as
possible) and efficiency (maximizing output with minimum work). It is based on a detailed study
of the practice of a busy criminal practitioner, and extensive field testing.
6.1 Layout Navigation
To change layouts you can use the buttons on the Navigation Bar.
[Contact] will take you to the Contact management layout. Here you can manage Contact name,
address, communication, family information and biography.
[Task]
will take you to the Task management layout. Here you can manage Task details, or
print or email a Task list to yourself or somebody else.
[Case]
will take you to the Case management layout. Here you can;
Create a new case with details such as client name, case title, charges,
docket number, assigned prosecutor
Store administrative information (retainer type, fees, funds in trust)
Manage and report on Court appearances (date, time, court, schedule,
outcome)
Create and store court submissions, organize and access caselaws
Prepare and display exhibits and other evidence
Use DrawPad, take and store general case notes and trial notes
Create and send documents and letters
[Report]
will take you to the Report management layout, where you can choose from a number
of statistics-based reports to view. For example: Court Schedule, Case Distribution
per Charge, Case Distribution per Retainer Type and Income Distribution per Month.
Because they are rarely used, some layouts are only accessible from the [Layout] button
located at the bottom left of your iPad. When pressed you can select from the following;
[Case I Charge List]
[Case I Library]
[Template]
[SetUp]
Manage your Charge list
Manage your Caselaw library
Manage templates for your letters and documents
Basic setup of CounselPad and password management
6.2 List View & Detail View
Many layouts have a Detail View and a List View. The Detail View is always the default.
Tap the [List] button on the top left of your screen to enter the List View
You can return to the Detail View by
Taping on the [Detail] button on the top left of your screen, or
Selecting any item (Task, Contact or other) on the list
10
6.3 Record Navigation
Record is a generic term for the data that makes up CounselPad, namely Contacts, Cases, Tasks
and Templates. If you are navigating through records in Contact, than that is to say that you are
flipping through Contacts; in Task, your records are Tasks, and so on.
To navigate between records tap the [Next] or [Previous] arrows on the Tool Bar at the
bottom of your iPad
Drag the slider to move quickly through records
Record 1 of 6/12 means that you are in the first record of the 6 in your found set, and
the total number of records in your database is 12
In List View, a black line at the left side of a record indicates the current record. You
can swipe to scroll
6.4 Field Navigation
When you are editing fields it is useful to learn how to use [Previous] and [Next] button on top of
your keyboard, instead of closing the keyboard every time. When you do want to close the
keyboard, you can use the [Hide] button (keyboard with downwards pointing arrow). This is easier
than finding a blank spot on the layout to tap.
11
7.0 Searching
To optimize the use of CounselPad, it is important to become familiar with the search engine. As
they say, if you can’t find the data, then never mind the database.
When you perform a search, the system searches through all the records in the database,
comparing the criteria you specify with the data. As previously mentioned, in CounselPad records
are defined as Cases, Contacts, Tasks, etc. Records with data matching the criteria become the
Found Set. Records that don't match are omitted. For example, if you initiate a search in
[Contact], select the [Group] field, and type “Prosecutor,” you will only be able to scroll between
the different Prosecutors you’ve saved to Contacts. No clients will appear.
To start your search, ensure you are in the layout where most likely you will find your data. For
example if you are searching for the Contact Address you must be in the Contact layout. The
fields that you will use for your search criteria must be visible.
7. 1 Quick Find
Quick find is the tool you will use the
most in CounselPad, so it is worth
investing a few minutes to understand
how it works. As an example, let’s say
you are searching for a contact with the
name Raymond. Make sure you are in
the [Contact] layout, then;
1. Tap the magnifying glass
at the bottom of your
screen, in the Tool Bar
2. Select [Quick Find]
The Keyboard will pop
out and a box on top to
enter your search criteria
You can cancel your
Quick Find by taping the
[Cancel] button
3. Enter your search criteria
4. Tap the [Search] button on your keyboard.
7.2 Regular Find
If you need to use multiple criteria a regular search is required
To start your search:
1. Tap the magnifying glass at the bottom of your screen
2. Select [Enter Find Mode]
3. A blank record(record with empty fields) will be displayed. Enter the data you are
searching for in any of the fields.
12
4. Enter your search criteria
For example, to locate a Task with the Task “Letter”, select the Task field and enter
“Letter”.
5. You can enter more than one criterion (use more than one field).
6. For example, to locate a Task with the Assigned to “Raymond” and Type “Call”,
select the Assigned to field and enter “Raymond” then select the Type field and
type “Call”.
7. Tap [Go] on the keyboard.
8. If no records are found, a “No records found message” will appear. Tap [OK] to
continue.
7.3 Search Text Fields
The system searches for any word that begins with or matches the criteria you entered. For
example, a search for the First Name "Ray" would also find the First Name "Raymond".
To find an exact match, use the equal sign (=) followed by the text. For example: =Ray would only
return records with the First Name "Ray", but not “Raymond”.
Search for empty fields in a record by entering = (an equal sign) in the appropriate field.
7.4 Search Number and Dates Fields
Refer to the following table for examples of different ways to search for a range of information:
To Find
Use
Values less than a specified value
<
Values greater than a specified value
>
Values within a range
Fields that are empty
.. or …
(two or three periods)
=
Examples
< 6300
<R
< 2/17/1952
> 6300
>R
> 2/17/1952
A…L
1/1/2004…12/31/2008
7. 5 Show all Records
If you are in a found set and you want to be able to browse through all your records
1. Tap the magnifying glass at the bottom of your screen, in the Tool Bar
2. Select [Show All]
13
8.0 Working with Contact
This layout contains basic information
about the client: address, phone
numbers, birth date and so forth. It is
called Contact because you may want to
use this layout for contacts other than
clients, and to distinguish those other
contacts from clients. CounselPad lets
you create the categories – for example
Client, Colleague, or Friend, and then
select the category to which this
particular contact belongs. There is a
Family tab, which is particularly helpful
when trying to locate a client and can be
important in dealing with youth, as well
as a Biography tab, which allows you to
detail a client’s life story. To access the
Contact layout tap the [Contact] button
on the navigation bar.
8.1 Add a Contact
1. Tap [+/-] button at the bottom right side of your layout
2. Tap [New Contact]
An empty Contact record will be available for you to enter your information
Please note that there is no save button, records are saved automatically, if you
change your mind you have to manually delete the record
3. Enter [Client Number] (optional)
You can go to the next field by taping [Next] at the top of your keyboard
4. To insert a photo tap the field at any time then select
[Camera] if you want to take the photo
[Photos] if you want to use a photo stored on your iPad
5. Enter [Salutation]
A drop-down selection window will pop-out to make a choice. At the bottom of the
list you will see [Edit Values…] Select this one if you wish to edit (add, delete or
modify) a value
6. Enter [First Name]
7. Enter [Middle Name]
8. Enter [Last Name]
9. Enter [Also Known As]
10. Enter [Birth Date]
11. [Age] will be calculated automatically
12. Select [Gender]
14
13. Enter [Group]
A drop-down selection window will pop-out to make a choice. At the bottom of the
list you will see [Edit Values…] Select this one if you wish to edit (add, delete or
modify) a value
If you tap the magnifying glass next to Group, only the contact matching the
same group will be displayed
To see all your contact again, you have to tap the magnifying glass at the right
bottom of your screen and select [Show All Contacts]
14. Enter [Work Phone]
15. Enter [Home Phone]
16. Enter [Mobile]
17. Enter [Fax Number]
18. Enter [Email]
If you tap the small envelop next to [Email], your mail tool will be launched, a new
mail message created and the email address of your contact automatically
inserted
19. Enter [Address 1]
20. Enter [Address 2]
21. Enter [City]
22. Enter [Province or State] (Automatically entered from your Setup)
23. Enter [Country] (Automatically entered from your setup)
If you tap the small Globe next to [Country], your Google Maps tool will be
launched to locate the address. Tap [Done] to return to [Contact]
24. Enter a [Note]
8. 2 Add a Family Contact
Tap the [Family] tab.
On this tab you can enter three family
members related to thecontact:
1. Enter [Full Name]
2. Enter [Relation to Contact]
3. Enter [Full Address]
4. Enter [Telephone]
5. Enter a [Note]
15
8.3 Add a Contact Biography
We have built into the [Contact] layout a
feature tab called [Biography]. This
provides a place for counsel to create a
well written digest of the salient
features of the client’s life.
This biography is instantly accessible
with a single tap of the screen, from any
court [Submission]. While in court, you
can then easily navigate from
Submission to Biography, allowing each
to inform the other seamlessly. At the
very least, the Biography will be a great
way to remind yourself of who the client
is.
When the client contacts you again with
a new case any number of years later
you do not need to go over his entire
history again, you simply open the
Biography, and continue where you left
off.
To add a biography, simply tap the [Biography] tab, and enter text in provided field.
8.4 Delete a Contact
To delete a contact
1. Tap [+/-] button at the bottom right side of your layout
2. Tap [Delete Contact…]
3. Tap [Yes] on the Confirmation Notice
16
9.0 Working with Task
When you are working on a case and a
task arises that cannot be completed
immediately, you can create a task to be
added to the task list. You can indicate
who is responsible for the completion of
the task, the due date, the particulars of
the task, and the priority it is to be given.
The task list itself will sort tasks for you
according to task type, assigned person,
or priority, as you like. Your task list can
also be printed and emailed.
To begin, tapthe [Task] button on the
navigation bar.
9.1 New Task
1.
Tap [+/-] button at the bottom
right side of your layout
2.
Tap [New Task]
An empty Task record will be available for you to enter your information.
Please note that there is no save button, records are saved automatically, if you
change your mind you have to manually delete the record.
3.
Enter [Creation Date]
[The system will enter automatically the current date]
A drop-down calendar will pop out for you to select a date
4.
Enter [Due Date]
A drop-down calendar will pop out for you to select a date
5.
Enter [Assigned To]
A drop-down selection window will pop-out to make a choice. At the bottom of the
list you will see [Edit Values…] Select this one if you wish to edit (add, delete or
modify) a value.
6.
Enter [Type]
A drop-down selection window will pop-out to make a choice. At the bottom of the
list you will see [Edit Values…] Select this one if you wish to edit (add, delete or
modify) a value.
7.
Enter [Status]
A drop-down selection window will pop-out to make a choice. At the bottom of the
list you will see [Edit Values…] Select this one if you wish to edit (add, delete or
modify) a value.
8.
Enter [Priority]
A drop-down selection window will pop-out to make a choice. At the bottom of the
list you will see [Edit Values…] Select this one if you wish to edit (add, delete or
modify) a value.
17
9.
Select [Client]
10. Enter [Task]
A brief description of the task, for example: Send a letter or Visit Parents
11. Enter [Details]
12. Enter [Note]
9.2 Delete a Task
4. Tap [+/-] button at the bottom right side of your layout
5. Tap [Delete Task…]
6. Tap [Yes] on the Confirmation Notice
9.3 List View
1. Tap [List] at the top left of your
screen
Tap any header to sort in ascending
order. Tap a second time to sort in
descending order.
9.4 Email
To email the task list to your office
2. Go to the Task List View
3. Tap [Email] at the top left of your
screen. By default, the email
address inserted at the setup
layout will be used as the sender
address, though you can change
this. A PDF version of your Task
List will be created and attached
to your email.
18
10.0 Working with Case
To access the Case layout tap the [Case]
button on the navigation bar.
Tabs for Case are not organized based
on sequence of events but rather on the
frequency of use. Although the first TAB
is Appearances, you will start a new case
by tapping the [Charge] tab.
10.1 New Case
1. Tap [Charge] tab.
2. Tap [+/-] button at the bottom
right side of your layout
3. Select [New Case]
You will arrive at [Select
Contact]. Tap the client
whose case you are
opening.
4. The date the case is created will be inserted automatically at the bottom of your screen in
the [Created] field. If you need to change the date, tap the field
5. Enter [Docket] number
6. Tap [Client] field
[Select Client] layout will display your clients list
Select your Client.
Once you have many clients in your database, it will be easier to use Quick Find
to locate your clientthan to scroll through the list. This is explained in the chapter
on Searching.
7. Enter [Case Title]
8. Enter [Prosecutor Name]
9. Enter [Charge Details]
Tap [+] button to add a new Charge
For consistency, we recommend using [Charge List] to enter your charge details
To use the Charge List
a. Tap the Colored field
b. [Charge Select] layout will display the Charge list you’ve created
c. Tap the Charge you want to select
10. The [Active] field is set to [Yes]. When a Case is closed tap [No] button.
11. You can enter a [Rating] to note the outcome of the case, such as Acquitted. These
ratings can be used in [Report] to generate statistics.
19
10. 2 Delete a Case
1. Tap [+/-] button at the bottom right side of your layout
2. Select [Delete Case…]
3. Tap [Yes] button to confirm your request
10.3 Managing the Charge List
Use the Charge List to build a library of
charges. As your library expands, so will
your efficiency. CounselPad is designed
with the mantra that no data should be
entered twice. Instead of typing out the
same charges over and over again
across cases, simply enter them once in
the Charge List.
To add, delete or modify Charge list:
1. Tap the Layout button at the
bottom left of your screen.
If you are working on your
computer select [Case | Charge
List] from the Layout drop-down
menu on the Tool Bar.
10.3.1 Add a Charge
1. Tap [+/-] button at the bottom right side of your layout
2. Select [New Charge]
An empty Charge record will be available for you to enter your information
Please note that there is no save button, records are saved automatically, if you
change your mind you have to manually delete the record
3. Enter [Locator]
Section reference or any other identifier
4. Enter [Charge Title]
10.3.2 Delete a Charge
1. Ensure that the proper charge is selected(the black line is visible at the left)
2. Tap [+/-] button at the bottom right side of your layout
3. Select [Delete Charge…]
4. Tap [Yes] button to confirm your request
10.3.3 Edit a Charge
20
1. Ensure that the proper charge is selected (the black line is visible at the left)
2. Tap the field you want to edit and type the change
3. Tap the [Next] button when done
10.4 Admin
The Admin tab provides fields for the
amount of your fee, the amount you have
in trust, a listing of disbursements, a field
to describe the action taken on the behalf
of the client for the eventual final
account, and options describing the type
of Retainer and a place for a Legal Aid
Certificate Number. The system
automatically calculates the applicable
taxes and ultimately provides much of the
information for the final account. The
name and amount of tax varies from
jurisdiction to jurisdiction.
10.4.1 Retainer
1. Tap [Admin] tab
2. Tap [Retainer] sub tab
3. Enter [In Trust] Amount
4. Enter [Fee] Amount
5. [Fee+Tax] Automatically calculated.
Tax calculation is based on setting entered in SetUp
6. [Disbursement] calculate field equal to Total of disbursements details entered below
7. [Total] calculated field adding [Fee + Tax]to[Disbursement]
8. [Balance] is a calculated field subtracting [Total] from [In Trust]
9. Enter [Description]
For example “To Legal services rendered…”
10. Add Disbursement Item
a. Tap [+] Button
b. Enter [Disbursement Item]
c. Enter [Amount] – Disbursement field will be updated with the total amount
d. Tap [Document] to insert supporting Document
11. Tap [Retainer Type]
21
12. Enter [Legal Aid Certificate Number]
10.4.2 Bail Tab
1. Tap [Bail] tab
2. Enter [Application Date]
3. Enter [Cash Bail]
4. Tap [Bail Assignment Filed]
5. Tap [Bail Not Spoken To]
6. Tap [Notice of Appeal Filed]
7. Tap [Transcript Ordered]
8. Tap [Transcript Filed]
10.5 Appearance
The purpose of this layout is to record
Date, Time, Court, and Proceeding for
each court appearance. Each of these
headings have options which counsel
can edit and has customized to his own
practice so that all he needs to do is
select the appropriate item with a tap.
Appearance records are automatically
organized most recent to most distant,
and each record contains a field on the
face of the record for brief notes which
counsel can observe at a glance when
opening the Appearances tab. As many
Appearances are displayed at once as
possible. You can swipe to scroll down.
10.5.1 Add an Appearance
1. Tap [Appearance] tab
2. Tap [+] button to create a new appearance
An empty Appearance record will be available for you to enter your information
Please note that there is no save button, records are saved automatically, if you
change your mind you have to manually delete the record
22
3. Creation [Date] automatically inserted
4. Creation [Time] is automatically inserted
5. Enter [Court Title]
A drop-down selection window will pop-out to make a choice. At the bottom of the
list you will see [Edit Values…] Select this one if you wish to edit (add, delete or
modify) a value.
6. Enter [Proceeding]
A drop-down selection window will pop-out to make a choice. At the bottom of the
list you will see [Edit Values…] Select this one if you wish to edit (add, delete or
modify) a value.
7. Enter [Details]
These can be notes, or perhaps the outcome of the appearance.
10.5.2 Delete an Appearance
1. Tap the [X] button at the right side of the Appearance to Delete
2. Answer [Yes] to the confirmation message
10.6 Submission
Each Appearances record contains a
[Submission] button. A tap on this button
opens up a differentlayout which provides
fields for taking points and inserting
caselaw
1. Tap [Submission] button at the
right side of any Appearance
A new layout will opens up.
Date, Time, Court and
Proceeding are transferred from
Appearance and cannot be
changed here.
2. Enter text
When needed,
1. Tap the [Biography] button to view your client biography, then
2. Tap the [Submission] button to return to that layout.
23
10.7 Caselaw
1. Tap [Caselaw] tab
2. Tap [+] button to create a new
Caselaw.An empty Caselaw row
will be available for you to enter
your information.
3. Enter [Cite]
4. Enter [Digest]
5. Tap [File] to insert a document
If you are working on
your iPad and you need
to add a file to Evidence,
The file must be located
on the root directory of
FileMaker Go (you must
place it there first using
iTunes). It’s easier to
perform this function on
your computer, where the
file could be located
anywhere.
Using the Library is a great way to make your Caselaws always available. To use the Library
1. Tap the [Library] [Cite] field
2. You are now in the [Select Caselaw] layout
3. Tap the Caselaw you want to insert into your case. As you accumulate Caselaw, it may
be easier to use Quick Find than to scroll to locate your Caselaw
10.8 Managing Library
To add, delete or modify Caselaw Library
1. Tap the [Layout] button on the Tool Bar. If you are working on your computer select
[Case | Library] from the Layout drop-down menu on the Tool Bar
10.8.1 Add a Caselaw
1. Tap [+/-] button at the bottom right side of your layout
2. Select [New Caselaw]
An empty Caselaw record will be available for you to enter your information.
Please note that there is no save button, records are saved automatically, if you
change your mind you have to manually delete the record
3. Enter [Cite]
24
Section reference or any other identifier
4. Enter [Title]
5. Enter a description or quick note
6. Tap [File] to insert a document
10.8.2 Delete a Caselaw
1. Ensure that the cursor is visible at the left of the line you want to delete
2. Tap [+/-] button at the bottom right side of your layout
3. Select [Delete Caselaw…]
4. Tap [Yes] button to confirm your request
10.8.3 Edit a Caselaw
1. Ensure that the cursor is visible at the left of the line you want to edit
2. Tap the field you want to edit and type the change
3. Tap the [Next] button when done
25
10.9 Evidence
The Evidence tab is your centralized
location for the all the evidence related to
the case.
10.9.1 Add Evidence
1. Tap the [Evidence] tab
2. Tap the [+] button at the right
side of the evidence table
An empty Evidence record will be
available for you to enter your
information at the top of the list
Please note that there is no save
button, records are saved
automatically, if you change your
mind you have to manually
delete the record
3. Enter Evidence [Title]
4. Enter Evidence[Note]
5. Tap on the [Evidence] field, the following options are available to you.
[Camera] to take a photo
Refer to your iPad manual on how to use this feature
[Photos] to use a photo stored on your iPad.
Refer to your iPad manual on how to use this feature
[Files] to add a document
If you are working on your iPad and you need to add a file to Evidence, the file
must be located on the root directory of FileMaker Go (you must drag it first using
iTunes). It’s much easier to perform this function on your computer, where the file
could be located anywhere.
26
10.9.2 Mark Evidence
You can have a client, witness or
anybody else mark up, or draw onto, any
evidence you attach to your case. This
can be useful for pointing out details in a
picture or describing events on a map.
Marking only works with an image. If you
want to draw on a blank background, see
the section on [DrawPad].
1. The [Pen] and [Eraser] buttons switch
between the two tools, while the [Stroke]
slider changes the size of the pen stroke.
[Colour] can also be customized, which is
useful if you’d like two persons to mark
the same image or if the background
colour and pen colour are too close.
2. Select [Cancel] if you want to restore
the image to default, otherwise [Save].
10.9.3 Delete Evidence
1. Tap the [X] button at the right
side of Evidence
2. Answer [Yes] to the confirmation
message
27
10.10 Note
Tap the [Note] tab to access Trial and
Case Notes. The former is designed for
in-court use while the latter is designed to
be a hub for any and all notes you might
want to keep on the case.
10.10.1 Trial Note
To create a Trial Note
1.
Ensure you are in the [Trial
Note] tab
2.
Tap the [+] button to create
a new Trial Note
3.
Creation [Date] is
automatically inserted
4.
Creation [Time] is automatically inserted
5.
A new layout [Case | Trial Note] will pop out to enter note
6.
Type a [Title] in the Title field
7.
Tap the [Next] field on the top of your keyboard
8.
Start typing your Trial Note
As the Crown witness is testifying, and something is said or a point is made that you want, or
need, to come back to for cross-examination
9.
Type qq
(press the letter q in the top
corner of your keyboard)
You can type qq as many
times as you like.
10. Continue typing. When you
are done hide the keyboard
11. Tap the [Red Flag] button on
top of the screen. All qq will
turn to a very visible pointer.
12. When you get up to crossexamine scroll from pointer
to pointer.
13. Continue typing if needed
28
14. Tap the [White Flag] to remove all pointers.
15. Tap the [Yes] option to execute
16. Tap the [Back] button when done
To modify a Trial Note
1. Select Note by tapping on the [Title]
2. Edit changes
3. Tap the [Back] Button
To delete a Trial Note you must be in [Case| Note Tab | Trial Note]
1. Tap the [X] button next to the Note you want to delete.
2. Answer [Yes] to the confirmation message
10.10.2 Case Note
To create a Case Note
1. Tap [Note] tab
2. Tap [Case Note] tab
3. Tap the [+] sign to create a
new Case Note
4. Creation[Date] automatically
inserted
5. Creation [Time] is
automatically inserted
6. Type Case Note
Use the navigation arrows to go the
First, Previous, Next or the Last note
To modify a Case Note
1. Select the Case Note
2. Edit changes
To delete a Case Note
1. Tap the [X] button next to the Note you want to delete.
29
10.10.3 DrawPad
Instead of crowding around a witness or
client to watch them draw out a scene
that is too difficult to visualize, let them
use DrawPad. Unlike the Mark feature
in Evidence, DrawPad is not designed
to draw on top of an image, but for
quick communication. You can clear the
slate if you need to redraw, or commit
the drawing and save it for later.
1. Tap the [DrawPad] tab
2. Tap anywhere in the large white
field
3. Select [Signature]
4. Draw with your fingertip or stylus
pen
5. [Clear] erases the drawing
6. [Accept] saves the drawing
7. [Cancel] returns you to [Note], and
nothing is saved
30
10.11 Document
Perhaps one of the most helpful things
you can do for your practice and stress
levels is to get the small tasks off your
desk – soon. The accumulation of a lot
of unfinished work can become for many
lawyers unmanageable and a liability.
CounselPad helps you stay right on top
of these tasks, particularly in the area of
letter writing and document creation.
CounselPad automatically creates
complete letters and documents based
on the data you have input elsewhere in
the system.
The possibilities are unlimited, but
some examples might include client
retainer letters, reminder letters, letters
to the Crown or District Attorney
requesting disclosure, letters to the
Clerk of the Court, letters to the police
requesting a bail hearing, bail orders,
final reporting letters and Statements of
Account.
Where a document requires the client’s signature, like a Designated Counsel Form, the client can
sign right on the iPad at the Courthouse. The document can then be either printed at your office
and sent for filing, or instantly efaxed to the Clerk’s office directly from your iPad.
Of course, these documents have to be built into the system and it is here that you will use the
Template builder to create your documents.
The templates that our programmers will create for you will be easily modifiable by counsel on a
case-by-case basis. For example, you may want to add an additional paragraph to the standard
retainer letter, or to change it in some way.
Managing templates is better performed on your desktop computers. Furthermore, you cannot
format on the iPad. The following instructions are for your computer:
10.11.1 Add a Template
1. Select [Template] from Layout on the Tool Bar
2. Click [New Template]
An empty template will be available for you to enter your information.
Please note that there is no save button, records are saved automatically, if you change
your mind you have to manually delete the record
31
3. [Locater]is determined automatically
4. Enter [Group]
5. Enter[Title]
6. Enter the[Body]for the template
To insert a field in the body of your template, click the field on the left of the body;
This will insert the field directly in your template exactly where the cursor is.
7. Click the Template Settingstab
In this layout, you will set the Header, Footer, Logo, Signature and the text under the
signature. It would be a good start to transfer your Set Up information then change as
required. To transfer your Setup information:
i.
Click on the [Transfer SetUp info] button
8. Select if a Template is [Recurrent]
Recurrent Templates could be all added with one click from the [Case l Document] tab.
Of course, it is up to you decide which kind of Templates to create, but one that we recommend
for all users is a simple, blank template. Include your header, footer and any other basics you
would use in a generic letter and leave the rest open; when the time comes this template will
allow you to quickly produce any sort non-standardized letter when the time comes.
10.11.2 Delete a Template
1. Locate the template you want to delete.
2. Click [Delete Template] button
3. Click [Delete] button to confirm your request
Deleting a template will not delete previous documents based on this template.
10.11.3 Working with Case Documents
1. Start from[Case]
2. Tap the [Document] tab
To transfer all templates selected as
recurrent to your case:
3. Tap [Transfer Recurrent]
New documents based
on all recurrent
templates will be created
and listed on your
screen.
To work with a document
4. Tap the Document on the list
32
The document will merge the required data with the base template and pop out a new
screen for you to work. You can edit directly your document on the screen. If you work on
your iPad you will not be able to format your text.
5. Tap [Back] button if you want to go back to the case
6. Tap [Reset] button if you want to reset the Document to the original base template. Very
handy if you create a mess while changing your document
7. Select [Hold or Queue] button
Hold is the default selection for every created document.
Selecting queue will add the Document to the list of Documents in the Group
print (in the following section)
10.11.4 Printing a Document
1. Tap on the Document you want to print
2. Tap [Print] if you want to print your Document
3. Follow the prompts to print your Document
4. Confirm by tapping [Yes] that printing was successful. This will allow the system to insert
a printed date for your reference
10.11.5 Printing a Group of Documents
Throughout your day, you will queue
many documents for printing. Often,
it will be easier to print all of your
documents across all of your cases
at once, rather than printing them
one at a time. The Group Print
function does just this: all the
documents you’ve queued will be
listed and prepared for printing. You
can deselect any that you don’t want
to print just then, and send the rest
to the printer.
1. Tap [Group Print]
2. Select Group
A new screen will pop
out showing the list of
all unprinted
documents with the
status [Queue].
3. Tap [Select] box, right of the list, to select or deselect a document for printing.
4. Tap [Select/Deselect All] button if needed.
For example, if you need to print few selected Documents, you can start by deselecting
all, then selecting individually what you need to print.
33
5. Tap [Hold] button if needed.
This button will change the status of all selected documents to be on Hold.
As a consequence, they will disappear from the screen. You need to change individually
their status to Queue to re-appear on the group print screen.
6. Tap [Print]
7. Confirm by tapping [Yes]
8. Follow the prompts to print your document
9. Confirm by tapping [Yes] that printing was successful
This will allow the system to insert a printed date for your reference
10.11.6 Printing an Envelop
1. Tap [Print Envelop] if you want to print an envelope for the client
2. Confirm [OK]
3. Tap [Print]
10.11. 7 Emailing a Document
1. Tap [Email]
A PDF copy of your Document will be automatically created.
Your iPad email screen will pop out with the email address of the client (change
as required) and the PDF attached to the email.
2. Confirm by tapping [Yes] that the email was sent successfully
This will allow the system to insert an email date for your reference
10.11.8 Faxing a Document
1. Select [Fax number] from the drop-down list
A drop-down selection window will pop-out to make a choice. At the bottom of the
list you will see [Edit Values…] Select this one if you wish to edit (add, delete or
modify) a value.
2. Tap [Fax To] button
A PDF copy of your document will be automatically created.
Your iPad email screen will pop out with the email address needed to fax
([email protected])
3. Confirm by tapping [Yes] that the Fax was sent successfully
This will allow the system to insert aFax date for your reference
34
11.0 Reports
CounselPad comes packaged with a number of reports. Some, like the Court Schedule, is
practical and will help you manage your practice day-to-day. Others, like Income Distribution per
Month and Case Distribution per Charge, will you give you a long-term view of your career, where
your focus has been, and the cases your clients have brought you. How you choose to act on this
information is of course up to you, and further reports for the data hungry can be easily
customized.
To access the Report layout, tap the [Report] button on the navigation bar.
Court Schedule
The date range in this report is set to today by default. Your court schedule shows the following:
Date
Time
Court
Client
Proceeding
Trust Amount
Legal Aid Certificate
To select another date range
Enter [From:] Date at the top of your screen
Enter [To:] Date at the top of your screen
The report will automatically refresh to display the proper information.
Bail Not Spoken To
This report will show all cases with Bail Not Spoken to as selected in Case\Admin\Bail tab
Statement Of Account
This a per case statement of account showing the following:
Client Information
Case Information
Fees
Disbursement Details
Total
Balance Amount
Income Distribution Per Month
The purpose of this graph is to display a distribution of your fees per month.
1. Enter [From] for starting date of observation
2. Enter[To] for ending date of observation
35
Case Distribution Per Retainer Type
The purpose of this graph is to display
the number of cases for each retainer
type (Private or Legal Aid).
1. Enter [From] for starting date of
observation
2. Enter [To] for ending date of
observation
Case Distribution Per Charge
The purpose of this graph is to display
the number of cases for each Charge
type.
1. Enter [From] for starting date of
observation
2. Enter [To] for ending date of observation
Case Distribution Per Rating
The purpose of this graph is to display the number of cases for each rating entered in
Case/Charge.
This will allow you to track your performance based on your own criteria
1. Enter [From] for starting date of observation
2. Enter [To] for ending date of observation
11.1 Print your Report, Chart or Graph
1. Tap [Print]
2. Follow the prompts to print your Document
36
11.2 Email your Report, Chart or Graph
1. Tap [Email]
A PDF copy of your Document will be automatically created.
Your iPad email screen will pop out with no email address.
Created PDF Document attached to the email.
2. Enter Email Address
3. Tap [Send]
37
12.0 Printing & Faxing
CounselPad works with AirPrint–enabled printers
AirPrint on iPad makes it simple to print any report from CounselPad. There’s no software to
download, no drivers to install and no cables to connect. With just a few taps, you can go from
viewing something on the screen to holding a printed copy. And because all the printing takes
place in the background, there’s no waiting around. Instead, you can start printing and go right
back doing whatever you were doing before.
AirPrint printing is 100 percent wireless. iPad automatically locates and connects to AirPrintenabled printers on your Wi-Fi network.
Many AirPrint-enabled printers are available from HP, Epson, and Canon.
Mac users have a very effective option in Ecamm's Printopia, a utility that when installed on an
iMac or MacBook will let you print through to a printer on your Mac's WiFi network, regardless of
its brand or how it's connected.
Just to be clear, Printopia is not an iPad app. It's a utility that runs on a Mac (which needs to have
Bonjour installed). Installation couldn't be easier—once you download it, you double-click on the
file, and it installs automatically. It should recognize all the printers on your network
12.1 Print
1.
2.
3.
4.
5.
6.
7.
Tap the [Wheel] button on the Status Bar
Select [Print]
Make sure iPad Orientation is set according to your needs
Change scale to fit your needs (we recommend 80% or less)
Tap [Print] button
Select your printer
Tap [Print] button.
12.2 Print Remotely
HP ePrint lets you print from virtually anywhere to a registered printer.
HP ePrint assigns an email address to your printer. You can then print from your CounselPad via
email without installing any special drivers or software.
Use HP ePrint sitting on the couch at home or from a coffee shop on the other side of the country.
As long as you can send an email to your HP ePrint-enabled printer or MFP, you can print.
Many of the newest printers from HP connect to the Internet, enabling ePrint.
If you need remote printing, please check HP ePrint to learn how to set and use it.
38
Documents printed with ePrint may appear different from the original. Style, formatting, and text
flow may differ slightly from the original document.
For higher quality, we recommend that you print using AirPrintfrom CounselPad or your
computer, where you will have more control over how your printouts appear.
12.3 Faxing
CounselPad is programmed to work with eFax. You need to subscribe to this service.
eFax enables you to send and receive faxes via email or online.
To receive your faxes, you will receive an email with a PDF or TIF attachment to an email
address you specify.
You may also access your faxes by logging into your eFax account anytime from anywhere.
You will get a real fax number. eFax has the largest available inventory of fax numbers: local or
toll-free/freephone numbers are available in 3,500 cities across 46 countries. 100% mobile, you
are free to keep your number for as long as you wish to maintain service.
Sending faxes is as easy attaching a file to an email. Simply address your email to the recipient's
fax number followed by "@efaxsend.com"; eFax will instantly send your attachment to your
recipient's fax machine and provide you with an email confirmation.
You may also send faxes online by logging into your eFax account.
CounselPad automated this feature for you, when you need to Fax;
1. Enter the Fax number
2. Tap the [Fax] button
To learn more visit: www.efax.com
39
13.0 Frequently Asked Questions
13.1 What should I do if I lose my iPad?
Apple has built an amazing Locate feature into the iPad, and the ability to remotely wipe out all of
the data on it in the event you are unable to affect its immediate return.
To prepare for this possibility;
1. Make sure you have an Apple ID and password.
2. Make sure your iPad is running iOS 5.
To update to iOS 5, just connect your device to your Mac or PC and follow the onscreen
instructions in iTunes.
3. Go to Settings on your iPad, tap iCloud, and enable Find My iPad.
To find your iPad;
1. Sign in to icloud.com from any web browser on a Mac or PC. Or borrow your friend’s
iPad, iPhone, or iPod Touch and use the Find My iPhone app.
2. Find My iPad shows you the approximate location of your iPad on a map.
3. Display a message or play a sound to help you find it.
If someone finds your iPad, let them know how to find you. Write a message and display
it on your iPad screen. Something like, “Sorry, lost my iPad. Please call me at 780-5551212.” Your message appears, even if the screen is locked. And if the map shows that
your iPad is nearby — perhaps in your office under a pile of papers — yet you still can’t
find it, you can tell Find My iPad to play a sound that overrides the volume or
silent setting.
4. Set a passcode lock remotely.
If you realize that you left your iPad in a public place, you may want to protect its contents
until it’s safely back in your hands. Remotely set a four-digit passcode lock to prevent
people from using your iPad, accessing your personal information, or tampering with your
settings.
5. Remote Wipe.
As a last resort, initiate a remote wipe, which will restore it to its factory settings. If you
find the iPad or replace it, you can restore the data using your most recent backup.
To learn more visit: http://www.apple.com/ca/ipad/find-my-ipad.html
40
13.2 How do I back up CounselPad on my computer?
Backing up is fast and easy, and should become a regular habit.
Syncing your iPad with iTunes will copy all files as a Backup, but you can also copy CounselPad
individually.
When you transfer CounselPad from your computer to your iPad or vice versa, you are creating a
copy of the original file. Data changes are not synchronized to the original file, and vice
versa. Close a file before transferring it. The file doesn't have to be shared and FileMaker Pro
doesn't have to be running.
To transfer CounselPad from your iPad to your computer:
1.
2.
3.
4.
5.
Connect iPad to your computer.
In iTunes, select your iPad device, and then click the Apps tab.
Below File Sharing, select FileMaker Go from Apps.
From the list on the right, select the files you want to transfer, then click “Save to.”
Select the destination where you want to copy the files, and then click Choose.
Note: Wait for any lengthy file operations to complete before closing a transferred file on your
device. For example, if you tap the Home button when a progress dialog is being displayed, you
will corrupt the file, making it difficult to open when you transfer it back to the desktop.
As backing up takes only a minute, we recommend you backup daily. Place all your backups in
the same folder. Add a date to your file. For example you can use the following structure;
CounselPad_BackUp
Daily_BackUps
CounselPad_Feb0312
CounselPad_Feb0712
CounselPad_Feb1012
CounselPad_Feb1512
CounselPad_Mar0112
Monthly_BackUps
CounselPad_Feb12
CounselPad_Mar12
It is highly recommended to save a copy of your Backup folder on a good quality removable
media or device and keep in a safe place (preferably a different location to where your computer
is).
41
13.3 What do I need to project my iPad in a courtroom?
If the courtroom is equipped with a monitor or a projector with the standard VGA connection; you
will need;
Adaptor from Apple "iPad Dock Connector to VGA Adapter"( MC552ZM/B), available at
http://www.apple.com/ipad/accessories/
VGA cable (male to male) to connect from the VGA adapter to the projector
If the courtroom is equipped with a monitor or a projector with composite input; you will need;
Adaptor from Apple "Composite AV Cable"( MC748ZM/A), available at
http://www.apple.com/ipad/accessories/
If the courtroom is equipped with a monitor or a projector with an HDMI compatible display; you
will need;
Adaptor from Apple “Apple Digital AV Adapter"( MC953ZM/A), available at
http://www.apple.com/ipad/accessories/
For best performance, we recommend using the iPad Airplay mirroring capability.
Minimum requirements.
iPad 2 (and later) with iOS 5 and later
Apple TV (2nd or 3rd generation) with software version 5.0 or later
An 802.11a, -g or -n wireless network
How to Enable AirPlay Mirroring from your iPad
1. Connect your iPad and your Apple TV to the same Wi-Fi network.
2. On your iPad, double-click the Home button to display your recently used apps.
3. Swipe your recently used apps twice from left to right until you see this icon:
4. Tap the icon to display a list of available AirPlay devices.
5. Enable AirPlay Mirroring from this menu by tapping the name of your Apple TV, and then
toggle the on/off slider to ON.
42
13.4 Can I Customize CounselPad?
Absolutely! One of the great features of CounselPad is the ability to customize it to your unique
requirements. When you purchase CounselPad 10 hours of customization is included in the
price.
If you would like to request customization, the process is as follows:
-
Send an email to [email protected] explaining in detail the required customization,
Attach to your email any document you feel will help us better understand your needs.
An analyst will contact you if clarifications are needed. Once we have a clear understanding of
your requirements, we will send you a firm estimate of the cost. If you approve the estimate, we
will proceed with the work.
CounselPad charges $120 per hour for analysis and programming, and $60 per hour for testing.
13.5 Why does CounselPad use FileMaker Go as its database engine?
CounselPad was designed with a view to security and mobility, which are premier requirements of
the criminal bar. After careful analysis and a thorough assessment of different technologies, the
engineers at CounselPad have concluded that FileMaker Go and the iPad meet these
requirements in a way and to an extent that exceeds any other technology.
There are Web Service Providers who will license other data base applications for a monthly fee
and while these offer benefits in outsourcing, simplicity of deployment and reduced costs, they
carry some serious risks for the criminal practitioner. We group these risks as follows:
Technical Risks
- Insufficient Bandwidth (application is too slow or erratic)
- Service disruption from the Internet Service Provider; imagine having your file disappear
in the middle of your trial because of Internet or server problems.
- Backup availability. Who guarantees the backup?
Server Business Risks
- What happens if the company providing the web based service goes out of business, or
bankrupt?
- How does one know how secure their systems are? How does one monitor the Web
Service Provider?
- An ASP simply cannot guarantee the safety and privacy of data in its custody. Many
“very well protected” companies are hacked on a daily basis.
- An internet based server can add or remove features in the application at will. You have
no control over this.
Counsel has a responsibility to take reasonable care to ensure that client confidentiality is
maintained, and their files are secure. The discussion continues in Law Societies and Bar
Associations everywhere as to what constitutes reasonable care, particularly with reference to
utilizing third party servers and cloud based data applications. How many instances of hacking
will it take before it is decided that the use of these servers does not amount to reasonable care?
Based on all of this, we decided that if CounselPad was to be as safe and as mobile as the files in
your briefcase, we had to use a technology that stored your data on your own devices. FileMaker
Go and the iPad fit the bill perfectly.
43
13.6 Is Support Available?
Yes. Upon your purchase of CounselPad one-year support is included.
Support staff are available at 1-800-765-1327 during business hours Monday to Friday (Mountain
Standard Time). You can also email us with your queries at [email protected]. A
programmer will contact you and walk with you through the problem to the solution. With your
permission, the programmer can remote to your computer to provide further help.
After the first year, you can purchase an optional ongoing support plan. If any new version of
CounselPad is released during the currency of any support plan, you can upgrade free of charge.
13.7 What is the size limit for emails sent from CounselPad?
CounselPad allows any sized email to be sent.
However, while CounselPad allows these emails to be sent, size limitations do exist and are
restricted by the mail server. Here are a few maximum attachment sizes by provider:
Gmail - 25MB
Yahoo - 25MB
Hotmail - 10 MB
Note: For internal business mail providers it may be beneficial to speak with your IT department
13.8 What are the system requirements to run CounselPad?
44
Computer System Requirements for FileMaker Pro
Operating System
Minimum Requirements
Recommended Requirements
Windows 7 Ultimate,
Professional, Home
Premium*
CPU: 1 GHz or faster
RAM: 1 GB
1024x768 or higher resolution video
adapter and display, DVD drive (for
boxed product)
CPU: 1 GHz or faster
RAM: 2 GB
1024x768 or higher resolution video
adapter and display, DVD drive (for
boxed product)
Windows Vista Ultimate,
Business, Home Premium
(SP 2)*
CPU: 1 GHz or faster
RAM: 1 GB
1024x768 or higher resolution video
adapter and display, DVD drive (for
boxed product)
CPU: 1 GHz or faster
RAM: 2 GB
1024x768 or higher resolution video
adapter and display, DVD drive (for
boxed product)
CPU: 700 MHz or faster
RAM: 256 MB
Windows XP Professional,
1024x768 or higher resolution video
Home Edition (SP 3)*
adapter and display, DVD drive (for
boxed product)
CPU: 700 MHz or faster
RAM: 2 GB
1024x768 or higher resolution video
adapter and display, DVD drive (for
boxed product)
Mac OS X Lion v10.7*
CPU: Intel-based Mac
RAM: 2 GB
1024x768 or higher resolution video
adapter and display, DVD drive (for
boxed product)
CPU: Intel-based Mac
RAM: 2 GB
1024x768 or higher resolution video
adapter and display, DVD drive (for
boxed product)
Mac OS X v10.6.x*
CPU: Intel-based Mac
RAM: 1 GB
1024x768 or higher resolution video
adapter and display, DVD drive (for
boxed product)
CPU: Intel-based Mac
RAM: 2 GB
1024x768 or higher resolution video
adapter and display, DVD drive (for
boxed product)
Technical Specifications for FileMaker Go for iPad
FileMaker Go Requires iOS 4.2.1 or later
45