1
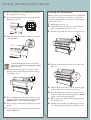
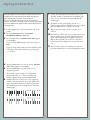
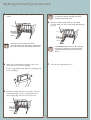
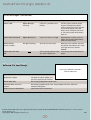
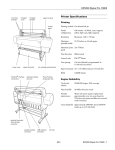
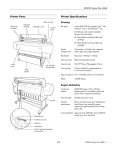
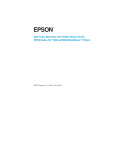
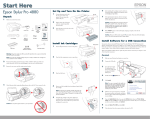
Quick Reference Guide
EPSON Stylus Pro 10000
®
EPSON Stylus Pro 10000
®
Printed in USA
CPD-12209
Loading Roll Paper
First you attach the paper roll to the spindle and place
the spindle in the printer. Then you load the paper for
printing.
4
Slide the movable paper stop back onto the spindle
and insert it firmly into the end of the roll.
5
Insert the white end of the spindle (with the fixed
paper stop) into the right mounting bracket. You can
use either the upper or lower bracket.
6
Place the black end of the spindle into the left
mounting bracket inside the printer.
Setting Up the Paper and Spindle
1 Open the roll paper cover and lift out the spindle.
2
Slide the movable paper stop off the left end of the
spindle.
3
Position the roll so the paper unwinds as shown, then
slide the roll onto the spindle so it fits securely against
the paper stop.
paper stop
Handle the roll carefully and avoid touching the
printable side of the paper with bare hands.
Fingerprints may affect print quality.
▲
Continue
1
Loading Roll Paper (Continued)
Loading Roll Paper for Printing
3
Feed the paper into the paper slot and then pull it
down so it extends through the slot.
4
Turn the paper roll back to remove the slack. Then
align the paper with the two rows of holes at the
paper exit.
5
Push the paper set lever all the way in, then close the
roll paper cover.
Once the roll paper is attached to the spindle and inserted
in the printer, you’re ready to load it for printing.
1
Make sure the printer is turned on. Then press the
Paper Source button repeatedly until one of the
Roll lights comes on (either Roll Auto Cut or Roll
Cutter Off).
To avoid feeding excess paper, make sure you
don‘t select Sheet when you’re using roll paper.
2
Pull the paper set lever out, to the released position.
To avoid damaging the printer, never move
the paper set lever while the Operate or Pause
light is flashing.
If you’re using Roll Auto Cut and the leading edge of
the paper is uneven, press the Cut/Eject button to
recut the edge.
6
2
Press the Pause button. The print head moves and
the paper feeds into printing position automatically.
READY appears on the control panel display.
Loading and Using Cut Sheet Paper
1
Make sure roll paper is not loaded for printing, and
the roll paper cover is closed.
2
Press the Paper Source button repeatedly until the
Sheet light comes on.
3
Printing on Posterboard
When you print on posterboard (more than 19 mil thick),
you need to open the lower cover before you feed the
board for printing. Follow steps 1 and 2 to the left, then
open the lower cover.
5
Pull the paper set lever out.
3
Align the board with the scale on the roll paper cover.
4
Align the board with the vertical row of holes at the
paper exit.
5
While holding the board in position, push the paper
set lever all the way in. Close the lower cover.
6
Press the Pause button. The print head moves and
the posterboard feeds into printing position. READY
appears on the control panel display.
7
Run your print job. After printing, the posterboard
stays in the printer.
8
Hold the posterboard as you pull the paper set lever
out. Then gently remove the print at the paper exit.
Feed the board into the paper slot until the bottom
edge rests behind the open lower cover.
Make sure the paper set lever is all the way in, in the
secured position.
To avoid damaging the printer, never move
the paper set lever while the Operate or Pause
light is flashing.
4
1
2
Feed the sheet into the paper slot until it extends
through the slot. Align the paper with the scale on
the roll paper cover.
Press the Pause button. The print head moves and
the paper feeds into printing position automatically.
READY appears on the control panel display.
6
Print your page. After printing, the sheet stays in the
printer.
7
To remove the print, hold it while pressing the lower
Paper Feed button.
3
Checking and Cleaning the Print Head
If dots are missing from the pattern, as shown below,
you need to run a cleaning cycle.
First you print a nozzle check pattern to see if the print
head needs cleaning. If dots are missing from the pattern,
you need to run a cleaning cycle. After cleaning, run
another nozzle check.
1
2
Load a sheet of paper (or roll paper) in the printer.
5
Make sure that all of the Ink Out lights on the
printer’s control panel are off. If an Ink Out light is
flashing or on, you need to replace the corresponding
ink cartridge instead.
6
Press the Cleaning button and hold it for at least
3 seconds. The Pause light flashes as the printer
cleans its print head. The cleaning cycle takes about
a minute and does not use any paper.
To avoid damaging the printer, don’t turn it off
until the cleaning cycle is finished and the
Pause light has stopped flashing.
Press the SelecType® button repeatedly until TEST
PRINT MENU appears on the display.
7
3
Press the Item button. NOZZLE CHECK = PRINT
appears on the display.
4
Press the Enter button. The nozzle check prints as
shown below:
If all the lines on the check pattern are complete, with
no gaps in the dot pattern, the print head doesn’t need
cleaning.
4
When the Pause light goes off, follow steps 1 through
4 to run another nozzle check to make sure the print
head is clean.
Aligning the Print Head
7
You can use EPSON roll paper to print the alignment
patterns. Two rows consisting of sets of 15 bars are printed
across the width of the paper. It takes about 10 minutes to
print both rows.
Look at the other patterns in the first row to see if
the same number consistently has the smallest gaps.
If not, choose the number that generally has the
smallest gaps.
8
Check the control panel display. Use the + or –
button to select the best aligned bar for row #1. Then
press the Enter button to register the setting.
1
Load roll paper that is at least 24 inches wide in the
printer.
9
Repeat steps 6 through 8 for the second row of
patterns.
2
Press the SelecType button until HEAD
ALIGNMENT MENU is displayed.
10 If you were not able to choose a bar that consistently
3
Press the Item button. PAPER THICK=STD appears
on the display.
If banding appears on your prints, or vertical lines are not
straight, you need to align the print head. This process
aligns the head for all modes and resolutions.
had the smallest gaps, print the alignment patterns
again. Then repeat steps 6 through 8 for that row.
Repeat this step until you can choose a bar that is
consistently the best aligned in every pattern in the
row.
If you are using EPSON paper, leave this setting on
STD.
11 After you have registered a number for both rows,
If you are using other media, enter the thickness value
of the paper in 0.1-mm increments by pressing the
+ or – button.
4
Press the Enter button to save the setting. ADJUST.
PATT.=ALL appears on the display.
5
Press the Enter button to print both rows of
alignment patterns.
press the Pause button to exit head alignment mode.
If you want to print a single row of alignment
patterns, press the + or – button until the row
number appears. Then press the Enter button.
6
Examine the first row. You see a series of patterns
similar to the pattern below across the width of the
paper. Determine which bar in the first pattern has
the smallest gaps. In the example below, #8 has the
smallest gaps.
5
Checking Ink Levels and Replacing Ink Cartridges
When one of the INK OUT lights stays on and INK OUT
is displayed, the cartridge is empty. To replace the
cartridge, first make sure the printer is on.
Before you begin a large print job, you should check your
ink levels. If one of your cartridges is low, you can replace it
before you start. Or, you can wait until the ink runs out,
replace the cartridge, and then continue the job without
any loss of print quality.
1
Push the indentation on the ink compartment cover
to release the lock and open the cover.
2
Locate the slot containing the empty ink cartridge
corresponding to the Ink Out light. Press down on
the top of the clamp and pull it forward.
Checking Ink Levels
1 Press the SelecType button until PRINTER STATUS
MENU appears on the display.
2
Press the Item button. VERSION
<number>
appears, indicating the firmware version installed in
your printer.
3
Continue pressing the Item button to display the
amount remaining for each of the 6 inks:
E*****F = full
E ****F = 3/4 full
E ***F = 1/2 full
E
**F = 1/4 full
E
*F = nearly empty
E
F = empty
4
Press SelecType to exit the Printer Status menu.
Replacing Ink Cartridges
When one of the INK OUT lights is flashing and INK LOW
is displayed on the control panel, the corresponding
cartridge is nearly empty. Make sure you have the correct
replacement cartridge.
Photographic Dye ink:
Black
T499201
Yellow
T500201
Magenta
T501201
Cyan
T502201
Light Magenta
T503201
Light Cyan
T504201
Archival ink:
Black
T511201
Yellow
T512201
Magenta
T513201
Cyan
T514201
Light Magenta
T515201
Light Cyan
T516201
▲
Continue
6
Replacing Ink Cartridges (Continued)
3
Carefully pull the empty cartridge straight out of the
printer.
If you can’t insert the cartridge smoothly, you
may have the wrong cartridge. Check the
package and product code.
6
If ink gets on your hands, wash them
thoroughly with soap and water. If ink gets into
your eyes, flush them immediately with water.
4
If the Ink Out light remains on, the cartridge
may not be installed correctly. Remove the
cartridge and then reinsert it as described
above.
7
Make sure the replacement cartridge is the correct
color, and remove it from its package.
If you’re using Archival ink, shake the cartridge gently
before installing it.
5
Push the cartridge clamp back into the locked
position. Make sure the corresponding Ink Out light
goes off.
Hold the cartridge with the arrow mark on the left
side and pointing to the rear of the printer. Then
insert the cartridge into the slot. Don’t force it.
7
Close the ink compartment cover.
Control Panel Messages
Status messages
These messages indicate normal phases of printer operation.
Message
Light
Explanation or response
READY
Operate light on
Printer is ready to print.
PRINTING
Operate light flashing
Printer is receiving data.
RESET
All lights flash briefly
Printer is resetting.
PRESS PAUSE BUTTON
Pause light on
Press the Pause button to continue.
WAIT
Pause light on or
flashing
Printer is warming up, performing maintenance, or
charging ink.
PAUSE
Pause light on
Printer is paused. To resume printing, press the Pause
button.
INK DRY FOR
<number> MIN
Pause light flashing
Printer is paused to let ink dry. Wait for the number of
minutes shown.
Error messages
For a complete list of error messages, see your Printer Guide.
Message
Light
Explanation
INK LOW
Ink Out light(s) flashing
Ink cartridge(s) nearly
Replace ink cartridge(s) indicated
empty (printing continues). by Ink Out light(s). See page 7.
INK OUT
Ink Out light(s) on
Ink cartridge(s) empty
(printing stops).
Replace ink cartridges indicated
by Ink Out light(s). See page 7.
LOAD ROLL PAPER
LOAD SHEET PAPER
Paper Out light on
Paper source setting in
print options is different
from control panel.
Make sure the right paper is loaded
and the paper source setting is the
same on the control panel and print
options.
A maintenance part will
need to be replaced soon.
Note the error number and contact
EPSON.
MAINTENANCE REQ.
<error number>
Response
▲
Continue
8
Control Panel Messages (Continued)
Error messages (Continued)
Message
Light
Explanation
Response
PAPER JAM
Paper Out light
flashing
Paper has jammed in the
printer.
Pull the paper set lever all the
way out and open the lower
cover if necessary. Then remove
the jammed paper, close the
lower cover, and push the lever
in. Turn the printer off and then
back on.
PAPER NOT STRAIGHT
Paper Out light on
Paper was fed at an angle.
Reload paper, making sure the
edges are straight and lined up
with the row of holes.
SERVICE REQ.
<error number>
All lights flashing
An error has occurred.
Note the error number, and turn
the printer off and then on. If the
message remains, contact
EPSON.
This message appears after
you clear a paper jam.
Turn the printer off and then on
again.
TURN PWR OFF AND
ON
Where To Get Help
Place your EPSON PreferredSM
Unit ID label here
Service
Access
Telephone support
Call (888) 377-6611. Make sure
you have your Unit ID number.
World Wide Web
Go to http://prographics.epson.com
EPSON E-MAIL technical
support
Go to http://support.epson.com and complete the form under the
troubleshooting tab.
Support for non-EPSON RIP
Contact the RIP manufacturer.
EPSON and EPSON Stylus are registered trademarks of SEIKO EPSON CORPORATION. EPSON Preferred is a service mark of
Epson America, Inc.
Copyright © 2001 by Epson America, Inc.
9
5/01
Quick Reference Guide
EPSON Stylus Pro 10000
®
EPSON Stylus Pro 10000
®
Printed in USA
CPD-12209