1
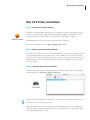
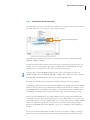
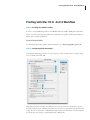
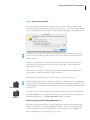
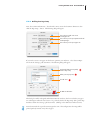
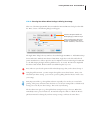
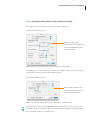
How to Use Epson Mac OS X Printer Drivers for the
EPSON Stylus Pro® 7600 and 9600 UltraChrome™ Printers
EPSON America, Inc. © 2003, Version 052103
Table of Contents 2
Contents
3
Forward
4
Mac OS X Driver Installation
STEP 1:
STEP 2:
STEP 3:
STEP 4:
STEP 5:
STEP 6:
8
Printing with Mac OS X: An ICC Workflow
STEP 1:
STEP 2:
STEP 3:
STEP 4:
STEP 5:
STEP 6:
15
Run the Driver Installer Package
Connect Your Printer and Get it Ready
Launch the Apple Print Center Utility
Selecting Your Printer Connection
Adding Your Printer Driver to the Print Center Utility
Naming Your Printer Driver and Deciding to Share It with Others
Installing Your RGB ICC Profiles
Configuring the Adobe Photoshop 7 Color Settings Dialog
Opening Your Image File
Defining Your Page Setup
Selecting Your ICC Profile and Rendering Intent
Choosing Your Printer Driver Settings & Printing Your Image
Tips and Troubleshooting
TIP 1:
TIP 2:
TIP 3:
TIP 4:
TIP 5:
Run ‘Repair Disk Permissions’
Turn ‘Off’ AppleTalk within the Epson Ethernet Card
Do not use older ‘Presets’ after installing an updated driver
Why are my ICC profiles not showing up?
Stopping ‘Command Errors’ on the SP7600 or SP9600
3
Forward
This document is to help assist anyone using the latest Mac OS X drivers from Epson for the
EPSON Stylus Pro 7600 or 9600 UltraChrome printers.
There are two different types of Macintosh users - Pre OS X and OS X only.
For Pre OS X users, one of the biggest problems facing Mac OS X printing is that everything is new.
Once you understand the Chooser is gone, you’re left with something that must be understood all
over again. It’s a dramatic change over the previous Chooser concept.
For users who started their Macintosh experience using only OS X, they are left with understanding
the basic concepts of adding a printer driver to OS X, configuring it properly, and printing through
their applications. Their experience will be significantly different than people who were used to the
previous Apple Chooser concept.
The Mac OS X operating system is completely new. Everything about its printing technology is different. Apple and its partners have worked hard to create the printing workflow behind this powerful
new operating system. Remember, OS 9 had many years of development behind it.
Being a Mac user since the beginning, I can assure you Mac OS X is worth the effort to learn. Once
you’ve perfected your printing workflow under Mac OS X, you will not switch back to OS 9.
The Macintosh has always been known for its ease-of-printing. With this document, I hope you’ll
agree this will always be the case. Goodbye OS 9 and hello OS X...!
Mark Radogna
Senior Manager, Professional Graphics
EPSON America, Inc.
Mac OS X Driver Installation 4
Mac OS X Driver Installation
STEP 1: Run the Driver Installer Package
Installing or reinstalling Mac OS X drivers are very straightforward. After downloading the proper
driver for your printer model, simply double-click the installer package and follow the on screen
instructions. When reinstalling a driver, your ‘Install’ button will change to ‘Upgrade’.
Your Macintosh may need to be restarted after installation has completed.
For the latest Mac OS X drivers, visit http://prographics.epson.com
STEP 2: Connect Your Printer and Get it Ready
In order for you to ‘add’ your printer for use within Mac OS X, you must have your printer connected to your Macintosh the way you intend to use it everyday. Make sure to turn ‘ON’ your printer
and ensure it’s in a ready mode. Ready mode means no printer errors exist and the printer is loaded
with ink and media and in a ready state for printing. Make sure no red lights exist on the printer’s
front control panel.
STEP 3: Launch the Apple Print Center Utility
The beloved ‘Chooser’ is gone. It has been replaced by the ‘Printer Center’ utility. It is available in
the following location: Applications / Utilities / Print Center
Select the Print Center Utility icon and drag it into the Dock. Now you will have quick access to it
whenever you need to deal with your printers.
Caution for OS 9 Users: Do not be tempted to move your Utilities folder out of your Applications
folder. By doing so, future OS X upgrades may not be properly installed. Use your Dock or make
an alias of the Utilities folder instead.
Mac OS X Driver Installation 5
STEP 4: Selecting Your Printer Connection
Select the ‘Add’ icon at the top of the Printer List window. Next, pull down the top menu and select
the proper connection you are trying to use for your Epson printer.
Select your connection type here
Depending upon your Epson printer model, you may be able to connect to Mac OS X via USB,
AppleTalk, TCP/IP, or FireWire.
You must only select an Epson printer connection by using one of the Epson interface choices. For
example, if you are connecting your Epson printer via USB, then select ‘EPSON USB’ from this
pull down menu, not ‘USB’. This is also true for all other connection types.
If using an Epson internal 10/100 BaseT Ethernet card, select and configure your printer via
‘EPSON TCP/IP’ rather than ‘EPSON AppleTalk’. TCP/IP is more reliable and a faster connection
than AppleTalk. TCP/IP will become your new best friend under Mac OS X.
For OS X only networks, Epson recommends to disable all other protocols except TCP/IP.
Configuring your Epson printer to work only under TCP/IP is easy. Simply make sure your TCP/IP
address for both the printer and your Macintosh are within the same domain. For example, if your
Mac’s TCP/IP address is 198.10.10.5, then configure your Epson Ethernet card’s TCP/IP address to
something like 198.10.10.6. If you are unsure about this setting, ask your IT manager for help.
You can verify the TCP/IP address of your Epson Ethernet card by pressing the little black button
on the back of the card. Hold it down until the printer starts to make some noise. A series of status
sheets will be printed. Locate the TCP/IP number on one of these sheets and set your Mac’s TCP/IP
address to be within this same domain. Now you can run your web browser and type the Epson
Ethernet card’s TCP/IP address in the URL line to get access to the Ethernet cards configuration
manager.
You can also use the EpsonNet MacAssist utility for OS X (version 4.0a) to configure your Epson
Ethernet card. See the documentation that came with your Epson Ethernet card for more details.
Mac OS X Driver Installation 6
STEP 5: Adding Your Printer Driver to the Print Center Utility
After selecting the connection type from step 4, the Epson printer should be showing up under the
‘Product’ and ‘Kind’ columns.
Select your printer model here 1
Then select your media input type here 2
1
Select your Epson printer model and if supported, select the appropriate media input type from the
‘Page Setup’ pull down menu at the bottom of the Printer List dialog box.
2
The ‘Page Setup’ menu allows you to add all or specifically the media input types you plan on using
with your Epson printer. For example, if you only plan on using roll based media types, then select
the ‘Roll Paper’ menu choice before selecting ‘Add’. You may add whatever combination of media
types you intend to use with your printer at any time by returning to this screen.
The most common two drivers to add to your Printer List for either the SP7600 or SP9600 are ‘Roll
Paper’ for any media that comes in roll form and ‘Sheet’, for any cut-sheet media being used.
Please Note: The default driver for both the SP7600 or SP9600 is the ‘Roll Paper’ media input type.
After selecting the correct media input type from the ‘Page Setup’ pull down menu, click on the
‘Add’ button to return to the Printer List window. Repeat this step to add more media input types.
Pre OS X User Question: Why must I install drivers in this way?
The current Epson drivers for Mac OS X do not handle multiple media margins within a single
printer driver. Therefore, in order to maximize your media margins, Epson needed to create
multiple drivers to handle each media input type. Epson is working closely with Apple to resolve this
issue within future Mac OS X and Epson driver releases.
Mac OS X Driver Installation 7
STEP 6: Naming Your Printer Driver and Deciding to Share It with Others
Once you’ve successfully added your printer driver and it’s showing up within the Printer List
window, you may want to rename it to better identify it later.
To rename your printer driver, simply select the printer device within the Printer List window and
hit command-I or select ‘Show Info’ from the ‘Printers’ pull down menu.
This is where you type-in a new name. This new
name will be used to describe your Epson printer.
1
Then click here for it to take effect. 2
Type in the name you want and click the ‘Apply Changes’ button, then close the window.
Next, if you wish to share this printer with other Mac OS X users on the same network, you must
turn-on ‘Printer Sharing’ within the ‘Sharing’ ‘System Preferences’ dialog.
By turning-on this feature, your Macintosh will be telling the network that you have an Epson
printer to share with others. If another Mac OS X user has ‘Show printers connected to other computers’ checked within their “Preferences...” menu within their Print Center Utility, your printer will
show up in their Printer List automatically.
Shared printers will be highlighted within the Printer List versus directly connected printer.
This printer is connected to someone else’s Mac and is being shared
This printer is directly connected
to your Mac and is default (bold)
Congratulations, you’ve just added a printer driver to your Mac OS X system. Now any application
will be able to print to this device.
Printing with Mac OS X: An ICC Workflow 8
Printing with Mac OS X: An ICC Workflow
STEP 1: Installing Your RGB ICC Profiles
In order to use any RGB ICC profile for your EPSON Stylus Pro 7600 or 9600 printer under Mac
OS X, you need to first place them within the standard place for profiles. Under Mac OS 10.2.6 or
higher, place your ICC profiles here:
/Library/ColorSync/Profiles
To obtain high-quality ICC profiles directly from Epson, go to http://prographics.epson.com
STEP 2: Configuring Adobe Photoshop 7
Launch Adobe Photoshop 7 and choose ‘Color Settings...’ under the ‘Edit’ menu. Setup the dialog
box to look like this and hit ‘OK’.
Depending upon who you talk to, this dialog box is very controversial. For the majority of professional photographic work, I feel this setup works best. Feel free to experiment based upon this basic
setting. Be sure to always turn-on ‘Black Point Compensation’ and ‘Use Dither’. For more information about these two settings, consult the Photoshop 7 Help menu.
Printing with Mac OS X: An ICC Workflow 9
STEP 3: Opening Your Image File
Next, open your image file and choose the proper conversion option if asked. If your file already
contains a profile that matches the color settings you’ve setup in step 2 or if your image file is in LAB
space, then the image will open right up. If not, then Photoshop will display a dialog similar to this:
In order to open your image file properly, you should NOT convert your data file. Instead, select
‘Leave as is (don’t color manage)’. The less color conversions you perform on your data file before
printing the better.
Whenever you ask Photoshop to convert color using this dialog box, you will be modifying your
image file forever. Depending upon how you created your image file, you may be limiting the
quality of the actual image!
However, if you know what your doing, then select ‘Assign working RGB: Adobe RGB (1998)’ or
assign a different profile using the ‘Assign profile:’ radio button.
Photoshop will then perform any color conversions and open your file into a window.
NIKON D1X & D1H
NIKON D100
Professional digital camera owners, I highly recommend the use of Adobe’s new Camera RAW plugin. By shooting your work within your camera’s RAW file format and using this new plug-in to open
it within Photoshop, you will have an incredible amount of control over the quality and final printed
size of the shot.
For the money (~$99), the technology within this plug-in makes it a must buy. For EPSON Stylus
Pro 7600 and 9600 owners, this plug-in will also generate a larger data file from your smaller original file that will impress you. Visit http://www.adobe.com for more details.
What Color Space Should I Calibrate My Monitor To?
The answer to this question will vary, but if your using the latest LCD monitors from Apple then
calibrate your monitors to a 2.2 gamma at 6500 degrees Kelvin. If you are using a CRT monitor
I would recommend the same, but you might want to try using a gamma of 1.8 at 5000 degrees
Kelvin, especially if your a graphic design or pre-press user.
Printing with Mac OS X: An ICC Workflow 10
STEP 4: Defining Your Page Setup
Next, choose ‘Print with Preview...’ from the ‘File’ menu. Notice the document dimensions, then
click the ‘Page Setup...’ button. The following dialog will appear.
This is where you will create a new
custom paper size.
This is where you select your printer model and
media input type.
This is where you select your paper size
If you need to create a new paper size that better optimizes your media use, select ‘Custom Paper
Size’ from the ‘Settings:’ pull down menu. The following dialog will appear.
Use this pull down menu to quickly
return to Page Setup
3
Define your new paper size, 1
Then hit ‘Save’.
✘
2
Do NOT use this button
This dialog box will be redesigned within future Mac OS X releases, but for now, define your paper
size and margins and hit the ‘Save’ button. To go directly back to the ‘Page Setup’ dialog select ‘Page
Attributes’ within the ‘Settings:’ pull down menu. (clicking on the ‘OK’ button will waste time)
Notice how I made the top and bottom margins the same. This will guarantee the image will be
printed perfectly centered on my sheet of paper.
Printing with Mac OS X: An ICC Workflow 11
STEP 5: Selecting Your ICC Profile and Rendering Intent
From the Photoshop 7 ‘Print with Preview’ dialog box select the ‘Show More Options’ check box,
and choose ‘Color Management’ from the pull down menu. Your dialog box should look something
like this:
1
2
3
1
Under ‘Source Space:’ the ‘Document:’ radio button should be selected. You may see a different
RGB profile tagged for your image file versus the example ‘Adobe RGB (1998)’ above. It may say
‘Lab Color’ or even ‘ColorMatch RGB’. If it says ‘Untagged RGB’, then Photoshop will apply the
default RGB working space profile that you defined in step 1 - which was ‘Adobe RGB (1998)’.
2
Under ‘Print Space:’ the ‘Profile:’ selection should be set to an RGB ICC printer profile designed
specifically for your combination of printer model, paper, ink, and driver setup.
3
Under ‘Print Space:’ the ‘Intent:’ selection should be set to either Perceptual or Relative Colorimetric
depending upon your image file. I prefer the Perceptual rendering intent for everything - color and
black and white. However, sometimes I use Relative Colorimetric for my black and whites or color
prints that I know fall within the gamut of the printer. Try both intents to see what you like.
Always turn-on ‘Use Black Point Compensation’. Perceptual will always override it, but Relative
Colorimetric almost always requires it. So turn it on and forget about it!
Printing with Mac OS X: An ICC Workflow 12
STEP 6: Choosing Your Printer Driver Settings & Printing Your Image
Take note of the ‘Print Space Profile’ selection within the ‘Print with Preview’ dialog box then click
the ‘Print...’ button. The following dialog box will appear.
1
2
Select the same printer model and
media input type you made in Step 4
Select each of the menu choices here
to setup your printer driver’s various
features - when done, create a Preset!
The Apple ‘Print’ dialog looks very similar to the standard Apple LaserWriter or AdobePS PostScript
drivers under OS 9. With the introduction of Mac OS X, Apple has rest the look and feel for all
printer manufacturer’s to follow. Epson has tried to implement our driver technology from Mac OS
9 to X, while keeping the Apple interface guidelines intact. As a result, Pre OS X users might find
this driver a little unusual, while new OS X users will find it quite easy to use.
1
First, make sure you select the printer model and media input type that you also selected in step 4.
2
Using this pull down menu, you must navigate through the various driver features. Once you’ve
selected all your driver settings, you can create a preset by pulling down the ‘Presets:’ menu to save
your settings.
Many Epson users like to go through their selections repeatedly to be sure they are correct before
printing. This process sometimes causes the driver to ‘reset’ all your settings back to a default mode,
forcing you to redo all your driver settings. This can be very frustrating.
The best advice I can give is to go through the driver settings from top-to-bottom. When done,
immediately create a preset for future use. Do NOT be tempted to click on or ‘flash’ the ‘Presets:’
pull down menu after selecting all your driver settings. Doing so will reset the entire driver!
Printing with Mac OS X: An ICC Workflow 13
STEP 6: Choosing Your Printer Driver Settings & Printing Your Image
Pull down the driver features menu and select ‘Print Settings’. The following dialog box appears.
This Print Settings dialog is setup for
an RGB ICC profile that was created
for an EPSON Stylus Pro 9600 using
Roll based Premium Luster Photo
Paper, printing in color or black &
white at 2,880 dpi.
High Speed = Off
You must make sure the printer driver settings match exactly the way the RGB ICC profile is expecting them to be set. You must find out how your particular ICC profile was created and set your
printer driver settings to match. Also, be sure you are using the correct printer model, ink, and
media the profile was made for.
On the SP7600 and SP9600 UltraChrome models, make sure you know which Black Ink Mode you
are in – Photo Black or Matte Black!
Next, pull down the driver features menu and select ‘Color Management’. The following dialog box
appears.
Since you are using Photoshop to
manage all your color, you need to
turn-off color management within
the Epson driver.
Printing with Mac OS X: An ICC Workflow 14
STEP 6: Choosing Your Printer Driver Settings & Printing Your Image
Next, pull down the driver features menu and select ‘Paper Configuration’.
The following dialog box appears.
Make sure to verify this setting.
Sometimes the Color Density is adjusted for
the creation of an RGB profile to optimize
D-max and color gamut.
Again, make sure you are selecting the correct settings for your ICC profile.
Depending upon your media input type, you may have a ‘Roll Paper Option’ selection. If so, pull
down the driver features menu and select ‘Roll Paper Option’.
The following dialog box appears.
Whatever settings you make here, will
always override what you have set on the
front control panel of the printer.
When you are all done making driver settings, then click on the ‘Print’ button.
If you make a preset of these settings BEFORE you hit the ‘Print’ button, you can speed-up this
process the next time you use this profile, printer, ink, and media combination, by simply selecting
the preset within the ‘Presets:’ pull down menu.
Mac OS X Driver Installation 15
TIPS and Troubleshooting
TIP 1: Run ‘Repair Disk Permissions’
Within the Apple Disk Utility, under the ‘First Aid’ tab, you have a choice to verify and repair your
disk permissions. We have found that by repairing your disk permissions about once per month,
you should run into less errors. This has been known to fix the ‘Command Error’ notice that sometimes shows-up on the front control panel of the SP7600 or SP9600.
TIP 2: Turn ‘Off’ AppleTalk within the Epson Ethernet Card
If you get communication errors when printing via the network through an Epson internal Ethernet card, verify your using that latest card (Epson part number: C12C823912) and turn ‘Off’ the
AppleTalk protocol via a web browser. (See your Ethernet card documentation for details)
As I’ve explained in this document, Mac OS X users should be configuring their Ethernet connections via TCP/IP not AppleTalk. By disabling ALL ethernet protocols except TCP/IP within the
Epson Ethernet card, your communication errors should stop.
TIP 3: Do not use older ‘Presets’ after installing an updated driver
When re-installing or updating your Epson printer driver, the older presets that you’ve defined with
the older driver may cause ‘Command Errors’ on the front LCD panel of the SP7600 or SP9600.
Simply delete the older presets and redefined them through the newer driver. See your installation
documentation that came with your driver for more information.
TIP 4: Why are my ICC profiles not showing up?
Under Mac OS X, ICC profiles do not show up to either the OS or application software until after
you’ve installed the printer driver.
TIP 5: Stopping ‘Command Errors’ on the SP7600 or SP9600
The reason why a ‘Command Error’ shows up on your printer LCD panel is due to incorrect driver
code being sent to your printer. For example, your printer is set to Matte Black Mode, but your
driver thinks it’s still in Photo Black Mode. In most cases, the best way to solve this is to reinstall
your driver, delete your older presets, and repair your disk permissions.
Another reason why this happens is due to incorrect media input types being used. For example,
you have cut sheet media being used, but you selected a roll based driver from within the Print Center Utility. Make sure your media type matches your installed driver.
Printing with Mac OS X: An ICC Workflow 16
This document comes with no technical support of any kind and can be distributed freely among Epson
customers for their use.
Specifications and terms are subject to change without notice. EPSON, EPSON Stylus and Micro Piezo are
registered trademarks of Seiko Epson Corporation. UltraChrome, EPSON Archival, EPSON Photographic
Dye, ColorLife, and DX3 are trademarks, and EPSON Preferred Protection Plan is a service mark of Epson
America, Inc. All other product brand names are trademarks and/or registered trademarks of their respective
companies. EPSON disclaims any and all rights in these trademarks. © Epson America, Inc. 2003.