1
Owner’s Manual
OPEN/CLOSE
POWER
REW
F.FWD STOP/EJECT
PLAY
DUBBING
PLAY
OUTPUT SELECT
CHANNEL
VCR
DVD
S-VIDEO
VIDEO
L - AUDIO - R
DVD
RECORD
RECORD
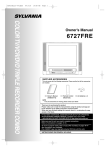
Playing discs
Supplied Accessory
• Audio/Video cables
(WPZ0102TM015 or
WPZ0102LTE01)
• Owner’s Manual
(1VMN20180)
• Quick Use Guide
(1VMN20195)
Editing
• Remote control
• RF cable
(NB108UD)
(WPZ0901TM002)
with two AA batteries
Recording
VCR
STOP
Getting started
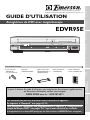
EDVR95E
Connections
DVD Recorder with Video Cassette Recorder
Before you start
EMERSON AND THE G-CLEF LOGO ARE REGISTERED TRADEMARKS
OF EMERSON RADIO CORP., PARSIPPANY, NEW JERSEY, U.S.A.
Owner's Manual
Others
(You CANNOT record on any copyright protected DVD disc with this unit.)
VCR functions
Before you use this unit , you need to complete connections. Refer to
“Connections” on pages 13-15.
To record a program easily, refer to “Easy DVD recording” on pages 16-17
after connections are completed.
Changing the SETUP menu
If you need additional operating assistance after reading this owner’s manual or to
order replacement accessories, please call
TOLL FREE : 1-800-287-4871
Before you start
Precautions
WARNING: TO REDUCE THE RISK OF FIRE OR ELECTRIC SHOCK, DO NOT EXPOSE THIS APPLIANCE TO RAIN OR MOISTURE.
CAUTION
RISK OF ELECTRIC SHOCK
DO NOT OPEN
CAUTION:
TO REDUCE THE RISK OF ELECTRIC SHOCK, DO NOT REMOVE COVER
(OR BACK). NO USER SERVICEABLE PARTS INSIDE. REFER SERVICING TO
QUALIFIED SERVICE PERSONNEL.
The lightning flash with arrowhead symbol, within an equilateral triangle, is intended to alert the user to the presence of
uninsulated “dangerous voltage” within the product’s enclosure that may be of sufficient magnitude to constitute a risk
of electric shock to persons.
The exclamation point within an equilateral triangle is intended to alert the user to the presence of important operating
and maintenance (servicing) instructions in the literature
accompanying the appliance.
Laser Safety
This unit employs a laser. Only a qualified service person should remove the cover or attempt to service this device, due to possible eye injury.
CAUTION:
CAUTION:
LOCATION:
USE OF CONTROLS OR ADJUSTMENTS OR PERFORMANCE OF PROCEDURES OTHER THAN THOSE SPECIFIED HEREIN
MAY RESULT IN HAZARDOUS RADIATION EXPOSURE.
VISIBLE AND INVISIBLE LASER RADIATION WHEN OPEN AND INTERLOCK DEFEATED. DO NOT STARE INTO BEAM.
INSIDE, NEAR THE DECK MECHANISM.
FCC WARNING- This equipment may generate or use radio frequency energy. Changes or modifications to
this equipment may cause harmful interference unless the modifications are expressly approved in the instruction manual.The user could lose the authority to operate this equipment if an unauthorized change or modification is made.
RADIO-TV INTERFERENCE
This equipment has been tested and found to comply with the limits for a Class B digital device, pursuant to Part 15 of the
FCC Rules.These limits are designed to provide reasonable protection against harmful interference in a residential installation.This equipment generates, uses, and can radiate radio frequency energy and, if not installed and used in accordance with
the instructions, may cause harmful interference to radio communications. However, there is no guarantee that interference
will not occur in a particular installation. If this equipment does cause harmful interference to radio or television reception,
which can be determined by turning the equipment off and on, the user is encouraged to try to correct the interference by
one or more of the following measures:
1) Reorient or relocate the receiving antenna.
2) Increase the separation between the equipment and receiver.
3) Connect the equipment into an outlet on a circuit different from that to which the receiver is connected.
4) Consult the dealer or an experienced radio/TV technician for help.
This Class B digital apparatus complies with Canadian ICES-003.
Cet appareil numérique de la classe B est conforme à la norme NMB-003 du Canada.
CAUTION:TO PREVENT ELECTRIC SHOCK, MATCH WIDE BLADE OF PLUG TO WIDE SLOT, FULLY
INSERT.
A NOTE ABOUT RECYCLING
This product’s packaging materials are recyclable and can be reused. Please dispose of any materials in accordance with your local recycling regulations.
Batteries should never be thrown away or incinerated but disposed of in accordance with your local regulations concerning chemical
wastes.
Make your contribution to the environment!!!
• Used up batteries do not belong in the dust bin.
• You can dispose of them at a collection point for used up batteries or special waste.
Contact your council for details.
For Customer Use:
Read carefully the information located at the back of this unit and enter below the Serial No.
Retain this information for future reference.
Model No. _____________________
Serial No. _____________________
2
Before you start
Important Safeguards
porting structure, grounding of the lead-in wire to an antenna
discharge unit, size of grounding conductors, location of antenna-discharge unit, connection to grounding electrodes, and
requirements for the grounding electrode. (Fig.A)
FIGURE A
EXAMPLE OF ANTENNA GROUNDING
AS PER NATIONAL ELECTRICAL CODE
ANTENNA
LEAD
WIRE
GROUND
CLAMP
Connections
ANTENNA
DISCHARGE UNIT
(NEC SECTION 810-20)
ELECTRIC
SERVICE
EQUIPMENT
NEC – NATIONAL ELECTRICAL CODE
S2898A
GROUNDING CONDUCTORS
(NEC SECTION 810-21)
GROUND CLAMP
POWER SERVICE GROUNDING
ELECTRODE SYSTEM
(NEC ART 250, PART H)
Playing discs
Editing
Changing the SETUP menu
VCR functions
Others
3
Recording
14. Lightning - For added protection for this product during a lightning storm, or when it is left unattended and unused for long
periods of time, unplug it from the wall outlet and disconnect
the antenna or cable system. This will prevent damage to the
product due to lightning and power-line surges.
15. Power Lines - An outside antenna system should not be located
in the vicinity of overhead power lines or other electric light or
power circuits, or where it can fall into such power lines or circuits.When installing an outside antenna system, extreme care
should be taken to keep from touching such power lines or circuits as contact with them might be fatal.
16. Overloading - Do not overload wall outlets and extension cords
as this can result in a risk of fire or electric shock.
17. Object and Liquid Entry - Never push objects of any kind into
this product through any openings as they may touch dangerous
voltage points or short-out parts that could result in a fire or
electric shock. Never spill liquid of any kind on the product.
18. Servicing - Do not attempt to service this product yourself as
opening or removing covers may expose you to dangerous voltage or other hazards. Refer all servicing to qualified service personnel.
19. Damage Requiring Service - Unplug this product from the wall
outlet and refer servicing to qualified service personnel under
the following conditions:
a.When the power-supply cord or plug is damaged.
b. If liquid has been spilled, or objects have fallen into the product.
c. If the product has been exposed to rain or water.
d. If the product does not operate normally by following the operating instructions. Adjust only those controls that are covered
by the operating instructions as an improper adjustment of
other controls may result in damage and will often require
extensive work by a qualified technician to restore the product
to its normal operation.
e. If the product has been dropped or damaged in any way.
f.When the product exhibits a distinct change in performance this
indicates a need for service.
20. Replacement Parts - When replacement parts are required, be
sure the service technician has used replacement parts specified
by the manufacturer or have the same characteristics as the
original part. Unauthorized substitutions may result in fire, electric shock or other hazards.
21. Safety Check - Upon completion of any service or repairs to this
product, ask the service technician to perform safety checks to
determine that the product is in proper operating condition.
22. Heat - This product should be situated away from heat sources
such as radiators, heat registers, stoves, or other products
(including amplifiers) that produce heat.
Getting started
1. Read Instructions - All the safety and operating instructions
should be read before the appliance is operated.
2. Retain Instructions- The safety and operating instructions should
be retained for future reference.
3. Heed Warnings - All warnings on the appliance and in the operating instructions should be adhered to.
4. Follow Instructions - All operating and use instructions should
be followed.
5. Cleaning - Unplug this product from the wall outlet before
cleaning. Do not use liquid cleaners or aerosol cleaners. Use a
damp cloth for cleaning.
EXCEPTION:A product that is meant for uninterrupted service and, that for some specific reason, such as the possibility
of the loss of an authorization code for a CATV converter, is
not intended to be unplugged by the user for cleaning or any
other purpose, may exclude the reference to unplugging the
appliance in the cleaning description otherwise required in
item 5.
6.Attachments - Do not use attachments not recommended by
the product manufacturer as they may cause hazards.
7.Water and Moisture- Do not use this product near water, for
example, near a bath tub, wash bowl, kitchen sink, or laundry
tub, in a wet basement, or near a swimming pool, and the like.
8.Accessories - Do not place this product on an unstable cart,
stand, tripod, bracket, or table.The product may fall, causing serious injury to a child or adult, and serious damage to the appliance. Use only with a cart, stand, tripod, bracket, or table recommended by the manufacturer, or sold
with the product. Any mounting of the
appliance should follow the manufacturer's
instructions and should use a mounting
accessory recommended by the manufacturer. An appliance and cart combination
should be moved with care. Quick stops,
excessive force, and uneven surfaces may
cause the appliance and cart combination to overturn.
9.Ventilation - Slots and openings in the cabinet are provided for
ventilation and to ensure reliable operation of the product and
to protect it from overheating, and these openings must not be
blocked or covered.The openings should never be blocked by
placing the product on a bed, sofa, rug, or other similar surface.
This product should not be placed in a built-in installation such
as a bookcase or rack unless proper ventilation is provided or
the manufacturer's instructions have been adhered to.
10. Power Sources - This product should be operated only from the
type of power source indicated on the marking label. If you are
not sure of the type of power supply to your home, consult your
appliance dealer or local power company. For products intended to operate from battery power, or other sources, refer to the
operating instructions.
11. Grounding or Polarization - This product is equipped with a
polarized alternating-current line plug (a plug having one blade
wider than the other). This plug will fit into the power outlet
only one way.This is a safety feature. If you are unable to insert
the plug fully into the outlet, try reversing the plug. If the plug
should still fail to fit, contact your electrician to replace your
obsolete outlet. Do not defeat the safety purpose of the polarized plug.
12. Power Cord Protection - Power supply cords should be routed
so that they are not likely to be walked on or pinched by items
placed upon or against them, paying particular attention to cords
at plugs, convenience receptacles, and the point where they exit
from the appliance.
13. Outdoor Antenna Grounding - If an outside antenna or cable
system is connected to the product, be sure the antenna or
cable system is grounded so as to provide some protection
against voltage surges and built-up static charges.Article 810 of
the National Electrical Code,ANSI/NFPA No. 70, provides information with regard to proper grounding of the mast and sup-
Before you start
Precautions (cont’d)
Before you start
Precautions (cont’d)
Installation Location
For safety and optimum performance of this unit:
• Install the unit in a horizontal and stable position. Do not
place anything directly on top of the unit. Do not place
the unit directly on top of the TV.
• Shield it from direct sunlight and keep it away from
sources of intense heat. Avoid dusty or humid places.
Avoid places with insufficient ventilation for proper heat
dissipation. Do not block the ventilation holes on the
sides of the unit. Avoid locations subject to strong vibration or strong magnetic fields.
Avoid the Hazards of Electrical Shock and Fire
• Do not handle the power cord with wet hands.
• Do not pull on the power cord when disconnecting it
from AC wall outlet. Grasp it by the plug.
• If by accident water is spilled on this unit, unplug the
power cord immediately and take the unit to our
Authorized Service Center for servicing.
• Do not put your fingers or objects into the unit cassette
holder.
Moisture Condensation Warning
Moisture condensation may occur inside the unit when it is
moved from a cold place to a warm place, or after heating
a cold room or under conditions of high humidity. Do not
use this unit at least for 2 hours until its inside gets dry.
About Copyright
Unauthorized copying, broadcasting, public performance
and lending of discs are prohibited.
This product incorporates copyright protection technology that is protected by method claims of certain U.S.
patents and other intellectual property rights owned by
Macrovision Corporation and other rights owners. Use of
this copyright protection technology must be authorized
by Macrovision Corporation, and is intended for home and
other limited viewing uses only unless otherwise authorized by Macrovision Corporation. Reverse engineering or
disassembly is prohibited.
Notice for progressive scan outputs
Consumers should note that not all high definition television sets are fully compatible with this product and may
cause artifacts to be displayed in the picture. In case of
525 progressive scan picture problems, it is recommended
that the user switch the connection to the ‘standard definition output. If there are questions regarding our TV set
compatibility with this model 525p DVD recorder, please
contact our customer service center.
Symbol in this owner's manual
Many functions of this unit are depending on the disc type
or the recording mode.
To specify for what disc type or recording mode each
function is, we put the following symbols at the beginning
of each item to operate.
4
Description
Symbol
Available to DVD Video discs
DVD-V
Video
Available to DVD-RW in Video mode
DVD-RW
VR
DVD-RW
Available to DVD-RW in VR mode
DVD-R
Available to DVD-R discs
CD
Available to Audio CDs
VCD
Available to Video CDs
MP3
VCR
First:
(Press:)
DVD
First:
(Press:)
VCR
Available to CD-R/RW discs with
MP3 files
Available to VHS tapes
Use only
cassettes marked
with this unit.
Indicates that you need to select the DVD
mode by pressing DVD button on the
remote control before proceeding next step.
Indicates that you need to select the VCR
mode by pressing VCR button on the
remote control before proceeding next step.
Maintenance
SERVICING
• Please refer to relevant topics on the Troubleshooting
Guide on pages 97-100 before returning the product.
• If this unit becomes inoperative, do not try to correct the
problem by yourself.There are no user-serviceable parts
inside.Turn off, unplug the power plug, and please call our
help line mentioned on the front page to locate an
Authorized Service Center.
CLEANING THE CABINET
• Use a soft cloth slightly moistened with a mild detergent solution. Do
not use a solution containing alcohol, spirits, ammonia or abrasive.
CLEANING DISCS
• When a disc becomes dirty, clean it with a cleaning
cloth.Wipe the disc from the center out. Do not wipe in
a circular motion.
• Do not use solvents such as benzine, thinner, commercially available cleaners, detergent, abrasive cleaning
agents or antistatic spray intended for analogue records.
CLEANING THE DISC LENS
• If this unit still does not perform properly although you refer to
the relevant sections and to “TROUBLESHOOTING GUIDE”
in this Owner’s Manual, the laser optical pickup unit may be
dirty. Consult your dealer or an Authorized Service Center for
inspection and cleaning of the laser optical pickup unit.
DISC HANDLING
• Handle the discs so that fingerprints and dust do not
adhere to the surfaces of the discs.
• Always store the disc in its protective case when it is not used.
AUTO HEAD CLEANING
• Automatically cleans video heads as you insert or
remove a cassette, so you can see a clearer picture.
• Playback picture may become blurred or interrupted
while the TV program reception is clear. Dirt accumulated on the video heads after a long period of use, or the
usage of rental or worn tapes can cause this problem. If
a streaky or snowy picture appears during playback, the
video heads in the unit may need to be cleaned.
1. Please visit your local Audio/Video store and purchase a
good quality VHS Video Head Cleaner.
2. If a Video Head Cleaner does not solve the problem,
please call our help line mentioned on the front page to
locate an Authorized Service Center.
NOTES:
• Remember to read the instructions provided with the
video head cleaner before use.
• Clean video heads only when problems occur.
Before you start
Before you start . . . . . . . . . . . . . . . . . . .2
Connections . . . . . . . . . . . . . . . . . . . . .13
Getting started . . . . . . . . . . . . . . . . . . .16
Recording . . . . . . . . . . . . . . . . . . . . . . .26
.
.
.
.
.
.
.
.
.
.
.
.
.
.
.
.
.
.
.
.
.
.
.
.
.
.
.
.
.
.
.
.
.
.
.
.
.
.
.
.
.
.
.
.
.
.
.
.
.
.
.
.
.
.
.
.
.
.
.
.
.
.
.
.
.
.
.
.
.
.
.
.
.
.
.
.
.
.
.
.
.
.
.
.
.
.85
.86
.88
.90
.92
VCR functions . . . . . . . . . . . . . . . . . . .94
Others . . . . . . . . . . . . . . . . . . . . . . . . .97
Memo . . . . . . . . . . . . . . . . . . . . . . . . .105
Warranty Statement . . . . . . . . . . . . .106
5
Others
Troubleshooting . . . . . . . . . . . . . . . . . . . . . . . . .97
RF converter output . . . . . . . . . . . . . . . . . . . . .101
Language code . . . . . . . . . . . . . . . . . . . . . . . . .102
Glossary . . . . . . . . . . . . . . . . . . . . . . . . . . . . . . .103
Specifications . . . . . . . . . . . . . . . . . . . . . . . . . . .104
VCR functions
Playback . . . . . . . . . . . . . . . . . . . . . . . . . . . . . . .94
Recording and One-touch timer recording . . . .94
Recording . . . . . . . . . . . . . . . . . . . . . . . . . . . . . . . . .94
One-touch timer recording . . . . . . . . . . . . . . . . . . . .95
Search . . . . . . . . . . . . . . . . . . . . . . . . . . . . . . . . .95
Index Search . . . . . . . . . . . . . . . . . . . . . . . . . . . . . . .95
Time Search . . . . . . . . . . . . . . . . . . . . . . . . . . . . . . .96
Other operations . . . . . . . . . . . . . . . . . . . . . . . .96
Changing the SETUP menu
Information on DVD play . . . . . . . . . . . . . . . . . .43
Guide to displays . . . . . . . . . . . . . . . . . . . . . . . . . . .43
Basic playback . . . . . . . . . . . . . . . . . . . . . . . . . . .44
Playback . . . . . . . . . . . . . . . . . . . . . . . . . . . . . . . . . .44
Playing discs using the disc menu . . . . . . . . . . . . . . .46
Playing discs using the title menu . . . . . . . . . . . . . . .47
Special playback . . . . . . . . . . . . . . . . . . . . . . . . .48
Resume play . . . . . . . . . . . . . . . . . . . . . . . . . . . . . . .48
Fast forward / Fast reverse . . . . . . . . . . . . . . . . . . .48
Skipping TV commercials during playback . . . . . . . . .49
Pause . . . . . . . . . . . . . . . . . . . . . . . . . . . . . . . . . . . .49
Step by step playback . . . . . . . . . . . . . . . . . . . . . . . .50
Slow forward / Slow reverse play . . . . . . . . . . . . . . .50
Zoom . . . . . . . . . . . . . . . . . . . . . . . . . . . . . . . . . . .51
Marker Setup . . . . . . . . . . . . . . . . . . . . . . . . . . . . . .51
Search . . . . . . . . . . . . . . . . . . . . . . . . . . . . . . . . .52
Title/Chapter search . . . . . . . . . . . . . . . . . . . . . . . .52
Track search . . . . . . . . . . . . . . . . . . . . . . . . . . . . . .53
Time search . . . . . . . . . . . . . . . . . . . . . . . . . . . . . . .53
Tour of the SETUP menu
Language Settings . . . . . .
Display Settings . . . . . . . .
Audio Settings . . . . . . . . .
Parental Control Settings
Editing
Playing discs . . . . . . . . . . . . . . . . . . . . .43
Changing the SETUP menu . . . . . . . . .85
Playing discs
Information on DVD recording . . . . . . . . . . . . . .26
Information . . . . . . . . . . . . . . . . . . . . . . . . . . . . . . .26
Recording speed . . . . . . . . . . . . . . . . . . . . . . . . . . .26
Restrictions on recording . . . . . . . . . . . . . . . . . . . .26
Information on copy control . . . . . . . . . . . . . . . . . .27
Making discs playable in other DVD player (Finalize) 27
Formatting a disc . . . . . . . . . . . . . . . . . . . . . . . .28
Choosing the recording format of a blank disc . . . .28
Reformatting a disc . . . . . . . . . . . . . . . . . . . . . . . . .30
Basic recording . . . . . . . . . . . . . . . . . . . . . . . . . .31
Checking the recording picture quality . . . . . . . . . .32
One-touch timer recording . . . . . . . . . . . . . . . .33
Timer recording . . . . . . . . . . . . . . . . . . . . . . . . .34
Hints for timer recording . . . . . . . . . . . . . . . . . . . . .36
Settings for an external source . . . . . . . . . . . . . .37
Connection to an external source . . . . . . . . . . . . . .37
Recording from an external source . . . . . . . . . . . . .38
Dubbing Mode . . . . . . . . . . . . . . . . . . . . . . . . . . .39
Finalizing the discs . . . . . . . . . . . . . . . . . . . . . . .41
Setting a disc to protect . . . . . . . . . . . . . . . . . . .42
Information on disc editing . . . . . . . . . . . . . . . . .59
Guide to a title list . . . . . . . . . . . . . . . . . . . . . . . . . .59
Editing discs in Video mode . . . . . . . . . . . . . . . . . . .59
Editing discs in VR mode . . . . . . . . . . . . . . . . . . . . .60
Editing DVD-RW discs in Video mode . . . . . . . .61
Deleting titles . . . . . . . . . . . . . . . . . . . . . . . . . . . . .61
Putting names on titles . . . . . . . . . . . . . . . . . . . . . .62
Setting or clearing chapter markers . . . . . . . . . . . . .64
Editing DVD-RW discs in VR mode (Original) . .65
Deleting titles . . . . . . . . . . . . . . . . . . . . . . . . . . . . .65
Deleting parts of titles . . . . . . . . . . . . . . . . . . . . . . .66
Naming titles . . . . . . . . . . . . . . . . . . . . . . . . . . . . . .67
Setting or clearing chapter markers . . . . . . . . . . . . .69
Setting pictures for thumbnails . . . . . . . . . . . . . . . . .70
Title protection . . . . . . . . . . . . . . . . . . . . . . . . . . . .72
Releasing titles from protection . . . . . . . . . . . . . . . .73
Editing DVD-RW discs in VR mode (Playlist) . . .74
Deleting titles . . . . . . . . . . . . . . . . . . . . . . . . . . . . .74
Deleting parts of titles . . . . . . . . . . . . . . . . . . . . . . .75
Naming titles . . . . . . . . . . . . . . . . . . . . . . . . . . . . . .76
Setting or clearing chapter markers . . . . . . . . . . . . .78
Setting pictures for thumbnails . . . . . . . . . . . . . . . . .79
Adding titles to a Playlist . . . . . . . . . . . . . . . . . . . . .81
Deleting a Playlist . . . . . . . . . . . . . . . . . . . . . . . . . . .82
Editing DVD-R discs . . . . . . . . . . . . . . . . . . . . . .83
Deleting titles . . . . . . . . . . . . . . . . . . . . . . . . . . . . .83
Naming titles . . . . . . . . . . . . . . . . . . . . . . . . . . . . . .84
Recording
Easy DVD recording . . . . . . . . . . . . . . . . . . . . . .16
Channel settings . . . . . . . . . . . . . . . . . . . . . . . . .18
Getting channels automatically . . . . . . . . . . . . . . . . .18
Adding/deleting channels . . . . . . . . . . . . . . . . . . . . .19
Selecting TV stereo or SAP . . . . . . . . . . . . . . . .20
Setting the Clock . . . . . . . . . . . . . . . . . . . . . . . .21
Auto Clock Setting . . . . . . . . . . . . . . . . . . . . . . . . .21
Manual Clock Setting . . . . . . . . . . . . . . . . . . . . . . . .22
Setting the daylight saving time . . . . . . . . . . . . . . . .24
Selecting the TV aspect ratio . . . . . . . . . . . . . . .25
Editing . . . . . . . . . . . . . . . . . . . . . . . . .59
Getting started
Connection to a TV . . . . . . . . . . . . . . . . . . . . . . .13
Connection to a cable box or satellite box . . . .14
Connection to an Audio System . . . . . . . . . . . . .15
. . . . . . . .54
. . . . . . . . .54
. . . . . . . . .54
. . . . . . . . .55
. . . . . . . .56
. . . . . . . . .56
. . . . . . . . .57
. . . . . . . . .58
. . . . . . . . .58
Connections
Precautions . . . . . . . . . . . . . . . . . . . . . . . . . . . . . .2
Table of contents . . . . . . . . . . . . . . . . . . . . . . . . . .5
Features . . . . . . . . . . . . . . . . . . . . . . . . . . . . . . . .6
Functional overview . . . . . . . . . . . . . . . . . . . . . . .7
Installing batteries in the remote control . . . . . . . . . .9
Using a remote control . . . . . . . . . . . . . . . . . . . . . . .9
VCR/DVD recorder switching . . . . . . . . . . . . . . . . . . .9
SETUP/DISC/CD menu . . . . . . . . . . . . . . . . . . . . . . . .9
DISPLAY menu . . . . . . . . . . . . . . . . . . . . . . . . . . . .11
Repeat/Random/Program play . . . . . .
Repeat play . . . . . . . . . . . . . . . . . . . . . .
Random play . . . . . . . . . . . . . . . . . . . . . .
Program play . . . . . . . . . . . . . . . . . . . . .
Selecting audio and video formats . . .
Switching audio soundtrack . . . . . . . . . .
Switching subtitles . . . . . . . . . . . . . . . . .
Switching camera angles . . . . . . . . . . . . .
Reducing block noise . . . . . . . . . . . . . . .
Before you start
Table of contents
Before you start
Features
This unit not only plays DVD’s, CDs and VHS tapes but also offers features for you to record to DVD discs
and edit them after that.The following features are offered with this unit.
Recording
Editing
DVD mode VCR mode
This unit is compatible with both DVD-RW, which is rewritable
repeatedly, and DVD-R, which is available for recording once.
Also, this unit allows you to record to a video cassette tape.
You can choose either one for your convenience.
Up to 8 programs recording:
You can program the unit to record up to 8 programs, up
to a year in advance. Daily or weekly program recordings
are also available.
One-touch timer recording:
You can easily set a recording time as you prefer. Every
time the REC/OTR button on the remote control or the
RECORD button on the front panel is pressed during
recording, the recording time will be increased by 30 minutes up to 8 hours.The recording automatically stops
when the recording time you set is reached.
Dubbing mode:
You can copy a DVD disc to a videotape or copy a videotape to a DVD disc.This function will be possible only if
the DVD disc is not copy protected.
DVD mode
Setting/Clearing chapter markers:
You can easily add chapter markers anywhere in your
recordings for easy editing. (VR mode)
Making your own Playlist:
With the original remaining as it is, you can edit titles on
various playlists as you prefer.
Putting names on titles.
Setting pictures for thumbnails.
Setting/clearing chapter markers.
Deleting parts of titles, etc.
Protecting titles:
Turn the protection function ON to avoid editing or erasing titles.
DVD mode
REC MONITOR:
You can confirm the picture quality for recording in the
current recording speed which you set.
If you want to change the recording speed, press REC
SPEED button to set the desired recording mode.
Automatic Chapter marker setting:
Chapter markers will be put on recordings as you set in
SETUP menu before attempting to record.
Automatic Title menu making:
The unit makes title menus automatically when finalizing
the disc which is recorded in Video mode.
Automatic PLAYLIST making (VR mode):
A Playlist will be prepared from an Original list, so that
you can edit titles in a Playlist as you prefer.
The Original list is kept as it is.
Compatibility
DVD mode
Available for playing discs recorded in Video mode
on a regular DVD player (Video mode):
Discs recorded in Video mode can be played on regular DVD
players, including computer DVD drives compatible with
DVD-Video playback*.You will need to finalize the discs
recorded in Video mode to play in other DVD players.
* DVD-Video Format (Video mode) is a new format for recording on DVD-R/RW discs that was approved by the DVD Forum
in 2000. Adoption of this format is optional for manufactures of
DVD playback devices and there are DVD-Video players, DVDROM drives or other DVD playback devices that do not play
DVD-R/RW discs recorded in the DVD-Video Format.
Others
Progressive Scan system
Unlike conventional interlace scanning, the progressive scan
system provides less flickering and images in higher resolution than that of traditional television signals.
Play
DVD mode
Theater surround sound in your home:
When connecting the unit to an amplifier or a decoder which is
compatible with Dolby Digital, you are able to experience the
theater surround sound from discs which contain tracks recorded in Dolby Digital format.
Quickly search for what you want to watch:
You can easily find the part you want to watch using the search function. Search for a desired point on a disc by title, chapter, or time.
VCR mode
Quickly search for what you want to watch:
You can easily find the part you want to watch using the Index
search/Time search functions.An index mark will be assigned at
the beginning of each recording you make.With the Time search
function, you can go to a specific point on a tape by entering the
exact amount of time you wish to skip.
Manufactured under license from Dolby Laboratories. “Dolby” and the double-D symbol are trademarks of
Dolby Laboratories.
6
Before you start
Before you start
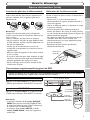
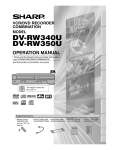
Functional overview
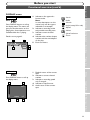
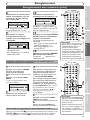
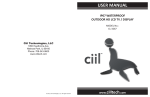
Front Panel
1
2
3
4
5
OPEN/CLOSE
POWER
REW
F.FWD STOP/EJECT
PLAY
DUBBING
VCR
STOP
PLAY
OUTPUT SELECT
CHANNEL
VCR
VIDEO
L - AUDIO - R
RECORD
16
1.
15 14 13 12 11 10 9 8
7
6
2 3
4 5
6
DVD
S-VIDEO
COMPONENT
VIDEO OUT
Y
CB
L
COAXIAL
IN
R
DVD/VCR
AUDIO IN AUDIO OUT ANTENNA
IN
L
L
R
R
VIDEO IN VIDEO OUT
OUT
CR
2.
3.
4.
5.
7.
7
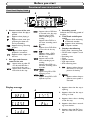
Note: Do not touch the inner pins of the jacks on the rear panel. Electrostatic discharge may cause permanent damage to the unit.
7
Others
6.
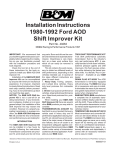
AC Power Cord (DVD/VCR)
Connect to a standard AC outlet to supply power to this unit.
S-VIDEO INPUT jack (LINE1) (DVD only)
Use to connect the S-Video output of external equipment with an S-Video cable (not supplied).
COMPONENT VIDEO OUTPUT jacks (DVD only)
Use to connect a TV monitor with component video
inputs with component video cables (not supplied).
AUDIO INPUT jacks (LINE1) (DVD/VCR)
Use to connect external equipment with standard
audio cables.
AUDIO OUTPUT jacks (DVD/VCR)
Use to connect a TV monitor, AV receiver or other
equipment with standard audio cables.
TV ANTENNA IN jack (DVD/VCR)
Use to connect an antenna.
TV ANTENNA OUT jack (DVD/VCR)
Use to connect an antenna cable to pass the signal
from the TV ANTENNA IN to your TV monitor.
9 8
VCR functions
useful only in
DVD mode.
8. VIDEO OUTPUT jack (DVD/VCR)
Use to connect a TV monitor, AV receiver or other
equipment with a standard video cable.
9. VIDEO INPUT jack (LINE1) (DVD/VCR)
Use to connect external equipment with a standard
video cable.
10. S-VIDEO OUTPUT jack (DVD only)
Use to connect the S-Video input of a TV monitor, AV
receiver or other equipment with an S-Video cable
(not supplied).
11. AUDIO OUTPUT jacks (DVD only)
Use to connect a TV monitor, AV receiver or other
equipment with standard audio cables.
12. COAXIAL DIGITAL AUDIO OUTPUT jack
(DVD only)
Use to connect an AV receiver, Dolby Digital decoder
or other equipment with a coaxial digital input with a
digital coaxial cable (not supplied).
12 11 10
Changing the SETUP menu
• These jacks are
OUT
1.
Editing
Rear Panel
DIGITAL
AUDIO
AUDIO OUT OUT
Playing discs
1
Recording
12. DVD SELECT indicator
This indicator lights up when the DVD output mode is selected.
13. VCR SELECT indicator
This indicator lights up when the VCR output mode is selected.
14. DUBBING button (DVD/VCR)
Press to start VCR to DVD (DVD to VCR) duplication
however you set it up in the SETUP menu.
15. CHANNEL L / K button (DVD/VCR)
Press to change the channel up and down.
16. Display (DVD/VCR)
Refer to “Front Panel Display Guide” on page 12.
17. Remote control sensor (DVD/VCR)
Receive signals from your remote control so that you
can control the unit from a distance.
18. RECORD button (VCR)
Press once to start a recording. Press repeatedly to
start a One-Touch Recording.
19. PLAY button (VCR)
Press to start playback.
20. STOP/EJECT button (VCR)
EJECTbutton-Press to remove the tape from the unit.
STOP button-Press to stop tape playback.
Press to stop the proceeding timer recording in VCR.
21. F.FWD button (VCR)
Press to rapidly advance the tape, or view the picture
rapidly in forward during playback. (Forward Search)
22. REW button (VCR)
Press to rewind the tape, or to view the picture rapidly
in reverse during playback mode. (Rewind Search)
Getting started
POWER button / indicator (DVD/VCR)
Press to turn the unit on and off.
If timer programmings have been set, press to set the
unit in timer-standby mode. Press to cancel the timer
standby mode, then turn the unit on.
The light besides the POWER button lights up when
power is on.
2. Cassette compartment (VCR)
Insert a tape here.
3. A OPEN/CLOSE button (DVD)
Press to open or close the disc tray.
4. OUTPUT SELECT { B button (DVD/VCR)
Press to select the component you wish to operate.
5. Disc tray (DVD)
Place a disc on the disc tray when it's open.
6. AUDIO INPUT jacks (LINE2) (DVD/VCR)
Use to connect external equipment with standard audio cables.
7. VIDEO INPUT jack (LINE2) (DVD/VCR)
Use to connect external equipment with a standard video cable.
8. S-VIDEO INPUT jack (LINE2) (DVD only)
Use to connect the S-Video output of external equipment with an S-Video cable (not supplied).
9. RECORD button (DVD)
Press once to start recording.
Press repeatedly to start a One-Touch Recording.
10. PLAY button (DVD)
Press to start or resume play.
11. STOP button (DVD)
Press to stop playback or recording.
Connections
RECORD
22 20 18
21 19 17
S-VIDEO
DVD
DVD
Before you start
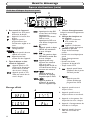
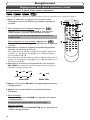
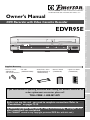
Functional overview (cont’d)
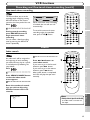
Remote Control
POWER
REC SPEED
AUDIO
.@/:
1
ABC
DEF
2
3
GHI
JKL
MNO
OPEN/CLOSE
1
2
15
4
5
6
PQRS
TUV
WXYZ
7
8
9
SPACE
CH
VIDEO/TV
SLOW
0
DISPLAY
4
14
VCR
DVD
18
19
PAUSE
3
21
PLAY
5
23
STOP
REC/OTR
6
7
8
SETUP
TIMER PROG.
MENU/LIST TOP MENU
10
12
9
11
CLEAR/C-RESET ZOOM
SEARCH
MODE
25
ENTER
REC MONITOR
CM SKIP
RETURN
SKIP
SKIP
16
17
27
28
29
20
22
24
26
30
13
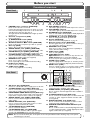
1. POWER button (DVD/VCR)
Press to turn the unit on and off.
If timer programmings have
been set, press to set the unit
in timer-standby mode. Press
to cancel the timer standby
mode, then turn the unit on.
2. Number buttons (DVD/VCR)
Press to select channel numbers.
Press to select a title/chapter/track on display or a TV
channel.
Also press to enter values for
the settings in the SETUP menu.
3. DISPLAY button (DVD/VCR)
Press to display or change the
on-screen display.
4. VCR button
Press to activate the remote
control in VCR mode. (Refer
to page 9)
Press to select the VCR output mode.
5. E button (DVD/VCR)
• DVD mode
During playback, press to play
fast reverse or during pause,
press to play slow reverse.
• VCR mode
Press to rewind the tape or
to view the picture rapidly in
reverse during playback
mode.
6. REC/OTR button (DVD/VCR)
Press once to start a recording. Press repeatedly to start
a One-Touch Recording.
8
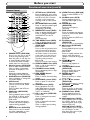
7. SETUP button (DVD/VCR)
Press to display the setup menu.
During DVD playback, press and
hold for more than 3 seconds
to switch to the progressive
scanning mode or the interlace
mode.
8. REC MONITOR button (DVD)
Press to check the video signal
to be recorded before
attempting a recording.
9. MENU/LIST button (DVD)
Press to display the Disc menu.
Press to change ORIGINAL
and PLAYLIST on the TV
screen.
(VR mode only)
10. TOP MENU button (DVD)
Press to display the top menu.
11. CLEAR/C-RESET button
(DVD/VCR)
• DVD mode
Press to clear the password once
entered, to cancel the programming for CD, to clear the selected marker number in the marker
setup mode or to clear the program once entered in the timer
recording setting mode,etc.
• VCR mode
Press to reset the tape counter.
12. SEARCH MODE button (VCR)
Press to call up the index or
time search menu.
13. CM SKIP button (DVD)
During playback, press to skip
30 seconds.
14. REC SPEED button
(DVD/VCR)
Press to switch the recording
speed.
15. OPEN/CLOSE A button (DVD)
Press to open or close the
disc tray.
16. AUDIO button (VCR)
During playback of a HiFi
video tape, press to change
the AUDIO OUT setting to
"Hi-Fi" or “MONO”.
17. CH K / L buttons (DVD/VCR)
• DVD mode
Press to change the channel
up and down.
• VCR mode
Press to change the channel
up and down.
Press to adjust tape tracking
during playback.
18. VIDEO/TV button (DVD/VCR)
Press to select VIDEO or TV
mode.
19. SLOW button (VCR)
During playback, press to
view the video tape in slow
motion.
20. PAUSE F button
(DVD/VCR)
Press to pause play or
recording.
21. DVD button
Press to activate the remote
control in DVD mode. (Refer
to page 9)
Press to select the DVD output mode.
22. PLAY B button
(DVD/VCR)
Press to start or resume play.
23. D button (DVD/VCR)
• DVD mode
During playback, press to play
fast forward.
• VCR mode
Press to rapidly advance the
tape or view the picture
rapidly in forward during playback.
24. STOP C button
(DVD/VCR)
Press to stop playback or
recording.
25. TIMER PROG. button
(DVD/VCR)
Press to display the timer
program setting menu.
26. ENTER button
(DVD/VCR)
Press to confirm or select
menu items.
27. K / L / { / B buttons
(DVD/VCR)
Press to select items or settings.
28. RETURN
button
(DVD/VCR)
Press to return to the previously displayed menu screen.
29. ZOOM button (DVD)
During playback, press to
enlarge the picture on the
screen.
30. SKIP H button (DVD)
During playback, press to skip to
the previous chapter or track.
Also during pause, press to play
reverse step by step.
SKIP G button (DVD)
During playback, press to skip to
the next chapter or track.
Also during pause, press to play
forward step by step.
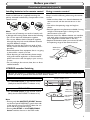
Before you start
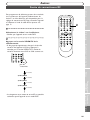
Install two AA batteries (supplied) matching the
polarity indicated inside battery compartment of the
remote control.
Keep in mind the following when using the remote
control:
• Make sure that there is no obstacle between the
remote control and the remote sensor on the
unit.
• Use within the operating range and angle as
shown.
• Remote operation may become unreliable if strong
sunlight or fluorescent light is shining on the
remote sensor of the unit.
• Remote control for different devices can interfere
with each other. Avoid using remote control for
other equipment located close to the unit.
• Replace the batteries when you notice a fall off in
the operating range of the remote control.
1
2
3
Recording
Within about
23feet (7m)
POWER
REW
F.FWD
STOP/E
JECT
PLAY
VCR
OPEN/C
LOSE
RECOR
D
DUBBIN
G
CHANN
EL
STOP
VCR
OUTPU
T SELECT
PLAY
DVD
DVD
RECOR
D
S-VIDE
O
VIDEO
L-
AUDIO
-R
60˚
Playing discs
Remote
control
REC
PAUS
k
E
h
REV
PLA
B Y
IP
P
SK
H
P
U/
MEN AL
GIN
STOC
G
TOP
ORI
g
K
PLA
R
NU
LIS
ME Y
ENTE
D
FW
T
Note:
Incorrect use of batteries can result in hazards such
as leakage and bursting. Please observe the following:
• Do not mix new and old batteries together.
• Do not use different kinds of batteries together,
although they may look similar, different batteries
may have different voltages.
• Make sure that the plus and minus ends of each
battery match the indications in the battery compartment.
• Remove batteries from equipment that is not going
to be used for a month or more.
• When disposing of used batteries, please comply
with governmental regulations or environmental
public instruction rules that apply in your country
or area.
• Do not recharge, short-circuit, heat, burn or disassemble batteries.
Getting started
Using a remote control
Connections
Installing batteries in the remote control
Before you start
Functional overview (cont’d)
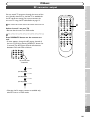
VCR/DVD recorder Switching
Editing
Because this product is a combination of a VCR and a DVD recorder, you must select first which component you wish to operate with the OUTPUT SELECT button.
OUTPUT SELECT button
VCR MODE
OPEN/CLOSE
POWER
REW
F.FWD STOP/EJECT
PLAY
DUBBING
VCR
STOP
OUTPUT SELECT
CHANNEL
VCR
RECORD
PLAY
DVD
S-VIDEO
VIDEO
POWER
REC SPEED
AUDIO
.@/:
1
ABC
DEF
RECORD
DVD MODE
VCR button
DVD button
Press the DVD button on the remote control.
(Verify that the DVD SELECT indicator is lit.)
OPEN/CLOSE
L - AUDIO - R
DVD
GHI
2
3
JKL
MNO
4
5
6
PQRS
TUV
WXYZ
7
8
9
SPACE
CH
VIDEO/TV
SLOW
0
DISPLAY
VCR
REC/OTR
SETUP
DVD
PAUSE
PLAY
OUTPUT SELECT
STOP
DVD
DVD SELECT
indicator
VCR SELECT
indicator
TIMER PROG.
ENTER
REC MONITOR
MENU/LIST TOP MENU
CLEAR/C-RESET ZOOM
SEARCH
MODE
VCR functions
VCR
RETURN
SKIP
SKIP
CM SKIP
Others
Note
• Pressing only the OUTPUT SELECT button
on the front panel DOES NOT switch the mode
of the remote control.You MUST select the correct mode on the remote control.
• Pressing the SETUP or the TIMER PROG.
button switches the unit to the DVD mode.
Changing the SETUP menu
Press the VCR button on the remote control.
(Verify that the VCR SELECT indicator is lit.)
9
Before you start
Functional overview (cont’d)
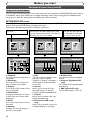
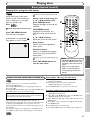
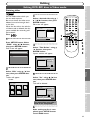
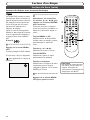
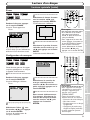
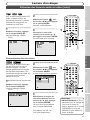
Guide to On Screen Menus
This unit uses the following types of on screen menus for most operations. SETUP/DISC/CD menu,Title list,
and DISPLAY menu, which allows you to change the playing status of disc during play.The DISPLAY menu
also gives you some disc information for checking the status of the disc.
SETUP/DISC/CD menu
Press SETUP button to display the setup main menu, then choose either SETUP/DISC/CD by pressing { / B
buttons.Then, press ENTER button to display each menu.
These menus provide entry to all main functions of the unit.
“DISC” is available only when a DVD-R/RW disc is
inserted into the unit. When playing back a DVDVideo disc (commercially available) or the finalized
DVD-R disc, you cannot select “DISC”.
“SETUP” is available only in the
Stop mode.
Setup Menu
Disc Setting
Setup
1
2
3
5
6
CD Playback Mode
Disc
CD Playback Mode
Edit
Random Play
Format
Program Play
Finalize
Disc Protect OFF
4
“CD” is available only when an
Audio CD disc,Video CD disc
or a CD-R/RW disc with MP3
files is inserted into the unit.
PBC (Video CD only)
OFF
ON
1 2 3 4
1 2 3
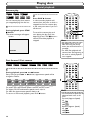
Playback Setting
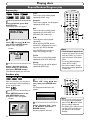
1. Playback:
To set up the unit to play discs as
you prefer.
2. Recording:
To set up the unit to record to
discs or tapes as you prefer.
3. Display:
To set up the OSD screen of the
unit as you prefer.
4. Select Video:
To choose a line input to record
to DVD discs from other video
equipment.
5. Clock:
To set up the clock of the unit as
you need.
6. Channel:
To adjust the channel setting of
the unit as you prefer.
10
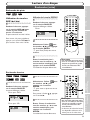
1. Edit:
Turns on a title list, (When a disc
with VR mode is inserted,
'Original' or 'PlayList' is available.),
which shows the recorded titles
on the disc.
2. Format:
Allows you to erase all of the
recorded content on the disc.
The disc will be completely blank.
3. Finalize:
Allows you to finalize a disc containing recorded titles.
4. Disc Protect (VR mode
only) :
Allows you to protect a disc from
accidental editing or recording.
1. Random Play:
To activate the random playback
feature.
2. Program Play(Audio CD
only):
To activate the programmed playback feature.
3. PBC (Video CD only):
To turn PBC function on or off.
Before you start
Before you start
Functional overview (cont’d)
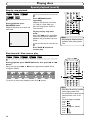
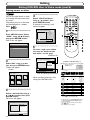
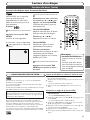
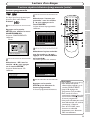
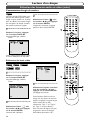
DISPLAY menu
DVD
Details are on page 43.
4
1
1
1
00:00:00
DVD-RW
: Search
: Audio
: Subtitle
: Angle (except VR mode)
: Repeat
: Marker
Getting started
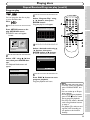
Press DISPLAY button to call up
the display menu.This menu will
give you the information on the
playing disc. Some operations are
available while disc is playing.
1. Indicates a disc type and a
format mode.
Note:
In some descriptions on this
manual, only one disc type is
indicated as an example.
2. Indicates a recording mode
and possible recording time.
3. Indicates current channel
number.
4. Indicates title number, chapter
number and the time elapsed
of disc play.
5. Each icon means:
Connections
DVD mode
First:
: Noise Reduction
: Zoom
Video mode
CH 1
2
3
Recording
SP 1:25 Rem.
5
Playing discs
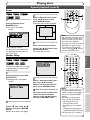
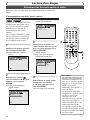
VCR
Press DISPLAY button to call up
the display menu.
2
CH21
0:00:00
HIFI
3
4
5
VCR functions
SP
Changing the SETUP menu
1
1. Playback status of the current
tape.
2. Indicates a current channel
number.
3. Indicates a recording speed
only 5 seconds.
4. Indicates a Tape Counter.
5. Audio status of the current
tape.
Editing
VCR mode
First:
Others
11
Before you start
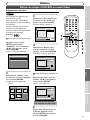
Functional overview (cont’d)
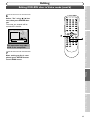
Front Panel Display Guide
4
2
1
3
7
6
5
1. Current status of the unit
: Appears when disc play is
paused.
: Appears when playing a
disc.
: Appears when timer programming has been set
and is proceeding.
: Appears during recording
process.
:
Appears when repeat
playback is turned on.
: Appears when a tape is in
the unit.
: Appears when a DVD disc
is inserted in the disc tray.
Appears when a DVD
timer recording is proceeding.
Appears when DVD is in
the timer recording standby mode.
:
Appears when a DVD-R disc
is inserted in the disc tray.
:
Appears when a DVDRW disc is inserted in
the disc tray.
: Appears when a VCR
timer recording is proceeding.
Appears when VCR is in
the timer recording standby mode.
:
Appears during VCR to DVD
duplication process.
:
Appears during DVD to VCR
duplication process.
2. Disc type and Current
status of the unit
: Appears when an audio CD
or a disc with MP3 files is
inserted in the disc tray.
: Appears when a video CD is
inserted in the disc tray.
Display message
1
4
3. Recording speed
Indicates the recording speed of
the disc.
4. Title/Track and Chapter
mark
: Appears when indicating
a title/track number.
: Appears when indicating
a chapter number.
5. Displays the following
• Playing time / remaining time
• Current title / chapter / track
number
• Recording time
• Clock
• Channel number
• VCR tape counter
• OTR remaining time
6.
: Appears when the current time is in the 'pm'
portion of the day.
7.
:
Appears when the progressive scan system is
activated.
1. Appears when the disc tray is
opening.
2. Appears when the disc tray is
closing or close.
2
3
5
3. Appears when a disc is loading
in the disc tray.
4. Appears when data is recording onto the disc.
5. Appears when the PBC function of a video CD is activated.
12
Connections
Before you start
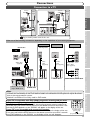
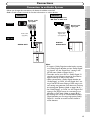
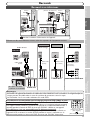
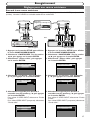
Connection to a TV
Antenna
Antenna
(Back of TV)
Cable
Signal
(Back of TV)
Cable
Signal
3
or
Connect
RF Cable
(supplied)
Connections
or
1
Disconnect
DIGITAL
AUDIO
AUDIO OUT OUT
DVD
S-VIDEO
COMPONENT
VIDEO OUT
Y
CB
L
COAXIAL
IN
R
R
VIDEO IN VIDEO OUT
2
OUT
CR
Getting started
R
DVD/VCR
AUDIO IN AUDIO OUT ANTENNA
IN
L
L
Connect
OUT
(Back of this unit)
4 Plug in the AC power cord of this unit.
Make one of the following connections, depending on the capabilities of your existing equipment.
Method 2
Better picture
Method 3
Recording
Basic Audio
Method 1
Good picture
Best picture
TV
AUDIO IN
VIDEO IN
COMPONENT
VIDEO IN
S-VIDEO IN
Y
CB
Playing discs
CR
Video
cable
(supplied)
Audio cable
(supplied)
S-Video
cable
(not supplied)
Component
Video cables
(not supplied)
This unit
DVD
DVD/VCR
AUDIO OUT
COMPONENT
VIDEO OUT
OUT
Y
CB
L
L
IN
R
R
S-VIDEO
Y
L
DVD/VCR
AUDIO IN AUDIO OUT ANTENNA
IN
L
L
CB
R
R
VIDEO IN VIDEO OUT
COMPONENT
VIDEO OUT
DVD
Editing
T
DVD
AUDIO
S-VIDEO
DVD/VCR
OUT
VIDEO OUT
CR
OUT
CR
OUT
or
DVD
AUDIO
OUT
DVD
S-VIDEO
COMPONENT
VIDEO OUT
Y
CB
L
COAXIAL
IN
R
VIDEO OUT
S-VIDEO OUT
COMPONENT VIDEO OUT
DVD/VCR
AUDIO IN AUDIO OUT ANTENNA
IN
L
L
R
L
R
VIDEO IN VIDEO OUT
Changing the SETUP menu
DIGITAL
AUDIO
AUDIO OUT OUT
OUT
CR
OUT
R
• These jacks are useful
only in DVD mode.
AUDIO OUT
Note
VCR functions
• Connect this unit directly to the TV. If the A/V cables are connected to a VCR, pictures may be distorted
due to the copy protection system.
• Method 2 and method 3 are only useful in DVD mode.
PLAY
STOP
REC/OTR
SETUP
REC MONITOR
MENU/LIST TOP MENU
TIMER PROG.
ENTER
RETURN
Others
If your TV is compatible with 525p (480p) progressive scanning and you want
to enjoy that high quality picture;
You must select the connection Method 3 above and progressive scanning mode.To set
the mode, press and hold the SETUP button on the remote control for more than 3 seconds during DVD playback, so that “P.SCAN” will appear on the display of this unit.
If your TV is not compatible with progressive scanning;
Use this unit in interlace mode. Make sure that no “P.SCAN” is on the display of this unit.
If not, press and hold the SETUP button on the remote control for more than 3 seconds
during DVD playback, so that “P.SCAN” on the display of this unit will disappear.
more than 3 seconds
during DVD playback
[Interlace mode]
[Progressive scanning mode]
13
Connections
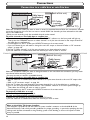
Connection to a cable box or satellite box
Connection A
(Cable box or
Satellite box)
IN
(Back of this unit)
DVD/VCR
OUT
ANTENNA
IN
OUT
RF Cable
Cable
Signal
E
(supplied)
(Back of TV)
Select this connection when you want to view or record a scrambled channel.With this connection, channels
cannot be changed on this unit.You can view or record ONLY the channels you have selected on the cable
box or the satellite box.
• While you are recording, only the recorded channel can be viewed.
To select channels on the cable box or satellite box
1) Turn on this unit by pressing POWER button.The “POWER” indicator on the front panel will light up.
Then, press the CHANNEL buttons to select channel 3 or 4 (the same channel as the output channel of
the cable box or satellite box).
• If noise appears on the TV screen, press VIDEO/TV button on the remote control.
• If you use channel 4, you will need to change this unit’s RF output to channel 4. Refer to “RF converter
output” on page 101.
2) On the TV, select channel 3 or 4 (the same channel as you have selected at step 1).
3) On the cable box or satellite box, select the channel you want to view or record.
(Back of this unit)
Connection B
DVD/VCR
ANTENNA
IN
Cable
Signal
OUT
(Cable box or
Satellite box)
IN
RF Cable (supplied)
E
OUT
RF Cable
(Back of TV)
Select this connection when you want to change channels on this unit.With this connection, you may watch
one channel while recording another.
• You may not view or record a scrambled channel.
To select channels on the cable box or satellite box
1) On the cable box or satellite box, select channel 3 or 4 (the same channel as this unit’s RF output channel.)
• Refer to “RF converter output” on page 101.
2) On the TV, select the same channel as the output channel (3 or 4) of the cable box or satellite box.
3) Turn on this unit by pressing POWER button. The “POWER” indicator on the front panel will light up.
Then, select the channel you want to view or record.
• If noise appears on the TV screen, press VIDEO/TV button on the remote control.
To playback a DVD disc or a tape
• Refer to “Playback” on pages 44-45, 94.
To view one channel while recording another
1) While you are recording on this unit, press VIDEO/TV button.
2) On the cable box or satellite box, select the channel you want to view.
Note to the Cable TV System Installer :
This reminder is provided to call the Cable TV system installer’s attention to Article 820-40 of the
National Electrical Code, which provides guidelines for proper grounding - in particular, specifying that the
cable ground shall be connected to the grounding system of the building, as close to the point of cable
entry as possible.
14
Connections
Before you start
Connection to an Audio System
• When you change the connections, all devices should be turned off.
• Refer to each owner’s manual for further information on other devices.
Method 1
Method 2
Stereo system
Analog audio
input jacks
AUDIO
COAXIAL
Connections
Dolby Digital decoder,
MD deck or DAT deck
Digital audio
input jack
Getting started
Audio Coaxial
Digital cable
(not supplied)
Audio cable
(supplied)
This unit
DVD/VCR
AUDIO OUT
AUDIO OUT
L
DIGITAL
AUDIO OUT
Recording
R
DVD
DIGITAL
AUDIO OUT
COAXIAL
or
DVD
AUDIO
OUT
R
Editing
Changing the SETUP menu
VCR functions
Note
• If output is Dolby Digital encoded audio, connect
to a Dolby Digital decoder, and set “Dolby Digital”
to “Stream” for the “Digital Out” setting in the
SETUP menu. (Refer to pages 90-91.)
• The audio source on a disc in a Dolby Digital 5.1
channel surround format cannot be recorded as
digital sound by an MD or DAT deck.
• Unless connected to a Dolby Digital decoder, set
“Dolby Digital” to “PCM” for the “Digital Out” setting in the SETUP menu. Playing a DVD using incorrect settings may generate noise distortion, and may
also damage the speakers. (Refer to pages 90-91.)
• Set “Dolby Digital” to “PCM” for the “Digital Out”
setting in the SETUP menu for connecting to an
MD deck or DAT deck. (Refer to pages 90-91.)
• By hooking this unit up to a Multi-channel Dolby
Digital decoder, you can enjoy high-quality Dolby
Digital 5.1 channel surround sound as heard in
movie theaters.
Playing discs
L
Others
15
Getting started
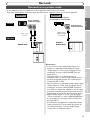
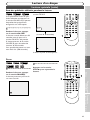
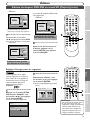
Easy DVD recording
The following will help you to understand easily how to record to DVD discs.
Note:
Make sure batteries are in the remote control and you have connected this unit and the TV correctly.
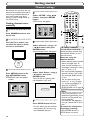
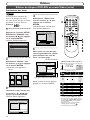
Step 1: Choose a disc type
Step 2: Insert a blank disc
Remote Control
There are several types of recordable DVD discs
to choose from. Choose a recordable DVD disc
type based on your playing/recording/editing
requirements. See “DVD disc type” below.
This unit can record on the following type of
discs.
POWER
REC SPEED
.@/:
1
ABC
2
3
GHI
JKL
MNO
4
5
6
1
Turn on
the unit
For example, when you want to record repeatedly on the same disc or when you want to edit the
disc after recording, select the rewritable DVDRW type disc.
When you want to save recordings without any
alteration, a non-rewritable DVD-R can be your
choice.
POWER
REC SPEED
AUDIO
.@/:
1
ABC
DEF
2
3
GHI
JKL
MNO
AUDIO
OPEN/CLOSE
2
Open the
disc tray
DEF
CH
OPEN/CLOSE
3
Close the
disc tray
CH
Loading
This operation may take a
while to be recognized.
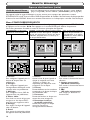
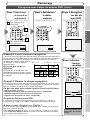
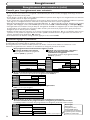
DVD disc types
.
: Most suitable.
: Can be used.
Format the disc
: Some functions are limited.
You want to
DVD-RW VR
: Cannot be used.
DVD-RW Video
DVD-R
DVD-RW Video
DVD-R
Record TV programs
Reuse by deleting unwanted contents
Edit recorded contents
Edit/Record from connected equipment
Copy discs for distribution
*1
Play on other DVD equipment
*1
Features
DVD-RW VR
Recording
Rewritable?
Yes
Yes
No
Can create chapters at fixed intervals (auto.)
Yes
Yes
Yes
Can create chapters wherever you like (manual)
Yes
No
No
Can record 16:9 size pictures
Yes
Yes
Yes
Can record Copy-Once programs
Yes
No
No
Can perform basic edit functions
Yes
Yes
Yes
Can perform advanced edit functions (Playlist edit)
Yes
No
No
Editing
*1
16
DVD-RW (VR mode) can only be played on DVD
equipment that is VR compatible.
Note:
For details of the above functions and implied
restrictions, see the explanations inside the manual.
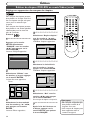
Insert the disc in the unit.
Then, format the disc from
SETUP menu.Video format
(Video mode) or Video
recording format (VR mode)
will be available depending on
the disc type inserted.This is
necessary to prepare the disc
for recording. Details are on
pages 28-30.
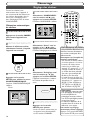
Getting started
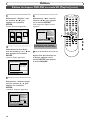
1
Step 4: Select the
desired
channel
Step 5: Record to
DVD discs
To select the DVD mode
1
2
3
GHI
JKL
MNO
4
5
6
PQRS
TUV
WXYZ
8
9
7
SPACE
Connections
Step 3: Select the
Recording
speed
CH
VIDEO/TV
SLOW
0
VCR
DISPLAY
REC SPEED
AUDIO
.@/:
1
ABC
DEF
2
3
GHI
JKL
MNO
4
5
6
PQRS
TUV
WXYZ
8
9
7
SPACE
OPEN/CLOSE
2
POWER
REC SPEED
AUDIO
.@/:
1
ABC
DEF
2
3
GHI
JKL
MNO
4
5
6
PQRS
TUV
WXYZ
8
9
2
VCR
CH
VIDEO/TV
7
SPACE
SLOW
DVD
PAUSE
OPEN/CLOSE
PLAY
STOP
CH
REC/OTR
VIDEO/TV
SETUP
TIMER PROG.
ENTER
REC MONITOR
SLOW
MENU/LIST TOP MENU
RETURN
0
0
DISPLAY
PAUSE
Getting started
POWER
DVD
Before you start
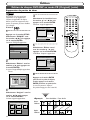
Easy DVD recording (Cont’d)
DISPLAY
1
VCR
DVD
PAUSE
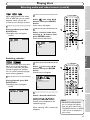
To select the recording
speed
CH 1
Recording
SP 2:01 Rem.
I
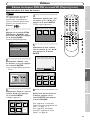
Hint 1: Play the recorded contents
What are titles and chapters?
Title 2
7
TUV
WXYZ
8
9
SPACE
VIDEO/TV
SLOW
0
DISPLAY
Chapter 1 Chapter 2 Chapter 3 Chapter 1 Chapter 2
VCR
DVD
PAUSE
Editing
The contents of DVD disc are generally
divided into titles.Titles may be further
subdivided into chapters.
Step 6: Stop the
Record
PQRS
Title 1
Playing discs
You can select the title you want to play from a displayed menu and immediately start to play. Recorded contents are very accessible on a disc, the procedure is really simple as you choose a
title on a chapter from the menu
Start Rec.
Stop/Start
Stop Rec.
screen.
PLAY
STOP
REC/OTR
REC MONITOR
TIMER PROG.
ENTER
Changing the SETUP menu
Hint 2: Edit the recorded disc
SETUP
You will find editing discs is very easy and the unit offers convenient edit functions, which are possible only with DVD-R/RW discs.
You can edit the following from a title list.
58%
Writing to Disc
VCR functions
• Putting names on titles
• Setting pictures for thumbnails (VR mode)
• Setting/clearing chapter markers
• Deleting parts of titles (VR mode)
Original and Playlist (VR mode)
You can edit the recordings in Playlist without changing the original recordings. A Playlist does not take up much disc space.
What “Original” or “Playlist” is for?
Others
Throughout this manual, you will find Original and Playlist to refer to the actual
content and the edited version.
• Original content refers to what’s actually recorded on the disc.
• Playlist content refers to the edited version of the disc; how the Original
content is to be played.
This operation may
take a while to be
completed.
17
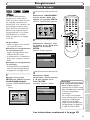
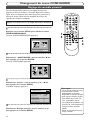
Getting started
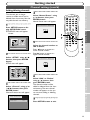
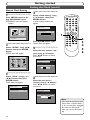
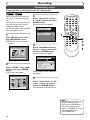
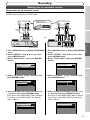
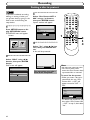
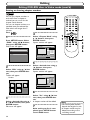
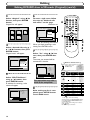
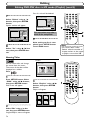
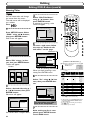
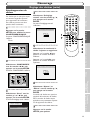
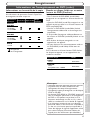
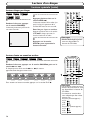
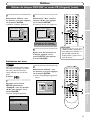
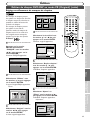
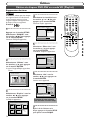
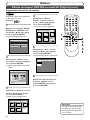
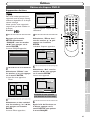
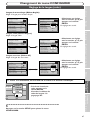
Channel settings
All channels are stored in the unit
when purchased.We recommend
that you get available channels in
your area stored using “Auto
Preset” in the Channel Preset of
the SETUP menu.
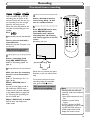
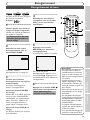
4
Select “SETUP” using { / B
buttons, then press ENTER
button.
SETUP menu will appear.
Getting channels automatically
1
POWER
REC SPEED
AUDIO
.@/:
1
ABC
DEF
2
3
GHI
JKL
MNO
4
5
6
PQRS
TUV
WXYZ
8
9
7
SPACE
OPEN/CLOSE
CH
VIDEO/TV
SLOW
0
Setup
DISPLAY
DVD
VCR
PAUSE
PLAY
1
Press POWER button to turn
on the unit.
3
7
Playback Setting
STOP
REC/OTR
SETUP
TIMER PROG.
ENTER
REC MONITOR
RETURN
MENU/LIST TOP MENU
CLEAR/C-RESET ZOOM
2
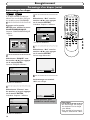
Turn the TV on and be sure
to select the input to which
the unit is connected.
SEARCH
MODE
5
Select “Channel” using K / L
/ { / B buttons, then press
ENTER button.
Channel Preset menu will appear.
Setup > Channel Preset
VCR
DVD
Auto Preset
Manual Preset
TV Audio Select
Stereo
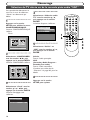
6
3
Press SETUP button to display SETUP/DISC menu.
SETUP/DISC menu will appear.
Screen:
Select “Auto Preset” using K
/ L buttons, then press
ENTER button.
The unit will start getting channels available in your area.
CH 18
SKIP
SKIP
CM SKIP
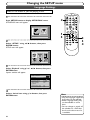
4
5
6
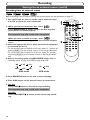
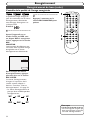
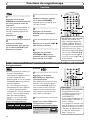
To select a channel
You can select a channel by
directly entering channel using
the Number buttons on the
remote control.
Notes for using the
Number buttons:
• When selecting cable channels
which are higher than 99,
enter channel numbers as a
three-digit number.(For example: 117, press 1,1,7)
• You must precede single-digit
channel numbers with a zero
(For example: 02, 03, 04 and
so on).
• You can select the line input
mode (“L1” or “L2”).To select
“L1” by pressing [0],[0],[1].To
select “L2” by pressing
[0],[0],[2].Details are on page 38.
Auto Presetting Now
Note
Setup Menu
7
Press SETUP button to exit.
•You can select only the channels
memorized in this unit by using
the CHANNEL buttons.
18
• If the auto presetting is cancelled during presetting, some
channels not yet preset may
not be received.
• The selection will depend on
how you receive the TV channels.
To cancel the auto presetting during scanning:
Press RETURN button or
SETUP button to cancel.
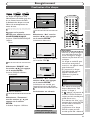
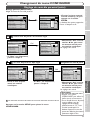
Getting started
Before you start
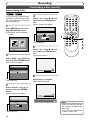
Channel settings (cont’d)
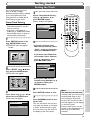
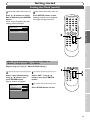
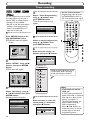
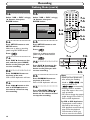
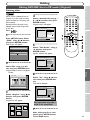
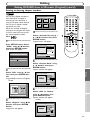
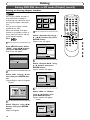
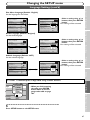
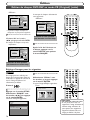
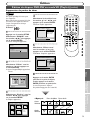
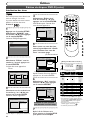
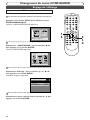
Adding/deleting channels
4
Select “Manual Preset” using
K / L buttons, then press
ENTER button.
Manual Preset menu will appear.
1
POWER
REC SPEED
.@/:
1
ABC
2
3
GHI
JKL
MNO
4
5
6
TUV
WXYZ
8
9
SPACE
DISPLAY
SLOW
DVD
VCR
PAUSE
PLAY
1
7
STOP
REC/OTR
SETUP
TIMER PROG.
ENTER
REC MONITOR
5
CLEAR/C-RESET ZOOM
SKIP
SKIP
Playing discs
Select “SETUP” using { / B
buttons, then press ENTER
button.
SETUP menu will appear.
CM SKIP
2
3
4
5
6
Recording
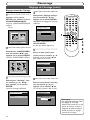
Select the channel number to
add or delete.
Press { button to move to a
lower channel number.
Press B button to move to a
higher channel number.
SEARCH
MODE
RETURN
Getting started
CH2
Add
Delete
MENU/LIST TOP MENU
2
CH
VIDEO/TV
0
Press SETUP button to display SETUP/DISC menu.
SETUP/DISC menu will appear.
Screen:
Setup Menu
OPEN/CLOSE
DEF
PQRS
7
Setup > Channel Preset > Manual Preset
AUDIO
Connections
The channels you no longer
receive or seldom watch can be
deleted from the memory.You also
may add channels into memory.
Setup > Channel Preset > Manual Preset
CH18
Add
Delete
Setup
Select “Channel” using K / L
/ { / B buttons, then press
ENTER button.
Channel Preset menu will appear.
DVD
Auto Preset
Manual Preset
TV Audio Select
VCR functions
VCR
Select “Add” or “Delete”
using K / L buttons, then
press ENTER button.
The channel number will be
added or deleted from the channel memory.The next channel
number will appear so that you
can continue adding or deleting
channels.
Changing the SETUP menu
3
Setup > Channel Preset
Editing
6
Playback Setting
Stereo
7
Press SETUP button to exit.
Others
19
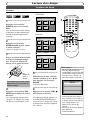
Getting started
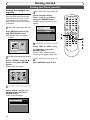
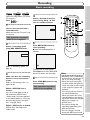
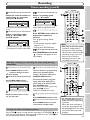
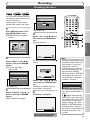
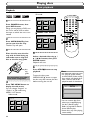
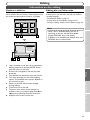
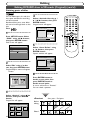
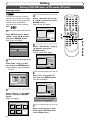
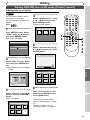
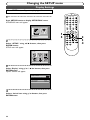
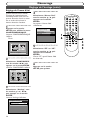
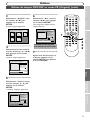
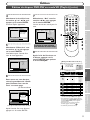
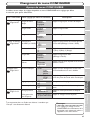
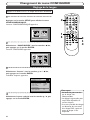
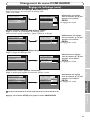
Selecting TV stereo or SAP
You can select a sound channel to
output from TV. “Stereo” has
been selected as the default.
1
Press SETUP button to display SETUP/DISC menu.
SETUP/DISC menu will appear.
Screen:
4
Select “TV Audio Select”
using K / L buttons, then
press ENTER button.
Option window will appear.
Setup > Channel Preset
VCR
POWER
REC SPEED
.@/:
1
ABC
2
3
GHI
JKL
MNO
4
5
6
TUV
WXYZ
8
9
SPACE
Auto Preset
CH
VIDEO/TV
SLOW
0
Manual Preset
TV Audio Select
OPEN/CLOSE
DEF
PQRS
7
DVD
AUDIO
DISPLAY
DVD
VCR
PAUSE
Stereo
Stereo
SAP
PLAY
1
6
5
Setup Menu
Select “Stereo” or “SAP”
using K / L buttons, then
press ENTER button.
2
Select “SETUP” using { / B
buttons, then press ENTER
button.
SETUP menu will appear.
Setup
Stereo:
Outputs main-audio.
SAP:
(Secondary Audio Program)
Outputs sub-audio.
Refer to the item in “Glossary”
on page 103 for more information.
6
Playback Setting
Press SETUP button to exit.
3
Select “Channel” using K / L
/ { / B buttons, then press
ENTER button.
Channel Preset menu will appear.
Setup > Channel Preset
VCR
DVD
Auto Preset
Manual Preset
TV Audio Select
20
Stereo
STOP
REC/OTR
SETUP
TIMER PROG.
ENTER
REC MONITOR
MENU/LIST TOP MENU
CLEAR/C-RESET ZOOM
SEARCH
MODE
CM SKIP
RETURN
SKIP
SKIP
2
3
4
5
Getting started
Before you start
Setting the Clock
Auto Clock Setting
4
Select “Auto Clock Setting”
using K / L buttons, then
press ENTER button.
Option window will appear.
Setup > Clock
POWER
REC SPEED
.@/:
1
ABC
2
3
GHI
JKL
MNO
4
5
6
TUV
WXYZ
8
9
SPACE
Clock Setting
Auto Clock Setting
Daylight Saving Time
CH
VIDEO/TV
SLOW
0
OFF
Auto
Auto
Manual
Off
DISPLAY
DVD
VCR
PAUSE
PLAY
1
6
1
STOP
REC/OTR
SETUP
TIMER PROG.
ENTER
REC MONITOR
MENU/LIST TOP MENU
5
CLEAR/C-RESET ZOOM
SEARCH
MODE
• If you do not know your
PBS channel number, select
“Auto” using K / L buttons,
then press ENTER button.
CM SKIP
RETURN
SKIP
SKIP
2
3
4
5
Setup Menu
Setup > Clock
Clock Setting
2
Auto Clock Setting
Daylight Saving Time
VCR DVD
OFF
Set Channel
No.
Auto
Auto
CH1
Manual
Off
Editing
Select “SETUP” using { / B buttons, then press ENTER button.
SETUP menu will appear.
Playing discs
• If you know your PBS channel number, select “Manual”
using K / L buttons, then
press ENTER button.
Recording
Press SETUP button to display SETUP/DISC menu.
SETUP/DISC menu will appear.
Screen:
OPEN/CLOSE
DEF
PQRS
7
VCR DVD
AUDIO
Getting started
Make sure
• The antenna/cable TV connections are correct.
• If this unit is connected to a
Cable Box or Satellite Box, select
the local PBS station on them to
set the clock automatically.
7
Connections
Set the clock before you try the
timer recording. If a Public
Broadcasting Station (PBS) is available
in your area, follow Auto Clock
Setting below. If not, follow Manual
Clock Setting on pages 22-23.
Setup
Playback Setting
6
3
Press SETUP button to exit.
Setup > Clock
VCR DVD
Clock Setting
Auto
Daylight Saving Time
ON
Press POWER button to turn
off the unit.
This unit will search for the time
only when the power is off. Leave
it off for several minutes to give
this unit time to set the clock on
the display of the front panel.
21
Others
Auto Clock Setting
7
VCR functions
Select “Clock” using K / L / { / B
buttons, then press ENTER button.
Clock menu will appear.
Note
• The clock may set itself automatically after you connect the
antenna/cable signal to this
unit and plug in the power
cord. In this case, the current
time will appear on the display
on the front panel.
• If the current time is not displayed or the displayed time is
not correct, set the clock
manually.
Changing the SETUP menu
Enter your PBS channel
number using Number or K
/ L buttons, then press
ENTER button.
Getting started
Setting the Clock (cont’d)
Manual Clock Setting
4
1
Press SETUP button to display SETUP/DISC menu.
SETUP/DISC menu will appear.
Screen:
Select “Clock Setting” using
K / L buttons, then press
ENTER button.
A clock setting window will
appear.
POWER
REC SPEED
.@/:
1
ABC
2
3
GHI
JKL
MNO
AUDIO
DEF
4
5
6
PQRS
TUV
WXYZ
8
9
7
SPACE
Setup > Clock
OPEN/CLOSE
CH
VIDEO/TV
SLOW
0
VCR DVD
DISPLAY
DVD
VCR
PAUSE
Clock Setting
Auto Clock Setting
Auto
Daylight Saving Time
ON
---/--/----(---)
--:--
PLAY
1
STOP
REC/OTR
SETUP
Setup Menu
TIMER PROG.
ENTER
REC MONITOR
MENU/LIST TOP MENU
Press ENTER button again.
Default date will appear.
2
Select “SETUP” using { / B
buttons, then press ENTER
button.
SETUP menu will appear.
Setup
CLEAR/C-RESET ZOOM
SEARCH
MODE
5
Enter the date (month / day /
year) using K / L buttons.
Press { / B buttons to move
the cursor.
Setup > Clock
CM SKIP
RETURN
SKIP
SKIP
2
3
4
5
6
VCR DVD
Clock Setting
Auto Clock Setting
Auto
Daylight Saving Time
ON
JAN / 12 / 2004 (MON)
12 : 00AM
Playback Setting
3
Select “Clock” using K / L /
{ / B buttons, then press
ENTER button.
Clock menu will appear.
Setup > Clock
VCR DVD
6
Enter the time (hour /
minute) using K / L buttons.
Press { / B buttons to move
the cursor.
Clock Setting
Auto Clock Setting
Auto
Daylight Saving Time
ON
Setup > Clock
VCR DVD
Clock Setting
Auto Clock Setting
Auto
Daylight Saving Time
ON
JAN / 12 / 2004 (MON)
09 : 24 AM
Note
• Your clock setting will be lost if
either there is a power failure
or this unit has been unplugged
for more than 30 seconds
when you set the clock manually.
22
Getting started
Before you start
Setting the Clock (cont’d)
8
Press K / L buttons to select
AM or PM, then press ENTER
button.
Clock menu will appear, then the
settings will be activated.
Press SETUP button to exit.
Although seconds are not displayed,
they begin counting from zero.
POWER
REC SPEED
.@/:
1
ABC
2
3
GHI
JKL
MNO
AUDIO
DEF
4
5
6
PQRS
TUV
WXYZ
8
9
7
SPACE
Setup > Clock
OPEN/CLOSE
Connections
7
CH
VIDEO/TV
SLOW
0
VCR DVD
DVD
VCR
DISPLAY
PAUSE
Clock Setting
Auto
Daylight Saving Time
ON
Getting started
Auto Clock Setting
PLAY
8
STOP
REC/OTR
SETUP
TIMER PROG.
ENTER
REC MONITOR
MENU/LIST TOP MENU
CLEAR/C-RESET ZOOM
SEARCH
MODE
RETURN
SKIP
7
SKIP
CM SKIP
Recording
Playing discs
When “Auto Clock Setting” is selected to “Auto” or
“Manual”, change it to “OFF” as follows:
Repeat steps (1) to (3) in “Manual Clock Setting”.
PLAY
6
Select “Auto Clock Setting”
using K / L buttons, then
press ENTER button.
Option window will appear.
Select “OFF” using K / L
buttons, then press ENTER
button.
Setup > Clock
Clock Setting
Auto Clock Setting
Daylight Saving Time
VCR DVD
OFF
Auto
Auto
Manual
Off
TIMER PROG.
ENTER
REC MONITOR
MENU/LIST TOP MENU
CLEAR/C-RESET ZOOM
SEARCH
MODE
RETURN
SKIP
SKIP
4
5
CM SKIP
Changing the SETUP menu
5
SETUP
Editing
4
STOP
REC/OTR
6
Press SETUP button to exit.
VCR functions
Others
23
Getting started
Setting the Clock (cont’d)
Setting the daylight saving time
When Daylight Saving Time is
ON, the clock will automatically
move forward one hour on the
first Sunday in April and move
back one hour on the last Sunday
in October.
4
Select “Daylight Saving
Time” using K / L buttons,
then press ENTER button.
Daylight Saving Time options will
appear.
POWER
REC SPEED
.@/:
1
ABC
2
3
GHI
JKL
MNO
AUDIO
DEF
4
5
6
PQRS
TUV
WXYZ
8
9
7
SPACE
1
Setup > Clock
Press SETUP button to display SETUP/DISC menu.
SETUP/DISC menu will appear.
Screen:
Auto Clock Setting
CH
VIDEO/TV
SLOW
0
VCR DVD
DISPLAY
DVD
VCR
PAUSE
Clock Setting
Daylight Saving Time
Auto
ON
OFF
PLAY
1
6
STOP
REC/OTR
SETUP
TIMER PROG.
ENTER
REC MONITOR
MENU/LIST TOP MENU
CLEAR/C-RESET ZOOM
5
Select “ON” or “OFF” using
K / L buttons, then press
ENTER button.
Choose “ON” when currently
observing the daylight saving time.
Setup Menu
2
Select “SETUP” using { / B
buttons, then press ENTER
button.
SETUP menu will appear.
Setup
Playback Setting
3
Select “Clock” using K / L /
{ / B buttons, then press
ENTER button.
Clock menu will appear.
Setup > Clock
VCR DVD
Clock Setting
24
OPEN/CLOSE
Auto Clock Setting
Auto
Daylight Saving Time
ON
6
Press SETUP button to exit.
SEARCH
MODE
CM SKIP
RETURN
SKIP
SKIP
2
3
4
5
Getting started
Before you start
Selecting the TV aspect ratio
Playback menu will appear.
Setup > Playback
TV Aspect
Parental Lock
Disc Menu Language
Audio Language
Subtitle Language
DVD
4:3 Letter Box
All
English
Original
OFF
Digital Out
Dynamic Range Control
Fast Forward with Audio
ON
OFF
POWER
REC SPEED
.@/:
1
ABC
2
3
GHI
JKL
MNO
OPEN/CLOSE
DEF
4
5
6
PQRS
TUV
WXYZ
8
9
7
1
AUDIO
Connections
You can select the TV aspect ratio
to match the formats of what you
are playing with the unit and your
TV screen (4:3 standard or 16:9
widescreen TV).
“4:3 Letter Box” has been selected as the default.
SPACE
CH
VIDEO/TV
SLOW
0
4
DVD
VCR
PLAY
Select “TV Aspect” using K /
L buttons, then press ENTER
button.
Option window will appear.
1
6
STOP
REC/OTR
SETUP
MENU/LIST TOP MENU
Parental Lock
Disc Menu Language
Audio Language
Subtitle Language
SEARCH
MODE
16:9 Box
Wide
4:3 Letter
8 & Scan
4:3 Pan
16:9English
Wide
Original
OFF
CM SKIP
RETURN
SKIP
SKIP
2
3
4
5
Digital Out
Select “SETUP” using { / B
buttons, then press ENTER
button.
SETUP menu will appear.
Setup
ON
Fast Forward with Audio
OFF
Refer to the Note on this
page.
Playing discs
2
Dynamic Range Control
5
Editing
Select a desired option using
K / L buttons, then press
ENTER button.
6
Playback Setting
Recording
TV Aspect
DVD
TIMER PROG.
ENTER
REC MONITOR
CLEAR/C-RESET ZOOM
Setup > Playback
Setup Menu
PAUSE
Getting started
Press SETUP button to display SETUP/DISC menu.
SETUP/DISC menu will appear.
Screen:
DISPLAY
Press SETUP button to exit.
Changing the SETUP menu
3
Select “Playback” using K / L
/ { / B buttons, then press
ENTER button.
Others
25
VCR functions
Note
If you have a standard TV:
Select “4:3 Letter Box”, so that
black bars appear on the top
and bottom of the screen.
Select “4:3 Pan & Scan” for a
full height picture with both
sides trimmed.
If you have a widescreen TV:
Select “16:9 Wide”.
Recording
Information on DVD recording
Information
Recording speed
This unit can record to DVD-R and DVD-RW discs.
When recording, you will need to select a recording
format between Video mode and VR mode depending on the disc format.The disc format for DVD-R
is always “Video format,” so a recording format will
be “Video mode”.
On the other hand, when recording to DVD-RW, a
recording format will be “Video mode” or “VR
mode” because a disc format is available between
“Video Recording format” and “Video format” for
DVD-RW.
You can select a recording speed among 6 options,
and the recording time will depend on the recording speed you select as follows.
Logo
Attributes
12cm, single-sided, single layer disc
Approx. max. recording time (SEP mode):
DVD-RW 600 minutes (4.7GB)
DVD-R
12cm, single-sided, single layer disc
Approx. max. recording time (SEP mode):
600 minutes (4.7GB)
About Video mode and VR (Video Recording)
mode
Video mode is the same recording format as DVDVideo discs purchased locally, so that you can play in
most DVD players.To play in other DVD players,
you will need to finalize the disc (see page 41). If
not finalized, you can play, record additionally or edit
discs recorded in Video mode with this unit.
VR (Video Recording) mode is a basic recording
format for DVD-RW.You can record and edit
repeatedly.
DVD players which are
compatible are
capable of playing DVD-RW recorded in VR mode.
Disc type
Disc format
Functions
Video mode
Playing, limited recording,
limited editing
Video
DVD-RW
DVD-RW VR mode
VR
DVD-RW
Video mode
DVD-R
26
DVD-R
Playing, recording,
Original/Playlist editing
Playing, limited recording,
limited editing
Recording Recording
Video/Sound Quality
speed
time *
XP (1H)
60 min
SP (2H)
120 min
LP (4H)
240 min
EP (6H)
360 min
SLP (8H)
480 min
SEP (10H) 600 min
* This table is designed for a new single-sided 12cm
disc as the standard.The recording time are estimates and actual recording time may differ.
* The audio and video quality is getting poorer as
the recording time becomes longer.
Restrictions on recording
You cannot record copy-protected video using this
unit. Copy-protected video includes DVD-Video
discs and some satellite broadcasts.
If copy-protected material is encountered during a
recording, the unit will pause or stop automatically
and an error message will be displayed on-screen.
Video that is “copy-once only” can only be recorded
using a DVD-RW disc in VR mode with CPRM (see
below).
When recording a TV broadcast or through an
external input, you can display copy control information on screen.
What is “CPRM”?
CPRM is a copy protection system with scramble system regarding the recording of “copy
once” broadcast programs. CPRM stands for
Content Protection for Recordable Media.
This unit is CPRM compatible, which means
that you can record copy-once broadcast programs, but you cannot then make a copy of
those recordings. CPRM recordings can only be
made on DVD-RW discs formatted in VR
mode, and CPRM recordings can only be played
on players that are specifically compatible with
CPRM.
Recording
Information on copy control
Some satellite broadcasts include copy-protected
information. For recording these, refer to the following.
Copy-free Copy-once Copyprohibited
VR mode
DVD-RW
ver.1.1
ver.1.1 CPRM
compatible
Recordable
Not Recordable
Mode
DVD-R
ver.2.0
Video mode
DVD-RW
ver.1.1
ver.1.1 CPRM compatible
Video mode
Playing discs
Disc type
Recording
Video mode
DVD-R
ver.2.0
Getting started
Video mode
DVD-RW
ver.1.1
ver.1.1 CPRM
compatible
You will need to finalize discs in the following cases:
- when playing DVD-R/RW (Video mode) recorded
with this unit in other DVD players.
- when DVD-RW (VR mode) recorded with this
unit fails to be played in other RW compatible DVD
players.
• Once DVD-R/RW (Video mode) is finalized, you
cannot record additionally or edit.
• You can record additionally to or edit DVD-RW
(VR mode), which is finalized with this unit.
• Be sure to finalize discs recorded with this unit by
using this unit.
• Title menu will be created automatically in DVDR/RW (Video mode) finalized with this unit.
To play in other DVD players, finalize discs recorded
from this unit with the following condition.
Connections
Disc type/
format
Making discs playable in other DVD
player (Finalize)
Before you start
Information on DVD recording (cont’d)
Note
Editing
Changing the SETUP menu
VCR functions
• The audio and video quality gets poorer as the
Recording time becomes longer.
• This unit cannot record onto CD-R or CD-RW
discs.
• DVD-R/RW and CD-R/RW discs recorded using
a personal computer or a DVD or CD recorder
may not play if the disc is damaged or dirty, or if
there is dirt or condensation on the units lens.
• If you record a disc using a personal computer,
even if it is recorded in a compatible format,
there are cases in which it may not play because
of the settings of the application software used
to create the disc. (Check with the software publisher for more detailed information.)
Others
27
Recording
Formatting a disc
Choosing the recording format of a blank disc
Video
VR
DVD-RW
DVD-RW
When inserting a blank disc, the
unit starts to initialize the blank
disc.
After that, you can record to the
disc with the recording format
selected in SETUP menu.
You are allowed to set a specified
time for chapter marks.
3
Select “Recording” using K /
L / { / B buttons, then press
ENTER button.
Recording menu will appear.
POWER
REC SPEED
.@/:
1
ABC
2
3
GHI
JKL
MNO
4
5
6
PQRS
TUV
WXYZ
8
9
7
OPEN/CLOSE
DEF
SPACE
CH
VIDEO/TV
SLOW
0
Setup > Recording
DVD-RW Recording Format
Auto Chapter
DVD
DISPLAY
Dubbing Mode
1
VCR
DVD
PLAY
VCR
DVD
STOP
1
REC/OTR
SETUP
TIMER PROG.
ENTER
REC MONITOR
MENU/LIST TOP MENU
CLEAR/C-RESET ZOOM
SEARCH
MODE
4
Select “DVD-RW Recording
Format” using K / L buttons,
then press ENTER button.
Option window will appear.
Setup > Recording
Setup Menu
PAUSE
Video mode
10 minutes
Timer Programming
Press SETUP button to display SETUP/DISC menu.
SETUP/DISC menu will appear.
Screen:
AUDIO
CM SKIP
RETURN
SKIP
SKIP
2
3
4
5
DVD
mode
DVD-RW Recording Format Video
VR mode
VR
mode
Auto Chapter
10 minutes
Timer Programming
Dubbing Mode
2
Select “SETUP” using { / B
buttons, then press ENTER
button.
SETUP menu will appear.
Setup
Playback Setting
VCR
DVD
Video mode
DVD Player Compatibility mode.
VR mode
Editing possibility mode.
Video mode has been selected as
the default.
5
Select “Video mode” or “VR
mode” using K / L buttons,
then press ENTER button.
The recording mode will be set.
Note
• When inserting a blank
DVD+R or DVD+RW disc,
the error message ("Disc
Error") will appear.This unit is
not compatible with a
DVD+R/RW disc.
28
Recording
Before you start
Formatting a disc (cont’d)
6
POWER
REC SPEED
.@/:
1
ABC
2
3
GHI
JKL
MNO
AUDIO
DEF
4
5
6
PQRS
TUV
WXYZ
8
9
7
SPACE
Setup > Recording
DVD
Timer Programming
Dubbing Mode
VR mode
OFF
5 minutes
10
minutes
10 minutes
15 minutes
VCR DVD
30 minutes
60 minutes
SLOW
VCR
DVD
PAUSE
PLAY
8
STOP
REC/OTR
SETUP
TIMER PROG.
ENTER
REC MONITOR
MENU/LIST TOP MENU
“10 minutes” has been selected as
the default.
CLEAR/C-RESET ZOOM
SEARCH
MODE
RETURN
SKIP
SKIP
6
7
Getting started
Auto Chapter
CH
VIDEO/TV
0
DISPLAY
DVD-RW Recording Format
OPEN/CLOSE
Connections
Select “Auto Chapter” using
K / L buttons, then press
ENTER button.
Option window will appear.
CM SKIP
Recording
7
Playing discs
Select a desired time option
using K / L buttons, then
press ENTER button.
Chapter marks will be put as you
specified.
8
Press SETUP button to exit
SETUP menu.
Editing
Changing the SETUP menu
VCR functions
29
Others
Note
• The time for chapter marks is
not accurate in Video mode.
Recording
Formatting a disc (cont’d)
Reformatting a disc
Video
VR
DVD-RW
DVD-RW
If you are using a DVD-RW disc,
by default it will be Video mode.
You can change this to VR mode
from SETUP menu.
1
4
Select “Yes” using { / B buttons, then press ENTER button.
Option window will appear.
POWER
REC SPEED
.@/:
1
ABC
2
3
GHI
JKL
MNO
4
5
6
PQRS
7
AUDIO
OPEN/CLOSE
DEF
TUV
WXYZ
8
9
SPACE
CH
VIDEO/TV
SLOW
0
Disc
Press SETUP button to display SETUP/DISC menu.
SETUP/DISC menu will appear.
Screen:
DISPLAY
DVD
VCR
Edit
Format
PLAY
Finalize
Disc Protect OFF ON
Yes
STOP
No
REC/OTR
1
Are you sure?
Yes
No
SETUP
TIMER PROG.
ENTER
REC MONITOR
MENU/LIST TOP MENU
* VR mode only
CLEAR/C-RESET ZOOM
SEARCH
MODE
5
Setup Menu
Select “Yes” using { / B buttons, then press ENTER button.
Formatting will start.
2
PAUSE
CM SKIP
RETURN
SKIP
SKIP
2
3
4
5
Select “DISC” using { / B buttons, then press ENTER button.
DISC menu will appear.
Disc
Edit
58%
Format
Formatting
Finalize
Disc Protect OFF ON
6
Formatting is complete.
100% will be indicated.
* VR mode only
3
Select “Format” using K / L
buttons, then press ENTER
button.
Option window will appear.
100%
Formatting
Disc
Edit
This operation may take a
while to be completed.
Format
Finalize
Disc Protect OFF ON
Yes
* VR mode only
30
No
Note
• When you reformat the disc,
the contents of the disc will
be erased.
• If you want to cancel format
at step 5, select “No”.
Recording
Before you start
Basic recording
DVD-R
Video
VR
DVD-RW
DVD-RW
DVD
4
Select a desired channel to
record using CH K / L buttons or number buttons.
1
2
4
POWER
REC SPEED
.@/:
1
ABC
2
3
GHI
JKL
MNO
AUDIO
DEF
4
5
6
PQRS
TUV
WXYZ
8
9
7
SPACE
CH 1
DISPLAY
SLOW
VCR
DVD
PAUSE
5
PLAY
STOP
5
REC/OTR
SETUP
TIMER PROG.
5
CLEAR/C-RESET ZOOM
SEARCH
MODE
RETURN
SKIP
SKIP
CM SKIP
Recording
Press REC/OTR button to
start recording.
I mark will be displayed for 5
seconds.
6
ENTER
REC MONITOR
MENU/LIST TOP MENU
Select a recording speed
using REC SPEED button.
4
0
This operation may take a
while to be recognized.
2
CH
VIDEO/TV
Getting started
Turn on the unit and load a
recordable disc.
Make sure that the TV input is set
on the unit.
OPEN/CLOSE
Connections
Follow the steps below to record
TV programs.
First:
SP 2:01 Rem.
Press STOP C button to stop
the recording.
This operation may take a
while to be completed.
• Recording starts immediately
and continues until the disc is
full or you stop recording.
• When the clock setting has
not been made, the space for
a date and time of title names
in the original or playlist will
be blank.
• You cannot mix two formats
on one DVD-RW disc.
When you load a disc once
recorded before, the recording format cannot be changed
even if you change it in
SETUP menu.
• You cannot change the
recording speed during the
REC pause mode.
• You can change a channel
during the REC pause mode.
31
Others
When a DVD-R disc is loaded:
DVD-R discs will always be in
Video mode.
6
Note
VCR functions
When a DVD-RW disc is
loaded:
You can choose Video mode or
VR mode from SETUP menu.
“Video mode” has been selected
as the default. Refer to “Choosing
the recording format of a blank
disc” on pages 28-29.
To pause the recording, press
PAUSE F button. Press REC/OTR
button to restart the recording.
Changing the SETUP menu
Make sure that the recording
format is set to the desired
mode.
Refer to “Formatting a disc” on
pages 28-30.
I
Editing
3
Playing discs
Refer to “Recording speed” on
page 26.
Recording
Basic recording (cont’d)
Checking the recording picture quality
DVD-R
Video
VR
DVD-RW
DVD-RW
You can confirm the recording picture quality with the recording
speed you have selected before
attempting to record to a DVD disc.
First:
2
1
Press REC MONITOR button
again to exit.
POWER
REC SPEED
.@/:
1
ABC
2
3
GHI
JKL
MNO
4
5
6
PQRS
TUV
WXYZ
8
9
7
AUDIO
OPEN/CLOSE
DEF
SPACE
CH
VIDEO/TV
SLOW
0
DVD
DISPLAY
1
DVD
VCR
PAUSE
PLAY
STOP
While the unit is in STOP or
REC with a DVD disc to
record inserted, press REC
MONITOR button.
The TV program will be on the
screen in the recording picture
quality with the recording speed
you have selected.
REC/OTR
1
2
SETUP
TIMER PROG.
ENTER
REC MONITOR
MENU/LIST TOP MENU
CLEAR/C-RESET ZOOM
SEARCH
MODE
RETURN
SKIP
SKIP
CM SKIP
CH 18
Rec Monitor
XP
If you want to change the
recording speed, press REC
SPEED button repeatedly.
The recording speed will be
changed as you press the button
as shown. Refer to “Recording
speed” on page 26.
• You cannot change the recording speed during recording.
XP
SP
LP
SEP
SLP
EP
Note
• You cannot check the recording sound quality with the
Rec monitor function.
32
Recording
Before you start
One-touch timer recording
DVD-R
Video
VR
DVD-RW
DVD-RW
1
2
POWER
REC SPEED
.@/:
1
ABC
2
3
GHI
JKL
MNO
OPEN/CLOSE
DEF
4
5
6
PQRS
TUV
WXYZ
8
9
7
5
AUDIO
SPACE
CH
4
VIDEO/TV
SLOW
0
Press REC/OTR button, then
press REC/OTR button
repeatedly until a desired
recording time (30 minutes
to 8 hours) appears on the TV
screen.
Recording will start.
DISPLAY
VCR
DVD
PAUSE
PLAY
STOP
5
REC/OTR
SETUP
TIMER PROG.
ENTER
REC MONITOR
MENU/LIST TOP MENU
CLEAR/C-RESET ZOOM
SEARCH
MODE
5
RETURN
SKIP
SKIP
CM SKIP
Recording
Turn on the unit and load a
recordable disc.
Make sure that the TV input is set
on the unit.
Select a desired channel to
record using CH K / L buttons or number buttons.
This operation may take a
while to be recognized.
Select a recording speed
using REC SPEED button.
Refer to "Recording speed" on
page 26.
3
(Normal Recording) 1:00
8:00
7:30
When the unit reaches the specified time, it will turn off automatically.
To cancel the one-touch timer
recording within the specified
time, press STOP C button.
This operation may take a
while to be completed.
Note
33
Others
• The unit will turn off automatically under the conditions
following.
1)No space remained on the
disc.
2)When a power failure
occurs.
• If OTR is finished in DVD
during playback or REC mode
in VCR, the DVD will be in
STOP mode and the VCR
keeps the current mode.
VCR functions
When a DVD-R disc is loaded:
DVD-R discs will always be in
Video mode.
0:30
Changing the SETUP menu
When a DVD-RW disc is
loaded:
You can choose Video mode or
VR mode from SETUP menu.
"Video mode" has been selected
as the default. Refer to pages 2829 "Choosing the recording format of a blank disc".
0:30
Editing
Make sure that the recording
format is set to the desired
mode.
Refer to "Formatting a disc" on
pages 28-30.
I
Playing discs
2
Getting started
DVD
4
Connections
This is a simple way to set the
recording time in blocks of 30
minutes. Check that the disc you
are recording onto has enough
space for the time you set.
When the recording finishes the
recorder automatically goes into
standby.
First:
Recording
Timer recording
DVD-R
Video
VR
DVD-RW
DVD-RW
VCR
You can program the unit to record
up to 8 programs, up to a year in
advance. Daily or weekly program
recordings are also available.
• Be sure to set the clock before
making a timer programming.
• Insert a recordable disc or a
tape with a safety tab.
4
Select “Timer Programming”
using K / L buttons, then
press ENTER button.
Timer Programming list will
appear.
You can choose the timer
programming menu by pressing TIMER PROG. button. In
this case, continue with step 5.
Setup > Recording > Timer Programming
Date
-------
1
Start
End
CH
DVD
VCR
Speed
POWER
REC SPEED
.@/:
1
ABC
2
3
GHI
JKL
MNO
4
5
6
TUV
WXYZ
8
9
PQRS
7
AUDIO
OPEN/CLOSE
DEF
SPACE
CH
VIDEO/TV
SLOW
0
DISPLAY
Press SETUP button to display SETUP/DISC menu.
SETUP/DISC menu will appear.
Screen:
5
DVD
VCR
PLAY
Select an empty program line
using K / L buttons, then
press ENTER button.
1
STOP
REC/OTR
SETUP
TIMER PROG.
ENTER
REC MONITOR
MENU/LIST TOP MENU
6
CLEAR/C-RESET ZOOM
SEARCH
MODE
RETURN
SKIP
CM SKIP
Enter the date using K / L
buttons, then press B button.
Setup Menu
Setup > Recording > Timer Programming
DVD
Date
Start
End
CH VCR
Speed
JAN / 01 - - : - -AM - - : - -AM CH8 DVD
-------
2
Select “SETUP” using { / B
buttons, then press ENTER
button.
SETUP menu will appear.
PAUSE
SKIP
2
3
4
5
6
7
e.g. January 1st
JAN/01
L
Daily
L
Setup
MON-SAT
When pressing L button at the
current date, timer recording
mode will change as follows.
L
MON-FRI
L
SAT
L
FRI
Playback Setting
L
L
3
SUN
L
Select “Recording” using K /
L / { / B buttons, then press
ENTER button.
Recording menu will appear.
Setup > Recording
DVD-RW Recording Format
Auto Chapter
DVD
Video mode
10 minutes
Timer Programming
Dubbing Mode
VCR
DEC/31
7
Enter the time to start and
to end using K / L buttons,
then press B button.
DVD
Setup > Recording > Timer Programming
DVD
Date
Start
End
CH VCR
Speed
JAN/12 10 :00PM - - : - -AM CH8 DVD
-----
34
Note
• If you have not set the
clock yet:
A clock setting window will
appear after step 4. Continue
with step 4 in “Auto Clock
Setting” on page 21 or
“Manual Clock Setting” on
page 22 before making a
timer programming.
• Press { or B buttons to
move the cursor to the left
and the right in the timer
programming menu.
Recording
Before you start
Timer recording (cont’d)
8
10
Select the channel number to
Select a recording speed
Setup > Recording > Timer Programming
Date
Start
JAN/12 10:00PM
---
Setup > Recording > Timer Programming
Date
Start
JAN/12 10:00PM
---
DVD
End
CH VCR
Speed
10:30PM CH8 DVD
To record from external input, L1
or L2.
using K / L buttons, then
press B button.
Setup > Recording > Timer Programming
Date
Start
JAN/12 10:00PM
---
DVD
End
CH VCR
Speed
10:30PM CH8 DVD
ABC
2
3
GHI
JKL
MNO
4
5
6
PQRS
TUV
WXYZ
8
9
7
DVD
End
CH VCR
Speed
10:30PM CH8 DVD 1H
SLOW
DVD
VCR
DISPLAY
PAUSE
PLAY
STOP
REC/OTR
SETUP
TIMER PROG.
ENTER
REC MONITOR
RETURN
MENU/LIST TOP MENU
CLEAR/C-RESET ZOOM
SEARCH
MODE
SKIP
SKIP
CM SKIP
8
9
10
11
Note
• After step 12, the unit will be
turned on automatically 2
minutes (For VCR recording,
10 seconds) in advance of the
recording time to start and
waits to start.Then the
recording will start at the
recording time you set.
Checking, canceling, or correcting the timer programming
information
4
Press POWER button so that
indicator disappears from
the front display.
To clear the timer programming,
select your desired program
using K / L buttons, then press
CLEAR/C-RESET button.
2
Setup > Recording > Timer Programming
Date
Start
JAN/12 10:00PM
---
DVD
End
CH VCR
Speed
10:30PM CH8 DVD 1H
3
5
Press TIMER PROG. button to exit.
6
Press POWER button to return
to the timer standby mode.
Press STOP C button to stop the disc recording or STOP/EJECT C A to
stop the tape recording on the front panel of the main unit. STOP C button on the remote control is not effective.
ABC
2
3
GHI
JKL
MNO
DEF
4
5
6
PQRS
TUV
WXYZ
8
9
7
OPEN/CLOSE
SPACE
CH
VIDEO/TV
SLOW
0
DISPLAY
VCR
DVD
PAUSE
PLAY
STOP
REC/OTR
SETUP
TIMER PROG.
ENTER
REC MONITOR
MENU/LIST TOP MENU
4
CLEAR/C-RESET ZOOM
SEARCH
MODE
RETURN
SKIP
2
5
4
SKIP
CM SKIP
Note
• Press TIMER PROG. button to
check the timer programming
in process.
When the timer recording is
in process, that program will
be red highlighted. In this case,
you cannot select any other
program.
35
Others
To stop the timer recording in process
.@/:
1
AUDIO
VCR functions
Check the information on the
list you will need.
To correct the timer programming, select your desired program using K / L buttons, then
press ENTER button.
Next, correct the timer programming
using K/L/{/B buttons.
Finally, press ENTER button again.
REC SPEED
Changing the SETUP menu
Press TIMER PROG. button.
Timer Programming list will appear.
POWER
Editing
1
1
6
Playing discs
Press POWER button to turn off.
indicator will appear on the
front display.
CH
VIDEO/TV
0
11
12
DEF
SPACE
Refer to “Recording speed” on page
26 for DVD or page 94 for VCR.
Press ENTER button when all
information required is
entered.
Your program setting will be
stored.
• To set another program, repeat
steps 5 to 11.
• To exit, press SETUP button.
OPEN/CLOSE
Recording
• To record on to a tape, select VCR.
• To record on to a disc, select DVD.
.@/:
1
AUDIO
Getting started
9
Select a recording media
12
using K / L buttons.
REC SPEED
Connections
record using K / L buttons,
then press B button.
POWER
Recording
Timer recording (cont’d)
Hints for timer recording
• If there is a power failure or this unit has been unplugged for more than 30 seconds, the clock setting and all timer settings will be lost.
• If a disc is not on the tray, the DVD indicator on the front panel flashes and timer recording cannot be performed.
Please insert a recordable disc.
• If a tape with a record tab is not in the cassette compartment, the VCR indicator on the front panel flashes and timer
recording cannot be performed. Please insert a recordable tape.
• When all the timer recording is completed, the
indicator flashes.To play or eject the recorded disc (or the tape),
press POWER button first and then press PLAY B or OPEN/CLOSE A (or STOP/EJECT C A) button.
• The timer recording is not performed in DVD and VCR at the same time. If you set two programmings with the same
channel and time both in DVD and VCR, the programming that has priority will be recorded (see below for details).
indicator is on the front display), any operations on the unit will not be
• During timer recording or timer standby (
available.To make these operations available, cancel the timer recording or timer standby first (
indicator disappears).
• To cancel the timer standby mode, press POWER button.
The priority of overlapped settings
This unit records the programs according to priority if timer programmings are overlapping.The timer programming set
previously has priority.
A timer recording of lower priority will be canceled, start from the middle, or stop on the way.
Check the overlapping timer programmings and change the priority if necessary.
A programming set previously has priority
When the starting time is the same:
A program with a lower program number
(PROG. 1) has priority.
When some programming have been
made at the end time of the
programming currently being recorded:
A program with a lower program number
(PROG. 2) has priority.
ex. 2
ex.1
PROG. 1
PROG. 1
PROG. 2
PROG. 2
PROG. 3
Actual
recording
PROG. 1
PROG. 2
Actual
recording
PROG. 1
PROG. 2
When the recording time is partially overlapped:
PROG. 1 will start after PROG. 2 is complete to be recorded.
PROG. 1
PROG. 2
Actual
recording
PROG. 2
PROG. 1
When the recording time is entirely overlapped:
PROG. 1 will not be recorded.
PROG. 1
PROG. 2
Actual
recording
PROG. 2
When the end time of the programming currently being recorded and the starting time
of the one to be recorded sequentially are same:
The first 20-90 seconds of the programming to be recorded sequentially will be cut off.
PROG. 1
PROG. 2
Actual
recording
36
PROG. 1
PROG. 2
The first 20-90 seconds will be cut off.
Note:
After finishing the timer
recording in DVD, other
timer programmings
cannot be performed for
a while.
Recording
Connection to an external source
Connect the external source properly to the unit by using input jacks either LINE2 (Front) or LINE1 (Rear).
S-VIDEO input is useful only in DVD mode.
L
OUTPUT
Another source
(VCR camcorder etc.)
VIDEO AUDIO
R
S -VIDEO
VIDEO AUDIO
R
L
or
or
Video
cable
S-Video
cable
Audio
cable
Video
cable
Audio
cable
DVD
S-VIDEO
Getting started
S-Video
cable
Connections
OUTPUT
S- VIDEO
DVD/VCR
AUDIO IN
L
or
S-VIDEO
VIDEO
R
IN
VIDEO IN
L - AUDIO - R
To LINE 1 IN
To LINE 2 IN
OPEN/CLOSE
DIGITAL
AUDIO
AUDIO OUT OUT
POWER
REW
F.FWD STOP/EJECT
PLAY
DUBBING
STOP
DVD
S-VIDEO
COMPONENT
VIDEO OUT
Y
PLAY
CB
L
VCR
OUTPUT SELECT
CHANNEL
VCR
RECORD
DVD
S-VIDEO
VIDEO
L - AUDIO - R
COAXIAL
IN
DVD
R
RECORD
Before you start
Settings for an external source
DVD/VCR
AUDIO IN AUDIO OUT ANTENN
IN
L
L
R
R
VIDEO IN VIDEO OUT
OUT
CR
OUT
Setup > Select Video
DVD
1. Press SETUP button to display SETUP/DISC
menu.
2. Select “SETUP” using { / B buttons, then
press ENTER button.
3. Select “Select Video”, then press ENTER
button.
Setup > Select Video
DVD
L1 (Rear)
Video In
L1 (Rear)
Video In
L2 (Front)
Video In
L2 (Front)
Video In
L1 (Rear)
L2 (Front)
DVD
Video
Video
In In
S-Video
Video In
Setup > Select Video
DVD
L1 (Rear)
L2 (Front)
DVD
Video
Video
In In
S-Video
Video In
5. Select the input jack type to connect using
K / L buttons, then press ENTER button.
If you want to use S-VIDEO INPUT, select “S-Video In”.
If you want to use VIDEO INPUT (Composite),
select “Video In”.
Setup > Select Video
DVD
Video In
L1 (Rear)
S-Video In
L2 (Front)
S-Video In
L2 (Front)
Video In
Others
L1 (Rear)
VCR functions
5. Select the input jack type to connect using
K / L buttons, then press ENTER button.
If you want to use S-VIDEO INPUT, select “S-Video In”.
If you want to use VIDEO INPUT (Composite),
select “Video In”.
Setup > Select Video
Changing the SETUP menu
Setup > Select Video
4. Select “L1 (Rear)” using K / L buttons, then
press ENTER button.
Editing
4. Select “L2 (Front)” using K / L buttons, then
press ENTER button.
Playing discs
1. Press SETUP button to display SETUP/DISC
menu.
2. Select “SETUP” using { / B buttons, then
press ENTER button.
3. Select “Select Video”, then press ENTER
button.
Rear of this unit
Recording
Front of this unit
37
Recording
Settings for an external source (cont’d)
Recording from an external source
DVD-R
Video
VR
DVD-RW
DVD-RW
VCR
Before recording from an external source, see the instructions for the connection on page 37.
1. Turn the TV and the unit on, and be sure to select the input
of the TV to which the unit is connected.
DVD
4
1
2. When you want to record to a disc: Press:
Press OPEN/CLOSE A button to open the disc tray, then
place the disc to record properly.
POWER
REC SPEED
AUDIO
.@/:
1
ABC
DEF
2
3
GHI
JKL
MNO
4
5
6
PQRS
TUV
WXYZ
8
9
7
SPACE
OPEN/CLOSE
CH
VIDEO/TV
2
3
SLOW
0
DISPLAY
This operation may take a while to be recognized.
VCR
When you want to record to a tape: Press:
Insert the tape with a safety tab into the cassette compartment.
3. Select the input of the unit to which the external equipment
is connected. (L2 or L1)
•To use the input jacks on the back of this unit, select “L1” position by
pressing [0],[0],[1] on the remote control or the CH K / L buttons.
•To use the input jacks on the front of this unit, select “L2” position
by pressing [0],[0],[2] on the remote control or the CH K / L buttons.
4. Select a recording speed using REC SPEED button. Refer to
“Recording speed” on page 26 for DVD or page 94 for VCR.
XP
SP
LP
SP
SEP
SLP
DVD mode
SLP
EP
VCR mode
5. Press REC/OTR button on the unit to start recording.
6. Press PLAY button on the external source to record from.
7. For disc:
Press STOP C button on the unit to stop recording.
This operation may take a while to be completed.
For tape:
Press STOP/EJECT C A button on the unit to stop recording.
38
VCR
DVD
PAUSE
PLAY
STOP
5
REC/OTR
SETUP
TIMER PROG.
ENTER
REC MONITOR
MENU/LIST TOP MENU
CLEAR/C-RESET ZOOM
SEARCH
MODE
CM SKIP
RETURN
SKIP
SKIP
6
7
Recording
Before you start
Dubbing Mode
DVD-R
Video
VR
DVD-RW
DVD-RW
VCR
Select “SETUP” using { / B
buttons, then press ENTER
button.
SETUP menu will appear.
Setup
REC SPEED
.@/:
1
ABC
2
3
GHI
JKL
MNO
AUDIO
OPEN/CLOSE
DEF
4
5
6
PQRS
TUV
WXYZ
8
9
7
SPACE
CH
VIDEO/TV
SLOW
0
DISPLAY
VCR
DVD
PAUSE
1
STOP
REC/OTR
SETUP
3
TIMER PROG.
ENTER
REC MONITOR
MENU/LIST TOP MENU
Setup > Recording
DVD-RW Recording Format
Auto Chapter
CLEAR/C-RESET ZOOM
SEARCH
MODE
CM SKIP
SKIP
SKIP
2
3
4
DVD
Video mode
10 minutes
VCR
Playing discs
Timer Programming
Dubbing Mode
DVD
1
Press SETUP button to display SETUP/DISC menu.
SETUP/DISC menu will appear.
Screen:
Editing
4
Select “Dubbing Mode” using
K / L buttons, then press
ENTER button.
Option window will appear.
Setup Menu
DVD-RW Recording Format
Auto Chapter
VCR
DVD
Video mode
OFF
Timer Programming
Dubbing Mode
VCR
DVD
VCR functions
For VCR to DVD duplication:
• After starting VCR to DVD
duplication, the picture may be
distorted because of the auto
tracking function.
This is not a malfunction. Be
advised to playback the tape
until the picture is stabilized,
then set the starting point
which you wish to start
recording, and start VCR to
DVD duplication.
Changing the SETUP menu
Note
Setup > Recording
Recording
Select “Recording” using K /
L / { / B buttons, then press
ENTER button.
Recording menu will appear.
RETURN
Getting started
PLAY
Playback Setting
Make sure:
• Insert a disc and a tape with a
safety tab.
Note for recording to a tape:
• The tape's record tab is intact.
• The videotape is long enough to
record the DVD disc.
Note for recording to a disc:
• The DVD disc is compatible
with the recording mode. Refer
to pages 26-27.
POWER
Connections
You can copy a DVD disc to a
videotape or copy a videotape to
a DVD disc.This function will be
possible only if the DVD disc or
the tape is not copy protected.
Before starting this function, prepare for the recording on the
DVD-R/RW disc or the videotape.
Refer to pages 31-32, 94.
2
Others
Instructions continue on page 40.
39
Recording
Dubbing Mode (cont’d)
VCR to DVD
DVD to VCR
5-a
5-b
Select “VCR ⇒ DVD” using K
/ L buttons, then press
ENTER button.
Select “VCR ⇐ DVD” using K
/ L buttons, then press
ENTER button.
POWER
REC SPEED
.@/:
1
ABC
2
3
GHI
JKL
MNO
4
5
6
PQRS
TUV
WXYZ
7
8
9
AUDIO
OPEN/CLOSE
DEF
SPACE
7-a
7-b
CH
VIDEO/TV
SLOW
0
DVD-RW Recording Format
Auto Chapter
VCR
DVD
Video mode
OFF
Timer Programming
Dubbing Mode
Setup > Recording
DVD-RW Recording Format
Auto Chapter
VCR
Dubbing Mode
Video mode
OFF
VCR
VCR DVD
DVD
VCR DVD
6-a
6-b
STOP
REC/OTR
SETUP
TIMER PROG.
ENTER
REC MONITOR
CLEAR/C-RESET ZOOM
SEARCH
MODE
6-a
6-b
Press SETUP button to exit
SETUP menu.
Make sure to select a recording
speed using REC SPEED button.
Press:
Press SETUP button to exit
SETUP menu.
Press:
7-a
9-a
9-b
PLAY
5-a
5-b
RETURN
MENU/LIST TOP MENU
VCR
PAUSE
DVD
Timer Programming
VCR
VCR DVD
DVD
VCR DVD
DVD
VCR
DISPLAY
Setup > Recording
SKIP
SKIP
CM SKIP
VCR
Make sure to select a recording
speed using REC SPEED button.
Press:
7-a
DVD
7-b
OPEN/CLOSE
Press PLAY B button on the
unit, and then press PAUSE
button at the point you wish
to start recording.
8-a
Press DUBBING button on
the front of the unit.
VCR to DVD duplication will start.
9-a
Press STOP C button on the
unit or STOP C button on
the remote control to stop
the recording.
7-b
Press PLAY B button on the
unit, and then press PAUSE
button at the point you wish
to start recording.
POWER
REW
F.FWD STOP/EJECT
PLAY
DUBBING
VCR
STOP
OUTPUT SELECT
CHANNEL
VCR
9-b
8-a 9-a
8-b
Note
Press DUBBING button on
the front of the unit.
DVD to VCR duplication will start.
• When you turn off the unit
after setting the Dubbing
Mode to
, the
setting will be set to
automatically.
• Dubbing Mode is available
only if the tape or disc is not
copy protected.
• You cannot change the output
mode during VCR to DVD or
DVD to VCR duplication.
Press STOP/EJECT C A button on the unit or STOP C
button on the remote control
to stop the recording.
D
REC
8-b
9-b
For VCR to DVD duplication:
• The playback sound mode is
followed by the setting of
VCR playback sound mode on
page 96. Set the playback
sound mode to which you
wish to record to the DVD.
40
PLAY
DVD
RECORD
Recording
Before you start
Finalizing the discs
DVD-R
Video
VR
DVD-RW
DVD-RW
You will need to finalize the discs
recorded in Video mode to play in
other DVD players.
Finalizing discs in Video mode
automatically creates title menus.
Disc
Format
REC SPEED
Finalize
.@/:
1
ABC
2
3
GHI
JKL
MNO
Disc Protect OFF ON
Yes
AUDIO
DEF
4
5
6
PQRS
TUV
WXYZ
8
9
No
7
OPEN/CLOSE
Connections
POWER
Edit
SPACE
CH
VIDEO/TV
SLOW
0
1
VCR
DISPLAY
PAUSE
* VR mode only
4
PLAY
STOP
Select “Yes” using { / B buttons, then press ENTER button.
Finalizing will start.
REC/OTR
1
SETUP
TIMER PROG.
ENTER
REC MONITOR
MENU/LIST TOP MENU
CLEAR/C-RESET ZOOM
SEARCH
MODE
CM SKIP
RETURN
SKIP
SKIP
Setup Menu
Recording
4
2
3
4
Getting started
Press SETUP button to display SETUP/DISC menu.
SETUP/DISC menu will appear.
Screen:
DVD
58%
2
Note
Select “DISC” using { / B
buttons, then press ENTER
button.
DISC menu will appear.
Video mode:
To cancel finalizing, press STOP C
button.
Do you want to cancel?
Yes
No
Edit
58%
Format
Finalizing
Finalize
Disc Protect OFF ON
3
5
Finalizing is complete.
This operation may take a
while to be completed.
Format
Undo Finalize
To release the finalizing of the
disc, select “Undo Finalize” at
step 3.
• If
appear when pressing
STOP button, you cannot cancel finalizing because the finalizing process is in progress.
When selecting “No”, press
ENTER or RETURN button,
finalizing will be continued.
You cannot cancel finalizing of
a DVD-R disc when it has
started.
41
Others
100%
Finalizing
Edit
VCR functions
Select “Finalize” using K / L
buttons, then press ENTER
button.
Option window will appear.
Disc
Changing the SETUP menu
* VR mode only
Select “Yes” using { / B buttons, then press ENTER button.
Finalizing is cancelled, then the
unit will be in stop mode.
Editing
Disc
• Once you have finalized a disc
recorded in Video mode, you
cannot edit or record anything else on that disc.
A VR mode disc can still be
recorded and edited on this
unit even after finalizing.
• When you insert a DVD-RW
disc finalized with this unit,
“Undo Finalize” will appear
instead of “Finalize”.
Playing discs
Finalizing
Recording
Setting a disc to protect
VR
DVD-RW
To prevent accidental recording,
editing, or erasing of titles, you
can protect them by going to the
DISC menu and following the
steps below.
3
Select “Disc Protect OFF ➔
ON” using K / L buttons,
then press ENTER button.
Option window will appear.
POWER
REC SPEED
.@/:
1
ABC
2
3
GHI
JKL
MNO
4
5
6
TUV
WXYZ
8
9
PQRS
7
AUDIO
DEF
SPACE
1
Disc
Press SETUP button to display SETUP/DISC menu.
SETUP/DISC menu will appear.
Screen:
Format
OPEN/CLOSE
CH
VIDEO/TV
SLOW
0
DISPLAY
DVD
VCR
PAUSE
Edit
Finalize
PLAY
Disc Protect OFF
ON
STOP
Yes
No
REC/OTR
1
SETUP
TIMER PROG.
ENTER
REC MONITOR
MENU/LIST TOP MENU
CLEAR/C-RESET ZOOM
4
Setup Menu
SEARCH
MODE
RETURN
SKIP
CM SKIP
Select “Yes” using { / B buttons, then press ENTER button.
A disc will be protected.
SKIP
2
3
4
2
Select “DISC” using { / B
buttons, then press ENTER
button.
DISC menu will appear.
58%
Writing to Disc
Disc
Edit
Format
Finalize
Disc Protect OFF ON
This operation may take a
while to be completed.
Note
• You cannot select other
menus but Disc Protect when
a protected disc is inserted.
To cansel the disc protect:
• When you insert a disc protected with this unit, “Disc
Protect ON → OFF” will
appear instead of “OFF →
ON”.
Disc
Edit
Format
Finalize
Disc Protect ON
Yes
OFF
No
To release the protect for the
disc, select “Disc Protect ON
→ OFF” at step 3, then select
“Yes”.
42
Playing discs
Before you attempt to play DVD discs, read the following information.
Region codes
This unit is compatible with following discs.
To play a DVD, make sure that it meets the requirements for Region Codes and Color Systems as
described below. Discs that have the following logos
will play on the unit. Other Disc types are not guaranteed to play.
This unit has been designed to play DVD discs with
Region One (1). DVDs must be labeled for ALL
regions or for Region 1 in order to play on this unit.
You cannot play DVDs that are labeled for other
regions. Look for the symbols below on your DVDs.
If these region symbols do not appear on your
DVD, you cannot play that DVD in this unit.
Disc
Logo
DVD-RW (VIDEO/VR FORMAT)
DVD-R (VIDEO FORMAT)
CD-DA (AUDIO CD)
DIGITAL VIDEO
VCD (VIDEO CD)
Hint for DVD playback
CD-R (CD-DA FORMAT, MP3 files)
Start Rec.
Stop/Start
Stop Rec.
CD-RW (CD-DA FORMAT, MP3 files)
Title 1
Title 2
Editing
Color systems
Chapter 1 Chapter 2 Chapter 3 Chapter 1 Chapter 2
Changing the SETUP menu
DVDs are recorded in different color systems
throughout the world.The most common color systems are NTSC (which is used primarily in the
United States and Canada), PAL, and SECAM.
This unit uses NTSC, so DVDs you play must be
recorded in the NTSC system.You cannot play
DVDs recorded in other color systems.
Guide to displays
First:
DVD
1
1
1
00:00:00
DVD-RW
Video mode
SP 1:25 Rem.
5
CH 1
2
3
: Audio
: Subtitle
: Angle (except VR mode)
: Repeat
: Marker
Others
4
: Search
VCR functions
Press DISPLAY button to call up
the display menu.This menu will
give you information on the playing disc. Some operations are
available while the disc is playing.
1. Indicates a disc type and a
format mode.
2. Indicates a recording speed
and possible recording time.
3. Indicates a current channel
number.
4. Indicates a title number, chapter number, and the time
elapsed of disc play.
5. Each icon means:
Playing discs
The contents of a DVD disc are generally divided
into titles.Titles may be further subdivided into
chapters.
Recording
The number inside the globe refers to region of the
world. Region 1 represents the United States,
Canada, Bermuda, the U.S.Virgin Islands, and small
regions near Australia.
A DVD labeled for a specific region can only play on
the unit with the same region code.
Getting started
DVD VIDEO
Connections
Playable discs
Before you start
Information on DVD play
: Noise Reduction
: Zoom
43
Playing discs
Basic playback
Playback
DVD-R
Video
VR
DVD-RW
DVD-RW
VR mode:
Original
1
1
1
2
3
1
POWER
REC SPEED
AUDIO
.@/:
1
ABC
DEF
2
3
GHI
Press POWER button, then
press DVD button.
When you are playing a DVD, turn
the TV on and be sure to select
the input to which the unit is connected.
JAN/1 12:00AM
4
JAN/1 1:00AM
JAN/1 2:00AM
JKL
5
6
TUV
WXYZ
8
9
2
6
CH
MNO
4
PQRS
7
5
OPEN/CLOSE
VIDEO/TV
SPACE
SLOW
0
JAN/1 3:00AM
JAN/1 4:00AM
MENU / LIST button
1
Press OPEN/CLOSE A button to open the disc tray.
The disc tray will open.
JAN/1 12:00AM
4
1
2
3
JAN/1 1:00AM
JAN/1 2:00AM
5
6
PAUSE
STOP
REC/OTR
SETUP
4
4
TIMER PROG.
ENTER
REC MONITOR
MENU/LIST TOP MENU
CLEAR/C-RESET ZOOM
SEARCH
MODE
JAN/1 3:00AM
DVD
PLAY
Playlist
2
VCR
DISPLAY
RETURN
SKIP
5
SKIP
CM SKIP
JAN/1 4:00AM
3
Place the disc onto the disc
tray with its label facing up
and make sure to align the
disc to the disc tray guide.
5
Select a desired title using K /
L / { / B buttons, then press
ENTER button.
Playback will start.
6
disc
tray
guide
Press STOP C button to stop
playback.
Note
This operation may take a
while to be recognized.
To eject the disc, press
OPEN/CLOSE A button to open
the disc tray, then remove the disc
before turning the unit off.
• For DVD-R (Video mode)
and DVD-RW (Video mode)
discs which are already finalized, a title list will be displayed instead of thumbnails.
4
Press TOP MENU button to
display the title menu.
You can change “Original” or
“Playlist” of VR mode using
MENU / LIST button.
Video mode:
Title Menu
1 JAN/1
12:24AM
CH96
XP
2
3
4
5
6
7
8
Title List
1
JAN/1 12:00AM
4
JAN/1 3:00AM
44
1
2
3
JAN/1 1:00AM
JAN/1 2:00AM
5
JAN/1 4:00AM
• You can resume play from
where you stopped playing
the disc. (Resume play)
Refer to page 48 for details
about Resume play.
• Some discs may start playing
automatically.
Playing discs
DVD-V
CD
VCD
MP3
1
Press POWER button, then
ton to open the disc tray.
The disc tray will open.
1
POWER
REC SPEED
AUDIO
.@/:
1
ABC
DEF
2
3
GHI
If you are playing a DVD-Video
disc or a Video CD with PBC
function, a menu may appear.
Refer to pages 46-47 for details
about a disc menu.
JKL
MNO
4
5
6
PQRS
TUV
WXYZ
8
9
7
SPACE
OPEN/CLOSE
2
CH
VIDEO/TV
SLOW
0
DVD
VCR
DISPLAY
PAUSE
PLAY
STOP
5
Press STOP C button to stop
REC/OTR
SETUP
TIMER PROG.
ENTER
REC MONITOR
playing.
MENU/LIST TOP MENU
RETURN
CLEAR/C-RESET ZOOM
3
Place the disc onto the disc
SEARCH
MODE
SKIP
SKIP
CM SKIP
Note
• Some discs may start playing
automatically.
Playing discs
For MP3 playback
1
In stop mode, press TOP MENU
button to call up the MP3 menu.
• Press s button or RETURN
button to go to the previous
hierarchy.
• Press STOP C button to return
to the first item.
POWER
REC SPEED
.@/:
1
ABC
2
3
GHI
JKL
MNO
4
5
6
PQRS
TUV
WXYZ
8
9
7
Hints for MP3 files:
• Folders are known as Groups,
files are known as Tracks.
• Folders are accompanied by
icon.
DISC NAME
DEF
SPACE
CH
VIDEO/TV
SLOW
0
DISPLAY
VCR
DVD
PAUSE
PLAY
STOP
1/ 2
• To exit the menu, press TOP
MENU button again.
desired folder (group) or track,
then press ENTER button.
When selecting track:
Playback will start.
This unit recommends the files
recorded under the following circumstances:
• Sampling frequency: 44.1kHz or 48kHz.
• Constant bit rate: 112kbps - 320kbps.
SETUP
TIMER PROG.
ENTER
REC MONITOR
MENU/LIST TOP MENU
1
CLEAR/C-RESET ZOOM
SEARCH
MODE
RETURN
SKIP
SKIP
2
2
2
CM SKIP
Note
• The audio source of MP3 files
cannot be recorded as digital
sound by an MD or DAT deck.
• Files whole extension other
than “.mp3 (MP3)” will not be
listed in the MP3 menu.
• Some unplayable folders or
tracks may be listed in the
MP3 menu due to the
recording status.
45
Others
When selecting the folder:
The files in the folder will appear.
Press K or L button to select the
track or folder you want, then
press ENTER button.
REC/OTR
VCR functions
2
Press K / L buttons to select a
• MP3 files are accompanied by icon.
Playback will start from the
selected track and go to the
next one in turn.
• The system can recognize up to 255
groups (or folders) and up to 255 tracks.
• The name of the group and track
can be displayed in up to 32 characters. Unrecognizable characters
will be replaced with asterisks.
• If there are no files in the folder,
“No Files” will be displayed.
Changing the SETUP menu
FOLDER NAME 1
FOLDER NAME 2
FOLDER NAME 3
FOLDER NAME 4
FOLDER NAME 5
FOLDER NAME 6
1 FILE NAME 1
2 FILE NAME 2
OPEN/CLOSE
Editing
List of MP3 Files
AUDIO
Recording
tray with its label facing up
and make sure to align the
disc to the disc tray guide.
4
5
Getting started
2
Press OPEN/CLOSE A but-
playing.
Playback will start.
Connections
press DVD button.
When you are playing a DVD or
an audio CD, turn the TV on and
be sure to select the input to
which the unit is connected.
4
Press PLAY B button to start
Before you start
Basic playback (cont’d)
Playing discs
Basic playback (cont’d)
Playing discs using the disc menu
DVD-V
A DVD disc contains a disc menu
that describes the contents or
allows you to customize the playback. For example, the menu may
offer choices for subtitle languages, special features, or chapter
selection.
Sometimes these are displayed
automatically when you start playback, sometimes they only appear
when you press MENU / LIST
button.
First:
2
Select an item using K / L /
{ / B buttons, then press
ENTER button to confirm.
Continue this step to set up all
the features you want or to start
playing the disc from the menu.
MENU / LIST button:
Displays a DVD disc menu which
varies with the disc and may be
the same as the ‘Title menu.’
DVD
1
Press MENU / LIST button.
The DVD main menu will appear.
If the feature is not available,
may appear on the TV screen.
K / L / { / B buttons:
Moves the cursor around screen.
REC SPEED
.@/:
1
ABC
2
3
GHI
JKL
MNO
AUDIO
DEF
4
5
6
PQRS
TUV
WXYZ
8
9
7
OPEN/CLOSE
SPACE
CH
VIDEO/TV
SLOW
0
DISPLAY
VCR
DVD
PAUSE
PLAY
1
2
3
STOP
REC/OTR
SETUP
TIMER PROG.
ENTER
REC MONITOR
MENU/LIST TOP MENU
CLEAR/C-RESET ZOOM
SEARCH
MODE
RETURN
SKIP
SKIP
CM SKIP
Enter button:
Selects the currently highlighted
menu option.
Number buttons:
Selects a numbered menu option
(some discs only). Press ENTER
button after.
3
Press MENU / LIST button to
exit the menu.
46
2
POWER
Note
• Menus vary among discs.
Refer to the information
accompanying the disc for
details.
2
Playing discs
Before you start
Basic playback (cont’d)
Playing discs using the title menu
DVD-V
DVD
2
Select a title to play using the
K / L / { / B buttons, then
press ENTER button.
Playback will begin at the title you
selected.
2
POWER
REC SPEED
.@/:
1
ABC
2
3
GHI
JKL
MNO
AUDIO
DEF
4
5
6
PQRS
TUV
WXYZ
8
9
7
OPEN/CLOSE
Connections
Some DVDs have a title menu,
which lists the titles available on
them. It helps you to start playback at a specific title.
First:
SPACE
CH
VIDEO/TV
SLOW
0
Press TOP MENU button.
The title menu will appear.
DISPLAY
If the feature is not available,
may appear on the TV screen.
PAUSE
STOP
SETUP
1
2
3
TIMER PROG.
ENTER
REC MONITOR
MENU/LIST TOP MENU
CLEAR/C-RESET ZOOM
SEARCH
MODE
RETURN
SKIP
2
SKIP
CM SKIP
Recording
Enter button:
Selects the current highlighted
menu option.
DVD
PLAY
REC/OTR
K / L / { / B buttons:
Moves the cursor around screen.
VCR
Number buttons:
Selects a numbered menu option
(some discs only). Press ENTER
button after.
Note
Press TOP MENU button to
exit the title menu.
• The TOP MENU button will
not always be active with all
DVDs.
• Menus vary among discs.
Refer to the information
accompanying the disc for
details.
Editing
ABOUT THE PBC FUNCTION OF VIDEO CD
Playing discs
3
Getting started
1
TOP MENU button:
Displays the ‘Title menu’ of a
DVD disc which varies with the
disc.
Playing Video CDs using the title menu
1. When playing a Video CD with PBC function, the title menu
This unit conforms to ver.1.1 and ver.2.0 of Video CD
standard, with PBC function.
Ver.1.1 (without PBC function): You can enjoy playback picture as
well as music CD.
Ver.2.0 (with PBC function): While using a Video CD with PBC function, “PBC” appears on the screen and the display.
• Playback will begin at the selected title.
3. Press RETURN button to go back to the title menu.
Cancelling and Recalling the PBC function
1. Press SETUP button to display SETUP/CD menu.
• SETUP/CD menu will appear.
2. Select “CD” using { / B buttons, then press ENTER button.
• CD Playback Mode menu will appear.
3. Select “PBC (Video CD only)” using K / L buttons, then press
ENTER button.
4. Select “OFF” on the pop-up menu, using K / L buttons, then
press ENTER button.
5. Press SETUP button to exit the menu.
6. To recall the PBC function, select “ON” in the step 4 above.
Others
NOTE:
When playing Video CDs with PBC function, only “pbc” is
displayed instead of the playing time and current track indications
on the front panel display. Also, some operations cannot be
performed unless the function is cancelled intentionally by you or
automatically.
The operations which are not available when the PBC function is
set to ON are indicated by the following symbol in this manual:
2. Press Number buttons to select the desired title.
VCR functions
What is PBC? “PBC” stands for Playback Control.
You can play interactive software using menu screens. Refer to
instructions provided with the Video CD.
will appear automatically.
Changing the SETUP menu
VCD
VCD
(PBC OFF)
47
Playing discs
Special playback
Resume play
Video
DVD-V
DVD-R
DVD-RW
2
VR
CD
DVD-RW
VCD
MP3
Press PLAY B button.
In a few seconds, playback will
resume from the point at which it
stopped last.You can resume play
at the same point even if you turn
off the unit.
(PBC OFF)
You can resume play from where
you stopped playing the disc last.
1
During playback, press STOP
C button.
The resume message will appear.
Screen:
POWER
REC SPEED
.@/:
1
ABC
2
3
GHI
JKL
MNO
4
5
6
TUV
WXYZ
8
9
PQRS
7
AUDIO
OPEN/CLOSE
DEF
SPACE
CH
VIDEO/TV
SLOW
0
DVD
VCR
DISPLAY
PAUSE
PLAY
To cancel the resume play and
start playing the disc from the
beginning, press STOP C button a
second time while playback is
stopped.
STOP
REC/OTR
SETUP
TIMER PROG.
ENTER
REC MONITOR
2
1
2
Note
• For Video CDs, if you turn
PBC ON using the setup
menu, the resume function is
canceled.
• For MP3 files, playback will
resume from the beginning of
the track at which playback
was stopped.
Resume ON
Fast forward / Fast reverse
DVD-V
DVD-R
Video
VR
DVD-RW
DVD-RW
CD
VCD
MP3
1
POWER
REC SPEED
AUDIO
.@/:
1
ABC
DEF
2
3
GHI
JKL
MNO
4
5
6
TUV
WXYZ
8
9
PQRS
7
During playback, press D or E button.
Every time you press D or E button, approximate speed will be
changed as follows.
g
g
x40
h
x20
h
g
x5
h
Normal
speed
playback
g
h
g
x2
h
g
x20
h
x40
SPACE
48
CH
VIDEO/TV
SLOW
0
DISPLAY
DVD
VCR
PAUSE
PLAY
1
STOP
REC/OTR
SETUP
REC MONITOR
For Audio CDs, approximate speed is fixed at x8 with sound.
For Video CDs, forward/reverse speeds are x2, x8, x16.
For MP3 files, approximate speed is fixed at x8.
To return to the normal playback, press PLAY B button.
OPEN/CLOSE
MENU/LIST TOP MENU
TIMER PROG.
1
1
ENTER
RETURN
Note
• Forward/reverse speed will be
indicated with icons as follows.
Forward (Approx. Speed)
x2:
x20:
x40:
Reverse (Approx. Speed)
x5:
x20:
x40:
Playing discs
Before you start
Special playback (cont’d)
Skipping TV commercials during play
DVD-R
Video
VR
DVD-RW
DVD-RW
e.g. Press CM SKIP button once
7
8
9
SPACE
You can skip TV commercials by
pressing CM SKIP button, so that
you can enjoy the recorded programs without interruption.
SLOW
0
VCR
DISPLAY
DVD
PAUSE
Connections
PLAY
STOP
REC/OTR
CM Skip
30 sec.
1
SETUP
TIMER PROG.
ENTER
REC MONITOR
MENU/LIST TOP MENU
CLEAR/C-RESET ZOOM
(forwarding 30 seconds.)
SEARCH
MODE
RETURN
SKIP
SKIP
Getting started
During playback, press CM
SKIP button.
Normal playback will start 30 seconds ahead from the point you
press CM SKIP button.
Every time you press CM SKIP
button, the searching point will
move 30 seconds ahead.
You can press up to 6 times (180
seconds).
CM SKIP
1
Recording
B
Playback will restart automatically.
Playing discs
Pause
Video
DVD-V
DVD-R
DVD-RW
VR
DVD-RW
CD
MP3
1
2
Press PLAY B button to
resume play.
REC SPEED
.@/:
1
ABC
2
3
GHI
JKL
MNO
4
5
6
TUV
WXYZ
8
9
PQRS
7
AUDIO
OPEN/CLOSE
DEF
SPACE
CH
VIDEO/TV
SLOW
0
DISPLAY
2
VCR
DVD
PAUSE
1
Editing
During playback, press
PAUSE F button.
Playback will pause and sound will
be muted.
POWER
PLAY
SETUP
TIMER PROG.
ENTER
REC MONITOR
MENU/LIST TOP MENU
CLEAR/C-RESET ZOOM
SEARCH
MODE
Changing the SETUP menu
STOP
REC/OTR
RETURN
SKIP
SKIP
CM SKIP
VCR functions
Others
49
Playing discs
Special playback (cont’d)
Step by step playback
Video
DVD-V
DVD-R
DVD-RW
DVD-RW
VCD
1
During playback, press
PAUSE F button.
Playback will pause and sound will
be muted.
TUV
WXYZ
7
8
9
SPACE
2
VR
PQRS
VIDEO/TV
SLOW
0
Press SKIP G button
repeatedly.
Playback will advance one frame
(or step) at a time when you
press the skip button with the
sound muted.
To play step by step backward:
Press SKIP H button repeatedly.
Every time you press the button,
playback will go backward by one
frame.
3
DVD
VCR
DISPLAY
PAUSE
PLAY
1
3
STOP
REC/OTR
SETUP
TIMER PROG.
ENTER
REC MONITOR
MENU/LIST TOP MENU
RETURN
CLEAR/C-RESET ZOOM
SEARCH
MODE
SKIP
SKIP
CM SKIP
2
Note
• Only Step by Step forward is
available when playing Video
CDs.
Press PLAY B button to
resume play.
Slow forward / Slow reverse play
DVD-V
DVD-R
Video
VR
DVD-RW
DVD-RW
VCD
1
During playback, press PAUSE k button, then press D or E
button.
Every time you press D or E button, approximate speed will be
changed as follows.
POWER
REC SPEED
.@/:
1
ABC
2
3
GHI
JKL
MNO
4
5
6
TUV
WXYZ
8
9
PQRS
7
AUDIO
OPEN/CLOSE
DEF
SPACE
CH
VIDEO/TV
SLOW
0
DISPLAY
g
g
x1/4
h
x1/8
h
g
x1/16
g
Pause
h
h
g
x1/16
h
DVD
VCR
PAUSE
g
x1/8
h
x1/2
PLAY
1
STOP
REC/OTR
SETUP
To return to the normal playback, press PLAY B button.
REC MONITOR
MENU/LIST TOP MENU
TIMER PROG.
1
1
1
ENTER
RETURN
Note
• Only Slow forward is available
when playing Video CDs.
• Forward/reverse speed will be
indicated with icons as follows.
Forward (Approx. Speed)
x1/16:
x1/8:
x1/2:
Reverse (Approx. Speed)
x1/16:
x1/8:
x1/4:
50
Playing discs
Zoom
STOP
REC/OTR
Video
DVD-V
DVD-R
DVD-RW
VR
VCD
DVD-RW
During playback, press
ZOOM button.
Zoom menu will appear.
Screen:
1
x1.2
01:23:45
x1.5
1
SEARCH
MODE
3
CM SKIP
Select a desired zoom position
using K / L / { / B buttons, then
press ENTER button.
The zoom play will start.
• When selecting a smaller factor
than the current one, the zoom
area will not be displayed.
• To remove the zoom menu, press
ZOOM button again at step 1.
• To cancel the zoom function,
select x1.0 using { / B buttons,
then press ENTER button.
Marker Setup
DVD-RW
Screen:
1
VR
1
DVD-Video
01:23:45
VCD
(PBC OFF)
POWER
REC SPEED
AUDIO
.@/:
1
ABC
DEF
2
3
GHI
JKL
MNO
4
5
6
TUV
WXYZ
8
9
PQRS
1
2
3
4
5
6
This feature allows you to assign
a specific point on a disc to be
called back later.
7
SPACE
OPEN/CLOSE
Playing discs
Video
CD
2
3
CH
VIDEO/TV
SLOW
0
1
DISPLAY
DVD
VCR
PAUSE
Editing
PLAY
1
STOP
1
1
01:23:45
DVD-Video
REC/OTR
SETUP
TIMER PROG.
ENTER
3
Select a desired marker num-
REC MONITOR
ber using { / B buttons.
When it reaches the desired
point, press ENTER button.
CLEAR/C-RESET ZOOM
MENU/LIST TOP MENU
SEARCH
MODE
CM SKIP
RETURN
SKIP
SKIP
2
3
4
Note
4
To return to the marker later,
2
51
Others
Select
icon using { / B
buttons, then press ENTER
button.
Marker setup menu will appear.
VCR functions
select the desired marker
number using { / B buttons,
then press ENTER button.
• To clear a marker, select the
marker number to be cleared,
then press CLEAR/C-RESET
button.
• All markers will be erased
when you do the following:
– Opening the disc tray.
– Turning off the power.
– Recording to a recordable
disc.
– Changing the mode between
Original and Playlist.(VR mode)
• You can mark up to 6 points.
Changing the SETUP menu
During playback, press DISPLAY button.
The display menu will appear.
Screen:
Recording
There are four options
(x1.0,x1.2,x1.5 and x2.0), these
are displayed excluding the current zoom rate.
DVD-RW
SKIP
Note
x2.0
DVD-R
SKIP
DVD-Video
B
DVD-V
RETURN
MENU/LIST TOP MENU
CLEAR/C-RESET ZOOM
Getting started
1
using { / B buttons, then
press ENTER button.
The zoom area will be displayed.
TIMER PROG.
ENTER
REC MONITOR
Connections
1
2
Select a desired zoom factor
SETUP
Before you start
Special playback (cont’d)
Playing discs
Search
Title/Chapter search
Video
DVD-V
DVD-R
DVD-RW
VR
DVD-RW
Using SKIP H / G buttons
Using DISPLAY button
1
1
During playback, press SKIP
G button to skip the current title or chapter and
move to the next.
The title or chapter will move
forward one at a time.
During playback, press DISPLAY button.
The display menu will appear.
Screen:
2
POWER
REC SPEED
.@/:
1
ABC
2
3
GHI
JKL
MNO
4
5
6
PQRS
TUV
WXYZ
8
9
7
SPACE
CH
VIDEO/TV
SLOW
0
1
DISPLAY
VCR
DVD
PAUSE
PLAY
1
1
01:23:45
STOP
DVD-Video
REC/OTR
SETUP
TIMER PROG.
ENTER
MENU/LIST TOP MENU
2
Select
icon using { / B
buttons, then press ENTER
button.
‘T’ for title will be highlighted.
Title:
Enter a desired title number
to search using K / L buttons
or number buttons, then
press ENTER button.
Title search will start.
Chapter:
To move to ‘C’ for chapter, press
B button.
Enter a desired chapter number to search using K / L buttons or number buttons, then
press ENTER button.
Chapter search will start.
52
OPEN/CLOSE
DEF
REC MONITOR
To go back to the previous title
or chapter, press SKIP H button.The title or chapter will move
backward one title at a time.
AUDIO
CLEAR/C-RESET ZOOM
SEARCH
MODE
CM SKIP
RETURN
SKIP
SKIP
2
1
Playing discs
Before you start
Search (cont’d)
Track search
CD
VCD
MP3
(PBC OFF)
1
1
During playback, press SKIP
G button to skip the current track and move to the
next.
The track will move forward one
track at a time.
During playback, press DISPLAY button.
The display menu will appear.
Screen:
1
01:23:45
Audio CD
POWER
REC SPEED
.@/:
1
ABC
2
3
GHI
JKL
MNO
AUDIO
DEF
4
5
6
PQRS
TUV
WXYZ
8
9
7
OPEN/CLOSE
SPACE
CH
VIDEO/TV
SLOW
0
DISPLAY
1
VCR
DVD
PAUSE
PLAY
STOP
To go back to the previous track,
press SKIP H button.The track
will move backward by one at a
time.
REC/OTR
SETUP
2
TIMER PROG.
ENTER
REC MONITOR
MENU/LIST TOP MENU
RETURN
CLEAR/C-RESET ZOOM
Select
icon using { / B
buttons, then press ENTER
button.
‘T’ for track will be highlighted.
SEARCH
MODE
SKIP
SKIP
CM SKIP
2
3
1
Getting started
Using DISPLAY button
Connections
Using SKIP H / G buttons
Recording
3
Note
• For Video CDs, without turning PBC OFF manually, you
can perform the track search
function in the STOP mode.
Video
DVD-V
DVD-R
DVD-RW
VR
CD
DVD-RW
VCD
1
During playback, press DISPLAY button.
The display menu will appear.
Screen for DVD:
WXYZ
8
9
SPACE
DISPLAY
1
01:23:45
SETUP
TIMER PROG.
ENTER
REC MONITOR
MENU/LIST TOP MENU
CLEAR/C-RESET ZOOM
RETURN
SKIP
SKIP
2
3
CM SKIP
DVD-Video
Screen for CD:
Audio CD
Enter a desired time to
search using K / L buttons or
number buttons, then press
ENTER button.
Time search will start.
Note
• For Video CDs, without turning PBC OFF manually, you
can perform the time search
function in the STOP mode.
• Time search function is available only in the same track or
title.
53
Others
01:23:45
PAUSE
STOP
REC/OTR
,
3
1
DVD
VCR functions
1
SLOW
VCR
PLAY
SEARCH
MODE
1
VIDEO/TV
0
Select
icon using { / B
buttons, then press ENTER
button.
‘T’ for title or track will be highlighted.
To move to the clock icon
press B button.
TUV
7
Changing the SETUP menu
(PBC OFF)
2
PQRS
Editing
Time search
Playing discs
Enter a desired track number
to search using K / L buttons
or number buttons, then
press ENTER button.
Track search will start.
Playing discs
Repeat/Random/Program play
Repeat play
Video
DVD-V
DVD-R
DVD-RW
VR
CD
DVD-RW
VCD
MP3
Title:
The current title will be played
repeatedly. (DVD only)
(PBC OFF)
1
During playback, press DISPLAY button.
The display menu will appear.
1
1
01:23:45
DVD-Video
Chapter:
The current chapter will be played
repeatedly. (DVD only)
POWER
REC SPEED
.@/:
1
ABC
2
3
GHI
JKL
MNO
4
5
6
PQRS
TUV
WXYZ
8
9
7
AUDIO
DEF
SPACE
icon using { / B buttons, then press ENTER button.
Repeat menu will appear.
Screen:
1
1
01:23:45
DVD-Video
DISPLAY
1
All:
The current disc will be played
repeatedly. CD,VCD, MP3 and
DVD-RW (VR mode only)
SLOW
DVD
VCR
OFF
Title
Chapter
A-B
3
Select a desired option to
repeat using K / L buttons,
then press ENTER button.
The selected repeat play will start.
Track:
The current track will be played
repeatedly. (CD,VCD, MP3 only)
Group:
The current group will be played
repeatedly. (MP3 only)
PAUSE
PLAY
STOP
REC/OTR
SETUP
TIMER PROG.
ENTER
REC MONITOR
A-B:
The A-B point will be played
repeatedly.
When pressing ENTER button
while A-B is highlighted, the starting point (A) will be decided.
Press ENTER button again to
select the ending point (B).
CH
VIDEO/TV
0
RETURN
MENU/LIST TOP MENU
2
Select
OPEN/CLOSE
CLEAR/C-RESET ZOOM
SEARCH
MODE
SKIP
SKIP
2
3
CM SKIP
Note
• The A-B Repeat playback can
only be set within the current
title (for DVDs), or current
track (for Audio CDs/Video
CDs).
• To cancel repeat playback,
select OFF at step 2.
• You cannot select “Group”
during the random playback
of MP3 files.
Random play
CD
VCD
MP3
(PBC OFF)
With this function, you can play a
disc randomly instead of playing it
in the original order.
First:
DVD
1
Press SETUP button to display SETUP/CD menu.
SETUP/CD menu will appear.
Screen:
2
Select “CD” using { / B buttons, then press ENTER button.
CD Playback Mode menu will
appear.
DVD
PAUSE
PLAY
1
STOP
REC/OTR
SETUP
REC MONITOR
CLEAR/C-RESET ZOOM
CD Playback Mode
Random Play
TIMER PROG.
ENTER
RETURN
SKIP
SKIP
2
3
Program Play
PBC (Video CD only)
OFF
K / L buttons, then press
ENTER button.
Random playback will start.
54
VCR
MENU/LIST TOP MENU
3
Select “Random Play” using
Setup Menu
DISPLAY
Note
• To cancel random playback,
press STOP C button twice
during random playback.
• For Video CDs, without turning PBC OFF manually, you
can perform this function
directly.
Playing discs
Before you start
Repeat/Random/Program play (cont’d)
Program play
CD
VCD
(PBC OFF)
DVD
1
3
Select “Program Play” using
K / L buttons, then press
ENTER button.
Program play list will appear.
4
POWER
REC SPEED
.@/:
1
ABC
2
3
GHI
JKL
MNO
AUDIO
DEF
4
5
6
PQRS
TUV
WXYZ
8
9
7
SPACE
CH
VIDEO/TV
SLOW
0
CD Playback Mode > Program Play
DISPLAY
VCR
DVD
PAUSE
-- -- -- -- -- -- -- -- -- --- -- -- -- -- -- -- -- -- --
5
PLAY
-- -- -- -- -- -- -- -- -- --- -- -- -- -- -- -- -- -- --- -- -- -- -- -- -- -- -- -Total
00:00:00
STOP
1
REC/OTR
SETUP
TIMER PROG.
ENTER
REC MONITOR
MENU/LIST TOP MENU
CLEAR/C-RESET ZOOM
SEARCH
MODE
CM SKIP
SKIP
SKIP
2
3
4
Select a desired track using K
/ L buttons, then press
ENTER button or B button.
A cursor will move to the next.
Setup Menu
Playing discs
2
CD Playback Mode > Program Play
Select “CD” using { / B buttons, then press ENTER button.
CD Playback Mode menu will
appear.
07 - - - - - - - - - - - - - - - -
--
-- -- -- -- -- -- -- -- --
--
-- -- -- -- -- -- -- -- --
--
-- -- -- -- -- -- -- -- --- -- -- -- -- -- -- -- --
---
Total
Recording
4
RETURN
Getting started
Press SETUP button to display SETUP/CD menu.
SETUP/CD menu will appear.
Screen:
OPEN/CLOSE
Connections
You can program the disc to play
in your desired order.
First:
00:04:30
CD Playback Mode
Editing
Random Play
Program Play
PBC (Video CD only)
OFF
5
Note
Others
55
VCR functions
• To erase tracks you selected,
press CLEAR/C-RESET button.
• You can make up to 50 program settings.
• To cancel program playback,
press STOP C button twice
during program playback.
• You may also select a desired
track using Number buttons
at step 4.
• For Video CDs, without turning PBC OFF manually, you
can perform this function
directly.
Changing the SETUP menu
Press PLAY B button to start
program playback.
Program playback will start.
Playing discs
Selecting audio and video formats
You can select an audio or video format as you prefer depending on
the contents of the disc you are playing.
Switching audio soundtrack
VR
DVD-V
DVD-RW
When playing a DVD-Video disc
recorded with two or more
soundtracks (these are often in
different languages), you can
switch between them anytime
during playback.
On DVD-RW discs recorded in
VR mode, you can switch to main
(L), sub audio (R) or a mix of
both (L/R).
1
During playback, press DISPLAY button.
The display menu will appear.
Screen:
1
1
01:23:45
<DVD-RW VR mode>
1
1
00:00:00
1 Dolby Digital Dual L/R
2 Dolby Digital 2ch ----
1
00:00:00
1 Dolby Digital 5.1ch English
2 Dolby Digital 2ch Japanese
56
DVD-Video
.@/:
1
ABC
2
3
GHI
JKL
MNO
4
5
6
PQRS
TUV
WXYZ
8
9
AUDIO
OPEN/CLOSE
DEF
CH
VIDEO/TV
SLOW
0
DISPLAY
1
3
Select a desired audio soundtrack using K / L buttons,
then press ENTER button.
<DVD-Video>
Audio soundtrack will switch.
<DVD-RW VR mode>
00:00:00
VCR
DVD
PAUSE
PLAY
STOP
REC/OTR
SETUP
TIMER PROG.
ENTER
REC MONITOR
MENU/LIST TOP MENU
CLEAR/C-RESET ZOOM
SEARCH
MODE
1
1 Dolby Digital Dual
2 Dolby Digital 2ch
Select
icon using { / B
buttons, then press ENTER
button.
Audio menu will appear.
<DVD-Video>
REC SPEED
SPACE
DVD-Video
2
POWER
7
1
1
DVD-RW
VR Original
DVD-RW
VR Original
CM SKIP
RETURN
SKIP
SKIP
2
3
4
L/R
L
R
4
Select a desired audio channel using K / L buttons, then
press ENTER button.
Audio channel will switch.
Note
• Some discs will only allow
you to change the soundtrack from the disc’s menu.
Press TOP MENU button or
MENU / LIST button to display the disc’s menu.
• On DVD-RW discs recorded
in VR mode that may have
both a main and a sub audio
channel, you can switch to
main (L), sub audio (R), or a
mix of both (L/R).
• This unit CANNOT record
in both stereo and SAP
(Secondary Audio Program)
at the same time.
Playing discs
Before you start
Selecting audio and video formats (cont’d)
CD
VCD
MP3
1
2
Select
icon using { / B
buttons, then press ENTER
button.
Audio menu will appear.
POWER
REC SPEED
.@/:
1
ABC
2
3
GHI
JKL
MNO
AUDIO
DEF
4
5
6
PQRS
TUV
WXYZ
8
9
7
OPEN/CLOSE
Connections
When playing Audio CDs,Video
CDs or MP3 files you can switch
between stereo, just the left
channel or just the right channel.
SPACE
CH
VIDEO/TV
SLOW
0
1
Audio CD
00:00:00
1
3
Select a desired audio channel using K / L buttons, then
press ENTER button.
Audio channel will switch.
DVD
PLAY
STOP
REC/OTR
SETUP
TIMER PROG.
ENTER
REC MONITOR
MENU/LIST TOP MENU
1
00:00:00
PAUSE
RETURN
Audio CD
CLEAR/C-RESET ZOOM
L/R
L
R
SEARCH
MODE
SKIP
SKIP
2
3
CM SKIP
Recording
Playing discs
Switching subtitles
VR
DVD-V
DVD-RW
2
Select
icon using { / B
buttons, then press ENTER
button.
Subtitle menu will appear.
1
POWER
REC SPEED
.@/:
1
ABC
2
3
GHI
JKL
MNO
AUDIO
DEF
4
5
6
PQRS
TUV
WXYZ
8
9
7
SPACE
1
1
1
00:00:00
DVD-Video
SLOW
DVD
1
01:23:45
PAUSE
PLAY
STOP
REC/OTR
SETUP
TIMER PROG.
ENTER
REC MONITOR
RETURN
DVD-Video
CLEAR/C-RESET ZOOM
Select a desired subtitle language using K / L buttons,
then press ENTER button.
Subtitle will be displayed in the
selected language.
SKIP
Note
• Some discs will only allow
you to change the subtitle
from the disc’s menu. Press
TOP MENU button or MENU
/ LIST button to display the
disc’s menu.
57
Others
When selecting “OFF,” subtitle will
disappear.
SKIP
CM SKIP
VCR functions
3
SEARCH
MODE
2
3
Changing the SETUP menu
OFF
1 English
2 Japanese
VCR
MENU/LIST TOP MENU
1
CH
VIDEO/TV
0
DISPLAY
During playback, press DISPLAY button.
The display menu will appear.
Screen:
OPEN/CLOSE
Editing
Many DVD Video discs have subtitles in one or more languages.
The case usually tells you which
subtitle languages are available.
You can switch subtitle languages
anytime during playback.
Getting started
During playback, press DISPLAY button.
The display menu will appear.
Screen:
VCR
DISPLAY
Playing discs
Selecting audio and video formats (cont’d)
Switching camera angles
DVD-V
Some DVD Video discs feature
scenes shot from two or more
angles, check the case for details:
it should be marked with an angle
icon if it contains multi-angle
scenes.
2
Select
icon using { / B
buttons, then press ENTER
button.
Angle will switch each time you
press ENTER button.
1
01:23:45
.@/:
1
ABC
2
3
GHI
JKL
MNO
AUDIO
OPEN/CLOSE
DEF
4
5
6
PQRS
TUV
WXYZ
8
9
SPACE
CH
VIDEO/TV
SLOW
0
1
1
REC SPEED
7
During playback, press DISPLAY button.
The display menu will appear.
Screen:
1
POWER
VCR
DISPLAY
DVD
PAUSE
PLAY
STOP
REC/OTR
SETUP
TIMER PROG.
ENTER
REC MONITOR
MENU/LIST TOP MENU
DVD-Video
RETURN
CLEAR/C-RESET ZOOM
SEARCH
MODE
SKIP
2
SKIP
CM SKIP
Angle icon appears when an additional camera angle is available.
Reducing block noise
Video
DVD-V
DVD-R
DVD-RW
1
VR
1
00:00:00
VCD
DVD-RW
OFF
Type 1
Type 2
1
REC SPEED
AUDIO
.@/:
1
ABC
DEF
2
3
GHI
JKL
MNO
4
5
6
TUV
WXYZ
8
9
PQRS
7
SPACE
During playback, press DISPLAY button.
The display menu will appear.
Screen:
1
1
01:23:45
DVD-Video
2
Select
icon using { / B
buttons, then press ENTER
button.
NR menu will appear.
OPEN/CLOSE
CH
VIDEO/TV
SLOW
0
1
DISPLAY
DVD
VCR
PAUSE
PLAY
STOP
3
Select a desired option using
K / L buttons, then press
ENTER button.
Your setting will be activated.
58
POWER
DVD-Video
This function reduces noise in the
playback picture.When playing
back discs recorded in long time
mode such as SLP or SEP mode,
select "Type 1" or "Type 2".
("Type 2" is more effective.)
When playing back discs with little noise such as DVD-Video
discs, select "OFF".
REC/OTR
SETUP
TIMER PROG.
ENTER
REC MONITOR
MENU/LIST TOP MENU
CLEAR/C-RESET ZOOM
SEARCH
MODE
CM SKIP
RETURN
SKIP
SKIP
2
3
Editing
Editing discs in Video mode
Title list allows you to easily check the titles recorded on the disc.You can choose a title to play from on
this screen and easily edit the titles as you prefer.
You can edit discs in Video mode for the following items.
Note that once you edit titles, they will not remain as
recorded originally.
• Deleting titles (Refer to page 61)
• Putting names on titles (Refer to pages 62-63)
• Setting or clearing chapter markers (Refer to page 64)
Disc > Edit > Original
1
2
3
JAN/1 1:00AM
JAN/1 2:00AM
JAN/1 3:00AM
5
6
JAN/1 5:00AM
JAN/1 6:00AM
4
JAN/1 4:00AM
1
Note
2
7
• Once a disc is finalized, editing the disc or
recording to the disc will not be available.
(Except DVD-RW discs in VR mode.)
• A playlist is not available with DVD-R discs and
DVD-RW discs in Video mode.
Getting started
1
Connections
Guide to a title list
Before you start
Information on disc editing
Disc > Edit > Original
JAN/1 1:00AM CH12
Title Delete
Scene Delete
Edit Title Name
Chapter Mark
Index Picture Set
Protect OFF ON
Recording
1
XP
0:01:25
6
5
Playing discs
8 3
4
Editing
1. Titles recorded on the disc can be selected for
editting purposes by pressing ENTER button
with the cursor on the title.
2. Protect icon will appear if the title has been
protected.
3. The selected title thumbnails from the title list.
4. This menu provides you with all the editing
options.The available menu options depend on
disc and format type.
5. Details of the title, which can be changed
through editing.
6. Time status bar of the title.
7. The arrow icon, which means the title list
includes a next or a previous page. Press B or
{ button by following direction of the icon.
8. Playback status of the current disc.
Changing the SETUP menu
VCR functions
Others
59
Editing
Information on disc editing (cont’d)
Editing discs in VR mode
For discs in VR mode, you can edit from “Original” menu or “Playlist” menu, which is created from the
original.
Editing original titles
Editing playlists
The following items can be used to edit the original
titles.
• Deleting titles (Refer to page 65)
• Deleting parts of titles (Refer to pages 66-67)
• Naming Titles (Refer to pages 67-68)
• Setting or clearing chapter markers (Refer to
pages 69-70)
• Setting pictures for thumbnails (Refer to pages
70-71)
• Title protection (Refer to page 72)
• Releasing titles from protection (Refer to page 73)
You can create a playlist from original titles, so that
you can edit as you prefer without losing original
titles.
The following items you can edit with a playlist.
• Deleting titles (Refer to page 74)
• Deleting parts of titles (Refer to pages 75-76)
• Naming Titles (Refer to pages 76-77)
• Setting or clearing chapter markers (Refer to
pages 78-79)
• Setting pictures for thumbnails (Refer to pages
79-80)
• Adding titles to a playlist (Refer to page 81)
• Deleting a playlist (Refer to page 82)
Note
• Original titles once edited will not remain as recorded originally.When you want to leave the original as
it is, edit the playlist as you prefer. (Refer to pages 74-82)
60
Editing
Before you start
Editing DVD-RW discs in Video mode
Deleting titles
Video
DVD-RW
3
Select a desired title using K /
L / { / B buttons, then press
ENTER button.
Edit menu will appear.
POWER
REC SPEED
.@/:
1
ABC
2
3
GHI
JKL
MNO
4
5
6
TUV
WXYZ
8
9
7
SPACE
Disc > Edit
DISPLAY
1
SLOW
VCR
DVD
PAUSE
PLAY
XP
0:01:25
1
6
STOP
REC/OTR
SETUP
MENU/LIST TOP MENU
CLEAR/C-RESET ZOOM
SEARCH
MODE
Select “Title Delete” using K
/ L buttons, then press
ENTER button.
Option window will appear.
CM SKIP
RETURN
SKIP
SKIP
1
2
3
4
5
Recording
4
TIMER PROG.
ENTER
REC MONITOR
Getting started
Title Delete
Edit Title Name
Chapter Mark
1
Edit
CH
VIDEO/TV
0
JAN/ 1 1:00AM CH12
Disc
OPEN/CLOSE
DEF
PQRS
DVD
Press SETUP button. Select
“DISC” using { / B buttons,
then press ENTER button.
DISC menu will appear.
AUDIO
Connections
You can delete titles which you
do not need anymore.
Be sure to know that titles once
deleted, cannot be brought back
to the disc.
When the last title in the title list
in Video mode is deleted, the disc
space available for recording will
be increased.
First:
Format
Finalize
Playing discs
Disc > Edit
1
Title Delete
Edit Title Name
Chapter Mark
Yes
JAN/ 1 1:00AM CH12
No
XP
2
0:01:25
1
1
2
3
JAN/1 1:00AM
JAN/1 2:00AM
JAN/1 3:00AM
5
Select “Yes” using { / B buttons, then press ENTER button.
Title will be deleted.
Changing the SETUP menu
Disc > Edit
Editing
Select “Edit” using K / L buttons, then press ENTER button.
Titlelist will appear.
Screen:
Disc > Edit
1
4
JAN/1 4:00AM
5
Title Delete
Edit Title Name
Chapter Mark
JAN/1 5:00AM
VCR functions
Yes
JAN/ 1 1:00AM CH12
No
XP
Writing to Disc
This operation may take a
while to be completed.
Others
6
After writing to disc is completed, press SETUP button
to exit DISC menu.
61
Editing
Editing DVD-RW discs in Video mode (cont’d)
Putting names on titles
Video
DVD-RW
You can put title names on titles
and change the title names from
this menu.
The names you put on the titles
will be displayed on a titlelist.
First:
DVD
4
Select “Edit Title Name”
using K / L buttons, then
press ENTER button.
A window for entering a title
name will appear.
5
POWER
REC SPEED
.@/:
1
ABC
2
3
GHI
JKL
MNO
AUDIO
DEF
4
5
6
PQRS
TUV
WXYZ
8
9
7
OPEN/CLOSE
CH
VIDEO/TV
SPACE
SLOW
0
VCR
DISPLAY
DVD
PAUSE
Disc > Edit > Edit Title Name
1
1
Press SETUP button. Select
“DISC” using { / B buttons,
then press ENTER button.
DISC menu will appear.
ABC
abc
123
@!?
PLAY
STOP
1
REC/OTR
SETUP
1
2
3
4
5
JAN/ 1 1:00AM CH12 XP
MENU/LIST TOP MENU
0:01:25
CLEAR/C-RESET ZOOM
Disc
SEARCH
MODE
Edit
TIMER PROG.
ENTER
REC MONITOR
RETURN
SKIP
SKIP
CM SKIP
5
Format
Finalize
To enter a title name, follow
the steps of "Guide to edit
title name" on this page.
character set
Disc > Edit > Edit Title Name
2
1
Select “Edit” using K / L buttons, then press ENTER button.
Titlelist will appear.
Screen:
ABC
abc
123
@!?
JAN/ 1 1:00AM CH12 XP
0:01:25
[ Guide to edit title name ]
[Step1]: Select a desired character set using K/ L
buttons, then press
ABC
ENTER button.
abc
123
@!?
[Step2]: Press Number buttons following by the list
below.
Select
area for entering title names
Disc > Edit
1
2
1
JAN/1 1:00AM
JAN/1 2:00AM
4
JAN/1 4:00AM
JAN/1 3:00AM
5
JAN/1 5:00AM
3
Select a desired title using K /
L / { / B buttons, then press
ENTER button.
Edit menu will appear.
Disc > Edit
1
JAN/ 1 1:00AM CH12
Title Delete
Edit Title Name
Chapter Mark
XP
0:01:25
62
0
3
When you finish entering a title
name, press ENTER button.
ABC
abc
123
@!?
<space>
<space>
0
<space>
1
”#$%
&‘ ( ) *
+ ,- ./ :;
<=>?
@[]^
_{|}!
Press
1
2
ABC
abc
2
3
DEF
def
3
4
GHI
ghi
4
5
6
JKL
jkl
5
MNO
mno
6
7
8
PQRS
pqrs
7
TUV
tuv
8
9
WXYZ
wxyz
9
* Press 1 button, character set will be changed
to the " @!? " mode automatically.
・To delete letters, press CLEAR/C-RESET button
repeatedly. Holding CLEAR/C-CRESET button
to delete all letters.
・To go on to the next entering area for letters,
press B button.
・You can enter up to 30 letters.
Editing
Before you start
Editing DVD-RW discs in Video mode (cont’d)
6
POWER
REC SPEED
.@/:
1
ABC
2
3
GHI
JKL
MNO
AUDIO
DEF
4
5
6
PQRS
TUV
WXYZ
8
9
7
OPEN/CLOSE
Connections
Select “Yes” using { / B buttons, then press ENTER button.
The name you entered will be
activated for the title.
SPACE
CH
VIDEO/TV
SLOW
0
DISPLAY
VCR
DVD
PAUSE
Disc > Edit > Edit Title Name
ABC
abc
123
@!?
Yes
No
PLAY
7
STOP
REC/OTR
SETUP
TIMER PROG.
ENTER
REC MONITOR
abc
Writing to Disc
MENU/LIST TOP MENU
CLEAR/C-RESET ZOOM
SKIP
6
SKIP
CM SKIP
Recording
This operation may take a
while to be completed.
SEARCH
MODE
RETURN
Getting started
1
7
Playing discs
After writing to disc is completed, press SETUP button
to exit DISC menu.
Editing
Changing the SETUP menu
VCR functions
Others
63
Editing
Editing DVD-RW discs in Video mode (cont’d)
Setting or clearing chapter markers
Video
DVD-RW
You can put chapter markers in
each title. Once a chapter is
marked, you can use it for the
chapter search feature.
You can set chapter markers at a
specified time you selected for
titles which are longer than 5
minutes.
First:
DVD
1
Press SETUP button. Select
“DISC” using { / B buttons,
then press ENTER button.
DISC menu will appear.
Disc > Edit
1
JAN/ 1 1:00AM CH12
Title Delete
Edit Title Name
Chapter Mark
POWER
REC SPEED
.@/:
1
ABC
2
3
GHI
JKL
MNO
4
5
6
TUV
WXYZ
8
9
SPACE
0:01:25
CH
VIDEO/TV
SLOW
0
DISPLAY
4
OPEN/CLOSE
DEF
PQRS
7
XP
AUDIO
VCR
DVD
PAUSE
PLAY
Select “Chapter Mark” using
K / L buttons, then press
ENTER button.
Option window will appear.
1
7
STOP
REC/OTR
MENU/LIST TOP MENU
CLEAR/C-RESET ZOOM
Disc > Edit
1
Edit
Format
TIMER PROG.
ENTER
REC MONITOR
SEARCH
MODE
Disc
SETUP
Title Delete
OFF
Edit Title5Name
minutes
Chapter
10Mark
minutes
15 minutes
30 minutes
60 minutes
CM SKIP
RETURN
SKIP
SKIP
1
2
3
4
5
6
Finalize
JAN/ 1 1:00AM CH12
XP
0:01:25
5
2
Select “Edit” using K / L buttons, then press ENTER button.
Titlelist will appear.
Screen:
Select a desired time using K
/ L buttons, then press
ENTER button.
Option window will appear.
Disc > Edit
1
Disc > Edit
1
1
2
Yes
3
JAN/ 1 1:00AM CH12
JAN/1 1:00AM
4
JAN/1 4:00AM
JAN/1 2:00AM
Title Delete
OFF
Edit Title5Name
minutes
Chapter
10Mark
minutes
15 minutes
30 minutes
60 minutes
No
XP
0:01:25
JAN/1 3:00AM
5
JAN/1 5:00AM
3
Select a desired title using K /
L / { / B buttons, then press
ENTER button.
Edit menu will appear.
6
Select “Yes” using { / B buttons, then press ENTER button.
A chapter marker will be added.
7
After writing to disc is completed, press SETUP button
to exit DISC menu.
64
Note
• You cannot place markers
beyond the length of a title.
• A chapter marker may be
delayed according to the
recording content.
Editing
Before you start
Editing DVD-RW discs in VR mode (Original)
Deleting titles
VR
DVD-RW
4
Select a desired title using K /
L / { / B buttons, then press
ENTER button.
Original menu will appear.
Disc Protect OFF ON
3
MNO
DEF
4
5
6
PQRS
TUV
WXYZ
8
9
Disc > Edit > Original
DISPLAY
1
JAN/ 1 1:00AM CH12
CH
VIDEO/TV
SLOW
Title Delete
Scene Delete
Edit Title Name
Chapter Mark
Index Picture Set
Protect OFF ON
XP
0:01:25
VCR
DVD
PLAY
1
7
STOP
REC/OTR
SETUP
TIMER PROG.
ENTER
REC MONITOR
MENU/LIST TOP MENU
CLEAR/C-RESET ZOOM
5
PAUSE
SEARCH
MODE
CM SKIP
RETURN
SKIP
SKIP
1
2
3
4
5
6
Playing discs
Disc > Edit > Original
1
2
Title Delete
Scene Delete
Edit Title Name
Chapter Mark
Index Picture
Protect OFF ON
Yes
Select “Edit” using K / L buttons, then press ENTER button.
Original/PlayList menu will appear.
Screen:
JAN/ 1 1:00AM CH12
No
XP
0:01:25
Editing
6
Disc > Edit
Original
Disc > Edit > Original
1
3
3
JAN/1 1:00AM
JAN/1 2:00AM
JAN/1 3:00AM
JAN/1 5:00AM
No
XP
Writing to Disc
Others
1
2
JAN/1 4:00AM
Yes
JAN/ 1 1:00AM CH12
This operation may take a
while to be completed.
1
5
Title Delete
Scene Delete
Edit Title Name
Chapter Mark
Index Picture
Protect OFF ON
VCR functions
Select “Original” using { / B
buttons, then press ENTER
button.
Original list will appear.
4
Changing the SETUP menu
Select “Yes” using { / B buttons, then press ENTER button.
Title will be deleted.
Disc > Edit > Original
Recording
Finalize
2
JKL
Getting started
Format
ABC
GHI
OPEN/CLOSE
0
Select “Title Delete” using K
/ L buttons, then press
ENTER button.
Option window will appear.
Edit
.@/:
1
AUDIO
SPACE
1
Disc
REC SPEED
7
DVD
Press SETUP button. Select
“DISC” using { / B buttons,
then press ENTER button.
DISC menu will appear.
POWER
Connections
When a title is deleted from an
original list in VR mode, the disc
space available for recording will
be increased.
Be advised that the titles once
deleted cannot be brought back
to the disc.
First:
7
After writing to disc is completed, press SETUP button
to exit DISC menu.
65
Editing
Editing DVD-RW discs in VR mode (Original) (cont’d)
Deleting parts of titles
VR
DVD-RW
You can delete part of a title, the
disc space available for recording
will be increased.
Be advised that parts, once deleted, cannot be brought back to the
disc.
First:
4
Select a desired title using K /
L / { / B buttons, then press
ENTER button.
Original menu will appear.
JAN/ 1 1:00AM CH12
Title Delete
Scene Delete
Edit Title Name
Chapter Mark
Index Picture Set
Protect OFF ON
XP
1
0:01:25
Select “Edit” using K / L buttons, then press ENTER button.
Original/PlayList menu will appear.
Screen:
JAN/ 1 1:00AM CH12
Title Delete
Scene Delete
Start
Edit Title Name
End
Chapter Mark
Preview
Index Picture
Delete
Protect OFF
XP
0:00:55
6
Press ENTER button to
decide a start point, then
press ENTER button to
decide an end point.
A cursor will move to “Preview.”
You can check a preview.
3
1
1
2
3
JAN/1 1:00AM
JAN/1 2:00AM
JAN/1 3:00AM
4
JAN/1 4:00AM
66
5
JAN/1 5:00AM
6
WXYZ
8
9
<Preview>
Before
editing
Edited
CH
VIDEO/TV
SLOW
VCR
DVD
PAUSE
STOP
REC/OTR
SETUP
TIMER PROG.
ENTER
REC MONITOR
SEARCH
MODE
2
Disc > Edit > Original
5
TUV
CLEAR/C-RESET ZOOM
1
Select “Original” using { / B
buttons, then press ENTER
button.
Original list will appear.
4
PQRS
MENU/LIST TOP MENU
Disc > Edit > Original
Original
DEF
PLAY
Select “Scene Delete” using
K / L buttons, then press
ENTER button.
Option window will appear.
Disc > Edit
3
MNO
OPEN/CLOSE
0
5
Disc Protect OFF ON
2
JKL
DISPLAY
Press SETUP button. Select
“DISC” using { / B buttons,
then press ENTER button.
DISC menu will appear.
Finalize
ABC
GHI
Disc > Edit > Original
1
Format
.@/:
1
AUDIO
SPACE
1
Edit
REC SPEED
7
DVD
Disc
POWER
Start point End point
CM SKIP
RETURN
SKIP
SKIP
1
2
3
4
5
6
Editing
Before you start
Editing DVD-RW discs in VR mode (Original) (cont’d)
8
Select “Delete” using K / L
buttons, then press ENTER
button.
Option window will appear.
Select “Yes” using { / B buttons, then press ENTER button.
Part of a title will be deleted.
POWER
REC SPEED
AUDIO
.@/:
1
ABC
DEF
2
3
GHI
JKL
MNO
4
5
6
PQRS
TUV
WXYZ
8
9
7
SPACE
1
SLOW
DVD
PAUSE
Disc > Edit > Original
1
No
Title Delete
Scene Delete
Start
Edit Title Name
End
Chapter Mark
Preview
Index Picture
Delete
Protect OFF
Yes
JAN/ 1 1:00AM CH12
XP
0:01:25
PLAY
9
STOP
REC/OTR
SETUP
TIMER PROG.
ENTER
REC MONITOR
No
XP
RETURN
MENU/LIST TOP MENU
Writing to Disc
CLEAR/C-RESET ZOOM
SEARCH
MODE
SKIP
SKIP
7
8
CM SKIP
Note
9
Naming Titles
VR
DVD-RW
DVD
2
Select “Edit” using K / L buttons, then press ENTER button.
Original/PlayList menu will appear.
Screen:
POWER
REC SPEED
AUDIO
.@/:
1
ABC
DEF
2
3
GHI
JKL
MNO
4
5
6
TUV
WXYZ
8
9
PQRS
7
SPACE
OPEN/CLOSE
Editing
You can put title names on titles
and change the title names from
this menu.
The names you put on the titles
will be displayed on a titlelist.
First:
Playing discs
After writing to disc is completed, press SETUP button
to exit DISC menu.
• You cannot select “Scene
Delete” when the number of
chapter markers in the original
or playlist is more than 900.
Recording
This operation may take a
while to be completed.
Getting started
Title Delete
Scene Delete
Start
Edit Title Name
End
Chapter Mark
Preview
Index Picture
Delete
Protect OFF
Yes
JAN/ 1 1:00AM CH12
CH
VIDEO/TV
0
VCR
DISPLAY
Disc > Edit > Original
OPEN/CLOSE
Connections
7
CH
VIDEO/TV
SLOW
0
DISPLAY
1
DVD
PAUSE
PLAY
Press SETUP button. Select
“DISC” using { / B buttons,
then press ENTER button.
DISC menu will appear.
1
STOP
REC/OTR
SETUP
Original
MENU/LIST TOP MENU
CLEAR/C-RESET ZOOM
SEARCH
MODE
RETURN
SKIP
SKIP
1
2
CM SKIP
Edit
Format
Finalize
Disc Protect OFF ON
VCR functions
Disc
TIMER PROG.
ENTER
REC MONITOR
Changing the SETUP menu
Disc > Edit
VCR
Others
67
Editing
Editing DVD-RW discs in VR mode (Original) (cont’d)
3
6
Select “Original” using { / B
buttons, then press ENTER
button.
Original list will appear.
To enter a title name, follow
the steps of "Guide to edit
title name" on this page.
character set
6
POWER
REC SPEED
.@/:
1
ABC
2
3
GHI
JKL
MNO
AUDIO
DEF
4
5
6
PQRS
TUV
WXYZ
8
9
7
OPEN/CLOSE
CH
VIDEO/TV
SPACE
Disc > Edit > Original > Edit Title Name
Disc > Edit > Original
VCR
DISPLAY
1
1
2
3
JAN/1 1:00AM
JAN/1 2:00AM
JAN/1 3:00AM
4
ABC
abc
123
@!?
1
JAN/ 1 1:00AM CH12 XP
JAN/1 4:00AM
JAN/1 5:00AM
DVD
PAUSE
PLAY
STOP
8
5
SLOW
0
REC/OTR
SETUP
0:01:25
TIMER PROG.
ENTER
REC MONITOR
MENU/LIST TOP MENU
area for entering title names
When you finish entering a title
name, press ENTER button.
4
Select a desired title using K /
L / { / B buttons, then press
ENTER button.
Original menu will appear.
Disc > Edit > Original
1
Title Delete
Scene Delete
Edit Title Name
Chapter Mark
Index Picture Set
Protect OFF ON
SEARCH
MODE
SKIP
SKIP
CM SKIP
7
Select “Yes” using { / B buttons, then press ENTER button.
The name you entered will be
activated for the title.
Disc > Edit > Original > Edit Title Name
JAN/ 1 1:00AM CH12
CLEAR/C-RESET ZOOM
3
4
5
6
7
RETURN
XP
1
0:01:25
ABC
abc
123
@!?
[ Guide to edit title name ]
[Step1]: Select a desired character set using K/ L
buttons, then press
ABC
ENTER button.
abc
123
@!?
[Step2]: Press Number buttons following by the list
below.
Select
Yes
5
No
abc
Select “Edit Title Name”
using K / L buttons, then
press ENTER button.
A window for entering a title
name will appear.
Disc > Edit > Original > Edit Title Name
1
ABC
abc
123
@!?
ABC
abc
123
@!?
<space>
<space>
0
<space>
1
”#$%
&‘ ( ) *
+ ,- ./ :;
<=>?
@[]^
_{|}!
Press
0
Writing to Disc
1
This operation may take a
while to be completed.
8
After writing to disc is completed, press SETUP button
to exit DISC menu.
2
ABC
abc
2
3
DEF
def
3
4
GHI
ghi
4
5
6
JKL
jkl
5
MNO
mno
6
7
8
PQRS
pqrs
7
TUV
tuv
8
9
WXYZ
wxyz
9
* Press 1 button, character set will be changed
to the " @!? " mode automatically.
JAN/ 1 1:00AM CH12 XP
0:01:25
68
・To delete letters, press CLEAR/C-RESET button
repeatedly. Holding CLEAR/C-CRESET button
to delete all letters.
・To go on to the next entering area for letters,
press B button.
・You can enter up to 30 letters.
Editing
Before you start
Editing DVD-RW discs in VR mode (Original) (cont’d)
Setting or clearing chapter markers
VR
DVD-RW
1
1
1
2
3
JAN/1 1:00AM
JAN/1 2:00AM
JAN/1 3:00AM
4
5
POWER
REC SPEED
.@/:
1
ABC
2
3
GHI
JKL
MNO
4
5
6
TUV
WXYZ
8
9
SPACE
JAN/1 5:00AM
OPEN/CLOSE
DEF
PQRS
7
JAN/1 4:00AM
AUDIO
CH
VIDEO/TV
SLOW
0
DISPLAY
4
VCR
DVD
PLAY
Select a desired title using K /
L / { / B buttons, then press
ENTER button.
Original menu will appear.
1
STOP
REC/OTR
SETUP
MENU/LIST TOP MENU
SEARCH
MODE
1
Disc
JAN/ 1 1:00AM CH12
Title Delete
Scene Delete
Edit Title Name
Chapter Mark
Index Picture Set
Protect OFF ON
XP
Edit
CM SKIP
RETURN
SKIP
SKIP
1
2
3
4
5
6
0:01:25
Playing discs
Format
Finalize
Disc Protect OFF ON
5
Select “Chapter Mark” using
K / L buttons, then press
ENTER button.
Option window will appear.
2
Editing
Select “Edit” using K / L buttons, then press ENTER button.
Original/PlayList menu will appear.
Screen:
Disc > Edit > Original
1
Chapter 1/1
Changing the SETUP menu
JAN/ 1 1:00AM CH12
Title Delete
Scene Delete
Edit Title Name
ChapterAdd
Mark
Delete
Index Picture
Protect OFF ON
XP
Disc > Edit
0:01:25
6
3
Disc > Edit > Original
1
Chapter 1/1
Title Delete
Scene Delete
Edit Title Name
ChapterAdd
Mark
Delete
Index Picture
Protect OFF ON
Others
Select “Original” using { / B
buttons, then press ENTER
button.
Original list will appear.
Select “Add” or “Delete”
using K / L buttons, then
press ENTER button.
Option window will appear.
<Add>:
VCR functions
Original
Recording
Disc > Edit > Original
TIMER PROG.
ENTER
REC MONITOR
CLEAR/C-RESET ZOOM
Press SETUP button. Select
“DISC” using { / B buttons,
then press ENTER button.
DISC menu will appear.
PAUSE
Getting started
DVD
Disc > Edit > Original
Connections
You can put chapter markers in
each title. Once a chapter is
marked, you can search for it
using the chapter search feature.
You can put a chapter marker
anywhere you want.
When the number of chapter
markers in the original list comes
to 999 in total, you cannot add
any more chapter markers.
First:
F
Yes
JAN/ 1 1:00AM CH12
No
XP
0:01:25
69
Editing
Editing DVD-RW discs in VR mode (Original) (cont’d)
<Delete>:
Disc > Edit > Original
1
Chapter 2/2
Title Delete
Scene Delete
Edit Title Name
ChapterAdd
Mark
Delete
Index Picture
Protect OFF ON
The chapter marker which you
selected will be deleted.
<Delete>:
Disc > Edit > Original
POWER
REC SPEED
AUDIO
.@/:
1
ABC
DEF
2
3
GHI
JKL
MNO
4
5
6
TUV
WXYZ
8
9
F
Yes
JAN/ 1 1:00AM CH12
No
1
XP
Chapter 2/2
0:01:25
Yes
• You cannot delete the first
chapter marker of each title.
7
Select “Yes” using { / B buttons, then press ENTER button.
A chapter marker will be added.
<Add>:
Disc > Edit > Original
1
Chapter 1/1
Title Delete
Scene Delete
Edit Title Name
ChapterAdd
Mark
Delete
Index Picture
Protect OFF ON
Yes
JAN/ 1 1:00AM CH12
JAN/ 1 1:00AM CH12
PQRS
Title Delete
Scene Delete
Edit Title Name
ChapterAdd
Mark
Delete
Index Picture
Protect OFF ON
7
SPACE
OPEN/CLOSE
CH
VIDEO/TV
SLOW
0
DVD
VCR
DISPLAY
PAUSE
No
XP
Writing to Disc
PLAY
8
This operation may take a
while to be completed.
STOP
REC/OTR
SETUP
TIMER PROG.
ENTER
REC MONITOR
MENU/LIST TOP MENU
RETURN
CLEAR/C-RESET ZOOM
8
SEARCH
MODE
SKIP
7
SKIP
CM SKIP
After writing to disc is completed, press SETUP button
to exit DISC menu.
No
XP
Writing to Disc
This operation may take a
while to be completed.
Setting pictures for thumbnails
VR
DVD-RW
You can use a picture for each title
as a thumbnail. It helps you remember the contents of the title you are
playing.The beginning picture has
been selected as the default.
First:
DVD
Select “Edit” using K / L buttons, then press ENTER button.
Original/PlayList menu will appear.
Screen:
POWER
REC SPEED
.@/:
1
ABC
2
3
GHI
JKL
MNO
4
5
6
TUV
WXYZ
8
9
PQRS
7
Press SETUP button. Select
“DISC” using { / B buttons,
then press ENTER button.
DISC menu will appear.
Disc
Edit
Format
Finalize
Disc Protect OFF ON
AUDIO
OPEN/CLOSE
DEF
SPACE
CH
VIDEO/TV
SLOW
0
DISPLAY
VCR
DVD
PAUSE
PLAY
Disc > Edit
1
70
2
STOP
1
REC/OTR
SETUP
TIMER PROG.
ENTER
REC MONITOR
MENU/LIST TOP MENU
CLEAR/C-RESET ZOOM
Original
SEARCH
MODE
RETURN
SKIP
SKIP
1
2
CM SKIP
Note
• When you delete part of a
title, the picture you chose to
be the thumbnail for that part
is deleted. A default picture
will then be used by the unit
instead.
Editing
Before you start
Editing DVD-RW discs in VR mode (Original) (cont’d)
6
Select “Original” using { / B
buttons, then press ENTER
button.
Original list will appear.
Select “Yes” using { / B buttons, then press ENTER button.
A picture for thumbnail will be
set.
.@/:
1
ABC
2
3
GHI
JKL
MNO
4
5
6
PQRS
TUV
WXYZ
8
9
3
JAN/1 1:00AM
JAN/1 2:00AM
JAN/1 3:00AM
OPEN/CLOSE
DEF
CH
VIDEO/TV
SLOW
0
DVD
VCR
PAUSE
Disc > Edit > Original
1
5
Title Delete
Scene Delete
Edit Title Name
Chapter Mark
Index Picture Set
Protect OFF ON
Yes
No
PLAY
7
STOP
REC/OTR
SETUP
TIMER PROG.
ENTER
REC MONITOR
JAN/1 5:00AM
JAN/ 1 1:00AM CH12
XP
MENU/LIST TOP MENU
RETURN
Writing to Disc
CLEAR/C-RESET ZOOM
SEARCH
MODE
Select a desired title using K /
L / { / B buttons, then press
ENTER button.
Original menu will appear.
1
JAN/ 1 1:00AM CH12
Title Delete
Scene Delete
Edit Title Name
Chapter Mark
Index Picture Set
Protect OFF ON
SKIP
7
After writing to disc is completed, press SETUP button
to exit DISC menu.
Playing discs
Disc > Edit > Original
This operation may take a
while to be completed.
SKIP
Recording
4
CM SKIP
3
4
5
6
Getting started
1
2
AUDIO
SPACE
DISPLAY
1
JAN/1 4:00AM
REC SPEED
7
Disc > Edit > Original
4
POWER
Connections
3
XP
0:01:25
Editing
5
Changing the SETUP menu
Select “Index Picture Set”
using K / L buttons, then
press ENTER button.
Option window will appear.
Disc > Edit > Original
1
Title Delete
Scene Delete
Edit Title Name
Chapter Mark
Index Picture Set
Protect OFF ON
Yes
VCR functions
F
JAN/ 1 1:00AM CH12
No
XP
0:01:25
Others
71
Editing
Editing DVD-RW discs in VR mode (Original) (cont’d)
Title Protection
VR
DVD-RW
To prevent accidental editing or
erasing of titles, you can protect
them from the original menu.
First:
DVD
4
Select a desired title using K /
L / { / B buttons, then press
ENTER button.
Original menu will appear.
POWER
REC SPEED
.@/:
1
ABC
2
3
GHI
JKL
MNO
4
5
6
PQRS
TUV
WXYZ
8
9
7
1
DISPLAY
JAN/ 1 1:00AM CH12
Title Delete
Scene Delete
Edit Title Name
Chapter Mark
Index Picture Set
Protect OFF ON
XP
0:01:25
Disc
Edit
5
Select “Protect OFF ➔ ON”
Format
Finalize
Disc Protect OFF ON
using K / L buttons, then
press ENTER button.
Option window will appear.
Disc > Edit > Original
2
1
Select “Edit” using K / L buttons, then press ENTER button.
Original/PlayList menu will appear.
Screen:
Title Delete
Scene Delete
Edit Title Name
Chapter Mark
Index Picture Set
Protect OFF ON
Yes
JAN/ 1 1:00AM CH12
No
XP
0:01:25
6
Disc > Edit
Select “Yes” using { / B buttons, then press ENTER button.
Disc > Edit > Original
1
Original
3
Title Delete
Scene Delete
Edit Title Name
Chapter Mark
Index Picture Set
Protect OFF ON
Yes
Select “Original” using { / B
buttons, then press ENTER
button.
Original list will appear.
Disc > Edit > Original
1
1
2
3
JAN/1 1:00AM
JAN/1 2:00AM
JAN/1 3:00AM
4
JAN/1 4:00AM
5
JAN/1 5:00AM
JAN/ 1 1:00AM CH12
CH
VIDEO/TV
SLOW
0
Disc > Edit > Original
1
OPEN/CLOSE
DEF
SPACE
Press SETUP button. Select
“DISC” using { / B buttons,
then press ENTER button.
DISC menu will appear.
72
AUDIO
No
XP
Writing to Disc
This operation may take a
while to be completed.
7
After writing to disc is completed, press SETUP button
to exit DISC menu.
To protect a whole disc
(DVD-RW VR mode Only):
Select “Disc Protect” from Disc
menu, then select “Yes”.
DVD
VCR
PAUSE
PLAY
1
7
STOP
REC/OTR
SETUP
TIMER PROG.
ENTER
REC MONITOR
MENU/LIST TOP MENU
CLEAR/C-RESET ZOOM
SEARCH
MODE
CM SKIP
RETURN
SKIP
SKIP
1
2
3
4
5
6
Editing
Before you start
Editing DVD-RW discs in VR mode (Original) (cont’d)
Releasing titles from protection
VR
DVD-RW
First:
DVD
4
Select a desired title using K /
L / { / B buttons, then press
ENTER button.
Original menu will appear.
1
POWER
REC SPEED
.@/:
1
ABC
2
3
GHI
JKL
MNO
4
5
6
PQRS
TUV
WXYZ
8
9
7
AUDIO
OPEN/CLOSE
Connections
You are allowed to release the
titles protection feature once protected.
DEF
SPACE
CH
VIDEO/TV
SLOW
0
Disc Edit > Original
2
JAN/ 1 2:00AM CH12
Title Delete
Scene Delete
Edit Title Name
Chapter Mark
Index Picture Set
Protect ON OFF
XP
0:01:25
Disc
Edit
DVD
VCR
PLAY
1
7
STOP
REC/OTR
SETUP
MENU/LIST TOP MENU
CLEAR/C-RESET ZOOM
SEARCH
MODE
Select “Protect ON ➔ OFF”
using K / L buttons, then
press ENTER button.
Option window will appear.
SKIP
SKIP
1
2
3
4
5
6
Playing discs
2
CM SKIP
RETURN
Disc Edit > Original
Select “Edit” using K / L buttons, then press ENTER button.
Original/PlayList menu will appear.
Screen:
2
B
Title Delete
Scene Delete
Edit Title Name
Chapter Mark
Index Picture Set
Protect ON OFF
Yes
JAN/ 1 2:00AM CH12
Recording
5
Disc Protect OFF ON
TIMER PROG.
ENTER
REC MONITOR
Format
Finalize
PAUSE
Getting started
Press SETUP button. Select
“DISC” using { / B buttons,
then press ENTER button.
DISC menu will appear.
DISPLAY
No
XP
0:01:25
Disc > Edit
Editing
6
Original
Changing the SETUP menu
Select “Yes” using { / B buttons, then press ENTER button.
Disc Edit > Original
2
3
Disc > Edit > Original
1
2
3
JAN/1 1:00AM
JAN/1 2:00AM
JAN/1 3:00AM
4
JAN/1 4:00AM
5
JAN/1 5:00AM
No
XP
Writing to Disc
This operation may take a
while to be completed.
7
Others
1
Yes
JAN/ 1 2:00AM CH12
VCR functions
Select “Original” using { / B
buttons, then press ENTER
button.
Original list will appear.
Title Delete
Scene Delete
Edit Title Name
Chapter Mark
Index Picture Set
Protect ON OFF
After writing to disc is completed, press SETUP button
to exit DISC menu.
73
Editing
Editing DVD-RW discs in VR mode (Playlist)
Deleting titles
VR
DVD-RW
In VR mode, even when a title is
deleted from a Playlist, the original
title will remain in the Original list.
The disc space available for
recording will not be increased.
First:
4
Select a desired title using K /
L / { / B buttons, then press
ENTER button.
Playlist menu will appear.
POWER
REC SPEED
.@/:
1
ABC
2
3
GHI
JKL
MNO
4
5
6
PQRS
TUV
WXYZ
8
9
7
DVD
OPEN/CLOSE
DEF
SPACE
CH
VIDEO/TV
SLOW
0
Disc > Edit > Playlist
1
1
Press SETUP button. Select
“DISC” using { / B buttons,
then press ENTER button.
DISC menu will appear.
JAN/ 1 1:00AM CH12
DISPLAY
Title Delete
Scene Delete
Edit Title Name
Chapter Mark
Index Picture Set
XP
0:01:25
DVD
VCR
5
Select “Title Delete” using K
Edit
Format
Finalize
/ L buttons, then press
ENTER button.
Option window will appear.
Disc Protect OFF ON
Disc > Edit > Playlist
1
2
Select “Edit” using K / L buttons, then press ENTER button.
Original/PlayList menu will appear.
Screen:
Title Delete
Scene Delete
Edit Title Name
Chapter Mark
Index Picture Set
Yes
JAN/ 1 1:00AM CH12
No
XP
0:01:25
6
Disc > Edit
Select “Yes” using { / B buttons, then press ENTER button.
Title will be deleted.
Disc > Edit > Playlist
Original
1
3
Title Delete
Scene Delete
Edit Title Name
Chapter Mark
Index Picture Set
Yes
Select “PlayList” using { / B
buttons, then press ENTER
button.
Playlist will appear.
JAN/ 1 1:00AM CH12
No
XP
Writing to Disc
This operation may take a
while to be completed.
Disc > Edit > Playlist
1
1
2
3
JAN/1 1:00AM
JAN/1 2:00AM
JAN/1 3:00AM
4
JAN/1 4:00AM
5
JAN/1 5:00AM
Add New
Title
Delete
Playlist
7
After writing to disc is completed, press SETUP button
to exit DISC menu.
PAUSE
PLAY
1
7
STOP
REC/OTR
SETUP
TIMER PROG.
ENTER
REC MONITOR
MENU/LIST TOP MENU
CLEAR/C-RESET ZOOM
Disc
74
AUDIO
SEARCH
MODE
CM SKIP
RETURN
SKIP
SKIP
1
2
3
4
5
6
Editing
Before you start
Editing DVD-RW discs in VR mode (Playlist) (cont’d)
Deleting parts of titles
VR
DVD-RW
4
Select a desired title using K /
L / { / B buttons, then press
ENTER button.
Playlist menu will appear.
Disc Protect OFF ON
3
MNO
4
5
6
PQRS
TUV
WXYZ
8
9
DEF
CH
VIDEO/TV
Disc > Edit > Playlist
1
DISPLAY
SLOW
Title Delete
Scene Delete
Edit Title Name
Chapter Mark
Index Picture Set
JAN/ 1 1:00AM CH12
DVD
VCR
PAUSE
PLAY
1
XP
STOP
REC/OTR
SETUP
TIMER PROG.
ENTER
REC MONITOR
0:01:25
MENU/LIST TOP MENU
CLEAR/C-RESET ZOOM
SEARCH
MODE
5
CM SKIP
RETURN
SKIP
SKIP
1
2
3
4
5
6
Playing discs
Disc > Edit > Playlist
1
2
Disc > Edit
JAN/ 1 1:00AM CH12
Title Delete
Scene Delete
Start
Edit Title Name
End
Chapter Mark
Preview
Index Picture
Delete
XP
0:00:55
Editing
Select “Edit” using K / L buttons, then press ENTER button.
Original/PlayList menu will appear.
Screen:
6
Changing the SETUP menu
Press ENTER button to
decide a start point, then
press ENTER button to
decide an end point.
A cursor will move to “Preview”.
You can check a preview.
Original
<Preview>
VCR functions
3
Select “PlayList” using { / B
buttons, then press ENTER
button.
Playlist will appear.
Recording
Finalize
2
JKL
OPEN/CLOSE
Getting started
Format
ABC
GHI
7
Select “Scene Delete” using
K / L buttons, then press
ENTER button.
Option window will appear.
Edit
.@/:
1
AUDIO
0
1
Disc
REC SPEED
SPACE
DVD
Press SETUP button. Select
“DISC” using { / B buttons,
then press ENTER button.
DISC menu will appear.
POWER
Connections
You can delete a specific part of a
title.
Even when a title is deleted from
the playlist, the original title will
remain.
The disc space available for
recording will not be increased.
First:
Start point End point
Before
editing
Disc > Edit > Playlist
1
2
3
JAN/1 1:00AM
JAN/1 2:00AM
JAN/1 3:00AM
4
JAN/1 4:00AM
5
Others
1
Edited
Add New
Title
Delete
Playlist
JAN/1 5:00AM
75
Editing
Editing DVD-RW discs in VR mode (Playlist) (cont’d)
Part of a title will be deleted.
7
Disc > Edit > Playlist
Select “Delete” using K / L
buttons, then press ENTER
button.
Option window will appear.
Yes
JAN/ 1 1:00AM CH12
Yes
JAN/ 1 1:00AM CH12
0:01:25
5
6
PQRS
TUV
WXYZ
8
9
DEF
CH
VIDEO/TV
SLOW
DVD
VCR
No
PAUSE
PLAY
XP
STOP
9
REC/OTR
SETUP
TIMER PROG.
ENTER
REC MONITOR
This operation may take a
while to be completed.
MENU/LIST TOP MENU
RETURN
CLEAR/C-RESET ZOOM
SEARCH
MODE
SKIP
SKIP
CM SKIP
7
8
9
After writing to disc is completed, press SETUP button
to exit DISC menu.
8
4
DISPLAY
No
XP
3
MNO
0
Writing to Disc
1
2
JKL
SPACE
Disc > Edit > Playlist
Title Delete
Scene Delete
Start
Edit Title Name
End
Chapter Mark
Preview
Index Picture
Delete
ABC
GHI
7
Title Delete
Scene Delete
Start
Edit Title Name
End
Chapter Mark
Preview
Index Picture
Delete
1
.@/:
1
Select “Yes” using { / B buttons, then press ENTER button.
Note
• You cannot select “Scene
Delete” when the number of
chapter markers in the original
or playlist is more than 900.
Naming Titles
Screen:
VR
DVD-RW
You can name titles and change
the names from this menu.
The names of the titles will be
displayed on a titlelist.
First:
Disc > Edit
DVD
POWER
REC SPEED
.@/:
1
ABC
2
3
GHI
JKL
MNO
4
5
6
PQRS
TUV
WXYZ
8
9
7
AUDIO
DEF
SPACE
DISPLAY
Press SETUP button. Select
“DISC” using { / B buttons,
then press ENTER button.
DISC menu will appear.
Disc
Select “PlayList” using { / B
buttons, then press ENTER
button.
Playlist will appear.
Disc > Edit > Playlist
1
1
2
3
JAN/1 1:00AM
JAN/1 2:00AM
JAN/1 3:00AM
4
JAN/1 4:00AM
2
Select “Edit” using K / L buttons, then press ENTER button.
Original/PlayList menu will appear.
76
1
VCR
DVD
PAUSE
STOP
REC/OTR
5
JAN/1 5:00AM
Add New
Title
Delete
Playlist
SETUP
TIMER PROG.
ENTER
REC MONITOR
MENU/LIST TOP MENU
CLEAR/C-RESET ZOOM
SEARCH
MODE
Format
Disc Protect OFF ON
SLOW
PLAY
3
Edit
Finalize
CH
VIDEO/TV
0
Original
1
OPEN/CLOSE
CM SKIP
RETURN
SKIP
SKIP
1
2
3
Editing
Before you start
Editing DVD-RW discs in VR mode (Playlist) (cont’d)
7
Select a desired title using K /
L / { / B buttons, then press
ENTER button.
Playlist menu will appear.
Select “Yes” using { / B buttons, then press ENTER button.
The name you entered will be
activated for the title.
.@/:
1
ABC
2
3
GHI
JKL
MNO
4
5
6
PQRS
TUV
WXYZ
8
9
OPEN/CLOSE
DEF
CH
VIDEO/TV
SPACE
SLOW
0
DVD
VCR
DISPLAY
Title Delete
Scene Delete
Edit Title Name
Chapter Mark
Index Picture Set
AUDIO
PAUSE
Disc > Edit > Playlist > Edit Title Name
1
XP
ABC
abc
123
@!?
Yes
0:01:25
PLAY
STOP
8
REC/OTR
No
SETUP
abc
TIMER PROG.
ENTER
REC MONITOR
MENU/LIST TOP MENU
CLEAR/C-RESET ZOOM
SEARCH
MODE
5
Select “Edit Title Name”
using K / L buttons, then
press ENTER button.
A window for entering a title
name will appear.
1
ABC
abc
123
@!?
JAN/ 1 1:00AM CH12 XP
0:01:25
SKIP
This operation may take a
while to be completed.
8
After writing to disc is completed, press SETUP to exit
DISC menu.
[ Guide to edit title name ]
[Step1]: Select a desired character set using K/ L
buttons, then press
ABC
ENTER button.
abc
123
@!?
[Step2]: Press Number buttons following by the list
below.
abc
123
@!?
0
<space>
<space>
0
<space>
1
”#$%
&‘ ( ) *
+ ,- ./ :;
<=>?
@[]^
_{|}!
To enter a title name, follow
the steps of "Guide to edit
title name" on this page.
character set
Disc > Edit > Playlist > Edit Title Name
1
ABC
abc
123
@!?
1
2
ABC
abc
2
3
DEF
def
3
4
GHI
ghi
4
5
6
JKL
jkl
5
MNO
mno
6
7
8
PQRS
pqrs
7
TUV
tuv
8
9
WXYZ
wxyz
9
JAN/ 1 1:00AM CH12 XP
0:01:25
area for entering title names
・To delete letters, press CLEAR/C-RESET button
repeatedly. Holding CLEAR/C-CRESET button
to delete all letters.
・To go on to the next entering area for letters,
press B button.
・You can enter up to 30 letters.
VCR functions
* Press 1 button, character set will be changed
to the " @!? " mode automatically.
Changing the SETUP menu
ABC
Editing
Select
Press
6
Playing discs
Disc > Edit > Playlist > Edit Title Name
SKIP
CM SKIP
Recording
4
5
6
7
RETURN
Writing to Disc
Getting started
JAN/ 1 1:00AM CH12
REC SPEED
7
Disc > Edit > Playlist
1
POWER
Connections
4
Others
When you finish entering a title
name, press ENTER button.
77
Editing
Editing DVD-RW discs in VR mode (Playlist) (cont’d)
Setting or clearing chapter markers
VR
DVD-RW
You can put chapter markers in
each title. Once a chapter is
marked, you can search for them
by using the chapter search feature.
You can put a chapter marker
anywhere you want.
When the number of chapter
markers in the playlist comes to
999 in total, you cannot add any
more chapter markers.
First:
DVD
1
Disc > Edit > Playlist
1
1
2
3
JAN/1 1:00AM
JAN/1 2:00AM
JAN/1 3:00AM
4
Add New
Title
Delete
Playlist
5
REC SPEED
.@/:
1
ABC
2
3
GHI
JKL
MNO
4
5
6
PQRS
TUV
WXYZ
8
9
7
JAN/1 5:00AM
DISPLAY
4
Disc > Edit > Playlist
1
Title Delete
Scene Delete
Edit Title Name
Chapter Mark
Index Picture Set
XP
0:01:25
Edit
Format
5
Select “Chapter Mark” using
K / L buttons, then press
ENTER button.
Option window will appear.
Disc > Edit > Playlist
Select “Edit” using K / L buttons, then press ENTER button.
Original/PlayList menu will appear.
Screen:
1
Chapter 1/1
JAN/ 1 1:00AM CH12
Title Delete
Scene Delete
Edit Title Name
ChapterAdd
Mark
DeleteSet
Index Picture
XP
0:01:25
Disc > Edit
6
Original
3
Select “PlayList” using { / B
buttons, then press ENTER
button.
Playlist will appear.
CH
VIDEO/TV
SLOW
DVD
VCR
PAUSE
STOP
Select a desired title using K /
L / { / B buttons, then press
ENTER button.
Playlist menu will appear.
JAN/ 1 1:00AM CH12
2
DEF
PLAY
Disc
Disc Protect OFF ON
OPEN/CLOSE
0
1
REC/OTR
Select “Add” or “Delete”
using K / L buttons, then
press ENTER button.
Option window will appear.
<Add>:
Disc > Edit > Playlist
1
Chapter 1/1
Title Delete
Scene Delete
Edit Title Name
ChapterAdd
Mark
DeleteSet
Index Picture
F
Yes
JAN/ 1 1:00AM CH12
No
XP
0:01:25
SETUP
TIMER PROG.
ENTER
REC MONITOR
MENU/LIST TOP MENU
CLEAR/C-RESET ZOOM
SEARCH
MODE
Finalize
AUDIO
SPACE
JAN/1 4:00AM
Press SETUP button. Select
“DISC” using { / B buttons,
then press ENTER button.
DISC menu will appear.
78
POWER
CM SKIP
RETURN
SKIP
SKIP
1
2
3
4
5
6
Editing
Before you start
Editing DVD-RW discs in VR mode (Playlist) (cont’d)
<Delete>:
Disc > Edit > Playlist
1
Disc > Edit > Playlist
F
Yes
JAN/ 1 1:00AM CH12
No
1
XP
Chapter 2/2
0:01:25
Title Delete
Scene Delete
Edit Title Name
ChapterAdd
Mark
DeleteSet
Index Picture
POWER
REC SPEED
.@/:
1
ABC
2
3
GHI
JKL
MNO
4
5
6
PQRS
TUV
WXYZ
8
9
7
AUDIO
OPEN/CLOSE
Connections
Chapter 2/2
Title Delete
Scene Delete
Edit Title Name
ChapterAdd
Mark
DeleteSet
Index Picture
The chapter marker which you
selected will be deleted.
<Delete>:
DEF
SPACE
CH
VIDEO/TV
SLOW
0
7
Select “Yes” using { / B buttons, then press ENTER button.
A chapter marker will be added.
<Add>:
1
Chapter 1/1
Title Delete
Scene Delete
Edit Title Name
ChapterAdd
Mark
DeleteSet
Index Picture
Yes
Writing to Disc
This operation may take a
while to be completed.
PLAY
STOP
8
REC/OTR
SETUP
TIMER PROG.
ENTER
REC MONITOR
MENU/LIST TOP MENU
RETURN
CLEAR/C-RESET ZOOM
8
SEARCH
MODE
SKIP
7
SKIP
CM SKIP
After writing to disc is completed, press SETUP button
to exit DISC menu.
No
XP
Playing discs
JAN/ 1 1:00AM CH12
No
XP
Recording
Disc > Edit > Playlist
Yes
JAN/ 1 1:00AM CH12
PAUSE
Getting started
• You cannot delete the first
chapter of each title.
DVD
VCR
DISPLAY
Writing to Disc
This operation may take a
while to be completed.
Setting pictures for thumbnails
2
Select “Edit” using K / L buttons, then press ENTER button.
Original/PlayList menu will appear.
Screen:
REC SPEED
AUDIO
.@/:
1
ABC
DEF
2
3
GHI
JKL
MNO
4
5
6
TUV
WXYZ
8
9
PQRS
7
SPACE
1
DVD
STOP
REC/OTR
SETUP
Disc Protect OFF ON
TIMER PROG.
ENTER
MENU/LIST TOP MENU
CLEAR/C-RESET ZOOM
Original
RETURN
SKIP
SKIP
1
2
Note
• When you delete part of a
title, the picture you chose to
be the thumbnail for that part
is deleted. A default picture
will then be used by the unit
instead.
79
Others
Finalize
PAUSE
VCR functions
Format
SLOW
VCR
REC MONITOR
Edit
VIDEO/TV
PLAY
Disc > Edit
1
Disc
CH
0
DISPLAY
DVD
Press SETUP button. Select
“DISC” using { / B buttons,
then press ENTER button.
DISC menu will appear.
OPEN/CLOSE
Changing the SETUP menu
You can use a picture for each
title as a thumbnail. It helps you
remember the contents of the
title you are playing.The beginning picture has been selected as
the default.
First:
POWER
Editing
VR
DVD-RW
Editing
Editing DVD-RW discs in VR mode (Playlist) (cont’d)
3
6
Select “PlayList” using { / B
buttons, then press ENTER
button.
Playlist will appear.
Select “Yes” using { / B buttons, then press ENTER button.
A picture for thumbnail will be
set.
.@/:
1
ABC
2
3
GHI
JKL
MNO
4
5
6
PQRS
TUV
WXYZ
8
9
1
2
3
JAN/1 1:00AM
JAN/1 2:00AM
JAN/1 3:00AM
OPEN/CLOSE
DEF
CH
VIDEO/TV
SLOW
0
DVD
VCR
PAUSE
Disc > Edit > Playlist
1
Add New
Title
Delete
Playlist
5
AUDIO
SPACE
DISPLAY
1
Title Delete
Scene Delete
Edit Title Name
Chapter Mark
Index Picture Set
Yes
JAN/1 4:00AM
REC SPEED
7
Disc > Edit > Playlist
4
POWER
No
PLAY
STOP
7
REC/OTR
SETUP
TIMER PROG.
ENTER
REC MONITOR
JAN/1 5:00AM
JAN/ 1 1:00AM CH12
XP
MENU/LIST TOP MENU
RETURN
Writing to Disc
CLEAR/C-RESET ZOOM
SEARCH
MODE
4
Select a desired title using K /
L / { / B buttons, then press
ENTER button.
Playlist menu will appear.
Disc > Edit > Playlist
1
JAN/ 1 1:00AM CH12
Title Delete
Scene Delete
Edit Title Name
Chapter Mark
Index Picture Set
XP
0:01:25
5
Select “Index Picture Set”
using K / L buttons, then
press ENTER button.
Option window will appear.
Disc > Edit > Playlist
1
Title Delete
Scene Delete
Edit Title Name
Chapter Mark
Index Picture Set
F
Yes
JAN/ 1 1:00AM CH12
No
XP
0:01:25
80
This operation may take a
while to be completed.
7
After writing to disc is completed, press SETUP button
to exit DISC menu.
CM SKIP
SKIP
SKIP
3
4
5
6
Editing
Before you start
Editing DVD-RW discs in VR mode (Playlist) (cont’d)
Adding titles to a Playlist
VR
DVD-RW
DVD
4
Select “Add New Title” using
K / L / { / B buttons, then
press ENTER button.
Original list will appear.
POWER
REC SPEED
.@/:
1
ABC
2
3
GHI
JKL
MNO
4
5
6
PQRS
TUV
WXYZ
8
9
7
AUDIO
OPEN/CLOSE
Connections
You can add or delete a title in
the playlist as you prefer.
You can add up to 99 titles to a
Playlist.
First:
DEF
SPACE
CH
VIDEO/TV
SLOW
0
Disc > Edit > Playlist > Add New Title
1
2
1
Press SETUP button. Select
“DISC” using { / B buttons,
then press ENTER button.
DISC menu will appear.
DVD
VCR
3
PLAY
JAN/10 10:30AM
JAN/12 5:00PM
JAN/12 8:00PM
1
6
Disc
STOP
REC/OTR
SETUP
MENU/LIST TOP MENU
SEARCH
MODE
Finalize
Select a desired title using K /
L / { / B buttons, then press
ENTER button.
Disc Protect OFF ON
CM SKIP
RETURN
SKIP
SKIP
1
2
3
4
5
Recording
5
Format
TIMER PROG.
ENTER
REC MONITOR
CLEAR/C-RESET ZOOM
Edit
PAUSE
Getting started
1
DISPLAY
Disc > Edit > Playlist > Add New Title
Playing discs
2
Select “Edit” using K / L buttons, then press ENTER button.
Original/PlayList menu will appear.
Screen:
58%
Writing to Disc
1
1
2
3
JAN/1 1:00AM
JAN/1 2:00AM
JAN/1 3:00AM
5
6
4
JAN/1 5:00AM
Changing the SETUP menu
JAN/1 4:00AM
Editing
Disc > Edit > Playlist
Disc > Edit
JAN/12 8:00PM
Original
6
3
Disc > Edit > Playlist
1
2
3
JAN/1 1:00AM
JAN/1 2:00AM
JAN/1 3:00AM
4
JAN/1 4:00AM
5
To delete a title from Playlist,
refer to “Deleting titles” on page
74.
To delete a Playlist, refer to
“Deleting a Playlist” on page 82.
Others
1
After writing to disc is completed, press SETUP button
to exit DISC menu.
VCR functions
Select “PlayList” using { / B
buttons, then press ENTER
button.
Playlist will appear.
Add New
Title
Delete
Playlist
JAN/1 5:00AM
81
Editing
Editing DVD-RW discs in VR mode (Playlist) (cont’d)
Deleting a Playlist
VR
DVD-RW
A Playlist can be deleted if no
longer needed.
First:
DVD
1
4
Select “Delete Playlist” using
K / L / { / B buttons, then
press ENTER button.
Option window will appear.
POWER
REC SPEED
.@/:
1
ABC
2
3
GHI
JKL
MNO
4
5
6
PQRS
TUV
WXYZ
8
9
7
AUDIO
OPEN/CLOSE
DEF
SPACE
CH
VIDEO/TV
SLOW
0
Press SETUP button. Select
“DISC” using { / B buttons,
then press ENTER button.
DISC menu will appear.
Disc > Edit > Playlist
DISPLAY
1
1
2
3
JAN/1 1:00AM
JAN/1 2:00AM
JAN/1 3:00AM
DVD
VCR
PAUSE
PLAY
4
Disc
JAN/1 4:00AM
5
JAN/1 5:00AM
Add New
Title
Delete
Playlist
Yes
No
Edit
1
6
STOP
REC/OTR
SETUP
TIMER PROG.
ENTER
REC MONITOR
MENU/LIST TOP MENU
RETURN
Format
CLEAR/C-RESET ZOOM
Finalize
Disc Protect OFF ON
SEARCH
MODE
5
Select “Yes” using { / B buttons, then press ENTER button.
A Playlist will be erased.
2
Select “Edit” using K / L buttons, then press ENTER button.
Original/PlayList menu will appear.
Screen:
CM SKIP
SKIP
SKIP
1
2
3
4
5
Disc > Edit > Playlist
Add New
Title
Delete
Playlist
Disc > Edit
6
After writing to disc is completed, press SETUP button
to exit DISC menu.
Original
3
Select “PlayList” using { / B
buttons, then press ENTER
button.
Playlist will appear.
Disc > Edit > Playlist
1
1
2
3
JAN/1 1:00AM
JAN/1 2:00AM
JAN/1 3:00AM
4
JAN/1 4:00AM
82
5
JAN/1 5:00AM
Add New
Title
Delete
Playlist
Note
• Deleting a Playlist will not
increase the available recording time on disc.
Editing
Before you start
Editing DVD-R discs
Deleting titles
DVD-R
Disc > Edit
1
JAN/ 1 1:00AM CH12
Title Delete
Edit Title Name
Chapter Mark
XP
POWER
REC SPEED
.@/:
1
ABC
2
3
GHI
JKL
MNO
4
5
6
PQRS
TUV
WXYZ
8
9
7
0:01:25
AUDIO
OPEN/CLOSE
Connections
You can delete titles which you
do not need, however the disc
space available for recording will
not be changed.
Be sure to know that the titles
once deleted cannot be brought
back to the disc.
First:
DEF
SPACE
CH
VIDEO/TV
SLOW
0
You cannot select “Chapter Mark”.
DISPLAY
DVD
VCR
PAUSE
DVD
1
Press SETUP button. Select
“DISC” using { / B buttons,
then press ENTER button.
DISC menu will appear.
Select “Title Delete” using K
/ L buttons, then press
ENTER button.
Option window will appear.
1
6
STOP
REC/OTR
MENU/LIST TOP MENU
CLEAR/C-RESET ZOOM
1
Edit
Title Delete
Edit Title Name
Chapter Mark
Format
Finalize
Yes
JAN/ 1 1:00AM CH12
No
CM SKIP
RETURN
SKIP
SKIP
1
2
3
4
5
XP
Playing discs
0:01:25
5
2
Select “Yes” using { / B buttons, then press ENTER button.
Title will be deleted.
Disc > Edit
1
Disc > Edit
1
2
3
JAN/1 1:00AM
JAN/1 2:00AM
JAN/1 3:00AM
Title Delete
Edit Title Name
Chapter Mark
Yes
4
JAN/1 4:00AM
JAN/ 1 1:00AM CH12
Changing the SETUP menu
1
Editing
Select “Edit” using K / L buttons, then press ENTER button.
Titlelist will appear.
Screen:
No
XP
Writing to Disc
5
JAN/1 5:00AM
This operation may take a
while to be completed.
Select a desired title using K /
L / { / B buttons, then press
ENTER button.
Edit menu will appear.
VCR functions
3
Recording
Disc
TIMER PROG.
ENTER
REC MONITOR
SEARCH
MODE
Disc > Edit
SETUP
Getting started
PLAY
4
6
After writing to disc is completed, press SETUP button
to exit DISC menu.
Others
83
Editing
Editing DVD-R discs (cont’d)
Naming Titles
DVD-R
You can name titles and change
the names from this menu.
The title names will be displayed
on a titlelist.
First:
DVD
4
Select “Edit Title Name”
using K / L buttons, then
press ENTER button.
A window for entering a title
name will appear.
5
POWER
REC SPEED
.@/:
1
ABC
2
3
GHI
JKL
MNO
4
5
6
PQRS
TUV
WXYZ
8
9
7
AUDIO
OPEN/CLOSE
DEF
CH
VIDEO/TV
SPACE
SLOW
0
Disc > Edit > Edit Title Name
1
1
Press SETUP button. Select
“DISC” using { / B buttons,
then press ENTER button.
DISC menu will appear.
ABC
abc
123
@!?
JAN/ 1 1:00AM CH12 XP
0:01:25
DVD
VCR
DISPLAY
PLAY
STOP
1
7
REC/OTR
SETUP
MENU/LIST TOP MENU
CLEAR/C-RESET ZOOM
5
To enter a title name, follow
Format
Finalize
TIMER PROG.
ENTER
REC MONITOR
Disc
Edit
PAUSE
SEARCH
MODE
1
2
3
4
5
6
RETURN
SKIP
SKIP
CM SKIP
the steps of "Guide to edit
title name" on this page.
character set
Disc > Edit > Edit Title Name
ABC
abc
123
@!?
1
2
Select “Edit” using K / L buttons, then press ENTER button.
Titlelist will appear.
Screen:
Disc > Edit
1
2
1
JAN/1 1:00AM
JAN/1 2:00AM
4
JAN/1 4:00AM
3
JAN/1 3:00AM
5
[ Guide to edit title name ]
JAN/ 1 1:00AM CH12 XP
0:01:25
area for entering title names
When you finish entering a title
name, press ENTER button.
3
Disc > Edit > Edit Title Name
Select a desired title using K /
L / { / B buttons, then press
ENTER button.
Edit menu will appear.
1
ABC
abc
123
@!?
Yes
abc
Disc > Edit
JAN/ 1 1:00AM CH12
Title Delete
Edit Title Name
Chapter Mark
XP
0:01:25
You cannot select “Chapter Mark”.
84
Select
ABC
abc
123
@!?
<space>
<space>
0
<space>
1
”#$%
&‘ ( ) *
+ ,- ./ :;
<=>?
@[]^
_{|}!
Press
1
2
ABC
abc
2
3
DEF
def
3
4
GHI
ghi
4
5
6
JKL
jkl
5
MNO
mno
6
7
8
PQRS
pqrs
7
TUV
tuv
8
9
WXYZ
wxyz
9
No
Writing to Disc
1
123
@!?
[Step2]: Press Number buttons following by the list
below.
0
6
Select “Yes” using { / B buttons, then press ENTER button.
JAN/1 5:00AM
[Step1]: Select a desired character set using K/ L
buttons, then press
ABC
ENTER button.
abc
This operation may take a
while to be completed.
7
After writing to disc is completed, press SETUP button
to exit DISC menu.
* Press 1 button, character set will be changed
to the " @!? " mode automatically.
・To delete letters, press CLEAR/C-RESET button
repeatedly. Holding CLEAR/C-CRESET button
to delete all letters.
・To go on to the next entering area for letters,
press B button.
・You can enter up to 30 letters.
Changing the SETUP menu
The following table shows the settings that are available in the SETUP menu and which are the default settings.
Refer to the following table for useful operation.
SETUP menu
Original
English
French
Set the language for audio.
Subtitle Language
OFF
English
French
Set the language for subtitle.
OSD Background
Transparency
100%
Set the background transparency of OSD
screen.
OSD Background
Color
1
2
3
35%
25%
Set the OSD screen color.
1 (Green), 2 (Blue), 3 (Red)
OSD Language
English
Français
Español
Set the language for OSD
(On Screen Display).
Screen Saver
OFF
5 minutes
10minutes
Set the time at which point the screen
saver turns on.
Digital Out
PCM
Set whether the sound recorded in 96kHz
will be down sampled to 48kHz.
Set the type of sound signal which outputs
from the digital audio output jack.
Compressing the range of sound volume.
ON
OFF
Outputting sound during playback in fast
forward.
Parental Lock
ALL
level 8 to 1
Set the parental level of your DVD discs.
(Change password)
Enter the current
four-digit password
Set and change the password.
VCR functions
ON
OFF
Changing the SETUP menu
Dynamic Range
Control
Fast Forward with
Audio
Editing
Auto
48kHz
96kHz
Dolby Digital
PCM
Stream
Playing discs
4.Parental setting
Pages 92-93
Audio Language
Recording
3.Audio setting
Pages 90-91
Set the language for disc menu.
Getting started
2.Display setting
Pages 88-89
Disc Menu Language English
French
Spanish
Contents
Connections
1.Language setting
Pages 86-87
Items (highlight is the default)
Before you start
Tour of the SETUP menu
Note
Others
• If you change a setting in SETUP
menu, the information of contents
stays on even when the power is
switched off.
85
Changing the SETUP menu
Language Settings
Press STOP button if you are playing a disc.
1
Press SETUP button to display SETUP/DISC menu.
SETUP/DISC menu will appear.
4
POWER
REC SPEED
AUDIO
.@/:
1
ABC
DEF
2
3
GHI
JKL
MNO
4
5
6
TUV
WXYZ
8
9
PQRS
7
SPACE
OPEN/CLOSE
CH
VIDEO/TV
SLOW
0
DISPLAY
DVD
VCR
PAUSE
PLAY
1
5
Setup Menu
STOP
REC/OTR
SETUP
TIMER PROG.
ENTER
REC MONITOR
MENU/LIST TOP MENU
2
CLEAR/C-RESET ZOOM
SEARCH
MODE
Select “SETUP” using { / B buttons, then press
ENTER button.
SETUP menu will appear.
CM SKIP
RETURN
SKIP
SKIP
2
3
4
Setup
Playback Setting
3
Select “Playback” using K / L / { / B buttons, then press
ENTER button.
Option window will appear.
Setup > Playback
TV Aspect
Parental Lock
Disc Menu Language
Audio Language
Subtitle Language
DVD
4:3 Letter Box
All
English
Original
OFF
Digital Out
Dynamic Range Control
ON
Fast Forward with Audio
OFF
4
Select a desired item using K / L buttons, then press
ENTER button.
Note
• Only the languages supported
by the disc can be selected.
• Audio Language setting may
not be available on some
discs.
• You can change or switch off
the subtitles on a DVD disc
also from the disc menu if it
is available.
86
Changing the SETUP menu
Before you start
Language Settings (cont’d)
Disc Menu Language (Default : English)
Set the language for Disc Menu.
TV Aspect
Parental Lock
Disc Menu Language
Audio Language
Subtitle Language
Setup > Playback
DVD
4:3 Letter Box
All
English
TV Aspect
Original
OFF
Audio Language
Parental Lock
Disc Menu Language
Subtitle Language
Digital Out
DVD
4:3 Letter Box
All
English
English
French
Original
Spanish
OFF
Other
• Select a setting using K / L
buttons, then press ENTER
button.
Your setting will be activated.
Digital Out
Dynamic Range Control
ON
Dynamic Range Control
ON
Fast Forward with Audio
OFF
Fast Forward with Audio
OFF
Setup > Playback
TV Aspect
Setup > Playback
DVD
TV Aspect
Original
OFF
Audio Language
Digital Out
4:3 Letter Box
All
Original
English
English
Original
French
OFF
Spanish
Other
Dynamic Range Control
ON
Dynamic Range Control
ON
Fast Forward with Audio
OFF
Fast Forward with Audio
OFF
Parental Lock
Disc Menu Language
Audio Language
Subtitle Language
Parental Lock
Disc Menu Language
Subtitle Language
Digital Out
• Select a setting using K / L
buttons, then press ENTER
button.
Your setting will be activated.
Recording
4:3 Letter Box
All
English
DVD
Setup > Playback
DVD
TV Aspect
Disc Menu Language
4:3 Letter Box
All
English
Audio Language
Original
Audio Language
Subtitle Language
OFF
Subtitle Language
TV Aspect
Parental Lock
Parental Lock
Disc Menu Language
Digital Out
DVD
4:3 Letter Box
All
OFF
English
English
Original
French
Digital Out
OFF
Spanish
Other
ON
Dynamic Range Control
ON
Fast Forward with Audio
OFF
Fast Forward with Audio
OFF
Editing
Dynamic Range Control
• Select a setting using K / L
buttons, then press ENTER
button.
Your setting will be activated.
age
e
Code Input
Audio
---ON
• When you finish entering
the code, press ENTER
button. Refer to the language code table on page
102.
VCR functions
Control
Changing the SETUP menu
If “Other” is selected, press 4-digit code using number buttons.
All
English
English
French
Original
Spanish
OFF
Other
Playing discs
Subtitle Language (Default : OFF)
Set the subtitle language.
Setup > Playback
Getting started
Audio Language (Default : Original)
Set the Audio language.
Connections
Setup > Playback
OFF
Others
5
Press SETUP button to exit SETUP menu.
87
Changing the SETUP menu
Display Settings
Press STOP button if you are playing a disc.
1
Press SETUP button to display SETUP/DISC menu.
SETUP/DISC menu will appear.
POWER
REC SPEED
AUDIO
.@/:
1
ABC
DEF
2
3
GHI
JKL
MNO
4
5
6
TUV
WXYZ
8
9
PQRS
7
SPACE
OPEN/CLOSE
CH
VIDEO/TV
SLOW
0
DISPLAY
DVD
VCR
PAUSE
PLAY
1
5
Setup Menu
STOP
REC/OTR
SETUP
TIMER PROG.
ENTER
REC MONITOR
MENU/LIST TOP MENU
2
CLEAR/C-RESET ZOOM
SEARCH
MODE
Select “SETUP” using { / B buttons, then press
ENTER button.
SETUP menu will appear.
Setup
Playback Setting
3
Select “Display” using K / L / { / B buttons, then press
ENTER button.
Option window will appear.
Setup > Display
DVD
OSD Background Transparency 35%
OSD Background Color
OSD Language
1
English
Screen Saver
10 minutes
4
Select a desired item using K / L buttons, then press
ENTER button.
88
CM SKIP
RETURN
SKIP
SKIP
2
3
4
Changing the SETUP menu
Setup > Display
DVD
OSD Background Transparency 35%
OSD Language
1
English
Screen Saver
10 minutes
DVD
OSD Background Transparency 35%100%
85%
OSD Background Color
1
70%
OSD Language
English
50%
Screen Saver
10 minutes
35%
25%
10%
0%
• Select a setting using K / L
buttons, then press ENTER
button.
Your setting will be activated.
Setup > Display
DVD
Setup > Display
DVD
OSD Background Transparency 35%
OSD Background Transparency 35%
OSD Background Color
OSD Background Color
OSD Language
1
English
Screen Saver
10 minutes
Screen Saver
11
2
English
3
10 minutes
Setup > Display
VCR
OSD Language
• Select a setting using K / L
buttons, then press ENTER
button.
Your setting will be activated.
Recording
OSD Language (Default : English)
Set the OSD language.
Setup > Display
VCR
DVD
OSD Background Transparency 35%
OSD Background Color
1
OSD Background Color
OSD Language
English
OSD Language
Screen Saver
10 minutes
Screen Saver
DVD
1
English
English
Français
10 minutes
Español
• Select a setting using K / L
buttons, then press ENTER
button.
Your setting will be activated.
DVD
Setup > Display
DVD
OSD Background Transparency 35%
OSD Background Color
OSD Background Color
OSD Language
1
English
Screen Saver
10 minutes
Screen Saver
OSD Language
1
OFF
5English
minutes
1010
minutes
minutes
15 minutes
30 minutes
5
Changing the SETUP menu
OSD Background Transparency 35%
• Select a setting using K / L
buttons, then press ENTER
button.
Your setting will be activated.
Editing
Screen Saver (Default : 10 minutes)
Set the time at which point the screen saver function turns on.
Playing discs
OSD Background Transparency 35%
Setup > Display
Getting started
OSD Background Color (Default : 1 Green)
Set the OSD screen color.
You can choose among the following options 1(Green), 2(Blue), and 3(Red).
Connections
OSD Background Color
Setup > Display
Before you start
Display Settings (cont’d)
OSD Background Transparency (Default : 35%)
Set the background transparency of OSD screen.
You can choose one among 0% through 100%.
VCR functions
Press SETUP button to exit SETUP menu.
Others
89
Changing the SETUP menu
Audio Settings
Choose the appropriate Audio settings for your equipment.
It will only affect DVD discs during playback.
Press STOP button if you are playing a disc.
1
POWER
REC SPEED
AUDIO
.@/:
1
ABC
DEF
2
3
GHI
JKL
MNO
4
5
6
TUV
WXYZ
8
9
PQRS
7
Press SETUP button to display SETUP/DISC menu.
SETUP/DISC menu will appear.
SPACE
OPEN/CLOSE
CH
VIDEO/TV
SLOW
0
DISPLAY
DVD
VCR
PAUSE
PLAY
1
5
STOP
REC/OTR
SETUP
TIMER PROG.
ENTER
REC MONITOR
MENU/LIST TOP MENU
CLEAR/C-RESET ZOOM
Setup Menu
SEARCH
MODE
2
CM SKIP
RETURN
SKIP
SKIP
2
3
4
Select “SETUP” using { / B buttons, then press
ENTER button.
SETUP menu will appear.
Setup
Playback Setting
3
Select “Playback” using K / L / { / B buttons, then press
ENTER button.
Option window will appear.
Setup > Playback
TV Aspect
Parental Lock
Disc Menu Language
Audio Language
Subtitle Language
DVD
4:3 Letter Box
All
English
Original
OFF
Digital Out
Dynamic Range Control
ON
Fast Forward with Audio
OFF
4
Select a desired item using K / L buttons, then press
ENTER button.
Note
• Dynamic Range Control function is available only on the
discs which are recorded in
the Dolby Digital format.
90
Changing the SETUP menu
Before you start
Audio Settings (cont’d)
Digital Out
Set the digital audio output.
Setup > Playback
TV Aspect
Setup > Playback
DVD
Disc Menu Language
Disc Menu Language
4:3 Letter Box
All
English
Audio Language
Original
Audio Language
Original
Subtitle Language
OFF
Subtitle Language
Parental Lock
Digital Out
Digital Out
Dynamic Range Control
ON
Dynamic Range Control
Fast Forward with Audio
OFF
Fast Forward with Audio
Settings for Dolby Digital (Default : Stream)
OFF
udio
PCM
ON
Dolby
Digital
PCM
Stream
OFF
Note
When playing a DVD-RW
disc recorded in VR mode
• If the audio source on a disc is
Dolby Digital format, set “Dolby
Digital” to “PCM” so that you
can switch to main (L), sub
audio (R), or a mix of both (L/R)
with your amplifier/decoder.
Settings for PCM (Default : Auto)
TV Aspect
Disc Menu Language
Audio Language
Subtitle Language
Setup > Playback
TV Aspect
Original
OFF
Audio Language
Digital Out
Parental Lock
Disc Menu Language
Subtitle Language
DVD
4:3 Letter Box
All
English
Original
OFF
Digital Out
Dynamic Range Control
ON
Dynamic Range Control
ON
Fast Forward with Audio
OFF
Fast Forward with Audio
OFF
• Select a setting using K / L
buttons, then press ENTER
button.
Your setting will be activated.
ON
OFF
Setup > Playback
TV Aspect
Parental Lock
Disc Menu Language
Audio Language
Subtitle Language
DVD
Setup > Playback
4:3 Letter Box
All
English
TV Aspect
Original
OFF
Audio Language
Digital Out
Parental Lock
Disc Menu Language
Subtitle Language
DVD
4:3 Letter Box
All
English
Original
OFF
• Select a setting using K / L
buttons, then press ENTER
button.
Your setting will be activated.
VCR functions
Fast Forward with Audio (Default : OFF)
Set to ON to output sound during playback in x2 fast forward.
Changing the SETUP menu
Parental Lock
DVD
4:3 Letter Box
All
English
Editing
Setup > Playback
Note
When playing disc with copyright protection
• If you select “Auto”, the sound
will be down sampled to 48kHz.
• If you select “96kHz”, no digital
sound will be output. Select
“Auto”, to output 48kHz digital
sound.
Playing discs
• Select a setting using K / L buttons, then
press ENTER button.
OFF
Your setting will be activated.
Auto
: Select “Auto” usually.
PCM Auto
48kHz : If your amplifier/decoder is NOT com48kHz
ntrol Dolby
ON
Digital
patible with 96kHz PCM, select “48kHz”.
96kHz
96kHz sound will be output in 48kHz.
udio
OFF
96kHz : If your amplifier/decoder is compatible
with 96kHz PCM, select “96kHz”. 96kHz
sound will be output.
Dynamic Range Control (Default : ON)
Set to ON to compress the range between soft and loud sounds.
Original
Recording
• Select a setting using K / L buttons, then
press ENTER button.
Your setting will be activated.
PCM : Converts Dolby Digital into PCM
(2 channel).
When your amplifier/decoder is NOT compatible with Dolby Digital, set to “PCM”.
Stream : Outputs Dolby Digital signals.
When your amplifier/decoder is compatible with Dolby Digital, set to “Stream”.
Original
ntrol
OFF
PCM
ON
Dolby
Digital
OFF
Getting started
A
Connections
TV Aspect
Parental Lock
B
DVD
4:3 Letter Box
All
English
• Select a setting using K / L
buttons, then press ENTER
button.
Option window will appear.
Proceed to steps A or B.
Digital Out
ON
Dynamic Range Control
Fast Forward with Audio
OFF
Fast Forward with Audio
Others
Dynamic Range Control
ON
ON
OFF OFF
5
Press SETUP button to exit SETUP menu.
91
Changing the SETUP menu
Parental Control Settings
Some DVD-Video discs feature Parental Control setting.
Playback will stop if the ratings exceed the levels you set, it will
require you to enter a password before the disc will playback.
This feature prevents your children from viewing inappropriate
material.
Press STOP button if you are playing a disc.
4
POWER
REC SPEED
AUDIO
.@/:
1
ABC
DEF
2
3
GHI
JKL
MNO
4
5
6
TUV
WXYZ
8
9
PQRS
7
SPACE
OPEN/CLOSE
CH
VIDEO/TV
SLOW
0
DISPLAY
1
Press SETUP button to display SETUP/DISC menu.
SETUP/DISC menu will appear.
DVD
VCR
PAUSE
PLAY
1
5
STOP
REC/OTR
SETUP
TIMER PROG.
ENTER
REC MONITOR
MENU/LIST TOP MENU
CLEAR/C-RESET ZOOM
SEARCH
MODE
CM SKIP
RETURN
SKIP
SKIP
2
3
4
Setup Menu
2
Select “SETUP” using { / B buttons, then press
ENTER button.
SETUP menu will appear.
Setup
Playback Setting
3
Select “Playback” using K / L / { / B buttons, then press
ENTER button.
Option window will appear.
Setup > Playback
TV Aspect
Parental Lock
Disc Menu Language
Audio Language
Subtitle Language
DVD
4:3 Letter Box
All
English
Original
OFF
Digital Out
Dynamic Range Control
ON
Fast Forward with Audio
OFF
4
Select “Parental Lock” using K / L buttons, then press
ENTER button.
92
Note
• Parental control function may
not be available on some
discs.
• With some DVDs, it may be
difficult to find if they are
compatible with parental control. Be sure to check if the
parental control function
operates in the way that you
have set it.
• Record the password in case
you forget it.
Changing the SETUP menu
Before you start
Parental Control Settings (cont’d)
Parental Lock (Default : All)
Set the Parental control level.
Setup > Playback
TV Aspect
Disc Menu Language
Audio Language
Subtitle Language
4:3 Letter Box
All
English
TV Aspect
Original
OFF
Audio Language
DVD
Parental Lock
Disc Menu Language
Subtitle Language
Digital Out
Digital Out
Dynamic Range Control
ON
Dynamic Range Control
Fast Forward with Audio
OFF
Fast Forward with Audio
Getting started
A
4:3
All Letter Box
8
All
7
English
6
Original
5
OFF
4
3
2
ON
1
OFF
• Change the parental level
using K / L buttons, then
press ENTER button.
Option window will appear.
Proceed to steps A or B.
Connections
Parental Lock
Setup > Playback
DVD
A password has not been set yet
Setup > Playback
DVD
TV Aspect
Yes
DVD
TV Aspect
Parental Lock
4:3
Password
All Letter Box
8- - - All
Parental Lock
Disc Menu Language
Audio Language
Subtitle Language
Digital Out
Dynamic Range Control
Fast Forward with Audio
7
English
6
Original
5
OFF
4
3
2
ON
1
OFF
• Select “Yes” using s / B
buttons, then enter a new
password using Number
buttons.
Your setting will be activated.
Recording
4:3
Letter Box
Change
AllPassword?
Yes
No
8
All
7
English
Disc Menu Language
6
Original
Audio Language
5
OFF
Subtitle Language
4
3
Digital Out
2
ON
Dynamic Range Control
1
Fast Forward with Audio
OFF
Setup > Playback
B
A password has been set already
Setup > Playback
TV Aspect
Parental Lock
Audio Language
Subtitle Language
Digital Out
Dynamic Range Control
Fast Forward with Audio
Setup > Playback
DVD
TV Aspect
4:3
Letter Box
Change
AllPassword?
Yes
No
8
Parental Lock
All
7
English
Disc Menu Language
6
Original
Audio Language
5
OFF
Subtitle Language
4
3
Digital Out
2
ON
Dynamic Range Control
1
Fast Forward with Audio
OFF
• If you select “No”, proceed
to Step 5.
Yes
TV Aspect
Parental Lock
Disc Menu Language
Audio Language
Subtitle Language
Digital Out
Dynamic Range Control
Fast Forward with Audio
DVD
4:3
Password
All Letter Box
8- - - All
7
English
6
Original
5
OFF
4
3
2
ON
1
OFF
Changing the SETUP menu
• Enter the current password
using Number buttons.
Setup > Playback
Change the password
Editing
Disc Menu Language
DVD
4:3
All Letter Box
Password
8
All
7* * * *
English
6
Original
5
OFF
4
3
2
ON
1
OFF
Playing discs
• If you select “No”, proceed
to Step 5.
• Select “Yes” using s / B
buttons, then enter a new
password using Number
buttons.
Your setting will be activated.
5
Press SETUP button to exit SETUP menu.
Others
93
VCR functions
Note
• Press CLEAR/C-RESET button to erase numbers entered
incorrectly.
• When you forget the password or you want to clear all
settings in Parental lock, enter
4,7,3,7 using Number buttons
in option window. Password
will be cleared and parental
levels will be set to All.
VCR functions
Playback
VCR
3
1
Press POWER button on the
remote control or the front
panel of the unit.
When you are playing a tape, turn
the TV on and be sure to select
the input to which the unit is connected.
Press:
VCR
During playback, press
PAUSE F button.
Playback will pause and sound will
be muted.
1
POWER
REC SPEED
.@/:
1
ABC
2
3
GHI
JKL
MNO
4
5
6
TUV
WXYZ
8
9
7
Press PLAY B button to
resume play.
OPEN/CLOSE
DEF
PQRS
SPACE
CH
VIDEO/TV
SLOW
0
DISPLAY
4
AUDIO
2
4
DVD
VCR
PAUSE
3
PLAY
STOP
REC/OTR
SETUP
TIMER PROG.
5
Note
2
5
Insert a prerecorded tape,
then press PLAY B button to
begin playback.
Press STOP C button to stop
playback.
6
Press STOP/EJECT C A button on the front panel of the
unit to eject the tape.
• When a tape without recording tab is inserted, the unit will
start playback automatically.
• Tracking will be automatically
adjusted upon playback.To
adjust the tracking manually,
press the CHANNEL K/L
buttons on the front panel of
the unit or CHK/CHL buttons on the remote control.
Recording and One-touch timer recording
Recording
PQRS
First:
VCR
7
VCR
TUV
WXYZ
8
9
SPACE
VIDEO/TV
SLOW
0
Before recording, make sure:
• The desired channel is selected
by pressing the number buttons
on the remote control or
CHANNEL K/L buttons on the
front panel of the unit.
• There is a tape with a recording
tab in the unit.
• The desired recording speed can
be selected (SP - standard play or
SLP - super long play) by pressing
REC SPEED button on the
remote control.
Recording speed:
Tape speed
Type of tape
SP mode
SLP mode
Recording/Playback Time
T60
T120
T160
1hour
2hours
2-2/3hours
3hours
6hours
8hours
• Stereo or SAP is selected.
94
DISPLAY
VCR
DVD
PAUSE
1
Press REC/OTR button to
begin the recording.
To temporarily stop recording or
to resume it, press PAUSE F button. After the unit has been in
Pause mode for 5 minutes, it will
stop automatically to protect the
tape and the video head from
damage.
2
Press STOP button when the
recording is completed.
Accidental erasure prevention
To prevent accidental recording
on a recorded cassette, remove
its record tab.To record on it
later, cover the hole with cellophane tape.
Record tab
1
PLAY
STOP
1
REC/OTR
SETUP
REC MONITOR
TIMER PROG.
ENTER
MENU/LIST TOP MENU
CLEAR/C-RESET ZOOM
2
RETURN
SKIP
SKIP
Note
• To view one channel while
recording another
1) While you are recording on
the unit, press VIDEO/TV button.
2) On the cable box or satellite box, select the channel
you want to view.
If you have connected the unit to
a cable box or satellite box, refer
to “Connection to a Cable Box
or Satellite Box” section on page
14.
VCR functions
Before you start
Recording and One-touch timer recording (cont’d)
One-touch timer recording
VCR
VCR
1
(8:00)
POWER
REC SPEED
.@/:
1
ABC
2
3
GHI
JKL
MNO
AUDIO
OPEN/CLOSE
(1:00)
(7:30)
When one-touch timer recording
is finished, the unit will turn off
automatically.
To cancel the one-touch timer
recording within the specified
time, press STOP C button.
DEF
4
5
6
PQRS
TUV
WXYZ
8
9
7
SPACE
CH
VIDEO/TV
SLOW
0
DVD
VCR
DISPLAY
PAUSE
PLAY
STOP
1
REC/OTR
SETUP
TIMER PROG.
ENTER
REC MONITOR
MENU/LIST TOP MENU
RETURN
CLEAR/C-RESET ZOOM
SEARCH
MODE
1
SKIP
SKIP
CM SKIP
Recording
Search
Index search
VCR
VCR
Press SEARCH MODE button
so that the index search
menu appears.
Press g/h buttons to
start index search.
If you want to go in the forward
direction, press g button.
If you want to go in the reverse
direction, press h button.
After index search is completed,
the VCR will play the tape automatically.
2
.@/:
1
ABC
2
3
GHI
JKL
MNO
AUDIO
OPEN/CLOSE
DEF
4
5
6
PQRS
TUV
WXYZ
8
9
7
SPACE
CH
VIDEO/TV
SLOW
0
DISPLAY
DVD
VCR
PAUSE
3
PLAY
STOP
REC/OTR
SETUP
TIMER PROG.
ENTER
REC MONITOR
MENU/LIST TOP MENU
CLEAR/C-RESET ZOOM
SEARCH
MODE
RETURN
SKIP
SKIP
CM SKIP
Changing the SETUP menu
1
2
REC SPEED
Editing
1
3
POWER
Playing discs
An index mark will be assigned at
the beginning of each recording
you make.You may skip to a specific marked point by following the
steps below.
First:
Enter the number of recordings you wish to skip using
Number buttons with in 30
seconds.
Note
• Every time a tape is recorded,
an index mark is written on
the tape.
VCR functions
INDEX SEARCH
03
Getting started
During normal recording,
press REC/OTR button to
begin one-touch timer
recording.
You can select a fixed recording
time by pressing the REC/OTR
button repeatedly.
(Normal recording)
(0:30)
Connections
This feature allows you to set the
recording length simply by pressing
REC/OTR button on the remote
control or the front panel of the unit.
First:
Others
95
VCR functions
Search (cont’d)
Time search
VCR
This feature allows you to go to a
specific point on a tape by entering
the exact amount of time you wish
to skip in order to reach the
point.
First:
TIME SEARCH
2:50
2
POWER
REC SPEED
.@/:
1
ABC
2
3
GHI
JKL
MNO
AUDIO
DEF
4
5
6
PQRS
TUV
WXYZ
8
9
7
OPEN/CLOSE
SPACE
CH
VIDEO/TV
SLOW
0
DISPLAY
VCR
DVD
VCR
PAUSE
3
3
PLAY
1
Press SEARCH MODE button
repeatedly so that the Time
search menu appears.
2
Enter your desired time to
skip using Number buttons
with in 30 seconds.
Press g/h buttons to
start time search.
If you want to go in the forward
direction, press g button.
If you want to go in the reverse
direction, press h button.
After time search, the unit will play
the tape automatically.
STOP
REC/OTR
SETUP
TIMER PROG.
ENTER
REC MONITOR
MENU/LIST TOP MENU
RETURN
CLEAR/C-RESET ZOOM
SEARCH
MODE
1
SKIP
SKIP
CM SKIP
Note
• These functions are not available during recording.
• Press STOP button to stop the
search.
• If the end of the tape is reached
during a Search, this unit will cancel
the search and rewind the tape.
Other operations
VCR
VCR
First:
To cue or review picture during playback (Picture Search):
Press g/h buttons during playback.
Press it again and the unit will search in super high speed. (in the SLP
mode only)
To freeze the picture on TV screen during playback (Still mode):
Press PAUSE F button. Each time you press the button, the picture will
be forwarded by one frame.
If the picture begins to vibrate vertically during the still mode, stabilize
the picture by pressing the CHANNEL K/L or CHK/CHL buttons.
If the picture is distorted or rolling vertically, adjust the vertical hold
control on your TV, if equipped.
Counter Reset:
Press CLEAR/C-RESET button.
To playback in slow motion:
Press SLOW
button during playback or the still mode.
If the noise bars appear on the TV screen, you can reduce it by pressing
CHANNEL K/L or CHK/CHL buttons.
When you playback a tape recorded in Hi-Fi stereo:
Press AUDIO button on the remote control to select Hi-Fi or MONO
for playback sound mode.
• If you have connected a stereo TV to this unit, select “Hi-Fi”.
• If you have connected a monaural TV to this unit, select “MONO”.
96
Note
• Still/Slow/Pause mode will be
automatically cancelled after 5
minutes to prevent damage to
the tape and the video head.
• To return to playback from
the Picture Search/Still/Slow
mode, press PLAY button.
Your Selection
Hi-Fi
MONO
Type of recorded tape
L-channel
R-channel
non Hi-Fi tapes
Monaural
Monaural
Monaural
Hi-Fi tapes
recorded in
Hi-Fi stereo
L
R
L+R
Hi-Fi tapes
recorded main
audio program
Main audio
program
Main audio
program
Main audio
program
Hi-Fi tapes
recorded second
audio program
Second audio Second audio Second audio
program
program
program
Others
Before you start
Troubleshooting
Before requesting service for this unit, check the table below for a possible cause of the problem you are
experiencing. Some simple checks or a minor adjustment on your part may eliminate the problem and
restore proper operation.
Symptom
Remedy
Connections
Power
The power does not turn on.
• Check that the AC power cord is connected securely.
There is no picture.
• Re-connect the connecting cord securely.
• The connecting cords are damaged.
• The Setup Display appears. Press RETURN
button to turn
off the display.
• Check the connection to your TV (page 13).
• Check the RF output channel when you view a TV program
using RF connection.
• Check if the INTERLACE/PROGRESSIVE mode is set correctly
according to your TV (page 13).
• Switch the input selector on your TV (such as to "LINE1") so
that the signal from this unit appears on the TV screen.
Picture noise appears.
• The disc is dirty or flawed.
• Head cleaning for VCR may be necessary.
Refer to “AUTO HEAD CLEANING”.
• If the picture output signal from the unit passes through your VCR
to get to your TV, or if you are connected to a combination
TV/VIDEO player, the copy-protection signal applied to some DVD
programs could affect picture quality. If you still experience this
problem even when you connect the unit directly to your TV, try
connecting the unit to your TV's S-VIDEO input.
• Adjust tracking control for better picture by pressing
CHANNEL (o / p) buttons on this unit or CH ( o / p)
buttons while you are playing a video tape.
TV program reception does not fill the
screen.
• Try to set the channels with "Auto Preset" in SETUP menu
(page 18).
• Select a channel of any TV program using the CH o / p buttons.
• Press VIDEO/TV button if necessary.
TV program pictures are distorted.
• Adjust TV antenna.
• Adjust the picture (see the TV's instruction manual).
• Place the unit and TV farther apart.
• Place the TV and any bunched antenna cables farther apart.
• Switch the input to TV.
• Connect the antenna cable correctly (page 13).
Picture
Getting started
Recording
Playing discs
Editing
TV channels cannot be changed.
There is no sound.
• The disc is dirty or flawed.
• Re-connect all connections securely.
• The connecting cord is damaged.
• Check the connections to the amplifier input.
• The input source setting on the amplifier is incorrect.
• The unit is in pause mode or in Slow-motion Play mode.
• The unit is in fast forward or fast reverse mode.
• If the audio signal does not come through the DIGITAL OUT
(COAXIAL) jack, check the Audio Setup settings (pages 90-91).
Sound is noisy.
• The disc is dirty or flawed.
• When playing a DTS-CD, noise may come from the speakers.
This unit is not compatible with DTS-CD.
No DTS sound is output
• This unit is not compatible with DTS sound.
Sound
VCR functions
• If the playback picture output from a DVD player,VCR, or tuner
goes through the unit before reaching your TV, the copyprotection signal applied to some programs could affect picture
quality. Disconnect the playback equipment in question and
connect it directly to your TV.
Changing the SETUP menu
The playback picture or TV program from
the equipment connected through the
unit is distorted.
Others
97
Others
Troubleshooting (cont’d)
Symptom
Playback
The disc does not play.
The disc does not start playback from the
beginning.
The unit starts playing from the disc
automatically.
Some functions such as Stop, Search, or
Slow-motion Play cannot be performed.
The language for the sound track cannot
be changed.
• No disc is inserted.
• A blank disc is inserted.
• No cassette tape is inserted.
• The disc is upside down. Insert the disc with the labeled side facing up.
• The disc is not correctly inserted.
• The unit cannot play certain discs (such as a CD-ROM) (page
43).
• The region code on the DVD VIDEO does not match the unit
(page 43).
• Moisture has condensed inside the unit. Remove the disc and
leave the unit turned on for about 2 hours until the moisture
evaporates (page 4).
• If the disc was recorded on another recorder, the unit cannot
play the disc if it was not finalized (page 41).
• Resume play was activated (page 48). Press STOP C button
twice.
• You have inserted a disc whose Title menu or DVD menu
automatically appears on the TV screen when it is first insert.
• The DVD VIDEO features an auto playback function.
• Depending on the disc, you may not be able to do some of the
operations above. See the instruction manual supplied with the disc.
• Multilingual tracks are not recorded on the DVD VIDEO,
DVD-R or DVD-RW being played.
• The DVD VIDEO prohibits the changing of the language for the
sound track.
• Try changing the language using the DVD VIDEO's menu.
The subtitle language cannot be changed
or turned off.
• Multilingual subtitle are not recorded on the DVD VIDEO.
• The DVD VIDEO prohibits changing of the subtitles.
• Try changing the subtitle using the DVD VIDEO's menu.
The angles cannot be changed.
• Multi-angles are not recorded on the DVD VIDEO being played.
• You are trying to change the angles when
icon does not
appear on the TV screen (page 58).
• The DVD VIDEO prohibits changing angles.
• Try changing the angle using the DVD VIDEO's menu.
Recording/Timer recording/Editing
The channel cannot be changed from the
channel you are recording.
Recording does not start immediately
after you press REC/OTR button.
• Set the TV's input to "TV."
• An unused DVD-R or DVD-RW was inserted. It takes a while
for the unit to automatically format a DVD-RW.
• Make sure the tape has a safety tab when you record to a
cassette tape. If needed, cover the hole with cellophane tape.
Nothing was recorded even though you
set the timer setting correctly.
•There was a power failure during recording.
• The units internal clock stopped due to a power failure that
lasted for more than 30 seconds.
Reset the clock (pages 22-23).
• Disconnect the AC power cord from the AC outlet, and
connect it again.
• The program contains copy protection signals that restricts copying.
• The timer setting overlapped with another setting that was set
later or has priority.
Recording does not stop immediately
after you press STOP C button.
• It will take a few seconds for the unit to input disc data before
recording can stop.
Timer recording is not complete or did
not start from the beginning.
• The timer setting overlapped with another setting that was set
later or has priority (page 36).
• Disc space was not enough.
• Make sure indicator appears on the front display of this unit. If not,
press POWER button.
Timer recording is impossible.
98
Remedy
Others
Symptom
Remedy
Remote control
The remote does not function.
Connections
• Batteries are weak.
• There are obstacles between the remote and the unit.
• The remote is far from the unit.
• There are no batteries in the remote.
• Turn on the unit.
• The remote is not pointed at the remote sensor on the unit.
• Press the DVD or VCR button, whichever you need. Then, try again.
• Check if a cassette tape is in this unit.
Before you start
Troubleshooting (cont’d)
Others
• When static electricity, etc., causes the unit to operate
abnormally, unplug the unit and then plug it in again.
The disc tray does not open when you
press OPEN/CLOSE A button.
• It may take a few seconds for the disc tray to open after you
have recorded or edited a disc.
• This is because the unit is adding disc data to the disc.
Cause
Recording
Error message
Getting started
The unit does not operate properly.
Solution
Unplayable disc is inserted
in the unit.
Insert the standardized disc which
bear the marks on page 43.
Region Error
--- Please eject the disc. --Playback is not authorized in your
region.
Playback is not authorized
because the region code of the
DVD video disc you inserted is
different.
Insert the DVD-Video disc with
region codes 1 or ALL.
Parental Lock On
--- Please eject the disc. --The current selected parental level
Prohibits playback.
The current selected parental
level in the SETUP Menu
prohibits playback.
Check the "Parental Lock" setting
(pages 92-93).
The recording function encountered
the copy prohibited program.
You cannot record copy prohibited
programs.
You are trying to record copyonce
program onto the DVD-RW disc
in Video mode or the DVD-R disc.
Set "DVD-RW Recording Format"
to "VR mode" (page 28).
You are trying to record onto disc
which is unrecordable, or the
disc status prevents recording.
Insert the recordable disc, and
ensure the disc status satisfies the
recording requirements (pages 26-42).
You are trying to record copyonce
program onto a DVD-RW disc
which is not compatible with CPRM.
Insert a ver. 1.1 CPRM compatible
DVD-RW disc (page 27).
You are trying to record on to the
protected disc which is set in the
Disc Setting Menu.
Release the disc protect setting
in the Disc Setting menu (page 42).
Recording Error
Recording Error
This program is not allowed to
be recorded on this disc.
Others
Recording Error
This disc is protected and not
recordable.
VCR functions
Can not record on this disc.
Changing the SETUP menu
Recording Error
This program is not
recordable in Video mode.
Editing
Recording Error
This program is not allowed
to be recorded.
Playing discs
Disc Error
--- Please eject the disc. --Playback feature may not be
available on this Disc.
99
Others
Troubleshooting (cont’d)
Error message
Recording Error
Disc is full.
Recording Error
You cannot record more then 99
titles on one disc.
Recording Error
You cannot record more the 999
chapters on one disc.
Recording Error
You cannot record on this disc
as Control Information is full.
Recording Error
You cannot record on the disc
as Power Calibration Area is full.
Recording Error
This disc is already finalized.
100
Cause
Solution
You are trying to record onto the
disc which has no space for
recording.
Insert a recordable disc with
enough recording space.
You are trying to record onto the
disc on which the number of
recording titles comes up to the
maximum (99).
Delete unnecessary titles
(pages 61, 65, 74).
You are trying to record onto a
VR mode DVD-RW disc on which
the number of recording chapters
comes up to the maximum (999).
Delete unnecessary chapter markers
(pages 69, 78).
This disc has no space to write the
Control Information onto when
recording or deleting contents.
When editing has been repeatedly
performed, the control Information
area may become full even if
recording area has enough space.
Delete unnecessary titles
(pages 61, 66, 75) or format the disc
(pages 28-29).
This disc's working area for
recording is full.
When recordings are performed
repeatedly onto an unstable disc,
this area may become full.
Format the disc (pages 28-29) or
insert a new disc.
You are trying to record onto a disc
which is finalized.
Release the finalization status of
this disc (page 41).
Others
Before you start
RF converter output
POWER
REC SPEED
AUDIO
.@/:
1
ABC
DEF
2
3
GHI
JKL
MNO
4
5
6
TUV
WXYZ
8
9
PQRS
1
7
SPACE
CH
VIDEO/TV
SLOW
2
1
0
DISPLAY
DVD
VCR
PAUSE
Getting started
Select channel 3 on your TV.
• Be sure that the unit is in DVD mode.
OPEN/CLOSE
Connections
You can watch TV programs through the tuner of the
unit. (Usually channel 3 or 4 of the TV is available for
the RF converter setting.) Be sure to connect the
unit to a TV using the RF cable. Refer to page 13.
PLAY
2
STOP
REC/OTR
1
2
3
GHI
JKL
MNO
4
5
6
PQRS
TUV
WXYZ
8
9
7
SPACE
TIMER PROG.
ENTER
REC MONITOR
MENU/LIST TOP MENU
CLEAR/C-RESET ZOOM
SEARCH
MODE
RETURN
SKIP
SKIP
CM SKIP
Recording
Press VIDEO/TV button on the remote control.
• If noise appears, change the RF output channel of
the unit to CH 4 by pressing VIDEO/TV button for
3 seconds.The RF output channel will alternate
between CH3 and CH4 as follows.
SETUP
CH
VIDEO/TV
SLOW
0
DISPLAY
VCR
DVD
PAUSE
Playing discs
for more than
3 seconds
3 seconds
Editing
(RF ON) CH4
3 seconds
(RF ON) CH3
3 seconds
Changing the SETUP menu
(RF ON) CH4
3 seconds
• Changing the RF output channel is available only
when the unit is in DVD mode.
VCR functions
Others
101
Others
Language code
Language
(Afan) Oromo
Abkhazian
Afar
Afrikaans
Albanian
Amharic
Arabic
Armenian
Assamese
Aymara
Azerbaijani
Bashkir
Basque
Bengali;Bangla
Bhutani
Bihari
Bislama
Breton
Bulgarian
Burmese
Byelorussian
Cambodian
Catalan
Chinese
Corsican
Croatian
Czech
Danish
Dutch
English
Esperanto
Estonian
Faroese
Fiji
Finnish
French
Frisian
Galician
Georgian
German
Greek
Greenlandic
Guarani
Gujarati
Hausa
Hebrew
102
Code
6159
4748
4747
4752
6563
4759
4764
5471
4765
4771
4772
4847
5167
4860
5072
4854
4855
4864
4853
5971
4851
5759
4947
7254
4961
5464
4965
5047
6058
5160
5161
5166
5261
5256
5255
5264
5271
5358
5747
5051
5158
5758
5360
5367
5447
5569
Language
Hindi
Hungarian
Icelandic
Indonesian
Interlingua
Interlingue
Inupiak
Irish
Italian
Japanese
Javanese
Kannada
Kashmiri
Kazakh
Kinyarwanda
Kirghiz
Kirundi
Korean
Kurdish
Laothian
Latin
Latvian; Lettish
Lingala
Lithuanian
Macedonian
Malagasy
Malay
Malayalam
Maltese
Maori
Marathi
Moldavian
Mongolian
Nauru
Nepali
Norwegian
Occitan
Oriya
Panjabi
Pashto; Pushto
Persian
Polish
Portuguese
Quechua
Rhaeto-Romance
Romanian
Code
5455
5467
5565
5560
5547
5551
5557
5347
5566
5647
5669
5760
5765
5757
6469
5771
6460
5761
5767
5861
5847
5868
5860
5866
5957
5953
5965
5958
5966
5955
5964
5961
5960
6047
6051
6061
6149
6164
6247
6265
5247
6258
6266
6367
6459
6461
Language
Russian
Samoan
Sangho
Sanskrit
Scots Gaelic
Serbian
Serbo-Croatian
Sesotho
Setswana
Shona
Sindhi
Singhalese
Siswat
Slovak
Slovenian
Somali
Spanish
Sundanese
Swahili
Swedish
Tagalog
Tajik
Tamil
Tatar
Telugu
Thai
Tibetan
Tigrinya
Tonga
Tsonga
Turkish
Turkmen
Twi
Ukrainian
Urdu
Uzbek
Vietnamese
Volapuk
Welsh
Wolof
Xhosa
Yiddish
Yoruba
Zulu
Code
6467
6559
6553
6547
5350
6564
6554
6566
6660
6560
6550
6555
6565
6557
6558
6561
5165
6567
6569
6568
6658
6653
6647
6666
6651
6654
4861
6655
6661
6665
6664
6657
6669
6757
6764
6772
6855
6861
4971
6961
7054
5655
7161
7267
Others
Title
(DVD)
A collection of chapters on DVD
disc. See also chapter.
(VCD)
Each contents of a Video CD.
When playing a Video CD with
the PBC function, the title menu
will appear automatically.
Track
Audio CDs and Video CDs use
tracks to divide up the content of
a disc.The DVD equivalent is
called a chapter. See also Chapter.
VCR functions
Playlist
From this list you can play contents of a disc as your desired
order or in sequence. Also it is
allowed to search a specific scene
directly.
S-Video output
It delivers independently each signal of color(C) and luminance(Y)
to TV as video signals, so that
higher-quality picture will be
gained.
Changing the SETUP menu
Others
Digital audio
An indirect representation of
sound by numbers. During recording, the sound is measured at discrete intervals (44, 100 times a
second for CD audio) by an analog-to-digital converter, generating
a stream of numbers. On playback,
a digital-to-analog converter generates an analog signal based on
these numbers. See also Sampling
frequency and Analog audio.
PCM
(Pulse Code Modulation)
The most common system of
encoding digital audio, found on
CDs and DAT. Excellent quality,
but requires a lot of data compared to formats such as Dolby
Digital and MPEG audio. For compatibility with digital audio
recorders (CD, MD and DAT) and
AV amplifiers with digital inputs,
this unit can convert Dolby Digital
and MPEG audio to PCM. See also
Digital audio.
SAP
(Secondary Audio Program)
Sub-audio channel which is delivered separately from main-audio
channel.This audio channel is used
as an alternate in bilingual broadcasting.
Editing
CPRM
(Content Protection for
Recordable Media)
CPRM is a copy protection system with scramble system regarding the recording of “copy-once”
broadcast programs (e.g. some
satellite broadcasts).
PBC (VCD only)
(Playback Control)
This function allows you to play
interactive software using menu
screen. See also Title in the
Glossary.
Playing discs
Component video output
Each signal of luminance(Y) and
component(PB/CB, PR/CR) is independent to output so that you can
experience picture color as it is.
Also, due to compatibility with
progressive scan (525p/480p), you
can experience higher-density picture than that in interlace
(525i/480i).
Finalize
To make DVD discs, which have
been recorded on, possible to play
in DVD players.With this unit, it is
possible to finalize DVD-R/DVDRW discs.
Sampling frequency
The rate which sound is measured
by a specified interval to turn into
digital audio data.The numbers of
sampling in one second defines as
sampling frequency.The higher the
rate, the better the sound quality
as possible as it is.
Recording
Chapter
Just as a book is split up into several chapters, a title on a DVD
disc is usually divided into chapters. See also Title.
MP3 (MPEG Audio Layer 3)
MP3 is a method of compressing
files.You can copy MP3 files on
CD-R/RW discs from the computer and play the files on this unit.
Regions code
Regions associate discs and players with particular areas of the
world.This unit will only play discs
that have compatible region
codes.You can find the region
code of your unit by looking on
the rear panel. Some discs are
compatible with more than one
region (or all regions).
Getting started
Aspect ratio
The width of a TV screen relative
to its height. Conventional TVs are
4:3 (in other words, the screen is
almost square); widescreen models
are 16:9 (the screen is almost
twice as wide as it is high).
Dolby Digital
The system to compress digital
sound developed by Dolby
Laboratories. It offers you sound
of stereo(2ch) or multi-channel
audio (up to 5.1ch).
Connections
Analog audio
An electrical signal that directly
represents sound. Compare this
to digital audio which can be an
electrical signal, but is an indirect
representation of sound. See also
Digital audio.
Before you start
Glossary
103
Others
Specifications
General
System
VCR video heads
Power requirements
Power consumption
Weight
Dimensions (width x height x depth)
Operating temperature
Operating humidity
TV format
DVD-Video, DVD-R/RW, Audio CD,Video CD, MP3,
CD-R/RW, Video Cassette Tape
Four heads
AC120 V, 60 Hz
37 W (standby: 4.3 W)
9.5 lbs ( 4.3 kg )
17 1/8" x 3 15/16" x 10 1/4" (435 x 100 x 261 mm)
41Fº to 104Fº (5ºC to 40ºC)
5% to 85% (no condensation)
NTSC
Tuner
Receivable channels
VHF
UHF
CATV
RF Converter
Converter output
2-13ch
14-69ch
C1-C125ch
Built-in VHF converter
VHF channel 3 or 4
Note:
The specifications and design of this product are subject to change without notice.
104
Before you start
MEMO
Connections
Getting started
Recording
Playing discs
Editing
Changing the SETUP menu
VCR functions
Others
105
EMERSON HOME ENTERTAINMENT WARRANTY
We appreciate your purchase of a EMERSON Home Entertainment product. We take pride in the
quality of our products and have manufactured your new Home Entertainment unit to exacting quality
standards. We feel confident that in normal use, it will provide you with satisfactory performance.
However, should you experience difficulty, you are protected under the provisions of this warranty.
EMERSON Home Entertainment products are warranted against manufacturing defects in materials
and workmanship in normal use for the following period from the date of purchase by the original
user, and is conditional upon the unit being installed and used as directed in the instruction manual.
PRODUCT
PARTS AND LABOUR
D.V.D. / VCR
Video Head
Remote Control
1 year
6 months
90 days
EMERSON's obligation under this warranty shall be limited to the repair, including all necessary parts
and the cost of the labour connected therewith, or at our option the exchange of any Home
Entertainment product which shows evidence of a manufacturing defect within the warranty period.
Replacement parts, furnished in connection with this warranty shall be warranted for a period equal to
the unexpired portion of the original equipment warranty.
CUSTOMER OBLIGATIONS
This warranty applies to the product from the original date of purchase at retail. Therefore, the owner
must provide a copy of the original, dated bill of sale. No warranty service will be performed without
a bill of sale. Transportation to and from the service depot is the responsibility of the owner.
WARRANTY EXCLUSIONS
This warranty is extended to EMERSON Home Entertainment products purchased and used in
Canada. This warranty shall not apply to appearance or accessory items including but not limited to:
antenna, cabinet, cabinet parts, knobs, batteries, connecting cables, cassette tapes, compact discs.
This warranty shall, in addition, not apply to damages due to handling, transportation, unpacking, setup, installation, customer adjustments that are covered in the instruction book, repair or replacement of
parts supplied by other than the EMERSON authorized service depot, any malfunction or failure
caused by or resulting from abnormal environmental conditions, improper unauthorized service,
improper maintenance, modifications or repair by the consumer, abuse, misuse, neglect, accident, fire,
flood, or other Acts of God, and incorrect line voltage.
This Home Entertainment product is only warranted to the original retail purchaser. This warranty
becomes void in the event of commercial or rental use. This warranty becomes void in the event serial
numbers are altered, defaced or removed.
EMERSON reserves the right to make changes in design or to make additions to or improvements
upon this product without incurring any obligation to install the same on products previously manufactured. The foregoing is in lieu of all other warranties expressed or implied and EMERSON neither
assumes nor authorizes any person to assume for it any other obligation or liability in connection with
the sale or service of this product. In no event shall EMERSON or its EMERSON dealers be liable
for special or consequential damage arising from the use of this product, or for any delay in the performance of this warranty due to cause beyond our control.
The purchaser may have other rights under existing provincial or federal laws, and where any terms of
this warranty are prohibited by such laws, they are deemed null and void, but the remainder of the
warranty shall remain in effect.
HOW TO OBTAIN SERVICE
Should this product require service, you may obtain specific information on how to obtain service by
contacting the EMERSON Dealer from whom this product was purchased, or by contacting us directly:
SONIGEM SERVICE
300 Alden Road
Markham, Ontario
L3R 4C1
PHONE: (905) 940-5089 FAX: (905) 940-2303
1-800-287-4871
Printed in China
1VMN20180 / E9412CD ★★★★★
GUIDE D’UTILISATION
EDVR95E
Démarrage
OPEN/CLOSE
REW
F.FWD STOP/EJECT
PLAY
DUBBING
VCR
STOP
PLAY
OUTPUT SELECT
CHANNEL
VCR
DVD
S-VIDEO
VIDEO
L - AUDIO - R
DVD
RECORD
RECORD
Accessoires fournis
• Câble RF
(WPZ0901TM002)
• Câbles audio/vidéo
• Guide d’utilisation
(WPZ0102TM015 ou
(1VMN20180)
WPZ0102LTE01)
• Guide d’utilisation
rapide (1VMN20195)
Édition
• Télécommande
(NB108UD)
avec deux piles AA
Enregistrement Lecture d’un disque
POWER
Raccords
Enregistreur de DVD avec magnétoscope
Avant le démarrage
EMERSON ET LE LOGO G-CLEF SONT DES MARQUES DE FABRIQUE
DÉPOSÉES DE EMERSON RADIO CORP., PARSIPPANY, NEW JERSEAY, U.S.A.
Owner's Manual
Autres
(L’enregistrement sur un disque DVD protégé par des droits d’auteur est IMPOSSIBLE avec cet appareil.)
Fonctions du
magnétoscope
Les raccords doivent être effectués avant d’utiliser cet appareil.
Se reporter à “Raccords” aux pages 13-15.
Pour enregistrer facilement une programmation se reporter à “Enregistrement
simple de disques DVD” aux pages 16-17 après avoir terminé les raccords.
Changement du menu
CONFIGURER
Si après la lecture du guide d’utilisation, vous avez besoin d’assistance supplémentaire,
ou des pièces déthachées, veuillez communiquer
SANS FRAIS avec le : 1-800-287-4871
Avant le démarrage
Précautions
MISE EN GARDE: AFIN DE RÉDUIRE LES RISQUES D’INCENDIE OU D’ÉLECTROCUTION, N’EXPOSEZ PAS CET APPAREIL À LA PLUIE OU À L’HUMIDITÉ.
ATTENTION
RISQUE D’ÉLECTROCUTION
NE PAS OUVRIR
ATTENTION:
AFIN DE RÉDUIRE LE RISQUE D'ÉLECTROCUTION, N'ENLEVEZ PAS
LA PARTIE ARRIÈRE (ENDOS) DU BOÎTIER DE CET APPAREIL - IL NE
CONTIENT AUCUNE PIÈCE POUVANT ÊTRE RÉPARÉE PAR
L'USAGER. CONFIEZ LA RÉPARATION À UN TECHNICIEN QUALIFIÉ.
Le symbole de l'éclair dans un triangle équilatéral est
conçu pour alerter l'usager de la présence d'une "tension dangereuse" non isolée à l'intérieur de l'appareil
et qui peut être d'une importance suffisante pour constituer un risque d'électrocution.
Le symbole du point d'exclamation dans un triangle
équilatéral est conçu pour avertir l'usager que la documentation accompagnant l'appareil contient des
instructions importantes concernant le fonctionnement et l'entretien (réparation) de l'appareil.
Sécurité concernant le laser
Cette unité utilise un laser. À cause de possibles blessures aux yeux, seul un technicien qualifié est habilité à retirer le couvercle ou
à essayer de réparer cet appareil.
ATTENTION:
L’UTILISATION DE COMMANDES, L’AJUSTEMENT OU L’EXÉCUTION DE PROCÉDURES AUTRES QUE CELLES
SPÉCIFIÉES DANS CE GUIDE PEUVENT ENTRAÎNER LE RISQUE D’EXPOSITION À DES RADIATIONS DANGEREUSES.
ATTENTION:
RAYONNEMENT LASER VISIBLE ET INVISIBLE LORSQUE L’APPAREIL EST OUVERT AVEC LE VERROUILLAGE INVALIDÉ. NE PAS REGARDER LE RAYON.
EMPLACEMENT: À L’INTÉRIEUR, PRÈS DU MÉCANISME DE LA PLATINE.
AVERTISSEMENT FCC- Cet appareil peut générer ou utiliser l’énergie de fréquences radio. Tout changement ou modi-fication subi par cet appareil peut entraîner des parasites néfastes à moins que ces modifications aient été expressément approuvées dans le guide d’utilisation. L’utilisateur peut perdre le droit de
faire fonctionner cet appareil si une modification ou un changement non autorisé est effectué.
INTERFÉRENCES AVEC LA RADIO-TÉLÉVISION
Cet appareil a été testé et jugé conforme aux limites des produits numériques de la Classe B, conformément à
la Partie 15 des règlements FCC. Ces limites sont prévues pour fournir une protection raisonnable contre les interférences préjudiciables dans une installation résidentielle. Cet appareil produit, utilise et peut émettre une énergie
de fréquence radio et, s'il n'est pas installé et utilisé conformément aux instructions, peut causer des interférences
préjudiciables aux communications radio. Il n'est cependant pas garanti que des interférences ne seront pas produites dans une installation particulière. Si cet appareil cause des interférences préjudiciables à la réception de
la radio ou de la télévision, ce qui peut être déterminé en le mettant hors puis à nouveau sous tension, il est
recommandé à l'utilisateur de corriger ces interférences en appliquant une ou plusieurs des mesures suivantes:
1) Réorienter ou déplacer l'antenne de réceptrice.
2) Augmenter la distance entre l'appareil et le récepteur.
3) Brancher l'appareil dans une prise faisant partie d'un circuit différent de celui sur lequel le récepteur est branché.
4) Consulter le revendeur ou un technicien radio/télévision qualifié.
Cet appareil numérique de classe B est conforme aux normes canadiennes NMB-003.
ATTENTION: POUR ÉVITER LES RISQUES D’ÉLECTROCUTION, INTRODUIRE LA LAME LA PLUS LARGE DE
LA FICHE DANS LA BORNE CORRESPONDANTE DE LA PRISE ET POUSSER JUSQU’AU FOND.
REMARQUE CONCERNANT LE RECYCLAGE
Les matériaux d’emballage de ce produit sont recyclables et peuvent être réutilisés. Veuillez disposer de tout matériau conformément aux règlements de recylage locaux.
Les piles ne doivent jamais être jetées ou incinérées, mais mises au rebut conformément aux règlements locaux concernant
les déchets chimiques.
Protection de l’environnement !!!
• Les piles usées ne doivent pas être jetées dans une poubelle.
• S’en défaire à un point de collecte pour piles usées ou dans un conteneur à ordures
spécial. Contacter les autorités locales pour plus de détails.
Informations client :
Lire attentivement les informations sur le dos de l’appareil et noter ci-dessous le n˚ de série.
Conserver cette information pour toute référence ultérieure.
N° de modèle _____________________
N° de série _____________________
2
Avant le démarrage
Mesures de sécurité importantes
national de l’électricité, ANSI/INFPA n˚70 donne des informations concernant la mise à la terre du mât et de la structure de
soutien, la mise à la terre de la descente d’antenne à l’unité de
décharge d’antenne, la taille des conducteurs de mise à la terre,
l’emplacement de l’unité de décharge d’antenne, la connexion
aux électrodes de mise à la terre, et les exigences pour l’électrode de mise à la terre. (Schéma A)
Schéma A
Modèle de mise à la masse d'une antenne
suivant les directives du Code National
de l'Électricité
Descente
d'antenne
Raccords
Collier de mise
à la masse
Limiteur de tension
(CNE, section 810-20)
Démarrage
Boîte d'entrée
de service
Conducteurs de terre
(CNE, section 810-21)
CNE-Code National de l'Électricité.
S2898A
Colliers de mise à la masse
Système d'électrodes de mise à
la masse de l'entrée de service
(CNE, art. 250, partie H)
Changement du menu
CONFIGURER
Fonctions du
magnétoscope
Autres
3
Édition
14. Foudre - Pour une protection accrue de ce produit contre les
orages ou quand il est laissé sans surveillance et inutilisé pendant
de longues périodes, le débrancher de la prise murale et déconnecter l’antenne ou le système de câble. Cela évitera les dommages dus à la foudre et aux surintensités des lignes électriques.
15. Lignes électriques - Une antenne extérieure reliée à cet appareil
ne devra jamais se trouver à proximité de câbles électriques,
d'un éclairage ou de transformateurs sur lesquels elle risquerait
de tomber. Lors de l'installation d'une telle antenne, faire en
sorte que l'antenne n'entre pas en contact avec de tels lignes ou
circuits, car leur contact peut être mortel.
16. Surcharge - Ne pas surcharger les prises murales et les rallonges, car cela pourrait provoquer un incendie ou des
décharges électriques.
17. Pénétration d’objet et de liquide - Ne jamais pousser des objets
de quelque nature qu’ils soient dans une ouverture car ils pourraient toucher des points à tension dangereuse ou court-circuiter des pièces, ce qui pourrait provoquer un incendie ou des
décharges électriques. Ne jamais répandre de liquide quel qu’il
soit sur le produit.
18. Réparations - Ne jamais essayer de réparer soi-même l'appareil.
En ouvrant ou en démontant le boîtier, on risque de s'exposer à
la tension élevée de certaines pièces ainsi qu'à d'autres dangers.
Pour n'importe quelle réparation, faire appel à un technicien
qualifié.
19. Dommages nécessitant une réparation - Débrancher l'appareil
de la prise de courant et le confier à un technicien qualifié dans
les cas suivants:
a. Lorsque le cordon d'alimentation (ou sa fiche) est endommagé.
b. Lorsqu'un liquide ou un objet a pénétré dans l'appareil.
c. Lorsque l'appareil a été exposé à la pluie ou à de l'eau.
d. Si l'appareil ne fonctionne pas normalement bien que l'on ait
suivi toutes les instructions, ne régler que les commandes
décries dans ce guide. Un réglage erroné d'autres pièces ou
commandes risque d'endommager l'appareil et peut nécessiter
ensuite un long travail de la part d'un technicien qualifié pour le
remettre en état de fonctionner.
e. Lorsqu'on a laissé tomber l'appareil ou que son boîtier a été
endommagé.
f. Lorsque le fonctionnement de l'appareil diffère de la période initiale ou ne présente plus les mêmes performances.
20. Pièces de rechange - Lorsque des pièces de rechange sont
nécessaires, s'assurer que le technicien utilise les pièces recommandées par le fabricant ou qu'elles présentent les mêmes caractéristiques que les pièces d'origine. L'utilisation de pièces différentes risque de provoquer un incendie, une électrocution ou
d'autres risques.
21. Inspection pour la sécurité - Après toute réparation ou entretien, demander au technicien de procéder à une inspection afin
de s'assurer que l'appareil fonctionne normalement sans danger.
22. Chaleur - Cet appareil doit être éloigné de toute source de
chaleur intense, telle que celle d'un appareil de chauffage, d'une
bouche d'air chaud, d'une cuisinière électrique ou de tout autre
appareil (y compris des amplificateurs) qui dégagent de la
chaleur.
Enregistrement Lecture d’un disque
1. Lire les instructions – Toutes les instructions sur la sécurité et le
fonctionnement doivent être lues avant la mise en service de
l’appareil.
2. Conserver ce guide d'utilisation - Les instructions relatives au
fonctionnement et à la sécurité doivent être conservées pour
pouvoir les consulter ultérieurement.
3. Prendre garde aux avertissements – Tous les avertissements sur
l’appareil et dans le guide d’utilisation doivent être respectés.
4. Suivre les instructions - Il est nécessaire de suivre toutes les
directives du guide d'utilisation concernant le fonctionnement et
l'utilisation de cet appareil.
5. Nettoyage - Débrancher l'appareil de la prise de courant avant
de procéder à un nettoyage. Ne pas utiliser de produits à nettoyer liquides ou en aérosol. Pour essuyer, utiliser un chiffon
légèrement humide.
EXCEPTION: Un produit prévu pour le service ininterrompu,
et qui pour une raison spécifique, comme la possibilité de la
perte du code d’autorisation pour un convertisseur CATV,
n’est pas prévu pour le débranchement par l‘utilisateur pour le
nettoyage ou autre chose, et peut exclure la référence au
débranchement de l’appareil dans la description du nettoyage,
sinon requise au point 5.
6.Accessoires - N'utiliser que les accessoires recommandés par le
fabricant de l'appareil. L'utilisation d'autres accessoires risque
d'être dangereuse.
7. Eau et humidité - Ne pas utiliser cet appareil à proximité de
l'eau; par exemple, près d'une baignoire, d'un évier, d'une
machine à laver, dans un sous-sol humide, près d'une piscine ou
d'autres endroits semblables.
8.Accessoires - Ne pas placer ce produit sur un chariot, un socle,
un trépied, un support ou une table instables. Il pourrait tomber,
provoquant des blessures sérieuses à un enfant ou un adulte, et
de sérieux dommages à l’appareil. Utiliser uniquement un chariot, un socle, un trépied, un support ou une table recommandés
par le fabricant, ou vendus avec le produit. AVERTISSEMENT
Tout montage de l’appareil doit être con- MEUBLE A ROULETTES
forme aux instructions du fabricant et un (symbole de RETAC)
accessoire de montage recommandé par le
fabricant doit être utilisé. Le combiné
appareil-chariot doit être déplacé avec soin.
Des arrêts brusques, une force excessive, et
des surfaces inégales peuvent provoquer le
renversement du combiné.
9.Ventilation - Le boîtier de cet appareil est muni de fentes et
d'orifices de ventilation permettant d'assurer un fonctionnement adéquat en l'empêchant de surchauffer. Ces fentes et
ces orifices ne doivent pas être bloqués ou recouverts. Ainsi,
l'appareil ne doit pas être placé sur un lit, un divan, un tapis ou
une autre surface similaire risquant d'obstruer ces orifices de
ventilation. Il ne doit pas être placé dans une installation encastrée comme un meuble ou une bibliothèque, qui risquerait
d'empêcher la circulation de l'air dans les orifices de ventilation,
à moins que l'aération soit adéquate ou que les directives du fabricant soient respectées.
10. Sources d’alimentation - Ce produit doit être opéré uniquement
à partir d’un type de source d’alimentation indiqué sur l’étiquette de marquage. En cas d’incertitude sur le type d’alimentation de son domicile, consulter le revendeur de l’appareil ou la
société d’électricité locale. Pour les produits prévus pour le
fonctionnement sur piles ou d’autres sources, voir le guide d’utilisation.
11. Mise à la terre ou polarisation - Ce produit est équipé d’une
fiche de ligne courant alternatif polarisée (prise à une lame plus
large que l’autre). Cette fiche ne s’insérera que dans un sens
dans une prise murale. C’est une caractéristique de sécurité. Si
la fiche ne peut pas être insérée à fond dans la prise, essayer de
la tourner. Si elle ne s’insère toujours pas, contacter un électricien pour remplacer la prise murale vieillie. Ne pas forcer
cette fiche polarisée de sécurité.
12. Protection du cordon d’alimentation - Les cordons d’alimentation doivent être acheminés de manière à ce qu’ils ne soient pas
foulés ou coincés par des articles placés dessus ou contre eux,
en faisant particulièrement attention aux fiches, prises de
courant, et autres points où ils sortent de l’appareil.
13. Mise à la terre de l’antenne extérieure - Si une antenne
extérieure ou un système de câble est raccordé au produit, vérifier que l’antenne ou le système de câble est mis à la terre de
manière à assurer une certaine protection contre les surtensions et les charges statiques accumulées. L’Article 810 du Code
Avant le démarrage
Précautions (suite)
Avant le démarrage
Précautions (suite)
Emplacement d’installation
Pour assurer la sécurité et des performances optimales de
cette unité :
• Installer ce lecteur en position horizontale stable. Ne
rien placer directement dessus. Ne pas le placer directement sur le téléviseur.
• Le protéger contre les rayons du soleil et le maintenir à
l’écart des sources de chaleur intense. Éviter les
emplacements poussiéreux ou humides. Éviter les
endroits insuffisamment aérés pour assurer une bonne
dissipation de la chaleur. Ne pas bloquer les orifices de
ventilation sur les côtés de l’unité. Éviter les
emplacements soumis à de fortes vibrations ou à des
champs magnétiques puissants.
Éviter les risques d’électrocution et
d’incendie
• Ne pas manipuler le cordon d'alimentation avec les
mains mouillées.
• Ne pas tirer sur le cordon d'alimentation pour le déconnecter de la prise murale. Le saisir par la fiche.
• Si, par accident, de l’eau est répandue sur cet appareil, immédiatement débrancher le cordon d’alimentation et emporter
l’appareil au Centre de service agréé pour la réparation.
• Ne pas placer les doigts ou des objets dans le logement de
cassette de l’appareil.
Attention à la condensation d’humidité
De l'humidité peut se condenser à l'intérieur de l'appareil
quand il est déplacé d'un endroit froid à un endroit chaud,
après la mise en marche du chauffage dans une pièce
froide ou en cas de forte humidité ambiante. Ne pas
utiliser l’unité au moins pendant 2 heures pour laisser à
l'intérieur de l'appareil le temps de sécher.
À propos du copyright
La copie sans autorisation, la diffusion, la présentation
publique et le prêt de disques sont interdits.
La technologie de protection du copyright intégrée à ce
produit est protégée par une méthode de réclamation de
certaines patentes américaines et autres droits à la propriété intellectuelle dont Macrovision Corporation et
d’autres sont propriétaires. L’utilisation de cette technologie
de protection du copyright doit faire l’objet d’une autorisation de la part de Macrovision Corporation et est conçue
pour le foyer et autres utilisations limitées, à moins qu’elles
ne soient autorisées par Macrovision Corporation. Le
démontage et l’ingénierie inverse sont interdits.
Avis pour les sorties de balayage progressif
Les consommateurs sont priés de bien vouloir noter que
tous les téléviseurs haute définition ne sont pas pleinement
compatibles avec ce produit et que cela peut entraîner l’affichage d’objets dans l’image. En cas de problèmes d’image
dus au balayage progressif du 525, il est conseillé à l’utilisateur
de commuter la connexion sur la sortie “définition standard”.
Si vous avez des questions au sujet de la compatibilité d’une
télévision avec ce lecteur DVD modèle 525p, merci de bien
vouloir contacter notre centre de service à la clientèle.
Symboles dans le guide d’utilisation
Beaucoup de fonctions de l’appareil dépendent du type de
disque ou du mode d’enregistrement.
Pour spécifier pour quel type de disque ou mode d’enregistrement chaque fonction est prévue, les symboles suivants ont été placés au début de chaque élément à opérer.
4
Description
Symbol
Disponible pour les disques DVD-Vidéo
DVD-V
Disponible pour les disques DVDRW en mode Vidéo
Video
DVD-RW
DVD-RW
Disponible pour les disques DVDRW en mode VR
VR
DVD-R
Disponible pour les disques DVD-R
CD
Disponible pour les CD audio
VCD
Disponible pour les disques CDR/RW avec fichiers MP3
MP3
Disponible pour les CD vidéo
Disponible pour les cassettes VHS
Utiliser uniquement des cassettes
marquées avec cet appareil.
VCR
D’abord:
(Appuyer:)
DVD
D’abord:
(Appuyer:)
VCR
Indique qu’il faut sélectionner le mode DVD en
appuyant sur la touche DVD de la télécommande
avant de passer à l’étape suivante.
Indique qu’il faut sélectionner le mode VCR en
appuyant sur la touche VCR de la télécommande
avant de passer à l’étape suivante.
Entretien
REPARATIONS
• Consulter les sujets pertinents dans le Guide de dépannage aux pages 97-100 avant de retourner le produit.
• Si cet appareil devient inopérant, ne pas essayer de corriger le problème
soi-même. Il ne contient pas de pièces réparables par l’utilisateur. Mettre
hors tension, débrancher la fiche d’alimentation et appeler la ligne d’aide
indiquée à la première page pour localiser le Centre de service agréé.
NETTOYAGE DU BOÎTIER
• Utiliser un chiffon doux légèrement humidifié de solution détergente douce. Ne
pas employer de solution contenant de l’alcool, de l’ammoniac ou un abrasif.
NETTOYAGE DES DISQUES
• Quand un disque est sale, le nettoyer avec un chiffon de
nettoyage. Essuyer le disque du centre vers sa périphérie.
Ne jamais nettoyer par mouvements circulaires.
• Ne pas utiliser de solvants, par exemple du benzène, du diluant, des
produits de nettoyage disponibles dans le commerce, du détergent,
des produits de nettoyage abrasifs ou des vaporisateurs antistatiques
utilisés sur les disques analogiques.
NETTOYAGE DE LA LENTILLE LASER
• Si le lecteur ne fonctionne toujours pas correctement en se
référant aux chapitres correspondants et au “Guide de dépannage”, le dispositif de lecture optique laser est peut-être sale.
Consulter son revendeur ou un centre de réparation agréé pour
l’inspection et le nettoyage du dispositif de lecture optique laser.
MANIPULATION DES DISQUES
• Manipuler les disques de façon à ne pas laisser d’empreintes
digitales ou de poussière sur la surface des disques.
• Toujours ranger les disques dans leur coffret protecteur
lorsqu’ils ne sont pas utilisés.
NETTOYAGE AUTOMATIQUE DES TETES
• Nettoyer automatiquement les têtes vidéo à l’insertion ou
au retrait d’une cassette, pour obtenir une image plus nette.
• L’image lue peut devenir floue ou être interrompue alors que la
réception du programme de télévision est nette. La saleté accumulée sur les têtes vidéo après une période d’emploi prolongée,
ou l’emploi de cassettes de location ou usées peut causer ce problème. Si des images rayées ou neigeuses apparaissent pendant la
lecture, le nettoyage des têtes vidéo est peut-être nécessaire.
1. Se rendre au magasin d’équipements audiovisuels local pour acheter
un dispositif de nettoyage de têtes vidéo VHS de bonne qualité.
2. Si le dispositif de nettoyage de têtes vidéo VHS ne résout
pas le problème, appeler la ligne d’aide indiquée sur la page
de couverture pour localiser un Centre de service autorisé.
REMARQUES:
• Ne pas oublier de lire les instructions fournies avec le
dispositif de nettoyage de têtes vidéo avant l’emploi.
• Nettoyer les têtes vidéo seulement en cas de problème.
Avant le démarrage
Avant le démarrage . . . . . . . . . . . . . . . .2
Raccords . . . . . . . . . . . . . . . . . . . . . . . .13
. . . . . . . . . . . . . .13
un récepteur
. . . . . . . . . . . . . .14
. . . . . . . . . . . . . .15
Démarrage . . . . . . . . . . . . . . . . . . . . . .16
Enregistrement . . . . . . . . . . . . . . . . . .26
.
.
.
.
.
.
.
.
.
.
.
.
.
.
.
.
.
.
.
.
.
.
.
.
.
.
.
.
.
.
.
.
.
.
.
.
.
.
.
.
.
.
.
.
.
.
.
.
.
.
.
.
.
.
.
.85
.86
.88
.90
.92
Fonctions du magnétoscope . . . . . . . .94
Lecture . . . . . . . . . . . . . . . . . . . . . . . . . . . . . . . .94
Enregistrement et enregistrement avec
minuterie par simple pression . . . . . . . . . . . . . .94
Enregistrement . . . . . . . . . . . . . . . . . . . . . . . . . . . . .94
Enregistrement avec minuterie par simple pression . .95
Recherche . . . . . . . . . . . . . . . . . . . . . . . . . . . . . .95
Recherche d’index . . . . . . . . . . . . . . . . . . . . . . . . . .95
Recherche horaire . . . . . . . . . . . . . . . . . . . . . . . . . .96
Autres opérations . . . . . . . . . . . . . . . . . . . . . . . .96
Autres . . . . . . . . . . . . . . . . . . . . . . . . . .97
Guide de dépannage . . . . . . . . . . . . . . . . . . . . . .97
Sortie du convertisseur RF . . . . . . . . . . . . . . . .101
Codes de langues . . . . . . . . . . . . . . . . . . . . . . .102
Glossaire . . . . . . . . . . . . . . . . . . . . . . . . . . . . . .103
Spécifications . . . . . . . . . . . . . . . . . . . . . . . . . . .104
Mémo . . . . . . . . . . . . . . . . . . . . . . . . .105
Déclaration de garantie . . . . . . . . . . .106
Fonctions du
magnétoscope
Autres
Information sur la lecture de DVD . . . . . . . . . . .43
Guide des affichages . . . . . . . . . . . . . . . . . . . . . . . . .43
Lecture de base . . . . . . . . . . . . . . . . . . . . . . . . . .44
Lecture . . . . . . . . . . . . . . . . . . . . . . . . . . . . . . . . . .44
Lecture de disques avec le menu de disque . . . . . . .46
Lecture de disques avec le menu de titres . . . . . . . .47
Lecture spéciale . . . . . . . . . . . . . . . . . . . . . . . . .48
Reprise de lecture . . . . . . . . . . . . . . . . . . . . . . . . . .48
Avance rapide/recul rapide . . . . . . . . . . . . . . . . . . . .48
Saut des publicités télévisés pendant la lecture . . . . .49
Pause . . . . . . . . . . . . . . . . . . . . . . . . . . . . . . . . . . . .49
Lecture étape par étape . . . . . . . . . . . . . . . . . . . . . .50
Lecture lente en avant/en arrière . . . . . . . . . . . . . . .50
Zoom . . . . . . . . . . . . . . . . . . . . . . . . . . . . . . . . . . .51
Configuration de marques . . . . . . . . . . . . . . . . . . . .51
Recherche . . . . . . . . . . . . . . . . . . . . . . . . . . . . . .52
Recherche de titre/chapitre . . . . . . . . . . . . . . . . . . .52
Recherche de piste . . . . . . . . . . . . . . . . . . . . . . . . .53
Recherche horaire . . . . . . . . . . . . . . . . . . . . . . . . . .53
Aperçu du menu CONFIGURER
Réglage de la langue . . . . . . . . . .
Réglage de l’affichage . . . . . . . . .
Réglages audio . . . . . . . . . . . . . . .
Réglages du contrôle parental . .
Changement du menu
CONFIGURER
Lecture d’un disque . . . . . . . . . . . . . . .43
Changement du menu CONFIGURER . .85
Édition
Informations sur l’enregistrement sur DVD . . . .26
Informations . . . . . . . . . . . . . . . . . . . . . . . . . . . . . .26
Vitesse d’enregistrement . . . . . . . . . . . . . . . . . . . . .26
Restrictions concernant l’enregistrement . . . . . . . . .26
Informations sur le contrôle de la copie . . . . . . . . .27
Rendre un disque lisible sur un autre lecteur de DVD (Finaliser) . .27
Formatage d’un disque . . . . . . . . . . . . . . . . . . . .28
Sélection du format d’enregistrement d’un disque vierge . .28
Reformatage d’un disque . . . . . . . . . . . . . . . . . . . . .30
Enregistrement de base . . . . . . . . . . . . . . . . . . .31
Contrôle de la qualité de l’image enregistrée . . . . . .32
Enregistrement avec minuterie par simple pression . .33
Enregistrement avec minuterie . . . . . . . . . . . . .34
Conseils pour l’enregistrement avec minuterie . . . .36
Réglages pour une source extérieure . . . . . . . . .37
Raccord à une source extérieure . . . . . . . . . . . . . . .37
Enregistrement à partir d’une source extérieure . . .38
Mode de copie . . . . . . . . . . . . . . . . . . . . . . . . . . .39
Finalisation d’un disque . . . . . . . . . . . . . . . . . . . .41
Réglage d’un disque pour la protection . . . . . . .42
Enregistrement Lecture d’un disque
Enregistrement simple de disques DVD . . . . . . .16
Réglage des chaînes . . . . . . . . . . . . . . . . . . . . . . .18
Obtention automatique de chaînes . . . . . . . . . . . . .18
Ajout/suppression de chaînes . . . . . . . . . . . . . . . . . .19
Sélection de TV stéréo ou de la seconde
piste audio “SAP” . . . . . . . . . . . . . . . . . . . . . . . .20
Réglage de l’horloge . . . . . . . . . . . . . . . . . . . . . .21
Réglage automatique de l’horloge . . . . . . . . . . . . . .21
Réglage manuel de l’horloge . . . . . . . . . . . . . . . . . .22
Réglage de l’heure d’été . . . . . . . . . . . . . . . . . . . . . .24
Sélection du rapport d’aspect du téléviseur . . .25
Informations sur l’édition du disque . . . . . . . . . .59
Guide pour la liste de titres . . . . . . . . . . . . . . . . . . .59
Édition de disques avec mode Vidéo . . . . . . . . . . . .59
Édition de disques avec mode VR . . . . . . . . . . . . . . .60
Édition de disques DVD-RW en mode Vidéo . . .61
Suppression de titres . . . . . . . . . . . . . . . . . . . . . . . .61
Attribution des titres . . . . . . . . . . . . . . . . . . . . . . . .62
Réglage ou suppression de marques de chapitre . . .64
Édition de disques DVD-RW en mode VR (Original) . . .65
Suppression de titres . . . . . . . . . . . . . . . . . . . . . . . .65
Suppression de parties de titres . . . . . . . . . . . . . . . .66
Attribution des titres . . . . . . . . . . . . . . . . . . . . . . . .67
Réglage ou effacement de marques de chapitre . . . .69
Réglage d’images pour les vignettes . . . . . . . . . . . . .70
Protection des titres . . . . . . . . . . . . . . . . . . . . . . . .72
Libération des titres de la protection . . . . . . . . . . . .73
Édition de disques DVD-RW en mode VR (Playlist) . . .74
Suppression de titres . . . . . . . . . . . . . . . . . . . . . . . .74
Suppression de parties de titres . . . . . . . . . . . . . . . .75
Attribution des titres . . . . . . . . . . . . . . . . . . . . . . . .76
Réglage ou suppression de marques de chapitre . . .78
Réglage d’images pour les vignettes . . . . . . . . . . . . .79
Ajout de titres à la liste de lecture . . . . . . . . . . . . . .81
Suppression d’une liste de lecture . . . . . . . . . . . . . . .82
Édition de disques DVD-R . . . . . . . . . . . . . . . . . .83
Suppression de titres . . . . . . . . . . . . . . . . . . . . . . . .83
Attribution des titres . . . . . . . . . . . . . . . . . . . . . . . .84
Démarrage
Raccord à un téléviseur . . . . .
Raccord à un câblosélecteur et
d’antenne parabolique . . . . . .
Raccords à un système audio .
Édition . . . . . . . . . . . . . . . . . . . . . . . . .59
Raccords
Précautions . . . . . . . . . . . . . . . . . . . . . . . . . . . . . .2
Table des matières . . . . . . . . . . . . . . . . . . . . . . . .5
Caractéristiques . . . . . . . . . . . . . . . . . . . . . . . . . .6
Aperçu des fonctions . . . . . . . . . . . . . . . . . . . . . .7
Insertion des piles dans la télécommande . . . . . . . . .9
Utilisation de la télécommande . . . . . . . . . . . . . . . . .9
Commutateur magnétoscope/d’enregisreur de DVD . .9
Menu CONFIGURER/DISQUE/CD . . . . . . . . . . . . . .10
Menu d’affichage . . . . . . . . . . . . . . . . . . . . . . . . . . .11
Lecture répétée/aléatoire/programmée . . . . . . .54
Lecture répétée . . . . . . . . . . . . . . . . . . . . . . . . . . . .54
Lecture aléatoire . . . . . . . . . . . . . . . . . . . . . . . . . . . .54
Lecture programmée . . . . . . . . . . . . . . . . . . . . . . . .55
Sélection des formats audio et vidéo . . . . . . . . .56
Commutation entre les pistes sonore . . . . . . . . . . .56
Commutation des sous-titres . . . . . . . . . . . . . . . . . .57
Commutation d’angle de caméra . . . . . . . . . . . . . . .58
Réduction du bruit vidéo . . . . . . . . . . . . . . . . . . . . .58
Avant le démarrage
Table des matières
5
Avant le démarrage
Caractéristiques
Cet appareil lit les disques DVD, les DC et les vidéocassettes et permet aussi d’enregistrer sur des disques
DVD et de les visionner par la suite. Il offre les caractéristiques suivantes.
Enregistrement
Édition
Mode DVD Mode VCR
Cet appareil est compatible à la fois avec les disques DVD-RW,
qui sont réinscriptibles à répétition et les disques DVD-R, prévus
pour un seul enregistrement. Il permet aussi d’enregistrer sur
une vidéocassette. Choisir selon ses besoins.
Enregistrement de 8 programmes maximum:
Cet appareil peut être programmé pour enregistrer 8 programmes
maximum, jusqu’à un an à l’avance. L’enregistrement de programmes journaliers ou hebdomadaires est aussi possible.
Enregistrement avec minuterie par simple pression:
Une heure d’enregistrement peut être réglée facilement à ses préférences.
À chaque pression de la touche REC/OTR sur la télécommande ou de la
touche RECORD sur le panneau avant pendant l’enregistrement, le temps
d’enregistrement sera augmenté de 30 minutes jusqu’à un maximum de 8
heures. L’enregistrement s’arrête automatiquement quand le temps
d’enregistrement réglé est atteint.
Mode de copie:
Un disque DVD peut être copié sur une cassette vidéo, ou bien
une cassette vidéo sur un disque DVD. Cette fonction est utilisable
seulement si le disque DVD n’est pas protégé contre la copie.
Mode DVD
Réglage/suppression de marques de chapitre:
Des marques de chapitre peuvent être ajoutées n’importe
où sur les enregistrements pour faciliter le montage
(mode VR).
Liste de lecture (Playlist) personnelle:
La liste originale restant telle quelle, les titres peuvent être
montés sur des listes de lecture diverses à sa guise.
Dénomination des titres
Réglage d’images pour les images miniatures
Réglage/suppression de marques de chapitre
Suppression de parties de titres etc,
Protection des titres:
Activer la fonction de protection pour éviter le montage
ou l’effacement des titres.
Mode DVD
MONITORAGE DE L’ENREGISTREMENT:
La qualité de l’image de l’enregistrement peut se confirmer à
la vitesse d’enregistrement présentement réglée. Pour changer
de vitesse d’enregistrement, appuyer sur la touche REC
SPEED pour régler au mode d’enregistrement souhaité.
Réglage automatique de marques de chapitre:
Des marques de chapitre seront placées sur les enregistrements, comme
réglé au menu CONFIGURER, avant de commencer l’enregistrement.
Création automatique de menus de titres:
Cet appareil crée automatiquement des menus de titres à
la finalisation d’un disque enregistré en mode Vidéo.
Liste de lecture (Playlist) automatique (mode VR):
Une liste de lecture peut être établie à partir d’une liste Original,
ce qui permet de monter les titres sur la liste de lecture selon
ses préférences.
La liste originale demeure inchangée.
Lecture
Mode DVD
Son ambiophonique de salle de cinéma à domicile:
Raccorder l’appareil à un amplificateur ou un décodeur
compatible Dolby Digital permet d’obtenir un son ambiophonique de salle de cinéma des disques contenant des
pistes enregistrées en format Dolby Digital.
Recherche rapide de ce qu’on veut voir:
La partie qu’on souhaite regarder est facile à trouver avec
la fonction de recherche. Rechercher le point souhaité sur
un disque par titre, chapitre ou heure.
Compatibilité
Mode DVD
Disponible pour la lecture de disques enregistrés
en mode Vidéo sur un lecteur de DVD ordinaire
(mode Vidéo):
Les disques enregistrés en mode Vidéo sont lisibles sur des
lecteurs de DVD ordinaires, y compris les lecteurs de DVD
d’ordinateurs compatibles avec la lecture de DVD-Vidéo*. Les
disques enregistrés en mode Vidéo doivent être finalisés pour
être lisibles sur d’autres lecteurs de DVD.
* Le format DVD-Vidéo (mode vidéo) est un nouveau format
pour l’enregistrement des disques DVD-R/RW approuvé au
Forum DVD de 2000. L’adoption de ce format est optionnelle
pour les fabricants de dispositifs de lecture de DVD, et certains
lecteurs de DVD-Vidéo, lecteurs de DVD-ROM ou autres
dispositifs de lecture de DVD ne lisent pas les disques
DVD-R/RW enregistrés en format DVD-Vidéo.
Autres
Système de balayage progressif
À la différence du balayage entrelacé conventionnel, le système
de balayage progressif assure moins de scintillement et des
images d’une définition plus élevée que celles des signaux de
télévision traditionnels.
Mode VCR
Recherche rapide de ce qu’on veut voir:
Il est facile de trouver la partie qu’on veut regarder en utilisant la
fonction de recherche d’index/recherche horaire. Une marque index
sera assignée au début de chaque enregistrement effectué. La fonction
de recherche horaire, elle, permet d’aller à un point spécifique sur
une bande en entrant la durée exacte qu’on souhaite sauter.
Fabriqué sous licence de Dolby Laboratories.“Dolby” et le symbole double D sont des marques de commerce
de Dolby Laboratories.
6
Avant le démarrage
Avant le démarrage
Aperçu des fonctions
Panneau avant
1
2
3
4
5
OPEN/CLOSE
POWER
REW
F.FWD STOP/EJECT
PLAY
DUBBING
VCR
STOP
PLAY
OUTPUT SELECT
CHANNEL
VCR
RECORD
1.
16
Touche/témoin POWER (DVD/VCR)
Logement de cassette (VCR)
Y insérer une cassette.
3.
Touche A OPEN/CLOSE (DVD)
Appuyer pour ouvrir ou fermer le tiroir à disque.
4.
Touche OUTPUT SELECT { B (DVD/VCR)
Appuyer pour sélectionner le composant à opérer.
5.
15 14 13 12 11 10 9 8
S’allume quand le mode de sortie VCR est sélectionné.
14. Touche DUBBING (DVD/VCR)
Appuyer pour démarrer le magnétoscope pour la copie du
DVD (DVD à magnétoscope) de la manière configurée au
menu Configurerer.
15. Touches CHANNEL L / K (DVD/VCR)
Appuyer pour changer de chaîne vers le haut ou le bas.
16. Affichage (DVD/VCR)
Consulter le “Guide des affichages du panneau avant” à la page 12.
17. Capteur de télécommande (DVD/VCR)
Reçoit des signaux de la télécommande pour permettre la
commande à distance de l’appareil.
18. Touche RECORD (VCR)
Appuyer une fois pour enregistrer. Appuyer plusieurs fois
pour commencer un enregistrement par simple pression.
Servent à connecter une source extérieur à l’aide de câbles audio standard.
7.
Prise VIDEO INPUT (LINE2) (DVD/VCR)
19. Touche PLAY (VCR)
Appuyer pour démarrer la lecture.
Sert à connecter un appareil extérieur à l’aide d’un câble vidéo standard.
8.
Prise S-VIDEO INPUT (LINE 2) (DVD seulement)
Sert à connecter la sortie S-Vidéo d’une source extérieure à
l’aide d’un câble S-Vidéo (non inclus).
9.
Touche RECORD (DVD)
Appuyer une fois pour démarrer l’enregistrement.
Appuyer plusieurs fois pour démarrer l’enregistrement par
simple pression.
20. Touche STOP/EJECT (VCR)
Touche EJECT-Appuyer pour retirer la cassette de l’appareil.
Touche STOP-Appuyer pour arrêter la lecture de la bande.
Appuyer pour arrêter l’enregistrement programmé en cours
dans le magnétoscope.
21. Touche F.FWD (VCR)
Appuyer pour faire avancer rapidement la bande, ou pour
visualiser l’image rapidement en avant pendant la lecture.
(Recherche en avant)
10. Touche PLAY (DVD)
Appuyer pour démarrer ou reprendre la lecture.
11. Touche STOP (DVD)
Appuyer pour arrêter la lecture ou l’enregistrement.
6
22. Touche REW (VCR)
Appuyer pour rebobiner la bande, ou pour visualiser l’image
rapidement en arrière en mode de lecture. (Recherche en
arrière)
12. Indicateur DVD SELECT
S’allume quand le mode de sortie DVD est sélectionné.
1
2 3
4 5
6
DVD
S-VIDEO
COMPONENT
VIDEO OUT
Y
CB
L
COAXIAL
IN
R
DVD/VCR
AUDIO IN AUDIO OUT ANTENNA
IN
L
L
R
R
VIDEO IN VIDEO OUT
OUT
• Ces prises sont
CR
OUT
1.
Cordon d’alimentation (DVD/VCR)
8.
Le brancher dans une prise murale standard pour alimenter
cet appareil.
2.
Prise S-VIDEO INPUT (LINE1) (DVD seulement)
Sert à raccorder la sortie S-Vidéo d’une source extérieure à
l’aide d’un un câble S-Vidéo (non inclus).
Prises COMPONENT VIDEO OUTPUT (DVD seulement)
Servent à raccorder un téléviseur avec entrées vidéo à composants avec des câbles vidéo à composants (non inclus).
4.
Prises AUDIO INPUT (LINE1) (DVD/VCR)
Servent à raccorder une source extérieure à l’aide de câbles
audio.
5.
Prises AUDIO OUTPUT (DVD/VCR)
Servent à connecter un téléviseur, un récepteur AV ou un
autre équipement à l’aide de câbles audio standard.
Prise TV ANTENNA IN (DVD/VCR)
Sert à raccorder une antenne.
7.
Prise TV ANTENNA OUT (DVD/VCR)
utiles seulement
en mode DVD.
Prise VIDEO OUTPUT (DVD/VCR)
Sert à connecter un téléviseur, un récepteur AV ou un autre
équipement à l’aide de câble vidéo standard.
9.
Prise VIDEO INPUT (LINE1)(DVD/VCR)
Sert à raccorder une source extérieure à l’aide d’un câble
vidéo.
10. Prise S-VIDEO OUTPUT (DVD seulement)
Sert à connecter l’entrée S-Vidéo d’un téléviseur, récepteur
AV ou autre équipement à l’aide de câbles S-Vidéo (non
inclus).
11. Prises AUDIO OUTPUT (DVD seulement)
Servent à connecter un téléviseur, un récepteur audio ou un
autre appareil à l’aide de câbles audio standard.
12. Prise COAXIAL DIGITAL AUDIO OUTPUT
(DVD seulement)
Sert à connecter un récepteur audio, un décodeur Dolby
Digital ou un autre appareil à entrée numérique coaxiale à
l’aide d’un câble numérique coaxial (non inclus).
Autres
6.
7
Sert à raccorder un câble d’antenne pour passer le signal de
TV ANTENNA IN au téléviseur.
Remarque: Ne pas toucher les broches internes des prises sur le panneau arrière. Une décharge électrostatique pourrait irrémédiablement endommager l’appareil.
Fonctions du
magnétoscope
3.
9 8
Changement du menu
CONFIGURER
12 11 10
Édition
Panneau arrière
DIGITAL
AUDIO
AUDIO OUT OUT
Enregistrement Lecture d’un disque
Prises AUDIO INPUT (LINE2) (DVD/VCR)
7
13. Indicateur VCR SELECT
Tiroir à disque (DVD)
Y placer un disque quand il est ouvert.
6.
L - AUDIO - R
Démarrage
Appuyer pour mettre l’appareil sous et hors tension.
Si des enregistrements avec minuterie ont été faits, appuyer
pour régler l’appareil au mode d’attente de minuterie.
La lampe à côté de la touche POWER s’allume quand l’appareil
est sous tension.
2.
VIDEO
RECORD
Raccords
22 20 18
21 19 17
S-VIDEO
DVD
DVD
7
Avant le démarrage
Aperçu des fonctions (suite)
Télécommande
6. Touche REC/OTR (DVD/VCR)
POWER
REC SPEED
AUDIO
.@/:
1
ABC
DEF
2
3
GHI
JKL
MNO
OPEN/CLOSE
1
2
15
4
5
6
PQRS
TUV
WXYZ
7
8
9
SPACE
CH
VIDEO/TV
SLOW
0
DISPLAY
4
14
VCR
DVD
18
19
21
PLAY
5
23
STOP
REC/OTR
7
6
8
SETUP
TIMER PROG.
MENU/LIST TOP MENU
9
10
11
12
CLEAR/C-RESET ZOOM
SEARCH
MODE
25
ENTER
REC MONITOR
CM SKIP
RETURN
SKIP
SKIP
7. Touche SETUP (DVD/VCR)
17
PAUSE
3
16
27
28
29
Appuyer une fois pour démarrer un
enregistrement.Appuyer plusieurs fois
pour démarrer un enregistrement par
simple pression.
20
22
24
26
30
13
Appuyer pour afficher le menu de
configuration. Pendant la lecture
de DVD, maintenir enfoncée plus
de 3 secondes pour commuter au
mode de balayage progressif ou
au mode entrelacé.
8. Touche REC MONITOR (DVD)
Appuyer pour contrôler le signal
vidéo à enregistrer avant de tenter
un enregistrement.
9. Touche MENU/LIST (DVD)
Appuyer pour afficher le menu
Disc.
Appuyer pour modifier ORIGINAL
et PLAYLIST sur l’écran du
téléviseur. (mode VR seulement)
10. Touche TOP MENU (DVD)
Appuyer pour afficher le menu
principal.
1. Touche POWER (DVD/VCR)
Appuyer pour mettre l’appareil
sous ou hors tension.
Si des enregistrements avec
minuterie ont été faits, appuyer
pour régler l’appareil au mode
d’attente de minuterie. Appuyer
pour annuler le mode d’attente
de minuterie, puis mettre
l’appareil sous tension.
2. Touches numériques (DVD/VCR)
Appuyer pour sélectionner les
numéros de chaîne.
Appuyer pour sélectionner un
titre/chapitre/piste sur l’affichage
ou une chaîne de télévision.
Egalement appuyer pour entrer
des valeurs pour les réglages au
menu Configurer.
3. Touche DISPLAY (DVD/VCR)
Appuyer pour afficher ou changer
l’affichage à l’écran.
4. Touche VCR
Appuyer pour activer la
télécommande en mode VCR.
(Voir la page 9.)
Appuyer pour sélectionner le
mode de sortie VCR.
5. Touche E (DVD/VCR)
• Mode DVD
Pendant la lecture, appuyer pour la
lecture en marche arrière rapide,
ou en pause, appuyer pour la
lecture lente en arrière.
• Mode VCR
Appuyer pour rebobiner la bande ou
pour visualiser l’image rapidement en
arrière en mode de lecture.
8
11. Touche CLEAR/C-RESET
(DVD/VCR)
• Mode DVD
Appuyer pour supprimer le mot
de passe entré, pour annuler la
programmation d’un CD, pour
supprimer le numéro de marque
sélectionné ou pour supprimer
un programme entré en mode de
réglage de programmation etc.
• Mode VCR
Appuyer pour réinitialiser le
compteur de bande.
12. Touche SEARCH MODE (VCR)
Appuyer pour appeler le menu
de recherche d’index ou
recherche horaire.
13. Touche CM SKIP (DVD)
Pendant la lecture, appuyer pour
sauter 30 secondes.
14. Touche REC SPEED
(DVD/VCR)
Appuyer pour commuter la
vitesse d’enregistrement.
15. Touche OPEN/CLOSE A
(DVD)
Appuyer pour ouvrir ou fermer
le tiroir à disque.
16. Touche AUDIO (VCR)
Pendant la lecture d’une cassette
HiFi, appuyer pour modifier le
réglage AUDIO OUT à “Hi-Fi”
ou “MONO”.
17. Touches CH K / L (DVD/VCR)
• Mode DVD
Appuyer pour changer de chaîne
vers le haut ou le bas.
• Mode VCR
Appuyer pour changer de chaîne
vers le haut ou le bas.
Appuyer pour ajuster l’alignement
de la bande pendant la lecture.
18. Touche VIDEO/TV (DVD/VCR)
Appuyer pour sélectionner le
mode VIDEO ou TV.
19. Touche SLOW (VCR)
Pendant la lecture, appuyer pour
visualiser la bande à vitesse lente.
20. Touche PAUSE F
(DVD/VCR)
Appuyer pour faire une pause de
lecture ou d’enregistrement.
21. Touche DVD
Appuyer pour activer la
télécommande en mode DVD.
(Voir la page 9)
Appuyer pour sélectionner le
mode de sortie DVD.
22. Touche PLAY B
(DVD/VCR)
Appuyer pour démarrer ou
reprendre la lecture.
23. Touche D (DVD/VCR)
• Mode DVD
Pendant la lecture, appuyer pour
la lecture en marche avant rapide.
• Mode VCR
Appuyer pour faire avancer
rapidement la bande ou pour
visualiser rapidement l’image en
avant pendant la lecture.
24. Touche STOP C
(DVD/VCR)
Appuyer pour arrêter la lecture
ou l’enregistrement.
25. Touche TIMER PROG.
(DVD/VCR)
Appuyer pour afficher le menu
de réglage d’enregistrement avec
minuterie.
26. Touche ENTER
(DVD/VCR)
Appuyer pour confirmer ou
sélectionner des items de menu.
27. Touches directionnelles
K / L / { / B (DVD/VCR)
Appuyer pour sélectionner des
postes ou réglages.
28. Touche RETURN
(DVD/VCR)
Appuyer pour revenir à l’écran
de menu antérieurement affiché.
29. Touche ZOOM (DVD)
Pendant la lecture, appuyer pour
agrandir l’image sur l’écran.
30. Touche SKIP H (DVD)
Pendant la lecture, appuyer pour
sauter au chapitre ou à la piste
précédente. Et pendant la pause,
appuyer pour la lecture en
arrière pas à pas.
Touche SKIP G (DVD)
Pendant la lecture, appuyer pour
sauter au chapitre ou à la piste
suivante. Et pendant la pause,
appuyer pour la lecture en avant
pas à pas.
Avant le démarrage
Garder à l’esprit les points suivants à l’emploi de la
télécommande:
• Vérifier qu’il n’y a pas d’obstacle entre la
télécommande et le capteur de télécommande à
l’avant de l’appareil.
• Utiliser la télécommande sur la portée et à l’angle
d’opération indiqués.
• Le fonctionnement de la télécommande peut
devenir peu fiable si des rayons du soleils puissants
ou une lumière fluorescente éclairent le capteur de
télécommande de l’apapareil.
• Des télécommandes de divers dispositifs peuvent
interférer entre elles. Eviter d’utiliser une
télécommande pour un autre équipement placé
près de cet appareil.
• Remplacer les piles quand la portée de la
télécommande diminue.
1
2
3
Moins de 7 m
(23 pieds)
POWER
REW
F.FWD
STOP/E
JECT
PLAY
VCR
OPEN/C
LOSE
RECOR
D
DUBBIN
G
CHANN
EL
STOP
VCR
OUTPU
T SELECT
PLAY
DVD
DVD
RECOR
D
S-VIDE
O
VIDEO
L-
AUDIO
-R
60˚
REC
PAUS
k
E
h
REV
PLA
B Y
IP
P
SK
H
P
U/
MEN AL
GIN
STOC
G
TOP
ORI
g
K
PLA
R
NU
LIS
ME Y
ENTE
D
FW
Télécommande
T
Remarque:
L’emploi incorrect des piles peut provoquer des
risques comme la fuite ou l’éclatement. Observer les
points suivants:
• Ne pas mélanger des piles neuve et ancienne.
• Ne pas combiner des piles de types différents; bien
qu’elles semblent simlaires, des piles différentes ont
des tensions différentes.
• Vérifier que les extrémités plus et moins de
chaque pile correspondent aux indications dans le
logement piles.
• Retirer les piles de l’appareil s’il doit rester inutilisé
un mois ou plus.
• À la mise au rebut des piles usées, respecter la réglementation nationale ou les règles environnementales
publiques appliquées dans le pays ou la zone.
• Ne pas recharger, court-circuiter, chauffer, brûler
ou démonter les piles.
Enregistrement Lecture d’un disque
Insérer deux piles AA (fournies) en respectant les
polarités indiquées dans le logement piles de la
télécommande.
Démarrage
Utilisation de la télécommande
Raccords
Insertion des piles dans la télécommande
Avant le démarrage
Aperçu des fonctions (suite)
Commutateur magnétoscope/d’enregisreur de DVD
Édition
Comme cet appareil est une combinaison de magnétoscope et d’enregistreur de DVD, il faut d’abord
sélectionner le composant à opérer avec la touche OUTPUT SELECT.
Touche OUTPUT SELECT
MODE VCR
OPEN/CLOSE
POWER
REW
F.FWD STOP/EJECT
PLAY
DUBBING
VCR
STOP
OUTPUT SELECT
CHANNEL
VCR
RECORD
PLAY
S-VIDEO
DVD
VIDEO
POWER
REC SPEED
AUDIO
.@/:
1
ABC
DEF
RECORD
MODE DVD
2
3
JKL
MNO
4
5
6
PQRS
TUV
WXYZ
7
8
9
SPACE
Touche VCR
Touche DVD
Appuyer sur la touche DVD sur la télécommande.
(Vérifier que l’indicateur DVD SELECT est allumé.)
OPEN/CLOSE
L - AUDIO - R
DVD
GHI
CH
VIDEO/TV
SLOW
0
DISPLAY
VCR
REC/OTR
SETUP
DVD
PAUSE
PLAY
OUTPUT SELECT
STOP
DVD
Indicateur
DVD SELECT
Indicateur
VCR SELECT
TIMER PROG.
ENTER
REC MONITOR
MENU/LIST TOP MENU
CLEAR/C-RESET ZOOM
SEARCH
MODE
Fonctions du
magnétoscope
VCR
RETURN
SKIP
SKIP
CM SKIP
Autres
Remarques
• La pression seulement de la touche OUTPUT
SELECT du panneau avant NE COMMUTE PAS
le mode de la télécommande. IL FAUT sélectionner
le mode correct à la télécommande.
• La pression de la touche SETUP ou de la
touche TIMER PROG. commute l’appareil au
mode DVD.
Changement du menu
CONFIGURER
Appuyer sur la touche VCR sur la télécommande.
(Vérifier que l’indicateur VCR SELECT est allumé.)
9
Avant le démarrage
Aperçu des fonctions (suite)
Guide du menu à l’écran
• Pour avoir l’affichage français, sélectionner d’abord “Français” comme “OSD language” (“Langue ASE”) du menu “SETUP” (“CONFIGURER”). (Voir la page 89.)
Cet appareil utilise les types d’affichages sur écran suivants pour la plupart des opérations. Le menu
SETUP/DISC/CD, la liste Titre et le menu DISPLAY permettent de modifier l’état de lecture de disque pendant
la lecture. Le menu DISPLAY donne aussi certaines informations sur le disque pour contrôler l’état du disque.
Menu CONFIGURER/DISQUE/CD
Appuyer sur la touche SETUP pour afficher le menu de configuration principal, puis choisir SETUP/DISC/CD
en appuyant sur les touches { / B. Puis appuyer sur la touche ENTER pour afficher chaque menu.
Ces menus permettent d’accéder à toutes les fonctions principales de l’appareil.
“CONFIGURER” est disponible
seulement en mode d’arrêt.
“DISQUE” est disponible seulement quand un disque
DVD-R/RW est inséré dans l’appareil. “DISQUE” ne
peut pas être sélectionné à la lecture d’un disque
DVD-Vidéo (disponible dans le commerce) ou
d’un disque DVD-R finalisé.
Réglage disque
Menu de configuration
Configurer
1
2
3
5
6
Mode lecture CD
Disque
Mode lecture CD
Edition
Format
Lecture hasard
Lecture progr.
Fermeture
PBC (CD vidéo uniquement)
Protection de disque HF
4
“CD” est disponible seulement
quand un disque CD Audio, un
disque CD Vidéo ou un disque
CD-R/RW avec fichiers MP3 est
inséré dans l’appareil.
HF
EF
1 2 3 4
1 2 3
Configuration de lecture
1. Lecture:
Pour configurer l’appareil pour la
lecture de disques selon ses
préférences.
2. Enregist.:
Pour configurer l’appareil pour
l’enregistrement de disques ou de
cassettes selon ses préférences.
3. Affichage:
Pour configurer l’écran OSD de
l’appareil selon ses préférences.
4. Sélect. vidéo:
Pour choisir une entrée de ligne pour
enregistrer sur des disques DVD à
partir d’un autre équipement vidéo.
5. Horloge:
Pour régler l’horloge de l’appareil
selon ses besoins.
6. Canal:
Pour ajuster le réglage des chaînes
de l’appareil selon ses préférences.
10
1. Edition:
Active la liste de titres (quand un
disque en mode VR est inséré,
‘Original’ ou ‘Playlist’ est
disponible), qui indique les titres
enregistrés sur le disque.
2. Format:
Permet d’effacer tous les matériaux
enregistrés sur le disque. Le disque
sera totalement vide.
3. Fermeture:
Permet de finaliser un disque contenant des titres enregistrés.
4. Protection de disque
(mode VR seulement):
Permet de protéger un disque
contre le montage ou
l’enregistrement accidentels.
1. Lecture hasard:
Pour activer la fonction de lecture
aléatoire.
2. Lecture programmée
(CD Audio seulement):
Pour activer la fonction de lecture
programmée.
3. PBC
(CD vidéo uniquement):
Pour activer ou désactiver la
fonction PBC.
Avant le démarrage
Avant le démarrage
Aperçu des fonctions (suite)
Menu d’affichage
DVD
Voir les détails à la page 43.
4
1
00:00:00
DVD-RW
: Recherche
: Audio
: Sous-titres
: Angle (sauf mode VR)
: Répétition
: Marque
: Réduction du bruit
: Zoom
Enregistrement Lecture d’un disque
1
1
5. Chaque icône signifie:
Démarrage
Appuyer sur la touche DISPLAY
pour appeler le menu d’affichage.
Ce menu donne des informations
sur le disque en cours de lecture.
Certaines opérations sont possibles
pendant la lecture d’un disque.
1. Indique le type du disque et le
mode format.
REMARQUE:
Dans certaines descriptions
de ce guide, un seul type de
disque est donné en exemple.
2. Indique un mode
d’enregistrement et un temps
d’enregistrement possible.
3. Indique le numéro de la
chaîne actuelle.
4. Indique le numéro du titre, le
numéro du chapitre et le
temps de lecture écoulé du
disque.
Raccords
Mode DVD
D’abord:
Mode vidéo
SP 1:25 Rem.
5
CH 1
VCR
Appuyer sur la touche DISPLAY
pour appeler le menu d’affichage.
2
CH21
0:00:00
HIFI
3
4
5
Fonctions du
magnétoscope
SP
Changement du menu
CONFIGURER
1
1. Etat de lecture actuel de la
bande.
2. Indique le numéro de chaîne
actuel.
3. Indique la vitesse d’enregistrement
seulement 5 secondes.
4. Indique le compteur de
bande.
5. Etat audio de la cassette
actuelle.
Édition
Mode VCR
D’abord:
2
3
Autres
11
Avant le démarrage
Aperçu des fonctions (suite)
Guide des affichages du panneau avant
4
2
1
3
7
6
5
1. Etat actuel de l’appareil
: Apparaît lors de la pause
de lecture de disque.
: Apparaît à la lecture d’un
disque.
: Apparaît quand la
programmation avec
minuterie est réglée et en
cours.
: Apparaît pendant
l’enregistrement.
:
Apparaît quand la lecture
répétée est activée.
: Apparaît quand une
cassette est dans l’appareil.
: Apparaît quand un dique DVD
est inséré dans le tiroir à disque.
Apparaît quand un
enregistrement avec minuterie
DVD est en cours.
Apparaît quand un DVD est en
mode d’attente d’enregistrement
avec minuterie.
:
Apparaît quand un dique
DVD-R est inséré dans
le tiroir à disque.
:
Apparaît quand un dique
DVD-RW est inséré dans
le tiroir à disque.
: Apparaît quand enregistrement avec minuterie
VCR est en cours.
Apparaît quand un VCR est
en mode d’attente d’enregistrement avec minuterie.
:
Apparaît pendant le
processus de copie du
magnétoscope au DVD.
:
Apparaît pendant le
processus de copie du
DVD au magnétoscope.
2. Type du disque et état
actuel de l’appareil
: Apparaît quand un CD
Audio ou un disque avec
fichiers MP3 est inséré
dans le tiroir à disque.
: Apparaît quand un CD
Vidéo est inséré dans le
tiroir à disque.
Message affiché
1
4
3. Vitesse d’enregistrement
Indique la vitesse d’enregistrement
du disque.
4. Marque de titre/piste et
de chapitre
: Apparaît à l’indication
d’un numéro de
titre/piste.
: Apparaît à l’indication
d’un numéro de chapitre.
5. Affiche ce qui suit
• Temps de lecture/temps
restant
• Numéro du titre/chapire/piste
actuel
• Temps d’enregistrement
• Horloge
• Numéro de chaîne
• Compteur de bande VCR
• Temps restant OTR
6.
7.
: Apparaît quand l’heure
actuelle est dans la partie
‘PM’ de la journée.
:
Apparaît quand le
système de balayage
progressif est activé.
1. Apparaît quand le tiroir à
disque s’ouvre.
2. Apparaît quand le tiroir à
disque se ferme ou est fermé.
2
3
5
3. Apparaît au chargement d’un
disque dans le tiroir à disque.
4. Apparaît à l’enregistrement de
données sur le disque.
5. Apparaît quand la fonction
PBC d’un CD Vidéo est
activée.
12
Raccords
Avant le démarrage
Raccord à un téléviseur
Antenne
Antenne
(Arrière du téléviseur)
Signal
de
câble
Signal
de
câble
(Arrière du
téléviseur)
3
ou
ou
Raccords
Connecter
Câble RF
(fourni)
1
Déconnecter
DIGITAL
AUDIO
AUDIO OUT OUT
DVD
S-VIDEO
COMPONENT
VIDEO OUT
Y
CB
L
COAXIAL
IN
R
DVD/VCR
AUDIO IN AUDIO OUT ANTENNA
IN
L
L
R
R
VIDEO IN VIDEO OUT
2
OUT
CR
Démarrage
Connecter
OUT
(Arrière de l’appareil)
4 Brancher le cordon d’alimentation de l’appareil.
Effectuer un des raccordements suivants, selon les capacités de l’équipement existant.
Méthode 2
Meilleure image
Enregistrement Lecture d’un disque
Audio de base
Méthode 1
Bonne image
Méthode 3
La meilleure image
Téléviseur
AUDIO IN
VIDEO IN
COMPONENT
VIDEO IN
S-VIDEO IN
Y
CB
CR
Câble vidéo
(fourni)
Câble audio
(fourni)
Câble S-Video
(non fourni)
Câbles vidéo à
composants
(non fournis)
Cette unité
DVD
DVD/VCR
AUDIO OUT
COMPONENT
VIDEO OUT
OUT
Y
CB
L
L
IN
R
R
S-VIDEO
Y
L
DVD/VCR
AUDIO IN AUDIO OUT ANTENNA
IN
L
L
CB
R
R
VIDEO IN VIDEO OUT
COMPONENT
VIDEO OUT
DVD
Édition
T
DVD
AUDIO
S-VIDEO
DVD/VCR
OUT
VIDEO OUT
CR
OUT
CR
OUT
ou
DVD
AUDIO
OUT
DVD
S-VIDEO
COMPONENT
VIDEO OUT
Y
CB
L
COAXIAL
IN
R
VIDEO OUT
S-VIDEO OUT
COMPONENT VIDEO OUT
DVD/VCR
AUDIO IN AUDIO OUT ANTENNA
IN
L
L
R
L
R
VIDEO IN VIDEO OUT
Changement du menu
CONFIGURER
DIGITAL
AUDIO
AUDIO OUT OUT
OUT
CR
OUT
R
• Ces prises sont utiles
seulement en mode DVD.
AUDIO OUT
Remarque
PLAY
STOP
REC/OTR
SETUP
REC MONITOR
MENU/LIST TOP MENU
TIMER PROG.
ENTER
RETURN
plus de 3 secondes
pendant la lecture du DVD
[Mode entrelacé]
[Mode de balayage progressif]
13
Autres
Si le téléviseur est compatible avec le balayage propressif 525p (480p) et pour
profiter de cette haute qualité d’image:
Sélectionner le raccordement de la Méthode 3 ci-dessus et le mode de balayage progressif.
Pour régler le mode, maintenir la touche SETUP pressée sur la télécommande au moins 3
secondes pendant la lecture du DVD de sorte que “P.SCAN” s’affiche sur cet appareil.
Si le téléviseur n’est pas compatible avec le balayage progressif:
Utiliser cet appareil en mode entelacé.Vérifier que “P.SCAN” n’est pas affiché sur
l’appareil. Sinon, maintenir la touche SETUP pressée au moins 3 secondes sur la
télécommande pendant la lecture du DVD, de sorte que “P.SCAN” disparaisse.
Fonctions du
magnétoscope
• Raccorder cet appareil directement au téléviseur. Si des câbles A/V sont raccordés à un magnétoscope, les
images peuvent être déformées à cause du système de protection contre la copie.
• Les méthodes 2 et 3 sont utiles seulement en mode DVD.
Raccords
Raccord à un câblosélecteur et un récepteur d’antenne parabolique
Raccord A
(Câblosélecteur ou
récepteur d’antenne
parabolique)
IN
OUT
(Arrière de l’appareil)
DVD/VCR
ANTENNA
IN
OUT
E
Câble RF
Signal
câble
(fourni)
(Arrière du téléviseur)
Sélectionner cette connexion pour visualiser ou enregistrer une chaîne brouillée.Avec cette connexion, les
chaînes ne peuvent pas être modifiées sur l’appareil. SEULES les chaînes sélectionnées au câblosélecteur ou à
l’antenne parabolique peuvent être visualisées ou enregistrées.
• Pendant l’enregistrement, seule la chaîne enregistrée est visible.
Pour sélectionner des chaînes au convertisseur ou à l’antenne parabolique
1) Mettre cet appareil sous tension en appuyant sur la touche POWER. Le témoin “POWER” sur le panneau
avant s’allume. Puis appuyer sur les touches CHANNEL pour sélectionner la chaîne 3 ou 4 (la même
chaîne que la chaîne de sortie du câblodistributeur ou de l’antenne parabolique).
• Si des parasites apparaissent sur l’écran du téléviseur, appuyer sur la touche VIDEO/TV sur la télécommande.
• Pour l’emploi de la chaîne 4, il faudra changer la sortie RF de l’appareil à la chaîne 4. Voir “Sortie du convertisseur
RF” à la page 101.
2) Au téléviseur, sélectionner la chaîne 3 ou 4 (la même chaîne que celle sélectionnée à l’étape 1).
3) Au convertisseur ou à l’antenne parabolique, sélectionner la chaîne à visualiser ou enregistrer.
Raccord B
(Arrière de l’appareil)
DVD/VCR
ANTENNA
IN
Signal
câble
OUT
(Câblosélecteur ou à
l’antenne parabolique)
IN
Câble RF (fourni)
E
OUT
Câble RF (Arrière du téléviseur)
Sélectionner cette connexion pour changer les chaînes sur l’appareil. Avec cette connexion, il est possible de
regarder une chaîne en en enregistrant une autre.
• Une chaîne brouillée ne peut pas être visualisée ou enregistrée.
Pour sélectionner des chaînes au câblosélecteur ou à l’antenne parabolique
1) À la boîte de câblovision ou la boîte satellite, sélectionner la chaîne 3 ou 4 (la même chaîne que pour la
sortie RF de cet appareil).
• Se rapporter à “Sortie du convertisseur RF” à la page 101.
2) Au téléviseur, sélectionner la même chaîne que la chaîne de sortie (3 ou 4) du câblosélecteur ou de l’antenne parabolique.
3) Mettre cet appareil sous tension en appuyant sur la touche POWER. Le témoin “POWER” sur le panneau
avant s’allume. Puis, sélectionner la chaîne à visualiser ou enregistrer.
• Si des parasites apparaissent sur l’écran du téléviseur, appuyer sur la touche VIDEO/TV sur la télécommande.
Pour lire un disque DVD ou une cassette
• Se rapporter à “Lecture” aux pages 44-45, 94.
Pour visualiser une chaîne en en enregistrant une autre
1) Pendant l’enregistrement sur cet appareil, appuyer sur la touche VIDEO/TV.
2) À la boîte de câblovision ou la boîte satellite, sélectionner la chaîne à visualiser.
Remarque pour l’installateur du système de télévision par câble :
Ce rappel est prévu pour attirer l’attention de l’installateur du système de télévision par câble sur
l’Article 820-40 du Code National de l’Électricité, qui fournit les lignes directrices pour la mise à la terre
correcte – en particulier, il spécifie que la terre du câble doit être raccordée au système de mise à la
terre du bâtiment, aussi près que possible du point d’entrée du câble.
14
Raccords
Avant le démarrage
Raccords à un système audio
• À la modification des raccordements, tous les appareils doivent être hors tension.
• Consulter chaque guide d’utilisation pour les informations supplémentaires sur les autres appareils.
Méthode 1
Method 2
Chaîne stéréo
AUDIO
COAXIAL
Prise d’entrée
audionumérique
Démarrage
Câble coaxial
audionumérique
(non fourni)
Câble audio
(fourni)
Cette unité
DVD/VCR
AUDIO OUT
L
R
DVD
DIGITAL
AUDIO OUT
DIGITAL
AUDIO OUT
COAXIAL
or
DVD
AUDIO
OUT
L
R
Changement du menu
CONFIGURER
Fonctions du
magnétoscope
Autres
15
Édition
Remarques:
• Si la sortie est audio codée Dolby Digital, raccorder à un décodeur Dolby Digital et régler
“Dolby Digital” à “Flux” pour le réglage “Sortie
numérique” au menu CONFIGURER. (Voir les
pages 90-91.)
• La source audio sur un disque en format
ambiophonique 5,1 canaux Dolby Digital ne peut
pas être enregistrée comme son numérique par
une platine MD ou DAT.
• Sauf connexion à un décodeur Dolby Digital, régler
“Dolby Digital” à “PCM” pour le réglage “Sortie
numérique” au menu CONFIGURER. La lecture
d’un DVD en utilisant des réglages incorrects peut
provoquer une déformation par parasites, et aussi
endommager les enceintes. (Voir les pages 90-91.)
• Régler “Dolby Digital” à “PCM” pour le réglage
“Sortie numérique” au menu CONFIGURER pour
le raccordement à une platine MD ou DAT. (Voir
les pages 90-91.)
• En connectant cet appareil à un décodeur Dolby
Digital multicanaux, il est possible de profiter du
son ambiophonique 5,1 canaux Dolby Digital,
comme dans les salles de cinéma.
Enregistrement Lecture d’un disque
AUDIO OUT
Raccords
Prises d’entrée
audio analogique
Décodeur Dolby Digital,
platine MD ou platine DAT
Démarrage
Enregistrement simple de disques DVD
Ce qui suit permettra de comprendre facilement comment enregistrer sur des disques DVD.
Remarque:
Vérifier la présence de piles dans la télécommande et le raccordement correct de cet appareil et du téléviseur.
Étape 1: Choisir un type de disque
Étape 2: Insérer un disque vierge.
Télécommande
Il y a plusieurs types de disques DVD enregistrables.
Choisir un type de disque DVD enregistrable sur la
base de ses propres besoins de lecture/enregistrement/
montage. Voir “Types de disque DVD” au bas de cette
page pour les détails sur les différences entre les divers
genres de supports compatibles.
Cet appareil peut enregistrer sur les types de disques
suivants.
POWER
REC SPEED
.@/:
1
ABC
2
3
GHI
JKL
MNO
4
5
6
1
Mettre
l’appareil sous
tension.
Par exemple, pour enregistrer à répétition sur le
même disque, ou pour éditer le disque après l’enregistrement, sélectionner un disque de type DVD-RW
réinscriptible.
POWER
REC SPEED
AUDIO
.@/:
1
ABC
DEF
2
3
GHI
JKL
MNO
AUDIO
OPEN/CLOSE
DEF
OPEN/CLOSE
2
Ouvrir le
tiroir à
disque.
CH
3
CH
Fermer le
tiroir à
disque.
Chargement
Pour sauvegarder des enregistrements sans
aucune modification, un DVD-R non-inscriptible
peut faire l’affaire.
La reconnaissance de
cette opération peut
exiger un certain temps.
Types de disques DVD
Formatage du disque
.
Insérer le disque dans
l’appareil. Puis, formater le
disque au menu
CONFIGURER. Le format
Vidéo (mode Vidéo) ou le
format d’enregistrement
vidéo (mode VR) sera
disponible selon le type de
disque inséré. Cela est
nécessaire pour préparer le
disque pour l’enregistrement.Voir les détails aux
pages 28-30.
: Le mieux adapté
: Utilisable
: Certaines fonctions sont limitées.
Pour
DVD-RW VR
: Inutilisable
DVD-RW Video
DVD-R
DVD-RW Video
DVD-R
Non
Enregistrer des programmes de télévision
Réutiliser en supprimant des matériaux indésirables
Monter les matériaux enregistrés
Monter/enregistrer à partir d’un appareil raccordé
Copier des disques pour la distribution
*1
Lire sur un autre appareil DVD
*1
Fonctions
DVD-RW VR
Enregistrement
Réinscriptible
Oui
Oui
Peut créer des chapitres à intervalles fixes (auto)
Oui
Oui
Oui
Peut créer des chapitres aux emplacements souhaités (manuel)
Oui
Non
Non
Peut enregistrer des images en format 16:9
Oui
Oui
Oui
Peut enregistrer des programmes Une copie
Oui
Non
Non
Montage
*1
16
Peut effectuer les fonctions de montage de base
Oui
Oui
Oui
Peut effectuer les fonctions de montage avancées (montage de Playlist)
Oui
Non
Non
Le DVD-RW (mode VR) est seulement lisible sur un
appareil DVD compatible VR.
Remarque:
Pour les détails sur les fonctions ci-dessus et les
restrictions impliquées, voir les explications dans le
manuel.
Démarrage
Étape 3: Sélectionner
la vitesse d’enregistrement
Étape 5: Enregistrer
sur des disques DVD
Pour sélectionner le
mode DVD
4
5
6
PQRS
TUV
WXYZ
7
8
9
SPACE
Raccords
1
Étape 4: Sélectionner
la chaîne
souhaitée
VIDEO/TV
SLOW
0
VCR
DISPLAY
REC SPEED
AUDIO
.@/:
1
ABC
DEF
2
3
GHI
JKL
MNO
4
5
6
PQRS
TUV
WXYZ
8
9
7
SPACE
OPEN/CLOSE
2
POWER
REC SPEED
AUDIO
.@/:
1
ABC
DEF
2
3
GHI
JKL
MNO
4
5
6
PQRS
TUV
WXYZ
8
9
2
VCR
CH
VIDEO/TV
7
SPACE
SLOW
DVD
PAUSE
OPEN/CLOSE
PLAY
STOP
CH
REC/OTR
VIDEO/TV
SETUP
TIMER PROG.
ENTER
REC MONITOR
SLOW
MENU/LIST TOP MENU
RETURN
0
0
DISPLAY
PAUSE
Démarrage
POWER
DVD
DISPLAY
1
VCR
DVD
PAUSE
SP 2:01 Rem.
CH 1
Enregistrement Lecture d’un disque
Pour sélectionner la vitesse
d’enregistrement
I
Conseil 1: Lire le contenu enregistrés
Le titre à lire peut être sélectionné au menu affiché, et la lecture peut commencer
immédiatement. Le contenu enregistrés sont très accessibles sur un disque, la
procédure est vraiment simple, comme si
on choisissait un titre de chapitre à
Démarrer enr.
Arrêt/Démarrer
Arrêter enr.
l’écran de menu.
Qu’est-ce que titres et
chapitres?
Titre 1
Titre 2
Étape 6:Arrêter
l’enregistrement.
4
5
6
PQRS
TUV
WXYZ
7
8
9
SPACE
VIDEO/TV
SLOW
0
DISPLAY
DVD
VCR
Édition
Les matériaux du disque DVD sont
généralement divisés en plusieurs titres.
Les titres peuvent encore être subdivisés
en chapitres.
Avant le démarrage
Enregistrement simple de disques DVD (suite)
PAUSE
Chapitre 1 Chapitre 2 Chapitre 3 Chapitre 1 Chapitre 2
PLAY
STOP
REC/OTR
REC MONITOR
TIMER PROG.
ENTER
Changement du menu
CONFIGURER
Conseil 2: Monter le disque enregistré
SETUP
Le montage des disques est très simple; cet appareil offre des fonctions de montage
pratiques, utilisables seulement avec les disques DVD-R/RW.
Ce qui suit peut être monté à partir d’une liste de titres.
58%
Ecriture infos
Fonctions du
magnétoscope
• Dénomination de titres
• Réglage d’immages pour les images miniatures (mode VR)
• Réglage/suppression de marques de chapitres
• Suppression de parties de titres (mode VR)
Original et Playlist (mode VR)
Il est possible de monter les enregistrements dans la Playlist sans changer les
enregistrements originaux. Une Playlist n’utilise beaucoup d’espace du disque.
À quoi servent “Original” ou “Playlist”?
Autres
Dans ce manuel, Original et Playlist seront utilisés pour référer aux matériaux
réels et à la version montée.
• Les matériaux Original réfèrent à ce qui est réellement enregistré sur le disque.
• Les matériaux Playlist réfèrent à la version montée du disque; comment
les matériaux Original seront lus.
Cette opération peut
demander un certain
temps.
17
Démarrage
Réglage des chaînes
Toutes les chaînes sont
mémorisées dans l’appareil. Il
est recommandé de mémoriser
les chaînes disponibles dans la
zone sous “Préréglage auto”
dans Préréglage canal du menu
CONFIGURER.
4
Sélectionner “CONFIGURER”
avec les touches { / B, puis
appuyer sur la touche ENTER.
Le menu CONFIGURER s’affiche.
1
POWER
REC SPEED
AUDIO
.@/:
1
ABC
DEF
2
3
GHI
JKL
MNO
4
5
6
PQRS
TUV
WXYZ
8
9
7
SPACE
OPEN/CLOSE
CH
VIDEO/TV
SLOW
0
Obtention automatique
de chaînes
Configurer
DISPLAY
DVD
VCR
PAUSE
PLAY
3
7
1
Appuyer sur la touche POWER
pour mettre l’appareil sous
tension.
Configuration de lecture
Allumer le téléviseur et bien
sélectionner l’entrée à laquelle
l’appareil est raccordé.
Sélectionner “Canal” avec les
touches K / L / { / B, puis
appuyer sur la touche ENTER.
Le menu Préréglage canal s’affiche.
VCR
DVD
Préréglage manuel
Sélection audio TV
Stéréo
6
Sélectionner “Préréglage auto”
avec les touches K / L, puis
appuyer sur la touche ENTER.
L’appareil commencera à obtenir
les chaînes disponibles dans la
zone.
7
Appuyer sur la touche
SETUP pour quitter.
•Seules les chaînes mémorisées par
cet appareil sont sélectionnables
avc les touches CHANNEL.
18
RETURN
CM SKIP
SKIP
SKIP
4
5
6
Pour sélectionner une chaîne
Il est possible de sélectionner une
chaîne en l’entrant directement
aux touches numériques de la
télécommande.
Remarques sur l’emploi des
touches numériques:
• À la sélection de chaînes câblées
à numéro supérieur à 99, entrer
le numéro de chaîne comme
numéro à trois chiffres (par
exemple: 117, appuyer sur 1, 1, 7).
• Chaque numéro de chaîne à
un chiffre doit être précédé
d’un zéro (par exemple: 02,
03, 04 et ainsi de suite).
• Le mode d’entrée de ligne (“L1”
ou “L2”) est sélectionnable. Pour
sélectionner “L1”, appuyer sur
[0], [0], [1]. Pour sélectionner
“L2”, appuyer sur [0], [0], [2].
Voir les détails à la page 38.
CH 18
Prér. auto instant.
Menu de configuration
REC MONITOR
SEARCH
MODE
Préréglage auto
Appuyer sur la touche
SETUP pour afficher le menu
CONFIGURER/DISQUE.
Le menu CONFIGURER/DISQUE
s’affiche.
Écran:
TIMER PROG.
ENTER
CLEAR/C-RESET ZOOM
Configurer > Préréglage canal
3
SETUP
MENU/LIST TOP MENU
5
2
STOP
REC/OTR
Remarques
• Si le préréglage automatique
est annulé pendant le
préréglage, certaines chaînes
non encore préréglées peuvent
ne pas être reçues.
• La sélection dépendra de la
manière dont les chaînes de
télévision sont reçues.
Pour annuler le préréglage
automatique pendant le balayage:
Appuyer sur la touche RETURN
ou la touche SETUP pour annuler.
Démarrage
Avant le démarrage
Réglage des chaînes (suite)
Ajout/suppression de
chaînes
Sélectionner “Préréglage
manuel” avec les touches K / L,
puis appuyer sur la touche
ENTER.
Le menu Préréglage manuel
s’affichera.
1
POWER
REC SPEED
.@/:
1
ABC
2
3
GHI
JKL
MNO
AUDIO
DEF
4
5
6
PQRS
TUV
WXYZ
8
9
7
OPEN/CLOSE
SPACE
Raccords
Les chaînes qui ne sont plus reçues
ou rarement regardées peuvent
être supprimées de la mémoire.
Des chaînes peuvent aussi être
ajoutées dans la mémoire.
4
CH
VIDEO/TV
SLOW
0
DISPLAY
DVD
VCR
PAUSE
Configurer > Préréglage canal> Préréglage manuel
PLAY
CH2
Ajouter
Effacer
1
7
STOP
REC/OTR
SETUP
MENU/LIST TOP MENU
CLEAR/C-RESET ZOOM
5
2
Sélectionner “CONFIGURER”
avec les touches { / B, puis
appuyer sur la touche ENTER.
Le menu CONFIGURER s’affiche.
Sélectionner le numéro de la
chaîne à ajouter ou supprimer.
Appuyer sur la touche { pour
passer à un numéro de chaîne
inférieur.
Appuyer sur la touche B pour
passer à un numéro de chaîne
supérieur.
CM SKIP
RETURN
SKIP
SKIP
2
3
4
5
6
Configurer > Préréglage canal> Préréglage manuel
Édition
CH18
Ajouter
Effacer
Configurer
3
VCR
DVD
Préréglage auto
Stéréo
7
Autres
Préréglage manuel
Sélection audio TV
Sélectionner “Ajouter” ou
“Effacer” avec les touches K / L,
puis appuyer sur la touche
ENTER.
Le numéro de chaîne sera ajouté ou
supprimé de la mémoire de chaînes.
Puis, le numéro de chaîne suivant
apparaîtra, vous permettant d’ajouter
ou de supprimer des chaînes.
Fonctions du
magnétoscope
Sélectionner “Canal” avec les
touches K / L / { / B, puis
appuyer sur la touche ENTER.
Le menu Préréglage canal s’affiche.
Configurer > Préréglage canal
Changement du menu
CONFIGURER
6
Configuration de lecture
Enregistrement Lecture d’un disque
SEARCH
MODE
Menu de configuration
TIMER PROG.
ENTER
REC MONITOR
Démarrage
Appuyer sur la touche
SETUP pour afficher le menu
CONFIGURER/DISQUE.
Le menu CONFIGURER/DISQUE
s’affiche.
Écran:
Appuyer sur la touche
SETUP pour quitter.
19
Démarrage
Sélection de TV stéréo ou de la seconde piste audio “SAP”
Il est possible de sélectionner le
canal son à sortir du téléviseur.
“Stéréo” est sélectionné par
défaut.
1
Appuyer sur la touche
SETUP pour afficher le menu
CONFIGURER/DISQUE.
Le menu CONFIGURER/DISQUE
s’affiche.
Écran:
4
Sélectionner “Sélection audio
TV” avec les touches K / L,
puis appuyer sur la touche
ENTER.
La fenêtre d’options s’affichera.
POWER
REC SPEED
.@/:
1
ABC
2
3
GHI
JKL
MNO
4
5
6
PQRS
TUV
WXYZ
8
9
7
SPACE
Configurer > Préréglage canal
VCR
DISPLAY
Configurer
Sélection audio TV
Stéréo
Stereo
SAP
PLAY
1
6
Sélectionner “Canal” avec les
touches K / L / { / B, puis
appuyer sur la touche ENTER.
Le menu Préréglage canal
s’affichera.
Configurer > Préréglage canal
VCR
DVD
Préréglage auto
Préréglage manuel
Sélection audio TV
20
Stéréo:
Fournit l’audio principale.
SAP:
(Secondary Audio Program –
Seconde piste audio)
Fournit l’audio secondaire.
Consulter cet article dans le
“Glossaire” à la page 103 pour les
détails.
Appuyer sur la touche
SETUP pour quitter.
3
Stéréo
PAUSE
Préréglage manuel
6
Configuration de lecture
SLOW
DVD
VCR
Préréglage auto
Sélectionner “Stéréo” ou
“SAP” avec les touches K / L,
puis appuyer sur la touche
ENTER.
Sélectionner “CONFIGURER”
avec les touches { / B, puis
appuyer sur la touche ENTER.
Le menu CONFIGURER s’affiche.
CH
VIDEO/TV
0
DVD
5
2
OPEN/CLOSE
DEF
STOP
REC/OTR
SETUP
TIMER PROG.
ENTER
REC MONITOR
MENU/LIST TOP MENU
CLEAR/C-RESET ZOOM
Menu de configuration
AUDIO
SEARCH
MODE
CM SKIP
RETURN
SKIP
SKIP
2
3
4
5
Démarrage
Avant le démarrage
Réglage de l’horloge
4
Sélectionner “Réglage horloge
auto” avec les touches K / L, puis
appuyer sur la touche ENTER.
La fenêtre d’options s’affichera.
7
Réglage automatique de l’horloge
1
Appuyer sur la touche
Réglage horloge auto
Heure d'été
.@/:
1
ABC
2
3
GHI
JKL
MNO
OPEN/CLOSE
DEF
4
5
6
PQRS
TUV
WXYZ
8
9
7
HF
Auto
Auto
Manuel
Off
AUDIO
SPACE
CH
VIDEO/TV
SLOW
0
DISPLAY
DVD
VCR
PAUSE
PLAY
5
• Si le numéro de la station
PBS est inconnu,
sélectionner “Auto” avec les
touches K / L, puis appuyer
sur la touche ENTER.
1
6
STOP
REC/OTR
SETUP
TIMER PROG.
ENTER
REC MONITOR
MENU/LIST TOP MENU
CLEAR/C-RESET ZOOM
SEARCH
MODE
CM SKIP
RETURN
SKIP
SKIP
2
3
4
5
• Si le numéro de la station
PBS est connu, sélectionner
“Manual” avec les touches
K / L, puis appuyer sur la
touche ENTER.
Menu de configuration
Configurer > Horloge
Réglage horloge
2
Sélectionner “CONFIGURER”
Réglage horloge auto
Heure d'été
VCR DVD
HF
Regler
le canal
Auto
Auto
CH1
Manuel
Off
Configuration de lecture
touches K / L / { / B, puis
appuyer sur la touche ENTER.
Le menu Horloge s’affichera.
VCR DVD
Réglage horloge
Auto
Heure d'été
EF
7
Appuyer sur la touche POWER
pour mettre l’appareil sous
tension.
Cet appareil cherchera l’heure
seulement quand il est éteint. Le
laisser hors tension quelques
minutes pour lui donner le temps
de régler l’horloge sur l’affichage
avant du panneau avant.
21
Autres
Réglage horloge auto
SETUP pour quitter.
Remarques
• L’horloge peut se régler
elle-même automatiquement
après la connexion du signal
d’antenne/câble à l’appareil et
le branchement du cordon
secteur. Dans ce cas, l’heure
présente apparaîtra dans
l’affichage du panneau avant.
• Si l’heure présente n’est pas
affichée ou si l’heure affichée
est incorrecte, régler l’horloge
manuellement.
Fonctions du
magnétoscope
3
Sélectionner “Horloge” avec les
6
Appuyer sur la touche
Changement du menu
CONFIGURER
Entrer le numéro de la
station PBS aux touches
numériques ou K / L, puis
appuyer sur la touche
ENTER.
Configurer
Configurer > Horloge
Édition
avec les touches { / B, puis
appuyer sur la touche ENTER.
Le menu CONFIGURER s’affiche.
Enregistrement Lecture d’un disque
SETUP pour afficher le menu
CONFIGURER/DISQUE.
Le menu CONFIGURER/DISQUE
s’affiche.
Écran:
Réglage horloge
VCR DVD
REC SPEED
Démarrage
Vérifier que:
• Le raccord de l’antenne/
télévision câblée est correct.
• Si cet appareil est raccordé à une
boîte de câblovision ou une boîte
satellite, sélectionner la station
PBS locale dessus pour régler
automatiquement l’horloge.
Configurer > Horloge
POWER
Raccords
Régler l’horloge avant d’essayer
l’enregistrement avec minuterie. Si une
Station publique de diffusion (PBS) est
disponible dans la zone, suivre le
réglage automatique de l’horloge
ci-dessus. Sinon, suivre le Réglage
manuel de l’horloge aux pages 22-23.
Démarrage
Réglage de l’horloge (suite)
Réglage manuel de l’horloge
4
1
Appuyer sur la touche
SETUP pour afficher le menu
CONFIGURER/DISQUE.
Le menu CONFIGURER/DISQUE
s’affiche.
Écran:
Sélectionner “Réglage horloge”
avec les touches K / L, puis
appuyer sur la touche ENTER.
Une fenêtre de réglage de l’horloge
s’affichera.
POWER
REC SPEED
.@/:
1
ABC
2
3
GHI
JKL
MNO
AUDIO
DEF
4
5
6
PQRS
TUV
WXYZ
8
9
7
SPACE
Configurer > Horloge
OPEN/CLOSE
CH
VIDEO/TV
SLOW
0
VCR DVD
DISPLAY
DVD
VCR
PAUSE
Réglage horloge
Réglage horloge auto
Auto
Heure d'été
EF
---/--/----(---)
--:--
PLAY
1
STOP
REC/OTR
SETUP
TIMER PROG.
ENTER
REC MONITOR
MENU/LIST TOP MENU
Appuyer à nouveau sur la
touche ENTER.
La date par défaut apparaîtra.
Menu de configuration
2
Sélectionner “CONFIGURER”
avec les touches { / B, puis
appuyer sur la touche ENTER.
Le menu CONFIGURER s’affiche.
CLEAR/C-RESET ZOOM
SEARCH
MODE
CM SKIP
5
Entrer la date (mois/ jour/
année) avec les touches K / L.
Appuyer sur les touches { / B
pour déplacer le curseur.
RETURN
SKIP
SKIP
2
3
4
5
6
Configurer
Configurer > Horloge
VCR DVD
Réglage horloge
Réglage horloge auto
Auto
Heure d'été
EF
JAN / 12 / 2004 (LUN)
12 : 00AM
Configuration de lecture
3
Sélectionner “Horloge” avec
les touches K / L / { / B,
puis appuyer sur la touche
ENTER.
Le menu Horloge s’affichera.
Configurer > Horloge
VCR DVD
6
Entrer l’heure (heures/ minutes)
avec les touches K / L, puis
appuyer sur les touches { / B.
Un curseur passera à AM ou PM.
Configurer > Horloge
VCR DVD
Réglage horloge
Réglage horloge
Réglage horloge auto
Auto
Réglage horloge auto
Auto
Heure d'été
EF
Heure d'été
EF
JAN / 12 / 2004 (LUN)
09 : 24 AM
Remarque
• Le réglage de l’horloge
effectué sera perdu en cas de
panne de courant ou bien si
l’appareil est débranché plus
de 30 secondes au réglage
manuel de l’horloge.
22
Démarrage
Avant le démarrage
Réglage de l’horloge (suite)
8
Appuyer sur les touches K / L
pour sélectionner AM ou PM,
puis appuyer sur la touche
ENTER.
Le menu de l’horloge apparraîtra,
puis les réglages seront activés.
Appuyer sur la touche
SETUP pour quitter.
Bien que les secondes ne soient
pas affichées, leur comptage
commence à zéro.
POWER
REC SPEED
.@/:
1
ABC
2
3
GHI
JKL
MNO
AUDIO
DEF
4
5
6
PQRS
TUV
WXYZ
8
9
7
OPEN/CLOSE
SPACE
Raccords
7
CH
VIDEO/TV
SLOW
0
Configurer > Horloge
DVD
VCR
DISPLAY
PAUSE
VCR DVD
Réglage horloge
Auto
Heure d'été
EF
PLAY
8
Démarrage
Réglage horloge auto
STOP
REC/OTR
SETUP
TIMER PROG.
ENTER
REC MONITOR
MENU/LIST TOP MENU
CLEAR/C-RESET ZOOM
SKIP
7
SKIP
Enregistrement Lecture d’un disque
SEARCH
MODE
RETURN
CM SKIP
Quand “Auto” ou “Manuel” est sélectionné pour “Réglage
horloge auto”, changer ce réglage à “HF” comme suit.
Répéter les étapes (1) à (3) de “Réglage manuel de l’horloge”.
5
Sélectionner “Réglage horloge Sélectionner “HF” avec les
auto” avec les touches K / L, touches K / L, puis appuyer
puis appuyer sur la touche
sur la touche ENTER.
ENTER.
La fenêtre d’options s’affichera.
Configurer > Horloge
Réglage horloge
Réglage horloge auto
Heure d'été
VCR DVD
HF
Auto
Auto
Manuel
Off
Appuyer sur la touche
SETUP pour quitter.
.@/:
1
ABC
2
3
GHI
JKL
MNO
4
5
6
PQRS
TUV
WXYZ
8
9
7
AUDIO
OPEN/CLOSE
DEF
SPACE
CH
VIDEO/TV
SLOW
0
DISPLAY
DVD
VCR
PAUSE
PLAY
6
STOP
REC/OTR
SETUP
TIMER PROG.
ENTER
REC MONITOR
MENU/LIST TOP MENU
CLEAR/C-RESET ZOOM
SKIP
SKIP
4
5
Fonctions du
magnétoscope
SEARCH
MODE
RETURN
Changement du menu
CONFIGURER
6
REC SPEED
Édition
4
POWER
CM SKIP
Autres
23
Démarrage
Réglage de l’horloge (suite)
Réglage de l’heure d’été
Quand l’heure d’été est activée,
l’horloge de l’appareil avancera
automatiquement d’une heure le
premier dimanche d’avril et reviendra en arrière d’une heure le
dernier dimanche d’octobre.
1
4
Sélectionner “Heure d’été”
avec les touches K / L, puis
appuyer sur la touche
ENTER.
Les options “Heure d’été”
s’afficheront.
POWER
REC SPEED
.@/:
1
ABC
2
3
GHI
JKL
MNO
AUDIO
DEF
4
5
6
PQRS
TUV
WXYZ
8
9
7
SPACE
CH
VIDEO/TV
SLOW
0
Appuyer sur la touche
SETUP pour afficher le menu
CONFIGURER/DISQUE.
Le menu CONFIGURER/DISQUE
s’affiche.
Écran:
DISPLAY
Configurer > Horloge
DVD
VCR
VCR DVD
Réglage horloge auto
PLAY
Auto
Heure d'été
EF
HF
1
6
STOP
REC/OTR
SETUP
TIMER PROG.
ENTER
REC MONITOR
CLEAR/C-RESET ZOOM
SEARCH
MODE
5
Sélectionner “EF” ou “HF”
avec les touches K / L, puis
appuyer sur la touche
ENTER.
Choisir “EF” quand l’heure d’été
est observée.
Menu de configuration
2
Sélectionner “CONFIGURER”
avec les touches { / B, puis
appuyer sur la touche ENTER.
Le menu CONFIGURER s’affiche.
Configurer
Configuration de lecture
3
Sélectionner “Horloge” avec
les touches K / L / { / B,
puis appuyer sur la touche
ENTER.
Le menu Horloge s’affichera.
Configurer > Horloge
VCR DVD
Réglage horloge
Réglage horloge auto
Auto
Heure d'été
EF
PAUSE
Réglage horloge
MENU/LIST TOP MENU
24
OPEN/CLOSE
6
Appuyer sur la touche
SETUP pour quitter.
CM SKIP
RETURN
SKIP
SKIP
2
3
4
5
Démarrage
Avant le démarrage
Sélection du rapport d’aspect du téléviseur
Le menu Lecture s’affichera.
Configurer > Lecture
Aspect TV
Blocage parental
Langue du menu disque
Langue audio
Langue sous-titre
DVD
4:3 Letter Box
Tout
Anglais
Original
HF
Sortie numérique
Réglage dynamique
Avance rapide audio
EF
HF
POWER
REC SPEED
.@/:
1
ABC
2
3
GHI
JKL
MNO
AUDIO
DEF
4
5
6
PQRS
TUV
WXYZ
8
9
7
OPEN/CLOSE
SPACE
Raccords
Le rapport d’aspect du téléviseur
peut être sélectionné en fonction
des formats de ce qui est lu avec
l’appareil et de l’écran du
téléviseur (écran de télévision
standard 4:3 ou large 16:9). “4:3
Letter Box” est
sélectionné par défaut.
CH
VIDEO/TV
SLOW
0
1
4
PAUSE
PLAY
Sélectionner “Aspect TV”
avec les touches K / L, puis
appuyer sur la touche
ENTER.
La fenêtre d’options s’affichera.
1
6
STOP
REC/OTR
MENU/LIST TOP MENU
CLEAR/C-RESET ZOOM
Blocage parental
Langue du menu disque
Langue audio
Langue sous-titre
CM SKIP
DVD
16:9 Box
Wide
4:3 Letter
8 & Scan
4:3 Pan
16:9English
Wide
RETURN
SKIP
SKIP
2
3
4
5
Original
HF
Sortie numérique
Menu de configuration
Réglage dynamique
EF
Avance rapide audio
HF
Consulter la Remarque sur
cette page.
2
Sélectionner “CONFIGURER”
avec les touches { / B, puis
appuyer sur la touche ENTER.
Le menu CONFIGURER s’affiche.
5
Édition
Sélectionner l’option souhaitée
avec les touches K / L, puis
appuyer sur la touche ENTER.
Configurer
6
Configuration de lecture
Autres
25
Fonctions du
magnétoscope
Sélectionner “Lecture” avec
les touches K / L / { / B,
puis appuyer sur la touche
ENTER.
Remarque
Pour un téléviseur standard:
Sélectionner “4:3 Letter Box”
de sorte que des barres noires
apparaissent en haut et au bas
de l’écran.
Sélectionner “4:3 Pan & Scan”
pour une image pleine hauteur
avec les deux côtés coupés.
Pour un téléviseur à écran
large:
Sélectionner “16:9 Wide”.
Changement du menu
CONFIGURER
Appuyer sur la touche
SETUP pour quitter.
3
Enregistrement Lecture d’un disque
Aspect TV
TIMER PROG.
ENTER
REC MONITOR
SEARCH
MODE
Configurer > Lecture
SETUP
Démarrage
Appuyer sur la touche
SETUP pour afficher le menu
CONFIGURER/DISQUE.
Le menu CONFIGURER/DISQUE
s’affiche.
Écran:
DVD
VCR
DISPLAY
Enregistrement
Informations sur l’enregistrement sur DVD
Informations
Vitesse d’enregistrement
Cet appareil peut enregistrer sur des disques DVDR et DVD-RW. À l’enregistrement, un format d’enregistrement doit être sélectionné: mode Vidéo ou
mode VR, selon le format du disque. Le format du
disque pour les DVD-R est toujours
“format Vidéo”, aussi le format d’enregistrement
sera le “mode Vidéo”.
D’autre part, à l’enregistrement sur des DVD-RW, le
format d’enregistrement sera “mode Vidéo” ou “mode
VR” parce que le format des disques DVD-RW peut
être le “format d’Enregistrement Vidéo” ou le “format
Vidéo”.
La vitesse d’enregistrement peut être sélectionnée
parmi 6 options, et le temps d’enregistrement dépendra
de la vitesse d’enregistrement sélectionnée comme suit.
Logo
Attributs
Disque à couche unique, une face, 12 cm
Temps d’enregistrement max. approx.
DVD-RW (mode SEP): 600 minutes (4,7 Go)
DVD-R
Disque à couche unique, une face, 12 cm
Temps d’enregistrement max. approx.
(mode SEP): 600 minutes (4,7 Go)
À propos du mode Vidéo et du mode VR
(Enregistrement vidéo)
Le mode Vidéo est le même format d’enregistrement
que les disques DVD-Vidéo achetés localement, qui
sont lisibles dans la plupart des lecteurs de DVD.
Pour la lecture dans d’autres lecteurs de DVD, ils
doivent être finalisés (voir la page 41). S’il ne sont
pas finalisés, la lecture, l’enregistrement additionnel
et le montage des disques enregistrés en mode
Vidéo sont possibles sur cet appareil.
Le mode VR (Enregistrement vidéo) est un format
d’enregistrement de base pour les DVD-RW. Ils peuvent être enregistrés et montés à répétition.
Les lecteurs de DVD avec
sont capables de
lire des DVD-RW enregistrés en mode VR.
Vitesse
Temps
d’enregistrement d’enregistrement* Qualité vidéo/son
XP (1H)
60 min.
SP (2H)
120 min.
LP (4H)
240 min.
EP (6H)
360 min.
SLP (8H)
480 min.
SEP (10H) 600 min.
* Ce tableau est conçu pour un nouveau disque 12
cm une face servant de standard. Les temps
d’enregistrement sont des estimations et le temps
d’enregistrement réel peut différer.
* La qualité de l’audio et de la vidéo diminue quand
le temps d’enregistrement devient plus long.
Restrictions concernant l’enregistrement
Une vidéo protégée contre la copie ne peut pas être
enregistrée sur cet appareil. Les vidéos protégées
contre la copie incluent les disques DVD-Vidéo et
certains programmes satellite.
En cas de rencontre de matériaux protégés contre
la copie pendant l’enregistrement, l’appareil passera
automatiquement en pause ou s’arrêtera, et un
message d’erreur s’affichera sur l’écran. Une vidéo
“copie une seule fois” peut seulement être
enregistrée en utilisant un disque DVD-RW en
mode RV avec CPRM (voir ci-dessous).
À l’enregistrement d’un programme télévisuel ou par
entrée extérieure, les informations de contrôle de la
copie peuvent être affichées sur l’écran.
Type de disque Format de disque Fonctions
Mode Vidéo
Video
DVD-RW
DVD-RW Mode VR
VR
DVD-RW
Mode Vidéo
DVD-R
26
DVD-R
Lecture, enregistrement
limité, montage limité
Lecture, enregistrement,
montage Original/Playlist
Lecture, enregistrement
limité, montage limité
Qu’est-ce que “CPRM”?
Le CPRM est un système de protection contre la copie
avec système de brouillage concernant l’enregistrement
des programmes diffusés “copiables une fois”. CPRM est
l’abréviation de “Content Protection for recordables
Media – Protection du contenu des supports
enregistrables”. Cet appareil est compatible CPRM,
ce qui signifie qu’il est possible d’enregistrer des
programmes diffusés copiables une fois, mais qu’il
est impossible de faire des copies de ces
enregistrements. Les enregistrements CPRM
peuvent seulement être faits sur des disques
DVD-RW formatés en mode VR, et lus sur des
lecteurs spécifiquement compatibles avec CPRM.
Enregistrement
Informations sur le contrôle de la copie
Certaines émission de l’antenne parabolique incluent
des informations de protection contre la copie. Pour
les enregistrer, consulter ce qui suit.
Mode VR
DVD-RW
ver.1.1
Compatible
ver. 1.1 CPRM
Enregistrable
Non enregistrable
Type de disque
Mode
DVD-R
ver.2.0
Mode Vidéo
DVD-RW
ver.1.1
Compatible ver. 1.1 CPRM
Mode Vidéo
Enregistrement Lecture d’un disque
Mode Vidéo
DVD-R
ver.2.0
Démarrage
Mode Vidéo
DVD-RW
ver.1.1
Compatible
ver. 1.1 CPRM
Les disques doivent être finalisés dans les cas suivants:
- Pour la lecture de DVD-R/RW (mode Vidéo)
enregistrés sur cet appareil sur d’autres lecteurs de
DVD.
- Quand un DVD-RW (mode VR) enregistré sur cet
appareil ne peut pas être lu sur d’autres lecteurs de
DVD compatibles RW.
• Une fois un DVD-R/RW (mode Vidéo) finalisé,
l’enregistrement additionnel ou le montage sont
impossibles.
• Il est possible d’enregistrer additionnellement ou
de monter un DVD-RW (mode VR), finalisé sur cet
appareil.
• Bien finaliser les disques enregistrés sur cet
appareil avec cet appareil.
• Le menu de titres sera automatiquement créé sur
un DVD-R/RW (mode Vidéo) finalisé avec cet
appareil.
Pour la lecture sur d’autres lecteurs DVD, finaliser
les disques enregistrés sur cet appareil dans les
conditions suivantes.
Raccords
Type/format Copie libre Copie une fois Copie
de disque
interdite
Rendre un disque lisible sur un autre
lecteur de DVD (Finaliser)
Avant le démarrage
Informations sur l’enregistrement sur DVD (suite)
Édition
Autres
27
Fonctions du
magnétoscope
• La qualité audio et vidéo se détériore avec
l’allongement du temps d’enregistrement.
• Cet appareil ne peut pas enregistrer sur des disques
CD-R ou CD-RW.
• Les disques DVD-R/RW et CD-R/RW enregistrés
avec un ordinateur personnel ou un enregistreur
de DVD ou CD peuvent ne pas être lus si le
disque est endommagé ou sale, ou s’il y a de la
saleté ou condensation sur la lentille de l’appareil.
• Si un disque est enregistré avec un ordinateur
personnel, même si c’est en format compatible, il
y a des cas où la lecture peut être impossible à
cause des réglages du logiciel d’application utilisé
pour créer le disque. (Consulter l’éditeur du
logiciel pour des informations plus détaillées.)
Changement du menu
CONFIGURER
Remarques
Enregistrement
Formatage d’un disque
Sélection du format d’enregistrement d’un disque
vierge
Video
VR
DVD-RW
DVD-RW
À l’insertion d’un disque vierge,
l’appareil commence à initialiser le
disque vierge.
Ensuite, il est possible d’enregistrer
sur le disque avec le format
d’enregistrement sélectionné au
menu CONFIGURER.
Il est possible de régler une durée
spécifiée pour les marques de
chapitre.
3
Sélectionner “Enregist.” avec
les touches K / L / { / B, puis
appuyer sur la touche ENTER.
Le menu Enregist. s’affiche.
Configurer > Enregist.
REC SPEED
.@/:
1
ABC
2
3
GHI
JKL
MNO
VCR
AUDIO
4
5
6
TUV
WXYZ
8
9
7
SPACE
DISPLAY
SLOW
VCR
DVD
PAUSE
PLAY
1
STOP
REC/OTR
SETUP
TIMER PROG.
ENTER
REC MONITOR
MENU/LIST TOP MENU
CLEAR/C-RESET ZOOM
Appuyer sur la touche
SETUP pour afficher le menu
CONFIGURER/DISQUE.
Le menu CONFIGURER/DISQUE
s’affiche.
Écran:
CH
VIDEO/TV
0
DVD
1
OPEN/CLOSE
DEF
PQRS
DVD
Format d'enregistrement DVD-RW Mode vidéo
Chapitre Auto
10 minutes
Programmation
Mode sonorisation
POWER
SEARCH
MODE
CM SKIP
4
RETURN
SKIP
SKIP
2
3
4
5
Sélectionner “Format
d'enregistrement DVD-RW ”
avec les touches K / L, puis
appuyer sur la touche ENTER.
La fenêtre d’options s’affichera.
Configurer > Enregist.
DVD
vidéo
Format d'enregistrement DVD-RW Mode
VR mode
Mode
VR
Chapitre Auto
10 minutes
Programmation
Mode sonorisation
Menu de configuration
2
Sélectionner “CONFIGURER”
avec les touches { / B, puis
appuyer sur la touche ENTER.
Le menu CONFIGURER s’affiche.
Configurer
VCR
DVD
Mode vidéo
Mode de compatibilité du lecteur DVD.
Mode VR
Mode de possibilité d'édition.
Le mode Vidéo a été sélectionné
par défaut.
5
Sélectionner “Mode vidéo” ou
“Mode VR” avec les touches
K / L, puis appuyer sur la
touche ENTER.
Le mode d’enregistrement sera
réglé.
Configuration de lecture
Remarques
• À l’insertion d’un disque
DVD+R ou DVD+RW vierge,
le message d’erreur (“Erreur
Disque”) apparaîtra. Cet
appareil n’est pas compatible
avec les disques DVD+R/RW.
28
Enregistrement
Avant le démarrage
Formatage d’un disque (suite)
6
POWER
REC SPEED
.@/:
1
ABC
2
3
GHI
JKL
MNO
AUDIO
DEF
4
5
6
PQRS
TUV
WXYZ
8
9
7
OPEN/CLOSE
SPACE
Raccords
Sélectionner “Chapitre Auto”
avec les touches K / L, puis
appuyer sur la touche
ENTER.
La fenêtre d’options s’affichera.
CH
VIDEO/TV
SLOW
0
DISPLAY
Configurer > Enregist.
VCR
DVD
PAUSE
DVD
PLAY
8
STOP
REC/OTR
SETUP
TIMER PROG.
ENTER
REC MONITOR
MENU/LIST TOP MENU
CLEAR/C-RESET ZOOM
SEARCH
MODE
SKIP
SKIP
6
7
Enregistrement Lecture d’un disque
“10 minutes” a été sélectionné
par défaut.
RETURN
Démarrage
Format d'enregistrement DVD-RW HF
VR mode
5 minutes
Chapitre Auto
10
minutes
10 minutes
Programmation
15 minutes
Mode sonorisation
VCR DVD
30 minutes
60 minutes
CM SKIP
7
Sélectionner l’option de
durée souhaitée avec les
touches K / L, puis appuyer
sur la touche ENTER.
Des marques de chapitre seront
placées comme spécifié.
8
Édition
Appuyer sur la touche
SETUP pour quitter le menu
CONFIGURER.
Changement du menu
CONFIGURER
Fonctions du
magnétoscope
• La durée pour les marques de
chapitre est plus précise
qu’en mode Vidéo.
29
Autres
Note
Enregistrement
Formatage d’un disque (suite)
Reformatage d’un disque
Video
VR
DVD-RW
DVD-RW
Si un disque DVD-RW est utilisé, par
défaut, il sera en mode Vidéo. Cela peut
être modifié au menu CONFIGURER.
1
4
Sélectionner “Oui” avec les
touches { / B, puis appuyer
sur la touche ENTER.
La fenêtre d’options s’affichera.
Appuyer sur la touche
SETUP pour afficher le menu
CONFIGURER/DISQUE.
Le menu CONFIGURER/DISQUE
s’affiche.
Écran:
POWER
REC SPEED
.@/:
1
ABC
2
3
GHI
JKL
MNO
4
5
6
PQRS
7
AUDIO
DEF
TUV
WXYZ
8
9
SPACE
Disque
DISPLAY
SLOW
DVD
VCR
PAUSE
Edition
Format
PLAY
Fermeture
Protection de disque HF
Oui
EF
STOP
Non
REC/OTR
1
Etes-vous sur ?
Oui
Non
* Mode VR seulement
SETUP
TIMER PROG.
ENTER
REC MONITOR
CLEAR/C-RESET ZOOM
SEARCH
MODE
CM SKIP
5
2
CH
VIDEO/TV
0
MENU/LIST TOP MENU
Menu de configuration
OPEN/CLOSE
Sélectionner “Oui” avec les
touches { / B, puis appuyer
sur la touche ENTER.
Le formatage démarrera.
RETURN
SKIP
SKIP
2
3
4
5
Sélectionner “DISQUE” avec
les touches { / B, puis appuyer
sur la touche ENTER.
Le menu DISQUE s’affichera.
Disque
58%
Edition
Formatage
Format
Fermeture
Protection de disque HF
EF
6
* Mode VR seulement
Le formatage est terminé.
100% sera indiqué.
3
Sélectionner “Format” avec
les touches K / L, puis appuyer
sur la touche ENTER.
La fenêtre d’options s’affichera.
Cette opération peut
prendre un certain temps.
Disque
Edition
Format
Fermeture
Protection de disque HF
Oui
EF
Non
* Mode VR seulement
30
100%
Formatage
Remarques
• Au reformatage d’un disque,
les matériaux sur le disque
sont effacés.
• Pour annuler le formatage à
l’étape 5, sélectionner “Non”.
Enregistrement
Avant le démarrage
Enregistrement de base
DVD-R
Video
VR
DVD-RW
DVD-RW
DVD
1
4
Sélectionner une chaîne à
enregistrer avec les touches
CH K / L ou aux touches
numériques.
2
4
POWER
REC SPEED
.@/:
1
ABC
2
3
GHI
JKL
MNO
AUDIO
DEF
4
5
6
PQRS
TUV
WXYZ
8
9
7
SPACE
Mettre l’appareil sous tension et
charger un disque enregistrable.
Vérifier que l’entrée du télévision
est réglée sur l’appareil.
DISPLAY
4
SLOW
VCR
DVD
PAUSE
CH 1
5
STOP
5
REC/OTR
SETUP
TIMER PROG.
ENTER
REC MONITOR
MENU/LIST TOP MENU
RETURN
SKIP
SKIP
Enregistrement Lecture d’un disque
5
SEARCH
MODE
6
CM SKIP
Appuyer sur la touche
REC/OTR pour démarrer
l’enregistrement.
La marque REC s’affiche 5 secondes.
SP 2:01 Rem.
I
3
Cette opération peut
prendre un certain temps.
31
Autres
Quand un disque DVD-R est
chargé:
Les disques DVD-R sont toujours
en mode Vidéo.
Appuyer sur la touche STOP C
pour arrêter l’enregistrement.
Fonctions du
magnétoscope
Quand un disque DVD-RW
est chargé:
Mode Vidéo ou mode VR peut être
choisi au menu CONFIGURER.
“Mode Vidéo” est sélectionné par
défaut. Consulter “Sélection du
format d’enregistrement d’un
disque vierge” aux pages 28-29.
6
Changement du menu
CONFIGURER
Vérifier que le format
d’enregistrement est réglé au
mode souhaité.
Consulter “Formatage d’un
disque” aux pages 28-30.
Pour faire une pause
d’enregistrement, appuyer sur la
touche PAUSE F. Appuyer sur la
touche REC/OTR pour redémarrer
l’enregistrement.
Remarques
• L’enregistrement démarre
immédiatement et continue
jusqu’à ce que le disque soit
plein ou que l’enregistrement
soit arrêté.
• Quand l’horloge n’est pas
réglée, l’espace pour la date
et l’heure sera vide dans les
noms de titre de l’original ou
de la Playlist.
• Deux formats ne peuvent pas
être mélangés sur un disque
DVD-RW.
Au chargement d’un disque
enregistré auparavant, le format
d’enregistrement ne peut pas
être modifié, même au menu
CONFIGURER.
• La vitesse d’enregistrement
ne peut pas être modifiée en
mode pause REC.
• Il est possible de changer de
chaîne en mode pause REC.
Édition
Consulter “Vitesse
d’enregistrement” à la page 26.
Démarrage
PLAY
CLEAR/C-RESET ZOOM
Sélectionner une vitesse
d’enregistrement avec la
touche REC SPEED.
CH
VIDEO/TV
0
La reconnaissance de cette
opération peut prendre un
certain temps.
2
OPEN/CLOSE
Raccords
Procéder comme suit pour enregistrer
des émissions de télévision.
D’abord:
Enregistrement
Enregistrement de base (suite)
Contrôle de la qualité de l’image enregistrée
DVD-R
Video
VR
DVD-RW
DVD-RW
La qualité de l’image enregistrée
peut être confirmée avec la vitesse
d’enregistrement sélectionnée
avant d’essayer d’enregistrer sur
un disque DVD.
D’abord:
2
1
Appuyer à nouveau sur la
touche REC MONITOR pour
quitter.
POWER
REC SPEED
.@/:
1
ABC
2
3
GHI
JKL
MNO
4
5
6
PQRS
TUV
WXYZ
8
9
7
AUDIO
OPEN/CLOSE
DEF
SPACE
CH
VIDEO/TV
SLOW
0
DISPLAY
DVD
VCR
PAUSE
DVD
PLAY
1
STOP
REC/OTR
Quand l’appareil est en
mode d’arrêt ou REC avec
un disque DVD à enregistrer
inséré, appuyer sur la touche
REC
MONITOR.
Le programme de télévision sera
sur l’écran dans la qualité d’image
enregistrée avec la vitesse
d’enregistrement sélectionnée.
1
2
SETUP
TIMER PROG.
ENTER
REC MONITOR
MENU/LIST TOP MENU
CLEAR/C-RESET ZOOM
SEARCH
MODE
RETURN
SKIP
SKIP
CM SKIP
CH 18
Moniteur enreg
XP
Pour changer de vitesse
d’enregistrement, appuyer
plusieurs fois sur la touche
REC SPEED.
La vitesse d’enregistrement
changera à la pression de la
touche comme indiqué cidessous. Consulter “Vitesse
d’enregistrement” à la page 26.
• La vitesse d’enregistrement ne
peut pas être modifiée pendant
l’enregistrement.
XP
SP
LP
SEP
SLP
EP
Remarque
• Le son enregistré ne peut pas
être contrôlé avec la fonction
contrôle d’enregistrement.
32
Enregistrement
Avant le démarrage
Enregistrement avec minuterie par simple pression
DVD-R
Video
VR
DVD-RW
DVD-RW
1
2
POWER
REC SPEED
.@/:
1
ABC
2
3
GHI
JKL
MNO
AUDIO
DEF
4
5
6
PQRS
TUV
WXYZ
8
9
7
OPEN/CLOSE
SPACE
CH
4
VIDEO/TV
SLOW
0
5
DISPLAY
Appuyer sur la touche
REC/OTR, puis appuyer
plusieurs fois sur la touche
REC/OTR jusqu’à ce que la
durée d’enregistrement (30
minutes à 8 heures) apparaisse sur l’écran du
téléviseur.
L’enregistrement sera réglé.
VCR
DVD
PAUSE
PLAY
STOP
5
REC/OTR
SETUP
TIMER PROG.
ENTER
REC MONITOR
MENU/LIST TOP MENU
CLEAR/C-RESET ZOOM
SEARCH
MODE
5
RETURN
SKIP
SKIP
Enregistrement Lecture d’un disque
Mettre l’appareil sous tension
et charger un disque
enregistrable.
Vérifier que l’entrée du télévision est
réglée sur l’appareil.
Sélectionner une chaîne à
enregistrer avec les touches
CH K / L ou aux touches
numériques.
CM SKIP
La reconnaissance de
cette opération peut
prendre un certain temps.
2
3
8:00
7:30
Quand l’appareil atteint le temps
spécifié, il se met automatiquement
hors tension.
Pour annuler l’enregistrement avec
minuterie par simple pression
pendant le temps spécifié, appuyer
sur la touche STOP C.
Cette opération peut
prendre un certain temps.
Remarque
• L’appareil sera automatiquement
mis hors tension dans les
situations suivantes.
1)Espace restant insuffisant
sur le disque
2)Panne de courant.
• Si OTR se termine pendant la
lecture sur l’appareil ou en
mode REC sur le magnétoscope, l’appareil sera en mode
STOP et le magnétoscope
maintenu dans le mode
actuel.
33
Autres
Quand un disque DVD-R est
chargé:
Les disques DVD-R sont toujours
en mode Vidéo.
(Enregistrement normal) 1:00
Fonctions du
magnétoscope
Quand un disque DVD-RW
est chargé:
Mode Vidéo ou mode VR peut être
choisi au menu CONFIGURER.
“Mode Vidéo” est sélectionné par
défaut. Consulter “Sélection du
format d’enregistrement d’un
disque vierge” aux pages 28-29.
0:30
Changement du menu
CONFIGURER
Vérifier que le format
d’enregistrement est réglé au
mode souhaité.
Consulter “Formatage d’un
disque” aux pages 28-30.
0:30
Édition
Sélectionner une vitesse
d’enregistrement avec la
touche REC SPEED.
Consulter “Vitesse d’enregistrement”
à la page 26.
I
Démarrage
DVD
4
Raccords
C’est une manière simple de
régler le temps d’enregistrement
en blocs de 30 minutes.Vérifier
que le disque d’enregistrement a
suffisamment d’espace libre pour
le temps réglé.
Quand l’enregistrement se
termine, l’enregistreur passe
automatiquement en attente.
D’abord:
Enregistrement
Enregistrement avec minuterie
DVD-R
Video
VR
DVD-RW
DVD-RW
VCR
L’appareil peut être programmé pour
enregistrer un maximum de 8
programmes, jusqu’à un an à l’avance.
Les enregistrements de programmes
journaliers ou hebdomadaires sont
aussi possibles.
• Bien régler l’horloge avant de
programmer la minuterie.
• Insérer un disque enregistrable ou une
vidéocassette avec onglets de sécurité.
4
Sélectionner
“Programmation” avec les
touches K / L, puis appuyer
sur la touche ENTER.
La liste de programmation de la
minuterie s’affichera.
Le menu de programmation
de la minuterie peut être
modifié en appuyant sur la
touche TIMER PROG. Dans ce
cas, passer à l’étape 5.
Configurer > Enregist. > Programmation
Date
-------
Début
Fin
CH
DVD
VCR
Vit.
POWER
REC SPEED
.@/:
1
ABC
2
3
GHI
JKL
MNO
AUDIO
DEF
4
5
6
PQRS
TUV
WXYZ
8
9
7
SPACE
1
Appuyer sur la touche
OPEN/CLOSE
CH
VIDEO/TV
SLOW
0
SETUP pour afficher le menu
CONFIGURER/DISQUE.
Le menu CONFIGURER/DISQUE
s’affiche.
Écran:
DISPLAY
5
Sélectionner une ligne de
programme vide avec les
touches K / L, puis appuyer
sur la touche ENTER.
DVD
VCR
PLAY
1
STOP
REC/OTR
SETUP
TIMER PROG.
ENTER
REC MONITOR
MENU/LIST TOP MENU
6
CLEAR/C-RESET ZOOM
Entrer la date avec les touches
K / L, puis appuyer sur la
touche B.
SEARCH
MODE
RETURN
SKIP
CM SKIP
Configurer > Enregist. > Programmation
DVD
Date
Début
Fin
CH VCR
JAN / 01 - - : - -AM - - : - -AM CH8 DVD
-----
Menu de configuration
2
Sélectionner “CONFIGURER”
PAUSE
Vit.
SKIP
2
3
4
5
6
7
par ex. 1er janvier
avec les touches { / B, puis
appuyer sur la touche ENTER.
Le menu CONFIGURER s’affichera.
JAN/01
L
Quotid.
L
LUN-SAM
Configurer
L
LUN-VEN
À la pression de la touche L à
la date présente, le mode
d’enregistrement avec minuterie
changera comme suit.
L
SAM
L
VEN
Remarques
L
Configuration de lecture
L
DIM
3
Sélectionner “Enregist.” avec
les touches K / L / { / B, puis
appuyer sur la touche ENTER.
Le menu Enregist. s’affichera.
Configurer > Enregist.
DVD
Format d'enregistrement DVD-RW Mode vidéo
Chapitre Auto
10 minutes
Programmation
Mode sonorisation
VCR
DVD
L
DÉC/31
7
Entrer l’heure de début et
l’heure de fin avec les touches
K / L, puis appuyer sur la
touche B.
Configurer > Enregist. > Programmation
DVD
Date
Début
Fin
CH VCR
JAN/12 10 :00PM - - : - -AM CH8 DVD
-----
34
Vit.
• Si l’horloge n’est pas
encore réglée:
Une fenêtre de réglage de
l’horloge apparaît à l’étape 4.
Passer à l’étape 4 de “Réglage
automatique de l’horloge” à la
page 21 ou “Réglage manuel de
l’horloge” à la page 22 avant de
programmer la minuterie.
• Appuyer sur la touche { ou
B pour déplacer le curseur
vers la gauche ou la droite au
menu de programmation de la
minuterie.
Enregistrement
Avant le démarrage
Enregistrement avec minuterie (suite)
10
Sélectionner la vitesse d’enre-
chaîne à enregistrer avec les
touches K / L, puis appuyer
sur la touche B.
gistrement avec les touches K / L.
Configurer > Enregist. > Programmation
Date
Début
JAN/12 10:00PM
---
Configurer > Enregist. > Programmation
Date
Début
JAN/12 10:00PM
---
DVD
VCR
Fin
CH
10:30PM CH8 DVD
Vit.
DVD
Fin
CH VCR
Vit.
10:30PM CH8 DVD 1H
11
Appuyer sur la touche ENTER
d’enregistrement avec les
touches K / L, puis appuyer sur
la touche B.
quand toutes les informations
requises sont entrées.
Le réglage de programme est
mémorisé.
• Pour régler un autre programme,
répéter les étapes 5 à 11.
• Pour quitter, appuyer sur la
touche SETUP.
Date
Début
JAN/12 10:00PM
---
DVD
VCR
Fin
CH
10:30PM CH8 DVD
Vit.
• Pour enregistrer sur une cassette,
sélectionner VCR.
• Pour enregistrer sur un disque,
sélectionner DVD.
12
Appuyer sur la touche POWER
pour mettre hors tension.
L’indicateur
apparaîtra sur
l’affichage avant.
.@/:
1
ABC
2
3
GHI
JKL
MNO
4
5
6
PQRS
TUV
WXYZ
8
9
7
AUDIO
OPEN/CLOSE
DEF
SPACE
CH
VIDEO/TV
SLOW
0
DVD
VCR
DISPLAY
PAUSE
PLAY
STOP
REC/OTR
SETUP
TIMER PROG.
ENTER
REC MONITOR
RETURN
MENU/LIST TOP MENU
CLEAR/C-RESET ZOOM
SEARCH
MODE
SKIP
SKIP
8
9
10
11
CM SKIP
Remarque
• Après l’étape 12, l’appareil sera
automatiquement mis sous
tension 2 minutes (pour
l’enregistrement du magnétoscope, 10 secondes) avant l’heure
de début de l’enregistrement et
attendra de commencer. Puis,
l’enregistrement démarrera à
l’heure d’enregistrement réglée.
Contrôle, annulation ou correction des informations de
programmation de la minuterie
4
Pour annuler la programmation
de sorte que l’indicateur
disparaisse de l’affichage.
de la minuterie, sélectionner le
programme souhaité avec les
touches K / L, puis appuyer sur
la touche CLEAR/C-RESET.
2
Appuyer sur la touche TIMER
Configurer > Enregist. > Programmation
Date
Début
JAN/12 10:00PM
---
DVD
Fin
CH VCR
Vit.
10:30PM CH8 DVD 1H
seront requises sur la liste.
5
Appuyer sur la touche TIMER
PROG. pour quitter.
6
Pour arrêter l’enregistrement avec minuterie en cours
Appuyer sur la touche STOP C pour arrêter l’enregistrement sur un disque ou sur
STOP/EJECT C A pour arrêter l’enregistrment sur une cassette sur le panneau
avant de l’appareil. La touche STOP C sur la télécommande n’est pas efficace.
2
3
JKL
MNO
4
5
6
PQRS
TUV
WXYZ
8
9
7
DEF
SPACE
CH
VIDEO/TV
SLOW
0
DISPLAY
DVD
VCR
PAUSE
PLAY
STOP
REC/OTR
SETUP
TIMER PROG.
ENTER
REC MONITOR
MENU/LIST TOP MENU
4
CLEAR/C-RESET ZOOM
SEARCH
MODE
RETURN
SKIP
2
5
4
SKIP
CM SKIP
Remarque
• Appuyer sur la touche TIMER PROG.
pour vérifier la programmation de la
minuterie en cours.
Quand l’enregistrement avec minuterie est en cours, ce programme sera
mis en évidence en rouge. Dans ce
cas, aucun autre programme ne peut
être sélectionné.
35
Autres
Appuyer sur la touche POWER pour
revenir en mode d’attente de minuterie.
ABC
GHI
OPEN/CLOSE
Fonctions du
magnétoscope
3
Vérifier les informations qui
Pour corriger la programmation
de la minuterie, sélectionner le
programme souhaité avec les
touches K / L. Puis appuyer sur
la touche ENTER. Ensuite, corriger
la programmation de la minuterie
avec les touches K / L / { / B.
Enfin, appuyer à nouveau sur la
touche ENTER.
.@/:
1
AUDIO
Changement du menu
CONFIGURER
PROG.
La liste de programmation de la
minuterie s’affichera.
1
6
REC SPEED
Édition
1
Appuyer sur la touche POWER
POWER
Enregistrement Lecture d’un disque
9
Sélectionner le support
REC SPEED
Démarrage
Pour enregistrer à partir d’une
entrée extérieure, L1 ou L2.
Se rapporter à “Vitesse d’enregistrement” à la page 26 pour l’enregistreur de DVD ou à la page 94
pour le magnétoscope.
Configurer > Enregist. > Programmation
12
POWER
Raccords
8
Sélectionner le numéro de la
Enregistrement
Enregistrement avec minuterie (suite)
Conseils pour l’enregistrement avec minuterie
• En cas de panne de courant ou si cet appareil a été débranché plus de 30 secondes, le réglage de l’horloge et tous les
réglages de minuterie seront perdus.
• Si auun disque n’est placé dans le tiroir, l’indicateur DVD sur le panneau avant clignote et l’enregistrement avec minuterie
est impossible. Insérer un disque enregistrable.
• Si une cassette avec ergot d’enregistrement n’est pas insérée dans le logement cassette, l’indicateur VCR sur le panneau
avant clignote et l’enregistrement avec minuterie est impossible. Insérer une cassette enregistrable.
• Quand tout l’enregistrement avec minuterie est terminé, l’indicateur
clignote. Pour lire ou éjecter le disque (ou la cassette)
enregistré, d’abord appuyer sur la touche POWER, puis sur la touche PLAY B ou OPEN/CLOSE A (ou STOP/EJECT C A).
• L’enregistrement avec minuterie n’est pas fait pour l’enregistreur de DVD et le magnétoscope en même temps. Si deux
programmations ont été faites avec les mêmes chaîne et heure pour les deux, la programmation ayant priorité sera
enregistrée (voir ci-dessous pour les détails).
est sur l’affichage avant), aucune
• Pendant l’enregistrement avec minuterie ou en attente d’enregistrement (l’indicateur
opération ne sera possible sur l’appareil. Pour les rendre possibles, d’abord annuler l’enregistrement avec minuterie ou
l’attente d’enregistrement (l’indicateur
disparaît).
• Pour annuler le mode d’attente d’enregistrement, appuyer sur la touche POWER.
Priorité des réglages se chevauchant
Cet appareil enregsitre les programmes selon la priorité sur les programmations de minuterie se chevauchent. La
programmation de minuterie faite en premier a priorité.
Un enregistrement avec minuterie à faible priorité sera annulé, commencera au milieu ou s’arrêtera en cours.
Vérifier les programmations de minuterie se chevauchant et changer la priorité si nécessaire.
Une programmation antérieurement réglée a priorité
Quand une programmation a été faite à
Si l’heure de début est la même:
l’heure de fin de la programmation
Un programme à numéro de programme
actuellement enregistrée:
inférieur (PROG. 1) a priorité.
Un programme à numéro de programme inférieur
(PROG. 2) a priorité.
Ex. 2
Ex. 1
PROG. 1
PROG. 1
PROG. 2
PROG. 2
PROG. 3
Enregistrement actuel
PROG. 1
PROG. 2
Enregistrement actuel
PROG. 1
PROG. 2
En cas de chevauchement partiel du temps d’enregistrement:
PROG. 1 commencera après la fin de l’enregistrement de PROG. 2.
PROG. 1
PROG. 2
Enregistrement actuel
PROG. 2
PROG. 1
En cas de chevauchement total du temps d’enregistrement:
PROG. 1 ne sera pas enregistré.
PROG. 1
PROG. 2
Enregistrement actuel
PROG. 2
Quand l’heure de fin de la programmation actuellement enregistrée
et l’heure de début d’une programmation à enregistrer par la suite est la même:
Les 20-90 premières secondes de la programmation à enregistrer par la suite seront coupées.
PROG. 1
PROG. 2
Enregistrement actuel
PROG. 1
PROG. 2
Les 20-90 premières secondes seront coupées.
36
Remarque:
Après la fin de
l’enregistrement avec
minuterie DVD, d’autres
programmations de minuterie
ne peuvent pas être exécutées
pendant un certain temps.
Enregistrement
Raccord à une source extérieure
Raccorder correctement la source extérieure à l’appareil à l’aide des prises d’entrée LINE2 (avant) ou LINE1
(arrière). L’entrée S-VIDEO est utilisable seulement en mode DVD.
Autre source
(magnétoscope, caméscope etc.)
VIDEO AUDIO
L
R
OUTPUT
S -VIDEO
VIDEO AUDIO
R
L
ou
ou
Câble
S-Vidéo
Raccords
OUTPUT
S- VIDEO
Câble
vidéo
Câble
S-Vidéo
Câble
audio
Câble
vidéo
Câble
audio
Démarrage
DVD
S-VIDEO
DVD/VCR
AUDIO IN
L
ou
S-VIDEO
VIDEO
R
IN
VIDEO IN
L - AUDIO - R
À LINE 2 IN
Avant le démarrage
Réglages pour une source extérieure
À LINE 1 IN
OPEN/CLOSE
DIGITAL
AUDIO
AUDIO OUT OUT
POWER
REW
F.FWD STOP/EJECT
PLAY
DUBBING
STOP
DVD
S-VIDEO
VCR
Y
DVD
S-VIDEO
VIDEO
L - AUDIO - R
COAXIAL
CB
R
RECORD
R
IN
DVD
R
VIDEO IN VIDEO OUT
OUT
CR
OUT
Avant de l’appareil
1. Appuyer sur la touche SETUP pour afficher
le menu CONFIGURER/DISQUE.
2. Sélectionner “CONFIGURER” avec les touches
{ / B, puis appuyer sur la touche ENTER.
3. Sélectionner “Sélect. vidéo”, puis appuyer
sur la touche ENTER.
Configurer > Sélect. vidéo
DVD
Arrière de l’appareil
1. Appuyer sur la touche SETUP pour afficher
le menu CONFIGURER/DISQUE.
2. Sélectionner “CONFIGURER” avec les touches
{ / B, puis appuyer sur la touche ENTER.
3. Sélectionner “Sélect. vidéo”, puis appuyer
sur la touche ENTER.
Configurer > Sélect. vidéo
DVD
L1 (Arrière)
Entrée vidéo
L1 (Arrière)
Entrée vidéo
L2 (Avant)
Entrée vidéo
L2 (Avant)
Entrée vidéo
L1 (Arrière)
L2 (Avant)
DVD
Video
Entrée
vidéoIn
Entrée
S-vidéo
Video
In
DVD
L2 (Avant)
DVD
Video
Entrée
vidéoIn
Video
In
Entrée
S-vidéo
5. Sélectionner le type de prise d’entrée à
raccorder avec les touches K / L, puis appuyer
sur la touche ENTER.
Pour utiliser S-VIDEO INPUT, sélectionner “Entrée
S-vidéo”.
Pour utiliser VIDEO INPUT (composite), sélectionner
“Entrée vidéo”.
Configurer > Sélect. vidéo
Autres
Configurer > Sélect. vidéo
L1 (Arrière)
DVD
L1 (Arrière)
Entrée vidéo
L1 (Arrière)
Entrée S-vidéo
L2 (Avant)
Entrée S-vidéo
L2 (Avant)
Entrée vidéo
Fonctions du
magnétoscope
5. Sélectionner le type de prise d’entrée à
raccorder avec les touches K / L, puis appuyer
sur la touche ENTER.
Pour utiliser S-VIDEO INPUT, sélectionner “Entrée
S-vidéo”.
Pour utiliser VIDEO INPUT (composite), sélectionner
“Entrée vidéo”.
Configurer > Sélect. vidéo
Changement du menu
CONFIGURER
Configurer > Sélect. vidéo
4. Sélectionner “L1 (Arrière)” avec les touches
K / L, puis appuyer sur la touche ENTER.
Édition
4. Sélectionner “L2 (Avant)” avec les touches
K / L, puis appuyer sur la touche ENTER.
Enregistrement Lecture d’un disque
OUTPUT SELECT
CHANNEL
RECORD
DVD/VCR
AUDIO IN AUDIO OUT ANTENN
IN
L
L
COMPONENT
VIDEO OUT
PLAY
L
VCR
37
Enregistrement
Réglages pour une source extérieure (suite)
Enregistrement à partir d’une source extérieure
DVD-R
Video
VR
DVD-RW
DVD-RW
VCR
Avant l’enregistrement à partir d’une source extérieure, voir les instructions sur le raccord à la page 37.
1. Mettre le téléviseur et l’appareil sous tension, et bien
sélectionner l’entrée du téléviseur à laquelle l’appareil est
raccordé.
4
1
POWER
REC SPEED
AUDIO
.@/:
1
ABC
DEF
2
3
GHI
DVD
2. Pour enregistrer sur un disque: Appuyer sur:
Appuyer sur la touche OPEN/CLOSE A pour ouvrir le
tiroir à disque, et y placer correctement un disque.
JKL
MNO
4
5
6
PQRS
TUV
WXYZ
8
9
7
SPACE
OPEN/CLOSE
2
CH
VIDEO/TV
SLOW
0
DISPLAY
La reconnaissance de cette opération peut prendre un
certain temps.
VCR
DVD
PLAY
STOP
VCR
Pour enregistrer sur une cassette: Appuyer sur:
Insérer une cassette avec ergots de sécurité dans le logement
cassette.
3. Sélectionner l’entrée de l’appareil à laquelle l’équipement
extérieur est raccordé. (L2 ou L1)
•Pour utiliser les prises d’entrée à l’arrière de cet appareil, sélectionner
la position “L1” en appuyant sur [0], [0], [1] sur la télécommande ou
sur les touches CH K / L.
•Pour utiliser les prises d’entrée à l’avant de cet appareil, sélectionner la
position “L2” en appuyant sur [0], [0], [2] sur la télécommande ou sur
les touches CH K / L.
4. Sélectionner une vitesse d’enregistrement avec la touche
REC SPEED. Se rapporter à “Vitesse d’enregistrement” à la page 26
pour DVD ou la page 94 pour VCR.
XP
SP
LP
SP
SEP
SLP
Mode DVD
SLP
EP
Mode VCR
5. Appuyer sur la touche REC/OTR sur l’appareil pour démarrer
l’enregistrement.
6. Appuyer sur la touche Play sur la touche extérieure à
enregistrer.
7. Pour un disque:
Appuyer sur la touche STOP C sur l’appareil pour arrêter
l’enregistrement.
Cette opération peut prendre un certain temps.
Pour une cassette:
Appuyer sur la touche STOP/EJECT C A sur l’appareil pour
arrêter l’enregistrement.
38
5
REC/OTR
SETUP
TIMER PROG.
ENTER
REC MONITOR
MENU/LIST TOP MENU
CLEAR/C-RESET ZOOM
SEARCH
MODE
CM SKIP
RETURN
SKIP
3
PAUSE
SKIP
6
7
Enregistrement
Avant le démarrage
Mode de copie
DVD-R
Video
VR
DVD-RW
DVD-RW
VCR
Configurer
POWER
REC SPEED
.@/:
1
ABC
2
3
GHI
JKL
MNO
AUDIO
DEF
4
5
6
PQRS
TUV
WXYZ
8
9
7
OPEN/CLOSE
SPACE
CH
VIDEO/TV
SLOW
0
DISPLAY
VCR
DVD
PAUSE
PLAY
1
Configuration de lecture
STOP
REC/OTR
SETUP
3
TIMER PROG.
ENTER
REC MONITOR
MENU/LIST TOP MENU
Configurer > Enregist.
CLEAR/C-RESET ZOOM
SEARCH
MODE
SKIP
SKIP
CM SKIP
2
3
4
DVD
Format d'enregistrement DVD-RW Mode vidéo
Chapitre Auto
10 minutes
Programmation
Mode sonorisation
VCR
DVD
1
Configurer > Enregist.
VCR
DVD
Format d'enregistrement DVD-RW Mode vidéo
Chapitre Auto
HF
Programmation
Mode sonorisation
DVD
Les instructions continuent à la page 40.
39
Autres
Pour la copie du VCR au DVD:
• Après le démarrage de la
copie du VCR au DVD, l’image
peut être déformée à cause de
la fonction d’alignement
automatique.
Ce n’est pas une anomalie.
Lire la cassette jusqu’à ce que
l’image soit stabilisée, puis
régler le point de début
auquel on souhaite démarrer
l’enregistrement, et démarrer
la copie du VCR au DVD.
Fonctions du
magnétoscope
Menu de configuration
VCR
Remarque
Changement du menu
CONFIGURER
Appuyer sur la touche
SETUP pour afficher le menu
CONFIGURER/DISQUE.
Le menu CONFIGURER/DISQUE
s’affiche.
Ecran:
Sélectionner “Mode
sonorisation” avec les touches
K / L, puis appuyer sur la
touche ENTER.
La fenêtre d’options s’affiche.
Édition
4
Enregistrement Lecture d’un disque
Sélectionner “Enregist.” avec
les touches K / L / { / B, puis
appuyer sur la touche
ENTER.
Le menu Enregist. apparaît.
RETURN
Démarrage
Ne pas oublier:
• Insérer un disque et une cassette
avec ergot de sécurité.
Remarque sur l’enregistrement
sur une vidéocassette:
• L’ergot d’enregistrement de la
vidéocassette est intact.
• La vidéocassette est suffisamment
longue pour enregistrer le disque
DVD.
Remarque sur l’enregistrement
sur un disque:
• Le disque DVD est compatible
avec le mode d’enregistrement.
Se rapporter aux pages 26-27.
Sélectionner “CONFIGURER”
avec les touches { / B, puis
appuyer sur la touche ENTER.
Le menu CONFIGURER apparaît.
Raccords
Un disque DVD peut être
enregistré sur une cassette
vidéo vice-versa. Cette fonction
est utilisable seulement si le
disque DVD ou la cassette n’est
pas protégée contre la copie.
Avant d’activer cette fonction,
effectuer les préparatifs pour
l’enregistrement sur le disque
DVD-R/RW ou la cassette
vidéo. Se rapporter aux pages
31-32, 94.
2
Enregistrement
Mode de copie (suite)
VCR à DVD
DVD à VCR
5-a
5-b
Sélectionner “VCR ⇒ DVD”
avec les touches K / L, puis
appuyer sur la touche
ENTER.
Sélectionner “VCR ⇐ DVD”
avec les touches K / L, puis
appuyer sur la touche
ENTER.
POWER
REC SPEED
.@/:
1
ABC
2
3
GHI
JKL
MNO
4
5
6
PQRS
TUV
WXYZ
7
8
9
VCR
DVD
Configurer > Enregist.
VCR
OPEN/CLOSE
DEF
SPACE
7-a
7-b
CH
VIDEO/TV
SLOW
0
DVD
VCR
DISPLAY
Configurer > Enregist.
AUDIO
PAUSE
9-a
9-b
DVD
PLAY
Format d'enregistrement DVD-RW Mode vidéo
Chapitre Auto
HF
Programmation
Format d'enregistrement DVD-RW Mode vidéo
Chapitre Auto
HF
Programmation
Mode sonorisation
Mode sonorisation
VCR
VCR DVD
DVD
VCR DVD
VCR
VCR DVD
DVD
VCR DVD
6-a
6-b
STOP
REC/OTR
SETUP
TIMER PROG.
ENTER
REC MONITOR
CLEAR/C-RESET ZOOM
SEARCH
MODE
6-a
6-b
Appuyer sur la touche
SETUP pour quitter le menu
CONFIGURER.
Bien sélectionner une vitesse
d’enregistrement avec la touche
REC SPEED.
Appuyer sur:
Appuyer sur la touche
SETUP pour quitter le menu
CONFIGURER.
Appuyer sur:
VCR
7-a
Appuyer sur la touche PLAY
B sur l’appareil, puis sur la
touche PAUSE au point où
l’on souhaite démarrer
l’enregistrement.
8-a
Appuyer sur la touche
DUBBING à l’avant de
l’appareil.
La copie VCR à DVD démarrera.
9-a
Appuyer sur la touche STOP
C sur l’appareil ou la touche
STOP C sur la télécommande
pour arrêter l’enregistrement.
40
5-a
5-b
RETURN
MENU/LIST TOP MENU
SKIP
SKIP
CM SKIP
VCR
Bien sélectionner une vitesse
d’enregistrement avec la touche
REC SPEED.
Appuyer sur:
DVD
7-b
Appuyer sur la touche PLAY
B sur l’appareil, puis sur la
touche PAUSE au point où
l’on souhaite démarrer
l’enregistrement.
8-b
Appuyer sur la touche
DUBBING à l’avant de
l’appareil.
La copie DVD à VCR démarrera.
9-b
Appuyer sur la touche
STOP/EJECT C A sur
l’appareil ou la touche STOP C
sur la télécommande pour
arrêter l’enregistrement.
7-a
7-b
OPEN/CLOSE
POWER
REW
F.FWD STOP/EJECT
PLAY
DUBBING
VCR
STOP
OUTPUT SELECT
CHANNEL
VCR
D
RECORD
9-b
PLAY
DVD
REC
8-a 9-a
8-b
Remarques
• À la mise hors tension de
l’appareil après réglage du
mode de copie à
, le réglage
sera automatiquement mis à
.
• Le mode de copie est
disponible seulement si la
cassette ou le disque n’est pas
protégé contre la copie.
• Le mode de sortie ne peut pas
être modifié pendant la copie
VCR à DVD ou DVD à VCR.
Pour la copie VCR à DVD:
• Le mode du son lu est
conforme au réglage du mode
son de lecture VCR de la page
96. Régler le mode son lu
comme souhaité pour
enregistrer sur le DVD.
Enregistrement
Avant le démarrage
Finalisation d’un disque
DVD-R
Video
VR
DVD-RW
DVD-RW
Disque
Les disques enregistrés en mode
Vidéo doivent être finalisés pour être
lus sur d’autres lecteurs de DVD.
La finalisation des disques en mode
Vidéo crée automatiquement des
menus de titres.
Edition
Format
.@/:
1
ABC
2
3
GHI
JKL
MNO
AUDIO
OPEN/CLOSE
Oui
EF
Non
DEF
4
5
6
PQRS
TUV
WXYZ
8
9
7
SPACE
CH
VIDEO/TV
SLOW
0
DISPLAY
VCR
4
DVD
PAUSE
PLAY
Sélectionner “Oui” avec les
touches { / B, puis appuyer
sur la touche ENTER.
La finalisation démarrera.
STOP
REC/OTR
1
SETUP
TIMER PROG.
ENTER
REC MONITOR
MENU/LIST TOP MENU
CLEAR/C-RESET ZOOM
CM SKIP
SKIP
SKIP
Remarques
58%
Fermeture
Menu de configuration
Pour annuler la finalisation, appuyer
sur la touche STOP C.
2
Disque
Edition
Fermeture
Protection de disque HF
EF
58%
Fermeture
Sélectionner “Oui” avec les
touches { / B, puis appuyer
sur la touche ENTER.
La finalisation est annulée, puis
l’appareil passe en mode d’arrêt.
5
* Mode VR seulement
La finalisation est achevée.
Sélectionner “Fermeture”
avec les touches K / L, puis
appuyer sur la touche
ENTER.
La fenêtre d’options s’affichera.
100%
Cette opération peut
prendre un certain temps.
Format
Déf. fermet.
Pour libérer la finalisation du
disque, sélectionner “Déf.
fermet.” à l’étape 3.
• Si
apparaît à la pression de
la touche STOP, la finalisation
ne peut pas être annulée parce
qu’elle est en cours.
À la sélection de “Non” et la
pression de la touche ENTER
ou RETURN, la finalisation
sera poursuivie.
La finalisation d’un disque
DVD-R ne peut pas être
annulée quand elle a démarré.
41
Autres
Fermeture
Edition
Fonctions du
magnétoscope
3
Disque
Changement du menu
CONFIGURER
Format
Annuler ?
Oui
Non
Édition
Sélectionner “DISQUE” avec
les touches { / B, puis appuyer
sur la touche ENTER.
Le menu DISQUE s’affichera.
Mode Vidéo:
• Une fois un disque enregistré
en mode Vidéo finalisé, plus
aucun montage ou enregistrement ne peut être fait sur
ce disque.
Un disque en mode VR peut
encore être enregistré et
monté sur cet appareil même
après finalisation.
• À l’insertion d’un disque
DVD-RW finalisé avec cet
appareil, “Déf. fermet.”
s’affichera à la place de
“Fermeture”.
Enregistrement Lecture d’un disque
SEARCH
MODE
RETURN
4
2
3
4
Démarrage
Appuyer sur la touche
SETUP pour afficher le menu
CONFIGURER/DISQUE.
Le menu CONFIGURER/DISQUE
s’affiche.
Écran:
REC SPEED
Raccords
Protection de disque HF
* Mode VR seulement
1
POWER
Fermeture
Enregistrement
Réglage d’un disque pour la protection
VR
DVD-RW
Pour éviter un enregistrement, un
montage accidentel, ou l’effacement
des titres, la protection est possible
en passant au menu DISQUE et en
procédant comme suit.
3
Sélectionner “Protection de
disque HF ➔ EF” avec les
touches K / L, puis appuyer
sur la touche ENTER.
La fenêtre d’options s’affichera.
1
POWER
REC SPEED
.@/:
1
ABC
2
3
GHI
JKL
MNO
4
5
6
TUV
WXYZ
8
9
PQRS
7
AUDIO
OPEN/CLOSE
DEF
CH
VIDEO/TV
SPACE
SLOW
0
DISPLAY
DVD
VCR
PAUSE
Disque
Appuyer sur la touche
SETUP pour afficher le menu
CONFIGURER/DISQUE.
Le menu CONFIGURER/DISQUE
s’affiche.
Écran:
Edition
PLAY
Format
Fermeture
STOP
Protection de disque HF
Oui
EF
REC/OTR
Non
1
SETUP
TIMER PROG.
ENTER
REC MONITOR
MENU/LIST TOP MENU
CLEAR/C-RESET ZOOM
SEARCH
MODE
RETURN
SKIP
SKIP
CM SKIP
4
Menu de configuration
2
3
4
Sélectionner “Oui” avec les
touches { / B, puis appuyer
sur la touche ENTER.
Le disque sera protégé.
2
Sélectionner “DISQUE” avec
les touches { / B, puis appuyer
sur la touche ENTER.
Le menu DISQUE s’affichera.
Cette opération peut
prendre un certain temps.
Disque
Edition
Format
Fermeture
Protection de disque HF
58%
Ecriture infos
EF
Remarque
• Seul le menu Disc Protect est
sélectionnable quand un
disque protégé est inséré.
Pour annuler la protection
du disque:
• À l’insertion d’un disque protégé dans l’appareil,
“Protection de disque EF →
HF” s’affiche à la place de
“HF → EF”.
Disque
Edition
Format
Fermeture
Protection de disque EF
Oui
HF
Non
Pour libérer la protection du
disque, sélectionner
“Protection de disque EF →
HF” à l’étape 3, puis “Oui”.
42
Lecture d’un disque
Avant d’essayer de lire des disques DVD, lire les infirmations suivantes.
Codes de région
Cet appareil est compatible avec la lecture des disques
suivants.
Pour lire un disque DVD, vérifier qu’il remplit les conditions de Code de région et de Système couleur comme
indiqué ci-dessous. Les disques portant les logos cidessous sont lisibles sur cet appareil. La lecture de disques d’autres types n’est pas garantie.
Cet appareil a été conçu pour lire des disques DVD
de la Région Un (1). Les DVD doivent être étiquetés
pour Toutes les régions (ALL) ou la Région 1 pour
être lisibles sur cet appareil. Des DVD étiquetés
pour d’autres régions ne sont pas lisibles.
Rechercher les symboles ci-dessus sur le DVD. Si
ces symboles de région n’apparaissent pas sur le
DVD, il n’est pas lisible sur cet appareil.
Disque
Logo
DVD-RW (FORMAT VIDÉO/VR)
DVD-R (FORMAT VIDÉO)
DIGITAL VIDEO
VCD (CD VIDÉO)
Conseils pour la lecture de DVD
Les matériaux d’un disque DVD sont généralement
divisés en titres, qui peuvent encore être subdivisés
en chapitres.
CD-R (FORMAT CD-CA, fichiers MP3)
Démarrer enr.
Arrêt/Démarrer
Arrêter enr.
CD-RW (FORMAT CD-DA, fichiers MP3)
Systèmes couleur
Titre 1
Les DVD sont enregistrés dans différents systèmes
couleur dans le monde. Les systèmes couleurs les
plus courants sont NTSC (principalement utilisé aux
États-Unis et au Canada), PAL et SECAM.
Cet appareil utilise NTSC, les DVD à lire doivent
donc être enregistrés en système NTSC. La lecture
de DVD enregistrés dans un autre système couleur
est impossible.
Chapitre 1 Chapitre 2 Chapitre 3 Chapitre 1 Chapitre 2
Édition
Titre 2
Changement du menu
CONFIGURER
Guide des affichages
D’abord:
DVD
1
1
1
00:00:00
DVD-RW
Mode vidéo
SP 1:25 Rem.
5
CH 1
2
3
: Audio
: Sous-titres
: Angle (sauf mode VR)
: Répétition
: Marque
Autres
4
: Recherche
Fonctions du
magnétoscope
Appuyer sur la touche DISPLAY pour
appeler le menu d’affichage, qui
donnera des informations sur le
disque en cours de lecture. Certaines
opérations sont disponibles pendant
la lecture du disque.
1. Indique le type de dique et le
mode format.
2. Indique une vitesse
d’enregistrement et le temps
d’enregistrement possible.
3. Indique le numéro de la
chaîne actuelle.
4. Indique un numéro de titre,
un numéro de chapitre et le
temps de lecture écoulé.
5. Chaque icône signifie:
Enregistrement Lecture d’un disque
CD-DA (CD AUDIO)
Les numéros dans le globe indiquent la région du
monde. La Région 1 représente les États-Unis, le
Canada, les Bermudes, les Iles Virgin américaines et
de petites zones proches de l’Australie.
Un DVD étiqueté pour une région spécifique peut
seulement être lu sur un enregistreur de DVD
portant le même code de région.
Démarrage
DVD VIDÉO
Raccords
Disques lisibles
Avant le démarrage
Information sur la lecture de DVD
: Réduction du bruit
: Zoom
43
Lecture d’un disque
Lecture de base
Lecture
DVD-R
Video
VR
DVD-RW
DVD-RW
Mode Vidéo:
Liste titres
1
1
1
2
3
1
POWER
REC SPEED
AUDIO
.@/:
1
ABC
DEF
2
3
GHI
Appuyer sur la touche
POWER, puis sur la touche
DVD.
Pour la lecture d’un DVD, allumer
le téléviseur et bien sélectionner
l’entrée à laquelle l’appareil est
raccordé.
JAN/1 12:00AM
4
JAN/1 1:00AM
JAN/1 2:00AM
JKL
5
6
TUV
WXYZ
8
9
2
6
CH
MNO
4
PQRS
7
5
OPEN/CLOSE
VIDEO/TV
SPACE
SLOW
0
JAN/1 3:00AM
JAN/1 4:00AM
VCR
DISPLAY
DVD
PAUSE
PLAY
6
Mode VR:
Original
2
1
Appuyer sur la touche
OPEN/CLOSE A pour ouvrir
le tiroir à disque.
Le tiroir à disque s’ouvrira.
JAN/1 12:00AM
1
2
3
JAN/1 1:00AM
JAN/1 2:00AM
STOP
REC/OTR
4
4
JAN/1 3:00AM
TIMER PROG.
ENTER
REC MONITOR
MENU/LIST TOP MENU
CLEAR/C-RESET ZOOM
SEARCH
MODE
4
SETUP
RETURN
SKIP
5
SKIP
CM SKIP
5
JAN/1 4:00AM
Touche MENU / LIST
3
Playlist
Placer un disque dans le tiroir
à disque, l’étiquette dirigée
vers le haut, en alignant le
disque sur le guide du tiroir.
1
JAN/1 12:00AM
4
JAN/1 3:00AM
Guide du
tiroir à
disque
La reconnaissance de cette
opération peut prendre un
certain temps.
1
2
3
JAN/1 1:00AM
JAN/1 2:00AM
5
JAN/1 4:00AM
5
Sélectionner le titre souhaité
avec les touches K / L / { / B,
puis appuyer sur la touche
ENTER.
La lecture démarrera.
Remarques
• Pour les disques DVD-R
(mode Vidéo) et les DVD-RW
(mode Vidéo) déjà finalisés, la
liste des titres s’affiche à la
place des images miniatures.
Menu titres
1 JAN/1
12:24AM
CH96
XP
2
3
4
4
6
Appuyer sur la touche TOP
MENU pour afficher le menu
de titres.
Il est possible de changer entre
“Original” et “Playlist” du mode
VR avec la touche MENU / LIST.
Appuyer sur la touche STOP C
pour arrêter la lecture.
44
Pour éjecter le disque, appuyer sur
la touche OPEN/CLOSE A pour
ouvrir le tiroir à disque, puis retirer
le disque avant de mettre l’appareil
hors tension.
5
6
7
8
• La lecture peut être reprise
de là où elle a été arrêtée sur
le disque. (lecture de reprise)
Voir la page 48 pour les
détails sur la lecture de
reprise.
• La lecture de certains disques
peut démarrer
automatiquement.
Lecture d’un disque
DVD-V
CD
VCD
MP3
1
Appuyer sur la touche
OPEN/CLOSE A pour ouvrir
le tiroir à disque.
Le tiroir à disque s’ouvrira.
1
POWER
REC SPEED
AUDIO
.@/:
1
ABC
DEF
2
3
GHI
JKL
5
6
TUV
WXYZ
8
9
7
4
MNO
4
PQRS
SPACE
OPEN/CLOSE
2
CH
VIDEO/TV
SLOW
0
DVD
VCR
DISPLAY
Appuyer sur la touche PLAY B
pour démarrer la lecture.
La lecture démarre.
PAUSE
PLAY
STOP
REC/OTR
5
Appuyer sur la touche STOP C
pour arrêter la lecture.
SETUP
TIMER PROG.
ENTER
REC MONITOR
MENU/LIST TOP MENU
RETURN
CLEAR/C-RESET ZOOM
SEARCH
MODE
SKIP
SKIP
CM SKIP
Remarque
• La lecture de certains disques
peut démarrer automatiquement.
Pour la lecture MP3
1
En mode d’arrêt, appuyer sur
la touche TOP MENU pour
appeler le menu MP3.
NOM DE DISQUE
1/ 2
• Pour quitter le menu, appuyer à
nouveau sur la touche TOP MENU.
pour sélectionner un dossier
(groupe) ou une piste, puis
appuyer sur la touche ENTER.
À la sélection d’une piste:
La lecture démarre.
ABC
2
3
GHI
JKL
MNO
4
5
6
TUV
WXYZ
8
9
PQRS
7
OPEN/CLOSE
DEF
SPACE
CH
VIDEO/TV
SLOW
0
DISPLAY
VCR
DVD
PAUSE
PLAY
STOP
REC/OTR
SETUP
TIMER PROG.
ENTER
REC MONITOR
MENU/LIST TOP MENU
1
CLEAR/C-RESET ZOOM
SEARCH
MODE
RETURN
SKIP
SKIP
2
2
2
CM SKIP
Remarques
• La source audio des fichiers
MP3 ne peut pas être enregistrée comme son numérique
par une platine MD ou DAT.
• Les fichiers à extension autre
que “.mp3(MP3)” ne seront
pas listés au menu MP3.
• Certains fichiers ou pistes
illisibles peuvent être listés au
menu MP3 à cause de l’état
d’enregistrement.
45
Autres
À la sélection d’un dossier:
Les fichiers dans le dossier
s’affichent. Appuyer sur les touches
K / L pour sélectionner la piste ou
le dossier souhaité, puis appuyer
sur la touche ENTER.
.@/:
1
AUDIO
Fonctions du
magnétoscope
2
Appuyer sur les touches K / L
REC SPEED
Changement du menu
CONFIGURER
NOM DU DOSSIER 1
NOM DU DOSSIER 2
NOM DU DOSSIER 3
NOM DU DOSSIER 4
NOM DU DOSSIER 5
NOM DU DOSSIER 6
1 NOM DU FICHIER 1
2 NOM DU FICHIER 2
POWER
Édition
Liste des fichiers MP3
• Appuyer sur la touche s ou la
touche RETURN
pour la
hiérarchie précédente.
• Appuyer sur la touche STOP
pour revenir au premier article.
Conseils pour les fichiers MP3:
• Les dossiers sont appelés
Groupes, les fichiers Pistes.
• L’icône
est jointe aux dossiers.
• L’icône est jointe aux fichiers
MP3. La lecture démarre à partir de
la piste sélectionnée et se poursuit
aux autres tour à tour.
• Le système peut reconnaître
jusqu’à 255 groupes (ou
dossiers) et jusqu’à 255 pistes.
• Un nom de groupe et de piste
peut être affiché en 32 caractères
maximum. Les caractères
non-reconnaissables sont
remplacés par des astérisques.
• S’il n’y a pas de fichiers dans un
dossier,“Pas de fichiers” s’affiche.
Les fichiers enregistrés sous les
conditions suivantes sont
recommandés pour cet appareil:
• Fréquence d’échantillonnage:
44,1 kHz ou 48 kHz
• Débit binaire constant: 112 kbps
– 320 kbps
Enregistrement Lecture d’un disque
À la lecture d’un disque DVD-Vidéo
ou CD Vidéo avec fonction PBC, un
menu peut apparaître.
Voir les pages 46-47 pour les détails
sur le menu du disque.
4
5
Démarrage
2
Appuyer sur la touche
à disque, l’étiquette dirigée
vers le haut, en alignant le
disque sur le guide du tiroir.
Raccords
POWER, puis sur la touche
DVD.
Pour la lecture d’un DVD ou d’un
CD audio, allumer le téléviseur et
bien sélectionner l’entrée à laquelle
l’appareil est raccordé.
3
Placer un disque dans le tiroir
Avant le démarrage
Lecture de base (suite)
Lecture d’un disque
Lecture de base (suite)
Lecture de disques avec le menu de disque
DVD-V
Un disque DVD contient un menu
de disque qui décrit le contenu ou
permet de personnaliser la lecture.
Par exemple, le menu permet de
choisir la langue des sous-titres,
des fonctions spéciales ou la
sélection de chapitre.
Parfois ils sont automatiquement
affichés au démarrage de la lecture;
sinon, ils apparaissent seulement à
la pression de la touche MENU /
LIST.
D’abord:
DVD
1
Appuyer sur la touche MENU /
LIST.
Le menu principal du DVD s’affiche.
Si la fonction n’est pas disponible,
peut apparaître sur l’écran du
téléviseur.
2
Sélectionner un article avec
les touches K / L / { / B, puis
appuyer sur la touche ENTER
pour confirmer.
Continuer ainsi pour configurer
toutes les fonctions souhaitées ou
démarrer la lecture du disque au
menu.
Touche MENU / LIST:
Affiche le menu du disque DVD,
variable selon les disques, qui peut
être identique au ‘menu des
titres’.
REC SPEED
.@/:
1
ABC
2
3
GHI
JKL
MNO
AUDIO
DEF
4
5
6
PQRS
TUV
WXYZ
8
9
7
OPEN/CLOSE
SPACE
CH
VIDEO/TV
SLOW
0
DISPLAY
VCR
DVD
PAUSE
PLAY
1
2
3
STOP
REC/OTR
SETUP
TIMER PROG.
ENTER
REC MONITOR
MENU/LIST TOP MENU
CLEAR/C-RESET ZOOM
SEARCH
MODE
RETURN
SKIP
2
SKIP
CM SKIP
Touches K / L / { / B:
Déplacent le curseur à l’écran.
Touche ENTER:
Sélectionne l’option du menu
présentement en évidence.
Touches numériques:
Sélectionnent une option de menu
numérotée (certains disques
seulement). Appuyer sur la touche
ENTER par la suite.
3
Appuyer sur la touche MENU /
LIST pour quitter le menu.
46
2
POWER
Remarque
• Les menus varient selon les
disques. Consulter les
informations accompagnant le
disque pour les détails.
Lecture d’un disque
Avant le démarrage
Lecture de base (suite)
Lecture de disques avec le menu de titres
DVD-V
DVD
2
Sélectionner un titre à lire avec
les touches K / L / { / B, puis
appuyer sur la touche ENTER.
La lecture démarrera à partir du
titre sélectionné.
POWER
REC SPEED
.@/:
1
ABC
2
3
GHI
JKL
MNO
2
AUDIO
DEF
4
5
6
PQRS
TUV
WXYZ
8
9
7
OPEN/CLOSE
SPACE
Raccords
Certains DVD ont un menu de
titres, qui donne les titres
disponibles dessus. Cela aide à
démarrer la lecture à partir d’un
titre spécifique.
D’abord:
CH
VIDEO/TV
SLOW
0
Appuyer sur la touche TOP
MENU.
Le menu de titres apparaîtra.
Si la fonction n’est pas disponible,
VCR
DVD
PAUSE
PLAY
STOP
REC/OTR
Touches K / L / { / B:
Déplacent le curseur sur l’écran.
Touche ENTER:
Sélectionne l’option du menu
présentement en évidence.
Touches numériques:
Sélectionnent une option de menu
numérotée (certains disques
seulement). Appuyer sur la touche
ENTER par la suite.
3
Appuyer sur la touche TOP
MENU pour quitter le menu
de titres.
1
2
3
TIMER PROG.
ENTER
REC MONITOR
MENU/LIST TOP MENU
CLEAR/C-RESET ZOOM
SEARCH
MODE
RETURN
SKIP
2
SKIP
CM SKIP
Remarques
• La touche TOP MENU est
toujours active sur tous les
DVD.
• Le menu varie selon les disques. Consulter les informations accompagnant le disque
pour les détails.
Lecture de CD Vidéo en utilisant le menu de titres
1. À la lecture d’un CD Vidéo avec fonction PBC, le menu de
VCD
Ver. 1.1 (sans fonction PBC): La lecture d’image ainsi que les CD
musicaux sont possibles.
Ver. 2.0 (avec fonction PBC): À l’emploi d’un CD Vidéo avec fonction
PBC, “PBC” apparaît sur l’écran et l’affichage,
VCD
Annulation et rappel de la fonction PBC
1. Appuyer sur la touche SETUP pour afficher le menu
CONFIGURER/CD.
• Le menu CONFIGURER/CD s’affichera.
2. Sélectionner “CD” avec les touches { / B, puis appuyer sur la
touche ENTER.
• Le menu du Mode Lecture de CD s’affichera.
3. Sélectionner “PBC (CD vidéo uniquement)” avec les touches
K / L, puis appuyer sur la touche ENTER.
4. Sélectionner “HF” au menu déroulant avec les touches K / L,
puis appuyer sur la touche ENTER.
5. Appuyer sur la touche SETUP pour quitter le menu.
6. Pour rappeler la fonction PBC, sélectionner “EF” à l’étape 4 cidessus.
(PBC HF)
47
Autres
REMARQUE:
À la lecture de CD Vidéo avec fonction PBC, seul “PBC” est
affiché à la place des indications de temps de lecture et de piste
actuelle sur l’affichage du panneau avant. De plus, certaines
opérations sont impossibles à moins que la fonction soit annulée
intentionnellement par l’utilisateur ou automatiquement.
Les opérations qui ne sont pas disponibles quand la fontion PBC
est activée sont indiquées par le symbole suivant dans ce manuel:
souhaité.
• La lecture démarrera au titre sélectionné.
3. Appuyer sur la touche RETURN pour revenir au menu de
titres.
Fonctions du
magnétoscope
Qu’est-ce que PBC? “PBC” est l’abréviation de Playback
Control (Contrôle de la lecture).Vous pouvez lire un support
interactif à l’aide des écrans de menu. Se rapporter aux
instructions dans le CD Vidéo.
titres apparaît automatiquement.
2. Appuyer sur les touches numériques pour sélectionner le titre
Changement du menu
CONFIGURER
Cet appareil est conforme à ver. 1.1. et ver. 2.0 des CD Vidéo
standard, avec fonction PBC.
Édition
FONCTION PBC DES CD VIDEO
SETUP
Enregistrement Lecture d’un disque
peut apparaître sur l’écran du
téléviseur.
DISPLAY
Démarrage
1
Touche TOP MENU:
Affiche le ‘menu de titres’ du disque
DVD qui varie selon les disques.
Lecture d’un disque
Lecture spéciale
Reprise de lecture
Video
DVD-V
DVD-R
DVD-RW
2
VR
CD
DVD-RW
VCD
MP3
Appuyer sur la touche PLAY B.
Au bout de quelques secondes, la
lecture reprendra du point où elle
a été arrêtée en dernier. La lecture
peut être reprise du même point,
même si l’appareil a été mis hors
tension.
(PBC HF)
La lecture peut être reprise de là
où elle a été arrêtée en dernier
sur le disque.
1
POWER
REC SPEED
.@/:
1
ABC
2
3
GHI
JKL
MNO
4
5
6
TUV
WXYZ
8
9
PQRS
7
AUDIO
OPEN/CLOSE
DEF
SPACE
CH
VIDEO/TV
SLOW
0
DVD
VCR
DISPLAY
PAUSE
PLAY
STOP
Pendant la lecture, appuyer
sur la touche STOP C.
Le message de reprise s’affichera.
Écran:
Pour annuler la lecture de reprise
et démarrer la lecture du disque à
son début, appuyer une seconde
fois sur la touche STOP C quand
la lecture est arrêtée.
Reprise en cours
REC/OTR
SETUP
TIMER PROG.
ENTER
REC MONITOR
2
1
2
Remarques
• Pour les CD Vidéo, si PBC est
activé au menu de
configuration, la fonction de
reprise est annulée.
• Pour les fichiers MP3, la lecture
reprendra à partir du début de
la piste à laquelle elle a été
arrêtée.
Avance rapide/recul rapide
DVD-V
DVD-R
Video
VR
DVD-RW
DVD-RW
CD
VCD
MP3
1
POWER
REC SPEED
AUDIO
.@/:
1
ABC
DEF
2
3
GHI
JKL
MNO
4
5
6
TUV
WXYZ
8
9
PQRS
Pendant la lecture, appuyer sur la touche FWD D ou
REV E.
À chaque pression de la touche FWD D ou REV E, la vitesse
approximative changera comme suit.
g
g
x40
h
x20
h
g
x5
h
Lecture à
vitesse
normale
g
h
g
x2
h
g
x20
h
x40
7
SPACE
48
CH
VIDEO/TV
SLOW
0
DISPLAY
DVD
VCR
PAUSE
PLAY
1
STOP
REC/OTR
SETUP
REC MONITOR
MENU/LIST TOP MENU
Pour les CD Audio, la vitesse approximative est fixée à x8 avec son.
Pour les CD Vidéo, les vitesses en marche avant/arrière sont de x2, x8
et x16.
Pour ls fichiers MP3, la vitesse approximative est fixée à x8.
Pour revenir à la lecture normale, appuyer sur la touche PLAY B.
OPEN/CLOSE
TIMER PROG.
1
1
ENTER
RETURN
Remarque
• La vitesse en marche
avant/arrière est indiquée par
les icônes suivantes.
En avant (vitesse approx.)
x2:
x20:
x40:
En arrière (vitesse approx.)
x5:
x20:
x40:
Lecture d’un disque
Avant le démarrage
Lecture spéciale (suite)
Saut des publicités télévisés pendant la lecture
DVD-R
Video
VR
DVD-RW
DVD-RW
7
8
9
SPACE
SLOW
0
VCR
DISPLAY
DVD
PAUSE
Raccords
Il est possible de sauter les publicités télévisées en appuyant sur
la touche CM SKIP, ce qui permet
de profiter des programmes
enregistrés sans interruption.
Par ex. appuyer une fois sur la
touche CM SKIP
PLAY
STOP
REC/OTR
SETUP
TIMER PROG.
ENTER
REC MONITOR
Non pub
30 sec.
1
MENU/LIST TOP MENU
CLEAR/C-RESET ZOOM
SEARCH
MODE
(avance de 30 secondes)
SKIP
Démarrage
CM SKIP
1
Enregistrement Lecture d’un disque
Pendant la lecture, appuyer
sur la touche CM SKIP.
La lecture normale démarrera 30
secondes avant le point où la
touche CM SKIP a été pressée.
À chaque pression de la touche
CM SKIP, le point de recherche
avancera de 30 secondes.
Il est possible de presser un maximum de 6 fois (180 secondes).
RETURN
SKIP
B
La lecture reprend automatiquement.
Pause
Video
DVD-V
DVD-R
DVD-RW
VR
DVD-RW
CD
MP3
1
Appuyer sur la touche
PLAY B pour reprendre la
lecture.
POWER
REC SPEED
.@/:
1
ABC
2
3
GHI
JKL
MNO
4
5
6
TUV
WXYZ
8
9
PQRS
7
AUDIO
OPEN/CLOSE
DEF
SPACE
CH
VIDEO/TV
SLOW
0
DISPLAY
2
VCR
DVD
PAUSE
1
Édition
Pendant la lecture, appuyer
sur la touche PAUSE F.
La lecture passera en pause et le
son sera assourdi.
2
PLAY
SETUP
TIMER PROG.
ENTER
REC MONITOR
MENU/LIST TOP MENU
CLEAR/C-RESET ZOOM
SEARCH
MODE
Changement du menu
CONFIGURER
STOP
REC/OTR
RETURN
SKIP
SKIP
CM SKIP
Fonctions du
magnétoscope
Autres
49
Lecture d’un disque
Lecture spéciale (suite)
Lecture étape par étape
Video
DVD-V
DVD-R
DVD-RW
DVD-RW
VCD
Pendant la lecture, appuyer
sur la touche PAUSE F.
La lecture passera en pause et le
son sera assourdi.
WXYZ
8
9
VIDEO/TV
SLOW
0
DVD
VCR
DISPLAY
Appuyer plusieurs fois sur la
touche SKIP G.
La lecture avancera d’un cadre (ou
pas) à la fois à la pression de la
touche SKIP avec le son assourdi.
1
TUV
7
SPACE
2
VR
PQRS
PAUSE
PLAY
1
3
STOP
REC/OTR
SETUP
TIMER PROG.
ENTER
REC MONITOR
MENU/LIST TOP MENU
Pour lire pas à pas en arrière:
Appuyer plusieurs fois sur la touche
SKIP H. À chaque pression, la
lecture reculera d’un cadre.
RETURN
CLEAR/C-RESET ZOOM
SEARCH
MODE
SKIP
SKIP
CM SKIP
2
Remarque
3
Appuyer sur la touche
PLAY B pour reprendre la
lecture normale.
• Seule la lecture pas à pas en
avant est disponible à la
lecture de CD Vidéo.
Lecture lente en avant/en arrière
DVD-V
DVD-R
Video
VR
DVD-RW
DVD-RW
VCD
1
Pendant la lecture, appuyer sur la touche PAUSE k, puis sur la
touche D ou E.
À chaque prssion de la touche D ou E, la vitesse
approximative changera comme suit.
POWER
REC SPEED
.@/:
1
ABC
2
3
GHI
JKL
MNO
AUDIO
DEF
4
5
6
PQRS
TUV
WXYZ
8
9
7
OPEN/CLOSE
SPACE
CH
VIDEO/TV
SLOW
0
DISPLAY
VCR
DVD
PAUSE
PLAY
g
g
x1/4
h
x1/8
h
g
x1/16
g
Pause
h
h
g
x1/16
h
g
x1/8
h
x1/2
1
STOP
REC/OTR
SETUP
REC MONITOR
Pour revenir en lecture normale, appuyer sur la touche PLAY B.
MENU/LIST TOP MENU
TIMER PROG.
1
1
1
ENTER
RETURN
Remarque
• Seule la lecture lente en avant
est disponible à la lecture de
CD Vidéo.
• La vitesse en avant/arrière
sera indiquée par des icônes
comme suit.
En avant (vitesse approx.)
x1/16:
x1/8:
x1/2:
En arrière (vitesse approx.)
x1/16:
x1/8:
x1/4:
50
Lecture d’un disque
Zoom
STOP
REC/OTR
Video
DVD-V
DVD-R
DVD-RW
VR
VCD
DVD-RW
Pendant la lecture, appuyer
sur la touche ZOOM.
Le menu Zoom apparaîtra.
Ecran:
1
x1.2
01:23:45
x1.5
x2.0
SEARCH
MODE
DVD-V
DVD-R
DVD-RW
Sélectionner la position de zoom
souhaitée avec les touches K / L /
{ / B, puis appuyer sur la touche
ENTER.
La lecture zoomée démarrera.
Écran:
CD
ABC
2
3
GHI
JKL
MNO
4
5
6
1
TUV
WXYZ
8
9
7
DVD-Video
01:23:45
DEF
SPACE
VCD
(PBC HF)
CM SKIP
.@/:
1
PQRS
1
VR
DVD-RW
2
3
4
5
6
1
DISPLAY
STOP
REC/OTR
SETUP
MENU/LIST TOP MENU
3
Sélectionner le numéro de
marque souhaité avec les
touches { / B. En arrivant au
point souhaité, appuyer sur la
touche ENTER.
2
CM SKIP
SKIP
SKIP
Remarques
• Pour supprimer une marque,
sélectionner le numéro de la
marque à supprimer, puis
appuyer sur la touche
CLEAR/C-RESET.
• Toutes les marques seront
effacées dans les cas suivants:
– Ouverture du tiroir à disque.
– Mise hors tension
– Enregistrement sur un disque
enregistrable
– Changement de mode entre
Original et Playlist (mode VR).
• 6 points maximum peuvent
être marqués.
51
Autres
Sélectionner l’icône
avec
les touches { / B, puis appuyer
sur la touche ENTER.
Le menu de configuration de
marques s’affichera.
à la marque, sélectionner le
numéro de marque souhaité
avec les touches { / B, puis
appuyer sur la touche
ENTER.
SEARCH
MODE
2
3
4
Fonctions du
magnétoscope
4
Pour revenir ultérieurement
CLEAR/C-RESET ZOOM
RETURN
Changement du menu
CONFIGURER
DVD-Video
TIMER PROG.
ENTER
Édition
01:23:45
PAUSE
PLAY
1
1
VIDEO/TV
SLOW
DVD
VCR
REC MONITOR
1
CH
0
1
Cette fonction permet d’assigner
un point spécifique sur un disque
à rappeler ultérieurement.
Pendant la lecture, appuyer
sur la touche DISPLAY.
Le menu Affichage s’affichera.
Écran:
2
3
• À la sélection d’un facteur
plus petit que le facteur
actuel, la zone de zoom ne
sera pas affichée.
• Pour supprimer le menu de
zoom, appuyer à nouveau sur
la touche ZOOM à l’étape 1.
• Pour annuler la fonction
zoom, sélectionner x1,0 avec
les touches { / B, puis
appuyer sur la touche ENTER.
Configuration de marques
Video
SKIP
Enregistrement Lecture d’un disque
3
Il y a quatre options (x1,0, x1,2,
x1,5 et x2,0) qui sont affichées en
excluant le taux de zoom actuel.
1
SKIP
Remarques
DVD-Video
B
RETURN
MENU/LIST TOP MENU
CLEAR/C-RESET ZOOM
Démarrage
1
avec les touches { / B, puis
appuyer sur la touche ENTER.
La zone de zoom s’affichera.
TIMER PROG.
ENTER
REC MONITOR
Raccords
1
2
Sélectionner le facteur de zoom
SETUP
Avant le démarrage
Lecture spéciale (suite)
Lecture d’un disque
Recherche
Recherche de titre/chapitre
Video
DVD-V
DVD-R
DVD-RW
VR
DVD-RW
Utilisation des touches
SKIP H / G
Utilisation de la touche
DISPLAY
1
1
Pendant la lecture, appuyer
sur la touche SKIP G pour
sauter le titre ou le chapitre
actuel et passer au suivant.
Le titre ou le chapitre avancera
d’une unité à la fois.
Pendant la lecture, appuyer
sur la touche DISPLAY.
Le menu Affichage s’affichera.
Écran:
2
POWER
REC SPEED
.@/:
1
ABC
2
3
GHI
JKL
MNO
AUDIO
DEF
4
5
6
PQRS
TUV
WXYZ
8
9
7
SPACE
1
01:23:45
1
DISPLAY
SLOW
VCR
DVD
STOP
SETUP
TIMER PROG.
DVD-Video
ENTER
REC MONITOR
CLEAR/C-RESET ZOOM
2
Sélectionner l’icône
avec
les touches { / B, puis
appuyer sur la touche
ENTER.
“T” pour titre sera mis en évidence.
Titre:
Entrer le numéro de titre à
chercher avec les touches K / L
ou aux touches numériques,
puis appuyer sur la touche
ENTER.
La recherche de titre
commencera.
Chapitre:
Pour passer à “C” pour chapitre,
appuyer sur la touche B.
Entrer le numéro de chapitre
à rechercher avec les touches
K / L ou aux touches
numériques, puis appuyer sur
la touche ENTER.
La recherche de chapitre
commencera.
52
PAUSE
PLAY
MENU/LIST TOP MENU
Pour revenir au titre ou chapitre
précédent, appuyer sur la touche
SKIP H. Le titre ou chapitre
reculera d’une unité à la fois.
CH
VIDEO/TV
0
REC/OTR
1
OPEN/CLOSE
SEARCH
MODE
CM SKIP
RETURN
SKIP
SKIP
2
1
Lecture d’un disque
Avant le démarrage
Recherche (suite)
Recherche de piste
CD
VCD
MP3
(PBC HF)
Utilisation de la touche DISPLAY
1
Pendant la lecture, appuyer
sur la touche DISPLAY.
Le menu Affichage s’affiche.
Écran:
1
01:23:45
Audio CD
REC SPEED
.@/:
1
ABC
2
3
GHI
JKL
MNO
4
5
6
TUV
WXYZ
8
9
7
OPEN/CLOSE
DEF
PQRS
SPACE
CH
VIDEO/TV
SLOW
0
1
DISPLAY
VCR
DVD
PAUSE
PLAY
STOP
REC/OTR
SETUP
2
TIMER PROG.
ENTER
REC MONITOR
MENU/LIST TOP MENU
RETURN
CLEAR/C-RESET ZOOM
Sélectionner l’icône
avec
les touches { / B, puis appuyer
sur la touche ENTER.
“T” pour Piste (Track) sera mis en
évidence.
3
Entrer le numéro de piste à
chercher avec les touches K / L
ou aux touches numériques, puis
appuyer sur la touche ENTER.
La recherche de piste démarrera.
SEARCH
MODE
SKIP
SKIP
CM SKIP
2
3
1
Remarque
• Pour les CD Vidéo, la recherche
de piste est possible en mode
d’arrêt sans désactiver PBC
manuellement.
Video
DVD-V
DVD-R
DVD-RW
VR
CD
DVD-RW
VCD
1
Pendant la lecture, appuyer
sur la touche DISPLAY.
Le menu Affichage s’affiche.
Écran pour DVD:
1
01:23:45
DVD-Video
, appuyer
01:23:45
Audio CD
Entrer l’heure à rechercher
avec les touches K / L ou aux
touches numériques, puis
appuyer sur la touche
ENTER.
La recherche horaire démarrera.
1
DISPLAY
SLOW
VCR
DVD
PAUSE
PLAY
STOP
REC/OTR
SETUP
TIMER PROG.
ENTER
REC MONITOR
MENU/LIST TOP MENU
CLEAR/C-RESET ZOOM
SEARCH
MODE
RETURN
SKIP
SKIP
2
3
CM SKIP
Remarque
• Pour les CD Vidéo, la recherche
horaire est possible en mode
d’arrêt sans désactiver PBC
manuellement.
• La fonction de recherche horaire
est disponible seulement sur la
même piste ou le même titre.
53
Autres
1
VIDEO/TV
0
3
Écran pour CD:
9
Fonctions du
magnétoscope
1
WXYZ
8
SPACE
Sélectionner l’icône
avec
les touches { / B, puis
appuyer sur la touche
ENTER.
“T” pour titre ou piste est mis en
évidence.
Pour passer à l’icône
sur la touche B.
TUV
7
Changement du menu
CONFIGURER
(PBC HF)
2
PQRS
Édition
Recherche horaire
Enregistrement Lecture d’un disque
Pour revenir à la piste précédente,
appuyer sur la touche SKIP H. La
piste reculera d’une unité à la fois.
AUDIO
Démarrage
Pendant la lecture, appuyer
sur la touche SKIP G pour
sauter la piste actuelle et
passer à la suivante.
La piste avancera d’une unité à la fois.
1
POWER
Raccords
Utilisation des touches
SKIP H / G
Lecture d’un disque
Lecture répétée/aléatoire/programmée
Lecture répétée
Video
DVD-V
DVD-R
DVD-RW
VR
CD
DVD-RW
VCD
MP3
Titre:
Le titre actuel sera lu à répétition
(DVD seulement).
(PBC HF)
1
Pendant la lecture, appuyer
sur la touche DISPLAY.
Le menu d’affichage apparaîtra.
1
1
01:23:45
DVD-Video
Chapitre:
Le chapitre actuel sera lu à répétition (DVD seulement).
POWER
REC SPEED
.@/:
1
ABC
2
3
GHI
JKL
MNO
4
5
6
PQRS
TUV
WXYZ
8
9
7
AUDIO
DEF
SPACE
Sélectionner l’icône
avec les
touches { / B, puis appuyer sur la
touche ENTER.
Le menu de répétition apparaîtra.
Ecran:
1
Tout:
Le disque actuel sera lu à répétition
(CD,VCD, MP3, DVD-RW (mode
VR) seulement).
SLOW
DISPLAY
DVD
VCR
1
1
01:23:45
DVD-Video
HF
Titre
Chapitre
A-B
3
Sélectionner l’option souhaitée
pour la répétition avec les
touches K / L, puis appuyer sur
la touche ENTER.
La lecture répétée sélectionnée démarrera.
Piste:
La piste actuelle sera lue à répétition (CD,VCD, MP3 seulement).
Groupe:
Le groupe actuel sera lu à répétition (MP3 seulement).
PAUSE
PLAY
STOP
REC/OTR
SETUP
TIMER PROG.
ENTER
REC MONITOR
A-B:
Le segment A-B sera lu à répétition.
En appuyant sur la touche ENTER
quand A-B est en évidence, le
point de départ (A) sera fixé.
Appuyer à nouveau sur la touche
ENTER pour sélectionner le point
de fin (B).
CH
VIDEO/TV
0
RETURN
MENU/LIST TOP MENU
2
OPEN/CLOSE
CLEAR/C-RESET ZOOM
SEARCH
MODE
SKIP
SKIP
2
3
CM SKIP
Remarques
• La lecture répétée A-B ne
peut être réglée que sur le
titre actuel (pour les DVD)
ou sur la piste actuelle (CD
Audio/Vidéo).
• Pour annuler la lecture
répétée, sélectionnez HF à
l’étape 2.
• “Groupe” ne peut pas être
sélectionné pendant la lecture
aléatoire de fichiers MP3.
Lecture aléatoire
CD
VCD
MP3
(PBC HF)
Cette fonction permet la lecture aléatoire
au lieu de la lecture dans l’ordre d’origine.
D’abord:
DVD
1
Appuyer sur la touche
2
DISPLAY
Sélectionner “CD” avec les
touches { / B, puis appuyer
sur la touche ENTER.
Le menu Mode lecture CD
s’affichera.
Lecture au hasard
1
STOP
REC/OTR
SETUP
REC MONITOR
TIMER PROG.
ENTER
MENU/LIST TOP MENU
RETURN
SKIP
SKIP
2
3
Remarques
Lecture programmée
PBC (CD vidéo uniquement)
PAUSE
PLAY
Mode lecture CD
HF
3
54
DVD
CLEAR/C-RESET ZOOM
SETUP pour afficher le menu
CONFIGURER/CD.
Le menu CONFIGURER/CD s’affichera.
Écran:
Menu de configuration
VCR
Sélectionner “Lecture au
hasard” avec les touches K / L,
puis appuyer sur la touche
ENTER.
La lecture aléatoire démarrera.
• Pour annuler la lecture
aléatoire, appuyer deux fois sur
la touche STOP C pendant la
lecture aléatoire.
• Pour les CD Vidéo, cette
fonction est utilisable
directement sans désactiver
PBC manuellement.
Lecture d’un disque
Avant le démarrage
Lecture répétée/aléatoire/programmée (suite)
Lecture programmée
CD
VCD
(PBC HF)
DVD
1
Sélectionner “Lecture programmée” avec les touches
K / L, puis appuyer sur la
touche ENTER.
La liste de lecture programmée
s’affichera.
4
POWER
REC SPEED
.@/:
1
ABC
2
3
GHI
JKL
MNO
4
5
6
TUV
WXYZ
8
9
7
-- -- -- -- -- -- -- -- -- --- -- -- -- -- -- -- -- -- --- -- -- -- -- -- -- -- -- --- -- -- -- -- -- -- -- -- -Durée
00:00:00
OPEN/CLOSE
DEF
PQRS
SPACE
CH
VIDEO/TV
SLOW
0
DISPLAY
VCR
Mode lecture CD > Lecture programmée
-- -- -- -- -- -- -- -- -- --
AUDIO
DVD
PAUSE
5
PLAY
1
STOP
REC/OTR
SETUP
TIMER PROG.
ENTER
REC MONITOR
MENU/LIST TOP MENU
CLEAR/C-RESET ZOOM
CM SKIP
SKIP
SKIP
2
3
4
4
Sélectionner la piste souhaitée
avec les touches K / L, puis
appuyer sur la touche ENTER
ou la touche B.
Le curseur passera à la suivante.
Menu de configuration
2
Sélectionner “CD”avec les
touches { / B, puis appuyer
sur la touche ENTER.
Le menu Mode lecture CD
s’affichera.
Mode lecture CD > Lecture programmée
--
-- -- -- -- -- -- -- -- --
--
-- -- -- -- -- -- -- -- --
--
-- -- -- -- -- -- -- -- --- -- -- -- -- -- -- -- --
---
Durée
Mode lecture CD
Édition
07 - - - - - - - - - - - - - - - -
Enregistrement Lecture d’un disque
SEARCH
MODE
RETURN
Démarrage
Appuyer sur la touche
SETUP pour afficher le menu
CONFIGURER/CD.
Le menu CONFIGURER/CD
s’affichera.
Écran:
3
Raccords
Un disque peut être programmé pour
la lecture dans l’ordre souhaité.
D’abord:
00:04:30
Lecture au hasard
Lecture programmée
PBC (CD vidéo uniquement)
HF
Appuyer sur la touche
PLAY B pour démarrer la
lecture programmée.
La lecture programmée démarrera.
Remarques
Autres
55
Fonctions du
magnétoscope
• Pour effacer des pistes
sélectionnées, appuyer sur la
touche CLEAR/C-RESET.
• Jusqu’à 50 réglages de
programme sont possibles.
• Pour annuler la lecture
programmée, appuyer deux fois
sur la touche STOP C pendant
la lecture programmée.
• Une piste souhaitée peut aussi
être sélectionnée aux touches
numériques à l’étape 4.
• Pour les CD Vidéo, cette
fonction est utilisable
directement sans désactiver
PBC manuellement.
Changement du menu
CONFIGURER
5
Lecture d’un disque
Sélection des formats audio et vidéo
Le format audio ou vidéo peut être sélectionné selon le contenu du
disque.
Commutation entre les pistes sonore
VR
DVD-V
DVD-RW
À la lecture d’un disque DVD-Vidéo
enregistré avec deux pistes son ou
plus (qui sont souvent en langues
différentes), il est possible de
commuter entre elles à tout
moment.
Sur les disques DVD-RW en mode
VR, il est possible de commuter à
principal (L), audio secondaire (R)
ou un mélange des deux (L/R).
1
Pendant la Lecture, appuyer
sur la touche DISPLAY.
Le menu Affichage s’affiche.
Écran:
1
1
01:23:45
DVD-Video
<DVD-RW mode VR>
1
1
00:00:00
1 Dolby Digital Dual L/R
2 Dolby Digital 2ch ----
1
1
00:00:00
1 Dolby Digital 5.1ch Anglais
2 Dolby Digital 2ch Japonais
56
DVD-Video
REC SPEED
.@/:
1
ABC
2
3
GHI
JKL
MNO
4
5
6
PQRS
TUV
WXYZ
8
9
AUDIO
OPEN/CLOSE
DEF
SPACE
CH
VIDEO/TV
SLOW
0
1
3
Sélectionner la prise son
audio désirée avec les touches K / L, puis appuyer sur la
touche ENTER.
<DVD-Vidéo>
La piste audio sera commutée.
<DVD-RW mode VR>
1
00:00:00
1 Dolby Digital Dual
2 Dolby Digital 2ch
Sélectionner l’icône
avec les touches { / B, puis
appuyer sur la touche
ENTER.
Le menu audio s’affichera.
<DVD-Vidéo>
POWER
7
1
2
DVD-RW
VR Original
DISPLAY
VCR
DVD
PAUSE
PLAY
STOP
REC/OTR
SETUP
TIMER PROG.
ENTER
REC MONITOR
MENU/LIST TOP MENU
CLEAR/C-RESET ZOOM
SEARCH
MODE
CM SKIP
RETURN
SKIP
SKIP
2
3
4
DVD-RW
VR Original
L/R
L
R
4
Sélectionner le canal audio
désiré avec les touches
K / L, puis appuyer sur la
touche ENTER.
Le canal audio sera commuté.
Remarques
• Certains disques pemettent
seulement le changement de
piste son au menu du disque.
Appuyer sur la touche TOP
MENU ou la touche
MENU/LIST pour afficher le
menu du disque.
• Sur les disques DVD-RW
enregistrés en mode VR ayant
à la fois un canal audio
principal et un canal
secondaire, il est possible de
commuter à principal (L),
audio secondaire (R) ou un
mélange des deux (L/R).
• Cet appareil ne permet PAS
l’enregistrement stéréo et SAP
(programme audio secondaire)
en même temps.
Lecture d’un disque
Avant le démarrage
Sélection des formats audio et vidéo (suite)
CD
VCD
MP3
2
Sélectionner l’icône
avec
les touches { / B, puis appuyer
sur la touche ENTER.
Le menu audio s’affichera.
POWER
REC SPEED
.@/:
1
ABC
2
3
GHI
JKL
MNO
AUDIO
DEF
4
5
6
PQRS
TUV
WXYZ
8
9
7
OPEN/CLOSE
SPACE
Raccords
Pour la lecture de CD Audio, CD
Vidéo ou fichiers MP3, il est
possible de commuter la stéréo,
seulement le canal gauche ou
seulement le canal droit.
CH
VIDEO/TV
SLOW
0
1
1
1
3
Sélectionner le canal audio
souhaité avec les touches K / L,
puis appuyer sur la touche ENTER.
Le canal audio sera commuté.
STOP
REC/OTR
SETUP
TIMER PROG.
ENTER
REC MONITOR
MENU/LIST TOP MENU
1
00:00:00
PAUSE
PLAY
Audio CD
00:00:00
DVD
RETURN
Audio CD
CLEAR/C-RESET ZOOM
SKIP
2
3
CM SKIP
Commutation des sous-titres
VR
DVD-V
DVD-RW
2
Sélectionner l’icône
avec
les touches { / B, puis appuyer
sur la touche ENTER.
Le menu Langue sous-titre apparaîtra.
1
POWER
REC SPEED
.@/:
1
ABC
2
3
GHI
JKL
MNO
AUDIO
DEF
4
5
6
PQRS
TUV
WXYZ
8
9
7
SPACE
1
1
00:00:00
CH
VIDEO/TV
SLOW
0
DVD-Video
DISPLAY
VCR
DVD
PAUSE
PLAY
STOP
Pendant la lecture, appuyer
sur la touche DISPLAY.
Le menu Affichage s’affiche.
Écran:
1
1
01:23:45
DVD-Video
REC/OTR
SETUP
TIMER PROG.
ENTER
REC MONITOR
MENU/LIST TOP MENU
CLEAR/C-RESET ZOOM
À la sélection de “HF”, les
sous-titres disparaîtront.
SKIP
CM SKIP
Remarque
• Certains disques ne
permettent pas de changer de
sous-titres au menu du
disque. Appuyer sur la touche
TOP MENU ou la touche
MENU/LIST pour afficher le
menu du disque.
57
Autres
Sélectionner la langue de
sous-titres désirée avec les
touches K / L, puis appuyer
sur la touche ENTER.
Les sous-titres seront affichés
dans la langue sélectionnée.
SKIP
2
3
Fonctions du
magnétoscope
3
SEARCH
MODE
RETURN
Changement du menu
CONFIGURER
HF
1 Anglais
2 Japonais
1
OPEN/CLOSE
Édition
Beaucoup de disques DVD Vidéo
ont des sous-titres en une ou
plusieurs langues – la boîte
indique généralement les langues
de sous-titres disponibles. Il est
possible de changer de langue de
sous-titres à tout moment
pendant la lecture.
Enregistrement Lecture d’un disque
SEARCH
MODE
L/R
L
R
SKIP
Démarrage
Pendant la lecture, appuyer
sur la touche DISPLAY.
Le menu Affichage s’affiche.
Écran:
VCR
DISPLAY
Lecture d’un disque
Sélection des formats audio et vidéo (suite)
Commutation d’angle de caméra
DVD-V
Certains disques DVD Vidéo comportent des scènes prises à deux
angles ou plus; vérifier sur la boîte
pour les détails. Une icône d’angle
est marquée si le disque contient
des scènes à plusieurs angles.
2
Sélectionner l’icône
avec
les touches { / B, puis appuyer
sur la touche ENTER.
L’angle sera commuté à chaque
pression de la touche ENTER.
1
01:23:45
.@/:
1
ABC
2
3
GHI
JKL
MNO
AUDIO
OPEN/CLOSE
DEF
4
5
6
PQRS
TUV
WXYZ
8
9
SPACE
CH
VIDEO/TV
SLOW
0
1
1
REC SPEED
7
Pendant la lecture, appuyer
sur la touche DISPLAY.
Le menu Affichage s’affiche.
Écran:
1
POWER
VCR
DISPLAY
DVD
PAUSE
PLAY
STOP
REC/OTR
SETUP
TIMER PROG.
ENTER
REC MONITOR
MENU/LIST TOP MENU
DVD-Video
RETURN
CLEAR/C-RESET ZOOM
SEARCH
MODE
SKIP
2
SKIP
CM SKIP
L’icône d’angle apparaît quand un angle
de caméra additionnel est disponible.
Réduction du bruit vidéo
Video
DVD-V
DVD-R
DVD-RW
1
VR
1
00:00:00
VCD
DVD-RW
HF
Type 1
Type 2
1
REC SPEED
AUDIO
.@/:
1
ABC
DEF
2
3
GHI
JKL
MNO
4
5
6
TUV
WXYZ
8
9
PQRS
7
SPACE
Pendant la lecture, appuyer
sur la touche DISPLAY.
Le menu Affichage s’affiche.
Écran:
1
1
01:23:45
DVD-Video
2
Sélectionner l’icône
avec
les touches { / B, puis appuyer
sur la touche ENTER.
Le menu NR s’affichera.
OPEN/CLOSE
CH
VIDEO/TV
SLOW
0
1
DISPLAY
DVD
VCR
PAUSE
PLAY
STOP
3
Sélectionner l’option souhaitée
avec les touches K / L, puis
appuyer sur la touche ENTER.
Le réglage sera activé.
58
POWER
DVD-Video
Cette fonction réduit le bruit sur
l’image lue. À la lecture de mauvais
disques enregistrés en mode longue
durée comme SLP ou SEP,
sélectionner “Type 1” ou “Type 2”.
(Le “Type 2” est plus efficace.)
Pour la lecture de disques avec peu
de parasites, comme les disques
DVD-Vidéo, sélectionner “HF”.
REC/OTR
SETUP
TIMER PROG.
ENTER
REC MONITOR
MENU/LIST TOP MENU
CLEAR/C-RESET ZOOM
SEARCH
MODE
CM SKIP
RETURN
SKIP
SKIP
2
3
Édition
Édition de disques avec mode Vidéo
La liste Title permet de contrôler facilement les titres
enregistrés sur le disque. Le titre à lire peut être
sélectionné à cet écran et le montage des titres
souhaités selon ses préférences est simple.
Les disques avec mode Vidéo peuvent être montés pour
les articles suivants. Noter qu’une fois montés, les titres
ne resteront pas comme originaux.
• Suppression de titres (Voir la page 61)
• Attribution des titres (Voir les pages 62-63)
• Réglage ou suppression de marques de chapitre
(Voir la page 64)
Disque > Edition > Original
1
2
3
JAN/1 1:00AM
JAN/1 2:00AM
JAN/1 3:00AM
5
6
JAN/1 5:00AM
JAN/1 6:00AM
4
JAN/1 4:00AM
1
Remarque
2
7
• Une fois un disque finalisé, le montage du disque
ou son enregistrement seront impossibles. (Sauf
les disques DVD-RW avec mode VR)
• Une Playlist n’est pas disponible avec les disques
DVD-R et DVD-RW en mode Vidéo.
Enregistrement Lecture d’un disque
Disque > Edition > Original
1
JAN/1 1:00AM CH12
Effacer titre
Effacer scene
Editer titre
Repère chapitre
Indexer image
Protection HF EF
XP
0:01:25
8 3
6
5
Démarrage
1
Raccords
Guide pour la liste de titres
Avant le démarrage
Informations sur l’édition du disque
4
Édition
1. Des titres enregistrés sur le disque peuvent
être sélectionnés pour le montage en appuyant
sur la touche ENTER avec le curseur sur le
titre.
2. L’icône de protection apparaîtra si le titre est
protégé.
3. Images miniatures des titres sélectionnés sur la
liste des titres.
4. Les menus disponibles dépendent du type de
disque et du type de format.
5. Les détails sur le titre, qui peuvent être modifiés
par montage.
6. Barre d’état du temps du titre.
7. Icône de flèche, qui signifie que la liste de titres
contient une page suivante ou prédécente.
Appuyez sur la touche B ou { en suivant
l’indication de l’icône.
8. État de lecture du disque actuel.
Changement du menu
CONFIGURER
Fonctions du
magnétoscope
Autres
59
Édition
Informations sur l’édition du disque (suite)
Édition de disques avec mode VR
Pour les disques avec mode Vidéo, il est possible de monter au menu “Original” ou “Playlist” créé à partir
de l’original.
Édition de titres originaux
Édition de listes de lecture
Les éléments ci-dessus sont utilisables pour monter
les titres originaux.
• Suppression de titres (Voir la page 65)
• Suppression de parties de titres
(Voir les pages 66-67)
• Attribution des titres (Voir les pages 67-68)
• Réglage ou suppression de marques de chapitre
(Voir les pages 69-70)
• Réglage d’images pour les images vignettes
(Voir les pages 70-71)
• Protection de titres
(Voir la page 72)
• Libération des titres de la protection
(Voir la page 73)
Une liste de lecture (Playlist) peut être créée à partir
de titres originaux, ce qui permet le montage selon
ses préférences sans perdre les titres originaux.
Les éléments suivants peuvent être montés avec
une liste de lecture.
• Suppression de titres (Voir la page 74)
• Suppression de parties de titres
(Voir les pages 75-76)
• Attribution des titres (Voir les pages 76-77)
• Réglage ou suppression de marques de chapitre
(Voir les pages 78-79)
• Réglage d’images pour les images miniatures
(Voir les pages 79-80)
• Ajout de titres à une liste de lecture
(Voir la page 81)
• Suppression d’une liste de lecture
(Voir la page 82)
Remarque
• Les titres originaux une fois édités ne resteront pas comme enregistrés à l’origine. Pour laisser un
original tel quel, monter la liste de lecture à sa préférence. (Voir les pages 74-82)
60
Édition
Avant le démarrage
Édition de disques DVD-RW en mode Vidéo
Suppression de titres
Video
DVD-RW
3
Sélectionner le titre souhaité avec
les touches K / L / { / B, puis
appuyer sur la touche ENTER.
Le menu Edition apparaîtra.
POWER
REC SPEED
.@/:
1
ABC
2
3
GHI
JKL
MNO
4
5
6
TUV
WXYZ
8
9
7
SPACE
CH
VIDEO/TV
SLOW
0
Disque > Edition
DISPLAY
1
OPEN/CLOSE
DEF
PQRS
VCR
DVD
PAUSE
Effacer titre
Editer titre
Repère chapitre
JAN/ 1 1:00AM CH12
XP
1
0:01:25
1
6
STOP
REC/OTR
SETUP
MENU/LIST TOP MENU
CLEAR/C-RESET ZOOM
SEARCH
MODE
Sélectionner “Effacer titre”
avec les touches K / L, puis
appuyer sur la touche ENTER.
La fenêtre d’options apparaîtra.
CM SKIP
RETURN
SKIP
SKIP
1
2
3
4
5
Disque
Edition
Disque > Edition
Format
1
Fermeture
Effacer titre
Editer titre
Repère chapitre
Oui
JAN/ 1 1:00AM CH12
Non
XP
Enregistrement Lecture d’un disque
4
TIMER PROG.
ENTER
REC MONITOR
Démarrage
PLAY
DVD
Appuyer sur la touche
SETUP. Sélectionner
“DISQUE” avec les touches
{ / B, puis appuyer sur la
touche ENTER.
Le menu DISQUE apparaîtra.
AUDIO
Raccords
Il est possible de supprimer des
titres devenus inutiles.
Noter qu’une fois supprimés, les
titres ne pourront pas être rétablis
sur le disque.
Quand le dernier titre de la liste
de titres en mode Vidéo sera
supprimé, l’espace d’enregistrement
du disque sera augmenté.
D’abord:
0:01:25
5
Sélectionner “Oui” avec les
touches { / B, puis appuyer
sur la touche ENTER.
Le titre sera supprimé.
Disque > Edition
Disque > Edition
1
1
2
3
JAN/1 1:00AM
JAN/1 2:00AM
JAN/1 3:00AM
1
5
Oui
JAN/ 1 1:00AM CH12
JAN/1 4:00AM
Effacer titre
Editer titre
Repère chapitre
JAN/1 5:00AM
Fonctions du
magnétoscope
4
Changement du menu
CONFIGURER
Sélectionner “Edition” avec
les touches K / L, puis appuyer
sur la touche ENTER.
La liste des titres apparaîtra.
Écran:
Édition
2
Non
XP
Ecriture infos
L’exécution de cette opération
peut demander un certain temps.
Après la fin de l’écriture sur
le disque, appuyer sur la
touche SETUP pour quitter
le menu DISQUE.
Autres
6
61
Édition
Édition de disques DVD-RW en mode Vidéo (suite)
Attribution des titres
Video
DVD-RW
Ce menu permet d’attribuer des
titres ou de changer leurs noms.
Les noms donnés aux titres ne seront
pas affichés sur la liste des titres.
D’abord:
DVD
1
4
Sélectionner “Editer titre”
avec les touches K / L, puis
appuyer sur la touche
ENTER.
Une fenêtre pour l’entrée d’un
nom de titre apparaîtra.
Appuyer sur la touche SETUP.
Sélectionner “DISQUE” avec
les touches { / B, puis appuyer
sur la touche ENTER.
Le menu DISQUE apparaîtra.
5
POWER
REC SPEED
.@/:
1
ABC
2
3
GHI
JKL
MNO
4
5
6
TUV
WXYZ
8
9
7
OPEN/CLOSE
DEF
PQRS
CH
VIDEO/TV
SPACE
SLOW
0
VCR
DISPLAY
Disque > Edition > Editer titre
1
AUDIO
DVD
PAUSE
PLAY
ABC
abc
123
@!?
1
STOP
REC/OTR
SETUP
TIMER PROG.
ENTER
REC MONITOR
MENU/LIST TOP MENU
1
2
3
4
5
RETURN
JAN/ 1 1:00AM CH12 XP
0:01:25
CLEAR/C-RESET ZOOM
Disque
SEARCH
MODE
SKIP
SKIP
CM SKIP
Edition
Format
5
Fermeture
Pour entrer un nom de titre,
suivre la procédure de “Guide
pour l’édition d’un nom de
titre” sur cette page.
jeu de caractères
2
Sélectionner “Edition” avec
les touches K / L, puis appuyer
sur la touche ENTER.
La liste des titres apparaîtra.
Écran:
[ Guide pour l'édition d’un nom de titre ]
Disque > Edition > Editer titre
1
ABC
abc
123
@!?
[Etape1]: Sélectionner un jeu de caractères avec
les touches K/ L,
ABC
puis appuyer sur
abc
la touche ENTER.
123
@!?
[Etape2]: Appuyer sur les touches numériques en
suivant la liste ci-dessous.
Sélectionner
JAN/ 1 1:00AM CH12 XP
Disque > Edition
0:01:25
1
1
2
3
JAN/1 1:00AM
JAN/1 2:00AM
JAN/1 3:00AM
zone pour l’entrée des noms de titres
4
5
Après l’entrée d’un nom de titre,
appuyer sur la touche ENTER.
ABC
abc
123
@!?
<espace>
<espace>
0
<espace>
1
”#$%
&‘ ( ) *
+ ,- ./ :;
<=>?
@[]^
_{|}!
Appuyer sur
0
1
2
ABC
abc
2
3
DEF
def
3
4
GHI
ghi
4
3
5
6
JKL
jkl
5
MNO
mno
6
Sélectionner le titre souhaité avec
les touches K / L / { / B, puis
appuyer sur la touche ENTER.
Le menu Edition apparaîtra.
7
8
PQRS
pqrs
7
TUV
tuv
8
9
WXYZ
wxyz
9
JAN/1 4:00AM
JAN/1 5:00AM
Disque > Edition
1
JAN/ 1 1:00AM CH12
Effacer titre
Editer titre
Repère chapitre
XP
0:01:25
62
* Appuyer sur la touche 1 , le jeu de caractères
passera automatiquement au mode " @!? ".
• Pour supprimer des lettres, appuyer plusieurs
fois sur la touche CLEAR/C-RESET. Maintenir la
touche CLEAR/C-RESET pressée supprime
toutes les lettres.
• Pour passer à la zone d’entrée de lettres
suivantes, appuyer sur la touche B .
• 30 maximum peuvent être entrées.
Édition
Avant le démarrage
Édition de disques DVD-RW en mode Vidéo (suite)
6
POWER
REC SPEED
.@/:
1
ABC
2
3
GHI
JKL
MNO
AUDIO
DEF
4
5
6
PQRS
TUV
WXYZ
8
9
7
OPEN/CLOSE
SPACE
Raccords
Sélectionner “Oui” avec les
touches { / B, puis appuyer
sur la touche ENTER.
Le nom entré sera activé pour le
titre.
CH
VIDEO/TV
SLOW
0
DISPLAY
VCR
DVD
PAUSE
Disque > Edition > Editer titre
Oui
Non
PLAY
7
STOP
REC/OTR
SETUP
TIMER PROG.
ENTER
REC MONITOR
abc
Ecriture infos
MENU/LIST TOP MENU
CLEAR/C-RESET ZOOM
SEARCH
MODE
SKIP
6
SKIP
Enregistrement Lecture d’un disque
L’exécution de cette opération
peut demander un certain temps.
RETURN
Démarrage
ABC
abc
123
@!?
1
CM SKIP
7
Après la fin de l’écriture sur
le disque, appuyer sur la
touche SETUP pour quitter
le menu DISQUE.
Édition
Changement du menu
CONFIGURER
Fonctions du
magnétoscope
Autres
63
Édition
Édition de disques DVD-RW en mode Vidéo (suite)
Réglage ou suppression de marques de chapitre
Video
DVD-RW
Des marques de chapitre peuvent
être placées sur chaque titre. Une
fois un chapitre marqué, cela peut
servir pour la recherche par
chapitre.
Des marques de chapitre peuvent
être placées à une durée spécifiée
sélectionnée pour les titres de
plus de 5 minutes.
D’abord:
DVD
1
Appuyer sur la touche
SETUP. Sélectionner
“DISQUE” avec les touches
{ / B, puis appuyer sur la
touche ENTER.
Le menu DISQUE apparaîtra.
Disque > Edition
1
JAN/ 1 1:00AM CH12
Effacer titre
Editer titre
Repère chapitre
POWER
REC SPEED
.@/:
1
ABC
2
3
GHI
JKL
MNO
4
5
6
TUV
WXYZ
8
9
SPACE
0:01:25
SLOW
VCR
DVD
PAUSE
PLAY
Sélectionner “Repère chapitre”
avec les touches K / L, puis
appuyer sur la touche ENTER.
La fenêtre d’options apparaîtra.
1
7
STOP
REC/OTR
SETUP
MENU/LIST TOP MENU
CLEAR/C-RESET ZOOM
CM SKIP
Disque > Edition
1
JAN/ 1 1:00AM CH12
TIMER PROG.
ENTER
REC MONITOR
SEARCH
MODE
Disque
CH
VIDEO/TV
0
DISPLAY
4
OPEN/CLOSE
DEF
PQRS
7
XP
AUDIO
EffacerHF
titre
Editer titre
5 minutes
Repère10
chapitre
minutes
15 minutes
30 minutes
60 minutes
RETURN
SKIP
SKIP
1
2
3
4
5
6
XP
0:01:25
Edition
Format
Fermeture
5
Sélectionner la durée désirée
avec les touches K / L, puis
appuyer sur la touche ENTER.
La fenêtre d’options apparaîtra.
2
Sélectionner “Edition” avec
les touches K / L, puis appuyer
sur la touche ENTER.
La liste des titres apparaîtra.
Écran:
Disque > Edition
1
Oui
JAN/ 1 1:00AM CH12
Disque > Edition
1
2
3
JAN/1 1:00AM
JAN/1 2:00AM
JAN/1 3:00AM
JAN/1 4:00AM
5
JAN/1 5:00AM
3
Sélectionner le titre souhaité
avec les touches K / L / { / B,
puis appuyer sur la touche
ENTER.
Le menu Edition apparaîtra.
64
Non
XP
0:01:25
1
4
EffacerHF
titre
Editer titre
5 minutes
Repère10
chapitre
minutes
15 minutes
30 minutes
60 minutes
6
Sélectionner “Oui” avec les
touches { / B, puis appuyer
sur la touche ENTER.
Une marque de chapitre sera ajoutée.
7
Après la fin de l’écriture sur
le disque, appuyer sur la
touche SETUP pour quitter
le menu DISQUE.
Remarques
• Des marques ne peuvent pas
être placées au-delà de la
longueur d’un titre.
• Une marque de chapitre peut
être supprimée selon le
contenu enregistré.
Édition
Avant le démarrage
Édition de disques DVD-RW en mode VR (Original)
Suppression de titres
VR
DVD-RW
4
Sélectionner le titre désiré avec
les touches K / L / { / B, puis
appuyer sur la touche ENTER.
Le menu original apparaîtra.
POWER
REC SPEED
.@/:
1
ABC
2
3
GHI
JKL
MNO
4
5
6
TUV
WXYZ
8
9
7
SPACE
DISPLAY
Effacer titre
Effacer scene
Editer titre
Repère chapitre
Indexer image
Protection HF EF
XP
0:01:25
Format
Fermeture
EF
PLAY
1
7
STOP
REC/OTR
SETUP
TIMER PROG.
ENTER
REC MONITOR
CLEAR/C-RESET ZOOM
5
PAUSE
SEARCH
MODE
CM SKIP
RETURN
SKIP
SKIP
1
2
3
4
5
6
Disque > Edition > Original
1
2
Oui
JAN/ 1 1:00AM CH12
Non
XP
0:01:25
6
Édition
Sélectionner “Edition” avec
les touches K / L, puis appuyer
sur la touche ENTER.
Le menu Original/Playlist apparaîtra.
Écran:
Effacer titre
Effacer scene
Editer titre
Repère chapitre
Indexer image
Protection HF EF
Changement du menu
CONFIGURER
Sélectionner “Oui” avec les
touches { / B, puis appuyer
sur la touche ENTER.
Le titre sera supprimé.
Disque > Edition
Disque > Edition > Original
Original
1
3
Effacer titre
Effacer scene
Editer titre
Repère chapitre
Indexer image
Protection HF EF
Oui
JAN/ 1 1:00AM CH12
Non
XP
Fonctions du
magnétoscope
Sélectionner “Original” avec les
touches { / B, puis appuyer
sur la touche ENTER.
La liste originale apparaîtra.
Ecriture infos
L’exécution de cette opération
peut demander un certain temps.
Disque > Edition > Original
1
2
3
JAN/1 1:00AM
JAN/1 2:00AM
JAN/1 3:00AM
4
JAN/1 4:00AM
5
JAN/1 5:00AM
7
Après la fin de l’écriture sur
le disque, appuyer sur la
touche SETUP pour quitter
le menu DISQUE.
Autres
1
Enregistrement Lecture d’un disque
Edition
DVD
MENU/LIST TOP MENU
Sélectionner “Effacer titre”
avec les touches K / L, puis
appuyer sur la touche ENTER.
La fenêtre d’options apparaîtra.
Disque
Protection de disque HF
JAN/ 1 1:00AM CH12
SLOW
VCR
Démarrage
1
CH
VIDEO/TV
0
Disque > Edition > Original
1
OPEN/CLOSE
DEF
PQRS
DVD
Appuyer sur la touche SETUP.
Sélectionner “DISQUE” avec
les touches { / B, puis appuyer
sur la touche ENTER.
Le menu DISQUE apparaîtra.
AUDIO
Raccords
Quand un titre est supprimé de la
liste originale en mode VR, l’espace
enregistrable du disque augmentera.
Noter que les titres supprimés ne
pourront pas être rétablis sur le
disque.
D’abord:
65
Édition
Édition de disques DVD-RW en mode VR (Original) (suite)
Suppression de parties de titres
VR
DVD-RW
Une partie d’un titre peut être
supprimée, ce qui augmentera
l’espace enregistrable du disque.
Noter qu’une fois supprimées, des
parties ne peuvent pas être rétablies
sur le disque.
D’abord:
4
Sélectionner le titre désiré avec
les touches K / L / { / B, puis
appuyer sur la touche ENTER.
Le menu original apparaîtra.
POWER
REC SPEED
.@/:
1
ABC
2
3
GHI
JKL
MNO
4
5
6
TUV
WXYZ
8
9
7
SPACE
DISPLAY
1
Appuyer sur la touche SETUP.
Sélectionner “DISQUE” avec
les touches { / B, puis appuyer
sur la touche ENTER.
Le menu DISQUE apparaîtra.
JAN/ 1 1:00AM CH12
Effacer titre
Effacer scene
Editer titre
Repère chapitre
Indexer image
Protection HF EF
XP
0:01:25
1
Fermeture
Protection de disque HF
EF
CLEAR/C-RESET ZOOM
SEARCH
MODE
1
Sélectionner “Edition” avec les
touches K / L, puis appuyer sur
la touche ENTER.
Le menu Original/Playlist apparaîtra.
Écran:
JAN/ 1 1:00AM CH12
Effacer titre
Effacer scene
Début
Editer titre
Fin
Repère chapitre
Indexer Aperçu
image
Effacer
Protection
HF EF
XP
0:00:55
6
Appuyer sur la touche ENTER
pour fixer d’un point de départ,
ensuite appuyer sur la touche
ENTER pour fixer un point de fin.
Le curseur passera à “Aperçu”.
Un prévisionnage peut être contrôlé.
3
Sélectionner “Original” avec les
touches { / B, puis appuyer
sur la touche ENTER.
La liste originale apparaîtra.
Avant
l’édition
Disque > Edition > Original
1
1
2
3
JAN/1 1:00AM
JAN/1 2:00AM
JAN/1 3:00AM
4
JAN/1 4:00AM
66
5
JAN/1 5:00AM
<Aperçu>
Après
l’édition
PAUSE
TIMER PROG.
ENTER
MENU/LIST TOP MENU
2
Original
SETUP
REC MONITOR
Disque > Edition > Original
Disque > Edition
DVD
STOP
REC/OTR
Sélectionner “Effacer scene”
avec les touches K / L, puis
appuyer sur la touche ENTER.
La fenêtre d’options apparaîtra.
Format
SLOW
VCR
PLAY
5
Edition
CH
VIDEO/TV
0
Disque > Edition > Original
1
OPEN/CLOSE
DEF
PQRS
DVD
Disque
AUDIO
Point de début Point de fin
CM SKIP
RETURN
SKIP
SKIP
1
2
3
4
5
6
Édition
Avant le démarrage
Édition de disques DVD-RW en mode VR (Original) (suite)
8
Sélectionner “Effacer” avec
les touches K / L, puis appuyer
sur la touche ENTER.
La fenêtre d’options apparaîtra.
Sélectionner “Oui” avec les
touches { / B, puis appuyer
sur la touche ENTER.
Une partie d’un titre sera supprimée.
POWER
REC SPEED
AUDIO
.@/:
1
ABC
DEF
2
3
GHI
JKL
MNO
4
5
6
PQRS
TUV
WXYZ
8
9
7
SPACE
1
SLOW
DVD
PAUSE
Disque > Edition > Original
1
Non
Effacer titre
Effacer scene
Début
Editer titre
Fin
Repère chapitre
Indexer Aperçu
image
Effacer
Protection
HF EF
Oui
JAN/ 1 1:00AM CH12
XP
0:01:25
PLAY
9
STOP
REC/OTR
SETUP
TIMER PROG.
ENTER
REC MONITOR
Non
XP
RETURN
MENU/LIST TOP MENU
Ecriture infos
CLEAR/C-RESET ZOOM
SEARCH
MODE
SKIP
SKIP
7
8
CM SKIP
Enregistrement Lecture d’un disque
L’exécution de cette opération
peut demander un certain temps.
Remarque
9
Après la fin de l’écriture sur
le disque, appuyer sur la
touche SETUP pour quitter
le menu DISQUE.
• “Effacer scene” ne peut pas
être sélectionné quand il y a
plus de 900 marques de
chapitre dans l’original ou la
liste de lecture.
Attribution des titres
VR
DVD-RW
DVD
2
Sélectionner “Edition” avec
les touches K / L, puis appuyer
sur la touche ENTER.
Le menu Original/Playlist apparaîtra.
Écran:
POWER
REC SPEED
AUDIO
.@/:
1
ABC
DEF
2
3
GHI
JKL
MNO
4
5
6
TUV
WXYZ
8
9
PQRS
7
SPACE
OPEN/CLOSE
Édition
Des noms peuvent être donnés
aux titres et changés à ce menu.
Les noms donnés aux titres
seront affichés sur la liste des
titres.
D’abord:
Démarrage
Effacer titre
Effacer scene
Début
Editer titre
Fin
Repère chapitre
Indexer Aperçu
image
Effacer
Protection
HF EF
Oui
JAN/ 1 1:00AM CH12
CH
VIDEO/TV
0
VCR
DISPLAY
Disque > Edition > Original
OPEN/CLOSE
Raccords
7
CH
VIDEO/TV
SLOW
0
Disque > Edition
DVD
PAUSE
PLAY
1
STOP
REC/OTR
SETUP
Original
TIMER PROG.
ENTER
REC MONITOR
MENU/LIST TOP MENU
CLEAR/C-RESET ZOOM
SEARCH
MODE
RETURN
SKIP
SKIP
1
2
CM SKIP
Disque
Edition
Format
Fermeture
Protection de disque HF
EF
Fonctions du
magnétoscope
Appuyer sur la touche
SETUP. Sélectionner
“DISQUE” avec les touches
{ / B, puis appuyer sur la
touche ENTER.
Le menu DISQUE apparaîtra.
VCR
Changement du menu
CONFIGURER
1
DISPLAY
Autres
67
Édition
Édition de disques DVD-RW en mode VR (Original) (suite)
3
6
Sélectionner “Original” avec
les touches { / B, puis
appuyer sur la touche
ENTER.
La liste originale apparaîtra.
Pour entrer un nom de titre,
suivre la procédure de “Guide
pour l’édition d’un nom de
titre” sur cette page.
jeu de caractères
6
POWER
REC SPEED
.@/:
1
ABC
2
3
GHI
JKL
MNO
AUDIO
DEF
4
5
6
PQRS
TUV
WXYZ
8
9
7
OPEN/CLOSE
CH
VIDEO/TV
SPACE
SLOW
0
VCR
DISPLAY
PAUSE
Disque > Edition > Original > Editer titre
Disque > Edition > Original
1
1
2
3
JAN/1 1:00AM
JAN/1 2:00AM
JAN/1 3:00AM
4
DVD
ABC
abc
123
@!?
1
5
PLAY
8
STOP
REC/OTR
SETUP
TIMER PROG.
ENTER
REC MONITOR
JAN/ 1 1:00AM CH12 XP
JAN/1 4:00AM
JAN/1 5:00AM
MENU/LIST TOP MENU
0:01:25
CLEAR/C-RESET ZOOM
zone pour l’entrée des noms de titres
Après l’entrée d’un nom de titre,
appuyer sur la touche ENTER.
4
Sélectionner le titre souhaité
avec les touches K / L / { / B,
puis appuyer sur la touche
ENTER.
Le menu original apparaîtra.
Disque > Edition > Original
1
Effacer titre
Effacer scene
Editer titre
Repère chapitre
Indexer image
Protection HF EF
SKIP
SKIP
CM SKIP
7
Sélectionner “Oui” avec les
touches { / B, puis appuyer
sur la touche ENTER.
Le nom entré sera activé pour le
titre.
Disque > Edition > Original > Editer titre
1
JAN/ 1 1:00AM CH12
SEARCH
MODE
RETURN
XP
0:01:25
ABC
abc
123
@!?
3
4
5
6
7
[ Guide pour l'édition d’un nom de titre ]
[Etape1]: Sélectionner un jeu de caractères avec
les touches K/ L,
ABC
puis appuyer sur
abc
la touche ENTER.
123
@!?
[Etape2]: Appuyer sur les touches numériques en
suivant la liste ci-dessous.
Sélectionner
ABC
abc
123
@!?
<espace>
<espace>
0
<espace>
1
”#$%
&‘ ( ) *
+ ,- ./ :;
<=>?
@[]^
_{|}!
Appuyer sur
Oui
0
abc
5
Ecriture infos
1
Sélectionner “Editer titre”
avec les touches K / L, puis
appuyer sur la touche
ENTER.
Une fenêtre pour l’entrée d’un
nom de titre apparaîtra.
Disque > Edition > Original > Editer titre
1
ABC
abc
123
@!?
JAN/ 1 1:00AM CH12 XP
0:01:25
68
Non
L’exécution de cette opération
peut demander un certain temps.
8
Après la fin de l’écriture sur
le disque, appuyer sur la
touche SETUP pour quitter
le menu DISQUE.
2
ABC
abc
2
3
DEF
def
3
4
GHI
ghi
4
5
6
JKL
jkl
5
MNO
mno
6
7
8
PQRS
pqrs
7
TUV
tuv
8
9
WXYZ
wxyz
9
* Appuyer sur la touche 1 , le jeu de caractères
passera automatiquement au mode " @!? ".
• Pour supprimer des lettres, appuyer plusieurs
fois sur la touche CLEAR/C-RESET. Maintenir la
touche CLEAR/C-RESET pressée supprime
toutes les lettres.
• Pour passer à la zone d’entrée de lettres
suivantes, appuyer sur la touche B .
• 30 maximum peuvent être entrées.
Édition
Avant le démarrage
Édition de disques DVD-RW en mode VR (Original) (suite)
Réglage ou effacement de marques de chapitre
VR
DVD-RW
1
2
3
JAN/1 1:00AM
JAN/1 2:00AM
JAN/1 3:00AM
4
5
POWER
REC SPEED
.@/:
1
ABC
2
3
GHI
JKL
MNO
4
5
6
TUV
WXYZ
8
9
SPACE
JAN/1 5:00AM
DISPLAY
4
SLOW
VCR
DVD
PAUSE
PLAY
Sélectionner le titre désiré avec
les touches K / L / { / B, puis
appuyer sur la touche ENTER.
Le menu original apparaîtra.
1
STOP
REC/OTR
SETUP
1
JAN/ 1 1:00AM CH12
Effacer titre
Effacer scene
Editer titre
Repère chapitre
Indexer image
Protection HF EF
XP
TIMER PROG.
ENTER
REC MONITOR
MENU/LIST TOP MENU
SEARCH
MODE
Disque > Edition > Original
Appuyer sur la touche
SETUP. Sélectionner
“DISQUE” avec les touches
{ / B, puis appuyer sur la
touche ENTER.
Le menu DISQUE apparaîtra.
CM SKIP
RETURN
SKIP
SKIP
1
2
3
4
5
6
0:01:25
5
Edition
Format
Fermeture
Protection de disque HF
CH
VIDEO/TV
0
CLEAR/C-RESET ZOOM
Disque
OPEN/CLOSE
DEF
PQRS
7
JAN/1 4:00AM
AUDIO
EF
Sélectionner “Repère chapitre”
avec les touches K / L, puis
appuyer sur la touche ENTER.
La fenêtre d’options apparaîtra.
Édition
Disque > Edition > Original
2
1
Chapitre 1/1
Disque > Edition
JAN/ 1 1:00AM CH12
Effacer titre
Effacer scene
Editer titre
Repère Ajouter
chapitre
Indexer Effacer
image
Protection HF EF
Changement du menu
CONFIGURER
Sélectionner “Edition” avec
les touches K / L, puis appuyer
sur la touche ENTER.
Le menu Original/Playlist apparaîtra.
Écran:
XP
0:01:25
6
Fonctions du
magnétoscope
Sélectionner “Ajouter” ou
“Effacer” avec les touches K / L,
puis appuyer sur la touche ENTER.
La fenêtre d’options apparaîtra.
<Ajouter>:
Original
Disque > Edition > Original
Sélectionner “Original” avec les
touches { / B, puis appuyer
sur la touche ENTER.
La liste originale apparaîtra.
1
Chapitre 1/1
Effacer titre
Effacer scene
Editer titre
Repère Ajouter
chapitre
Indexer Effacer
image
Protection HF EF
Autres
3
F
Oui
JAN/ 1 1:00AM CH12
Enregistrement Lecture d’un disque
1
1
Démarrage
DVD
Disque > Edition > Original
Raccords
Des marques de chapitre peuvent
être placées sur chaque titre. Une fois
un chapitre marqué, la recherche est
possible en utilisant la fonction de
recherche de chapitre.
Des marques de chapitre peuvent
être placées à tout endroit.
Quand le nombre de marques de
chapitre atteint 999 au total sur la
liste originale, aucune marque de
chapitre ne peut plus être ajoutée.
D’abord:
Non
XP
0:01:25
69
Édition
Édition de disques DVD-RW en mode VR (Original) (suite)
<Effacer>:
Disque > Edition > Original
1
Chapitre 2/2
Effacer titre
Effacer scene
Editer titre
Repère Ajouter
chapitre
Indexer Effacer
image
Protection HF EF
La marque de chapitre sélectionnée
sera supprimée.
<Effacer>:
Disque > Edition > Original
POWER
REC SPEED
AUDIO
.@/:
1
ABC
DEF
2
3
GHI
JKL
MNO
4
5
6
TUV
WXYZ
8
9
F
Oui
JAN/ 1 1:00AM CH12
Non
1
XP
Chapitre 2/2
0:01:25
Oui
• La première marque de chapitre de
chaque titre ne peut pas être supprimée.
7
Sélectionner “Oui” avec les touches
{ / B, puis appuyer sur la touche ENTER.
Une marque de chapitre sera ajoutée.
<Ajouter>:
Disque > Edition > Original
1
Chapitre 1/1
Effacer titre
Effacer scene
Editer titre
Repère Ajouter
chapitre
Indexer Effacer
image
Protection HF EF
Oui
JAN/ 1 1:00AM CH12
JAN/ 1 1:00AM CH12
PQRS
Effacer titre
Effacer scene
Editer titre
Repère Ajouter
chapitre
Indexer Effacer
image
Protection HF EF
7
SPACE
OPEN/CLOSE
CH
VIDEO/TV
SLOW
0
DVD
VCR
DISPLAY
PAUSE
Non
XP
Ecriture infos
PLAY
8
L’exécution de cette opération
peut demander un certain temps.
STOP
REC/OTR
SETUP
TIMER PROG.
ENTER
REC MONITOR
MENU/LIST TOP MENU
RETURN
CLEAR/C-RESET ZOOM
8
SEARCH
MODE
SKIP
7
SKIP
CM SKIP
Après la fin de l’écriture sur
le disque, appuyer sur la
touche SETUP pour quitter
le menu DISQUE.
Non
XP
Ecriture infos
L’exécution de cette opération
peut demander un certain temps.
Réglage d’images pour les vignettes
VR
DVD-RW
Une image peut être utilisée pour
chaque titre comme image miniature.
Cela aide à se rappeler le contenu du
titre lu. L’image de début a été
sélectionnée par défaut.
D’abord:
DVD
1
Appuyer sur la touche SETUP.
Sélectionner “DISQUE” avec
les touches { / B, puis appuyer
sur la touche ENTER.
Le menu DISQUE apparaîtra.
Disque
Edition
Format
Fermeture
Protection de disque HF
70
EF
2
REC SPEED
.@/:
1
ABC
2
3
GHI
JKL
MNO
4
5
6
TUV
WXYZ
8
9
PQRS
Sélectionner “Edition” avec
les touches K / L, puis appuyer
sur la touche ENTER.
Le menu Original/Playlist apparaîtra.
Écran:
Disque > Edition
POWER
7
AUDIO
DEF
SPACE
CH
VIDEO/TV
SLOW
0
DISPLAY
VCR
DVD
PAUSE
PLAY
1
STOP
REC/OTR
SETUP
TIMER PROG.
ENTER
REC MONITOR
MENU/LIST TOP MENU
CLEAR/C-RESET ZOOM
SEARCH
MODE
Original
OPEN/CLOSE
RETURN
SKIP
SKIP
1
2
CM SKIP
Remarque
• Si une partie d’un titre est
supprimée, l’image sélectionnée
comme image miniature de
cette partie sera supprimée.
L’appareil utilisera alors une
image par défaut à la place.
Édition
Avant le démarrage
Édition de disques DVD-RW en mode VR (Original) (suite)
6
Sélectionner “Original” avec
les touches { / B, puis
appuyer sur la touche
ENTER.
La liste originale apparaîtra.
Sélectionner “Oui” avec les
touches { / B, puis appuyer
sur la touche ENTER.
Une image sera réglée comme
image miniature.
POWER
REC SPEED
.@/:
1
ABC
2
3
GHI
JKL
MNO
4
5
6
PQRS
TUV
WXYZ
8
9
7
1
2
3
JAN/1 1:00AM
JAN/1 2:00AM
JAN/1 3:00AM
1
5
Effacer titre
Effacer scene
Editer titre
Repère chapitre
Indexer image
Protection HF EF
Oui
JAN/ 1 1:00AM CH12
JAN/1 5:00AM
DVD
VCR
PAUSE
Non
XP
PLAY
7
STOP
REC/OTR
SETUP
TIMER PROG.
ENTER
REC MONITOR
MENU/LIST TOP MENU
RETURN
Ecriture infos
CLEAR/C-RESET ZOOM
4
Sélectionner le titre souhaité
avec les touches K / L / { / B,
puis appuyer sur la touche
ENTER.
Le menu original apparaîtra.
Disque > Edition > Original
SEARCH
MODE
CM SKIP
SKIP
SKIP
3
4
5
6
7
Après la fin de l’écriture sur
le disque, appuyer sur la
touche SETUP pour quitter
le menu DISQUE.
Effacer titre
Effacer scene
Editer titre
Repère chapitre
Indexer image
Protection HF EF
Enregistrement Lecture d’un disque
L’exécution de cette opération
peut demander un certain temps.
JAN/ 1 1:00AM CH12
SLOW
0
Démarrage
1
1
CH
VIDEO/TV
Disque > Edition > Original
Disque > Edition > Original
JAN/1 4:00AM
OPEN/CLOSE
DEF
SPACE
DISPLAY
4
AUDIO
Raccords
3
XP
Édition
0:01:25
5
Changement du menu
CONFIGURER
Sélectionner “Indexer image”
avec les touches K / L, puis
appuyer sur la touche
ENTER.
La fenêtre d’options apparaîtra.
Disque > Edition > Original
Fonctions du
magnétoscope
1
Effacer titre
Effacer scene
Editer titre
Repère chapitre
Indexer image
Protection HF EF
F
Oui
JAN/ 1 1:00AM CH12
Non
XP
0:01:25
Autres
71
Édition
Édition de disques DVD-RW en mode VR (Original) (suite)
Protection de titres
VR
DVD-RW
Pour éviter tout montage
accidentel ou effacement de titres,
ils peuvent être protégés à partir
du menu original.
D’abord:
DVD
4
Sélectionner le titre souhaité avec
les touches K / L / { / B, puis
appuyer sur la touche ENTER.
Le menu original apparaîtra.
POWER
REC SPEED
.@/:
1
ABC
2
3
GHI
JKL
MNO
4
5
6
PQRS
TUV
WXYZ
8
9
7
1
Appuyer sur la touche SETUP.
Sélectionner “DISQUE” avec
les touches { / B, puis appuyer
sur la touche ENTER.
Le menu DISQUE apparaîtra.
JAN/ 1 1:00AM CH12
Edition
Effacer titre
Effacer scene
Editer titre
Repère chapitre
Indexer image
Protection HF EF
XP
0:01:25
avec les touches K / L, puis
appuyer sur la touche ENTER.
La fenêtre d’options apparaîtra.
Format
Fermeture
Protection de disque HF
EF
Disque > Edition > Original
1
2
Sélectionner “Edition” avec
les touches K / L, puis appuyer
sur la touche ENTER.
Le menu Original/Playlist apparaîtra.
Écran:
Effacer titre
Effacer scene
Editer titre
Repère chapitre
Indexer image
Protection HF EF
Oui
JAN/ 1 1:00AM CH12
Non
XP
0:01:25
6
Sélectionner “Oui” avec les
touches { / B, puis appuyer sur la
touche ENTER.
Disque > Edition
Disque > Edition > Original
1
Original
JAN/ 1 1:00AM CH12
Sélectionner “Original” avec les
touches { / B, puis appuyer
sur la touche ENTER.
La liste originale apparaîtra.
Disque > Edition > Original
1
1
2
3
JAN/1 1:00AM
JAN/1 2:00AM
JAN/1 3:00AM
4
JAN/1 4:00AM
72
Effacer titre
Effacer scene
Editer titre
Repère chapitre
Indexer image
Protection HF EF
Oui
3
Non
XP
Ecriture infos
L’exécution de cette opération
peut demander un certain temps.
7
Après la fin de l’écriture sur le
disque, appuyer sur la touche SETUP
pour quitter le menu DISQUE.
5
JAN/1 5:00AM
CH
VIDEO/TV
SLOW
0
5
Sélectionner “Protection HF ➔ EF”
Disque
OPEN/CLOSE
DEF
SPACE
Disque > Edition > Original
1
AUDIO
Pour protéger tout le disque
(mode VR de DVD-RW seulement):
Sélectionner “Protection de disque” au
menu Disc, puis sélectionner “Oui”.
DISPLAY
DVD
VCR
PAUSE
PLAY
1
7
STOP
REC/OTR
SETUP
TIMER PROG.
ENTER
REC MONITOR
MENU/LIST TOP MENU
CLEAR/C-RESET ZOOM
SEARCH
MODE
CM SKIP
RETURN
SKIP
SKIP
1
2
3
4
5
6
Édition
Avant le démarrage
Édition de disques DVD-RW en mode VR (Original) (suite)
Libération de titres de la protection
VR
DVD-RW
Les titres protégés peuvent être
libérés de leur protection.
DVD
1
Sélectionner le titre désiré avec
les touches K / L / { / B, puis
appuyer sur la touche ENTER.
Le menu original apparaîtra.
POWER
REC SPEED
.@/:
1
ABC
2
3
GHI
JKL
MNO
4
5
6
PQRS
TUV
WXYZ
8
9
7
AUDIO
DEF
SPACE
Disque Edition > Original
2
DISPLAY
Effacer titre
Effacer scene
Editer titre
Repère chapitre
Indexer image
Protection EF HF
XP
0:01:25
Disque
Edition
1
7
STOP
REC/OTR
SETUP
MENU/LIST TOP MENU
2
CM SKIP
RETURN
SKIP
SKIP
1
2
3
4
5
6
Disque Edition > Original
Sélectionner “Edition” avec
les touches K / L, puis appuyer
sur la touche ENTER.
Le menu Original/Playlist apparaîtra.
Écran:
2
B
Effacer titre
Effacer scene
Editer titre
Repère chapitre
Indexer image
Protection EF HF
Oui
JAN/ 1 2:00AM CH12
Non
XP
Enregistrement Lecture d’un disque
SEARCH
MODE
Sélectionner “Protection EF ➔ HF”
avec les touches K / L, puis appuyer
sur la touche ENTER.
La fenêtre d’options apparaîtra.
TIMER PROG.
ENTER
REC MONITOR
CLEAR/C-RESET ZOOM
5
PAUSE
PLAY
Format
EF
SLOW
DVD
VCR
Démarrage
JAN/ 1 2:00AM CH12
Protection de disque HF
CH
VIDEO/TV
0
Appuyer sur la touche SETUP.
Sélectionner “DISQUE” avec
les touches { / B, puis appuyer
sur la touche ENTER.
Le menu DISQUE apparaîtra.
Fermeture
OPEN/CLOSE
Raccords
D’abord:
4
0:01:25
Disque > Edition
Édition
6
Original
Changement du menu
CONFIGURER
Sélectionner “Oui” avec les
touches { / B, puis appuyer
sur la touche ENTER.
Disque Edition > Original
3
2
1
2
3
JAN/1 1:00AM
JAN/1 2:00AM
JAN/1 3:00AM
JAN/1 4:00AM
JAN/1 5:00AM
Non
XP
Ecriture infos
7
Autres
1
5
Oui
JAN/ 1 2:00AM CH12
L’exécution de cette opération
peut demander un certain temps.
Disque > Edition > Original
4
Effacer titre
Effacer scene
Editer titre
Repère chapitre
Indexer image
Protection EF HF
Fonctions du
magnétoscope
Sélectionner “Original” avec
les touches { / B, puis
appuyer sur la touche
ENTER.
La liste originale apparaîtra.
Après la fin de l’écriture sur le
disque, appuyer sur la touche SETUP
pour quitter le menu DISQUE.
73
Édition
Édition de disques DVD-RW en mode VR (Playlist)
Suppression de titres
VR
DVD-RW
En mode VR, même quand un disque
est supprimé de la liste de lecture,
le titre original reste sur la liste
original. L’espace d’enregistrement
du disque n’est pas augmenté.
D’abord:
DVD
4
Sélectionner le titre désiré avec
les touches K / L / { / B, puis
appuyer sur la touche ENTER.
Le menu Playlist apparaîtra.
POWER
REC SPEED
.@/:
1
ABC
2
3
GHI
JKL
MNO
4
5
6
PQRS
TUV
WXYZ
8
9
7
AUDIO
DEF
SPACE
Disque > Edition > Playlist
1
1
Appuyer sur la touche SETUP.
Sélectionner “DISQUE” avec
les touches { / B, puis appuyer
sur la touche ENTER.
Le menu DISQUE apparaîtra.
JAN/ 1 1:00AM CH12
DISPLAY
Effacer titre
Effacer scene
Editer titre
Repère chapitre
Indexer image
XP
0:01:25
5
Edition
Fermeture
Protection de disque HF
EF
Disque > Edition > Playlist
1
2
Sélectionner “Edition” avec
les touches K / L, puis appuyer
sur la touche ENTER.
Le menu Original/Playlist apparaîtra.
Écran:
Effacer titre
Effacer scene
Editer titre
Repère chapitre
Indexer image
Oui
JAN/ 1 1:00AM CH12
Non
XP
0:01:25
6
Disque > Edition
Sélectionner “Oui” avec les
touches { / B, puis appuyer sur
la touche ENTER.
Le titre sera supprimé.
Disque > Edition > Playlist
Original
1
3
Effacer titre
Effacer scene
Editer titre
Repère chapitre
Indexer image
Oui
Sélectionner “PlayList” avec les
touches { / B, puis appuyer
sur la touche ENTER.
La Playlist apparaîtra.
JAN/ 1 1:00AM CH12
Non
XP
Ecriture infos
L’exécution de cette opération
peut demander un certain temps.
Disque > Edition > Playlist
1
1
2
3
JAN/1 1:00AM
JAN/1 2:00AM
JAN/1 3:00AM
4
JAN/1 4:00AM
74
5
JAN/1 5:00AM
Ajouter
titre
Effacer
Playlist
7
SLOW
DVD
VCR
Après la fin de l’écriture sur le
disque, appuyer sur la touche SETUP
pour quitter le menu DISQUE.
PAUSE
PLAY
1
7
STOP
REC/OTR
SETUP
TIMER PROG.
ENTER
REC MONITOR
MENU/LIST TOP MENU
SEARCH
MODE
Sélectionner “Effacer titre” avec
les touches K / L, puis appuyer
sur la touche ENTER.
La fenêtre d’options apparaîtra.
Format
CH
VIDEO/TV
0
CLEAR/C-RESET ZOOM
Disque
OPEN/CLOSE
CM SKIP
RETURN
SKIP
SKIP
1
2
3
4
5
6
Édition
Avant le démarrage
Édition de disques DVD-RW en mode VR (Playlist) (suite)
Suppression de parties de titres
VR
DVD-RW
4
Sélectionner le titre désiré avec
les touches K / L / { / B, puis
appuyer sur la touche ENTER.
Le menu Playlist apparaîtra.
POWER
REC SPEED
.@/:
1
ABC
2
3
GHI
JKL
MNO
4
5
6
PQRS
TUV
WXYZ
8
9
7
Disque > Edition > Playlist
Appuyer sur la touche SETUP.
Sélectionner “DISQUE” avec
les touches { / B, puis appuyer
sur la touche ENTER.
Le menu DISQUE apparaîtra.
JAN/ 1 1:00AM CH12
DISPLAY
Effacer titre
Effacer scene
Editer titre
Repère chapitre
Indexer image
XP
1
STOP
REC/OTR
TIMER PROG.
ENTER
0:01:25
MENU/LIST TOP MENU
CLEAR/C-RESET ZOOM
SEARCH
MODE
Sélectionner “Effacer scene”
avec les touches K / L, puis
appuyer sur la touche ENTER.
La fenêtre d’options apparaîtra.
EF
SETUP
CM SKIP
RETURN
SKIP
SKIP
1
2
3
4
5
6
Disque > Edition > Playlist
1
2
Sélectionner “Edition” avec les
touches K / L, puis appuyer sur
la touche ENTER.
Le menu Original/Playlist apparaîtra.
Écran:
JAN/ 1 1:00AM CH12
Effacer titre
Effacer scene
Début
Editer titre
Fin
Repère chapitre
Indexer Aperçu
image
Effacer
XP
0:00:55
Édition
6
Disque > Edition
Changement du menu
CONFIGURER
Appuyer sur la touche ENTER
pour fixer d’un point de départ,
ensuite appuyer sur la touche
ENTER pour fixer un point de fin.
Le curseur passera à “Aperçu”.
Un prévisionnage peut être contrôlé.
Original
3
1
2
3
JAN/1 1:00AM
JAN/1 2:00AM
JAN/1 3:00AM
JAN/1 4:00AM
Ajouter
titre
Effacer
Playlist
Autres
1
5
Point de début Point de fin
Avant
l’édition
Disque > Edition > Playlist
4
<Aperçu>
Fonctions du
magnétoscope
Sélectionner “PlayList” avec les
touches { / B, puis appuyer
sur la touche ENTER.
La Playlist apparaîtra.
Enregistrement Lecture d’un disque
Protection de disque HF
PAUSE
PLAY
REC MONITOR
5
Fermeture
SLOW
DVD
VCR
Démarrage
1
Format
CH
VIDEO/TV
0
1
Edition
OPEN/CLOSE
DEF
SPACE
DVD
Disque
AUDIO
Raccords
Une partie spécifique d’un titre peut
être supprimée.
Même quand le titre est supprimé de la liste
de lecture, le titre original sera maintenu.
L’espace d’enregistrement du disque
n’augmentera pas.
D’abord:
Après
l’édition
JAN/1 5:00AM
75
Édition
Édition de disques DVD-RW en mode VR (Playlist) (suite)
Une partie d’un titre sera supprimée.
7
Disque > Edition > Playlist
Sélectionner “Effacer” avec les
touches K / L, puis appuyer
sur la touche ENTER.
La fenêtre d’options apparaîtra.
1
Oui
JAN/ 1 1:00AM CH12
0:01:25
8
Sélectionner “Oui” avec les
touches { / B, puis appuyer
sur la touche ENTER.
4
5
6
PQRS
TUV
WXYZ
8
9
DEF
SPACE
CH
VIDEO/TV
SLOW
0
DVD
VCR
DISPLAY
PAUSE
PLAY
STOP
9
REC/OTR
SETUP
TIMER PROG.
ENTER
REC MONITOR
L’exécution de cette opération
peut demander un certain temps.
MENU/LIST TOP MENU
RETURN
CLEAR/C-RESET ZOOM
Non
XP
3
MNO
Non
Ecriture infos
1
2
JKL
XP
Disque > Edition > Playlist
Effacer titre
Effacer scene
Début
Editer titre
Fin
Repère chapitre
Indexer Aperçu
image
Effacer
ABC
GHI
7
Effacer titre
Effacer scene
Début
Editer titre
Fin
Repère chapitre
Indexer Aperçu
image
Effacer
Oui
JAN/ 1 1:00AM CH12
.@/:
1
SEARCH
MODE
SKIP
SKIP
CM SKIP
7
8
9
Après la fin de l’écriture sur
le disque, appuyer sur la
touche SETUP pour quitter
le menu DISQUE.
Note
• “Effacer scene” ne peut pas être
sélectionné quand il y a plus de
900 marques de chapitre dans
l’original ou la liste de lecture.
Attribution des titres
Écran:
VR
DVD-RW
Des noms peuvent être donnés aux
titres et changés à ce menu.
Les noms donnés aux titres seront
affichés sur la liste des titres.
D’abord:
Disque > Edition
DVD
POWER
REC SPEED
.@/:
1
ABC
2
3
GHI
JKL
MNO
4
5
6
PQRS
TUV
WXYZ
8
9
7
AUDIO
DEF
SPACE
DISPLAY
Appuyer sur la touche SETUP.
Sélectionner “DISQUE” avec
les touches { / B, puis appuyer
sur la touche ENTER.
Le menu DISQUE apparaîtra.
Disque
Edition
Sélectionner “PlayList” avec
les touches { / B, puis
appuyer sur la touche
ENTER.
La Playlist apparaîtra.
Fermeture
EF
Disque > Edition > Playlist
1
1
2
3
JAN/1 1:00AM
JAN/1 2:00AM
JAN/1 3:00AM
4
2
Sélectionner “Edition” avec
les touches K / L, puis appuyer
sur la touche ENTER.
Le menu Original/Playlist apparaîtra.
76
SLOW
VCR
DVD
PAUSE
PLAY
3
Format
Protection de disque HF
CH
VIDEO/TV
0
Original
1
OPEN/CLOSE
JAN/1 4:00AM
5
JAN/1 5:00AM
Ajouter
titre
Effacer
Playlist
1
STOP
REC/OTR
SETUP
TIMER PROG.
ENTER
REC MONITOR
MENU/LIST TOP MENU
CLEAR/C-RESET ZOOM
SEARCH
MODE
CM SKIP
RETURN
SKIP
SKIP
1
2
3
Édition
Avant le démarrage
Édition de disques DVD-RW en mode VR (Playlist) (suite)
7
Sélectionner le titre désiré avec
les touches K / L / { / B, puis
appuyer sur la touche ENTER.
Le menu Playlist apparaîtra.
Sélectionner “Oui” avec les
touches { / B, puis appuyer
sur la touche ENTER.
Le nom entré sera activé pour le
titre.
.@/:
1
ABC
2
3
GHI
JKL
MNO
4
5
6
PQRS
TUV
WXYZ
8
9
OPEN/CLOSE
DEF
CH
VIDEO/TV
SPACE
SLOW
0
DVD
VCR
DISPLAY
Effacer titre
Effacer scene
Editer titre
Repère chapitre
Indexer image
AUDIO
PAUSE
Disque > Edition > Playlist > Editer titre
ABC
abc
123
@!?
1
XP
Oui
0:01:25
PLAY
STOP
8
REC/OTR
Non
SETUP
abc
TIMER PROG.
ENTER
REC MONITOR
MENU/LIST TOP MENU
CLEAR/C-RESET ZOOM
5
Sélectionner “Editer titre” avec
les touches K / L, puis appuyer
sur la touche ENTER.
Une fenêtre pour l’entrée d’un
nom de titre apparaîtra.
Disque > Edition > Playlist > Editer titre
1
ABC
abc
123
@!?
JAN/ 1 1:00AM CH12 XP
0:01:25
SEARCH
MODE
L’exécution de cette opération
peut demander un certain temps.
SKIP
SKIP
CM SKIP
8
Après la fin de l’écriture sur
le disque, appuyer sur la
touche SETUP pour quitter
le menu DISQUE.
[ Guide pour l'édition d’un nom de titre ]
[Etape1]: Sélectionner un jeu de caractères avec
les touches K/ L,
ABC
puis appuyer sur
abc
la touche ENTER.
123
@!?
[Etape2]: Appuyer sur les touches numériques en
suivant la liste ci-dessous.
abc
123
@!?
<espace>
0
<espace>
0
6
1
”#$%
&‘ ( ) *
+ ,- ./ :;
<=>?
@[]^
_{|}!
Pour entrer un nom de titre,
suivre la procédure de “Guide
pour l’édition d’un nom de
titre” sur cette page.
jeu de caractères
Disque > Edition > Playlist > Editer titre
1
JAN/ 1 1:00AM CH12 XP
0:01:25
zone pour l’entrée des noms de titres
2
ABC
abc
2
3
DEF
def
3
4
GHI
ghi
4
5
6
JKL
jkl
5
MNO
mno
6
7
8
PQRS
pqrs
7
TUV
tuv
8
9
WXYZ
wxyz
9
* Appuyer sur la touche 1 , le jeu de caractères
passera automatiquement au mode " @!? ".
• Pour supprimer des lettres, appuyer plusieurs
fois sur la touche CLEAR/C-RESET. Maintenir la
touche CLEAR/C-RESET pressée supprime
toutes les lettres.
• Pour passer à la zone d’entrée de lettres
suivantes, appuyer sur la touche B .
• 30 maximum peuvent être entrées.
Fonctions du
magnétoscope
ABC
abc
123
@!?
1
Changement du menu
CONFIGURER
ABC
<espace>
Édition
Sélectionner
Appuyer sur
Enregistrement Lecture d’un disque
4
5
6
7
RETURN
Ecriture infos
Démarrage
JAN/ 1 1:00AM CH12
REC SPEED
7
Disque > Edition > Playlist
1
POWER
Raccords
4
Autres
Après l’entrée d’un nom de titre,
appuyer sur la touche ENTER.
77
Édition
Édition de disques DVD-RW en mode VR (Playlist) (suite)
Réglage ou suppression de marques de chapitre
VR
DVD-RW
Des marques de chapitre peuvent
être placées sur chaque titre. Une fois
un chapitre marqué, la recherche est
possible en utilisant la fonction de
recherche de chapitre.
Des marques de chapitre peuvent être
placées aux emplacements souhaités.
Quand le nombre de marques de
chapitre dans la liste de lecture atteint
un total de 999, aucune marque de
chapitre ne peut plus être ajoutée.
D’abord:
DVD
1
Disque > Edition > Playlist
1
1
2
3
JAN/1 1:00AM
JAN/1 2:00AM
JAN/1 3:00AM
4
Ajouter
titre
Effacer
Playlist
5
REC SPEED
.@/:
1
ABC
2
3
GHI
JKL
MNO
4
5
6
PQRS
TUV
WXYZ
8
9
7
JAN/1 5:00AM
DISPLAY
4
Protection de disque HF
Disque > Edition > Playlist
1
JAN/ 1 1:00AM CH12
Effacer titre
Effacer scene
Editer titre
Repère chapitre
Indexer image
XP
5
EF
Sélectionner “Repère chapitre”
avec les touches K / L, puis
appuyer sur la touche ENTER.
La fenêtre d’options apparaîtra.
2
Disque > Edition > Playlist
1
Sélectionner “Edition” avec
les touches K / L, puis appuyer
sur la touche ENTER.
Le menu Original/Playlist apparaîtra.
Écran:
Disque > Edition
Original
3
Sélectionner “PlayList” avec les
touches { / B, puis appuyer
sur la touche ENTER.
La liste de lecture apparaîtra.
CH
VIDEO/TV
SLOW
DVD
VCR
PAUSE
STOP
Sélectionner le titre désiré avec
les touches K / L / { / B, puis
appuyer sur la touche ENTER.
Le menu Playlist apparaîtra.
Disque
Fermeture
DEF
PLAY
0:01:25
Format
OPEN/CLOSE
0
1
REC/OTR
Chapitre 1/1
JAN/ 1 1:00AM CH12
Effacer titre
Effacer scene
Editer titre
Repère Ajouter
chapitre
Indexer Effacer
image
XP
0:01:25
6
Sélectionner “Ajouter” ou
“Effacer” avec les touches K / L,
puis appuyer sur la touche ENTER.
La fenêtre d’options apparaîtra.
<Ajouter>:
Disque > Edition > Playlist
1
Chapitre 1/1
Effacer titre
Effacer scene
Editer titre
Repère Ajouter
chapitre
Indexer Effacer
image
F
Oui
JAN/ 1 1:00AM CH12
Non
XP
0:01:25
SETUP
TIMER PROG.
ENTER
REC MONITOR
MENU/LIST TOP MENU
CLEAR/C-RESET ZOOM
SEARCH
MODE
Edition
AUDIO
SPACE
JAN/1 4:00AM
Appuyer sur la touche SETUP.
Sélectionner “DISQUE” avec
les touches { / B, puis appuyer
sur la touche ENTER.
Le menu DISQUE apparaîtra.
78
POWER
CM SKIP
RETURN
SKIP
SKIP
1
2
3
4
5
6
Édition
Avant le démarrage
Édition de disques DVD-RW en mode VR (Playlist) (suite)
<Effacer>:
Disque > Edition > Playlist
1
Chapitre 2/2
Disque > Edition > Playlist
F
Oui
JAN/ 1 1:00AM CH12
Non
1
XP
Chapitre 2/2
0:01:25
Effacer titre
Effacer scene
Editer titre
Repère Ajouter
chapitre
Indexer Effacer
image
POWER
REC SPEED
.@/:
1
ABC
2
3
GHI
JKL
MNO
4
5
6
PQRS
TUV
WXYZ
8
9
7
AUDIO
OPEN/CLOSE
DEF
SPACE
Raccords
Effacer titre
Effacer scene
Editer titre
Repère Ajouter
chapitre
Indexer Effacer
image
La marque de chapitre sélectionnée
sera supprimée.
<Effacer>:
CH
VIDEO/TV
SLOW
0
• La première marque de chapitre de
chaque titre ne peut pas être supprimée.
Disque > Edition > Playlist
1
Chapitre 1/1
Effacer titre
Effacer scene
Editer titre
Repère Ajouter
chapitre
Indexer Effacer
image
Oui
JAN/ 1 1:00AM CH12
XP
Ecriture infos
L’exécution de cette opération
peut demander un certain temps.
PLAY
8
STOP
REC/OTR
SETUP
TIMER PROG.
ENTER
REC MONITOR
MENU/LIST TOP MENU
RETURN
CLEAR/C-RESET ZOOM
8
SEARCH
MODE
SKIP
7
SKIP
Enregistrement Lecture d’un disque
Sélectionner “Oui” avec les touches
{ / B, puis appuyer sur la touche ENTER.
Une marque de chapitre sera ajoutée.
<Ajouter>:
Non
PAUSE
CM SKIP
Après la fin de l’écriture sur
le disque, appuyer sur la
touche SETUP pour quitter
le menu DISQUE.
Non
XP
Ecriture infos
L’exécution de cette opération
peut demander un certain temps.
Réglage d’images pour les vignettes
DVD
2
Fermeture
Protection de disque HF
EF
DEF
2
3
GHI
JKL
MNO
4
5
6
TUV
WXYZ
8
9
7
SPACE
CH
VIDEO/TV
SLOW
0
DISPLAY
DVD
VCR
PAUSE
PLAY
1
REC/OTR
SETUP
TIMER PROG.
ENTER
REC MONITOR
MENU/LIST TOP MENU
CLEAR/C-RESET ZOOM
SEARCH
MODE
Original
RETURN
SKIP
SKIP
1
2
CM SKIP
Remarque
• Si une partie d’un titre est
supprimée, l’image sélectionnée
comme image miniature de
cette partie sera supprimée.
L’appareil utilisera alors une
image par défaut à la place.
79
Autres
Format
ABC
Fonctions du
magnétoscope
Edition
.@/:
1
OPEN/CLOSE
STOP
1
Appuyer sur la touche SETUP.
Disque
AUDIO
PQRS
Sélectionner “Edition” avec
les touches K / L, puis appuyer
sur la touche ENTER.
Le menu Original/Playlist apparaîtra.
Écran:
Disque > Edition
Sélectionner “DISQUE” avec
les touches { / B, puis appuyer
sur la touche ENTER.
Le menu DISQUE apparaîtra.
REC SPEED
Changement du menu
CONFIGURER
Une image peut être réglée
comme vignettes pour chaque
titre. Cela aide à se rappeler le
contenu du titre lu. L’image de
commencement peut être
sélectionnée par défaut.
D’abord:
POWER
Édition
VR
DVD-RW
Démarrage
7
Oui
JAN/ 1 1:00AM CH12
DVD
VCR
DISPLAY
Édition
Édition de disques DVD-RW en mode VR (Playlist) (suite)
3
6
Sélectionner “PlayList” avec
les touches { / B, puis
appuyer sur la touche
ENTER.
La liste de lecture apparaîtra.
Sélectionner “Oui” avec les
touches { / B, puis appuyer
sur la touche ENTER.
Une image sera réglée comme
vignette.
POWER
REC SPEED
.@/:
1
ABC
2
3
GHI
JKL
MNO
4
5
6
PQRS
TUV
WXYZ
8
9
7
1
2
3
JAN/1 1:00AM
JAN/1 2:00AM
JAN/1 3:00AM
JAN/1 4:00AM
1
Ajouter
titre
Effacer
Playlist
5
Effacer titre
Effacer scene
Editer titre
Repère chapitre
Indexer image
Oui
JAN/ 1 1:00AM CH12
JAN/1 5:00AM
DVD
VCR
Non
XP
L’exécution de cette opération
peut demander un certain temps.
Sélectionner le titre désiré
avec les touches K / L / { / B,
puis appuyer sur la touche
ENTER.
Le menu Playlist apparaîtra.
Disque > Edition > Playlist
Effacer titre
Effacer scene
Editer titre
Repère chapitre
Indexer image
XP
0:01:25
5
Sélectionner “Indexer image”
avec les touches K / L, puis
appuyer sur la touche
ENTER.
La fenêtre d’options apparaîtra.
Disque > Edition > Playlist
1
Effacer titre
Effacer scene
Editer titre
Repère chapitre
Indexer image
F
Oui
JAN/ 1 1:00AM CH12
Non
XP
0:01:25
80
PAUSE
PLAY
STOP
7
REC/OTR
SETUP
TIMER PROG.
ENTER
REC MONITOR
MENU/LIST TOP MENU
RETURN
Ecriture infos
4
JAN/ 1 1:00AM CH12
SLOW
0
CLEAR/C-RESET ZOOM
1
CH
VIDEO/TV
Disque > Edition > Playlist
1
4
OPEN/CLOSE
DEF
SPACE
DISPLAY
Disque > Edition > Playlist
AUDIO
7
Après la fin de l’écriture sur
le disque, appuyer sur la
touche SETUP pour quitter
le menu DISQUE.
SEARCH
MODE
CM SKIP
SKIP
SKIP
3
4
5
6
Édition
Avant le démarrage
Édition de disques DVD-RW en mode VR (Playlist) (suite)
Ajout de titres à la liste de lecture
VR
DVD-RW
DVD
4
Sélectionner “Ajouter titre” avec
les touches K / L / { / B, puis
appuyer sur la touche ENTER.
La liste original apparaîtra.
POWER
REC SPEED
.@/:
1
ABC
2
3
GHI
JKL
MNO
4
5
6
PQRS
TUV
WXYZ
8
9
7
AUDIO
OPEN/CLOSE
DEF
SPACE
Raccords
Des titres peuvent être ajoutés
ou supprimés de la liste de
lecture selon ses préférences.
99 titres maximum peuvent être
ajoutés à une liste de lecture.
D’abord:
CH
VIDEO/TV
SLOW
0
Disque > Edition > Playlist > Ajouter titre
1
1
1
2
DVD
VCR
3
PLAY
JAN/10 10:30AM
JAN/12 5:00PM
JAN/12 8:00PM
1
6
STOP
REC/OTR
SETUP
MENU/LIST TOP MENU
CLEAR/C-RESET ZOOM
Sélectionner le titre souhaité
avec les touches K / L / { / B,
puis appuyer sur la touche
ENTER.
Fermeture
Protection de disque HF
EF
CM SKIP
RETURN
SKIP
SKIP
1
2
3
4
5
Disque > Edition > Playlist > Ajouter titre
2
Sélectionner “Edition” avec
les touches K / L, puis appuyer
sur la touche ENTER.
Le menu Original/Playlist apparaîtra.
Écran:
58%
Ecriture infos
Édition
Disque > Edition
Disque > Edition > Playlist
1
2
3
JAN/1 1:00AM
JAN/1 2:00AM
JAN/1 3:00AM
5
6
Original
JAN/1 4:00AM
JAN/12 8:00PM
6
Après la fin de l’écriture sur
le disque, appuyer sur la
touche SETUP pour quitter
le menu DISQUE.
Fonctions du
magnétoscope
Sélectionner “PlayList” avec les
touches { / B, puis appuyer
sur la touche ENTER.
La Playlist apparaîtra.
JAN/1 5:00AM
Changement du menu
CONFIGURER
1
4
3
Disque > Edition > Playlist
1
2
3
JAN/1 1:00AM
JAN/1 2:00AM
JAN/1 3:00AM
4
JAN/1 4:00AM
5
JAN/1 5:00AM
Ajouter
titre
Effacer
Playlist
Pour supprimer un titre de la
Playlist, consulter “Suppression de
titres” à la page 74.
Pour supprimer une Playlist,
consulter “Suppression d’une
Playlist” à la page 82.
Autres
1
Enregistrement Lecture d’un disque
SEARCH
MODE
5
Format
TIMER PROG.
ENTER
REC MONITOR
Disque
Edition
PAUSE
Démarrage
Appuyer sur la touche SETUP.
Sélectionner “DISQUE” avec
les touches { / B, puis appuyer
sur la touche ENTER.
Le menu DISQUE apparaîtra.
DISPLAY
81
Édition
Édition de disques DVD-RW en mode VR (Playlist) (suite)
Suppression d’une liste de lecture
VR
DVD-RW
Une Playlist peut être supprimée
si elle devient inutile.
D’abord:
DVD
1
4
Sélectionner “Effacer
Playlist” avec les touches
K / L / { / B, puis appuyer
sur la touche ENTER.
La liste des options apparaîtra.
Appuyer sur la touche SETUP.
Sélectionner “DISQUE” avec
les touches { / B, puis appuyer sur la touche ENTER.
Le menu DISQUE apparaîtra.
POWER
REC SPEED
.@/:
1
ABC
2
3
GHI
JKL
MNO
4
5
6
PQRS
TUV
WXYZ
8
9
7
1
1
2
3
JAN/1 1:00AM
JAN/1 2:00AM
JAN/1 3:00AM
JAN/1 4:00AM
5
JAN/1 5:00AM
Ajouter
titre
Effacer
Playlist
Oui
Non
Edition
SLOW
0
DVD
VCR
PAUSE
PLAY
1
6
STOP
REC/OTR
SETUP
MENU/LIST TOP MENU
CLEAR/C-RESET ZOOM
SEARCH
MODE
Fermeture
CM SKIP
5
Sélectionner “Oui” avec les
touches { / B, puis appuyer
sur la touche ENTER.
La liste de lecture sera supprimée.
Sélectionner “Edition” avec
les touches K / L, puis appuyer
sur la touche ENTER.
Le menu Original/Playlist apparaîtra.
Écran:
TIMER PROG.
ENTER
REC MONITOR
Format
2
CH
VIDEO/TV
Disque > Edition > Playlist
Disque
EF
OPEN/CLOSE
DEF
SPACE
DISPLAY
4
Protection de disque HF
AUDIO
RETURN
SKIP
SKIP
1
2
3
4
5
Disque > Edition > Playlist
Ajouter
titre
Effacer
Playlist
Disque > Edition
6
Après la fin de l’écriture sur
le disque, appuyer sur la
touche SETUP pour quitter
le menu DISQUE.
Original
3
Sélectionner “PlayList” avec les
touches { / B, puis appuyer
sur la touche ENTER.
La liste de lecture apparaîtra.
Disque > Edition > Playlist
1
1
2
3
JAN/1 1:00AM
JAN/1 2:00AM
JAN/1 3:00AM
4
JAN/1 4:00AM
82
5
JAN/1 5:00AM
Ajouter
titre
Effacer
Playlist
Remarque
• La suppression d’une Playlist
n’augmentera pas le temps
d’enregistrement disponible
sur le disque.
Édition
Avant le démarrage
Édition de disques DVD-R
Suppression de titres
DVD-R
Disque > Edition
DVD
1
JAN/ 1 1:00AM CH12
Effacer titre
Editer titre
Repère chapitre
XP
POWER
REC SPEED
.@/:
1
ABC
2
3
GHI
JKL
MNO
4
5
6
PQRS
TUV
WXYZ
8
9
7
0:01:25
AUDIO
OPEN/CLOSE
DEF
SPACE
Raccords
Des titres inutiles peuvent être
supprimés, mais le temps d’enregistrement disponible sur le disque
restera inchangé.
Noter que les titres supprimés
ne pourront pas être rétablis sur
le disque.
D’abord:
CH
VIDEO/TV
SLOW
0
“Repère chapitre” ne peut pas être
sélectionné.
DISPLAY
DVD
VCR
PAUSE
4
Appuyer sur la touche
SETUP. Sélectionner
“DISQUE” avec les touches
{ / B, puis appuyer sur la
touche ENTER.
Le menu DISQUE apparaîtra.
Sélectionner “Effacer titre”
avec les touches K / L, puis
appuyer sur la touche
ENTER.
La fenêtre d’options apparaîtra.
Disque > Edition
Disque
1
Edition
Effacer titre
Editer titre
Repère chapitre
1
6
STOP
REC/OTR
SETUP
TIMER PROG.
ENTER
REC MONITOR
MENU/LIST TOP MENU
CLEAR/C-RESET ZOOM
SEARCH
MODE
CM SKIP
RETURN
SKIP
SKIP
1
2
3
4
5
Format
Fermeture
Oui
JAN/ 1 1:00AM CH12
Non
XP
0:01:25
5
2
Sélectionner “Oui” avec les
touches { / B, puis appuyer
sur la touche ENTER.
Le titre sera supprimé.
Disque > Edition
1
2
3
JAN/1 1:00AM
JAN/1 2:00AM
JAN/1 3:00AM
Effacer titre
Editer titre
Repère chapitre
Oui
4
JAN/1 4:00AM
JAN/ 1 1:00AM CH12
6
Après la fin de l’écriture sur
le disque, appuyer sur la
touche SETUP pour quitter
le menu DISQUE.
Autres
Sélectionner un titre souhaité
avec les touches K / L / { / B,
puis appuyer sur la touche
ENTER.
Le menu Edition apparaîtra.
L’exécution de cette opération
peut demander un certain temps.
Fonctions du
magnétoscope
3
Non
XP
Ecriture infos
5
JAN/1 5:00AM
Changement du menu
CONFIGURER
1
Disque > Edition
1
Édition
Sélectionner “Edition” avec
les touches K / L, puis appuyer
sur la touche ENTER.
La liste des titres apparaîtra.
Écran:
Enregistrement Lecture d’un disque
1
Démarrage
PLAY
83
Édition
Édition de disques DVD-R (suite)
Attribution des titres
DVD-R
Des noms peuvent être donnés aux
titres et changés à ce menu.
Les noms donnés aux titres seront
affichés sur la liste des titres.
D’abord:
DVD
4
Sélectionner “Editer titre”
avec les touches K / L, puis
appuyer sur la touche ENTER.
Une fenêtre pour l’entrée d’un
nom de titre apparaîtra.
5
POWER
REC SPEED
.@/:
1
ABC
2
3
GHI
JKL
MNO
4
5
6
PQRS
TUV
WXYZ
8
9
7
AUDIO
OPEN/CLOSE
DEF
CH
VIDEO/TV
SPACE
1
Disque > Edition > Editer titre
JAN/ 1 1:00AM CH12 XP
0:01:25
DVD
VCR
DISPLAY
ABC
abc
123
@!?
1
Appuyer sur la touche SETUP.
Sélectionner “DISQUE” avec
les touches { / B, puis appuyer
sur la touche ENTER.
Le menu DISQUE apparaîtra.
1
7
STOP
REC/OTR
SETUP
5
Format
TIMER PROG.
ENTER
REC MONITOR
MENU/LIST TOP MENU
CLEAR/C-RESET ZOOM
Edition
PAUSE
PLAY
Disque
SEARCH
MODE
1
2
3
4
5
6
RETURN
SKIP
SKIP
CM SKIP
Pour entrer un nom de titre,
suivre la procédure de “Guide
pour l’édition d’un nom de
titre” sur cette page
jeu de caractères
Fermeture
2
Disque > Edition > Editer titre
Disque > Edition
1
1
2
3
JAN/1 1:00AM
JAN/1 2:00AM
JAN/1 3:00AM
4
JAN/1 4:00AM
5
JAN/1 5:00AM
ABC
abc
123
@!?
1
Sélectionner “Edition” avec les
touches K / L, puis appuyer sur
la touche ENTER.
La liste des titres apparaîtra.
Écran:
JAN/ 1 1:00AM CH12 XP
0:01:25
zone pour l’entrée des noms de titres
Après l’entrée d’un nom de titre,
appuyer sur la touche ENTER.
“Repère chapitre” ne peut pas être sélectionné.
123
@!?
0
<espace>
0
1
”#$%
&‘ ( ) *
+ ,- ./ :;
<=>?
@[]^
_{|}!
ABC
abc
2
DEF
def
3
4
GHI
ghi
4
5
6
JKL
jkl
5
MNO
mno
6
7
8
PQRS
pqrs
7
TUV
tuv
8
9
WXYZ
wxyz
9
ABC
abc
123
@!?
1
Oui
Non
abc
0:01:25
abc
<espace>
3
Ecriture infos
XP
ABC
<espace>
2
Disque > Edition
JAN/ 1 1:00AM CH12
Sélectionner
Appuyer sur
Sélectionner “Oui” avec les
touches { / B, puis appuyer
sur la touche ENTER.
Sélectionner un titre souhaité avec
les touches K / L / { / B, puis
appuyer sur la touche ENTER.
Le menu Edition apparaîtra.
Effacer titre
Editer titre
Repère chapitre
123
@!?
[Etape2]: Appuyer sur les touches numériques en
suivant la liste ci-dessous.
6
Disque > Edition > Editer titre
1
[ Guide pour l'édition d’un nom de titre ]
[Etape1]: Sélectionner un jeu de caractères avec
les touches K/ L,
ABC
puis appuyer sur
abc
la touche ENTER.
1
3
84
SLOW
0
L’exécution de cette opération
peut demander un certain temps.
7
Après la fin de l’écriture sur le
disque, appuyer sur la touche SETUP
pour quitter le menu DISQUE.
* Appuyer sur la touche 1 , le jeu de caractères
passera automatiquement au mode " @!? ".
• Pour supprimer des lettres, appuyer plusieurs
fois sur la touche CLEAR/C-RESET. Maintenir la
touche CLEAR/C-RESET pressée supprime
toutes les lettres.
• Pour passer à la zone d’entrée de lettres
suivantes, appuyer sur la touche B .
• 30 maximum peuvent être entrées.
Changement du menu CONFIGURER
Avant le démarrage
Aperçu du menu CONFIGURER
Le tableau suivant indique les réglages disponibles au menu CONFIGURER et les réglages par défaut.
Le consulter pour opérer efficacement.
Menu CONFIGURER
Postes (réglages par défaut en surbrillance)
Régler la langue pour le menu du disque.
Langue audio
Original
Anglais
Français
Régler la langue audio.
Langue sous-titre
HF
Anglais
Français
Régler la langue des sous-titres.
Couleur fond ASE
Langue ASE
English*
Français
Español
Régler la langue pour ASE
(affichage à l’écran).
Economiseur
d'écran
HF
5 minutes
10minutes
Régler la durée après laquelle l’économiseur
d’écran s’active.
Sortie numérique
PCM
Auto
48kHz
96kHz
Dolby Digital
PCM
Flux
Régler si le son enregistré à 96 kHz sera
sous-échantillonné ou non à 48 kHz.
Régler le type de signal sonore qui sera
sorti des prises de sortie audio numériques.
EF
HF
Compression de la plage du volume sonore.
Avance rapide audio
EF
HF
Sortie du son pendant la lecture rapide en
avant.
Blocage parental
Tout
niveaux 8 à 1
Régler le niveau parental de ses disques
DVD.
(Changement du
mot de passe)
Entrer le mot de passe Régler et changer le mot de passe.
de quatre chiffres actuel.
*Les exprications dans ce Guide sont décrites à condition que
“Français” soit sélectionné d’abord.
Fonctions du
magnétoscope
Réglage dynamique
Changement du menu
CONFIGURER
4.Réglage parental
Pages 92-93
Régler la couleur de l’écran ASE
1 (Vert), 2 (Bleu), 3 (Rouge)
Édition
3.Réglage audio
Pages 90-91
1
2
3
Régler la transparence de l’arrière-plan de
l’écran ASE (affichage à l’écran : OSD).
Enregistrement Lecture d’un disque
100%
2.Réglage de l’affichage Transparence
fond ASE (ou l’OSD)
Pages 88-89
35%
25%
Démarrage
Anglais
Français
Espagnol
Raccords
1.Réglage de la langue Langue du menu
Pages 86-87
disque
Description
Remarque
85
Autres
• Si un réglage est changé au menu
CONFIGURER, les informations de la
description sont maintenues même si
l’appareil est mis hors tension.
Changement du menu CONFIGURER
Réglage de la langue
Appuyer sur la touche STOP si un disque est en cours de lecture.
1
Appuyer sur la touche SETUP pour afficher le menu
CONFIGURER/DISQUE.
Le menu CONFIGURER/DISQUE apparaîtra.
4
POWER
REC SPEED
AUDIO
.@/:
1
ABC
DEF
2
3
GHI
JKL
MNO
4
5
6
TUV
WXYZ
8
9
PQRS
7
SPACE
OPEN/CLOSE
CH
VIDEO/TV
SLOW
0
DISPLAY
DVD
VCR
PAUSE
PLAY
1
5
Menu de configuration
STOP
REC/OTR
SETUP
TIMER PROG.
ENTER
REC MONITOR
MENU/LIST TOP MENU
CLEAR/C-RESET ZOOM
2
SEARCH
MODE
CM SKIP
Sélectionner “CONFIGURER” avec les touches { / B,
puis appuyer sur la touche ENTER.
Le menu CONFIGURER apparaîtra.
RETURN
SKIP
SKIP
2
3
4
Configurer
Configuration de lecture
3
Sélectionner “Lecture” avec les touches K / L / { / B,
puis appuyer sur la touche ENTER.
La fenêtre d’options apparaîtra.
Configurer > Lecture
Aspect TV
Blocage parental
Langue du menu disque
Langue audio
Langue sous-titre
DVD
4:3 Letter Box
Tout
Anglais
Original
HF
Sortie numérique
Réglage dynamique
EF
Avance rapide audio
HF
4
Sélectionner le poste souhaité avec les touches K / L, puis
appuyer sur la touche ENTER.
86
Remarques
• Seules les langues assistées
par le disque sont
sélectionnables.
• Le réglage Langue audio peut
ne pas être disponible sur
certains disques.
• Il est aussi possible de changer
ou désactiver les sous-titres
d’un disque DVD à partir du
menu du disque s’il est
disponible.
Changement du menu CONFIGURER
Avant le démarrage
Réglage de la langue (suite)
Langue du menu disque (Défaut: Anglais)
Régler la langue pour le Menu disque.
Configurer > Lecture
Blocage parental
Langue du menu disque
Langue audio
Langue sous-titre
4:3 Letter Box
Tout
Anglais
Aspect TV
Original
HF
Langue audio
Blocage parental
Langue du menu disque
Langue sous-titre
Sortie numérique
DVD
4:3 Letter Box
Tout
Anglais
English
Français
Original
Espagnol
OFF
Autre
• Sélectionner un réglage
avec les touches K / L, puis
appuyer sur la touche
ENTER.
Ce réglage sera activé.
Sortie numérique
Réglage dynamique
EF
Réglage dynamique
EF
Avance rapide audio
HF
Avance rapide audio
HF
Configurer > Lecture
Aspect TV
Configurer > Lecture
DVD
Aspect TV
Original
HF
Langue audio
Sortie numérique
4:3 Letter Box
Tout
Original
English
Anglais
Original
Français
OFF
Espagnol
Autre
Réglage dynamique
EF
Réglage dynamique
EF
Avance rapide audio
HF
Avance rapide audio
HF
Blocage parental
Langue du menu disque
Langue audio
Langue sous-titre
Blocage parental
Langue du menu disque
Langue sous-titre
Sortie numérique
• Sélectionner un réglage
avec les touches K / L, puis
appuyer sur la touche
ENTER.
Ce réglage sera activé.
Langue sous-titre (Défaut: HF)
Régler la langue des sous-titres.
Configurer > Lecture
DVD
Configurer > Lecture
Aspect TV
Langue du menu disque
4:3 Letter Box
Tout
Anglais
Langue audio
Original
Langue audio
Langue sous-titre
HF
Langue sous-titre
Aspect TV
Blocage parental
Sortie numérique
Blocage parental
Langue du menu disque
DVD
4:3 Letter Box
Tout
HF
English
Anglais
Original
Français
Sortie numérique
OFF
Espagnol
Autre
EF
Réglage dynamique
EF
Avance rapide audio
HF
Avance rapide audio
HF
Édition
Réglage dynamique
• Sélectionner un réglage
avec les touches K / L, puis
appuyer sur la touche
ENTER.
Ce réglage sera activé.
ue
---EF
dio
HF
• À la fin de l’entrée du
code, appuyer sur la
touche ENTER.
Consulter le tableau des
codes de langues à la
page page 102.
Fonctions du
magnétoscope
Saisie du code
Changement du menu
CONFIGURER
Si “Autre” est sélectionné, faire le code de 4 chiffres aux touches numériques.
Tout
Anglais
English
Français
Original
Espagnol
OFF
Autre
Enregistrement Lecture d’un disque
4:3 Letter Box
Tout
Anglais
DVD
Démarrage
Langue audio (Défaut: Original)
Régler la langue audio.
disque
Raccords
Aspect TV
Configurer > Lecture
DVD
Autres
5
Appuyer sur la touche SETUP pour quitter le menu
CONFIGURER.
87
Changement du menu CONFIGURER
Réglage de l’affichage
Appuyer sur la touche STOP si un disque est en cours de lecture.
1
Appuyer sur la touche SETUP pour afficher le menu
CONFIGURER/DISQUE.
Le menu CONFIGURER/DISQUE apparaîtra.
POWER
REC SPEED
AUDIO
.@/:
1
ABC
DEF
2
3
GHI
JKL
MNO
4
5
6
TUV
WXYZ
8
9
PQRS
7
SPACE
OPEN/CLOSE
CH
VIDEO/TV
SLOW
0
DISPLAY
DVD
VCR
PAUSE
PLAY
1
5
Menu de configuration
STOP
REC/OTR
SETUP
REC MONITOR
MENU/LIST TOP MENU
CLEAR/C-RESET ZOOM
2
SEARCH
MODE
Sélectionner “CONFIGURER” avec les touches { / B,
puis appuyer sur la touche ENTER.
Le menu CONFIGURER apparaîtra.
Configurer
Configuration de lecture
3
Sélectionner “Affichage” avec les touches K / L / { / B,
puis appuyer sur la touche ENTER.
La fenêtre d’options apparaîtra.
Configurer > Affichage
DVD
Transparence fond ASE
35%
Couleur fond ASE
Langue ASE
1
Français
Economiseur d’écran
10 minutes
4
Sélectionner le poste souhaité avec les touches K / L, puis
appuyer sur la touche ENTER.
88
TIMER PROG.
ENTER
CM SKIP
RETURN
SKIP
SKIP
2
3
4
Changement du menu CONFIGURER
Configurer > Affichage
DVD
Configurer > Affichage
35%
Transparence fond ASE
Couleur fond ASE
1
Français
Couleur fond ASE
Langue ASE
Economiseur d’écran
10 minutes
Economiseur d’écran
35%100%
85%
1
70%
English
50%
10 minutes
35%
25%
10%
0%
Langue ASE
• Sélectionner un réglage
avec les touches K / L, puis
appuyer sur la touche
ENTER.
Ce réglage sera activé.
Configurer > Affichage
DVD
Configurer > Affichage
DVD
Transparence fond ASE
35%
Transparence fond ASE
35%
Couleur fond ASE
Couleur fond ASE
Langue ASE
1
Français
Economiseur d’écran
10 minutes
Economiseur d’écran
11
2
English
3
10 minutes
Langue ASE
Langue de l’affichage OSD (Défaut: English)
Régler la langue de l’affichage OSD.
Configurer > Affichage
VCR
Transparence fond ASE
Couleur fond ASE
Langue ASE
Economiseur d’écran
Configurer > Affichage
VCR
35%
1
Transparence fond ASE
Français
Langue ASE
10 minutes
Economiseur d’écran
35%
1
English
English
Français
10 minutes
Español
DVD
Couleur fond ASE
DVD
• Sélectionner un réglage
avec les touches K / L, puis
appuyer sur la touche
ENTER.
Ce réglage sera activé.
Configurer > Affichage
DVD
Configurer > Affichage
35%
Transparence fond ASE
Couleur fond ASE
Couleur fond ASE
Langue ASE
1
Français
Economiseur d’écran
10 minutes
Economiseur d’écran
Langue ASE
35%
1
HF
5English
minutes
1010
minutes
minutes
15 minutes
30 minutes
• Sélectionner un réglage
avec les touches K / L, puis
appuyer sur la touche
ENTER.
Ce réglage sera activé.
5
Changement du menu
CONFIGURER
Transparence fond ASE
DVD
Édition
Economiseur d'écran (Défaut: 10 minutes)
Régler la durée après laquelle l’économiseur d’écran s’active.
Enregistrement Lecture d’un disque
• SSélectionner un réglage
avec les touches K / L, puis
appuyer sur la touche
ENTER.
Ce réglage sera activé.
Démarrage
Couleur fond de l’affichage OSD (Défaut: 1 Vert)
Régler la couleur de l’arrière-plan de l’affichage OSD.
Choix entre les options suivantes: 1 (Vert), 2 (Bleu) et 3 (Rouge).
Raccords
Transparence fond ASE
DVD
Avant le démarrage
Réglage de l’affichage (suite)
Transparence fond de l’affichage OSD (Défaut: 35%)
Régler la transparence de l’arrière-plan de l’affichage OSD.
Choix de 0% à 100%.
Fonctions du
magnétoscope
Appuyer sur la touche SETUP pour quitter le menu CONFIGURER.
Autres
89
Changement du menu CONFIGURER
Réglages audio
Choisir les réglages audio convenables pour l’appareil car ils
n’affecteront que les disques DVD pendant la lecture.
Appuyer sur la touche STOP si un disque est en cours de lecture.
1
POWER
REC SPEED
AUDIO
.@/:
1
ABC
DEF
2
3
GHI
JKL
MNO
4
5
6
TUV
WXYZ
8
9
PQRS
7
Appuyer sur la touche SETUP pour afficher le menu
CONFIGURER/DISQUE.
Le menu CONFIGURER/DISQUE apparaîtra.
SPACE
OPEN/CLOSE
CH
VIDEO/TV
SLOW
0
DISPLAY
DVD
VCR
PAUSE
PLAY
1
5
STOP
REC/OTR
SETUP
TIMER PROG.
ENTER
REC MONITOR
MENU/LIST TOP MENU
CLEAR/C-RESET ZOOM
SEARCH
MODE
Menu de configuration
CM SKIP
RETURN
SKIP
SKIP
2
3
4
2
Sélectionner “CONFIGURER” avec les touches { / B,
puis appuyer sur la touche ENTER.
Le menu CONFIGURER apparaîtra.
Configurer
Configuration de lecture
3
Sélectionner “Lecture” avec les touches K / L / { / B,
puis appuyer sur la touche ENTER.
La fenêtre d’options apparaîtra.
Configurer > Lecture
Aspect TV
Blocage parental
Langue du menu disque
Langue audio
Langue sous-titre
DVD
4:3 Letter Box
Tout
Anglais
Original
HF
Sortie numérique
Réglage dynamique
EF
Avance rapide audio
HF
4
Sélectionner le poste souhaité avec les touches K / L, puis
appuyer sur la touche ENTER.
90
Remarque
• La fonction Contrôle
dynamique de plage est
disponible seulement sur les
disques enregistrés en format
Dolby Digital.
Changement du menu CONFIGURER
Configurer > Lecture
Aspect TV
DVD
Langue du menu disque
Langue audio
Original
Langue audio
Original
Langue sous-titre
HF
Langue sous-titre
Blocage parental
Sortie numérique
Réglage dynamique
EF
Réglage dynamique
Avance rapide audio
HF
Avance rapide audio
A
Raccords
Langue du menu disque
4:3 Letter Box
Tout
Anglais
Sortie numérique
HF
PCM
ON
Dolby
Digital
HF
Réglages
pour Dolby Digital (Défaut: Flux)
g
HF
l’amplificateur/décodeur.
B
Réglages pour PCM (Défaut: Auto)
Configurer > Lecture
Aspect TV
Langue du menu disque
Langue audio
Langue sous-titre
Configurer > Lecture
Aspect TV
Original
HF
Langue audio
Sortie numérique
Blocage parental
Langue du menu disque
Langue sous-titre
DVD
4:3 Letter Box
Tout
Anglais
Original
HF
Sortie numérique
Réglage dynamique
EF
Réglage dynamique
EF
Avance rapide audio
HF
Avance rapide audio
HF
EF
HF
• Sélectionner un réglage
avec les touches K / L, puis
appuyer sur la touche
ENTER.
Ce réglage sera activé.
Configurer > Lecture
Aspect TV
Blocage parental
Langue du menu disque
Langue audio
Langue sous-titre
DVD
Configurer > Lecture
4:3 Letter Box
Tout
Anglais
Aspect TV
Original
HF
Langue audio
Sortie numérique
Blocage parental
Langue du menu disque
Langue sous-titre
DVD
4:3 Letter Box
Tout
Anglais
Original
HF
Sortie numérique
EF
Réglage dynamique
EF
Avance rapide audio
HF
Avance rapide audio
HF
EF
HF
5
Appuyer sur la touche SETUP pour quitter le menu CONFIGURER.
91
Autres
Réglage dynamique
• Sélectionner un réglage
avec les touches K / L, puis
appuyer sur la touche
ENTER.
Ce réglage sera activé.
Fonctions du
magnétoscope
Avance rapide audio (Défaut: HF)
Régler à EF pour fournir le son pendant la lecture en avance rapide x2.
Changement du menu
CONFIGURER
Blocage parental
DVD
4:3 Letter Box
Tout
Anglais
Édition
• Sélectionner un réglage avec les touches
Remarque
K / L, puis appuyer sur la touche ENTER.
À la lecture d’un disque avec
Le réglage sera activé.
HF
protection du copyright
Auto
: Ordinairement sélectionner “Auto”.
• Si “Auto” est sélectionné, le son
PCM Auto
48kHz : Si l’amplificateur/décodeur n’est PAS compatible sera sous-échantillonné à 48 kHz.
avec PCM 96kHz, sélectionner “48kHz”. Le son • Si “96kHz” est sélectionné, aucun
48kHz
ON
Dolby
Digital
“96 kHz sera sorti en 48 kHz.
son numérique ne sera sorti.
96kHz
o
OFF
96kHz : Si l’amplificateur/décodeur est compatible Sélectionner “Auto” pour la sortie
avec PCM 96kHz, sélectionner “96kHz”.
du son numérique 48 kHz.
Le son 96 kHz sera sorti.
Réglage dynamique (Défaut: EF)
Régler à EF pour comprimer la plage entre les sons doux et forts.
Original
Enregistrement Lecture d’un disque
PCM
ON
Dolby
Digital
PCM
Flux
OFF
Démarrage
• Sélectionner un réglage avec les touches
Remarque
K / L, puis appuyer sur la touche ENTER.
À la lecture d’un disque
Le réglage sera activé.
DVD-RW en mode VR
PCM : Convertit Dolby Digital en PCM (2 canaux).
• Si la source audio sur le disque est
Si l’amplificateur/décodeur n’est PAS
en format Dolby Digital, régler
compatible avec Dolby Digital, régler à “PCM”. “Dolby Digital” à “PCM” pour
pouvoir commuter à principal (L)
Flux : Fournit des signaux Dolby Digital.
Quand l’amplificateur/décodeur est compatible et audio secondaire (R), ou à un
mélange des deux (L/R) avec
avec Dolby Digital, régler à “Flux”.
Original
o
DVD
Aspect TV
Blocage parental
q
Configurer > Lecture
4:3 Letter Box
Tout
Anglais
• Sélectionner le réglage avec
les touches K / L, puis appuyer
sur la touche ENTER.
La fenêtre des options apparaîtra.
Passer à l’étape A ou B.
Avant le démarrage
Réglages audio (suite)
Sortie numérique
Régler la sortie audio numérique.
Changement du menu CONFIGURER
Réglage du contrôle parental
Certains disques DVD-Vidéo ont un réglage de Contrôle
parental. La lecture s’arrêtera si le niveau dépasse les niveaux
réglés, et le mot de passe devra être entré pour permettre la
lecture du disque. Cette fonction empêche les enfants de
regarder des matériaux inadaptés.
Appuyer sur la touche STOP si un disque est en cours de lecture.
4
POWER
REC SPEED
AUDIO
.@/:
1
ABC
DEF
2
3
GHI
JKL
MNO
4
5
6
TUV
WXYZ
8
9
PQRS
7
SPACE
OPEN/CLOSE
CH
VIDEO/TV
SLOW
0
DISPLAY
1
Appuyer sur la touche SETUP pour afficher le menu
CONFIGURER/DISQUE.
Le menu CONFIGURER/DISQUE apparaîtra.
DVD
VCR
PAUSE
PLAY
1
5
STOP
REC/OTR
SETUP
TIMER PROG.
ENTER
REC MONITOR
MENU/LIST TOP MENU
CLEAR/C-RESET ZOOM
SEARCH
MODE
CM SKIP
RETURN
SKIP
SKIP
2
3
4
Menu de configuration
2
Sélectionner “CONFIGURER” avec les touches { / B,
puis appuyer sur la touche ENTER.
Le menu CONFIGURER apparaîtra.
Configurer
Configuration de lecture
3
Sélectionner “Lecture” avec les touches K / L / { / B,
puis appuyer sur la touche ENTER.
La fenêtre d’options apparaîtra.
Remarques
Configurer > Lecture
Aspect TV
Blocage parental
Langue du menu disque
Langue audio
Langue sous-titre
DVD
4:3 Letter Box
Tout
Anglais
Original
HF
Sortie numérique
Réglage dynamique
EF
Avance rapide audio
HF
4
Sélectionner “Blocage parental” avec les touches K / L,
puis appuyer sur la touche ENTER.
92
• La fonction de contrôle
parental peut ne pas être
disponible sur certains disques.
• Avec certains disques, il peut
être difficile de trouver s’ils
sont compatibles avec le
contrôle parental.Vérifier si la
fonction de contrôle parental
fonctionne de la manière
réglée.
• Noter le mot de passe pour
ne pas l’oublier.
Changement du menu CONFIGURER
Configurer > Lecture
Aspect TV
Blocage parental
Langue audio
Langue sous-titre
4:3 Letter Box
Tout
Anglais
Aspect TV
Original
HF
Langue audio
Blocage parental
Langue du menu disque
Langue sous-titre
Sortie numérique
Sortie numérique
Réglage dynamique
EF
Réglage dynamique
Avance rapide audio
HF
Avance rapide audio
4:3
ToutLetter Box
8
Tout
7
Anglais
6
Original
5
HF
4
3
2
EF
1
HF
• Changer le niveau parental
avec les touches K / L, puis
appuyer sur la touche
ENTER.
La fenêtre des options apparaîtra.
Passer à l’étape A ou B.
Aucun mot de passe n’est encore réglé
Configurer > Lecture
Blocage parental
Langue du menu disque
Langue audio
Langue sous-titre
Sortie numérique
Réglage dynamique
Avance rapide audio
4:3
Changer
MPBox
?
ToutLetter
OuiTout
Non
8
Configurer > Lecture
Oui
Aspect TV
Box
Mot4:3
deLetter
passe
Tout
8- - - Tout
Blocage parental
7
Anglais
6
Original
5
HF
4
3
2
EF
1
HF
DVD
Langue du menu disque
Langue audio
Langue sous-titre
Sortie numérique
Réglage dynamique
Avance rapide audio
7
Anglais
6
Original
5
HF
4
3
2
EF
1
HF
• Sélectionner “Oui” avec les
touches s / B, puis entrer
un nouveau mot de passe
aux touches numériques.
Le réglage sera activé.
• Si “Non” est sélectionné,
passer à l’étape 5.
B
Un mot de passe est déjà réglé
Configurer > Lecture
Aspect TV
Blocage parental
Langue audio
Langue sous-titre
Sortie numérique
Réglage dynamique
Avance rapide audio
Aspect TV
Blocage parental
Langue du menu disque
Langue audio
Langue sous-titre
Sortie numérique
Réglage dynamique
Avance rapide audio
Configurer > Lecture
DVD
4:3
Changer
MPBox
?
ToutLetter
OuiTout
Non
8
7
Anglais
6
Original
5
HF
4
3
2
EF
1
HF
• Si “Non” est sélectionné,
passer à l’étape 5.
Oui
Aspect TV
Blocage parental
Langue du menu disque
Langue audio
Langue sous-titre
Sortie numérique
Réglage dynamique
Avance rapide audio
DVD
Box
Mot4:3
deLetter
passe
Tout
8- - - Tout
7
Anglais
6
Original
5
HF
4
3
2
EF
1
HF
• Sélectionner “Oui” avec les
touches s / B, puis entrer
un nouveau mot de passe
aux touches numériques.
Le réglage sera activé.
Remarques
93
Autres
Appuyer sur la touche SETUP pour quitter le menu
CONFIGURER.
Fonctions du
magnétoscope
5
• Appuyer sur la touche
CLEAR/C-RESET pour effacer les
chiffres entrés incorrectement.
• En cas d’oubli du mot de passe
ou pour effacer tous les
réglages de verrouillage
parental, entrer 4, 7, 3, 7 aux
touches numériques à la
fenêtre d’options. Le mot de
passe sera effacé et les niveaux
parentaux réglés à Tout.
Changement du menu
CONFIGURER
• Entrer le mot de passe
actuel aux touches
numériques.
Configurer > Lecture
Édition
Langue du menu disque
DVD
4:3
ToutLetter Box
MotTout
8de passe
7* * * *
Anglais
6
Original
5
HF
4
3
2
EF
1
HF
Changement du mot de passe
Enregistrement Lecture d’un disque
Aspect TV
DVD
Démarrage
A
DVD
Raccords
Langue du menu disque
Configurer > Lecture
DVD
Avant le démarrage
Réglage du contrôle parental (suite)
Blocage parental (Défaut:Tout)
Régler le niveau du contrôle parental.
Fonctions du magnétoscope
Lecture
VCR
3
1
Pendant la lecture, appuyer
sur la touche PAUSE F.
L’appareil passera en pause et le
son sera assourdi.
Appuyer sur la touche
POWER sur la télécommande
ou sur le panneau avant de
l’appareil.
Pour lire une cassette, allumer le
téléviseur et bien sélectionner
l’entrée à laquelle l’appareil est
raccordé.
Appuyer sur:
Appuyer sur la touche
PLAY B pour reprendre la
lecture.
2
5
Insérer une cassette
préenregistrée, puis appuyer
sur la touche PLAY B pour
démarrer la lecture.
Appuyer sur la touche STOP C
pour arrêter la lecture.
VCR
1
POWER
REC SPEED
.@/:
1
ABC
2
3
GHI
JKL
MNO
4
5
6
TUV
WXYZ
8
9
7
6
Appuyer sur la touche
STOP/EJECT C A sur le
panneau avant de l’appareil
pour éjecter la cassette.
OPEN/CLOSE
DEF
PQRS
SPACE
CH
VIDEO/TV
SLOW
0
DISPLAY
4
AUDIO
2
4
DVD
VCR
PAUSE
3
PLAY
STOP
REC/OTR
SETUP
TIMER PROG.
5
Remarques
• Quand une cassette sans
ergot d’enregistrement est
insérée, l’appareil démarre
automatiquement la lecture.
• L’alignement sera automatiquement
ajusté à la lecture. Pour ajuster
manuellement l’alignement, appuyer
sur les touches CHANNEL K/L
sur le panneau avant de l’appareil
ou sur les touches CHK/CHL de
la télécommande.
Enregistrement et enregistrement avec minuterie par simple pression
Enregistrement
VCR
D’abord:
PQRS
VCR
7
TUV
WXYZ
8
9
SPACE
Avant l’enregistrement, vérifier que:
• La chaîne souhaitée est
sélectionnée en appuyant sur les
touches numériques de la
télécommande ou sur les touches
CHANNEL K/L sur le panneau
avant de l’appareil.
• Il y a une cassette avec ergot
d’enregistrement dans l’appareil.
• La vitesse d’enregistrement
souhaitée (SP – lecture standard
ou SLP – lecture super longue)
peut être sélectionnée en
appuyant sur la touche REC
SPEED sur la télécommande.
Vitesse d’enregistrement:
Vitesse de la bande Temps d’enregistrement/lecture
Type de cassette
T60
T120
T160
Mode SP
1 heure
2 heures 2-2/3 heures
Mode SLP
3 heures
6 heures
8 heures
• Stéréo ou SAP est sélectionné:
94
VIDEO/TV
SLOW
0
1
Appuyer sur la touche
REC/OTR pour démarrer
l’enregistrement.
Pour temporairement arrêter l’enregistrement ou le reprendre, appuyer
sur la touche PAUSE F. Après être
resté en mode de pause 5 minutes,
l’appareil s’arrête automatiquement
pour protéger la cassette et la tête
vidéo contre les dommages.
2
Appuyer sur la touche STOP quand
l’enregistrement est terminé.
Prévention de l’effacement accidentel
Pour prévenir l’enregistrement accidentel
sur une cassette enregistrée, briser son
ergot d’enregistrement. Pour réenregistrer
dessus par la suite, couvrir le trou de
Ergot d’enregistrement
ruban adhésif.
DISPLAY
VCR
DVD
PAUSE
1
PLAY
STOP
1
REC/OTR
SETUP
REC MONITOR
MENU/LIST TOP MENU
TIMER PROG.
2
ENTER
RETURN
Remarques
• Pour visionner une chaîne pendant
l’enregistrement d’une autre
1) Pendant l’enregistrement sur
cet appareil, appuyer sur la
touche VIDEO/TV.
2) Sur la boîte de câblovision ou
la boîte satellite, sélectionner la
chaîne à visualiser.
Si cet appareil est raccordé à une
boîte de câblovision ou une boîte
satellite, se reporter à la section
“Raccord à un câblosélecteur et
un récepteur d’antenne parablique” à la page 14.
Fonctions du magnétoscope
Enregistrement avec minuterie par simple pression
VCR
VCR
(0:30)
(Enregistrement normal)
(8:00)
POWER
REC SPEED
.@/:
1
ABC
2
3
GHI
JKL
MNO
AUDIO
OPEN/CLOSE
(1:00)
(7:30)
Quand l’enregistrement avec
minuterie par simple pression est
terminé, l’appareil se met
automatiquement hors tension.
DEF
4
5
6
PQRS
TUV
WXYZ
8
9
7
SPACE
CH
Raccords
Cette fonction permet de régler la
longueur d’enregistrement en
appuyant sur la touche REC/OTR
de la télécommande ou sur le
panneau avant de l’appareil.
D’abord:
VIDEO/TV
SLOW
0
DVD
VCR
DISPLAY
Avant le démarrage
Enregistrement et enregistrement avec minuterie par simple pression (suite)
PAUSE
PLAY
STOP
1
REC/OTR
SETUP
TIMER PROG.
ENTER
REC MONITOR
MENU/LIST TOP MENU
RETURN
CLEAR/C-RESET ZOOM
SEARCH
MODE
1
SKIP
SKIP
CM SKIP
Enregistrement Lecture d’un disque
Pendant l’enregistrement normal,
appuyez sur la touche REC/OTR
pour commencer l’enregistrement
avec minuterie par simple pression.
Pour sélectionner un temps
d’enregsitrement fixe, appuyez
plusieurs fois sur la touche
REC/OTR.
Pour annuler l’enregistrement avec
minuterie par simple pression
pendant le temps spécifié, appuyer
sur la touche STOP C.
Recherche
Recherche d’index
VCR
VCR
1
2
Appuyer sur les touches
g/h pour démarrer la
recherche d’index.
Pour aller en marche avant, appuyer
sur la touche g.
Pour aller en marche arrière,
appuyer sur la touche h.
À la fin de la recherche d’index,
l’appareil lit automatiquement la
cassette.
2
REC SPEED
.@/:
1
ABC
2
3
GHI
JKL
MNO
AUDIO
DEF
4
5
6
PQRS
TUV
WXYZ
8
9
7
OPEN/CLOSE
SPACE
CH
VIDEO/TV
SLOW
0
DISPLAY
DVD
VCR
PAUSE
3
PLAY
STOP
REC/OTR
SETUP
TIMER PROG.
ENTER
REC MONITOR
MENU/LIST TOP MENU
CLEAR/C-RESET ZOOM
1
SEARCH
MODE
RETURN
SKIP
Changement du menu
CONFIGURER
Appuyer sur la touche
SEARCH MODE de sorte que
le menu de recherche d’index
apparaisse.
3
POWER
SKIP
CM SKIP
Remarque
95
Autres
• A chaque fois qu’une cassette
est enregistrée, une marque
index est inscrite sur la
bande.
Fonctions du
magnétoscope
Entrer le numéro des
enregistrements à sauter aux
touches numériques dans les
30 secondes.
RECHERCHE INDEX
03
Édition
Une marque index sera assignée au
début de chaque enregistrement
effectué. Il est possible de sauter à
un point spécifique marqué en
procédant comme suit.
D’abord:
Démarrage
1
Fonctions du magnétoscope
Recherche (suite)
Recherche horaire
VCR
Cette fonction permet de passer à
un point spécifique sur une bande
en entrant le temps exact qu’on
souhaite sauter pour atteindre ce
point.
D’abord:
RECHERCHE HEURE
2:50
2
POWER
REC SPEED
.@/:
1
ABC
2
3
GHI
JKL
MNO
AUDIO
DEF
4
5
6
PQRS
TUV
WXYZ
8
9
7
OPEN/CLOSE
SPACE
CH
VIDEO/TV
SLOW
0
DISPLAY
VCR
DVD
VCR
PAUSE
3
3
PLAY
1
Appuyer plusieurs fois sur la
touche SEARCH MODE de
sorte que le menu de
recherche horaire apparaisse.
2
Entrer le temps aux touches
numériques dans les 30
secondes.
Appuyer sur les touches
g/h pour démarrer la
recherche horaire.
Pour aller en marche avant, appuyer
sur la touche g.
Pour aller en marche arrière,
appuyer sur la touche h.
À la fin de la recherche horaire,
l’appareil lit automatiquement la
cassette.
STOP
REC/OTR
SETUP
TIMER PROG.
ENTER
REC MONITOR
MENU/LIST TOP MENU
RETURN
CLEAR/C-RESET ZOOM
SEARCH
MODE
1
SKIP
SKIP
CM SKIP
Remarques
• Ces fonctions ne sont pas disponibles
pendant l’enregistrement.
• Appuyer sur la touche STOP
pour arrêter la recherche.
• Si la fin de la bande est atteinte pendant
une recherche, l’appareil annulera la
recherche et rebobinera la bande.
Autres opérations
VCR
VCR
D’abord:
Pour repérer ou revoir une image pendant la lecture (Recherche d’image):
Appuyer sur les touches g/h pendant la lecture.
Appuyer à nouveau et l’appareil cherchera à une vitesse super élevée.
(en mode SLP seulement)
Pour geler l’image sur l’écran du téléviseur pendant la lecture (Mode Arrêt sur image):
Appuyer sur la touche PAUSE F. À chaque pression de la touche, l’image
avancera d’un cadre.
Si l’image commence à vibrer verticalement en mode Arrêt sur image, la
stabiliser en appuyant sur les touches CHANNEL K / L ou CH K / CH L.
Si l’image est déformée ou défile verticalement, ajuster la commande de
maintien vertical sur le téléviseur, s’il en a une.
Réinitialisation du compteur:
Appuyer sur la touche CLEAR/C-RESET.
Remarques
• Le mode Arrêt sur image/
lecture lente/pause sera
automatiquement annulé au
bout de 5 minutes pour
éviter d’endommager la
bande et la tête vidéo.
• Pour revenir en lecture à partir
du mode recherche d’image/
arrêt sur image/lecture lente,
appuyer sur la touche PLAY.
Pour la lecture lente:
Appuyer sur la touche SLOW
pendant la lecture ou en mode Arrêt sur image.
Si des barres parasites apparaissent sur l’écran du téléviseur, elles peuvent être
réduites en appuyant sur les touches CHANNEL K / L ou CH K / CH L.
À la lecture d’une cassette enregistrée en stéréo Hi-Fi:
Appuyer sur la touche AUDIO sur la télécommande pour sélectionner
Hi-Fi ou MONO pour le mode son de lecture.
• Si un téléviseur stéréo est raccordé à l’appareil, sélectionner “Hi-Fi”.
• Si un téléviseur monaural est raccordé à l’appareil, sélectionner “MONO”.
96
Sélection
Hi-Fi
MONO
Type de cassette enregistrée
Canal g
Canal dr
Cassette non-Hi-Fi
Monaural
Monaural
Monaural
Cassette Hi-Fi
enregistrée en
stéréo Hi-Fi
L
R
L+R
Programme audio
Programme
Programme
principal enregistré Programme
sur cassette Hi-Fi audio principal audio principal audio principal
Second programme
audio enregistré
sur cassette Hi-Fi
Second
programme
audio
Second
programme
audio
Second
programme
audio
Autres
Avant le démarrage
Guide de dépannage
Avant de demander la réparation de cet appareil, contrôler sur le tableau ci-dessous la cause possible du
problème rencontré. Des contrôles simples ou un ajustement mineur peuvent éliminer le problème et
rétablir le bon fonctionnement.
Solutions
Alimentation
L’appareil ne se met pas sous tension.
• Vérifier si le cordon secteur est fermement branché.
Image
• Le disque est sale ou défectueux.
• Le nettoyage de la tête de VCR peut être nécessaire.
Se rapporter à “NETTOYAGE AUTOMATIQUE DES TETES”.
• Si le signal de sortie d’image de l’appareil passe par le magnétoscope
pour aller au téléviseur, ou si un combiné téléviseur/magnétoscope est
raccordé, le signal de protection contre la copie appliqué à certains
programmes DVD peut affecter la qualité de l’image. Si ce problème
persiste même après le raccordement direct de l’appareil au téléviseur,
essayer de raccorder l’appareil à l’entrée S-VIDEO du téléviseur.
• Ajuster la commande d’alignement pour obtenir une meilleure image
en appuyant sur les touches CHANNEL (o / p) sur cet appareil ou
les touches CH ( o / p) pendant la lecture d’une cassette vidéo.
L’image reçue du programme de télévision
ne remplit pas l’écran.
• Essayer de régler les chaînes avec ‘Préréglage auto’ au menu SETUP (page 18).
• Sélectionner une chaîne d’un programme avec les touches CH o / p.
• Appuyer sur la touche VIDEO/TV si nécessaire.
Les images du programme de télévision
sont déformées.
• Ajuster l’antenne du téléviseur.
• Ajuster l’image (voir le mode d’emploi du téléviseur).
• Eloigner davantage l’appareil et le téléviseur.
• Eloigner davantage le téléviseur et toute antenne groupée.
• Commuter l’entrée à TV.
• Connecter correctement le câble d’antenne (page 13).
Changement de chaîne de télévision
impossible.
Édition
Des parasites apparaissent sur l’image.
Enregistrement Lecture d’un disque
• Reconnecter fermement le cordon secteur.
• Les cordons de raccordement sont endommagés.
• L’Affichage Setup apparaît. Appuyer sur la touche RETURN
pour couper l’affichage.
• Vérifier le raccord au téléviseur (page 13).
• Vérifier la chaîne de sortie RF lors de la visualisation d’un
programme de télévision utilisant la connexion RF.
• Vérifier si le mode entrelacé/progressif est réglé correctement
selon le téléviseur. (page 13).
• Commuter le sélecteur d’entrée du téléviseur (tel que “LINE1”) de sorte
que le signal de l’enregistreur DVD apparaisse sur l’écran du téléviseur.
Démarrage
Pas d’image.
Raccords
Problèmes
Pas de son.
• Le disque est sale ou défectueux.
• Refaire fermement toutes les connexions.
• Le cordon de raccordement est endommagé.
• Vérifier les connexions à l’entrée de l’amplificateur.
• Le réglage de la source d’entrée de l’amplificateur est incorrect.
• L’enregistreur est en mode de pause ou en mode de lecture lente.
• L’enregistreur est en mode d’avance ou de recul rapide.
• Si le signal audio ne passe pas via la prise DIGITAL OUT
(COAXIAL), vérifier les réglages Configuration audio (page 90-91).
Son parasité.
• Le disque est sale ou défectueux.
• À la lecture d’un DTS-CD, du bruit peut venir des enceintes.
Cet enregistreur DVD n’est pas compatible avec les DTS-CD.
Pas de sortie de son DTS
• Cet enregistreur DVD n’est pas compatible avec le son DTS.
Son
Fonctions du
magnétoscope
• Si l’image lue sortie d’une lecteur DVD, magnétoscope ou syntoniseur
passe par l’appareil avant d’atteindre le téléviseur, le signal de
protection contre la copie appliqué à certains programmes peut
affecter la qualité de l’image. Déconnecter l’appareil de lecture en
question et le connecter directement au téléviseur.
Changement du menu
CONFIGURER
L’image lue ou le programme de télévision
de l’appareil raccordé via l’appareil est
déformé.
Autres
97
Autres
Guide de dépannage (suite)
Problèmes
Lecture
Pas de lecture du disque.
La lecture du disque ne commence pas au
début.
Cet appareil commence automatiquement
la lecture du disque.
Certaines fonctions comme l’arrêt, la
recherche ou la lecture lente sont inutilisables.
La modification de la langue de la piste
son est impossible.
Solutions
• Aucun disque n’est inséré.
• Un disque vierge est inséré.
• Aucune cassette vidéo n’est inséré.
• Le disque est à l’envers. L’insérer avec le côté étiqueté vers le haut.
• Le disque est mal inséré.
• L’appareil ne peut pas lire certains disques (comme CD-ROM)
(page 43).
• Le code de région sur le DVD VIDEO ne correspond pas à celui
de l’appareil (page 43).
• De l’humidité s’est condensée dans l’appareil. Retirer le disque
et laisser l’appareil sous tension environ 2 heures jusqu’à
l’évaporation de l’humidité (page 4).
• Si le disque a été enregistré sur un autre enregistreur, cet appareil
ne peut pas lire le disque s’il n’est pas finalisé (page 41).
• La lecture de reprise a été activée (page 48). Appuyer deux fois
sur la touche STOP C.
• Un disque dont le menu Title ou le menu DVD apparaît automatiquement
sur l’écran du téléviseur à sa première insertion a été inséré.
• Les DVD VIDEO ont une fonction de lecture automatique.
• Selon le disque, il peut être impossible d’effectuer certaines des
opérations de gauche. Voir le mode d’emploi fourni avec le disque.
• Des pistes multilingues ne sont pas enregistrées sur le DVD
VIDEO, DVD-R ou DVD-RW en cours de lecture.
• Le DVD VIDEO interdit le changement de langue pour la piste
son.
• Essayer de changer de langue au menu du DVD VIDEO.
La modification ou la désactivation de la
langue des sous-titres est impossible.
• Des sous-titres multilingues ne sont pas enregistrés sur le DVD VIDEO.
• Le DVD VIDEO interdit le changement de sous-titres.
• Essayer de changer de sous-titres au menu du DVD VIDEO.
Changement de l’angle impossible.
• Des angles multiples ne sont pas enregistrés sur le DVD VIDEO en cours de lecture.
• Un essai de changement d’angle alors que l’icône
n’apparaît pas sur l’écran du téléviseur a été fait (page 58).
• Le DVD VIDEO interdit le changement d’angle.
• Essayer de changer d’angle au menu du DVD VIDEO.
Enregistrement/Enregistrement avec minuterie/Montage
Impossible de changer de la chaîne en
• Régler l’entrée du téléviseur à “TV”.
cours d’enregistrement.
L’enregistrement ne démarre pas immédiatement • Un DVD-R ou DVD-RW inutilisé a été inséré. Il faut un certain
après la pression de la touche REC/OTR.
temps à l’appareil pour formater automatiquement un DVD-RW.
• Vérifier que la cassette a un ergot de protection pour l’enregistrement
sur une cassette. Si nécessaire, couvrir le trou de ruban adhésif.
Rien n’est enregistré même si le réglage
de la minuterie était correct.
• Il y a eu une panne de courant pendant l’enregistrement.
• L’horloge interne de l’appareil s’est arrêtée à cause de la panne
de courant qui a duré plus de 30 secondes.
Réinitialiser l’horloge (pages 22-23).
• Déconnecter le cordon secteur de la prise murale, puis le reconnecter.
• Le programme contient des signaux de protection contre la
copie qui limitent la copie.
• Le réglage de la minuterie a chevauché un autre réglage qui a
été fait plus tard ou avait priorité.
L’enregistrement ne s’arrête pas immédiatement
après la pression de la touche STOP C.
• Il faut quelques secondes à l’appareil pour entrer les données
de disque avant que l’enregistrement puisse s’arrêter.
L’enregistrement avec minuterie n’est pas
terminé ou n’a pas commencé au début.
• Le réglage de la minuterie a chevauché un autre réglage qui a
été fait plus tard ou avait priorité (page 36).
• L’espace du disque était insuffisant.
• Vérifier que l’indicateur
apparaît sur l’affichage avant de l’appareil.
Sinon, appuyer sur la touche POWER.
Enregsistrement avec minuterie
impossible.
98
Autres
Avant le démarrage
Guide de dépannage (suite)
Problèmes
Solutions
Télécommande
La télécommande ne fonctionne pas.
Raccords
• Les piles sont faibles.
• Il y a des obstacles entre la télécommande et l’appareil.
• La télécommande est éloignée de l’appareil.
• Il n’y a pas de piles dans la télécommande.
• Mettre l’appareil sous tension.
• La télécommande n’est pas pointée vers le capteur de
télécommande l’appareil.
• Appuyer sur la touche DVD ou VCR, selon les besoins. Puis,
essayez à nouveau.
• Vérifier qu’il y a une cassette dans l’appareil.
L’appareil ne fonctionne pas
correctement.
• Quand de l’électricité statique etc. cause le fonctionnement
anormal de l’appareil, le débrancher, puis le rebrancher.
Le tiroir à disque ne s’ouvre pas à la
pression de la touche OPEN CLOSE A.
• Le tiroir à disque peut mettre quelques secondes à s’ouvrir
après l’enregistrement ou le montage d’un disque.
• Cela parce que l’appareil ajoute des données de disque au disque.
Erreur d'enregistrement
Erreur d'enregistrement
Programme non enregistrable
en mode vidéo.
Erreur d'enregistrement
Disque non enregistrable.
Erreur d'enregistrement
Emission non enregistrable
sur ce disque.
Erreur d'enregistrement
Disque protégé non
enregistrable.
La lecture n’est pas autorisée parce
que le code de région du disque
DVD Vidéo inséré est différent.
Insérer un disque DVD-Vidéo à
code de région 1 ou ALL.
Le niveau parental actuellement
sélectionné au menu CONFIGURER
interdit la lecture.
Vérifier le réglage “Blocage parental”
(pages 92-93).
La fonction d’enregistrement a
rencontré un programme
interdisant la copie.
L’enregistrement de programme à
copie interdite est impossible.
L’enregistrement d’un programme
copiable une fois a été tenté sur
un disque DVD-RW en mode Vidéo
ou un disque DVD-R.
Régler “DVD-RW Recording
Format” à ‘VR mode’ (page 28).
Un enregistrement sur un disque
non-enregistrable a été tenté, ou
bien l’état du disque interdit
l’enregistrement.
Insérer le disque enregistrable, et
vérifier que l’état du disque satisfait
les exigences d’enregistrement
(pages 26-42).
L’enregistrement d’un programme
copiable une fois a été tenté sur
un disque DVD-RW incompatible
avec CPRM.
Insérer un disque DVD-RW ver. 1.1
compatible CPRM (page 27).
Un essai d’enregistrement sur un
disque protégé réglé au Réglage
de disque au menu a été tenté.
Libérer le réglage de protection
du disque au Réglage de disque au
menu (page 42).
99
Changement du menu
CONFIGURER
Enregistrement de ce
programme interdit.
Insérer un disque normalisé
portant les marques de la page 43.
Édition
Verrouillage parental
--- Éjectez le disque. --La lecture est interdite.
Un disque non lisible est inséré
dans l’appareil.
Autres
Erreur de Région
--- Éjectez le disque. --Ce disque n’a pas le bon code
de zone et ne peut être lu!
Solution
Fonctions du
magnétoscope
Erreur Disque
--- Éjectez le disque. --La lecture peut ne pas être
offerte sur le disque.
Cause
Enregistrement Lecture d’un disque
Message d’erreur
Démarrage
Autres
Autres
Guide de dépannage (suite)
Message d’erreur
Cause
Solution
Erreur d'enregistrement
Le disque est plein.
(Aucun secteur pour le
nouvel enregistrement)
Essai d’enregistrement sur un
disque sans espace d’enregistrement.
Insérer un disque enregistrable avec
suffisamment d’espace
d’enregistrement.
Erreur d'enregistrement
Vous ne pouvez pas enregistrer
plus que 99 titres sur un disque.
(Le maximum est 99)
Essai d’enregistrement sur un
disque dont le nombre de titres
enregistrés atteint le maximum (99).
Supprimer des titres inutiles
(pages 61, 65, 74).
Erreur d'enregistrement
Vous ne pouvez pas enregistrer
plus de 999 chapitres sur un
disque. (Le maximum est 999)
Essai d’enregistrement sur un disque
Supprimer des marques de chapitre
DVD-RW en mode VR dont le nombre inutiles (pages 69, 78).
de chapitres enregistrés atteint le
maximum (999).
Erreur d'enregistrement
Vous ne pouvez pas enregistrer
sur ce disque car les Contrôle
Information sont pleins.
Erreur d'enregistrement
Vous ne pouvez pas enregistrer
sur ce disque car le Puissance
Calibrage Région est plein.
Erreur d'enregistrement
Ce disque est déjà finalisé.
100
Ce disque n’a pas d’espace pour
inscrire les informations de contrôle
à l’enregistrement ou la suppression
de matériaux.
Si le montage a été répété, la zone des
informations de contrôle peut être
pleine même s’il y a suffisamment
d’espace dans la zone d’enregistrement.
Supprimer des titres inutiles
(pages 61, 66, 75).
La zone de travail pour l’enregistrement
du disque est pleine.
Quand des enregistrements sont
effectués à répétition sur un disque
instable, cette zone peut devenir pleine.
Formater le disque (pages 28-29) ou
insérer un nouveau disque.
Essai d’enregistrement sur un disque
déjà finalisé.
Libérer l’état de finalisation de ce
disque (page 41).
Autres
Avant le démarrage
Sortie du convertisseur RF
POWER
REC SPEED
AUDIO
.@/:
1
ABC
DEF
2
3
GHI
JKL
MNO
4
5
6
TUV
WXYZ
8
9
PQRS
7
SPACE
OPEN/CLOSE
Raccords
Des programmes de télévision peuvent être visualisés
via le syntoniseur de l’appareil.(Ordinairement, les
chaînes 3 et 4 du téléviseur sont disponibles pour le
réglage du convertisseur RF.) Bien raccorder l’appareil
au téléviseur à l’aide du câble RF. Se reporter à la
page 13.
CH
VIDEO/TV
SLOW
2
1
0
1
DISPLAY
Sélectionner la chaîne 3 sur le téléviseur.
• Vérifier que l’appareil est en mode DVD.
TIMER PROG.
ENTER
MENU/LIST TOP MENU
2
3
JKL
MNO
4
5
6
PQRS
TUV
WXYZ
8
9
7
SPACE
CLEAR/C-RESET ZOOM
SEARCH
MODE
RETURN
SKIP
SKIP
Enregistrement Lecture d’un disque
1
GHI
Démarrage
STOP
SETUP
REC MONITOR
Appuyer sur la touche VIDEO/TV de la
télécommande.
• Si des parasites apparaissent, changer la chaîne de
sortie RF de l’appareil à CH 4 en appuyant 3
secondes sur la touche VIDEO/TV. La chaîne de
sortie RF alternera entre CH3 et CH4 comme suit.
PAUSE
PLAY
REC/OTR
2
DVD
VCR
CM SKIP
CH
VIDEO/TV
SLOW
0
DISPLAY
VCR
DVD
PAUSE
plus de
3 secondes
Édition
3 secondes
(RF ON) CH4
3 secondes
Changement du menu
CONFIGURER
(RF ON) CH3
3 secondes
(RF ON) CH4
3 secondes
Fonctions du
magnétoscope
• Le changement de la chaîne de sortie RF est possible
seulement quand l’appareil est en mode DVD.
Autres
101
Autres
Codes de langues
Langue
(Afan) Omoran
Abkhazien
Afar
Afrikans
Albanais
Allemand
Amhar
Anglais
Arabe
Arménien
Assamien
Aymara
Azerbaïdjanais
Bashkir
Basque
Bengalais
Biharis
Birman
Bislamien
Biélorusse
Bhoutanais
Breton
Bulgare
Cambodgien
Cashmiri
Catalan
Chinois
Corse
Coréen
Croate
Danois
Espagnol
Espéranto
Estonien
Faroësien
Fiji
Finnois
Français
Frison
Galicien
Gallois
Gaélique écossais
Georgien
Grec
Groenlandais
Guarani
102
Code
6159
4748
4747
4752
6563
5051
4759
5160
4764
5471
4765
4771
4772
4847
5167
4860
4854
5971
4855
4851
5072
4864
4853
5759
5765
4947
7254
4961
5761
5464
5047
5165
5161
5166
5261
5256
5255
5264
5271
5358
4971
5350
5747
5158
5758
5360
Langue
Gujrati
Hausa
Hébreu
Hindi
Hongrois
Indonésien
Interlingua
Interlingue
Inupiak
Irlandais
Islandais
Italien
Japonais
Japonais
Kannada
Kazakh
Kinyarwanda
Kirghize
Kirundi
Kurde
Laotien
Latin
Latvien; Letton
Lingalais
Lithuanien
Macédonien
Malais
Malayalamien
Malais
Maltais
Maori
Marathi
Moldave
Mongol
Nauru
Norvégien
Néerlandais
Népalais
Occitan
Oriyen
Ouzbèque
Panjabi
Perse
Polonais
Portugais
Pushtu; pushto
Code
5367
5447
5569
5455
5467
5560
5547
5551
5557
5347
5565
5566
5647
5669
5760
5757
6469
5771
6460
5767
5861
5847
5868
5860
5866
5957
5965
5958
5953
5966
5955
5964
5961
5960
6047
6061
6058
6051
6149
6164
6772
6247
5247
6258
6266
6265
Langue
Quechuan
Romanche
Roumain
Russe
Samoan
Sangho
Sanscrit
Serbe
Serbo-croate
Sesotho
Setswanais
Shonan
Sindhi
Singhalais
Siswat
Slovaque
Slovène
Somalien
Soudanais
Suédois
Swahili
Tagalog
Tajique
Tamoul
Tatare
Tchèque
Thaïlandais
Tibétain
Tigrinya
Tongais
Tsongais
Turc
Turkmène
Twi
Télugu
Ukrainien
Urdu
Vietnamien
Volapük
Wolof
Xhosa
Yiddish
Yoruba
Zoulou
Code
6367
6459
6461
6467
6559
6553
6547
6564
6554
6566
6660
6560
6550
6555
6565
6557
6558
6561
6567
6568
6569
6658
6653
6647
6666
4965
6654
4861
6655
6661
6665
6664
6657
6669
6651
6757
6764
6855
6861
6961
7054
5655
7161
7267
Autres
Sortie vidéo à composants
La sortie de chaque signal de luminance
(Y) et composants (PB/CB, PR/CR) est
indépendante, ce qui permet d’apprécier
la couleur de l’image telle qu’elle est.
De plus, la compatibilité avec le balayage
progressif (535p/480p) permet d’obtenir
une image à densité plus forte qu’en
mode entrelacé (525i/480i).
PCM
(Modulation par impulsions
codées)
Le système le plus ordinaire pour
le codage de l’audio numérique,
qu’on trouve sur les CD et DAT.
Excellente qualité, mais exige
beaucoup de données par rapport
aux formats tels qu’audio Dolby
Digital et MPEG. Pour la
compatibilité avec les enregistreurs
audio numériques (CD, MD et
DAT) et les amplificateurs AV avec
entrées numériques, cet appareil
peut convertir l’audio Dolby
Digital ou MPEG en PCM. Voir
également Audio numérique.
Sortie S-Vidéo
Fournit indépendamment chaque
signal de couleur (C) et de
luminance (Y) au téléviseur comme
signaux vidéo, pour obtenir une
meilleure qualité d’image.
Titre
(DVD)
Une collection de chapitres sur un
disque DVD. Voir également
Chapitre.
(VCD)
Chaque contenu d’un CD Vidéo.
À la lecture d’un CD Vidéo avec
fonction PBC, le menu de titres
apparaît automatiquement.
Liste de lecture
À partir de cette liste, il est possible
de lire un disque dans l’ordre ou la
séquence souhaitée. Permet aussi
directement la recherche d’une
scène spécifique.
103
Autres
Piste
Les CD Audio et CD Vidéo
utilisent des pistes pour diviser le
contenu d’un disque. L’équivalent
pour le DVD est appelé chapitre.
Voir également Chapitre.
Fonctions du
magnétoscope
SAP
(Programme audio secondaire)
Un sous-canal audio fourni
séparément du canal audio
principal. Ce canal audio est utilisé
pour la diffusion bilingue.
Changement du menu
CONFIGURER
Audio numérique
Une représentation indirecte du son
par nombres. Pendant
l’enregistrement, le son est mesuré à
intervalle discret (44.100 fois par
seconde pour un CD audio) par un
convertisseur analogique/numérique,
produisant une chaîne de nombres.
À la lecture, un convertisseur
numérique/analogique produit un
signal analogique basé sur ces
nombres. Voir également Fréquence
d’échantillonnage et Audio
analogique.
PBC (VCD seulement)
(Contrôle de la lecture)
Cette fonction permet de lire des
logiciels interactifs en utilisant
l’écran de menus. Voir également
Titre dans le Glossaire.
Édition
CPRM
(Content Protection for
Recordable Media –
Protection du contenu des
supports enregistrables)
Le CPRM est un système de
protection contre la copie avec
système de brouillage indépendant
de l’enregistrement des
programmes “une copie” diffusés
(par ex. programmes par satellite).
Finaliser
Pour rendre des disques DVD sur
lesquels des matériaux sont
enregistrés lisibles sur des lecteurs
de DVD. Sur cet appareil, il est
possible de finaliser des disques
DVD-R/DVD-RW.
Fréquence d’échantillonnage
Le taux auquel le son est mesuré
par intervalle spécifié pour le
transformer en donnée audio
numérique. Les nombres
d’échantillonnage en une seconde
définissent la fréquence
d’échantillonnage. Plus le taux est
élevé, plus la qualité du son est
meilleure.
Enregistrement Lecture d’un disque
Chapitre
Comme un livre est séparé en
plusieurs chapitres, un titre sur un
disque DVD est divisé en
chapitres. Voir également Titre.
MP3 (MPEG Audio Layer 3)
MP3 est une méthode de
compression des fichiers. Il est
possible de copier des fichiers
MP3 sur des disques CD-R/RW à
partir d’un ordinateur et de lire
les fichiers sur cet appareil.
Code de région
Les régions associent les disques
et lecteurs avec des zones
particulières du monde. Cet
appareil lira seulement les disques
compatibles avec les codes de
région. Le code de région de
l’appareil se trouve sur le panneau
arrière. Certains disques sont
compatibles avec plus d’une
région (ou toutes les régions).
Démarrage
Rapport d’aspect
La largeur de l’écran du téléviseur par
rapport à sa hauteur. Il est de 4:3
pour les téléviseurs conventionnels
(autrement dit pratiquement carrés); il
est de 16:9 pour les modèles à écran
large (l’écran est pratiquement deux
fois plus large que haut).
Dolby Digital
Un système pour comprimer le
son numérique développé par
Dolby Laboratories. Il offre le son
audio stéréo (2 canaux) et
multicanaux (juqu’à 5,1 canaux).
Raccords
Audio analogique
Un signal électrique qui représente
directement le son. Le comparer à
l’audio numérique qui peut être un
signal électrique, mais est une
représentation indirecte du son.
Voir également Audio numérique.
Avant le démarrage
Glossaire
Autres
Spécifications
Généralités
Système
Têtes vidéo VCR
Alimentation
Consommation
Poids
Diensions (largeur x hauteur x profondeur)
Température de fonctionnement
Humidité de fonctionnement
Format télévision
DVD-Vidéo, DVD-R/RW, CD Audio, CD Vidéo, MP3,
CD-R/RW, cassettes vidéo
Quatre têtes
Secteur de 120 V, 60 Hz
37 W (Attente: 4,3 W)
9,5 lbs ( 4,3 kg )
435 x 100 x 261 mm (17 1/8” x 3 15/16” x 10 1/4”)
5 à 40˚C (41 à 104˚F)
5 à 85% (sans condensation)
NTSC
Syntoniseur
Chaînes recevables
VHF
UHF
CATV
Convertisseur RF
Sortie du convertisseur
2 - 13 chaînes
14 - 69 chaînes
C1 - C125 chaînes
Intégré
Chaîne 3 ou 4 VHF
Remarque:
Les spécifications et la conception de ce produit sont sujettes à modification sans préavis.
104
Avant le démarrage
MÉMO
Raccords
Démarrage
Enregistrement Lecture d’un disque
Édition
Changement du menu
CONFIGURER
Fonctions du
magnétoscope
Autres
105
GARANTIE D'UN APPAREIL DE DIVERTISSEMENT EMERSON
Nous vous remercions d'avoir acheté un appareil de divertissement EMERSON. Votre nouvel appareil, comme tous ceux de
notre production, se conforme à de normes de qualité. Dans des conditions normales d'usage, nous sommes certains qu'il vous
donnera entière satisfaction pendant de nombreuses années. Cependant, en cas de problèmes, vous êtes protégé en vertu des
clauses de cette garantie.
Les appareils de divertissement EMERSON sont garantis, à l'usage normal, contre tous défauts de matériaux et de fabrication
pour les période spécifiées ci-dessous à condition que les dits appareils aient été installés et utilisés tel qu'explique dans le
manuel d'instruction.
PRODUCT
MAIN-D'OEUVRE
Lecteur DVD/Magnétoscope:
Têtes video:
Télécommande:
1 an
6 mois
90 jours
L'obligation de EMERSON, en vertu des clauses de cette garantie, est limitée à la réparation, y compris le remplacement des
pièces et le coût de la main-d'oeuvre pertinente, ou, à notre discrétion, au remplacement de tout appareil de divertissement qui
présente des défauts de fabrication pendant le période de garantie.
Les pièces remplacées fournies en rapport avec cette garantie, sont couverts pour une période égale à la portion restante de la
garantie de l'équipement original.
EXCLUSIONS DE LA GARANTIE
Cette garantie ne s'applique qu'aux appareils de divertissement EMERSON achetés et utilisés au Canada. Cette garantie ne
s'applique ni à l'apparence ni aux accessoires comprenant mais n'étant pas limités aux antennes, pièces du boîtier, boutons,
piles, couvercles, câbles de raccord, cassettes, disques compacts, boîtiers, peu importe la cause du dommage. En outre, cette
garantie ne s'applique pas non plus aux dommages causés par ou survenus lors de la manipulation, le transport, le déballage,
l'installation, les réglages effectués par le client et mentionnés dans le manuel d'instructions, les réparations ou le remplacement des pièces fournies par un service autre que le Centre de Service et de Réparations de EMERSON, à tout mauvais fonctionnement ou toute panne causé par ou résultant de conditions environmentales anormales, des réparations inadéquates par un
service non authorisé, un entretien incorrect, des réparations ou modifications effectuées par le client, les mauvais traitements
ou un fonctionnement non approprié la négligence, un accident, un incendie, une inondation ou tout autre cas de force
majeure, ou le branchement à un circuit à tension incorrecte.
La garantie de cet appareil de divertissement ne s'applique qu'à l'acheteur au détail initial. Cette garantie est nulle en cas d'utilisation commerciale de l'appareil ou à des-fins de location, ou si les numéros de série ont été modifiés, égratignés ou effacés.
EMERSON se réserve le droit de changer le concept, de faire des modifications ou des améliorations aux produits, sans avoir
l'obligation d'effectuer les mêmes changements aux mêmes produits fabriqués auparavant.
Ce qui précède remplace toute autre garantie explicite ou implicite et EMERSON n'assume responsabilité ni autorise
quiconque d'accepter en son nom toute obligation ou responsabilité liée à la vente, à l'entretien ou aux réparations de ce produit. En aucunes circonstances, EMERSON et ses détaillants EMERSON ne seront responsables des dommages spéciaux ou
indirects résultant de l'utilisation de ce produit ou de tout retard dans l'application de cette garantie attribuable à des causes
indépendants de notre volonté.
En vertu de certaines lois provinciales ou fédérales, l'acheteur peut avoir d'autres droits spécifiques, et si certaines clauses de
cette garantie sont interdites en vertu de ces lois, ces clauses seront nulles et non avenues, mais les autres clauses de cette
garantie resteront en vigueur.
OBLIGATIONS DU CLIENT
L'appareil est couvert par la garantie à partir de la date de l'achat initial au détail. En cas de service couverts par la garantie, le
propriétaire de l'appareil doit présenter la facture originale, datée. Aucun service ne sera effectué sans présentation de la facture. Le propriétaire est seul responsable pour l'expédition ou le transport de l'appareil vers le centre de service et son retour.
COMMENT OBTENIR LES SERVICES OU REPARATIONS
En cas de besoin, vous pouvez obtenir tous les renseignements sur les services et réparations en vous adressant au marchand
EMERSON qui vois a vendu cet appareil, ou en vous adressant directement à:
SONIGEM SERVICE
300 Alden Road
Markham, Ontario
L3R 4C1
TÉLÉPHONE: (905) 940-5089
TÉLÉCOPIEUR: (905) 940-2303
1-800-287-4871
E9412CD