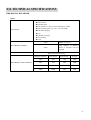
1
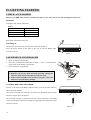
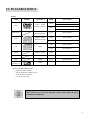
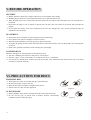
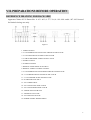
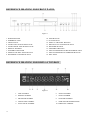
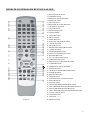
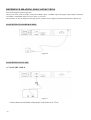
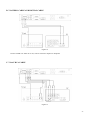
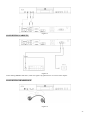
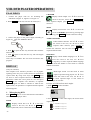
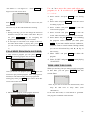
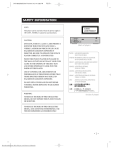
USER'S MANUAL
HDVR 6000
HDD VIDEO RECORDER
I. SAFETY INSTRUCTIONS
Read all the safety instructions before first use of your HDD video
recorder.
POWER SOURCE
You should only plug the appliance into a 100V to 240VAC, 50Hz supply.
Safety considerations
Position the power supply lead and other leads so that they are not likely to be walked on or pinched by things
placed on or against them.
Do not use the appliance in humid or damp conditions. Do not allow the appliance to get wet, i.e. dripping or
splashing, as this may be dangerous. Do not place water filled object, such as vases, on top of the appliance.
Make sure that no naked flame sources, such as candles, are placed on top of the appliance.
Cleaning
Unplug the appliance before you clean it.
Do not use liquid or aerosol cleaners.
Clean your appliance with a soft damp (not wet) cloth.
Ventilation
Any slots and opening on the appliance are for ventilation. Do not cover or block them as it could lead to
overheating.
NEVER let children push anything into the holes or slots on the case.
Servicing
There are no user serviceable parts in your HDD video recorder.
When servicing, refer to qualified service personnel.
Battery disposal
Please ensure batteries are disposed of safety.
Electrical information
Make ensure that the voltage of your electricity supply is the same as that indicated on the rear plate. This appliance may
be fitted with a non-rewireable plug. If you need to change the fuse in a non-rewireable, the fuse cover must be refitted.
If the fuse cover is lost or damaged, the plug must not be used until a replacement is obtained (available from the
appliance manufacturers). It is important that the colour of the replacement fuse cover corresponds with the colour
marking on the base of the plug.
If the plug has to be changed because it is not suitable for your socket, or becomes damaged, it should be removed and
an appropriate plug fitted following the wiring instructions below. The plug removed must be disposed of safety as
insertion into a main socket is likely to cause an electrical hazard.
If a 3 Amp (BS1363) plug is used, a 3 Amp fuse (BS1362) must be fitted, or if any other type of plug is used a 3 Amp
fuse must be fitted, either in the plug, adaptor or on the distribution board.
-1-
II. GETTING STARTED
CHECK ACCESSORIES
Remove your HDD video recorder carefully from the box, You may wish to store the packaging for future use.
In the box
Included in this package should be:
Table 1
HDD video recorder
Remote controller
AAA batteries
User’s manual
1
1
2
1
Read these instructions before use.
Switching on
Connect the 2-pin main plug into the main socket and switch on.
Press the power button on the front of the unit to turn the HDD video
recorder on or off.
Figure 1
USE REMOTE CONTROLLER
1. Open the battery compartment.
2. Insert two AAA batteries, make sure to match “+” and “-” of the batteries
to the marks in the battery compartment.
3. Close the battery compartment.
Notes:
1. Batteries can last for about 6 months generally. Change the
batteries of the remote controller if it does not work.
2. If the remote controller is not used for a long time, remove the
batteries to prevent battery leakage.
2
1
3
Figure 2
CONTROL HDD VIDEO RECORDER
Point it at the front of the HDD video recorder; press the relevant button to
choose demand function.
The remote controller will work up to 6 metres from the HDD video recorder
45
and at an angle of up to 45 degrees.
Do not block the path of the beam from the remote controller to the HDD
video recorder, dark walls direct sunlight or bright light will reduce the remote
control sensitivity.
Figure 3
-2-
TABLE OF CONTENTS
I. SAFETY INSTRUCTIONS ............................................................................................................................................1
II. GETTING STARTED ...................................................................................................................................................2
CHECK ACCESSORIES..................................................................................................................................................2
USE REMOTE CONTROLLER ......................................................................................................................................2
III. FEATURES...................................................................................................................................................................4
IV. PLAYABLE DISCS......................................................................................................................................................5
V. BEFORE OPERATION ................................................................................................................................................6
VI. PRECAUTIONS FOR DISCS .....................................................................................................................................6
VII. PREPARATIONS BEFORE OPERATION.............................................................................................................7
REFERENCE DRAWING FOR BACK SIDE .................................................................................................................7
REFERENCE DRAWING FOR FRONT PANEL............................................................................................................8
REFERENCE DRAWING FOR DISPLAY WINDOW ...................................................................................................8
REMOTE CONTROLLER BUTTON LAYOUT.............................................................................................................9
REFERENCE DRAWING FOR CONNECTIONS ........................................................................................................10
VIII. DVD PLAYER OPERATIONS..............................................................................................................................14
PLAY DISCS ..................................................................................................................................................................14
DISPLAY ........................................................................................................................................................................14
VOLUME CONTROL....................................................................................................................................................17
DVD MENU PLAY ........................................................................................................................................................17
FAST PLAY ....................................................................................................................................................................18
SLOW PLAY ..................................................................................................................................................................18
DIGEST PLAY ...............................................................................................................................................................18
PLAY MP3......................................................................................................................................................................18
IX. HDD RECORDER OPERATION ............................................................................................................................20
RECORD TV PROGRAM .............................................................................................................................................20
SCHEDULE RECORD...................................................................................................................................................20
RECORD EXTERNAL PROGRAM..............................................................................................................................20
PLAY/EDIT PROGRAM LIST HDD................................................................................................................................21
TIME SHIFT RECORD..................................................................................................................................................21
X. FUNCTION SETTING................................................................................................................................................22
PVR SETUP....................................................................................................................................................................22
DVD SETUP...................................................................................................................................................................23
MAIN SETTING ............................................................................................................................................................25
XI. TROUBLESHOOTING.............................................................................................................................................26
XII. TECHNICAL SPECIFICATIONS..........................................................................................................................27
-3-
III. FEATURES
1. MULTIPLE FUNCTIONS
Combines the functionalities of DVD player and HDD
Recorder.
2. HDD RECORDER
a. TIME-SHIFTING
Time-shifting recording using the HDD (Play and
record at the same time);
b. PLAY/RECORD AT SAME TIME
Play external DVD and record on the HDD at the
same time;
c. RECORD TV PROGRAM
Programming to record TV input at given time and
date;
d. POWERFUL DISPLAY
Display up to 8 programs in a play list per page
Navigate through play list;
Play, Edit, Info, Delete a play-list entry;
Display current recording schedule list, up to 36
programs;
Navigation of current recording schedule list
New/Edit/Delete options;
e. POWERFUL RECORDING
Define start, length, quality, and record mode of
recordings;
VCD, SVCD, DVD, SDVD record quality.
Five schedule record mode: once, daily, weekend,
weekday, Monday / Wednesday / Friday / Tuesday /
Thursday / Saturday;
View, edit, play from pre-recorded play list;
f. TIMER
Timer, date and time setup.
g. MULTIPLE INPUT
AV1, AV2, SCART, TV TUNER INPUT.
3. DVD PLAYER
a. OUTSTANDING SOUND QUALITY
Features high quality sound, can play DVD or CD
discs at home, reproduce high quality sound effects.
-4-
b. HIGH DEFINITION
The unit adopts MPEG2 coding format and brings
the horizontal resolution over 500 lines
c. UNIQUE FUNCTIONS
Multi-angle, multi-language and multi-story features
bring you unique trick functions.
Parent lock makes it easy to control the content of
discs.
d. SCREEN
Both ordinary screen and wide (16:9) screen are
available.
e. COMPATIBILITY
The unit can play DVD discs, and is compatible with
Super-VCD, VCD, CD, CD-R, CD-RW and MP3
discs.
f. ZOOM
It can enlarge pictures twice or four times as big.
g. NINE-PICTURE DIGEST
It can look through the content of discs and select to
play.
h. TRICK-PLAY
Fast forward, fast reverse, slow play, frame play,
repeat play and program play.
i. TIME SEARCH
It can search a specific part on a disc, especially well
for watching fiction movies.
j. RESUME PLAY
It can memorize the position where the disc is
stopped and resume playback.
k. CONTENT DISPLAY
It adopts coloured fluorescent display and English or
other national OSD (On Screen Display), make the
disc content clearer.
l. VIDEO OUTPUT
Composite video, S-video signal output mode, and
easy system change.
m. AUDIO OUTPUT
Analogue audio output and optical, coaxial digital
audio output can be connected with any amplifier to
enjoy high-quality sound effects.
IV. PLAYABLE DISCS
Table 2
TYPE
DVD
MARK
CONTENT
Audio + Video
(Motion pictures)
Super-VCD
Audio + Video
(Motion pictures)
VCD
Audio + Video
(Motion pictures)
CD
SIZE
12cm
8cm
PLAYING
About 2hrs(single-side disc)
About 4hrs(double-side disc)
About 80mins(double-side disc)
About 160mins(double-side disc)
12cm
About 45mins
12cm
About 74mins
8cm
About 20mins
12cm
About 74mins
8cm
About 20mins
Audio
CD-R
Audio + Video
12cm
CD-RW
Audio + Video
12cm
MP3
Audio
12cm
Kodak
Picture Cd
Video
About 600mins
Notices: MARK INDICATION
DVD- functions of DVD
SVCD- functions of Super-VCD
VCD- functions of VCD
CD- functions of CD
THIS UNIT IS SET TO PLAY REGION 2 DISCS FOR THE UK AND
EUROPEAN MARKETS.
-5-
V. BEFORE OPERATION
SECURITY
Before operation, check if the voltage of the unit is in line with the local voltage.
Hold the plug to disconnect it from the mains outlet. Do not pull the power cord.
When the plug of the unit is connected to the mains outlet, the unit will be still connected to AC even of the power is
turned off.
Disconnect the plug as soon as liquid or objects enter the unit. The unit cannot be used until being checked by
experts.
Do not open the cabinet. Laser rays employed by the unit may damage eyes. Any servicing should be done by
qualified service personnel.
PLACEMENT
Put the unit where ventilation is good enough to prevent overheating.
Never put the unit in direct sunlight or near heat sources.
Place the unit horizontally, never put any heavy object on the unit.
To protect the pickup, do not put the unit where there is much dust. If there is dust on the pickup, use a cleaning disc
to clean it.
Refer to the operation instructions of the cleaning disc you bought.
CONDENSATION
Moisture will appear on the pickup lens in the following cases:
The unit is suddenly moved from a cold place to a warm place.
The unit is put in a room with a heater, or in cold air from an air - conditioner.
Use the unit in a humid place. In these cases, the unit cannot work. Unload the disc and leave the unit on for about
one hour to evaporate the water.
VI. PRECAUTIONS FOR DISCS
HANDLING DISC
To keep the disc clean, do not touch the play sides of the disc.
Do not attach paper or tape to the disc.
Keep the disc away from direct sunlight or heat sources.
Store the disc in a disc case after playback.
Figure 4
CLEANING DISC
Before playback, wipe the disc outwards from the centre with clean cloth.
Do not use any type of solvent such as thinner, benzine, commercially
available cleaners or antistatic spray.
-6-
Figure 5
VII. PREPARATIONS BEFORE OPERATION
REFERENCE DRAWING FOR BACK SIDE
Apparatus Claims of U.S. Patent Nos. 4,631,603; 4,577,216; 4,819,098,and 4,907,093 licensed
for limited viewing uses only.
Figure 6
1. VIDEO OUTPUT
2. 5.1-CH SURROUND AUDIO LEFT TRACK OUTPUT JACK
3. 5.1-CH LEFT TRACK AUDIO OUTPUT JACK
4. 5.1CH SUBWOOFER AUDIO OUTPUT JACK
5. SCART OUTPUT
6. S-VIDEO OUTPUT
7. DIGITAL AUDIO OPTICAL OUTPUT
8. DIGITAL AUDIO COAXIAL OUTPUT
9. 5.1-CH SURROUND AUDIO RIGHT TRACK OUTPUT JACK
10. 5.1-CH RIGHT TRACK AUDIO OUTPUT JACK
11. 5.1-CH CENTER AUDIO OUTPUT JACK
12. SCART INPUT/OUTPUT
13. AV1 VIDEO INPUT
14. AV1 AUDIO LEFT INPUT JACK
15. AV1 AUDIO RIGHT INPUT JACK
16. VENTILATUON FOR FAN
17. ANTENNA OUT JACK
18. TV ANTENNA IN JACK
19. POWER SUPPLY WIRE SOCKET
-7-
REFERENCE DRAWING FOR FRONT PANEL
Figure 7
1. POWER BUTTON
2. EARPHONE JACK
3. VIDEO IN PUT
4. AUDIO LEFT TRACK INPUT JACK
5. AUDIO RIGHT TRACK INPUT JACK
6. DISPLAY WINDOW
7. STANDBY INDICATOR
8. OPEN/CLOSE DISC TRAY BUTTON
9. DVD/HDVR CONVERT BUTTON
10. STOP BUTTON
11. PLAY BUTTON
12. NEXT TV CHANNEL BUTTON
13. PREVIOUS TV CHANNEL BUTTON
14. RECODER BUTTON
15. TIME/SHIFT BUTTON
16. ONE CHAPTER/TRACK BACKWARD BUTTON
17. ONE CHAPTER/TRACK FORWARD BUTTON
18. DISC TRAY
REFERENCE DRAWING FOR DISPLAY WINDOW
Figure 8
-8-
1. DISC SYMBOL
6. ANGLE SYMBOL
2. REPEAT SYMBOL
7. TITLE NUMBER
3. PROGRAM SYMBOL
8. CHAPTER SYMBOL
4. DOLBY/DTS SYMBOL
9. TIME/TRACK INFORMATION
5. PLAY/PAUSE SYMBOL
10. PARENTAL SYMBOL
REMOTE CONTROLLER BUTTON LAYOUT
42
Figure 9
1. OPEN/CLOSE BUTTON
2. POWER BUTTON
3. REPEAT PLAYING BUTTON
4. DIGEST BUTTON
5. TITLE BUTTON
6. PROGRAM PLAYING BUTTON
7. A-B REPEAT BUTTON
8. ANGLE BUTTON
9. SUBTITLE BUTTON
10. VIDEO MODE
11. GOTO BUTTON
12. PBC BUTTON
13. DIGIT BUTTON
14. PAL/NTSC SWITCH BUTTON
15. CLEAR BUTTON
16. MUTE BUTTON
17. REGHT/LEFT SWITCH BUTTON
18. AUDIO BUTTON
19. BOOK/MARK BUTTON
20. NEXT TV CHANNEL BUTTON
21. RECORD BUTTON
22. TV / AV SWITCH BUTTON
23. TIME/SHIFT BUTTON
24. PREVIOUS TV CHANNEL BUTTON
25. A-TIME BUTTON
26. MEMORY PLAYING BUTTON
27. SETUP BUTTON
28. UP/DOWN/LEFT/RIGHT DIRECTION
29. ENTER BUTTON
30. RETURN BUTTON
31. STOP BUTTON
32. STEP PLAYING / PAUSE BUTTON
33. SLOW BUTTON
34. PLAY BUTTON
35. FAST BACKWARD SEARCH BUTTON
36. ONE CHAPTER/TRACK FORWARD BUTTON
37. FAST FORWARD SEARCH BUTTON
38. ONE CHAPTER/TRACK BACKWARD BUTTON
39. LANGUAGE BUTTON
40. ZOOM BUTTON
41. VOLUME “+ / -”
42. SAVE BUTTON
-9-
REFERENCE DRAWING FOR CONNECTIONS
Turn off all equipment before operation.
The unit has many kinds of output modes like VIDEO output, S-VIDEO output and digital signal output (OPTICAL,
COAXIAL) and SCART output. You may select, as you need.
This platform can also be integrated into high-end TV products such as Digital TV, HDTV, Back-Panel or Plasma-TV.
CONNECTING TO POWER SUPPLY
Figure 10
CONNECTING TO TV SET
A. VIA SCART CABLE
Figure 11
Connect Scart out a backside of the player to the Scart in on TV set.
-10-
B. VIA VIDEO CABLE AND DIGITAL CABLE
Figure 12
Connect CVBS or S-Video to TV set, connect Coaxial or Optical to Amplifier.
C. VIA AV RCA CABLE
Figure 13
-11-
CONNECTING AV INPUT DEVICE
A. VIA SCART CABLE
Figure 14
B. VIA AV RCA CABLE (AV1)
Figure 15
C. VIA AV RCA CABLE (AV2)
Figure 16
-12-
Figure 17
CONNECTING CABLE TV
Figure 18
Notes: During HDVR's shut-down, cable TV signal is by-passed to TV set via TV tuner outport.
CONNECTING HEADPHONE
Figure 19
-13-
VIII. DVD PLAYER OPERATIONS
PLAY DISCS
CHAPTER
1. Connect the player with TV set according the
indication in Figure 11, Figure 12 or Figure 13.
2. Push POWER on the TV, switch to AV mode (TV).
/
Display current chapter. Use
cursor to the icon, use
/
to move the
or CHAPTER to
select required chapter, press ENTER to confirm the
selection.
TIME
/
to move the
Display current time. Use
cursor to 00:00:00, input time by pressing digit
key, press ENTER to confirm the time setting.
3. Connect the player to the power supply according to
Figure 10. Push the “POWER” Button.
AUDIO CHANNEL
POWER
the cursor to the icon, use
to open the disc tray and load a disc with the
4. Push
label side up.
5. Push
again to close the disc tray. The unit begins
to read the disc.
After step 5 is finished. The TV screen will shows disc
program.
DISPLAY
(Only for reference)
This Graphics User Interface provides a set of graphic
operating menu for you to control and to be informed of
system status. By using arrow keys and ENTER, users
are able to select required functions and set required
parameters. When the cursor points an icon and press
ENTER, on the Graphics User Interface, an optional
menu is popped out. When a selection is made on the
optical menu, the operation is completed and the optional
menu disappears.
1.
/
Audio channel selection. Use
/
to move
to select
required audio channel, press ENTER to
confirm the selection. You can also use R/L to select
required audio channel.
SUBTITLE
Display current subtitle language. Use
/
to
move the cursor to the icon, use
/
or
SUB-T or digit Key to select required subtitle language
or switch on/off the subtitle. It will switch to selected
subtitle in real-time.
ANGLE
Multi-angle switch. Use this menu to select
/
angles of pictures being played. Use
move the cursor to the icon, use
/
to
or
ANGLE to select required angle. It will switch to
selected angle in real-time.
Example: A DVD has four movie angles.
a. Push ANGLE to select ANGLE.
The screen shows:
When playing DVD
Push DISPLAY, the TV screen will show the information
about the disc and player status.
b. Push ANGLE to select other angles, the screen shows
TITLE
Display current title. Use
/
to move the
cursor to the icon, use
/
or ENTER to
select required title, and to confirm the selection.
-14-
respectively:
2/4(SELECT angle 2)
3/4(SELECT angle 3)
4/4(SELECT angle 4)
A- B
REPEAT
Repeat play function. Use
cursor to the icon, use
/
/
to move the
, REPEAT or
ENTER to select required repeat play function.
Afterwards, the unit plays from A to B always.
c. Then press A-B , remove A-B repeat.
a. Repeat a chapter.
Push REPEAT or use
/
, the screen shows:
Notes: Only press A-B or
/
to remove A-B repeat.
BOOK/ MARK
b. Repeat a title
Push REPEAT again or use
/
Set a bookmark. Use
/ to move the cursor
to the icon, use digit key to select required
position, press ENTER to confirm the selection.
At maximum five bookmarks (1,2,3,4,5) can be set. This
operation is valid only when “BOOKMARK” is
, the screen shows:
/
displayed on OSD. You may also use
cursor to a bookmark and press ENTER to jump to the
position set and play.
c. Repeat a disc
Push REPEAT again or use
/
to move the
, the screen shows:
2. When playing VCD, Super-VCD
Push DISPLAY, The TV screen shows the information
about the disc and player status.
d. Remove REPEAT function.
Push REPEAT again or use
TRACK
/
, to cancel the repeat
/
Display current track. Use
function. The screen display:
cursor to the icon, use
/
to move the
or digit key to
select required track, and press ENTER to confirm the
selection when the PBC function is “OFF”.
TIME
REPEAT A-B
Repeat play from A to B selected. Use
move the cursor to the icon, use
/
/
to
, A-B or
ENTER to select required repeat play function.
a. Press A-B , set a starting point A. The screen shows:
A- B
b. Press A-B again, set a end point B. The screen shows:
/
to move the
Display current time. Use
cursor to 00:00:00, input time by pressing digit
key, press ENTER to confirm the time setting.
AUDIO CHANNEL
/
Audio channel selection. Use
to move
the cursor to the icon, use
/
to select
required audio channel, and to confirm the
selection. You can also use R/L to select required audio
channel.
PLAY MODE
Play mode selection. Use
/
cursor to the icon, use
to select required
/
to move the
-15-
audio channel, press ENTER to confirm the selection.
Three play modes are available: Sequential, Programmed
and Random.
PBC
A- B
b. Press A-B again, set a point B. The screen shows:
When PBC is “ON”, the system will display the
A- B
menu of VCD, use digit key to select what you
like. When PBC is “OFF”, system will be in
sequential play mode.
Afterwards, the unit plays from A to B.
c. Then press A-B , remove A-B repeat.
REPEAT
/
Repeat play function. Use
cursor to the icon, use
/
to move the
, REPEAT or
ENTER to select required repeat play function,
and to confirm the selection.
a. Repeat a chapter.
Push REPEAT or use
/
/
to remove A-B repeat.
BOOK/ MARK
, the screen shows:
Set a bookmark. Use
/ to move the cursor
to the icon, use digit keys to select required
position, press ENTER to confirm the selection.
At maximum five bookmarks (1,2,3,4,5) can be set. This
operation is valid only when “BOOKMARK” is
b. Repeat a disc
Push REPEAT again or use
Notes: Only press A-B or
displayed on OSD. You may also use
/
, the screen shows:
/
to move the
cursor to a bookmark and press ENTER to jump to the
position set and play.
3. When playing CD
Push DISPLAY, The TV screen shows the information
about the disc.
c. Remove REPEAT function.
Push REPEAT again or use
/
, to cancel the repeat
function. The screen display:
TRACK
/
Display current track. Use
cursor to the icon, use
/
to move the
or Digit Keys to
select required track, press ENTER to confirm the
selection.
TIME
REPEAT A-B
Repeat play from A to B selected. Use
move the cursor to the icon, use
/
/
to
, A-B or
/
to move the
Display current time. Use
cursor to 00:00:00, input time by pressing digit
key, press ENTER to confirm the time setting.
ENTER to select required repeat play function, and to
confirm the selection.
a. Press A-B , set a starting point A. The screen shows:
-16-
PLAY MODE
Play mode selection. Use
/
cursor to the icon, use
audio channel.
to select required
/
to move the
REPEAT
/
Repeat play function. Use
cursor to the icon, use
/
to move the
, REPEAT or
ENTER to select required repeat play function,
and to confirm the selection.
a. Repeat a chapter.
Push REPEAT or use
/
Notes: Only press A-B or
/
to remove A-B repeat.
BOOK/ MARK
, the screen shows:
Set a bookmark. Use
/ to move the cursor
to the icon, use digit keys to select required
position, press ENTER to confirm the selection. At
maximum five bookmarks (1,2,3,4,5) can be set. This
operation is valid only when “BOOKMARK” is
b. Repeat a disc
displayed on OSD. You may also use
Push REPEAT again or use
cursor to a bookmark and press ENTER to jump to the
position set and play.
/
, the screen shows:
/
to move the
VOLUME CONTROL
c. Remove REPEAT function.
Push REPEAT again or use
/
, to cancel the repeat
function. The screen display:
Push VOLUME on the TV or amplifier to adjust the
volume.
Also you can push VOLUME key on the remote control
to adjust volume. Push “+” to raise the volume.
+
Push “-” to lower the volume.
REPEAT A-B
Repeat play from A to B selected. Use
move the cursor to the icon, use
/
/
to
, A-B or
-
ENTER to select required repeat play function, and to
confirm the selection.
a. Press A-B , set a starting point A. The screen shows:
A- B
b. Press A-B again, set a point B. The screen shows:
A- B
DVD MENU PLAY
Some DVD discs have title menus and chapter menus.
Push MENU or TITLE, the screen shows the menu. Use
the arrow key to move to the desired item, then press
PLAY, or ENTER to choose select, or direct press digit
key to choose menu item.
to see the next page, select with digit key and
Push
arrow key.
Afterwards, the unit plays from A to B.
c. Press A-B , remove A-B repeat.
ROOT 1.-------MENU 2.-------.
.
--------
Example: select menu item 13.
-17-
1. Push
to enter the next menu.
3. Push PLAY to play normally when playing fast.
ROOT 12.------MENU 13.------14.------15.-------
2. Push digit buttons to select directly.
10+
+
SLOW PLAY
Enjoy slow motions by the following steps.
WHEN PLAYING DVD Super-VCD or VCD
3
1. Push SLOW to play slowly. The screen shows orderly:
Pressing 10+ one time means adding 10. If select tracks
greater 19, please press 10+ twice, and then press 1 to 9
button. It is the similarity for selecting tracks greater 29
or item.
You can also do as follows:
1. Push
1/2
SLOW
1/4
1/8
to select menu item 13.
2.Push PLAY to play normally when playing slow.
ROOT 12.------MENU 13.------14.------15.-------
2. Push PLAY to start playing the selected menu item.
Push TITLE once to return to the title menu. Push it
again to return to the current playback.
DIGEST PLAY
(For VCD, SVCD, CD only)
This function can be used to look through the content of a
track or a disc.
FAST PLAY
Push DIGEST after the unit stop and shows 9 picture on
When playing disc, you may play it fast forward or
reverse it quickly to find what you need.
the screen.
PLAYING DVD, Super-VCD or VCD, CD,MP3
Note: There is different format in each disc, so playing
time is different. Time follow discs.
1. Push
to play forward fast. Each time you push the
button, the screen shows orderly.
The unit plays usually each track for ten seconds.
PLAY MP3
2X
4X
MP3 Discs use a navigation system on the DVD player
called SMART NAVI.
Please use the following instructions for navigation and
8X
to reverse the disc fast. Each time you push
2. Push
the button, the screen shows orderly:
2X
4X
file playback.
1. Insert MP3 Disc.
2. After a few seconds the SMART NAVI Control panel
will display on your TV screen.
3. SMART NAVI consists of two navigation panels and a
information indication area, the top Panel displays
folders whilst the bottom panel displays further nested
8X
-18-
folders and files. Information indication area consists
of three indicator: Time, File name, Play mode
indicator.
4. Press the RETURN on the remote control handset to
return to top panel when the cursor locates in bottom
panel.
5. Scroll up and down through files or folders using the
0:02:00
000116825.mp3
DISC
Root
Mp3_01
Mp3_02
1. 000116821.mp3
2. 000116822.mp3
3. 000116823.mp3
4. 000116824.mp3
5. 000116825.mp3
6. 000116826.mp3
7. 000116827.mp3
8. 000116828.mp3
9. 000116829.mp3
UP/DOWN cursors on the remote control
6. Select and expand a folder by pressing the PLAY /
REPEAT PLAYBACK
ENTER button on the remote control handset whilst it
a. Choose track to play.
is highlighted.
b. Press REPEAT to choose playback mode “ONE”,
7. Play a file by highlighting it, then press PLAY or press
the corresponding number on the remote key pad to
that listed on the bottom panel on the screen.
“DISC”, “DIR”, “SHUFFLE”.
c. Cancel repeat mode, press REPEAT until the
indicator show nothing.
-19-
IX. HDD RECORDER OPERATION
You can record TV program and other A/V program by
PVR PAGE
connecting cable TV or other A/V device output to
PROGRAM LIST
RECORD SCHEDULE
SETTING
RETURN
PVR
HDD recorder.
DVD
SETTING
RECORD TV PROGRAM
EXIT
If you want to record a chapter when you are watching
Use
TV.
SCHEDULE”, then push ENTER to confirm. The
Push RECORD to begin record. The screen show:
screen show:
/
to move the cursor and select “RECORD
RECORD 00:00:00
CH 26
SCHEDULE LIST
No. DATE START END
INPUT REC.Q MO DE
Push STOP If you want to finish this record at once.
The screen show:
EDIT
DEL
EXIT
Select EDIT, press ENTER to confirm. The screen
show:
EVENT SETTING
Notice: Push CH+ / CH- or digit button to change the
TV channel when playing TV. But in recording status,
you can not change TV channel.
CURRENT TIME: 2003/01/05 10:10:12 MONDAY
START TIME :
2001/01/01 00:00
END TIME:
00:01
INPUT:
067
PROG NAME:
HXX1259
MODE: ONE TIME/EVERY DAY/EVERY WEEKL
REC-Q: COMMON /GOOD/BETTER/BEST
OK
SCHEDULE RECORD
Record schedule allow you to make schedule for
recording. There are three schedule modes: One time
mode, Every day mode, and Every week mode. You can
enter setup menu to make recording schedule. Push
SETUP to enter the main menu. The screen show:
MAIN PAGE
PVR
CANCEL
Now you can use
/
/
/
to move the cursor to
the icon, use CH+ / CH- or digit key to date, time and
channel number change, and use
/
to select
MODE and REC-Q .
Notice: If you finish schedule, that menu item will be
marked with scheduled symbol. When you choose
that one again, you can choose “DELETE”, to delete
that record Schedule or “EDIT” to change schedule
parameters.
DVD
SETTING
EXIT
Use
/
to move the cursor to the icon and select
“PVR”, then push ENTER to confirm. The screen
show:
-20-
RECORD EXTERNAL PROGRAM
If connect external audio/video output device to AV1
AV2, you can make a record of external program.
In the TV/AV status, push TV/AV for select “AV1”
input mode if the A/V output device is connected to
“AV INPUT 1”(ref Figure 15). Push RECORD to
Use
to move the cursor and select one
begin record. The screen show:
program, use
/
/
to select and push ENTER
to confirm.
RECORD 00:00:00
AV1
Select “PLAY” and push ENTER to for starting
play.
Push STOP, if you want to finish this record. Now, the
Select “SEL” and push ENTER to mark this record
for adding to play list.
record is over.
The same way to AV2 and SCART IN recording.
Notes:
1. During recording, you can not change the television
channel or navigate CD / MP3 / video discs. But you
can press PROGRAM key for navigating the
program list that has already been recorded.
2. If AV2 input is connected to AV output of this unit,
and when DVD loader is playing disc, press REC,
you can record disc program to hard disc.(ref Figure
17)
Select “VIEW” and push ENTER to view the
content of the program.
Select “LOCK” and push ENTER to, lock the
record. After locked the program can not be deleted.
Select “REN” and push ENTER to start renaming
the program. After renamed, you must press
SAVE
if you want confirm and exit. Otherwise,
just press return to cancel rename. During rename,
you can use directional key and
PLAY/EDIT PROGRAM LIST HDD
1. Play record a program you can press PROG or
SETUP for choosing program list, the screen show:
PROGRAM LIST
H001259
H00 1260
H001261
H001262
H001263
H001264
H001265
PAGE1/1
INFO
DATE 2002/09/10
TIME 16:00:02
LGTH 00:05:16
TYPE PRO GRAM
MODE LP
PLAY SEL VIEW LOC K REN DEL P-LIST
After you choose one program, press PLAY again, the
unit start to play selected program. After one program is
finished, it will automatically return to program list.
During play status, push STOP if you want to finish this
,
key to
move cursor.
Select “DEL” and push ENTER to delete the
program.
Select “P-LIST” and push ENTER to start playing
“PLAY LIST”.
TIME SHIFT RECORD
When you are busy, but you want to watch a program,
in later time, you can press T/SHIFT and the
screen show:
TIME SHIFTING 00:00:00
CH 26
record. The screen show:
Notes: If you want to use the time shift function, must
setup the shift time in setup menu (refer
“SETTING”).
2. Edit recorded program, in the program list status.
PROGRAM LIST
H001259
H00 1260
H001261
H001262
H001263
H001264
H001265
PAGE1/1
In the time shift mode, no recorded file is generated.
The program is buffered in the hard disc
INFO
DATE 2002/09/10
TIME 16:00:02
LGTH 00:05:16
TYPE PRO GRAM
MODE LP
PLAY SEL VIEW LOC K REN DEL P-LIST
-21-
X. FUNCTION SETTING
According to the recorded information and external
equipment, set the following functions for HDD video
recorder to obtain the best playing status.
Push SETUP to enter the main menu.
SETUP
RECORD SCHEDULE
Use
/
to move the cursor and select “REDORD
SCHEOULE”, then push ENTER to confirm. the screen
show:
SCHEDULE LIST
The screen shows:
No. DATE START END
INPUT REC.Q MO DE
MAIN PAGE
PVR
EDIT
DVD
DEL
EXIT
SETTING
Record schedule allow you to make schedule for
EXIT
recording. (reference “Record schedule”)
Push SETUP or go to EXIT toexit from the main menu.
SETTING
PVR SETUP
Use
/
to move the cursor and select “PVR”, The
Use
/
to move the cursor and select “SETTING”,
then push ENTER to confirm. the screen show:
screen show:
PVR SETTING PAGE
PVR PAGE
PVR
DVD
DATE/TIME SETUP
HDD MANAGER
RECORD QUALITY
TIME SHIFTING
POWER ON MODE
AUTO OVERLAY
RETURN
PVR
PROGRAM LIST
RECORD SCHEDULE
SETTING
RETURN
DVD
SETTING
EXIT
SETTING
EXIT
DATE / TIME SETUP
Utilize this function to set for up date and time.
PROGRAM LIST
Use
/
PVR SETTING PAGE
to move the cursor and select “PROGRAM
PVR
DVD
LIST”, then push ENTER to confirm. the screen show:
SETTING
PROGRAM LIST
H001259
H00 1260
H001261
H001262
H001263
H001264
H001265
PAGE1/1
INFO
DATE 2002/09/10
TIME 16:00:02
LGTH 00:05:16
TYPE PRO GRAM
MODE LP
PLAY SEL VIEW LOC K REN DEL P-LIST
In the program list status, you can play record a program
and edit recorded program. (reference “PLAY/EDIT
PROGRAM LIST HDD”)
-22-
EXIT
Use
/
DATE/TIME SETUP
HDD MANAGER
RECORD QUALITY
TIME SHIFTING
POWER ON MODE
AUTO OVERLAY
RETURN
2003/01/05
16:09:16
to move the cursor, and use
/
to make
modification, push ENTER to confirm the modification.
HARD DISK MANAGER
Use
/
to move the cursor to the icon and select
“HARD MANAGER”, the screen show:
PVR SETTING PAGE
PVR
DVD
SETTING
EXIT
DATE/TIME SETUP
HDD MANAGER
RECORD QUALITY
TIME SHIFTING
POWER ON MODE
AUTO OVERLAY
RETURN
“POWER-ON MODE”, the screen show:
PVR SETTING PAGE
SYSTEM INFO
SCAN DISK
FO RMAT DISK
PVR
DVD
SETTING
EXIT
Select “system info”, the screen show the hard disk
information.
Select “scan disk”, check the hard disk, and
reconstruct the hard disk if there is bad sector
detected.
Select “format disk”, the function can format the
hard disk, all program will be deleted, all space in
hard disc will be available for recording.
shifting Mode.
AUTO OVERLAY
Use
/
to move the cursor and select “AUTO
OVERLAY”, the screen show:
PVR SETTING PAGE
Utilize this item to set up recore quality.
PVR
PVR SETTING PAGE
DVD
SETTING
EXIT
NO RMAL MO DE
TIMESH IFTIN G
There are two power-on mode: Normal Mode and Time
RECORD QUALITY
PVR
DATE/TIME SETUP
HDD MANAGER
RECORD QUALITY
TIME SHIFTING
POWER ON MODE
AUTO OVERLAY
RETURN
DVD
SETTING
DATE/TIME SETUP
HDD MANAGER
RECORD QUALITY
TIME SHIFTING
POWER ON MODE
AUTO OVERLAY
RETURN
EXIT
SEP
EP
LP
SP
DATE/TIME SETUP
HDD MANAGER
RECORD QUALITY
TIME SHIFTING
POWER ON MODE
AUTO OVERLAY
RETURN
ENABLE
DISABLE
Select “ENABLE”, if the hard disk is full of record,
the new record program will overlay. the oldest
record content automatically.
Select “SEP”, longest time lowest recording quality.
Select “DISABLE”, if the hard disk is full of record,
Select “EP”, average time, ordinary recording
unit will stop recording and show error message.
quality.
Select “LP”, recording quality.
Select “SP”, shortest time highest recording quality.
DVD SETUP
TIME SHIFTING SETUP
Use
Use
screen show:
/
to move the cursor and select “TIME
/
to move the cursor and select “DVD”. The
SHIFTING”, the screen show:
DVD PAGE
PVR SETTING PAGE
PVR
DVD
SETTING
EXIT
DATE/TIME SETUP
HDD MANAGER
RECORD QUALITY
TIME SHIFTING
POWER ON MODE
AUTO OVERLAY
RETURN
DVD
30 MINU TE S
60 MINU TE S
90 MINU TE S
120 MIN UTES
time.
POWER ON MODE
/
AUDIO SETUP
VIDEO SETUP
RETURN
SETTING
If you want to use the time shift function, must setup shift
Use
PVR
to move the cursor to the icon and select
EXIT
AUDIO SETUP
Use
/
to move the cursor and select “AUDIO
SETUP”, the screen show:
-23-
AUDIO SETUP PAGE
VIDEO SYSTEM
VIDEO SETUP PAGE
ANALOG OUTPUT
DIGITAL OUTPUT
RETURN
PVR
DVD
PVR
DVD
SETTING
EXIT
VIDEO SYSTEM
SCREEN ASPECT
VIDEO OUTPUT
RETURN
NTSC
PAL
SETTING
EXIT
ANALOG OUTPUT
AUDIO SETUP PAGE
ANALOG OUTPUT
DIGITAL OUTPUT
RETURN
PVR
DVD
You can select NTSC or PAL according TV system of
TV set.
Select “NTSC” for a NTSC TV system output.
Select “PAL” for a PAL TV system output.
2 C HANNEL
5.1 CHA NNEL
SCREEN ASPECT
SETTING
EXIT
Use
2 CHANNEL: Down Mix to left and the right track
as output.
/
to move the cursor and select “SCREEN
ASPECT”, the screen show:
VIDEO SETUP PAGE
5.1 CHANNEL: Switch to 5.1channel output: left,
Right, Rear Left, Rear Right, Center and Subwoofer.
PVR
DVD
DIGITAL OUTPUT
Use
/
EXIT
OUTPUT”, the screen show:
Select “16:9 WS”: This is selected when the unit is
connected with a wide-screen TV.
AUDIO SETUP PAGE
DVD
ANALOG OUTPUT
DIGITAL OUTPUT
RETURN
Select “4:3 LB”: This is selected when the unit is
connected with a normal TV. Wide-screen images
are shown on screen, with black belts on the top and
bottom.
DOLBY DTS
LPCM
SETTING
EXIT
Select “4:3 PS”: This is selected when the unit is
connected with a normal TV. Wide-screen images
are shown on the screen, but with some parts cut
automatically.
DOLBY DTS: Select this when the HDD video
recorder is connected to an amplifier Dolby or DTS
decoder.
LPCM: Select this if you want to have high quality
output. But only 2 channel output.
VIDEO SETUP
Use
/
VIDEO OUTPUT
Use
/
to move the cursor to the icon and select
“VIDEO OUTPUT”, the screen show:
to move the cursor and select “VIDEO
SETUP”, the screen show:
VIDEO SETUP PAGE
VIDEO SETUP PAGE
PVR
DVD
SETTING
PVR
DVD
SETTING
EXIT
-24-
VIDEO SYSTEM
SCREEN ASPECT
VIDEO OUTPUT
RETURN
16:9 WS
4:3 LB
4:3 PS
SETTING
to move the cursor and select “DIGITAL
PVR
VIDEO SYSTEM
SCREEN ASPECT
VIDEO OUTPUT
RETURN
VIDEO SYSTEM
SCREEN ASPECT
VIDEO OUTPUT
RETURN
YCrCb
SCART
EXIT
YCrCb: The OUTPUT is in YCrCb.
SCART: The OUTPUT is in SCART.
MAIN SETTING
Select “MANUAL”: The TV start to search one
channel by one channel in manual.
Use
Select “FINE”: The TV start to search one channel
fine adjustment.
/
to move the cursor and select “SETTING”.
MAIN SETTING PAGE
OSD LANGUAGE
TV CHANNEL
PICTURE SETUP
DEFAULT
RETURN
PVR
DVD
PICTURE SETUP
Use
/
to move the cursor and select “PICTURE
SETUP”, the screen show:
SETTING
EXIT
MAIN SETTING PAGE
OSD LANGUAGE SETUP
Use
/
DVD
to move the cursor and select “OSD
SETTING
LANGUAGE SETUP”, the screen show:
PVR
DVD
BRIGHTNESS
CONTRAST
COLOR
D E FA U L T
EXIT
MAIN SETTING PAGE
OSD LANGUAGE
TV CHANNEL
PICTURE SETUP
DEFAULT
RETURN
OSD LANGUAGE
TV CHANNEL
PICTURE SETUP
DEFAULT
RETURN
PVR
Select “BRIGHTNESS”: In this menu you can
adjust the brightness of the picture. Move the bar by
pressing the buttons CH+ or CH- to set the
brightness.
Select “CONTRAST”: In this menu you can adjust
the picture sharpness. Move the highlight bar by
ENGLISH
CHINESE
SETTING
EXIT
TV CHANNEL MANAGER
pressing the buttons CH+ or CH- to set the
sharpness either to high, medium or low.
Select “COLOR”: In this menu you can adjust the
picture color. Move the highlight bar by pressing the
Use
buttons CH+ or CH- to set the balance equilibrium.
ENGLISH: The OSD is in ENGLISH.
CHINESE: The OSD is in CHINESE.
/
to move the cursor and select “TV
Select “DEFAULT”: Push ENTER to recover to
factory setting.
CHANNEL MANAGER”, the screen show:
MAIN SETTING PAGE
PVR
DVD
SETTING
OSD LANGUAGE
TV CHANNEL
PICTURE SETUP
DEFAULT
RETURN
SORT
AUTO
MANUAL
FINE
DEFAULT
Use
/
to move the cursor and select “DEFAULT”,
the screen show:
MAIN SETTING PAGE
EXIT
PVR
Use
/
to move the cursor, select TV channel
DVD
managing mode: SORT, AUTO, MANUAL and FINE,
push ENTER to confirm.
Select “SORT”: You can sort TV channel according
to your demand.
Select “AUTO”: The TV start to search all channels
automatically.
SETTING
OSD LANGUAGE
TV CHANNEL
PICTURE SETUP
DEFAULT
RETURN
DEFAULT
RETURN
EXIT
Select “DEFAULT”, push ENTER to recover to factory
setting.
-25-
XI. TROUBLESHOOTING
If you experience the following problems while using the
unit, this troubleshooting guide can help you.
No sound
Check if the unit is connected securely.
Make sure you operate the TV or amplifier correctly.
Make sure you have selected HDD video recorder
position on the amplifier.
No image
Check if the unit is connected securely.
Make sure you operate the TV correctly.
Make sure you set the colour system correctly.
Bad sound quality
Make sure the audio output mode is set correctly.
Make sure the audio connection between the unit
and amplifier is right.
Image rolls and no colour
The colour system set by this unit does not match
with that of TV. Push P/N on the remote control to
-26-
select needed one.
Disc cannot be played
There is no disc in the unit.
Put the disc on the disc tray properly with the label
side up.
Clean the disc.
Moisture has condensed in the unit. Remove the disc
and leave the unit on for about one hour.
Remote control does not work
Remove barriers between the remote control and the
unit.
Replace the batteries with new ones.
Point the remote control at the remote control sensor
of the unit.
Reference page 2.
XII. TECHNICAL SPECIFICATIONS
HDD DIGITAL RECORDER
Table 3
FUNCTION
Play
Fast Forward
Fast Backward
Switch between video record and DVD play modes
Switch Video inputs (TV, A/V1, A/V2, SCART)
PVR Status Display
Stop
Schedule recording
Time shifting
Timer
Audio
MPEG-2, Layer II
Video
either MPEG-1 or MPEG-2
format, 4 selections: SP, LP,
EP, SEP
RECORDING FORMAT
OTHER
RECORDING TIME LENGTH
Date, Clock, Tuner Set-up
Harddisc capability
VCD format
DVD format
Average
40G
36H
12H
24H
80G
72H
24H
48H
120G
108H
36H
72H
160G
144H
48H
96H
-27-
DVD PLAYER
Table 4
Television system
NTSC / PAL
Frequency response
20Hz~ 20KHz
Signal/noise ratio(Audio)
≥ 106 dB (At 1KHz,JIS A-Weighted)
Distortion (Audio)
≤ -80dB (At 1KHz 0dB)
Channel
separation
1KHz
> 85 dB (Mixed output)
10KHz
> 85 dB (Mixed output)
≥ 80 dB
Dynamic range
Output
Audio
Output
Video
Analogue
2.0±0.2Vrms
Digital
0.5±0.1Vp-p
Output impedance
< 1.5KΩ
Composite
1.0±0.2Vp-p
Load impedance: 75Ω,imbalance, negative polarity
Output Impedance
75±7.5Ω
S-video out
Luma
1.0±0.2Vp-p
Chro.
0.286±20%
Power Voltage
AC100~240V, 50Hz/60Hz
Power consumption (Max)
60 W
Dimension(W×H×D)
430 × 55 × 295 mm
Weight
5.0kg
Manufactured under license from Dolby Laboratories.
“Dolby” and the double-D symbol are trademarks of Dolby Laboratories.
This product incorporates copyright protection technology that is protected by method claims of certain
U.S. patents and other intellectual property rights owned by Macrovision Corporation and other rights
owners. Use of this copyright protection technology must be authorized by Macrovision Corporation,
and is intended for home and other limited viewing uses only unless otherwise authorized by
Macrovision Corporation. Reverse engineering or disassembly is prohibited.
HDVR6000-om-v04
-28-