1
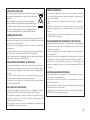
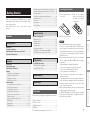
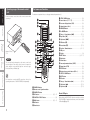
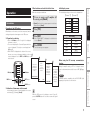
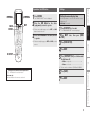
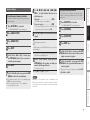
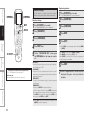
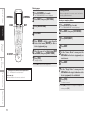
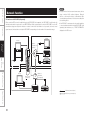
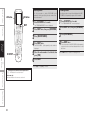
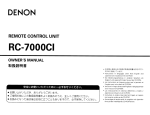
REMOTE CONTROL UNIT
RC-7000CI
OWNER’S MANUAL
IC Information (For Canadian customers)
FCC Information (For US customers)
1. DEVICE
RC-7000CI IC: 6963A-RC7000
This device complies with RSS-210 of Industry Canada.
Operation is subject to the following two conditions: (1) this device may not
cause harmful interference, and (2) this device must accept any interference
received, including interference that may cause undesired operation.
APPAREIL
RC-7000CI IC: 6963A-RC7000
Cet appareil est conforme à la norme CNR-210 du Canada.
L’utilisation de ce dispositif est autorisée seulement aux deux conditions
suivantes : (1) il ne doit pas produire de brouillage, et (2) l’utilisateur du
dispositif doit être prêt à accepter tout brouillage radioélectrique reçu, même
si ce brouillage est susceptible de compromettre le fonctionnement du
dispositif
1. DEVICE
RC-7000CI FCC ID: BV2-RC7000
This device complies with Part 15 of the FCC Rules. Operation is subject to the
following two conditions: (1) this device may not cause harmful interference,
and (2) this device must accept any interference received, including interference
that may cause undesired operation.
IMPOTANT SAFETY
INSTRUCTIONS
1. Read these instructions.
2. Keep these instructions.
3. Heed all warnings.
4. Follow all instructions.
5. Do not use this apparatus near water.
6. Clean only with dry cloth.
7. Do not place near any heat sources such as radiators, heat registers, stoves, or
other apparatus (including amplifiers) that produce heat.
8. Only use attachments/accessories specified by the manufacturer.
9. Refer all servicing to qualified service personnel. Servicing
is required when the apparatus has been damaged in any
way, such as liquid has been spilled the apparatus has been
exposed to rain or moisture, does not operate normally, or
has been dropped.
10. Batteries shall not be exposed to excessive heat such as sunshine, fire or the
like.
2. IMPORTANT NOTICE: DO NOT MODIFY THIS DEVICE
This device, when installed as indicated in the instructions contained in this
manual, meets FCC requirements. Modification not expressly approved by
DENON may void your authority, granted by the FCC, to use the device.
3. NOTE
This device has been tested and found to comply with the limits for a Class B
digital device, pursuant to Part 15 of the FCC Rules. These limits are designed
to provide reasonable protection against harmful interference in a residential
installation.
This device generates, uses and can radiate radio frequency energy and, if
not installed and used in accordance with the instructions, may cause harmful
interference to radio communications. However, there is no guarantee that
interference will not occur in a particular installation. If this device does cause
harmful interference to radio or television reception, which can be determined
by turning the device OFF and ON, the user is encouraged to try to correct the
interference by one or more of the following measures:
• Reorient or relocate the receiving antenna.
• Increase the separation between the equipment and receiver.
• Connect the device into an outlet on a circuit different from that to which the
receiver is connected.
• Consult the local retailer authorized to distribute this type of device or an
experienced radio/TV technician for help.
A NOTE ABOUT RECYCLING:
This product’s packaging materials are recyclable and can be reused.
Please dispose of any materials in accordance with the local recycling
regulations.
When discarding the unit, comply with local rules or regulations.
Batteries should never be thrown away or incinerated but disposed of
in accordance with the local regulations concerning battery disposal.
This product and the supplied accessories, excluding the batteries,
constitute the applicable product according to the WEEE directive.
HINWEIS ZUM RECYCLING:
Das Verpackungsmaterial dieses Produktes ist zum Recyceln geeignet und kann
wieder verwendet werden. Bitte entsorgen Sie alle Materialien entsprechend
der örtlichen Recycling-Vorschriften.
Beachten Sie bei der Entsorgung des Gerätes die örtlichen Vorschriften und
Bestimmungen.
Die Batterien dürfen nicht in den Hausmüll geworfen oder verbrannt werden;
bitte entsorgen Sie die Batterien gemäß der örtlichen Vorschriften.
Dieses Produkt und das im Lieferumfang enthaltene Zubehör (mit Ausnahme
der Batterien!) entsprechen der WEEE-Direktive.
UNE REMARQUE CONCERNANT LE RECYCLAGE:
Les matériaux d’emballage de ce produit sont recyclables et peuvent être réutilisés.
Veuillez disposer des matériaux conformément aux lois sur le recyclage en vigueur.
Lorsque vous mettez cet appareil au rebut, respectez les lois ou réglementations
en vigueur.
Les piles ne doivent jamais être jetées ou incinérées, mais mises au rebut
conformément aux lois en vigueur sur la mise au rebut des piles.
Ce produit et les accessoires inclus, à l’exception des piles, sont des produits
conformes à la directive DEEE.
NOTA RELATIVA AL RICICLAGGIO:
I materiali di imballaggio di questo prodotto sono riutilizzabili e riciclabili.
Smaltire i materiali conformemente alle normative locali sul riciclaggio.
Per lo smaltimento dell’unità, osservare le normative o le leggi locali in vigore.
Non gettare le batterie, né incenerirle, ma smaltirle conformemente alla
normativa locale sui rifiuti chimici.
Questo prodotto e gli accessori inclusi nell’imballaggio sono applicabili alla
direttiva RAEE, ad eccezione delle batterie.
ACERCA DEL RECICLAJE:
Los materiales de embalaje de este producto son reciclables y se pueden
volver a utilizar. Disponga de estos materiales siguiendo los reglamentos de
reciclaje de su localidad.
Cuando se deshaga de la unidad, cumpla con las reglas o reglamentos
locales.
Las pilas nunca deberán tirarse ni incinerarse. Deberá disponer de ellas
siguiendo los reglamentos de su localidad relacionados con los desperdicios
químicos.
Este producto junto con los accesorios empaquetados es el producto aplicable
a la directiva RAEE excepto pilas.
EEN AANTEKENING MET BETREKKING TOT DE RECYCLING:
Het inpakmateriaal van dit product is recycleerbaar en kan opnieuw gebruikt
worden. Er wordt verzocht om zich van elk afvalmateriaal te ontdoen volgens
de plaatselijke voorschriften.
Volg voor het wegdoen van de speler de voorschriften voor de verwijdering van
wit- en bruingoed op.
Batterijen mogen nooit worden weggegooid of verbrand, maar moeten volgens
de plaatselijke voorschriften betreffende chemisch afval worden verwijderd.
Op dit product en de meegeleverde accessoires, m.u.v. de batterijen is de
richtlijn voor afgedankte elektrische en elektronische apparaten (WEEE) van
toepassing.
OBSERVERA ANGÅENDE ÅTERVINNING:
Produktens emballage är återvinningsbart och kan återanvändas. Kassera det
enligt lokala återvinningsbestämmelser.
När du kasserar enheten ska du göra det i överensstämmelse med lokala
regler och bestämmelser.
Batterier får absolut inte kastas i soporna eller brännas. Kassera dem enligt
lokala bestämmelser för kemiskt avfall.
Denna apparat och de tillbehör som levereras med den uppfyller gällande
WEEE-direktiv, med undantag av batterierna.
II
• DECLARATION OF CONFORMITY
Hereby, D&M Holdings Inc., Denon Brand Company declares that this
product RC-7000CI is in compliance with the essential requirements and
other relevant provisions of Directive 1999/5/EC, in conformity with the
following standards;
EN300328, EN301489-01 and EN301489-17
The declaration of conformity may be consulted to our European
representative, DENON EUROPE.
• ÜBEREINSTIMMUNGSERKLÄRUNG
Hiermit erklärt D&M Holdings Inc., Denon Brand Company, dass sich
das Gerät RC-7000CI in Übereinstimmung mit den grundlegenden
Anforderungen und den übrigen einschlägigen Bestimmungen der Richtlinie
1999/5/EG befindet, den folgenden Standards entspricht:
EN300328, EN301489-01 und EN301489-17
Wenden Sie sich bei Fragen zur Konformitätserklärung an unseren
europäischen Vertreter, DENON EUROPE.
• DECLARATION DE CONFORMITE
Par la présente, D&M Holdings Inc., Denon Brand Company déclare que
l’appareil RC-7000CI est conforme aux exigences essentielles et aux autres
dispositions pertinentes de la directive 1999/5/CE, e conforme alle seguenti
normative:
EN300328, EN301489-01 et EN301489-17
La déclaration de conformité pourra être consultée auprès de notre
représentant en Europe, DENON EUROPE.
• DICHIARAZIONE DI CONFORMITÀ
Con la presente D&M Holdings Inc., Denon Brand Company dichiara che
questo RC-7000CI è con-forme ai requisiti essenziali ed alle altre disposizioni
pertinenti stabilite dalla direttiva 1999/5/CE, e conforme alle seguenti
normative:
EN300328, EN301489-01 e EN301489-17
La dichiarazione di conformità può essere consultata presso il nostro
rappresentante europeo, DENON EUROPE.
QUESTO PRODOTTO E’ CONFORME
AL D.M. 28/08/95 N. 548
III
• DECLARACIÓN DE CONFORMIDAD
Por la presente, D&M Holdings Inc., Denon Brand Company, declara que
este RC-7000CI cumple con los requisitos esenciales y otras exigencias
relevantes de la Directiva 1999/5/EC, esta conforme con los siguientes
estandares:
EN300328, EN301489-01 y EN301489-17
Puede consultar a nuestro representante europeo, DENON EUROPE, acerca
de la declaración de conformidad.
• EENVORMIGHEIDSVERKLARING
Hierbij verklaart D&M Holdings Inc., Denon Brand Company dat het toestel
RC-7000CI in overeenstemming is met de essentiële eisen en de andere
relevante bepalingen van richtlijn 1999/5/EG, in overeenstemming is met de
volgende normen:
EN300328, EN301489-01 en EN301489-17
De eenvormigheidsverklaring mag worden geconsulteerd aan onze Europese
vertegenwoordiger, DENON EUROPA.
• ÖVERENSSTÄMMELSESINTYG
Denna utrustning är i överensstämmelse med de väsentliga kraven och andra
relevanta bestämmelser i Direktiv 1999/5/EC, uppfyller foljande standarder:
EN300328, EN301489-01 och EN301489-17
EU-konformitetsintyget kan på begäran fås från DENON EUROPE, vår
representant i Europa.
DENON EUROPE
Division of D&M Germany GmbH
An der Landwehr 19, Nettetal,
D-41334 Germany
Inserting the batteries
qLift the clasp and remove wLoad the four batteries
the rear lid.
properly as indicated by
the marks in the battery
compartment.
Operation
Thank you for purchasing this DENON product. To ensure
proper operation, please read these owner’s manual carefully
before using the product.
After reading them, be sure to keep them for future
reference.
Deleting signals registered with the learning function····18
Deleting signals registered with the macro function·······19
Deleting favorites····························································19
Deleting the registered punch-thru function····················19
Operational reset···························································· 20
User reset······································································· 20
Lock function·································································· 21
Unlock function······························································· 21
Network function. .................................................22
Contents
Accessories········································································· 1
Inserting the batteries······················································· 1
Operating range of the remote control unit···················· 2
Part names and functions················································· 2
Troubleshooting. ....................................................27
Specifications. .........................................................27
Check that the following parts are supplied with the product.
qOwner’s Manual............................................................... 1
wRemote control................................................................. 1
eLR03/AAA batteries.......................................................... 4
rCD-ROM........................................................................... 1
tUSB cable (Cord length: Approx. 3.3 ft / 1 m)................... 1
Specifications
Accessories
Troubleshooting
Introduction········································································ 3
Settings menu map··························································· 4
Operation the LCD button················································· 5
Settings
Setting the screen display time········································ 5
Setting the backlight on time············································ 6
Adjusting the contrast······················································ 6
Completing the setting····················································· 6
Various settings
Using the preset memory function·································· 7
Using the learning function··········································· 7, 8
Using the Macro function············································· 8, 9
Using the delay time function·········································· 9
Using the code search function········································ 9
Favorites settings······················································ 10, 11
Using the punch through function···································11
Editing pages····························································· 11, 12
Editing devices······················································· 12 ~ 15
Editing buttons······················································· 15 ~ 18
PC Application
RC-7000CI Editor function··············································· 26
RC-7000CI Editor installation·········································· 26
Using RC-7000CI Editor·················································· 26
NOTE
• Use a LR03/AAA battery for the remote control unit.
• If you try to operate the RC-7000CI / 7001RCI near the
device you want to operate but the device does not operate,
replace the batteries with new ones. (The included batteries
are only meant for verifying operation. Replace them with
new batteries soon.)
• When inserting the batteries, be sure to do so in the proper
direction, following the “q” and “w” marks in the battery
compartment.
• To prevent damage or leakage of battery fluid:
•Do not use a new battery together with an old one.
• Do not use two different types of batteries.
• Do not attempt to charge dry batteries.
• Do not short-circuit, disassemble, heat or dispose of
batteries in flames.
• If the battery fluid should leak, carefully wipe the fluid off the
inside of the battery compartment and insert new batteries.
• Remove the batteries from the remote control unit if it will
not be in use for long periods.
• When replacing the batteries, have the new batteries ready
and insert them as quickly as possible.
• “LOW BATTERY”appears on the LCD when the remaining
battery power decreases. When this happens, replace the
battery as soon as possible.
PC
Application
Operation
ePut the rear cover back on.
Network
function
Getting Started
Operations using nodes
Adding nodes (1)···························································· 23
Adding nodes (2)···························································· 23
Deleting nodes······························································· 24
Viewing nodes································································ 24
Changing node labels····················································· 25
Setting the receiver display mode (RDM)······················· 25
Checking the remote control unit version······················ 25
Getting Started
Getting Started
Getting Started
Operating range of the remote control
unit
Point the remote control unit at the remote sensor when
operating it.
Part names and functions
For buttons not explained here, see the page indicated in parentheses ( ).
Operation
q
w
e
30°
Network
function
30°
Approx. 23 feet /
7m
PC
Application
NOTE
The set may function improperly or the remote control unit
may not operate if the remote control sensor is exposed to
direct sunlight, strong artificial light from an inverter type
fluorescent lamp or infrared light.
y
r
r
t
W2
Troubleshooting
u
i
o
Q0
Q1
Q2
Q3
Q4
Q5
Q6
Q7
Q8
Q9
W0
W3
W4
W5
W6
W7
W8
W9
E0
E1
E2
E3
E4
E5
W1
For instructions on using with RF connections, refer to the
operating instructions of the RC-7001RCI (sold separately).
Specifications
qPOWER ON button
wRemote control signal transmitter
ePOWER OFF button
rLCD buttons… …………………………………… (3, 5 ~ 7)
tFUNCTION / DEVICE button…………………………… (6)
yBACK button… …………………………………… (3, 5 ~ 7)
uRed button
iGreen button
oSETUP / MENU button… ……………………………… (11)
Q0Cursor buttons (uio p)… ………………………… (11)
Q1On-screen display button (OSD)… …………………… (11)
Q2Channel buttons (CH + –)… …………………………… (11)
Q3HDD 1/3 button………………………………………… (11)
Q4iPod 1/3 button… ……………………………………… (11)
Q5Tuning – / Search button (6)… ………………… (7, 11)
Q6Play button (1)… ……………………………………… (7)
Q7Skip button (8)… …………………………………… (7)
Q8REC button (4)…………………………………………… (11)
Q9Pause button (3)……………………………………… (7, 11)
W0Function / Number buttons… ………………………(5 ~ 7)
W1USB port
W2Display……………………………………………………… (3)
W3NEXT button… …………………………………… (3, 5 ~ 7)
W4Blue button
W5Yellow button
W6Surround parameter button (SURR)… ……………… (11)
W7Return button (RTN)… ………………………………… (11)
W8ENTER button… ………………………………………… (11)
W9Master volume control buttons (VOL + –)…………… (11)
E0STATUS / HOME button………………………………… (11)
E1MUTE button……………………………………………… (11)
E2EQ button… ……………………………………………… (11)
E3Tuning + / Search button (7)……………………… (7, 11)
E4Skip button (9)……………………………………… (7, 11)
E5Stop button (2)………………………………………… (7, 11)
About USB ports
When editing the RC-7000CI’s functions using the exclusive
“RC-7000CI Editor” application software, connect the included
USB cable (vpage 26).
Initial display screen
Make the setting described below.
The initial display settings are shown on the display below.
1
2
3
Press [YES].
When buttons on the remote control unit are pressed, various
settings and operation items appear on the LCD screen.
nOperation for selecting
iPod
ZONE3
ZONE4
VCR 2
NetAud
TUNER
CD
DTU
DVD
TV
Cable
Page 1/2
Press NEXT.
TV
SAT
Cable
VCR-1
VCR-2
Others
Press DEVICE.
The initial settings screen appears.
1
2
Please select
which type of
Denon product
you are using
below.
You have selected
Denon 1
Are you
sure you
want to set up
Denon1?
3
NO
YES
PLEASE WAIT
4
Denon1 has been set
succesfully!
Press NEXT to
continue with
more setup
choices or DEVICE
to begin using
your remote.
Page 2/2
Initial setting
Hitachi
RCA
Motrola
Hitachi
SONY
DENON
When using the RF two-way communication
function
Change the amplifier setting to “RF” at “Setting the remote
control code transmission mode (In the case of RF)“ (vpage
15).
NOTE
A DENON product compatible with the RC-7001RCI (sold
separately) is required to use this function.
DEVICE button
nIndication of item names in this manual
Specifications
In this manual, the names of items displayed on the screen
are indicated [ ]. (Example: [Denon1])
Troubleshooting
This process
will take a few
moments to
complete. Press
NEXT to begin
Setting up your
Denon1 remote.
Denon 1 Denon 2
NEXT button
VCR 1
PC
Application
LCD button
4
ZONE2
SAT
After “PLEASE WAIT” is displayed, the default device
is set to [Denon1].
DEVICE SELECT
AMP
Network
function
•Press the LCD button to the left or right of the displayed
item name to select it.
•The screen is displayed for 5 seconds. Operate while the
screen is displayed. (“Setting the screen display time”
(vpage 5))
•When “PAGE” is displayed at the bottom of the screen,
there are one or more other pages in addition to the one
currently displayed. Use the NEXT and BACK button to
switch screens.
GScreen 2H
DEVICE SELECT
Operation
Operation of the LCD buttons
BACK button
GScreen 1H
b[Denon2] is a function for system expansion in the future.
Normally select [Denon1].
Introduction
LCD button
To use to operate an AV amplifier (AV
receiver), press [Denon1].
Getting Started
Operation
When batteries are loaded for the first time
When the LCD screen in the display on screen 1 goes off,
press the RC SETUP button for 3 seconds to resume the original
screen.
Getting Started
Settings menu map
nBASIC SETUP (vpage 7, 9)
•BRAND SET
•CODE SEARCH
Operation
nFAVORITES (vpage 10, 19)
Network
function
•ADD / REDO
•DELETE
•CONFIGURE
· FAV DEVICE
· FAV IR DELAY
· TOTAL DIGITS
· CHANNEL KEY
nMACROS (vpage 8, 9, 19)
PC
Application
•ADD / REDO
•DELETE
•EDIT DELAY
n PUNCH THRU (vpage 11, 19)
Troubleshooting
•ADD
· CHANNEL TUNE
· TRANSPORTS
· VOLUME CONT.
· MENU NAVIG.
•CLEAR
· CHANNEL TUNE
· TRANSPORTS
· VOLUME CONT.
· MENU NAVIG.
Specifications
n LEARNING (vpage 7, 18)
•LEARN KEY
•ERASE LEARN
nEDIT PAGE (vpage 11, 12)
•ADD PAGE
•DELETE PAGE
nEDIT DEVICE (vpage 11, 13)
•MOVE/SWAP
•MOVE/INSERT
•COPY
•ERASE
•DISPLAY MODE
•IR/RF
nEDIT TEXT (vpage 15, 18)
•DEVICE NAME
•KEY NAME
n EDIT FUNC (vpage 15, 16, 17)
•MOVE/SWAP
•MOVE/INSERT
•COPY
•ERASE
•DISPLAY MODE
•ADD FUNC
•ADD Synth b
b This is a function for system expansion in the future.
n RESET/LOCK (vpage 20, 21)
•OP RESET
•USER RESET
•LOCK
•UNLOCK
n NETWORK (vpage 23, 24)
•ADD NODES
•DELETE NODES
•VIEW NODES
•EDIT LABEL
nUSER PREF (vpage 5, 6, 25)
•VERSION INFO
•CONTRAST
•DISPLAY T/O
•LIGHT T/O
•RDM
LCD
button
LCDボタン
NEXT
1
2
Press DEVICE.
Setting the screen display time
The “DEVICE SELECT” menu is displayed.
Use this procedure to set the time until the screen
display turns off.
Initial setting: 5 seconds
Press the LCD button for the device
(equipment) you want to operate.
bIf there are multiple pages, use the NEXT and BACK
button to switch screens.
3
Press the LCD button for the item you want
to operate.
Press
twice, then press [USER
Press
.
Press
Press
RC SETUP
for 3 seconds.
The “PROGRAM DEVICE” menu is displayed.
.
Network
function
bIf there are multiple pages, use NEXT and BACK to switch
screens.
1 RC SETUP
2 PREF] NEXT
3 [DISPLAY T/O]
4 NEXT
5 [–DISPLAY T/O+]
.
to set the time until
b The time can be set between 1 (MIN) and 30 (MAX).
Press [SAVE].
Troubleshooting
6
7
PC
Application
Press
the light turns off.
• LCD button on right side....................................... +
• LCD button on left side......................................... –
About the button names in these explanations
[ ] : L CD buttons for selection items
Button name only:
Indicates a button on the remote control unit
Operation
BACK
DEVICE
LCD button
LCDボタン
Settings
Getting Started
Operation the LCD button
Press NEXT.
Specifications
Getting Started
LCD
button
LCDボタン
LCD button
LCDボタン
Setting the backlight on time
Adjusting the contrast
Use this procedure to set the time until the backlight
turns off.
Initial setting: 5 seconds
Set this if the characters on the screen are hard to see.
Initial setting: Level 5
1 RC SETUP
2 PREF] NEXT
3 [LIGHT T/O]
4 NEXT
5 [–LIGHT T/O+]
Press
Operation
BACK
DEVICE
Network
function
6
8
3
NEXT
for 3 seconds.
The “PROGRAM DEVICE” menu is displayed.
twice, then press [USER
Press
.
VOL+ –
7
1
9
2
RC SETUP
Press
Press
to set the time until
PC
Application
b The time can be set between Light Off and 30 (MAX).
Troubleshooting
About the button names in these explanations
[ ] : L CD buttons for selection items
Button name only:
Indicates a button on the remote control unit
Press [SAVE].
Press NEXT.
for 3 seconds.
The “PROGRAM DEVICE” menu is displayed.
twice, then press [USER
Press
.
Press
.
• LCD button on right side........................................+
• LCD button on left side..........................................–
6
7
Press
Press
.
Press
the light turns off.
1 RC SETUP
2 PREF] NEXT
3 [CONTRAST]
4 NEXT
5 [–CONTRAST+]
.
.
Press
to set the contrast.
• LCD button on right side........................................+
• LCD button on left side..........................................–
bThe contrast can be set within the range of “Level 0
(MIN)” to “Level 12 (MAX)”.
6
7
Press [SAVE].
Press NEXT.
Completing the setting
Specifications
Press DEVICE until the “DEVICE SELECT”
screen appears.
Using the preset memory function
8 VOL+1– 2
, 3, 6, 7, 8, 9,
to check whether the device to be
added operates.
Operates......................................... [YES]
Use
The remote control unit can be preset to operate devices
of various brands.
• The IR/RF selection screen appears.
Does not operate............................ [NO]
Press RC SETUP for 3 seconds.
•The screen switches to the next code. Find the code
that operates and set it by pressing [YES].
The “PROGRAM DEVICE” menu is displayed.
Press [BASIC SETUP].
Press [BRAND SET].
Press
.
At the “Select Brand” screen, press the LCD
for the device’s brand name.
bIf the brand you want to choose is not displayed, press
NEXT to switch the brand display.
b If there are multiple codes, “1 ofz” is displayed.
(z is the number of codes)
b For details on the RC-7001RCI (sold separately), see
“Network function” (vpage 22).
10LCD button
At the “Select Position” screen, press the
for the posision at which you
want to add the preset device.
The setting is entered.
bPress [NO] to end, [YES] to continue.
Press
for 3 seconds.
The “PROGRAM DEVICE” menu is displayed.
Press
.
Press
Press
.
twice.
At the “Select Device” screen, press the LCD
for the device whose remote control
signals you want to register.
6 button
At the “Learn Key” screen, press the LCD
for the operation button name you
want to register.
bSignals can be “learned” at buttons other than RC SETUP,
NEXT, BACK and DEVICE.
NOTE
Depending on the product’s year of manufacture and
differences in functions from model to model, there may be
some buttons that do not operate or buttons that operate
erroneously.
Troubleshooting
6 NEXT
7 button
[IR] :
Infrared signals are transmitted.
[RF] :
Send RF signals to the RC-7001RCI remote control receiver
(sold separately).
1 RC SETUP
2 [LEARNING]
3 [LEARN KEY]
4 NEXT
5 button
PC
Application
At the “Press Device Type” screen, press
the LCD button for the device you want to
set in the preset memory.
Press [IR] or [RF] to select the remote control
signal.
This function lets you register the desired remote
signals of devices by sending them to the remote
control unit.
Network
function
Press NEXT.
9
Using the learning function
Operation
1
2
3
4
5
,
Getting Started
Various settings
Specifications
Getting Started
7
LCD
button
LCDボタン
Operation
BACK
DEVICE
LCD button
LCDボタン
Place the remote control units with their
signal transmitters facing each other, press
NEXT, then immediately press the button
on the remote control unit you want to
register.
NEXT
Network
function
To register other buttons, press NEXT.
b Repeat steps 6 to 8.
PC
Application
1 RC SETUP
2 [MACROS]
3 [ADD/REDO]
4 NEXT
5 LCD button
for 3 seconds.
The “PROGRAM DEVICE” menu is displayed.
8
9
Press [EXIT] to exit the learning mode.
b Press [EDIT] if you want to change the button name.
Perform the procedure at “Changing the button name”
(v page 18) starting from step 7.
NOTE
Troubleshooting
About the button names in these explanations
[ ] : L CD buttons for selection items
Button name only:
Indicates a button on the remote control unit
This function allows you to register a series of
operations at a single button.
With this function you can for example turn on the
amplifier, select the input source, turn on the TV’s
power, turn on the source device’s (equipment) power
and set the play mode all by pressing a single button.
Press
”Success!” is displayed if the
code was learned successfully.
RC SETUP
Using the Macro function
The learning function may not work for some remote control
units, and sometimes a device may not operate properly even
if its remote control signals have been learned. In this case,
use the remote control unit included with the device.
Press
.
Press
Press
.
twice.
At the “Assign Macro” screen, press the
for the device (equipment) for
which you want to register the macro.
6
Press the button at which you want to
register the macro.
bMacros can be registered at buttons other than NEXT,
BACK and DEVICE.
7
Press NEXT to register the next signal.
b Press DEVICE to select the device.
b Repeat steps 5 to 6.
Specifications
Press RC SETUP.
Using the delay time function
Using the code search function
The registration menu is displayed.
The interval at which the remote control signals
registered with the system call function are sent (the
“delay time”) can be set.
This function lets you search for preset codes when
adding new devices (equipment) to the remote control
unit.
Press [SAVE] to register the set macro.
Press [EXIT] to end the setting.
NOTE
Press [MACROS].
Press [EDIT DELAY].
Press NEXT twice.
The “Edit Macro” screen is displayed.
Select a macro that has been registered.
Press NEXT.
Use [– DELAY +] to change the delay time,
then press [SAVE].
[TEST] :
Press this to send the registered macro to check it.
[– DELAY +] :
Use these to set the transmission interval.
[CREATE AGAIN] :
The macro registration screen reappears.
Press RC SETUP for 3 seconds.
6
7
Press NEXT twice.
The “PROGRAM DEVICE” menu is displayed.
Press [BASIC SETUP].
Press [CODE SEARCH].
Press NEXT.
At the “Press Device Type” screen, press
the LCD button for the device (equipment)
whose code you want to search for.
If the device (equipment) operates when the
remote control unit’s buttons are pressed,
press [YES].
bIf [NO] is pressed, the code switches. Press a remote
control unit button again to check. Press [BACK] to return
to the previous code.
8 LCD button
At the “Select Position” screen, press the
for the position at which you
want to add the preset device (equipment).
bPress [NO] to end, [YES] to continue.
Specifications
8
Press [EXIT] to end the setting.
1
2
3
4
5
Troubleshooting
The macro setting button cannot be registered in a macro.
The “PROGRAM DEVICE” menu is displayed.
PC
Application
bPress [EDIT] if you want to change the button name
(macro name).
Perform the procedure at “Changing the button name”
(vpage 18) starting from step 7.
Press RC SETUP for 3 seconds.
Network
function
10
1
2
3
4
5
6
7
Operation
[TEST] :
Press this to send the registered macro to check it.
[– DELAY +] :
Use these to set the transmission interval. This can be set
to between “0.05(MIN)” and “60(MAX)”. (Initial setting: 0.25
seconds)
[CANCEL ENTRY] :
Press this to cancel the last code registered and return to
the registration mode.
[START OVER] :
Press this to start over from the beginning.
Getting Started
8
9
Getting Started
Favorites settings
LCD
button
LCDボタン
LCD button
LCDボタン
Use this function to register your favorite channel
numbers so they can be operated with a single button.
Favorites settings
NEXT
Operation
ENTER
Network
function
RC SETUP
PC
Application
Troubleshooting
About the button names in these explanations
] : L
CD buttons for selection items
Button name only:
Indicates a button on the remote control unit
[
1
2
3
4
5
Press RC SETUP for 3 seconds.
The “PROGRAM DEVICE” menu is displayed.
Press [FAVORITES].
Press [CONFIGURE].
Press NEXT twice.
At the “CONFIGURE FAV” screen, press
the LCD button for the item you want to
set.
Specifications
[FAV DEVICE] :
Press this to select the device to be stored in the favorites.
This is initially set to “SAT”.
[FAV IR DELAY] :
Press this to set the interval at which the remote control
signals are sent when buttons at which favorites have been
registered are pressed.
[TOTAL DIGITS] :
Use this to set the number of digits of channels registered
in the favorites.
[CHANNEL KEY] :
Set this to add ENTER after registered favorites
(Set this for types of devices for which ENTER is pressed to
set the channel after selecting it with the number buttons.)
To add ENTER at the end of the channel, press ENTER. If you
do not want to add ENTER, press NEXT.
bWhen [EXIT] is pressed, the setting is completed. Press
[CONFIG] to continue registering.
10
Registering favorites
1
2
3
4
5
Press RC SETUP for 3 seconds.
The “PROGRAM DEVICE” menu is displayed.
Press [FAVORITES].
Press [ADD/REDO].
Press NEXT.
Press [KEY].
b When [PAGE] is selected, pages can be added to [MAIN]
or [DEVICE].
When [PAGE] is selected, press [MAIN] or [DEVICE].
When [MAIN] is selected, press [YES] to set.
When [DEVICE] is selected, select the device (equipment)
for which a page is to be added.
6
7
Press NEXT.
At the “Assign Favorite” screen, select the
button for the place to be stored in the
favorites.
Input the number (channel) you want to
register.
Press NEXT.
Press [SAVE] to register the favorite.
11
Press [EXIT] to end the registration.
Press [ADD] to continue registering.
Press
At the “Punch Thru” screen, press the LCD
for the group you want to set.
The functions for which punch thru can be assigned in
units of groups are as shown on the table below.
Groups
CHANNEL TUNE
TRANSPORTS
The“PROGRAM DEVICE” menu is displayed.
Press [PUNCH THRU].
Press [ADD].
6 NEXT
7 LCD button
Press
.
At the “Source Device” screen, press the
for the device of the group you
want to set.
8 NEXT
9 LCD button
Press
.
1
2
3
4
5
Press RC SETUP for 3 seconds.
The “PROGRAM DEVICE” menu is displayed.
Press NEXT, then press [EDIT PAGE].
Press [ADD PAGE].
Press NEXT.
Press [MAIN] to add a page to the device
select menu, [DEVICE] to add a page in the
device (equipment).
b When and only when [DEVICE] is selected, press the LCD
button for the device to which you want to add a page.
6
Press [YES].
The page is added.
Troubleshooting
1
2
3
Press RC SETUP for 3 seconds.
SETUP, SURR, OSD, RTN,
uiop, ENTER
MENU
NAVIGATION
Inserting pages
PC
Application
Even when a different device mode is selected, it is
possible to assign the buttons below to a different device
in units of groups.
For example, the DVD play operation can be performed
even if the operating mode is set to the amplifier.
Functions
CH+, CH–, STATUS, 1~9,
0/10, +10
iPod 1/3,
HDD 1/3, EQ, 6, 7,
8, 9, REC, 3, STOP,
VOL+, VOL–, MUTE
Pages can be inserted and devices (equipment) or
buttons can be added in the device (equipment) select
menu or in the individual devices.
Network
function
VOLUME
CONTROL
Using the punch through function
Editing pages
.
Operation
b Press [EDIT] if you want to change the button name.
4 NEXT
5 button
Getting Started
8
9
10
b Press NEXT to return to the setting menu.
At the “Target Device” screen, press the
or the device whose group
selected at step 7 you want to send.
10
Specifications
Press [YES].
b Press NEXT to return to the setting menu.
11
Getting Started
Deleting pages
1
2
3
4
5
Press RC SETUP for 3 seconds.
LCD
button
LCDボタン
BACK
LCD button
LCDボタン
NEXT
Operation
Network
function
RC SETUP
PC
Application
6
7
The “PROGRAM DEVICE” menu is displayed.
Press NEXT, then press [EDIT PAGE].
Press [DELETE PAGE].
Press NEXT.
Press [MAIN] to delete a page from the
device select menu, [DEVICE] to delete a
device (equipment) page.
Select the page to be deleted using NEXT
and BACK, then press [SELECT PAGE].
Press [YES].
The page is delete.
b Press NEXT to return to the setting menu.
Troubleshooting
About the button names in these explanations
] : L
CD buttons for selection items
Button name only:
Indicates a button on the remote control unit
[
Editing devices
Devices registered in the remote control unit can be
moved, copied and inserted.
Moving or swapping devices
1 RC SETUP
2 NEXT
3 [MOVE/SWAP]
4 NEXT
5 LCD button
Press
for 3 seconds.
The “PROGRAM DEVICE” menu is displayed.
Press
, then press [EDIT DEVICE].
Press
Press
.
.
At the “Source Device” screen, press the
for the device (equipment) you
want to move.
6 NEXT
7 LCD button
Press
.
At the “Target Device” screen, press the
for the target destination or the
device (equipment) to be substituted.
8
Press [YES].
The device is moved.
b When [NO] is pressed, the setting menu reappears. To
continue, press [YES].
Specifications
12
Copying devices
Deleting devices
6
7 LCD button
Press
Press
, then press
Press
.
Press
.
.
At the “Source Device” screen, press the
for the device you want to
move.
Press NEXT.
At the “Target Device” screen, press the
button in the place you want to insert.
Press
for 3 seconds.
The “PROGRAM DEVICE” menu is displayed.
Press
Press
Press
The device is moved.
.
.
At the “Source Device” screen, press the
for the device (equipment) you
want to copy.
Press NEXT.
At the “Target Device” screen, press the
for the place you want to copy.
The device at the copy destination is cleared and the
device is copied.
.
8
Press [YES].
The device is moved.
b When [NO] is pressed, the setting menu reappears. To
continue, press [YES].
Press
for 3 seconds.
The “PROGRAM DEVICE” menu is displayed.
Press
, then press
Press
Press
.
.
.
At the “Select Device” screen, press the
for the device you want to delete.
Press
or
.
[LEAVE EMPTY] :
The device (equipment) is deleted.
[SHIFT ALL UP] :
The device is deleted and the other devices are all shifted
up, filling in the space of the deleted device.
7
Press [YES].
The device is deleted.
b When [NO] is pressed, the setting menu reappears. To
continue, press [YES].
Troubleshooting
b When [NO] is pressed, the setting menu reappears. To
continue, press [YES].
, then press [EDIT DEVICE].
1 RC SETUP
[EDIT DEVICE]
2 NEXT
3 [ERASE]
4 NEXT
LCD
5 button
6 [LEAVE EMPYT] [SHIFT ALL UP]
PC
Application
6
7 LCD
8 [YES]
for 3 seconds.
The “PROGRAM DEVICE” menu is displayed.
Network
function
1 RC SETUP
2 NEXT
3 [COPY]
4 NEXT
5 LCD button
Press
Operation
1 RC SETUP
[EDIT DEVICE]
2 NEXT
3 [MOVE/INSERT]
4 NEXT
5 LCD button
Getting Started
Inserting devices
Specifications
13
Getting Started
Setting the device display mode
LCD
button
LCDボタン
LCD button
LCDボタン
Use this procedure to select the way in which the devices
(equipment) are displayed.
1
[EDIT DEVICE]
2 NEXT
3 [DISPLAY MODE]
4 NEXT
LCD
5 button
Press RC SETUP for 3 seconds.
The “PROGRAM DEVICE” menu is displayed.
NEXT
Press
, then press
Operation
Press
Press
Network
function
RC SETUP
PC
Application
Troubleshooting
About the button names in these explanations
[ ] : L CD buttons for selection items
Button name only:
Indicates a button on the remote control unit
.
.
.
At the “Select Device” screen, press the
for the device whose display mode
you want to change.
6
Press [COLUMN MODE] or [ROW MODE].
[COLUMN MODE] :
The devices are displayed two per row.
[ROW MODE] :
The devices are displayed one per row.
7
Press [YES].
The display mode is set.
b When [NO] is pressed, the setting menu reappears. To
continue, press [YES].
Specifications
NOTE
The display mode is not set in the device. Set with respect to
the LCD button position.
14
Setting the remote control code transmission
mode (In the case of IR)
1 RC SETUP
2 NEXT
3 NEXT
4 [IR/RF]
5 NEXT
6 button
Press
for 3 seconds.
The “PROGRAM DEVICE” menu is displayed.
Press
, then press [EDIT DEVICE].
Press
.
Press
Press
.
.
At the “Select Device” screen, press the LCD
for the device whose transmission
mode you want to change.
7
8
Press NEXT.
Press [IR].
[IR] :
The codes are sent as infrared signals.
9
Press [YES].
The transmission mode is set.
b When [NO] is pressed, the setting menu reappears. To
continue, press [YES].
The “PROGRAM DEVICE” menu is displayed.
Press
Press
.
1 RC SETUP
[EDIT TEXT]
2 NEXT
3 [DEVICE NAME]
4 button
Press
for 3 seconds.
Press [RF], then press [YES].
Press NEXT.
Press
.
.
At the “Select Device” screen, press the LCD
for the device (equipment) whose
name you want to change.
5
6
7
Press NEXT.
At the “Edit Text” screen, use the first
column of LCD buttons to select the position
of the character to be edited.
Select the character to be input with the
second column of LCD buttons, then press
[SELECT].
b Lower case letters are input when [CAPS] is displayed,
capital letters when [lower] is displayed.
Up to 12 characters can be input.
8
Press [SAVE].
b When [NO] is pressed, the setting menu reappears. To
continue, press [YES].
Press
Press
.
.
At the “Source Device” screen, press the
for the device of the button you
want to move.
6
7 NEXT
8 LCD button
At the “Select Key” screen, press the LCD
button of the button you want to move.
Press
.
At the “Target Device” screen, press the
of the device for the destination
or the button to be swapped.
9 button
At the “Select key” screen, press the LCD
for the destination or the button to
be swapped.
10
Press [YES].
The button moves or is replaced.
b When [NO] is pressed, the setting menu reappears. To
continue, press [YES].
15
Specifications
b When [RF] is selected, the RC-7001RCI (sold separately)
node number is displayed. Press LCD button.
, then press
Troubleshooting
b The setting at “Adding nodes” (vpage 23) must be
made in order to add [RF].
Press
, then press [EDIT FUNC].
PC
Application
Press NEXT.
for 3 seconds.
Network
function
.
1 RC SETUP
2 NEXT
3 [MOVE/SWAP]
4 NEXT
5 LCD button
The “PROGRAM DEVICE” menu is displayed.
The “PROGRAM DEVICE” menu is displayed.
.
Moving or swapping buttons
Press
Press
[RF] :
The codes are sent as radio waves.
9
Use this procedure to move, copy and insert buttons.
b When [NO] is pressed, the setting menu reappears. To
continue, press [YES].
Changing the device name
At the “Select Device” screen, press the LCD
for the device whose transmission
mode you want to change.
7
8
Editing buttons
The transmission mode is set.
, then press [EDIT DEVICE].
Press
Press
Press [YES].
Operation
1
2 NEXT
3 NEXT
4 [IR/RF]
5 NEXT
6 button
Press RC SETUP for 3 seconds.
10
Getting Started
Setting the remote control code transmission
mode (In the case of RF)
Getting Started
Inserting buttons
LCD button
LCDボタン
NEXT
1 RC SETUP
2 NEXT
3 [COPY]
4 NEXT
5 LCD button
6 button
7 NEXT
8 LCD button
6 button
7 NEXT
8 LCD
9
10 [YES]
for 3 seconds.
Press
The “PROGRAM DEVICE” menu is displayed.
Operation
Press
, then press
Press
.
Press
.
.
Network
function
At the “Select key” screen, press the LCD
for the button you want to move.
PC
Application
Press
About the button names in these explanations
] : L
CD buttons for selection items
Button name only:
Indicates a button on the remote control unit
[
.
At the “Target Device” screen, press the
for the device of the button for
the place to be inserted.
9
10
At the “Select key” screen, press the LCD
button for insert destination.
Press [YES].
The button is inserted.
Specifications
b When [NO] is pressed, the setting menu reappears. To
continue, press [YES].
16
for 3 seconds.
The “PROGRAM DEVICE” menu is displayed.
At the “Source Device” screen, press the
for the device of the button you
want to move.
RC SETUP
Troubleshooting
1 RC SETUP
[EDIT FUNC]
2 NEXT
3 [MOVE/INSERT]
4 NEXT
5 LCD button
Press
LCD
button
LCDボタン
Copying buttons
Press
, then press [EDIT FUNC].
Press
Press
.
.
At the “Source Device” screen, press the
for the device (equipment) of
the button you want to copy.
At the “Select key” screen, press the LCD
for the button you want to copy.
Press
.
At the “Target Device” screen, press the
button of the device to copy to.
At the “Select Key” screen, press the LCD
button for copy destination.
Press
.
The button is copied.
b When [NO] is pressed, the setting menu reappears. To
continue, press [YES].
Press
for 3 seconds.
The “PROGRAM DEVICE” menu is displayed.
Press
, then press [EDIT FUNC].
Press
Press
1 RC SETUP
2 NEXT
3 NEXT
4 NEXT
5 LCD button
6 button
6 NEXT
7 button
Press
for 3 seconds.
At the “Select key” screen, press the LCD
for the button you want to delete.
, then press
Press [YES].
The button is deleted.
b When [NO] is pressed, the setting menu reappears. To
continue, press [YES].
.
.
.
At the “Select Device” screen, press the LCD
for the device of the button whose
display mode you want to change.
At the “Select key” screen, press the LCD
for the button whose display mode
you want to change.
7
Press [COLUMN MODE] or [ROW MODE].
[COLUMN MODE] :
The buttons are displayed two per row.
[ROW MODE] :
The buttons are displayed one per row.
8
Press [YES].
The display mode is set.
, then press [EDIT FUNC].
Press
, then press [ADD FUNC].
Press
.
At the “Source Device” screen, press the
for the device (equipment) you
want to add.
Press
.
At the “ADD IR” screen, press the LCD
for the function of the button you
want to add.
8 NEXT
9 button
Press
.
At the “Select key” screen, press the LCD
for the position of the button you
want to add.
10
Press [TEST KEY], and if the operation has
been performed press [YES].
b Press [YES] to add more buttons.
17
Specifications
b When [NO] is pressed, the setting menu reappears. To
continue, press [YES].
Press
Troubleshooting
[LEAVE EMPTY] :
The button is deleted.
[SHIFT ALL UP] :
The button is deleted and the other buttons are all shifted up,
filling in the space of the deleted button.
Press
for 3 seconds.
The “PROGRAM DEVICE” menu is displayed.
PC
Application
or [SHIFT ALL UP].
Press
The “PROGRAM DEVICE” menu is displayed.
Network
function
At the “Source Device” screen, press the
for the device of the button you
want to delete.
8
1 RC SETUP
[EDIT FUNC]
2 NEXT
3 [DISPLAY MODE]
4 NEXT
5 button
Press
.
Press
When new buttons are added, it is possible to select and add
new functions.
Press
.
6 button
7 [LEAVE EMPYT]
Adding buttons
Use this procedure to select the way in which the buttons are
displayed.
Operation
1 RC SETUP
2 NEXT
3 [ERASE]
4 NEXT
5 LCD button
Setting the button display mode
Getting Started
Deleting buttons
Getting Started
Changing the button name
1
2 NEXT
3 [KEY NAME]
4 button
Press RC SETUP for 3 seconds.
LCD
button
LCDボタン
LCD button
LCDボタン
NEXT
The “PROGRAM DEVICE” menu is displayed.
Operation
5 button
1 RC SETUP
2 [LEARNING]
3 [ERASE LEARN]
4 NEXT
5 LCD button
6
7
6
7
Press
, then press [EDIT TEXT].
Press
.
At the “Select Device” screen, press the LCD
for the device whose button name
you want to change.
Network
function
At the “Select key” screen, select the LCD
for the button whose button name
you want to change.
RC SETUP
PC
Application
Troubleshooting
About the button names in these explanations
] : L
CD buttons for selection items
Button name only:
Indicates a button on the remote control unit
[
8
Press NEXT.
At the “Edit Text” screen, use the first
column of LCD buttons to select the position
of the character to be edited.
Select the character to be input with the
second column of LCD buttons, then press
[SELECT].
bLower case letters are input when [CAPS] is displayed,
capital letters when [lower] is displayed.
Up to 12 characters can be input.
Specifications
9
Press [SAVE].
bWhen [NO] is pressed, the setting menu reappears. To
continue, press [YES].
18
Deleting signals registered with the
learning function
Press
for 3 seconds.
The “PROGRAM DEVICE” menu is displayed.
Press
.
Press
Press
.
twice.
At the “Source Device” screen, press the
for the device you want to
delete.
At the “Select Key” screen, press the button
for the learning function you want to erase.
To delete, press [YES].
If you do not want to delete, press [NO].
bPress [NO] to end, [YES] to continue.
The “PROGRAM DEVICE” menu is displayed.
Press
Press
Press
.
.
twice.
To delete, press [YES].
If you do not want to delete, press [NO].
bPress [NO] to end, [YES] to continue.
for 3 seconds.
The “PROGRAM DEVICE” menu is displayed.
Press
.
Press
.
Press
twice.
At the “Source Device” screen, press the
for the device (equipment) you
want to delete.
6 button
7
At the “Select key” screen, press the LCD
for the button you want to delete.
To delete, press [YES].
If you do not want to delete, press [NO].
bPress [NO] to end, [YES] to continue.
registered
punch-thru
1 RC SETUP
2 [PUNCH THRU]
3 [CLEAR]
4 NEXT
5 button
6 NEXT
7 button
Press
for 3 seconds.
The “PROGRAM DEVICE” menu is displayed.
Press
.
Press
Press
.
.
At the “Punch Thru” screen, press the LCD
for the group you want to delete.
Press
.
At the “Select Device” screen, press the LCD
for the device (equipment) whose
punch through setting you want to delete.
8
Troubleshooting
To delete, press [YES].
If you do not want to delete, press [NO].
PC
Application
6
7
At the “Select Key” screen, press the LCD
button for the macro you want to delete.
Press
the
Network
function
At the “Source Device” screen, press the
for the device (equipment)
whose macro you want to delete.
1 RC SETUP
2 [FAVORITES]
3 [DELETE]
4 NEXT
5 LCD button
Deleting
function
Operation
1
2 [MACROS]
3 [DELETE]
4 NEXT
5 LCD button
Press RC SETUP for 3 seconds.
Deleting favorites
Getting Started
Deleting signals registered with the
macro function
bPress NEXT to return to the settings menu.
Specifications
19
Getting Started
LCD
button
LCDボタン
LCD button
LCDボタン
NEXT
Operation
Network
function
RC SETUP
PC
Application
Troubleshooting
About the button names in these explanations
[ ] : L CD buttons for selection items
Button name only:
Indicates a button on the remote control unit
Specifications
20
Operational reset
User reset
The settings are returned to as they were upon
purchase.
This procedure deletes the macro settings added by
the user and the remote control codes that have been
learned. It does not delete added devices.
1
2
3
4
5
6
7
Press RC SETUP for 3 seconds.
The “PROGRAM DEVICE” menu is displayed.
Press NEXT, then press [RESET/LOCK].
Press [OP RESET].
Press NEXT.
Press [YES].
Press NEXT.
“PLEASE WAIT” is displayed.
Press NEXT.
The settings are returned to as they were upon purchase
(vpage 3).
1
2
3
4
5
6
7
Press RC SETUP for 3 seconds.
The “PROGRAM DEVICE” menu is displayed.
Press NEXT, then press [RESET/LOCK].
Press [USER RESET].
Press NEXT.
Press [YES].
Press NEXT.
“PLEASE WAIT” is displayed and the setting is reset.
Press NEXT.
The settings menu reappears.
Unlock function
When locked, device (equipment) editing is not
possible.
This procedure unlocks devices (equipment) that have
been locked.
Press
for 3 seconds.
The “PROGRAM DEVICE” menu is displayed.
Press
, then press [RESET/LOCK].
Press
Press
.
twice.
Press [YES].
bWhen [NO] is pressed, the setting menu reappears. To
continue, press [YES].
for 3 seconds.
The “PROGRAM DEVICE” menu is displayed.
Press
, then press [RESET/LOCK].
Press
Press
.
twice.
At the “Select Device” screen, press the LCD
for the device (equipment) you want
to unlock
6
Press [YES].
PC
Application
6
Press
Network
function
At the “Select Device” screen, press the LCD
for the device (equipment) you want
to lock.
1 RC SETUP
2 NEXT
3 [UNLOCK]
4 NEXT
5 button
Operation
1 RC SETUP
2 NEXT
3 [LOCK]
4 NEXT
5 button
Getting Started
Lock function
bWhen [NO] is pressed, the setting menu reappears. To
continue, press [YES].
Troubleshooting
Specifications
21
Getting Started
NOTE
Network function
Operation
This functions uses the RC-7001RCI (sold separately).
When a wireless (RF) network is established using the RC-7001RCI (sold separately), the RC-7001RCI is called a node. An
individual node number is registered for each RC-7001RCI unit. When registering devices with the RC-7001RCI, once the RF
transmission settings are made, when a button on a device for which the node number is set is pressed, the remote control
signals are sent (wireless) and received by the RC-7001RCI corresponding to the node number of the transmission target.
•Using the wireless function near microwave ovens, devices
using a wireless LAN, cordless telephones, Bluetooth
devices or other wireless devices could adversely affect
communications performance. In this case move away from
the interfering device.
•If the RC-7000C1 cannot properly receive radio signals due
to excessive distance between it and the RC-7001RC1 (sold
separately), radio interference, etc., “RF OUT OF RANGE”is
displayed on the LCD screen.
Monitor
Monitor
Network
function
Repeater 1
(RC-7001RCI, sold
separately)
AV amplifier
PC
Application
DVD player
FR
FL
Troubleshooting
Monitor
Repeater 2
(RC-7001RCI,
sold separately)
Remote control
(RC-7000CI)
FR
FL
Specifications
AV amplifier
22
DVD player
: IR (Infrared communications)
: RF (Two-way communications)
LCD
button
LCDボタン
LCD button
LCDボタン
NEXT
Use this procedure to register a node number and add an
RC-7001RCI (sold separately) to the network.
Press RC SETUP for 3 seconds.
The “PROGRAM DEVICE” menu is displayed.
Press NEXT twice, then press [NETWORK].
Press [ADD NODES].
Press NEXT.
Press RESET/CONFIG on the RC-7001RCI
(sold separately) for about 1 second.
The indicator flashes green.
7
Press NEXT twice.
“Success!” is displayed when the device has been
added successfully.
bPress NEXT to return to the settings menu.
Press RC SETUP for 3 seconds.
The “PROGRAM DEVICE” menu is displayed.
Press NEXT twice, then press [NETWORK].
Press [ADD NODES].
Press NEXT.
To add the RC-7001RCI to the network,
press [OTHER].
Press RESET/CONFIG on the RC-7001RCI
(sold separately) for about 1 second.
The indicator flashes red.
7
Press NEXT twice.
“Success!” is displayed when the device has been
added successfully.
bPress NEXT to return to the settings menu.
Troubleshooting
About the button names in these explanations
[ ] : L CD buttons for selection items
Button name only:
Indicates a button on the remote control unit
1
2
3
4
5
6
PC
Application
To add the remote control unit to the
network, press [REMOTE].
Press RESET/CONFIG on the RC-7001RCI (sold separately) for at
least 10 seconds so that the indicator lights red.
Network
function
1
2
3
4
5
6
Use this procedure to add a second or more units of the
RC-70001CI (sold separately) to the network.
Operation
RC SETUP
Adding nodes (1)
Adding nodes (2)
Getting Started
Operations using nodes
Specifications
23
Getting Started
LCD
button
LCDボタン
LCD
button
LCDボタン
NEXT
Operation
Network
function
RC SETUP
Deleting nodes
Viewing nodes
Use this procedure to delete RC-7001RCI (sold
separately) units by specifying the node number from
the current network.
Use this procedure to search for and display a list of RC7001RCIs (sold separately) registered in the network.
1
2
3
4
PC
Application
5
6
Press RC SETUP for 3 seconds.
The “PROGRAM DEVICE” menu is displayed.
Press NEXT twice, then press [NETWORK].
Press [DELETE NODES].
Press NEXT twice.
The RC-7001RCI’s
displayed.
(sold separately) node number is
Select the node number to be deleted, then
press [YES].
Press NEXT.
bPress [NO] to end, [YES] to continue.
Troubleshooting
About the button names in these explanations
] : L
CD buttons for selection items
Button name only:
Indicates a button on the remote control unit
[
Specifications
24
1
2
3
4
Press RC SETUP for 3 seconds.
The “PROGRAM DEVICE” menu is displayed.
Press NEXT twice, then press [NETWORK].
Press [VIEW NODES].
Press NEXT twice.
The node numbers of the RC-7001RCIs (sold separately)
registered on the network are indicated with an z mark
after them.
bPress NEXT twice to return to the settings menu.
Use this procedure to add labels to RC-7001RCIs (sold
separately) for easier distinction.
The “PROGRAM DEVICE” menu is displayed.
Press NEXT twice, then press [NETWORK].
Press [EDIT LABEL].
Press NEXT twice.
The RC-7001RCI’s (sold separately) node number is
displayed.
Select the node number to be changed, then
press NEXT.
The edit screen for the selected node appears.
At the “Edit Text” screen, use the first
column of LCD buttons to select the position
of the character to be edited.
bLower case letters are input when [CAPS] is displayed,
capital letters when [lower] is displayed.
Press [SAVE].
Press NEXT.
twice, then press [USER
Press
.
Press
.
The LCD button version information is displayed.
bPress NEXT twice to return to the settings menu.
twice, then press [USER
.
Press
.
Press
.
Press
.
Use
and [LAST] to set the position
at which you want the RDM page to be
displayed.
[FIRST] :
The RDM page is displayed at the beginning of the normal
button screen.
[LAST] :
The RDM page is displayed at the end.
bPress NEXT to return to the settings menu.
Specifications
8
9
Press
for 3 seconds.
The “PROGRAM DEVICE” menu is displayed.
Troubleshooting
7
Select the character to be input with the
second column of LCD buttons, then press
[SELECT].
The “PROGRAM DEVICE” menu is displayed.
Press
PC
Application
6
1
2 PREF] NEXT
3 [RDM]
4 NEXT
5 [YES]
6 [FIRST]
Press RC SETUP for 3 seconds.
1 RC SETUP
2 PREF] NEXT
3 [VERSION INFO]
Network
function
5
Press RC SETUP for 3 seconds.
This setting is made for conducting two-way
communications between the RC-7001RCI (sold
separately) and compatible DENON products. The status
information of the compatible DENON product can be
displayed on the set's screen. Use this procedure to set
the RDM page display position.
Checking the remote control unit version
Operation
1
2
3
4
Setting the receiver display mode
(RDM)
Getting Started
Changing node labels
bWhen [NO] is pressed, the setting menu reappears. To
continue, press [YES].
25
Getting Started
PC Application
RC-7000CI Editor function
Operation
nYou
can use “RC-7000CI Editor” for the
following operations.
•Editing RC-7000CI setting data.
•Backing up RC-7000CI setting data on the PC.
•Remote control code database downloading.
Network
function
nRecommended
devices and environment
required for using “RC-7000CI Editor”.
PC
Application
•Personal computer running Windows® XP Service Pack2
operating system.
•HDD with sufficient free disk space.
•USB 2.0 connection terminal.
•Internet connection environment
Troubleshooting
Specifications
26
RC-7000CI Editor installation
First connect the RC-7000CI to the personal computer using
the USB cable provided.
Use a computer connected to the Internet.
1
2
Load the CD-ROM (RC-7000CI Editor) in
the CD-ROM drive.
Run “RC-7000CI Editor.exe”
bFollow the installation instructions on the installation
wizard screen.
bAfter installation, the “Installation complete” dialog
message is displayed.
3
Press “Finish” to finish installation, and
start the application.
Using RC-7000CI Editor
1
When using the application for the first
time, check the New User box, enter e-mail
address, password, etc., and press OK.
2
Run “RC-7000CI Editor.exe” from the CDROM drive in My Computer.
“RC-7000CI Editor” starts up.
3
Follow the wizard instructions.
NOTE
•During data upload or download using “RC-7000CI Editor”
do not carry out the following operations. Failure of the main
unit and personal computer may result.
•Remove the USB cable.
•Switch off the personal computer power.
•Remove batteries from main unit.
Specifications
Cause
1
2
• Remove the obstacle.
2
• Insert the batteries in the proper direction,
following the polarity marks in the battery
compartment.
• Move the set to a place in which the
remote control sensor will not be exposed
to strong light.
2
• Brightness setting is inappropriate.
• Adjust the screen’s brightness
“Adjusting the contrast”.
at
6
• Radio interference with other devices.
• Move away from microwave ovens,
devices using a wireless LAN, or other
wireless devices.
• Use the procedure below to set the
network again.
q Press the RESET/CONFIG button for
about 10 seconds so the indicator lights
red.
w Press the RESET/CONFIG button again
for about 3 seconds so the indicator
lights green.
e Next register the RC-7000CI again.
22
• Change in wireless environment.
2
,405 MHz – 2,475 MHz (15 ch)
2
Bandwidth 2 MHz
Radio frequencies:
2.4 GHz
Modulation method: O-QPSK
Spectrum spread system:
DSSS
Communication distance: 30 m (varies with the environment)
Maximum external dimensions:
63 (W) x 233 (H) x 28 (D) mm
(2-31/64” x 9-11/64” x 1-7/64”)
Weight: 170 g (Approx 6.0 oz)
Troubleshooting
Wireless connections
with the RC7001RCI (sold
separately) cannot be
established.
Page
Frequency:
PC
Application
Display screen does
not appear.
Countermeasure
• Replace with new batteries.
• Operate within the specified range.
LR03/AAA Type (four batteries)
Approx. 3 months
(depending on usage frequency)
Network
function
• Batteries are worn.
Set does not work
properly when remote • You are operating outside of the specified
control unit operated.
range.
• Obstacle between main unit and remote
control unit.
• The batteries are not inserted in the proper
direction, as indicated by the polarity
marks in the battery compartment.
• The set’s remote control sensor is
exposed to strong light (direct sunlight,
inverter type fluorescent bulb light, etc.).
Batteries:
Battery service life:
Operation
1. If a problem should arise, first check the following:
2. Is the set being operated as described in the operating instructions ?
If this unit does not operate properly, check the items listed in the table below. Should the problem persist, there may be a
malfunction.
In this case, disconnect the power immediately and contact your store of purchase.
Symptom
Getting Started
Troubleshooting
23
Specifications
27
TOKYO, JAPAN
www.denon.com
Denon Brand Company, D&M Holdings Inc.