1
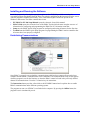
^1 EZ SETUP SOFTWARE MANUAL
^2 PMAC2A-PC/104
^3 EZ PMAC2A-PC104 Setup Manual
^4 4EZ-603670-xSxx
^5 September 24, 2004
Single Source Machine Control
Power // Flexibility // Ease of Use
21314 Lassen Street Chatsworth, CA 91311 // Tel. (818) 998-2095 Fax. (818) 998-7807 // www.deltatau.com
Copyright Information
© 2003 Delta Tau Data Systems, Inc. All rights reserved.
This document is furnished for the customers of Delta Tau Data Systems, Inc. Other
uses are unauthorized without written permission of Delta Tau Data Systems, Inc.
Information contained in this manual may be updated from time-to-time due to product
improvements, etc., and may not conform in every respect to former issues.
To report errors or inconsistencies, call or email:
Delta Tau Data Systems, Inc. Technical Support
Phone: (818) 717-5656
Fax: (818) 998-7807
Email: [email protected]
Website: http://www.deltatau.com
Operating Conditions
All Delta Tau Data Systems, Inc. motion controller products, accessories, and
amplifiers contain static sensitive components that can be damaged by incorrect
handling. When installing or handling Delta Tau Data Systems, Inc. products, avoid
contact with highly insulated materials. Only qualified personnel should be allowed to
handle this equipment.
In the case of industrial applications, we expect our products to be protected from
hazardous or conductive materials and/or environments that could cause harm to the
controller by damaging components or causing electrical shorts. When our products
are used in an industrial environment, install them into an industrial electrical cabinet
or industrial PC to protect them from excessive or corrosive moisture, abnormal
ambient temperatures, and conductive materials. If Delta Tau Data Systems, Inc.
products are directly exposed to hazardous or conductive materials and/or
environments, we cannot guarantee their operation.
EZ PMAC2A-PC-104 Setup Manual
Table of Contents
INTRODUCTION .......................................................................................................................................................1
Configuring PMAC ...................................................................................................................................................1
Getting More Information .........................................................................................................................................1
CONNECTIONS AND INITIAL SETTINGS ..........................................................................................................5
Power Supplies Connections .....................................................................................................................................5
Communication Ports Connections ...........................................................................................................................5
Serial Communication Connections ..........................................................................................................................5
Installing and Running the Software .........................................................................................................................6
Establishing Communications ..............................................................................................................................6
If Communications Cannot be Established...........................................................................................................7
Main Setup Screen ....................................................................................................................................................7
Built-in Catalog of Functions ...............................................................................................................................8
The PMAC Guide Manual ....................................................................................................................................8
Resetting PMAC for First Time Use .....................................................................................................................8
Power Supplies..........................................................................................................................................................9
Analog Amplifier Command Signals ........................................................................................................................9
Stepper Driver Command Signals ...........................................................................................................................10
Encoder Feedback ...................................................................................................................................................11
Safety Flags: End-of-Travel Limits, Home and Amplifier Fault Inputs..................................................................12
Polarity Test ............................................................................................................................................................13
TUNING THE MOTORS .........................................................................................................................................15
The Tuning Procedure .............................................................................................................................................15
The Parabolic Move ...........................................................................................................................................15
MOTOR JOG COMMANDS ...................................................................................................................................17
Motor Safety I-Variables.........................................................................................................................................17
Ix11 - Motor x Fatal Following Error Limit.......................................................................................................17
Ix12 - Motor x Warning Following Error Limit .................................................................................................17
Ix13 - Motor x + Software Position Limit...........................................................................................................17
Ix14 - Motor x - Software Position Limit ............................................................................................................17
Ix15 - Motor x Abort/Lim Deceleration Rate......................................................................................................18
Ix16 - Motor x Maximum Velocity ......................................................................................................................18
Ix17 - Motor x Maximum Acceleration...............................................................................................................18
Ix19 - Motor x Maximum Jog/Home Acceleration..............................................................................................18
S-Curve and Linear Acceleration Variables.......................................................................................................18
Rate vs Time: Programming the Maximum Acceleration Parameters................................................................19
Benefits of Using S-Curve Acceleration Profiles ................................................................................................19
Motor Jog Movement I-Variables ...........................................................................................................................19
Ix20 Motor x Jog/Home Acceleration Time........................................................................................................19
Ix21 Motor x Jog/Home S-Curve Time ...............................................................................................................19
Ix22 Motor x Jog Speed ......................................................................................................................................19
Motor Jog Commands .............................................................................................................................................20
HomeZ ................................................................................................................................................................20
Jog Neg ...............................................................................................................................................................20
Stop .....................................................................................................................................................................20
Jog Pos ...............................................................................................................................................................20
Jog Abs ...............................................................................................................................................................20
Jog Inc ................................................................................................................................................................20
HOME PROCEDURE ..............................................................................................................................................21
Motor Home Movement I-Variables .......................................................................................................................21
Ix19 - Motor x Maximum Jog/Home Acceleration..............................................................................................21
Ix20 Motor x Jog/Home Acceleration Time........................................................................................................21
Table of Contents
i
EZ PMAC2A-PC-104 Setup Manual
Ix21 Motor x Jog/Home S-Curve Time ...............................................................................................................21
Ix23 Motor x Home Speed and Direction ...........................................................................................................22
Ix26 Motor x Home Offset ..................................................................................................................................22
Motor Home Commands .........................................................................................................................................22
MOTION PROGRAMS............................................................................................................................................23
Coordinate Systems Definitions ..............................................................................................................................23
S-Curve and Linear Acceleration Variables.......................................................................................................23
Benefits of Using S-Curve Acceleration Profiles ................................................................................................24
Motion Program Velocity ...................................................................................................................................24
Blending Disable/Enable ....................................................................................................................................25
Motion Programs.....................................................................................................................................................25
PLC PROGRAMS.....................................................................................................................................................27
General-Purpose I/O and Analog Inputs Page...................................................................................................28
Software Setup ........................................................................................................................................................28
General-Purpose Digital Inputs and Outputs.....................................................................................................28
Analog Inputs......................................................................................................................................................29
BACKUP AND RESET PROCEDURES ................................................................................................................31
Backup Procedures..................................................................................................................................................31
Reset Procedures .....................................................................................................................................................31
Reset PMAC to Last Saved Backup File Parameters..........................................................................................32
Reset PMAC to Last Memory Saved Parameters................................................................................................32
Reset PMAC to Factory Defaults........................................................................................................................32
Save Parameters in PMAC Memory ...................................................................................................................32
THE TERMINAL WINDOW AND UTILITY FUNCTIONS...............................................................................33
The Watch Window ................................................................................................................................................33
The Calculator Function..........................................................................................................................................33
The Circle Function.................................................................................................................................................34
ii
Table of Contents
EZ PMAC2A-PC-104 Setup Manual
INTRODUCTION
PMAC, pronounced Pe’-MAC, stands for Programmable Multi-Axis Controller. It is a family of highperformance servo motion controllers capable of commanding up to 32 axes of motion simultaneously
with a high level of sophistication.
The PMAC2A-PC/104, member of the PMAC family, is a cost-effective 8-axis motion controller. The
PMAC2A-PC/104 can be composed of three boards in a stack configuration. The base board provides
four channels of either DAC ±10V or pulse and direction command outputs. The optional axis expansion
board provides a set of four additional servo channels and I/O ports. The optional communications board
provides extra I/O ports and either the USB or Ethernet interface for faster communications. Only one
communication port can be used at any given time.
The PMAC Quick Setup program is a software tool for setting up and troubleshooting the PMAC2APC/104 board. Each screen is dedicated to testing and setting up a particular feature of the board, thus
making the setup of the PMAC motion controller a very simple process.
The PMAC Quick Setup program runs in most 32-bit Microsoft© Windows operating systems, and can
communicate through any method including serial RS-232, USB, Ethernet, and PC/104 bus.
Configuring PMAC
PMAC is shipped with all the configuration jumpers set for a typical application. These default settings
are explained in the particular sections of this manual where each feature is illustrated.
Follow these steps to install and configure PMAC for a typical application:
1.
2.
3.
4.
5.
6.
7.
8.
9.
10.
Establish power supplies connections.
Establish communications.
Establish amplifier and motor connections.
Establish flags connections (home switches and end-of-travel switches).
Check motor polarity.
Set up motor software parameters.
Jog motors.
Home motors.
Define a coordinate system. Write and run a simple motion program.
Save the configuration.
Getting More Information
The PMAC Quick Setup program is provided with the PMAC Guide manual which has the complete
description of each PMAC connector and software command used in a typical application. This manual
can be accessed from the main setup screen of the program.
Introduction
1
EZ PMAC2A-PC-104 Setup Manual
Machine Connections Example: using analog ±10 Volts amplifiers
5V Power Supply
Load
Amplifier
Motor
Flags
± 15V Power Supply
Encoder
Motor #1 Motor #2 Motor #3 Motor #4
Pin #
Pin #
Pin #
5
7
9
1
3
6
8
10
1
3
19
21
23
2
4
20
22
24
2
4
Symbol
HOMEn
PLIMn
MLIMn
Flag_V
Gnd
Motor #1 Motor #2 Motor #3 Motor #4
Flags Sensor Connection
5-24 VDC
Power Supply
JMACH2
1
7
Flag_1_2_V +
Pin #
Pin #
1
3
5
7
9
11
13
15
29
31
33
35
2
4
6
8
10
12
14
16
30
32
34
36
1
3
17
19
21
23
25
27
37
39
41
43
2
4
18
20
22
24
26
28
38
40
42
44
-
Symbol
+5V
GND
CHAn+
CHAnCHBn+
CHBnCHCn+
CHCnDACn+
DACnAENAn
FAULTn
FLT_FLG_V
GND
+12 to +15V
-12 to -15V
GND
GND
5V
47
48
49
50
48
3
1
Flags Switch Connection
5-24 VDC
Power Supply
JMACH2
1
5 to 24 Volts normally
closed to ground NPN
sinking type sensor.
PLIM1
Pin #
JMACH1
Note: The 5V and ±12V external
power supplies are only required
when PMAC is not installed in a
PC/104 computer bus.
Pin #
JMACH2
Pin #
7
Flag_1_2_V +
PLIM1
Normally-Closed
Switch
Software Setup
Amplifier Fault Connection
I-variables setup for using the DAC outputs:
JMACH1
47
35
2
5-24 VDC
Power Supply
FLT_FLG_V +
FAULT-
Connect to
amplifier
I900
I901
I902
I906
I9n6
Ix69
I10
=
=
=
=
=
=
=
1001
2
3
1001
0
; n = channel number from 1 to 8
1024 ; x = motor number from 1 to 8
1710933
Introduction
EZ PMAC2A-PC-104 Setup Manual
Machine Connections Example: using pulse and direction drivers
Driver
Load
Stepper
Motor
Flags
Motor #1 Motor #2 Motor #3 Motor #4
5V Power Supply
Note: The 5V external power
supply is only required when
PMAC is not installed in a PC/104
computer bus.
Pin #
Pin #
Pin #
Pin #
5
7
9
1
3
6
8
10
1
3
19
21
23
2
4
20
22
24
2
4
Symbol
HOMEn
PLIMn
MLIMn
Flag_V
Gnd
Pin #
Symbol
3
1
GND
5V
Motor #1 Motor #2 Motor #3 Motor #4
Pin #
Pin #
Pin #
1
3
5
7
9
11
13
15
33
35
47
2
4
6
8
10
12
14
16
34
36
47
1
3
17
19
21
23
25
27
41
43
47
2
4
18
20
22
24
26
28
42
44
47
Symbol
+5V
GND
CHAn+
CHAnCHBn+
CHBnCHCn+
CHCnAENAn
FAULTn
FLT_FLG_V
Motor #1 Motor #2 Motor #3 Motor #4
JMACH2
1
7
5-24 VDC
Power Supply
Flag_1_2_V +
Pin #
Pin #
14
16
4
27
29
3
28
30
4
1
5 to 24 Volts normally
closed to ground NPN
sinking type sensor.
Symbol
PUL_n+
DIR_n+
GND
Flags Switch Connection
5-24 VDC
Power Supply
JMACH2
-
PLIM1
Pin #
13
15
3
JMACH2
Flags Sensor Connection
Pin #
JMACH1
Pin #
JMACH2
Encoder
(Optional)
7
Flag_1_2_V +
PLIM1
Normally-Closed
Switch
Software Setup
Driver Fault Connection
I-variables setup for using the stepper outputs:
JMACH1
47
35
Introduction
5-24 VDC
Power Supply
FLT_FLG_V +
FAULT-
Ix02 = *
Ix02 = Ix02+2
I9n6 = 2
Connect to
driver
; x = motor number from 1 to 8
; x = motor number from 1 to 8
; n = channel number from 1 to 8
I-variables setup if no encoder feedback is used:
I9n0 = 8
; n = channel number from 1 to 8
3
EZ PMAC2A-PC-104 Setup Manual
4
Introduction
EZ PMAC2A-PC-104 Setup Manual
CONNECTIONS AND INITIAL SETTINGS
Power Supplies Connections
Communication Ports Connections
•
•
Connect the host computer to only one communication port, either PC/104 bus, RS-232, USB or
Ethernet.
Select the port by clicking on the Device button.
Serial Communication Connections
Connections and Initial Settings
5
EZ PMAC2A-PC-104 Setup Manual
Installing and Running the Software
Install the program by selecting the appropriate option on the CD-ROM provided or running the
executable program downloaded from the Delta Tau website, and following the instructions on the screen.
After the program is installed successfully, a new folder labeled QSPC104 will be present on the
Windows© Start menu. The folder contains these items:
•
•
•
•
EZ PMAC2A-PC/104 Setup Manual opens the electronic form of this manual.
PMAC Guide opens the electronic form of the PMAC Guide which the most complete resource of
information for configuring and programming the PMAC2A-PC/104 motion controller.
Setup runs the PMAC Quick Setup program for configuring and testing all motors for the first time.
Terminal runs the PMAC Quick Setup program for programming the PMAC motion controller after
all motors have been properly configured.
Establishing Communications
Once PMAC is properly powered and the communications cable has been connected between the host
computer and the PMAC, communications can be established. The communications setup screen appears
when the program is run for the first time or when the PMAC cannot be found in the previously defined
channel of communications. Press the F1 function key for instructions.
The Instructions button provides a direct link to the PCOMM32 manual and it explains how to enable
PMAC communications under different operating systems.
The program can run even if PMAC is not linked to the computer. By pressing the Offline button, the
program is run in simulated dry mode.
6
Connections and Initial Settings
EZ PMAC2A-PC-104 Setup Manual
If Communications Cannot be Established
1.
2.
3.
4.
5.
6.
Press the Re-Initialize button on the Communications Setup screen.
Power-up PMAC with jumper E3 on the baseboard installed.
Make sure the green LED in PMAC is lit; this will confirm that PMAC is properly powered with 5V.
Press the Reset button in the middle of the screen. This will reset the memory to factory defaults.
Turn off PMAC and remove the E3 jumper.
Power-up PMAC and try communications again.
Main Setup Screen
Once communications has been established, the main Setup screen displays. At any time during the
execution of this program, press the F1 function key to get instructions for each particular page.
Connections and Initial Settings
7
EZ PMAC2A-PC-104 Setup Manual
The steps to configure PMAC are listed sequentially from top to bottom, but they can be called in any
order.
A simple terminal is provided to allow a direct communication with PMAC. However, during the initial
setup process this is seldom necessary. If any I-Variable is changed on the terminal window, or if any
reset command is issued, all motor status will change to red and the setup process must be repeated for
each required motor.
The colored motors status strip helps determine the configuration of each motor. A red-colored square
indicates that the polarity test has not yet been run for the particular motor. A yellow colored square
indicates that the motor passed the polarity test, but its servo parameters haved not yet been tuned. A
green colored square indicates that the motor has already been tuned and that it is ready to be operated in
closed-loop mode. Clicking on the particular motor box will open the appropriate screen to complete the
motor setup. For example, if the motor status is indicated with a red box, then the motor polarity test
screen will open. If the motor status is indicated with a yellow box instead, then the motor tuning screen
will open.
Built-in Catalog of Functions
This function, accessible from the F1 Help command, allows searching for the description of any PMAC
setup variable or command. The Search button will list all the entries based on a particular entered search
key. This window can be kept open at all times for easy reference to each command in every part of the
setup process.
The PMAC Guide Manual
This Acrobat© PDF file is the most complete reference for setting up PMAC for a typical application.
This file also can be kept open for easy reference during the setup process.
Resetting PMAC for First Time Use
The first button on the setup screen is labeled Reset and allows PMAC to be reset for first time use. This
is recommended if setting up this particular PMAC for the first time and there are no contents in its
memory that needs to be kept. After performing this procedure, all programs inside memory will be
erased and all variables will be configured to the default values.
8
Connections and Initial Settings
EZ PMAC2A-PC-104 Setup Manual
Power Supplies
This page functions as a reminder that the ±15V should be connected before starting the setup process.
Since PMAC requires a 5V power supply for operation and communications, the 5V power supply is
assumed to be satisfactory at this point.
Analog Amplifier Command Signals
On this page, the output type for a particular motor is selected to be either analog ±10V or pulse-anddirection stepper outputs. The following is the description for the analog ±10V DAC test.
PMAC can command the amplifier and motor through the DAC (digital to analog converter) outputs.
These ±10V signals translate, depending on the amplifier, in current/torque or velocity causing the motor
to move. A typical amplifier has the following characteristics for the related PMAC control signals:
Connections and Initial Settings
9
EZ PMAC2A-PC-104 Setup Manual
•
•
±10V input command differential signals
Sinking enable input: the amplifier enables when the enable input is tied to ground.
Since the DAC outputs are powered from PMAC, there is no need to turn-on the amplifier during this
process. It is recommended that the amplifier and the machine are turned-off during this process.
1.
2.
3.
4.
Select the motor to test its motor control signals.
Slide the DAC value bar or input a DAC value from the keyboard.
Use a voltmeter to measure the selected DAC value on the indicated pins PMAC or breakout board.
Measure a change on the amplifier enable signal as it is enabled/disabled with the corresponding
button. Since the output is sinking type, a 5V value indicates that the output is activated. Make sure
that the amplifier enable signal is operating properly. This is how PMAC will disable the amplifier in
case of failure or in an emergency.
5. The maximum DAC output could be clipped to any desired value with the dedicated slide bar or data
input field. The DAC output limitation is based on the amplifier/motor limitations, if any, of torque
and/or velocity.
If no DAC voltage is measured:
1. Make sure that the motor in which the DAC and enable signals are being measured is selected.
2. Disconnect anything connected to the PMAC DAC output lines and measure the voltage again at
open circuit.
3. Press the Reset button and try again.
4. Make sure PMAC has the ±15V power supply properly connected and try again.
Stepper Driver Command Signals
On this page, select the output type for a particular motor to be either analog ±10V or pulse-and-direction
stepper outputs. The following is the description for the pulse and direction outputs test.
PMAC can command the amplifier and motor through the pulse-and-direction stepper outputs. These
signals are TTL levels, and can be programmed to output a particular range of outputs. The settings of the
pulse-and-direction signals are accessible by pressing the Configuration button.
•
•
10
±10V input command differential signals
Sinking enable input: the amplifier enables when the enable input is tied to ground.
Connections and Initial Settings
EZ PMAC2A-PC-104 Setup Manual
Since the pulse-and-direction stepper outputs are provided from PMAC, there is no need to turn on the
stepper driver during this process. It is recommended that the stepper driver and the machine be turned off
during this process.
1. Select the motor to test its motor control signals.
2. Slide the output value bar or input an output value from the keyboard.
3. Use an oscilloscope to observe the square signal generated from the pulse output. Monitor a change in
the direction signal as the output value is switched between positive and negative values.
4. Measure a change on the amplifier enable signal as it is enabled/disabled with the corresponding
button. Make sure that the amplifier enable signal is operating properly. This is how PMAC will
disable the amplifier in case of failure or in an emergency.
5. The maximum output can be clipped to any desired value with the dedicated slide bar or data input
field.
If no pulse signal is output:
1. Make sure that the motor in which the stepper and enable signals are being measured is selected.
2. Disconnect anything connected to the PMAC stepper output lines and analyze the signal at open
circuit.
3. Press the Reset button and try again.
Encoder Feedback
For a proper motion control process, PMAC needs to know motor position at all times. The encoder
feedback provides this information. The encoder used for a typical application has the following
characteristics:
• 5V, TTL level differential signals
• Typically 4096 counts of resolution
• Electrically isolated from any other circuit of the amplifier, motor or the machine
In case the motor is configured with pulse-and-direction outputs, the use of an external encoder is
optional. In this case, select Internal as the feedback source type.
Since the encoder gets powered from PMAC there is no need to turn on the amplifier during this process.
It is recommended that the amplifier and the machine be turned off during this process.
1. Select the motor where the encoder being tested is connected.
2. Rotate the encoder in the direction assumed to be positive.
3. Click the CCW or CW radio buttons if the encoder counter is found to decrease instead of increase.
Connections and Initial Settings
11
EZ PMAC2A-PC-104 Setup Manual
4. The Encoder Capture indicator should change at every turn of the encoder shaft by the number of
encoder counts per revolution. This indicates that the encoder C channel is operating properly.
5. Click Done if the encoder counts in the proper direction.
If the encoder does not count:
1. Make sure the motor to which the encoder is connected is selected.
2. Press the Reset button and try again.
3. Use an oscilloscope to monitor the encoder signals and the 5V connection to the encoder.
Safety Flags: End-of-Travel Limits, Home and Amplifier Fault Inputs
This page sets up and monitors the PMAC safety flag inputs function.
When assigned for dedicated uses, the overtravel limit flags provide important safety and accuracy
functions. PLIMn and MLIMn are direction-sensitive over-travel limits that must conduct current (either
sinking or sourcing) to permit motion in that direction. The home input flag is used in conjunction with
home search type moves to establish a machine point of reference when an incremental type of feedback
is used. The user input flag is used mostly in conjunction with the position capture feature, which allows
recording the feedback information when the input is activated.
The switch or sensor connected on the home input provides a physical reference for every programmed
move. The home procedure and setup is explained later in this manual. The home sensor or switch, in
contrast with the end-of-travel switches, can be either normally open or normally closed. However, it is
recommended to use the same type of switches for the end-of-travel inputs as well as the home input.
Usually, a passive normally closed switch is used. If a proximity switch is needed instead, use a normally
closed to ground sinking NPN type sensor.
Note:
If not planning to use the position limits, disable them with the dedicated button on
the screen.
Any time the selected motor being set up faults, either because of excessive following error or because the
amplifier fault signal indicates it, there is a choice to disable only this motor, all PMAC motors or only
those motors that are part of the same coordinate system. These options are selectable on the screen. The
definition of coordinate systems and maximum following error are explained later in this manual.
12
Connections and Initial Settings
EZ PMAC2A-PC-104 Setup Manual
Polarity Test
On this page, the motor polarity is checked. Correct polarity will show increasing encoder counts when
PMAC outputs a positive command signal. This procedure requires the amplifier and motor being
powered so, if possible, mechanically disengage the motor from the load.
On this screen, the motor is controlled in open loop mode. The value in the Open Loop Command field is
a percentage of the maximum allowed DAC output, Ix69 which was set up in the DACs or stepper output
setup screen. In case of analog amplifiers, the voltage can be monitored in the Output Voltage indicator.
In some cases, the amplifier will deliver a small current or velocity to the motor even when the command
signal from PMAC is zero. This is known as drifting conditions. The motor would drift away even when
it is not commanded to move. PMAC can output a bias component at all times to compensate for these
drifting conditions if they exist.
To perform the polarity check procedure:
1. Select the motor to check the signals polarity.
2. Test the amplifier enable signal, making sure the amplifier enables and disables when so commanded
with the dedicated button on the screen. It is important to confirm that the motor can be disabled
when necessary.
3. A continuous increase or decrease in the encoder counter when the amplifier is enabled with a zero
command value and zero bias value will indicate a drifting condition. Set the bias value manually by
changing the slide bar or input value. Alternatively, as long as the motor is free to move in an
uncontrolled fashion, click on the Auto Set Bias button for an automatic procedure. During this
process, the motor might perform a sudden and uncontrolled move.
4. To check the motor polarity, set a positive command output value and monitor an increase in the
encoder counter. Then, set a negative command output value and monitor a decrease in the encoder
counter. Alternatively, as long as the motor is free to move in an uncontrolled fashion, click on the
Check Polarity button for an automatic procedure. During this process, the motor might perform a
sudden and uncontrolled move.
Connections and Initial Settings
13
EZ PMAC2A-PC-104 Setup Manual
5. The open loop command can be output up until a limited time set on the screen. To disable this
feature, set the Timer value to zero. The maximum value for this timer is 3600 seconds (one hour).
At any time, press the Esc key to disable or kill all motors. However, it is recommended that there is easy
access to an electrical switch that will shut down the amplifier and motor in case of failure or in an
emergency.
14
Connections and Initial Settings
EZ PMAC2A-PC-104 Setup Manual
TUNING THE MOTORS
The Tuning Procedure
The tuning process is the definition of the PID loop parameters and the confirmation that PMAC can
move the motors in closed loop with limited following error. The basic tuning procedure provided by the
PMAC Quick Setup program might be limited in some cases to achieve an optimum tuning performance,
but would allow, nevertheless, moving the motors in closed loop. For a more accurate tuning procedure,
use a more sophisticated program like PEWIN or P2SETUP, both provided separately.
Warning:
It is important to run this procedure with the motor polarity already checked. If the
motor polarity is reversed, a dangerous runaway condition could occur.
1. Select the motor to be tuned.
2. To get the motors to move in closed loop, only an increase in the proportional gain parameter from its
default value is needed. As a rule of thumb, slowly increase the proportional gain variable until a
buzzing noise in the motor is heard, and then back down 20% from that value.
3. Perform a parabolic move to let the program know that the motor is successfully tuned. The parabolic
move is explained below.
4. If there is a similar kind of amplifier and motors connected to the other PMAC motors, copy the
tuning parameters with the Clone button. However, a parabolic move must be performed for each
cloned motor.
5. When exiting this page, the motor selected will be disabled if the parabolic move was not performed
or if it was performed unsuccessfully. The program assumes that a not properly tuned motor will not
be used in this application.
The Parabolic Move
The parabolic move is a simple way to monitor how much following error the motor of interest has during
a closed loop move. In some cases, the shape of the parabolic response can indicate how to improve the
tuning parameters. The slides on the right-hand side of the page are present for this purpose.
Tuning the Motors
15
EZ PMAC2A-PC-104 Setup Manual
1. Select the motor that will perform the parabolic move.
2. Select the move distance in encoder counts based on the available travel distance and the encoder
resolution.
3. Select the move time in milliseconds. This parameter determines how fast the move will be executed,
resulting in a lower or higher velocity. Make sure the distance and time results in a kind of move
close to those used in the actual application. A well-tuned motor at lower velocities might not perform
well for faster or longer moves.
4. Click on the Check Tuning button to start the motion. The result will be plotted when the move is
completed.
5. Monitor the maximum velocity and following error indicated in the plot. This provides an indication
of how the motor performs at a given velocity.
6. Press the Previous and Next buttons for indications on improving the tuning parameters based on the
parabolic response plot. For the PMAC Quick Setup program, the motor is considered properly tuned
once the parabolic response is plotted
At any time, press the Esc key to disable or kill all motors. However, it is recommended that there is
easy access to an electrical switch that will shut down the amplifier and motor in case of failure or in
an emergency.
16
Tuning the Motors
EZ PMAC2A-PC-104 Setup Manual
MOTOR JOG COMMANDS
From this page any activated motor can be moved in closed loop by means of Jog commands. Before
jogging each motor, it is important to properly define all the move parameters. These parameters are
explained in the following sections.
Motor Safety I-Variables
Warning:
Setting Ix11 to zero (disabled) could lead to a dangerous motor runaway condition.
For example, if the encoder feedback information is lost but Ix11 is enabled,
PMAC will shut down the motor when the following error exceeds Ix11 and so
will prevent the motor from running away in an uncontrollable fashion.
Ix11 - Motor x Fatal Following Error Limit
This variable specifies the maximum number of counts of allowed following error before the motor is
shutdown. This variable is scaled in 1/16 counts; this means, for example, that a value of 1600 in I111
would result in a maximum allowed following error for motor #1 of 100 encoder counts.
Ix12 - Motor x Warning Following Error Limit
This variable specifies the maximum number of counts of allowed following error before a warning is
issued in the status word for that motor. This variable is scaled in 1/16 counts; this means, for example,
that a value of 800 in I112 would result in a warning following error for motor #1 of 50 encoder counts.
Ix13 - Motor x + Software Position Limit
This variable, scaled in encoder counts, determines the maximum allowed range of motion in the positive
direction. Enabling this function is useful when no actual end-of-travel limit switches are used for this
motor.
Ix14 - Motor x - Software Position Limit
This variable, scaled in encoder counts, determines the maximum allowed range of motion in the negative
direction. Enabling this function is useful when no actual end-of-travel limit switches are used for this
motor.
Motor Jog Commands
17
EZ PMAC2A-PC-104 Setup Manual
Ix15 - Motor x Abort/Lim Deceleration Rate
This variable, scaled in encoder counts per millisecond square, sets the deceleration rate used when a
programmed motion is aborted either by the A Abort command or when a maximum position limit is
reached.
Ix16 - Motor x Maximum Velocity
This variable, scaled in encoder counts per second, specifies the maximum allowed velocity for a motor
performing a linear move commanded from a motion program. This maximum value is not observed if
variable I13 is greater than zero.
Ix17 - Motor x Maximum Acceleration
This variable, scaled in encoder counts per millisecond square, sets up the maximum allowed acceleration
rate for a motor performing a linear move issued from a motion program. This maximum value is not
observed if variable I13 is greater than zero.
Warning:
Safety parameters Ix16 and Ix17 are not observed if I13 is greater than zero. I13
set to greater than zero is necessary, for example, when a motion program is
performing a circular interpolation move.
Ix19 - Motor x Maximum Jog/Home Acceleration
This variable, scaled in encoder counts per millisecond square, sets the maximum allowed acceleration
rate for a motor in performing jog or homing move.
S-Curve and Linear Acceleration Variables
Velocity vs Time
No ‘S’
with ‘S’
Ix22
Ix21
Ix21
Ix20
Ix20
The acceleration portion of a jog-programmed move is controlled by two time parameters in units of
milliseconds. In the case of jog or homing commands, these two parameters are I-Variables Ix20 and
Ix21. Ix20 determines the overall acceleration time which is the total time required for any change in
velocity. Ix21 determines the portion of the overall acceleration ramp that is performed in S-curve mode.
In all cases, if two times the S-curve acceleration parameter is greater than the linear acceleration
parameter, then the overall acceleration time will be two times the S-curve acceleration time:
If (2 x Ix21)
18
> Ix20 then Ix20 = (2 x Ix21)
Motor Jog Commands
EZ PMAC2A-PC-104 Setup Manual
Rate vs Time: Programming the Maximum Acceleration Parameters
The safety I-Variables Ix17 and Ix19 determine the maximum allowed acceleration for the motor x.
These variables are programmed in the rate of encoder counts per millisecond square. However, the
acceleration of a jog-programmed move is set in milliseconds as described above. The following
relationship holds for the conversion between those parameters:
Maximum Velocity
Acceleration Rate =
Linear Acceleration Time - ' S' Curve Acceleration Time
Example:
Ix22
Ix19 =
Ix20 - Ix21
Benefits of Using S-Curve Acceleration Profiles
In an electric motor, the acceleration directly translates into torque and electrical current. When no Scurve component is programmed, the acceleration, torque and current are all applied immediately to the
motor as soon as it starts moving.
On the other hand, with a programmed S-curve profile, the acceleration is linearly introduced resulting in
a smoother transition in torque and current. However, the acceleration rate in a pure S-curve acceleration
profile is two times than necessary for a pure linear acceleration profile (see equation above). This can
result in a longer acceleration time when using a S-curve acceleration profile maintaining the same
maximum acceleration rate.
Motor Jog Movement I-Variables
Ix20 Motor x Jog/Home Acceleration Time
This variable, scaled in milliseconds, determines how long the acceleration portion of the jog moves will
take, regardless of whether S-curve components are programmed also (see previous diagram).
Ix21 Motor x Jog/Home S-Curve Time
This variable, scaled in milliseconds, determines the portion of the acceleration ramp that will be
performed in S-curve mode. If Ix20 is set to zero, then the acceleration ramp will take 2*Ix21 and will be
executed in pure S-curve mode.
Ix22 Motor x Jog Speed
This variable sets the jog velocity in units of encoder counts per millisecond. If the motor x is moving
already, a new jog command must be issued for the new Ix22 parameter to have effect.
Motor Jog Commands
19
EZ PMAC2A-PC-104 Setup Manual
Motor Jog Commands
HomeZ
This button resets the encoder counter, establishing a new zero reference for absolute jog move
commands.
Jog Neg
This button jogs the selected motor continuously in the negative direction.
Stop
This button stops any jog command issued previously for the selected motor.
Jog Pos
This button jogs the selected motor continuously in the positive direction.
Jog Abs
This button jogs the selected motor in absolute mode to the position entered on the input field at the right
of the button. Press HomeZ at any time to re-define the zero position reference for absolute jog
commands.
Jog Inc
This button jogs the selected motor in incremental mode to the position entered on the input field at the
right of the button. Pressing this button repeatedly allows moving the motor at fixed distance intervals.
20
Motor Jog Commands
EZ PMAC2A-PC-104 Setup Manual
HOME PROCEDURE
Home commands allow establishing a physical point of reference for all programmed moves. If no home
procedure is performed for a particular motor, the zero physical point of reference of that motor will be
located at the point where it is found on power-up or reset.
When a home command is given, either from a motion program or an online command, the motor x will
move towards the location of the home switch with the direction and velocity determined by the Ix23
parameter. When the trigger condition is found, which can be programmed to be the open or closed
condition of the home switch, PMAC will reset the motor position registers and will reference any
subsequent programmed move in absolute mode to that physical location.
Motor Home Movement I-Variables
Ix19 - Motor x Maximum Jog/Home Acceleration
This variable, scaled in encoder counts per millisecond square, sets the maximum allowed acceleration
rate for a motor performing a homing move. In addition, it determines the maximum acceleration rate for
jog commands. See the Motor Jog Commands section of this manual for more details.
Ix20 Motor x Jog/Home Acceleration Time
This variable, scaled in milliseconds, determines how long the acceleration portion of the home search
move will take, regardless of whether S-curve components are programmed also. In addition, this
parameter determines the acceleration time for jog commands. See the Motor Jog Commands section of
this manual for more details.
Ix21 Motor x Jog/Home S-Curve Time
This variable, scaled in milliseconds, determines the portion of the acceleration ramp that will be
performed in S-curve mode. If Ix20 is set to zero, then the acceleration ramp will take 2*Ix21 and will be
executed in pure S-curve mode. This parameter also determines the S-curve acceleration time for jog
commands. See the Motor Jog Commands section of this manual for more details.
Home Procedure
21
EZ PMAC2A-PC-104 Setup Manual
Ix23 Motor x Home Speed and Direction
This variable sets the motor home search speed and direction in units of encoder counts per millisecond.
Usually, the magnitude of this parameter is set the same as the jog velocity parameter Ix22. See the Motor
Jog Commands section of this manual for more details.
Ix26 Motor x Home Offset
This is the relative position of the end of the homing cycle to the position at which the home trigger was
made. That is, the motor will command a stop at this distance from where it found the home flag(s) and
call this commanded location as motor position zero. The units of this parameter are 1/16 of a count, so
the value should be 16 times the number of counts between the trigger position and the home zero
position.
Homing Search Move Trajectory
Vel
Trigger
Occurs
Home Complete=1
Home Search in Progress=0
Home Complete=0
Home Search
In Progress=1
Net distance from
trigger position
= Ix26
Ix23
Time
Ix21
Ix21
Ix21
Ix20
Desired Velocity Zero=1
In Position=1
(when FE in range)
Note: Rate of acceleration
limited by Ix19 - can override
Ix20 and Ix21
Ix21
Ix21
Ix20
Ix21
Ix20
Motor Home Commands
When the Home button located on this page is pressed, the selected motor will start moving according to
the I-Variables defined. The jog buttons are available to eventually move the motor away from the home
switch if necessary. The motor will move until the selected trigger condition is found. The trigger
condition can be selected from the Home Capturing Control selector on this page. The home flag to use
for the trigger condition is also selectable from this page. Usually, the trigger condition is the open or
closed of the home input flag combined with the state of the encoder C channel.
Example:
Homing Capturing Control:
Homing Flag Select:
Rising edge of [CHCn AND Flag n]
Home Flag
This configuration will result in the trigger condition found when the home input flag is open and when
the encoder C channel state changes from low to high. In this case, the sensor or switch used for the home
flag should be normally closed to analog ground.
22
Home Procedure
EZ PMAC2A-PC-104 Setup Manual
MOTION PROGRAMS
Coordinate Systems Definitions
Before running a motion program, a coordinate system must be defined. A coordinate system consists of
one or several motors that will be controlled in a coordinate fashion from a motion program.
Each motor is linked to an axis letter with an optional scale factor. The scale factor allows, for example,
programming each move in the motion program in units of inches, millimeters or simply revolutions of
the motor. The scale factor can depend, for example, on the encoder resolution, the ratio of an optional
gearbox and the pitch of the ball screw translating rotational motion into linear motion. For simplicity, set
the scale factor to 1 and program the first motion program in units of encoder counts.
1. Select a coordinate system number. Usually Coordinate System 1 is used.
2. Select a motor number from the menu on the screen.
3. Enter the appropriate scale factor or 1 for programming the first motion program in encoder counts.
4. Select an axis letter from the menu.
5. Click on the Add Motor button.
6. Repeat the steps for all other motors.
S-Curve and Linear Acceleration Variables
The acceleration portion of a motion program move in either linear or circular interpolation is controlled
by two timing parameters in units of millisecond. These two parameters are the motion commands TA
and TS, or the corresponding I-variables Ix87 and Ix88 in case TA or TS is not included in the motion
program. TA or Ix87 determines the overall acceleration time which is the total time required for any
change in velocity. TS or Ix88 determines the portion of the overall acceleration ramp that is performed in
S-curve mode.
Motion Programs
23
EZ PMAC2A-PC-104 Setup Manual
In all cases, if two times the S-curve acceleration parameter is greater than the linear acceleration
parameter, then the overall acceleration time will be two times the S-curve acceleration time:
If (2 x TS)
> TA then TA = (2 x TS)
Benefits of Using S-Curve Acceleration Profiles
In an electric motor, the acceleration directly translates into torque and electrical current. When no Scurve component is programmed, the acceleration, torque and current are all immediately applied to the
motor as soon as it starts moving.
On the other hand, with a programmed S-curve profile, the acceleration is linearly introduced, resulting in
a smoother transition in torque and current. However, the acceleration rate in a pure S-curve acceleration
profile is two times than that necessary for a pure linear acceleration profile (see equation above). This
can result in a longer acceleration time when using a S-curve acceleration profile maintaining the same
maximum acceleration rate.
Motion Program Velocity
One way to program the feedrate or velocity of a linear or circular interpolated move is by using the F
motion program parameter. The units of this parameter are units of distance per Ix90 milliseconds. The
units of distance are determined by the scale factor set in the coordinate systems definition. The default
value of the Ix90 variable is 1000 which means that the feedrate will be programmed in units of distance
per second.
24
Motion Programs
EZ PMAC2A-PC-104 Setup Manual
Example:
Motor 1 has been defined to be axis X with a scale factor of 1
X1000 F500
; Move axis ‘X’ (motor 1) 1000 encoder counts with a
; velocity of 500 encoder counts per second
If F is not included specifically in the program, the default value set in Ix89 will be used as the federate
value. If the F parameter exceeds the value of the Ix98 variable and Ix98 is greater than zero, the value of
Ix98 will be used as feedrate instead.
Blending Disable/Enable
If the Ix92 coordinate system variable is set to zero, a sequence of linearly interpolated moves will be
blended together without a stop between moves. If Ix92 is set to one, there will be a stop to zero velocity
of all interpolated axes between moves. Ix92 is read only when the motion program starts. This
parameter must be set before running a motion program.
Motion Programs
From this centralized screen, a motion program can be written, edited, run and debugged. The coordinate
system definitions and the status portion of the screen are used for indication and diagnostics only.
1. Select the coordinate system to run the motion programs.
2. Make sure a motor or group of motors are part of the coordinate system axes list. If no motors are
present, press C.S. to redefine or check the coordinate systems definitions.
3. Press Update List to refresh the list of motion programs loaded in memory.
4. Select a motion program from the programs list or enter the number in the data input box. If no
motion program exists in memory, enter a motion program number from 1 to 32767 in the data input
box.
5. Press Edit to view the contents of the selected motion program or to create a new motion program.
6. When the edit window is open, enter the following text:
OPEN PROG 1 CLEAR
LINEAR
INC
TA100
TS0
F40
X3
Motion Programs
;
;
;
;
;
;
;
Opens “PROG1” buffer for editing
Linear mode motion
Incremental mode
Acceleration time is 100 msec
No S-curve component
Feedrate is 40 length_units / second
Move axis X 3 length_units of distance
25
EZ PMAC2A-PC-104 Setup Manual
X-3
; Move axis X 3 length_units of distance in the
; opposite direction
CLOSE
Press Alt+X to exit the editor window:
7. To run this motion program, either press Run or Step. If Run is pressed, the program will run from
start to finish without stopping. Otherwise, every time Step is pressed one line of the motion program
will execute and the program will stop. The Quit button will rewind the motion program when it is
run in step mode, or will execute the last programmed command and stop if it was run with the RUN
command.
8. To stop any motion in this coordinate system, press the Abort button.
9. To change program operation speed, adjust the feedrate override value either with the slide bar or
with the input value field. Allowed values 0 to 225 % of the programmed feedrate. In some cases, this
is useful for debugging the motion program by running it in slow motion.
26
Motion Programs
EZ PMAC2A-PC-104 Setup Manual
PLC PROGRAMS
PMAC is not only an excellent motion controller, but it can perform PLC operations. The 32 different
PLC programs are similar to motion programs, but they run independently of motion programs and of
other PLCs.
Note:
PLC0 is a special PLC that should be dedicated for operations that require fast
execution. A large, time consuming PLC0 could in some cases, interfere with
normal communications with the host computer.
This screen will display a list of PLCs that are present in memory, together with the indication of whether
the PLC is running, enabled or disabled.
1. Enter a PLC number to be created or edited in the PLC Number Data Input field. Valid numbers are 0
to 31, although PLC0 is reserved for special uses.
2. Press Edit to view the contents of the selected PLC program or to create a new PLC program.
3. When the edit window is open, enter the following text:
OPEN PLC1 CLEAR
IF (M8=1)
M0=1
M1=0
ELSE
M0=1
M1=0
ENDIF
;
;
;
;
;
;
if input
output 1
output 2
else, if
output 1
output 2
1 is ON…
is set to ON
is set to OFF
input 1 is OFF…
is set to OFF
is set to ON
CLOSE
Press Alt+X to exit the editor window:
4. Set the PLC radio button to ON and the PLC radio button to Enable. Then, make sure that PLC1 has
running indicated next to it.
PLC Programs
27
EZ PMAC2A-PC-104 Setup Manual
General-Purpose I/O and Analog Inputs Page
This page shows the status of the JOPTO port on the ACC-1P board and the voltage that is input in the
optional analog to digital converter inputs.
Clicking on the I/O Port button on the PLC Programs page will show PMAC’s general-purpose digital
I/O connector page. This page checks the PLC program example written above.
1. Set the PLCs and Simulated Inputs radio buttons to ON.
2. Click on the input switch for input MI1, pin 15. Observe a change on outputs MO1 and MO2 as the
state of the input MI1 is changed.
Note:
Make sure that no actual device is connected to any output line on the JOPTO port
when testing this sample PLC. The logic shown in this example is for illustration
purposes only; it might not be appropriate for the actual machine configuration.
Software Setup
General-Purpose Digital Inputs and Outputs
If one ACC-1P is present on the PMAC2A-PC/104 stack configuration, then its jumpers E5 and E6
should be set at the default position 1-2. In this case, the lines on its J7 general-purpose I/O connector
will be mapped into PMAC’s address space in register Y:$C080. Jumpers E5 and E6 should be
configured on position 2-3 only when two ACC-1Ps are used. In this case, the I/O lines can be accessed
at address Y:$C0C0.
If no ACC-1P is present on the PMAC2A-PC/104 stack configuration and only ACC-2P is used, then
jumper E5 on the ACC-2P board should connect pins 1 and 2. In this case, the lines on its JOPT generalpurpose I/O connector will be mapped into PMAC’s address space in register Y:$C080.
If both ACC-1P and ACC-2P are used, then jumper E5 on the ACC-2P board should connect pins 2 and 3
and its I/O lines can be accessed at address Y:$C0C0.
Typically, these I/O lines are accessed individually with M-Variables. Following is a suggested set of MVariable definitions to use these data lines in an ACC-1P with jumper E6 on position 1-2:
28
PLC Programs
EZ PMAC2A-PC-104 Setup Manual
M0->Y:$C080,0
M1->Y:$C080,1
M2->Y:$C080,2
M3->Y:$C080,3
M4->Y:$C080,4
M5->Y:$C080,5
M6->Y:$C080,6
M7->Y:$C080,7
M8->Y:$C080,8
M9->Y:$C080,9
M10->Y:$C080,10
M11->Y:$C080,11
M12->Y:$C080,12
M13->Y:$C080,13
M14->Y:$C080,14
M15->Y:$C080,15
M32->X:$C080,0,8
M34->X:$C080,8,8
M40->X:$C084,0,24
M42->Y:$C084,0,24
;
;
;
;
;
;
;
;
;
;
;
;
;
;
;
;
;
;
;
;
Digital Output M00
Digital Output M01
Digital Output M02
Digital Output M03
Digital Output M04
Digital Output M05
Digital Output M06
Digital Output M07
Digital Input MI0
Digital Input MI1
Digital Input MI2
Digital Input MI3
Digital Input MI4
Digital Input MI5
Digital Input MI6
Digital Input MI7
Direction Control (1=output, 0 = input)
Direction Control (1=output, 0 = input)
Inversion control (0 = 0V, 1 = 5V)
J7 port data type control (1 = I/O)
In order to properly setup the digital outputs, an initialization PLC must be written scanning through once
on power-up/reset, then disabling itself:
OPEN PLC31 CLEAR
M32=$FF
M34=$0
M40=$FF00
M42=$FFFF
DIS PLC1
;Bits 0-8 are assigned as output
;Bits 9-16 are assigned as input
;Define inputs and outputs voltages
;All lines are I/O type
;Disable PLC1 (scanning through once on power;up/reset)
CLOSE
Note:
After loading this program, set I5=2 or 3 and enable PLC 1.
Analog Inputs
The optional analog-to-digital converter inputs are ordered either through Option-12 on the base board or
Option-2 on the axis expansion board. Each option provides two 12-bit analog inputs with a ±10VDC
range. The M-Variables associated with these inputs provide values between +2048 and –2048 for the
respective ±10VDC input range. The following is the software procedure to setup and read these ports.
Base Board Analog Inputs Setup
I903 = 1746
WX:$C014, $1FFFFF
M105->X:$0710,12,12,S
M205->X:$0711,12,12,S
;
;
;
;
Set ADC clock frequency at 4.9152 MHz
Clock strobe set for bipolar inputs
ADCIN_1 on JMACH1 connector pin 45
ADCIN_2 on JMACH1 connector pin 46
;
;
;
;
Set ADC clock frequency at 4.9152 MHz
Clock strobe set for bipolar inputs
ADCIN_1 on JMACH1 connector pin 45
ADCIN_2 on JMACH1 connector pin 46
ACC-1P Analog Inputs Setup
I907 = 1746
WX:$C034, $1FFFFF
M505->X:$0714,12,12,S
M605->X:$0715,12,12,S
PLC Programs
29
EZ PMAC2A-PC-104 Setup Manual
30
PLC Programs
EZ PMAC2A-PC-104 Setup Manual
BACKUP AND RESET PROCEDURES
Backup Procedures
Once PMAC is properly configured, save the software parameters in a backup file. On this page, select
the parameters to save and the name of the file.
To save the parameters on disk, press the Save button. To restore the parameters from a disk or read them
from a previously saved backup file, press the Restore button.
Note:
With serial communications at 9600 baud rate, this procedure takes about one or
two minutes. Once the procedure starts, it cannot be interrupted.
•
•
Use the Check All and Uncheck All buttons on this page, to select or de-select all items.
Use the Open button to check, edit or modify, if necessary any previously saved configuration file.
Reset Procedures
Backup and Reset Procedures
31
EZ PMAC2A-PC-104 Setup Manual
Reset PMAC to Last Saved Backup File Parameters
Every time a backup file is created in the backup utilities page, a copy is saved under the BACKUP.CFG
file name. With this command, PMAC can be reset at any time to the last saved configuration file, reading
it from the BACKUP.CFG file.
Reset PMAC to Last Memory Saved Parameters
After a SAVE online command has been issued (see below), PMAC maintains its memory contents either
with a battery or with a flash type memory. The type of backup memory depends on the particular type of
on-board PMAC memory that was ordered. With this type of reset, which is the $$$ online command,
all the variables will be returned to the last saved values.
Reset PMAC to Factory Defaults
With this type of reset ($$$*** online command), all PMAC variables can be reverted to the factory
default values. This is important when PMAC is configured for the first time. After performing this
procedure, all programs inside the memory will be erased and all variables will be configured to the
default values.
Save Parameters in PMAC Memory
With the SAVE online command, the values in PMAC memory will be saved and kept under a reset or
power-up cycle. It is important to save the PMAC memory contents every time a change has been made
to any of its variables or programs.
32
Backup and Reset Procedures
EZ PMAC2A-PC-104 Setup Manual
THE TERMINAL WINDOW AND UTILITY FUNCTIONS
After PMAC has been configured properly, this terminal screen becomes the main operating screen from
which every previously described function can be accessed easily.
The terminal window has a rotating buffer that records the five last issued commands. These commands
can be recalled through the arrow keys on the keyboard.
Based on the limited size of the terminal window, we suggest listing any PLC or Motion Program from
the dedicated pages instead of using the LIST online command.
The Watch Window
The watch window provides a simple method for continuously monitoring any PMAC variable or
memory register. By default, the following information is displayed: Position, Velocity, and following
error of the first four motors, the number of the selected motor, the number of the selected coordinate
system and the feedrate value parameter for the selected coordinate system.
The watch window can be paused with the by pressing the Stop Watch button, improving the
communications response of the terminal window. The contents of the watch window can be edited with
the Edit Watch button and any valid online command can be inserted. The data displayed is that received
directly from PMAC and no further formatting is applied other than that provided by the PMAC I9
variable.
The Calculator Function
The Terminal Window and Utility Functions
33
EZ PMAC2A-PC-104 Setup Manual
This simple calculator has common arithmetic functions and an automatic decimal to hexadecimal
conversion for every number entered. The hexadecimal field can be edited to obtain hexadecimal to
decimal conversions as well.
The Circle Function
This function calculates the center and radius of any circular path, given the coordinates of three nonaligned points that belong to it. This is useful when programming PMAC in circular interpolation mode.
The Reset button clears all the entry fields.
34
The Terminal Window and Utility Functions