1
Server Administrator
Version 7.2 Installation Guide
Notes, Cautions, and Warnings
NOTE: A NOTE indicates important information that helps you make better use of your computer.
CAUTION: A CAUTION indicates either potential damage to hardware or loss of data and tells you how to avoid the
problem.
WARNING: A WARNING indicates a potential for property damage, personal injury, or death.
Copyright
© 2012 Dell Inc. All Rights Reserved.
Trademarks used in this text: Dell™, the Dell logo, Dell Boomi™, Dell Precision™ , OptiPlex™ Latitude™, PowerEdge™, PowerVault™,
PowerConnect™, OpenManage™, EqualLogic™, Compellent™, KACE™, FlexAddress™, Force10™ and Vostro™ are trademarks of Dell
Inc. Intel®, Pentium®, Xeon®, Core® and Celeron® are registered trademarks of Intel Corporation in the U.S. and other countries. AMD®
is a registered trademark and AMD Opteron™, AMD Phenom™ and AMD Sempron™ are trademarks of Advanced Micro Devices, Inc.
Microsoft®, Windows®, Windows Server®, MS-DOS®, Windows Vista®, and Active Directory® are either trademarks or registered
trademarks of Microsoft Corporation in the United States and/or other countries. Red Hat Enterprise Linux® and Enterprise Linux® are
registered trademarks of Red Hat, Inc. in the United States and/or other countries. Novell® is a registered trademark and SUSE™ is a
trademark of Novell Inc. in the United States and other countries. Oracle® is a registered trademark of Oracle Corporation and/or its
affiliates. Citrix®, Xen®, XenServer® and XenMotion® are either registered trademarks or trademarks of Citrix Systems, Inc. in the
United States and/or other countries. VMware®, Virtual SMP®, vMotion®, vCenter® and vSphere® are registered trademarks or
trademarks of VMware, Inc. in the United States or other countries. IBM® is a registered trademark of International Business Machines
Corporation.
2013 - 01
Rev. A01
Contents
Notes, Cautions, and Warnings...................................................................................................2
1 Introduction..................................................................................................................................9
What Is New In This Release...................................................................................................................................9
Software Availability..........................................................................................................................................9
Systems Management Software..............................................................................................................................9
Server Administrator Components On A Managed System.............................................................................10
Security Features....................................................................................................................................................12
Other Documents You Might Need.........................................................................................................................12
2 Preinstallation Setup................................................................................................................15
Prerequisite Checker..............................................................................................................................................15
Installation Requirements.......................................................................................................................................18
Supported Operating Systems And Web Browsers.........................................................................................18
Multilingual User Interface Support.................................................................................................................18
Viewing Localized Versions Of The Web-Based Interface..............................................................................18
System Requirements......................................................................................................................................18
Digital Certificates............................................................................................................................................20
Enabling Windows Installer Logging Service..................................................................................................20
Microsoft Active Directory...............................................................................................................................20
Configuring SNMP Agents......................................................................................................................................21
Secure Port Server And Security Setup.................................................................................................................21
Setting User And Server Preferences..............................................................................................................21
X.509 Certificate Management.........................................................................................................................23
Remote Enablement Requirements........................................................................................................................23
Installing WinRM..............................................................................................................................................24
Certificate Authority Signed Self-Signed Certificate.......................................................................................24
Dependent RPMs For Remote Enablement......................................................................................................26
Post-Installation Configuration For Remote Enablement.................................................................................27
Winbind Configuration For openwsman And sfcb For Red Hat Enterprise Linux Operating Systems....................28
Winbind Configuration For openwsman And sfcb For SUSE Linux Enterprise Server Operating System.............29
Workaround For The Libssl Issue...........................................................................................................................29
3 Installing Managed System Software On Microsoft Windows Operating Systems .....31
Deployment Scenarios For Server Administrator...................................................................................................31
Installer Location..............................................................................................................................................32
Installing Server Administrator .......................................................................................................................32
System Recovery On Failed Installation.................................................................................................................38
Failed Updates..................................................................................................................................................38
Upgrading Managed System Software..................................................................................................................39
Upgrading Guidelines.......................................................................................................................................39
Upgrade............................................................................................................................................................39
Modify...............................................................................................................................................................40
Repair...............................................................................................................................................................41
Uninstalling Managed System Software................................................................................................................41
Uninstalling Managed System Software Using The Provided Media..............................................................41
Uninstalling Managed System Software Features Using The Operating System............................................42
Unattended Uninstall Using The Product GUID...............................................................................................42
Unattended Uninstallation Of Managed System Software..............................................................................42
4 Installing Managed System Software On Supported Linux And VMware ESX..............45
Software License Agreement.................................................................................................................................46
RPM For Individual Components............................................................................................................................46
OpenIPMI Device Driver.........................................................................................................................................50
Degradation Of Functionality When The Server Administrator Instrumentation Service Is Started...............50
Installing Managed System Software....................................................................................................................51
Prerequisites For Installing Managed System Software.................................................................................51
Installing Managed System Software Using The Provided Media..................................................................52
Server Administrator Custom Installation Utility..............................................................................................55
Managed System Software Installation Using Third Party Deployment Software..........................................57
Uninstalling Managed System Software................................................................................................................58
Uninstalling Managed System Software Using The Uninstall Script...............................................................58
Uninstalling Managed System Software Using The RPM Command...............................................................58
5 Installing Managed System Software On Microsoft Windows Server 2008 Core
And Microsoft Hyper-V Server..................................................................................................59
Running Prerequisite Checker In CLI Mode...........................................................................................................59
Installing Managed System Software In CLI Mode................................................................................................59
Uninstalling Systems Management Software........................................................................................................60
6 Installing Systems Management Software On VMware ESXi...........................................61
Using The vSphere CLI............................................................................................................................................61
Using The VMware vSphere Management Assistant (vMA).................................................................................62
Using The VMWare Update Manager (VUM).........................................................................................................62
Using The Power CLI..............................................................................................................................................63
Enabling Server Administrator Services On The Managed System.......................................................................64
Enabling CIM OEM Providers Using vSphere Client (For VMware ESXi4.0/ESXi 4.1)......................................64
Enabling CIM OEM Providers Using vSphere CLI (For VMware ESXi 4.0/ESXi 4.1).........................................64
Enabling CIM OEM Providers Using vMA (For VMware ESXi 4.0/ESXi 4.1).....................................................65
Uninstalling The Existing Systems Management VIB......................................................................................65
Configuring The SNMP Agent On Systems Running VMware ESXi.......................................................................65
Configuring The System To Send Traps To A Management Station Using The vSphere CLI..........................65
Troubleshooting......................................................................................................................................................66
7 Installing Systems Management Software On Citrix XenServer .....................................67
During The installation Of XenServer.....................................................................................................................67
On A Running System.............................................................................................................................................67
XenServer Upgrade................................................................................................................................................68
Post Installation Tasks............................................................................................................................................68
8 Using Microsoft Active Directory...........................................................................................69
Active Directory Schema Extensions.....................................................................................................................69
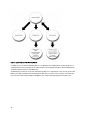
Overview Of The Active Directory Schema Extensions...................................................................................69
Active Directory Object Overview....................................................................................................................69
Active Directory Objects In Multiple Domains.................................................................................................71
Setting Up Server Administrator Active Directory Objects In Multiple Domains............................................72
Configuring Active Directory To Access The Systems....................................................................................73
Configuring The Active Directory Product Name.............................................................................................74
Extending The Active Directory Schema................................................................................................................74
Using The Dell Schema Extender.....................................................................................................................75
Active Directory Users And Computers Snap-In.............................................................................................77
Installing The Extension To The Active Directory Users And Computers Snap-In..........................................77
Adding Users And Privileges To Active Directory...........................................................................................78
9 Frequently Asked Questions....................................................................................................81
How do I install Server Administrator with only the CLI features?.........................................................................81
What ports do systems management applications use?........................................................................................81
When I run virtual media on the DRAC controller over a Wide Area Network (WAN) with low bandwidth
and latency, launching Systems Management Install directly on the virtual media failed, what do I do?............81
Do I need to uninstall the Adaptec Fast Console application installed on the system before installing the
Server Administrator Storage Management Service?...........................................................................................81
Microsoft Windows................................................................................................................................................81
How do I fix a faulty installation of Server Administrator?...............................................................................81
What do I do when the creation of WinRM listener fails with the following error message?.........................82
What are the firewall-related configuration that needs to be done for WinRM?............................................82
When launching the Systems Management Install, an error message may display, stating a failure to
load a specific library, a denial of access, or an initialization error. An example of installation failure
during Systems Management Install is "failed to load OMIL32.DLL." What do I do?.......................................82
I get a misleading warning or error message during systems management installation................................82
I am getting the following error message while launching systems management Install:..............................82
Do I need to uninstall previous versions of Server Administrator before installing Citrix Metaframe?..........83
When I run systems management Install, I see unreadable characters on the Prerequisite check
information screen...........................................................................................................................................83
I have installed Server Administrator and Online Diagnostics in the same directory and Online
Diagnostics fails to work, what do I do?..........................................................................................................83
I have installed Server Administrator using remote Server Administrator deploy on Windows Server
2008, I do not see Server Administrator icon on the desktop?.........................................................................83
I see a warning message while uninstalling Server Administrator on Windows Server 2008 as the
installer tries to remove the shortcut?.............................................................................................................83
Where can I find the MSI log files? .................................................................................................................83
I downloaded the Server Administrator files for Windows from the Support website and copied it to
my own media. When I tried to launch the SysMgmt.msi file, it failed. What is wrong?.................................83
Does systems management Install support Windows Advertised installation?..............................................84
How do I check the disk space availability during custom installation?.........................................................84
What do I do when I see the current version is already installed message is displayed?..............................84
What is the best way to use the prerequisite checker information?...............................................................84
In the Prerequisite Checker screen, I get the following message. What can I do to resolve this problem?...84
Is the time shown during installation or uninstallation by Windows Installer Services accurate?.................85
Can I launch my installation without running the prerequisite checker? How do I do that?...........................85
How do I know what version of systems management software is installed on the system?.........................85
Do I need to reboot the system after upgrading systems management ?.......................................................85
Where can I see the Server Administrator features that are currently installed on my system?...................85
What are the names of all the systems management features under Windows?...........................................85
Red Hat Enterprise Linux or SUSE Linux Enterprise Server...................................................................................86
After installing Server Administrator, I cannot log in.......................................................................................86
I see the following message when I try to install Server Administrator on a guest Linux operating
system..............................................................................................................................................................86
I manually installed my Red Hat Enterprise Linux 4 64-bit operating system and can see RPM
dependencies while installing Server Administrator. Where can I find these dependent RPM files?............86
I have performed a non-default install of the Linux operating system using the Linux operating system
media, I see missing RPM file dependencies while installing Server Administrator?.....................................86
Where can I find the source packages for Open Source RPMs?....................................................................87
What do I do when management station RAC utility installation fails due to missing RPM file?....................87
When using the rpm -e 'rpm -qa | grep srvadmin' command to remove systems management
software, some RPM utility versions may schedule an uninstallation in an incorrect order, which
results in users encountering misleading warning or error messages. What is the solution?.......................87
What do I do when I am asked to authenticate using the root user account?................................................87
Why am I getting a warning concerning the RPM package key during installation?......................................87
What are the names of all the Systems Management features under Red Hat Enterprise Linux or
SUSE Linux Enterprise Server?........................................................................................................................88
What do the directories under srvadmin/linux/custom/<operating system> contain?....................................88
What are the additional components that can be installed on a system that already has Server
Administrator installed?...................................................................................................................................92
What happens if I install the RPM package on an unsupported system or on an unsupported
operating system?............................................................................................................................................93
What daemons run on Red Hat Enterprise Linux and SUSE Linux Enterprise Server operating systems
after Server Administrator is started?..............................................................................................................93
What kernel modules are loaded when Server Administrator is started?.......................................................94
10 Linux Installer Packages........................................................................................................95
8
Introduction
1
This topic provides information on:
•
Installing Server Administrator on managed systems.
•
Installing and using the Remote Enablement feature.
•
Managing remote systems using Server Administrator Web Server.
•
Configuring the system before and during a deployment or upgrade.
NOTE: If you are installing management station and managed system software on the same system, install identical
software versions to avoid system conflicts.
What Is New In This Release
The release highlights of Server Administrator are:
•
Added support for granular install options on systems running Microsoft Windows. For more information, see
Installing Managed System Software On Microsoft Windows Operating Systems.
•
Availability of Server Administrator on supported 64-bit Windows operating systems.
NOTE: On system prior to 12G running the Windows operating system, Server Administrator (64–bit) does
not support information collection for DRAC5 using SNMP and does not display few of the DRAC5
information on Server Administrator GUI and CLI.
•
Added support for granular install options for the latest release of Server Administrator 7.2 on systems running
Linux . For more information, see Linux Installer Packages.
•
Added functionality for custom installation. For more information, see Server Administrator Custom Installation
Utility.
•
PowerEdge OEM Ready server models with Server Administrator 7.2 installed with generic Server Administrator
branding. For more information on PowerEdge OEM Ready, see dell.com/oem.
•
A link to the complete overview of OpenManage products which provides more information on what is available
in the Systems Management Tools and Documentation (SMTD) DVD, what is embedded in the server, and what
can be downloaded from dell.com/support
Software Availability
The Server Administrator software can be installed from:
•
DVD
•
Support site — For more information, see dell.com/support.
•
VMWare Update Manager (VUM) — For more information, see http://vmwaredepot.dell.com/.
•
Linux Repository using YUM, rug, or zypper — For more information, see Linux Repository.
Systems Management Software
Systems management software is a suite of applications that enables you to manage the systems with proactive
monitoring, notification, and remote access.
9
Systems management software comprises of two DVDs:
•
•
Systems Management Tools and Documentation
Server Update Utility
NOTE: For more information on these DVDs, see Management Station Software Installation Guide.
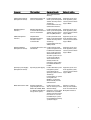
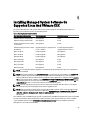
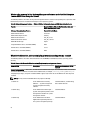
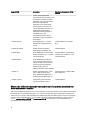
Server Administrator Components On A Managed System
The setup program provides the following options:
•
Custom Setup
•
Typical Setup
The custom setup option enables you to select the software components you want to install. The Managed System
Software Components table lists the various managed system software components that you can install during a custom
installation.
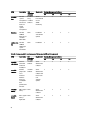
Table 1. Managed System Software Components
Component
What is installed
Deployment Scenario
Systems to install on
Server Administrator Web
Server
Web-based Systems
Management functionality
that enables you to manage
systems locally or remotely.
Install only if you want to
Any system. For example,
remotely monitor the
laptop or desktops.
managed system. You need
not have physical access to
the managed system.
Server Instrumentation
Server Administrator
Instrumentation Service
Install to use the system as
the managed system.
Installing Server
Instrumentation and the
Server Administrator Web
Server installs Server
Administrator. Use Server
Administrator to monitor,
configure, and manage the
system.
Supported systems. For a
list of supported systems,
see the Systems Software
Support Matrix at dell.com/
support/manuals.
NOTE: If you choose to
install only Server
Instrumentation, you
must also install one of
the Management
Interfaces or the
Server Administrator
Web Server.
Storage Management
Server Administrator
Storage Management
Install to implement
hardware RAID solutions
and configure the storage
components attached to the
system. For more
information on Storage
Management, see the
Server Administrator
Storage Management
10
Only those systems on
which you have installed
Server Instrumentation or
the Management
Interfaces.
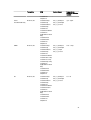
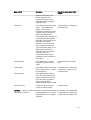
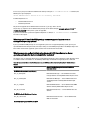
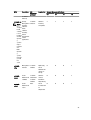
Component
What is installed
Deployment Scenario
Systems to install on
User’s Guide in the docs
directory.
Command Line Interface
(Management Interface)
Command Line Interface of
Server Instrumentation
Install to provide local and
remote system management
solutions to manage Server
and Storage
instrumentation data using
command line interfaces.
Supported systems. For a
list of supported systems,
see the Systems Software
Support Matrix.
WMI (Management
Interface)
Windows Management
Install to provide local and
Instrumentation Interface of remote system management
Server Instrumentation
solutions to manage Server
data using WMI protocol.
Supported systems. For a
list of supported systems,
see the Systems Software
Support Matrix.
SNMP (Management
Interface)
Simple Network
Management Protocol
Interface of Server
Instrumentation
Install to provide local and
remote system management
solutions to manage Server
and Storage
instrumentation data using
SNMP protocol.
Supported systems. For a
list of supported systems,
see the Systems Software
Support Matrix.
Remote Enablement
(Management Interface)
Instrumentation Service and Install to perform remote
CIM Provider
systems management tasks.
Install Remote Enablement
on one system and Server
Administrator Web Server
on another system. You can
use the system with the
Server Administrator to
remotely monitor and
manage the systems which
have Remote Enablement
installed.
Supported systems. For a
list of supported systems,
see the Systems Software
Support Matrix.
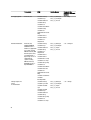
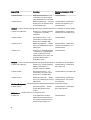
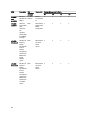
Operating System Logging
(Management Interface)
Operating System Logging
Install to allow local system
management specific
events logging on the
operating system for Server
and Storage
instrumentation. On systems
running Microsoft
Windows, use the Event
Viewer to locally view the
collected events.
Supported systems. For a
list of supported systems,
see the Systems Software
Support Matrix.
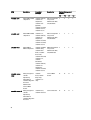
DRAC Command Line Tools
Hardware application
programing interface and
iDRAC 12G or iDRAC, DRAC
5, or DRAC 4 (depending on
the type of the system)
Install to receive e-mail
alerts for warnings or errors
related to voltage,
temperature, and fan speed.
Remote Access Controller
also logs event data and the
most recent crash screen
(available only on systems
running Windows operating
system) to help you
Only those systems on
which you have installed
Server Instrumentation or
Management Interface.
11
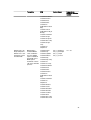
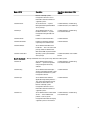
Component
What is installed
Deployment Scenario
Systems to install on
diagnose the probable
cause of a system crash.
Intel SNMP Agent (NIC
Interfaces)
Intel Simple Network
Management Protocol
(SNMP) Agent
Install to enable Server
Administrator to obtain
information about Network
Interface Cards (NICs).
Only on systems on which
Server Instrumentation is
installed and which are
running on Windows
operating system.
Broadcom SNMP Agent
(NIC Interfaces)
Broadcom SNMP Agent
Install to enable Server
Administrator to obtain
information about NICs.
Only on systems on which
Server Instrumentation is
installed and which are
running on Windows
operating system.
Related Links:
Custom Installation
Security Features
Systems management software components provide these security features:
•
Authentication for users from operating system with different privilege levels, or by using the optional Microsoft
Active Directory.
•
Support for Network Information Services (NIS), Winbind, Kerberos, and Lightweight Directory Access Protocol
(LDAP) authentication protocols for Linux operating systems.
•
Role-based authority that allows specific privileges to be configured for each user.
NOTE: Applicable only for systems running Red Hat Enterprise Linux, SUSE Linux Enterprise Server, or
VMware ESX/ESXi.
•
User ID and password configuration through the web-based interface or the command line interface (CLI), in
most cases.
•
SSL encryption (Auto Negotiate and 128-bit or higher).
NOTE: Telnet does not support SSL encryption.
•
Session time-out configuration (in minutes) through the web-based interface.
•
Port configuration to allow systems management software to connect to a remote device through firewalls.
NOTE: For information about ports that the various systems management components use, see the User Guide for
that component.
For information about the Security Management, see the Server Administrator User’s Guide at dell.com/support/
manuals.
Other Documents You Might Need
In addition to this guide, for more information, access the following guides.
12
•
The Lifecycle Controller 2 Version 1.00.00 User's Guide provides information on using the Lifecycle Controller.
•
The Management Console User’s Guide provides information about installing, configuring, and using
Management Console.
•
The Systems Build and Update Utility User’s Guide provides information on using the Systems Build and Update
Utility.
•
The Systems Software Support Matrix provides information about the various systems, the operating systems
supported by these systems, and the systems management components that can be installed on these systems.
•
The Server Administrator User's Guide describes the installation and use of Server Administrator.
•
The Server Administrator SNMP Reference Guide documents the SNMP management information base (MIB).
•
The Server Administrator CIM Reference Guide documents the Common Information Model (CIM) provider,
which is an extension of the standard management object format (MOF) file. This guide explains the supported
classes of management objects.
•
The Server Administrator Messages Reference Guide lists the messages that are displayed on the Server
Administrator home page Alert log, or on the operating system’s event viewer. This guide explains the text,
severity, and cause of each alert message that the Server Administrator displays.
•
The Server Administrator Command Line Interface Guide documents the complete command line interface for
Server Administrator, including an explanation of CLI commands to view system status, access logs, create
reports, configure various component parameters, and set critical thresholds.
•
The Remote Access Controller 5 User’s Guide provides complete information about installing and configuring a
DRAC 5 controller and using DRAC 5 to remotely access an inoperable system.
•
The Integrated Remote Access Controller User's Guide provides complete information about configuring and
using an integrated Remote Access Controller to remotely manage and monitor the system and its shared
resources through a network.
•
The Update Packages User's Guide provides information about obtaining and using the Update Packages for
Windows and Linux as part of the system update strategy.
•
The Server Update Utility User's Guide provides information on using the Server Update Utility.
•
The Systems Management Tools and Documentation DVD contains readme files for applications found on the
media.
NOTE: If the product does not perform as expected or you do not understand a procedure described in this guide,
see Getting Help in the system’s Hardware Owner’s Manual.
13
14
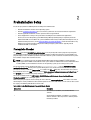
2
Preinstallation Setup
Ensure that you perform the following before installing Server Administrator:
•
Read the installation instructions for the operating system.
•
Read the Installation Requirements to ensure that the system meets or exceeds the minimum requirements.
•
Read the applicable readme files and the Systems Software Support Matrix.
•
Close all applications running on the system before installing the Server Administrator applications.
On Linux, ensure that all operating system RPM Package Manager (RPM) packages required by the Server
Administrator RPMs are installed. If the system had VMware ESX factory-installed, Red Hat Enterprise Linux, or
SUSE Linux Enterprise Server, see the Dependent RPMs for Remote Enablement section for information on any
RPMs that you need to manually install prior to installing managed system software. Typically, manual
installation of RPMs is not required.
Prerequisite Checker
The setup.exe (located at \SYSMGMT\srvadmin\windows) starts the prerequisite checker program. The prerequisite
checker program examines the prerequisites for software components without launching the actual installation. This
program displays a status window that provides information about the system’s hardware and software that may affect
the installation and operation of software features.
NOTE: To use supporting agents for the Simple Network Management Protocol (SNMP), install the operating
system support for the SNMP standard before or after you install Server Administrator. For more information about
installing SNMP, see the installation instructions for the operating system you are running on the system.
Run the prerequisite checker silently by executing runprereqchecks.exe /s from the SYSMGMT\srvadmin
\windows\PreReqChecker directory on the Systems Management Tools and Documentation DVD. After running the
prerequisite checker, a HTML file (omprereq.htm) is created in the %Temp% directory. This file contains the results of
the prerequisite check. The Temp directory is located at X:\Documents and Settings\username\Local Settings\Temp. To
find %TEMP%, go to a command line prompt and type echo %TEMP%.
The results are written under the HKEY_LOCAL_MACHINE\Software\Dell Computer Corporation\OpenManage \PreReqChecks\MN\ key for a managed system:
While running the prerequisite checker silently, the return code from runprereqchecks.exe is the number associated
with the highest severity condition for all the software products. The return code numbers are the same as those used in
the registry. The following table details the return codes.
Table 2. Return Codes While Running the Prerequisite Checker Silently
Return Code
Description
0
No condition, or conditions, is associated with the
software.
1
An informational condition, or conditions, is associated
with the software. It does not prevent a software product
from being installed.
15
Return Code
Description
2
A warning condition, or conditions, is associated with the
software. It is recommended that you resolve the
conditions causing the warning before proceeding with
the installation of the software. To continue, select and
install the software using the custom installation.
3
An error condition, or conditions, is associated with the
software. Resolve the conditions causing the error before
proceeding with the installation of the software. If you do
not resolve the issues, the software is not installed.
—1
A Microsoft Windows Script Host (WSH) error. The
prerequisite checker does not run.
—2
The operating system is not supported. The prerequisite
checker does not run.
—3
The user does not have Administrator privileges. The
prerequisite checker does not run.
—4
Not an implemented return code.
—5
The prerequisite checker does not run. The user failed to
change the working directory to %TEMP%.
—6
The destination directory does not exist. The prerequisite
checker does not run.
—7
An internal error has occurred. The prerequisite checker
does not run.
—8
The software is already running. The prerequisite checker
does not run.
—9
The WSH is corrupted, is a wrong version, or is not
installed. The prerequisite checker does not run.
—10
An error has occurred with the scripting environment. The
prerequisite checker does not run.
NOTE: A negative return code (-1 through -10) indicates a failure in running the prerequisite checker tool. Probable
causes for negative return codes include software policy restrictions, script restrictions, lack of folder
permissions, and size constraints.
NOTE: If you encounter a return code of 2 or 3, it is recommended that you inspect the omprereq.htm file in the
windows temporary folder %TEMP%. To find %TEMP%, run echo %TEMP% .
Common causes for a return value of 2 from the prerequisite checker:
16
•
One of the storage controllers or drivers has outdated firmware or driver. See
firmwaredriverversions_<lang>.html (where < lang > stands for language) or firmwaredriverversions.txt found in
the %TEMP% folder. To find %TEMP%, run echo %TEMP%.
•
RAC component software version 4 is not selected for a default install unless the device is detected on the
system. The prerequisite checker generates a warning message in this case.
•
Intel and Broadcom agents are selected for a default install only if the corresponding devices are detected on
the system. If the corresponding devices are not found, prerequisite checker generates a warning message.
•
Domain Name System (DNS) or Windows Internet Name Service (WINS) server running on the system can
cause a warning condition for RAC software. See the relevant section in Server Administrator readme for more
information.
•
Do not install managed system and management station RAC components on the same system. Install only the
managed system RAC components, as they offer the required functionality.
Common causes for a return code of 3 (failure) from the prerequisite checker:
•
You are not logged in with built-in Administrator privileges.
•
The MSI package is corrupt or one of the required XML files is corrupt.
•
Error during copying from a DVD or network access problems while copying from a network share.
•
Prerequisite checker detects that another MSI package installation is currently running or that a reboot is
pending: HKEY_LOCAL_MACHINE\\SOFTWARE\\Microsoft\Windows\CurrentVersion\Installer\InProgress
indicates another MSI package installation is in progress. HKEY_LOCAL_MACHINE\\SYSTEM\\CurrentControlSet
\\Control\\Session Manager\\PendingFileRenameOperations indicates that a reboot is pending.
•
Running the 64-bit version of Windows Server 2008 Core, since certain components are disabled from being
installed.
Ensure that any error or warning is corrected before you proceed to install systems management software components.
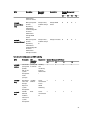
Each software has an associated value set after running the prerequisite check. The following table provides the list of
feature IDs for each software feature. The feature ID is a 2 to 5 character designation.
NOTE: The software feature IDs mentioned in the table are case-sensitive.
Table 3. Software Feature IDs for Managed Systems Software
Feature ID
Description
ALL
All features
BRCM
Broadcom Network Interface Card (NIC) Agent
INTEL
Intel NIC Agent
IWS
Server Administrator Web Server
OMSS
Server Administrator Storage Management Service
RAC4
DRAC Command Line Tools (RAC 4)
RAC5
DRAC Command Line Tools (RAC 5)
iDRAC ( for yx1x systems)
Integrated DRAC Command Line Tools
iDRACG ( for yx2x systems)
Integrated DRAC Command Line Tools
SI
Server Instrumentation
RmtMgmt
Remote Enablement
CLI
Command Line Interface of Server Instrumentation
WMI
Windows Management Instrumentation Interface of
Server Instrumentation
SNMP
Simple Network Management Protocol Interface of Server
Instrumentation
OSLOG
Operating System Logging
SA
Installs SI, CLI, WMI, SNMP, OSLOG
OMSM
Installs SI, OMSS, CLI, WMI, SNMP, OSLOG
NOTE: To manage the server, select either Server Administrator Webserver or one of the Management Interfaces
– CLI, WMI, SNMP or OSLOG along with Server Instrumentation (SI) or Server Administrator Storage Management
Service (OMSS).
17
Installation Requirements
This section describes the general requirements of the Server Administrator and provides information on supported
operating systems and web browsers.
NOTE: Prerequisites specific to an operating system are listed as part of the installation procedures.
Supported Operating Systems And Web Browsers
For information on supported operating systems and web browsers, see the Systems Software Support Matrix .
NOTE: Ensure that the web browser is configured to bypass the proxy server for local addresses.
Multilingual User Interface Support
The installer provides Multilingual User Interface (MUI) support available on the following operating systems:
•
Windows Server 2008 (64-bit)
•
Windows Server 2008 (64-bit) R2
•
Windows Server 2008 (64-bit) R2 SP1
•
Windows Small Business Server 2011 (64-bit)
The MUI Pack are a set of language-specific resource files that you can add to the English version of a supported
Windows operating system. The installer supports only six languages: English, German, Spanish, French, Simplified
Chinese, and Japanese.
NOTE: When the MUI Pack is set to non-Unicode languages like Simplified Chinese, set the system locale to
Simplified Chinese. This enables display of the prerequisite checker messages. This is because any non-Unicode
application runs only when the system locale (also called Language for non-Unicode Programs on XP) is set to
match the application's language.
Viewing Localized Versions Of The Web-Based Interface
To view the localized versions of the web interface on Windows, in the Control Panel select Regional and Language
Options.
System Requirements
Install Server Administrator on each system to be managed. You can manage each system running Server Administrator
locally or remotely through a supported web browser.
Managed System Requirements
18
•
One of the supported operating system and web browser.
•
Minimum 2 GB RAM.
•
Minimum 512 MB free hard drive space.
•
Administrator rights.
•
TCP/IP connection on the managed system and the remote system to facilitate remote system management.
•
One of the Supported Systems Management Protocol Standards.
•
Monitor with a minimum screen resolution of 800 x 600. The recommended screen resolution is at least 1024 x
768.
•
The Server Administrator Remote Access Controller service requires remote access controller (RAC) installed
on the managed system. See the relevant Remote Access Controller User’s Guide for complete software and
hardware requirements.
NOTE: The RAC software is installed as part of the Typical Setup installation option, provided the managed
system meets all of the RAC installation prerequisites.
•
The Server Administrator Storage Management Service requires Server Administrator installed on the managed
system. See the Server Administrator Storage Management User’s Guide for complete software and
hardware requirements.
•
Microsoft Software Installer (MSI) version 3.1 or later.
NOTE: Systems Management software detects the MSI version on the system. If the version is lower than
3.1, the prerequisite checker prompts you to upgrade to MSI version 3.1. After upgrading the MSI to
version 3.1, reboot the system to install other software applications such as Microsoft SQL Server.
Related Links:
Supported Systems Management Protocol Standards
Supported Systems Management Protocol Standards
Install a supported systems management protocol on the managed system before installing the management station or
managed system software. On supported Windows and Linux operating systems, systems management software
supports:
•
Common Information Model (CIM)/Windows Management Instrumentation (WMI)
•
Simple Network Management Protocol (SNMP)
Install the SNMP package provided with the operating system. If SNMP is installed post OMSA installation, restart
OMSA services.
NOTE: For information about installing a supported systems management protocol standard on the managed
system, see the operating system documentation.
The following table shows the availability of the systems management standards for each supported operating system.
Table 4. Availability of Systems Management Protocol by Operating Systems
Operating System
SNMP
CIM/WMI
Supported Microsoft Windows
operating systems.
Available from the operating system
installation media.
Always installed.
Supported Red Hat Enterprise Linux
operating systems.
Install the SNMP package provided
with the operating system.
Available. Install the CIM packages
provided on theSystems Management
Tools and Documentation DVD SFCB/SFCC/CMPI-Devel.
Supported SUSE Linux Enterprise
Server operating systems.
Install the SNMP package provided
with the operating system.
Available. Install the CIM packages
provided on the Systems
Management Tools and
Documentation DVD - SFCB/SFCC/
CMPI-Devel.
NOTE: It is recommended to install the SFCB, SFCC, OpenWSMAN, and CMPI-Devel packages from the operating
system media, if available.
19
Digital Certificates
All Server Administrator packages for Microsoft are digitally signed with a certificate that helps guarantee the integrity
of the installation packages. If these packages are repackaged, edited, or manipulated in other ways, the digital
signature is invalidated. This manipulation results in an unsupported installation package and the prerequisite checker
does not allow you to install the software.
Enabling Windows Installer Logging Service
Windows includes a registry-activated logging service to help diagnose Windows Installer issues.
To enable this logging service during a silent install, open the registry editor and create the following path and keys:
HKEY_LOCAL_MACHINE\Software\Policies\Microsoft\Windows\Installer
Reg_SZ: Logging
Value: voicewarmup
The letters in the value field can be in any order. Each letter turns on a different logging mode. Each letter's actual
function is as follows for MSI version 3.1:
v- Verbose output
o- Out-of-disk-space message
i- Status message
c- Initial UI parameter
e- All error message
w - Non-fatal warning
a- Startup of action
r- Action-specific record
m- Out-of-memory or fatal exit information
u- User request
p- Terminal property
+- Append to existing file
!- Flush each line to the log
"*"- Wildcard, log all information except for the v option. To include the v option, specify "/l*v".
Once activated, the log files are generated in the %TEMP% directory. Some log files generated in this directory are:
•
Managed System Installation
–
•
SysMgmt.log
Management Station Installation
–
MgmtSt.log
These log files are created by default if the prerequisite checker user interface (UI) is running.
Microsoft Active Directory
If you use Active Directory service software, you can configure it to control access to the network. The Active Directory
database is modified to support remote management authentication and authorization. Server Administrator, Integrated
20
Remote Access Controller (iDRAC), Chassis Management Controller (CMC), and Remote Access Controllers (RAC), can
interface with Active Directory. Using Active Directory, add and control users and privileges from a central database.
Related Links:
Using Microsoft Active Directory
Configuring SNMP Agents
The systems management software supports the SNMP systems management standard on all supported operating
systems. The SNMP support may or may not be installed depending on the operating system and how the operating
system was installed. An installed supported systems management protocol standard, such as SNMP, is required before
installing the systems management software.
Configure the SNMP agent to change the community name, enable set operations, and send traps to a management
station. To configure the SNMP agent for proper interaction with management applications, perform the procedures
described in the Server Administrator User’s Guide.
Related Links:
•
•
Installation Requirements
Supported Systems Management Protocol Standards
Secure Port Server And Security Setup
This section contains the following topics:
•
•
Setting User and Server Preferences
x 509 Certificate Management
Setting User And Server Preferences
You can set user and secure port server preferences for Server Administrator from the Preferences web page. Click
General Settings and click either the User tab or Web Server tab.
Setting User Preferences
To set up user preferences:
NOTE: Log in with administrator privileges to set or reset user or server preferences.
1.
Click Preferences on the global navigation bar.
2.
Click General Settings.
3.
To add a preselected e-mail recipient, type the e-mail address of the designated service contact in the Mail To:
field, and click Apply Changes.
NOTE: Clicking Email in any window sends an e-mail message with an attached HTML file of the window to
the designated e-mail address.
4.
To change the home page appearance, select an alternative value in the skin or scheme fields and click Apply
Changes.
Setting Secure Port Server Preferences
To set up secure port server preferences:
NOTE: Log in with administrator privileges to set or reset user or server preferences.
21
1.
Click Preferences on the global navigation bar.
2.
Click General Settings, and the Web Server tab.
3.
Set options as necessary in the Server Preferences window:
Session Timeout
Sets the time limit for a session to remain active. Select Enable to set a time-out if there is
no user interaction for a specified time in minutes. After a session time-out, the user must
log in again to continue. Select Disable to disable the Server Administrator session timeout feature.
HTTPS Port
Specifies the secure port for Server Administrator. The default secure port for Server
Administrator is 1311.
NOTE: Changing the port number to an invalid or in-use port number may prevent
other applications or browsers from accessing Server Administrator on the managed
system.
IP Address to
Bind to
Specifies the IP address(es) for the managed system that Server Administrator binds to
when starting a session. Select All to bind to all IP addresses applicable for the system.
Select Specific to bind to a specific IP address.
NOTE: A user with administrator privileges cannot use Server Administrator when
logged into the system remotely.
NOTE: Changing the IP Address to Bind to value to a value other than All may prevent
other applications or browsers from remotely accessing Server Administrator on the
managed system.
Mail To:
Allows to set the default mail address for e-mail(s) from OMSA GUI.
SMTP Server
name and DNS
Suffix for SMTP
Server
Specifies the organization's Simple Mail Transfer Protocol (SMTP) and Domain Name
Server (DNS) suffix. To enable Server Administrator to send e-mails, you must type the IP
address and DNS suffix for the SMTP server for the organization in the appropriate fields.
Command Log
Size
Specifies the largest file size in MB for the command log file.
Support Link
Specifies the web address for the business entity that provides support for the managed
system.
Custom Delimiter
Specifies the character used to separate the data fields in the files created using the
Export button. The ; character is the default delimiter. Other options are !, @, #, $, %, ^, *,
~, ?, :,|, and ,.
SSL Encryption
Allows the Administrator or the Power User to set the encryption levels for sessions
between a web browser and the Server Administrator web server. Select Auto Negotiable
for auto selections of encryption level based on web browser settings. Select 128–bit or
higher for 128 bit or higher encryption levels.
NOTE: For security reasons, the organization may not allow e-mails to be sent
through the SMTP server to outside accounts.
NOTE: Change of encryption level requires restart of the Server Administrator web
server.
22
Key Signing
Algorithm (For
Self Signed
Certificate)
Displays the supported signing algorithms. Select an algorithm from the drop-down list.
NOTE: If you select either SHA 512 or SHA 256, ensure that your operating system/
browser supports this algorithm. If you select one of these options without the
requisite operating system/browser support, Server Administrator displays a
cannot display the webpageerror.
NOTE: This field is available only for Server Administrator auto-generated self-signed
certificates. The drop-down list is grayed out if you import or generate new
certificate into Server Administrator.
4.
Click Apply Changes.
X.509 Certificate Management
Web certificates are necessary to ensure that the identity and information exchanged with a remote system is not
viewed or changed by others. To ensure system security, it is strongly recommended that you either generate a new X.
509 certificate, reuse an existing X.509 certificate, or import a root certificate or certificate chain from a Certificate
Authority (CA). Authorized CAs include Verisign, Entrust, and Thawte.
NOTE: Log in with administrator privileges to perform certificate management.
You can manage X.509 certificates for Server Administrator from the Preferences page. Click General Settings, select
the Web Server tab, and click X.509 Certificate.
Best Practices For X.509 Certificate Management
For the security of the system while using server administrator, ensure the following:
Unique host
name
All systems that have Server Administrator installed should have unique host names.
Change
'localhost' to
unique
For systems with host name set to localhost change the host name to a unique host name.
Remote Enablement Requirements
The Remote Enablement feature is currently supported on:
•
Microsoft Windows
•
Microsoft Hyper-V
•
Hyper-V Server
•
Red Hat Enterprise Linux
•
SUSE Enterprise Linux
•
VMware ESXi and ESX
•
Citrix XenServer
To install the Remote Enablement feature, configure the following on the system:
•
Windows Remote Management (WinRM)
•
CA/Self-Signed Certificate
•
WinRM HTTPS Listener Port
•
Authorization for WinRM and Windows Management Instrumentation (WMI) Servers
23
Installing WinRM
On Windows Server 2008 R2, Windows Server 2008 R2 SP1, Windows 7, Windows 8 and Windows Server 2012, WinRM
2.0 is installed by default. On Windows Server 2008, WinRM 1.1 is installed by default.
Certificate Authority Signed Self-Signed Certificate
You need a certificate signed by a CA or a self‑signed certificate (generated using the SelfSSL tool) to install and
configure the Remote Enablement feature on the system.
NOTE: It is recommended that you use a certificate signed by a CA.
Using A Certificate Signed By A CA
To use a certificate signed by a CA:
1.
Request a valid CA signed certificate.
2.
Create a HTTP listener with the CA signed certificate.
Requesting A Valid CA Signed Certificate
To request a valid CA signed certificate:
1.
Click Start → Run.
2.
Type mmc and click OK.
3.
Click File → Add/Remove Snap-in.
4.
Select Certificates, and then click Add.
5.
In the Certificates snap-in dialog box, select Computer account, and then click Next.
6.
Select Local Computer, and then click Finish.
7.
Click Close, and then click OK.
8.
On the Console window, expand Certificates (Local Computer) in the left navigation pane.
9.
Right-click Personal, select All tasks → Request New Certificate.
10. Click Next.
11. Select the appropriate certificate type, Mostly (Computer), and then click Enroll.
12. Click Finish.
Creating The HTTPS Listener With The Valid CA Signed Certificate
Run the installer and click the link on the prerequisite checker to create the HTTPS listener.
NOTE: The HTTP listener is enabled by default and listens at port 80.
Configuring User Authorization For WinRM And WMI Servers
To provide access rights to WinRM and WMI services, explicitly add users with the appropriate access levels.
NOTE: To configure user authorization - For WinRM and WMI Servers, you must login with administrator privileges.
- For Windows Server 2008 operating systems, you must login with built-in administrator privileges
NOTE: The administrator is configured by default.
24
WinRM
To configure user authorization for WinRM servers:
1.
2.
Click Start → Run.
Type winrm configsddl and click OK.
If you are using WinRM 2.0, type winrm configsddl default.
3.
Click Add and add the required users or groups (local/domain) to the list.
4.
Provide the appropriate permission(s) to the respective users and click OK.
WMI
To configure user authorization for WMI servers:
1.
Click Start → Run.
2.
Type wmimgmt.msc, and then click OK.
The Windows Management Infrastructure (WMI) screen is displayed.
3.
Right-click the WMI Control (Local) node in the left pane, and then click Properties.
The WMI Control (Local) Properties screen is displayed.
4.
Click Security and expand the Root node in the namespace tree.
5.
Navigate to Root → DCIM → sysman.
6.
Click Security.
7.
Click Add to add the required users or groups (local/domain) to the list.
8.
Provide the appropriate permission(s) to the respective users, and then click OK.
9.
Click OK.
The Security screen is displayed.
10. Close the Windows Management Infrastructure (WMI) screen.
Configuring The Windows Firewall For WinRM
To configure the Windows Firewall for WinRM:
1.
Open Control Panel.
2.
Click Windows Firewall.
3.
Click Exceptions tab.
4.
Select Windows Remote Management check box. If you do not see the check box, click Add Program to add
Windows Remote Management.
Configuring The Envelope Size For WinRM
To configure the envelope size for WinRM:
NOTE: On WinRM version 2.0, enable the compatibility mode for WinRM version 2.0 to use port 443. WinRM version
2.0 uses port 5986 by default. To enable the compatibility mode, type the following command:
winrm s winrm/config/Service @{EnableCompatibilityHttpsListener="true"}
1.
Open a command prompt.
2.
Type winrm g winrm/config.
3.
Check the value of the MaxEnvelopeSizekb attribute. If the value is less than 4608, type the following command:
winrm s winrm/config @{MaxEnvelopeSizekb="4608"}
4.
Set the value of MaxTimeoutms to 3 minutes:
winrm s winrm/config @{MaxTimeoutms ="180000"}
25
Dependent RPMs For Remote Enablement
If you choose to install the Remote Enablement feature, you have to install certain dependent RPMs and configure these
RPMs before installing the feature. Install the following RPMs:
•
libcmpiCppImpl0
•
libwsman1
•
openwsman-server
•
sblim-sfcb
•
sblim-sfcc
The dependent RPMs are available on the Systems Management Tools and Documentation DVD at srvadmin\linux
\RPMS\supportRPMS\opensource-components\<OS>\<arch>.
NOTE: On supported SLES 11 and above and Red Hat Enterprise Linux 6 and preceding operating systems, it is
recommended that you install the RPMs from the operating system media, if available.
Installing Dependent RPMs
To install the dependent RPMs not available on the operating system media:
1.
Make sure that Pegasus RPMs are uninstalled.
2.
Check if the openwsmand and sfcbd binaries are already installed using make-install. Check by running the
commands: openwsman or sfcbd or you can check the existence of the binaries in the /usr/local/sbin directory.
3.
If the binaries are installed, uninstall these binaries.
4.
Check for the required dependencies for the openwsman and sfcbd RPMs listed in the following table.
Table 5. Required Dependencies
5.
Packages
Red Hat Enterprise Server
SUSE Linux Enterprise Server
Openwsman
OpenSSL
LibXML
Pkgconfig
CURL
Chkconfig
Initscript
SBLIM-SFCC
LibOpenSSL
LibXML
Pkg-config
libCURL
aaa_base
aaa_base
SBLIM-SFCC
SBLIM SFCC
CURL
LibCURL
SBLIM SFCB
zlib
CURL
PAM
OpenSSL
Chkconfig
Initscript
zlib
LibCURL
PAM
LibOpenSSL
aaa_base
aaa_base
Install the dependent RPMs. You can install the RPMs:
–
with a single command rpm -ivh rpm1 rpm2 rpm3 rpm4 … rpmN
or
–
26
individually
NOTE: If you are installing RPMs individually, follow this sequence.
rpm -ivh sblim-sfcb-x.x.x.rpm
rpm -ivh sblim-sfcc-x.x.x.rpm
NOTE: Install the libwsman and openwsman client RPMs simultaneously as they have cyclic
dependency.
rpm -ivh libwsman1-x.x.x.rpm openwsman-client-x.x.x.rpm
rpm -ivh openwsman-server-x.x.x.rpm
Post-Installation Configuration For Remote Enablement
This section details the steps to configure the dependent RPMs if you have installed the Remote Enablement feature.
The post-installation configuration script is available at /opt/dell/srvadmin/etc/ on the server file system.
After installing all the dependent RPMs and the Remote Enablement feature, execute the autoconf_cim_component.sh
script.
Before executing the autoconf_cim_component.sh script, make sure that Systems Management is installed.
Execute the following command to configure sfbc and openwsman as per the default configurations: ./
autoconf_cim_component.sh
NOTE: To configure openwsman on the managed node to run on a different port, use the -p <port> option with
autoconf_cim_component.sh. This is optional and by default the openwsman is configured to run on port 443.
Related Links:
Installing Managed System Software on Supported Linux and VMware ESX
Creating Server Certificate For WSMAN
You can either create a new certificate for WSMAN or reuse an existing certificate.
Creating A New Certificate
You can create a new server certificate for WSMAN by executing the owsmangencert.sh script located at /etc/
openwsman. This script is provided by the openwsman RPM. Follow the steps in the wizard to create the server
certificate.
Reusing An Existing Certificate
If you have a self-signed or CA-signed certificate, you can use the same certificate for the openwsman server by
updating the ssl_cert_file and ssl_key_file values, grouped under [server] tag, in /etc/openwsman/
openwsman.conf with the existing certificate values.
Configuring CRL For The openwsman Client
You need to configure the Certificate Revocation List (CRL) used by Server Administrator Web Server. To do this:
1.
Mention a valid CRL file in /etc/openwsman/openwsman_client.conf.
2.
If left blank, the CRL check is ignored.
NOTE: CRL support is only present on SUSE Linux Enterprise Server version 11 and Red Hat Enterprise Linux
Server version 5 update 5. For other operating systems, contact the operating system vendor to provide the
required CURL library with CRL support.
Running sfcb And openwsman
Run sfcb and openwsman:
•
•
/etc/init.d/sfcb start
/etc/init.d/openwsmand start
27
NOTE: On Red Hat Enterprise Linux 6, replace sfcb with sblim-sfcb.
On Red Hat Enterprise Linux 6, for the sblim-sfcb and openwsman to start automatically after a reboot you need to
change the run-levels using the chkconfig utility. For example, if you want to run sblim-sfcb in run-levels 3 and 5,
use the following command:
#chkconfig sblim-sfcb on --level 35
NOTE: For more information on chkconfig and its usage, see the operating system documentation.
The managed system is configured and is ready to be used by the Server Administrator Web Server.
Winbind Configuration For openwsman And sfcb For Red Hat
Enterprise Linux Operating Systems
Follow the instructions mentioned below to configure openwsman and sfcb on 32-bit OMI installation. In case of a 64-bit
installation, replace with .lib lib64
1.
2.
3.
28
Back up these files:
–
/etc/pam.d/openwsman
–
/etc/pam.d/sfcb
– /etc/pam.d/system-auth
Replace the content of /etc/pam.d/openwsman and /etc/pam.d/sfcb with
auth required pam_stack.so service=system-auth
auth required /lib/security/pam_nologin.so
account required pam_stack.so service=system-auth
Replace the content of /etc/pam.d/system-auth with
%PAM-1.0
This file is auto-generated.
User changes will be destroyed the next time authconfig is run.
auth required /lib/security/$ISA/pam_env.so
auth sufficient /lib/security/$ISA/pam_unix.so likeauth nullok
auth sufficient /lib/security/$ISA/pam_krb5.so use_first_pass
auth sufficient /lib/security/$ISA/pam_winbind.so use_first_pass
auth required /lib/security/$ISA/pam_deny.so
account required /lib/security/$ISA/pam_unix.so broken_shadow
account sufficient /lib/security/$ISA/pam_succeed_if.so uid 100 quiet
account [default=bad success=ok user_unknown= ignore] /lib/security/$ISA/
pam_krb5.so
account [default=bad success=ok user_unknown= ignore] /lib/security/$ISA/
pam_winbind.so
account required /lib/security/$ISA/pam_permit.so
password requisite /lib/security/$ISA/pam_cracklib.so retry=3
password sufficient /lib/security/$ISA/pam_unix.so nullok use_authtok md5
shadow
password sufficient /lib/security/$ISA/pam_krb5.so use_authtok
password sufficient /lib/security/$ISA/pam_winbind.so use_authtok
password required /lib/security/$ISA/pam_deny.so
session required /lib/security/$ISA/pam_limits.so
session required /lib/security/$ISA/pam_unix.so
session optional /lib/security/$ISA/pam_krb5.so
Winbind Configuration For openwsman And sfcb For SUSE Linux
Enterprise Server Operating System
Follow the instructions mentioned below to configure openwsman and sfcb on 32-bit OMI installation. In case of a 64-bit
installation, replace .lib with .lib64.
1.
2.
Back up the following files:
–
/etc/pam.d/openwsman
–
/etc/pam.d/sfcb
–
/etc/pam.d/system-auth
– /etc/pam.d/common-account
Replace the content of /etc/pam.d/openwsman/ and /etc/pam.d/sfcb with
%PAM-1.0
auth include common-auth
auth required /lib/security/pam_nologin.so
account include common-account
3.
Replace the content of /etc/pam.d/common-auth with
auth required pam_env.so
auth sufficient pam_unix2.so debug
auth sufficient pam_winbind.so use_first_pass debug
4.
Replace the content of /etc/pam.d/common-account with
account sufficient pam_unix2.so
account sufficient pam_winbind.so
Workaround For The Libssl Issue
If the required library needed by openwsman is present on the system, the autoconf_cim_component.sh script tries to
resolve the libssl.so issue. However, if the library is not present, then the script reports the same. Check if the latest
version of the libssl library is installed on the system and then create a soft link with libssl.so.
For example: On a 32-bit installation, if you have libssl.so.0.9.8a and libssl.so.0.9.8b in /usr/lib, then
create soft link with the latest libssl.so.0.9.8b:
•
ln -sf /usr/lib/libssl.so.0.9.8b /usr/lib/libssl.so
•
ldconfig
On a 64-bit installation, if you have libssl.so.0.9.8a and libssl.so.0.9.8b in /usr/lib, then create soft link
with the latest libssl.so.0.9.8b:
•
ln -sf /usr/lib64/libssl.so.0.9.8b /usr/lib64/libssl.so
•
ldconfig
29
30
Installing Managed System Software On
Microsoft Windows Operating Systems
3
On Microsoft Windows, an autorun utility is displayed when you insert the Systems Management Tools and
Documentation DVD. This utility allows you to choose the systems management software you want to install on the
system.
If the autorun program does not start automatically, use the autorun program from the DVD root or the setup program in
the SYSMGMT\srvadmin\windows directory on the Systems Management Tools and Documentation DVD. See the
Systems Software Support Matrix for a list of operating systems currently supported.
NOTE: Use the Systems Management Tools and Documentation DVD to perform an unattended and scripted silent
installation of the managed system software. Install and uninstall the features from the command line.
Deployment Scenarios For Server Administrator
You can install Server Administrator in the following ways:
•
Install the Server Administrator Web Server on any system (laptop, or desktop) and the Server Instrumentation
on another supported system.
In this method, the Server Administrator Web Server performs the function of a central web server and you can
use it to monitor a number of managed systems. Using this method reduces the Server Administrator footprint on
the managed systems.
•
Continue to install the Server Administrator Web Server and the Server Instrumentation on the same system.
The following table lists the deployment scenarios for installing and using Server Administrator and helps you make the
right choice while selecting the various installation options:
Table 6. Deployment Scenarios
You want to
Select
Remotely manage and monitor the entire network of
managed systems from the system (laptop, desktop, or
server).
Server Administrator Web Server. You must then install
Server Instrumentation on the managed systems.
Manage and monitor the current system.
Server Administrator Web Server and Server
Instrumentation.
Manage and monitor the current system using some other Remote Enablement
remote system.
For systems running on Microsoft Windows, Remote
Enablement is under the Server Instrumentation option.
You must then install the Server Administrator Web Server
on the remote system.
View the status of local and remote storage attached to a
managed system and obtain storage management
information in an integrated graphical view.
Storage Management.
31
You want to
Select
Remotely access an inoperable system, receive alert
notifications when a system is down, and remotely restart
a system.
DRAC Command Line Tools.
NOTE: Install the Simple Network Management Protocol (SNMP) agent on the managed system using the
operating system medium before installing the managed system software.
Installer Location
The location of the installers for 32–bit and 64–bit are:
•
32–bit: DVD Drive\SYSMGMT\srvadmin\windows\SystemsManagement\SysMgmt.msi
•
64–bit: DVD Drive\SYSMGMT\x64\srvadmin\windows\SystemsManagement\SysMgmtx64.msi
NOTE: You cannot install both 32–bit and 64–bit installers on the same system.
Installing Server Administrator
This section explains how to install the Server Administrator and other managed system software using two
installation options:
•
Using the setup program at \SYSMGMT\srvadmin\windows on the Systems Management Tools and
Documentation DVD.
•
Using the unattended installation method through the Windows Installer Engine msiexec.exe.
NOTE: SNMP service is stopped and started during Systems Management installation and uninstallation. As a
result, other third party services, dependent on SNMP stop. If the third party services are stopped, manually restart
these services.
NOTE: For Blade systems, you must install Server Administrator on each server module installed in the chassis.
NOTE: During installation of Server Administrator on supported Windows systems, if an Out of Memory error
message is displayed, you must exit the installation and free up memory. Close other applications or perform any
other task that frees up memory, before re-attempting Server Administrator installation.
The setup program invokes the prerequisite checker, which uses the system's Peripheral Component Interconnect (PCI)
bus to search for installed hardware such as controller cards.
The Systems Management installer features a Typical Setup option and a Custom Setup option for installing Server
Administrator and other managed system software.
Related Links:
•
Deployment Scenarios for Server Administrator
•
Optional Command Line Settings
Typical Installation
When you launch the Server Administrator installation from the prerequisite checker and select the Typical Setup
option, the setup program installs the following managed system software features:
32
•
Server Administrator Web Server
•
Server Instrumentation
•
Storage Management
•
Command Line Interface
•
WMI
•
SNMP
•
Operating System Logging
•
DRAC Command Line Tools
•
Intel SNMP Agent
•
Broadcom SNMP Agent
During a Typical installation, individual management station services that do not meet the specific hardware and
software requirement for that service are not installed on the managed systems. For example, the Server Administrator
Remote Access Controller service software module is not installed during a Typical installation unless the managed
system has a remote access controller installed on it. You can, however, go to Custom Setup and select the DRAC
Command Line Tools software module for installation.
NOTE: The Remote Enablement feature is available only through the Custom Setup option.
NOTE: Server Administrator installation also installs some of the required Visual C++ runtime components on
the system.
Custom Installation
The sections that follow describe how to install Server Administrator and other managed system software using the
Custom Setup option.
NOTE: Management station and managed system services can be installed in the same or in different directories.
You can select the directory for installation.
1.
Log in with built-in administrator privileges to the system on which you want to install the system management
software.
2.
Close all open applications and disable any virus-scanning software.
3.
Insert the Systems Management Tools and Documentation DVD into the system's DVD drive. The autorun menu is
displayed.
4.
Select Server Administrator from the autorun menu and click Install.
The Server Administrator prerequisite status screen is displayed and runs the prerequisite checks for the managed
system. Any relevant informational, warning, or error messages are displayed. Resolve all error and warning
situations, if any.
5.
Click the Install, Modify, Repair, or Remove Server Administrator option.
The Welcome to the Install Wizard for Server Administrator screen is displayed.
6.
Click Next.
The Software License Agreement is displayed.
7.
Click I accept the terms in the license agreement and Next if you is displayed.
The Setup Type dialog box is displayed.
8.
Select Custom and click Next.
If you are installing Server Administrator on a unsupported system, the installer displays only the Server
Administrator Web Server option.
A selected feature has a hard drive icon depicted next to it. A deselected feature has a red X depicted next to it. By
default, if the prerequisite checker finds a software feature with no supporting hardware, the checker deselects
them.
To accept the default directory path to install managed system software, click Next. Otherwise, click Change and
navigate to the directory where you want to install the managed system software, and click OK.
The Custom Setup dialog box is displayed.
33
9.
Click Next on the Custom Setup dialog box to accept the selected software features for installation.
The Ready to Install the Program dialog box is displayed.
NOTE: You can cancel the installation process by clicking Cancel. The installation rolls back the changes that
you made. If you click Cancel after a certain point in the installation process, the installation may not roll back
properly, leaving the system with an incomplete installation.
10. Click Install to install the selected software features.
The Installing Server Administrator screen is displayed and provides the status and progress of the software
features being installed. After the selected features are installed, the Install Wizard Completed dialog box is
displayed.
11. Click Finish to exit the Server Administrator installation.
If you are prompted to reboot the system, select from the following reboot options to make the installed managed
system software services available for use:
–
–
Yes, reboot my system now.
No, I will reboot my system later.
NOTE: If you have selected Remote Enablement during installation, an error message A provider,
WinTunnel, has been registered in the Windows Management Instrumentation
namespace ROOT\dcim\sysman to use the LocalSystem account. This account is
privileged and the provider may cause a security violation if it does not
correctly impersonate user requests. is logged in Windows Event Log. You can safely ignore this
message and continue with installation.
Related Links:
System Recovery on Failed Installation
Server Administrator Installation With Citrix Application Server
Citrix remaps all the hard drive letters when installed. For example, if you install Server Administrator on drive C: and
then install Citrix, it may change the drive letter C: to M:. Server Administrator may not work properly because of the
remapping.
In order to avoid this problem, select one of the following options:
Option 1:
1.
Uninstall Server Administrator.
2.
Install Citrix.
3.
Reinstall Server Administrator.
Option 2:
After installing Citrix, type the command msiexec.exe /fa SysMgmt.msi
Performing An Unattended Installation Of Managed System Software
The Systems Management installer features a Typical Setup option and a Custom Setup option for the unattended
installation procedure.
Unattended installation enables you to simultaneously install Server Administrator on multiple systems. Perform an
unattended installation by creating a package that contains the necessary managed system software files. The
unattended installation option also provides several features that enable you to configure, verify, and view information
about unattended installations.
The unattended installation package is distributed to the remote systems using a software distribution tool from an
independent software vendor (ISV). When the package is distributed, the installation script executes to install the
software.
34
Creating And Distributing The Typical Unattended Installation Package
The Typical Setup unattended installation option uses the Systems Management Tools and Documentation DVD as the
unattended installation package. The msiexec.exe /i <SysMgmt or SysMgmtx64>.msi /qb command
accesses the DVD to accept the software license agreement and installs all the required Server Administrator features
on selected remote systems. These features are installed on the remote systems based on the system's hardware
configuration.
NOTE: After an unattended installation is complete, to use the command line interface (CLI) feature of Server
Administrator, you must open a new console window and execute the CLI commands from there. Executing
CLI commands from the same console window in which Server Administrator was installed does not work.
You can make the DVD image available to the remote system by either distributing the entire contents of the media, or by
mapping a drive from the target system to the location of the DVD image.
Mapping A Drive To Act As The Typical Unattended Installation Package
1.
Share an image of the Systems Management Tools and Documentation DVD with each remote system on which
you want to install Server Administrator.
You can accomplish this task by directly sharing the DVD or by copying the entire DVD to a drive and sharing the
copy.
2.
Create a script that maps a drive from the remote systems to the shared drive described in step 1. This script should
execute msiexec.exe /i Mapped Drive\<32–bit or 64–bit MSI path on the DVD>/qb
after the drive has been mapped.
3.
Configure the ISV distribution software to distribute and execute the script created in step 2.
4.
Distribute this script to the target systems by using the ISV software distribution tools.
The script executes to install Server Administrator on each remote system.
5.
Reboot each remote system to enable Server Administrator.
Distributing The Entire DVD as The Typical Unattended Installation Package
1.
Distribute the entire image of the Systems Management Tools and Documentation DVD to the target systems.
2.
Configure the ISV distribution software to execute the msiexec.exe /i DVD Drive\<32–bit or 64–
bit MSI path on the DVD>/qb command from the DVD image.
The program executes to install Server Administrator on each remote system.
3.
Reboot each remote system to enable Server Administrator.
Creating Custom Unattended Installation Packages
To create a custom unattended installation package, perform the following steps:
1.
Copy the SYSMGMT\srvadmin\windows directory from the DVD to the system hard drive.
2.
Create a batch script that executes the installation using the Windows Installer Engine (msiexec.exe).
NOTE: For Customized Unattended Installation, each required feature must be included as a command line
interface (CLI) parameter for it to be installed.
An example is msiexec.exe /i SysMgmt.msi ADDLOCAL= SA,IWS,BRCM /qb.
3.
Place the batch script in the windows directory on the system hard drive.
Related Links:
Customization Parameters
Distributing Custom Unattended Installation Packages
For distributing custom unattended installation packages:
35
1.
Configure the ISV distribution software to execute the batch script once the installation package is distributed.
2.
Use the ISV distribution software to distribute the custom unattended installation package to the remote systems.
The batch script installs Server Administrator along with specified features on each remote system.
The batch script installs Server Administrator along with specified features on each remote system.
3.
Reboot each remote system to enable Server Administrator.
Related Links:
•
Creating Custom Unattended Installation Packages
•
Distributing Custom Unattended Installation Packages
Specifying Log File Locations
For managed system MSI installation, run the following command to perform an unattended installation while specifying
the log file location
msiexec.exe /i <SysMgmt or SysMgmtx64>.msi /l*v
"C:\openmanage\logs\SysMgmt.log"
Unattended Installation Features
Unattended installation provides the following features:
•
A set of optional command line settings to customize an unattended installation.
•
Customization parameters to designate specific software features for installation.
•
A prerequisite checker program that examines the dependency status of selected software features without
having to perform an actual installation.
Optional Command Line Settings
The following table shows the optional settings available for the msiexec.exe MSI installer. Type the optional settings on
the command line after msiexec.exe with a space between each setting.
NOTE: See support.microsoft.com for details about all the command line switches for the Windows Installer Tools.
Table 7. Command Line Settings for MSI Installer
Setting
Result
/i <Package|Product Code>
This command installs or configures a product.
/i <SysMgmt or SysMgmtx64>.msi – Installs the Server
Administrator software.
/i <SysMgmt or SysMgmtx64>.msi /qn
This command carries out a fresh installation.
/x <Package|Product Code>
This command uninstalls a product.
/x <SysMgmt or SysMgmtx64>.msi – Uninstalls the Server
Administrator software.
/q[n|b|r|f]
This command sets the user interface (UI) level.
/q or /qn – no UI. This option is used for silent and
unattended installation.
/qb – basic UI. This option is used for unattended but not
silent installation.
/qr – reduced UI. This option is used for unattended
installation while displaying a modal dialog box showing
install progress.
/qf – full UI. This option is used for standard attended
installation.
36
Setting
Result
/f[p|o|e|d|c|a|u |m|s|v]<Package|
ProductCode>
This command repairs a product.
/fp – This option reinstalls a product if a file is missing.
/fo – This option reinstalls a product if a file is missing or if
an older version of a file is installed.
/fe – This option reinstalls a product if a file is missing or
an equal or older version of a file is installed.
/fd – This option reinstalls a product if a file is missing or a
different version of a file is installed.
/fc – This option reinstalls a product if a file is missing or
the stored checksum value does not match the calculated
value.
/fa – This option forces all files to be reinstalled.
/fu – This option rewrites all required user-specific
registry entries.
/fm – This option rewrites all required system-specific
registry entries.
/fs – This option overwrites all existing shortcuts.
/fv – This option runs from the source and re-caches the
local package. Do not use this reinstall option for the first
installation of an application or feature.
INSTALLDIR=<path>
This command installs a product in a specific location. If
you specify an install directory with this switch, it must be
created manually prior to executing the CLI install
commands or they fail without displaying an error
message.
/i <SysMgmt or SysMgmtx64>.msi INSTALLDIR=c:
\OpenManage /qn – installs a product to a specific
location where c:\OpenManage is the install location.
For example, running msiexec.exe /i SysMgmt.msi /qn installs Server Administrator features on each
remote system based on the system's hardware configuration. This installation is done silently and unattended.
Customization Parameters
REINSTALL and REMOVE customization CLI parameters provide a way to customize the exact software features to
install, reinstall, or uninstall when running a silent or unattended installation. With the customization parameters, you
selectively install, reinstall, or uninstall software features for different systems using the same unattended installation
package. For example, you can choose to install Server Administrator, but not Remote Access Controller service on a
specific group of servers, and choose to install Server Administrator, but not Storage Management Service, on another
group of servers. You can also choose to uninstall one or multiple features on a specific group of servers.
NOTE: Type the REINSTALL, and REMOVE CLI parameters in upper case, as they are case‑sensitive.
You can include the REINSTALL customization parameter on the command line and assign the feature ID (IDs) of the
software feature that you want to reinstall. For example, msiexec.exe /i SysMgmt.msi
REINSTALL=BRCM /qb
This command runs the installation for Systems Management and reinstalls only the Broadcom agent, in an unattended
but not silent mode.
You can include the REMOVE customization parameter on the command line and assign the feature ID (IDs) of the
software feature that you want to uninstall. For example, msiexec.exe /i SysMgmt.msi REMOVE=BRCM /qb
This command runs the installation for Systems Management and uninstalls only the Broadcom agent, in an unattended
but not silent mode.
37
You can also choose to install, reinstall, and uninstall features with one execution of the msiexec.exe program. For
example, msiexec.exe /i SysMgmt.msi REMOVE=BRCM /qb
This command runs the installation for managed system software, and uninstalls the Broadcom agent. This execution is
in an unattended but not silent mode.
Related Links:
Software Feature IDs
MSI Return Code
An application event log entry is recorded in the SysMgmt.log file. The following table shows some of the error codes
returned by the msiexec.exe Windows Installer Engine.
Table 8. Windows Installer Return Codes
Error Code
Value
Description
ERROR_SUCCESS
0
The action is completed successfully.
ERROR_INVALID_PARAMETER
87
One of the parameters was invalid.
ERROR_INSTALL_USEREXIT
1602
The user canceled the installation.
ERROR_SUCCESS_REBOOT_REQUI
RED
3010
A restart is required to complete the installation. This
message is indicative of a successful installation.
NOTE: For more information on all the error codes returned by the msiexec.exe and InstMsi.exe Windows Installer
functions, see support.microsoft.com.
System Recovery On Failed Installation
The Microsoft Software Installer (MSI) provides the ability to return a system to its fully working condition after a failed
installation. MSI does this by maintaining an undo operation for every standard action it performs during an install,
upgrade, or uninstall. This operation includes restoration of deleted or overwritten files, registry keys, and other
resources. Windows temporarily saves all files that it deletes or overwrites during the course of an installation or
removal, so that they can be restored if necessary, which is a type of rollback. After a successful installation, Windows
deletes all of the temporary backup files.
In addition to the rollback of MSI Standard Actions, the library also has the ability to undo commands listed in the INI file
for each application if a rollback occurs. All files that are modified by the installation actions are restored to their
original state if a rollback occurs.
When the MSI engine is going through the installation sequence, it ignores all actions that are scheduled as rollback
actions. If a Custom Action, MSI Standard Action, or a installation action fails, then a rollback starts.
You cannot roll back an installation once it is completed; transacted installation is only intended as a safety net that
protects the system during an installation session. If you want to remove an installed application, you should uninstall
that application.
NOTE: Driver installation and removal is not executed as part of the installation transaction and therefore cannot
be rolled back if a fatal error occurs during execution.
NOTE: Installations, uninstallations, and upgrades that you cancel during installer cleanup, or after the installation
transaction is completed, are not rolled back.
Failed Updates
Apply the MSI patches and updates provided by vendors to the original vendor MSI packages provided. If you
intentionally or accidentally repackage an MSI package, or make changes to it directly, patches and updates may fail.
MSI packages must not be repackaged; doing so changes the feature structure and Globally Unique Identifier (GUID),
38
which break any provided patches or updates. To make any changes to a vendor-provided MSI package, use a .mst
transform file.
NOTE: A GUID is 128-bit long, and the algorithm used to generate a GUID guarantees unique GUID. The product
GUID uniquely identifies the application.
Upgrading Managed System Software
The Systems Management installer provides an Upgrade option for upgrading Server Administrator and other managed
system software.
The setup program runs the prerequisite checker, which uses the system's PCI bus to search for installed hardware,
such as controller cards.
The setup program installs or upgrades all of the managed system software features that are appropriate for the
particular system's hardware configuration.
NOTE: All user settings are preserved during upgrades.
The following procedures show how to upgrade Server Administrator and other managed system software.
Upgrading Guidelines
•
•
You can upgrade to the latest version of Server Administrator from any of the previous three versions. For
example, upgrade to Server Administrator 7.2 is supported only for Server Administrator versions 6.5 and later.
You can upgrade to the latest version of Server Administrator which includes Linux granular installation. If you
require the Linux granular installation options, you have to uninstall the existing version of Server Administrator
and install the latest version of Server Administrator. For more information on Linux granular options, see Linux
Installer Packages.
To upgrade from versions earlier than 6.3, uninstall the existing version of Server Administrator and reinstall the
latest version of Server Administrator.
•
•
NOTE: Uninstalling Server Administrator deletes its user settings. Reinstall Server Administrator and apply
the user settings.
When upgrading an operating system to a major version, uninstall the existing Systems Management software
and reinstall the latest Systems Management software. When upgrading only to an update level change (for
example, Red Hat Enterprise Linux 5 Update 7 to Red Hat Enterprise Linux 5 Update 8), upgrade to the latest
Systems Management software; all user settings are preserved.
•
NOTE: Uninstalling Systems Management software deletes its user settings. Reinstall Systems
Management software and apply the user settings.
If you have installed Server Administrator Web Server version 7.2, ensure that you install Server Instrumentation
version 7.2 on the managed system. Accessing an earlier version of Server Administrator using Server
Administrator Web Server version 7.2 may display an error.
Upgrade
For an unattended upgrade, the msiexec.exe /i SysMgmt.msi /qb command accesses the DVD to accept the
software license agreement and upgrades all the required Server Administrator features on selected remote systems.
All major user settings are retained during an unattended upgrade.
NOTE: It is not possible to upgrade from a 32-bit to a 64-bit systems Management software on a 64-bit operating
system.
1.
Insert the Systems Management Tools and Documentation DVD into the system's DVD drive. The autorun menu is
displayed.
2.
Select Server Administrator and click Install.
39
If the autorun program does not start automatically, go to the SYSMGMT\srvadmin\windows directory on the DVD,
and run the setup.exe file.
The Server Administrator prerequisite status screen is displayed and runs the prerequisite checks for the managed
station. Any relevant informational, warning, or error messages are displayed. Resolve all error and warning
situations, if any.
3.
Click the Install, Modify, Repair, or Remove Server Administrator option.
The Welcome to the Install Wizard for Server Administrator screen is displayed.
4.
Click Next.
The Software License Agreement is displayed.
5.
Click I accept the terms in the license agreement and Next if you agree.
The Setup Type dialog box is displayed.
6.
Continue the installation from step 8 as mentioned in the Custom Installation section.
Modify
If you want to add or remove Server Administrator components:
1.
Navigate to the Windows Control Panel.
2.
Click Add/Remove Programs.
3.
Click Server Administrator and click Change.
The Welcome to the Install Wizard for Server Administrator dialog box is displayed.
4.
Click Next.
The Program Maintenance dialog box is displayed.
5.
Select the Modify option and click Next.
The Custom Setup dialog box is displayed.
6.
To select a specific managed system software application, click the drop-down arrow beside the listed feature and
select either This feature will be installed… to install the feature, or This feature will not be available to ignore the
feature.
A selected feature has a hard drive icon depicted next to it. A deselected feature has a red X next to it. By default, if
the prerequisite checker finds a software feature with no supporting hardware, the checker deselects the feature.
7.
Click Next to accept the selected software features for installation.
The Ready to Modify the Program dialog box is displayed.
8.
Click Install to install the selected software features.
The Installing Server Administrator screen is displayed. Messages give the status and progress of the software
features being installed. When the selected features are installed, the Install Wizard Completed dialog box is
displayed.
9.
Click Finish to exit the Server Administrator installation.
If you are prompted to reboot the system, select from the following reboot options to make the managed system
software services available for use:
40
–
Yes, reboot my system now.
–
No, I will reboot my system later.
NOTE: If you run the installer from another system and try to add a component using the Modify option, the
installer may display an error. A corrupt source on the system on which you run the installer may have caused
the error. You can verify this by checking the following registry entry: HKLM\Software\Classes\Installer
\Products\<GUID>\sourcelist\lastusedsource. If the value of lastusedsource is a negative number, it means
that the source is corrupt.
Repair
If you want to repair an installed Server Administrator component that is damaged:
1.
Navigate to the Windows Control Panel.
2.
Click Add/Remove Programs.
3.
Click Server Administrator and click Change.
4.
Click Next.
The Welcome to the Install Wizard for Server Administrator dialog box is displayed.
The Program Maintenance dialog box is displayed.
5.
Select the Repair option and click Next.
The Ready to Repair the Program dialog box is displayed.
6.
Click Install to install the selected software features.
The Installing Server Administrator screen is displayed and provides the status and progress of the software
features being installed. When the selected features are installed, the Install Wizard Completed dialog box is
displayed.
7.
Click Finish to exit the Server Administrator installation.
If you are prompted to reboot the system, select from the following reboot options:
–
Yes, reboot my system now.
–
No, I will reboot my system later.
Uninstalling Managed System Software
You can uninstall managed system software features by using the Systems Management Tools and Documentation DVD,
or the operating system. You can simultaneously perform unattended uninstallation on multiple systems.
Uninstalling Managed System Software Using The Provided Media
Perform the following tasks to uninstall managed system software using the provided media.
1.
Insert the Systems Management Tools and Documentation DVD into the system's DVD drive.
If the setup program does not start automatically, run the setup.exe in the SYSMGMT\srvadmin\windows directory
on the DVD.
The Server Administrator prerequisite status screen is displayed and runs the prerequisite checks for the managed
system. Any relevant informational, warning, or error messages detected during checking are displayed. Resolve
all error and warning situations, if any.
2.
Click the Install, Modify, Repair, or Remove Server Administrator option.
3.
Click Next.
The Welcome to the Install Wizard for Server Administrator screen is displayed.
This dialog enables you to modify, repair, or remove the program.
41
The Program Maintenance dialog box is displayed.
Select the Remove option and click Next.
4.
The Remove the Program dialog box is displayed.
5.
Click Remove.
The Uninstalling Server Administrator screen is displayed and provides the status and progress of the software
features being uninstalled.
When the selected features are uninstalled, the Install Wizard Completed dialog box is displayed.
6.
Click Finish to exit the Server Administrator uninstallation.
If you are prompted to reboot the system, select from the following reboot options:
–
Yes, reboot my system now.
–
No, I will reboot my system later.
All Server Administrator features are uninstalled.
Uninstalling Managed System Software Features Using The Operating System
Perform the following tasks to uninstall managed system software features using the operating system.
1.
Navigate to the Windows Control Panel.
2.
Click Add/Remove Programs.
3.
Click Server Administrator, and then click Remove.
The Add or Remove Programs dialog box is displayed.
4.
Click Yes to confirm uninstallation of Server Administrator.
The Server Administrator screen is displayed and provides the status and progress of the software features being
uninstalled.
If you are prompted to reboot the system, select from the following reboot options:
•
Yes, reboot my system now.
•
No, I will reboot my system later
All Server Administrator features are uninstalled.
Unattended Uninstall Using The Product GUID
If you do not have the installation DVD or the MSI package available during an uninstallation, use the package GUIDs in
the command line to uninstall systems management software on managed systems or management stations running
Windows operating system.
For managed systems, use:
•
32–bit msiexec.exe /x {BF2E05A3-9F39-48A0-B12E-B680949C84BD}
•
64–bit msiexec.exe /x {19C69326-9EF6-4093-82F7-B52C6F93A239}
Unattended Uninstallation Of Managed System Software
The systems management installer features an unattended uninstallation procedure. Unattended uninstallation enables
you to simultaneously uninstall managed systems software from multiple systems. The unattended uninstallation
42
package is distributed to the remote systems using a software distribution tool from an ISV. When the package is
distributed, the uninstallation script executes to uninstall the software.
Distributing The Unattended Uninstallation Package
The Systems Management Tools and Documentation DVD is pre‑configured to act as the unattended uninstallation
package. To distribute the package to one or more systems:
1.
Configure the ISV distribution software to execute the msiexec.exe /x DVD Drive\<32–bit or 64–
bit MSI path on the DVD>/qb command, if you are using the DVD, after the unattended uninstallation
package has been distributed.
2.
Use the ISV distribution software to distribute the typical unattended uninstallation package to the remote systems.
The program executes to uninstall managed systems software on each remote system.
3.
Reboot each remote system to complete uninstallation.
Unattended Uninstall Command Line Settings
The Command Line Settings for MSI Installer table shows the unattended uninstall command line settings available for
unattended uninstallation. Type the optional settings on the command line after msiexec.exe /x <SysMgmt or
SysMgmtx64>.msi with a space between each setting.
For example, running msiexec.exe /x SysMgmt.msi /qb runs the unattended uninstallation, and displays the
unattended uninstallation status while it is running.
Running msiexec.exe /x <SysMgmt or SysMgmtx64>.msi /qn runs the unattended uninstallation, but
silently (without displaying messages.)
43
44
Installing Managed System Software On
Supported Linux And VMware ESX
4
The Systems Management installer supports both 32-bit and 64-bit architecture. The following table explains the
operating system installation matrix for Systems Management.
Table 9. Operating System Installation Matrix
Operating System Architecture
32-bit Architecture
64-bit Architecture
Red Hat Enterprise Linux 6.3 64-bit
Not Supported
Install
Red Hat Enterprise Linux 5.8 64-bit
Not supported
Install
SUSE Linux Enterprise Server (SLES)
11 SP 2 64- bit
Not supported
Install
SUSE Linux Enterprise Server (SLES)
10 SP4 64-bit
Upgrade (Upgrade is supported from
N-1, N-2, and N-3)
Install or Upgrade (Upgrade is
supported from N-1 and N- 2)
ESX 4.1 U3 64-bit
Install or Upgrade
Not supported
ESX 4.1 U2 64-bit
Install or Upgrade
Not supported
ESX 4.0 U3 64-bit
Install or Upgrade
Not supported
ESXi 4.1 U3 64-bit
Not supported
Install
ESXi 4.0 U3 64-bit
Not supported
Install
ESXi 5.1 U1 64-bit
Not supported
Install
ESXi 5.0 U1 64-bit
Not supported
Install
NOTE: On a Systems Management upgrade, it is recommended to upgrade to the latest open source components
available on the DVD.
NOTE: With scripted installation using srvadmin-install.sh or Yum repository-based installations, the srvadmin-cm
RPM that provides 32-bit Inventory Collector does not get installed on a 64-bit operating system. Inventory
Collector utility feeds software inventory data to management station applications. If required, install the srvadmincm package from appropriate subfolders under SYSMGMT/srvadmin/linux/RPMS/supportRPMS/srvadmin from the
Systems Management Tools and Documentation DVD. Since srvadmin-cm RPM requires 32- bit version of zlib and
compat-libstdc++ libraries, ensure that these libraries are installed on the system.
NOTE: If you are upgrading the operating system to a major version (example, SLES 10 to SLES 11), uninstall the
existing version of Systems Management and install the supported version.
NOTE: Before you migrate to a 64-bit version of Systems Management software, make sure to uninstall the 32-bit
Systems Management and other OpenSource components (openwsman-server, openwsman-client, libwsman1,
sblim-sfcb, sblim-sfcc, libcmpiCppImpl0, libsmbios2, smbios-utils-bin) installed as part of the 32-bit Systems
Management.
The installation scripts and RPM packages specific to supported Linux and VMware ESX operating systems are provided
to install and uninstall the Server Administrator and other managed system software components. These installation
scripts and RPMs are located in the SYSMGMT/srvadmin/linux/supportscripts directory available in theSystems
Management Tools and Documentation DVD.
45
The install script srvadmin-install.sh allows silent or interactive installation. By including the srvadmin-install.sh script in
the Linux scripts, install Server Administrator locally or across a network on single or multiple systems.
The second install method uses the Server Administrator RPM packages provided in the custom directories and the
Linux rpm command. Write Linux scripts that install Server Administrator locally or across a network on single or
multiple systems.
Using a combination of the two install methods is not recommended and may require that you manually install the
required Server Administrator RPM packages provided in the custom directories, using the Linux rpm command.
For information on supported platforms and supported operating systems, see the Systems Software Support Matrix.
Software License Agreement
The software license for the Red Hat Enterprise Linux and SUSE Linux Enterprise Server version of the Systems
Management software is located on the Systems Management Tools and Documentation DVD. Read the license.txt file.
By installing or copying any of the files on the provided media, you are agreeing to the terms in this file. This file is also
copied to the root of the software tree where you install the Systems Management software.
RPM For Individual Components
The following table lists the RPMs for individual components that can be used during installation:
Table 10. RPM for Individual Components
Prerequisite
RPM
Server Administrator
Web Server
OS
srvadmin-omilcore
dsm_om_connsvc
srvadmin-omcommon
srvadmin-jre
srvadmin-omacs
srvadmin-tomcat
srvadmin-smcommon
srvadmin-smweb
-w or --web
Server
Instrumentation
PE Server, OS
srvadmin-omilcore
srvadmin-smcommon
srvadmin-omacore
srvadmin-deng
srvadmin-hapi
srvadmin-isvc
srvadmin-omcommon
srvadmin-idrac-snmp
srvadmin-isvc-snmp
srvadmin-deng-snmp
srvadmin-cm
(applicable for x32 bit
only)
srvadmin-omacs
srvadmin-ominst
srvadmin-xmlsup
-d or --dellagent
46
Service Names
dsm_sa_datamgrd
dsm_sa_eventmgrd
dsm_sa_snmpd
dsm_sa_shrsvcd
Command Line
Options for srvadmininstall.sh
Prerequisite
RPM
Service Names
Command Line
Options for srvadmininstall.sh
srvadmin-raccomponents
Server
Instrumentation Only
PE Server, OS
srvadmin-xmlsup
dsm_sa_datamgrd
srvadmin-hapi
dsm_sa_eventmgrd
srvadmin-omilcore
dsm_sa_shrsvcd
srvadmin-deng
srvadmin-isvc
srvadmin-omcommon
srvadmin-cm
(applicable for x32 bit
only)
srvadmin-omacs
srvadmin-ominst
srvadmin-raccomponents
-g or --agent
SNMP
PE Server, OS
srvadmin-xmlsup
srvadmin-hapi
srvadmin-omilcore
srvadmin-deng
srvadmin-isvc
srvadmin-omcommon
srvadmin-idrac-snmp
srvadmin-isvc-snmp
srvadmin-deng-snmp
srvadmin-cm
(applicable for x32 bit
only)
srvadmin-omacs
srvadmin-ominst
srvadmin-raccomponents
-m or --snmp
CLI
PE Server, OS
srvadmin-xmlsup
dsm_sa_datamgrd
srvadmin-hapi
dsm_sa_eventmgrd
srvadmin-omilcore
dsm_sa_shrsvcd
srvadmin-deng
srvadmin-isvc
srvadmin-omcommon
srvadmin-omacore
srvadmin-cm
(applicable for x32 bit
only)
srvadmin-omacs
srvadmin-ominst
srvadmin-raccomponents
dsm_sa_datamgrd
dsm_sa_eventmgrd
dsm_sa_snmpd
dsm_sa_shrsvcd
-i or --cli
47
Prerequisite
RPM
OS Logging Option
PE Server, OS
srvadmin-xmlsup
dsm_sa_datamgrd
srvadmin-hapi
dsm_sa_eventmgrd
srvadmin-omilcore
dsm_sa_shrsvcd
srvadmin-deng
srvadmin-isvc
srvadmin-omcommon
srvadmin-oslog
srvadmin-cm
(applicable for x32 bit
only)
srvadmin-omacs
srvadmin-ominst
srvadmin-raccomponents
-l or --oslog
Remote Enablement
PE Server, OS,
CIMOM, WSMAN
CIMOM version >=
SFCB 1.3.2 (applicable
for systems running
VMware ESX 4.0, Red
Hat Enterprise Linux,
and SUSE Linux) >=
Open Pegasus 2.5.1-2
(applicable for
systems running
VMware ESX 3.5)
WSMAN Version >=
OpenWSMAN 2.1
srvadmin-xmlsup
srvadmin-hapi
srvadmin-omilcore
srvadmin-deng
srvadmin-raccomponents
srvadmin-omacs
srvadmin-ominst
srvadmin-idrac-snmp
srvadmin-isvc-snmp
srvadmin-deng-snmp
srvadmin-isvc
srvadmin-omcommon
srvadmin-omacore
srvadmin-cm
(applicable for x32 bit
only)
srvadmin-smcommon
srvadminitunnelprovider
dsm_sa_datamgrd
dsm_sa_eventmgrd
dsm_sa_snmpd
dsm_sa_shrsvcd
-c or --cimagent
srvadmin-xmlsup
srvadmin-sysfsutils
srvadmin-storelibsysfs
srvadmin-storelib
srvadmin-hapi
srvadmin-omilcore
srvadmin-deng
srvadmin-deng-snmp
srvadmin-isvc
srvadmin-isvc-snmp
dsm_sa_datamgrd
dsm_sa_eventmgrd
dsm_sa_snmpd
dsm_sa_shrsvcd
-s or --storage
Storage Agent and
Server
Instrumentation
48
Service Names
Command Line
Options for srvadmininstall.sh
Prerequisite
RPM
Service Names
Command Line
Options for srvadmininstall.sh
dsm_sa_datamgrd
dsm_sa_eventmgrd
dsm_sa_snmpd
dsm_sa_shrsvcd
-r or --rac
srvadmin-omcommon
srvadmin-omacore
srvadmin-omacs
srvadmin-ominst
srvadmin-cm
(applicable for x32 bit
only)
srvadmin-realssd
(applicable for x86_64
bit only)
srvadmin-smcommon
srvadmin-storage
srvadmin-storage-cli
srvadmin-idrac-snmp
srvadmin-storagesnmp
srvadmin-raccomponents
Remote Access SA
Plugin Component ->
Remote access core
components, Server
Instrumentation
DRAC4 agent is
installed if DRAC4
card is available in
the server. DRAC5
agent is installed for
9G and 10G servers.
iDRAC agent is
installed for 11G and
12G servers with RAC
presence.
srvadmin-xmlsup
srvadmin-hapi
srvadmin-argtable2
srvadmin-omilcore
srvadmin-deng
srvadmin-deng-snmp
srvadmin-isvc
srvadmin-isvc-snmp
srvadmin-omcommon
srvadmin-omacs
srvadmin-ominst
srvadmin-omacore
srvadmin-cm
(applicable for x32 bit
only)
srvadmin-smcommon
srvadmin-raccomponents
srvadmin-idracdrsc
srvadmin-racdrsc
srvadmin-idracadm7
srvadmin-idracadm
srvadmin-racadm4
srvadmin-idrac7
srvadmin-idrac-snmp
srvadmin-idrac-vmcli
49
Prerequisite
RPM
Service Names
Command Line
Options for srvadmininstall.sh
Storage Agent and
Server
Instrumentation
PE Server, OS
srvadmin-xmlsup
srvadmin-hapi
srvadmin-omacs
srvadmin-ominst
srvadmin-omilcore
srvadmin-deng
srvadmin-isvc
srvadmin-cm
(applicable for x32 bit
only)
srvadmin-raccomponents
dsm_sa_datamgrd
dsm_sa_eventmgrd
dsm_sa_shrsvcd
-t or --stragent
Remote Enablement
and Server
Instrumentation
PE Server, OS
srvadmin-xmlsup
srvadmin-hapi
srvadmin-omilcore
srvadmin-deng
srvadmin-isvc
srvadmin-cm
(applicable for x32 bit
only)
srvadmin-omacs
srvadmin-ominst
srvadminitunnelprovider
srvadmin-raccomponents
dsm_sa_datamgrd
dsm_sa_eventmgrd
dsm_sa_shrsvcd
-z or --corecim
NOTE: To manage the server, select either Server Administrator Web Server or one of the Management Interfaces
– CLI, SNMP or OS LOG along with Server Instrumentation (SI) or Server Administrator Storage Management
Service (OMSS).
NOTE: Command line options for [-t] and [-g] cannot be used without a management interface. These options need
to be combined with management interface options such as [-w], [-i], [-z], [-l], or [-m]. For more information on
custom installations, see Server Administrator Custom Installation Utility.
OpenIPMI Device Driver
The Server Instrumentation feature of Server Administrator requires the OpenIPMI device driver that provides IPMIbased information and functionality.
All supported Linux systems contain the required version of IPMI module in the default kernel itself. You do not have to
install the IPMI RPM. For more information on supported systems, see the Systems Software Support Matrix.
Degradation Of Functionality When The Server Administrator Instrumentation Service Is
Started
After Server Administrator is installed, the Server Administrator Instrumentation Service performs a run‑time check of
the OpenIPMI device driver whenever it is started. The Server Administrator Instrumentation Service is started
50
whenever you run either the srvadmin-services.sh start or srvadmin‑services.sh restart commands, or when you restart
the system (during which the Server Administrator Instrumentation Service is started.)
Server Administrator installation blocks the installation of Server Administrator packages if an appropriate version of the
OpenIPMI device driver is not currently installed on the system. However, it is still possible, though not typical, that you
can uninstall or replace a sufficient version of the OpenIPMI device driver after Server Administrator has been installed.
Server Administrator cannot prevent this.
To account for a user uninstalling or replacing a sufficient version of the OpenIPMI device driver after Server
Administrator has been installed, the Server Administrator Instrumentation Service checks the OpenIPMI device driver
version whenever it is started. If a sufficient version of the OpenIPMI device driver is not found, the Server Administrator
Instrumentation Service degrades itself so that it does not provide any of the IPMI-based information or functionality.
Primarily, this means that it does not provide any probe data (for example, fans, temperatures, and voltage probe data.)
Installing Managed System Software
This section explains how to install managed system software using the following installation options:
•
Using the srvadmin-install.sh shell script
NOTE: If you have downloaded the managed system software installer (available as a .tar.gz file), the srvadmininstall.sh shell script is present as setup.sh in the root directory.
•
Using the RPM command
Related Links:
Deployment Scenarios for Server Administrator
Prerequisites For Installing Managed System Software
The prerequisites are:
•
Log in as root.
•
The running kernel must have loadable module support enabled.
•
The /opt directory must have at least 250 MB of free space, and the /tmp, /etc, and /var directories must each
have at least 20 MB of free space.
•
Install the ucd-snmp or net-snmp package that is provided with the operating system if you use SNMP to
manage the server. If you want to use supporting agents for the ucd-snmp or net-snmp agent, you must install
the operating system support for the SNMP standard before you install Server Administrator. For more
information about installing SNMP, see the installation instructions for the operating system you are running on
the system.
NOTE: When installing RPM packages, to avoid warnings concerning the RPM–GPG key, import the key with a
command similar to rpm --import <OM DVD mountpoint>/SYSMGMT/srvadmin/linux/RPMGPG-KEY
•
In case of Red Hat Enterprise Linux 6.2 and above and SLES 11 SP2, install the wsman and sblim packages from
the operating system DVD. See, To install the wsman and sblim packages
•
Install all the prerequisite RPMs required for successful installation.
If the system had VMware ESX (version 4.0 or 4.1) factory-installed, Red Hat Enterprise Linux (versions 5.x and
6.0), or SUSE Linux Enterprise Server (version 10 and 11), see the Dependent RPMs for Remote Enablement
section for information on any RPMs that you need to manually install prior to installing managed system
software. Typically, you may not need to manually install any RPMs.
51
Installing The wsman And sblim Packages
1.
In Package selection, select Basic Server.
2.
Select Customize now and click Next.
3.
Select System Management group.
4.
From the sub-category, select Web-based Enterprise Management → Optional Packages option. The default
selected packages are: openwsman-client, sblim-sfcb, sblim-wbemcli, and wsmancli
Deselect the sblim-wbemcli package from the above list.
5.
Select openwsman-server and click Next.
6.
After the operating system installation, install libcmpiCppImpl0 package from the operating system DVD or using
the Yum utility.
Installing Managed System Software Using The Provided Media
The installer uses RPMs to install each component. The media (DVD) is divided into subdirectories to enable easy
custom installation.
NOTE: On the Red Hat Enterprise Linux 5.x operating system, DVDs are auto-mounted with the -noexec mount
option. This option does not allow you to run any executable from the DVD. Manually mount the DVD and then run
executables.
To review the software before you install it, follow this procedure:
1.
Load the Systems Management Tools and Documentation DVD into the system's DVD drive.
2.
Mount the DVD, if required.
3.
When you have mounted the DVD, navigate to: <OM DVD mount point>/SYSMGMT/srvadmin/linux/
The installation script and RPM folder are available under the Linux directory.
Express Install
Use the provided shell script to perform the express installation on supported Linux and VMware ESX operating systems.
NOTE: On the Red Hat Enterprise Linux 5.x operating system, DVDs are auto‑mounted with the -noexec mount
option. This option does not allow you to run any executable from the DVD. Manually mount the DVD and then run
executables.
1.
Log in as root to the system running the supported operating system where you want to install the managed
system components.
2.
Insert the Systems Management Tools and Documentation DVD into the DVD drive.
3.
Mount the DVD, if required.
4.
Navigate to <OM DVD mount point>/SYSMGMT/srvadmin/linux/supportscripts directory. Run the srvadmininstall.sh shell script, which performs an express installation.
sh srvadmin-install.sh --express
or
sh srvadmin-install.sh -x
The setup program installs the following managed system software features:
52
–
Server Administrator Web Server
–
Server Instrumentation
–
Storage Management
–
Remote Access Controller
Remote enablement is not installed and Server Administrator services do not start automatically.
NOTE: The 32-bit srvadmin-cm RPM is not installed when systems management software is installed on a 64bit operating system. If required, install the srvadmin-cm package from the appropriate subfolders under
SYSMGMT/srvadmin/linux/RPMS/supportRPMS/srvadmin from the Systems Management Tools and
Documentation DVD. Inventory Collector utility carried as part of srvadmin-cm rpm feeds software inventory
data to Management Station applications.
Start the Server Administrator services after the installation using the srvadmin-services.sh script by using the sh
srvadmin-services start command.
5.
Component Specific Install Using RPM Commands
The RPMs specific to a particular OpenManage component are grouped together. To facilitate an RPM-based
installation, install the RPMs from the following directories:
•
SYSMGMT/srvadmin/linux/custom/<OS>/Remote-Enablement/< arch>
•
SYSMGMT/srvadmin/linux/custom/<OS>/SA-WebServer/<arch>
•
SYSMGMT/srvadmin/linux/custom/<OS>/Server-Instrumentation/<arch >
•
SYSMGMT/srvadmin/linux/custom/<OS>/add-RAC4/<arch>
•
SYSMGMT/srvadmin/linux/custom/<OS>/add-RAC5/<arch>
•
SYSMGMT/srvadmin/linux/custom/<OS>/add-StorageManagement/< arch>
•
SYSMGMT/srvadmin/linux/custom/<OS>/add-iDRAC/<arch>
Where <OS> is the supported operating system and <arch> is 32-bit (i386) or 64-bit (x86_64).
NOTE: In case of SUSE Linux Enterprise Server version 10 and 11: 32-bit rpm packages are provided for upgrade
from the previous 32-bit installs only. If you do not have an existing installation, then you cannot install a 32-bit
version of the software. You must install operating system specific rpms from the 64-bit directory.
For example, if you are running Red Hat Enterprise Linux version 5, you can customize the installation by adding the
RPMs from the following directories:
Table 11. RPM Directory
Directory
RPM Package
SYSMGMT/srvadmin/linux/custom/ RHEL5/addStorageManagement/<arch>
Storage Management component packages
SYSMGMT/srvadmin/linux/custom/ RHEL5/SAWebServer/
<arch>
Server Administrator Web Server component packages
SYSMGMT/srvadmin/linux/custom/ RHEL5/ServerInstrumentation/<arch>
Server Instrumentation packages
The DVD provides RPMs that enable repository-based installation using clients such as Yum, Zypper, and Rug. There are
RPMs that install the entire set or you can select individual RPMs to install specific components. The RPMs are
available at:
SYSMGMT/srvadmin/linux/RPMS/supportRPMS/metaRPMS
The following list of RPMs enables the installation of a particular RPM set.
53
Table 12. Meta RPMs
Meta RPMs
Details
srvadmin-all
Installs all the components.
srvadmin-base
Installs the Server Instrumentation component. This
component has to be installed before installing any of the
other specific components.
srvadmin-idrac
Installs the iDRAC component.
srvadmin-rac4
Installs the DRAC 4 component.
srvadmin-rac5
Installs the DRAC 5 component.
srvadmin-standardAgent
Installs the Remote Enablement component.
srvadmin-storageservices
Installs the storage services component.
srvadmin-webserver
Installs the web server component.
srvadmin-server-snmp
Installs the server Simple Network Management Protocol
(SNMP) component.
srvadmin-server-cli
Installs the server Command Line Interface (CLI)
component.
srvadmin-storageservices-snmp
Installs the storage SNMP component.
srvadmin-storageservices-cli
Installs the storage CLI component.
Related Links:
Linux Installer Packages
Custom RPMs Based Installation
The following is an example of custom RPMs-based installation of Server Administrator, including the installation of the
Remote Enablement feature and the Storage Management Service components.
NOTE: On the Red Hat Enterprise Linux 5.x operating system, DVDs are automounted with the -noexec mount
option. This option does not allow you to run any executable from the DVD. You have to manually mount the DVD
and then run executables.
1.
Log in as root to the system running the supported operating system where you want to install the managed
system components.
2.
Insert the Systems Management Tools and Documentation DVD into the DVD drive.
3.
Navigate to the operating system specific directory corresponding to the system.
4.
Type the following command:
rpm –ivh Server-Instrumentation/<arch>/*.rpm
add-StorageManagement/<arch>/*.rpm
RemoteEnablement/<arch>/*.rpm
Server Administrator services do not start automatically.
NOTE: Ensure that you install Server Instrumentation or Remote Enablement before installing Remote Access
Controller or Storage Management.
NOTE: If you choose to install the Remote Enablement feature, ensure that you install the dependent RPMs
before installing this feature.
5.
54
Start the Server Administrator services after the installation by using the command:
sh srvadmin-services start
NOTE: You can install Server Administrator on any system that meets operating system dependencies.
However, after installation, certain Server Administrator services may not be started on unsupported systems.
NOTE: When Server Administrator is installed on a system, dependency issues related to RPMs may occur. To
resolve these issues, install the missing RPMs from SYSMGMT/srvadmin/linux/RPMS/supportRPMS/
opensourcecomponents. If the RPMs are not available in this directory, install these RPMs from the operating
system media. If not available on the media, search for these RPMs on the Internet.
Related Links:
Dependent RPMs for Remote Enablement
Using The Shell Script To Perform The Custom Installation
You can run the Server Administrator Custom Install script in an interactive mode.
The basic usage of the script is:
srvadmin-install.sh [OPTION]...
Server Administrator Custom Installation Utility
The Server Administrator utility runs in an interactive mode if you do not specify any options, and runs silently if you
provide one or more options.
The options are:
•
[-c|--cimagent] — Installs Remote Enablement components.
•
[-d|--dellagent] — Installs Server Instrumentation components. Including the granular components:
a. Server Administrator CLI Interface
b. Server Administrator SNMP Interface
c. Server Administrator Operating System Log Interface
•
[-g|--agent] — Installs the Server Instrumentation agent only.*
•
[-h|--help] — Displays the help text.
•
[-i|--cli] — Installs Server Administrator Command Line Interface.*
•
[-l|--oslog] — Installs operating system logging component.*
•
[-m|--snmp] — Installs Server Administrator SNMP component.*
•
[-r|--rac] — Installs applicable RAC components and Server Instrumentation components.
•
[-s|--storage] — Installs Storage Management, Server Instrumentation, and Default Management Interfaces'.
•
[-t|--stragent] — Installs Server Instrumentation and Storage Management. This requires at least one
management interface option in combination.*
•
[-u|--update] — Updates applicable Server Administrator components.
•
[-w|--web] — Installs Server Administrator Web Server.
•
[-x|--express] — Installs default components. Any other options passed will be ignored. The following
components are installed::
a. Server Instrumentation
b. Storage Management
c. RAC, if applicable
d. Server Administrator Web Server
•
[-z|--corecim] — Installs core CIM Interface.*
55
The following options can be used along with options stated above:
•
[-a|--autostart] — Starts the installed services after components have been installed.
•
[-p|--preserve] — Preserves the screen without clearing the installation information.
NOTE: If you do not use the [-p | --preserve] option during the installation, the history information on the
screen gets erased.
* — Options included for Linux granular installation.
Using The Shell Script To Perform The Installation In Interactive Mode
This installation procedure uses the srvadmin-install.sh to prompt you for the installation of specific
components.
1.
Log in as root to the system running the supported operating system where you want to install the managed
system components.
2.
Insert the Systems Management Tools and Documentation DVD into the DVD drive.
3.
Mount the DVD, if required.
4.
Navigate to <OM DVD mount point>/SYSMGMT/srvadmin/linux/supportscripts.
5.
Execute the script with the sh srvadmin-install.sh command and accept the terms of the end-user
license agreement.
Executing the command displays a list of component options. If any of the components are already installed, then
those components are listed separately with a check mark next to them. The Server Administrator installation
options are displayed.
6.
Press <c>to copy, <i> to install, <r> to reset and start over, or <q> to quit. If you press <c>, you are prompted to
enter the absolute destination path.
7.
Press <y>to start the services or <Enter> to exit.
When the installation is complete, the script has an option for starting the services.
Using The Install Script To Run In Silent Mode
Perform these steps for a silent installation using the srvadmin‑install.sh shell script:
1.
Log in as root to the system running the supported operating system where you want to install the managed
system components.
2.
Insert the Systems Management Tools and Documentation DVD into the DVD drive.
3.
Mount the DVD, if required.
4.
Navigate to <OM DVD mount point>/SYSMGMT/srvadmin/linux/supportscripts.
5.
To install the Storage Management Service components, type the command sh srvadmin-install.sh -storage (long options) OR sh srvadmin-install.sh -s (short options)
NOTE: Long options can be combined with short options, and vice-versa.
6.
Start Server Administrator services after the installation by typing the command sh srvadmin-services
start.
NOTE: After installing Server Administrator, log out and then log in again to access the Server Administrator
Command Line Interface (CLI).
Determining The Server Administrator Architecture
Use the following command to identify if the already installed Server Administrator is of 32-bit or 64-bit architecture
rpm -q --queryformat "%{NAME} - %{ARCH}\n" `rpm -qa | grep srvadmin`
The system displays a message identifying the architecture where, i386 refers to 32-bit and x86_64 refers to 64-bit.
56
Managed System Software Installation Using Third Party Deployment Software
You can use third-party deployment software, such as Altiris Deployment Solution, VMWare Update Manager (VUM), or
Linux Respository for Yellowdog Updater Modified (YUM), Rug, and Zypper, to install managed systems software on
supported systems.
To distribute and install Server Administrator using Altiris Deployment Solution:
1. Start the Altiris application
2. Import OpenManage_Jobs.bin located at SYSMGMT\srvadmin\support\Altiris on the Systems Management Tools
and Documentation DVD
3. Specify a job folder to import OpenManage_Jobs.bin.
4. Modify the Run Script and Copy File tasks to match the deployment environment.
5. Schedule the job to run on the supported systems that are managed from the Altiris Deployment Solution.
NOTE: For more information on VMWare Update Manager, see Using the VMWare Update Manager (VUM).
Linux Repository
The Linux Repository is the official repository for all related software and updates for your Linux systems. You can use
this repository to complete the following tasks:
•
Install Server Administrator
•
Install drivers for all your Linux systems
•
Install BIOS and firmware updates
Setting Up The Linux Repository
Before you can start using the Linux Repository for installing software or upgrades, you must set up the repository. For
more information, see http://linux.dell.com/repo/hardware/.
Set up the repository with:
wget -q -O - http://linux.dell.com/repo/hardware/latest/bootstrap.cgi | bash
NOTE: If you require 64-bit packages, uninstall the existing 32-bit packages before installing the new software.
Server Administrator is designed to match your current operating system.
Installation Using Linux Repository
You can install Server Administrator using the Linux Repository by following any of the methods listed below:
NOTE: Ensure that you set up the Linux Repository before you install the software from the repository.
NOTE: Server Administrator will not install on unsupported systems. If you try installing Server Administrator on
unsupported systems, you will receive a message that the system is not supported and the installation will fail.
Using YUM
NOTE: Ensure that you are using the latest version of YUM as the older versions do not support plug-ins or
mirrorlists.
If you are using YUM with CentOS, or Scientific Linux, ensure that the plug-ins are enabled as the system connects to a
system specific repository using a YUM plug-in. If the plug-in is not enabled, the repository will not work properly and
you will not be able to install packages from the repository. Add the plugins=1 line, to your yum.conf, if the plug-in is
not enabled.
57
The following command line will work for Red Hat Enterprise Linux 5 and 6, CentOS, and Scientific Linux:
yum install srvadmin-all
NOTE: You can install YUM as an add-on for SLES 9 or 10.
Using RUG
You can install Server Administrator using rug for SLES 10 or higher.
rug install srvadmin-base
rug install srvadmin-webserver
rug install srvadmin-storageservices
NOTE: You must have setserial installed, if you want to install srvadmin-all.
Using ZYPPER
You can install Server Administrator using zypper for SLES 11 or higher.
zypper install srvadmin-all
Uninstalling Managed System Software
To uninstall Managed System Software, log in as root.
Uninstalling Managed System Software Using The Uninstall Script
An uninstallation script is installed when you install Server Administrator. Execute the script by typing srvadminuninstall.sh and then pressing <Enter>.
Uninstalling Managed System Software Using The RPM Command
The individual components of systems management software can be uninstalled without uninstalling all of systems
management.
To uninstall only the Server Administrator Web Server, use the command rpm –e `rpm -qa | grep
srvadmin-tomcat`.
During an uninstallation, files in which user settings are made are preserved with the .rpmsave file extension. Log files
are also preserved after the uninstallation.
58
Installing Managed System Software On
Microsoft Windows Server 2008 Core And
Microsoft Hyper-V Server
5
The Server Core installation option of the Microsoft Windows Server 2008 and Hyper-V Server operating system
provides a minimal environment for running specific server roles that reduce the maintenance and management
requirements and the attack surface for those server roles. A Windows Server 2008 Core or Hyper-V Server installation
installs only a subset of the binaries that are required by the supported server roles. For example, the Explorer shell is
not installed as part of a Windows Server 2008 Core or Hyper-V Server installation. Instead, the default user interface for
a Windows Server 2008 Core or Hyper-V Server installation is the command prompt.
NOTE: On Windows Server 2008 R2 SP1 Core and Windows Server 2012 Core, to install Server Administrator,
Windows-on-Windows (WOW) mode should be enabled.
NOTE: Windows Server 2008 Core or Hyper-V Server operating system does not support a graphical user interface
(GUI) based installation of software components. Install the software in the Command Line Interface (CLI) mode on
Server Core. For more information on Server Core, see microsoft.com.
NOTE: On Windows 7, to install the systems management software successfully, log in using an account which
belongs to the Administrators Group and must execute the setup.exe using the option Run as administrator from
the right-click menu.
NOTE: Log in as a built-in administrator to install the systems management software on Windows Server 2008 and
Windows Vista. For more information about the built-in Administrator account, see the Windows Server 2008 Help.
NOTE: Server Administrator is also supported on Windows Server 2012.
Running Prerequisite Checker In CLI Mode
You must run the prerequisite checker in the CLI mode as Windows Server 2008 and Hyper-V Server does not support
the GUI mode.
Related Links:
Prerequisite Checker
Installing Managed System Software In CLI Mode
Launch the MSI file from the command prompt using the command msiexec /i <SysMgmt or
SysMgmtx64>.msi.
To install the localized version of the managed system software, type
msiexec /i <SysMgmt or SysMgmtx64>.msi TRANSFORMS= <languauge_transform >.mst
in the command prompt. Replace <language_transform >.mst with the appropriate language file:
•
•
1031.mst (German)
1034.mst (Spanish)
59
•
1036.mst (French)
•
1041.mst (Japanese)
•
2052.mst (Simplified Chinese)
Related Links:
Optional Command Line Settings
Uninstalling Systems Management Software
To uninstall managed system software, type msiexec /x <SysMgmt or SysMgmtx64>.msi at the command
prompt.
60
Installing Systems Management Software On
VMware ESXi
6
VMware ESXi is factory-installed on some systems. For a list of these systems, see the latest Systems Software Support
Matrix. Use Server Administrator Web Server version 7.0 to access VMware ESXi 4.0 U3, VMware ESXi 4.1 U2, VMware
ESXi 5.0 U1 systems.
Server Administrator is available as a .zip file for installing on systems running VMware ESXi. The zip file, OM-SrvAdminDell-Web-7.1.0-<bldno>.VIB-ESX<version>i_<bld-revno>.zip, where <version> is the supported ESXi version.
Download VMware vSphere Command Line Interface (vSphere CLI) from vmware.com and install on the Microsoft
Windows or Linux system. Alternately, you can import VMware vSphere Management Assistant (vMA) to the ESXi host.
Using The vSphere CLI
To install systems management software on VMware ESXi using the vSphere CLI:
1.
Copy and unzip the OM-SrvAdmin-Dell-Web-7.1.0-<bldno>.VIB-ESX<version>i_<bld-revno>.zip file to a directory on
the system. For ESXi 5.0 and ESXi 5.0 P1, copy the unzipped file to the /var/log/vmware folder on the ESXi 5.0 U1
server.
NOTE: For ESX 4.x, you do not have to unzip the file.
2.
Shut down all guest operating systems on the ESXi host and put the ESXi host in maintenance mode.
3.
If you are using vSphere CLI on Windows, navigate to the directory where you have installed the vSphere CLI
utilities.
If you are using vSphere CLI on Linux, execute the command from any directory.
4.
Execute the following command:
For VMware ESXi4.0/ESXi 4.1: vihostupdate.pl --server<IP address of ESXi host>-i -b
<path to Dell OpenManage file>
For VMware ESXi 5.0 U1: esxcli --server <IP Address of ESXi 5.0 host> software vib
install -d /var/log/vmware/<Dell OpenManage file>
NOTE: The .pl extension is not required if you are using vSphere CLI on Linux.
5.
Enter the root username and password of the ESXi host when prompted.
The command output displays a successful or a failed update.
6.
Restart the ESXi host system.
To get or list the information about the installed VIBs:
•
For ESXi 4.x, use vihostupdate.pl --server <IP> --query or -q
•
For ESXi 5.x, use esxcli --server <IP>software vib get or software vib list
The VIB contains the following items:
•
Server Administrator Instrumentation Service
•
Remote Enablement
61
•
Server Administrator Storage Management
•
Remote Access Controller
Related Links:
Troubleshooting
Using The VMware vSphere Management Assistant (vMA)
The vMA allows administrators and developers to run scripts and agents to manage ESX/ESXi systems. For more
information on vMA, see vmware.com/support/developer/vima/.
1.
Log on to vMA as an administrator and provide the password when prompted.
2.
Copy and unzip the OM-SrvAdmin-Dell-Web-7.1.0-<bldno>.VIB-ESX<version>i_<bld-revno>.zip file to a directory on
the vMA.
3.
Shut down all guest operating systems on the ESXi host and put the ESXi host in maintenance mode.
4.
In vMA, execute the following command:
For VMware ESXi4.0/ESXi 4.1: vihostupdate --server <IP address of ESXi Host> -i -b
<path to Dell OpenManage file>
For VMware ESXi 5.0 U1: esxcli --server <IP Address of ESXi 5.0 host> software vib
install -d /var/log/vmware/<Dell OpenManage file>
5.
Enter the root username and password of the ESXi host when prompted.
The command output displays a successful or a failed update.
6.
Restart the ESXi host system.
When you run the command, the following components are installed on the system:
•
Server Administrator Instrumentation Service
•
Remote Enablement
•
Server Administrator Storage Management
•
Remote Access Controller
Install the Server Administrator Web Server separately on a management station.
After installing Server Administrator, enable the Server Administrator Services.
Related Links:
•
Troubleshooting
•
Installing Managed System Software on Microsoft Windows Operating Systems
•
Installing Managed System Software on Supported Linux and VMware ESX
•
Enabling Server Administrator Services on the Managed System
Using The VMWare Update Manager (VUM)
To install Server Administrator using VUM:
1.
Install VMware vSphere 5.x (vCenter Server, vSphere Client, and VMware vSphere Update Manager) on a
Windows 2008 R2 SP1 64-bit server.
2.
On the desktop, double-click VMware vSphere Client and login to vCenter Server.
3.
Right-click vSphere Client host and click New Datacenter.
4.
Right-click New Datacenter and click Add Host. Provide information for the ESXi server per online instructions.
62
5.
Right-click the ESXi host added in the previous step and click Maintenance Mode.
6.
From Plug-ins select Manage Plug-ins → download VMware Update Manager (The status is enabled if the
download is successful.) Follow the instructions to install the VUM client.
7.
Select the ESXi host. Click Update Manager → Admin view → Patch Repository → Import Patches and follow the
online instructions to upload the patch successfully.
The offline bundle is displayed.
8.
Click Baselines and Groups.
9.
Click create from Baselines tab, mention baseline name and select Host Extension as baseline type. Complete the
rest as per instructions.
10. Click Admin View.
11. Click Add to Baseline (against the uploaded patch name) and select the baseline name that you have created in
step 8.
12. Click Compliance view. Select the Update Manager tab. Click Attach and select the Extension Baseline created in
step 8 and follow the instructions.
13. Click Scan and select Patches & Extensions (if not selected by default) and click on Scan.
14. Click Stage, select created Host Extension and follow the instructions.
15. Click Remediate and follow the instructions once the staging is completed.
Server Administrator installation is complete.
16. Reboot the host.
NOTE: For more information on VMWare Update Manager, see the VMWare official website.
NOTE: You can install Server Administrator from the VUM repository, https://vmwaredepot.dell.com/.
Using The Power CLI
To install Server Administrator using Power CLI:
1.
Install the supported PowerCLI of ESXi on Windows System.
2.
Copy the OM-SrvAdmin-Dell-Web-7.1.0-<bldno>.VIB-ESX<version>i_<bld-revno>.zip file to the ESXi host.
3.
Navigate to the bin directory.
4.
Run Connect-VIServer and provide the server and other credentials.
5.
Log on to the ESXi host using supported vSphere CLI of ESXi 5.0 U1 and create a datastore.
6.
Create a folder OM-SrvAdmin-Dell-Web-7.1.0-<bldno>.VIB-ESX<version>I on ESXi 5.0 U1 host under /vmfs/volumes/
<datastore_name> directory.
7.
Copy the ESXi zip file on ESXi 5.0 U1 host to/vmfs/volumes/<datastore_name>OM-SrvAdmin-Dell-Web-7.1.0<bldno>.VIB-ESX<version>I directory.
8.
Unzip the zip file in the above specified directory.
9.
Run the following command in Power CLI Install-VMHostPatch -VMHost 10.94.171.97 HostPath /vmfs/volumes/<datastore_name>name>/OMSrvAdmin- Dell-Web-7.1.0<build ID>.VIBESX<version>i/ cross_oem-dell-openmanage-esxi_7.1-0000metadata.zip
10. Reboot the ESXi host.
11. Run the following command to check if OpenManage is installed successfully on the host. esxcli software
vib list|grep -i open
OpenManage is displayed.
NOTE: For more information on Power CLI, see the VMWare official website.
63
Enabling Server Administrator Services On The Managed System
The Server Administrator Web Server communicates with the VMware ESXi system through the Server Administrator
Common Interface Model (CIM) provider. The Server Administrator CIM provider is an Original Equipment Manufacturer
(OEM) provider on the VMware ESXi system. CIM OEM providers are disabled by default on VMware ESXi 4.0 and ESXi
4.1. Enable the CIM OEM providers on the VMware ESXi system before accessing it using Server Administrator Web
Server.
NOTE: In ESXi 4.1 U2, ESXi 5.0 U1 CIM OEM provider is enabled by default.
Enabling CIM OEM Providers Using vSphere Client (For VMware ESXi4.0/ESXi 4.1)
To enable CIM OEM providers using VMware vSphere Client, you must have the vSphere Client tool installed. You can
download and install the tool from https://<IP_address of ESXi host> where <ip_address> is the IP address of the
VMware ESXi system.
To enable CIM OEM providers on the VMware ESXi system using vSphere Client:
1.
Log on to the VMware ESXi host system using vSphere Client.
2.
Click the Configuration tab.
3.
Under the Software section on the left side, click Advanced Settings.
4.
In the Advanced Settings dialog box, click UserVars on the left pane.
5.
Change the value of the CIMOEMProvidersEnabled (for ESXi 4.0) or CIMoemProviderEnabled (for ESXi 4.1) field to 1.
6.
Click OK.
7.
For the changes to take effect without restarting the system, use the Restart Management Agents option in the
Direct Console User Interface (DCUI) on the local console of the VMware ESXi system.
NOTE: This option is available under Troubleshooting Options in ESXi 4.1.
If the changes are not effective and you cannot connect to the VMware ESXi host using Server Administrator,
restart the VMware ESXi host system.
Enabling CIM OEM Providers Using vSphere CLI (For VMware ESXi 4.0/ESXi 4.1)
To enable CIM OEM providers on the VMware ESXi system using vSphere CLI:
1.
If you are using vSphere CLI on Windows, navigate to the directory where you have installed the vSphere CLI
utilities. On Linux, proceed to step 2.
2.
Execute the command vicfg-advcfg.pl --server <ip_address of ESXi host> --username
<user_name> --password <password> --set 1 UserVars.CIMOEMProvidersEnabled
NOTE: For ESXi 4.0, use CIMOEMProvidersEnabled and for ESXi 4.1, use CIMoemProviderEnabled.
The .pl extension is not required if you are using vSphere CLI on Linux.
3.
For the changes to take effect without restarting the system, use the Restart Management Agents option in the
DCUI on the local console of the VMware ESXi system.
NOTE: This option is available under Troubleshooting Options in ESXi 4.1.
If the changes are not effective and you cannot connect to the VMware ESXi host using Server Administrator,
restart the VMware ESXi host system.
64
Enabling CIM OEM Providers Using vMA (For VMware ESXi 4.0/ESXi 4.1)
To enable CIM OEM providers on the VMware ESXi system using vMA:
1.
Log in to the vMA as an administrator and provide the password when prompted.
2.
Execute the command vicfg-advcfg --server <ip_address of ESXi host> --username
<user_name> --password <password> --set 1 UserVars.CIMOEMProvidersEnabled
NOTE: For ESXi 4.0, use CIMOEMProvidersEnabled and for ESXi 4.1, use CIMoemProviderEnabled.
3.
For the changes to take effect without restarting the system, use the Restart Management Agents option in the
DCUI on the local console of the VMware ESXi system.
If the changes are not effective and you cannot connect to the VMware ESXi host using Server Administrator,
restart the VMware ESXi host system.
Uninstalling The Existing Systems Management VIB
To uninstall the existing Systems Management VIB:
1.
2.
Run the following command to uninstall the VIB:
On ESXi 4.x:
vihostupdate.pl --server <IP> -r -B <VIB Name>
On ESXi 5.x:
esxcli
--server <IP> software vib remove <VIB Name>
Reboot the system after uninstalling.
Configuring The SNMP Agent On Systems Running VMware ESXi
Server Administrator generates Simple Network Management Protocol (SNMP) traps in response to changes in the
status of sensors and other monitored parameters. You must configure one or more trap destinations on the system
running Server Administrator to send SNMP traps to a management station.
Server Administrator supports SNMP traps on VMware ESXi but does not support SNMP Get and Set operations
because VMware ESXi does not provide the required SNMP support. You can use the VMware vSphere CLI to configure
VMware ESXi to send SNMP traps to a management application.
NOTE: For more information about using the VMware vSphere CLI, see the VMware support site at vmware.com/
support.
Configuring The System To Send Traps To A Management Station Using The vSphere CLI
Server Administrator generates SNMP traps in response to changes in the status of sensors and other monitored
parameters. One or more trap destinations must be configured on the system running Server Administrator to send
SNMP traps to a management station.
Configure the ESXi system running Server Administrator to send traps to a management station:
1.
Install the VMware vSphere CLI.
2.
Open a command prompt on the system in which the vSphere CLI is installed.
3.
Navigate to the directory in which the vSphere CLI is installed. The default location on Linux is /usr/bin and on
Windows is C:\Program Files\VMware\VMware vSphere CLI\bin.
65
4.
Configure the SNMP setting using the command: vicfg-snmp.pl --server <server> --username
<username> --password <password> -c <community> -t <hostname>@162/
<community>
where <server> is the hostname or IP address of the ESXi system, <username> is a user on the ESXi system,
<password> is the password of the ESXi user, <community> is the SNMP community name and <hostname> is the
hostname or IP address of the management station.
NOTE: If you do not specify a user name and password, you are prompted to specify the same.
5.
Enable SNMP using the command: vicfg-snmp.pl --server <server> --username <username>
--password <password> -E
6.
View the SNMP configuration using the command: vicfg-snmp.pl --server <server> --username
<username> --password <password> -s
7.
Test the SNMP configuration using the command: vicfg-snmp.pl --server <server> --username
<username> --password <password> -T
NOTE: The .pl extension is not required if you are using vSphere CLI on Linux or using vMA.
The SNMP trap configuration takes effect immediately without restarting any services.
Troubleshooting
•
When attempting to use the vihostupdate command, the following error may be displayed:
unpacking c:\OM-SrvAdmin-Dell-Web-7.1.0-<bldno>.VIB-ESX<version>i_<bldrevno>.zip
metadata.zip.sig does not exist
signature mismatch : metadata.zip
Unable to unpack update package.
This error is displayed if you are using an older version of the Remote CLI. To resolve this issue, download and
install the latest vSphere version of the CLI.
•
When attempting to use the vihostupdate command, the following error may be displayed:
Unable to create, write or read a file as expected.I/O Error (28) on
file : [Errno 28] No space left on device.
See the VMware KB article 1012640 at kb.vmware.com to fix this error.
66
Installing Systems Management Software On
Citrix XenServer
7
The Server Administrator is installed on Citrix XenServer using the Supplemental Pack. The Supplemental Pack for Citrix
XenServer can be installed in two ways:
•
During the installation of XenServer
•
On a running system
During The installation Of XenServer
To install the Supplemental Pack for Citrix XenServer during the installation of XenServer:
1.
Start the installation of XenServer as usual and follow the instructions on the screen.
2.
One of the early questions during the installation process of XenServer is if you want to install any Supplemental
Packs; click Yes and continue with the installation process.
3.
After the base XenServer image is installed (5-10 minutes depending on the speed of the system), you are prompted
to insert the Supplemental Pack CD. Eject the XenServer installation CD from the optical drive, insert the
Supplemental Pack CD and click OK. The message OpenManage Supplemental Pack was found is
displayed. To confirm installation, click Use and click OK.
NOTE: If you have more than one Supplemental Pack, (either the Linux Supplemental Pack from Citrix or other
third-party applications) you can install them in any order, although it is recommended that you install the
Supplemental Pack last.
4.
After completing the Supplemental Pack installation (2-5 minutes, depending on the speed of the system), you are
prompted to install other Supplemental Packs. If you do not want to install other supplemental packs, click Skip and
press <Enter>. The XenServer is installed successfully.
NOTE: When installing RPM packages, to avoid warnings concerning the RPM–GPG key, import the key with a
command similar to the following:
rpm --import<OM DVD mountpoint>SYSMGMT/srvadmin/linux/RPM-GPG-KEY
On A Running System
To install the Supplemental Pack for Citrix XenServer 6.1 on a running system:
1.
Burn the Supplemental Pack ISO file to a CD/DVD or download the ISO file to the server.
If you are downloading the ISO file, mount it on a temporary directory as follows:
$ mount -o loop <openmanange-supplemental-pack-filename>.iso /mnt
If you burned the ISO file to a CD/DVD, insert it in the optical drive and run:
$ mount /dev/cdrom /mnt
2.
Install the supplemental pack:
$ cd /mnt
$ ./install.sh
67
OR
$ xe-install-supplemental-pack <openmanange-supplemental-pack-filename>.iso
NOTE: If a previous version of Server Administrator is already installed on the system, then the command to
upgrade it to version 7.0 is ./install.sh.
After the installation or upgrade, execute the following post-installation configuration script of Remote Enablement
feature
$ cd /opt/dell/srvadmin/etc
$ ./autoconf_cim_component.sh -p 5986
3.
When the installation is complete, unmount the ISO file or CD:
$ cd ..
$ umount /mnt
CAUTION: Removal of the Supplemental Pack or any RPMs is not supported by your service provider or Citrix
and it is not recommended. Manual removal of any RPM leaves the system in an inconsistent state which
could make any potential issue debugging effort difficult or impossible. A future Supplemental Pack release
supports removal of the Supplemental Pack.
XenServer Upgrade
If the XenServer image is upgraded to a newer XenServer update or release, the Supplemental Pack must be reinstalled
since the new XenServer image is placed on a different partition from the original. In this case, follow the same
installation instructions as before. However, any systems management configuration settings saved on the server is lost.
NOTE: If you are connecting to a XenServer 6.1 managed node using server administrator web server, use port
5986 in the format Hostname:Port Number, or IP address:Port Number.
Post Installation Tasks
After the installation or upgrade of Server Administrator:
1.
Execute the post installation configuration scripts of Remote Enablement feature:
$ cd /opt/dell/srvadmin/etc
$ ./autoconf_cim_component.sh -p 5986
$ service iptables save
or
$ /etc/init.d/iptables save
2.
Restart openwsman and sfcb services:
$
/etc/init.d/openwsmand restart
$
/etc/init.d/sfcb restart
NOTE: In case the openwsman services do not start properly, you may need to reboot the server.
3.
Open the port 5986:
$ iptables -I RH-Firewall-1-INPUT -p tcp --destination-port 5986 -j ACCEPT
4.
Start the Server Administrator services:
$ sh srvadmin-services start
68
Using Microsoft Active Directory
8
If you use Active Directory service software, configure it to control access to the network. The Active Directory
database is modified to support remote management authentication and authorization. Server Administrator, as well as
Integrated Remote Access Controllers (iDRAC), Remote Access Controllers (RAC), can now interface with Active
Directory. With this tool, you can add and control users and privileges from one central database.
Active Directory Schema Extensions
The Active Directory data exists in a distributed database of Attributes and Classes. An example of a Active Directory
Class is the User class. Some example Attributes of the user class might be the user’s first name, last name, phone
number, and so on. Define every Attribute or Class that is added to an existing Active Directory schema with a unique ID.
To maintain unique IDs throughout the industry, Microsoft maintains a database of Active Directory Object Identifiers
(OIDs).
The Active Directory schema defines the rules for what data can be included in the database. To extend the schema in
Active Directory, install the latest received unique OIDs, unique name extensions, and unique linked attribute IDs for the
new attributes and classes in the directory service from the Systems Management Tools and Documentation DVD.
Dell extension is: dell
Dell base OID is: 1.2.840.113556.1.8000.1280
Dell LinkID range is:12070 to 12079
Overview Of The Active Directory Schema Extensions
Dell created classes, or groups of objects, that can be configured by the user to meet their unique needs. New classes
in the schema include an Association, a Product, and a Privilege class. An association object links the user or group to a
given set of privileges and to systems (Product Objects) in the network. This model gives an administrator control over
the different combinations of user, privilege, and system or RAC device on the network, without adding complexity.
Active Directory Object Overview
For each of the systems that you want to integrate with Active Directory for authentication and authorization, there must
be at least one Association Object and one Product Object. The Product Object represents the system. The Association
Object links it with users and privileges. You can create as many Association Objects as you need.
Each Association Object can be linked to as many users, groups of users, and Product Objects as required. The users
and Product Objects can be from any domain. However, each Association Object may only link to one Privilege Object.
This behavior allows an administrator to control users and their rights on specific systems.
The Product Object links the system to Active Directory for authentication and authorization queries. When a system is
added to the network, the administrator must configure the system and its product object with its Active Directory name
so that users can perform authentication and authorization with Active Directory. The administrator must also add the
system to at least one Association Object for users to authenticate.
The following figure illustrates that the Association Object provide the connection that is needed for all of the
authentication and authorization.
69
Figure 1. Typical Setup for Active Directory Objects
In addition, you can set up Active Directory objects in a single domain or in multiple domains. Setting up objects in a
single domain does not vary, whether you are setting up RAC, or Server Administrator objects. When multiple domains
are involved, however, there are some differences.
The following figure shows the set up of the Active Directory objects in a single domain. In this scenario, you have two
DRAC 4 cards (RAC1 and RAC2) and three existing Active Directory users (User1, User2, and User3). You want to give
User1 and User2 administrator privilege on both DRAC 4 cards and give User3 login privilege on the RAC2 card.
70
Figure 2. Setting Up RAC Active Directory Objects in a Single Domain
Setting Up Objects In A Single Domain
To set up the objects in a single domain scenario, perform the following tasks:
1.
Create two Association Objects.
2.
Create two RAC Product Objects, RAC1 and RAC2, to represent the two DRAC 4 cards.
3.
Create two Privilege Objects, Priv1 and Priv2, in which Priv1 has all privileges (administrator) and Priv2 has login
privileges.
4.
Group User1 and User2 into Group1.
5.
Add Group1 as Member in Association Object 1 (AO1), Priv1 as Privilege Object in AO1, and both RAC1 and RAC2 as
RAC Products in AO1.
6.
Add User3 as Member in Association Object 2 (AO2), Priv2 as Privilege Object in AO2, and RAC2 as RAC Product in
AO2.
Related Links:
Adding Users and Privileges to Active Directory
Active Directory Objects In Multiple Domains
The following figure shows the setup of the Active Directory objects in multiple domains for RAC. In this scenario, you
have two DRAC 4 cards (RAC1 and RAC2) and three existing Active Directory users (User1, User2, and User3). User1 is in
Domain1, but User2 and User3 are in Domain2. You want to give User1 and User2 Administrator privileges on both the
RAC1 and RAC2 card and give User3 Login privilege on the RAC2 card.
71
Figure 3. Setting Up RAC Active Directory Objects In Multiple Domains
Setting Up RAC Active Directory Objects In Multiple Domain
To set up the objects for this multiple domain scenario, perform the following tasks:
1.
Ensure that the domain forest function is in Native mode.
2.
Create two Association Objects, AO1 (of Universal scope) and AO2, in any domain.
3.
Create two RAC Device Objects, RAC1 and RAC2, to represent the two remote systems.
4.
Create two Privilege Objects, Priv1 and Priv2, in which Priv1 has all privileges (Administrator) and Priv2 has Login
privileges.
5.
Group User1 and User2 into Group1. The group scope of Group1 must be Universal.
6.
Add Group1 as Member in Association Object 1 (AO1), Priv1 as Privilege Object in AO1, and both RAC1 and RAC2 as
Products in AO1.
7.
Add User3 as Member in Association Object 2 (AO2), Priv2 as Privilege Object in AO2, and RAC2 as a Product in
AO2.
Setting Up Server Administrator Active Directory Objects In Multiple Domains
For Server Administrator, the users in a single Association can be in separate domains and need not be in a Universal
group. The following is a very similar example to show how Server Administrator systems in separate domains affect the
setup of directory objects. Instead of RAC devices, you will have two systems running Server Administrator (Server
Administrator Products sys1 and sys2). sys1 and sys2 are in different domains. You can use any existing Users or Groups
that you have in Active Directory. The following figure shows how to set up the Server Administrator Active Directory
objects for this example.
72
Figure 4. Setting up Server Administrator Active Directory Objects In Multiple Domains
Setting Up Server Administrator Active Directory Objects For Multiple Domain
To set up the objects for this multiple domain scenario, perform the following tasks:
1.
Ensure that the domain forest function is in Native mode.
2.
Create two Association Objects, AO1 and AO2, in any domain. The figure shows the objects in Domain1.
3.
Create two Server Administrator Products, sys1 and sys2, to represent the two systems. sys1 is in Domain1 and
sys2 is in Domain2.
4.
Create two Privilege Objects, Priv1 and Priv2, in which Priv1 has all privileges (Administrator) and Priv2 has Login
privileges.
5.
Group sys2 into Group1. The group scope of Group1 must be Universal.
6.
Add User1 and User2 as Members in Association Object 1 (AO1), Priv1 as Privilege Objects in AO1, and both sys1
and Group1 as Products in AO1.
7.
Add User3 as a Member in Association Object 2 (AO2), Priv2 as a Privilege object in AO2, and Group1 as a Product
in AO2.
NOTE: Neither of the Association objects needs to be of Universal scope.
Configuring Active Directory To Access The Systems
Before you can use Active Directory to access the systems, you must configure both the Active Directory software and
the systems.
1.
Extend the Active Directory schema.
2.
Extend the Active Directory Users and Computers Snap-in.
3.
Add system users and their privileges to Active Directory.
4.
For RAC systems, enable SSL on each of the domain controllers.
5.
Configure the system’s Active Directory properties using either the Web-based interface or the CLI.
Related Links:
•
Extending the Active Directory Schema
73
•
Installing the Extension to the Active Directory Users and Computers Snap-In
•
Adding Users and Privileges to Active Directory
•
Configuring the Systems or Devices
Configuring The Active Directory Product Name
To configure the Active Directory product name:
1.
Locate the omsaoem.ini file in the installation directory.
2.
Edit the file to add the line adproductname=text, where text is the name of the product object that you
created in Active Directory. For example, the omsaoem.ini file contains the following syntax if the Active Directory
product name is configured to omsaApp.
productname=Server Administrator
startmenu=Dell OpenManage Applications
autdbid=omsa
accessmask=3
adsupport=true
adproductname=omsaApp
3.
Restart the Systems Management Server Administrator (DSM SA) Connection Service after saving the omsaoem.ini
file.
Extending The Active Directory Schema
The schema extensions for RAC and Server Administrator are available. Extend the schema for software or hardware
that you are using. Apply each extension individually to receive the benefit of its software-specific settings. Extending
the Active Directory schema adds schema classes and attributes, example privileges and association objects, and a
organizational unit to the schema.
NOTE: Before you extend the schema, you must have Schema Admin privileges on the Schema Master Flexible
Single Master Operation (FSMO) Role Owner of the domain forest.
Extend the schema using two different methods. Use the Schema Extender utility, or use the Lightweight Directory
Interchange Format (LDIF) script file.
NOTE: The organizational unit is not added if you use the LDIF script file.
The LDIF script files and the Schema Extender utility are located in the following directories on the Systems
Management Tools and Documentation DVD:
•
<DVD drive>drive>:\SYSMGMT\ManagementStation\support\OMActiveDirect ory_Tools\<installation type>\LDIF
Files
•
<DVD drive>:\SYSMGMT\ManagementStation\support\OMActiveDirect ory_ Tools\<installation type>\Schema
Extender
The following table lists the folder names and <installation type>.
Table 13. Folder Names and Installation Types
Folder Name
Installation Type
OMSA
Server Administrator
Remote_Management
RAC 5, CMC, and iDRAC on xx0x Blade systems
Remote_Management_Advanced
iDRAC on xx1x and xx2x systems
74
Folder Name
Installation Type
NOTE: Only iDRAC6 is supported on xx1x systems and
iDRAC7 is supported on xx2X systems.
To use the LDIF files, see the instructions in the readme that is in the LDIF files directory. To use the Schema Extender to
extend the Active Directory Schema, perform the steps in Using the Dell Schema Extender.
Copy and run the Schema Extender or LDIF files from any location.
Using The Dell Schema Extender
To use the Dell Schema Extender perform the following tasks:
CAUTION: The Dell Schema Extender uses the SchemaExtenderOem.ini file. To ensure that the Dell Schema
Extender utility functions properly, do not modify the name or the contents of this file.
1.
Click Next on the Welcome screen.
2.
Read the warning and click Next.
3.
Select Use Current Log In Credentials or enter a user name and password with schema administrator rights.
4.
Click Next to run the Dell Schema Extender.
5.
Click Finish.
To verify the schema extension, use the Active Directory Schema Snap-in in the Microsoft Management Console
(MMC) to verify the existence of the following classes and attributes. See the Microsoft documentation for more
information on enabling and using the Active Directory Schema Snap-in.
For more information on class definitions for DRAC, see the Remote Access Controller 4 User’s Guide and Remote
Access Controller 5 User’s Guide. For more information on class definitions for iDRAC, see the Integrated Remote
Access Controller User's Guide.
Table 14. Class Definitions for Classes Added to the Active Directory Schema
Class Name
Assigned Object Identification
Number (OID)
Class Type
dellAssociationObject
1.2.840.113556.1.8000.1280.1.1.1.2
Structural Class
dellPrivileges
1.2.840.113556.1.8000.1280.1.1.1.4
Structural Class
dellProduct
1.2.840.113556.1.8000.1280.1.1.1.5
Structural Class
dellOmsa2AuxClass
1.2.840.113556.1.8000.1280.1.2.1.1
Auxiliary Class
dellOmsaApplication
1.2.840.113556.1.8000.1280.1.2.1.2
Structural Class
Table 15. dellAssociationObject Class
OID
1.2.840.113556.1.8000.1280.1.1.1.2
Description
This class represents the Dell Association Object. The
Association Object provides the connection between
the users and the devices or products.
Class Type
Structural Class
SuperClasses
Group
Attributes
dellProductMembers
75
dellPrivilegeMember
Table 16. dellPrivileges Class
OID
1.2.840.113556.1.8000.1280.1.1.1.4
Description
This class is used as a container Class for the Dell
Privileges (Authorization Rights).
Class Type
Structural Class
SuperClasses
User
Attributes
dellRAC4Privileges
dellRAC3Privileges
dellOmsaAuxClass
Table 17. dellProduct Class
OID
1.2.840.113556.1.8000.1280.1.1.1.5
Description
This is the main class from which all Dell products are
derived.
Class Type
Structural Class
SuperClasses
Computer
Attributes
dellAssociationMembers
Table 18. dellOmsa2AuxClass Class
OID
1.2.840.113556.1.8000.1280.1.2.1.1
Description
This class is used to define the privileges (Authorization
Rights) for Server Administrator.
Class Type
Auxiliary Class
SuperClasses
None
Attributes
dellOmsaIsReadOnlyUser
dellOmsaIsReadWriteUser
dellOmsaIsAdminUser
Table 19. dellOmsaApplication Class
76
OID
1.2.840.113556.1.8000.1280.1.2.1.2
Description
This class represents the Server Administrator
application. Server Administrator must be configured as
dellOmsaApplication in Active Directory. This
configuration enables the Server Administrator
application to send LDAP queries to Active Directory.
Class Type
Structural Class
SuperClasses
dellProduct
Attributes
dellAssociationMembers
Table 20. General Attributes Added to the Active Directory Schema
Attribute Name/Description
Assigned OID/Syntax Object
Identifier
dellPrivilegeMember
1.2.840.113556.1.8000.1280.1.1.2.1
FALSE
Distinguished Name (LDAPTYPE_DN
1.3.6.1.4.1.1466.115.121.1.12)
List of dellPrivilege Objects that
belong to this Attribute.
dellProductMembers
List of dellRacDevices Objects that
belong to this role. This attribute is
the forward link to the
dellAssociationMembers backward
link.
Link ID: 12070
Single Valued
1.2.840.113556.1.8000.1280.1.1.2.2
FALSE
Distinguished Name (LDAPTYPE_DN
1.3.6.1.4.1.1466.115.121.1.12)
1.2.840.113556.1.8000.1280.1.1.2.14
FALSE
Distinguished
Name
(LDAPTYPE_DN
List of
dellAssociationObjectMembers that 1.3.6.1.4.1.1466.115.121.1.12)
belong to this Product. This attribute
is the backward link to the
dellProductMembers Linked
attribute.
Link ID: 12071
dellAssociationMembers
Table 21. Server Administrator-Specific Attributes Added to the Active Directory Schema
Attribute Name/Description
Assigned OID/Syntax Object
Identifier
Single Valued
dellOMSAIsReadOnlyUser
1.2.840.113556.1.8000.1280.1.2.2.1
Boolean (LDAPTYPE_BOOLEAN
1.3.6.1.4.1.1466.115.121.1.7)
TRUE
1.2.840.113556.1.8000.1280.1.2.2.2
Boolean (LDAPTYPE_BOOLEAN
1.3.6.1.4.1.1466.115.121.1.7)
TRUE
1.2.840.113556.1.8000.1280.1.2.2.3
Boolean (LDAPTYPE_BOOLEAN
1.3.6.1.4.1.1466.115.121.1.7)
TRUE
TRUE if the User has Read-Only
rights in Server Administrator
dellOMSAIsReadWriteUser
TRUE if the User has Read-Write
rights in Server Administrator
dellOMSAIsAdminUser
TRUE if the User has Administrator
rights in Server Administrator
Active Directory Users And Computers Snap-In
When you extend the schema in Active Directory, extend the Active Directory Users and Computers snap-in so that the
administrator can manage Products, Users and User Groups, Associations, and Privileges. Extend the snap-in once,
even if you have added more than one schema extension. Install the snap-in on each system that you intend to use for
managing these objects.
Installing The Extension To The Active Directory Users And Computers Snap-In
When you are installing the systems management software using the Systems Management Tools and Documentation
DVD, you can install the Snap-in by selecting the Active Directory Snap-in option.
77
For 64-bit Windows operating systems, the Snap-in installer is located under <DVD drive>:\SYSMGMT
\x64\ManagementStation\windows\ADSnapIn.
NOTE: Install the Administrator Pack on each management station that is managing the new Active Directory
objects. If you do not install the Administrator Pack, you cannot view the new object in the container.
NOTE: For more information about the Active Directory Users and Computers snap-in, see the Microsoft
documentation.
Related Links:
Opening the Active Directory Users and Computers Snap-In
Opening The Active Directory Users And Computers Snap-In
To open the Active Directory Users and Computers snap-in, perform the following steps:
1.
If you are on the domain controller, click Start → Admin Tools → Active Directory Users and Computers . If you are
not on the domain controller, you must have the appropriate Microsoft administrator pack installed on the local
system. To install this administrator pack, click Start → Run, type MMC, and press <Enter>.
2.
Click File in the Console 1 window.
3.
Click Add/Remove Snap-in.
4.
Click Add.
5.
Select the Active Directory Users and Computers snap-in and click Add.
6.
Click Close and click OK.
Adding Users And Privileges To Active Directory
The extended Active Directory Users and Computers snap-in allows you to add DRAC and Server Administrator users
and privileges by creating RAC, Association, and Privilege objects. To add an object, perform the steps in the applicable
subsection.
Creating A Product Object
To create a Product Object:
NOTE: Server Administrator users must use Universal-type Product Groups to span domains with their product
objects.
NOTE: When adding Universal-type Product Groups from separate domains, create an Association object with
Universal scope. The default Association objects created by the Schema Extender utility are domain Local Groups
and do not work with Universal-type Product Groups from other domains.
1.
In the Console Root (MMC) window, right-click a container.
2.
Select New.
3.
Select a RAC or Server Administrator object, depending on what you have installed.
The New Object window is displayed.
4.
Type in a name for the new object. This name must match the Active Directory product name as discussed in
Configuring Active Directory Using CLI on Systems Running Server Administrator.
5.
Select the appropriate Product Object.
6.
Click OK.
Creating A Privilege Object
Privilege Objects must be created in the same domain as the Association Object to which they are associated.
78
1.
In the Console Root (MMC) window, right-click a container.
2.
Select New.
3.
Select a RAC or Server Administrator object, depending on what you have installed.
The New Object window is displayed.
4.
Type in a name for the new object.
5.
Select the appropriate Privilege Object.
6.
Click OK.
7.
Right-click the privilege object that you created and select Properties.
8.
Click the appropriate Privileges tab and select the privileges that you want the user to have.
Creating An Association Object
The Association Object is derived from a Group and must contain a group Type. The Association Scope specifies the
Security Group Type for the Association Object. When you create an Association Object, choose the Association Scope
that applies to the type of objects you intend to add. Selecting Universal, for example, means that Association Objects
are only available when the Active Directory Domain is functioning in Native Mode.
1.
In the Console Root (MMC) window, right-click a container.
2.
Select New.
3.
Select a RAC or Server Administrator object, depending on what you have installed.
The New Object window is displayed.
4.
Type in a name for the new object.
5.
Select Association Object.
6.
Select the scope for the Association Object.
7.
Click OK.
Adding Objects To An Association Object
By using the Association Object Properties window, you can associate users or user groups, privilege objects, systems,
RAC devices, and system or device groups.
NOTE: RAC users must use Universal Groups to span domains with their users or RAC objects.
You can add groups of Users and Products. You can create related groups in the same way that you created other
groups.
To Add Users Or User Groups
1.
Right-click the Association Object and select Properties.
2.
Select the Users tab and click Add.
3.
Type the User or User Group name or browse to select and click OK.
Click the Privilege Object tab to add the privilege object to the association that defines the user’s or user group’s
privileges when authenticating to a system.
NOTE: Add only one Privilege Object to an Association Object.
To Add A Privilege
1.
Select the Privileges Object tab and click Add.
2.
Type the Privilege Object name or browse and click OK.
Click the Products tab to add one or more systems or devices to the association. The associated objects specify the
products connected to the network that are available for the defined users or user groups.
79
NOTE: Add multiple systems or RAC devices to an Association Object.
To Add Products
1.
Select the Products tab and click Add.
2.
Type the system, device, or group name and click OK.
3.
In the Properties window, click Apply and then OK.
Configuring The Systems Or Devices
For instructions on configuring the Server Administrator systems using CLI commands, see Configuring Active Directory
Using CLI on Systems Running Server Administrator. For DRAC users, see the Remote Access Controller 4 User’s Guide
or Remote Access Controller 5 User’s Guide. For iDRAC users, see the Integrated Remote Access Controller User's
Guide.
NOTE: The systems on which Server Administrator is installed must be a part of the Active Directory domain and
should also have computer accounts on the domain.
Configuring Active Directory Using CLI On Systems Running Server Administrator
You can use the omconfig preferences dirservice command to configure the Active Directory service. The
productoem.ini file is modified to reflect these changes. If the adproductname is not present in the productoem.ini file, a
default name is assigned.
The default value is system name-software-product name, where system name is the name of the system running Server
Administrator, and softwareproduct name refers to the name of the software product defined in omprv32.ini (that is,
computerName-omsa).
NOTE: This command is applicable only on Windows.
NOTE: Restart the Server Administrator service after you have configured Active Directory.
The following table shows the valid parameters for the command.
Table 22. Active Directory Service Configuration Parameters
name=value pair
Description
prodname=<text>
Specifies the software product to which you want to apply
the Active Directory configuration changes. Prodname
refers to the name of the product defined in omprv32.ini.
For Server Administrator, it is omsa.
enable=<true | false>
true: Enables Active Directory service authentication
support.
false: Disables Active Directory service authentication
support.
adprodname=<text>
Specifies the name of the product as defined in the Active
Directory service. This name links the product with the
Active Directory privilege data for user authentication.
80
Frequently Asked Questions
9
How do I install Server Administrator with only the CLI features?
By choosing not to install the Server Administrator Web Server, you get CLI features only.
What ports do systems management applications use?
The default port used by Server Administrator is 1311. These ports are configurable. For port information of a particular
component, see the User Guide of that respective component.
When I run virtual media on the DRAC controller over a Wide Area
Network (WAN) with low bandwidth and latency, launching
Systems Management Install directly on the virtual media failed,
what do I do?
Copy the web install package to the local system and then launch systems management Install.
Do I need to uninstall the Adaptec Fast Console application
installed on the system before installing the Server Administrator
Storage Management Service?
Yes, if you already have Adaptec Fast Console installed on the system, you must uninstall this application before
installing the Server Administrator Storage Management Service.
Microsoft Windows
How do I fix a faulty installation of Server Administrator?
You can fix a faulty installation by forcing a reinstall and then performing an uninstall of Server Administrator. To force a
reinstall:
1. Find out the version of Server Administrator that was previously installed.
2. Download the installation package for that version.
3. Locate <SysMgmt or SysMgmtx64>.msi and enter the following command at the command prompt to force a
reinstall.
msiexec /i <SysMgmt or SysMgmtx64>.msi REINSTALL=ALL REINSTALLMODE=vomus
4. Select Custom Setup and choose all the features that were originally installed. If you are not sure which features
were installed, select all of them and perform the installation.
NOTE: If you installed Server Administrator in a non-default directory, make sure to change it in Custom Setup
as well.
81
Once the application is installed, you can uninstall it from Add/Remove Programs.
What do I do when the creation of WinRM listener fails with the following error message?
The CertificateThumbprint property must be empty when the SSL configuration
will be shared with another service
This error occurs when the Internet Information Server (IIS) is already installed and configured for HTTPS
communication. Details about coexistence of IIS and WinRM is available at technet.microsoft.com/en-us/library/
cc782312.aspx.
In this case, use the following command to create a HTTPS Listener with the CertificateThumbprint empty:
winrm create winrm/config/Listener?Address=*+Transport=HTTPS
@{Hostname="<host_name>";CertificateThumbprint=""}
What are the firewall-related configuration that needs to be done for WinRM?
With firewall turned ON, WinRM must be added to the firewall exclusion list to allow TCP port 443 for HTTPS traffic.
When launching the Systems Management Install, an error message may display, stating
a failure to load a specific library, a denial of access, or an initialization error. An example
of installation failure during Systems Management Install is "failed to load OMIL32.DLL."
What do I do?
This is most likely due to insufficient Component Object Model (COM) permissions on the system. To remedy this
situation, see the article support.installshield.com/kb/view.asp?articleid=Q104986
The Systems Management Install may also fail if a previous installation of systems management software or some other
software product was unsuccessful. Delete the following temporary windows installer registry, if present:
HKLM\Software\Microsoft\Windows\CurrentVersion\Installer\InProgress
I get a misleading warning or error message during systems management installation.
If you have insufficient disk space on the Windows system drive, you may encounter misleading warning or error
messages when you run systems management Install. Additionally, windows installer requires space to temporarily
extract the installer package to the %TEMP% folder. Ensure that you have sufficient disk space (100 MB or more) on the
system drive prior to running systems management Install.
I am getting the following error message while launching systems management Install:
An older version of Server Administrator software is detected on this system.
You must uninstall all previous versions of Server Administrator applications
before installing this version
If you see this error when trying to launch systems management Install, it is recommended that you run the
OMClean.exe program, under the SYSMGMT\srvadmin\support\OMClean directory, to remove an older version of Server
Administrator on the system.
82
Do I need to uninstall previous versions of Server Administrator before installing Citrix
Metaframe?
Yes. Uninstall previous versions of Server Administrator before installing Citrix Metaframe (all versions). As errors may
exist in the registry after the Citrix Metaframe installation, you must reinstall Server Administrator.
When I run systems management Install, I see unreadable characters on the Prerequisite
check information screen.
When you run systems management Install in English, German, French, or Spanish and get unreadable characters on
the Prerequisite Check Information screen, ensure that the browser encoding has the default character set. Resetting
the browser encoding to use the default character set resolves the problem.
I have installed Server Administrator and Online Diagnostics in the same directory and
Online Diagnostics fails to work, what do I do?
If you have installed Server Administrator and Online Diagnostics in the same directory, Online Diagnostics may fail to
work. On uninstalling Server Administrator, you may also lose all Online Diagnostics files. To avoid this problem, install
Server Administrator and Online Diagnostics in different directories. In general it is recommended not to install more
than one application in the same directory.
I have installed Server Administrator using remote Server Administrator deploy on
Windows Server 2008, I do not see Server Administrator icon on the desktop?
On an initial Server Administrator install using remote Server Administrator deploy (OMSA push) on a server running
Windows Server 2008, the Server Administrator icon is not visible until the desktop is refreshed manually by pressing the
<F5> key.
I see a warning message while uninstalling Server Administrator on Windows Server 2008
as the installer tries to remove the shortcut?
While uninstalling Server Administrator on Windows Server 2008, you might see a warning message as the installer tries
to remove the shortcut. Click OK to continue the uninstallation.
Where can I find the MSI log files?
By default, the MSI log files are stored in the path defined by the %TEMP% environment variable.
I downloaded the Server Administrator files for Windows from the Support website and
copied it to my own media. When I tried to launch the SysMgmt.msi file, it failed. What is
wrong?
MSI requires all installers to specify the MEDIAPACKAGEPATH property if the MSI file does not reside on the root of the
DVD.
This property is set to SYSMGMT\srvadmin\windows\SystemsManagement for the managed system software MSI
package. If you want to make the own DVD you must ensure that the DVD layout stays the same. The SysMgmt.msi file
83
must be located in the SYSMGMT \srvadmin\windows\SystemsManagement. For more detailed information, go to
msdn.microsoft.com and search for
MEDIAPACKAGEPATH Property
Does systems management Install support Windows Advertised installation?
No. Systems management Install does not support Windows Advertised installation - the process of automatically
distributing a program to client computers for installation, through the Windows group policies.
How do I check the disk space availability during custom installation?
In the Custom Setup screen, you must click an active feature to view the hard drive space availability or to change the
installation directory. For example, if Feature A is selected for installation (active) and Feature B is not active, the
Change and Space buttons are disabled if you click Feature B. Click Feature A to view the space availability or to change
the installation directory.
What do I do when I see the current version is already installed message is displayed?
If you upgrade from version X to version Y using MSP and then try to use the version Y DVD (full install), the prerequisite
checker on the version Y DVD informs you that the current version is already installed. If you proceed, the installation
does not run in Maintenance mode and you do not get the option to Modify, Repair, or Remove. Proceeding with the
installation removes the MSP and creates a cache of the MSI file present in the version Y package. When you run it a
second time, the installer runs in Maintenance mode.
What is the best way to use the prerequisite checker information?
The prerequisite checker is available for Windows. See the readme file at SYSMGMT\srvadmin\windows
\PreReqChecker\readme.txt on the Systems Management Tools and Documentation DVD, for detailed information about
using the prerequisite checker.
In the Prerequisite Checker screen, I get the following message. What can I do to resolve
this problem?
An error occurred while attempting to execute a Visual Basic Script. Please
confirm that Visual Basic files are installed correctly.
This error occurs when the prerequisite checker calls the systems management script, vbstest.vbs (a Visual Basic
script), to verify the installation environment, and the script fails. The possible causes are:
•
Incorrect Internet Explorer Security Settings.
Ensure that Tools → Internet Options → Security → Custom level → Scripting → Active scripting is set to
Enable.
Ensure that Tools → Internet Options → Security → Custom level → Scripting → Scripting of Java applets
is set to Enable.
•
Windows Scripting Host (WSH) has disabled the running of VBS scripts. WSH is installed during operating
system installation, by default. On Windows 2003, WSH can be configured to prevent the running of scripts with
a .VBS extension.
a. Right-click My Computer on the desktop and click Open → Tools → Folder Options → File Types .
b. Look for the VBS file extension and ensure that File Types is set to VBScript Script File.
84
c. If not, click Change and choose Microsoft Windows Based Script Host as the application that gets invoked
to run the script.
•
WSH is the wrong version, corrupted, or not installed. WSH is installed during operating system installation, by
default. Download WSH from msdn.microsoft.com.
Is the time shown during installation or uninstallation by Windows Installer Services
accurate?
No. During installation or uninstallation, the Windows Installer Service may display the time remaining for the current
task to complete. This is only an approximation by the Windows Installer Engine based on varying factors.
Can I launch my installation without running the prerequisite checker? How do I do that?
Yes, you can. For example, you can run the MSI of the managed system software, directly from SYSMGMT\srvadmin
\Windows\SystemsManagement. In general, it is not a good idea to bypass the prerequisite checker as there could be
important information that you would not know otherwise.
How do I know what version of systems management software is installed on the system?
Navigate to the Windows Control Panel and double-click Add/Remove Programs and select systems management
software. Select the link for support information.
Do I need to reboot the system after upgrading systems management ?
Upgrade may require a reboot if the files to be upgraded are in use. This is a typical Windows installer behavior. It is
recommended that you reboot the system when prompted.
Where can I see the Server Administrator features that are currently installed on my
system?
Navigate to the Windows Control Panel and double-click Add/Remove Programs to view the Server Administrator
features that are currently installed.
What are the names of all the systems management features under Windows?
The following table lists the names of all systems management features and their corresponding names in Windows.
Table 23. Systems Management Features — Windows
Feature
Name in WIndows
Managed System Services
Server Administrator Instrumentation Service
DSM SA Data Manager
DSM SA Event Manager
Server Administrator
DSM SA Connection Service
DSM SA Shared Services
Server Administrator Storage Management Service
Mr2kserv
85
Feature
Name in WIndows
Remote Access Controller Console (DRAC 4)
Remote Access Controller 4 (DRAC 4)
Red Hat Enterprise Linux or SUSE Linux Enterprise Server
After installing Server Administrator, I cannot log in.
Log out and then log in again to access the Server Administrator Command Line Interface (CLI).
I see the following message when I try to install Server Administrator on a guest Linux
operating system.
./srvadmin-install.sh: line 2295 : [: ==: unary operator expected.
When installing Systems Management components on a guest Linux operating system, the warning message may be
displayed. However, the installation continues and completes without any loss of functionality.
I manually installed my Red Hat Enterprise Linux 4 64-bit operating system and can see
RPM dependencies while installing Server Administrator. Where can I find these
dependent RPM files?
For Red Hat Enterprise Linux, the dependent RPM files are on the Red Hat Enterprise Linux installation media. All other
RPMs are available in the /SYSMGMT/srvadmin/linux/RPMS/supportRPMS\opensource-components directory. To install
or update all the dependent RPM files execute the following command:
rpm –ivh /SYSMGMT/srvadmin/linux/RPMS/ supportRPMS/opensource-components
You can then continue with the Server Administrator installation.
I have performed a non-default install of the Linux operating system using the Linux
operating system media, I see missing RPM file dependencies while installing Server
Administrator?
Server Administrator is a 32-bit application. When installed on a system running a 64-bit version of Red Hat Enterprise
Linux operating system, the Server Administrator remains a 32-bit application, while the device drivers installed by
Server Administrator are 64-bit. If you attempt to install Server Administrator on Red Hat Enterprise Linux (versions 5 and
version 6) for Intel EM64T, ensure that you install the applicable 32-bit versions of the missing RPM file dependencies.
The 32-bit RPM versions always have i386 in the file name extension. You may also experience failed shared object files
(files with so in the file name extension) dependencies. In this case, you can determine which RPM is needed to install
the shared object, by using the RPM --whatprovides switch. For example: rpm -q --whatprovides
libpam.so.0
An RPM name such as pam-0.75-64 could be returned, so obtain and install the pam-0.75-64.i386.rpm. When Server
Administrator is installed on a system running a 64-bit version of Linux operating system, ensure that the compat-libstdc
++-<version>.i386.rpm RPM package is installed. You need to resolve the dependencies manually by installing the
missing RPM files from the Linux operating system media.
NOTE: If you are using later versions of supported Linux operating systems and the RPM files available in the
directory SYSMGMT/srvadmin/linux/RPMS/supportRPMS on the DVD are incompatible, use the latest RPMs from
the operating system media.
86
Where can I find the source packages for Open Source RPMs?
Source packages for Open Source RPMs are available on an orderable DVD image.
What do I do when management station RAC utility installation fails due to missing RPM
file?
During the installation of the management station RAC utility (mgmtst-racadm RPM under /SYSMGMT/
ManagementStation/linux/rac directory on the Systems Management Tools and Documentation DVD), the installation
may fail due to missing RPM file dependencies on libstdc++.so libraries. Install the compat-libstdc++ RPM provided in
the same directory to resolve the dependency and retry the installation.
When using the rpm -e 'rpm -qa | grep srvadmin' command to remove systems
management software, some RPM utility versions may schedule an uninstallation in an
incorrect order, which results in users encountering misleading warning or error
messages. What is the solution?
The solution is to use the systems management uninstall script srvadmin-uninstall.sh, provided on the DVD.
What do I do when I am asked to authenticate using the root user account?
Systems Build and Update Utility adds a script to the root user's .bash_profile file that prompts for the installation of
systems management software. This script may interfere with remote client applications that authenticate using the root
user account on the system, but do not have a means to handle user prompts. To remedy this limitation, edit
the .bash_profile file and comment the line [ ${SHLVL}....
During uninstallation, error: %preun(srvadmin-NAME-X.Y.Z-N.i386) scriptlet failed, exit
status 1 error message is displayed.
There may be problems uninstalling Server Administrator after an unsuccessful upgrade during a manual RPM upgrade.
The following error message is displayed:
error: %preun(srvadmin-NAME-X.Y.Z-N.i386) scriptlet failed, exit status 1
In this case, NAME is a feature name, for example omacore. X.Y.Z-N is the version and build number of the
feature. Some possible solutions to rectify this problem:
1. Attempt to uninstall again. For example, use the following command:
rpm -e srvadmin-NAME-X.Y.Z-N.i386
2. Delete the upgrade.relocation=bad line if present in the /etc/omreg.cfg file and attempt to uninstall again.
Why am I getting a warning concerning the RPM package key during installation?
The RPM files are signed with a digital signature. To avoid this warning, you should mount the media or package, and
import the key using a command such as the following:
rpm --import /mnt/dvdrom/SYSMGMT/srvadmin/linux/RPM-GPG-KEY
87
What are the names of all the Systems Management features under Red Hat Enterprise
Linux or SUSE Linux Enterprise Server?
The following table lists the names of all systems management features and their corresponding init script names under
Red Hat Enterprise Linux and SUSE Linux Enterprise Server operating systems.
Table 24. Systems Management Features — VMware ESX, Red Hat Enterprise Linux, and SUSE Linux Enterprise Server
Feature
Name in VMware ESX, Red Hat Enterprise Linux, and
SUSE Linux Enterprise Server
Managed System Services Feature
Feature init Script Name
DSM SA Device Drivers
DSM SA Data Engine Service
instsvcdrv
dataeng
DSM SA Shared Service
DSM SA Connection Service
dsm_om_shrsvc
dsm_om_connsvc
DSM SM LSI Manager
mptctl
Integrated Remote Access Controller (iDRAC)
None
Remote Access Controller (DRAC 4)
racsvc
Remote Access Controller (DRAC 5)
None
What do the directories under srvadmin/linux/custom/<operating system> contain?
The following table lists the names of the directories in the SYSMGMT/srvadmin/linux/custom/<operating system>
directory.
Table 25. Names of the Directories Under the srvadmin/linux/custom/<operating system> directory
Name of RPM
Description
Other Server Administrator RPMs
required
Server-Instrumentation — This is the core code for Server Administrator. It provides motherboard alerts and contains
the CLI that allows to monitor and control Server Administrator, for example, omconfig, omdiag, and omreport.
All peripheral packages, except the standalone DRAC support, require all or most of the RPMs in this directory to be
installed.
NOTE: You may need to install IPMI drivers for proper functionality.
srvadmin-cm
Server Administrator Inventory
Collector — Systems management
change management inventory
collector.
srvadmin-deng
Server Administrator Data Engine — srvadmin-omilcore
Systems management provides a data
management framework for systems
management software.
srvadmin-hapi
Server Administrator Hardware
srvadmin-omilcore
Application Programming Interface —
This systems management package
88
srvadmin-omilcore, srvadmin-deng,
and srvadmin-omacore
Name of RPM
Description
Other Server Administrator RPMs
required
provides the device drivers and
libraries needed by systems
management software to access
information about the hardware on
supported systems.
srvadmin-isvc
Server Administrator Instrumentation srvadmin-omilcore, srvadmin-deng,
Service — Server Administrator
and srvadmin-hapi
provides a suite of systems
management information for keeping
supported systems on the network
healthy. Server Administrator
Instrumentation Service provides fault
management information, prefailure
information, and asset and inventory
information to management
applications. The Instrumentation
Service monitors the health of the
system and provides rapid access to
detailed fault and performance
information about the hardware on
supported systems. The
Instrumentation Service requires
installation of systems management
device drivers.
srvadmin-omacore
Server Administrator — Systems
management managed mode core
and CLI.
srvadmin-omhip
Server Administrator Instrumentation srvadmin-omilcore, srvadmin-deng,
Service Integration Layer — Provides srvadmin-hapi, srvadmin-isvc, and
Instrumentation CLI.
srvadmin-omacore
srvadmin-omilcore
Server Administrator Install Core —
This is the core install package that
provides the tools necessary for the
rest of the Systems management
install packages. All Server
Administrator RPMs require this RPM.
srvadmin-syscheck
Package that checks the level of
systems management support.
srvadmin-omilcore and srvadmindeng
srvadmin-omilcore
add-iDRAC — Software for remote management of third generation Remote Access Controllers. For example, iDRAC.
srvadmin-idrac-components
Integrated Remote Access Card Data
Populator Remote Access Controller
components.
srvadmin-omilcore, srvadmin-deng,
srvadmin-hapi, and srvadmin-racser
89
Name of RPM
Description
Other Server Administrator RPMs
required
srvadmin-idracadm
iDRAC Command Interface — The
srvadmin-omilcore
command line user interface to the
Integrated Remote Access Controller.
srvadmin-idracdrsc
iDRAC Integration Layer — Integrated srvadmin-omilcore, srvadmin-deng,
Remote Access CLI and Web Plug-in srvadmin-rac4 components, and
to Server Administrator.
srvadmin-omacore
add-RAC4 — Software for remote management of fourth generation Remote Access Controllers. For example, DRAC 4.
srvadmin-rac4-components
Remote Access Card Data Populator
— Remote Access Controller
components.
srvadmin-omilcore, srvadmin-deng,
srvadmin-hapi, and srvadmin-racsvc
srvadmin-racadm4
RAC Command Interface — The
command line user interface to the
Remote Access Controller (RAC).
srvadmin-omilcore
srvadmin-racdrsc4
DRAC 4 Integration Layer — Remote
Access CLI and Web Plugin to Server
Administrator.
srvadmin-omilcore, srvadmin-deng,
srvadmin-rac4 components, and
srvadmin-omacore
srvadmin-racsvc
Remote Access Card Managed Node
— Remote Access Controller (RAC)
services supporting the central
administration of server clusters and
the remote administration of
distributed resources.
srvadmin-omilcore
add-RAC5 — Software for remote management of fifth generation Remote Access Controllers. For example, DRAC 5.
srvadmin-rac5-components
Remote Access Card Data Populator,
DRAC 5 and Remote Access
Controller components, DRAC 5.
srvadmin-omilcore, srvadmin-deng,
and srvadmin-hapi
srvadmin-racadm5
RAC Command Interface — The
command line user interface to the
Remote Access Controller (RAC).
srvadmin-omilcore and srvadmin-hapi
srvadmin-racdrsc5
DRAC 5 Integration Layer — Remote srvadmin-omilcore, srvadmin-deng,
Access CLI and Web Plug-in to Server srvadmin-omacore, and srvadminAdministrator.
rac5 components
add-StorageManagement — Storage Management RAID configuration utility and storage alert software.
srvadmin-storage
Storage Management — Provides
Systems Management Storage
Services.
srvadmin-omilcore, srvadmin-deng,
and srvadmin-omacore
SA-WebServer — Provides web access to manage the server.
srvadmin-hapi
90
Server Administrator Hardware
srvadmin-omilcore
Application Programming Interface —
This systems management package
provides the device drivers and
Name of RPM
Description
Other Server Administrator RPMs
required
libraries needed by systems
management software to access
information about the hardware on
supported systems.
srvadmin-tomcat
Secure Port Server — Systems
Management Managed Node Web
Server package.
srvadmin-omilcore, srvadmin-deng,
srvadmin-omacore, and srvadmin-jre
srvadmin-jre
Server Administrator Sun Java
Runtime Environment — Systems
management managed node Java
runtime.
srvadmin-omilcore, srvadmin-deng,
and srvadmin-omacore
srvadmin-omauth
Provides the authentication files.
srvadmin-omilcore
srvadmin-omcommon
Provides the common framework
required by Server Administrator.
srvdamin-omilcore
srvadmin-omilcore
Server Administrator Web Server
Install Core — This is the core install
package. All Server Administrator
Web Server RPMs require this RPM.
srvadmin-wsmanclient
Operating system specific WSMan
client package.
srvadmin-omcommon and srvadminomauth
Remote-Enablement — Manage and monitor the current system using some other remote system.
srvadmin-cm
Server Administrator Inventory
Collector — Systems management
change management inventory
collector.
srvadmin-omilcore, srvadmin-deng,
and srvadmin-omacore
srvadmin-deng
Server Administrator Data Engine — srvadmin-omilcore
Systems management provides a data
management framework for systems
management software.
srvadmin-hapi
Server Administrator Hardware
srvadmin-omilcore
Application Programming Interface —
This systems management package
provides the device drivers and
libraries needed by systems
management software to access
information about the hardware on
supported systems.
srvadmin-isvc
Server Administrator Instrumentation
Service — Server Administrator
provides a suite of systems
management information for keeping
supported systems on the network
srvadmin-omilcore, srvadmin-deng,
and srvadmin-hapi
91
Name of RPM
Description
Other Server Administrator RPMs
required
healthy. Server Administrator
Instrumentation Service provides fault
management information, prefailure
information, and asset and inventory
information to management
applications. The Instrumentation
Service monitors the health of the
system and provides rapid access to
detailed fault and performance
information about the hardware on
supported systems. The
Instrumentation Service requires
installation of systems management
device drivers.
srvadmin-omacore
Server Administrator — Systems
management managed mode core
and CLI.
srvadmin-omilcore and srvadmindeng
srvadmin-omcommon
Provides Common Framework
required by Server Administrator.
srvadmin-omilcore
srvadmin-omhip
Server Administrator Instrumentation srvadmin-omilcore, srvadmin-deng,
Service Integration Layer — Provides srvadmin-hapi, srvadmin-isvc, and
Instrumentation CLI.
srvadmin-omacore
srvadmin-omilcore
Server Administrator Install Core —
This is the core install package that
provides the tools necessary for the
rest of the Systems management
install packages. All Server
Administrator RPMs require this RPM.
srvadmin-ssa
Enables management of the system
from a remote system on which
Server Administrator Web Server is
installed, using WS-Man interfaces.
srvadmin-omacore, srvadmin-omhip,
and srvadmin-isvc.
srvadmin-syscheck
Package that checks the level of
systems management support.
srvadmin-omilcore
What are the additional components that can be installed on a system that already has
Server Administrator installed?
There are a few additional components that can be installed on a system that already has Server Administrator installed.
For example, you can install Online Diagnostics on a system that has previously been installed with managed system
software. On such a system, while uninstalling Server Administrator, only those RPM packages that are not required by
any of the newly installed components are uninstalled. In the above example, Online Diagnostics requires packages
such as - srvadmin-omilcore-X.Y.Z-N and srvadmin-hapi-X.Y.Z-N. These packages are not uninstalled during an
uninstallation of Server Administrator.
92
In this case, if you try to install Server Administrator later by running the sh srvadmin-install.sh command, the
following message is displayed:
Server Administrator version X.Y.Z is currently installed.
Installed components are:
•
srvadmin-omilcore-X.Y.Z-N
•
srvadmin-hapi-X.Y.Z-N
Do you want to upgrade Server Administrator to X.Y.Z? Press (y for yes| <Enter> to exit):
On pressing <y>, only those Server Administrator packages (in the above example), srvadmin-omilcore-X.Y.Z-N and
srvadmin-hapi-X.Y.Z-N residing on the system are upgraded.
If you have to install other systems management components as well, the sh srvadmin-install.sh command
has to be run once again.
What happens if I install the RPM package on an unsupported system or on an
unsupported operating system?
If you try to install the RPM packages on an unsupported system or an unsupported operating system, you may see
unpredictable behavior during the install, uninstall, or during use of the RPM package. Most of the RPM packages have
been written and tested for supported systems and the Linux versions listed in the readme.
What daemons run on Red Hat Enterprise Linux and SUSE Linux Enterprise Server
operating systems after Server Administrator is started?
The daemons that run on Red Hat Enterprise Linux and SUSE Linux Enterprise Server operating systems depend on what
is installed and what is enabled to run. The following table displays the daemons that typically run for a full install:
Table 26. Daemons that Run on Red Hat Enterprise Linux and SUSE Linux Enterprise Server Once Server Administrator is
Started
Daemon Name
Name in Red Hat Enterprise Linux and SUSE Linux
Enterprise Server
For RPMs in the srvadmin-base directory
dsm_sa_datamgr32d
DSM SA Data Manager — Server Administrator data
manager daemon started by DSM SA Data Engine service.
dsm_sa_eventmgr32d
DSM SA Event Manager — Server Administrator event
and logging daemon started by DSM SA Data Engine
service.
dsm_sa_snmp32d
DSM SA SNMP daemon — Server Administrator SNMP
daemon started by DSM SA Data Engine service.
dsm_om_shrsvc32d
DSM SA Shared Services — Server Administrator core
daemon.
For RPMs in the SA-WebServer directory
dsm_om_connsvc32d
DSM SA Connection Services — Server Administrator
Web server daemon.
For systems that support DRAC 4: add-RAC4
93
Daemon Name
Name in Red Hat Enterprise Linux and SUSE Linux
Enterprise Server
racsvc
DRAC 4 Administrator daemon.
What kernel modules are loaded when Server Administrator is started?
This is dependent on the type of systems instrumentation. The following table displays the kernel modules loaded when
Server Administrator is started.
Table 27. Kernel Modules Loaded When Server Administrator Services are Started
Driver Name
Description
For a system with IPMI
dell_rbu
BIOS Update Driver
ipmi_devintf
IPMI device driver
ipmi_msghandler
IPMI device driver
ipmi_si
IPMI device driver — For systems running Red Hat
Enterprise Linux or SUSE Linux Enterprise Server
For a TVM system
dcdbas
Systems Management Base Driver
dell_rbu
BIOS Update Driver
For an ESM system
dcdbas
Systems Management Base Driver
dell_rbu
BIOS Update Driver
For support of Server Administrator Storage Systems
mptctl
94
Device driver for LSI RAID
10
Linux Installer Packages
This section lists the Linux installer packages.
Table 28. Meta RPMs
RPM
Description
Dependent
packages
srvadmin-base,
srvadmin-idrac,
srvadmin-rac4,
srvadmin-rac5,
srvadminstandardAgent,
srvadminstorageservices,
srvadminwebserver
Required for
Systems Management
Software
6.5
7.0
7.1
7.2
Complete Server
Administrator
features
Y
Y
Y
Y
srvadmin-all
Meta package for
installing all Server
Administrator
features
srvadmin-base
Meta package for
srvadmin-cm,
installing the Server srvadmin-omacore,
Agent
srvadminsmcommon
Server
Instrumentation,
SNMP monitoring,
and Server
Administrator CLI
Y
Y
Y
Y
srvadminstandardAgent
Meta package for
installing the
Standard Server
Agent
srvadmin-cm,
srvadminitunnelprovider,
srvadminsmcommon
Enabling remote
management using
Server
Administrator Web
Server
Y
Y
Y
Y
srvadminwebserver
Meta package for
installing the Server
Administrator Web
Server feature
srvadminsmcommon,
srvadmin-smweb,
srvadmin-tomcat
Server
Y
Administrator Web
Server for local and
remote node
management
Y
Y
Y
srvadminstorageservices
Meta package for
installing the Server
Administrator
Storage Services
feature
srvadmin-cm,
srvadmin-megalib,
srvadminsmcommon,
srvadmin-storage,
srvadmin-storelib,
srvadmin-sysfsutils
Storage
Management using
Server
Administrator
GUI/CLI
Y
Y
Y
Y
95
RPM
Description
Dependent
packages
Required for
Systems Management
Software
6.5
7.0
7.1
7.2
srvadmin-rac4
Meta RPM for RAC4 srvadmin-omilcore,
components
srvadmin-raccomponents,
srvadmin-rac4populator,
srvadmin-racadm4,
srvadmin-racdrsc,
srvadmin-racsvc
RAC 4 management Y
using Server
Administrator GUI/
CLI, RAC4 tools
Y
Y
Y
srvadmin-rac5
Meta RPM for RAC5 srvadmin-isvc,
components
srvadmin-omilcore,
srvadmin-raccomponents,
srvadmin-racadm4,
srvadmin-racadm5,
srvadmin-racdrsc
RAC 5 management Y
using Server
Administrator GUI/
CLI, RAC5 tools
Y
Y
Y
srvadmin-idrac
Meta RPM for
iDRAC components
srvadmin-argtable2,
srvadmin-deng,
srvadmin-idracivmcli, srvadminidrac-vmcli,
srvadmin-idracadm,
srvadmin-isvc,
srvadminomcommon,
srvadmin-omilcore,
srvadmin-raccomponents,
srvadmin-racadm4,
srvadmin-racdrsc
iDRAC management Y
using Server
Administrator GUI/
CLI, iDRAC tools
Y
Y
Y
srvadmin-serversnmp
Meta package that
contains
dependency
information to
automatically pull in
the Server
Administrator
Server SNMP
feature
srvadminbase,srvadmindeng-snmp,
srvadmin-isvcsnmp
Server SNMP
feature
N
N
N
Y
Server CLI feature
N
N
N
Y
srvadmin-server-cli Meta package that srvadmin-base,
contains
srvadmin-omacore
dependency
information to
automatically pull in
the Server
96
RPM
Description
Dependent
packages
Required for
Systems Management
Software
6.5
7.0
7.1
7.2
Administrator
Server CLI feature
srvadminstorageservicessnmp
Meta package that storageservices,
contains
srvadmin-storagedependency
snm
information to
automatically pull in
the Server
Administrator
Storage SNMP
feature
Storage SNMP
feature
N
N
N
Y
srvadminstorageservices-cli
Meta package that storageservices ,
contains
srvadmin-storagedependency
cli
information to
automatically pull in
the Server
Administrator
Storage CLI feature
Storage CLI feature
N
N
N
Y
Table 29. Server Instrumentation and SNMP monitoring
RPM
Description
OM
Dependant
packages
Required for
Systems Management Software
6.5
7.0
7.1
7.2
srvadminomilcore
Core Install pciutils,smbi
package that os-utils-bin
provides
tools for the
systems
management
install
packages
Installing
Y
and
functioning
of Server
Administrato
r
Y
Y
Y
srvadmindeng
Data Engine srvadminstores and
omilcore
manages
objects for
systems
management
Server
Y
Instrumentati
on and
SNMP
monitoring
Y
Y
Y
srvadminhapi
Provides
None
low-level
hardware
interface for
systems
management
Server
Y
Instrumentati
on
Y
Y
Y
97
RPM
Description
OM
Dependant
packages
Required for
srvadmindeng,
srvadminomilcore
srvadminisvc
Provides
systems
management
interface to
local and
remote
systems
management
libsmbios
Provides
None
SMBIOS
library to get
standard
BIOS tables
smbios-utils- Provides
bin
SMBIOS
Utility to get
system
information
None
Systems Management Software
6.5
7.0
7.1
7.2
Server
Y
Instrumentati
on and
SNMP
monitoring
Y
Y
Y
Installation
Y
and software
updates
Y
Y
Y
Installation
Y
Y
Y
Y
Table 30. Packages needed for local management that are used by GUI and CLI components
RPM
Description
OM
Dependant
packages
Required for
Systems Management Software
6.5
7.0
7.1
7.2
srvadminomcommon
Common
framework
or libraries
for GUI/CLI
srvadminomilcore
Server
Y
Administrato
r GUI/CLI
Y
Y
Y
srvadminomacore
Provides
srvadminplugins that omilcore
act as
interfaces
between
back end
and GUI/CLI.
Also
provides OM
CLI tools.
Server
Y
Administrato
r GUI/CLI and
infrastructur
e for
software
updates
Y
Y
Y
srvadminxmlsup
XML support None
library
Server
Y
Administrato
r GUI/CLI
Y
Y
Y
srvadminlibxslt
XSLT support None
library *
Applicable
Server
Y
Administrato
r GUI/CLI
Y
Y
Y
98
RPM
Description
OM
Dependant
packages
Required for
Systems Management Software
6.5
7.0
7.1
7.2
on VMware
ESX only
srvadmin-cm Change
srvadminManagement omacore
NOTE:
inventory
On a
collector.
scripted
Feeds
install,
software
srvadmi
inventory
n-cm is
data to
installed
management
on 32bit
station
operatin
applications
g
systems
only. If
required
on a
64bit
operatin
g
system,
manuall
y install
the
same.
Software
inventory
and updates
Y
Y
Y
Y
srvadminoslog
Management srvadmininterface
omilcore
Replicating
N
Server
Administrato
r Events in
OS Log
N
N
Y
srvadminomacs
Server
srvadminAdministrato omcommon
r OMACS
srvadminomilcore
Common
N
services
bundled in
helper library
N
N
Y
srvadminominst
Server
None
Administrato
r Core
Server
N
Instrumentati
on
Components
N
N
Y
99
Table 31. Server Administrator Web Server (GUI) for Local and Remote Management
RPM
Description
Dependant
packages
Required for
srvadmin-jre Provides
JAVA
Runtime for
web server
srvadminomilcore
srvadminiws
Server
Administrato
r Web server
and GUI
package
srvadmintomcat
Systems Management Software
6.5
7.0
7.1
7.2
Server
Y
Administrato
r GUI
Y*
Y
Y
srvadminServer
Y
omilcore,
Administrato
srvadminr GUI
omcommon,
srvadmin-jre,
openwsmanclient,
libwsman1
Y*
O***
N
Server
srvadmin-jre, Server
N
Administrato srvadminAdministrato
r Web server omcommon, r GUI
srvadminomilcore
N
Y
Y
openwsman- Openwsman
client
client
libraries
None
Server
Y*
Administrato
r GUI to
manage
remote
nodes using
WSMAN
Y
Y
Y
libwsman1
None
Openwsman
support
library
Y
Y
Y
Openwsman
libraries
used by
client and
server
components
Y**
* — Not applicable for OM 7.0 supplemental pack for Citrix Xen 6.0.
** — Should be installed from the OS media for RHEL6 and SLES11.
*** — Obsolete and replaced with srvadmin-tomcat
Table 32. Server Administrator Remote Enablement (Standard Agent)
RPM
Description
srvadminThe Small
itunnelprovid Footprint
er
CIM Broker
(SFCB)
100
OM
Dependant
packages
Required for
Systems Management Software
libcmpiCppI
mpl0,
openwsmanserver,
Enabling
Y
remote
management
of server
6.5
7.0
7.1
7.2
Y
Y
Y
RPM
Description
OM
Dependant
packages
Required for
Systems Management Software
6.5
7.0
7.1
7.2
Y
Y
Y
Y
provider that sblim-sfcb
enables
sblim-sfcc
remote
management
of the server
libwsman1
Openwsman
libraries
used by
client and
server
components
None
Openwsman
support
library
openwsman- Openwsman None
server
server and
service
libraries
*N/A on
VMware ESX
Enabling
Y*
remote
management
of server
Y
Y
Y
sblim-sfcb
Small
None
Footprint
CIM Broker
(sfcb) - CIM
server
conforming
to the CIM
Operations
over HTTP
protocol.
*N/A on
VMware ESX
Enabling
Y*
remote
management
of server
Y
Y
Y
sblim-sfcc
Small
None
Footprint
Common
Information
Model (CIM)
Client Library
(sfcc)
Runtime
Libraries
*N/A on
VmWare ESX
Enabling
Y*
remote
management
of server
Y
Y
Y
libcmpiCppI
mpl0
Provides
None
helper library
to implement
Common
Manageabilit
Enabling
Y
remote
management
of server
Y
Y
Y
101
RPM
Description
OM
Dependant
packages
Required for
Systems Management Software
6.5
7.0
7.1
7.2
y
Programmin
g Interface
(CMPI) C++
plugins into
SFCB *N/A
on VmWare
ESX
* — Should be installed from the OS media for RHEL6 and SLES11.
Table 33. Storage Instrumentation, SNMP Monitoring, GUI and CLI Plugins
RPM
Description
OM
Dependant
packages
srvadminrealssd*
Required for
Systems Management Software
6.5
7.0
7.1
7.2
Meta
None
package for
* For Red Hat installing
Enterprise
management
Linux 6.0 and libraries for
SUSE Linux PCIeSS
Enterprise
Devices
Server 11
Peripheral
N
Component
Interconnect
Express
Solid State
(PCIeSS)
Devices
management
Y
Y
Y
srvadminstorage
Core
interface
library for
storage
management
Storage
Y
instrumentati
on, SNMP
monitoring
and CLI (for
storage
management
)
Y
Y
Y
srvadminstorelib
LSI utility
srvadminlibraries for storelibstorage
sysfs
management
Storage
Y
instrumentati
on
Y
Y
Y
srvadminstorelibsysfs
Provides
library for
interfacing
with the
kernel's sys
filesystem.
Used by LSI
Storage
Y
instrumentati
on
Y
Y
Y
102
srvadmindeng,
srvadminisvc,
srvadminmegalib,
srvadminomilcore,
srvadminsmcommon,
srvadminstorelib
None
RPM
Description
OM
Dependant
packages
Required for
Systems Management Software
6.5
7.0
7.1
7.2
storelib
libraries
*N/A for
VMware ESX
srvadminsysfsutils
Provide
None
utilities for
interfacing
with sysfs
file system.
Used by the
storage
management
libraries
Storage
Y
instrumentati
on
Y
Y
Y
srvadminmegalib
LSI utility
None
libraries for
storage
management
of PERC 4
controllers.
*N/A for 64bit OMSA
installation,
and VMware
ESX.
Storage
Y
instrumentati
on of PERC 4
controllers
Y
Y
Y
srvadminsmcommon
Common
None
framework
or libraries
for GUI/CLI
(for storage
management
)
Storage
Y
management
using Server
Administrato
r GUI/CLI
Y
Y
Y
srvadminsmweb
GUI plugins srvadminfor storage
omcommon,
management srvadminsmcommon
Storage
Y
management
using Server
Administrato
r GUI
Y**
Y
Y
srvadminstorage-cli
Storage
srvadminManagement storage
CLI Interface
CLI interface N
access for
Storage
Managemen
t
N
N
Y
srvadminstoragesnmp
Storage
srvadminManagement deng-snmp,
CLI Interface
Storage
related
SNMP
N
N
Y
N
103
RPM
Description
OM
Dependant
packages
Required for
srvadminstorage
queries and
SNMP Traps
Systems Management Software
6.5
7.0
7.1
7.2
srvadmindeng-snmp
Server
srvadminAdministrato deng
r SNMP
Framework
Server
N
Administrato
r SNMP
Framework
N
N
Y
srvadminisvc-snmp
Server
SNMP
module
Server and
N
Operating
System
related
SNMP
Queries and
SNMP Traps
N
N
Y
srvadminhapi,
srvadminisvc
* — Obsolete - merged with srvadmin-storage
** — Not applicable for OM 7.0 supplemental pack for Citrix Xen 6.0.
Table 34. RAC Instrumentation, SNMP Monitoring, GUI and CLI Plugins
RPM
Description
OM
Dependant
packages
Required for
Systems Management Software
6.5
7.0
7.1
7.2
srvadminracsvc
RAC services setserial,
to manage
srvadminDRAC 4
omilcore
DRAC 4
Y
instrumentati
on
Y
Y
Y
srvadminraccomponents
RAC data
None
populator for
DRAC 4
DRAC 4
Y
instrumentati
on and
SNMP
monitoring
Y
Y
Y
srvadminracadm4
Provides CLI None
tools for
DRAC 4
administratio
n
RAC CLI tools Y
for DRAC 4
Y
Y
Y
srvadminrac5components
RAC Data
srvadminpopulator for omilcore,
DRAC 5
srvadminhapi,
srvadmindeng
DRAC 5
N
instrumentati
on and
SNMP
monitoring
N
N
Y
srvadminracadm5
Provides CLI
tools for
DRAC 5
RAC CLI tools Y
for DRAC 5
Y
Y
Y
104
srvadminhapi,
srvadminomilcore
RPM
Description
OM
Dependant
packages
Required for
Systems Management Software
6.5
7.0
7.1
7.2
administratio
n
srvadminidrac7
RAC data
srvadminpopulator for argtable2,
iDRAC7
srvadmindeng,
srvadminidrac-vmcli,
srvadminidracadm7,
srvadminisvc,
srvadminomcommon,
srvadminomilcore,
srvadminraccomponents,
srvadminracadm4,
srvadminracdrsc
iDRAC7
N
instrumentati
on and
SNMP
monitoring
N
Y
Y
srvadminidracadm
Provides CLI
tools for
iDRAC
administratio
n
srvadminargtable2,
srvadminomilcore
RAC CLI tools Y
for iDRAC
Y
Y
Y
srvadminidracadm7
Provides CLI
tools for
iDRAC7
administratio
n
srvadminargtable2
srvadminomilcore
RAC CLI tools N
for iDRAC7
N
Y
Y
srvadminracdrsc
RAC CLI and None
Web Plugin
to Server
Administrato
r for RAC 4, 5
and iDRAC
RAC
Y
management
using Server
Administrator
GUI/CLI
Y
Y
Y
srvadminraccomponents
RAC SNMP
components
for RAC 4, 5
and iDRAC
RAC
Y
instrumentati
on and
SNMP
monitoring
Y
Y
Y
None
105
RPM
Description
OM
Dependant
packages
Required for
Systems Management Software
6.5
7.0
7.1
7.2
srvadminrac4populator-
RAC Data
srvadminpopulator for omilcore
DRAC 4
DRAC 4
Y
instrumentati
on
Y
Y
Y
srvadminargtable2
Library for
None
parsing GNU
style
command
line
argument.
Used by RAC
5 and iDRAC
packages
RAC CLI tools Y
for RAC 5 and
iDRAC
management
Y
Y
Y
srvadminidrac-ivmcli
Provides CLI None
tools that
provide
virtual media
features
from the
management
station to the
iDRAC in the
remote
modular
system
RAC CLI tools Y
for virtual
media
feature
Y
Y
Y
srvadminidrac-vmcli
Provides CLI None
tools that
provide
virtual media
features
from the
management
station to the
iDRAC in the
remote Rack
and Tower
system
RAC CLI tools Y
for virtual
media
feature
Y
Y
Y
106