1
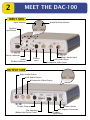
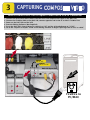
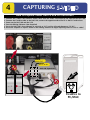
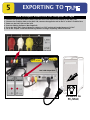
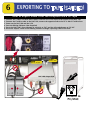
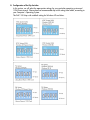
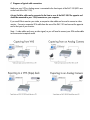
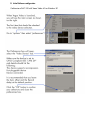
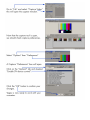
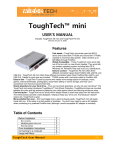
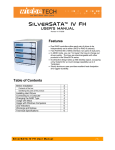
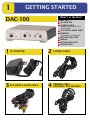
1
GETTING STARTED
DAC-100
What’s in the Box?
DAC-100
AC ADAPTER
S-VIDEO CABLE
(REQUIRES RED & WHITE RCA
AUDIO CABLE)
RCA VIDEO & AUDIO CABLE
FIREWIRE
(6 PIN MALE TO 6 PIN MALE)
INSTALLATION GUIDE
MANUAL
REGISTRATION CARD
SUPPORT INFO
1 AC ADAPTER
2 S-VIDEO CABLE
3
4
RCA VIDEO & AUDIO CABLE
FIREWIRE CABLE
6 PIN MALE TO 6 PIN MALE
2
MEET THE DAC-100
INPUT SIDE
Audio Bit Rate Selector
Input Selector
FireWire
Input/Output
Source Indicator
Audio
Bit Rate Indicator
S-Video
Input
Right Audio Input
Left Audio Input
Composite Video Input
OUTPUT SIDE
Right Audio Output
Left Audio Output
Composite Video Output
S-Video Output
Dip Switches
(Behind the Plastic Cover)
Power Switch
AC Adapter Connector
FireWire
Input/Output
3
CAPTURING
How to connect DAC-100 to capture Video from a VCR or Camcorder
1.
2.
3.
4.
5.
6.
Connect the RCA Video/audio cables from the VCR’s Line output to the input on the DAC-100.
Connect the FireWire cable to the DAC-100, connect opposite end to the PC or Mac’s FireWire Port.
Power on the DAC-100 and the VCR.
Start the Editing Software. (Not Supplied)
Press the DAC-100’s Source Button to switch it to “AV” and the A Encode Button to “16 bit”.
Go to the “Capture or Import” mode on the Editing software to begin capturing video to a PC or a MAC
PRESS
Set to “AV”
PRESS
Set to “16 bit”
Side
Input
DAC-100
FRONT
(Input)
ire
SOURCE
A ENCODE
W
re
i
F
FireWire to
PC/MAC
4
CAPTURING
How to capture Video from a VCR or Camcorder
1.
2.
3.
4.
5.
6.
Connect the S-Video cable and RCA audio cables from the VCR’s Line output to the input on the DAC-100.
Connect the FireWire cable to the DAC-100, connect the opposite end to the PC or Mac’s FireWire Port.
Power on the DAC-100 and the VCR.
Start the Editing Software. (Not Supplied)
Press the DAC-100’s Source Button to switch it to “AV” and the A Encode Button to “16 bit”.
Go to the “Capture or Import” mode on the Editing software to begin capturing video to a PC or a MAC.
PRESS
Set to “AV”
PRESS
Set to “16 bit”
DAC-100 Input Side
SOURCE
ire
eW
A ENCODE
S-Video
r
Fi
FireWire to
PC/MAC
5
EXPORTING TO
How to Export Video from the computer to Tape
1.
2.
3.
4.
5.
6.
Connect the RCA Video/audio cables from the VCR’s Line input to the output on the DAC-100.
Connect the FireWire cable to the DAC-100, connect the opposite end to the PC or Mac’s FireWire Port.
Power on the DAC-100 and the VCR.
Start the Editing Software. (Not Supplied)
Press the DAC-100’s Source Button to switch it to “DV” and the A Encode Button to “16 bit”.
Go to the “Export” mode on the Editing software to begin exporting video to the VCR.
PUSH
Set to “16 bit”
PUSH
Set to “AV”
DAC-100 Output Side
ire
SOURCE
A ENCODE
W
re
i
F
FireWire to
PC/MAC
6
EXPORTING TO
(
)
How to Export Video from the computer back to Tape
1.
2.
3.
4.
5.
6.
Connect the S-Video and RCA audio cables from the VCR’s Line input to the output on the DAC-100.
Connect the FireWire cable to the DAC-100, connect the opposite end to the PC or Mac’s FireWire Port.
Power on the DAC-100 and the VCR.
Start the Editing Software. (Not Supplied)
Press the DAC-100’s Source Button to switch it to “DV” and the A Encode Button to “16 bit”.
Go to the “Export” mode on the Editing software to begin exporting video to the VCR.
Set to “16 bit”
PUSH
Set to “16 bit”
PUSH
Set to “AV”
REAR VIEW
DAC-100 Output Side
SOURCE
A ENCODE
ire
W
re
Fi
FireWire to
PC/MAC
DAC-100 Quick Setup with Vegas Video on Windows XP
This setup guide will cover four specific areas:
A. Explanation of the DAC-100 Dip Switches
B. Configuration of the dip switches
C. Diagrams of typical cable connections
D. Initial Software configuration
A. Explanation of the DAC-100 Dip Switches
The DAC-100 has dip switches to customize the converter for your hardware and software. The
DAC-100 is sold throughout the world, so dip switch settings can be changed to accommodate
different regions and different firewire devices.
The diagram below explains what each dip switch controls within the DAC-100.
B. Configuration of the Dip Switches
In this section, we will select the appropriate settings for your particular operating system and
1394/firewire card. Please choose a recommended dip switch setting from below, according to
your Computer’s Operating System.
The DAC-100 ships with a default setting for Windows XP and Macs.
C. Diagrams of typical cable connections
Make sure your VCR or Analog source is connected to the front inputs of the DAC-100 (LED’s are
on the front of the DAC-100).
A 6-pin FireWire cable can be connected to the front or rear of the DAC-100. The opposite end
should be connected to your 1394/connector on your computer.
If you would like to monitor your video, a composite video cable can be used to connect a video
monitor. Connect a composite RCA cable from the rear of the DAC-100 and connect the opposite
end to the input of your monitor.
Note: S-video cables only carry a video signal, so you will need to connect your RCA audio cables
to the converter to capture sound.
D. Initial Software configuration
Configuring a DAC-100 with Vegas Video 4.0 on Windows XP