1
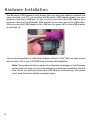
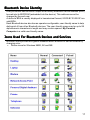
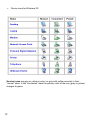
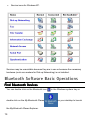
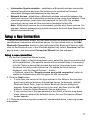
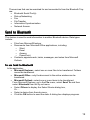
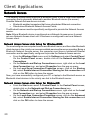
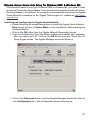
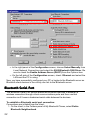
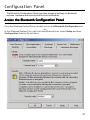
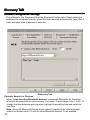
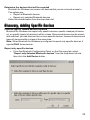
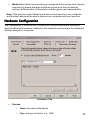
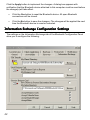
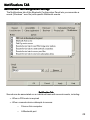
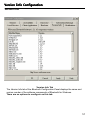
DBT-120
Bluetooth USB Adapter
Rev.2.0 (08/27/2002)
2
Contents
Introduction.....................................5
Package Contents..............................6
Installing Bluetooth Software ............6
Hardware Installation ........................8
Introduction to Bluetooth Software ....9
Bluetooth Software Basic Operations. 14
Client Applications ......................... 20
Local Services................................. 29
Configuration Panel ........................ 31
Security ......................................... 52
Troubleshooting.............................. 56
3
4
Introduction
Introduction to Bluetooth
The term “Bluetooth” refers to a worldwide standard for the wireless
exchange of data between two devices within a short range. In order to
exchange data, two Bluetooth devices must establish a connection. Before
a connection is established, one device must request a connection with
another, where the second device accepts (or rejects) the connection. The
originator of the request is known as the client. The device that accepts (or
rejects) the request is known as the server. Many Bluetooth devices can act
as both client and server. A client Bluetooth device runs a software program
that requests a connection to another device as part of its normal operation.
For example, the program may request a connection to a remote computer,
a printer, or a modem.
Becoming a Bluetooth client normally requires an action by the device
operator, such as an attempt to browse a remote computer, print a file, or
dial out on a modem. Every Bluetooth device that provides a service must
be prepared to respond to a connection request. Bluetooth software is
always running in the background on the server, ready to respond to
connection requests.
Introduction to the D-Link Bluetooth USB Adapter
The D-Link Bluetooth USB Adapter is the best solution for quick and easy
access to Bluetooth enabled devices without cables or wires. It is a class 2/
3 low power device. The wireless transmission range of the D-Link Bluetooth
USB Adapter is about 15 Meter (45 feet). APC configured as the Bluetooth
server can support up to 7 Bluetooth client devices with IP addresses automatically assigned whenthey connect.
After finishing the steps outlined in this manual, you will have the ability to
share information, obtain network access and take the full advantage of a
"connected" environment.
5
Package Contents
After opening the D-Link Bluetooth Adapter package, check what’s in the package,
then refer to the Installation Guide for the fastest way to get up and running with the
Bluetooth USB Adapter.
The following items should be found in the Bluetooth USB Adapter box:
• D-Link DBT-120 Bluetooth USB Adapter
• USB Extension Cable
• Installation CD with Manual & Software
• Installation Guide
Installing Bluetooth Software
Uninstalling a previous version of Bluetooth software:
If you are installing the Bluetooth software for the first time, please skip this
section.
Any previous versions of the Bluetooth software must be uninstalled before installing
an upgraded version.
Please uninstall the software by completing these steps:
1) Close any open programs and insert the Driver CD into your CD-ROM Drive.
2) The Autorun screen will appear. Click on Install Bluetooth Software.
3) The Welcome screen informs you the previous version of BTW you have
installed. Click on the Next button to continue.
4) Click on the Remove button from “Remove the Program” screen.
5) When the files have been removed, you will be presented with a screen
informing of its completion.
a. Click on the Finish button, a pop-up dialog box will show on the
screen.
b.Click on the Yes button to reboot your PC.
You have now completely uninstalled the previous version of the Bluetooth software.
6
Installing the Bluetooth software:
Be sure to install the Bluetooth software prior to plugging in the USB
Adapter to a USB port. If you have connected the Bluetooth adapter to your
computer, please remove it, cancel any hardware wizards that may show
up, restart your computer and start here.
1) Close any open programs and insert the Driver CD into your CD-ROM Drive.
2) The Autorun screen will appear. Click on Install Bluetooth Software.
3) The Welcome screen informs you that the WIDCOMM Bluetooth Software
Setup program is ready to begin. Click on the Next button.
4) In the License Agreement screen, click on the radio button to the left of I
accept the terms in the license agreement. Click on the Next button.
5) In the Device Information screen:
a. Enter a device name
b. Select a device type
c. Click on the Next button.
6) In the Destination Folder screen you are asked to confirm the Destination
Folder for the application software. If you would like, you may change the
destination folder to another location as the directory. Click on the Next button.
7) The Ready to Install the Program screen informs you that the driver is ready for
installation. Click on the Install button to continue.
Note: Please click on the OK button from the Driver Signature Notice dialog
box to proceed with driver installation in Windows 2000 and XP operating
systems.
8) When the files have been copied, you will be presented with a screen informing
of its completion.
a. Click on the Finish button, a pop-up dialog box will show on the screen.
b. Click the Yes button to reboot your PC.
9) After you reboot your PC, the Bluetooth Icon
system tray.
will reside in the Windows
7
Hardware Installation
The Bluetooth USB Adapter is plug-&-play. After you have the software installed and
have rebooted your PC, you can plug the Bluetooth USB Adapter directly into your
laptop’s or desktop’s USB port. Or you can plug one end of the USB cable to your
computer and plug the Bluetooth USB Adapter to the other end of the USB cable.
When you plug the USB Adapter to the USB port, the green LED on the USB Adapter
should light up.
You may be prompted by a “Add New Hardware Wizard”, Click “Next” on each screen
with the driver CD in your CD-ROM drive to finalize the installation.
Note: The system will show a series of configuration messages in the Windows
system tray only when you have the software and hardware installed for the first
time. When you unplug and plug the USB Adapter subsequently, the system
won’t show the above bubble messages again.
8
Introduction to Bluetooth Software
The Bluetooth Software is the solution for the seamless integration of Bluetooth
technology into personal computers. The software provides an easy interface to
manage the Bluetooth Adapter.
Introduction to Bluetooth Software
Most Bluetooth-enabled devices have the capability to act as:
• A Bluetooth server—these devices provide one or more services, such as
access to the Internet, to other Bluetooth devices.
• A Bluetooth client—these devices use the service(s) provided by Bluetooth
servers.
Bluetooth devices that can act as both server and client can often do both at the
same time.
The Bluetooth software provides:
• Clients with the means:
o To locate other Bluetooth devices in the immediate vicinity (inquiry)
o Discover the services that those devices offer (discovery)
o Connect to, use, and disconnect from those services.
• Servers with the means to include/exclude individual services in the list of
services they provide to clients.
• Extensive security, including:
o Authorization
o Authentication
o Encryption
9
The services supported by Bluetooth Software are:
• Bluetooth Serial Port - establishes a Bluetooth wireless connection
between two devices. The connection may be used by applications as
though a physical serial cable connected the devices.
• Dial-up Networking - allows a Bluetooth client to use a modem that is
physically attached to the Bluetooth server.
• Fax - allows a Bluetooth client to wirelessly send a fax using a device that is
physically attached to the Bluetooth server.
• File Transfer - establishes a Bluetooth wireless connection that allows your
computer to perform file system operations on another Bluetooth-enabled
device—browse, drag/drop, open, print, cut/copy, paste, delete, rename,
etc.
• Information Exchange - establishes a Bluetooth wireless connection
between two devices so that they can exchange personal information
manager data such as business cards, calendar items, email messages,
and notes.
• Information Synchronization - establishes a Bluetooth wireless connection
between two devices and uses the connection to synchronize Personal
Information Manager data between the two devices.
• Network Access - establishes a Bluetooth wireless connection between the
client and a server that is physically connected to the Local Area Network. If
the client has permission (user name and password for the LAN), the
wireless connection can be used as if the client were hardwired to the LAN.
Note: All Bluetooth servers do not necessarily provide all of these services.
To determine the services provided by a Bluetooth device:
1. On the client, in the Folders panel of My Bluetooth Places, select Entire
Bluetooth Neighborhood.
2. In the right panel of Entire Bluetooth Neighborhood, right-click anywhere except
on a device name and select Refresh from the pop-up menu.
3. In the Folders panel of My Bluetooth Places, right-click a device and select
Discover Available Services from the pop-up menu to update the available
services list. The available services will be displayed in the right panel of My
Bluetooth Places.
10
Bluetooth Device Identity
Every Bluetooth device has an unique 48-bit binary Bluetooth Device Address (BDA)
burned into its EEPROM (embedded into the device). This address cannot be
changed by the end-user.
A device’s BDA is usually displayed in hexadecimal format; 00:D0:B7:03:2E:9F is a
valid BDA.
Each Bluetooth device also has an operator-configurable, user-friendly name to help
distinguish it from other Bluetooth devices. The user-friendly name may be up to 99
alphanumeric characters in length and may contain spaces. My Personal
Computer is a valid user-friendly name.
Icons Used For Bluetooth Devices and Services
Bluetooth icons provide at-a-glance feedback about a device or service’s status by
changing color.
• Device icons for Windows 98SE, 2K and ME.
11
•
Device icons for Windows XP.
Service icons are gray or yellow in color (or gray with yellow accents) in their
“normal” state. In the “connected” state the primary color of the icon (gray or yellow)
changes to green.
12
•
Service icons for Windows 98SE, 2K and ME.
13
•
Service icons for Windows XP.
Services may be unavailable because they are in use or because the necessary
hardware (such as a modem for Dial-up Networking) is not installed.
Bluetooth Software Basic Operations
Find Bluetooth Devices
You can double click on the Bluetooth icon
double click on the My Bluetooth Places
the My Bluetooth Places Explorer.
14
in the Windows system tray or
on your desktop to launch
Bluetooth Software Explorer
Open the Bluetooth menu from the above screen and select Search for Devices.
The system will start to look for Bluetooth devices in the vicinity and display the
devices it finds in the right panel of My Bluetooth Places.
The Bluetooth Software can be configured to automatically search for devices on a
regular basis. From Configuration Panel/Discovery Tab, check the box of “Look for
other Bluetooth devices”. You can set a searching time so that the device will
search other Bluetooth devices at a regular time.
Note: If you find that some devices are within connection range but do not show up
in the list of devices found, the possible causes are:
• Your device is configured to report only specific types or classes of devices
• The unlisted device is configured to be non-discoverable
15
Find a Service
In the Folders panel of My Bluetooth Explorer, right-click on the device name and
select Discover Available Services from the pop-up menu. The services the device
provides will show up in the right panel.
In the Folders panel of My Bluetooth Explorer, right-click on the device name and
select Discover Available Services from the pop-up menu. The services the
device provides will show up in the right panel.
Bluetooth Software Explorer – Available Services
16
The services supported by Bluetooth software are:
• Bluetooth Serial Port - establishes a Bluetooth wireless connection between
two devices. The connection may be used by applications as though a physical
serial cable connected the devices.
• Dial-up Networking - allows a Bluetooth client to use a modem that is
physically attached to the Bluetooth server.
• Fax - allows a Bluetooth client to wirelessly send a fax using a device that is
physically attached to the Bluetooth server.
• File Transfer - establishes a Bluetooth wireless connection that allows your
computer to perform file system operations on another Bluetooth-enabled
device—browse, drag/drop, open, print, cut/copy, paste, delete, rename, etc.
• Information Exchange - establishes a Bluetooth wireless connection between
two devices so that they can exchange personal information manager (PIM) data
such as business cards, calendar items, email messages, and notes.
•
•
Information Synchronization - establishes a Bluetooth wireless connection
between two devices and uses the connection to synchronize Personal
Information Manager data between the two devices.
Network Access - establishes a Bluetooth wireless connection between the
client and a server that is physically connected to the Local Area Network. If the
client has permission (user name and password for the LAN), the wireless
connection can be used as if the client were hardwired to the LAN.
Note: All Bluetooth servers do not necessarily provide all of these services. For
example, network gateways only provide access to the Local Area Network (the
Network Access service).
Setup a New Connection
Through the connection wizard, you can walk through the process of setting up a
new Bluetooth connection with another device. You can double click on the Add
Bluetooth Connection shortcut in the right panel of My Bluetooth Places or rightclick on the Bluetooth icon in the Windows system tray, select Services from the
pop-up menu, and then select Connection Wizard from the submenu.
Setup a new connection
1. On the first Connection Wizard screen:
a) In the Select a Service drop-down menu, select the type of connection that
will be established. (The specific service will be selected later, if necessary.)
b) In the “Select a device that provides the service” drop-down menu, select
the device that will provide the service. (To update the list of devices
displayed, click the Search Devices… button.)
c) Optional: select the “Require secure encrypted connection” option to
enable an Authentication and Encryption for this connection.
2. Click the Next button:
• If more than one service of the type selected in the Select a Service dropdown menu (above) exists on the selected device, for example, multiple
Bluetooth Serial Ports, then the Select Bluetooth Service dialog box
appears. Select the specific service to be used, and then click the OK
button to close the Select Bluetooth Service dialog box.
• If only one service of the type selected in the Select a Service drop-down
menu (above) exists on the selected device, the next Connection Wizard
screen appears.
3. If “Require secure encrypted connection” was selected above, a security screen
may appear:
17
•
To establish a paired relationship with the remote device while using this
wizard, enter your Personal Identification Number in the PIN Code field of the
security screen, and then click the Next button.
• To establish the paired relationship with the remote device the first time this
connection is used, leave the PIN Code field blank in the security screen,
and click the Next button.
• Note: The Security screen WILL NOT appear if the devices have been
paired.
4. On the last Connection Wizard screen:
• The top of the screen provides basic information about the new connection—
the name of the device that will provide the service and the name of the
service that will be provided. If this information is NOT correct, click the
Back button to return to the previous screen, and from that screen select
the correct service and device.
• In the “Connection Name:” field, enter a descriptive name for the connection,
for example, “BT Serial Connection to Andy’s Desktop.”
Bluetooth Tray
The Bluetooth Tray icon
resides in the Windows System Tray, which is
normally located in the lower-right corner of the screen. Bluetooth Tray provides fast
access to many routine Bluetooth operations.
From the Bluetooth Tray you can:
• Access My Bluetooth Places - double-click the Bluetooth icon.
• Access the Bluetooth Configuration Panel - right-click the Bluetooth
icon, select Setup, and then select Configuration from the submenu.
• Access the Bluetooth Security dialog box - right-click the Bluetooth
icon, select Setup, and then select Security from the submenu.
• Access the Bluetooth Connection Wizard - right-click the Bluetooth icon,
select Services, and then select Connection Wizard from the submenu.
• Exchange Business Cards with another Bluetooth Computer - rightclick the Bluetooth icon, select Services, and then select Business Card
Exchange from the submenu.
• Search for, and connect to, a specific service - right-click the Bluetooth
icon, select Services, and then select the desired service from the
submenu. An additional submenu will appear that contains one or more
options, including:
Find Devices…
or
Other Devices and one or more device names. The device name(s) will be
present if this computer has used this service, and connected via this
technique, at least once before. If a device name is present in the submenu,
selecting that device will re-initialize the connection.
18
The services that can be searched for and connected to from the Bluetooth Tray
are:
• Bluetooth Serial Port(s)
• Dial-up Networking
• Fax
• File Transfer
• Information Synchronization
• Network Access.
Send to Bluetooth
This feature is used to send information to another Bluetooth device. Data types
include:
•
•
•
Files from Microsoft Explorer
Documents from Microsoft Office applications, including:
o Word
o Excel
o Access
o PowerPoint.
Contacts, appointments, tasks, messages, and notes from Microsoft
Outlook.
To use Send to Bluetooth
In the application:
• Microsoft Explorer - select one or more files to be transferred. Folders
cannot be transferred.
• Microsoft Office - only the document in the active window can be
transferred.
• Microsoft Outlook - select one or more items to be transferred.
From Microsoft Explorer, go to the File menu, select Send To and then
select Bluetooth from the fly-out menu.
• Select Others to display the Select Device dialog box,
Or …
• Select a device from the sub-menu.
• Click the OK button to send the data. A dialog box displays progress.
19
Client Applications
Network Access
The Network Access service permits a Bluetooth client to use a Local Area Network
connection that is physically attached to another Bluetooth device (the server).
Possible Network Access servers include:
• Bluetooth-enabled computers that have a hardwired Ethernet connection.
• Stand-alone Bluetooth Network Access Points.
The Bluetooth server must be specifically configured to provide the Network Access
service.
Note: After a Bluetooth device is configured as a Network Access server it cannot
act as a Network Access client until it has been re-configured to act as a Network
Access client.
Network Access Server-side Setup for Windows2000
You must configure one computer to serve as a Bluetooth server, and then other Bluetooth
client devices in the vicinity can access available services the server provides. Being a
Bluetooth Network Access server, the computer must have a hardwired Ethernet
connection and be specifically configured to provide the Network Access service.
• From the Windows Start menu scroll to Settings and select Control Panel.
On the Control Panel screen, double click on the Network and Dial-up
Connections.
• On the Network and Dial-up Connections screen, right-click on the Local
Area Connection icon, and select Properties from the pop-up menu.
• On the Local Area Connection Properties screen, click on the Sharing
tab; select Enable Internet Connection Sharing for this connection and
click on the OK button to close the screen.
Now, you have successfully configured your PC or laptop to the Bluetooth server so
Bluetooth client devices in the vicinity can link to the Bluetooth server.
Network Access Server-side Setup for WindowsXP:
•
•
•
20
From the Start menu scroll to Control Panel. In the Control Panel screen,
double click on the Network and Dial-up Connections icon.
On the Network and Dial-up Connections screen, right-click on the Local
Area Connection icon, and select Properties from the pop-up menu.
On the Local Area Connection Properties screen, click on the Advanced
tab; select Enable Internet Connection Sharing for this connection and
click on the OK button to close the screen.
Network Access Server-side Setup for Windows 98SE & Windows ME:
If the Bluetooth sever is running in Windows 98SE or Windows ME, you have to install
an Internet Protocol Routing software. There are lots of trial versions of Internet Protocol
Routing software in the Internet. For example: A downloadable trial version of Sygate
Home Network is available on the Sygate Technologies Inc. website at http://www.
sygate.com/.
Installing and configuring the Sygate Home Network:
• Please follow the on-screen descriptions to install the Sygate Home Network.
Note: check the box of Server Mode on the Installation Setting dialog box
during installation.
• Click on the OK button from the Sygate Network Diagnostics screen.
• Click on the Yes button from the Reboot dialog box to restart your computer.
After you reboot your PC, click on the OK button from the Thank You For
Trying Sygate screen. The Sygate Manager screen will show up.
• Click on the Advanced button from the Sygate Manager screen and click on
the Configuration icon. The Configuration screen will show up.
21
• In the right panel of the Configuration screen, choose Select Manually from
Local Network Connections and select the 0000:Bluetooth PAN Driver. Be
sure to check the Enable Address Server (DHCP) from the Options item.
• On the left side of the Configuration screen, check Ethernet and select the
LAN card the PC is using.
Now, you have successfully configured your PC or laptop to the Bluetooth server so
Bluetooth client devices in the vicinity can link to the Bluetooth server.
Bluetooth Serial Port
The Bluetooth Serial Port service allows two Bluetooth devices to establish a
wireless connection through virtual communications ports and then use that
connection as if it were a hardwired serial cable between the devices.
To establish a Bluetooth serial port connection:
Connections are initiated from the client:
1. On the client, in the Folders panel of My Bluetooth Places, select Entire
Bluetooth Neighborhood.
22
2. In the right panel of Entire Bluetooth Neighborhood, right-click anywhere
except on a device name and select Refresh from the pop-up menu.
3. In the Folders panel of My Bluetooth Places, right-click the server to which
you wish to connect and select Discover Available Services from the pop-up
menu to update the available services list. The available services will be displayed
in the right panel of My Bluetooth Places.
Bluetooth Software Explorer – Available Services
4. In the right panel of My Bluetooth Places, double-click Bluetooth Serial Port.
A dialog box appears that contains the communications port number assigned to
this connection by the client. The application that will use this connection must
be configured to send data to this port.
Depending on the security configuration, the dialog box that provides
communications port information may not appear until after Authentication and
Authorization have been accomplished.
The application on the server must be configured to use the correct
communications port.
To determine the communications port being used by the service:
• On the server, in the Folders panel of My Bluetooth Places, right-click My
Device and select Properties from the pop-up menu
• In the Bluetooth Configuration Panel, select the Local Services tab.
• Double-click the Bluetooth Serial Port service to display its Service
Properties dialog box. The Service Properties dialog box shows the
communications port the connection is using.
23
To close a Bluetooth serial port connection
Connections are normally closed from the client:
• On the client, in the Folders panel of My Bluetooth Places, select (highlight)
the device that is providing the Bluetooth Serial Port service.
• In the right panel of My Bluetooth Places, right-click Bluetooth Serial Port and
then select Disconnect Bluetooth Serial Port from the pop-up menu.
Though not recommended, connections can also be closed from the server:
• On the server, in the Folders panel of My Bluetooth Places, select (highlight)
My Device.
• In the right panel of My Bluetooth Places, right-click Bluetooth Serial Port and
then select Stop to close the service. The service must be re-started before it
will be available to remote devices (right-click Bluetooth Serial Port and select
Start from the pop-up menu).
Dial-Up Networking
The Dial-up Networking service permits a Bluetooth client to use a modem that is
physically connected to a different Bluetooth device (the server).
After the Bluetooth wireless connection is established the client can use the
server’s modem as if it were a local device on the client.
To establish a Dial-up Networking session
Connections are initiated from the client:
1. On the client, in the Folders panel of My Bluetooth Places, select Entire
Bluetooth Neighborhood.
2. In the right panel of Entire Bluetooth Neighborhood, right-click anywhere except
on a device name and select Refresh from the pop-up menu.
3. In the Folders panel of My Bluetooth Places, right-click the server that will
provide the Dial-up Networking Service and select Discover Available
Services from the pop-up menu to update the available services list. The
available services will be displayed in the right panel of My Bluetooth Places.
4. In the right panel of My Bluetooth Places, double-click Dial-up Networking.
5. In the Connect to dialog box, fill in your user name, password, and the phone
number to be dialed, and then click the Dial button. Select the Save Password
check box and the dialog box will not appear for subsequent connections to the
same phone number.
You can now open a web browser and connect to the Internet.
24
To close a Dial-up Networking connection
•
•
On the client, in the Folders pane of My Bluetooth Places, select (highlight)
the device that is providing the Dial-up Networking service.
In the right pane of My Bluetooth Places, right-click Dial-up Networking and
then select Disconnect Dial-up Networking from the pop-up menu.
FAX
The Fax service allows a Bluetooth client to wirelessly send a fax using a device
that is physically attached to a Bluetooth server.
Send a Fax
Connections are initiated from the client:
•
On the client, in the Folders panel of My Bluetooth Places, select Entire
Bluetooth Neighborhood.
•
In the right panel of Entire Bluetooth Neighborhood, right-click anywhere
except on a device name and select Refresh from the pop-up menu.
•
In the Folders panel of My Bluetooth Places, right-click the server that will
provide the Fax service and select Discover Available Services from the
pop-up menu to update the available services list. The available services will
be displayed in the right panel of My Bluetooth Places.
•
In the right panel of My Bluetooth Places, double-click Fax.
After the Fax connection is established, open or create the document to be faxed
and use the “Print” or “Send to FAX Recipient” option available in most
applications.
The Fax connection closes automatically when the transmission is complete.
File Transfer
The File Transfer service allows one Bluetooth device to perform file operations on
the default File Transfer directory (and the folders and files it contains) of another
Bluetooth device.
To perform an operation on a folder or file
On the machine from which the File Transfer service will be used:
1. In the Folders panel of My Bluetooth Places, select Entire Bluetooth
Neighborhood.
2. In the right panel of Entire Bluetooth Neighborhood, right-click anywhere except
on a device name and select Refresh from the pop-up menu.
In the Folders panel of My Bluetooth Places, right-click the device you want to
transfer files with and select Discover Available Services from the pop-up
menu to update the available services list. The available services will be
25
displayed in the right panel of My Bluetooth Places.
3. In the Folders panel of My Bluetooth Places, click the plus ( + ) sign in front of
Public Folder to expand that folder. If there are additional folders inside the
expanded folder, those additional folders may have to be expanded.
Folder contents are displayed in the right panel of My Bluetooth Places.
Types of File Transfer operations
In the right panel of My Bluetooth Places, right-click a folder item and select an
option from the pop-up menu. A dialog box (the title varies, depending on the
operation being carried out) appears and the status line (bottom of the dialog box)
indicates the operational step that is being carried out.
The types of operations that can be accomplished are:
• Open:
o Files—are opened in the application associated with them.
o Folders—are expanded to show their contents.
o Print—sends the selected server file to the client’s default printer.
• Send to:
o 3.5" Floppy Drive—copies the selected item(s) from the server to the
client’s 3.5" floppy drive.
o My Shared Folder—copies the selected item(s) from the server to the
default File Transfer folder on the client.
• Cut - copies a folder and its contents, or individually selected files in a folder,
to the Windows clipboard. When the clipboard contents are pasted to a new
location, the originally selected file(s) on the server are deleted.
• Copy - copies a folder and its contents, or individually selected files in a
folder, to the Windows clipboard.
• Delete - deletes selected file(s) and/or folder(s) on the server.
• Rename - allows you to change an empty folder’s name.
• Properties - displays the file or folder’s properties dialog box.
Other options may appear (depending on the context the menu appears in):
• Update - updates the contents of a folder
• New Folder - creates a new folder on the server
• Abort FTP Operation - aborts an in-process File Transfer operation.
26
Information Exchange
The Information Exchange service provides a way to send and receive Microsoft
Outlook items to and from another Bluetooth device, such as a Personal Digital
Assistant or notebook computer.
Information Exchange Tab
The supported Outlook items are
• Business cards (*.vcf and *.vcd)
• Calendar entries (*.vcs)
• Notes (*.vnt)
• Messages (*.vmg)
There are three types of operations:
• Send—sends an object to another device.
• Receive—requests an object from another device.
• Exchange—sends a client object and receives a server object.
27
The default location of your business card and the location where received items are
placed can be configured in the Bluetooth Configuration Panel.
To send, receive or exchange an object:
On the client, in the Folders panel of My Bluetooth Places, right-click the Inbox
icon of the remote device. Select an option from the pop-up menu. Business cards
are sent, received or exchanged without further intervention.
To send Calendar Items, Notes, and Messages, navigate to the folder that contains
the item you want to send, select the item, and then click Open.
Information Synchronization
The Information Synchronization service is used to synchronize information (e.g., a
Personal Information Manager database) between a Bluetooth client and a Bluetooth
server.
Bluetooth Software supports synchronization with devices that support IrMC v1.1
and exchange the v2.1 vCard format.
Four data types are supported:
• Business cards
• Calendar items
• Email messages
• Notes
The first time Information Synchronization is used with a new application it may
take a few minutes to synchronize the database; the data from both devices must
be merged, duplicate entries deleted, and then the updated database copied back to
both devices.
Subsequent uses of Information Synchronization, for the same application, are
much faster— only the changes that have been made since the databases were last
synchronized must be exchanged.
Microsoft Outlook is the only Personal Information Manager supported in this
release of Bluetooth Software. Outlook permits duplicate entries, so all duplicates
may not be exchanged in the synchronization process.
Note: Only Outlook’s default contacts folder is synchronized. Items in sub-folders
are not synchronized. Items that are moved from the default folder to a sub-folder
will appear to have been deleted when the next synchronization takes place.
Use Information Synchronization
•
•
28
On the client, in the Folders panel of My Bluetooth Places, select Entire
Bluetooth Neighborhood.
In the right panel of Entire Bluetooth Neighborhood, right-click anywhere
except on a device name and select Refresh from the pop-up menu.
•
In the Folders panel of My Bluetooth Places, right-click the server with which
you will synchronize and select Discover Available Services from the popup menu to update the available services list. The available services will be
displayed in the right panel of My Bluetooth Places.
• In the right panel of My Bluetooth Places, double-click Information
Synchronization.
A dialog box displays synchronization progress and, when the process is complete,
indicates that synchronization has successfully completed.
The connection closes automatically when synchronization is complete.
Local Services
Local Services are those services that a Bluetooth server is capable of providing.
The services provided by Bluetooth Software are:
• Bluetooth Serial Port
• Dial-Up Networking
• Fax
• File Transfer
• Information Exchange
• Information Synchronization
• Network Access
The names of all the services are displayed even though the server may not be
capable of supporting all services. For example, when a server provides a service
that is hardware-dependent, that server must be capable of local action, i.e., a Dialup Networking server must have a working modem, a Fax server must have a
functional fax modem, and a Network Access server must be physically connected
to the Local Area Network.
All services start automatically by default when Bluetooth Software is initialized.
Automatic start-up can be turned off for individual services (Go to Bluetooth
Configuration Panel >Local Services tab > double-click the service name.) If a
service is not configured to start automatically it can still be started manually (rightclick the service and select Start from the pop-up menu).
Stop a local service
Right-click the service and select Stop from the pop-up menu. Stopped services are
not available for use by clients.
With Local Device selected, the Details view of Explorer provides basic information
about each local service:
29
•
•
•
•
Service—the name of the service
Startup—Automatic or Manual
Status:
o Started(COM#)—the service is running and ready to use COM#
o Not Started—the service is not running (not available to clients)
o Connected(COM#)—the service is in use, the local port is COM#
Device name if connected:
o Empty field—the service is not connected
o A device name and/or Bluetooth Device Address - identifies the device
that is using the service.
To interrupt a connection from the server side:
•
•
30
Right-click the local service and select Stop from the pop-up menu.
Right-click the local service and select Start from the pop-up menu to re-start
the service.
Configuration Panel
The Bluetooth Configuration Panel provides access to settings for Bluetooth
services, hardware and security and for event notification.
Access the Bluetooth Configuration Panel
From the Windows Control Panel, double-click on the Bluetooth Configuration icon.
-orIn the Windows System Tray, right-click the Bluetooth icon, select Setup and then
Configuration from the fly-out menu.
31
Accessibility TAB
Accessibility Configuration Settings
The Accessibility tab of the Bluetooth Configuration Panel lets you specify which
remote devices may access this computer.
Accessibility Tab
Note: Security settings configured in the General, Local Services, and Client
Applications tabs may also affect which devices have access to this computer.
•
•
32
Allow other devices to discover this computer: Select “Let other
Bluetooth devices discover this computer” to permit remote Bluetooth
devices to find and report this computer. If “Allow No devices to connect”
(below) is selected, this option is not available.
Control the types of devices that are allowed to connect to this
computer:
From the Allow drop-down-menu, select:
o All devices to connect—all remote devices are permitted to connect to
this computer.
o
o
o
No devices to connect—no remote devices are permitted to initiate a
connection with this computer. However, this computer can still initiate
connections (as a client) with remote Bluetooth devices.
Only-paired devices to connect—only devices that have been paired
with this computer are allowed to connect to it.
Only devices listed below to connect—only the listed devices are
allowed to connect to this computer (see Accessibility, adding and
deleting devices).
Adding and Deleting Devices
Limit access to your computer to specific remote devices
From the Bluetooth Configuration Panel, Accessibility tab, in the Allow drop-down
list box, select “Only devices listed below”.
Add a device to the list of devices allowed to connect:
• From the Bluetooth Configuration Panel, Accessibility tab, click the Add
Device button.
Accessibility Tab- Add Devices
In the Devices with access... dialog box select the device(s) and click OK.
Multiple devices can be selected at the same time using SHIFT + click and/or
CTRL + click.
Delete a device from the list of devices allowed to connect:
From the Bluetooth Configuration Panel, go to the Accessibility tab. In the list of
devices allowed to connect, click the name of the device to be removed, then
click Delete.
•
•
33
Discovery TAB
Discover Configuration Settings
The settings on the Discovery tab of the Bluetooth Configuration Panel determine
whether your computer looks for other Bluetooth devices automatically, how often it
looks and what type of devices it looks for.
Discovery Tab
Periodic Search for Devices
When “Look for other Bluetooth devices” is selected, Bluetooth for Windows
automatically searches for devices every X minutes. X is an integer from 1 to 60. To
change the time between auto inquiries, highlight the existing time and enter the
new time.
Note: When My Bluetooth Places is first opened it performs an initial automatic
search for devices even if “Look for other Bluetooth devices” is not enabled.
34
Determine the devices that will be reported
Bluetooth for Windows can screen out devices that you do not need access to.
The options are:
• Report all Bluetooth devices
• Report only selected Bluetooth devices
Select the desired option from the drop-down list.
Discovery, Adding Specific Devices
Limit the type of remote devices reported
Bluetooth for Windows can report only specific devices, specific class(es) of device
(s), or specific type(s) of device(s) within a class. Discovered devices can be mixedand-matched; you can discover one or more specific devices, classes of devices and
types of devices within a class at the same time.
Note: When Bluetooth for Windows is configured to report only specific devices, it
reports ONLY those devices.
Report only specific devices
• From the Bluetooth Configuration Panel, on the Discovery tab, select
“Report only Selected Bluetooth devices” from the drop-down list and
then click the Add Device button.
35
•
Discovery Tab – Discoverable Devices
In the Discoverable devices... dialog box, highlight the device to be
discovered and click the OK button. Multiple devices can be selected at the
same time using SHIFT + click and/or CTRL + Click.
Note: To add a device to the list of devices to be discovered, that device must
be within range of the Bluetooth radio; devices that are not within radio range will
not appear in the list of devices in the Discoverable devices... dialog box.
Report only a specific class of device
• From the Bluetooth Configuration Panel, in the Discovery tab, select
“Report only Selected Bluetooth devices” from the drop-down list and then
click the Add Device button.
•
In the Discoverable devices... dialog box, select “Allow this computer to
discover all devices of a specific class or a specific type of device
within a specific class.”
Discovery Tab – Discoverable Devices
36
•
•
From the Class drop-down list, select a class of devices to be discovered.
Click the OK button.
Report only a specific type of device within a class
• Configure Bluetooth for Windows to report the class of device to which the
type of device belongs (follow the steps in “Report only a specific class of
device,” above, but do NOT click OK.)
• In the Discoverable devices... dialog box, from the Type drop-down menu
select the specific type of device to be reported.
• Click OK.
Discovery, Deleting Specific Devices
Remove a device from the list of devices to be discovered
In the Bluetooth Configuration Panel, select the Discovery tab, select the device to
be removed and click Delete.
Note: If “Report only selected Bluetooth devices” is not selected, the Delete button
will not be available.
Temporarily override the discovery of specific devices
In the Bluetooth Configuration Panel, from the Discovery tab, select “Report all
Bluetooth devices.” The specifically selected devices will be discovered along with
all other devices.
To re-enable specific device discovery re-select “Report only selected Bluetooth
devices.”
Note: When all devices are deleted an error message will appear if “Report all
Bluetooth devices” is not selected.
General Configuration Settings
The settings on the General tab of the Bluetooth Configuration Panel determine device
properties and basic system security settings.
37
General Tab
Identity section
•
Computer Name- enter a unique name to identify this computer to other
Bluetooth devices in the vicinity; this field cannot be left blank.
•
Computer type- select either Desktop or Laptop from the drop-down menu to
help identify this computer to other Bluetooth devices in the vicinity.
Bluetooth Security Section
•
38
High-requires Bluetooth devices to authenticate (enter a Personal
Identification Number (PIN)) before allowing a connection to be established.
Your computer and the connected Bluetooth device will exchange data using
encrypted links.
•
Medium-the default security setting is configured at the service-level. Service
level security means that each individual service must have its security
settings (Authentication, Authorization and Encryption) set independently.
Note: If the security mode is Medium and service-level security is not configured,
any Bluetooth device will be able to discover your computer and use it services.
Hardware Configuration
The Hardware tab of the Bluetooth Configuration Panel provides basic information
about the Bluetooth hardware installed on this computer and access to the Advanced
Settings dialog box, if required:
Hardware Tab
•
Devices:
o
Name: the name of the device
o
Type: the type of device, e.g., USB.
39
•
•
40
Device Properties:
o
Manufacturer: the name of the company that manufactured the
device selected in the Devices section of this dialog box.
o
Firmware Revision: the manufacturer’s firmware version number.
o
Device status: indicates that the device is operating properly or that
there is a problem/conflict.
o
Device Address: the Bluetooth Device Address (BDA or BD_Addr)
programmed into this device when it was manufactured.
o
HCI Version: the version number of the Bluetooth Specification that
the Host Controller Interface complies with.
o
HCI Revision: the revision number of the Bluetooth Specification that
the Host Controller Interface complies with.
o
LMP Version: the version number of the Bluetooth Specification that
the Link Manager Protocol complies with.
o
LMP Sub Version: the sub-version number of the Bluetooth
Specification that the Link Manager Protocol complies with.
The Advanced button: displays the Advanced Settings dialog box, which
allows you to select the country code and transmission power settings. This
option is not available on all systems.
Hardware Advanced Settings Dialog Box
When available, this dialog box is reached from the Hardware tab of the Bluetooth
Configuration Panel.
Depending on the country in which the hardware is sold and/or in which it will be
used, the Advanced button may not be present.
Hardware Tab - Advanced
From this dialog box you can set the:
•
•
Country Code:
o
North America, Europe (except France), and Japan
o
France and China
Maximum Transmission Power:
o
High
o
Medium
o
Low.
41
Click the Apply button to implement the changes. A dialog box appears with
notification that the Bluetooth device attached to this computer must be reset before
the change(s) will take effect.
•
Click the Yes button to reset the Bluetooth device. All open Bluetooth
connections will be closed.
•
Click the No button to save the changes -The changes will be applied the next
time the Bluetooth device is reset or restarted.
Information Exchange Configuration Settings
The settings on the Information Exchange tab of the Bluetooth Configuration Panel
allow you to configure the following:
42
Information Tab
•
The highest-level directory on this computer that a remote device has
permission to access.
•
The path to your electronic business card.
•
The path to the directory that will be used to save incoming:
o
Business cards
o
Notes
o
Messages
o
Calendar items.
File Transfer
My Shared Directory: the directory configured in this section is the highest-level
directory to which a remote Bluetooth computer has access. This directory and its
sub directories are displayed in the remote device’s My Bluetooth Places.
Click the Browse button and navigate to the directory that will be used as My
Shared Directory.
Send Business Card
My Business Card: the path to the directory on this computer that contains your
electronic business card.
Select the “Send Business Card on Request” option to allow remote devices to
obtain your business card.
Click the Browse button and navigate to the directory that contains your business
card.
Receive Business Card
My Inbox Directory: the path to the directory on this computer where inbound
Personal Information Manager items such as Business cards, Notes, Calendar
entries and messages will be saved.
Select the types of items you wish to accept by placing a checkmark in the
appropriate boxes, then click the Browse button and navigate to the directory where
they should be saved.
Select the “Save Object in Personal Information Manager” option to save
incoming objects directly in the PIM if you have installed the PIM application. When
this option is selected, the path specified in My Inbox Directory is not used.
43
Local Services TAB
Local Services Configuration Settings
The settings on the Local Services tab of the Bluetooth Configuration Panel
determine the configuration of the services provided by your computer to remote
devices. Each service can be configured individually for security, name, and other
settings.
The Local Services tab also includes options to add and delete user-defined serial
services.
Local Service Tab
44
Bluetooth for Windows Local Service Names
•
Bluetooth Serial Port
•
Dial-Up Networking
•
Fax
•
File Transfer
•
Information Exchange
•
Information Synchronization
•
Network Access
Property settings which are common to all of the local services
Although each of these settings can be set individually for each service, all local
services have the setting for:
• Authentication
• Authorization
• Encryption
• Startup
• Service Name
Some local services have additional property settings
Some services have an additional setting that is specific to that service.
•
Network Access - as an additional setting for the maximum number of
connections allowed at any time.
•
Dial-Up Networking - as an additional setting for selecting the modem that
will be used by the service.
•
Fax - as an additional setting for selecting the modem that will be used by
the service.
•
Bluetooth Serial Port - as an additional setting for selecting the
communications that will be used by the service.
45
Local Device, Add A User Defined Bluetooth Serial Port
Most applications that use a serial connection can also use the wireless Bluetooth
Serial Port service to transfer data; the Bluetooth Serial Port is a replacement for the
physical cable and is transparent to the application.
Bluetooth for Windows has one pre-configured Bluetooth Serial Port, but additional
Bluetooth Serial Ports can be added when needed.
Add an additional Bluetooth Serial Port
• From the Bluetooth Configuration Panel, Local Services tab, click the Add
Serial Service button.
• In the Service Properties dialog box, modify the properties:
o
Enter a unique name (less than 99 alphanumeric characters).
o
Select the appropriate security settings.
o
If you want the service to start automatically when Bluetooth for Windows
initializes, select Startup.
o
From the COM Port drop-down menu select a communications port that
is not assigned to any other service.
• Click OK.
Property settings which are common to all of the local services
Although each of these settings can be set individually for each service, all local
services have the setting for:
• Authentication
• Authorization
• Encryption
• Startup
• Service Name
46
Some local services have additional property settings
Some services have an additional setting that is specific to that service.
•
Network Access - as an additional setting for the maximum number of
connections allowed at any time.
•
Dial-Up Networking - as an additional setting for selecting the modem that
will be used by the service.
•
Fax - as an additional setting for selecting the modem that will be used by
the service.
•
Bluetooth Serial Port - as an additional setting for selecting the
communications that will be used by the service.
Local Device, Remove a User Defined Bluetooth
Serial Port
From the Bluetooth Configuration Panel, Local Services tab, select (highlight) the
port to be removed and then click the Delete button.
Note: The Delete button is only available when the Bluetooth Serial Port service or a
user-defined serial port service is selected.
47
Local Services Properties
Change local service properties
From the Configuration Control Panel, Local Services tab, double-click the service
name.
Make the changes by selecting or clearing the appropriate boxes and click the OK
button.
The service properties that may be changed are:
48
•
Startup - when enabled, starts the service when Bluetooth for Windows
initializes. The default setting is enabled. If Startup is not enabled the service
can still be started manually.
•
Authorization - when enabled, requires confirmation by the server operator
before a remote device is allowed to connect to this service. The default
setting is disabled. Authentication (see below) is automatically enabled when
Authorization is enabled.
•
Encryption - when enabled, encrypts data exchanged by the Bluetooth server
and the Bluetooth client. The default setting is disabled. Encryption applies to
the Bluetooth connection ONLY. Data transmitted to/from a modem, Local
Area Network, etc., is NOT affected by this setting.
Authentication is automatically enabled when Encryption is enabled.
•
Authentication - when enabled, requires that the client and server exchange
a passkey or Link Key before a connection is established. The default setting
is disabled. Devices are paired automatically when authentication is
complete.
•
Service Name - Enter a service name (one to 99 alphanumeric characters) in
this field. In most cases the default service name will serve. However, in
environments where there is more than one device of the same type or one
device provides more than one service of the same type (this is only possible
for the Bluetooth Serial Port service), the service name can be customized.
Notifications TAB
Notifications Tab Configuration Settings
The Notifications tab of the Bluetooth Configuration Panel lets you associate a
sound (Windows *.wav file) with specific Bluetooth events.
Notification Tab
Sounds can be associated on an individual basis with several events, including:
• When a PIN code is required
• When a remote device attempts to access:
o
Files on this computer
o
A Bluetooth port
49
o
The Dial-up network service
o
The LAN Access service
o
The Fax service.
• When a remote device attempts to send:
o
Information items
o
Synchronization information.
Associate a sound with a Bluetooth event
From the Bluetooth Configuration Panel, Notifications tab:
• In the Notify column of the Events list, select the check box associated with
the event.
• In the Sound area of the Notifications tab, click the Browse button and
navigate to the sound file (*.wav) to be used for notification.
To preview the sound file, click the play ( ) button.
• Click the OK button to close the Bluetooth Configuration Panel.
Note: The sound will not play, even though it has been assigned, unless the Notify
check box is selected.
50
Version Info Configuration
Version info
Version Info Tab
The Version Info tab of the Bluetooth Configuration Panel displays the name and
version number of the software components of Bluetooth for Windows.
There are no options to configure on this tab.
51
Security
Security Introduction
Each service that the server provides can be configured to require:
• Authorization -The server operator must acknowledge all connection
attempts before a connection is established.
• Authentication -The server requires a Personal Identification Number (PIN)
code or a Link Key before a connection is established.
• Encryption - All data sent between the Bluetooth client and Bluetooth server
is encrypted. The encryption key is based on the Authentication Link Key;
Encryption requires that Authentication be enabled.
The default security setting for Authorization, Authentication and Encryption is
disabled.
Devices can also be paired, a process that eliminates the need to enter a PIN code
every time access is attempted.
Authentication
Authentication is used to verify identity; it requires a passkey or Link Key from the
remote device. When a remote device attempts access a visual and/or audio
warning notifies the local operator.
The local operator can open a dialog box that provides:
• The user-friendly name of the device attempting access
• The name of the local service that the remote device is attempting to access
• A place for the local operator to enter a passkey.
The operator of the remote system must enter the identical passkey or access is
denied.
If the notification is ignored, access is denied after a preset timeout.
When devices are paired, those devices automatically exchange a Link Key and
Authentication is carried out without operator intervention.
Authorization
Authorization is Yes or No, go-no-go security.
A visual and/or audio warning alerts the server operator that a remote device is
attempting to connect.
The server operator responds by clicking the Bluetooth icon in the Windows system
tray to open
52
a dialog box that displays:
•
The user-friendly name of the device attempting to connect
•
The local service to which the remote device is attempting to connect.
The server operator may grant or deny access to the service by clicking an onscreen button.
If the server operator ignores the Authorization notification access will be denied
after a preset timeout.
Encryption
Encrypting translates data into an unreadable format using a secret key or
password. Decrypting the data requires the same key or password that was used to
encrypt it.
Encryption in Bluetooth for Windows is based on the same passkey or Link Key
that is used for Authentication. If Authentication is not enabled the key is not
available and encryption will not take place.
Note: To use Encryption, Authentication must be enabled.
Enable Encryption for a service
•
Right-click a service name and select Properties from the pop-up menu to
display the Bluetooth Properties dialog box.
•
Select the Encryption option. If Authentication is not enabled it will be
automatically turned on when Encryption is selected.
•
Click the OK button to close the dialog box and apply the change.
Levels of Security
Security for local services may be configured on an individual basis.
The configuration options are
• Startup-Automatic or Manual
• Authorization
• Authentication
• Encryption
To access the security settings for a local service, in the Bluetooth Configuration
Panel, from the Local Services tab, double-click the service name.
Note: Bluetooth-enabled devices from different vendors may handle security in a
slightly different manner.
53
Link Key
Link Key is a unique, internally generated, access code. Link Keys are generated
automatically when devices are Paired or when Authentication is enabled.
Link Keys are created by combining
•
The Passkey
•
The Bluetooth Device Address
•
An internally generated random number.
Pairing Devices
Pairing allows you to avoid entering access information each time a connection is
attempted. Paired devices share a unique Link Key, which they exchange when
connecting.
Note: The mate of a pair will always appear in My Bluetooth Places, even if the
mate is not turned on or is out of connection range.
Paired devices remain paired even when
•
One of the devices is not powered up
•
A service connection is interrupted or the service stopped
•
One or both devices are rebooted.
When Authentication is enabled devices are paired the first time they attempt to
connect, after a successful passkey exchange.
To pair devices before attempting a connection
• In the Windows System Tray, right-click the Bluetooth icon, then Setup and
select Security from the fly-out menu.
• The Bluetooth Security dialog box appears and Bluetooth for Windows
performs a device inquiry to update the list of devices in the area. After the
inquiry is complete:
o In the Found Devices Panel of the dialog box, click the name of the device
to be paired
o Click the Execute Pairing button.
• In the Bluetooth Passkey Request dialog box, enter the Bluetooth Passkey
• Click the OK button.
Note: The check box on the main screen, when selected, permits all services to
connect without Authorization.
54
Remove Pairing
When devices are paired, the configuration information is saved on both devices.
Devices remain paired until the relationship is broken on both devices.
To break a paired device relationship
•
In the Windows System Tray, right-click the Bluetooth icon, then Setup and
select Security from the fly-out menu.
•
From the Bluetooth Security dialog box, in the Paired Devices list, select a
device, click the Delete button and then click the Done button.
Note: Pairing must be broken on both devices.
Passkey
A Passkey is an alphanumeric string of up to 16 characters in length. Passkeys are
also called PIN codes, or Personal Identification Numbers.
In Bluetooth for Windows, passkeys are used in the Authentication and Encryption
process.
Request Dialog
Security Request Dialog Box
A Bluetooth Authorization or Bluetooth Passkey Request dialog box may appear
(depending on security settings) when a connection is attempted if either
Authorization or Authentication is enabled. The method of notification depends on
the version of Windows:
• Windows 2000, Windows ME and Windows XP - A bubble message is
displayed over the Bluetooth icon in the Windows System Tray
• Windows 98SE - The Bluetooth for Windows icon in the Windows System
Tray blinks.
Regardless of the version of Windows, click the Bluetooth icon in the Windows
System Tray and then follow the on-screen instructions. The instructions vary,
depending on the security configuration of the system.
If the security notification is ignored the connection request will fail after a preset
timeout.
The dialog box provides
• Device Name: the user-friendly name of the device attempting to connect.
• Request to access: the service the remote device is attempting to access.
• Buttons for responding are as follows:
o OK - allow the connection
55
•
o Cancel - deny the connection
o Advanced (click the See Also button, below, for more information).
A check box that, when enabled, grants (authorizes) the connecting device
access to all of the services on this computer.
Security Request Dialog Box, Advanced Button
The check box on the main page of the Bluetooth Authorization and Bluetooth
Passkey Request dialog boxes (“Check this box to ALWAYS allow this device to
access ALL the services of your computer”), when enabled, grants permission
(authorizes) the device attempting to connect to access all services on this
computer when attempting to connect in the future.
To limit the services the connecting device may use:
•
Click the Advanced button
•
In the expanded dialog box, select the services that the connecting device is
authorized to use. When a service is selected, that service will NOT require
authorization in the future (no prompt will appear when a connection is
attempted)
Note: Regardless of whether the main dialog box is for Authorization or
Authentication, these options pertain to Authorization; they do not affect
Authentication.
•
Click the Authorize or Authenticate button.
Troubleshooting
Q: Cannot connect to a paired device?
A: Paired devices are always displayed in My Bluetooth Places, even if the remote
device is out of range or not powered up.
Verify that the remote member of the pair is within radio range and powered up and
then attempt the connection again.
Q: Cannot discover services on an un-paired remote device?
A: The remote device may not be powered up or may be out of range.
• Verify that the remote device is powered up.
• Verify that the remote device is in Connectable mode (Bluetooth Configuration
Panel -> Accessibility tab).
• Perform a Search for Devices to verify that the device is within range.
56
Q: Dial-up Networking service does not start?
A: The Dial-up Networking service will not start unless a properly configured modem is
attached to the server.
• Verify that the modem is usable as a local device from the server.
• In the Bluetooth Configuration Panel, Local Services tab, double-click the
Dial-up Networking service:
o Click the down arrow in the Modem field and select
the modem that will be used to dial out
o Click the OK button
o Click the OK button to close the Bluetooth
Configuration Panel.
Q: How do I determine the Bluetooth Device Address (BDA) of my hardware
device?
A: In the Bluetooth Configuration Panel, on the Hardware tab, in the Devices section,
select the device. In the Device Properties section of the dialog box, the fourth entry,
Device Address, is the BDA of the selected Bluetooth device.
Q: How do I determine the version number of the Bluetooth Specification that
the Host Controller Interface (HCI) complies with?
A: In the Bluetooth Configuration Panel, on the Hardware tab, in the Device Properties
section, the fifth entry provides Bluetooth Specification compliance information for the
Host Controller Interface.
The sixth entry contains the Specification Revision information for the Host Controller
Interface, if appropriate.
Q: How do I determine the version number of the Link Manager Protocol
(LMP)?
A: In the Bluetooth Configuration Panel, on the Hardware tab, in the Device Properties
section, the seventh entry provides Link Manager Protocol version number information.
The eighth entry contains the Link Manager Protocol sub-version number information,
if appropriate.
Q: How do I find information about the Bluetooth hardware attached to my
computer?
A: In the Bluetooth Configuration Panel, select the Hardware tab.
Q: How do I test a Network Access connection?
A: If the client is hardwired to the LAN, unplug the hardwired connection to ensure
that the test checks the wireless connection rather than the hardwired connection.
57
If the server has access to the Internet, open a browser on the client and connect to
the World Wide Web.
You may also Ping the server from the DOS prompt.
Q: Why do I get an Unknown Port message when I attempt to use a Bluetooth
Serial Port?
A: The Unknown Port error message usually means an attempt was made to connect
a port that was in use.
Additional Bluetooth Serial Ports can be added if they are required.
Q: When I start to install the Bluetooth software, the system pops up a
message “- 1155 : Bluetooth software 1.2.1.xx.msi not found.” How can I fix
this problem?
A: This installation problem may occur because of an earlier version of Windows
Installer in your system. Please go to the downloads page of Microsoft web site and
download the newer windows installer to update your system.
58
•
For Windows98SE and ME see “Windows Installer 2.0 Redistributable for
Windows 9X”, available at
•
http://www.microsoft.com/downloads/release.asp?ReleaseID=32831
•
For Windows NT 4.0 &2000 see “Windows Installer 2.0 Redistributable for
Windows NT4.0 and 2000”, available at http://www.microsoft.com/downloads/
release.asp?ReleaseID=32832
Index
A
Access the Bluetooth Configuration Panel 31
Accessibility TAB 32
Adding and Deleting Devices 33
Authentication 52
Authorization 52
B
Bluetooth Device Identity 11
Bluetooth Serial Port 22
Bluetooth Tray 18
D
Dial-Up Networking 24
Discovery, Adding Specific Devices 35
Discovery, Deleting Specific Devices 37
Discovery TAB 34
E
Enable Encryption for a service 53
Encryption 53
F
FAX 25
File Transfer 25
Find a Service 16
Find Bluetooth Devices 14
G
General Configuration Settings 37
H
Hardware Advanced Settings Dialog Box 41
Hardware Configuration 39
I
Icons Used For Bluetooth Devices and Services 11
59
Information Exchange 27
Information Exchange Configuration Settings 42
Information Synchronization 28
Installing Bluetooth Software 6
L
Levels of Security 53
Link Key 54
Local Device, Add A User Defined Bluetooth Serial 46, 47
Local Device, Remove a User Defined Bluetooth Seri 48
Local Services Configuration Settings 44
Local Services Properties 48
Local Services TAB 44
N
Network Access 20
Network Access Server-side Setup for Windows 98SE 21
Network Access Server-side Setup for Windows2000 20
Network Access Server-side Setup for WindowsXP: 20
Notifications TAB 49
P
Paired devices remain paired even when 54
Pairing Devices 54
Passkey 55
Property settings which are common to all of the l 45, 46
R
Remove Pairing 55
Request Dialog 55
S
Security Request Dialog Box, Advanced Button 56
Send a Fax 25
Send to Bluetooth 19
Setup a New Connection 17
Some local services have additional property setti 45, 47
Stop a local service 29
T
To close a Dial-up Networking connection 25
To establish a Dial-up Networking session 24
To limit the services the connecting device may us 56
60
To pair devices before attempting a connection 54
Types of File Transfer operations 26
U
Uninstalling previous version of Bluetooth softwar 6
V
Version Info Configuration 51
61
62