1
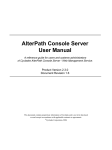
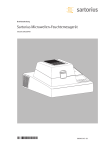
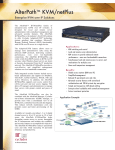
AlterPath™ Manager
E2000, 2500, and 5000
QuickStart Guide
This guide provides a summary of basic AlterPath™ Manager installation tasks for installers who
already know how to install and configure Cyclades AlterPath products.
The following table lists basic tasks in the order they should be performed. For more-detailed
procedures, go to the listed page numbers.
1.
Rack Mounting the AlterPath Manager
Page 1
To Bracket Mount an APM
Page 1
To Rail Mount an APM 2500 or 5000
Page 1
Making the Ethernet Connection
Page 2
To Set up a Single Network
Page 3
To Set up a Private Network
Page 4
3
Running the First Time Configuration Wizard
Page 5
4
Connecting to the Web Management Interface (WMI)
Page 8
2
1. Rack Mounting the AlterPath Manager
For the AlterPath Manager E2000, 2500 and 5000, two brackets and the necessary mounting
screws are supplied. For the AlterPath Manager 2500 and 5000, a set of sliding rails are also
provided (the small “ear” brackets are already attached).
T
To Bracket Mount an APM
1. Attach the mounting brackets to the sides of the APM E2000 towards the front of the box. Use
a screwdriver to firmly tighten the mounting brackets (already attached to the APM 2500 and
APM 5000).
2. Mount the APM securely to the vertical bars of the rack. Screws should go in through the front
of the brackets into the outside front of the vertical bars. Be sure to locate the APM so the
brackets line up correctly with the holes. Be sure the right and left brackets are at the same
height.
T
To Rail Mount an APM 2500 or 5000
1. Remove the inner rails from the rail assemblies. Slide each inner rail out until it stops. Then
depress the exposed locking tab to unlock the inner rail and slide it out the rest of the way.
2. Attach the inner rails to the sides of the APM 2500 or APM 5000. When the inner rails are
correctly positioned, the tabs will be to the rear of the APM, and the front three holes in the
inner rails will line up with the holes in the sides of the APM.
3. Attach the outer rails to the rack, using the end brackets. Be sure the open end of each outer
rail is located towards the front of the rack.
AlterPath Manager E2000, 2500, 5000 Quick Start Guide
a. The shorter end brackets mount onto the front of the outer rails. Use the two round screw
holes in each front end bracket to mount it in a fixed position to its respective outer rail.
b. The longer end brackets mount onto the rear of the outer rails. The long slots in each rear
end bracket can be adjusted to fit the bracket and outer rail assembly to the exact length of
the rack.
4. Slide the APM 2500 or 5000 into the front of the rack so the inner rails engage into the outer
rails.
2. Making the Ethernet Connection
Figure 1:
APM E2000 Front View
Figure 2 provides a rear view of the AlterPath Manager E2000 with the ports, the power switch,
and the AC power connector. Figure 3 and Figure 4 provide similar information for the APM
2500. Figure 5 and Figure 6 provide similar information for the APM 5000.
USB port 1
Eth1 Eth0
Expansion slots
USB port 2
Figure 2:
AUX serial port
Fan
Reset
Console port
LCD panel
Press and hold for 10 seconds to shut down the system.
APM 2500 Front View with Control Buttons
Fan
Figure 4:
2
AC
connector
APM E2000 Rear View with Ports, Power Connector, and Power Switch
Press and hold for 1 second to power on the system.
Press and hold for 4 seconds to reset the system.
Figure 3:
Power
switch
USB
AC
connector
Console
Eth0 Eth1
APM 2500 Rear View with Ports and Power Connector
2. Making the Ethernet Connection
Press and hold for 1 second to power on the system.
Press and hold for 4 seconds to reset the system.
LCD panel
Press and hold for 10 seconds to shut down the system.
Figure 5:
APM 5000 Front View with Control Buttons
Fans
Redundant
AC
connectors
Figure 6:
USB
Console
Eth0
Eth1
APM 5000 Rear View with Ports and Power Connector
There are two diagrams that show alternate LAN configurations. Choose either the “Single
Network Setup” or the “Private Network Setup.”
Note: The private network configuration is the most secure of the two, because the only path to
the managed devices is through the AlterPath Manager.
T
To Set up a Single Network
1. Connect an Ethernet cable from the “Eth1” port on the AlterPath Manager to a hub or switch
that is connected to your public Ethernet LAN. Refer to the “Single Network Setup” diagram
that follows.
2. Connect the Ethernet ports of any KVM/net, ACS, TS, or OnSite to a hub or switch that is
connected to the same public Ethernet LAN.
3. Set up the other AlterPath devices in the normal manner. Refer to the documentation for the
other AlterPath devices as required.
Figure 7 shows a typical connection setup for a single network.
3
AlterPath Manager E2000, 2500, 5000 Quick Start Guide
Figure 7:
T
Single Network Setup
To Set up a Private Network
1. Connect an Ethernet cable from the “Eth1” port on the AlterPath Manager to a hub or switch
that is connected to your public Ethernet LAN. Refer to the “Private Network Setup” diagram
that follows.
2. Connect an Ethernet cable from the “Eth2” port on the AlterPath Manager to a hub or switch
that is connected to your private (or managed) Ethernet LAN. Refer to the “Private Network
Setup” diagram that follows.
3. Connect the Ethernet ports of any KVM/net, ACS, TS, or OnSite to a hub or switch that is
connected to the private Ethernet LAN.
4. Set up the other AlterPath devices in the normal manner. Refer to the documentation for the
other AlterPath devices as required.
Figure 8 shows a typical connection setup for a private network. This the most secure setup
because the only path to devices on the private LAN is through the APM.
4
3. Running the First Time Configuration Wizard
.
Figure 8:
Private Network Setup
3. Running the First Time Configuration Wizard
The First Time Configuration Wizard includes parameters such as root and admin passwords,
network configuration parameters, and time and date.You need to run the First Time Configuration
Wizard from a serial terminal (or terminal emulator such as Hyper Terminal) connected to the
serial console port on the AlterPath Manager.
T
To Run the First Time Configuration Wizard
1. Before you power on the AlterPath Manager, connect one end of a DB-9 to DB-9 Null Modem
cable (or equivalent) to the console port of the AlterPath Manager.
2. Connect the other end of the cable to a terminal or computer’s serial port.
3. Using the terminal or a terminal emulation program installed on a computer, start a session
with the following settings:
•
9600 BPS
•
8 data bits
5
AlterPath Manager E2000, 2500, 5000 Quick Start Guide
•
No parity
•
1 stop bit
•
ANSI emulation
4. Power on the APM
Boot information will scroll up on the screen for a short time until the system is ready for
initial configuration input data.
Welcome to Cyclades-APM!
Since this is the first time you are booting your APM, you need to
answer some basic configuration questions. Once this is done, the
other APM configuration parameters can be set through its Web
Management Interface (WMI).
Press any key to continue.
5. Press any key to run the First Time Configuration Wizard.
You will be asked to enter the following parameters:
•
Enter a password for root (and re type the password)
•
Enter a password for admin (and re type the password)
•
Select a time zone
•
Enter a new system date and time (format is MM/DD/YY)
Note: You must type a date, even if it is the same as the date displayed, in order to change the
time.
•
Enter the time (if you did not select the default date: format is HH:MM)
•
Select static or none (for DHCP) for the primary IP address
•
Enter the primary Ethernet IP address (if you selected static)
•
Enter the primary Ethernet subnet mask address
•
Select static or none for the secondary IP address
•
Enter the secondary Ethernet IP address (if you selected static)
•
Enter the secondary Ethernet subnet mask address
•
Configure Ethernet subinterfaces (Y)es, (N)o, or (L)ist
•
Configure Ethernet VLANs (Y)es, (N)o, or (L)ist
•
Enter Ethernet default gateway
•
Set Ethernet eth0 speed/duplex
•
Choose the correct operation mode from the following:
1) Auto-negotiation
2) 10 Mbps, full duplex
6
3. Running the First Time Configuration Wizard
3) 10 Mbps, half duplex
4) 100 Mbps, full duplex
5) 100 Mbps, half duplex
6) 1000 Mbps, full duplex
7) 1000 Mbps, half duplex
•
Enter the system's hostname (max 30 characters)
•
Enter the system's domain name (max 60 chars)
•
Enter the primary nameserver's IP address
•
Enter the secondary nameserver's IP address
•
Enter the NTP server
•
Enter the E-mail (SMTP) server
•
Enter an authentication method (local, RADIUS, TACACS+, LDAP, Kerberos, NIS,
Active Directory)
Note: After you select an authentication service type, you will be prompted with questions that
are specific to that type of authentication. For example, if you select RADIUS, you will be
prompted for the RADIUS server name and the RADIUS secret.
Once you have finished with the last parameter, the configuration will automatically be saved
to flash memory.
If you have made a mistake in any of the foregoing configuration steps, you can usually make
adjustments to parameters by running one of the following commands as required:
•
setauth
•
setdatetime
•
setdhcp
•
setethernet
•
sethosts
•
setnames
•
setnetwork
•
setntp
•
setserial
•
setsmtp
If you feel you need to configure all the parameters from the beginning, run the defconf
command as shown below.
7
AlterPath Manager E2000, 2500, 5000 Quick Start Guide
Note: In the following example, user input is shown in bold type.:
[root@APM_gregg root]# defconf
WARNING: this will erase all of your current configuration and restore the
system's factory default configuration. This action is irreversible!
Are you sure you wish to continue? (y/N) y
Restoring default configuration ... done.
The new configuration will take effect after the next boot.
[root@APM-gregg root]#
The default configuration will not take effect until you reboot the APM.
4. Connecting to the Web Management Interface (WMI)
Your configuration will now allow you to connect to the Web Management Interface.
T
To Connect to the APM Web Management Interface
1. Open a web browser, such as Internet Explorer.
2. In your browser’s URL entry field, enter the primary or secondary URL that you assigned to
your APM.
Note: You can either use a non-encrypted version of the URL as follows:
http://nnn.nnn.nnn.nnn
or you can use the encrypted version as follows:
https://nnn.nnn.nnn.nnn
Where: nnn.nnn.nnn.nnn is either the primary or secondary IP address that you assigned to the
APM during the First Time Configuration session.
3. When the Login screen appears, log in to the APM as admin. Use the password that you
assigned to admin during the First Time Configuration session.
Cyclades Corporation
3541 Gateway Boulevard
Fremont, CA 94538 USA
1.888.CYCLADES (292.5233)
1.510.771.6100
1.510.771.6200 (fax)
http://www.cyclades.com
Part Number: PAC0381
Release Date: April 2006