1
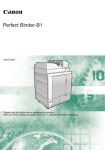
Operating Information
Please read this guide before operating this product.
ENG
Contents
Contents
Chapter 1
Preface.................................................................................................................7
Trademarks.................................................................................................8
Copyright...................................................................................................10
Notes for the reader.................................................................................11
Abbreviations used in this manual.........................................................13
Available documentation.........................................................................14
Chapter 2
Main parts..........................................................................................................15
Overview of the machine configuration.................................................16
The paper module....................................................................................19
Bulk paper modules.................................................................................21
The automatic document feeder (ADF)..................................................23
The operator panel...................................................................................26
The operator attention light....................................................................30
The copy tray............................................................................................32
Stacker/stapler and integrated punch unit.............................................33
The puncher..............................................................................................47
Inserter......................................................................................................49
Folder.........................................................................................................52
Chapter 3
Operating concept............................................................................................59
Operating concept....................................................................................60
Access the Settings Editor.......................................................................64
Maintain the 'Media catalog' ..................................................................66
Maintain the 'Media families' .................................................................68
Maintain the 'Color pre-sets' ..................................................................70
Maintain the 'Input profiles' ...................................................................72
Maintain the 'Output profiles' ................................................................73
Maintain the 'Spot colors' ......................................................................74
Prepare print jobs with PRISMAprepare................................................75
Prepare print jobs with the printer driver...............................................77
Manage production printing...................................................................80
Chapter 4
Operator panel views.......................................................................................83
The dashboard..........................................................................................84
The 'Schedule' view.................................................................................86
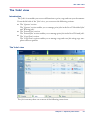
The 'Jobs' view.........................................................................................87
2
Contents
The 'Trays' view.......................................................................................89
The 'System' view....................................................................................90
Chapter 5
Power information............................................................................................93
The power buttons and power modes...................................................94
Turn on the controller..............................................................................96
Turn on the printer...................................................................................97
Turn off the printer...................................................................................98
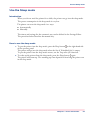
Use the Sleep mode.................................................................................99
Chapter 6
Print jobs..........................................................................................................101
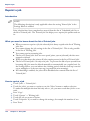
General information...............................................................................102
Introduction to the print function....................................................102
Description of the print job settings...............................................104
Contradiction handling....................................................................118
Manage print jobs..................................................................................119
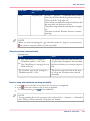
Print an urgent job immediately.....................................................119
Give priority to a print job...............................................................120
Print a scheduled job later...............................................................121
Reprint a job......................................................................................122
Print a job ticket................................................................................124
Make a proof.....................................................................................125
Stop the printer.................................................................................126
Delete print jobs...............................................................................128
Schedule a waiting job for printing................................................130
Select more than one job for printing............................................131
Print a file from a USB drive............................................................132
Media handling.......................................................................................133
Introduction to the 'Schedule' view................................................133
Load the media using the 'Schedule' view....................................137
Description of the 'Trays' view........................................................139
Load the media using the 'Trays' view...........................................142
Introduction to the 'Media' section.................................................144
Introduction to the media handling................................................146
Add temporary media to the 'Media catalog' ...............................148
Perform a media registration..........................................................149
Change the job settings before printing...............................................151
Change the number of sets.............................................................151
Check the first set.............................................................................152
Change the use of separator sheets...............................................154
Stack the prints with an offset.........................................................155
Combine jobs....................................................................................157
Change the output settings before printing.........................................159
3
Contents
Change '2-sided' into '1-sided' and vice versa...............................159
Change the binding edge.................................................................160
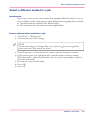
Select a different media for a job....................................................161
Change the settings for covers........................................................162
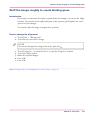
Shift the image roughly to create binding space...........................163
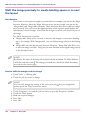
Shift the image precisely to create binding space or correct the layout......................................................................................................164
Change the print delivery settings..................................................166
Change the finishing method..........................................................168
Chapter 7
Copy jobs.........................................................................................................169
General information...............................................................................170
Introduction to the copy function....................................................170
Description of the copy job settings...............................................172
Feeding originals into the ADF........................................................194
Put originals on the glass plate.......................................................197
Copy your documents............................................................................201
Make a copy......................................................................................201
Combine subsets into 1 document.................................................202
Access other functions during a copy job or scan job..................203
The zoom behavior...........................................................................204
Create and use custom copy templates.........................................207
Rename a copy job...........................................................................208
Copy non-standard size originals....................................................209
Scan now and print later (postponed copying).............................210
Finish the output...............................................................................211
Adjust the image to improve the copy and scan quality..............212
Chapter 8
Scan jobs.........................................................................................................213
Introduction to the scan function..........................................................214
Description of the scan job settings.....................................................216
Scan to file..............................................................................................227
Scan to USB............................................................................................228
Combine subsets into one file...............................................................229
Chapter 9
Paper, toner, and staples...............................................................................233
Consumables..........................................................................................234
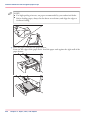
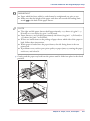
Loading paper.........................................................................................237
Load the media into the integrated paper trays............................237
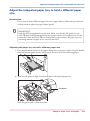
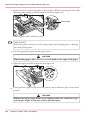
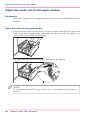
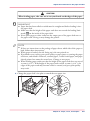
Adjust the integrated paper tray to hold a different paper size.....243
Load the media into the paper module..........................................245
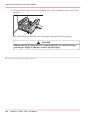
Adjust the media size for the paper module..................................252
Load the media into the bulk paper modules................................257
4
Contents
Adjust the media size for the bulk paper module..........................263
Load the media into the inserter.....................................................272
Load the media into the special feeder (multipurpose tray).........278
Loading transparencies....................................................................285
Loading tab paper............................................................................287
Load tab paper into the paper tray.................................................289
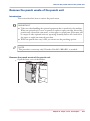
Removing paper waste..........................................................................292
Check the status of the punch waste box.......................................292
Remove the punch waste of the punch unit..................................293
Remove the trim waste....................................................................296
Toner.......................................................................................................299
Check the status of the toner reservoir and waste toner container.299
Replace the toner cartridge.............................................................301
Staples.....................................................................................................306
Check the status of the staple cartridges........................................306
Replace the staple cartridge in the stapler unit.............................308
Replace the staple cartridge in the saddle stitch unit....................312
Chapter 10
Adapt printer settings to your needs............................................................317
System settings (access through the operator panel)........................318
Introduction to the 'Setup' section..................................................318
Work with the workflow profiles.....................................................320
Change the warning time................................................................324
Disable the warning time.................................................................325
Truncate the job name.....................................................................326
Adjust the brightness and contrast of the operator panel............327
Access Settings Editor settings via the operator panel.................328
Automated workflows (access through the Settings Editor)..............331
Introduction to automated workflows............................................331
Add an automated workflow...........................................................333
Edit an automated workflow...........................................................334
Delete an automated workflow.......................................................335
Restore the factory default workflow..............................................336
Hotfolders................................................................................................337
Introduction to hotfolders................................................................337
Activate the hotfolder function........................................................338
Create a hotfolder.............................................................................339
Create a shared network folder on a workstation..........................340
Create a hotfolder default ticket ('default_ticket.jdf').....................342
Chapter 11
Maintenance and calibration.........................................................................343
Introduction to the 'Maintenance' section...........................................344
Routine cleaning.....................................................................................346
5
Contents
Introduction.......................................................................................346
Clean the glass plate and underside the feeder.............................347
Clean the automatic document feeder (ADF).................................348
Clean the wire...................................................................................352
Clean the roller.................................................................................353
Clean the automatic document feeder rollers................................354
Clean the drum.................................................................................355
Clean the operator panel.................................................................356
Maintenance...........................................................................................357
Reset the day counters.....................................................................357
Find the meter readings (counters).................................................358
Handle paper jams...........................................................................359
'Auto color mismatch correction' ...................................................360
Calibration...............................................................................................361
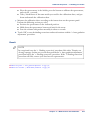
Introduction to printer calibration...................................................361
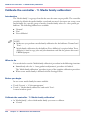
Calibrate the printer - '1. Shading correction' ...............................362
Calibrate the printer - '2. Auto gradation adjustment' .................364
Calibrate the controller - '3. Media family calibration' .................366
Adjust the CMYK calibration curve manually................................368
Chapter 12
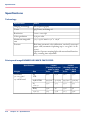
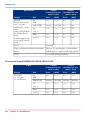
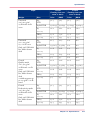
Specifications..................................................................................................369
Specifications.........................................................................................370
Chapter 13
Third party software.......................................................................................391
Third Party Software..............................................................................392
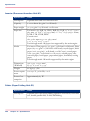
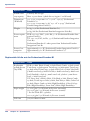
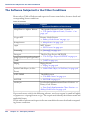
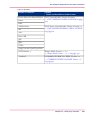
The Software Subjected to the Other Conditions................................394
The Apache Software License, Version 1.1..........................................396
Bouncy Castle License...........................................................................397
dump/restore..........................................................................................398
MIT License.............................................................................................400
fontconfig................................................................................................401
The FreeType Project LICENSE.............................................................402
J2ME........................................................................................................405
libpng.......................................................................................................406
Adobe Flash Player (in NetFront)..........................................................408
The BSD License.....................................................................................410
MSTLIB....................................................................................................416
Java Servlet Implementation Classes Version 2.1.1 Binary Code License........................................................................................................418
GNU GENERAL PUBLIC LICENSE.........................................................419
GNU LESSER GENERAL PUBLIC LICENSE..........................................426
Eclipse Public License - v 1.0 ................................................................436
COMMON PUBLIC LICENSE Version 1.0..............................................441
6
Chapter 1
Preface
Trademarks
Trademarks
List of trademarks
Adobe, Acrobat, Reader and Distiller are registered trademarks of Adobe Systems Incorporated.
PostScript 3® is a registered trademark of Adobe Systems Incorporated.
Microsoft, Windows, Windows NT, Windows 98, Windows 2000, Windows XP, and
Windows Server 2003 are registered trademarks or trademarks of Microsoft Corporation
in the United States and/or other countries.
Products in this publication are referred to by their general trade names. In most, if not
all cases, these designations are claimed as trademarks or registered trademarks of their
respective companies.
PANTONE® Colors displayed in the software application or in the user documentation
may not match PANTONE-identified standards. Consult current PANTONE Color
Publications for accurate color. PANTONE® and other Pantone, Inc. trademarks are
the property of Pantone, Inc. © Pantone, Inc., 2007
Pantone, Inc. is the copyright owner of color data and/or software which are licensed to
(insert name of your company) to distribute for use only in combination with (insert
appropriate name of Licensed Materials). PANTONE Color Data and/or Software shall
not be copied onto another disk or into memory unless as part of the execution of (insert
appropriate name of Licensed Materials).
This product contains the Universal Font Scaling Technology or UFST® under license
from Monotype Imaging, Inc. UFST® is a trademark of Monotype Imaging, Inc. registered in the United States Patent and Trademark Office and may be registered in certain
jurisdictions.
8
Chapter 1 - Preface
Trademarks
Copyright © 1989 - 1996, 1997, 2003, 2004, 2008, all rights reserved, by Monotype
Imaging Inc.
Java and all Java based trademarks and logos are trademarks or registered trademarks of
Oracle and/or its affiliates.
This product includes NetFront, a product of ACCESS Co., Ltd., for the Internet function. NetFront is a registered trademark or trademark of ACCESS Co., Ltd., in Japan
and/or other countries.
The Web Access Software includes modules developed by Independent JPEG Group.
This product contains Adobe® Flash® Player technology under license from Adobe
Systems Incorporated.
Copyright(C) 1995-2003 Adobe Systems Inc. All rights reserved.
Adobe and Adobe Flash are trademarks or registered trademarks of Adobe Systems Inc.
in the United States and/or other countries.
http://www.adobe.com/software/flash/about/
Chapter 1 - Preface
9
Copyright
Copyright
Copyright 2011 by Canon Inc. All rights reserved.
No part of this publication may be reproduced or transmitted in any form or by any
means, electronic or mechanical, including photocopying and recording, or by any information storage or retrieval system without the prior written permission of Canon Inc.
© 2011, Océ
All rights reserved. No part of this work may be reproduced, copied, adapted, or transmitted in any form or by any means without written permission from Océ.
Océ makes no representation or warranties with respect to the contents hereof and
specifically disclaims any implied warranties of merchantability or fitness for any particular
purpose.
Furthermore, Océ reserves the right to revise this publication and to make changes from
time to time in the content hereof without obligation to notify any person of such revision
or changes.
This product includes software and/or software modules that are licensed by Canon Inc.
or its licensors from third parties. Use and distribution of this software and/or software
modules are subject to copyrights (a) and (b) below.
(a)
Copyright © 1999, 2000, 2002 Aladdin Enterprises. All rights reserved.
(b)
Copyright © Unpublished Work of Novell, Inc.
All Rights Reserved
10
Chapter 1 - Preface
Notes for the reader
Notes for the reader
Introduction
This manual helps you to use the imageRUNNER ADVANCE C9075S PRO/C9065
PRO. The manual contains a description of the product and guidelines to use and operate
the imageRUNNER ADVANCE C9075S PRO/C9065 PRO.
Definition
Attention-Getters
Parts of this manual require your special attention. These parts can provide the following:
• Additional general information, for example, information that is useful when you
perform a task.
• Information to prevent personal injuries or property damage.
Symbols used in this manual
The following symbols are used in this manual to explain procedures, restrictions, handling
precautions, and instructions that should be observed for safety.
Overview of the attention-getters#
Word
Icon
Indicates
WARNING
Indicates a warning concerning operations
that may lead to death or injury to persons if
not performed correctly. To use the machine
safely, always pay attention to these warnings.
CAUTION
Indicates a caution concerning operations that
may lead to injury to persons if not performed
correctly. To use the machine safely, always
pay attention to these cautions.
IMPORTANT
Indicates operational requirements and restrictions. Be sure to read these items carefully to
operate the machine correctly and to avoid
damaging the machine or property.
NOTE
Indicates a clarification of an operation or
contains additional explanations for a procedure. Reading these notes is highly recommended.
Chapter 1 - Preface
11
Notes for the reader
Word
Icon
Indicates
Indicates an operation that must not be performed. Read these items carefully and make
sure not to perform the described operations.
12
Chapter 1 - Preface
Abbreviations used in this manual
Abbreviations used in this manual
#
Microsoft Windows 2000:
Microsoft Windows 2000 Professional:
Microsoft Windows 2000 Server:
Microsoft Windows Server 2003:
Microsoft Windows XP:
Microsoft Windows XP Professional:
Microsoft Windows Vista operating system:
Microsoft Windows 7 operating system:
Microsoft Windows Server 2008:
Microsoft Windows operating system:
Novell NetWare:
Apple Macintosh:
Apple Mac:
Windows 2000
Windows 2000 Professional
Windows 2000 Server
Windows Server 2003
Windows XP
Windows XP Professional
Windows Vista
Windows 7
Windows Server 2008
Windows
NetWare
Macintosh
Mac
Chapter 1 - Preface
13
Available documentation
Available documentation
For imageRUNNER ADVANCE C9075S PRO/C9065 PRO, the following information
is available.
•
•
•
•
14
Operating information
Safety Instructions for the printer
Safety Information for the controller
Material Safety Data Sheets.
Chapter 1 - Preface
Chapter 2
Main parts
Overview of the machine configuration
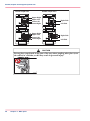
Overview of the machine configuration
Introduction
The following figures display two example configurations.
3
2
4
5
6
7
15
14
13
12
8
9
1
[8] Extended configuration
4
17
16
11
10
[9] Compact configuration
Main unit
#
1
16
Component
Function
PRISMAsync controller
The controller helps you set up the
workflow to meet your specific needs.
Chapter 2 - Main parts
Overview of the machine configuration
Component
Function
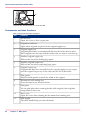
2
Operator panel
The operator panel helps you with
your daily work, for example the
scheduling of the jobs. Furthermore,
the operator panel helps you to solve
errors.
3
Operator attention light
The operator attention light enables
you to check the status of the system
from a distance.
The operator warning light is optional.
4
Automatic document feeder
(ADF)
(Duplex Color Image Reader
Unit-A1)
The automatic document feeder is
used to copy and scan sets of 1-sided
and 2-sided documents automatically. You can scan documents, such as
books, thick originals, thin originals,
and transparencies, on the glass plate.
5
Toner compartment cover
Gives access to the toner bottles.
6
Fixing transport unit
The fixing transport unit contains
the components that print the media.
Access to the fixing transport unit is
only required when a paper jam occurs or when maintenance is required.
7
Integrated paper trays
The main unit contains paper trays
holding the media that will be printed on.
8
Main unit
The engine module consists of components 2–7.
Optional paper modules
Input options#
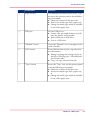
9
Component
Function
Paper module
(Multi-Drawer Paper Deck-A1)
The additional paper module has
paper trays that contain the media
that will be printed.
Chapter 2 - Main parts
17
Overview of the machine configuration
Component
Function
10
Bulk paper module
(POD Deck Lite-A1)
The bulk paper module contains the
media that will be printed. The bulk
paper module contains 1 tray.
11
Bulk paper module
(Paper Deck Unit-A1)
The bulk paper module contains the
media that will be printed. The bulk
paper module contains 1 tray.
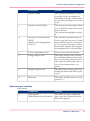
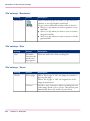
Optional finishing equipment
Output options#
18
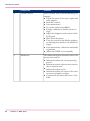
Component
Function
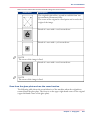
12
Inserter
(Document Insertion Unit-H1)
The inserter feeds cover sheets, separator sheets, or preprinted colored
sheets for printed documents and
booklets.
13
Puncher
(Professional Puncher-C1 and
Professional Puncher Integration
Unit-B1)
Use the puncher to punch holes into
prints. Punchers allow you to change
die sets.
14
Folder
(Paper Folding Unit-G1)
The folder is used to fold prints in
different ways.
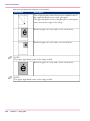
15
Stacker/stapler
(Booklet Finisher-A1, Punch
Unit-BG1/BH1/BF1 and Inner
Booklet Trimmer-A1)
The name of the puncher unit
may differ according to region.
The stacker/stapler offers the following functionality.
• Stack prints
• Staple prints
• Create stapled booklets
• Punch prints
• Trim booklets
16
Stacker/stapler
(Staple Finisher-A1 with Punch
Unit-BG1/BH1/BF1)
The name of the puncher unit
may differ according to region.
The stacker/stapler offers the following functionality.
• Stack prints
• Staple prints
• Punch prints
17
Copy tray
The copy tray is used to receive the
prints and copies.
Chapter 2 - Main parts
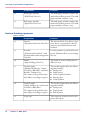
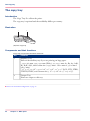
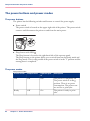
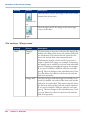
The paper module
The paper module
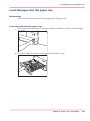
Introduction
The optional paper module (Multi-Drawer Paper Deck-A1) provides three additional
paper trays. You can load up to 2000 sheets of paper (80 g/m2 / 20 lb bond) per tray.
#
IMPORTANT
• If the printer is in Sleep mode, you may not be able to open the paper trays, even
when pressing the Open buttons. In this case, press the Sleep Mode key on the
operator panel to reactivate the printer, then press the Open button on the paper
tray you want to open.
• To detect when multiple papers are fed with Multi-Drawer Paper Deck-A1, Paper
Deck Double Feeding Detection Kit-A1 is required.
• If Multi-Drawer Paper Deck-A1 is attached, the special feeder cannot be used.
#
NOTE
The following paper sizes can load into Multi-Drawer Paper Deck-A1:
- 330 × 483 mm
- 320 × 450 mm (SRA3)
- 305 × 457 mm
- A3, B4, A4, A4R, B5, B5R, and A5R
- Custom size (139.7 × 182.0 mm to 330.2 × 487.7 mm)
- 13" × 19"
- 12 5/8" × 17 11/16"
- 12" × 18"
- 11" × 17"
- LGL, LTR, LTRR, STMTR, EXEC
- Custom size (5½" × 7 1/8" to 13" × 19 1/4")
Chapter 2 - Main parts
19
The paper module
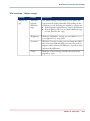
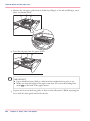
Components and their functions
1
2
3
[10] The paper module
Paper module components and their functions#
No.
Function
1
Front cover (buffer pass)
Open this cover to remove jammed paper.
2
Open button
Press to open the paper tray when you need to load paper or check for a paper
jam.
3
Paper tray
Contains the media that will be printed on.
•Overview of the machine configuration, on page 16
•Load the media into the paper module, on page 245
•Adjust the media size for the paper module, on page 252
20
Chapter 2 - Main parts
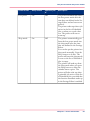
Bulk paper modules
Bulk paper modules
Introduction
The optional bulk paper module (Paper Deck Unit-A1/POD Deck Lite-A1) allows you
to load up to 4000 sheets of paper (64 g/m2 / 17 lb bond) or 3500 sheets of paper (80
g/m2 / 20 lb bond).
#
IMPORTANT
If the printer is in Sleep mode, you may not be able to open the bulk paper module.
In this case, press the Sleep Mode key on the operator panel to reactivate the printer,
then press the Open button on the bulk paper module.
#
NOTE
• The paper size of the Paper Deck Unit-A1 is fixed to A4 or B5/LTR.
• The following paper sizes can load into POD Deck Lite-A1:
- 330 × 483 mm
- 320 × 450 mm (SRA3)
- 305 × 457 mm
- A3, B4, A4, A4R, and B5
- 13" × 19"
- 12 5/8" × 17 11/16"
- 12" × 18"
- 11" x 17"
- LGL, LTR, and LTRR
Chapter 2 - Main parts
21
Bulk paper modules
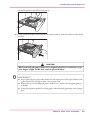
Illustration
1
2
1
3
Paper Deck Unit-A1
2
3
POD Deck Lite-A1
[11] Available bulk paper modules
Components and their functions
Bulk paper module components and their functions#
No.
Function
1
Release button
Press to move the paper deck away from the main unit when you want to
detach it from the printer.
2
Open button
Press to open the paper deck when you want to load paper or check for a
paper jam.
3
Paper supply indicator
Allows you to check the amount of paper remaining in the paper deck.
•Overview of the machine configuration, on page 16
•Load the media into the bulk paper modules, on page 257
•Adjust the media size for the bulk paper module, on page 263
22
Chapter 2 - Main parts
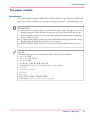
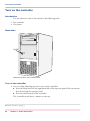
The automatic document feeder (ADF)
The automatic document feeder (ADF)
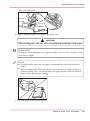
Introduction
The automatic document feeder (ADF) copies and scans sets of 1-sided and 2-sided
documents automatically. You can scan documents, such as books, thick originals, thin
originals, and transparencies, on the glass plate.
#
CAUTION
Do not put your fingers into the gaps around the original supply tray, as your
fingers may get caught. Also, be careful not to drop objects, such as paper clips,
into the gaps. Doing so may damage the printer or cause it to break down.
#
IMPORTANT
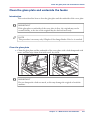
• When using the glass plate to copy or scan thick originals, such as books or magazines, do not press down hard on the feeder.
• Blocking the original output area can result in damaging originals, and printing
may not take place correctly. Therefore, do not place objects into the original
output area.
• If the glass plate is dirty, print quality may deteriorate. Make sure the feeding belt
and glass plate are clean.
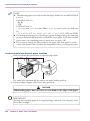
Illustration
1 2
3
4
5
7
6
8
9
10
[12] The ADF includes the glass plate
Chapter 2 - Main parts
23
The automatic document feeder (ADF)
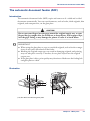
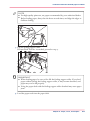
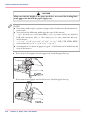
11
[13] The ADF handle helps you close the ADF
Components and their functions
ADF components and their functions#
24
No.
Function
1
Feeder cover
Open this cover to clear a paper jam.
2
Original set indicator
Lights when originals are placed in the original supply tray.
3
Original supply tray
Originals placed here are automatically fed into the feeder sheet by sheet.
Place originals into this tray with the surface that you want to scan face up.
4
Auxiliary original supply tray
Pull out this tray when feeding large paper.
5
Auxiliary original output tray
Pull out this tray when outputting large paper.
6
Original output tray
Originals that have been scanned from the original supply tray are output
into the original output tray in the order they are fed in the feeder.
7
Slide guides
Adjust the slide guides to match the width of the original.
8
Document feed scanning area
Scans documents sent from the feeder.
9
Glass plate
Use the glass plate when scanning books, thick originals, thin originals,
transparencies, and so on.
10
Inner cover
Open this cover when cleaning the document feed scanning area.
11
ADF handle
The ADF handle helps you close the feeder.
Chapter 2 - Main parts
The automatic document feeder (ADF)
•Overview of the machine configuration, on page 16
•Feeding originals into the ADF, on page 194
•Put originals on the glass plate, on page 197
Chapter 2 - Main parts
25
The operator panel
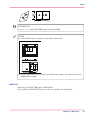
The operator panel
Introduction
The operator panel helps you to carry out print jobs, copy jobs and scan jobs. This section
describes the main components of the operator panel.
#
IMPORTANT
You can clean the screen of the operator panel with a 50% mix of water and isopropyl
alcohol (K2). Use a lint-free cloth. Always put the cleaner onto the cloth and not directly on the screen.
Illustration
10
9
1
4
2
3
5
6
7
8
[14] The operator panel
The components of the operator panel
The components of the operator panel#
26
Component
Function
1
Sleep mode key
Depending on whether the printer is currently
active or in the sleep mode:
• Put the machine into the sleep mode, or
• Wake up the machine from the sleep
mode.
• Shut down the printer and controller.
2
Stop key
Stop the printer.
• After a set, or
• As soon as possible
Chapter 2 - Main parts
The operator panel
Component
Function
3
Paper tray key
Get immediate and always access to the 'Trays'
section on the operator panel to do the following, for example:
• Check the content of all paper trays.
• Load a new media type into a paper tray.
• Change the media type which is available
in one of the paper trays.
4
USB port
Use the USB port to:
• Connect the spectrophotometer and calibrate the printer and controller.
• Print a file from an USB drive
• Scan to a USB drive
5
'Schedule' button
Access the 'Schedule' view to manage the jobs
in the schedule.
6
'Jobs' button
Access all functions to print, copy and scan
your documents.
• Manage or change the settings of jobs in
the lists of 'Waiting jobs', 'Scheduled jobs'
and 'Printed jobs'.
• Carry out copy jobs and scan jobs.
7
'Trays' button
Access the 'Trays' view on the operator panel
to do the following, for example:
• Check the content of all paper trays.
• Load a new media type into a paper tray,
or
• Change the media type which is available
in one of the paper trays.
Chapter 2 - Main parts
27
The operator panel
28
Component
Function
8
'System' button
Access 'System' view to do the following, for
example:
• Check the status of the toner, staples and
other supplies.
• Read the counters.
• Start maintenance.
• Set up the preferred workflows.
• Change a number of default system settings.
• Adjust the brightness and contrast of the
LCD panel.
• Shut down the printer.
• View the content of the Media catalogue
or add temporary media to the Media catalogue.
• Start maintenance, calibration and media
registration
• Adjust the CMYK curve manually.
9
Dashboard
The dashboard displays information about the
system status such as:
• Information about the current printing
process.
• Information about operator intervention
that is required soon.
• Information about errors.
• Information about the status of the toner
reservoir and staple cartridges.
• Continue the job when the status is 'On
hold'.
Chapter 2 - Main parts
The operator panel
10
Component
Function
Status LED
Displays the status of the system.
• Red
The machine has stopped, for example
because a required media type is not available or an error has occurred. Operator
attention is required now.
• Orange
The machine will stop soon, for example
because more paper is required. Operator
attention is required soon.
The orange light illuminates when the
machine reaches the warning time. The
warning time is a time you can set to determine when the orange light must illuminate. You can set the warning time in the
'System' view of the operator panel.
• Green
The machine is busy printing. The machine can print longer than the set warning
time. Operator attention is not required.
• No color.
The machine is idle. There are no jobs
scheduled for printing.
•Overview of the machine configuration, on page 16
•Stop the printer, on page 126
•Introduction to the Schedule view, on page 133
•The operator attention light, on page 30
Chapter 2 - Main parts
29
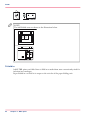
The operator attention light
The operator attention light
Introduction
The operator attention light on top of the printer helps you to monitor the status of the
printer from a distance. The colors of the lights match the printer status that the dashboard
displays.
Illustration
[15] The operator attention light
Status colors
The status colors of the operator attention light#
30
Color
Description
Red
The machine has stopped, for example because a required
media type is not available or an error has occurred.
Operator attention is required now.
Chapter 2 - Main parts
The operator attention light
Color
Description
Orange
The machine will stop soon, for example because more
paper is required.
Operator attention is required soon.
The orange light illuminates when the machine reaches the
warning time. The warning time is a time you can set to
determine when the orange light must illuminate. You can
set the warning time in the 'System' section of the operator
panel.
By factory default, the warning time is set to 10 minutes.
So 10 minutes before operator attention is required, the
orange light will illuminate.
Green
The machine is busy printing. The machine can print
longer than the set warning time.
Operator attention is not required.
All lights off
The machine is idle. There are no jobs scheduled for
printing.
•Overview of the machine configuration, on page 16
Chapter 2 - Main parts
31
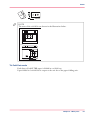
The copy tray
The copy tray
Introduction
The Copy Tray-P1 collects the prints.
The copy tray is optional and the availability differs per country.
Illustration
1
2
[16] The copy tray
Components and their functions
Copy tray components and their functions#
No.
Function
1
Auxiliary Tray
Pull out the auxiliary tray if you are printing on large paper.
- 330 × 483 mm, 320 × 450 mm (SRA3), 305 × 457 mm, A3, B4, A4, A4R,
B5, B5R, A5R, and Custom size (139.7 mm × 182.0 mm to 330.2 mm ×
487.7 mm).
- 13" × 19", 12 5/8" × 17 11/16", 12" × 18", 11" × 17" (LGL, LTR, LTRR,
STMTR, EXEC, and Custom size (5 ½" × 7 1/8" to 13" × 19 1/4").
2
Output Tray
Prints are output to this tray.
•Overview of the machine configuration, on page 16
32
Chapter 2 - Main parts
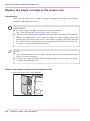
Stacker/stapler and integrated punch unit
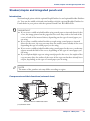
Stacker/stapler and integrated punch unit
Introduction
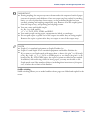
Stack and staple prints with the optional Staple Finisher-A1 and optional Booklet FinisherA1. You can also saddle stich and trim booklets with the optional Booklet Finisher-A1.
Punch holes in your prints with the optional Punch Unit BG1/BH1/BF1.
#
IMPORTANT
• If you create a saddle stitched booklet using coated paper or inserted sheets for the
cover, the image printed on the page after the cover may stick to the back of the
cover or back of the inserted sheets, depending on the type of coated paper you
are using.
• If you create a saddle stitched booklet or staple using coated paper or inserted
sheets for the cover, the copy sets may dirty the surface (toner streaks) of the cover
depending the type of coated paper you are using.
• If you create a saddle stitched booklet using coated paper for the cover, cracks may
appear around the fold of the cover, depending on the type of coated paper you
are using.
• If you staple multiple copy sets using coated paper for the cover, the staples of the
copy sets may dirty the surface of the cover of the copy sets that have already been
output, depending on the type of coated paper you are using.
#
NOTE
The name of the puncher unit may differ according to region.
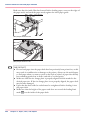
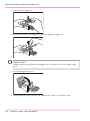
Components and their functions (external view)
1
6
6
5
5
2
4
2
4
3
Booklet Finisher-A1 + Buffer Pass Unit-F1
Staple Finisher-A1
[17] External view
Chapter 2 - Main parts
33
Stacker/stapler and integrated punch unit
Stacker/stapler components and their functions#
34
No.
Function
1
Buffer Pass Unit-F1 (standard)
Buffer Pass Unit-F1 is required to attach Staple Finisher-A1 or Booklet
Finisher-A1 to the main unit. Open Buffer Pass Unit-F1 to remove jammed
paper.
2
Front Cover of Staple Finisher-A1/Booklet Finisher-A1
Open this cover to replace the staple cartridge, remove jammed paper, or
clear a staple jam from the stapler unit and saddle stitcher unit.
3
Booklet tray (Booklet Finisher-A1)
Saddle stitched or saddle folded prints are output to this tray.
4
Lower tray
Prints are output to this tray.
5
Middle tray
Prints are output to this tray.
6
Upper tray
Prints are output to this tray.
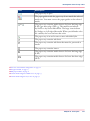
Chapter 2 - Main parts
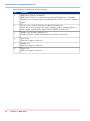
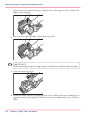
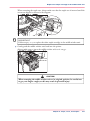
Stacker/stapler and integrated punch unit
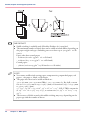
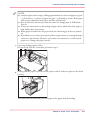
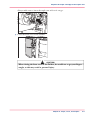
Components and their functions (internal view)
1
2
[18] Internal view
Stacker/stapler components and their functions#
No.
Function
1
Punch waste tray (Puncher Unit-BG1/BH1/BF1)
Pull out the punch waste tray to remove punch waste.
2
Trim waste tray (Inner Booklet Trimmer-A1)
Pull out the trim waste tray to discard trim waste.
Chapter 2 - Main parts
35
Stacker/stapler and integrated punch unit
Finishing options
#
CAUTION
• Do not place your fingers or hands on the finisher when the finisher is in use.
Doing so may result in personal injury or damage to the finisher.
• When removing paper from the tray of the finisher, do not place your hands
on the output tray of the finisher. The tray may move upward and your hands
may get caught.
• Do not place anything other than output paper in the trays of the finisher,
as doing so may damage the trays.
• Do not place anything under the trays of the finisher, as doing so may damage
the trays.
• The finishing options cannot be set for paper less than 60g/m2 / 16 lb bond.
Do not select the finishing options.
#
NOTE
If the finishing is used, the output trays move downward as the stack of paper that is
output increases in quantity and thickness. Once an output tray has reached its
stacking limit, subsequent prints are automatically delivered to the next available tray.
If all of the available trays have reached their stacking limits, printing stops temporarily. Remove all of the output paper from the trays. The trays move upward and
printing resumes.
36
Chapter 2 - Main parts
Stacker/stapler and integrated punch unit
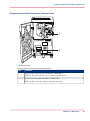
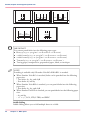
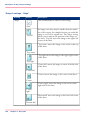
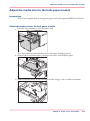
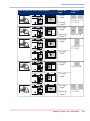
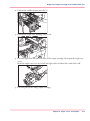
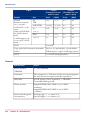
Stapling
Prints are automatically collated into sets arranged in page order and stapled. Prints are
stapled in the following places:
• If an original is placed on the glass plate:
Double Staple Area
Corner Staple Area
Upper Left
Upper Right
Lower Right
Lower Left
Left Side
Upper Left
Upper Right
Lower Right
Lower Left
Left Side
Right Side
Right Side
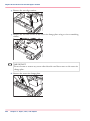
• If originals are placed in the feeder:
Chapter 2 - Main parts
37
Stacker/stapler and integrated punch unit
Corner Staple Area
Double Staple Area
Upper Right
Upper Left
Lower Left
Lower Right
Right Side
Upper Right
Upper Left
Lower Left
Lower Right
Right Side
Left Side
Left Side
#
CAUTION
Do not place your hands in the part of the tray where stapling takes place (near
the rollers) in a finisher, as this may result in personal injury.
38
Chapter 2 - Main parts
Stacker/stapler and integrated punch unit
#
IMPORTANT
• During stapling, the output trays move downward as the outputted stack of paper
increases in quantity and thickness. Once an output tray has reached its stacking
limit, 100 sets of prints have been output, or the predefined height has been
reached, printing and stapling temporarily stop. Remove all of the stapled prints
from the output tray, and printing and stapling resume.
• You can corner and double staple:
A3, B4, A4, A4R, and B5
11" × 17", LGL, LTR, LTRR, and EXEC
• You cannot staple tracing paper, transparencies, labels, or envelopes.
• Do not pull copies or prints out of the output area while they are being stapled.
Remove the copies or prints after they are output to one of the output trays.
#
NOTE
• Staple-G1 is standard equipment on Staple Finisher-A1.
• Staple-G1 and Staple-P1 are standard equipment on Booklet Finisher-A1.
• If you want to use Staple mode with more than 50 sheets (80 g/m2 / 20 lb bond)
of A3, B4, A4R, 11" × 17", LGL, or LTRR paper, or 100 sheets (80 g/m² / 20 lb
bond) of A4, B5, LTR, EXEC paper, the copies or prints are offset but not stapled.
In addition, when selecting coated or heavy paper, you may not be able to use
Staple mode even if the number of sheets, including sheet insertions or job separators, is below the set limit of the finisher.
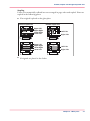
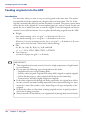
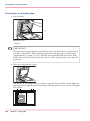
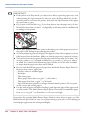
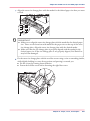
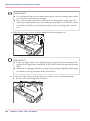
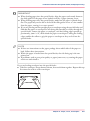
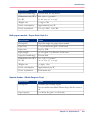
Saddle stitching
Saddle stitching allows you to make booklets whose pages are folded and stapled in the
center.
Chapter 2 - Main parts
39
Stacker/stapler and integrated punch unit
#
IMPORTANT
• Saddle stitching is available only if Booklet Finisher-A1 is attached.
• The maximum number of sheets that can be saddle stitched differs depending on
the paper weight and type. (Including one cover sheet up to 300 g/m2 / 110 lb
cover).
Paper other than coated paper:
- 20 sheets (60 to 81.4 g/m2 / 16–21 lb bond)
- 10 sheets (81.5 to 105 g/m2 / 22–28 lb bond)
Coated paper:
- 5 sheets (106 to 209 g/m2 / 29 lb bond to 110 lb index)
#
NOTE
• You cannot saddle stitch tracing paper, transparencies, prepunched paper, tab
paper 1, tab paper 2, labels, or envelopes.
• The paper sizes that can be saddle stitched are:
330 × 483 mm, 320 × 450 mm (SRA3), 305 × 457 mm, A3, B4, A4R, custom
size (210.0 × 279.3 mm to 297.0 × 487.7 mm) or custom size (297.1 × 279.3 mm
to 330.2 × 487.7 mm).
13" × 19", 12 5/8" × 17 11/16", 12" × 18", 11" × 17", LGL, LTRR, custom size
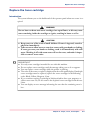
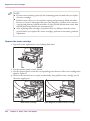
(8 1/4" × 11" to 11 3/4" × 19 1/4"), or custom size (11 3/4" × 11" to 13" × 19
1/4").
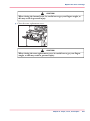
• The accuracy of folds created with saddle stitching may vary, depending on the
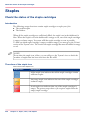
paper type and the number of sheets.
40
Chapter 2 - Main parts
Stacker/stapler and integrated punch unit
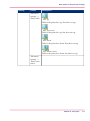
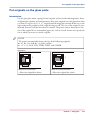
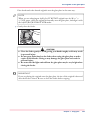
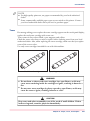
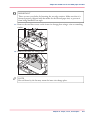
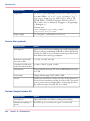
Punching
Punching allows you to punch holes into printed sheets.
The hole-punched areas are shown in the illustration below.
Glass plate
Feeder
Hole
Punched
Area
Hole
Punched
Area
Hole
Punched
Area
Hole
Punched
Area
The distance between the punch holes is shown in the illustration below.
Chapter 2 - Main parts
41
Stacker/stapler and integrated punch unit
80 mm
80 mm 80 mm 80 mm
Puncher Unit-BG1 (2 holes)
Puncher Unit-BG1 (4 holes)
21 mm
70 mm
21 mm
Puncher Unit-BH1
2 3/4"
(70 mm)
4 1/4"
4 1/4"
(108 mm) (108 mm)
Puncher Unit-BF1
#
IMPORTANT
You cannot punch holes into the following paper types.
• Heavy 4 (257 to 300 g/m2 / 100 lb cover to 110 lb cover)
• 1-sided coated 4 (257 to 300 g/m2 / 100 lb cover to 110 lb cover)
• 2-sided coated 4 (257 to 300 g/m2 / 100 lb cover to 110 lb cover)
• Textured 4 (257 to 300 g/m2 / 100 lb cover to 110 lb cover )
• Tracing paper, transparencies, prepunched paper, labels, or envelopes
#
NOTE
Punching is available only if Puncher Unit-BG1/BH1/BF1 is attached.
• When Puncher Unit-BG1 is attached, holes can be punched into the following
paper sizes.
- Two holes: A3, A4, and A4R
- Four holes: A3 and A4
• When Puncher Unit-BH1 is attached, you can punch holes into the following
paper sizes.
- Four holes: A3, A4, and A4R
• When Puncher Unit-BF1 is attached, you can punch holes into the following paper
sizes.
- A3 and A4
- 11" × 17", LGL, LTR, LTRR, and EXEC
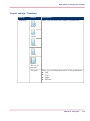
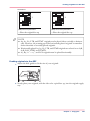
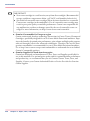
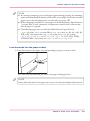
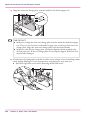
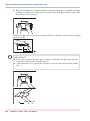
Saddle folding
Saddle folding allows you to fold multiple sheets in 2 folds.
42
Chapter 2 - Main parts
Stacker/stapler and integrated punch unit
Origin als
Copies
1
2
3
4
1
5
The paper is saddle folded
with a maximum of 5 sheets
#
IMPORTANT
• Saddle folding is available only if Booklet Finisher-A1 is attached.
• The paper is saddle folded with a maximum of 5 sheets (80 g/m2 / 20 lb Bond)
and then output.
#
NOTE
• You cannot saddle fold tracing paper, transparencies, prepunched paper, tab paper
1, tab paper 2, labels, or envelopes.
• The paper sizes that can be saddle folded are:
330 × 483 mm, 320 × 450 mm (SRA3), 305 × 457 mm, A3, B4, A4R, custom
size (210.0 × 279.3 mm to 297.0 × 487.7 mm) or custom size (297.1 × 279.3 mm
to 330.2 × 487.7 mm).
13" × 19", 12 5/8" × 17 11/16", 12" × 18", 11" × 17", LGL, LTRR, custom size
(8 1/4" × 11" to 11 3/4" × 19 1/4"), or custom size (11 3/4" × 11" to 13" × 19
1/4").
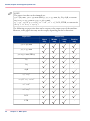
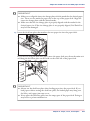
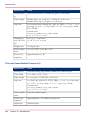
Trimming
Trimming allows you to trim the edges of the printed sheets.
The following are paper sizes that can be output to the output trays of the machine.
However, some paper sizes may not be output, depending on the set functions.
#
IMPORTANT
• Trimming is available only if Inner Booklet Trimmer-A1 is attached to Booklet
Finisher-A1.
• You cannot trim heavy paper (210 to 300 g/m2 / 111 lb index to 110 lb cover ),
textured paper, coated paper (210 to 300 g/m2 / 111 lb index to 110 lb cover),
tracing paper, transparencies, prepunched paper, tab 1, tab 2, labels, or envelopes.
Chapter 2 - Main parts
43
Stacker/stapler and integrated punch unit
#
NOTE
The paper sizes that can be trimmed are:
330 × 483 mm, 320 × 450 mm (SRA3), 305 × 457 mm, A3, B4, A4R, or custom
size (210.0 × 279.3 mm to 330.2 × 487.7 mm).
13" × 19", 12 5/8" x 17 11/16", 12" × 18", 11" × 17", LGL, LTRR, or custom size
(8 1/4" × 11" to 13" × 19 1/4")
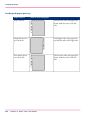
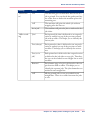
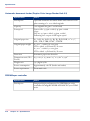
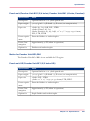
The following are paper sizes that can be output to the output trays of the machine.
However, some paper sizes may not be output, depending on the set functions.
#
Paper size
Output tray
Upper
tray
Middle
tray
Lower
tray
Booklet
tray
330 × 483 mm
305 × 457 mm
320 x 450 mm (SRA3)
A3
A4
-
A4R
13" × 19"
12 5/8" × 17 11/16"
12" × 18"
11" × 17"
LGL
LTR
44
Chapter 2 - Main parts
-
Stacker/stapler and integrated punch unit
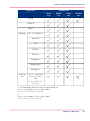
Paper size
Output tray
Upper
tray
Middle
tray
Lower
tray
Booklet
tray
LTRR
Envelope
Custom
size
STMTR
-
EXEC
-
No. 10 (COM10)
-
Monarch
-
DL
-
ISO-B5
-
ISO-C5
-
Nagagata 3
-
Yougatanaga 3
-
Kakugata 2
-
100.0 × 148.0 mm
to 330.2 × 487.7
mm
4" × 5 7/8" to 13"
× 19 1/4"
*1
*1: Custom paper sizes can only be output if they are
210.0 × 279.3 mm to 297.0 × 487.7 mm /
8 1/4" × 11" to 11 3/4" × 19 1/4"
or
297.1 × 279.3 mm to 330.2 × 487.7 mm /
11 3/4" × 11" to 13" × 19 1/4"
Chapter 2 - Main parts
45
Stacker/stapler and integrated punch unit
#
NOTE
The booklet tray can only be used when Booklet Finisher-A1 is attached.
Optional accessories
Staple-G1
[113] A case for stapling
The maximum number of sheets that can be stapled is:
• 100 in case of Staple-G1
Staple-P1
[114] A case for saddle stitching
•Overview of the machine configuration, on page 16
46
Chapter 2 - Main parts
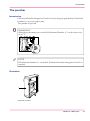
The puncher
The puncher
Introduction
Professional Puncher Integration Unit-B1 reverses the paper punched by Professional
Puncher-C1 to prevent paper jams.
The puncher is optional.
#
IMPORTANT
Always keep the main power switch of Professional Puncher- C1 on the front cover
set to "I".
#
NOTE
If Professional Puncher-C1 is attached, Professional Puncher Integration Unit-B1 is
required.
Illustration
1
[116] The puncher
Chapter 2 - Main parts
47
The puncher
Components and their functions
Puncher components and their functions#
No.
Function
1
Front Cover of Professional Puncher Integration Unit-B1
Open this cover to remove jammed paper.
•Overview of the machine configuration, on page 16
48
Chapter 2 - Main parts
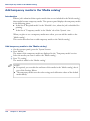
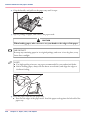
Inserter
Inserter
Introduction
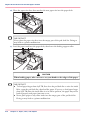
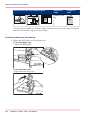
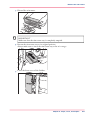
The optional inserter (Document Insertion Unit-H1) allows you to load inserts and
covers for booklets.
#
IMPORTANT
• Rolled or curled paper must be straightened before placing it into Document Insertion Unit-H1.
• Do not place the following types of paper into Document Insertion Unit. Doing
so may cause a paper jam.
- Insertion sheets with holes or tears
- Severely curled or wrinkled paper
- Clipped or stapled insertion sheets
- Transparencies or other highly transparent insertion sheets
- Labels
• Some types of paper cannot be used with Document Insertion Unit-H1. For more
information, contact your local authorized dealer.
Chapter 2 - Main parts
49
Inserter
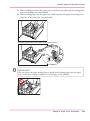
Illustration
3
4
2
1
5
[117] Inserter
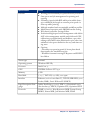
Components and their functions
Inserter components and their functions#
50
No.
Function
1
Upper tray
Load paper you want to use as a cover, sheet insertion, job separator, and so
on.
2
Lower tray
Load paper you want to use as a cover, sheet insertion, job separator, and so
on.
3
Tray cover
Lift to load paper into the lower tray.
4
Slide guides
Adjust the slide guides to match the width of the original.
5
Front cover
Open this cover to remove jammed paper.
Chapter 2 - Main parts
Inserter
•Overview of the machine configuration, on page 16
Chapter 2 - Main parts
51
Folder
Folder
Introduction
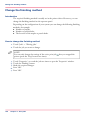
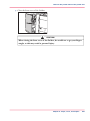
The optional folder (Paper Folding Unit-G1) allows you to fold paper in five different
ways (Z-fold, half fold, tri-fold in, tri-fold out, double parallel fold). This section describes
the folder and the five folding methods.
Illustration
1
2
3
[118] Folder
Components and their functions
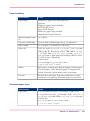
Folder components and their functions#
No.
Function
1
Front cover
Open this cover to remove jammed paper.
2
Folding unit
Open this cover to remove jammed paper.
3
Exit slot
Folded paper is output to this tray.
Z-fold
Paper Folding Unit-G1 folds A3, B4 / 11" x 17" or A4R/LTRR paper into A4, B5/LTR,
or A5/STMT, respectively. When you want to make multiple copies of originals with
different sizes, Z-fold mode allows you to easily handle paper with the same leading edge
length but different width.
Paper folded in a Z-fold is output to the tray specified for the finisher.
52
Chapter 2 - Main parts
Folder
#
IMPORTANT
A3 / 11" x 17" and A4R/LTRR paper can be Z-folded.
#
NOTE
• The Z-folded areas are shown in the illustration below.
Glass plate
Feeder
• If paper that has been Z-folded is included in the output, the sheets may not be
aligned when output.
Half fold
Each sheet of A4R/LTRR paper is half folded.
Paper folded in a half fold is output to the tray specified for the finisher.
Chapter 2 - Main parts
53
Folder
#
NOTE
The half folded areas are shown in the illustration below.
Glass plate
Feeder
Tri-fold in
A4R/LTRR prints are folded into tri-fold in to make them more conveniently sized for
insertion into envelopes.
Paper folded in a tri-fold in is output to the exit slot of the paper folding unit.
54
Chapter 2 - Main parts
Folder
#
NOTE
The areas of the tri-fold in are shown in the illustration below.
Glass plate
Feeder
Tri-Fold Out mode
Each sheet of A4R/LTRR paper is folded in a tri-fold out.
Paper folded in a tri-fold out is output to the exit slot of the paper folding unit.
Chapter 2 - Main parts
55
Folder
#
NOTE
The tri-fold out areas are shown in the illustration below.
Glass plate
Feeder
Double Parallel Fold mode
Each sheet of A4R/LTRR paper is folded in a double parallel fold.
Paper folded in a double parallel fold is output to the exit slot of the paper folding unit.
56
Chapter 2 - Main parts
Folder
#
NOTE
The double parallel folded areas are shown in the illustration below.
Glass plate
Feeder
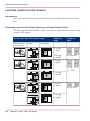
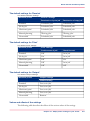
Folding methods and output locations#
Folding methods
Output location
Stacker/stapler
Folder
Z-Fold
-
Half Fold
-
Tri-fold in
-
Tri-fold out
-
Double parallel fold
-
•Overview of the machine configuration, on page 16
Chapter 2 - Main parts
57
Folder
58
Chapter 2 - Main parts
Chapter 3
Operating concept
Operating concept
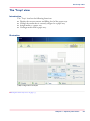
Operating concept
Introduction
To maximize efficient and productive printing, the operating concept of the system, is
based on the following principles.
• Document preparation / job submission and production printing are clearly separated
steps in the workflow.
• Media definition is done by choosing from a media catalog instead of selecting trays.
• Operation is intuitive and convenient at all workflow steps.
• The workflow is entirely integrated because all components work together seamlessly.
60
Chapter 3 - Operating concept
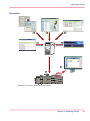
Operating concept
Illustration
2
3
4
1
6
5
7
8
[134] The components of the complete system
Chapter 3 - Operating concept
61
Operating concept
Components overview
#
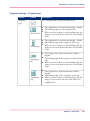
62
Component
Main task
1
Settings Editor
Define initial and default system settings
• Set default print and workflow settings
• Define default color management settings like
color pre-sets
• Maintain the media catalog
• Set scan settings
2
Printer driver
Document preparation and job submission
Available via any appli- • Document preparation for production printing
cation, e.g. Adobe Acro- • Define settings per print job
• Send print jobs to the printer
bat, Microsoft Word.
3
PRISMAprepare
Optional software
Document preparation and job submission
• Document preparation with full preview for
production printing
• Define settings per page for complex print jobs
• Send print jobs to the printer
• Send print jobs to the PostScript printers in
the network
4
PRISMAaccess
Optional software
Workflow management for production environments
• Easy integration in PDF workflow
• Job submission via web
• Acceptance and preparation of incoming jobs
• Link to PRISMAprepare
• Link to all production printers
• Link to PRISMAarchive or your local reprint
archive
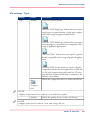
5
PRISMAsync controller
Process print jobs
• Rip print jobs
6
Remote Monitor
Monitor production printing remotely
• Monitor remotely when operator intervention
is needed
Chapter 3 - Operating concept
Operating concept
7
Component
Main task
Operator panel
Manage production printing from the 'Schedule'
view
• Monitor your print and copy jobs
• Load and assign media to the media trays
Manage jobs from the 'Jobs' view
• Schedule print and copy jobs
• Change job properties if required
• Define and handle copy jobs
• Define and handle scan jobs
Manage media from the 'Trays' view
• Change the media that is currently assigned to
a paper tray
• Assign the media to the paper tray
Manage the system from the 'System' view
• Calibrate the system
• Perform maintenance tasks
• Set default workflow and printer settings
• View the media catalog, add temporary media
and perform media registration
8
imageRUNNER ADVANCE C9075S
PRO/C9065 PRO
• Production printing
• Finishing
Chapter 3 - Operating concept
63
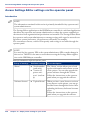
Access the Settings Editor
Access the Settings Editor
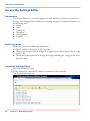
Introduction
The Settings Editor is a web-based application and therefore accessible via an Internet
browser. The Settings Editor enables you to manage settings or to display information in
the following areas.
• 'Media'
• 'color'
• 'Preferences'
• 'Workflow'
• 'Configuration'
• 'Support'
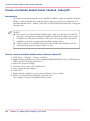
Before you begin
Make sure you have the following information.
• The IP address or hostname of the controller.
• The key operator password to change all settings except for the settings in the 'Configuration' tab.
• The administrator password to change all settings including the settings in the 'Configuration' tab.
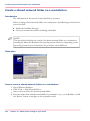
Access the Settings Editor
1. Open the Internet browser.
2. At the address bar, enter the IP-address or hostname of the controller.
The Settings Editor appears.
64
Chapter 3 - Operating concept
Access the Settings Editor
Result
You can now use the Settings Editor to make changes in the above listed areas.
Chapter 3 - Operating concept
65
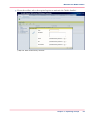
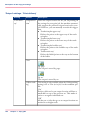
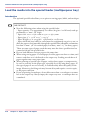
Maintain the 'Media catalog'
Maintain the 'Media catalog'
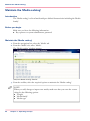
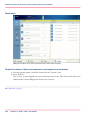
Introduction
The 'Media catalog' is a list of media with pre-defined characteristics including the 'Media
family'.
Before you begin
Make sure you have the following information.
• Key operator or system administrator password
Maintain the 'Media catalog'
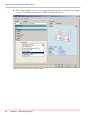
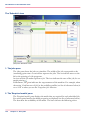
1. From the navigation bar, select the 'Media' tab.
2. From the 'Media' tab, select 'Media'.
The 'Media catalog' window appears.
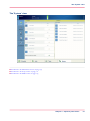
[136] The 'Media catalog' window
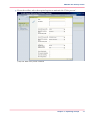
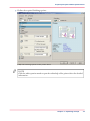
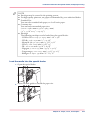
3. From the toolbar, select the required option to maintain the 'Media catalog'.
#
NOTE
When you add, change or import new media, make sure that you enter the correct
values for the following options.
• 'Weight'
• 'Media family'
• 'Media type'
66
Chapter 3 - Operating concept
Maintain the 'Media catalog'
The correct values are required for optimal print quality.
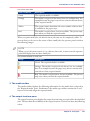
[137] The 'Add new media' window
Chapter 3 - Operating concept
67
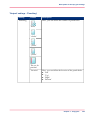
Maintain the 'Media families'
Maintain the 'Media families'
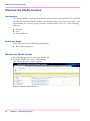
Introduction
The 'Media family' is a group of media that uses the same output profile. The controller
provides by default the media families coated and uncoated. An expert can create a new
media family for a specific group of media. A media family refers to 1 of the following
halftones.
• 'Normal'
• 'Fine'
• 'Error diffusion'
Before you begin
Make sure you have the following information.
• Key operator password
Maintain the 'Media families'
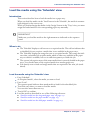
1. From the navigation bar, select the 'Media' tab.
2. From the 'Media' tab, select 'Media family'.
The 'Media families' window appears.
[138] The 'Media families' window
68
Chapter 3 - Operating concept
Maintain the 'Media families'
3. From the toolbar, select the required option to maintain the 'Media families'.
[139] The 'Add media family' window
Chapter 3 - Operating concept
69
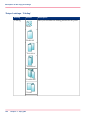
Maintain the 'Color pre-sets'
Maintain the 'Color pre-sets'
Introduction
A color pre-set is a collection of color and quality settings that matches a specific document
type, workflow or color application. The color pre-sets enable users to select the correct
settings easily without in-depth knowledge about color management.
The controller provides the following color pre-sets to start printing immediately.
• 'Office documents' to print Microsoft Office documents.
Microsoft Office documents use the RGB color space.
• 'Photographic content' to print documents from photo editing or layout applications.
These documents use the CMYK color space.
A color expert can create more color pre-sets. The color pre-sets appear in the printer
driver and in PRISMAprepare (optional software).
Maintain the 'Color pre-sets'
1. From the navigation bar, select the 'color' tab.
2. From the 'color' tab, select 'Color pre-sets'.
The 'Color pre-sets' window appears.
[140] The 'Color pre-sets' window
70
Chapter 3 - Operating concept
Maintain the 'Color pre-sets'
3. From the toolbar, select the required option to maintain the 'Color pre-sets'.
[141] The 'Add color pre-set' window
Chapter 3 - Operating concept
71
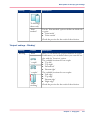
Maintain the 'Input profiles'
Maintain the 'Input profiles'
Introduction
An input profile defines a reference color workspace for the color data of the objects in
the document. An input profile is used to define colors in a device independent way.
Maintain the 'Input profiles'
1. From the navigation bar, select the 'color' tab.
2. From the 'color' tab, select 'Input profiles'.
The 'Input profiles' window appears.
[142] The 'Input profiles' window
3. From the toolbar, select the required option to maintain the input profiles.
72
Chapter 3 - Operating concept
Maintain the 'Output profiles'
Maintain the 'Output profiles'
Introduction
An output profile defines a reference color workspace for the color data of the objects in
the document. An output profile is used to define colors in a device independent way.
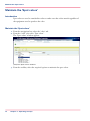
Maintain the 'Output profiles'
1. From the navigation bar, select the 'color' tab.
2. From the 'color' tab, select 'Output profiles'.
The 'Output profiles' window appears.
[143] The 'Output profiles' window
3. From the toolbar, select the required option to maintain the output profiles.
Chapter 3 - Operating concept
73
Maintain the 'Spot colors'
Maintain the 'Spot colors'
Introduction
Spot colors are used to standardize colors to make sure that colors match regardless of
the equipment used to produce the color.
Maintain the 'Spot colors'
1. From the navigation bar, select the 'color' tab.
2. From the 'color' tab, select 'Spot colors'.
The 'Spot colors' window appears.
[144] The 'Spot colors' window
3. From the toolbar, select the required option to maintain the spot colors.
74
Chapter 3 - Operating concept
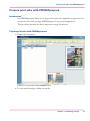
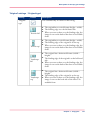
Prepare print jobs with PRISMAprepare
Prepare print jobs with PRISMAprepare
Introduction
Océ PRISMAprepare allows you to prepare the print job completely on page level. You
can preview the result per page. PRISMAprepare is an optional application.
This procedure describes the most important settings for daily use.
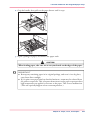
Prepare print jobs with PRISMAprepare
1. Prepare the document.
[145] Lay out preparation with PRISMAprepare
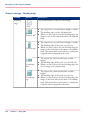
2. Use the media catalog to define the media.
Chapter 3 - Operating concept
75
Prepare print jobs with PRISMAprepare
With PRISMAprepare you can export the media catalogue to PRISMAsync controllers
of the black & white and color systems.
[146] The media catalog in PRISMAprepare
3. Select the required color pre-set or define customized color settings for optimal print
quality.
• Select 'Office documents' to print the Microsoft Office documents. The Microsoft
Office documents use the RGB color space.
• Select 'Photographic content' to print documents from photo editing or layout applications. These documents use the CMYK color space.
4. Define the required finishing options.
#
NOTE
Please refer to the online help of PRISMAprepare for detailed information.
76
Chapter 3 - Operating concept
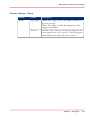
Prepare print jobs with the printer driver
Prepare print jobs with the printer driver
Introduction
The printer driver enables you to prepare the print job completely. The printer driver
appears in all applications running in the Microsoft Windows or Apple Mac OS operating
systems.
This procedure describes the most important settings for daily use.
Prepare print jobs with the printer driver
1. Use the media catalog to select the media to print on.
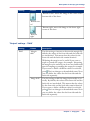
[147] The media catalog in the printer driver
2. Select the required color pre-set or define customized color settings for optimal print
quality.
• Select 'Office documents' to print Microsoft Office documents. Microsoft Office
documents use the RGB color space.
Chapter 3 - Operating concept
77
Prepare print jobs with the printer driver
• Select 'Photographic content' to print documents from photo editing or layout appli-
cations. These documents use the CMYK or RGB color space.
[148] The color pre-sets in the printer driver
78
Chapter 3 - Operating concept
Prepare print jobs with the printer driver
3. Define the required finishing options.
[149] The finishing options in the printer driver
#
NOTE
Click the white question mark to open the online help of the printer driver for detailed
information.
Chapter 3 - Operating concept
79
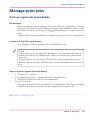
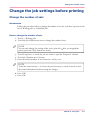
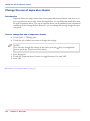
Manage production printing
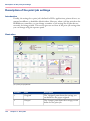
Manage production printing
Introduction
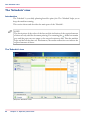
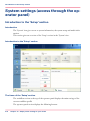
The operating panel of the printer enables you to manage production printing. You
manage all print jobs from the 'Schedule' tab. The Remote Monitor enables you to
monitor the system status from a distance via an internet browser.
Manage production printing
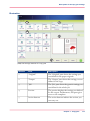
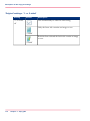
1. Press the 'Schedule' button at the lower left of the operator panel to access the 'Schedule'
view.
[150] The 'Schedule' view
Monitor operator intervention remotely
1. Open the Internet Browser.
2. At the address bar, enter 'http://printername/remoteinfo'.
80
Chapter 3 - Operating concept
Manage production printing
The Remote Monitor displays a fixed time line of 30 minutes.
[151] The remote monitor
Chapter 3 - Operating concept
81
Manage production printing
82
Chapter 3 - Operating concept
Chapter 4
Operator panel views
The dashboard
The dashboard
Introduction
The dashboard is the upper part of the operator panel. The dashboard is always visible,
irrespective of the current view. The dashboard shows the following.
• The status of the system.
• The status of the supplies.
• The status of the finishers.
• The current process.
• Instructions for the operator.
• The 'Continue' button after you stopped the printer.
Illustration
The following illustration shows the dashboard while the machine is busy. The vertical
status bar is green. No action is required.
2
1
3
4
[152] The dashboard - No action is required
The following illustration shows the dashboard while the machine is busy. The vertical
status bar is orange. Next to the status bar, the dashboard displays a message that indicates
which action is required soon.
2
1
3
4
[153] The dashboard - Action is required soon
The parts of the dashboard
The dashboard#
84
Number
Function
1
Display the status of the machine, for example Initializing...,
Printing... or Printing will stop.... Each status message can have
a sub-message with additional information.
Chapter 4 - Operator panel views
The dashboard
Number
Function
2
Display the file name of the current job (for document printing)
or current stream (for stream printing). Furthermore, the
progress of the current job is displayed.
For document printing, the counter can display the following
information.
• Set X of Y
• Sheet X of Y or Sheet X.
X represents the current status of the print job. Y represents the
total number of sets or sheets of a print job.
When the sorting method for a job is set to By set and a set
contains at least 40 pages, then the dashboard displays the set
count (Set X of Y).
When the sorting method for a job is set to By page, or when
you print stream jobs, then the dashboard only displays a sheet
count.
3
Display the action that you must do now or soon. The colors
of the vertical status bar at the left-hand side match the colors
of the LED on the operator panel and the operator attention
light. When the color is orange or red, a message indicates the
required action.
Orange means that action is required soon. How long before
an upcoming action the operator panel starts to display the
message depends on the defined warning time.
Red means that action is required now.
4
Displays a status action when you must do something now or
soon regarding the following items.
• Finishers.
• Staple cartridges.
• Toner reservoir.
#
NOTE
The operator panel can only display one message at a time. When there are more
messages, the operator panel displays the first required or most important message.
Chapter 4 - Operator panel views
85
The 'Schedule' view
The 'Schedule' view
Introduction
The 'Schedule' is your daily planning board for print jobs. The 'Schedule' helps you to
keep the machine running.
This section shows and describes the main parts of the 'Schedule'.
#
NOTE
The descriptions of the colors of the bars and the indication of the required amount
of sheets are only valid for document printing. For streaming jobs , all the bars remain
grey until the paper trays are empty or the output locations are full. Then the machine
stops and the bars become red. Furthermore, the media toolbar does not indicate the
required amount of sheets.
The 'Schedule' view
[154] The 'Schedule' view
86
Chapter 4 - Operator panel views
The 'Jobs' view
The 'Jobs' view
Introduction
The 'Jobs' view enables you to access all functions to print, copy and scan your documents.
From the left side of the 'Jobs' view, you can access the following sections.
• The 'Queues' section.
The 'Queues' section enables you to manage print jobs in the list of 'Scheduled jobs'
and 'Waiting jobs'.
• The 'Printed jobs' section
The 'Printed jobs' section enables you to manage print jobs in the list of 'Printed jobs'.
• The 'Copy/Scan' section.
The 'Copy/Scan' section enables you to manage copy and scan jobs using copy templates and scan profiles.
The 'Jobs' view
The job icons may show one or more of the following status icons.
Chapter 4 - Operator panel views
87
The 'Jobs' view
#
Icon
Description
The printer is downloading the document via the network
(spooling)
The printer converts the document into a printable bitmap
(ripping)
The printer is printing
The job is ready for printing
The printer converts and prints simultaneously (ripping
and printing)
The job contains an operator note
Indicates a streaming job
Indicates a proof print
The job settings are overruled by the PRISMAsync controller settings
Indicates an RIP error
•Description of the print job settings, on page 104
•Introduction to the copy function, on page 170
•Description of the copy job settings, on page 172
•Introduction to the scan function, on page 214
•Description of the scan job settings, on page 216
88
Chapter 4 - Operator panel views
The 'Trays' view
The 'Trays' view
Introduction
The 'Trays' view has the following functions.
• Display the current content and filling level of the paper trays
• Change the media that is currently assigned to a paper tray
• Assign media to a paper tray
• Unassign media from a paper tray.
Illustration
[166] Configuration example
•Description of the Trays view, on page 139
Chapter 4 - Operator panel views
89
The 'System' view
The 'System' view
Introduction
The system view enables you to access all functions to maintain and set up the system.
From the left side of the 'System' view, you can access the following sections.
• The 'Printer' section.
•
•
•
•
90
The 'Printer' section enables you to check the toner levels and the status of the waste
boxes and staples of finishing equipment.
The 'Maintenance' section.
The 'Maintenance' section enables you to read the counters and start the maintenance
actions.
The 'Setup' section.
The 'Setup' section enables you to set up your personal workflow, the behavior of the
operator panel and the advanced system settings.
The 'Media' section.
The 'Media' section enables you to view the content of the 'Media catalog'or add
temporary media to the 'Media catalog'.
The 'Color management' section.
The 'Color management' section gives access to the following functions.
Chapter 4 - Operator panel views
The 'System' view
The 'System' view
•Introduction to the Maintenance section, on page 344
•Introduction to the Setup section, on page 318
•Introduction to the Media section, on page 144
Chapter 4 - Operator panel views
91
The 'System' view
92
Chapter 4 - Operator panel views
Chapter 5
Power information
The power buttons and power modes
The power buttons and power modes
The power buttons
The printer has the following switches and buttons to control the power supply.
• Power switch
The power switch is located on the upper-right side of the printer. The power switch
connects and disconnects the printer to and from the main power.
( I side)
• Sleep button with LED .
The Sleep button is located at the right-hand side of the operator panel.
The Sleep button on the printer allows you to switch between the Ready mode and
the Sleep mode. This is only possible if the power switch is in the "I" position and the
startup phase is completed.
The power modes
The power modes#
94
Power mode
Sleep button
Operator panel
Description
Off
Off
Off
The printer is completely off.
The power switch is in the
position. There is no power
consumption. The printer cannot receive or print jobs.
Ready
Off
On
The printer is ready to print
jobs.
Chapter 5 - Power information
The power buttons and power modes
Power mode
Sleep button
Operator panel
Description
Low power
On
Off
The printer automatically enters
the low-power mode after the
time that was defined in the Settings Editor and no button was
pressed.
The printer wakes up when a job
arrives in the list of Scheduled
jobs or when you touch a button. The printer will start to
warm up.
Sleep mode
On
Off
The printer automatically goes
from the low-power mode into
the sleep mode after the time
that was defined in the Settings
Editor.
You can also put the printer into
sleep mode manually. Press the
Sleep button to do this. The
printer will enter the sleep mode
as soon as the list of Scheduled
jobs is empty.
The printer will wake up from
the sleep mode when you press
the Sleep button or when the
calendar timer expires. The
printer will also wake up when
a printable job arrives in the list
of Scheduled jobs, provided that
the function Automatic wake-up
in the Settings Editor is enabled.
Chapter 5 - Power information
95
Turn on the controller
Turn on the controller
Introduction
You are advised to turn on the system in the following order.
1. The controller
2. The printer
Illustration
On/Off
[169] The location of the on/off button
Turn on the controller
1. Use one of the following options to turn on the controller.
• Press the Sleep button at the right-hand side of the operator panel if the system was
shut down from the operator panel.
• Press the on/off button of the controller
The controller needs about 1 minute to start up.
•Turn on the printer, on page 97
96
Chapter 5 - Power information
Turn on the printer
Turn on the printer
Introduction
You are advised to turn on the system in the following order.
1. The controller
2. The printer
How to turn on the printer
1. Put the main power switch on the upper-right side of the main unit in the "I" position.
2. If required, wait until the controller is ready.
3. Press the Sleep button at the right-hand side of the operator panel.
Chapter 5 - Power information
97
Turn off the printer
Turn off the printer
Introduction
You are advised to turn off the system in the following order.
1. The controller
2. The printer
How to turn off the printer
1. Touch 'System' -> 'Setup' -> 'Shut down system'.
2. Select 'Shut down' to shut down the controller and printer.
3. Put the main power switch on top of the main unit in the "I" position.
98
Chapter 5 - Power information
Use the Sleep mode
Use the Sleep mode
Introduction
When you do not need the printer for a while, the printer can go into the sleep mode.
The power consumption in the sleep mode is very low.
The printer can enter the sleep mode in 2 ways:
• Automatically
• Manually
The timers and settings for the automatic way can be defined in the Settings Editor.
The procedure below describes the manual way.
How to use the sleep mode
1. To put the printer into the sleep mode, press the Sleep button at the right-hand side
of the operator panel.
The printer will go into the sleep mode when the list of 'Scheduled jobs' is empty.
To put the printer into the sleep mode sooner, use the 'Stop after job' function.
2. To wake up the printer from the sleep mode, press the Sleep button again.
The printer will warm up. The warming-up time depends on how long the printer was
in the sleep mode.
Chapter 5 - Power information
99
Use the Sleep mode
100
Chapter 5 - Power information
Chapter 6
Print jobs
Introduction to the print function
General information
Introduction to the print function
Introduction
Print jobs can be sent from the following locations.
• The printer driver.
• PRISMAprepare.
• From the printer itself (copy job).
Depending on the workflow settings, the print job will appear in one of the following
destinations.
• List of 'Waiting jobs'
• List of 'Scheduled jobs'
The list of 'Printed jobs' can store jobs temporarily.
The 'Schedule' view enables you to plan your daily print jobs.
The 'Jobs' view enables you to manage the print jobs in the different queues.
102
Chapter 6 - Print jobs
Introduction to the print function
Introduction to the print function
[170] The jobs view
•Description of the print job settings, on page 104
Chapter 6 - Print jobs
103
Description of the print job settings
Description of the print job settings
Introduction
Usually, the settings for a print job is defined in PDLs, applications, printer drivers, automated workflows, or hotfolder default tickets. However, when a job has arrived on the
PRISMAsync controller, you can change a number of job settings for all jobs that are
currently not being printed. This section gives an overview of the print job settings that
you can change using the operator panel.
Illustration
1
3
2
4
5
[171] The job properties
#
104
Number
Pane
Description
1
'Original'
The 'Original' pane shows the settings you
can define for the paper originals
2
'Output'
The 'Output' pane shows the settings you can
define for the print job.
Chapter 6 - Print jobs
Description of the print job settings
Number
Pane
Description
3
'Job'
The 'Job' pane shows the generic settings you
can define for the whole job
4
Preview
The preview displays the settings you defined
for the output. Furthermore, this pane gives
access to the templates
5
Action buttons
The action buttons indicate the actions you
can carry out.
'Output' settings - '1- or 2-sided'
#
Setting
Values
'1- or 2-sided'
Description
The automatically set value for this setting.
'Auto'
The output contains an image on 1 side.
'1-sided'
The output contains an image on both sides.
'2-sided'
Chapter 6 - Print jobs
105
Description of the print job settings
'Output' settings - 'Binding edge'
#
Setting
Values
'Binding
edge'
Description
The automatically set value for this setting.
'Auto'
'Portrait left'
'Portrait top'
• The output has a vertical format (height > width).
• The binding edge is at the left-hand side.
• When you turn a sheet over the binding edge, the
image or text on the back of the sheet is in readable
form.
• The output has a vertical format (height > width).
• The binding edge of the print is at the top.
• When you turn a sheet over the binding edge the
image on the back side of the sheet is in readable
form. This means that every back of a 2-sided print
is upside down compared to the front.
• The output has a horizontal format (width >
height).
'Landscape
left'
• The binding edge of the print is on the left side.
• When you turn a sheet over the binding edge, the
text or image is in readable form.
• The output has a horizontal format (width >
height).
'Landscape
top'
• The binding edge of the print is at the top.
• When you turn a sheet over the binding edge, the
image on the back side of the sheet is in readable
form. This means that every back of a 2-sided print
is upside down compared to the front.
Media
The tile is read-only.
You can change the required media for the job through the media button in the preview
pane on the right side. When more than one media type has been defined for a job, a
separate button for each media type is displayed.
106
Chapter 6 - Print jobs
Description of the print job settings
#
NOTE
You can only change to media with the same size, for example, from A4 blue to A4
green.
'Output' settings - 'Cover'
#
Setting
Values
'Cover'
'Front'
Description
Here you can indicate that the print job requires a
front cover. When the setting is enabled the corresponding setting 'Media' becomes enabled.
'Media'
When the setting 'Front cover' is enabled, you can
select a media from the media catalogue.
'Print sides'
Here you can select the sides of the front cover you
want to print on.
• 'Both sides'
• 'Front side'
• 'Back side'
• 'None'
'Back cover'
Here you can indicate that the print job requires a
back cover. When the setting is enabled the corresponding setting 'Media' becomes enabled.
'Media'
When the setting 'Back cover' is enabled, you can select a media from the media catalogue.
'Print sides'
Here you can select the sides of the back cover you
want to print on.
• 'Both sides'
• 'Front side'
• 'Back side'
• 'None'
Chapter 6 - Print jobs
107
Description of the print job settings
'Output' settings - 'Align'
#
Setting
Values
'Align'
Description
The automatically set value for this setting.
'Auto'
'Top left'
An image on a sheet may be smaller than the media
size of the output, for example because you scaled the
image to 70% of its original size. The 'Align' setting
allows you to indicate the position of the image on
the sheet. 'Top left' moves the image to the upper left
corner of the sheet.
'Top center' moves the image to the centre at the top
of the sheet.
'Top center'
'Top right' moves the image to the upper right corner
of the sheet.
'Top right'
'Center left' moves the image to centre of the left side
of the sheet.
'Center left'
'Center' moves the image to the centre of the sheet.
'Center'
'Center right' moves the image to the centre of the
right side of the sheet.
'Center
right'
'Bottom left' moves the image to the lower left corner
of the sheet.
'Bottom left'
108
Chapter 6 - Print jobs
Description of the print job settings
Setting
Values
Description
'Bottom center' moves the image to the centre of the
bottom side of the sheet.
'Bottom center'
'Bottom right' moves the image to the lower right
corner of the sheet.
'Bottom
right'
'Output' settings - 'Shift'
#
Setting
Values
Description
'Shift'
'Margin
shift'
Use this setting to increase or decrease the margin. By
default, the values of the front side and the back side
are interlocked. This means that the values for the
front side and the back side remain identical.
Widening the margin can be useful if you want to
staple or punch the output, for example. Narrowing
the margin can be useful if you do not need additional
space for stapling or punching the output, for example.
If you want to define a different value for each side,
press . The icon changes to the unlocked status. Now
you can define the values for the front side and the
back side separately.
'Image shift'
Use this setting to shift the image horizontally or vertically. By default, the values of the front side and the
back side are interlocked. This means that the values
for the front side and the back side remain identical.
If you want to define a different value for each side,
press . The icon changes to the unlocked status. Now
you can define the values for the front side and the
back side separately.
Chapter 6 - Print jobs
109
Description of the print job settings
'Output' settings - 'Print delivery'
#
Setting
Values
Description
'Print delivery'
'Output location'
Select the output location for the job. Depending on
the settings for your print job, the machine automatically suggests the preferred output location for your
job. However, you can manually overrule this suggestion.
• 'Stacker/stapler upper tray'
Deliver the prints at the upper tray of the stacker/stapler.
• 'Stacker/stapler lower tray'
Deliver the prints at the lower tray of the stacker/stapler.
• 'Stacker/stapler booklet tray'
Deliver the prints at the booklet tray of the stacker/stapler.
• 'Folder main tray'
Deliver the folded prints to the tray at the bottom
of the folder.
'Sort'
'By page'
The output is sorted by page.
'By set'
The output is sorted by set.
'Offset stacking'
110
Chapter 6 - Print jobs
This setting is only available when the 'Offset stacking'
setting is set to 'Sets (as in job)' in the workflow profile.
'On'
Each set delivered to an output location will have a
small shift on top of the previous set. This makes it
easier to recognize individual sets.
'Off'
All the sets or jobs that get to an output location are
stacked in a straight stack.
Description of the print job settings
Setting
Values
'Advanced
settings' ->
'Sheet order'
Description
'Face up'
Deliver the prints face up, first sheet on top.
'Face up reverse'
Deliver the prints face up, last sheet on top.
'Face down'
Deliver the prints face down, first sheet on top.
'Face down reverse'
Deliver the prints face down, last sheet on top.
'Advanced
settings' ->
'Sheet orientation'
Chapter 6 - Print jobs
111
Description of the print job settings
Setting
Values
Description
'Header up LEF'
Deliver the prints with the header on top side and in
portrait position (vertical).
'Header up SEF'
Deliver the prints with the header on top side and in
landscape position (horizontal).
'Header down LEF'
Deliver the prints with the header at the bottom side
and in portrait position (vertical).
'Header down SEF'
Deliver the prints with the header at the bottom side
and in landscape position (horizontal).
112
Chapter 6 - Print jobs
'Advanced
settings' ->
'Print order'
• 'Front/back'
'Advanced
settings' ->
'Rotation'
• '0 degrees'
• '180 degrees'
Default value. The front page on the front, the
back page on the back.
• 'Back/front'
Puts the front page on the back and the back page
on the front.
Rotates the prints 180 degrees.
Description of the print job settings
'Output' settings - 'Punching'
#
Setting
Values
'Punching'
Description
Here, you can define the number of punch holes.
'None'
'2 holes'
'3 holes'
'4 holes'
'Die set dependent'
'Location'
Here, you can define the location of the punch holes.
• 'Left'
• 'Top'
• 'Right'
• 'Bottom'
Chapter 6 - Print jobs
113
Description of the print job settings
'Output' settings - 'Folding'
#
Setting
Values
'Folding'
Here you can define the folding method for the prints.
'None'
'Half-fold'
'Tri-fold in'
'Tri-fold out'
'Parallel fold'
'Z-fold'
114
Chapter 6 - Print jobs
Description
Description of the print job settings
Setting
Values
Description
'Z-fold large
sheets only'
'Print
method'
Use the 'Print method' option to define on which side
to print:
• 'Print inside'
• 'Print outside'
Check the preview for the result of the selection.
'Output' settings - 'Binding'
#
Setting
Values
Description
'Binding'
'None'
Here you can define the required number of staples.
Furthermore you can define where you want the staples with the 'Location' option.
The available locations for one staple:
• 'Top left'
• 'Top right'
• 'Bottom left'
• 'Bottom right'
'1 staple'
'2 staples'
'Saddle
stitching'
The available locations for two staples:
• 'Left edge'
• 'Top edge'
• 'Bottom edge'
• 'Right edge'
Check the preview for the result of the selection.
Chapter 6 - Print jobs
115
Description of the print job settings
'Output' settings - 'Trimming'
#
Setting
Values
'Trimming'
'None'
Description
Trims the long edge according to the specified value.
The minimum trim size is 2 mm.
'Trim size'
'Job name'
#
Setting
Values
'Job name'
Description
By default, all print jobs are named "Print job" and
include a sequence number. To identify your copy
job more easily in the list of waiting jobs or scheduled
jobs, you can change the name of the copy job. When
you touch the 'Job name' button a keyboard appears.
'Number of sets'
#
Setting
Values
'Number of
sets'
Description
Use this setting to define the number of copies. You
can enter a value from 1 - 65,000. The default value
is 1.
'Page range'
#
116
Setting
Values
Description
'Page range'
'All'
When 'All' is selected, all pages of the job
will be printed.
'Pages'
When 'Pages' is selected, use the 'From'
and 'To' fields to indicate the first and
last pages you want printed.
Chapter 6 - Print jobs
Description of the print job settings
'Separator sheets'
#
Setting
Values
Description
'Separator
sheets'
'On'
When the 'Separator sheets' setting is enabled, a separate sheet is inserted automatically before each set of
a job to create a clear distinction between two sets.
Separator sheets are always empty. In the Settings
Editor, select a media from the media catalog use as
separator sheets. You can also indicate the feed direction of the separator sheets (long-edge feed or shortedge feed).
'Off'
No separator sheet will be inserted before each set.
Chapter 6 - Print jobs
117
Contradiction handling
Contradiction handling
Be aware that if you change settings you might make contradicting settings. If you make
contradicting settings, the preview pane informs you how to solve the contradictions.
The contradicting settings are marked orange and indicate where contradictions are found.
The green check marks indicate where to find the settings that you must change to resolve
the contradictions.
118
Chapter 6 - Print jobs
Print an urgent job immediately
Manage print jobs
Print an urgent job immediately
Introduction
When a job must be printed urgently, you can give that print job priority over all other
print jobs. The 'Print now' button allows you to print a job immediately. When you use
the 'Print now' button, the active print job will be paused as soon as the current set is
ready.
To print a job as soon as possible but not immediately, you can use the 'To top' function.
Location of the 'Print now' button
The 'Print now' button is available in the 'Scheduled jobs' view.
#
NOTE
To give priority to a job in the list of 'Waiting jobs', you must first touch 'Print' to
send the job to the list of 'Scheduled jobs'. There you can select the job and touch
'Print now'.
To give priority to a job in the list of 'Printed jobs', you must first reprint the job.
When the job is in the list of 'Scheduled jobs', you can select the job and touch 'Print
now'.
How to print an urgent job immediately
1.
2.
3.
4.
Touch 'Jobs' -> 'Queues'.
If collapsed, first touch to expand the list of 'Scheduled jobs'.
Touch the job which you want to print immediately.
Press 'Print now'.
The urgent job appears at the top of the list of 'Scheduled jobs'. The active print job
is paused as soon as the current set is ready and becomes second in the list.
•Give priority to a print job, on page 120
Chapter 6 - Print jobs
119
Give priority to a print job
Give priority to a print job
Introduction
When you want to print a job as soon as possible, but not necessarily immediately, you
must use the 'To top' function. The 'To top' function moves the selected job to the second
position in the list of 'Scheduled jobs', below the active print job . The job will be
printed when the active print job is ready.
How to give priority to a print job
1.
2.
3.
4.
Touch 'Jobs' -> 'Queues'.
If collapsed, first touch to expand the list of 'Scheduled jobs'.
Touch the job to which you want to give priority.
Press 'To top'.
•Print an urgent job immediately, on page 119
120
Chapter 6 - Print jobs
Print a scheduled job later
Print a scheduled job later
Introduction
The machine prints the print jobs and copy jobs that are present in the list of 'Scheduled
jobs' jobs.
However, you can decide to print a job later, for example because:
• The required media are out of stock, or
• You first want to make a proof.
Then you must move the job back to the list of 'Waiting jobs'.
How to print a scheduled job later
1. Touch 'Jobs' -> 'Queues'.
2. If collapsed, first touch to expand the list of 'Scheduled jobs'.
3. Touch the job(s) you want to print later or use the 'Select' button to make a selection.
To undo the multiple selection and only select 1 job, you must touch that job for 2 seconds.
#
NOTE
To select the active print job you must first press the 'Stop' key 2 times to stop the
job. However, the printing continues until the buffer is empty. You must touch the
'Continue' button to resume printing.
4. Press 'Move'.
The job is moved to the list of 'Waiting jobs'.
•Make a proof, on page 125
Chapter 6 - Print jobs
121
Reprint a job
Reprint a job
Introduction
#
NOTE
The following description is only applicable when the setting 'Printed jobs' in the
Settings Editor is enabled.
Print jobs that have been completed are moved from the list of 'Scheduled jobs' list to
the list of 'Printed jobs'. The 'Printed jobs' list helps you to reprint jobs quicker and easier.
What you need to know about the list of Printed jobs
• When you want to reprint a job, the selected job is always copied to the list of 'Waiting
jobs' first.
• You cannot change the job settings in the list of 'Printed jobs'. This is only possible
in the list of 'Waiting jobs'.
• You cannot reprint streaming jobs.
• The list of 'Printed jobs' does not store proof prints, system jobs and jobs that were
stopped or deleted.
• When you shut down the printer all jobs remain present in the list of 'Printed jobs'.
• The list of 'Printed jobs' can only store jobs. To prevent the disk of your system from
becoming full, jobs must be deleted manually or automatically on a regular basis. In
the Settings Editor, you can indicate the cleaning period, then the clean-up is carried
out at midnight or at the next start-up (in general the next morning).
• If E-shredding is enabled, the jobs will be shredded after removal from the list of
'Printed jobs'.
How to reprint a job
1. Touch 'Jobs' -> 'Printed jobs'.
2. Touch the job(s) you want to reprint or use the 'Select' button to make a selection.
To undo the multiple selection and only select 1 job, you must touch that job for 2 seconds.
3. Press 'Copy'.
4. Touch 'Queues' -> 'Waiting jobs'.
5. Touch the job you want to reprint.
6. Touch 'Properties' if you want to change the settings, for example the number of sets.
7. Press 'Print'.
122
Chapter 6 - Print jobs
Reprint a job
•Delete print jobs, on page 128
Chapter 6 - Print jobs
123
Print a job ticket
Print a job ticket
Introduction
Job tickets are used to transfer settings from an application to the printer. It can be convenient to print a job ticket before printing a job, to get an overview of the main job
characteristics.
Job tickets can contain the following information, for example.
• Job name.
• Job owner.
• Job destination.
• Job settings such as the number of sets.
• Required media.
The 'Ticket' button, which allows you to print a job ticket, is available in various locations
on the operator panel.
#
NOTE
You can only print a job ticket for 1 job at a time.
Locations of the 'Ticket' button
The 'Ticket' button is available at the following locations.
• List of 'Printed jobs' if this function is enabled in the Settings Editor.
• List of 'Scheduled jobs'.
• List of 'Waiting jobs'.
Print the job ticket
1. Go to one of the following locations.
• Touch 'Jobs' -> 'Queues'
If collapsed, first touch to expand the desired list of 'Scheduled jobs' or 'Waiting
jobs'.
• Touch 'Jobs' -> 'Printed jobs'
2. Touch the job for which you want to print the job ticket.
3. Press 'Ticket'.
The job is sent to the bottom of the list of 'Scheduled jobs'. The job may not be immediately visible in the list of 'Scheduled jobs'. You can recognize the job by the prefix @_ in
front of the job name.
124
Chapter 6 - Print jobs
Make a proof
Make a proof
Introduction
You can make a proof to check whether the quality and the layout of the output meet
your expectations. When you use the 'Proof' function, the machine prints 1 copy of the
job. You can only make a proof for a job in the list of 'Waiting jobs'.
When you make a proof, the printed set is not subtracted from the defined total number
of sets for a job. For example, if you need 10 sets the printer will still print 10 sets after
you made the proof. This is different from the checking of the first set.
Locations of the 'Proof' button
The 'Proof' button is available at the following locations.
• List of 'Waiting jobs'.
#
NOTE
To make a proof of a job in the list of 'Printed jobs', you must first touch 'Copy' to
copy the job to the list of 'Waiting jobs'. There you can select the job and touch
'Proof'.
Make a proof
1. Touch 'Jobs' > 'Queues'.
2. If collapsed, first touch to expand the desired list of 'Waiting jobs'.
3. Touch the job of which you want to print a proof.
#
NOTE
You can select multiple jobs.
4. Press 'Proof'.
A copy of the job goes to the bottom of the list of 'Scheduled jobs'. The original job remains in the list of 'Waiting jobs'.
You can recognize a proof by the magnifying glass on the job icon .
•Reprint a job, on page 122
Chapter 6 - Print jobs
125
Stop the printer
Stop the printer
Introduction
The printer can be stopped in 2 ways.
• Manually
Use the Stop button or the 'Stop after job' button to stop the printer.
• Automatically
Define a corresponding setting in the workflow profiles.
Stop the printer manually
Manual stop#
Stop after
A set
Press the button
one time
Description
The printer stops when the currently printed set
of the active print job is completed.
It depends on the set size and the moment you
press the 'Stop' button when the printer will stop.
For example, when you have a large set of 1,000
pages and you press the 'Stop' button after the first
page, the printing will continue for a couple of
minutes.
NOTE
When you press the 'Stop' button one time, the dashboard will immediately display
a 'Resume' button with a vertical, orange bar. However, the printing continues until
the current set is completed. You must touch the 'Resume' button to resume printing.
A page
two times
The printer stops when the printer buffer is empty
(as soon as possible).
The buffer can contain up to 50 pages. Because
the printer stops when the buffer is empty, it is
possible that the last printed set is not complete.
NOTE
When you press the 'Stop' button two times, the dashboard will immediately display
a 'Resume' button with a vertical, red bar. However, the printing continues until the
buffer is empty. You must touch the 'Resume' button to resume printing.
126
Chapter 6 - Print jobs
Stop the printer
Stop after
Press the button
Description
A job
'Stop after job'
In 'Jobs' -> 'Queues' -> 'Scheduled jobs' you must
select the job after which the printer must stop.
Then touch the 'Stop after job'.
A horizontal, red and white stop bar indicates that
the stop-after-job function is active.
The printer stops when the selected job is completed.
You must touch the 'Resume' button to resume
printing.
#
NOTE
When you print streaming jobs or jobs that consist of 1 large set, you must press
two times to stop the printer as soon as possible.
Stop the printer automatically
Automatic stop#
When
Then
• The 'Check first set' setting in a
The printer stops each time the first set
of a print job is completed. You can check
the first set before you continue the print
job.
'Workflow profile' is 'On', and
• The 'Check first set' setting is also en-
abled in the job.
The 'Confirm start of job' setting in a
'Workflow profile' is 'On'.
The printer stops each time at the start
of a new job. You must start each job
manually.
How to stop and continue printing manually
1. Press button one time to stop when the current set is completed.
2. Press button two times to stop as soon as possible.
in the dashboard.
3. To resume printing, press
#
NOTE
To stop printing after a job, you must select a job in 'Jobs' -> 'Queues' -> 'Scheduled
jobs'. Then you must touch the 'Stop after job' button.
Chapter 6 - Print jobs
127
Delete print jobs
Delete print jobs
Locations from which jobs can be deleted
You can delete jobs from the following locations.
• List of 'Printed jobs' (if this function is enabled in the Settings Editor).
• List of 'Scheduled jobs'.
• List of 'Waiting jobs'.
#
NOTE
You can only delete the active print job
printer is on hold.
in the list of 'Scheduled jobs' when the
Select the jobs you want to delete
The table below describes your options to select one or more jobs.
Select one or more jobs that you want to delete#
What to delete?
How to do?
One or more separate
jobs
Go to the correct location described above, then touch the
jobs one by one.
All jobs
Go to the correct location, then touch 'Select' -> 'All'.
'Jobs with available media'
Go to the correct location, then touch 'Select' -> 'Jobs with
available media'.
'Jobs with label'
Go to the correct location, then touch 'Select' -> 'Jobs with
label'.
#
NOTE
For the list of 'Printed jobs', you can indicate in the Settings Editor that the list must
be cleaned automatically at specified times. The factory default is 1 day.
How to delete the jobs
1. Go to one of the following locations.
• Touch 'Jobs' -> 'Queues'
If collapsed, first touch to expand the list of 'Scheduled jobs' or 'Waiting jobs'.
• Touch 'Jobs' -> 'Printed jobs'
2. Select the jobs you want to delete.
128
Chapter 6 - Print jobs
Delete print jobs
3. Press 'Delete'.
A message appears.
4. When you are sure that you want to delete the selected job(s), touch 'Yes'.
Chapter 6 - Print jobs
129
Schedule a waiting job for printing
Schedule a waiting job for printing
Introduction
The destination of jobs is determined by the selected workflow profile. When jobs go to
the list of 'Waiting jobs', you must manually send the jobs to the print queue (list of
'Scheduled jobs'). This enables you to keep full control of all jobs that must be printed.
How to schedule a waiting job for printing
1. Touch 'Jobs' -> 'Queues'.
2. If collapsed, first touch to expand the desired list of 'Waiting jobs'.
3. Touch the job(s) you want to print or use the 'Select' button to make a selection.
To undo the multiple selection and only select 1 job, you must touch that job for 2 seconds.
4. Press 'Print'.
The job is moved to the bottom of the list of 'Scheduled jobs'.
•Work with the workflow profiles, on page 320
130
Chapter 6 - Print jobs
Select more than one job for printing
Select more than one job for printing
Introduction
The table below describes the possibilities to select more than one job for printing.
Select more jobs#
Options
Description
Select 2 or more jobs
manually
Touch the jobs you want to print one by one.
'Select' button - 'All'
All jobs in the list of 'Waiting jobs' are printed. The order
in the list of 'Waiting jobs' determines the print order.
However, in the list of 'Scheduled jobs' you can give priority to a job.
'Select' button - 'Jobs
with available media'
All jobs for which the required media are currently available
in the paper trays, will be printed. This improves the productivity, because you must not change the required media
during printing. You may only need to add more of the
currently available media types.
'Select' button - 'Jobs
with label'
A label is a name or tag that helps you to identify certain
jobs on the operator panel. When a job is sent to the
printer, the person who submits the job can add a label to
that job. The label can be any name that helps to identify
certain jobs. A label is not connected to job settings. The
label can be defined in the printer driver, in a job ticket or
via an automated workflow. For example, the label ‘Customer XYZ’ can be added to jobs. Then you can select and
print all the jobs for 'Customer XYZ' at once.
How to select more than one job for printing
1. Touch 'Jobs' -> 'Queues'.
2. If collapsed, first touch to expand the desired list of 'Waiting jobs'.
3. Touch the jobs you want to print one by one, or make a selection using the 'Select' button.
The selected jobs are highlighted.
4. Press 'Print'.
Chapter 6 - Print jobs
131
Print a file from a USB drive
Print a file from a USB drive
Introduction
You can print documents (*.pdf, *.ps) on a USB drive.
How to print a file from a USB drive
1.
2.
3.
4.
5.
6.
132
Insert the USB drive into the USB port
at the left-hand side of the operator panel.
Touch 'Jobs' -> 'USB'.
Touch to browse through the directories on the USB drive.
Touch the file or files you want to print, or touch 'Select' to select multiple files.
Touch 'Print' to send the file to the list of 'Scheduled jobs' immediately, or
Touch 'Save' to save a copy of the file to another location on your printer such as the list
of 'Waiting jobs'. Then you can edit the file first and print the file from the other location
The locations you can select depend on your system configuration.
Chapter 6 - Print jobs
Introduction to the 'Schedule' view
Media handling
Introduction to the 'Schedule' view
Introduction
The 'Schedule' is your daily planning board for print jobs. The 'Schedule' helps you to
keep the machine running.
This section shows and describes the main parts of the 'Schedule'.
#
NOTE
The descriptions of the colors of the bars and the indication of the required amount
of sheets are only valid for document printing. For streaming jobs , all the bars remain
grey until the paper trays are empty or the output locations are full. Then the machine
stops and the bars become red. Furthermore, the media toolbar does not indicate the
required amount of sheets.
Chapter 6 - Print jobs
133
Introduction to the 'Schedule' view
The 'Schedule' view
1
3
5
2
4
[218] The 'Schedule' view
1. The jobs pane
The jobs pane shows the jobs on a timeline. The width of the job corresponds to the
(remaining) print time. A vertical line separates the jobs. The vertical line moves to the
left as the printing of a job progresses.
An icon and the job name represent a job. The icon indicates the state of the job, for example printing .
Furthermore, the icon indicates the stop moments of the machine. For example, when
the setting 'Confirm start of job' in the workflow profiles (see list of references below) is
set to 'On' or when you use the 'Stop after job' function.
2. The 'Required media' pane
The 'Required media' pane displays the media that are required for each scheduled job.
For each required media, the media properties are displayed (see list of references below).
The bars show the availability of the media. The bars can have the following colors.
134
Chapter 6 - Print jobs
Introduction to the 'Schedule' view
The colors of the bars#
Color of the bar
Description
Green
The required media is available.
Orange
The media is required in the future, but not available then. For
example because the paper trays do not contain sufficient sheets
of the required media.
Yellow
The system cannot determine the exact number of sheets that
is available in the paper trays.
Red
The media is required now, but not available. The job can only
start when you load the required media.
When you print small jobs, the bars for these jobs may not be completely visible. To
prevent that you do not see the status of these small jobs, the operator panel can show
the following images.
#
NOTE
When you set the zoom control (5) to a shorter time-scale, in most cases the operator
panel will display bars for these small jobs.
The possible display of small jobs#
Image
Description
Green. The required media is available.
Orange. The media is required in the future, but not available
then. For example because the paper trays do not contain sufficient sheets of the required media.
Red. The media is required now, but not available. The job can
only start when you load the required media.
3. The media toolbar
The media toolbar displays the following information for the media that is selected in
the 'Required media' pane. Furthermore, the media type toolbar contains the 'Load'
button to load and assign the required media.
4. The output locations pane
The output locations pane displays the output locations that are required for the scheduled
jobs. The bars show the availability of the output locations. The bars can have the following
colors.
Chapter 6 - Print jobs
135
Introduction to the 'Schedule' view
The colors of the bars#
Color of the bar
Description
Green
The output location is required and available.
Orange
The output location is required in the future, but not available
then. For example, because the output location will be full soon.
Red
The output location is required now, but not available. For example, because the output location is full.
Gray
The output location is required, but availability is unknown.
5. The zoom control
The zoom control enables you to adjust the time scale visible in the 'Schedule'. When
you touch the zoom button, a drop-down list appears. Then you can select the desired
time scale ( 5 minutes - 8 hours).
•Description of the Trays view, on page 139
•Work with the workflow profiles, on page 320
136
Chapter 6 - Print jobs
Load the media using the 'Schedule' view
Load the media using the 'Schedule' view
Introduction
This section describes how to load the media into a paper tray.
When you load the media via the 'Load' button in the 'Schedule', the media is automatically assigned to the correct tray.
When you load and assign the media via the 'Assign' button in the 'Trays' view, you must
assign the loaded media to the corresponding paper tray manually.
#
IMPORTANT
Make sure you load the media at the right moment as indicated on the operator
panel.
When to do
• The 'Schedule' displays a red bar next to a required media. The red bar indicates that
a scheduled job now requires a media that is not available in the paper trays.
• The 'Schedule' displays an orange bar next to a required media. The orange bar indi-
cates that a scheduled job requires media which is either not available in the paper
trays or which is available, but not in sufficient quantity to finish the job.
• The current job requires more of the same media than is currently loaded in the paper
trays. You can add more of the required media into another paper tray.
• You already want to load and assign media that are required for the next job (work
ahead).
Load the media using the 'Schedule' view
1. Press 'Schedule'.
2. At 'Required media', select the media you want to load.
3. Press 'Load'.
The operator panel indicates how much media to load for the scheduled jobs.
4. Touch the tray where you want to load the media.
You can select more than one tray.
5. Touch 'OK' to confirm.
6. Load the media as described in one of the following references.
• ‘Load the media into the integrated paper trays’ on page 237
• ‘Load the media into the paper module’ on page 245
• ‘Load the media into the bulk paper modules’ on page 257
Chapter 6 - Print jobs
137
Load the media using the 'Schedule' view
Result
#
NOTE
• The printer continues printing automatically after closing the paper tray.
• To load media in a grayed-out paper tray, you can open the paper tray and load
the media.
•Description of the Trays view, on page 139
138
Chapter 6 - Print jobs
Description of the 'Trays' view
Description of the 'Trays' view
Introduction
The 'Trays' view has the following functions.
• Display the current content and filling level of the paper trays
• Change the media that is currently assigned to a paper tray
• Assign media to a paper tray when you already loaded the media
• Unassign media from a paper tray.
This section describes the items of the 'Trays' view.
#
NOTE
The trays view also opens when you press the paper tray key on the operator panel.
Illustration
2
4
3
4
1
[222] Example of a configuration with 1 paper module
Chapter 6 - Print jobs
139
Description of the 'Trays' view
The items of the 'Trays' view
Description of the 'Trays' view#
Number
Item
Function
1
Content of the paper
trays
Indicate the current content and filling level of the
paper trays. The 'Trays' view displays the parameters of the media that are currently in the paper
trays. The parameters are a combination of icons
and texts.
2
'Assign' button
Assign media from the media catalog to the paper
tray.
3
'Unassign' button
Unassign media from the paper tray.
4
Arrow buttons
When your configuration contains more paper
modules or an inserter than the 'Trays' view can
display in 1 screen, you can press the arrow buttons
to change the part of the machine displayed.
The paper tray information
The 'Trays' view displays the following textual information for each paper tray.
• The media name, for example 'Normal paper'
• The media size, for example A4 or Letter
• The media weight, for example 80 g or 20 lb bond
• The media color
• The special characteristics of the media, for example 'cyclic' or 'punched'. In brackets,
additional information is given about these media, for example the cycle count or the
number of holes for punched media.
The 'Trays' view displays the following icons for each paper tray.
The meaning of the icons#
Icon
Description
The paper tray is empty
The paper tray is full
NOTE
Each line indicates the presence of about 100 sheets
The paper tray is too full. Please remove sheets from the stack
The plate inside the paper tray is down
140
Chapter 6 - Print jobs
Description of the 'Trays' view
Icon
Description
The paper tray is open
The paper guides inside the paper tray do not match the selected
media size. You must correct the paper guides or the selected
media
or
The paper tray contains media that are fed over the long edge
(LEF) or short edge (SEF) . The small icons indicate
A4/Letter or A4/Letter-like media. The large icons indicate
A3/Ledger or A3/Ledger-like media. When you defined a color
for a media, the icon can have that color
The paper tray is in use for one or more scheduled jobs
The paper tray contains tab sheets
The paper tray contains tab sheets that must be processed as
inserts
The paper tray contains inserts
The paper tray contains media that are fed over the long edge
(LEF)
The paper tray contains media that are fed over the short edge
(SEF)
•Overview of the machine configuration, on page 16
•The paper module, on page 19
•Bulk paper modules, on page 21
•Load the media using the Schedule view, on page 137
•Load the media using the Trays view, on page 142
Chapter 6 - Print jobs
141
Load the media using the 'Trays' view
Load the media using the 'Trays' view
Introduction
This section describes how to load the media into a paper tray.
When you load the media via the 'Load' button in the 'Schedule', the paper tray is automatically assigned to the correct media.
When you load and assign the media via the 'Assign' button in the 'Trays' view, you must
assign the paper tray to the loaded media manually.
#
IMPORTANT
Make sure you load the media at the right moment as indicated on the operator
panel.
When to do
• The 'Schedule' displays a red bar next to a required media. The red bar indicates that
a scheduled job now requires a media that is not available in the paper trays.
• The 'Schedule' displays an orange bar next to a required media. The orange bar indi-
cates that a scheduled job requires media which is either not available in the paper
trays or which is available, but not in sufficient quantity to finish the job.
• The current job requires more of the same media than is currently loaded in the paper
trays. You can add more of the required media into another paper tray.
• You already want to load and assign media that are required for the next job (work
ahead).
Load the media using the 'Trays' view
1. Press 'Trays'.
2. Select the tray where you want to load the media.
3. Load the media as described in one of the following references.
• ‘Load the media into the integrated paper trays’ on page 237
• ‘Load the media into the paper module’ on page 245
• ‘Load the media into the bulk paper modules’ on page 257
4. Press 'Assign'.
The 'Assign media' window opens with media names. The previous media in the selected
paper tray is highlighted. The list displays all the media in the media catalog. When the
list is empty, the media catalog does not contain media that match the position of the
paper guides.
5. Select the media you loaded and touch 'OK' to assign the media to the selected tray.
142
Chapter 6 - Print jobs
Load the media using the 'Trays' view
Result
#
NOTE
• To load media in a grayed-out paper tray, you can open the paper tray and load
the media.
• You can use 'Unassign' for example to prevent unnecessary printing on expensive
media.
•Load the media using the Schedule view, on page 137
Chapter 6 - Print jobs
143
Introduction to the 'Media' section
Introduction to the 'Media' section
Introduction
This section gives an overview of the 'Media' section in the 'System' view.
Overview of the 'Media' section
4
3
1
2
[229] Overview of the 'Media' section
The items of the 'Media' section
Description of the 'Media' section#
144
Number
Item
Function
1
List of all the media
that are available in the
'Media catalog'
Display the current content of the 'Media catalog'.
2
List of temporary media
Display the temporary media that are currently
available on the system.
3
'To catalog' button
Add temporary media to the media catalog.
Chapter 6 - Print jobs
Introduction to the 'Media' section
Number
Item
Function
4
'Registration' button
Perform a media registration to position the image
at the exact position of the media.
•Description of the Trays view, on page 139
•Add temporary media to the Media catalog , on page 148
Chapter 6 - Print jobs
145
Introduction to the media handling
Introduction to the media handling
Introduction
The machine supports a wide range of media, including tabs and inserts. The supported
media sizes range from 203 mm x 203 mm (minimum) to 305 mm x 457 mm (maximum).
The supported media weights range from 33 - 202 lb bond for media that are recommended by the manufacturer, and 40 - 135 lb bond for other media.
This section describes the following:
• Media handling in general
• The 'Media catalog'
• Temporary media.
General introduction to the media handling
All the print jobs require media that you can assign to the paper trays via the operator
panel. The print jobs can require media that are included in the 'Media catalog'. However,
the print jobs can also require media that are not included in the 'Media catalog'. These
media become temporary media on the system.
What is the media catalog
The media catalogue is a list of predefined media and media attributes which you can
define in the Settings Editor application on the PRISMAsync controller.
When you use the media catalog, the operator panel, the printer drivers and other applications all display the same list of predefined media. The operator panel and the printer
driver automatically retrieve and display the latest version of the media catalog.
What are temporary media
You can also use many other media that are not included in the 'Media catalog'. These
media become temporary media. You can look up the currently used temporary media
in the 'Media' section of the 'System' view. Furthermore, you can assign the temporary
media to a paper tray.
The temporary media remain available on the system until:
• No more waiting jobs need this media type
• No more scheduled jobs need this media type
• No more printed jobs need this media type
• This media type is no longer available in the paper trays.
146
Chapter 6 - Print jobs
Introduction to the media handling
When you plan to use these media more often, you can add these temporary media to
the 'Media catalog'.
Chapter 6 - Print jobs
147
Add temporary media to the 'Media catalog'
Add temporary media to the 'Media catalog'
Introduction
When a job is submitted that requires media that are not included in the 'Media catalog',
these media become temporary media. The operator panel displays the temporary media
in the following places.
• In the list of 'Required media' in the 'Schedule' view, when the job is scheduled for
printing.
• In the list of 'Temporary media' in the 'Media' tab of the 'System' view.
When you plan to use a temporary media more often, you can add the media to the
'Media catalog'.
This section describes how to add temporary media to the 'Media catalog'.
Add temporary media to the 'Media catalog'
1. On the operator panel, press the 'System' button.
2. Press 'Media'.
The names of the temporary media are displayed in the 'Temporary media' section.
3. Select the media you want to add to the 'Media catalog'.
4. Press 'To catalog'.
The media is added to the 'Media catalog'.
#
NOTE
• If required, you can edit the attributes of the media in the 'Media catalog' that is
part of the Settings Editor.
• The temporary media uses the color settings and calibration values of the default
media family.
148
Chapter 6 - Print jobs
Perform a media registration
Perform a media registration
Introduction
The different properties of media can influence the alignment of images on the media.
To ensure a correct alignment, you can perform a media registration for each individual
media in the 'Media catalog'.
Required tool
• Ruler
Illustration
[230] Media registration chart
Perform a media registration
1. Touch 'System' -> 'Media'.
2. From the 'Media catalog', select the media you want to register.
3. Press 'Registration'.
An instruction windows opens.
Chapter 6 - Print jobs
149
Perform a media registration
4. Read the instructions carefully and touch 'Next'.
Please wait while a media registration sheet is printed.
5. Check the media registration chart.
• If the media registration sheet is correct, you can stop the media registration procedure.
• If the media registration sheet is wrong, continue with the next step.
An instruction window opens.
6. Follow the instructions on the window.
7. Press 'Finish'.
8. Repeat step 1-5 to check the result.
150
Chapter 6 - Print jobs
Change the number of sets
Change the job settings before printing
Change the number of sets
Introduction
Follow the procedure below to change the number of sets for a job that is present in the
list of 'Waiting jobs' or 'Scheduled jobs'.
How to change the number of sets
1. Touch -> 'Waiting jobs'.
2. Touch the job of which you want to change the number of sets.
#
NOTE
You can only change the settings of the active print job
printer (press the 'Stop' button two times).
after you stopped the
3. Touch 'Properties', or touch the job two times to open the 'Properties' window.
4. Touch the 'Number of sets' button.
5. Enter the desired number of sets (between 1 and 65,000).
#
NOTE
Touch the arrow button <- to correct the previous entry or touch 'Cancel' to close
the numerical keyboard without saving the changes.
6. Press 'OK'.
7. Press 'OK'.
Chapter 6 - Print jobs
151
Check the first set
Check the first set
Introduction
If you have a large print job and you want to check whether the job is printed correctly,
it is advised to check the first set before printing all other sets. When a job is sent to the
printer, the submitter can indicate in the job submission application that the first set
must be checked. However, the workflow profile that is selected on the operator panel
determines how the printer handles these requests.
Depending on the selected workflow profile, the 'Check first set' setting can have the
following values:
• 'On'
• 'Off'
• 'As in job'
When you use the 'Check first set' function, the printed set is subtracted from the indicated total number of sets for a job. For example, when you need 10 sets, the printer will
print the first set and then stop. When you continue the job, the 9 remaining sets are
printed. This is different from printing a proof.
Methods to check the first set
You can use 1 of the following methods to indicate that you want to check the first set.
• Use a workflow profile where 'Check first set' is enabled. Then the printer stops after
the first set.
• Enable the function 'Check first set' in the 'Properties' window for a specific job only.
However, you can only change the 'Check first set' setting there when a workflow
profile is selected where the 'Check first set' setting is 'As in job'.
How to enable the checking of the first set
1. Touch 'Jobs' -> 'Waiting jobs'.
2. Touch the job of which you want to check the first set.
#
NOTE
You cannot change this setting for the active print job .
3. Touch 'Properties' - or touch the job 2x to open the 'Properties' window.
4. Touch the 'Number of sets' button.
5. Touch 'Check first set' when the button states 'Off'.
152
Chapter 6 - Print jobs
Check the first set
The text changes from 'Off' to 'On'. A check mark indicates that the checking of the first
set is enabled.
6. Press 'OK'.
The Number of sets button will now show a check mark.
7. Press 'OK'.
•Work with the workflow profiles, on page 320
Chapter 6 - Print jobs
153
Change the use of separator sheets
Change the use of separator sheets
Introduction
Separator sheets are empty sheets that are automatically inserted before each new set or
job to separate two sets or jobs. In the Settings Editor you can define the media that must
be used as separator sheets. The use of separator sheets can be enabled via the automated
workflows in the Settings Editor. However, you can change this setting trough the operator panel.
How to change the use of separator sheets
1. Touch 'Jobs' -> 'Waiting jobs'.
2. Touch the job of which you want to change the settings.
#
NOTE
You can only change the settings of the active print job
printer (press the 'Stop' button two times).
after you stopped the
3. Press 'Properties'.
4. Touch the 'Separator sheets' button to toggle between 'On' and 'Off'.
5. Press 'OK'.
•Introduction to automated workflows, on page 331
154
Chapter 6 - Print jobs
Stack the prints with an offset
Stack the prints with an offset
Introduction
The 'Offset stacking' function creates a visible distinction between sets or jobs in an
output location. The active workflow profile or the active automated workflow determines
the default type of offset stacking. The table below describes the possible types of offset
stacking. Furthermore, the table describes when you can change the defined type of offset
stacking in the 'Properties' window.
Types of offset stacking#
Default type of offset
stacking
Possible changes in the 'Properties' window
'Jobs'
No changes possible.
'Sets (always)'
You can indicate the number of sets (N sets) after which
an offset will be applied, for example 5.
Then 5 sets will be delivered in a straight stack. The next
5 sets will also be delivered in a straight stack, but with a
shift compared to the previous stack.
N must be a value between 1 and 65536 (default = 1).
NOTE
When 'Sets (always)' is possible, the 'Properties' window displays a special button at
the upper right-hand side which is otherwise not visible.
'Sets (as in job)'
You can set the 'Offset stacking' function to:
• 'On' - each set will be shifted compared to the previous
set, or
• 'Off' - all sets are delivered in 1 straight stack.
'Banners'
No changes possible.
'Off'
No changes possible.
How to change the type of offset stacking in the Properties window
1. Touch 'Jobs' -> 'Waiting jobs'.
2. Touch the job of which you want to change the type of offset stacking.
#
NOTE
You can only change the settings of the active print job
printer (press the 'Stop' button two times).
after you have stopped the
3. Touch 'Properties' - or touch the job two times to open the 'Properties' window.
Chapter 6 - Print jobs
155
Stack the prints with an offset
4. Touch the 'Print delivery' button when the default type of offset stacking is 'Sets (as in
job)'.
#
NOTE
You can only change this setting when the default type of offset stacking is set to 'Sets
(as in job)'.
5. Make the required changes.
6. Press 'OK'.
•Work with the workflow profiles, on page 320
•Introduction to automated workflows, on page 331
156
Chapter 6 - Print jobs
Combine jobs
Combine jobs
Introduction
The bundle function allows you to combine 2 or more jobs into 1 new job. For example,
this can be convenient when the participants of a meeting need several documents in a
specific order. Often, the required documents are sent from several workplaces to the
printer in advance. Normally, this means that you must print the documents first and
sort or staple them later. By using the bundle function you can determine the order of
the documents before printing and print all documents in the correct order in only 1
print job.
Important information about the bundle function
• You can only bundle print jobs that are currently in the list of 'Waiting jobs'.
• You can change a number of settings for the bundled job via the 'Properties' window.
• By default, the number of sets for a bundled job is 1. So before printing, you must
first indicate the required number of sets (see...).
• When you stop a job after a set, the printing stops after 1 copy of the complete bundle.
• The jobs in a bundle are accounted separately under the account ID of the original
jobs.
• All the jobs in the bundle must have the same output location. Otherwise, the operator
panel displays a warning message. To continue, you must first split the bundled job,
then change the individual job settings and finally bundle the jobs again.
Main actions on the bundle function
The table below describes the main actions you can carry out with regard to the bundle
function.
Main bundle functions#
Main actions
Description
'Bundle'
When you touch 'Bundle' after selecting 2 or more jobs, a
new job is created that contains the original jobs. The new
job is added to the bottom of the list of 'Waiting jobs'. The
original jobs are removed from the list. The new job gets
a new name that is based on the name of the first job in
the bundle.
Chapter 6 - Print jobs
157
Combine jobs
Main actions
Description
'Split'
When you touch 'Split' after selecting a bundled job, the
job is split into the original, separate jobs. The bundled job
is removed. The separate jobs are added to the bottom of
the list of 'Waiting jobs'. You can use the 'Split' function
to correct mismatched settings, for example.
Change job settings
The 'Properties' window gives access to a pane where you
can do the following.
• Change a number of job settings.
• Change the order of the jobs in the bundle.
'Delete'
Delete print jobs.
'Ticket'
Print a job ticket.
'Proof'
Make a proof.
How to combine print jobs
1. Touch 'Jobs' -> 'Waiting jobs'.
2. Touch the jobs you want to combine.
#
NOTE
If all jobs you want to combine have the same label, you can also touch 'Select' ->
'Jobs with label' to select all the required jobs at once.
3. Press 'Bundle'.
The operator panel displays an overview of the bundled job.
4. If necessary, use the Up and Down keys to change the job order.
5. Press 'OK'.
•Delete print jobs, on page 128
•Print a job ticket, on page 124
•Make a proof, on page 125
158
Chapter 6 - Print jobs
Change '2-sided' into '1-sided' and vice versa
Change the output settings before
printing
Change '2-sided' into '1-sided' and vice versa
Introduction
Jobs for which '1-sided' or '2-sided' printing was defined, will be printed on either 1 side
or both sides of a sheet. If required, you can change this setting.
How to change '2-sided' into '1-sided' and vice versa
1. Touch 'Jobs' -> 'Waiting jobs'.
2. Touch the job of which you want to change the number of sets.
#
NOTE
You can only change the settings of the active print job
printer (press the 'Stop' button two times).
3.
4.
5.
6.
7.
after you have stopped the
Touch 'Properties' - or touch the job 2x to open the 'Properties' window.
Touch the '1- or 2-sided' button.
Touch the desired value.
Press 'OK'.
Press 'OK'.
Chapter 6 - Print jobs
159
Change the binding edge
Change the binding edge
Introduction
The binding edge determines whether the binding position is along the long edge or the
short edge of the media. The binding edge is usually set via the printer driver, for example.
However, you can view and change the binding edge via the operator panel. The binding
edge has a relation with the direction of the margin shift, orientation and staple position.
#
NOTE
When the binding edge is changed for '2-sided' printing, the image orientation is
automatically adjusted to get the correct layout. The orientation of the image on the
back side of the page will be changed too.
How to change the binding edge
1. Touch 'Jobs' -> 'Waiting jobs'.
2. Touch the job you want to change.
#
NOTE
You can only change the settings of the active print job
printer (press the 'Stop' button two times).
3.
4.
5.
6.
7.
160
after you stopped the
Touch 'Properties', or touch the job two times to open the 'Properties' window.
Touch the 'Binding edge' button.
Touch the desired value.
Press 'OK'.
Press 'OK'.
Chapter 6 - Print jobs
Select a different media for a job
Select a different media for a job
Introduction
If you want to print a job on other media than originally defined for that job, you can
select a different media via the operator panel. Requirements regarding the new media:
• The media must be available in the 'Media catalog'.
• The media must have the same size as the original media.
How to select another media for a job
1. Touch 'Jobs' -> 'Waiting jobs'.
2. Touch the job you want to change.
#
NOTE
You can only change the settings of the active print job
printer (press the 'Stop' button two times).
after you stopped the
3. Touch 'Properties', or touch the job two times to open the 'Properties' window.
4. In the preview pane at the right-hand side, touch the media you want to change.
When more than 1 media was defined for a job, the preview pane displays a separate
button for each media.
5. From the list, select the new media.
6. Press 'OK'.
7. Press 'OK'.
Chapter 6 - Print jobs
161
Change the settings for covers
Change the settings for covers
Introduction
When front covers or back covers are required, the settings are usually set in the printer
driver, for example. However, you can view and change the settings for the covers via the
operator panel.
You can change the following settings for both the front cover and the back cover separately.
• Enable or disable the use of a cover.
• Select the desired media from the 'Media catalog'.
• Indicate whether the cover must be left empty, or printed 1-sided and/or 2-sided.
How to change the settings for covers
1. Touch 'Jobs' -> 'Waiting jobs'.
2. Touch the job of which you want to change the cover settings.
#
NOTE
You cannot change this setting for the active print job .
3.
4.
5.
6.
7.
162
Touch 'Properties' - or touch the job 2x to open the 'Properties' window.
Touch the 'Cover' button.
Make the required changes.
Press 'OK'.
Press 'OK'.
Chapter 6 - Print jobs
Shift the image roughly to create binding space
Shift the image roughly to create binding space
Introduction
If you want to create space for staples or punch holes, for example, you can use the 'Align'
function. The preview in the right-hand pane of the operator panel displays the consequences of your changes.
You can also shift the image or margin more precisely.
How to change the alignment
1. Touch 'Jobs' -> 'Waiting jobs'.
2. Touch the job you want to change.
#
NOTE
You cannot change this setting for the active print job .
3.
4.
5.
6.
7.
Touch 'Properties' - or touch the job 2x to open the 'Properties' window.
Touch the 'Align' button.
Make the required changes.
Press 'OK'.
Press 'OK'.
•Shift the image precisely to create binding space or correct the layout, on page 164
Chapter 6 - Print jobs
163
Shift the image precisely to create binding space or correct the layout
Shift the image precisely to create binding space or correct
the layout
Introduction
If you want to create space for staples or punch holes, for example, you can use the 'Align'
function. However, when the 'Align' function is not precise enough, you can use the
'Margin shift' and 'Image shift' functions. These functions allow you to shift the image
more precisely. The preview in the right-hand pane of the operator panel displays the
consequences of your changes. If you shift the margin too much, you may loose part of
the image.
The 'Shift' function has 2 options.
• 'Margin shift' allows you to increase or decrease the margin to create more binding
space, for example. With 'Margin shift', you can shift an image relative to the binding
edge.
• 'Image shift' has basically the same function. However, 'Image shift' also allows you
to move the image vertically. This gives you more freedom in moving the image exactly
to the desired position.
#
NOTE
By default, the values of the front side and the back side are linked. To define different
values for each side, touch . The changes you make are valid for the whole document,
not only for the current page.
How to shift the margin and the image
1. Touch 'Jobs' -> 'Waiting jobs'.
2. Touch the job you want to change.
#
NOTE
You can only change the settings of the active print job
printer (press the 'Stop' button two times).
3.
4.
5.
6.
7.
164
after you stopped the
Touch 'Properties', or touch the job two times to open the 'Properties' window.
Touch the 'Shift' button.
Make the required changes.
Press 'OK'.
Press 'OK'.
Chapter 6 - Print jobs
Shift the image precisely to create binding space or correct the layout
•Shift the image roughly to create binding space, on page 163
Chapter 6 - Print jobs
165
Change the print delivery settings
Change the print delivery settings
Introduction
Usually the print delivery settings have been defined in the printer driver.
Overview of the print delivery settings
#
Setting
Description
'Output location'
Change the output location for the job. The list shows all
the output locations that are available for your system.
Make sure there is a match between the selected output
location and the job requirements. For example, when a
job requires staples, you must select an output location that
allows stapling.
'Sort'
Change the sorting method of the prints. You can select
sort 'By page' or 'By set'.
[231] Sort by page
[232] Sort by set
166
'Offset stacking'
Stack the prints with an offset.
This setting is only available when the 'Offset stacking'
setting of the active 'Workflow profile' is set to 'Sets (as in
job)'.
'Advanced settings'
Finishing equipment often requires that the printed sheets
are delivered in a certain order. For finishers that are integrated in your printing system, the required settings are
adapted automatically. However, sometimes it can be necessary to change a number of settings manually, for example
when you want to finish the prints using offline finishers.
If required, you can change the 'Sheet order', 'Sheet orientation', 'Print order' and 'Rotation'.
Chapter 6 - Print jobs
Change the print delivery settings
How to change the print delivery settings
1. Touch 'Jobs' -> 'Waiting jobs'.
2. Touch the job of which you want to change the settings.
#
NOTE
You can only change the settings of the active print job
printer (press the 'Stop' button two times).
3.
4.
5.
6.
7.
after you stopped the
Press 'Properties'.
Touch the 'Print delivery'.
Make the required changes.
Press 'OK'.
Press 'OK'.
•Stack the prints with an offset, on page 155
Chapter 6 - Print jobs
167
Change the finishing method
Change the finishing method
Introduction
The required finishing method is usually set in the printer driver. However, you can
change the finishing method on the operator panel.
Depending on the configuration of your system you can change the following finishing
methods, for example.
• Number of staples.
• Number of punch holes.
• The location of the staples or punch holes.
How to change the finishing method
1. Touch 'Jobs' -> 'Waiting jobs'.
2. Touch the job you want to change.
#
NOTE
You can only change the settings of the active print job
printer (press the 'Stop' button two times).
3.
4.
5.
6.
7.
168
after you stopped the
Touch 'Properties', or touch the job two times to open the 'Properties' window.
Touch the 'Binding' button.
Make the required changes.
Press 'OK'.
Press 'OK'.
Chapter 6 - Print jobs
Chapter 7
Copy jobs
Introduction to the copy function
General information
Introduction to the copy function
Introduction
The copy function enables you to copy paper originals. You can define the settings of the
copy jobs manually or by using templates. Templates contain predefined settings for recurring types of copy jobs.
The copy function contains a number of factory default templates, for example for
copying mixed-size originals or combining several sets of originals. Furthermore, you can
define customized templates. The factory default templates are directly available when
you access the copy function. When you select one of these templates, the system sets the
typical settings for the selected type of copy job automatically. Next you can define all
other settings for the originals and the output.
The illustration and the table below show the factory default templates you can use to
start a copy job.
Illustration
[233] The copy templates at the upper row
170
Chapter 7 - Copy jobs
Introduction to the copy function
The factory default templates
Overview of the templates#
Template
When to use
'Copy job'
Copy originals that have the same media size and only require simple settings, for example 2-sided or a staple.
'Combined copy job'
Combine several sets of originals and create 1 single copy
job.
When you select this template, the possibility to add subsets
is already displayed.
'Booklet job'
Create booklets from paper originals.
When you select this template:
• The 'Layout' setting is set to 'Booklet', and
• The 'Media' setting is set to A3 / 11"x 17", because the
system assumes you want to create booklets of A4 / LTR
originals.
'Mixed size'
Copy a set of originals that consists of different media sizes.
The output will also consist of these different media sizes.
'Last used'
Reuse the settings of the previous copy job for your new
copy job.
NOTE
You cannot use 'Last used' when the previous job was a scan job or a combined copy
job.
•Create and use custom copy templates, on page 207
•Work with the workflow profiles, on page 320
Chapter 7 - Copy jobs
171
Description of the copy job settings
Description of the copy job settings
Introduction
When you make a copy, you must define the following.
• The characteristics of the paper originals
• The characteristics of the output
• Generic settings that apply to the whole job.
When you started the copy job by selecting one of the factory default templates or by
selecting a custom template, some of the settings have already been changed.
Furthermore, the system links a number of logical settings for the Original and the Output
automatically. However, you can overrule these automated settings manually. The automated settings have the prefix 'Auto'.
172
Chapter 7 - Copy jobs
Description of the copy job settings
Illustration
1
3
2
4
5
[234] The settings window for copy jobs
#
Number
Pane
Description
1
'Original'
The 'Original' pane shows the settings you
can define for the paper originals
2
'Output'
The 'Output' pane shows the settings you can
define for the copy.
3
'Job'
The 'Job' pane shows the generic settings you
can define for the whole job
4
Preview
The preview displays the settings you defined
for the output. Furthermore, this pane gives
access to the templates
5
Action buttons
The action buttons indicate the actions you
can carry out.
Chapter 7 - Copy jobs
173
Description of the copy job settings
'Original' settings - '1- or 2-sided'
#
Setting
Values
'1- or 2-sided'
Description
The automatically set value for this setting.
Only the front side contains an image or text.
'1-sided'
Both the front side and the back side contain an image
or text.
'2-sided'
174
Chapter 7 - Copy jobs
Description of the copy job settings
'Original' settings - 'Original type'
#
Setting
Values
'Original
type'
Description
The automatically set value for this setting.
'Portrait left'
'Portrait top'
• The original has a vertical format (height > width).
• The binding edge is at the left-hand side.
• When you turn a sheet over the binding edge, the
image or text on the back of the sheet is in readable
form.
• The original has a vertical format (height > width).
• The binding edge of the original is at the top.
• When you turn a sheet over the binding edge, the
image or text on the back of the sheet is in readable
form.
• The original has a horizontal format (width >
height).
'Landscape
left'
• The binding edge of the original is at the left-hand
side.
• When you turn a sheet over the binding edge, the
image or text on the back of the sheet is in readable
form.
• The original has a horizontal format (width >
height).
'Landscape
top'
• The binding edge of the original is at the top.
• When you turn a sheet over the binding edge, the
image or text on the back side of the sheet is in
readable form.
Chapter 7 - Copy jobs
175
Description of the copy job settings
'Original' settings - 'Size'
#
Setting
Values
Description
A4, A3, Letter, Ledger,
etc.
Original in the ADF or on the glass plate:
• Automatic size detection, or
• Enter the media format of the original.
When your original has a non-standard size, you
can use the - and + buttons to enter the exact
measures. You can enter the measures in steps of
1 mm / 0.01 inches. The text of the'Size' button
changes into 'Custom'.
'Size'
• Automatic orientation detection, or
• Indicate the orientation of nonstandard size media
'Portrait'
'Landscape'
'Original' settings - 'Background suppression'
You can use the 'Background suppression' to print a uniform background. For example
to suppress unwanted spots.
176
Chapter 7 - Copy jobs
Description of the copy job settings
'Output' settings - '1- or 2-sided'
#
Setting
Values
'1- or 2-sided'
Description
The automatically set value for this setting.
'Auto'
The output contains an image on 1 side.
'1-sided'
The output contains an image on both sides.
'2-sided'
Chapter 7 - Copy jobs
177
Description of the copy job settings
'Output' settings - 'Binding edge'
#
Setting
Values
'Binding
edge'
Description
The automatically set value for this setting.
'Auto'
'Portrait left'
'Portrait top'
• The output has a vertical format (height > width).
• The binding edge is at the left-hand side.
• When you turn a sheet over the binding edge, the
image or text on the back of the sheet is in readable
form.
• The output has a vertical format (height > width).
• The binding edge of the print is at the top.
• When you turn a sheet over the binding edge the
image on the back side of the sheet is in readable
form. This means that every back of a 2-sided print
is upside down compared to the front.
• The output has a horizontal format (width >
height).
'Landscape
left'
• The binding edge of the print is on the left side.
• When you turn a sheet over the binding edge, the
text or image is in readable form.
• The output has a horizontal format (width >
height).
'Landscape
top'
178
Chapter 7 - Copy jobs
• The binding edge of the print is at the top.
• When you turn a sheet over the binding edge, the
image on the back side of the sheet is in readable
form. This means that every back of a 2-sided print
is upside down compared to the front.
Description of the copy job settings
'Output' settings - 'Media'
#
Setting
Values
Description
'Media'
Names of
the media in
the media
catalogue
Here you can select the media for the copy job. The
list displays all the media that are available in the media catalogue. The media catalog is a list of media that
you can define in the Settings Editor application on
the PRISMAsync controller.
'Output' settings - 'Cover'
#
Setting
Values
'Cover'
'Front'
Description
Here you can indicate that the print job requires a
front cover. When the setting is enabled the corresponding setting 'Media' becomes enabled.
'Media'
When the setting 'Front cover' is enabled, you can
select a media from the media catalogue.
'Print sides'
Here you can select the sides of the front cover you
want to print on.
• 'Both sides'
• 'Front side'
• 'Back side'
• 'None'
'Back cover'
Here you can indicate that the print job requires a
back cover. When the setting is enabled the corresponding setting 'Media' becomes enabled.
'Media'
When the setting 'Back cover' is enabled, you can select a media from the media catalogue.
'Print sides'
Here you can select the sides of the back cover you
want to print on.
• 'Both sides'
• 'Front side'
• 'Back side'
• 'None'
Chapter 7 - Copy jobs
179
Description of the copy job settings
'Output' settings - 'Layout'
#
Setting
Values
'Layout'
Description
The machine prints the pages with no special layout
settings.
'Normal'
'Booklet'
'Same up'
The machine prints the pages in booklet order. The
pages 1 and 4 are printed on the front side of a sheet.
The pages 2 and 3 are printed on the back side of a
sheet.
The machine prints the same image multiple times
next to each other. By default, the system keeps the
size of the originals.
When you copy A4/LTR originals with the 'Same up'
and 'Images per sheet' settings at 2, the printer automatically prints the job on A3/11" x 17", for example.
When you cut A3/11"x 17" sheets in two, you get
two identical A4/LTR copies of your document. To
reduce your A4/LTR originals to A5/STMT prints,
you can use the zoom function or select another media
type.
The machine prints multiple consecutive images on
1 side of a sheet, next to each other.
'Multiple up'
'Same-up
flipped'
'Images per
sheet'
180
Chapter 7 - Copy jobs
The printer prints the same image twice on one side
of a sheet, but one image is upside down compared
to the other.
Here, you can select the number of images you want
to print when you select 'Same up' or 'Multiple up'.
Description of the copy job settings
'Output' settings - 'Zoom'
#
Setting
Values
Description
'Zoom'
'Fit to page'
When 'Fit to page' is 'On', the image is resized so it
fits onto the page.
When 'Fit to page' is 'Off', the original size of the
image is maintained.
'Percent'
Use the + and - buttons to reduce or enlarge the size
of the image (from 25% to 400%). The preview pane
immediately shows the results of your action.
Chapter 7 - Copy jobs
181
Description of the copy job settings
'Output' settings - 'Align'
#
Setting
Values
'Align'
Description
The automatically set value for this setting.
'Auto'
'Top left'
An image on a sheet may be smaller than the media
size of the output, for example because you scaled the
image to 70% of its original size. The 'Align' setting
allows you to indicate the position of the image on
the sheet. 'Top left' moves the image to the upper left
corner of the sheet.
'Top center' moves the image to the centre at the top
of the sheet.
'Top center'
'Top right' moves the image to the upper right corner
of the sheet.
'Top right'
'Center left' moves the image to centre of the left side
of the sheet.
'Center left'
'Center' moves the image to the centre of the sheet.
'Center'
'Center right' moves the image to the centre of the
right side of the sheet.
'Center
right'
'Bottom left' moves the image to the lower left corner
of the sheet.
'Bottom left'
182
Chapter 7 - Copy jobs
Description of the copy job settings
Setting
Values
Description
'Bottom center' moves the image to the centre of the
bottom side of the sheet.
'Bottom center'
'Bottom right' moves the image to the lower right
corner of the sheet.
'Bottom
right'
'Output' settings - 'Shift'
#
Setting
Values
Description
'Shift'
'Margin
shift'
Use this setting to increase or decrease the margin. By
default, the values of the front side and the back side
are interlocked. This means that the values for the
front side and the back side remain identical.
Widening the margin can be useful if you want to
staple or punch the output, for example. Narrowing
the margin can be useful if you do not need additional
space for stapling or punching the output, for example.
If you want to define a different value for each side,
press . The icon changes to the unlocked status. Now
you can define the values for the front side and the
back side separately.
'Image shift'
Use this setting to shift the image horizontally or vertically. By default, the values of the front side and the
back side are interlocked. This means that the values
for the front side and the back side remain identical.
If you want to define a different value for each side,
press . The icon changes to the unlocked status. Now
you can define the values for the front side and the
back side separately.
Chapter 7 - Copy jobs
183
Description of the copy job settings
'Output' settings - 'Print delivery'
#
Setting
Values
Description
'Print delivery'
'Output location'
Select the output location for the job. Depending on
the settings for your print job, the machine automatically suggests the preferred output location for your
job. However, you can manually overrule this suggestion.
• 'Stacker/stapler upper tray'
Deliver the prints at the upper tray of the stacker/stapler.
• 'Stacker/stapler lower tray'
Deliver the prints at the lower tray of the stacker/stapler.
• 'Stacker/stapler booklet tray'
Deliver the prints at the booklet tray of the stacker/stapler.
• 'Folder main tray'
Deliver the folded prints to the tray at the bottom
of the folder.
'Sort'
'By page'
The output is sorted by page.
'By set'
The output is sorted by set.
'Offset stacking'
184
Chapter 7 - Copy jobs
This setting is only available when the 'Offset stacking'
setting is set to 'Sets (as in job)' in the workflow profile.
'On'
Each set delivered to an output location will have a
small shift on top of the previous set. This makes it
easier to recognize individual sets.
'Off'
All the sets or jobs that get to an output location are
stacked in a straight stack.
Description of the copy job settings
Setting
Values
'Advanced
settings' ->
'Sheet order'
Description
'Face up'
Deliver the prints face up, first sheet on top.
'Face up reverse'
Deliver the prints face up, last sheet on top.
'Face down'
Deliver the prints face down, first sheet on top.
'Face down reverse'
Deliver the prints face down, last sheet on top.
'Advanced
settings' ->
'Sheet orientation'
Chapter 7 - Copy jobs
185
Description of the copy job settings
Setting
Values
Description
'Header up LEF'
Deliver the prints with the header on top side and in
portrait position (vertical).
'Header up SEF'
Deliver the prints with the header on top side and in
landscape position (horizontal).
'Header down LEF'
Deliver the prints with the header at the bottom side
and in portrait position (vertical).
'Header down SEF'
Deliver the prints with the header at the bottom side
and in landscape position (horizontal).
186
Chapter 7 - Copy jobs
'Advanced
settings' ->
'Print order'
• 'Front/back'
'Advanced
settings' ->
'Rotation'
• '0 degrees'
• '180 degrees'
Default value. The front page on the front, the
back page on the back.
• 'Back/front'
Puts the front page on the back and the back page
on the front.
Rotates the prints 180 degrees.
Description of the copy job settings
'Output' settings - 'Margin erase'
#
Setting
Values
Description
'Margin
erase'
'Binding
edge'
Margins of a document sometimes contain notes or
punch holes, for example. The machine allows you to
hide these elements on the copy. With the + and buttons of the 'Binding edge' setting you can define
how much margin of the original you want to erase.
You can enter a value up to 100 mm / 3.94 inches.
'Output' settings - 'Adjust image'
#
Setting
Values
Description
'Adjust image'
'Describe
original'
'Describe
copy'
The Adjust Image setting allows you to define the
copy and scan quality manually. Depending on the
situation you can describe the original or copy/scan.
• If the original is unsatisfactory, enter a description.
• If the original is OK, but you want a different copy
or scan, describe the copy.
'Brightness'
With the 'Brightness' setting you can darken (-1 to 3) or lighten (1-3) your print.
'Contrast'
With the 'Contrast' setting, you can change the differences between dark and light areas on your print. A
negative value reduces the difference, a positive value
increases the difference.
'Color'
With the 'Color' setting, describe the color of the
original or copy.
Chapter 7 - Copy jobs
187
Description of the copy job settings
'Output' settings - 'Color/Black & white'
#
Setting
'Color/Black
& white'
Values
Here, choose to print in color or black and white.
'Black and
white'
'Color'
188
Chapter 7 - Copy jobs
Description
Description of the copy job settings
'Output' settings - 'Punching'
#
Setting
Values
'Punching'
Description
Here, you can define the number of punch holes.
'None'
'2 holes'
'3 holes'
'4 holes'
'Die set dependent'
'Location'
Here, you can define the location of the punch holes.
• 'Left'
• 'Top'
• 'Right'
• 'Bottom'
Chapter 7 - Copy jobs
189
Description of the copy job settings
'Output' settings - 'Folding'
#
Setting
Values
'Folding'
Here you can define the folding method for the prints.
'None'
'Half-fold'
'Tri-fold in'
'Tri-fold out'
'Parallel fold'
'Z-fold'
190
Chapter 7 - Copy jobs
Description
Description of the copy job settings
Setting
Values
Description
'Z-fold large
sheets only'
'Print
method'
Use the 'Print method' option to define on which side
to print:
• 'Print inside'
• 'Print outside'
Check the preview for the result of the selection.
'Output' settings - 'Binding'
#
Setting
Values
Description
'Binding'
'None'
Here you can define the required number of staples.
Furthermore you can define where you want the staples with the 'Location' option.
The available locations for one staple:
• 'Top left'
• 'Top right'
• 'Bottom left'
• 'Bottom right'
'1 staple'
'2 staples'
'Saddle
stitching'
The available locations for two staples:
• 'Left edge'
• 'Top edge'
• 'Bottom edge'
• 'Right edge'
Check the preview for the result of the selection.
Chapter 7 - Copy jobs
191
Description of the copy job settings
'Output' settings - 'Trimming'
#
Setting
Values
'Trimming'
'None'
Description
Trims the long edge according to the specified value.
The minimum trim size is 2 mm.
'Trim size'
'Job name'
#
Setting
Values
'Job name'
Description
By default, all print jobs are named "Print job" and
include a sequence number. To identify your copy
job more easily in the list of waiting jobs or scheduled
jobs, you can change the name of the copy job. When
you touch the 'Job name' button a keyboard appears.
'Number of sets'
#
Setting
Values
'Number of
sets'
Description
Use this setting to define the number of copies. You
can enter a value from 1 - 65,000. The default value
is 1.
'Destination'
#
192
Setting
Values
Description
'Destination'
'Scheduled
jobs'
Add the copy job to the list of 'Scheduled jobs' in the
'Jobs' view.
'Waiting
jobs'
Add the copy job to the list or 'Waiting jobs' in the
'Jobs' view.
Chapter 7 - Copy jobs
Description of the copy job settings
'Separator sheets'
#
Setting
Values
Description
'Separator
sheets'
'On'
When the 'Separator sheets' setting is enabled, a separate sheet is inserted automatically before each set of
a job to create a clear distinction between two sets.
Separator sheets are always empty. In the Settings
Editor, select a media from the media catalog use as
separator sheets. You can also indicate the feed direction of the separator sheets (long-edge feed or shortedge feed).
'Off'
No separator sheet will be inserted before each set.
Chapter 7 - Copy jobs
193
Feeding originals into the ADF
Feeding originals into the ADF
Introduction
Use the feeder when you want to copy several originals at the same time. The printer
automatically feeds the originals onto the glass plate and scans them. The size of the
original is automatically detected, and the document is scanned. The printer cannot always
detect the size of the original if it is nonstandard paper size, such as a book. In this case,
specify the size at which you want to scan the original. Two-sided originals can also be
scanned as two-sided documents. You can place the following originals into the ADF:
• Weight:
One-sided scanning: 38 to 220 g/m2 / 10 lb bond to 80 lb cover
Two-sided scanning: 50 to 220 g/m2 / 13 lb bond to 80 lb cover
(However, if you are scanning in color, 64 to 220 g/m2 / 17 lb bond to 80 lb cover
paper can be used for both 1-sided and 2-sided scanning)
• Size:
A3, B4, A4, A4R, B5, B5R, A5, A5R, and B6R
11" × 17", LGL, LTR, LTRR, STMT, or STMTR
• Tray Capacity:
300 sheets of paper (80 g/m2 / 20 lb bond)
#
IMPORTANT
• Thin originals may become creased, if used in a high temperature or high humidity environment.
• Do not place the following types of originals into the feeder:
- Originals with tears or large binding holes
- Severely curled originals, originals with sharp folds, clipped or stapled originals
- Carbon backed paper or other originals which may not feed smoothly
- Transparencies and other highly transparent originals
• If the same original is fed through the feeder repeatedly, the original may fold or
become creased, and make feeding impossible. Limit repeated feeding to a maximum of 30 times (this number varies, depending on the type and quality of the
original).
• If the feeder rollers are dirty from scanning originals written in pencil, perform
the feeder cleaning procedure.
• Always smooth out any folds in your originals before placing them into the feeder.
194
Chapter 7 - Copy jobs
Feeding originals into the ADF
Orientation#
1
1
[299] Vertical placement
[300] Horizontal placement
1 Place the original face up
1 Place the original face up
#
NOTE
• A4, A5, B5, LTR, and STMT originals can be placed either vertically or horizontally. However, the scanning speed for horizontally placed originals is somewhat
slower than that of vertically placed originals.
• Horizontally placed A4, A5, B5, LTR, and STMR originals are referred to as A4R,
A5R, B5R, LTRR, and STMTR.
• A3, B4, 11" × 17", and LGL originals must be placed horizontally.
Feeding originals to the ADF
1. Adjust the slide guides to fit the size of your originals.
2. Neatly place your originals, with the side to be copied face up, into the original supply
tray.
Chapter 7 - Copy jobs
195
Feeding originals into the ADF
Place your originals as far into the feeder as they will go, until the Original Set indicator
is lit.
1
[302] Original Set indicator (1)
#
IMPORTANT
• Do not add or remove originals while they are being scanned.
• When scanning is complete, remove the originals from the original output area
to avoid paper jams.
1
[303] Original output area (1)
#
NOTE
• When enlarging an A4/B5/LTR/STMT original onto A3/B4/11" X 17"/LGL
paper, place the original horizontally.
• The scanned originals are output to the original output area in the order they are
fed into the feeder.
196
Chapter 7 - Copy jobs
Put originals on the glass plate
Put originals on the glass plate
Introduction
Use the glass plate when copying bound originals (such as books and magazines), heavy
or lightweight originals, and transparencies. Also, place originals onto the glass plate when
you want to copy an A3/11"x 17" original with an image that extends all the way to the
edges without the periphery of the original being cut off. The size of the original is automatically detected, and the document is scanned. The printer cannot always detect the
size of the original if it is nonstandard paper size, such as a book. In this case, specify the
size at which you want to scan the original.
#
NOTE
The printer automatically detects the size of the following originals:
• A3, B4, A4, A4R, B5, A5, B5R, and B6.
• 11" × 17", LGL, LTR, LTRR, STMT, and STMTR.
Orientation#
1
1
[304] Vertical placement
[305] Horizontal placement
1 Place the original face down.
1 Place the original face down.
Chapter 7 - Copy jobs
197
Put originals on the glass plate
Put originals on the glass plate
1. Lift the feeder.
1
[306] Sensor (1)
1: Sensor
#
IMPORTANT
This printer is equipped with an Open/Close sensor on the feeder (see circled area in
the above illustration). When placing originals onto the glass plate, lift the feeder
approximately 300 mm/11 7/8" so that the sensor detaches from the feeder. If the
sensor does not detach from the feeder, the size of the originals may not be detected
correctly.
2. Place your originals face down.
The surface of the original that you want to copy must be placed face down. Align the
top edge of your original with the back edge of the glass plate (by the arrow in the upperleft corner).
198
Chapter 7 - Copy jobs
Put originals on the glass plate
Place books and other bound originals onto the glass plate in the same way.
#
NOTE
When you are enlarging an A4/B5/A5/LTR/STMT original onto A3/B/ 11" x
17"/LGL paper, place the original horizontally onto the glass plate, and align it with
the A4R/B5R/A5R/LTRR/STMTR marks.
3. Gently close the feeder.
#
CAUTION
• Close the feeder gently to avoid getting your hands caught, as this may result
in personal injury.
• Do not press down hard on the feeder when using the glass plate to make
copies of thick books. Doing so may damage the glass plate and result in
personal injury.
• Be aware that the light emitted from the glass plate may be very bright when
closing the feeder.
#
IMPORTANT
If you are placing the original onto the glass plate, the size of the original is detected
after the feeder is closed. Be sure to close the feeder before copying.
Chapter 7 - Copy jobs
199
Put originals on the glass plate
#
NOTE
Remove the original from the glass plate when scanning is complete.
200
Chapter 7 - Copy jobs
Make a copy
Copy your documents
Make a copy
Introduction
A basic copy is a copy for which you only define a few settings before touching the Start
button , such as:
• 1-sided or 2-sided
• A staple
• The number of copies required.
Before you begin
• Remove staples or paper clips.
• Make sure that the originals in the automatic document feeder have the same size.
• Make sure that the automatic document feeder does not contain more than 100 sheets
(80 g/m² or 20 lb bond).
• Make sure that the originals are not curled.
How to make a basic copy
1.
2.
3.
4.
5.
Place the originals face up into the ADF, or place 1 original face down on the glass plate.
Touch 'Jobs' -> 'Copy/Scan' -> 'Copy job'.
If required, define the settings and the required number of copies.
Select 'Scheduled jobs' in the 'Destination' field to start copying immediately.
Press .
The job is added to the list of 'Scheduled jobs'.
Chapter 7 - Copy jobs
201
Combine subsets into 1 document
Combine subsets into 1 document
Introduction
A subset is an original you want to copy. A subset can be a single sheet or a full document.
Each subset can require different settings for the original and the output. To create 1
document from several subsets, you can use the Combined copy job template in the
'Copy/Scan' section. You also need this template when you want to use tab sheets to split
up the subsets. Then each tab sheet is also considered to be a subset.
After you created 1 document, you can still add, insert, delete or edit a subset.
How to combine subsets into 1 document
1.
2.
3.
4.
5.
6.
7.
8.
202
Place the first subset face up into the ADF.
Touch 'Jobs' -> 'Copy/Scan' -> 'Combined copy job'.
Define the settings for the subset (both in the 'Original' and 'Output' section).
Press .
Place the next subset face up into the ADF.
Repeat the steps 3-4 for all subsequent subsets.
Touch 'Ready' after you scanned the last subset.
Touch to start the copy job or touch 'Edit' to check the document first or to add, insert
or delete a subset.
Chapter 7 - Copy jobs
Access other functions during a copy job or scan job
Access other functions during a copy job or scan job
Introduction
When you access the copy function or scan function from the 'Copy/Scan' view, the job
window opens in full screen mode. Therefore, the buttons that give access to the other
system functions are not visible. However, you can access the other functions while you
define the settings for your copy job or scan job.
#
NOTE
The machine will remember all the job settings you already defined.
How to access other functions and get back to your job
1. In the job window, touch 'Minimize'.
The 'Copy/Scan' view appears. The navigation buttons at the bottom of the operator
panel become visible and accessible.
2. Carry out the desired actions.
3. To get back to your job window, touch 'Jobs'.
4. Press 'Resume job'.
Chapter 7 - Copy jobs
203
The zoom behavior
The zoom behavior
Introduction
When you carry out a copy job or scan job, you can use the Zoom function to reduce or
enlarge an image, for example:
• Copy an A4 / LTR original on an A3 / 11"x 17" sheet. The system enlarges the image
• Copy an A3 / 11"x 17" original on an A4 / LTR sheet. The system reduces the image
• Copy an A4 / LTR original with a small illustration on an A4 / LTR sheet, and at the
same time enlarge the illustration.
By factory default, the zoom function is set to Fit to page. This makes sure that no information is lost. To change the zoom factor manually, touch the - and + buttons of the
Zoom function in the job window. If you use non-standard size originals, you must use
the glass plate.
The zoom function for originals in the automatic document feeder is different from the
zoom function for originals on the glass plate.
Zoom behavior#
Original
Starting point of the zoom function
Automatic document feeder
Center
Glass plate
Upper left-hand corner
This section describes the characteristics of the zoom function when you use the automatic
document feeder or the glass plate.
#
NOTE
The zoom function works identical for both copy jobs and scan jobs.
Scan from the automatic document feeder and use the zoom function
The following table shows the zoom behavior of the machine when the originals are
scanned from the automatic document feeder. The focus is on the centre of the original.
204
Chapter 7 - Copy jobs
The zoom behavior
Scan from the automatic document feeder using the zoom function#
Illustration
Description
The original is placed face up and in readable form into
the automatic document feeder.
The center of the original is a fixed point and is used as the
origin of the image.
Result of a scan with a 100% zoom factor.
Result of a scan with a 50% zoom factor.
NOTE
The center of the image is fixed.
Result of a scan with a 200% zoom factor.
NOTE
The center of the image is fixed.
Scan from the glass plate and use the zoom function
The following table shows the zoom behavior of the machine when the originals are
scanned from the glass plate. The focus is on the upper right-hand corner of the original
(upper left-hand corner of the glass plate).
Chapter 7 - Copy jobs
205
The zoom behavior
Scan from the glass plate using the zoom function#
Illustration
Description
The original is placed face-down and in readable form in
the upper left-hand corner on the glass plate.
The upper left-hand corner of the glass plate is a fixed point
and is used as the origin of the image.
Result on paper of a scan with a 100% zoom factor.
Result on paper of a scan with a 50% zoom factor.
NOTE
The upper right-hand corner of the image is fixed.
Result on paper of a scan with a 200% zoom factor.
NOTE
The upper right-hand corner of the image is fixed.
206
Chapter 7 - Copy jobs
Create and use custom copy templates
Create and use custom copy templates
Introduction
When you regularly carry out identical copy jobs, you can create custom copy templates
for these recurring jobs. The custom templates contain the default settings for these jobs.
You can carry out the following actions:
• Creating a Custom Template
• Use a custom template
• Delete a custom template
• Rename a custom template
• Make a custom template your default custom template.
How to create and edit custom copy templates
Touch 'Jobs' -> 'Copy/Scan' -> 'Copy job'.
Touch to enter the template section.
Touch the custom template called 'Current' for 2 seconds.
Select 'Save'.
The system saves the custom template as 'Custom' followed by a number that is not yet
in use.
5. Touch the new custom template to select this template.
When you touch the new template for 2 seconds, a menu appears that allows you to select,
delete or rename the template, or make it your new default template.
1.
2.
3.
4.
Chapter 7 - Copy jobs
207
Rename a copy job
Rename a copy job
Introduction
When you carry out a new copy job, the system creates an automatic name for the job.
The default name 'Copy Job' followed by a sequence number is displayed in the 'Job
name' field. However, you can rename the copy job into a name of your choice. This
name helps you to recognize the job in the list of 'Scheduled jobs' or 'Waiting jobs'.
How to rename a copy job
1. In the job window, touch 'Job name'.
A keyboard appears.
2. Touch 'Backspace' until the current name is deleted.
3. Touch the characters to enter a new name.
4. Press 'OK'.
208
Chapter 7 - Copy jobs
Copy non-standard size originals
Copy non-standard size originals
Introduction
You can use the automatic document feeder to copy originals in a simple and quick way.
The automatic document feeder supports the following standard media sizes.
• A5, A5R, A4, A4R, A3, B5, B5R, and B4
• LGL, LTR, STML, 13" x 19.2" (330.2 x 487.7 mm), 12" x 18" (305 x 457 mm),
and 11" x 17" (279 x 432 mm)
The document feeder supports non standard sizes from 139,7 x 182 mm to 630 x 297
mm / 5,5" x 7,17" to 24,80" x 11,30".
If more than one media fits, the user must select the desired media. The selected media
will be the default media.
The glass plate is the location where you usually place originals that the automatic document feeder cannot handle. The glass plate cannot detect the dimensions of your original.
When you copy from the glass plate, you must always define the size of your original.
How to copy non-standard size originals
Place the originals face up into the ADF, or place 1 original face down on the glass plate.
Touch 'Jobs' -> 'Copy/Scan' -> 'Copy job'.
In the 'Original' section, touch 'Size'.
Use the - and + buttons to enter the correct media size.
Press 'OK'.
The 'Size' button displays the defined size.
6. In the 'Output' section, touch 'Media'.
7. Select a media from the list and touch 'OK'.
The setting 'Zoom' determines how the copy will look. When 'Zoom' ->'Fit to page' is
enabled, the original will be scaled to fit the media size of the output. When 'Zoom' ->
'Fit to page' is disabled, you can enter a custom zoom percentage.
1.
2.
3.
4.
5.
Chapter 7 - Copy jobs
209
Scan now and print later (postponed copying)
Scan now and print later (postponed copying)
Introduction
You can scan an original document now and print the document later. This is called
postponed copying. To use this function, you must send a copy job to the list of 'Waiting
jobs'.
When to do
You must only change the destination to 'Waiting jobs' when the default destination of
copy jobs is 'Scheduled jobs'. The default destination of copy jobs is defined in the
workflow profiles.
How to use postponed copying
Put the originals face up and in readable form into the automatic document feeder.
Touch 'Jobs' -> 'Copy/Scan' -> 'Copy job'.
Define the settings for your copy job.
Touch 'Destination' to select 'Waiting jobs'.
If required, touch 'Job name' to rename the job. This helps you to recognize the job more
easily.
6. Touch 'Start' .
The job is sent to the selected destination. There you can select and print the job later.
1.
2.
3.
4.
5.
210
Chapter 7 - Copy jobs
Finish the output
Finish the output
How to punch or staple the output
1. Place the originals face up into the ADF, or place 1 original face down on the glass plate.
2. Touch 'Jobs' -> 'Copy/Scan' -> 'Copy job'.
3. At the 'Binding' setting, select the required number of staples and the location of the
staples.
4. At the 'Punching' setting, select the required number of holes.
5. At the 'Folding' setting, select the folding method.
6. At the 'Trimming' setting, define the trim settings
7. If required, define the other settings for the original document and the output.
8. Enter the generic values in the 'Job' section.
9. Touch 'Start' .
Chapter 7 - Copy jobs
211
Adjust the image to improve the copy and scan quality
Adjust the image to improve the copy and scan quality
Introduction
The 'Adjust image' setting enables you to define the copy and scan quality manually.
Depending on the situation, you can describe the original or the copy/scan.
Adjust the image to improve the copy and scan quality
1. Place the originals face up into the ADF, or place 1 original face down on the glass plate.
2. Touch 'Jobs' -> 'Copy/Scan' -> 'Copy job'.
3. Press 'Adjust image'.
A window opens.
4. Determine if you need to describe the original or the copy/scan.
• If the original is not okay, describe the original.
• If the original is okay, but you want a different copy or scan, describe the copy.
5. If required, adjust the following settings.
• 'Brightness'
• 'Contrast'
• 'Color'
6. Press 'OK'.
212
Chapter 7 - Copy jobs
Chapter 8
Scan jobs
Introduction to the scan function
Introduction to the scan function
Introduction
The scan function allows you to convert paper originals into digital documents using
scan profiles. The system offers several factory default scan profiles. However, you can
change and add scan profiles at the Settings Editor.
Illustration
[319] The scan profiles at the lower row
The factory default profiles
Overview of the scan profiles#
214
Template
When to use
'Scan to USB'
Scan to the USB stick
TIFF printing
Scan for printing purposes.
TIFF viewing archiving
Scan for viewing and archiving purposes.
Chapter 8 - Scan jobs
Introduction to the scan function
Template
When to use
PDF printing
Scan for printing purposes.
PDF viewing archiving
Scan for viewing and archiving purposes.
Chapter 8 - Scan jobs
215
Description of the scan job settings
Description of the scan job settings
Introduction
To scan a document, you must first select a scan profile. A scan profile contains default
job settings. After you select a scan profile, the job window opens. The job window allows
you to change a number of default settings for the original and the resulting file. To increase the productivity, the system automatically links the 'Size'settings for the 'Original'and the 'File'. However, you can always manually overrule this automated setting.
The automated setting has the prefix 'Auto'. The changes that you make only apply to
the current job.
This section describes the parts and settings of the job window.
216
Chapter 8 - Scan jobs
Description of the scan job settings
Illustration
3
1
2
4
5
[320] The scan job settings
#
Number
Pane
Description
1
'Original'
The 'Original' pane shows the settings you
can define for the paper originals
2
'File'
The 'File' pane shows the settings you can
define for the file
3
'Job'
The 'Job' pane shows the generic settings you
can define for the whole job
4
Preview
The preview displays the settings you defined
for the output. Furthermore, this pane gives
access to the templates
5
Action buttons
The action buttons indicate the actions you
can carry out.
Chapter 8 - Scan jobs
217
Description of the scan job settings
'Original' settings - '1- or 2-sided'
#
Setting
Values
'1- or 2-sided'
Description
The automatically set value for this setting.
Only the front side contains an image or text.
'1-sided'
Both the front side and the back side contain an image
or text.
'2-sided'
218
Chapter 8 - Scan jobs
Description of the scan job settings
'Original' settings - 'Original type'
#
Setting
Values
'Original
type'
Description
The automatically set value for this setting.
'Portrait left'
'Portrait top'
• The original has a vertical format (height > width).
• The binding edge is at the left-hand side.
• When you turn a sheet over the binding edge, the
image or text on the back of the sheet is in readable
form.
• The original has a vertical format (height > width).
• The binding edge of the original is at the top.
• When you turn a sheet over the binding edge, the
image or text on the back of the sheet is in readable
form.
• The original has a horizontal format (width >
height).
'Landscape
left'
• The binding edge of the original is at the left-hand
side.
• When you turn a sheet over the binding edge, the
image or text on the back of the sheet is in readable
form.
• The original has a horizontal format (width >
height).
'Landscape
top'
• The binding edge of the original is at the top.
• When you turn a sheet over the binding edge, the
image or text on the back side of the sheet is in
readable form.
Chapter 8 - Scan jobs
219
Description of the scan job settings
'Original' settings - 'Size'
#
Setting
Values
Description
A4, A3, Letter, Ledger,
etc.
Original in the ADF or on the glass plate:
• Automatic size detection, or
• Enter the media format of the original.
When your original has a non-standard size, you
can use the - and + buttons to enter the exact
measures. You can enter the measures in steps of
1 mm / 0.01 inches. The text of the'Size' button
changes into 'Custom'.
'Size'
• Automatic orientation detection, or
• Indicate the orientation of nonstandard size media
'Portrait'
'Landscape'
'Original' settings - 'Background suppression'
You can use the 'Background suppression' to print a uniform background. For example
to suppress unwanted spots.
220
Chapter 8 - Scan jobs
Description of the scan job settings
'File' settings - 'Type'
#
Setting
Values
Description
'Type'
'Format'
Select the required format.
Select the 'TIFF Single Page' format when you require
single pages in a general format, a single page, compatible with a range of graphical applications.
Select the 'TIFF Multi Page' format when you require
multiple pages in a general format compatible with a
range of graphical applications.
Select the 'JPEG' format when you require a general
format, compatible with a range of graphical applications.
Select the 'PDF' format when you require a format
compatible with the Acrobat applications. A PDF file
is a file with compressed graphics and text. This format matches all print systems and is common in the
Internet environment.
Define the compression factor to reduce the file size.
'Compression'
NOTE
A higher compression factor results in a scan with lower quality.
'Quality'
Define the quality factor to reduce the file size.
NOTE
A higher quality factor results in a scan with a larger file size.
Chapter 8 - Scan jobs
221
Description of the scan job settings
'File' settings - 'Resolution'
#
Setting
Values
'Resolution'
'600 dpi'
Description
Select a value from the list, from 150 dpi (lowest resolution) to 600 dpi (highest resolution).
To give you an indication of what value to choose:
• Select 150 dpi when you want to generate a very
small file.
• Select 300 dpi when you want to view or archive
the generated file.
• Select 600 dpi when you want to print or edit the
generated file.
'File' settings - 'Size'
#
Setting
Values
Description
'Size'
All media
sizes that the
media catalog supports
Select the media size of the resulting file.
Setting
Values
Description
'Zoom'
'Fit to page'
When 'Fit to page' is 'On', the image is resized so it
fits onto the page.
When 'Fit to page' is 'Off', the original size of the
image is maintained.
'Percent'
Use the + and - buttons to reduce or enlarge the size
of the image (from 25% to 400%). The preview pane
immediately shows the results of your action.
'File' settings - 'Zoom'
#
222
Chapter 8 - Scan jobs
Description of the scan job settings
'File' settings - 'Align'
#
Setting
Values
'Align'
Description
The automatically set value for this setting.
'Auto'
'Top left'
An image on a sheet may be smaller than the media
size of the output, for example because you scaled the
image to 70% of its original size. The 'Align' setting
allows you to indicate the position of the image on
the sheet. 'Top left' moves the image to the upper left
corner of the sheet.
'Top center' moves the image to the centre at the top
of the sheet.
'Top center'
'Top right' moves the image to the upper right corner
of the sheet.
'Top right'
'Center left' moves the image to centre of the left side
of the sheet.
'Center left'
'Center' moves the image to the centre of the sheet.
'Center'
'Center right' moves the image to the centre of the
right side of the sheet.
'Center
right'
'Bottom left' moves the image to the lower left corner
of the sheet.
'Bottom left'
Chapter 8 - Scan jobs
223
Description of the scan job settings
Setting
Values
Description
'Bottom center' moves the image to the centre of the
bottom side of the sheet.
'Bottom center'
'Bottom right' moves the image to the lower right
corner of the sheet.
'Bottom
right'
'File' settings - 'Margin erase'
#
224
Setting
Values
Description
'Shift'
'Margin
shift'
Use this setting to increase or decrease the margin. By
default, the values of the front side and the back side
are interlocked. This means that the values for the
front side and the back side remain identical.
Widening the margin can be useful if you want to
staple or punch the output, for example. Narrowing
the margin can be useful if you do not need additional
space for stapling or punching the output, for example.
If you want to define a different value for each side,
press . The icon changes to the unlocked status. Now
you can define the values for the front side and the
back side separately.
'Image shift'
Use this setting to shift the image horizontally or vertically. By default, the values of the front side and the
back side are interlocked. This means that the values
for the front side and the back side remain identical.
If you want to define a different value for each side,
press . The icon changes to the unlocked status. Now
you can define the values for the front side and the
back side separately.
Chapter 8 - Scan jobs
Description of the scan job settings
'File' settings - 'Adjust image'
#
Setting
Values
Description
'Adjust image'
'Describe
original'
'Describe
copy'
The Adjust Image setting allows you to define the
copy and scan quality manually. Depending on the
situation you can describe the original or copy/scan.
• If the original is unsatisfactory, enter a description.
• If the original is OK, but you want a different copy
or scan, describe the copy.
'Brightness'
With the 'Brightness' setting you can darken (-1 to 3) or lighten (1-3) your print.
'Contrast'
With the 'Contrast' setting, you can change the differences between dark and light areas on your print. A
negative value reduces the difference, a positive value
increases the difference.
'Color'
With the 'Color' setting, describe the color of the
original or copy.
Chapter 8 - Scan jobs
225
Description of the scan job settings
'File' settings - 'Color/Black & white'
#
Setting
Values
'Color/Black
& white'
'Colors'
Description
'Black and white'
Select this setting to make black & white scans.
'Grayscale'
Select this setting to make grayscale scans. When you
select this option, the 'Image type' and 'Zoom' functions are disabled. The file type automatically changes
into the preferred settings.
'Color'
Select this setting to make color scans.
NOTE
To make color scans, the color scanning option must be licensed.
'Color profile'
•Scan to file, on page 227
226
Chapter 8 - Scan jobs
• 'sRGB'
Select 'sRGB' for a smaller color gamut with
smaller differences between consecutive colors.
The 'sRGB' setting reduces the risk of banding.
• 'AdobeRGB'
Select 'AdobeRGB' for a bigger color gamut with
bigger differences between consecutive colors.
The 'AdobeRGB' setting increases the risk of
banding.
Scan to file
Scan to file
How to use the scan-to-file function
1. Place the originals face up into the ADF, or place 1 original face down on the glass plate.
2. Touch 'Jobs' -> 'Copy/Scan'.
3. Select a scan-to-file profile.
The job window opens.
4. Change the settings for the original and the file.
5. Touch 'Start' .
The scanner scans the originals. The system sends the resulting file to the scan server.
The file is stored with a predefined name in a designated directory. There is no message
on the operator panel to inform you that the file was stored successfully. You can access
the status information on the controller.
Chapter 8 - Scan jobs
227
Scan to USB
Scan to USB
How to use the Scan-to-USB function
1. Insert a USB drive into the USB port on the left side of the operator panel.
2. Place the originals face up into the ADF, or place 1 original face down on the glass plate.
3. Touch 'Jobs' -> 'Copy/Scan' -> 'Scan to USB'.
The job window opens.
4. Change the settings for the original and the file.
5. Touch 'Job name' to change the default job name.
Use the keyboard to change the name, then touch 'OK'.
6. Touch 'Destination' to indicate the folder on your USB drive where you want to save
the file.
7. If applicable, enter the 'Account ID'.
8. Touch 'Start' .
The scanner scans the originals. The system sends the resulting file to your USB drive.
228
Chapter 8 - Scan jobs
Combine subsets into one file
Combine subsets into one file
Introduction
You can use the scan function of the machine to carry out all kinds of scan jobs. You can
carry out scan-to-file or scan-to-email jobs, for example. When the document contains
non-standard size media or when you want to combine various documents, you can create
a combined scan job. All the different originals are then combined in 1 file. This is comparable to combining several documents in a copy job. The following situations can occur,
for example.
• You want to scan a document that consists of several parts - called subsets - that differ
from each other and require individual settings
• You want to combine different documents into one file
Different subsets are subsets that have a mix of 1-sided and 2-sided pages, or require different exposure settings, for example. When you scan these types of documents, you must
define the settings for each subset individually.
This section describes the following:
• Combine subsets into one file.
Furthermore, this sections describes the actions you can carry out from the preview
pane.
• Add a subset
• Insert a subset
• Delete a subset
• Edit a subset.
Before you begin
1. Divide your document into subsets.
2. Put the first subset into the automatic document feeder or on the glass plate.
Note:
When you use the automatic document feeder, the size of the originals must be one of
the supported standard sizes.
3. If necessary, adjust the original guides of the automatic document feeder.
Combine subsets into one file
1. On the operator panel, press the 'Copy/Scan' button.
2. Select a scan profile.
Chapter 8 - Scan jobs
229
Combine subsets into one file
The job window opens.
3. Press 'Subsets'.
4. Define the settings for the first subset (original and file).
#
NOTE
Some settings that you define for the first subset apply to the whole job, the 'Type'
and 'Resolution' settings, for example. These settings are fixed and are grayed out after
scanning the first subset.
5. Touch the Start button .
6. Put the next subset into the automatic document feeder or on the glass plate.
7. Repeat the steps 4 - 6 for all other subsets.
#
NOTE
A number indicates the order in which the subsets have been scanned.
8. When all subsets have been scanned, Touch 'Ready'.
A full overview of all the scanned subsets appears in the right-hand pane. If required, you
can still adapt the job:
• Add another subset (see below)
• Insert a subset (see below)
• Delete a subset (see below)
• Edit a subset (see below).
9. When the job is OK, start the creation of the file (see below).
Add a subset
1. Place the first subset face up into the ADF or face down on the glass plate.
2. In the preview pane, touch 'Add'.
The settings pane becomes available.
3. Define the settings for the new subset.
4. Touch the 'Start' button .
The new subset is added to the end of the list of subsets.
5. Repeat the steps 3 and 4 if you want to add more subsets, or touch 'Ready' when all the
additional subsets have been scanned.
The full overview of all the scanned subsets appears.
6. When the job is OK, start the creation of the file (see below).
230
Chapter 8 - Scan jobs
Combine subsets into one file
Insert a subset
1. Put the first subset face up into the automatic document feeder or face down on the glass
plate.
2. In the preview pane, select the subset below the position where you want to insert a subset.
3. Press 'Insert'.
The settings pane becomes available. Furthermore, an empty line appears above the selected subset.
4. Define the settings for the new subset.
5. Touch the 'Start' button .
6. Repeat the steps 4 and 5 if you want to insert more subsets after the new subset, or touch
'Ready' when all the additional subsets have been scanned.
#
NOTE
If you want to insert another subset at another position, you must first touch 'Ready'
and then repeat the steps 1 to 5.
The full overview of all the scanned subsets appears.
7. When the job is OK, start the creation of the file (see below).
Delete a subset
1. In the preview pane, select the subset you want to delete.
2. Press 'Delete'.
3. When the job is OK, start the creation of the file (see below).
Edit a subset
1. In the preview pane, select the subset you want to edit.
2. Edit the settings.
#
NOTE
The settings you can edit become available. All the settings you cannot change are
grayed out.
3. When the job is OK, start the creation of the file.
Chapter 8 - Scan jobs
231
Combine subsets into one file
Define the general parameters and start the creation of the file
1. When the job is OK, touch 'Ready'.
2. Define the parameters, like the user code and the 'Account ID'. These values apply to
the whole scan job.
3. Touch the 'Start' button to start the creation of the file.
232
Chapter 8 - Scan jobs
Chapter 9
Paper, toner, and staples
Consumables
Consumables
Introduction
The following consumables are available. For more information, contact your local authorized dealer.
We recommend that you order paper stock and toner from your local authorized dealer
before your stock runs out.
Paper stock
In addition to plain paper (A3, B4, A4, B5, A5/11" × 17", LGL, LTR, and STMT), recycled paper, color paper, transparencies (recommended for this printer), tracing paper,
labels, other types of paper stock are available.
For more information, contact your local authorized dealer.
#
CAUTION
Do not store paper in places exposed to open flames, as this may cause the paper
to ignite, resulting in burns or a fire.
#
IMPORTANT
To prevent moisture buildup, tightly wrap remaining paper in its original package
for storage.
234
Chapter 9 - Paper, toner, and staples
Consumables
#
NOTE
• For high-quality printouts, use paper recommended by your local authorized
dealer.
• Some commercially available paper types are not suited to this printer. Contact
your local authorized dealer when you need to purchase paper.
Toner
If a message asking you to replace the toner cartridge appears on the touch panel display,
replace the used toner cartridge with a new one.
Toner comes in four colors: black, cyan, magenta, and yellow.
Check the toner color that you need to replace before ordering toner from your local
authorized dealer. Also, when replacing the toner cartridge, make sure that you replace
toner of the correct color.
Use only toner cartridges intended for use with this machine.
Black Toner Cartridge
Cyan, Magenta, or Yellow Toner Cartridge
#
WARNING
• Do not burn or throw used toner cartridges into open flames, as this may
cause toner remaining inside the cartridges to ignite, resulting in burns or a
fire.
• Do not store toner cartridges in places exposed to open flames, as this may
cause the toner to ignite, resulting in burns or a fire.
#
CAUTION
Keep toner and other consumables out of the reach of small children. If these
items are ingested, consult a physician immediately.
Chapter 9 - Paper, toner, and staples
235
Consumables
#
IMPORTANT
• Store toner cartridges in a cool location, away from direct sunlight. (Recommended
storage conditions: temperatures below 30°C/86°F, and humidity below 80%.)
• [Be careful of counterfeit toner cartridges] Please be aware that there are counterfeit
Canon toner cartridges in the marketplace. Use of counterfeit toner cartridge may
result in poor print quality or machine performance. Canon is not responsible for
any malfunction, accident or damage caused by the use of counterfeit toner cartridge.For more information, see http://www.canon.com/counterfeit.
• Genuine Consumables for European region
Canon continuously develops technology innovations in Canon Toners, Drums and
Cartridges, specifically designed for use in Canon Multi-Functional machines. Experience the benefits of optimal print performance, print volume and high quality outputs,
achieved through Canon's new advanced technologies. Therefore, the use of Canon
genuine consumables is recommended for your Canon Multi-Functional machines.
Go to http://www.canon-europe.com/consumables to understand the secret behind
Canon's Consumable products.
• Genuine Supplies for North American region
Canon has developed and manufactured Toner, Parts, and Supplies specifically for
use in this machine. For optimal print quality and for optimal machine performance
and productivity, we recommend that you use Genuine Canon Toner, Parts, and
Supplies. Contact your Canon Authorized Dealer or Service Provider for Genuine
Canon Supplies.
236
Chapter 9 - Paper, toner, and staples
Load the media into the integrated paper trays
Loading paper
Load the media into the integrated paper trays
Introduction
This section describes how to load the media into the integrated paper trays.
When you load the media via the 'Load' button in the 'Schedule', the media is automatically assigned to the correct tray.
When you load and assign the media via the 'Assign' button in the 'Trays' view, you must
assign the loaded media to the corresponding paper tray manually.
#
CAUTION
When loading paper, take care not to cut your hands on the edges of the paper.
#
IMPORTANT
• A screen asking you to load paper also appears if the selected paper tray is not
fully inserted into the printer. Make sure that the paper drawer is properly in place.
• Do not load the following types of paper into the paper drawers. Doing so may
cause a paper jam.
- Severely curled or wrinkled paper
- Envelopes
- Thin straw paper
- Heavy paper (more than 221 g/m2 / 59 lb bond)
- Paper which has been printed on using a thermal transfer printer (Do not print
on the reverse side of this paper either.)
• Fan the stack of paper well before loading it, and align the edges of the paper stack
on a flat surface.
• Never place paper or any other items into the empty part of the drawer next to
the paper stack. Doing so may cause paper jams.
• Fan the stack of paper well before loading it. Paper, such as thin paper, recycled
paper, prepunched paper, heavy paper, transparencies, and tab paper, should be
fanned particularly well before loading.
Chapter 9 - Paper, toner, and staples
237
Load the media into the integrated paper trays
#
NOTE
• If a message prompting you to load paper appears during printing, the remaining
prints are automatically made after you load the correct paper. If you select another
paper drawer, the remaining prints are made after you press 'OK'.
• The following paper sizes can be loaded into paper drawers:
Left and right paper drawers:
- A4, B5
- LTR
Paper drawers 3 and 4:
- 330 × 483 mm, 320 × 450 mm (SRA3), 305 × 457 mm, A3, A4, A4R, A5R,
and custom size (139.7 × 182.0 mm to 330.2 × 487.7 mm)
- 13" x 19", 12 5/8" x 17 11/16", 12" x 18", 11" × 17", LGL, LTR, LTRR,
STMTR, EXEC, and custom size (5 ½" × 7 1/8" to 13" × 19 1/4")
Load the media into the integrated paper tray.
1. Press and release the button on the paper drawer in which you want to load paper.
238
Chapter 9 - Paper, toner, and staples
Load the media into the integrated paper trays
2. Grip the handle, then pull out the paper drawer until it stops.
3. Open a package of paper, and remove the paper stack.
#
CAUTION
When loading paper, take care not to cut your hands on the edges of the paper.
#
IMPORTANT
• Rewrap any remaining paper in its original package, and store it in a dry place,
away from direct sunlight.
• If you print onto paper that has absorbed moisture, steam may be released from
the printer output area. This is because the moisture on the paper evaporates when
high temperatures are applied to fix toner to the paper. This is not a malfunction.
(This can especially happen at low room temperatures.)
Chapter 9 - Paper, toner, and staples
239
Load the media into the integrated paper trays
#
NOTE
• For high-quality printouts, use paper recommended by your authorized dealer.
• Before loading paper, always fan the sheets several times, and align the edges to
facilitate feeding.
4. Load the paper stack into the paper drawer.
Even out the edges of the paper stack. Load the paper stack against the right wall of the
paper drawer.
240
Chapter 9 - Paper, toner, and staples
Load the media into the integrated paper trays
#
IMPORTANT
• Paper which has been rolled or curled must be straightened out prior to use.
• Make sure that the height of the paper stack does not exceed the loading limit
mark ( ) at the back of the paper drawer.
#
NOTE
• The right and left paper drawers hold approximately 1250 sheets (64 g/m² / 17
lb bond) or 1100 sheets (80 g/m² / 20 lb bond).
• Paper drawers 3 and 4 hold approximately 680 sheets (64 g/m² / 17 lb bond) or
550 sheets (80 g/m² / 20 lb bond).
• If there are instructions on the package of paper about which side of the paper to
load, follow those instructions.
• When paper is loaded into the paper drawer, the side facing down is the one
printed on.
• If problems occur, such as poor print quality or paper jams, try turning the paper
stack over, and reload it.
5. Gently push the paper tray back into the printer until it clicks into place in the closed
position.
Chapter 9 - Paper, toner, and staples
241
Load the media into the integrated paper trays
#
CAUTION
When returning the paper drawer to its original position, be careful not to get
your fingers caught, as this may result in personal injury.
#
IMPORTANT
You will not be able to make copies or print if you load paper that exceeds the loading
limit or the paper tray is not completely pushed into the printer. Always check that
the paper drawers are in place and that the paper does not exceed the loading limit.
#
NOTE
If paper runs out during copying or printing, load a new paper stack, and follow the
instructions on the touch panel display. The machine automatically restarts, and
produces the remaining copies or prints.
242
Chapter 9 - Paper, toner, and staples
Adjust the integrated paper tray to hold a different paper size.
Adjust the integrated paper tray to hold a different paper
size.
Introduction
If you want to load a different paper size into a paper drawer, follow the procedure described below to adjust the paper drawer guides.
#
IMPORTANT
Only A4/LTR transparencies can be used. Make sure that the left guide is set to
A4/LTR when loading transparencies into a paper drawer. If transparencies of a different size (other than A4/LTR) are loaded into a paper drawer, the paper size and
remaining amount of paper is not correctly detected.
Adjusting the paper tray to hold a different paper size
1. Press and release the button on the paper drawer that you want to adjust. Grip the handle,
then pull out the paper drawer until it stops. Remove all of the remaining paper.
2. Slide the left guide to align it with the mark for the desired paper size.
Left Guide
Slide the guide until it clicks into place.
Chapter 9 - Paper, toner, and staples
243
Adjust the integrated paper tray to hold a different paper size.
3. Squeeze the lever on the front guide, as shown below. Without releasing the lever, slide
the front guide to align it with the mark for the desired paper size.
Front Guide
Slide the guide until it clicks into place.
#
IMPORTANT
Adjust the guides correctly to avoid causing a paper jam, dirtying prints, or dirtying
the inside of the printer.
4. Load the appropriate paper into the paper drawer.
#
CAUTION
When loading paper, take care not to cut your hands on the edges of the paper.
5. Adjust the paper size label to show the new paper size.
6. Gently push the paper tray back into the printer until it clicks into place in the closed
position.
#
CAUTION
When returning the paper drawer to its original position, be careful not to get
your fingers caught, as this may result in personal injury.
244
Chapter 9 - Paper, toner, and staples
Load the media into the paper module
Load the media into the paper module
Introduction
Multi-Drawer Paper Deck-A1 provides three additional paper trays. You can load up to
2000 sheets of paper (80 g/m2 / 20 lb bond) per tray.
This section describes how to load the media into the paper tray module.
When you load the media via the 'Load' button in the 'Schedule', the media is automatically assigned to the correct tray.
When you load and assign the media via the 'Assign' button in the 'Trays' view, you must
assign the loaded media to the corresponding paper tray manually.
#
CAUTION
When loading paper, take care not to cut your hands on the edges of the paper.
Chapter 9 - Paper, toner, and staples
245
Load the media into the paper module
#
IMPORTANT
• If the printer is in Sleep mode, you may not be able to open the paper trays, even
when pressing the Open buttons. In this case, press the Sleep Mode key on the
operator panel to reactivate the printer, then press the Open button on the paper
tray you want to open.
• If you need to lift the lifter (e.g., if you drop objects into the paper tray), do not
lift the lifter more than 50 mm/2" or diagonally, as this may result in a malfunction
or damage to the printer.
• Never place paper or any other items in the empty part of the paper tray next to
the paper stack. Doing so may damage the printer.
• A screen prompting you to load paper also appears if the selected paper tray is not
fully inserted into the machine. Make sure that the paper tray is properly in place.
• You can load custom size paper if both paper sides are between 182.0 mm/7 1/8"
and 487.7 mm/19 1/4" in length, and between 139.7 mm/5½" and 330.2 mm/13"
in width. You cannot load custom size paper if either one of the sides is smaller
or larger than the paper sizes that can be loaded.
• Do not load the following types of paper into the Multi-Drawer Paper Deck-A1.
Doing so may cause a paper jam.
- Severely curled or wrinkled paper
- Envelopes
- Thin straw paper
- Heavy paper (more than 300 g/m2 / 158 lb index )
- Thin paper (less than 52 g/m2 / 14 lb bond)
- Paper that has been printed on using a thermal transfer printer. (Do not print
on the reverse side of this paper.)
• Fan the stack of paper well before loading it, and align the edges of the paper stack
on a flat surface. The Multi-Drawer Paper Deck-A1 can only accommodate paper
from 52 to 300 g/m2 / 14 lb bond to 110 lb cover in weight.
If you select the optional Multi-Drawer Paper Deck-A1 when it has no paper, or if the
Multi-Drawer Paper Deck-A1 runs out of paper during a print job, a screen asking you
to load paper appears on the touch panel display.
246
Chapter 9 - Paper, toner, and staples
Load the media into the paper module
#
NOTE
• If a message prompting you to load paper appears during printing, the remaining
prints are automatically made after you load the correct paper. If you select another
paper source, the remaining prints are made after you press 'OK'.
• When changing from plain to coated paper in the Multi-Drawer Paper Deck-A1
, you may have to wait a moment, as temperature control of the warm air that
fans the paper is required.
• The following paper sizes can load into Multi-Drawer Paper Deck-A1:
- 330 × 483 mm, 320 × 450 mm (SRA3), 305 × 457 mm, A3, B4, A4, A4R, B5,
B5R, A5R, and custom size (139.7 × 182.0 mm to 330.2 × 487.7 mm)
- 13" × 19", 12 5/8" × 17 11/16", 12" × 18", 11" × 17", LGL, LTR, LTRR,
STMTR, EXEC, and custom size (5½" × 7 1/8" to 13" × 19 1/4")
Load the media into the paper module.
1. Press the button on the paper tray corresponding to paper you want to load.
The inside lifter automatically descends to the paper loading position.
#
NOTE
It may take some time for the paper tray to open, even after pressing the Open button.
Chapter 9 - Paper, toner, and staples
247
Load the media into the paper module
2. Grip the handle, and pull out the paper tray until it stops.
3. Open a package of paper, and remove the paper stack.
#
CAUTION
When loading paper, take care not to cut your hands on the edges of the paper.
#
IMPORTANT
Rewrap any remaining paper in its original package, and store it in a dry place, away
from direct sunlight.
#
NOTE
• For high-quality printouts, use paper recommended by your authorized dealer.
• Before loading paper, always fan the sheets several times, and align the edges to
facilitate feeding.
4. Load the paper stack into the paper tray.
• Even out the edges of the paper stack. Load the paper stack against the left wall of the
paper tray.
248
Chapter 9 - Paper, toner, and staples
Load the media into the paper module
• When loading paper into the paper tray for the first time, adjust the size change plate
to match the paper size being loaded.
• When loading paper into the paper tray, make sure that the paper size setting is the
same size of the paper that is being loaded.
Load the paper below the rollers of the paper holder.
#
IMPORTANT
Do not subject the paper holder plate to shock when loading paper into the paper
tray, as this may result in a malfunction or damage to the machine.
Chapter 9 - Paper, toner, and staples
249
Load the media into the paper module
#
IMPORTANT
• Paper which has been rolled or curled must be straightened out before loading it
into the paper tray.
• Make sure that the height of the paper stack does not exceed the loading limit
mark ( ) on the inside of the paper tray.
#
NOTE
• If there are instructions on the package of paper about which side of the paper to
load, follow those instructions.
• When paper is loaded, the side facing up is the one printed on.
• If problems occur, such as poor print quality or paper jams, try turning the paper
stack over, and reload it. However, textured paper, 1-sided coated paper, and paper
already printed on cannot be turned over. Change to new paper.
• When loading paper, make sure that the height of the paper stack does not exceed
20 mm (13/16"). If the height of the paper stack exceeds 20 mm (13/16"), the
edges of the paper stack may become curled or creased, and poor print quality
may result.
5. Gently push the paper tray back into the machine until it clicks into place in the closed
position.
The inside lifter automatically rises, and prepares the paper tray for printing.
#
CAUTION
When returning the paper tray to its original position, be careful not to get your
fingers caught, as this may result in personal injury.
250
Chapter 9 - Paper, toner, and staples
Load the media into the paper module
#
IMPORTANT
You will not be able to make copies or print if you load paper that exceeds the loading
limit, or if the paper tray is not completely pushed into the machine.
#
NOTE
If paper runs out while copying or printing, load a new paper stack, then follow the
instructions on the touch panel display. The machine automatically restarts, and
produces the remaining copies or prints.
•Adjust the media size for the paper module, on page 252
•Loading transparencies, on page 285
•Loading tab paper, on page 287
Chapter 9 - Paper, toner, and staples
251
Adjust the media size for the paper module
Adjust the media size for the paper module
Introduction
This section explains how to change the paper size in the optional Multi-Drawer Paper
Deck-A1.
Adjust the media size for paper module
1. Press the button on the paper deck that you want to adjust, and pull out the paper deck
until it stops. Slide the paper holder plate until it does not catch onto the paper you are
setting, then remove all the remaining paper.
The paper holder plate slides by holding it as shown in the diagram.
#
NOTE
It may take some time for the paper deck to open, even when pressing the Open
button.
252
Chapter 9 - Paper, toner, and staples
Adjust the media size for the paper module
2. Squeeze the lever, as shown below. Without releasing the lever, slide the outer size change
plate and inner size change plate until they do not catch onto the paper you are setting.
3. Load the desired paper until approximately 10 mm (3/8") in height. Slide the outer size
change plate and inner size change plate to align them with the desired paper size.
If you use a paper whose parallel edge to the feeding direction is longer than 457.2
mm/18", slide the paper holder plate to the right edge, press the button on the paper
holder plate, then fold down the paper holder plate.
②
①
If the paper holder plate is folded down, proceed to step 6.
Chapter 9 - Paper, toner, and staples
253
Adjust the media size for the paper module
#
IMPORTANT
Do not subject the paper holder plate to shocks when loading paper into the paper
tray, as this may result in a malfunction or damage to the printer.
#
IMPORTANT
Adjust the guides correctly to avoid causing a paper jam, dirtying prints, or dirtying
the inside of the printer.
4. Slide the paper holder plate to align it with the desired paper size, as shown below.
5. Load all remaining paper into the paper deck.
Load the paper below the loading limit of the paper holder plate.
254
Chapter 9 - Paper, toner, and staples
Adjust the media size for the paper module
#
CAUTION
When loading paper, take care not to cut your hands on the edges of the paper.
#
IMPORTANT
• Paper that has been rolled or curled must be straightened before loading it into
the paper deck.
• Make sure that the height of the paper stack does not exceed the loading limit
mark ( ) on the inside of the paper deck.
• Never place paper or other items into the empty part of the paper deck next to
the paper stack. Doing so may damage the printer.
#
NOTE
• If there are instructions on the package of paper about which side of the paper to
load, follow those instructions.
• When paper is loaded, the side facing up is the one printed on.
• If problems occur, such as poor print quality or paper jams, try turning the paper
stack over, and reload it. However, textured paper, 1-sided coated paper, and paper
already printed on cannot be turned over. Change to new paper.
• When loading paper, make sure that the height of the paper stack does not exceed
20 mm (13/16"). If the height of the paper stack exceeds 20 mm (13/16"), the
edges of the paper stack may become curled or creased, and poor print quality
may result.
6. Change the paper deck's size plate to match the new paper size.
Chapter 9 - Paper, toner, and staples
255
Adjust the media size for the paper module
7. Gently push the paper tray back into the printer until it clicks into place in the closed
position.
The inside lifter automatically rises and prepares the paper deck for printing.
#
CAUTION
When returning the paper deck to its original position, be careful not to get
your fingers caught, as this may result in personal injury.
•Load the media into the paper module, on page 245
256
Chapter 9 - Paper, toner, and staples
Load the media into the bulk paper modules
Load the media into the bulk paper modules
Introduction
The bulk paper module (Paper Deck Unit-A1/POD Deck Lite-A1) allows you to load
up to 4000 sheets of paper (64 g/m2 / 17 lb bond) or 3500 sheets of paper (80 g/m2 / 20
lb bond).
#
CAUTION
When loading paper, take care not to cut your hands on the edges of the paper.
#
IMPORTANT
• If the printer is in Sleep mode, you may not be able to open the bulk paper module.
In this case, press the Sleep Mode key on the operator panel to reactivate the
printer, then press the Open button on the bulk paper module.
• Never place paper or other items into the empty part of the paper deck next to
the paper stack. Doing so may cause paper jams.
• A paper blower is attached inside the paper deck. Do not insert paper clips or
other foreign objects into the blower.
• Paper jams may occur if you load paper into Paper Deck Unit-A1/POD Deck
Lite-A1 in a low humidity environment. If paper jams occur, follow the instructions
on the touch panel display to remove the jammed paper. In addition, make sure
that the loaded paper is not curled. Paper curls must be straightened out prior to
loading.
• A screen asking you to load paper also appears if the paper deck is not fully inserted
to the printer. Make sure the paper deck is properly in place.
• Do not load the following types of paper into the paper deck. Doing so may cause
a paper jam.
- Severely curled or wrinkled paper
- Thin straw paper
- Paper which has been printed on using a thermal transfer printer (Do not print
on the reverse side of this paper either.)
• Fan the stack of paper well before loading it, and align the edges of the paper stack
on a flat surface.
• Paper Deck Unit-A1 can only accommodate paper from 52 to 220 g/m² / 14 lb
bond to 80 lb cover in weight.
• POD Deck Lite-A1 can only accommodate paper from 52 to 300 g/m² / 14 lb
bond to 110 lb cover in weight.
Chapter 9 - Paper, toner, and staples
257
Load the media into the bulk paper modules
#
NOTE
• The following paper sizes can be loaded into Paper Deck Unit-A1 and POD Deck
Lite-A1:
Paper Deck Unit-A1:
- A4, B5
- LTR
POD Deck Lite-A1:
- 330 × 483 mm, 320 × 450 mm (SRA3), 305 × 457 mm, A3, B4, A4, A4R, and
B5
- 13" × 19", 12 5/8" × 17 11/16", 12" × 18", 11" × 17", LGL, LTR, and LTRR
• If a message prompting you to load paper appears during printing, the remaining
prints are automatically made after you load the correct paper. If you select another
paper source, the remaining prints are made after you press 'OK'.
• If you want to change the paper loaded in the paper deck from plain to coated,
wait for the warm air fan to readjust the temperature before you change the paper.
Load the media into the bulk paper modules
1. Press and release the Open button to open the paper deck.
The inside lifter automatically descends to the paper loading position.
2. Open a package of paper, and remove the paper stack.
#
CAUTION
When loading paper, take care not to cut your hands on the edges of the paper.
#
IMPORTANT
Rewrap any remaining paper in its original package, and store it in a dry place, away
from direct sunlight.
258
Chapter 9 - Paper, toner, and staples
Load the media into the bulk paper modules
#
NOTE
• For high-quality printouts, use paper recommended by your authorized dealer.
• Before loading paper, always fan the sheets several times, and align the edges to
facilitate feeding.
3. Lift the feeding support roller.
If Paper Deck Unit-A1 is attached, proceed to step 4.
#
IMPORTANT
• When loading paper, be sure to first lift the feeding support roller. If you load
paper without raising the feeding support roller, it may become detached, and
paper may not be fed properly.
• Using the paper deck with the feeding support roller detached may cause paper
jams.
4. Load the paper stack into the paper deck.
Chapter 9 - Paper, toner, and staples
259
Load the media into the bulk paper modules
Make sure that the inside lifter has lowered before loading paper, even out the edges of
the paper stack, and stack the paper neatly against the inner paper guide.
[387] Paper Deck Unit-A1
[388] Paper Deck Lite-A1
#
IMPORTANT
• Do not load paper into the paper deck that has previously been printed on, as this
may result in a malfunction or damage to the printer. Always use the stack bypass
to feed paper when you want to print on the back of a sheet of paper that already
has something printed on its front (2nd side of 2-sided print).
• Make sure that the size change plate is properly aligned with the marks for the
desired paper size. If the size change plate is not properly aligned, the paper deck
may become damaged.
• Paper that has been rolled or curled must be straightened before loading it into
the paper deck.
• Make sure that the height of the paper stack does not exceed the loading limit
mark ( ) on the inside of the paper deck.
260
Chapter 9 - Paper, toner, and staples
Load the media into the bulk paper modules
#
NOTE
• Load the paper stack in stages, adding approximately 600 sheets of paper (64 g/m²
/ 17 lb bond) or 550 sheets of paper (80 g/m² / 20 lb bond) at a time. If the paper
deck can accommodate more paper, the lifter will descend.
• Hot air blown by the fan may warm the inner size change plate of POD Deck
Lite-A1.
• If there are instructions on the package of paper about which side of the paper to
load, follow those instructions.
• When paper is loaded into the paper deck, the side facing up is the one printed
on.
• If problems occur, such as poor print quality or paper jams, try turning the paper
stack over, and reload it. However, you cannot turn textured or 1-sided coated
paper over. Change this paper instead.
5. Lower the feeding support roller.
If Paper Deck Unit-A1 is attached, proceed to step 6.
6. Gently push the paper tray back into the printer until it clicks into place in the closed
position.
The inside lifter automatically rises and prepares the paper deck for feeding.
Chapter 9 - Paper, toner, and staples
261
Load the media into the bulk paper modules
#
CAUTION
When closing the paper deck, be careful not to get your fingers caught, as this
may result in personal injury.
•Loading transparencies, on page 285
•Adjust the media size for the bulk paper module, on page 263
262
Chapter 9 - Paper, toner, and staples
Adjust the media size for the bulk paper module
Adjust the media size for the bulk paper module
Introduction
This section explains how to change the paper size for the optional POD Deck Lite-A1.
Adjust the media size for the bulk paper module
1. Press the Open button to open the paper deck.
The inside lifter automatically descends to the paper loading position.
2. Remove all of the loaded paper, the paper size sheet, and deck base plate.
3. Remove the blue screw on the rear edge retainer using a coin or similar instrument.
Chapter 9 - Paper, toner, and staples
263
Adjust the media size for the bulk paper module
4. Remove the rear edge retainer.
5. Remove the two blue screws on the outer size change plate using a coin or something
similar.
#
IMPORTANT
Do not loosen or remove any screw other than the two blue screws on the outer size
change plate.
6. Remove the outer size change plate.
264
Chapter 9 - Paper, toner, and staples
Adjust the media size for the bulk paper module
7. Align the outer size change plate with the marks for the desired paper size that you want
to load.
(SRA3)
320mm 450mm
330mm 483mm
13 19
12 5/ 8 17 11/ 16
305mm 457mm
12 18
A4/A3
11 17/LTR
B5/B4
LGL/LTR R
A4 R
#
IMPORTANT
• Make sure to align the outer size change plate with the marks for the desired paper
size. There are two locations with marks for the paper size on the top of the outer
size change plate. Align the outer size change plate with the desired marks.
• Make sure that the size change plate is properly aligned with the marks for the
desired paper size. If the size change plate is not properly aligned, Pod Deck Lite
may become damaged.
8. Fix the outer size change plate with the two blue screws using a coin or something similar,
while slightly holding its centre front portion and pressing it towards you.
• Fix the screws by turning them clockwise.
• Fasten the left blue screw before fastening the right blue screw.
Chapter 9 - Paper, toner, and staples
265
Adjust the media size for the bulk paper module
#
IMPORTANT
• If you fasten the blue screws without pressing the outer size change plate toward
you, the plate may be fixed at an angle.
• If you use the paper deck with a tilted outer size change plate, paper may feed
slanted, poor print quality may result, and paper jams may occur. Therefore, make
sure to fasten the blue screw while pressing the outer size change plate towards
you.
9. Align the rear edge retainer with the marks for the desired paper size.
B5
LTR
A4
#
IMPORTANT
• If the rear edge retainer is not aligned properly, paper may become jammed, the
quality of the image may be degraded, or the inside of the main unit may become
dirty.
• Make sure to load paper with the rear edge retainer properly aligned with the paper
size marks on the top and base of the pod deck lite.
10. Fix the rear edge retainer with the blue screw using a coin or something similar.
• Fix the screws by turning them clockwise.
266
Chapter 9 - Paper, toner, and staples
Adjust the media size for the bulk paper module
#
IMPORTANT
There are two screw holes for fastening the rear edge retainer. Make sure that it is
fastened properly (aligned with the marks for the desired paper size) to prevent it
from being installed at an angle.
11. Remove the two blue screws on the inner size change plate using a coin or something
similar.
12. Remove the inner size change plate.
#
NOTE
Hot air blown by the fan may warm the inner size change plate.
Chapter 9 - Paper, toner, and staples
267
Adjust the media size for the bulk paper module
13. Align the inner size change plate with the marks for the desired paper size.
B4
B5
11 17/LTR
12 18
305mm 457mm
13 19
A3
A4
125/8 1711/16
320mm 450mm
(SRA3)
330mm 483mm
#
IMPORTANT
• Make sure to align the inner size change plate with the marks for the desired paper
size. There are two locations with marks for paper size on the top of the inner size
change plate. Align the inner size change plate with the desired marks.
• Make sure that the size change plate is properly aligned with the marks for the
desired paper size. If the size change plate is not properly aligned, Pod Deck Lite
may become damaged.
14. Fix the inner size change plate with the two blue screws using a coin or something similar,
while slightly holding its centre front portion, and pressing it away from you.
• Fasten the right blue screw before fastening the left blue screw.
268
Chapter 9 - Paper, toner, and staples
Adjust the media size for the bulk paper module
#
IMPORTANT
• Make sure to align the inner size change plate with the marks for the desired paper
size. There are two marks for paper size on the top of the paper deck. Align the
inner size change plate with the desired marks.
• Make sure that the size change plate is properly aligned with the marks for the
desired paper size. If the size change plate is not properly aligned, Pod Deck Lite
may become damaged.
15. Insert the deck base plate that matches the new paper size into the paper deck.
If you are not using the deck base plate, move the paper deck away from the main unit
and hang the deck base plate on the hook on the outer left of the paper deck.
#
IMPORTANT
• Always use the deck base plate when loading paper into the paper deck. If you
load paper without setting the deck base plate, the loaded paper may hang over
the lifter, and a paper jam may occur.
• Never place the deck base plate into the empty part of the paper deck. Doing so
may lead to a printer malfunction.
Chapter 9 - Paper, toner, and staples
269
Adjust the media size for the bulk paper module
16. Place the paper size sheet that matches the new paper size into the paper deck.
#
IMPORTANT
Never place the paper size sheet into the empty part of the pod deck lite. Doing so
may lead to a printer malfunction.
17. Load the paper stack into the paper deck, then lower the feeding support roller.
#
CAUTION
When loading paper, take care not to cut your hands on the edges of the paper.
#
IMPORTANT
• To load paper larger than A4/LTR, first close the pod deck lite to raise the inside
lifter, open the pod deck lite, then load the paper. If you try to load paper larger
then A4/LTR when the inside lifter is at its lowest position, the paper may not be
loaded properly and paper jams may occur.
• Never place paper or any other items into the empty part of the pod deck lite.
Doing so may lead to a printer malfunction.
270
Chapter 9 - Paper, toner, and staples
Adjust the media size for the bulk paper module
#
NOTE
When loading paper, make sure that the height of the paper stack does not exceed
20 mm (13/16"). If the height of the paper stack exceeds 20 mm (13/16"), the edges
of the paper stack may become curled or creased, and poor print quality may result.
18. Place a magnet label indicating the new paper size onto the paper deck.
19. Close the paper deck.
The inside lifter automatically rises and prepares the paper deck for feeding.
#
CAUTION
When closing the paper deck, be careful not to get your fingers caught, as this
may result in personal injury.
•Load the media into the bulk paper modules, on page 257
Chapter 9 - Paper, toner, and staples
271
Load the media into the inserter
Load the media into the inserter
Introduction
This section describes how to load media into the inserter (Document Insertion UnitH1).
Document Insertion Unit Staple Settings and Output Results Table
The following table shows the effect of the cover position, original position and the staple
settings on the output.
#
How to place the cover sheet/original
Document Insertion Unit*1
Feeder
Staple settings
Output results
Glass plate
'Top left'
'1 staple'
/
'Left edge'
'2 staples'
A4, B5/LTR
'Top left'
'1 staple'
A3, B4 / 11" X
17", LGL
'Top edge'
'2 staples'
'Top left'
'1 staple'
A4, B5/LTR
'Top edge'
'2 staples'
272
Chapter 9 - Paper, toner, and staples
Load the media into the inserter
How to place the cover sheet/original
Staple settings
'Top left'
'1 staple'
/
'Left edge'
'2 staples'
'Top right'
'1 staple'
/
'Right edge'
'2 staples'
Output results
A3, B4 / 11" X
17", LGL
A4, B5/LTR
'Top right'
'1 staple'
A3, B4 / 11" X
17", LGL
'Top right'
'1 staple'
'Top right'
'1 staple'
A4, B5/LTR
'Top right'
'1 staple'
'Top right'
'1 staple'
/
'Right edge'
'2 staples'
A3, B4 / 11" X
17", LGL
Chapter 9 - Paper, toner, and staples
273
Load the media into the inserter
How to place the cover sheet/original
Staple settings
Output results
'Saddle stitching'
ABC
*1 Paper can be loaded into both the upper and lower trays. Load the paper facing the
same side for both the upper and lower trays.
Load the media into the inserter
1. Adjust the slide guides to fit the paper size.
To use the upper tray:
- Adjust the slide guide.
To use the lower tray:
- Open the lower tray cover.
274
Chapter 9 - Paper, toner, and staples
Load the media into the inserter
- Adjust the slide guide.
2. Open a package of paper, and remove the paper stack.
#
CAUTION
When loading paper, take care not to cut your hands on the edges of the paper.
#
IMPORTANT
Rewrap any remaining paper in its original package, and store it in a dry place, away
from direct sunlight.
#
NOTE
• For high-quality printouts, use paper recommended by your local authorized
dealer.
• Before loading paper, always fan the sheets several times, and align the edges to
facilitate feeding. Also, you should always fan paper that has just been removed
from a newly opened paper package.
3. Load the paper stack into the inserter.
Chapter 9 - Paper, toner, and staples
275
Load the media into the inserter
#
CAUTION
Make sure that the height of the paper stack does not exceed the loading limit
mark ( ) at the back of the paper supply tray.
#
NOTE
• You cannot make copies or prints on paper that is loaded into the document insertion unit.
• You can load the following media into the trays of the inserter:
- 330 × 483 mm, 320 × 450 mm (SRA3), 305 × 457 mm, A3, B4, A4, A4R, B5,
B5R, and custom size (182.0 × 182.0 mm to 330.2 × 487.7 mm) into the trays
of the inserter.
- 13" × 19", 12 5/8" × 17 11/16", 12" × 18", 11" × 17", LGL, LTR, LTRR, EXEC,
and custom size (7 1/8" × 7 1/8" to 13" × 19 1/4")
• A maximum of 200 sheets of paper (80 g/m2 / 20 lb bond) can be loaded into the
trays of the inserter.
• If you want to load paper into the upper tray: Load the paper face up.
• If you want to load paper into the lower tray: Load the paper face up.
276
Chapter 9 - Paper, toner, and staples
Load the media into the inserter
• Close the tray cover.
•Loading tab paper, on page 287
Chapter 9 - Paper, toner, and staples
277
Load the media into the special feeder (multipurpose tray)
Load the media into the special feeder (multipurpose tray)
Introduction
The optional special feeder allows you to print on tracing paper, labels, and envelopes.
#
IMPORTANT
• Note the following points when using the special feeder:
- Paper quantity: 1 to approximately 100 sheets (80 g/m2 / 22 lb bond, stack approximately 11 mm / 3/8" high)
- Paper sizes: 100.0 × 148.0 mm to 330.2 × 487.7 mm
- Paper sizes: 4" × 5 7/8" to 13" × 19 1/4"
- Paper Weight: 52 to 300 g/m² / 14 lb bond to 110 lb cover
- Paper which has been rolled or curled must be straightened out prior to use, to
allow the paper to feed smoothly through the special feeder (allowable curl amount:
less than 10 mm / 3/8" for normal paper, less than 5 mm / 1/5" for heavy paper).
There are some types of paper stock that may meet the above specifications but
cannot be fed into the special feeder.
• Do not load different size/type paper at the same time.
• When using tracing paper or coated paper, feed the paper one sheet at a time, and
remove each sheet as it is delivered to the output tray. Loading several sheets of
paper together may cause paper jams.
• When printing on special types of paper, such as heavy paper or transparencies,
be sure to correctly set the paper type, especially if you are using heavy paper. If
the type of paper is not set correctly, it could adversely affect the quality of the
image. Moreover, the fixing unit may become dirty and require a service repair,
or the paper could jam.
• If you are printing on envelopes, do not allow more than 10 envelopes to accumulate in the output tray. Always empty the output tray once 10 envelopes have accumulated.
278
Chapter 9 - Paper, toner, and staples
Load the media into the special feeder (multipurpose tray)
#
NOTE
• Envelopes may be creased in the printing process.
• For high-quality printouts, use paper recommended by your authorized dealer.
• Standard Size
You can select standard inch paper, or A or B series paper.
• Customer size
You can load nonstandard paper sizes
(100.0 × 148.0 mm to 330.2 × 487.7 mm)
( 4" × 5 7/8" to 13" × 19 1/4")
• Envelope
The following envelopes can be loaded into the special feeder:
- COM10 No.10: 104.7 × 241.3 mm / 1/8" × 9½"
- ISO-B5: 176 × 250 mm / 7" × 9 7/8"
- Monarch: 98.4 × 190.5 mm / 3 7/8" × 7½"
- ISO-C5: 162 × 229 mm / 6 3/8" × 9"
- DL: 110 × 220 mm / 4 3/8" × 8 5/8"
- Nagagata 3: 120 × 235 mm / 4 3/4" × 9 1/4"
- Yougatanaga 3: 120 × 235 mm / 4 3/4" × 9 1/4"
- Kakugata 2: 240 × 332 mm / ½" × 13 ½"
Load the media into the special feeder
1. Open the special feeder.
2. Adjust the slide guides to match the paper size.
Chapter 9 - Paper, toner, and staples
279
Load the media into the special feeder (multipurpose tray)
If you are feeding large paper, pull out the auxiliary tray.
3. Load the paper into the special feeder.
Make sure the height of the paper stack does not exceed the loading limit mark ( ).
When you use the special feeder to make copies, straighten curled paper prior to use, as
shown below. Curled paper may cause a paper jam.
Feeding Direction
To print on the back of preprinted paper, straighten curled paper and load the preprinted
paper face up into the special feeder, as shown in the illustration below.
Output Direction
After the first one sided
copy is made
280
Chapter 9 - Paper, toner, and staples
Feeding Direction
When copying on the back
side of a preprinted sheet
Load the media into the special feeder (multipurpose tray)
#
IMPORTANT
• When loading paper into the special feeder, align the paper stack neatly between
the slide guides. If the paper is not loaded correctly, a paper jam may occur.
• When loading paper into the special feeder, make sure the paper is placed down
flat. The paper may not be able to be fed if the slide guides are set to a size smaller
than the paper, causing it to curve upward.
• If you are printing on heavyweight paper or envelopes using the special feeder and
find that the paper or envelopes are not being fed smoothly or evenly through the
special feeder, remove the paper or envelopes, curl the feeding edges upward approximately 3mm / 1/8", then reload the paper or envelopes. Curling the feeding
edges enables the rollers to grip the paper or envelopes as they are fed into the
special feeder.
#
NOTE
• If there are instructions on the paper package about which side of the paper to
load, follow those instructions.
• When the paper is loaded into the special feeder, the side facing up is the one
printed on.
• If problems, such as poor print quality or paper jams occur, try turning the paper
stack over and reload it.
If you are loading envelopes into the special feeder:
• Take five envelopes, loosen them as shown, then stack them together. Repeat this step
five times for each set of five envelopes.
Chapter 9 - Paper, toner, and staples
281
Load the media into the special feeder (multipurpose tray)
• Place the envelopes on a clean, level surface, then press all the way around the envelopes
by hand, in the direction of the arrows, to remove any curls. Repeat this step five times
for each set of five envelopes.
Hold down the four corners of the envelopes firmly so that they and the sealed or glued
portion stay flat.
#
IMPORTANT
• If you use envelopes that have glue attached to their flaps, the glue may melt due
to the heat and pressure of the fixing unit.
• Take particular care to spread the envelopes out in the direction that they will be
fed.
Feeding Direction
282
Chapter 9 - Paper, toner, and staples
Load the media into the special feeder (multipurpose tray)
#
IMPORTANT
• Do not print on the back of the envelopes (the side with the flap).
• If the envelopes become filled with air, flatten them by hand before loading them
into the special feeder.
• Load the envelopes, as shown below.
If you are using Nagagata 3 or Kakugata 2:
Feeding Direction
If you are using ISO-B5:
Feeding Direction
If you are using COM10 No.10, Monarch, DL, ISO-C5, or Yougatanaga 3:
Feeding Direction
Chapter 9 - Paper, toner, and staples
283
Load the media into the special feeder (multipurpose tray)
#
IMPORTANT
• The special feeder can hold five envelopes at a time.
• If the envelopes do not pass through the printer properly after following the procedures up to this point, repeat the procedures by feeding once for each envelope.
• Envelopes may be creased in the printing process.
284
Chapter 9 - Paper, toner, and staples
Loading transparencies
Loading transparencies
Introduction
You can load transparencies into the following paper source.
• Paper drawers of the main unit
• Special feeder
• POD Deck Lite-A1
• Multi-Drawer Paper Deck-A1
Unlike normal paper, transparencies have a specific printable surface to ensure the optimal
reproduction of images.
When a transparency is loaded into the paper drawer of the main unit, the side facing
down is the one printed on.
When the transparency is loaded into the special feeder, POD Deck Lite-A1, or MultiDrawer Paper Deck-A1, the side facing up is the one printed on.
Important remarks and notes
#
IMPORTANT
• Only A4/LTR transparencies can be used.
When loading transparencies, be careful not to touch the printable surface. Hold
transparencies by their edges.
• Fan the stack of transparencies well before loading it in a paper source. Loading
transparencies without fanning them may cause a paper jam.
• Do not load transparencies into a paper source while a print job is in progress.
This may cause paper jams.
• Only use transparencies that are specially recommended for use in this printer.
Other chemicals can damage the printer.
• To prevent paper jams or the folding of transparencies, it is recommended that
you remove them from the output tray as soon as possible.
• Place unused transparencies into the box in which they came. Leaving them in
the paper tray for an extended period of time may cause them to adhere to one
another, resulting in paper jams. Avoid storing transparencies in a location subject
to high temperatures or humidity.
• If transparencies are adhering to one another and a paper jam occurs, remove
them, fan them well, make sure that fewer than 100 transparencies are loaded, or
use new transparencies.
• When printing onto transparencies, image density may be high, depending on the
image type. In this case, adjust the output image density.
Chapter 9 - Paper, toner, and staples
285
Loading transparencies
#
NOTE
You can load up to 250 transparencies in a paper source other than the special feeder.
If a paper jam occurs, remove the transparencies and fan them well before reloading
them into the paper tray.
286
Chapter 9 - Paper, toner, and staples
Loading tab paper
Loading tab paper
Introduction
This section describes how to load tab paper. You can load tab paper into the following
paper source.
• Paper trays 3 and 4 of the main unit.
• Multi-Drawer Paper Deck-A1.
• Document Insertion Unit-H1.
#
IMPORTANT
Only A4/LTR tab paper can be used.
There are two kinds of tab paper: right order tab paper and reverse order tab paper.
1
1
2
2
3
3
4
4
Right Order Tab Paper
Reverse Order Tab Paper
#
NOTE
• You cannot make copies or prints on tab paper that is loaded into Document Insertion Unit-H1.
• You can use the tab paper set in Document Insertion Unit-H1 for Add Cover,
Insert Sheets or Job Separator.
• If you want to insert printed tab paper as chapter pages, insert a blank paper where
the tab paper will be inserted.
Chapter 9 - Paper, toner, and staples
287
Loading tab paper
Loading tab paper per tray
#
Paper source
Paper drawer
How to load tab paper
Load reverse order tab paper face
down with the tabs to the left
side.
1
2
3
4
Multi-Drawer Paper Deck-A1
1
Load right order tab paper face
up with the tabs to the right side.
2
3
4
Document Insertion Unit-H1
1
2
3
4
288
Chapter 9 - Paper, toner, and staples
Load reverse order tab paper face
down with the tabs to the left
side.
Load tab paper into the paper tray
Load tab paper into the paper tray
Introduction
This section describes how to load tab paper into the paper tray.
Load tab paper into the paper tray
1. Press and release the button on the paper drawer in which you want to load tab paper.
2. Grip the handle, then pull out the paper drawer until it stops.
Chapter 9 - Paper, toner, and staples
289
Load tab paper into the paper tray
3. Remove the tab paper guide from its holder by sliding it to the left and lifting it, then
place it as shown below.
4. Load the tab paper into the paper drawer.
#
IMPORTANT
• Paper which has been rolled or curled must be straightened out prior to use.
• Make sure that the height of the paper stack does not exceed the loading limit
mark ( ) at the back of the paper drawer.
5. Squeeze the lever on the front guide, as shown in the illustration. While squeezing the
lever, slide the front guide until it fits the tab.
290
Chapter 9 - Paper, toner, and staples
Load tab paper into the paper tray
Set the left guide to A4/LTR, if necessary.
6. Gently push the paper tray back into the printer until it clicks into place in the closed
position.
#
CAUTION
When returning the paper drawer to its original position, be careful not to get
your fingers caught, as this may result in personal injury.
#
IMPORTANT
• Never place paper or any other items into the open part of the paper drawer next
to the paper stack. Doing so may cause a paper jam.
• When you are not loading tab paper, make sure to return the tab paper guide to
its holder.
• Using the tab paper guide for storing paper other than tab paper may cause a paper
jam.
Chapter 9 - Paper, toner, and staples
291
Check the status of the punch waste box
Removing paper waste
Check the status of the punch waste box
Introduction
You can check the status of the punch waste box in the 'System' view.
Check the status of the punch waste box
1. On the operator panel, touch the button for the 'System' view.
2. Press 'Printer'.
The status of the punch waste box displays at the right-hand side of the operator panel.
•The dashboard, on page 84
292
Chapter 9 - Paper, toner, and staples
Remove the punch waste of the punch unit
Remove the punch waste of the punch unit
Introduction
This section describes how to remove the punch waste.
#
IMPORTANT
• Take care when handling the optional equipment that is attached to the machine.
When an optional unit's cover is opened to replace a staple cartridge, discard the
punch waste, discard the trim waste, or clear paper or staple jams, prints may still
be output if other optional units are operating normally and are not involved in
the paper or staple jam removal procedure.
• When the punch waste tray is full, you cannot use the punching options.
#
NOTE
This procedure is necessary only if Puncher Unit-BG1/BH1/BF1 is attached.
Remove the punch waste of the punch unit
1. Open the front cover of the finisher.
Chapter 9 - Paper, toner, and staples
293
Remove the punch waste of the punch unit
2. Pull out the punch waste tray.
3. Discard the punch waste into a receptacle.
#
IMPORTANT
Make sure that the punch waste tray is completely emptied.
4. Return the punch waste tray to its original position.
Always make sure to insert the punch waste tray as far as it can go.
#
NOTE
If the punch waste tray is not securely in place, you cannot make copies or prints in
the Hole Punch mode.
294
Chapter 9 - Paper, toner, and staples
Remove the punch waste of the punch unit
5. Close the front cover of the finisher.
#
CAUTION
When closing the front cover of the finisher, be careful not to get your fingers
caught, as this may result in personal injury.
Chapter 9 - Paper, toner, and staples
295
Remove the trim waste
Remove the trim waste
Introduction
This section describes how to remove trim waste from Booklet Finisher- A1 when Inner
Booklet Trimmer-A1 is installed.
#
IMPORTANT
• Take care when handling the optional equipment that is attached to the machine.
When an optional unit's cover is opened to replace a staple cartridge, discard the
punch waste, discard the trim waste, or clear paper or staple jams, prints may still
be output if other optional units are operating normally and are not involved in
the paper or staple jam removal procedure.
• When the trim waste tray is full, you cannot make copies or prints using the
trimming options.
Remove the trim waste
1. Open the front cover of the finisher.
2. Pull out the trim waste tray.
296
Chapter 9 - Paper, toner, and staples
Remove the trim waste
3. Discard the trim waste.
#
IMPORTANT
Make sure that the trim waste tray is completely emptied.
4. Return the trim waste tray to its original position.
Always make sure to insert the trim waste tray as far as it can go.
5. Close the front cover of the finisher.
Chapter 9 - Paper, toner, and staples
297
Remove the trim waste
#
CAUTION
When closing the front cover of the finisher, be careful not to get your fingers
caught, as this may result in personal injury.
298
Chapter 9 - Paper, toner, and staples
Check the status of the toner reservoir and waste toner container
Toner
Check the status of the toner reservoir and waste toner
container
Introduction
You can check the status of the toner reservoirs in the dashboard and in the 'System' view.
The icons in the following table indicate the status of the toner reservoir.
This section gives an overview of the possible toner statuses. Furthermore, this section
describes how to check the status in the 'System' view.
The colors of the toner icons
The toner icons#
Toner icon
Description
A blue toner icon indicates that the toner reservoir is sufficiently
filled. Do not add toner.
An orange toner icon indicates that toner reservoir is filled less
than 25%. The printer can print another 600 sheets. You must
replace the toner cartridge as soon as possible.
A red toner icon indicates that the toner reservoir is empty. The
printing stops. You must replace the toner cartridge to continue
the printing.
Chapter 9 - Paper, toner, and staples
299
Check the status of the toner reservoir and waste toner container
Illustration
[499] The location of the toner icons (left-side of the main window)
Check the status of the toner reservoirs and waste toner container
1. On the operator panel, touch the button for the 'System' view.
2. Press 'Printer'.
The 'Toner' section displays the toner and waste toner icons. The color of the toner icon
indicates the current filling level of the toner reservoir.
•The dashboard, on page 84
300
Chapter 9 - Paper, toner, and staples
Replace the toner cartridge
Replace the toner cartridge
Introduction
The system informs you on the dashboard of the operator panel when new toner is required.
#
WARNING
Do not burn or throw used toner cartridges into open flames, as this may cause
toner remaining inside the cartridges to ignite, resulting in burns or a fire.
#
CAUTION
• Keep toner out of the reach of small children. If toner is ingested, consult a
physician immediately.
• Take care not to allow toner to come into contact with your hands or clothing.
If toner gets onto your hands or clothing, wash it off immediately with cold
water. Washing it off with warm water will set the toner, and make it impossible to remove toner stains.
#
IMPORTANT
• Use only toner cartridges intended for use with this machine.
• Do not replace toner cartridges until the message asking you to do so appears.
• You can replace a toner cartridge while the printer is printing.
• The color of the toner to replace is displayed on the touch panel display. If multiple
toner cartridges must be replaced, replace the toner cartridges in the following
order: Black, Yellow, Magenta, Cyan.
• If you continue copying or printing in black-and-white after cyan, magenta, or
yellow toner runs out, do not remove the depleted toner cartridges from the machine.
• You can display an error message informing the user that the remaining toner is
low.
Chapter 9 - Paper, toner, and staples
301
Replace the toner cartridge
#
NOTE
• If toner runs out during a print job, the remaining prints are made after you replace
the toner cartridge.
• If black toner is left, you can continue copying and printing in black and white.
However, if a job is interrupted because cyan, magenta, or yellow toner runs out,
copying and printing in black-and-white is only possible for functions other than
the function being used for the interrupted job.
• After replacing toner cartridges, if printed colors are different from the colors
printed before you replaced the toner cartridges, perform an automatic gradation
adjustment.
Replace the toner cartridge
1. Open the toner replacement cover, holding both sides.
2. On the operator panel, touch 'System'.
3. On the operator panel, touch the corresponding arrow button of the toner cartridge that
must be replaced.
4. Wait for the internal cover to open automatically, then pull the toner cartridge out of
the toner supply port.
Black Toner Cartridge
302
Chapter 9 - Paper, toner, and staples
Cyan, Magenta, or Yellow Toner Cartridge
Replace the toner cartridge
#
WARNING
Do not burn or throw used toner cartridges into open flames, as this may cause
toner remaining inside the cartridges to ignite, resulting in burns or a fire.
#
IMPORTANT
Do not open the internal cover by force; doing so may damage the printer.
5. Hold the new toner cartridge in your hands, as shown below, and gently tilt it up and
down 10 times.
#
IMPORTANT
Never touch the tip of the toner cartridge or subject it to shock by hitting it.
6. Twist the protective cap of the new toner cartridge in the direction of the arrow to remove
it.
Chapter 9 - Paper, toner, and staples
303
Replace the toner cartridge
#
IMPORTANT
Never touch the tip of the toner cartridge or subject it to shock by hitting it. Doing
so may cause the toner cartridge to leak.
7. Push the new toner cartridge in as far as possible.
Black Toner Cartridge
Cyan, Magenta, or Yellow Toner Cartridge
#
IMPORTANT
When replacing toner cartridges, make sure that the color of the toner cartridge
matches the color of the label on the internal cover.
8. Close the internal cover.
Black Toner Cartridge
Cyan, Magenta, or Yellow Toner Cartridge
If the toner cartridge is not inserted, you cannot close the internal cover.
304
Chapter 9 - Paper, toner, and staples
Replace the toner cartridge
#
CAUTION
When closing the internal cover, be careful not to get your fingers caught, as
this may result in personal injury.
9. Close the toner replacement cover.
#
CAUTION
When closing the toner replacement cover, be careful not to get your fingers
caught, as this may result in personal injury.
Chapter 9 - Paper, toner, and staples
305
Check the status of the staple cartridges
Staples
Check the status of the staple cartridges
Introduction
The following output locations contain staple cartridges to staple your jobs.
• The stacker/stapler
• The finisher.
When all the staple cartridges are sufficiently filled, the staple icon in the dashboard is
blue. When the staple icon in the dashboard is orange or red, one of the staple cartridges
is empty or almost empty. You must refill the staple cartridge as soon as possible.
To find out which staple cartridge is empty or almost empty, you must go to the 'Printer'
section of the 'System' view. The icon for the staple cartridge that must be refilled is orange
or red.
#
NOTE
Even when the staple icon is blue, you can still go to the 'System' view to check the
number of staples that has been used since the last refill.
The colors of the staple icon
The colors of the staple icon#
Staple icon
Description
A blue staple icon indicates that all the staple cartridges contain
sufficient staples.
An orange staple icon indicates that one of the staple cartridges
is almost empty.
A red staple icon indicates that one of the staple cartridges is
empty. The printer stops when a job requires staples from the
empty staple cartridge.
306
Chapter 9 - Paper, toner, and staples
Check the status of the staple cartridges
Illustration
[511] The location of the staple icons (right-side of the main window)
How to check the status of the staple cartridges
1. Check the staple icon in the dashboard.
2. When the staple icon is orange or red, go to the 'Printer' section of the 'System' view to
check which staple cartridge must be refilled.
•The dashboard, on page 84
Chapter 9 - Paper, toner, and staples
307
Replace the staple cartridge in the stapler unit
Replace the staple cartridge in the stapler unit
Introduction
This section describes how to replace the staple cartridge in the stapler unit of Staple
Finisher-A1/Booklet Finisher-A1.
#
IMPORTANT
• Use only staple cartridges intended for use in this machine.
See ‘Stacker/stapler and integrated punch unit’ on page 33.
• Take care when handling the optional equipment that is attached to the machine.
When an optional unit's cover is opened to replace a staple cartridge, discard the
punch waste, discard the trim waste, or clear paper or staple jams, prints may still
be output if other optional units are operating normally and are not involved in
the paper or staple jam removal procedure.
#
NOTE
• We recommend that you order staple cartridges from your local authorized dealer
before your stock runs out.
• Remove the orange seal that holds the staples together after you place the staple
cartridge into the staple case.
Replace the staple cartridge in the stapler unit (A)
1. Open the front cover of the finisher.
308
Chapter 9 - Paper, toner, and staples
Replace the staple cartridge in the stapler unit
2. Pull out the staple case from the stapler unit, holding it by its green tab.
3. Turn over the staple case, and open the cover while pressing PUSH on both sides of the
staple case.
#
NOTE
• Align the staple case as indicated in the diagram.
• The cover will not open if there are any staples remaining, even if you press PUSH
on both sides of the staple case.
4. Remove the staple case by pulling it out.
Chapter 9 - Paper, toner, and staples
309
Replace the staple cartridge in the stapler unit
5. Insert the new staple case.
6. Remove the white seal fixing the staples by pulling it straight out.
#
IMPORTANT
Make sure that you pull the seal straight out. If you pull it out at an angle, it may
tear.
7. Close the staple case cover.
8. Gently push the staple case into the stapler unit, until it is securely in place.
310
Chapter 9 - Paper, toner, and staples
Replace the staple cartridge in the stapler unit
Always make sure to insert the staple case as far as it can go.
9. Close the front cover of the finisher.
#
CAUTION
When closing the front cover of the finisher, be careful not to get your fingers
caught, as this may result in personal injury.
Chapter 9 - Paper, toner, and staples
311
Replace the staple cartridge in the saddle stitch unit
Replace the staple cartridge in the saddle stitch unit
Introduction
This section describes how to replace the staple cartridge in the saddle stitch unit of
Booklet Finisher-A1.
#
IMPORTANT
• Use only staple cartridges intended for use in this machine.
See ‘Stacker/stapler and integrated punch unit’ on page 33.
• Take care when handling the optional equipment that is attached to the machine.
When an optional unit's cover is opened to replace a staple cartridge, discard the
punch waste, discard the trim waste, or clear paper or staple jams, prints may still
be output if other optional units are operating normally and are not involved in
the paper or staple jam removal procedure.
• If necessary, remove all the output paper in the booklet tray before replacing the
staple cartridge in the saddle stitcher unit.
• This procedure is necessary only if Booklet Finisher-A1 is attached.
#
NOTE
Since both the front and inner staple cartridges need to be replaced when staples run
out in the saddle stitcher unit, we recommend that you order staple cartridges from
your local authorized dealer before your stock runs out.
Replace the staple cartridge in saddle stitch unit
1. Open the front cover of the finisher.
312
Chapter 9 - Paper, toner, and staples
Replace the staple cartridge in the saddle stitch unit
2. Pull out the saddle stitcher unit (F-C5).
3. Pull out the staple case, holding it by its tab.
4. Press the light blue area on both sides of the staple cartridge, then open the staple case
cover.
Hold the staple case cover by its left and right sides, and then lift it and slide it off.
5. Lift and pull out the empty staple cartridge.
Chapter 9 - Paper, toner, and staples
313
Replace the staple cartridge in the saddle stitch unit
Squeeze the arrow indicated in step 4 (and its twin on the opposite side) to release the
empty staple cartridge.
6. Insert the new staple cartridge until it clicks into place.
#
IMPORTANT
When replacing the staple cartridges, replace both the front and back staple cartridges.
7. Close the staple case cover.
8. Return the staple case to its original position in the saddle stitcher unit, making sure to
align the arrow on the staple case with the arrow on the saddle stitcher unit, as shown
below.
314
Chapter 9 - Paper, toner, and staples
Replace the staple cartridge in the saddle stitch unit
When returning the staple case, always make sure that the staple case is inserted until the
arrows are aligned as shown in the diagram.
#
IMPORTANT
Follow steps 3 to 7 to replace the other staple cartridge in the saddle stitcher unit.
9. Gently push the saddle stitcher unit back into the printer.
Always make sure to insert the saddle stitcher as far as it can go.
#
CAUTION
When returning the saddle stitcher unit to its original position, be careful not
to get your fingers caught, as this may result in personal injury.
Chapter 9 - Paper, toner, and staples
315
Replace the staple cartridge in the saddle stitch unit
10. Close the front cover of the finisher.
#
CAUTION
When closing the front cover of the finisher, be careful not to get your fingers
caught, as this may result in personal injury.
316
Chapter 9 - Paper, toner, and staples
Chapter 10
Adapt printer settings to
your needs
Introduction to the 'Setup' section
System settings (access through the operator panel)
Introduction to the 'Setup' section
Introduction
The 'System' view gives access to system information, the system setup and media information.
This section gives an overview of the 'Setup' section in the 'System' view.
Introduction to the 'Setup' section
The items of the 'Setup' section
The workflow section at the top of the operator panel displays the main settings of the
current workflow profile
The operator panel section displays the following buttons.
318
Chapter 10 - Adapt printer settings to your needs
Introduction to the 'Setup' section
• 'Workflow profile'
Select a workflow profile or manually define the settings that match your needs.
• 'Language'
Change the language of the operator panel.
• 'Warning time'
Define the moment when the system warns you about an action that is required soon,
for example 10 minutes in advance. The warning is displayed in the dashboard and
indicated through the operator attention light.
• 'Job name truncation'
Define the way the system shortens the job name when the job name is too long to
display fully.
• 'Operator panel settings'
Adjust the brightness and contrast of the screen of the operator panel.
• 'Shut down system'
Shut down the printer and the controller in a controlled way.
The advanced section displays the following buttons.
• 'Local key operator settings'
Get direct access to a number of important key operator settings in the Settings Editor
on the PRISMAsync controller.
Chapter 10 - Adapt printer settings to your needs
319
Work with the workflow profiles
Work with the workflow profiles
Introduction
The machine is used in different printing environments. Each environment requires
other settings to optimize the workflow or to meet your personal workflow preferences.
The machine contains a number of default workflow profiles to help you optimize your
workflow. The default workflow profiles are combinations of frequently used settings for
print jobs ('Receive', 'Print' and 'Output'). However, the workflow profiles cannot cover
all the possible workflows you may need. Therefore, you can also define the settings individually (custom workflow).
This section makes recommendations about when to use which workflow profile. Furthermore, this section describes the settings and the effects of the settings.
#
NOTE
The 'Workflow profile' button in the 'Setup' section of the 'System' view displays
the name of the selected workflow profile. When you customized the settings of a
workflow profile, the button displays the text 'Custom'.
The use of the default workflow profiles
The following table makes recommendations about when to use which default workflow
profile.
When to use which workflow#
320
Profile
When to use
'Standard'
You need a productive workflow but you still want to have
sufficient control over the jobs.
'Job by job'
You want to start the jobs one by one. Each time a job has been
printed, the machine goes on hold. Always touch 'Resume' in
the dashboard to start the next job.
'Check and print'
You want to check the quality and layout of each first set of a
job before the remaining sets will be printed.
'Manual planning'
The jobs are sent to the machine in a random order. You can
manually define the most productive order in which the machine
will print the jobs.
'Unattended'
You want to continue printing while you are absent, for example
after working hours. Then the machine will print the scheduled
jobs, provided that all the required media, supplies and output
locations are available.
Chapter 10 - Adapt printer settings to your needs
Work with the workflow profiles
The default settings for 'Receive'
The default 'Receive' settings#
Workflow profile
'Receive' settings
'Destination of print job'
'Destination of copy job'
'Standard'
'Scheduled jobs'
'Scheduled jobs'
'Job by job'
'Scheduled jobs'
'Scheduled jobs'
'Check and print'
'Scheduled jobs'
'Scheduled jobs'
'Manual planning'
'Waiting jobs'
'Waiting jobs'
'Unattended'
'Scheduled jobs'
'Scheduled jobs'
The default settings for 'Print'
The default 'Print' settings#
Workflow profile
'Print' settings
'Confirm start of job'
'Check first set'
'Standard'
'Off'
'As in job'
'Job by job'
'On'
'As in job'
'Check and print'
'Off'
'On'
'Manual planning'
'Off'
'As in job'
'Unattended'
'Off'
'Off'
The default settings for 'Output'
The default 'Output' settings#
Workflow profile
'Output' settings
'Offset stacking'
'Standard'
'Sets (as in job)'
'Job by job'
'Sets (as in job)'
'Check and print'
'Sets (as in job)'
'Manual planning'
'Sets (as in job)'
'Unattended'
'Banners'
Values and effects of the settings
The following table describes the effects of the various values of the settings.
Chapter 10 - Adapt printer settings to your needs
321
Work with the workflow profiles
Values and effects of the settings#
Setting
Values
Effect
'Destination of
print job'
'Scheduled
jobs'
The jobs are immediately sent to the list of
'Scheduled jobs'. The machine will print the jobs
in the ripped order. You can do the following to
rearrange the order in which the jobs will be
printed.
• Move jobs to the list of 'Waiting jobs' or
• Use 'To top' to move a job to the top of the
list of 'Scheduled jobs'.
'Waiting jobs'
You can manually define the order in which the
jobs will be printed.
'As in job'
The submitted jobs go to the destination that is
defined in the job ticket or in the copy job.
'Scheduled
jobs'
The jobs are immediately sent to the list of
'Scheduled jobs'. The machine will print the jobs
in the ripped order. You can do the following to
rearrange the order in which the jobs will be
printed.
• Move jobs to the list of 'Waiting jobs' or
• Use 'To top' to move a job to the top of the
list of 'Scheduled jobs'.
'Waiting jobs'
You can manually define the order in which the
jobs will be printed.
'On'
The machine always stops before the next scheduled job. You must press the Release key to start
each job.
'Off'
The machine prints the scheduled jobs one after
the other. The machine does not stop before the
next scheduled job, unless there is a reason to stop.
For example when a media is not available.
'On conflict'
Ask for a confirmation if a conflict occurs.
For example when the punch setting is set in the
driver and the printer has no puncher.
'Destination of
copy job'
'Confirm start
of job'
322
Chapter 10 - Adapt printer settings to your needs
Work with the workflow profiles
Setting
Values
Effect
'Check first
set'
'On'
The machine goes on hold after the first set of a
job is printed. You can check the quality and layout of the first set before the machine prints the
remaining sets.
'Off'
The machine will print the whole job without
stopping after the first set.
'As in job'
The machine will print the jobs as indicated in the
job ticket.
'Jobs'
Each printed job that is delivered to an output location is stacked on top of the previous printed
job with an offset. This helps you to identify the
various jobs.
'Sets (always)'
Each printed set that is delivered to an output location is stacked on top of the previous set with
an offset. This helps you to identify the various
sets.
'Sets (as in
job)'
Each printed set is delivered to the output location
as defined in the job ticket or copy job. Therefore,
the sets can be stacked in one straight line or with
an offset.
'Banners'
Each banner page of a job is delivered to the output location with an offset. This helps you to
identify the separate jobs. The jobs themselves are
stacked in one straight line.
'Off'
All the printed jobs or sets are stacked in one
straight line. There is no offset between the jobs
or sets.
'Offset stacking'
Chapter 10 - Adapt printer settings to your needs
323
Change the warning time
Change the warning time
Introduction
When operator interaction is required now or soon, the dashboard and the operator attention light can warn you. This is a trigger that action is required now or soon., for example load a required media type or empty an output location. You can define how long
in advance the warning message is displayed.
By factory default, the function 'Warning in advance' is enabled and set to 10 minutes.
Then the dashboard starts to display the warning 10 minutes before an action becomes
inevitable. If you do not respond to the warning message, the printer will stop. Depending
on the urgency of the warning message, the vertical bar in the dashboard and the operator
attention light are orange or red.
#
NOTE
• The operator attention light is linked to the status of the machine. For example,
when the dashboard displays an orange warning, the orange light of the operator
attention light also lights up.
• You can only change the warning time when the 'Warning in advance' function
is enabled.
How to change the warning time
1. Touch 'System' -> 'Setup' -> 'Warning time'.
2. Touch the - or + button to decrease or increase the warning time in steps of 1 minute.
You can set a time from 1 - 60 minutes.
3. Press 'OK'.
•The dashboard, on page 84
•The operator attention light, on page 30
324
Chapter 10 - Adapt printer settings to your needs
Disable the warning time
Disable the warning time
Introduction
When operator interaction is required now or soon, the dashboard and the operator attention light warn you. However, you can disable this warning function.
Disable the warning time
1. Touch 'System' -> 'Setup' -> 'Warning time' (under 'Operator panel').
When the box for 'Warning in advance' has a check mark and states 'On', the function
is enabled.
2. Touch the 'Warning in advance' button.
The check mark disappears. The status 'On' changes into 'Off'.
3. Press 'OK'.
•The dashboard, on page 84
•The operator attention light, on page 30
Chapter 10 - Adapt printer settings to your needs
325
Truncate the job name
Truncate the job name
Introduction
In the 'Jobs' view, the operator panel displays all jobs with their job names. If a job name
is too long, the systems truncates the job name. To enable you to identify your jobs in
the lists more easily, you can define how the system truncates the job names. This allows
you to keep the identifying part of the job name. You can choose to truncate the job
name at the beginning or at the end of the name.
How to truncate the job name
1.
2.
3.
4.
326
Touch 'System' -> 'Setup' -> 'Job name truncation' (under 'Operator panel').
For 'Truncate job name at', select 'Beginning' or 'End'.
Touch the - or + button to indicate the number of characters before truncation.
Press 'OK'.
Chapter 10 - Adapt printer settings to your needs
Adjust the brightness and contrast of the operator panel
Adjust the brightness and contrast of the operator panel
Introduction
You can adjust the brightness and contrast of your monitor to improve the readability of
the operator panel. The required brightness and contrast settings can depend on the
lighting in your room, for example.
#
Setting
Description
'Auto adjust'
The screen of the operator panel will automatically set the
correct ratio of brightness and contrast.
'Brightness'
You can increase or decrease the brightness from level 20
to 100 in steps of 1. The factory default value is 80. Higher
values will increase the brightness.
'Contrast'
You can increase or decrease the contrast from level 10 to
100 in steps of 1. The factory default value is 50. Higher
values will increase the contrast.
How to adjust the brightness and contrast of the operator panel
1. Touch 'System' -> 'Setup' -> 'Operator panel settings'.
2. Touch 'Auto adjust' to optimize the brightness and contrast of the screen automatically.
3. Touch 'OK' when the brightness and contrast are OK, or continue with the steps below
when these settings are not yet OK.
4. Touch '-' to decrease or '+' to increase the 'Brightness'.
5. Touch '-' to decrease or '+' to increase the 'Contrast'.
6. Press 'OK'.
Chapter 10 - Adapt printer settings to your needs
327
Access Settings Editor settings via the operator panel
Access Settings Editor settings via the operator panel
Introduction
#
NOTE
The information contained in this section is primarily intended for key operators and
system administrators.
The Settings Editor application on the PRISMAsync controller is a web based application
that allows key operators and system administrators to adapt the system completely to
the situation in an organization and production environment. The Settings Editor allows
key operators and system administrators to manage settings with regard to network configuration, system preferences, job preferences and media, for example.
For convenience reasons, a subset of frequently used settings is accessible through the
operator panel.
#
NOTE
You need the key operator PIN or the system administrator PIN to make changes in
this section. This PIN is the same as used when accessing the Settings Editor application on the PRISMAsync controller.
Settings available through the operator panel#
Group of settings
Available settings
Short description
'About'
• 'Serial number'
The 'About' section allows you to look
up the serial number and software version
of the printer. You can also upgrade the
printer software through this section.
Follow the instructions on the operator
panel when you upgrade the software.
(read-only)
• 'Version of
printer software' (read-only)
'Software licenses'
328
• 'Upload license'
Chapter 10 - Adapt printer settings to your needs
When you have a new license to activate
a new feature on the printer, you can upload the license through this section. After
uploading the license, the feature becomes
active.
Follow the instructions on the operator
panel when you upgrade the software.
Access Settings Editor settings via the operator panel
Group of settings
Available settings
Short description
'Logging'
• 'Save the datad-
When an error occurs, the help desk of
your printer supplier can ask you to create
and send a datadump file. The datadump
file is a .zip file that contains detailed
technical information about your system.
Furthermore, the system can store trace
log files in .zip files. You can save both
.zip files to a USB location.
The configuration report contains information about the configuration of your
printing system, for example information
about the system configuration, controller
configuration or network settings. You
can print the configuration report for
backup purposes, for example.
Follow the instructions on the operator
panel when you save a file or print a report.
ump file'
• 'Save the trace
file'
• 'Print the configuration report'
'Connectivity'
• 'MAC address'
(read-only)
• 'Host name'
• 'Link speed and
•
•
•
•
•
•
•
connection
type'
'DHCP enabled'
'TCP/IP address'
'Subnet mask'
'Default gateway'
'Primary DNS
suffix'
'DNS suffix follows domain'
'Test the
TCP/IP connection'
The 'Connectivity' section contains the
main settings to integrate the printer into
a network. After you have adapted the
network settings, you can test the connection from here.
Follow the instructions on the operator
panel when you adapt the network settings.
Chapter 10 - Adapt printer settings to your needs
329
Access Settings Editor settings via the operator panel
Group of settings
Available settings
Short description
'System settings'
• 'Date and time'
• 'System of mea-
The 'System settings' section contains
settings to change the date and time of
the system, or the system of measurement
used. When you change the system of
measurement, all corresponding values
on the system will be changed. For example, when you change 'Metric' into 'Imperial', all values will be displayed in inches.
surement'
• 'Time zone'
How to change key operator settings and system administrator settings via the
operator panel
1.
2.
3.
4.
5.
330
Touch 'System' -> 'Setup' -> 'Local key operator settings' (below 'Advanced').
Touch the button of the group that contains the setting you want to change or view.
Touch the required setting.
Look up the required information or make the required changes.
Press 'OK'.
Chapter 10 - Adapt printer settings to your needs
Introduction to automated workflows
Automated workflows (access through
the Settings Editor)
Introduction to automated workflows
Definition
The Settings Editor enables you to set up separate automated workflows. Automated
workflows are print queues that you can program to perform a range of operations. Automated workflows are mostly used for legacy applications where jobs are printed automatically and certain settings must be set automatically. Every automated workflow represents
a different virtual printer with its own specific attributes. The table below describes the
attributes you can define.
The selection of automated workflows is handled when the job is sent over LPR via the
name of the automated workflow of the job ticket. Once the job is sent to a specified
automated workflow on the printer, you cannot move the job to another workflow. The
operator panel does not display the various automated workflows. However, jobs can get
a label that you can use as a selection criterion for further processing and production.
The use of automated workflows has for example the following advantages.
• The print workflow is automated even more, which improves the productivity.
• The programming of individual jobs is eliminated, which optimizes the job throughput.
• You can more easily distinguish, prioritize and produce jobs in different automated
workflows with different properties using less operator involvement.
• You can easily assign legacy applications without job tickets to specific job profiles.
#
NOTE
You can define whether or not the settings of a job ticket overrule the settings of an
automated workflow in the Settings Editor.
Attributes
#
NOTE
It is not compulsory to define all the settings. When you put a check mark in front
of a setting, that setting and its values become enabled.
Refer to the Settings Editor to get an overview of the settings.
Chapter 10 - Adapt printer settings to your needs
331
Introduction to automated workflows
•Add an automated workflow, on page 333
•Edit an automated workflow, on page 334
•Delete an automated workflow, on page 335
•Restore the factory default workflow, on page 336
332
Chapter 10 - Adapt printer settings to your needs
Add an automated workflow
Add an automated workflow
Introduction
The Settings Editor contains 1 factory default automated workflow. However, it can be
beneficial for your productivity to add more automated workflows.
#
NOTE
It is not compulsory to define all the settings. When you put a check mark in front
of a setting, that setting and its values become enabled.
How to add an automated workflow
1. Go to 'Workflow' -> 'Automated workflows'.
2. Click the 'Add' button.
A pop-up window displays the attributes you can specify for the new workflow.
3. Put a check mark in front of the attributes you want to define.
4. Specify or select the values of the attributes.
5. Click 'Ok'.
•Introduction to automated workflows, on page 331
•Edit an automated workflow, on page 334
•Delete an automated workflow, on page 335
•Restore the factory default workflow, on page 336
Chapter 10 - Adapt printer settings to your needs
333
Edit an automated workflow
Edit an automated workflow
Introduction
You can change the attributes of an existing automated workflow.
#
NOTE
It is not compulsory to define all the settings. When you put a check mark in front
of a setting, that setting and its values become enabled.
How to edit an automated workflow
1. Go to 'Workflow' -> 'Automated workflows'.
2. Put a check mark in front of the workflow you want to edit.
3. Click the 'Edit' button.
A pop-up window displays the attributes you can specify for your workflow.
4. Change the attributes.
5. Click 'Ok'.
•Introduction to automated workflows, on page 331
•Add an automated workflow, on page 333
•Delete an automated workflow, on page 335
•Restore the factory default workflow, on page 336
334
Chapter 10 - Adapt printer settings to your needs
Delete an automated workflow
Delete an automated workflow
Introduction
When you no longer need a certain automated workflow, you can delete that workflow.
#
NOTE
You cannot delete the factory default automated workflow.
How to delete an automated workflow
1.
2.
3.
4.
Go to 'Workflow' -> 'Automated workflows'.
Put a check mark in front of the workflow you want to delete.
Click the 'Delete' button.
Click 'Ok'.
•Introduction to automated workflows, on page 331
•Add an automated workflow, on page 333
•Edit an automated workflow, on page 334
•Restore the factory default workflow, on page 336
Chapter 10 - Adapt printer settings to your needs
335
Restore the factory default workflow
Restore the factory default workflow
Introduction
You can restore the factory default automated workflow. This has the following consequences.
• All the automated workflows you added will be removed
• All the changes in the default workflow will be lost.
How to restore the factory default workflow
1. Go to 'Workflow' -> 'Automated workflows'.
2. Click the 'Restore' button.
The factory default automated workflow is restored.
•Introduction to automated workflows, on page 331
•Add an automated workflow, on page 333
•Edit an automated workflow, on page 334
•Delete an automated workflow, on page 335
336
Chapter 10 - Adapt printer settings to your needs
Introduction to hotfolders
Hotfolders
Introduction to hotfolders
Introduction
Technically, a hotfolder is a mapped network drive on a workstation that is linked to a
shared folder on the PRISMAsync controller.
For an operator, a hotfolder is a folder on a workstation where printable files can be
dropped for printing.
Hotfolders are primarily aimed at recurring PDF workflows. In these workflows identical
PDFs, or other printable files, with identical settings are printed on a regular basis. Hotfolders should not be used in combination with print job tickets.
The job settings for hotfolders
The settings of a hotfolder can be defined by:
• a hotfolder default ticket in the hotfolder itself, or
• the automated workflow to which the hotfolder is linked.
It is advisable to use the hotfolder functionality in combination with the hotfolder default
ticket.
However, if you want to use the settings of the automated workflow where the hotfolder
is linked to, it is advised not to place a hotfolder default ticket in the hotfolder, to prevent
mixing up settings. Furthermore, you must make sure that the 'Overrule the job ticket'
setting in that automated workflow is enabled (tick the checkbox).
Before you can use a hotfolder
To be able to use the hotfolder function, the following steps must be carried out first:
• In the Settings Editor, the system administrator must activate the hotfolder function.
• In the Settings Editor, the system administrator must create a hotfolder and link the
hotfolder to an automated workflow.
• On a workstation, the key operator must create a shared network drive that is linked
to the hotfolder.
• On the desktop of that workstation, the key operator can create a shortcut to the
hotfolder, if desired.
Chapter 10 - Adapt printer settings to your needs
337
Activate the hotfolder function
Activate the hotfolder function
Introduction
The information in this section is intended for system administrators.
#
NOTE
• By factory default, the hotfolder function is disabled. To use the hotfolder function,
the system administrator must activate this function once. After the system administrator activated the hotfolder function, up to 10 hotfolders can be defined.
• For this procedure, the System administrator password is required.
How to activate the hotfolder function
1. Open the web browser and enter the host name or IP address of your PRISMAsync
controller.
2. Go to the 'Workflow' -> 'Hotfolders' section.
3. Click 'Configure'.
4. At 'Enabled', select 'Yes' to activate the hotfolder function.
5. Enter a unique 'Hotfolder user name' and 'Hotfolder password'.
Make sure that you filled in the user name and password before you continue with the
next step.
6. Click 'OK' to confirm the activation of the hotfolder function.
A confirmation window opens.
7. Click 'OK' to restart the controller now.
338
Chapter 10 - Adapt printer settings to your needs
Create a hotfolder
Create a hotfolder
Introduction
The information in this section is intended for key operators.
#
NOTE
• You can create up to 10 hotfolders.
• For this procedure, the Key operator PIN is required.
Before you begin
The hotfolder function must be activated. Otherwise, the system administrator must activate the hotfolder function first.
How to create a hotfolder
1. Open your web browser and enter the host name or IP address of your PRISMAsync
controller.
2. Go to the 'Workflow' -> 'Hotfolders' section.
3. Click 'Add'.
4. Give the hotfolder a logical name.
5. Select the workflow folder to which you want to link.
6. Click 'OK'.
Chapter 10 - Adapt printer settings to your needs
339
Create a shared network folder on a workstation
Create a shared network folder on a workstation
Introduction
The information in this section is intended for key operators.
Before creating a shared network folder on a workstation, the following actions must be
carried out first:
• Enable the hotfolder function.
• Create an automated workflow including a hotfolder.
#
NOTE
This procedure describes the creation of a shared network folder on a workstation
running the Microsoft Windows XP operating system. However, depending on the
operating system of your workstation, the procedure can be different.
Illustration
[532] Create a shared network drive
How to create a shared network folder on a workstation
1.
2.
3.
4.
340
Open Windows Explorer.
Click Tools -> Map Network Drive...
Select a drive letter for the shared network folder.
Enter the name of the shared network folder, for example \\12.34.56.78\Booklet, or click
the 'Browse' button to navigate to the required location.
Chapter 10 - Adapt printer settings to your needs
Create a shared network folder on a workstation
#
NOTE
Instead of 12.34.56.78 you must enter the host name or IP address of the PRISMAsync
controller. Booklet is the name you gave to the hotfolder when you created the automated workflow.
5. Click 'Finish'.
A log in screen will appear.
6. Enter the user name and the password that were defined when the hotfolder function
was enabled in the Settings Editor.
7. Click 'OK.'
The hotfolder is now ready for use.
8. If desired, you can create a shortcut to the shared network folder on the desktop of the
workstation.
Chapter 10 - Adapt printer settings to your needs
341
Create a hotfolder default ticket ('default_ticket.jdf')
Create a hotfolder default ticket ('default_ticket.jdf')
Introduction
Hotfolders are primarily aimed at recurring PDF workflows. In these workflows identical
PDFs, or other printable files, with identical settings are printed on a regular basis. A
hotfolder default ticket (' default_ticket.jdf') in the hotfolder determines the settings for
the print jobs.
#
NOTE
• If you want to use the hotfolder default ticket, make sure that the 'Overrule the
job ticket' setting of the automated workflow in which the hotfolder was created,
is disabled (no tick in the checkbox). Otherwise, the settings of the automated
workflow overrule the settings of the hotfolder default ticket.
• This procedure is an example of the procedure in Microsoft Windows XP. For
other operating systems, the procedure can vary.
How to create a hotfolder default ticket ('default_ticket.jdf')
1. Click 'Start' - 'Settings' - 'Printers and Faxes'.
2. Right-click the printer driver of your imageRUNNER ADVANCE C9075S PRO/C9065
PRO and select 'Printing preferences...'.
3. Define the required settings.
4. Click the 'Save' icon in the Templates bar.
5. Enter a name for the template.
6. Click 'OK'.
7. Right-click the template you just created and select 'Save as ticket'.
8. Browse to the shared network folder and click 'Save'.
The template is saved as a hotfolder default ticket.
342
Chapter 10 - Adapt printer settings to your needs
Chapter 11
Maintenance and calibration
Introduction to the 'Maintenance' section
Introduction to the 'Maintenance' section
Introduction
The maintenance section displays the following information.
• 'Billing counters'
The 'Billing counters' section displays the total number of prints that have been made
since the machine was installed. Which counters there are visible depends on the region.
You cannot reset the billing counters.
• 'Day counters'
The 'Day counters' section displays the number of prints that have been made since
the counter was last reset to 0. You can, for example, reset the day counters at the beginning of a working day or before you start a new job for a particular customer.
Furthermore the maintenance section gives access to the following functions.
• 'Start maintenance'
From the maintenance section you can start the maintenance and calibration procedures.
• 'Go to the service mode'
344
Chapter 11 - Maintenance and calibration
Introduction to the 'Maintenance' section
The maintenance section
Chapter 11 - Maintenance and calibration
345
Introduction
Routine cleaning
Introduction
Introduction
If the original is not copied clearly, clean the following parts of the printer. For highquality printouts, we recommend cleaning these parts once or twice a month.
• Glass plate
• Feeder and the underside of the feeder
• Rollers
• Wires
• Drums
• Control panel
Warnings
#
WARNING
• When cleaning the printer, first turn OFF the main power switch, then dis-
connect the power cord. Failure to follow these steps may result in a fire or
electrical shock.
• Do not use alcohol, benzene, paint thinner, or other solvents for cleaning.
Doing so may result in damage to the plastic parts.
• Disconnect the power cord from the power outlet regularly, and clean the
area around the base of the power plug’s metal pins and the power outlet
with a dry cloth to ensure that all dust and grime is removed. If the power
cord is connected for a long period of time in a damp, dusty, or smoky location, dust can build up around the power plug and become damp. This may
cause a short circuit and result in a fire.
346
Chapter 11 - Maintenance and calibration
Clean the glass plate and underside the feeder
Clean the glass plate and underside the feeder
Introduction
This section describes how to clean the glass plate and the underside of the cover plate.
#
IMPORTANT
If the glass plate or underside of the cover plate is dirty, the original may not be
scanned clearly, or the size of the original may be detected incorrectly.
#
NOTE
This procedure is necessary only if Duplex Color Image Reader Unit-A1 is attached.
Clean the glass plate
1. Clean the glass plate and the underside of the cover plate with a cloth dampened with
water, and then wipe them clean with a soft, dry cloth.
#
IMPORTANT
Do not dampen the cloth too much, as this may damage the original or break the
machine.
Chapter 11 - Maintenance and calibration
347
Clean the automatic document feeder (ADF)
Clean the automatic document feeder (ADF)
Introduction
If originals that have been fed through the feeder have streaks or appear dirty, clean the
feeder’s scanning area.
#
IMPORTANT
• Do not dampen the cloth too much, as this may damage the original or break the
machine.
• If the document feed scanning area is dirty, documents may not be scanned
clearly, and the size of the document may not be detected correctly.
#
NOTE
This procedure is necessary only if Duplex Color Image Reader Unit-A1 is attached.
Clean the ADF
1. Open the feeder.
348
Chapter 11 - Maintenance and calibration
Clean the automatic document feeder (ADF)
2. Clean the original scanning area (thin glass strip) with a cloth dampened in water or a
mild detergent, then wipe the area with a soft dry cloth.
3. Pull the lever above the feeder, and open the document scan cover.
#
IMPORTANT
Open the document scan cover carefully, making sure not to scratch the glass plate.
4. Open the inside cover.
Chapter 11 - Maintenance and calibration
349
Clean the automatic document feeder (ADF)
5. Clean the feed scanning area with a cloth dampened in water or a mild detergent, then
wipe the area with a soft dry cloth.
6. Close the inside cover.
#
CAUTION
When closing the inside cover, be careful not to get your fingers caught, as this
may result in personal injury.
7. Close the document scan cover.
350
Chapter 11 - Maintenance and calibration
Clean the automatic document feeder (ADF)
#
CAUTION
When closing the document scan cover, be careful not to get your fingers caught,
as this may result in personal injury.
8. Close the feeder.
#
CAUTION
• When closing the feeder, be careful not to get your fingers caught, as this
may result in personal injury.
• Be aware that the light emitted from the glass plate may be very bright when
closing the feeder.
#
IMPORTANT
Do not dampen the cloth too much, as this may damage the original or break the
machine.
Chapter 11 - Maintenance and calibration
351
Clean the wire
Clean the wire
Introduction
If streaks appear on printed output or parts of the printed image are missing, clean the
corona assembly wires inside the main unit.
#
NOTE
• It takes approximately 35 seconds to clean the wires.
• Wire cleaning cannot be performed during printing.
Clean the wire
1. Touch 'System' -> 'Maintenance'.
2. Press 'Start maintenance'.
3. Touch 'Clean the corona wires' and touch 'Start' .
A wizard opens.
4. Press 'Next'.
A status message displays.
5. Press 'Finish'.
6. Touch 'Stop' to close the 'Maintenance tasks' menu.
Result
If the procedure displays an engine error, contact your local service representative.
352
Chapter 11 - Maintenance and calibration
Clean the roller
Clean the roller
Introduction
If dirt or streaks appear on printed output, clean the roller inside of the main unit.
#
NOTE
• It takes approximately 20 seconds to clean the roller.
• Roller cleaning cannot be performed during printing.
Clean the roller (main unit)
1. Touch 'System' -> 'Maintenance'.
2. Press 'Start maintenance'.
3. Touch 'Clean the clean roller (main unit)' and touch 'Start' .
A wizard opens.
4. Touch 'Next'
A status message displays.
5. Press 'Finish'.
6. Touch 'Stop' to close the 'Maintenance tasks' menu.
Chapter 11 - Maintenance and calibration
353
Clean the automatic document feeder rollers
Clean the automatic document feeder rollers
Introduction
If your originals have black streaks or appear dirty after scanning them through the feeder,
clean the rollers of the feeder.
#
NOTE
• It takes approximately 20 seconds to clean the feeder.
• Use clean A4/LTR paper (60 to 80 g/m2 / 16 lb bond to 20 lb bond).
• Feeder roller cleaning cannot be performed during printing.
Clean the ADF automatically
1. Touch 'System' -> 'Maintenance'.
2. Press 'Start maintenance'.
3. Touch 'Clean the rollers of the ADF' and touch 'Start' .
A wizard opens.
4. Put 10 sheets of blank paper into the feeder.
5. Touch 'Next'
A status message displays.
6. Press 'Finish'.
7. Touch 'Stop' to close the 'Maintenance tasks' menu.
354
Chapter 11 - Maintenance and calibration
Clean the drum
Clean the drum
Introduction
Printed images may be light or distorted when the printer is used immediately after installation or after a long period time of not being used. If printed images are light or distorted,
clean the drum inside the printer, as necessary.
#
NOTE
• It takes approximately 35 seconds to clean the drum.
• Drum cleaning cannot be performed during printing.
Clean the drum
1. Touch 'System' -> 'Maintenance'.
2. Press 'Start maintenance'.
3. Touch 'Clean the drum' and touch 'Start' .
A wizard opens.
4. Touch 'Next'
A status message displays.
5. Press 'Finish'.
6. Touch 'Stop' to close the 'Maintenance tasks' menu.
Chapter 11 - Maintenance and calibration
355
Clean the operator panel
Clean the operator panel
1. Clean the screen of the operator panel with a 50% mix of water and isopropyl alcohol
(K2). Use a lint-free cloth. Always put the cleaner onto the cloth and not directly on the
screen.
356
Chapter 11 - Maintenance and calibration
Reset the day counters
Maintenance
Reset the day counters
Introduction
The 'Maintenance' section of the 'System' view displays 2 types of counters
• 'Billing counters'
• 'Day counters'
These counters provide information about the number of sheets that have been printed.
This section first describes the 2 counters in the 'Maintenance' section and how to reset
the day counters.
Reset the day counters
1. On the operator panel, press the 'System' button.
2. Press 'Maintenance'.
3. Touch the 'Reset day counters' button in the 'Day counters' section.
A dialog box will ask you to confirm that you really want to reset the day counters.
4. Touch 'Yes' to reset the day counters to 0.
Chapter 11 - Maintenance and calibration
357
Find the meter readings (counters)
Find the meter readings (counters)
Introduction
The 'Printer' section of the 'System' view displays 2 types of counters.
• The billing counters provide information about the number of sheets that have been
printed since the printer was installed. You cannot reset the billing counters.
• The day counters provide information about the number of prints since the last reset.
You do not need the day counters for the meter reading. The day counters are only
intended for your own convenience.
This section describes how to find the counters.
Find the meter readings
1. On the operator panel, press the 'System' button.
2. Press 'Maintenance'.
You can find the required meter readings at the left-hand side of the screen.
358
Chapter 11 - Maintenance and calibration
Handle paper jams
Handle paper jams
When a paper jam occurs, follow the instructions on the operator panel.
#
IMPORTANT
Make sure you follow the instructions precisely in the correct order to avoid unnecessary service calls.
Chapter 11 - Maintenance and calibration
359
'Auto color mismatch correction'
'Auto color mismatch correction'
Introduction
You can automatically correct color mismatching that occurs in the output. The 'Auto
color mismatch correction' aligns the position of the four different colors.
#
NOTE
Automatic color mismatch correction cannot be performed during printing.
'Auto color mismatch correction'
1. Touch 'System' -> 'Maintenance'.
2. Press 'Start maintenance'.
3. Touch 'Auto color mismatch correction' and touch 'Start' .
A wizard opens.
4. Press 'Next'.
A status message displays.
5. Press 'Finish'.
6. Touch 'Stop' to close the 'Maintenance tasks' menu.
Result
If the procedure displays an engine error, contact your local service representative.
360
Chapter 11 - Maintenance and calibration
Introduction to printer calibration
Calibration
Introduction to printer calibration
Introduction
Due to external environmental circumstances, like temperature and humidity, consumables
and print quality change over time. These changes effect the color quality of the printed
documents. Although the printer performs automatic adjustments on a regular basis, you
are advised to calibrate the printer configuration regularly.
#
IMPORTANT
To assure optimal print quality, you must perform and complete all main steps in
the described order. The calibration procedure will guide you through these steps
automatically.
Calibrate the printer
1. ‘Calibrate the printer - '1. Shading correction' ’ on page 362
2. ‘Calibrate the printer - '2. Auto gradation adjustment' ’ on page 364
3. ‘Calibrate the controller - '3. Media family calibration' ’ on page 366
Chapter 11 - Maintenance and calibration
361
Calibrate the printer - '1. Shading correction'
Calibrate the printer - '1. Shading correction'
Introduction
The '1. Shading correction' procedure corrects slight density unevenness that occurs on
the printed image in the areas with a color density of 50%. The '1. Shading correction'
assures consistent color planes on the print.
#
NOTE
Make sure you use media from the same batch for '1. Shading correction' and '2.
Auto gradation adjustment'.
When to do
• After a service visit.
• After replacing the drum (key operator maintenance).
• After replacing the corona (key operator maintenance).
Before you begin
Make sure you have an Eye-One spectrophotometer connected to the USB connector of
the operator panel.
Make sure you use one of the following media.
•
•
•
•
Canon CS-814 81.4 g/m²
Océ Top Colour FSC 100 g/m²
Mondi Neusiedler 100 g/m²
International Paper Hammermill 105 g/m²
Calibrate the printer - '1. Shading correction'
1. Touch 'System' -> 'Color management'.
2. Touch '1. Shading correction' and touch 'Start'.
An instruction window opens.
3. Follow the instructions carefully and touch 'Next'.
A calibration chart is printed.
An instruction window opens.
4. Calibrate the spectrometer according to the instruction on the operator panel.
362
Chapter 11 - Maintenance and calibration
Calibrate the printer - '1. Shading correction'
• Place the spectrometer in the holder, press the button to calibrate the spectrometer,
and wait for 5 seconds.
• Take 5 blank sheets of the same media you used for the calibration chart, and put
them underneath the calibration chart.
5. Measure the calibration sheet according to the instructions on the operator panel.
Perform the following actions per color.
• Position the spectrometer at the indicated position.
• Hold down the spectrometer button and wait for the arrow.
• Scan the column with patches smoothly in about 2 seconds.
6. Touch 'OK' to save the shading correction results and continue with the '2. Auto gradation
adjustment' procedure.
Result
#
NOTE
In exceptional cases the '1. Shading correction' procedure fails with a 'Density out
of range' message. In that case you can first perform the '2. Auto gradation adjustment'
procedure before the '1. Shading correction' procedure. If the '1. Shading correction'
procedure still fails, contact your local service representative.
•Calibrate the printer - 2. Auto gradation adjustment , on page 364
•Calibrate the controller - 3. Media family calibration , on page 366
Chapter 11 - Maintenance and calibration
363
Calibrate the printer - '2. Auto gradation adjustment'
Calibrate the printer - '2. Auto gradation adjustment'
Introduction
The '2. Auto gradation adjustment' procedure is a precise calibration of the gradation,
density and color settings of the printer. A test print is used to scan and to correct the irregularities automatically. The auto gradation adjustment is part of the complete calibration
procedure. However, you can perform an auto gradation procedure separately.
You are advised to run the '2. Auto gradation adjustment' procedure separately after a
toner bottle is replaced..
#
NOTE
In case of a full system calibration, make sure you use media from the same batch for
'1. Shading correction' and '2. Auto gradation adjustment' procedure.
When to do
Immediately after the '1. Shading correction' procedure is finished.
The '2. Auto gradation adjustment' procedure is part of the complete calibration procedure.
Before you begin
Make sure you use one of the following media.
•
•
•
•
Canon CS-814 81.4 g/m²
Océ Top Colour FSC 100 g/m²
Mondi Neusiedler 100 g/m²
International Paper Hammermill 105 g/m²
Calibrate the printer - '2. Auto gradation adjustment'
1. From the 'Calibration method' window, select 'Automatic (internal sensor)' and touch
'OK'.
An instruction window opens.
Wait a few minutes while the printer performs the '2. Auto gradation adjustment' procedure.
2. Remove the test prints.
3. Touch 'Next' to continue with the '3. Media family calibration' procedure.
364
Chapter 11 - Maintenance and calibration
Calibrate the printer - '2. Auto gradation adjustment'
Perform the '2. Auto gradation adjustment' procedure separately
1. Touch 'System' -> 'Color management'.
2. Press '2. Auto gradation adjustment'.
3. Touch one of the following options.
• 'Full adjustment' (recommended)
• 'Quick adjustment'
4. From the 'Calibration method' window, select 'Automatic (internal sensor)' and touch
'OK'.
An instruction window opens.
Wait a few minutes while the printer performs the '2. Auto gradation adjustment'.
5. Remove the test prints.
6. Press 'OK'.
7. Press 'Finish'.
•Calibrate the printer - 1. Shading correction , on page 362
•Calibrate the controller - 3. Media family calibration , on page 366
Chapter 11 - Maintenance and calibration
365
Calibrate the controller - '3. Media family calibration'
Calibrate the controller - '3. Media family calibration'
Introduction
The 'Media family' is a group of media that uses the same output profile. The controller
provides by default the media families coated and uncoated. An expert can create a new
media family for a specific group of media. A media family refers to 1 color profile per
halftone. The following halftones are available.
• 'Normal'
• 'Fine'
• 'Error diffusion'
#
NOTE
• Make sure you perform a media family calibration for the halftones 'Normal' and
'Fine'.
• Media family calibration for the halftone 'Error diffusion' is required when 'Error
diffusion' is used in copy jobs and job submission tools like the printer driver and
PRISMAprepare.
When to do
You are advised to run the 'Media family calibration' procedure in the following situations.
• Immediately after the '2. Auto gradation adjustment' procedure is finished.
The 'Media family calibration' procedure is part of the complete calibration procedure.
• When a new media family is defined with the Settings Editor.
Before you begin
In case a new media family becomes available.
1. Touch 'System' -> 'Color management'.
2. Touch '3. Media family calibration' and touch 'Start'.
A status window opens.
Calibrate the controller - '3. Media family calibration'
1. At 'Media family', select which media family you want to calibrate.
• 'Coated'
366
Chapter 11 - Maintenance and calibration
Calibrate the controller - '3. Media family calibration'
• 'Uncoated'
• Customer defined
2. At 'Halftone', select which halftone you want to calibrate.
• 'Normal'
• 'Fine'
• 'Error diffusion'
3. At 'Media', select which media you want to calibrate.
4. Touch 'OK' to print the calibration chart.
An instruction window opens.
5. Follow the instructions carefully and touch 'Next'.
A few calibration charts are printed. Make sure you use the last printed calibration chart.
An instruction window opens.
6. Calibrate the spectrometer according to the instructions on the operator panel.
• Place the spectrometer in the holder, press the button to calibrate the spectrometer,
and wait for 5 seconds.
• Take 5 blank sheets of the same media you used for the calibration chart, and put
them underneath the last printed calibration chart.
7. Measure the calibration sheet according to the instructions on the operator panel.
Perform the following actions per color.
• Position the spectrometer at the indicated position.
• Hold down the spectrometer button and wait for the arrow.
• Scan the column with patches smoothly in about 2 seconds.
8. Touch 'OK' to save the calibration results.
9. Select one of the following options.
• Touch 'Yes' and 'OK' to calibrate another media family / halftone combination.
• Touch 'No' and 'OK' to stop the media family calibration.
10. Touch 'Finish' to finish the calibration procedure.
•Calibrate the printer - 1. Shading correction , on page 362
•Calibrate the printer - 2. Auto gradation adjustment , on page 364
Chapter 11 - Maintenance and calibration
367
Adjust the CMYK calibration curve manually
Adjust the CMYK calibration curve manually
Introduction
Calibration curves assure color consistency over different engines. There is a calibration
curve for each media family/halftone combination. The calibration curve is automatically
set after calibration. However, you can adjust the curve manually for your specific needs.
#
IMPORTANT
This setting applies to the complete media family/halftone combination.
Adjust the CMYK calibration curve manually
1. Touch 'System' -> 'Color management'.
2. Press 'Edit CMYK curves manually'.
A log in window opens.
3. Log in as key operator.
4. Select the media family/halftone combination for which you want to adjust the CMYK
curve.
The current CMYK curves are displayed.
5. Press 'Edit'.
6. Select the area you want to adjust.
• 'Highlights' (default)
• 'Midtones'
• 'Shadows'
7. Touch the link/unlink button to link or unlink the CMYK values.
Use link to shift all sliders at the same time.
Use unlink to shift each slider.
8. Use the sliders to change the CMYK curve for the selected area.
9. Repeat step 6 to 9 for the next area.
10. Repeat step 4 to 9 for another media family/halftone combination.
11. Touch 'OK' to save the values set.
12. Press 'Close'.
368
Chapter 11 - Maintenance and calibration
Chapter 12
Specifications
Specifications
Specifications
Technology
#
Specification
Value
Imaging technology
Electrophotography
Toner
pQ Toner; no fusing oil
Resolution
1200 x 1200 dpi
Color gradations
256 per color
Maximum imageable
area
323 x 476.6 mm/12.72" x 18.76"
Features
Real-time automatic color calibration, on-the-fly toner and
paper refill, automatic duplexing (up to 220 g/m² / 80 lb
cover)
Option: Operator warning light with warn-ahead functionality, warning time adjustable
Print speed imageRUNNER ADVANCE C9075S PRO
#
Specification
370
1-sided
(Feeding from cassette or deck)
2-sided
(Feeding from cassette or deck)
Weight
Size
Color
B&W
Color
B&W
Uncoated
52–105 g/m²
14–28 lb bond
A4
LTR
70.0
75.0
70.0
75.0
A4R/LTRR
49.5/52.6
53.0/56.4
49.5/52.6
53.0/56.4
A3
11 x 17
35.0
37.5
35.0
37.5
SRA3
33.6
36
33.6
36
13 x 19
31.3
33.6
31.3
33.6
Chapter 12 - Specifications
Specifications
Specification
1-sided
(Feeding from cassette or deck)
2-sided
(Feeding from cassette or deck)
Weight
Size
Color
B&W
Color
B&W
Uncoated
106–220 g/m²
29 lb bond–82 lb
cover
A4
LTR
35.0
37.5
35.0
37.5
A4R/LTRR
24.7/26.3
26.5/28.2
24.7/26.3
26.5/28.2
A3
11 x 17
17.5
18.7
17.5
18.7
SRA3
16.8
18.0
16.8
18.0
13 x 19
15.6
16.8
15.6
16.8
A4
LTR
23.3
25.0
n.a.
n.a
A4R/LTRR
16.5/17.5
17.6/18.8
n.a.
n.a.
A3
11 x 17
11.6
12.5
n.a.
n.a.
SRA3
11.2
12.0
n.a.
n.a.
13 x 19
10.4
11.2
n.a.
n.a.
Coated
Quality mode
106–300 g/m²
28 lb bond–110 lb
cover
Only via POD deck
lite, Multi drawer
deck
2-sided supports up
to 220 g/m² / 82 lb
bond
A4
LTR
21.6
21.6
21.6
21.6
A4R/LTRR
15.3/16.3
15.3/16.3
15.3/16.3
15.3/16.3
A3
11 x 17
10.8
10.8
10.8
10.8
SRA3
10.4
10.4
10.4
10.4
13 x 19
9.7
9.7
9.7
9.7
Coated
Productivity mode
106–180 g/m²
28 lb bond–66 lb
cover
Only via POD deck
lite, Multi drawer
deck
A4
LTR
35.0
37.5
35.0
37.5
A4R/LTRR
24.7/26.3
26.5/28.2
24.7/26.3
26.5/28.2
A3
11 x 17
17.5
18.7
17.5
18.7
SRA3
16.8
18.0
16.8
18.0
13 x 19
15.6
16.8
15.6
16.8
Uncoated
221–300 g/m²
83–110 lb cover
Only via POD deck
lite, Multi drawer
deck
Chapter 12 - Specifications
371
Specifications
Specification
1-sided
(Feeding from cassette or deck)
2-sided
(Feeding from cassette or deck)
Weight
Size
Color
B&W
Color
B&W
Coated
Productivity mode
181–300 g/m²
67 lb bond–110 lb
cover
Only via POD deck
lite, Multi drawer
deck
2-sided supports up
to 220 g/m² / 82 lb
bond
A4
LTR
23.3
25.0
n.a.
n.a.
A4R/LTRR
16.5/17.5
17.6/18.8
n.a.
n.a.
A3
11 x 17
11.6
12.5
n.a.
n.a.
SRA3
11.2
12.0
n.a.
n.a.
13 x 19
10.4
11.2
n.a.
n.a.
FPOT
8 seconds
Copy speed (with automatic document
feeder)
First set: 45 ipm simplex, 44 ipm duplex
Following sets: output at full engine speed
FCOT
15 seconds (from glass plate)
Print speed imageRUNNER ADVANCE C9065S PRO
#
Paper
372
1-sided
(Feeding from cassette or deck)
2-sided
(Feeding from cassette or deck)
Weight
Size
Color
B&W
Color
B&W
Uncoated
52–105 g/m²
14–28 lb bond
A4
LTR
65.0
65.0
65.0
65.0
A4R/LTRR
46.0/48.9
46.0/48.9
46.0/48.9
46.0/48.9
A3
11 x 17
32.5
32.5
32.5
32.5
SRA3
31.2
31.2
31.2
31.2
13 x 19
29.1
29.1
29.1
29.1
Chapter 12 - Specifications
Specifications
Paper
1-sided
(Feeding from cassette or deck)
2-sided
(Feeding from cassette or deck)
Weight
Size
Color
B&W
Color
B&W
Uncoated
106–220 g/m²
29 lb bond–82 lb
cover
A4
LTR
32.5
32.5
32.5
32.5
A4R/LTRR
23.0/24.4
23.0/24.4
23.0/24.4
23.0/24.4
A3
11 x 17
16.2
16.2
16.2
16.2
SRA3
15.6
15.6
15.6
15.6
13 x 19
14.5
14.5
14.5
14.5
A4
LTR
21.7
21.7
n.a.
n.a
A4R/LTRR
15.3/16.3
15.3/16.3
n.a.
n.a.
A3
11 x 17
10.8
10.8
n.a.
n.a.
SRA3
10.4
10.4
n.a.
n.a.
13 x 19
9.7
9.7
n.a.
n.a.
Coated
Quality mode
106–300 g/m²
28 lb bond–110 lb
cover
Only via POD deck
lite, Multi drawer
deck
2-sided supports up
to 220 g/m² / 82 lb
bond
A4
LTR
21.6
21.6
21.6
21.6
A4R/LTRR
15.3/16.3
15.3/16.3
15.3/16.3
15.3/16.3
A3
11 x 17
10.8
10.8
10.8
10.8
SRA3
10.4
10.4
10.4
10.4
13 x 19
9.7
9.7
9.7
9.7
Coated
Productivity mode
106–180 g/m²
28 lb bond–66 lb
cover
Only via POD deck
lite, Multi drawer
deck
A4
LTR
32.5
32.5
32.5
32.5
A4R/LTRR
23.0/24.4
23.0/24.4
23.0/24.4
23.0/24.4
A3
11 x 17
16.2
16.2
16.2
16.2
SRA3
15.6
15.6
15.6
15.6
13 x 19
14.5
14.5
14.5
14.5
Uncoated
221–300 g/m²
83–110 lb cover
Only via POD deck
lite, Multi drawer
deck
Chapter 12 - Specifications
373
Specifications
Paper
1-sided
(Feeding from cassette or deck)
2-sided
(Feeding from cassette or deck)
Weight
Size
Color
B&W
Color
B&W
Coated
Productivity mode
181–300 g/m²
67 lb bond–110 lb
cover
Only via POD deck
lite, Multi drawer
deck
2-sided supports up
to 220 g/m² / 82 lb
bond
A4
LTR
21.7
21.7
n.a
n.a
A4R/LTRR
15.3/16.3
15.3/16.3
n.a
n.a
A3
11 x 17
10.8
10.8
n.a
n.a
SRA3
10.4
10.4
n.a
n.a
13 x 19
9.7
9.7
n.a
n.a
FPOT
8 seconds
Copy speed (with automatic document
feeder)
First set: 45 ipm simplex, 44 ipm duplex
Following sets: output at full engine speed
FCOT
15 seconds (from glass plate)
General
#
374
Specification
Value
Device memory
(SDRAM)
2.5 GB (SDRAM)
Operation
One integrated 15" full color touch screen operating panel
for total system (no engine/controller separation)
Hard disk
80 GB (option: can be replaced by 1 TB HDD)
Second hard disk optional.
Warm-up time
imageRUNNER ADVANCE C9075S PRO:
6 minutes
imageRUNNER ADVANCE C9065S PRO:
5 minutes
Front-to-back registration tolerance
Leading edge: +/- 1.5 mm/0.059"
Left and right: +/- 2.0 mm/0.079"
Chapter 12 - Specifications
Specifications
Specification
Value
Dimensions main engine (WxDxH)
1120 x 932 x 1400 mm/44" x 36.7" x 55.12"
(with automatic document feeder, operator panel)
(H, incl. operator attention light) 1650 mm/94.96"
(W, operating panel in most right position) 1275 mm/50.2"
Weight main engine
304 kg/670 lbs
(with toner, automatic document feeder, operator panel,
and PRISMAsync controller)
Operator attention light: approx. 1 kg/2.2 lbs
Security
E-shredding option provides HDD erase functionality
Optional removable engine HDD
Certificates
EPA Energy Star, RoHS
Power consumption
Maximum power consumption: 2.68 kW
TEC
imageRUNNER ADVANCE C9075S PRO: 17.48 KWh
imageRUNNER ADVANCE C9065S PRO: 16.00 KWh
Power requirements
PRISMAsync controller (also feeding operating panel/operator warning light): 100–240 VAC, 10–5 A, 50–60Hz
imageRUNNER ADVANCE C9075S PRO/C9065S
PRO:208 VAC, 15 A, 60 Hz
Environmental
#
Specification
Value
Sound power level
Standby mode: 58 dB
Print mode: 75 dB
Ozone emissions
Initial startup: maximum 0.01 parts per million
After short break-in period: maximum 0.035 parts per
million
Optimum temperature
15–27.5°C
59°F–81.5°F
Relative humidity
25%–75%
Chapter 12 - Specifications
375
Specifications
Automatic document feeder (Duplex Color Image Reader Unit-A1)
#
Specification
Value
Description
Optional automatic document feeder and scanner for duplex scanning of 1- or 2-sided originals
Capacity
300 originals (80 g/m² / 20 lb bond)
Scan speed
Scan-to-file: 45 ipm 1-sided, 44 ipm 2-sided
Copy:
First set: 45 ipm 1-sided, 44 ipm 2-sided
Following sets: output at full engine speed
Original paper size
A5, A5R, A4, A4R, A3, B4, B5, B5R, B6R, 11" x 17",
LGL, LTR, LTRR, STMT, STMTR
Original paper weight
8.5 x 11" 1-sided: 38–220 gsm
LTR 1-sided: 10 lb bond–85 lb cover
8.5 x 11" 2-sided: 50–220 gsm
LTR 2-sided: 13 lb bond–85 lb cover
Detection
Automatic paper size detection
Dimensions unit (W x
D x H)
635 x 605 x 253 mm / 25" x 23.82" x 9.96"
Weight unit
39.4 kg/86.9 lbs
Power consumption
Approximately 180 W (feeder and reader)
Power requirement
From main unit
PRISMAsync controller
#
376
Specification
Value
Description
Integrated high-performance Océ PRISMAsync color
controller for imageRUNNER ADVANCE C9000S PRO
series
Chapter 12 - Specifications
Specifications
Specification
Value
Features
• Waiting jobs/Scheduled job queues/Printed job archive
• One queue and job management for printing and
copying
• Streaming (spool-while-RIP-while-print-while-clean-
•
•
•
•
•
up): unlimited job length at constant print speed via
clean-up while printing
Multiple standard and customizable workflow profiles
Media-based operation with PRISMA media catalog
Web-based controller Settings Editor
Professional high-speed color management with Adobe
ACE color management module and dedicated GPU,
calibration per media family and halftone, spot color
editing with CMYK value definition for spot color tints,
unlimited color preset definition for easy and time-saving reuse
Options:
- Scheduler on operating panel: 8 hours plan-ahead
functionality for simultaneous jobs
- Workflow automation using LPR queues and PDF/PS
hot folders
Server type
External
Operating system
Windows XPE SP3
Processor
Intel Core i7
GPU
NVIDIA GeForce GTS 450
Memory
4 GB
Hard disk
3 x 3.5" SATA II, 250 GB, 7200 rpm
Interface
Ethernet (10/100/1000 Base-T), TCP/IP (LPR/LPD, 9100
Socket, SMB), Static IP/Auto-IP (DHCP)
Page Description Language
Adobe PostScript 3 (3019); PDF 1.7, Extension Level 3
(for Acrobat 9); PDF-X; Optimized PS; Optimized PDF
Protocols
SNMP v1/v2c/v3, Host Resources MIB, System Group
MIB II, Printer MIB, Job Monitor MIB, LDAP
Chapter 12 - Specifications
377
Specifications
Specification
Value
Fonts
• 136 Type1 fonts for Romance languages
• User import of PS fonts through Settings Editor
• Optional Adobe Asian fonts:
- Japanese: 5 Morisawa fonts (no Heisei fonts)
- Chinese: 2 fonts for Simplified Chinese, 1 font for
Traditional Chinese
- Korean: 1 font for Korean
Spot color libraries
HKS K, HKS K 3000+, HKS N, HKS N 3000+ PANTONE Goe un/coated, Pantone+ solid un/coated
Printer drivers
Windows Vista, Windows 7 (32 and 64 bit), Mac OS X
10.4/10.5/10.6 (32 bit), PPD
Functions: Media selection, layout selection, page programming, including tab shift and tab captions, selection of
(sub)sets, mixed duplex/simplex printing of (sub)sets,
margin shift, image quality and color settings, color presets,
template definition, watermarks
Security
E-shredding, HTTPS, SNMP v3
Password protection per user role (key operator, system
administrator, service technician)
Accessories
Standard license:
• Scanning-B1
• Scheduler-A1
• Multiple queues/Hot folders-A1
• E-shredding-B1
Optional license:
• Remote Viewer-B1
• Asian font sets: Korean-B1, Japanese-B1, Simplified
Chinese-B1, Traditional Chinese-B1
378
Chapter 12 - Specifications
Specifications
Paper handling
#
Specification
Value
Paper Input
Standard: 4 paper trays and bypass tray
Options:
Single-tray paper input modules:
POD Deck Lite-A1
Paper Deck Unit-A1
Multi-tray paper input module:
Multi-Drawer Paper Deck-A1
Maximum paper capacity
9300 sheets
Paper feed technology
Friction feed (standard paper trays), air separation
Paper weight
52–300 g/m² / 14 lb bond–110 lb cover
Paper size
A5R, A4, A4R, A3, 12 5/8" × 17 11/16" / 320 × 450 mm
(SRA3), B4, B5, B5R, LGL, LTR, LTRR, EXEC, 13"x19"
/ 330 x 483 mm, 12" x 18" / 305 x 457 mm , 11" x 17" /
279 x 432 mm, 4-pane postcard, envelopes (ISO-B5, ISOC5, DL, Com10, Monarch)
Custom sizes:
100 x 148 mm to 330.2 x 487.7 mm /
3.94" x 5.83" to 13" x 19.20"
Media
Plain paper, Coated paper, Recycled paper, Colored paper,
Textured paper, Tabs, Punched paper, Transparencies,
Labels, Postcards, special media, such as envelopes
Features
Double-sheet detection, Paper-level indication (visual),
Automatic tray opening, Automatic paper size detection
Standard paper trays
#
Specification
Value
Paper trays
2 x 1100 sheets (80 g/m² / 20 lb bond), A4/B5/LTR
2 x 550 sheets (80 g/m² / 20 lb bond), A5R - 12 5/8" × 17
11/16"/320 × 450 mm (SRA3), 13" x 19" / 330 x 483 mm
Custom size:
139.7 x 182 mm to 330.2 x 487.7 mm /
5.5" x 7.17" to 13" x 19.20"
Chapter 12 - Specifications
379
Specifications
Specification
Value
Features
Paper-level indication (visual), Automatic tray opening
Paper module (Multi-Drawer Paper Deck-A1)
#
Specification
Value
Description
Optional 3-tray paper input module
Paper trays
3 x 2000 sheets (80 g/m² / 20 lb bond)
Maximum paper capacity
6000 sheets
Paper sizes
13" x 19" / 330 x 483 mm, 12" x 18" / 305 x 457 mm,
11" x 17" / 279.4 x 431.8 mm, 12 5/8" × 17 11/16" / 320
× 450 mm (SRA3), A3, A4, A4R, B4, B5, B5R, A5R, LGL,
LTR, LTRR, EXEC
Custom size:
139. 7 x 182 mm to 330.2 x 487.7 mm /
5.5" x 7.17" to 13" x 19.20"
Paper weight
52–300 g/m² / 14 lb bond–110 lb cover
Dimensions unit (W x
D x H)
950 x 797 x 1040 mm /
37.40" x 31.38" x 40.95"
Weight unit
150 kg/330 lbs
Power consumption
Approximately 753 W
Features
Paper-level indication (visual), Automatic tray opening
Power requirement
100–240 VAC, 50/60 Hz
Bulk paper module - POD Deck Lite-A1
#
380
Specification
Value
Description
Optional single-tray paper input module
Paper trays
1 x 3500 sheets (80 g/m² / 20 lb bond)
Paper sizes
13" x 19" / 330 x 483 mm, 12" x 18" / 305 x 457 mm,
11" x 17" / 279.4 x 431.8 mm, 12 5/8" × 17 11/16" / 320
× 450 mm (SRA3), A3, A4, A4R, B4, B5, LGL, LTR,
LTRR
Paper weight
52–300 g/m² / 14 lb bond–110 lb cover
Chapter 12 - Specifications
Specifications
Specification
Value
Paper feed technology
Friction feed, Air separation
Dimensions unit (W x
D x H)
601 x 621 x 570 mm /
23.66" x 24.25" x 22.44"
Weight unit
50 kg/110 lbs
Power consumption
Approximately 263 W
Power requirement
100–240 VAC, 50/60 Hz
Bulk paper module - Paper Deck Unit-A1
#
Specification
Value
Description
Optional single-tray paper input module
Paper trays
1 x 3500 sheets (80 g/m² / 20 lb bond)
Paper sizes
A4, B5, LTR
Paper weight
52–220 g/m² / 14 lb bond - 80 lb cover
Paper feed technology
Friction feed
Dimensions unit (W x
D x H)
323 x 583 x 570 mm /
12.72" x 22.95" x 22.44"
Weight unit
37 kg/81.5 lbs
Power consumption
Approximately 44 W
Power requirement
From main unit
Special feeder - (Multi-Purpose Tray)
#
Specification
Value
Description
Standard part of main engine.
Not accessible when Multi-Drawer Paper Deck is connected.
Paper capacity
100 sheets (80 g/m² / 20 lb bond)
Chapter 12 - Specifications
381
Specifications
Specification
Value
Paper sizes
13" x 19" / 330 x 483 mm, 12 5/8" x 17 11/16" (320 x
450 mm (SRA3), 12" x 18" / 305 x 457 mm, 11"x17" /
279.4 x 431.8 mm, A3, A4, A4R, B4, B5, LGL, LTR,
LTRR, EXEC, STMTR, Envelopes (ISO-B5, ISO-C5,
DL, Com10 No.10, Monarch, Nagagata 3, Yougatanaga
3, Kakugata 2)
Custom sizes:
100 x 148 mm to 330.2 x 487.7 mm /
3.94" x 5.83" to 13" x 19.20"
Paper weight
52–300 g/m² / 14 lb bond–110 lb cover
Scan-to-file (optional)
#
Specification
Value
Description
Option to resale license enabling scan-to-file functionality
Features: Direct embedding of sRGB or Adobe RGB color
profiles for PDF scan; scan-while-warm-up; standard and
user-defined scan and copy templates
Resolution (selectable
for scan-to-file)
150 dpi, 300 dpi, 600 dpi
Scan speed (with automatic document feeder)
45 ipm 1-sided, 44 ipm 2-sided
Destination
Scan-to-Email, Scan-to-FTP, Scan-to-PRISMAaccess, Scanto-USB
File format
(Single-/Multi-page) TIFF, JPEG, PDF
Notes
Initial scan resolution is always 600 dpi. If the operator selected a lower resolution setting for scan-to-file, the initial
scan is processed accordingly before outputting the file to
the selected output location (FTP or email).
Finisher (Staple Finisher-A1)
#
382
Specification
Value
Description
Optional finisher for (offset) stacking and stapling
Maximum stapling capacity
A4/LTR: up to 100 sheets (80 g/m² / 22 lb bond)
Chapter 12 - Specifications
Specifications
Specification
Value
Maximum stacking capacity
4250 sheets
Output capacity
(in sheets)
Top tray
Middle tray
Lower tray
A4
LTR
1500
2500
250
A4R
LTRR
750
750
125
A5R
STMTR
1500
1500
250
A3
11"x 17"
750
750
125
SRA3
13" x 19"
750
750
30
Paper weight
52–300 g/m² / 14 lb bond–110 lb cover
Paper size
Corner stapling front/rear 30 degrees: A4R, A3, B4, A4,
B5, LGL, LTRR, LTR, EXEC, 11" x 17" / 279.4 x 431.8
mm
Two-point stapling: A3, B4, A4, A4R, B5, 11" x 17" /
279.4 x 431.8 mm, LTR, LTRR, LGL, EXEC
Dimensions unit (W x
D x H)
782 x 765 x 1040 mm /
30.79" x 30.12" x 40.94"
Weight unit
61 kg/134.5 lbs
Power requirement
100–240 VAC; 50/60 Hz, 2.8 A
Power Consumption
Approximately 207 W
Features
Corner stapling, Two-point stapling (also A4R/LTRR)
Stacker/stapler (Booklet Finisher-A1)
#
Specification
Value
Description
Stacker/stapler with same stacking and stapling capabilities as staple
finisher plus saddle stitching functionality
Maximum saddle-stitch capacity
20 sheets (80 g/m² / 20 lb bond)
Chapter 12 - Specifications
383
Specifications
Specification
Value
Output capacity
On Conveyor belt: 25 booklets (80 g/m² / 20 lb bond)
Paper weight
Booklet pages: 64–220 g/m² / 17 lb bond - 81 lb cover
Booklet cover: up to 300 g/m² / 110 lb cover
Paper size
For booklets before folding: B4, A4R, A3, SRA3, 13” x 19” / 330 x
483 mm, 12" x 18" / 305 x 457 mm, 11" x 17" / 279.4 x 431.8 mm,
LGL, LTRR
Custom sizes:
210 x 279.3 mm to 330.2 x 487.7 mm /
8.27" x 11" to 13" x 19.2"
Dimensions
unit (W x D x
H)
896 x 765 x 1040 mm /
35.28" x 30.12" x 40.94"
Weight unit
108 kg/238 lbs
Power requirement
100–240 VAC; 50/60 Hz, 2.8 A
Power Consumption
Approximately 225 W
Trim unit (Inner Booklet Trimmer-A1)
#
384
Specification
Value
Description
Optional leading-edge booklet trimmer for stacker/stapler
Trim width
2–20 mm / 0.079"–0.787"
Paper weight
52–300 g/m² / 14 lb bond–110 lb cover
Paper size
A3, SRA3, B4, A4R, LGL, LTR, LTRR, 13” x 19” / 330 x 483 mm,
12" x 18" / 305 x 457 mm, 11" x 17" / 279.4 x 431.8 mm
Custom sizes:
210 x 279.4 mm to 330.2 x 487.7 mm /
8.27" x 11" to 13" x 19.2"
Power requirement
From the stacker/stapler
Power Consumption
Approximately 51 W (when in operation)
Option for
Stacker/stapler
Chapter 12 - Specifications
Specifications
Punch unit (Puncher Unit-BG1 (2/4 holes), Puncher Unit-BH1 (4 holes, Sweden))
#
Specification
Value
Description
Optional built-in 2- or 4-hole punch unit
Paper weight
52–256 g/m² / 14 lb bond –95 lb cover (no transparencies)
Paper size
2 holes: A3, A4, A4R, LGL, LTRR
4 holes (France): A3, A4
4-holes (Sweden): A3, A4, A4R, 11" x 17" / 279.4 x 431.8 mm,
LGL, LTR, LTRR
Power requirement
From the finisher or stacker/stapler
Power Consumption
Approximately 56 W (when in operation)
Option for
Finisher and stacker/stapler
Notice for Puncher Unit-BG1/BH1
The Puncher Unit-BG1/BH1 is not available for US region.
Punch unit US (Puncher Unit-BF1 (2/3 holes US))
#
Specification
Value
Description
Optional built-in 2- or 3-hole punch unit
Paper weight
52–256 g/m² / 14 lb bond –95 lb cover (no transparencies)
Paper size
2 holes: LGL, LTRR
3 holes: 11" x 17" / 279.4 x 431.8 mm, LTR, EXEC
Power requirement
From the finisher or stacker/stapler
Power Consumption
Approximately 56 W (when in operation)
Option for
Staple finisher and stacker/stapler
Chapter 12 - Specifications
385
Specifications
Inserter (Document Insertion Unit-H1)
#
Specification
Value
Description
Optional sheet and cover insertion unit
Capacity
2 x 200 sheets (80 g/m² / 20 lb bond)
Paper weight
52–300 g/m² / 14 lb bond–110 lb cover
Paper size
For inserts: A4, A4R, A3, SRA3, B4R, B5, B5R, 13” x 19” / 330 x
483 mm, 12" x 18" / 305 x 457 mm, 11" x 17" / 279.4 x 431.8 mm,
LGLR, LTR, LTRR, EXEC
Custom sizes:
182 x 182 mm to 330.2 x 487.7 mm /
7.17" x 7.17" to 13" x 19.2"
Pass-through mode: All paper sizes supported by the main engine
Media
For inserts: Thin paper(52–63 g/m² / 14 lb bond–16 lb bond), Plain
paper (64–105 g/m² / 17 lb bond–28 lb bond), recycled paper, thick
paper (106–300 g/m² / 29 lb bond–110 lb Cover), coated paper
(106–300 g/m² / 29 lb bond–110 lb cover), colored paper, tabs,
textured paper, bond paper, prepunched paper, letterhead, tracing
paper
Pass-through mode: All media supported by the main engine
Dimensions
(WxDxH)
746 × 793 × 1407 mm /
29.37" x 31.22" x 55.39"
Weight
61 kg/134.5 lbs
Power requirement
100–240 V, 50/60 Hz, 1.0 A
Power Consumption
Approximately 85 W
Folder (Paper Folding Unit-G1)
#
386
Specification
Value
Description
Optional unit with various folding options: Letter fold in, letter fold
out, double parallel fold, Z-fold, half folding
Chapter 12 - Specifications
Specifications
Specification
Value
Folding output and output capacity
Output to folding unit output tray:
• Letter fold in (C fold)/letter fold out: 40 sheets
• Double parallel fold: 20 sheets
Output to staple finisher or booklet maker top tray or lower tray:
• Z-fold/half fold (A3, B4R, 11" × 17"): 30 sheets
• Z-fold/half fold (A4R, LTRR, LGLR): 10 sheets
Output to staple finisher or booklet maker escape tray:
• Z-fold/half fold: 10 sheets
Paper weight
52–105 g/m² / 14 lb bond–28 lb bond:
Z-folding, letter fold in (C-fold), letter fold out (Accordion Z-fold),
double parallel folding, half fold
52–90 g/m² / 14 lb bond–24 lb bond: Double parallel fold
Paper size
Z-fold: A4R, B4R, A3, LTRR, LGL, 11" × 17" / 279.4 x 431.8 mm
Letter fold in (C fold): A4R, LTRR
Letter fold out: A4R, LTRR
Double parallel fold: A4R, LTRR, LGL
Half fold: A4R, LTRR
Dimensions
(WxDxH)
336 × 793 × 1190 mm /
13.23" x 31.22" x 46.85"
Weight
71 kg/156.5 lbs
Power requirement
From the staple finisher and stacker/stapler
Power Consumption
Approximately 132 W
Puncher (Professional Puncher-C1; Professional Puncher Integration Unit-B1)
#
Specification
Value
Description
Punch unit with user-replaceable dies for plastic comb-, twin loop-,
color coil-, pro click-, velo-, and ring binding
Paper weight
Uncoated paper: 75–216 g/m² / 20 lb bond–80 lb cover
Coated paper: 120–216 g/m² / 32 lb bond–80 lb cover
Exact specifications depend on die set
Paper size
EU: A4, A4 tabs
US: LTR, LTR tab
Chapter 12 - Specifications
387
Specifications
Specification
Value
Punch waste
tray capacity
Varies by die set type.
Max. 25,000 sheets (4-hole die set; 80g/m² / 20 lb bond)
Dimensions
(WxDxH)
305 x 792 x 1040 mm / 12" x 31.18" x 40.94" (Professional
Puncher-C1)
250 x 792 x 1040 mm / 9.84" x 31.18" x 40.94" (Professional
Puncher Integration Unit-B1)
Weight
80 kg / 176 lbs (Professional Puncher-C1)
40 kg / 88 lbs (Professional Puncher Integration Unit-B1)
Power requirement
EUR: 220–240 VAC; 50/60 Hz; 3.1 A (Professional Puncher Integration Unit-B1)
US: 120–127 VAC, 60 Hz, 5.5 A (Professional Puncher Integration
Unit-B1)
Professional Puncher-C1 takes power from Professional Puncher
Integration Unit-B1
Power Consumption
Approximately 130 W (Professional Puncher Integration Unit-B1)
Approximately 320 W (Professional Puncher-C1)
Replaceable A4 die sets for Professional Puncher-B1
#
388
Specification
Value
Replaceable
punch die sets
(A4/LTR)
EUR: 20-hole Plastic Comb, 21-hole Plastic Comb, 23-hole round
Twin Loop, 23-hole square Twin Loop, 34-hole square Twin Loop,
34-hole round Twin Loop, 47-hole Color Coil, 12-hole Velo Bind,
4-hole Loose Leaf, 34-hole Pro Click, 2-hole Loose Leaf, 4-hole Loose
Leaf (Swedish), 2-hole 6.5 mm Loose Leaf, 4-hole 6.5 mm Loose
Leaf, 3- hole Loose Leaf
US: Loose Leaf 3-Hole/5-Hole, Velo Bind 11 hole, Plastic Comb
19-hole, Twin Loop-21 hole/32 hole, ProClick 32- Hole, Color Coil
44-hole, Plastic Comb 19-hole (High Durability), Color Coil 44hole (High Durability), Loose Leaf 3-Hole (High Durability)
Paper weight
75–216 g/m² / 20 lb bond–80 lb cover (uncoated)
120–216 g/m² / 32 lb bond–80 lb cover (coated)*
* For Pro Click (EU: 34-hole):
120–176 g/m² / 32 lb bond–65 lb cover (coated)
Life time
500,000 sheets or more
Chapter 12 - Specifications
Specifications
Copy tray
#
Specification
Value
Description
Output tray for straight output stacking only; no offset stacking
Paper weight
As defined for main engine
Paper size
As defined for main engine
Tray capacity
1-sided printed output: 50 sheets (80 gsm/22 lb Bond)
2-sided printed output: 100 sheets (80 gsm/22 lb Bond)
Dimensions
(W x D x H)
420 × 382 × 267 mm/19.2" x 15.04" x 10.51"
Weight
1.3 kg/2.87 lbs
Chapter 12 - Specifications
389
Specifications
390
Chapter 12 - Specifications
Chapter 13
Third party software
Third Party Software
Third Party Software
This Canon product (the “PRODUCT”) includes third-party software modules. Use and
distribution of these software modules (the “SOFTWARE”) are subject to the conditions
below.
(1) You agree that you will comply with any applicable export control laws, restrictions
or regulations of the countries involved in the event that this product including the
SOFTWARE is shipped, transferred or exported into any country.
(2) Rights holders of the SOFTWARE retain in all respects the title, ownership and intellectual property rights in and to the SOFTWARE. Except as expressly provided herein,
no license or right, expressed or implied, is hereby conveyed or granted by rights holders
of the SOFTWARE to you for any intellectual property of rights holders of the SOFTWARE.
(3) You may use the SOFTWARE solely for use with the PRODUCT.
(4) You may not assign, sublicense, market, distribute, or transfer the SOFTWARE to
any third party without prior written consent of rights holders of the SOFTWARE.
(5) Notwithstanding the foregoing, you may transfer the SOFTWARE only when (a)
you assign to a transferee all of your rights to the PRODUCT and all rights and obligations
under the conditions governing the SOFTWARE and PRODUCT and (b) such transferee
agrees in writing to be bound by all these conditions.
(6) You may not decrypt, decompile, reverse engineer, disassemble or otherwise reduce
the code of the SOFTWARE to human readable form.
(7) You may not modify, adapt, translate, rent, lease or loan the SOFTWARE or create
derivative works based on the SOFTWARE.
(8) You are not entitled to remove or make separate copies of the SOFTWARE from the
PRODUCT.
(9) The human-readable portion (the source code) of the SOFTWARE is not licensed
to you.
Notwithstanding (1) through (9) above, in case any other license conditions accompany
third-party software modules, these software modules are subject to these other conditions,
as well.
ACCEPTANCE
THE TERMS OF THIS THIRD PARTY SOFTWARE STATED HERE OR IN RELATED WARRANTY PROVISIONS SHALL BE DEEMED ACCEPTED UPON
YOUR USE OF THE PRODUCT FOR ONE OR MORE OF ITS NORMAL PURPOSES, IF THERE HAS BEEN NO OTHER PRIOR EXPRESS ACCEPTANCE.
392
Chapter 13 - Third party software
Third Party Software
THE TERMS OF THIS THIRD PARTY SOFTWARE GOVERN THE THIRD
PARTY SOFTWARE AS DELIVERED WITH THE PRODUCT AND ALL UPDATED VERSIONS OF THE THIRD PARTY SOFTWARE PROVIDED UNDER
MAINTENANCE AGREEMENTS OR OTHER SERVICE ARRANGEMENTS FOR
THE PRODUCT WITH CANON USA OR CANON CANADA OR THEIR RESPECTIVE AUTHORIZED SERVICE ORGANIZATIONS.
Chapter 13 - Third party software
393
The Software Subjected to the Other Conditions
The Software Subjected to the Other Conditions
Please refer to Table of Software and respective License terms below, for more detail and
corresponding license conditions.
Table of Software#
Names of Software
License
- Terms and Conditions of the License
HttpClient2.0 Alpha1 Release
The Apache Software License, Version 1.1
-> ‘The Apache Software License, Version 1.1’ on
page 396
Crypto API
Bouncy Castle License
-> ‘Bouncy Castle License’ on page 397
dump/restore
-> ‘dump/restore’ on page 398
expat
MIT License
-> ‘MIT License’ on page 400
fontconfig
-> ‘fontconfig’ on page 401
freetype2
pango (part of OpenTypeCode)
The FreeType Project LICENSE
-> ‘The FreeType Project LICENSE’ on page 402
J2ME
-> ‘J2ME’ on page 405
libpng
libpng License
-> ‘libpng’ on page 406
Adobe Flash Player (in NetFront)
-> ‘Adobe Flash Player (in NetFront)’ on page 408
NET-SNMP
The BSD License
-> ‘The BSD License’ on page 410
MSTLIB
-> ‘MSTLIB’ on page 416
servlet.jar
Java Servlet Implementation Classes Version 2.1.1
Binary Code License
-> ‘Java Servlet Implementation Classes Version 2.1.1
Binary Code License’ on page 418
If you need source code for the following software, send your request by email in English
or Japanese to: <[email protected]>. The request must identify the software name and
applicable license.
See the table of software and respective license terms below for more detail and corresponding license conditions.
394
Chapter 13 - Third party software
The Software Subjected to the Other Conditions
Table of Software#
Names of Software
License
- Terms and Conditions of the License
Device Driver for Marvell Yukon
GNU General Public License Version 2
-> ‘GNU GENERAL PUBLIC LICENSE’ on page
419
Linux
lvm2
ALSA Library
atk
cairo
GNU Lesser General Public License Version 2.1
-> ‘GNU LESSER GENERAL PUBLIC LICENSE’
on page 426
Direct FB
glib
glibc
GTK+
pango (except OpenTypeCode)
OSGi Release 4
Eclipse Public License - v 1.0
-> ‘Eclipse Public License - v 1.0 ’ on page 436
TrouSerS
COMMON PUBLIC LICENSE Version 1.0
-> ‘COMMON PUBLIC LICENSE Version 1.0’
on page 441
Chapter 13 - Third party software
395
The Apache Software License, Version 1.1
The Apache Software License, Version 1.1
This product includes software developed by the Apache Software Foundation
(http://www.apache.org/) and is subject to the following terms and conditions.
Copyright (c) 2001 The Apache Software Foundation. All rights reserved.
Redistribution and use in source and binary forms, with or without modification, are
permitted provided that the following conditions are met:
1. Redistributions of source code must retain the above copyright notice, this list of
conditions and the following disclaimer.
2. Redistributions in binary form must reproduce the above copyright notice, this list of
conditions and the following disclaimer in the documentation and/or other materials
provided with the distribution.
3. The end-user documentation included with the redistribution, if any, must include
the following acknowledgement:
"This product includes software developed by the Apache Software Foundation
(http://www.apache.org/)."
Alternately, this acknowledgement may appear in the software itself, if and wherever such
third-party acknowledgements normally appear.
4. The names "The Jakarta Project", "Commons", "Xerces", "Crimson", "Velocity", and
"Apache Software Foundation" must not be used to endorse or promote products derived
from this software without prior written permission. For written permission, please contact
[email protected].
5. Products derived from this software may not be called "Jakarta", "Commons", "Xerces"
"Crimson", "Velocity", or "Apache", nor may "Jakarta", "Commons", "Xerces" "Crimson",
"Velocity", or "Apache" appear in their names without prior written permission of the
Apache Group.
396
Chapter 13 - Third party software
Bouncy Castle License
Bouncy Castle License
COPYRIGHT INFORMATION
Copyright (c) 2000 The Legion Of The Bouncy Castle (http://www.bouncycastle.org)
Permission is hereby granted, free of charge, to any person obtaining a copy of this software
and associated documentation files (the "Software"), to deal in the Software without restriction, including without limitation the rights to use, copy, modify, merge, publish,
distribute, sublicense, and/or sell copies of the Software, and to permit persons to whom
the Software is furnished to do so,subject to the following conditions:
The above copyright notice and this permission notice shall be included in all copies or
substantial portions of the Software.
THE SOFTWARE IS PROVIDED "AS IS", WITHOUT WARRANTY OF ANY
KIND, EXPRESS OR IMPLIED,INCLUDING BUT NOT LIMITED TO THE
WARRANTIES OF MERCHANTABILITY, FITNESS FOR A PARTICULAR PURPOSE AND NONINFRINGEMENT. IN NO EVENT SHALL THE AUTHORS OR
COPYRIGHT HOLDERS BE LIABLE FOR ANY CLAIM, DAMAGES OR OTHER
LIABILITY, WHETHER IN AN ACTION OF CONTRACT, TORT OR OTHERWISE, ARISING FROM, OUT OF OR IN CONNECTION WITH THE SOFTWARE
OR THE USE OR OTHER DEALINGS IN THE SOFTWARE.
Chapter 13 - Third party software
397
dump/restore
dump/restore
/*
* Ported to Linux's Second Extended File System as part of the
* dump and restore backup suit
* Remy Card <[email protected]>, 1994-1997
* Stelian Pop <[email protected]>, 1999-2000
* Stelian Pop <[email protected]> - Alc?e <www.alcove.com>, 2000-2002
*/
/** Copyright (c) 1980, 1993
* The Regents of the University of California. All rights reserved.
*
* Redistribution and use in source and binary forms, with or without
* modification, are permitted provided that the following conditions
* are met:
* 1. Redistributions of source code must retain the above copyright
* notice, this list of conditions and the following disclaimer.
* 2. Redistributions in binary form must reproduce the above copyright
* notice, this list of conditions and the following disclaimer in the
* documentation and/or other materials provided with the distribution.
* 3. Neither the name of the University nor the names of its contributors
* may be used to endorse or promote products derived from this software
* without specific prior written permission.
*
* THIS SOFTWARE IS PROVIDED BY THE REGENTS AND CONTRIBUTORS
``AS IS'' AND
* ANY EXPRESS OR IMPLIED WARRANTIES, INCLUDING, BUT NOT LIMITED
TO, THE
* IMPLIED WARRANTIES OF MERCHANTABILITY AND FITNESS FOR A
PARTICULAR PURPOSE
* ARE DISCLAIMED. IN NO EVENT SHALL THE REGENTS OR CONTRIBUTORS BE LIABLE
* FOR ANY DIRECT, INDIRECT, INCIDENTAL, SPECIAL, EXEMPLARY, OR
CONSEQUENTIAL
* DAMAGES (INCLUDING, BUT NOT LIMITED TO, PROCUREMENT OF
SUBSTITUTE GOODS
* OR SERVICES; LOSS OF USE, DATA, OR PROFITS; OR BUSINESS INTERRUPTION)
* HOWEVER CAUSED AND ON ANY THEORY OF LIABILITY, WHETHER IN
CONTRACT, STRICT
* LIABILITY, OR TORT (INCLUDING NEGLIGENCE OR OTHERWISE) ARISING IN ANY WAY
398
Chapter 13 - Third party software
dump/restore
* OUT OF THE USE OF THIS SOFTWARE, EVEN IF ADVISED OF THE POSSIBILITY OF
* SUCH DAMAGE.
*/
Chapter 13 - Third party software
399
MIT License
MIT License
Copyright (c) 1998, 1999, 2000 Thai Open Source Software Center Ltd and
Clark Cooper
Copyright (c) 2001, 2002, 2003, 2004, 2005, 2006 Expat maintainers.
Permission is hereby granted, free of charge, to any person obtaining a copy of this software
and associated documentation files (the "Software"), to deal in the Software without restriction, including without limitation the rights to use, copy, modify, merge, publish,
distribute, sublicense, and/or sell copies of the Software, and to permit persons to whom
the Software is furnished to do so, subject to the following conditions:
The above copyright notice and this permission notice shall be included in all copies or
substantial portions of the Software.
THE SOFTWARE IS PROVIDED "AS IS", WITHOUT WARRANTY OF ANY
KIND, EXPRESS OR IMPLIED, INCLUDING BUT NOT LIMITED TO THE
WARRANTIES OF MERCHANTABILITY, FITNESS FOR A PARTICULAR PURPOSE AND NONINFRINGEMENT. IN NO EVENT SHALL THE AUTHORS OR
COPYRIGHT HOLDERS BE LIABLE FOR ANY CLAIM, DAMAGES OR OTHER
LIABILITY, WHETHER IN AN ACTION OF CONTRACT, TORT OR OTHERWISE, ARISING FROM, OUT OF OR IN CONNECTION WITH THE SOFTWARE
OR THE USE OR OTHER DEALINGS IN THE SOFTWARE.
400
Chapter 13 - Third party software
fontconfig
fontconfig
Copyright © 2001,2003 Keith Packard
Permission to use, copy, modify, distribute, and sell this software and its documentation
for any purpose is hereby granted without fee, provided that the above copyright notice
appear in all copies and that both that copyright notice and this permission notice appear
in supporting documentation, and that the name of Keith Packard not be used in advertising or publicity pertaining to distribution of the software without specific, written
prior permission. Keith Packard makes no representations about the suitability of this
software for any purpose. It is provided "as is" without express or implied warranty.
KEITH PACKARD DISCLAIMS ALL WARRANTIES WITH REGARD TO THIS
SOFTWARE, INCLUDING ALL IMPLIED WARRANTIES OF MERCHANTABILITY AND FITNESS, IN NO EVENT SHALL KEITH PACKARD BE LIABLE FOR
ANY SPECIAL, INDIRECT OR CONSEQUENTIAL DAMAGES OR ANY DAMAGES WHATSOEVER RESULTING FROM LOSS OF USE, DATA OR PROFITS,
WHETHER IN AN ACTION OF CONTRACT, NEGLIGENCE OR OTHER
TORTIOUS ACTION, ARISING OUT OF OR IN CONNECTION WITH THE
USE OR PERFORMANCE OF THIS SOFTWARE.
Chapter 13 - Third party software
401
The FreeType Project LICENSE
The FreeType Project LICENSE
---------------------------2006-Jan-27
Copyright 1996-2002, 2006 by
David Turner, Robert Wilhelm, and Werner Lemberg
Introduction
============
The FreeType Project is distributed in several archive packages; some of them may contain,
in addition to the FreeType font engine, various tools and contributions which rely on,
or relate to, the FreeType Project.
This license applies to all files found in such packages, and which do not fall under their
own explicit license. The license affects thus the FreeType font engine, the test programs,
documentation and makefiles, at the very least.
This license was inspired by the BSD, Artistic, and IJG (Independent JPEG Group) licenses, which all encourage inclusion and use of free software in commercial and freeware
products alike. As a consequence, its main points are that:
• We don't promise that this software works. However, we will be interested in any
kind of bug reports. (`as is' distribution)
• You can use this software for whatever you want, in parts or full form, without having
to pay us. (`royalty-free' usage)
• You may not pretend that you wrote this software. If you use it, or only parts of it, in
a program, you must acknowledge somewhere in your documentation that you have
used the FreeType code. (`credits')
We specifically permit and encourage the inclusion of this software, with or without
modifications, in commercial products. We disclaim all warranties covering The FreeType
Project and assume no liability related to The FreeType Project.
Finally, many people asked us for a preferred form for a credit/disclaimer to use in compliance with this license. We thus encourage you to use the following text:
"""
Portions of this software are copyright © <year> The FreeType
Project (www.freetype.org). All rights reserved.
"""
Please replace <year> with the value from the FreeType version you actually use.
402
Chapter 13 - Third party software
The FreeType Project LICENSE
Legal Terms
===========
0. Definitions
-------------Throughout this license, the terms `package', `FreeType Project', and `FreeType archive'
refer to the set of files originally distributed by the authors (David Turner, Robert Wilhelm, and Werner Lemberg) as the `FreeType Project', be they named as alpha, beta or
final release.
`You' refers to the licensee, or person using the project, where `using' is a generic term
including compiling the project's source code as well as linking it to form a `program' or
`executable'. This program is referred to as `a program using the FreeType engine'.
This license applies to all files distributed in the original FreeType Project, including all
source code, binaries and documentation, unless otherwise stated in the file in its original,
unmodified form as distributed in the original archive. If you are unsure whether or not
a particular file is covered by this license, you must contact us to verify this.
The FreeType Project is copyright (C) 1996-2000 by David Turner, Robert Wilhelm,
and Werner Lemberg. All rights reserved except as specified below.
1. No Warranty
-------------THE FREETYPE PROJECT IS PROVIDED `AS IS' WITHOUT WARRANTY OF
ANY KIND, EITHER EXPRESS OR IMPLIED, INCLUDING, BUT NOT LIMITED
TO, WARRANTIES OF MERCHANTABILITY AND FITNESS FOR A PARTICULAR PURPOSE. IN NO EVENT WILL ANY OF THE AUTHORS OR COPYRIGHT
HOLDERS BE LIABLE FOR ANY DAMAGES CAUSED BY THE USE OR THE
INABILITY TO USE, OF THE FREETYPE PROJECT.
2. Redistribution
----------------This license grants a worldwide, royalty-free, perpetual and irrevocable right and license
to use, execute, perform, compile, display, copy, create derivative works of, distribute and
sublicense the FreeType Project (in both source and object code forms) and derivative
works thereof for any purpose; and to authorize others to exercise some or all of the rights
granted herein, subject to the following conditions:
• Redistribution of source code must retain this license file (`FTL.TXT') unaltered; any
additions, deletions or changes to the original files must be clearly indicated in accompanying documentation. The copyright notices of the unaltered, original files must
be preserved in all copies of source files.
Chapter 13 - Third party software
403
The FreeType Project LICENSE
• Redistribution in binary form must provide a disclaimer that states that the software
is based in part of the work of the FreeType Team, in the distribution documentation.
We also encourage you to put an URL to the FreeType web page in your documentation, though this isn't mandatory.
These conditions apply to any software derived from or based on the FreeType Project,
not just the unmodified files. If you use our work, you must acknowledge us. However,
no fee need be paid to us.
3. Advertising
-------------Neither the FreeType authors and contributors nor you shall use the name of the other
for commercial, advertising, or promotional purposes without specific prior written permission.
We suggest, but do not require, that you use one or more of the following phrases to refer
to this software in your documentation or advertising materials: `FreeType Project',
`FreeType Engine', `FreeType library', or `FreeType Distribution'.
As you have not signed this license, you are not required to accept it. However, as the
FreeType Project is copyrighted material, only this license, or another one contracted
with the authors, grants you the right to use, distribute, and modify it. Therefore, by using,
distributing, or modifying the FreeType Project, you indicate that you understand and
accept all the terms of this license.
4. Contacts
----------There are two mailing lists related to FreeType:
• [email protected]
Discusses general use and applications of FreeType, as well as future and wanted additions to the library and distribution. If you are looking for support, start in this list if
you haven't found anything to help you in the documentation.
• [email protected]
Discusses bugs, as well as engine internals, design issues, specific licenses, porting, etc.
Our home page can be found at
http://www.freetype.org
--- end of FTL.TXT ---
404
Chapter 13 - Third party software
J2ME
J2ME
a. Restriction. Software is confidential copyrighted information of Canon and title to all
copies is retained by Canon and/or its licensors. Software shall not be modified, decompiled, disassembled, decrypted, extracted, or otherwise reverse engineered. Software may
not be leased, assigned, or sublicensed, in whole or in part.
b. Export Regulations. Software, including technical data, is subject to U.S. export control
laws, including the U.S. export Administration Act and its associated regulations, and
may be subject to export or import regulations in other countries. You agree to comply
strictly with all such regulations and acknowledges that it has the responsibility to obtain
licenses to export, re-export, or import Software. Software may not be downloaded, or
otherwise exported or re-exported (i) into, or to a national or resident of, Cuba, Iraq,
Iran, North Korea, Libya, Sudan, Syria or any country to which the U.S. has embargoed
goods; or (ii) to anyone on the U.S.Treasury Department's list of Specially Designated
Nations or the U.S. Commerce Department's Table of Denial Orders.
c. Restriction Rights. Use, duplication or disclosure by the United States government is
subject to the restrictions as set forth in the Rights in Technical Data and Computer
Software Clauses in DFARS 252.227-7013(c) (1) (ii) and FAR 52.227-19(c) (2) as applicable.
Chapter 13 - Third party software
405
libpng
libpng
* If you modify libpng you may insert additional notices immediately following
* this sentence.
*
* libpng versions 1.0.7, July 1, 2000, through 1.2.5, October 3, 2002, are
* Copyright (c) 2000-2002 Glenn Randers-Pehrson, and are
* distributed according to the same disclaimer and license as libpng-1.0.6
* with the following individuals added to the list of Contributing Authors
*
* Simon-Pierre Cadieux
* Eric S. Raymond
* Gilles Vollant
*
* and with the following additions to the disclaimer:
*
* There is no warranty against interference with your enjoyment of the
* library or against infringement. There is no warranty that our
* efforts or the library will fulfill any of your particular purposes
* or needs. This library is provided with all faults, and the entire
* risk of satisfactory quality, performance, accuracy, and effort is with
* the user.
*
* libpng versions 0.97, January 1998, through 1.0.6, March 20, 2000, are
* Copyright (c) 1998, 1999, 2000 Glenn Randers-Pehrson
* Distributed according to the same disclaimer and license as libpng-0.96,
* with the following individuals added to the list of Contributing Authors:
*
* Tom Lane
* Glenn Randers-Pehrson
* Willem van Schaik
*
* libpng versions 0.89, June 1996, through 0.96, May 1997, are
* Copyright (c) 1996, 1997 Andreas Dilger
* Distributed according to the same disclaimer and license as libpng-0.88,
* with the following individuals added to the list of Contributing Authors:
*
* John Bowler
* Kevin Bracey
* Sam Bushell
* Magnus Holmgren
* Greg Roelofs
* Tom Tanner
406
Chapter 13 - Third party software
libpng
*
* libpng versions 0.5, May 1995, through 0.88, January 1996, are
* Copyright (c) 1995, 1996 Guy Eric Schalnat, Group 42, Inc.
*
* For the purposes of this copyright and license, "Contributing Authors"
* is defined as the following set of individuals:
*
* Andreas Dilger
* Dave Martindale
* Guy Eric Schalnat
* Paul Schmidt
* Tim Wegner
*
* The PNG Reference Library is supplied "AS IS". The Contributing Authors
* and Group 42, Inc. disclaim all warranties, expressed or implied,
* including, without limitation, the warranties of merchantability and of
* fitness for any purpose. The Contributing Authors and Group 42, Inc.
* assume no liability for direct, indirect, incidental, special, exemplary,
* or consequential damages, which may result from the use of the PNG
* Reference Library, even if advised of the possibility of such damage.
*
* Permission is hereby granted to use, copy, modify, and distribute this
* source code, or portions hereof, for any purpose, without fee, subject
* to the following restrictions:
*
* 1. The origin of this source code must not be misrepresented.
*
* 2. Altered versions must be plainly marked as such and
* must not be misrepresented as being the original source.
*
* 3. This Copyright notice may not be removed or altered from
* any source or altered source distribution.
*
* The Contributing Authors and Group 42, Inc. specifically permit, without
* fee, and encourage the use of this source code as a component to
* supporting the PNG file format in commercial products. If you use this
* source code in a product, acknowledgment is not required but would be
* appreciated.
Chapter 13 - Third party software
407
Adobe Flash Player (in NetFront)
Adobe Flash Player (in NetFront)
Terms and Conditions
Please use the Web Access Software (hereinafter referred to as the "Software") under the
terms and conditions below.
Terms and conditions for use of the Software:
• You may use the Software only on the Canon product specified when acquiring a Li-
•
•
•
•
•
•
•
408
cense Access Number (hereinafter referred to as the "Hardware"), and you may not
use the Software on any device other than the Hardware. The Software may not be
shared, installed, or used concurrently on different computers.
Other than as set forth in this Terms and Conditions section, you may not transfer,
sublicense, sell, rent, lease, or lend the Software to another person or entity and you
may not make copies of the Software.
You may not alter, modify, adapt, convert to another programming language, decompile, disassemble, or otherwise reverse engineer the Software in part or in full, and you
shall not have another person or entity do so. You may not separate the Software from
the Hardware, and you shall not have another person or entity do so.
Canon or someone designated by Canon may audit your use of the Software for
compliance with these terms at any time. In this case, Canon or the party designated
by Canon will give you reasonable notice of the audit.
You may permanently transfer all of your rights to another person or entity to use the
Software only when you transfer the Hardware itself to them, provided you retain no
copies and transfer all of the Software (including all component parts, the media and
printed materials, any upgrades or anything related to the Software including, but not
limited to, its instruction manual). The recipient must use the Software under the
terms and conditions outlined in this Terms and Conditions section.
You may not remove or alter any trademarks, trade names, product names, logos,
copyrights or other proprietary notices, legends, symbols, or labels of Canon or its licensors in the Software.?
Canon or its licensors retain all rights, titles and interests, including all copyrights and
intellectual property rights, in and to, the Software and all copies thereof. You may
not export or re-export, directly or indirectly, the Software in violation of any related
laws, restrictions and regulations, or without all necessary approvals.
Canon or its licensors in the Software, Canon's subsidiaries and affiliates, and Canon's
distributors and dealers are not responsible for maintaining or assisting you in your
use of the Software and are not responsible for updates, bug-fixes, or support for the
Software. If an upgrade version of the Software is provided to you, it is provided to
you in exchange for the previous version. In this case, such an upgrade version is regarded as the Software and used under the terms and conditions outlined in this Terms
and Conditions section. You can no longer use the previous version or transfer the
rights to another person or entity.
Chapter 13 - Third party software
Adobe Flash Player (in NetFront)
Except when required by an applicable law, Canon or its licensors disclaim all warranties
and representations, whether expressed, implied, or otherwise, including the warranties
of merchantability or fitness for a particular purpose. Also, there is no warranty of noninfringement. The Software is not designed, intended, or licensed for use in hazardous
environments requiring fail-safe controls, including without limitation, the design, construction, maintenance, or operation of nuclear facilities, aircraft navigation or communication systems, air traffic management or control systems, life support systems or
weapons systems.
Chapter 13 - Third party software
409
The BSD License
The BSD License
Various copyrights apply to this package, listed in various separate parts below. Please
make sure that you read all the parts. Up until 2001, the project was based at UC Davis,
and the first part covers all code written during this time. From 2001 onwards, the project
has been based at SourceForge, and Networks Associates Technology, Inc hold the
copyright on behalf of the wider Net-SNMP community, covering all derivative work
done since then. An additional copyright section has been added as Part 3 below also
under a BSD license for the work contributed by Cambridge Broadband Ltd. to the
project since 2001. An additional copyright section has been added as Part 4 below also
under a BSD license for the work contributed by Sun Microsystems, Inc. to the project
since 2003.
Code has been contributed to this project by many people over the years it has been in
development, and a full list of contributors can be found in the README file under the
THANKS section.
---- Part 1: CMU/UCD copyright notice: (BSD like) ----Copyright 1989, 1991, 1992 by Carnegie Mellon University
Derivative Work - 1996, 1998-2000
Copyright 1996, 1998-2000 The Regents of the University of California
All Rights Reserved
Permission to use, copy, modify and distribute this software and its documentation for
any purpose and without fee is hereby granted, provided that the above copyright notice
appears in all copies and that both that copyright notice and this permission notice appear
in supporting documentation, and that the name of CMU and The Regents of the University of California not be used in advertising or publicity pertaining to distribution of
the software without specific written permission.
CMU AND THE REGENTS OF THE UNIVERSITY OF CALIFORNIA DISCLAIM
ALL WARRANTIES WITH REGARD TO THIS SOFTWARE, INCLUDING ALL
IMPLIED WARRANTIES OF MERCHANTABILITY AND FITNESS. IN NO
EVENT SHALL CMU OR THE REGENTS OF THE UNIVERSITY OF CALIFORNIA BE LIABLE FOR ANY SPECIAL, INDIRECT OR CONSEQUENTIAL DAMAGES OR ANY DAMAGES WHATSOEVER RESULTING FROM THE LOSS OF
USE, DATA OR PROFITS, WHETHER IN AN ACTION OF CONTRACT, NEGLIGENCE OR OTHER TORTIOUS ACTION, ARISING OUT OF OR IN CONNECTION WITH THE USE OR PERFORMANCE OF THIS SOFTWARE.
---- Part 2: Networks Associates Technology, Inc copyright notice (BSD) -----
410
Chapter 13 - Third party software
The BSD License
Copyright (c) 2001-2003, Networks Associates Technology, Inc
All rights reserved.
Redistribution and use in source and binary forms, with or without modification, are
permitted provided that the following conditions are met:
* Redistributions of source code must retain the above copyright notice, this list of conditions and the following disclaimer.
* Redistributions in binary form must reproduce the above copyright notice, this list of
conditions and the following disclaimer in the documentation and/or other materials
provided with the distribution.
* Neither the name of the Networks Associates Technology, Inc nor the names of its
contributors may be used to endorse or promote products derived from this software
without specific prior written permission.
THIS SOFTWARE IS PROVIDED BY THE COPYRIGHT HOLDERS AND
CONTRIBUTORS ``AS IS'' AND ANY EXPRESS OR IMPLIED WARRANTIES,
INCLUDING, BUT NOT LIMITED TO, THE IMPLIED WARRANTIES OF
MERCHANTABILITY AND FITNESS FOR A PARTICULAR PURPOSE ARE
DISCLAIMED. IN NO EVENT SHALL THE COPYRIGHT HOLDERS OR
CONTRIBUTORS BE LIABLE FOR ANY DIRECT, INDIRECT, INCIDENTAL,
SPECIAL, EXEMPLARY, OR CONSEQUENTIAL DAMAGES (INCLUDING, BUT
NOT LIMITED TO, PROCUREMENT OF SUBSTITUTE GOODS OR SERVICES;
LOSS OF USE, DATA, OR PROFITS; OR BUSINESS INTERRUPTION) HOWEVER CAUSED AND ON ANY THEORY OF LIABILITY, WHETHER IN CONTRACT, STRICT LIABILITY, OR TORT (INCLUDING NEGLIGENCE OR
OTHERWISE) ARISING IN ANY WAY OUT OF THE USE OF THIS SOFTWARE,
EVEN IF ADVISED OF THE POSSIBILITY OF SUCH DAMAGE.
---- Part 3: Cambridge Broadband Ltd. copyright notice (BSD) ----Portions of this code are copyright (c) 2001-2003, Cambridge Broadband Ltd.
All rights reserved.
Redistribution and use in source and binary forms, with or without modification, are
permitted provided that the following conditions are met:
* Redistributions of source code must retain the above copyright notice, this list of conditions and the following disclaimer.
* Redistributions in binary form must reproduce the above copyright notice, this list of
conditions and the following disclaimer in the documentation and/or other materials
provided with the distribution.
Chapter 13 - Third party software
411
The BSD License
* The name of Cambridge Broadband Ltd. may not be used to endorse or promote roducts
derived from this software without specific prior written permission.
THIS SOFTWARE IS PROVIDED BY THE COPYRIGHT HOLDER ``AS IS'' AND
ANY EXPRESS OR IMPLIED WARRANTIES, INCLUDING, BUT NOT LIMITED
TO, THE IMPLIED WARRANTIES OF MERCHANTABILITY AND FITNESS
FOR A PARTICULAR PURPOSE ARE DISCLAIMED. IN NO EVENT SHALL THE
COPYRIGHT HOLDER BE LIABLE FOR ANY DIRECT, INDIRECT, INCIDENTAL, SPECIAL, EXEMPLARY, OR CONSEQUENTIAL DAMAGES (INCLUDING,
BUT NOT LIMITED TO, PROCUREMENT OF SUBSTITUTE GOODS OR
SERVICES; LOSS OF USE, DATA, OR PROFITS; OR BUSINESS INTERRUPTION)
HOWEVER CAUSED AND ON ANY THEORY OF LIABILITY, WHETHER IN
CONTRACT, STRICT LIABILITY, OR TORT (INCLUDING NEGLIGENCE OR
OTHERWISE) ARISING IN ANY WAY OUT OF THE USE OF THIS SOFTWARE,
EVEN IF ADVISED OF THE POSSIBILITY OF SUCH DAMAGE.
---- Part 4: Sun Microsystems, Inc. copyright notice (BSD) ----Copyright ? 2003 Sun Microsystems, Inc., 4150 Network Circle, Santa Clara, California
95054, U.S.A. All rights reserved.
Use is subject to license terms below.
This distribution may include materials developed by third parties.
Sun, Sun Microsystems, the Sun logo and Solaris are trademarks or registered trademarks
of Sun Microsystems, Inc. in the U.S. and other countries.
Redistribution and use in source and binary forms, with or without modification, are
permitted provided that the following conditions are met:
* Redistributions of source code must retain the above copyright notice, this list of conditions and the following disclaimer.
* Redistributions in binary form must reproduce the above copyright notice, this list of
conditions and the following disclaimer in the documentation and/or other materials
provided with the distribution.
* Neither the name of the Sun Microsystems, Inc. nor the names of its contributors may
be used to endorse or promote products derived from this software without specific prior
written permission.
THIS SOFTWARE IS PROVIDED BY THE COPYRIGHT HOLDERS AND
CONTRIBUTORS ``AS IS'' AND ANY EXPRESS OR IMPLIED WARRANTIES,
INCLUDING, BUT NOT LIMITED TO, THE IMPLIED WARRANTIES OF
MERCHANTABILITY AND FITNESS FOR A PARTICULAR PURPOSE ARE
DISCLAIMED. IN NO EVENT SHALL THE COPYRIGHT HOLDERS OR
412
Chapter 13 - Third party software
The BSD License
CONTRIBUTORS BE LIABLE FOR ANY DIRECT, INDIRECT, INCIDENTAL,
SPECIAL, EXEMPLARY, OR CONSEQUENTIAL DAMAGES (INCLUDING, BUT
NOT LIMITED TO, PROCUREMENT OF SUBSTITUTE GOODS OR SERVICES;
LOSS OF USE, DATA, OR PROFITS; OR BUSINESS INTERRUPTION) HOWEVER CAUSED AND ON ANY THEORY OF LIABILITY, WHETHER IN CONTRACT, STRICT LIABILITY, OR TORT (INCLUDING NEGLIGENCE OR
OTHERWISE) ARISING IN ANY WAY OUT OF THE USE OF THIS SOFTWARE,
EVEN IF ADVISED OF THE POSSIBILITY OF SUCH DAMAGE.
---- Part 5: Sparta, Inc copyright notice (BSD) ----Copyright (c) 2003-2005, Sparta, Inc
All rights reserved.
Redistribution and use in source and binary forms, with or without modification, are
permitted provided that the following conditions are met:
* Redistributions of source code must retain the above copyright notice, this list of conditions and the following disclaimer.
* Redistributions in binary form must reproduce the above copyright notice, this list of
conditions and the following disclaimer in the documentation and/or other materials
provided with the distribution.
* Neither the name of Sparta, Inc nor the names of its contributors may be used to endorse
or promote products derived from this software without specific prior written permission.
THIS SOFTWARE IS PROVIDED BY THE COPYRIGHT HOLDERS AND
CONTRIBUTORS ``AS IS'' AND ANY EXPRESS OR IMPLIED WARRANTIES,
INCLUDING, BUT NOT LIMITED TO, THE IMPLIED WARRANTIES OF
MERCHANTABILITY AND FITNESS FOR A PARTICULAR PURPOSE ARE
DISCLAIMED. IN NO EVENT SHALL THE COPYRIGHT HOLDERS OR
CONTRIBUTORS BE LIABLE FOR ANY DIRECT, INDIRECT, INCIDENTAL,
SPECIAL, EXEMPLARY, OR CONSEQUENTIAL DAMAGES (INCLUDING, BUT
NOT LIMITED TO, PROCUREMENT OF SUBSTITUTE GOODS OR SERVICES;
LOSS OF USE, DATA, OR PROFITS; OR BUSINESS INTERRUPTION) HOWEVER CAUSED AND ON ANY THEORY OF LIABILITY, WHETHER IN CONTRACT, STRICT LIABILITY, OR TORT (INCLUDING NEGLIGENCE OR
OTHERWISE) ARISING IN ANY WAY OUT OF THE USE OF THIS SOFTWARE,
EVEN IF ADVISED OF THE POSSIBILITY OF SUCH DAMAGE.
---- Part 6: Cisco/BUPTNIC copyright notice (BSD) ----Copyright (c) 2004, Cisco, Inc and Information Network
Center of Beijing University of Posts and Telecommunications.
All rights reserved.
Chapter 13 - Third party software
413
The BSD License
Redistribution and use in source and binary forms, with or without modification, are
permitted provided that the following conditions are met:
* Redistributions of source code must retain the above copyright notice, this list of conditions and the following disclaimer.
* Redistributions in binary form must reproduce the above copyright notice, this list of
conditions and the following disclaimer in the documentation and/or other materials
provided with the distribution.
* Neither the name of Cisco, Inc, Beijing University of Posts and Telecommunications,
nor the names of their contributors may be used to endorse or promote products derived
from this software without specific prior written permission.
THIS SOFTWARE IS PROVIDED BY THE COPYRIGHT HOLDERS AND
CONTRIBUTORS ``AS IS'' AND ANY EXPRESS OR IMPLIED WARRANTIES,
INCLUDING, BUT NOT LIMITED TO, THE IMPLIED WARRANTIES OF
MERCHANTABILITY AND FITNESS FOR A PARTICULAR PURPOSE ARE
DISCLAIMED. IN NO EVENT SHALL THE COPYRIGHT HOLDERS OR
CONTRIBUTORS BE LIABLE FOR ANY DIRECT, INDIRECT, INCIDENTAL,
SPECIAL, EXEMPLARY, OR CONSEQUENTIAL DAMAGES (INCLUDING, BUT
NOT LIMITED TO, PROCUREMENT OF SUBSTITUTE GOODS OR SERVICES;
LOSS OF USE, DATA, OR PROFITS; OR BUSINESS INTERRUPTION) HOWEVER CAUSED AND ON ANY THEORY OF LIABILITY, WHETHER IN CONTRACT, STRICT LIABILITY, OR TORT (INCLUDING NEGLIGENCE OR
OTHERWISE) ARISING IN ANY WAY OUT OF THE USE OF THIS SOFTWARE,
EVEN IF ADVISED OF THE POSSIBILITY OF SUCH DAMAGE.
---- Part 7: Fabasoft R&D Software GmbH & Co KG copyright notice (BSD) ----Copyright (c) Fabasoft R&D Software GmbH & Co KG, 2003
[email protected]
Author: Bernhard Penz <[email protected]>
Redistribution and use in source and binary forms, with or without modification, are
permitted provided that the following conditions are met:
* Redistributions of source code must retain the above copyright notice, this list of conditions and the following disclaimer.
* Redistributions in binary form must reproduce the above copyright notice, this list of
conditions and the following disclaimer in the documentation and/or other materials
provided with the distribution.
* The name of Fabasoft R&D Software GmbH & Co KG or any of its subsidiaries, brand
or product names may not be used to endorse or promote products derived from this
software without specific prior written permission.
414
Chapter 13 - Third party software
The BSD License
THIS SOFTWARE IS PROVIDED BY THE COPYRIGHT HOLDER ``AS IS'' AND
ANY EXPRESS OR IMPLIED WARRANTIES, INCLUDING, BUT NOT LIMITED
TO, THE IMPLIED WARRANTIES OF MERCHANTABILITY AND FITNESS
FOR A PARTICULAR PURPOSE ARE DISCLAIMED. IN NO EVENT SHALL THE
COPYRIGHT HOLDER BE LIABLE FOR ANY DIRECT, INDIRECT, INCIDENTAL, SPECIAL, EXEMPLARY, OR CONSEQUENTIAL DAMAGES (INCLUDING,
BUT NOT LIMITED TO, PROCUREMENT OF SUBSTITUTE GOODS OR
SERVICES; LOSS OF USE, DATA, OR PROFITS; OR BUSINESS INTERRUPTION)
HOWEVER CAUSED AND ON ANY THEORY OF LIABILITY, WHETHER IN
CONTRACT, STRICT LIABILITY, OR TORT (INCLUDING NEGLIGENCE OR
OTHERWISE) ARISING IN ANY WAY OUT OF THE USE OF THIS SOFTWARE,
EVEN IF ADVISED OF THE POSSIBILITY OF SUCH DAMAGE.
Chapter 13 - Third party software
415
MSTLIB
MSTLIB
Copyright (c) 1994, 1997, 2001, 2002 Red Hat Incorporated.
All rights reserved.
Redistribution and use in source and binary forms, with or without modification, are
permitted provided that the following conditions are met:
Redistributions of source code must retain the above copyright notice, this list of conditions and the following disclaimer.
Redistributions in binary form must reproduce the above copyright notice, this list of
conditions and the following disclaimer in the documentation and/or other materials
provided with the distribution.
The name of Red Hat Incorporated may not be used to endorse or promote products
derived from this software without specific prior written permission.
THIS SOFTWARE IS PROVIDED BY THE COPYRIGHT HOLDERS AND
CONTRIBUTORS "AS IS" AND ANY EXPRESS OR IMPLIED WARRANTIES,
INCLUDING, BUT NOT LIMITED TO, THE IMPLIED WARRANTIES OF
MERCHANTABILITY AND FITNESS FOR A PARTICULAR PURPOSE ARE
DISCLAIMED. IN NO EVENT SHALL RED HAT INCORPORATED BE LIABLE
FOR ANY DIRECT, INDIRECT, INCIDENTAL, SPECIAL, EXEMPLARY, OR
CONSEQUENTIAL DAMAGES (INCLUDING, BUT NOT LIMITED TO, PROCUREMENT OF SUBSTITUTE GOODS OR SERVICES; LOSS OF USE, DATA,
OR PROFITS; OR BUSINESS INTERRUPTION) HOWEVER CAUSED AND ON
ANY THEORY OF LIABILITY, WHETHER IN CONTRACT, STRICT LIABILITY,
OR TORT (INCLUDING NEGLIGENCE OR OTHERWISE) ARISING IN ANY
WAY OUT OF THE USE OF THIS SOFTWARE, EVEN IF ADVISED OF THE
POSSIBILITY OF SUCH DAMAGE.
Copyright (c) 1990 The Regents of the University of California.
All rights reserved.
Redistribution and use in source and binary forms are permitted provided that the above
copyright notice and this paragraph are duplicated in all such forms and that any documentation, advertising materials, and other materials related to such distribution and use
acknowledge that the software was developed by the University of California, Berkeley.
The name of the University may not be used to endorse or promote products derived
from this software without specific prior written permission.
THIS SOFTWARE IS PROVIDED ``AS IS'' AND WITHOUT ANY EXPRESS OR
IMPLIED WARRANTIES, INCLUDING, WITHOUT LIMITATION, THE IM-
416
Chapter 13 - Third party software
MSTLIB
PLIED WARRANTIES OF MERCHANTABILITY AND FITNESS FOR A PARTICULAR PURPOSE.
Chapter 13 - Third party software
417
Java Servlet Implementation Classes Version 2.1.1 Binary Code License
Java Servlet Implementation Classes Version 2.1.1 Binary
Code License
1. Java Platform Interface. Licensee may not modify the Java Platform Interface (JPI,
identified as classes contained within the javax package or any subpackages of the javax
package), by creating additional classes within the JPI or otherwise causing the addition
to or modification of the classes in the JPI. In the event that Licensee creates any Javarelated API and distribute such API to others for applet or application development, you
must promptly publish broadly, an accurate specification for such API for free use by all
developers of Java-based software.
2. Restrictions. Software is confidential copyrighted information of Sun and title to all
copies is retained by Sun and/or its licensors. Licensee shall not modify, decompile, disassemble, decrypt, extract, or otherwise reverse engineer Software. Software may not be
leased, assigned, or sublicensed, in whole or in part. Software is not designed or intended
for use in on-line control of aircraft, air traffic, aircraft navigation or aircraft communications; or in the design, construction, operation or maintenance of any nuclear facility.
Licensee warrants that it will not use or redistribute the Software for such purposes.
3. Disclaimer of Warranty. Software is provided "AS IS," without a warranty of any kind.
ALL EXPRESS OR IMPLIED REPRESENTATIONS AND WARRANTIES, INCLUDING ANY IMPLIED WARRANTY OF MERCHANTABILITY, FITNESS FOR A
PARTICULAR PURPOSE OR NON-INFRINGEMENT, ARE HEREBY EXCLUDED.
4. Termination. This License is effective until terminated. Licensee may terminate this
License at any time by destroying all copies of Software. This License will terminate immediately without notice from Sun if Licensee fails to comply with any provision of this
License. Upon such termination, Licensee must destroy all copies of Software.
5. Export Regulations. Software, including technical data, is subject to U.S. export control
laws, including the U.S. Export Administration Act and its associated regulations, and
may be subject to export or import regulations in other countries. Licensee agrees to
comply strictly with all such regulations and acknowledges that it has the responsibility
to obtain licenses to export, re-export, or import Software. Software may not be downloaded, or otherwise exported or re-exported (i) into, or to a national or resident of, Cuba,
Iraq, Iran, North Korea, Libya, Sudan, Syria or any country to which the U.S. has embargoed goods; or (ii) to anyone on the U.S. Treasury Department's list of Specially Designated Nations or the U.S. Commerce Department's Table of Denial Orders.
418
Chapter 13 - Third party software
GNU GENERAL PUBLIC LICENSE
GNU GENERAL PUBLIC LICENSE
Version 2, June 1991
Copyright (C) 1989, 1991 Free Software Foundation, Inc.
51 Franklin Street, Fifth Floor, Boston, MA 02110-1301, USA
Everyone is permitted to copy and distribute verbatim copies of this license document,
but changing it is not allowed.
Preamble
The licenses for most software are designed to take away your freedom to share and change
it. By contrast, the GNU General Public License is intended to guarantee your freedom
to share and change free software--to make sure the software is free for all its users. This
General Public License applies to most of the Free Software Foundation's software and
to any other program whose authors commit to using it. (Some other Free Software
Foundation software is covered by the GNU Lesser General Public License instead.) You
can apply it to your programs, too.
When we speak of free software, we are referring to freedom, not price. Our General
Public Licenses are designed to make sure that you have the freedom to distribute copies
of free software (and charge for this service if you wish), that you receive source code or
can get it if you want it, that you can change the software or use pieces of it in new free
programs; and that you know you can do these things.
To protect your rights, we need to make restrictions that forbid anyone to deny you these
rights or to ask you to surrender the rights. These restrictions translate to certain responsibilities for you if you distribute copies of the software, or if you modify it.
For example, if you distribute copies of such a program, whether gratis or for a fee, you
must give the recipients all the rights that you have. You must make sure that they, too,
receive or can get the source code. And you must show them these terms so they know
their rights.
We protect your rights with two steps: (1) copyright the software, and (2) offer you this
license which gives you legal permission to copy, distribute and/or modify the software.
Also, for each author's protection and ours, we want to make certain that everyone understands that there is no warranty for this free software. If the software is modified by
someone else and passed on, we want its recipients to know that what they have is not
Chapter 13 - Third party software
419
GNU GENERAL PUBLIC LICENSE
the original, so that any problems introduced by others will not reflect on the original
authors' reputations.
Finally, any free program is threatened constantly by software patents. We wish to avoid
the danger that redistributors of a free program will individually obtain patent licenses,
in effect making the program proprietary. To prevent this, we have made it clear that any
patent must be licensed for everyone's free use or not licensed at all.
The precise terms and conditions for copying, distribution and modification follow.
TERMS AND CONDITIONS FOR COPYING, DISTRIBUTION AND MODIFICATION
0. This License applies to any program or other work which contains a notice placed by
the copyright holder saying it may be distributed under the terms of this General Public
License. The "Program", below, refers to any such program or work, and a "work based
on the Program" means either the Program or any derivative work under copyright law:
that is to say, a work containing the Program or a portion of it, either verbatim or with
modifications and/or translated into another language. (Hereinafter, translation is included
without limitation in the term "modification".) Each licensee is addressed as "you".
Activities other than copying, distribution and modification are not covered by this License;
they are outside its scope. The act of running the Program is not restricted, and the output
from the Program is covered only if its contents constitute a work based on the Program
(independent of having been made by running the Program). Whether that is true depends
on what the Program does.
1. You may copy and distribute verbatim copies of the Program's source code as you receive
it, in any medium, provided that you conspicuously and appropriately publish on each
copy an appropriate copyright notice and disclaimer of warranty; keep intact all the notices
that refer to this License and to the absence of any warranty; and give any other recipients
of the Program a copy of this License along with the Program.
You may charge a fee for the physical act of transferring a copy, and you may at your
option offer warranty protection in exchange for a fee.
2. You may modify your copy or copies of the Program or any portion of it, thus forming
a work based on the Program, and copy and distribute such modifications or work under
the terms of Section 1 above, provided that you also meet all of these conditions:
a) You must cause the modified files to carry prominent notices stating that you changed
the files and the date of any change.
b) You must cause any work that you distribute or publish, that in whole or in part contains or is derived from the Program or any part thereof, to be licensed as a whole at no
charge to all third parties under the terms of this License.
420
Chapter 13 - Third party software
GNU GENERAL PUBLIC LICENSE
c) If the modified program normally reads commands interactively when run, you must
cause it, when started running for such interactive use in the most ordinary way, to print
or display an announcement including an appropriate copyright notice and a notice that
there is no warranty (or else, saying that you provide a warranty) and that users may redistribute the program under these conditions, and telling the user how to view a copy
of this License. (Exception: if the Program itself is interactive but does not normally print
such an announcement, your work based on the Program is not required to print an announcement.)
These requirements apply to the modified work as a whole. If identifiable sections of that
work are not derived from the Program, and can be reasonably considered independent
and separate works in themselves, then this License, and its terms, do not apply to those
sections when you distribute them as separate works. But when you distribute the same
sections as part of a whole which is a work based on the Program, the distribution of the
whole must be on the terms of this License, whose permissions for other licensees extend
to the entire whole, and thus to each and every part regardless of who wrote it.
Thus, it is not the intent of this section to claim rights or contest your rights to work
written entirely by you; rather, the intent is to exercise the right to control the distribution
of derivative or collective works based on the Program.
In addition, mere aggregation of another work not based on the Program with the Program
(or with a work based on the Program) on a volume of a storage or distribution medium
does not bring the other work under the scope of this License.
3. You may copy and distribute the Program (or a work based on it, under Section 2) in
object code or executable form under the terms of Sections 1 and 2 above provided that
you also do one of the following:
a) Accompany it with the complete corresponding machine-readable source code, which
must be distributed under the terms of Sections 1 and 2 above on a medium customarily
used for software interchange; or,
b) Accompany it with a written offer, valid for at least three years, to give any third party,
for a charge no more than your cost of physically performing source distribution, a
complete machine-readable copy of the corresponding source code, to be distributed
under the terms of Sections 1 and 2 above on a medium customarily used for software
interchange; or,
c) Accompany it with the information you received as to the offer to distribute corresponding source code. (This alternative is allowed only for noncommercial distribution and
only if you received the program in object code or executable form with such an offer, in
accord with Subsection b above.)
The source code for a work means the preferred form of the work for making modifications
to it. For an executable work, complete source code means all the source code for all
Chapter 13 - Third party software
421
GNU GENERAL PUBLIC LICENSE
modules it contains, plus any associated interface definition files, plus the scripts used to
control compilation and installation of the executable. However, as a special exception,
the source code distributed need not include anything that is normally distributed (in
either source or binary form) with the major components (compiler, kernel, and so on)
of the operating system on which the executable runs, unless that component itself accompanies the executable.
If distribution of executable or object code is made by offering access to copy from a
designated place, then offering equivalent access to copy the source code from the same
place counts as distribution of the source code, even though third parties are not compelled
to copy the source along with the object code.
4. You may not copy, modify, sublicense, or distribute the Program except as expressly
provided under this License. Any attempt otherwise to copy, modify, sublicense or distribute the Program is void, and will automatically terminate your rights under this License.
However, parties who have received copies, or rights, from you under this License will
not have their licenses terminated so long as such parties remain in full compliance.
5. You are not required to accept this License, since you have not signed it. However,
nothing else grants you permission to modify or distribute the Program or its derivative
works. These actions are prohibited by law if you do not accept this License. Therefore,
by modifying or distributing the Program (or any work based on the Program), you indicate your acceptance of this License to do so, and all its terms and conditions for copying,
distributing or modifying the Program or works based on it.
6. Each time you redistribute the Program (or any work based on the Program), the recipient automatically receives a license from the original licensor to copy, distribute or
modify the Program subject to these terms and conditions. You may not impose any
further restrictions on the recipients' exercise of the rights granted herein. You are not
responsible for enforcing compliance by third parties to this License.
7. If, as a consequence of a court judgment or allegation of patent infringement or for
any other reason (not limited to patent issues), conditions are imposed on you (whether
by court order, agreement or otherwise) that contradict the conditions of this License,
they do not excuse you from the conditions of this License. If you cannot distribute so
as to satisfy simultaneously your obligations under this License and any other pertinent
obligations, then as a consequence you may not distribute the Program at all. For example,
if a patent license would not permit royalty-free redistribution of the Program by all those
who receive copies directly or indirectly through you, then the only way you could satisfy
both it and this License would be to refrain entirely from distribution of the Program.
If any portion of this section is held invalid or unenforceable under any particular circumstance, the balance of the section is intended to apply and the section as a whole is intended
to apply in other circumstances.
422
Chapter 13 - Third party software
GNU GENERAL PUBLIC LICENSE
It is not the purpose of this section to induce you to infringe any patents or other property
right claims or to contest validity of any such claims; this section has the sole purpose of
protecting the integrity of the free software distribution system, which is implemented
by public license practices. Many people have made generous contributions to the wide
range of software distributed through that system in reliance on consistent application
of that system; it is up to the author/donor to decide if he or she is willing to distribute
software through any other system and a licensee cannot impose that choice.
This section is intended to make thoroughly clear what is believed to be a consequence
of the rest of this License.
8. If the distribution and/or use of the Program is restricted in certain countries either
by patents or by copyrighted interfaces, the original copyright holder who places the
Program under this License may add an explicit geographical distribution limitation excluding those countries, so that distribution is permitted only in or among countries not
thus excluded. In such case, this License incorporates the limitation as if written in the
body of this License.
9. The Free Software Foundation may publish revised and/or new versions of the General
Public License from time to time. Such new versions will be similar in spirit to the present
version, but may differ in detail to address new problems or concerns.
Each version is given a distinguishing version number. If the Program specifies a version
number of this License which applies to it and "any later version", you have the option
of following the terms and conditions either of that version or of any later version published
by the Free Software Foundation. If the Program does not specify a version number of
this License, you may choose any version ever published by the Free Software Foundation.
10. If you wish to incorporate parts of the Program into other free programs whose distribution conditions are different, write to the author to ask for permission. For software
which is copyrighted by the Free Software Foundation, write to the Free Software
Foundation; we sometimes make exceptions for this. Our decision will be guided by the
two goals of preserving the free status of all derivatives of our free software and of promoting the sharing and reuse of software generally.
NO WARRANTY
11. BECAUSE THE PROGRAM IS LICENSED FREE OF CHARGE, THERE IS
NO WARRANTY FOR THE PROGRAM, TO THE EXTENT PERMITTED BY
APPLICABLE LAW. EXCEPT WHEN OTHERWISE STATED IN WRITING THE
COPYRIGHT HOLDERS AND/OR OTHER PARTIES PROVIDE THE PROGRAM
"AS IS" WITHOUT WARRANTY OF ANY KIND, EITHER EXPRESSED OR IMPLIED, INCLUDING, BUT NOT LIMITED TO, THE IMPLIED WARRANTIES
OF MERCHANTABILITY AND FITNESS FOR A PARTICULAR PURPOSE. THE
ENTIRE RISK AS TO THE QUALITY AND PERFORMANCE OF THE PROGRAM
Chapter 13 - Third party software
423
GNU GENERAL PUBLIC LICENSE
IS WITH YOU. SHOULD THE PROGRAM PROVE DEFECTIVE, YOU ASSUME
THE COST OF ALL NECESSARY SERVICING, REPAIR OR CORRECTION.
12. IN NO EVENT UNLESS REQUIRED BY APPLICABLE LAW OR AGREED
TO IN WRITING WILL ANY COPYRIGHT HOLDER, OR ANY OTHER PARTY
WHO MAY MODIFY AND/OR REDISTRIBUTE THE PROGRAM AS PERMITTED
ABOVE, BE LIABLE TO YOU FOR DAMAGES, INCLUDING ANY GENERAL,
SPECIAL, INCIDENTAL OR CONSEQUENTIAL DAMAGES ARISING OUT OF
THE USE OR INABILITY TO USE THE PROGRAM (INCLUDING BUT NOT
LIMITED TO LOSS OF DATA OR DATA BEING RENDERED INACCURATE
OR LOSSES SUSTAINED BY YOU OR THIRD PARTIES OR A FAILURE OF THE
PROGRAM TO OPERATE WITH ANY OTHER PROGRAMS), EVEN IF SUCH
HOLDER OR OTHER PARTY HAS BEEN ADVISED OF THE POSSIBILITY OF
SUCH DAMAGES.
END OF TERMS AND CONDITIONS
How to Apply These Terms to Your New Programs
If you develop a new program, and you want it to be of the greatest possible use to the
public, the best way to achieve this is to make it free software which everyone can redistribute and change under these terms.
To do so, attach the following notices to the program. It is safest to attach them to the
start of each source file to most effectively convey the exclusion of warranty; and each file
should have at least the "copyright" line and a pointer to where the full notice is found.
one line to give the program's name and an idea of what it does.
Copyright (C) yyyy name of author
This program is free software; you can redistribute it and/or modify it under the terms
of the GNU General Public License as published by the Free Software Foundation; either
version 2 of the License, or (at your option) any later version.
This program is distributed in the hope that it will be useful, but WITHOUT ANY
WARRANTY; without even the implied warranty of MERCHANTABILITY or FITNESS
FOR A PARTICULAR PURPOSE. See the GNU General Public License for more details.
You should have received a copy of the GNU General Public License along with this
program; if not, write to the Free Software Foundation, Inc., 51 Franklin Street, Fifth
Floor, Boston, MA 02110-1301, USA.
Also add information on how to contact you by electronic and paper mail.
If the program is interactive, make it output a short notice like this when it starts in an
interactive mode:
424
Chapter 13 - Third party software
GNU GENERAL PUBLIC LICENSE
Gnomovision version 69, Copyright (C) year name of author Gnomovision comes with
ABSOLUTELY NO WARRANTY; for details type `show w'. This is free software, and
you are welcome to redistribute it under certain conditions; type `show c' for details.
The hypothetical commands `show w' and `show c' should show the appropriate parts
of the General Public License. Of course, the commands you use may be called something
other than `show w' and `show c'; they could even be mouse-clicks or menu items-whatever suits your program.
You should also get your employer (if you work as a programmer) or your school, if any,
to sign a "copyright disclaimer" for the program, if necessary. Here is a sample; alter the
names:
Yoyodyne, Inc., hereby disclaims all copyright interest in the program `Gnomovision'
(which makes passes at compilers) written by James Hacker.
signature of Ty Coon, 1 April 1989
Ty Coon, President of Vice
This General Public License does not permit incorporating your program into proprietary
programs. If your program is a subroutine library, you may consider it more useful to
permit linking proprietary applications with the library. If this is what you want to do,
use the GNU Lesser General Public License instead of this License.
Chapter 13 - Third party software
425
GNU LESSER GENERAL PUBLIC LICENSE
GNU LESSER GENERAL PUBLIC LICENSE
Version 2.1, February 1999
Copyright (C) 1989, 1991 Free Software Foundation, Inc.
51 Franklin Street, Fifth Floor, Boston, MA 02110-1301, USA
Everyone is permitted to copy and distribute verbatim copies of this license document,
but changing it is not allowed.
[This is the first released version of the Lesser GPL. It also counts as the successor of the
GNU Library Public License, version 2, hence the version number 2.1.]
Preamble
The licenses for most software are designed to take away your freedom to share and change
it. By contrast, the GNU General Public Licenses are intended to guarantee your freedom
to share and change free software--to make sure the software is free for all its users.
This license, the Lesser General Public License, applies to some specially designated
software packages--typically libraries--of the Free Software Foundation and other authors
who decide to use it. You can use it too, but we suggest you first think carefully about
whether this license or the ordinary General Public License is the better strategy to use
in any particular case, based on the explanations below.
When we speak of free software, we are referring to freedom of use, not price. Our General Public Licenses are designed to make sure that you have the freedom to distribute
copies of free software (and charge for this service if you wish); that you receive source
code or can get it if you want it; that you can change the software and use pieces of it in
new free programs; and that you are informed that you can do these things.
To protect your rights, we need to make restrictions that forbid distributors to deny you
these rights or to ask you to surrender these rights. These restrictions translate to certain
responsibilities for you if you distribute copies of the library or if you modify it.
For example, if you distribute copies of the library, whether gratis or for a fee, you must
give the recipients all the rights that we gave you. You must make sure that they, too, receive or can get the source code. If you link other code with the library, you must provide
complete object files to the recipients, so that they can relink them with the library after
making changes to the library and recompiling it. And you must show them these terms
so they know their rights.
We protect your rights with a two-step method: (1) we copyright the library, and (2) we
offer you this license, which gives you legal permission to copy, distribute and/or modify
the library.
426
Chapter 13 - Third party software
GNU LESSER GENERAL PUBLIC LICENSE
To protect each distributor, we want to make it very clear that there is no warranty for
the free library. Also, if the library is modified by someone else and passed on, the recipients
should know that what they have is not the original version, so that the original author's
reputation will not be affected by problems that might be introduced by others.
Finally, software patents pose a constant threat to the existence of any free program. We
wish to make sure that a company cannot effectively restrict the users of a free program
by obtaining a restrictive license from a patent holder. Therefore, we insist that any patent
license obtained for a version of the library must be consistent with the full freedom of
use specified in this license.
Most GNU software, including some libraries, is covered by the ordinary GNU General
Public License. This license, the GNU Lesser General Public License, applies to certain
designated libraries, and is quite different from the ordinary General Public License. We
use this license for certain libraries in order to permit linking those libraries into non-free
programs.
When a program is linked with a library, whether statically or using a shared library, the
combination of the two is legally speaking a combined work, a derivative of the original
library. The ordinary General Public License therefore permits such linking only if the
entire combination fits its criteria of freedom. The Lesser General Public License permits
more lax criteria for linking other code with the library.
We call this license the "Lesser" General Public License because it does Less to protect
the user's freedom than the ordinary General Public License. It also provides other free
software developers Less of an advantage over competing non-free programs. These disadvantages are the reason we use the ordinary General Public License for many libraries.
However, the Lesser license provides advantages in certain special circumstances.
For example, on rare occasions, there may be a special need to encourage the widest possible use of a certain library, so that it becomes a de-facto standard. To achieve this, nonfree programs must be allowed to use the library. A more frequent case is that a free library
does the same job as widely used non-free libraries. In this case, there is little to gain by
limiting the free library to free software only, so we use the Lesser General Public License.
In other cases, permission to use a particular library in non-free programs enables a greater
number of people to use a large body of free software. For example, permission to use
the GNU C Library in non-free programs enables many more people to use the whole
GNU operating system, as well as its variant, the GNU/Linux operating system.
Although the Lesser General Public License is Less protective of the users' freedom, it
does ensure that the user of a program that is linked with the Library has the freedom
and the wherewithal to run that program using a modified version of the Library.
The precise terms and conditions for copying, distribution and modification follow. Pay
close attention to the difference between a "work based on the library" and a "work that
Chapter 13 - Third party software
427
GNU LESSER GENERAL PUBLIC LICENSE
uses the library". The former contains code derived from the library, whereas the latter
must be combined with the library in order to run.
TERMS AND CONDITIONS FOR COPYING, DISTRIBUTION AND MODIFICATION
0. This License Agreement applies to any software library or other program which contains
a notice placed by the copyright holder or other authorized party saying it may be distributed under the terms of this Lesser General Public License (also called "this License").
Each licensee is addressed as "you".
A "library" means a collection of software functions and/or data prepared so as to be
conveniently linked with application programs (which use some of those functions and
data) to form executables.
The "Library", below, refers to any such software library or work which has been distributed under these terms. A "work based on the Library" means either the Library or any
derivative work under copyright law: that is to say, a work containing the Library or a
portion of it, either verbatim or with modifications and/or translated straightforwardly
into another language. (Hereinafter, translation is included without limitation in the term
"modification".)
"Source code" for a work means the preferred form of the work for making modifications
to it. For a library, complete source code means all the source code for all modules it
contains, plus any associated interface definition files, plus the scripts used to control
compilation and installation of the library.
Activities other than copying, distribution and modification are not covered by this License;
they are outside its scope. The act of running a program using the Library is not restricted,
and output from such a program is covered only if its contents constitute a work based
on the Library (independent of the use of the Library in a tool for writing it). Whether
that is true depends on what the Library does and what the program that uses the Library
does.
1. You may copy and distribute verbatim copies of the Library's complete source code as
you receive it, in any medium, provided that you conspicuously and appropriately publish
on each copy an appropriate copyright notice and disclaimer of warranty; keep intact all
the notices that refer to this License and to the absence of any warranty; and distribute a
copy of this License along with the Library.
You may charge a fee for the physical act of transferring a copy, and you may at your
option offer warranty protection in exchange for a fee.
2. You may modify your copy or copies of the Library or any portion of it, thus forming
a work based on the Library, and copy and distribute such modifications or work under
the terms of Section 1 above, provided that you also meet all of these conditions:
428
Chapter 13 - Third party software
GNU LESSER GENERAL PUBLIC LICENSE
• a) The modified work must itself be a software library.
• b) You must cause the files modified to carry prominent notices stating that you
changed the files and the date of any change.
• c) You must cause the whole of the work to be licensed at no charge to all third parties
under the terms of this License.
• d) If a facility in the modified Library refers to a function or a table of data to be
supplied by an application program that uses the facility, other than as an argument
passed when the facility is invoked, then you must make a good faith effort to ensure
that, in the event an application does not supply such function or table, the facility
still operates, and performs whatever part of its purpose remains meaningful.
(For example, a function in a library to compute square roots has a purpose that is entirely
well-defined independent of the application. Therefore, Subsection 2d requires that any
application-supplied function or table used by this function must be optional: if the application does not supply it, the square root function must still compute square roots.)
These requirements apply to the modified work as a whole. If identifiable sections of that
work are not derived from the Library, and can be reasonably considered independent
and separate works in themselves, then this License, and its terms, do not apply to those
sections when you distribute them as separate works. But when you distribute the same
sections as part of a whole which is a work based on the Library, the distribution of the
whole must be on the terms of this License, whose permissions for other licensees extend
to the entire whole, and thus to each and every part regardless of who wrote it.
Thus, it is not the intent of this section to claim rights or contest your rights to work
written entirely by you; rather, the intent is to exercise the right to control the distribution
of derivative or collective works based on the Library.
In addition, mere aggregation of another work not based on the Library with the Library
(or with a work based on the Library) on a volume of a storage or distribution medium
does not bring the other work under the scope of this License.
3. You may opt to apply the terms of the ordinary GNU General Public License instead
of this License to a given copy of the Library. To do this, you must alter all the notices
that refer to this License, so that they refer to the ordinary GNU General Public License,
version 2, instead of to this License. (If a newer version than version 2 of the ordinary
GNU General Public License has appeared, then you can specify that version instead if
you wish.) Do not make any other change in these notices.
Once this change is made in a given copy, it is irreversible for that copy, so the ordinary
GNU General Public License applies to all subsequent copies and derivative works made
from that copy.
This option is useful when you wish to copy part of the code of the Library into a program
that is not a library.
Chapter 13 - Third party software
429
GNU LESSER GENERAL PUBLIC LICENSE
4. You may copy and distribute the Library (or a portion or derivative of it, under Section
2) in object code or executable form under the terms of Sections 1 and 2 above provided
that you accompany it with the complete corresponding machine-readable source code,
which must be distributed under the terms of Sections 1 and 2 above on a medium customarily used for software interchange.
If distribution of object code is made by offering access to copy from a designated place,
then offering equivalent access to copy the source code from the same place satisfies the
requirement to distribute the source code, even though third parties are not compelled
to copy the source along with the object code.
5. A program that contains no derivative of any portion of the Library, but is designed
to work with the Library by being compiled or linked with it, is called a "work that uses
the Library". Such a work, in isolation, is not a derivative work of the Library, and
therefore falls outside the scope of this License.
However, linking a "work that uses the Library" with the Library creates an executable
that is a derivative of the Library (because it contains portions of the Library), rather than
a "work that uses the library". The executable is therefore covered by this License. Section
6 states terms for distribution of such executables.
When a "work that uses the Library" uses material from a header file that is part of the
Library, the object code for the work may be a derivative work of the Library even though
the source code is not. Whether this is true is especially significant if the work can be
linked without the Library, or if the work is itself a library. The threshold for this to be
true is not precisely defined by law.
If such an object file uses only numerical parameters, data structure layouts and accessors,
and small macros and small inline functions (ten lines or less in length), then the use of
the object file is unrestricted, regardless of whether it is legally a derivative work. (Executables containing this object code plus portions of the Library will still fall under Section
6.)
Otherwise, if the work is a derivative of the Library, you may distribute the object code
for the work under the terms of Section 6. Any executables containing that work also fall
under Section 6, whether or not they are linked directly with the Library itself.
6. As an exception to the Sections above, you may also combine or link a "work that uses
the Library" with the Library to produce a work containing portions of the Library, and
distribute that work under terms of your choice, provided that the terms permit modification of the work for the customer's own use and reverse engineering for debugging such
modifications.
You must give prominent notice with each copy of the work that the Library is used in
it and that the Library and its use are covered by this License. You must supply a copy
of this License. If the work during execution displays copyright notices, you must include
430
Chapter 13 - Third party software
GNU LESSER GENERAL PUBLIC LICENSE
the copyright notice for the Library among them, as well as a reference directing the user
to the copy of this License. Also, you must do one of these things:
• a) Accompany the work with the complete corresponding machine-readable source
•
•
•
•
code for the Library including whatever changes were used in the work (which must
be distributed under Sections 1 and 2 above); and, if the work is an executable linked
with the Library, with the complete machine-readable "work that uses the Library",
as object code and/or source code, so that the user can modify the Library and then
relink to produce a modified executable containing the modified Library. (It is understood that the user who changes the contents of definitions files in the Library will
not necessarily be able to recompile the application to use the modified definitions.)
b) Use a suitable shared library mechanism for linking with the Library. A suitable
mechanism is one that (1) uses at run time a copy of the library already present on
the user's computer system, rather than copying library functions into the executable,
and (2) will operate properly with a modified version of the library, if the user installs
one, as long as the modified version is interface-compatible with the version that the
work was made with.
c) Accompany the work with a written offer, valid for at least three years, to give the
same user the materials specified in Subsection 6a, above, for a charge no more than
the cost of performing this distribution.
d) If distribution of the work is made by offering access to copy from a designated
place, offer equivalent access to copy the above specified materials from the same place.
e) Verify that the user has already received a copy of these materials or that you have
already sent this user a copy.
For an executable, the required form of the "work that uses the Library" must include
any data and utility programs needed for reproducing the executable from it. However,
as a special exception, the materials to be distributed need not include anything that is
normally distributed (in either source or binary form) with the major components
(compiler, kernel, and so on) of the operating system on which the executable runs, unless
that component itself accompanies the executable.
It may happen that this requirement contradicts the license restrictions of other proprietary
libraries that do not normally accompany the operating system. Such a contradiction
means you cannot use both them and the Library together in an executable that you distribute.
7. You may place library facilities that are a work based on the Library side-by-side in a
single library together with other library facilities not covered by this License, and distribute
such a combined library, provided that the separate distribution of the work based on
the Library and of the other library facilities is otherwise permitted, and provided that
you do these two things:
Chapter 13 - Third party software
431
GNU LESSER GENERAL PUBLIC LICENSE
• a) Accompany the combined library with a copy of the same work based on the Library,
uncombined with any other library facilities. This must be distributed under the terms
of the Sections above.
• b) Give prominent notice with the combined library of the fact that part of it is a work
based on the Library, and explaining where to find the accompanying uncombined
form of the same work.
8. You may not copy, modify, sublicense, link with, or distribute the Library except as
expressly provided under this License. Any attempt otherwise to copy, modify, sublicense,
link with, or distribute the Library is void, and will automatically terminate your rights
under this License. However, parties who have received copies, or rights, from you under
this License will not have their licenses terminated so long as such parties remain in full
compliance.
9. You are not required to accept this License, since you have not signed it. However,
nothing else grants you permission to modify or distribute the Library or its derivative
works. These actions are prohibited by law if you do not accept this License. Therefore,
by modifying or distributing the Library (or any work based on the Library), you indicate
your acceptance of this License to do so, and all its terms and conditions for copying,
distributing or modifying the Library or works based on it.
10. Each time you redistribute the Library (or any work based on the Library), the recipient automatically receives a license from the original licensor to copy, distribute, link
with or modify the Library subject to these terms and conditions. You may not impose
any further restrictions on the recipients' exercise of the rights granted herein. You are
not responsible for enforcing compliance by third parties with this License.
11. If, as a consequence of a court judgment or allegation of patent infringement or for
any other reason (not limited to patent issues), conditions are imposed on you (whether
by court order, agreement or otherwise) that contradict the conditions of this License,
they do not excuse you from the conditions of this License. If you cannot distribute so
as to satisfy simultaneously your obligations under this License and any other pertinent
obligations, then as a consequence you may not distribute the Library at all. For example,
if a patent license would not permit royalty-free redistribution of the Library by all those
who receive copies directly or indirectly through you, then the only way you could satisfy
both it and this License would be to refrain entirely from distribution of the Library.
If any portion of this section is held invalid or unenforceable under any particular circumstance, the balance of the section is intended to apply, and the section as a whole is intended to apply in other circumstances.
It is not the purpose of this section to induce you to infringe any patents or other property
right claims or to contest validity of any such claims; this section has the sole purpose of
protecting the integrity of the free software distribution system which is implemented by
public license practices. Many people have made generous contributions to the wide range
432
Chapter 13 - Third party software
GNU LESSER GENERAL PUBLIC LICENSE
of software distributed through that system in reliance on consistent application of that
system; it is up to the author/donor to decide if he or she is willing to distribute software
through any other system and a licensee cannot impose that choice.
This section is intended to make thoroughly clear what is believed to be a consequence
of the rest of this License.
12. If the distribution and/or use of the Library is restricted in certain countries either
by patents or by copyrighted interfaces, the original copyright holder who places the Library under this License may add an explicit geographical distribution limitation excluding
those countries, so that distribution is permitted only in or among countries not thus
excluded. In such case, this License incorporates the limitation as if written in the body
of this License.
13. The Free Software Foundation may publish revised and/or new versions of the Lesser
General Public License from time to time. Such new versions will be similar in spirit to
the present version, but may differ in detail to address new problems or concerns.
Each version is given a distinguishing version number. If the Library specifies a version
number of this License which applies to it and "any later version", you have the option
of following the terms and conditions either of that version or of any later version published
by the Free Software Foundation. If the Library does not specify a license version number,
you may choose any version ever published by the Free Software Foundation.
14. If you wish to incorporate parts of the Library into other free programs whose distribution conditions are incompatible with these, write to the author to ask for permission.
For software which is copyrighted by the Free Software Foundation, write to the Free
Software Foundation; we sometimes make exceptions for this. Our decision will be
guided by the two goals of preserving the free status of all derivatives of our free software
and of promoting the sharing and reuse of software generally.
NO WARRANTY
15. BECAUSE THE LIBRARY IS LICENSED FREE OF CHARGE, THERE IS NO
WARRANTY FOR THE LIBRARY, TO THE EXTENT PERMITTED BY APPLICABLE LAW. EXCEPT WHEN OTHERWISE STATED IN WRITING THE COPYRIGHT HOLDERS AND/OR OTHER PARTIES PROVIDE THE LIBRARY "AS
IS" WITHOUT WARRANTY OF ANY KIND, EITHER EXPRESSED OR IMPLIED,
INCLUDING, BUT NOT LIMITED TO, THE IMPLIED WARRANTIES OF
MERCHANTABILITY AND FITNESS FOR A PARTICULAR PURPOSE. THE
ENTIRE RISK AS TO THE QUALITY AND PERFORMANCE OF THE LIBRARY
IS WITH YOU. SHOULD THE LIBRARY PROVE DEFECTIVE, YOU ASSUME
THE COST OF ALL NECESSARY SERVICING, REPAIR OR CORRECTION.
16. IN NO EVENT UNLESS REQUIRED BY APPLICABLE LAW OR AGREED
TO IN WRITING WILL ANY COPYRIGHT HOLDER, OR ANY OTHER PARTY
Chapter 13 - Third party software
433
GNU LESSER GENERAL PUBLIC LICENSE
WHO MAY MODIFY AND/OR REDISTRIBUTE THE LIBRARY AS PERMITTED
ABOVE, BE LIABLE TO YOU FOR DAMAGES, INCLUDING ANY GENERAL,
SPECIAL, INCIDENTAL OR CONSEQUENTIAL DAMAGES ARISING OUT OF
THE USE OR INABILITY TO USE THE LIBRARY (INCLUDING BUT NOT
LIMITED TO LOSS OF DATA OR DATA BEING RENDERED INACCURATE
OR LOSSES SUSTAINED BY YOU OR THIRD PARTIES OR A FAILURE OF THE
LIBRARY TO OPERATE WITH ANY OTHER SOFTWARE), EVEN IF SUCH
HOLDER OR OTHER PARTY HAS BEEN ADVISED OF THE POSSIBILITY OF
SUCH DAMAGES.
END OF TERMS AND CONDITIONS
How to Apply These Terms to Your New Libraries
If you develop a new library, and you want it to be of the greatest possible use to the
public, we recommend making it free software that everyone can redistribute and change.
You can do so by permitting redistribution under these terms (or, alternatively, under
the terms of the ordinary General Public License).
To apply these terms, attach the following notices to the library. It is safest to attach them
to the start of each source file to most effectively convey the exclusion of warranty; and
each file should have at least the "copyright" line and a pointer to where the full notice
is found.
one line to give the library's name and an idea of what it does.
Copyright (C) year name of author
This library is free software; you can redistribute it and/or modify it under the terms of
the GNU Lesser General Public License as published by the Free Software Foundation;
either version 2.1 of the License, or (at your option) any later version.
This library is distributed in the hope that it will be useful, but WITHOUT ANY
WARRANTY; without even the implied warranty of MERCHANTABILITY or FITNESS
FOR A PARTICULAR PURPOSE. See the GNU Lesser General Public License for
more details.
You should have received a copy of the GNU Lesser General Public License along with
this library; if not, write to the Free Software Foundation, Inc., 51 Franklin Street, Fifth
Floor, Boston, MA 02110-1301
Also add information on how to contact you by electronic and paper mail.
You should also get your employer (if you work as a programmer) or your school, if any,
to sign a "copyright disclaimer" for the library, if necessary. Here is a sample; alter the
names:
Yoyodyne, Inc., hereby disclaims all copyright interest in the library `Frob' (a library for
tweaking knobs) written by James Random Hacker.
434
Chapter 13 - Third party software
GNU LESSER GENERAL PUBLIC LICENSE
signature of Ty Coon, 1 April 1990
Ty Coon, President of Vice
That's all there is to it!
Chapter 13 - Third party software
435
Eclipse Public License - v 1.0
Eclipse Public License - v 1.0
THE ACCOMPANYING PROGRAM IS PROVIDED UNDER THE TERMS OF
THIS ECLIPSE PUBLIC LICENSE ("AGREEMENT"). ANY USE, REPRODUCTION
OR DISTRIBUTION OF THE PROGRAM CONSTITUTES RECIPIENT'S ACCEPTANCE OF THIS AGREEMENT.
1. DEFINITIONS
"Contribution" means:
a) in the case of the initial Contributor, the initial code and documentation distributed
under this Agreement, and
b) in the case of each subsequent Contributor:
i) changes to the Program, and
ii) additions to the Program;
where such changes and/or additions to the Program originate from and are distributed
by that particular Contributor. A Contribution 'originates' from a Contributor if it was
added to the Program by such Contributor itself or anyone acting on such Contributor's
behalf. Contributions do not include additions to the Program which: (i) are separate
modules of software distributed in conjunction with the Program under their own license
agreement, and (ii) are not derivative works of the Program.
"Contributor" means any person or entity that distributes the Program.
"Licensed Patents " mean patent claims licensable by a Contributor which are necessarily
infringed by the use or sale of its Contribution alone or when combined with the Program.
"Program" means the Contributions distributed in accordance with this Agreement.
"Recipient" means anyone who receives the Program under this Agreement, including
all Contributors.
2. GRANT OF RIGHTS
a) Subject to the terms of this Agreement, each Contributor hereby grants Recipient a
non-exclusive, worldwide, royalty-free copyright license to reproduce, prepare derivative
works of, publicly display, publicly perform, distribute and sublicense the Contribution
of such Contributor, if any, and such derivative works, in source code and object code
form.
b) Subject to the terms of this Agreement, each Contributor hereby grants Recipient a
non-exclusive, worldwide, royalty-free patent license under Licensed Patents to make,
use, sell, offer to sell, import and otherwise transfer the Contribution of such Contributor,
436
Chapter 13 - Third party software
Eclipse Public License - v 1.0
if any, in source code and object code form. This patent license shall apply to the combination of the Contribution and the Program if, at the time the Contribution is added by
the Contributor, such addition of the Contribution causes such combination to be covered
by the Licensed Patents. The patent license shall not apply to any other combinations
which include the Contribution. No hardware per se is licensed hereunder.
c) Recipient understands that although each Contributor grants the licenses to its Contributions set forth herein, no assurances are provided by any Contributor that the Program
does not infringe the patent or other intellectual property rights of any other entity. Each
Contributor disclaims any liability to Recipient for claims brought by any other entity
based on infringement of intellectual property rights or otherwise. As a condition to exercising the rights and licenses granted hereunder, each Recipient hereby assumes sole responsibility to secure any other intellectual property rights needed, if any. For example,
if a third party patent license is required to allow Recipient to distribute the Program, it
is Recipient's responsibility to acquire that license before distributing the Program.
d) Each Contributor represents that to its knowledge it has sufficient copyright rights in
its Contribution, if any, to grant the copyright license set forth in this Agreement.
3. REQUIREMENTS
A Contributor may choose to distribute the Program in object code form under its own
license agreement, provided that:
a) it complies with the terms and conditions of this Agreement; and
b) its license agreement:
i) effectively disclaims on behalf of all Contributors all warranties and conditions, express
and implied, including warranties or conditions of title and non-infringement, and implied
warranties or conditions of merchantability and fitness for a particular purpose;
ii) effectively excludes on behalf of all Contributors all liability for damages, including
direct, indirect, special, incidental and consequential damages, such as lost profits;
iii) states that any provisions which differ from this Agreement are offered by that Contributor alone and not by any other party; and
iv) states that source code for the Program is available from such Contributor, and informs
licensees how to obtain it in a reasonable manner on or through a medium customarily
used for software exchange.
When the Program is made available in source code form:
a) it must be made available under this Agreement; and
b) a copy of this Agreement must be included with each copy of the Program.
Contributors may not remove or alter any copyright notices contained within the Program.
Chapter 13 - Third party software
437
Eclipse Public License - v 1.0
Each Contributor must identify itself as the originator of its Contribution, if any, in a
manner that reasonably allows subsequent Recipients to identify the originator of the
Contribution.
4. COMMERCIAL DISTRIBUTION
Commercial distributors of software may accept certain responsibilities with respect to
end users, business partners and the like. While this license is intended to facilitate the
commercial use of the Program, the Contributor who includes the Program in a commercial product offering should do so in a manner which does not create potential liability
for other Contributors. Therefore, if a Contributor includes the Program in a commercial
product offering, such Contributor ("Commercial Contributor") hereby agrees to defend
and indemnify every other Contributor ("Indemnified Contributor") against any losses,
damages and costs (collectively "Losses") arising from claims, lawsuits and other legal
actions brought by a third party against the Indemnified Contributor to the extent caused
by the acts or omissions of such Commercial Contributor in connection with its distribution of the Program in a commercial product offering. The obligations in this section do
not apply to any claims or Losses relating to any actual or alleged intellectual property
infringement. In order to qualify, an Indemnified Contributor must: a) promptly notify
the Commercial Contributor in writing of such claim, and b) allow the Commercial
Contributor to control, and cooperate with the Commercial Contributor in, the defense
and any related settlement negotiations. The Indemnified Contributor may participate
in any such claim at its own expense.
For example, a Contributor might include the Program in a commercial product offering,
Product X. That Contributor is then a Commercial Contributor. If that Commercial
Contributor then makes performance claims, or offers warranties related to Product X,
those performance claims and warranties are such Commercial Contributor's responsibility alone. Under this section, the Commercial Contributor would have to defend claims
against the other Contributors related to those performance claims and warranties, and
if a court requires any other Contributor to pay any damages as a result, the Commercial
Contributor must pay those damages.
5. NO WARRANTY
EXCEPT AS EXPRESSLY SET FORTH IN THIS AGREEMENT, THE PROGRAM
IS PROVIDED ON AN "AS IS" BASIS, WITHOUT WARRANTIES OR CONDITIONS OF ANY KIND, EITHER EXPRESS OR IMPLIED INCLUDING, WITHOUT LIMITATION, ANY WARRANTIES OR CONDITIONS OF TITLE, NONINFRINGEMENT, MERCHANTABILITY OR FITNESS FOR A PARTICULAR
PURPOSE. Each Recipient is solely responsible for determining the appropriateness of
using and distributing the Program and assumes all risks associated with its exercise of
rights under this Agreement , including but not limited to the risks and costs of program
438
Chapter 13 - Third party software
Eclipse Public License - v 1.0
errors, compliance with applicable laws, damage to or loss of data, programs or equipment,
and unavailability or interruption of operations.
6. DISCLAIMER OF LIABILITY
EXCEPT AS EXPRESSLY SET FORTH IN THIS AGREEMENT, NEITHER RECIPIENT NOR ANY CONTRIBUTORS SHALL HAVE ANY LIABILITY FOR ANY
DIRECT, INDIRECT, INCIDENTAL, SPECIAL, EXEMPLARY, OR CONSEQUENTIAL DAMAGES (INCLUDING WITHOUT LIMITATION LOST PROFITS),
HOWEVER CAUSED AND ON ANY THEORY OF LIABILITY, WHETHER IN
CONTRACT, STRICT LIABILITY, OR TORT (INCLUDING NEGLIGENCE OR
OTHERWISE) ARISING IN ANY WAY OUT OF THE USE OR DISTRIBUTION
OF THE PROGRAM OR THE EXERCISE OF ANY RIGHTS GRANTED HEREUNDER, EVEN IF ADVISED OF THE POSSIBILITY OF SUCH DAMAGES.
7. GENERAL
If any provision of this Agreement is invalid or unenforceable under applicable law, it
shall not affect the validity or enforceability of the remainder of the terms of this Agreement, and without further action by the parties hereto, such provision shall be reformed
to the minimum extent necessary to make such provision valid and enforceable.
If Recipient institutes patent litigation against any entity (including a cross-claim or
counterclaim in a lawsuit) alleging that the Program itself (excluding combinations of
the Program with other software or hardware) infringes such Recipient's patent(s), then
such Recipient's rights granted under Section 2(b) shall terminate as of the date such litigation is filed.
All Recipient's rights under this Agreement shall terminate if it fails to comply with any
of the material terms or conditions of this Agreement and does not cure such failure in
a reasonable period of time after becoming aware of such noncompliance. If all Recipient's
rights under this Agreement terminate, Recipient agrees to cease use and distribution of
the Program as soon as reasonably practicable. However, Recipient's obligations under
this Agreement and any licenses granted by Recipient relating to the Program shall continue and survive.
Everyone is permitted to copy and distribute copies of this Agreement, but in order to
avoid inconsistency the Agreement is copyrighted and may only be modified in the following manner. The Agreement Steward reserves the right to publish new versions (including revisions) of this Agreement from time to time. No one other than the Agreement
Steward has the right to modify this Agreement. The Eclipse Foundation is the initial
Agreement Steward. The Eclipse Foundation may assign the responsibility to serve as the
Agreement Steward to a suitable separate entity. Each new version of the Agreement will
be given a distinguishing version number. The Program (including Contributions) may
Chapter 13 - Third party software
439
Eclipse Public License - v 1.0
always be distributed subject to the version of the Agreement under which it was received.
In addition, after a new version of the Agreement is published, Contributor may elect to
distribute the Program (including its Contributions) under the new version. Except as
expressly stated in Sections 2(a) and 2(b) above, Recipient receives no rights or licenses
to the intellectual property of any Contributor under this Agreement, whether expressly,
by implication, estoppel or otherwise. All rights in the Program not expressly granted
under this Agreement are reserved.
This Agreement is governed by the laws of the State of New York and the intellectual
property laws of the United States of America. No party to this Agreement will bring a
legal action under this Agreement more than one year after the cause of action arose. Each
party waives its rights to a jury trial in any resulting litigation.
440
Chapter 13 - Third party software
COMMON PUBLIC LICENSE Version 1.0
COMMON PUBLIC LICENSE Version 1.0
THE ACCOMPANYING PROGRAM IS PROVIDED UNDER THE TERMS OF
THIS COMMON PUBLIC LICENSE ("AGREEMENT"). ANY USE, REPRODUCTION OR DISTRIBUTION OF THE PROGRAM CONSTITUTES RECIPIENT'S
ACCEPTANCE OF THIS AGREEMENT.
1. DEFINITIONS
"Contribution" means:
a) in the case of the initial Contributor, the initial code and documentation distributed
under this Agreement, and
b) in the case of each subsequent Contributor:
i) changes to the Program, and
ii) additions to the Program;
where such changes and/or additions to the Program originate from and are distributed
by that particular Contributor. A Contribution 'originates' from a Contributor if it was
added to the Program by such Contributor itself or anyone acting on such Contributor's
behalf. Contributions do not include additions to the Program which: (i) are separate
modules of software distributed in conjunction with the Program under their own license
agreement, and (ii) are not derivative works of the Program.
"Contributor" means any person or entity that distributes the Program.
"Licensed Patents " mean patent claims licensable by a Contributor which are necessarily
infringed by the use or sale of its Contribution alone or when combined with the Program.
"Program" means the Contributions distributed in accordance with this Agreement.
"Recipient" means anyone who receives the Program under this Agreement, including
all Contributors.
2. GRANT OF RIGHTS
a) Subject to the terms of this Agreement, each Contributor hereby grants Recipient a
non-exclusive, worldwide, royalty-free copyright license to reproduce, prepare derivative
works of, publicly display, publicly perform, distribute and sublicense the Contribution
of such Contributor, if any, and such derivative works, in source code and object code
form.
Chapter 13 - Third party software
441
COMMON PUBLIC LICENSE Version 1.0
b) Subject to the terms of this Agreement, each Contributor hereby grants Recipient a
non-exclusive, worldwide, royalty-free patent license under Licensed Patents to make,
use, sell, offer to sell, import and otherwise transfer the Contribution of such Contributor,
if any, in source code and object code form. This patent license shall apply to the combination of the Contribution and the Program if, at the time the Contribution is added by
the Contributor, such addition of the Contribution causes such combination to be covered
by the Licensed Patents. The patent license shall not apply to any other combinations
which include the Contribution. No hardware per se is licensed hereunder.
c) Recipient understands that although each Contributor grants the licenses to its Contributions set forth herein, no assurances are provided by any Contributor that the Program
does not infringe the patent or other intellectual property rights of any other entity. Each
Contributor disclaims any liability to Recipient for claims brought by any other entity
based on infringement of intellectual property rights or otherwise. As a condition to exercising the rights and licenses granted hereunder, each Recipient hereby assumes sole responsibility to secure any other intellectual property rights needed, if any. For example,
if a third party patent license is required to allow Recipient to distribute the Program, it
is Recipient's responsibility to acquire that license before distributing the Program.
d) Each Contributor represents that to its knowledge it has sufficient copyright rights in
its Contribution, if any, to grant the copyright license set forth in this Agreement.
3. REQUIREMENTS
A Contributor may choose to distribute the Program in object code form under its own
license agreement, provided that:
a) it complies with the terms and conditions of this Agreement; and
b) its license agreement:
i) effectively disclaims on behalf of all Contributors all warranties and conditions, express
and implied, including warranties or conditions of title and non-infringement, and implied
warranties or conditions of merchantability and fitness for a particular purpose;
ii) effectively excludes on behalf of all Contributors all liability for damages, including
direct, indirect, special, incidental and consequential damages, such as lost profits;
iii) states that any provisions which differ from this Agreement are offered by that Contributor alone and not by any other party; and
iv) states that source code for the Program is available from such Contributor, and informs
licensees how to obtain it in a reasonable manner on or through a medium customarily
used for software exchange.
When the Program is made available in source code form:
442
Chapter 13 - Third party software
COMMON PUBLIC LICENSE Version 1.0
a) it must be made available under this Agreement; and
b) a copy of this Agreement must be included with each copy of the Program.
Contributors may not remove or alter any copyright notices contained within the Program.
Each Contributor must identify itself as the originator of its Contribution, if any, in a
manner that reasonably allows subsequent Recipients to identify the originator of the
Contribution.
4. COMMERCIAL DISTRIBUTION
Commercial distributors of software may accept certain responsibilities with respect to
end users, business partners and the like. While this license is intended to facilitate the
commercial use of the Program, the Contributor who includes the Program in a commercial product offering should do so in a manner which does not create potential liability
for other Contributors. Therefore, if a Contributor includes the Program in a commercial
product offering, such Contributor ("Commercial Contributor") hereby agrees to defend
and indemnify every other Contributor ("Indemnified Contributor") against any losses,
damages and costs (collectively "Losses") arising from claims, lawsuits and other legal
actions brought by a third party against the Indemnified Contributor to the extent caused
by the acts or omissions of such Commercial Contributor in connection with its distribution of the Program in a commercial product offering. The obligations in this section do
not apply to any claims or Losses relating to any actual or alleged intellectual property
infringement. In order to qualify, an Indemnified Contributor must: a) promptly notify
the Commercial Contributor in writing of such claim, and b) allow the Commercial
Contributor to control, and cooperate with the Commercial Contributor in, the defense
and any related settlement negotiations. The Indemnified Contributor may participate
in any such claim at its own expense.
For example, a Contributor might include the Program in a commercial product offering,
Product X. That Contributor is then a Commercial Contributor. If that Commercial
Contributor then makes performance claims, or offers warranties related to Product X,
those performance claims and warranties are such Commercial Contributor's responsibility alone. Under this section, the Commercial Contributor would have to defend claims
against the other Contributors related to those performance claims and warranties, and
if a court requires any other Contributor to pay any damages as a result, the Commercial
Contributor must pay those damages.
5. NO WARRANTY
EXCEPT AS EXPRESSLY SET FORTH IN THIS AGREEMENT, THE PROGRAM
IS PROVIDED ON AN "AS IS" BASIS, WITHOUT WARRANTIES OR CONDITIONS OF ANY KIND, EITHER EXPRESS OR IMPLIED INCLUDING, WITH-
Chapter 13 - Third party software
443
COMMON PUBLIC LICENSE Version 1.0
OUT LIMITATION, ANY WARRANTIES OR CONDITIONS OF TITLE, NONINFRINGEMENT, MERCHANTABILITY OR FITNESS FOR A PARTICULAR
PURPOSE. Each Recipient is solely responsible for determining the appropriateness of
using and distributing the Program and assumes all risks associated with its exercise of
rights under this Agreement, including but not limited to the risks and costs of program
errors, compliance with applicable laws, damage to or loss of data, programs or equipment,
and unavailability or interruption of operations.
6. DISCLAIMER OF LIABILITY
EXCEPT AS EXPRESSLY SET FORTH IN THIS AGREEMENT, NEITHER RECIPIENT NOR ANY CONTRIBUTORS SHALL HAVE ANY LIABILITY FOR ANY
DIRECT, INDIRECT, INCIDENTAL, SPECIAL, EXEMPLARY, OR CONSEQUENTIAL DAMAGES (INCLUDING WITHOUT LIMITATION LOST PROFITS),
HOWEVER CAUSED AND ON ANY THEORY OF LIABILITY, WHETHER IN
CONTRACT, STRICT LIABILITY, OR TORT (INCLUDING NEGLIGENCE OR
OTHERWISE) ARISING IN ANY WAY OUT OF THE USE OR DISTRIBUTION
OF THE PROGRAM OR THE EXERCISE OF ANY RIGHTS GRANTED HEREUNDER, EVEN IF ADVISED OF THE POSSIBILITY OF SUCH DAMAGES.
7. GENERAL
If any provision of this Agreement is invalid or unenforceable under applicable law, it
shall not affect the validity or enforceability of the remainder of the terms of this Agreement, and without further action by the parties hereto, such provision shall be reformed
to the minimum extent necessary to make such provision valid and enforceable.
If Recipient institutes patent litigation against a Contributor with respect to a patent applicable to software (including a cross-claim or counterclaim in a lawsuit), then any patent
licenses granted by that Contributor to such Recipient under this Agreement shall terminate as of the date such litigation is filed. In addition, if Recipient institutes patent litigation against any entity (including a cross-claim or counterclaim in a lawsuit) alleging that
the Program itself (excluding combinations of the Program with other software or hardware) infringes such Recipient's patent(s), then such Recipient's rights granted under
Section 2(b) shall terminate as of the date such litigation is filed.
All Recipient's rights under this Agreement shall terminate if it fails to comply with any
of the material terms or conditions of this Agreement and does not cure such failure in
a reasonable period of time after becoming aware of such noncompliance. If all Recipient's
rights under this Agreement terminate, Recipient agrees to cease use and distribution of
the Program as soon as reasonably practicable. However, Recipient's obligations under
this Agreement and any licenses granted by Recipient relating to the Program shall continue and survive.
444
Chapter 13 - Third party software
COMMON PUBLIC LICENSE Version 1.0
Everyone is permitted to copy and distribute copies of this Agreement, but in order to
avoid inconsistency the Agreement is copyrighted and may only be modified in the following manner. The Agreement Steward reserves the right to publish new versions (including revisions) of this Agreement from time to time. No one other than the Agreement
Steward has the right to modify this Agreement. IBM is the initial Agreement Steward.
IBM may assign the responsibility to serve as the Agreement Steward to a suitable separate
entity. Each new version of the Agreement will be given a distinguishing version number.
The Program (including Contributions) may always be distributed subject to the version
of the Agreement under which it was received. In addition, after a new version of the
Agreement is published, Contributor may elect to distribute the Program (including its
Contributions) under the new version. Except as expressly stated in Sections 2(a) and
2(b) above, Recipient receives no rights or licenses to the intellectual property of any
Contributor under this Agreement, whether expressly, by implication, estoppel or otherwise. All rights in the Program not expressly granted under this Agreement are reserved.
This Agreement is governed by the laws of the State of New York and the intellectual
property laws of the United States of America. No party to this Agreement will bring a
legal action under this Agreement more than one year after the cause of action arose. Each
party waives its rights to a jury trial in any resulting litigation.
Chapter 13 - Third party software
445
Index
Index
1- or 2-sided
Copy job ......................................................177
Original setting ............................................174
Print job .......................................................105
Scan job .......................................................218
1-Sided printing
1-Sided printing ...........................................159
2-Sided printing
2-Sided printing ...........................................159
A
Access other functions during copy job or scan job
Access other functions during copy job or scan job
......................................................................203
Add
Automated workflow ....................................333
Add temporary media to the Media catalog
Add temporary media to the Media catalog ...148
Add toner
Add toner .....................................................301
ADF
ADF ......................................................23, 194
Cleaning .......................................................348
ADF rollers
ADF rollers ..................................................354
Adjust image
Adjust image ................................................212
Copy job ......................................................187
Scan job .......................................................225
Adjust paper module
Adjust paper module ....................................252
Adjust paper tray
Adjust paper tray ..........................................243
Align
Copy job ......................................................182
Print job .......................................................108
Scan job .......................................................223
Align image / media
Align image / media .....................................149
Alignment
Alignment ....................................................163
Assign
Assign ...........................................................142
Auto color mismatch correction
446
Auto color mismatch correction ...................360
Automated settings
Copy job ......................................................172
Scan job .......................................................216
Automated workflow
Add ..............................................................333
Delete ...........................................................335
Edit ..............................................................334
Restore default ..............................................336
Automated workflows
Attributes .....................................................331
Explanation ..................................................331
Automatic Document Feeder
Automatic Document Feeder ..........................23
Automatic document feeder
Automatic document feeder .........................194
Available documentation
Available documentation ................................14
B
Background suppression
Original settings ...........................................176
Scan job .......................................................220
Basic copy
Basic copy ....................................................201
Billing counters
Billing counters ....................................357–358
Binding
Copy job ......................................................191
Print job .......................................................115
Binding edge
Binding edge ................................................160
Copy job ......................................................178
Print job .......................................................106
Black and white
Scan job .......................................................226
Booklet Finisher-A1
Booklet Finisher-A1 ........................................33
Booklet maker
Booklet maker ................................................33
Bulk paper module
Bulk paper module .........................................21
Load media ..................................................257
Bundle print jobs
Bundle print jobs ..........................................157
Bundled jobs
Change job settings ......................................157
Index
C
Calibration
1. Shading correction ...................................362
2. Auto gradation adjustment .......................364
3. Media family calibration ...........................366
Introduction .................................................361
Calibration curve
Calibration curve ..........................................368
cartridge
toner .............................................................235
Change
Alignment ....................................................163
Binding edge ................................................160
Check first set ...............................................152
Finishing method .........................................168
Image shift ...................................................164
Margin Shift .................................................164
Media ...........................................................161
Number of sets .............................................151
Offset stacking ..............................................166
Output location ............................................166
Print order ....................................................166
Rotation .......................................................166
Separator sheets ............................................154
Settings for covers .........................................162
Sheet order ...................................................166
Sheet orientation ..........................................166
Sort by page .................................................166
Sort by set ....................................................166
Warning time ...............................................324
Change paper size
Integrated paper tray ....................................243
Paper module ...............................................252
change paper size
multidrawer paper deck-A1 ..........................252
POD deck lite-A1 ........................................263
Check
Punch waste box ...........................................292
Staple Cartridges ..........................................306
Toner level ...................................................299
Waste toner container ..................................299
Check first set
Check first set ...............................................152
Clean roller
Clean roller ..................................................353
Clean the operator panel
Clean the operator panel .................................26
Cleaning
Cleaning .......................................................346
ADF .............................................................348
Cover plate ...................................................347
Drum ...........................................................355
Feeder ..........................................................348
Glass plate ....................................................347
Operator panel .............................................356
CMYK calibration curve
CMYK calibration curve ...............................368
Color
Scan job .......................................................226
Color pre-sets
Color pre-sets .................................................70
Concept ..........................................................60
Printer driver ..................................................77
PRISMAprepare (optional) .............................75
color toner cartridge
color toner cartridge .....................................235
Color/black and white
Copy job ......................................................188
Combine analog documents
Combine analog documents .........................229
Combine subsets
Create 1 document .......................................202
Create 1 file ..................................................229
Concept
Concept ..........................................................60
Connectivity
Default gateway ............................................328
DHCP .........................................................328
DNS suffix follows domain ..........................328
Host name ....................................................328
Link speed and connection type ...................328
MAC address ................................................328
Primary DNS suffix ......................................328
Subnet mask .................................................328
TCP/P ..........................................................328
Test TCP/IP connection ..............................328
Continue printing after printer stop
Continue printing after printer stop .............127
Contradiction handling
Contradiction handling ................................118
Controller
Concept ..........................................................60
Turn on ..........................................................96
Copy
Copy ............................................................201
Glass plate ....................................................197
Non-standard size originals ...........................209
Scan now, print later ....................................210
447
Index
Copy function
About ...........................................................170
Copy job
1- or 2-sided .................................................177
Adjust image ................................................187
Align ............................................................182
Automated settings .......................................172
Background suppression ...............................176
Binding ........................................................191
Binding edge ................................................178
Color/black and white ..................................188
Covers ..........................................................179
Destination ..................................................192
Folding .........................................................190
Job name ......................................................192
Job settings ...................................................172
Layout ..........................................................180
Margin erase .................................................187
Media ...........................................................179
Number of sets .............................................192
Original type ................................................175
Print delivery ................................................184
Punching ......................................................189
Rename ........................................................208
Separator sheets ............................................193
Shift .............................................................183
Size ...............................................................176
Staples ..........................................................191
Trimming ....................................................192
Zoom ...........................................................181
Copy jobs
Access other functions ..................................203
Combined copy job ......................................202
Minimize ......................................................203
Zoom ...........................................................204
Copy quality
Copy quality .................................................212
Copy tray
Copy tray .......................................................32
Copy Tray-P1
Copy Tray-P1 .................................................32
Corona wire
Corona wire .................................................352
Counters
Counters ..............................................357–358
Cover plate
Cleaning .......................................................347
Covers
Covers ..........................................................162
Copy job ......................................................179
448
Print job .......................................................107
Create a hotfolder
Create a hotfolder .........................................339
Creating a Custom Template
Creating a Custom Template .......................207
Custom templates
Create ...........................................................207
Delete ...........................................................207
Make default ................................................207
Rename ........................................................207
Save ..............................................................207
Use ...............................................................207
D
Dashboard
Dashboard ......................................................84
Date and time
Date and time ..............................................328
Day counters
Day counters ................................................357
Default gateway
Default gateway ............................................328
Define job settings in hotfolder
Define job settings in hotfolder ....................342
Delete
Automated workflow ....................................335
Delete a custom template
Delete a custom template .............................207
Delete jobs
All jobs .........................................................128
Jobs with available media ..............................128
Jobs with label ..............................................128
List of Printed jobs .......................................128
List of Scheduled jobs ...................................128
List of Waiting jobs ......................................128
New jobs ......................................................128
One by one ..................................................128
Printed jobs ..................................................128
Destination
Copy job ......................................................192
DHCP
DHCP .........................................................328
Disable
Warning time ...............................................325
DNS suffix follows domain
DNS suffix follows domain ..........................328
Document Insertion Unit-H1
Document Insertion Unit-H1 ........................49
Load media ..................................................272
Index
Double parallel fold
Double parallel fold ........................................52
Drum
Cleaning .......................................................355
Duplex Color Image Reader Unit-A1
Cleaning ..............................................347–348
General information .....................................337
Include in automated workflow ....................339
Job settings ...................................................337
Job ticket ......................................................337
I
E
Edit
Automated workflow ....................................334
Envelopes
Envelopes .....................................................278
Error diffusion
Error diffusion ..............................................366
F
Feeder
Feeder .............................................................23
Cleaning .......................................................348
File type
Scan job .......................................................221
Fine
Fine ..............................................................366
Finishing method
Finishing method .........................................168
Folding
Copy job ......................................................190
Print job .......................................................114
G
Glass plate
Glass plate .............................................23, 197
Cleaning .......................................................347
Grayscale
Scan job .......................................................226
H
Half-fold
Half-fold .........................................................52
Host name
Host name ....................................................328
Hotfolder
Activate ........................................................338
Create shared network drive .........................340
Define job settings ........................................342
Drag & drop ................................................337
Image reader
Cleaning .......................................................347
Image shift
Image shift ...................................................164
Inner Booklet Trimmer-A1
Inner Booklet Trimmer-A1 ............................33
Input profiles
Input profiles ..................................................72
Inserter
Inserter ...........................................................49
Load media ..................................................272
Insertion unit
Insertion unit ..................................................49
Integrated paper tray
Change paper size .........................................243
Load media ..................................................237
J
Job
Change alignment ........................................163
Change binding edge ....................................160
Change finishing method .............................168
Change number of sets .................................151
Change settings for covers ............................162
Change the media .........................................161
Check the first set .........................................152
Give priority .................................................120
Make a proof ................................................125
Print later .....................................................121
Print the job parameters ...............................124
Reprint .........................................................122
Separator sheets ............................................154
Shift the image .............................................164
Shift the margin ...........................................164
To top ..........................................................120
Job name
Copy job ......................................................192
Print job .......................................................116
Truncate .......................................................326
Job settings
Copy job ......................................................172
Hotfolder .....................................................337
449
Index
Print job .......................................................104
Job status
Job status ........................................................87
Job status icons
Job status icons ...............................................87
Job ticket
Job ticket ......................................................124
Jobs view
Overview ........................................................87
Jobs with available media
Jobs with available media ..............................131
Jobs with label
Jobs with label ..............................................131
JPEG
JPEG ............................................................214
K
Key operator settings
Key operator settings ....................................328
L
Label
Label ............................................................131
Layout
Copy job ......................................................180
Link speed and connection type
Link speed and connection type ...................328
Load the media
Bulk paper module .......................................257
Inserter .........................................................272
Integrated paper tray ....................................237
Paper module ...............................................245
Schedule view ...............................................137
Special feeder ................................................278
Trays view ....................................................142
Loading tab paper
Loading tab paper .........................................287
Logging
Printing the Configuration Report ...............328
Save the datadump file .................................328
Save the zipped log file .................................328
M
MAC address
MAC address ................................................328
Maintenance view
Maintenance view .........................................344
450
Make a custom template your default
Make a custom template your default ...........207
Make a proof
Make a proof ................................................125
Manual settings
Print job .......................................................104
Margin erase
Copy job ......................................................187
Scan job .......................................................224
Margin Shift
Margin Shift .................................................164
Media
Bulk paper module .......................................257
Copy job ......................................................179
Icons ............................................................140
Information ..................................................140
Inserter .........................................................272
Integrated paper tray ....................................237
Paper module ...............................................245
Print job .......................................................106
Schedule view ...............................................137
Special feeder ................................................278
Trays view ....................................................142
Media catalog
Media catalog ........................................66, 146
Concept ..........................................................60
Printer driver ..................................................77
PRISMAprepare (optional) .............................75
Media family
Media family ..................................................68
Media handling
Description ..................................................146
Media registration
Media registration ........................................149
Media size
Scan job .......................................................222
Meter readings
Meter readings ..............................................358
Minimize
Minimize ......................................................203
Monitor remotely
Monitor remotely ...........................................80
Multi-Drawer Paper Deck Lite-A1
Multi-Drawer Paper Deck Lite-A1 .................19
Multi-Drawer Paper Deck-A1
Adjust paper size ...........................................252
Change paper size .........................................252
Loading paper ......................................245, 257
Index
N
New
Scan to file ....................................................227
Non-standard size originals
Non-standard size originals ...........................209
Normal
Normal .........................................................366
Number of sets
Number of sets .............................................151
Copy job ......................................................192
Print job .......................................................116
O
Océ PRISMAprepare
Concept ..........................................................60
Offset stacking
Offset stacking ..............................................166
Changes in the Properties window ................155
Every N sets .................................................166
Types ...........................................................155
Operator attention light
Description .....................................................30
Operator panel
Brightness .....................................................327
Clean ..............................................................26
Cleaning .......................................................356
Contrast .......................................................327
Main components ...........................................26
Original setting
1- or 2-sided .................................................174
Original type
Original setting ............................................175
Scan job .......................................................219
Output
Punch ...........................................................211
Staple ...........................................................211
Output profile
Media tab .......................................................66
Output profiles
Output profiles ...............................................73
P
Page range
Print a part of a job ......................................116
Print all pages ...............................................116
Paper Deck Unit-A1
Paper Deck Unit-A1 .......................................21
Paper Deck-A1
Paper Deck-A1 ...............................................19
Paper Folding Unit-G1
Paper Folding Unit-G1 ...................................52
Paper jams
Paper jams ....................................................359
Paper module
Paper module .................................................19
Adjust for media size ....................................252
Load media ..................................................245
Paper stock
Paper stock ...................................................234
Paper storage
Paper storage ................................................234
Paper tray
Paper tray .......................................................19
Adjust for media size ....................................243
Change paper size .........................................243
Tab paper .....................................................289
Paper tray icons
Paper tray icons ............................................140
POD Deck Lite-A1
POD Deck Lite-A1 ........................................21
POD deck lite-A1
change paper size ..........................................263
Postponed copying
Postponed copying .......................................210
Power modes
Power modes ..................................................94
Power switch
Power switch ..................................................94
Primary DNS suffix
Primary DNS suffix ......................................328
Print
All jobs .........................................................131
Job parameters ..............................................124
Job settings ...................................................124
Jobs in list of Waiting jobs ...........................130
Jobs with available media ..............................131
Jobs with label ..............................................131
Print a job from USB drive
Print a job from USB drive ...........................132
Print a scheduled job later
Print a scheduled job later ............................121
Print delivery
Copy job ......................................................184
Print job .......................................................110
Print delivery settings
Offset stacking ..............................................166
451
Index
Output location ............................................166
Print order ....................................................166
Rotation .......................................................166
Sheet order ...................................................166
Sheet orientation ..........................................166
Sort by page .................................................166
Sort by set ....................................................166
Print immediately
Print immediately .........................................119
Print job
1- or 2-sided .................................................105
Align ............................................................108
Binding ........................................................115
Binding edge ................................................106
Covers ..........................................................107
Folding .........................................................114
Job name ......................................................116
Job settings ...................................................104
Manual settings ............................................104
Media ...........................................................106
Number of sets .............................................116
Page range ....................................................116
Print delivery ................................................110
Punching ......................................................113
Separator sheets ............................................117
Shift .............................................................109
Staples ..........................................................115
Trimming ....................................................116
Print jobs
Bundle several jobs .......................................157
Split bundled jobs ........................................157
Print speed
Print speed ...................................................370
Printer
Shut down ......................................................98
Sleep mode .....................................................98
Turn off ..........................................................98
Turn on ..........................................................97
Wake up .........................................................97
Printer driver
Concept ..........................................................60
Job preparation ...............................................77
Printing the Configuration Report
Printing the Configuration Report ...............328
Priority for a job
Priority for a job ...........................................120
PRISMAprepare
Job preparation ...............................................75
Production printing
Production printing ........................................80
452
Professional Puncher Integration Unit-B1
Professional Puncher Integration Unit-B1 ......47
Professional Puncher-C1
Professional Puncher-C1 .................................47
Punch the output
Punch the output .........................................211
Punch unit
Punch unit ......................................................33
Punch waste .................................................293
Punch waste
Check ...........................................................292
Puncher ........................................................293
Punch waste tray
Punch waste tray .............................................33
Puncher
Puncher ..........................................................47
Puncher Unit-BG1/BH1/BF1
Puncher Unit-BG1/BH1/BF1 ........................33
Punching
Copy job ......................................................189
Print job .......................................................113
Q
Quality
Manually ......................................................212
R
Remove trim waste
Remove trim waste .......................................296
Reprint a job
Reprint a job ................................................122
Reset day counters
Reset day counters ........................................357
Resolution
Scan job .......................................................222
Restore
Default workflow .........................................336
S
Saddle finisher
Saddle finisher ................................................33
Save a custom template
Save a custom template .................................207
Save the datadump file
Save the datadump file .................................328
Save the zipped log file
Save the zipped log file .................................328
Index
Scan function
About ...........................................................214
Scan job
1- or 2-sided .................................................218
Adjust image ................................................225
Align ............................................................223
Automated settings .......................................216
Background suppression ...............................220
Black and white ............................................226
Color ............................................................226
Combined job ..............................................229
File type .......................................................221
Grayscale ......................................................226
Margin erase .................................................224
Media size ....................................................222
Original type ................................................219
Resolution ....................................................222
Size ...............................................................220
Subset job .....................................................229
Types of settings ...........................................216
Zoom ...........................................................222
Scan jobs
Access other functions ..................................203
Minimize ......................................................203
Zoom ...........................................................204
Scan quality
Scan quality ..................................................212
Scan to file
Scan to file ....................................................227
Scan to USB
Scan to USB .................................................228
Schedule view
Introduction .................................................133
Jobs pane ......................................................134
Load media ..................................................137
Media toolbar ...............................................135
Output locations pane ..................................135
Overview ........................................................86
Required media pane ....................................134
Streaming jobs ..............................................133
Zoom control ...............................................136
Schedule waiting jobs
Schedule waiting jobs ...................................130
Select
Different media for job .................................161
Separator sheets
Separator sheets ............................................154
Copy job ......................................................193
Print job .......................................................117
Serial number
Serial number ...............................................328
Settings Editor
Access .............................................................64
Access through operator panel ......................328
Change settings. ...........................................328
Concept ..........................................................60
View settings ................................................328
Shading correction
Shading correction .......................................362
Shift
Copy job ......................................................183
Print job .......................................................109
Shut-down procedure
Shut-down procedure .....................................98
Size
Original setting ............................................176
Scan job .......................................................220
Sleep button
Sleep button ...................................................94
Sleep mode
Automatically .................................................99
Manually ........................................................99
Use the Sleep button .......................................99
Wake up .........................................................99
Software licenses
Software licenses ...........................................328
Special feeder
Load media ..................................................278
Specifications
Specifications ................................................370
Split print jobs
Split print jobs ..............................................157
Spot color
Spot color .......................................................74
Stacker/stapler
Stacker/stapler ................................................33
Trim waste ...................................................296
Staple Cartridge
Saddle stitch unit ..........................................312
Stapler unit ...................................................308
Staple Finisher-A1
Staple Finisher-A1 ..........................................33
Staple icons
Staple icons ..................................................306
Staple the output
Staple the output ..........................................211
Staple-G1
Staple-G1 .......................................................33
Stapler
Stapler ............................................................33
453
Index
Staples
Copy job ......................................................191
Print job .......................................................115
Stop behavior
Stop after a job .............................................126
Stop after a set ..............................................126
Stop the printer
After a job ....................................................126
After a page ..................................................126
After a set .....................................................126
Automatically ...............................................126
Manually ......................................................126
Subnet mask
Subnet mask .................................................328
Subsets
Add ..............................................................230
Create 1 document .......................................202
Create one file ..............................................229
Delete ...........................................................231
Edit ..............................................................231
Insert ............................................................231
Tab sheets ....................................................202
System administrator settings
System administrator settings .......................328
System of measurement
System of measurement ................................328
System settings
Date and time ..............................................328
System of measurement ................................328
Time zone ....................................................328
System view
Media section ...............................................144
Overview ........................................................90
Setup section ................................................318
T
Tab paper
loading .........................................................287
Paper tray .....................................................289
TCP/P
TCP/P ..........................................................328
Technology
Technology ..................................................370
Temporary media
Temporary media ................................146, 148
Test TCP/IP connection
Test TCP/IP connection ..............................328
Ticket
Ticket ...........................................................124
454
TIFF
TIFF ............................................................214
Time zone
Time zone ....................................................328
To top
To top ..........................................................120
Toner
Toner ...........................................................301
Toner cartridge
Toner cartridge .............................................301
toner cartridge
store toner ....................................................235
Toner counter
Toner counter ..............................................358
Toner icons
Toner icons ..................................................299
Toner indicator
Status bar .....................................................301
Toner icon ...................................................301
Transparencies
Transparencies ..............................................285
Trays view
Load media ..................................................142
Overview ...............................................89, 139
Tri-fold in
Tri-fold in ......................................................52
Tri-fold out
Tri-fold out ....................................................52
Trim waste
Remove ........................................................296
Trim waste tray
Trim waste tray ..............................................33
Trimming
Copy job ......................................................192
Print job .......................................................116
Truncate
Job name ......................................................326
Turn off
Printer ............................................................98
Turn on
Controller .......................................................96
Printer ............................................................97
U
Unassign
Unassign .......................................................142
Urgent job
Urgent job ....................................................119
USB drive
Index
Print job .......................................................132
Save a file to another location .......................132
Use a custom template
Use a custom template ..................................207
V
Version of printer software
Version of printer software ...........................328
View
Maintenance view .........................................344
W
Warning time
Change .........................................................324
Disable .........................................................325
Enable ..........................................................325
Waste toner container
Waste toner container ..................................299
Wire cleaning
Wire cleaning ...............................................352
Workflow profiles
Check and print ...........................................320
Function ......................................................320
Job by job .....................................................320
Manual planning ..........................................320
Standard .......................................................320
Unattended ..................................................320
Z
Z-fold
Z-fold .............................................................52
Zoom
Copy job ......................................................181
Scan job .......................................................222
Zoom behavior
Zoom behavior .............................................204
455
-
CANON INC.
30-2, Shimomaruko 3-chome, Ohta-ku, Tokyo 146-8501, Japan
CANON U.S.A., INC.
One Canon Plaza, Lake Success, NY 11042, U.S.A.
CANON CANADA INC.
6390 Dixie Road Mississauga, Ontario L5T 1P7, Canada
CANON EUROPA N.V.
Bovenkerkerweg 59-61 1185 XB Amstelveen, The Netherlands
(See http://www.canon-europe.com/ for details on your regional dealer)
CANON LATIN AMERICA, INC.
703 Waterford Way Suite 400 Miami, Florida 33126 U.S.A.
CANON AUSTRALIA PTY. LTD
1 Thomas Holt Drive, North Ryde, Sydney, N.S.W. 2113, Australia
CANON CHINA CO., LTD
15F Jinbao Building No.89 Jinbao Street, Dongcheng District, Beijing 100005, China
CANON SINGAPORE PTE. LTD.
1 HarbourFront Avenue #04-01 Keppel Bay Tower, Singapore 098632
CANON HONGKONG CO., LTD
19/F., The Metropolis Tower, 10 Metropolis Drive, Hunghom, Kowloon, Hong Kong
USRM2-0698-01
CANON INC. 2011