1
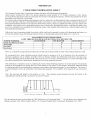
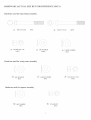
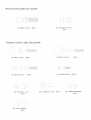
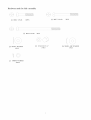
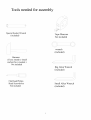
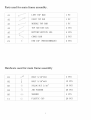
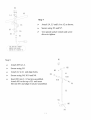
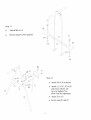
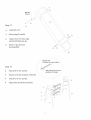
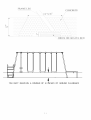
MSC-2769-SLD
OWNER'S
CAMERON
MANUAL
ASSEMBLY INSTRUCTION,CARE,
MAINTENANCE
& USER'S GUIDE
",,,",,,
CAUTION
This unit is designed
to 8, with
a maximum
not to exceed
to be used safely by up 6 children
weight
a combined
of 100 pounds(45.4kgs)
weight
between
the age of 2
each, simultaneously,
of 600 pounds(272.72kgs).
WARNING
Please read this instruction manual before you start with the assembly or use this swing set.
You must follow all safety instructions while using this equipment; be absolutely sure that the surface, on which
this swing set is set up on, is properly surfaced with fine sand, wood chips or double shredded bark mulch. Do
not use this swing set on hard pack soil, concrete or any kind of hard surface. Read all cautionary statement on
page 1 - page 4, before using this equipment. Save this instruction manual for future reference.
CUSTOMER
SERVICE:
DO NOT RETURN TO THE STORE,
PLEASE CALL
1-866-884-0535
Monday-Friday,
8:00AM-5:00PM
Eastern Time
www.Sportspowercustomerservice.com
Flat M, 3/Floor,
Kaiser
Sportspower
Ltd
Estate
Phase 3, 11 Hok Yuen
Hunghom,
Kowloon,
HongKong
Street,
USER'S
GUIDE
1
]READ
BEFORE
[CAUTION!
USING
THIS
I
EQUIPMENT
GENERAL INSTRUCTION
•
Read this manual
•
Observing
•
Recommending
•
This unit
weight
(272.72
and follow
the following
statements
on-site
is designed
all instructions
and warnings
adult supervision
to be used
of 100 pounds
(45.4
reduces
for children
safely
kgs)
using
and assembling
the likelihood
of all ages
by up to 6 children
each,
simultaneously,
this unit.
of serious
fatal
injury.
at all times.
between
the
not to exceed
age of 2 to 8, with
a combined
weight
a maximum
of 600 pounds
kgs).
_WARNIN_Lawn
swings
is designed
age of two can result in entrapment
facing position
or with legs between
opening
before
causing
_WARNIN_
entrapment
for use by children
between
the seat
of the child's
This unit must be assembled
We suggest
that you get someone
Children
over
two years
of age. Use
the seat and back areas. NEVER
and backrest
because
the child's
by children
place children
body may pass
under
the
in rearward
through the
head.
and disassembled
by a capable
adult
person.
to help.
must not use the equipment
until properly
assembled
and anchored.
Always locate the swing set on level groundY
_WA_'_IN_
Do not allow swing set near any obstruction
less than 6ft (1.8m) from any structures
branches, laundry line, electrical wires.
or sharp object ! Place gym set on level ground, not
or obstacles
such as fence,
garage,
shed house,
overhanging
If the seats of swing, glide or slide are wet, do not use this equipment.
If any bolts & nuts are missing, do not use this equipment!
_WARNIN_
•
A capable
adult should supervise
the use of this equipment
playing, such as jumping off swing, slide, or Glide ride.
Provide proper surface material cover for this equipment
manual for more information.
_WA_'_IN_
Children
at all times. Do not allow reckless
prior to using this equipment.
Do not allow more than one child to play on the swing, trapeze
See page 3 of this
bar or slide at any one time.
shall take turns using the slide.
If the child has any physical condition that may affect his/her ability to use this equipment,
shall consult a physician, before allowing the child to use this equipment.
,_WARNIN_
Do not allow child over the weight limit to use this equipment.
one
Adults should never ride on any
of the rides, swing, trapeze or slide.
_WARNIN_
Do not allow child to stand on the swing seats or glide ride.
_WA_'_IN_
Instruct
children
not to walk too close in front of, behind,
or between
moving
items. Instruct
children to keep a safe distance away to avoid being struck by items in play.
_WA_'_IN_
Instruct
children not to twist swing chains or ropes or loop them over the top support bar since
this mac reduce the strength of the chain or rope.
_WARNIN_
Instruct children to avoid swinging empty play items.
_
_WARNINq
Teach children to sit in the center of the swing play items, with their full weight in the seats.
Instruct children not to use the equipment in any manner other than intended.
_WARNIN_
Instruct
children
not to get off equipment
while it is in motion.
Do not allow children
to jump
from moving play items.
_WA_IN_
Parent to dress children
appropriately
while on and around this equipment
include the use of well fitting shoes and the avoidance of ponchos,
clothing t]1at is potentially hazardous while using equipment).
_[_
WA_ING Do not allow children to climb or play on equipment
scarves, jewelry
when it is wet.
Do not stand on the lawn swing when using this ride. One child per seat only!
_WA_ING
Check the openings
•
and sliding surfaces
of roller slides for foreign
that could be potentially hazardous to users.
Please verify that suspended climbing ropes, chain, or cable are secured
suspended climbing ropes, chain, or cable cannot be looped back on itself.
_WARNIN_
•
rollers
Instruct
children
not to attach
would
and other loose fitting
_WA_ING
between
(Examples
items to the playground
at both ends,
equipment
materials
and verify
that
that are not specifically
designed for use with the equipment such as but not limited to jump ropes, clothesline, pet leashes, cables
and chain as they may cause a strangulation hazard.
It is recommended
that the gym set be placed in concrete. Be certain that all anchoring devices ( including
concrete ) are placed below the level of the playing surface or below ground level to prevent tripping.
_WARNIN_
DO not allow children
to lean to the side when riding on other rides, structural
members
on
collide with other playmates.
Do not install home playground equipment over concrete, asphalt, packed earth, grass, carpet, or
any other hard surface.
A fall onto a hard surface can result in serious injury to the equipment user.
_WA_ING
Do anchor all gyms.
_WA_ING
If the swing
concrete
footing (Concrete
set is set up on grounds
with sandy soil condition,
it must be anchored
with
not included).
OPERATING
INSTRUCTIONS
(WARNING THE BUYER)
Observing the following statements and warnings reduces the likelihood of serious or fatal injury.
This unit is designed to be used safely by up to 6 children between the age of 2 to 8, with a maximum
weight of 100 pounds (45.4 kgs) each, simultaneously,
not to exceed a combined weight of 600 pounds
(272.7 kgs).
On-site adult supervision for children of all ages is recommended..
Instruct
children
not to walk close
to, in front of, behind,
or between
moving
items.
Instruct children not to twist swing chains or ropes or loop them over the top support bar since
this may reduce the strength of the chain or rope.
_
WARNING]
_WA_IN_
Instruct children to avoid swinging empty seats.
Teach children to sit in the center of the swings with their full weight on the seats,
Instruct children not to use the equipment
in a manner other than intended,
Instruct children not to get off equipment
while it is in motion.
Adult should dress children
appropriately
(examples
and the avoidance of ponchos, scarfs, and other loose-fitting
potentially hazardous while using equipment).
_WA_IN_
suspended
Instruct children not to climb when the equipment
would include the use of well-fitting
shoes and other loose-fitting
clothing
shoes
that is
is wet.
Please verify that suspended climbing ropes, chain, or cable are secured
climbing ropes, chain, or cable cannot be looped back on itself.
at both ends, and that
'_kWARNIN_
Instruct
designed
cables
Lawn
for use
and chain
swings,
children
with
the
not
to attach
equipment,
as they my cause
if applicable,
items
such
to the
as, but
a strangulation
are designed
playground
not
limited
equipment
to, jump
that
ropes,
are
not
clothesline,
specifically
pet
leashes,
hazard.
for use by children
two years
of age and older.
The use by children
under the age of two can result in entrapment
between the seat and back rest because
the child's body may pass
through
the opening,
causing
entrapment
of the child's
head. Such entrapment
may result in strangulation.
NEVER
_k
place
children
in a rearward
WARNING Instruct
_WARNING
children
Check
sunlight
slide
facing
position
not to go down
bed
for extreme
or with legs between
slide head
heat
the seat and backrest.
first.
before
letting
children
use
slide
( When
exposed
to direct
)
A
/
AWARNIN_
Do not allow
children
to climb
on swing
from structural
members
•
These are structural
components
only and NOT play features.
If there is any cracked or damaged
parts, do not use this equipment;
•
replacement
part.
Please save this instruction
manual
•
Plastic
be replaced
components
TIGHTENING
should
NUTS
for future
every
and review
call the
top bar and chin bar).
1-866-884-0535
number
for
each season.
three years.
& BOLTS
•
At the start of assembling,
ease of installation.
do not tighten
•
After
are assembled,
all major
reference
(Legs,
components
bolt/nut
go back
all the way, so to allow
over
all bolts
some
possible
and nuts and properly
adjustment,
tighten
for
all of them
before using this product.
CARE & MAINTENACE
INSTRUCTION
•
Check
all nuts and bolts
•
is particularly
important
Oil all metallic moving
twice
monthly
during
the usage
season
for tightness
that this procedure
be followed at the beginning
parts monthly during the usage period.
Sand rusted areas on metal
Title 16 CFR Part 1303.
•
Check
•
Replacement
should be made in accordance
with manufacturer's
instructions.
Check all coverings
for bolts and sharp edges twice monthly during usage season
in place.
season.
•
Remove
degrees
Disposal
seats,
Replace
plastic
ropes,
when
swing
F (0 degrees
cables
necessary.
seats
slide
and repaint
and chains
using
monthly
It is especially
and
take
indoors
a nonlead-based
during
important
usage
paint
season
as required.
meeting
the requirements
for evidence
to be certain
temperature
of
of deterioration.
to do this at the beginning
or do not use when
It
of each season.
•
swing
tubing
and tighten
they are
of each
drops
below
new
32
C).
Instructions
+
+
+
+
+
+
"_
Please use with care to disassemble the unit, when it is no longer in operational condition. Wear
heavy duty working gloves!
Consumer may wish to recycle the steel tubing, please take the frame to your local recycling
center.
Be sure to completely disassemble the whole swing and slide sets, before disposal.
Do not leave partially disassembled equipment in area where accessible by children.
All plastic parts could be recycled, take it to your local recycling center.
All rusted parts, bolts shall be properly disposed of in trash bin. Do not reuse.
Do not let children play with any disassembled parts destined for disposal, such as chain, slide,
tubings, bolts, nuts, screws!
IMPORTANT
CONSUMER
INFORMATION
SHEET
The Consumer Product Safety Commission estimates that about 100,000 playground equipmentrelated iniuries resulting from falls to the ground equipment treated annually in U.S. hospital emergency rooms. Iniuries
involving this hazard pattern tend to be among the most serious of all playground iniuries, And have the potential to be fatal,
particularly when the iniury is to the head.
The surface under and around playground equipment can be a major factor in determining the iniury-causing potential of a fall.
It is self evident that a fall onto a shock absorbing surface is less likely to cause a serious iniury than a fall onto a hard surface.
Playground equipment should never be placed on hard surfaces such as concrete or asphalt and while grass may appear to be
acceptable it may quickly turn to hard packed earth in areas of high traffic. Shredded bark mulch, wood chips fine sand or fine
gravel are considered to be acceptable shock absorbing surface when installed and maintained at a sufficient depth under and
around playground equipment.
Table below lists the maximum height from which a child would not be expected to sustain a life-threatening head iniury in a
fall onto four different loose-fill surfacing materials if they are installed and maintained at depths of 6, 9, and 12 in.
FALL HEIGHT IN FEET FROM WHICH
A LIFE THREATENING
HEAD INJURY WOULD NOT BE EXPECTED
TYPE OF MATERIAL
6INCH DEPTH
9INCH DEPTH
Double shredded bark mulch
6
10
Wood Chips
Fine Sand
Fine Gravel
6
5
6
However, it should be recognized
We recommend that
stationary equipment
The shock absorbing
pivot point measured
12INCH DEPTH
11
7
5
7
12
9
10
that all iniuries due to falls can not be prevented no matter what surfacing material is used.
a shock absorbing material should extend a minimum of 6ft in all directions from the perimeter of
such as climbers and slides. However, Because children may deliberately jump from a moving swing.
material should extend in the front and rear of a swing a minimum distance of 2 times the height of the
from a point directly beneath the pivot on the supporting structure.
This information is intended to assist in comparing the relative shock-absorbing properties of various materials. No particular
material is recommended over another. However, Each material is only effective when properly maintained. Materials should
be checked periodically and replenished to maintain correct depth as determined necessary for your equipment. The choice of
a material depends on the type and height of the playground equipment. The availability of the material in your area and its
cost.
Note: The maximum fall height for this product is 6 feet. The minimum
suspended plays and the playing or ground service must be 8 inches.
YOU
MUST
MAINTAIN
A
MINIMUM
OF
8
INCHES
OF
GROUND
ground clearance
between
the bottom of the
CLEARANCE
This information has been extracted from the CPSC publication on" Playground Safety".
You can obtain more information
sending a postcard to the: Office of public Affairs, U.S. Consumer Product Safety Commission, Washington, D.C. 20207.
by
HARDWARE
Hardware
(ACTUAL
SIZE BUT FOR REFERENCE
ONLY
)
used for main frame assembly
,:LB
1)
BOLT
• :<........................
i
f
5/16"x63
4PCS
_),
BOLT
5/16"x63
12PCS
/7
//
\
\
/
)
/
\5
LBy NYLON NUT 5/16"
16PCS
Hardware
_
ARC WASHER
28PCS
,_
LARGE WASHER
4PCS
used for swing seats assembly
\
\
/
/
'/J2"_' ARC WASHER
'\
//
4PCS
/F-_\
i
2_ LARGE
J6/
WASHER
4PCS
k.
ii
.........//
i_S5) ARC WASHER
2PCS
NYLONNUT
8PCS
Hardware used for trapeze assembly
",2;; \ "-
/
'\ ...........................
/
NYLON
NUT
2PCS
5/16"
Bracket used for glide ride assembly
\
/
/
_N_ BOLT
5/16"x25
2PCS
@,
NYLON NUT 5/16"
2PCS
Hardware used for glide ride assembly
_}
BOLT
/'i i\
1/4"x34
,<__ BOLT
4PCS
1/4"x48
2PCS
Y,
'.\..
_ ../
,
_',_, BOLT
1/4"x34
,@
4PCS
SCREW
O5.5x16
4PCS
/
f
f--\
_
_i_'
NYLONNUT 1/4"
10PCS
ARC WASHER
4PCS
_
CAP BOLT
1/4"x14
2PCS
(N10) SPRING WASHER
\\
/'
10PCS
Hardware
used for slide
assembly
f
'\
(Z_ BOLT 1/4"x34
_gl BOLT 1/4"x59
14PC S
_X BOLT 1/4"x96
j
2PCS
2PCS
/
\
\./
/
,_
@
SMALL WASHER
6PCS
SPRING WASHER
12PCS
_5_' NYLON NUT 1/4"
14PCS
, __ SMALL ARC WASHER
4PCS
Tools needed for assembly
Special Socket Wrench
(included)
Tape Measure
Not included
wrench
(included)
Hammer
(If you intend to install
anchor, this is needed.)
Not included
j .........................................................................................................................................................
J-'
/
/J/'
,,//
_ "_/I
Big Allen Wrench
(included)
Flat Head Philips
Head Screwdriver
Not included
Small Allen Wrench
(included)
j
Parts used for main frame assembly.
A1
A2
A3
_::::_:_:_:'_
_
....-s_::::_"
LEFT TOP BAR
1 PC
RIGHTTOP BAR
1 PC
MIDDLE TOP BAR
1 PC
A4
_
TOP SECTION LEG
4 PCS
A5
_
BOTTOMSECTION LEG
4 PCS
A6
%_
CROSS BAR
2 PCS
END CAP (PREASSEMBLED)
2 PCS
C2
5_
Hardware used for main frame assembly
B1
BOLT 5/16".63
4 PCS
B2
BOLT 5/16%63
12 PCS
B3
NYLONNUT 5/16 _
16 PCS
B4
ARC WASHER
28 PCS
B5
WASHER
4 PCS
C1
PLASTIC CAP
20 PCS
Parts used for swing seats assembly
Jl
PVCCOVERED
CHAIN(PREASSEMBLED)
4 PCS
EYE BOLT WITH ATTACHMENT
BOLT (PREASSEMBLED)
4 PCS
EYE BOLT (PREASSEMBLED)
4 PCS
K1
SWINGSEAT
2 PCS
K2
RUBBERCOVER (PREASSEMBLED)
4 PCS
J3
J4
___
,,9
N
Hardware used for swing seats assembly
J2
ARC WASHER
4 PCS
J5
LARGE WASHER
4 PCS
J6
NYLONNUT 5/16"
8 PCS
K3
PLASTIC CAP
8 PCS
Parts used for trapeze assembly
P1
TRAPEZE TUBE
1 PC
$1
EYE BOLT WITH ATTACHMENTBOLT
2 PCS
T3
RUBBER CAP (PREASSEMBLED)
2 PCS
Hardware used for trapeze assembly
$5
ARC WASHER5/16"
2 PCS
$6
NYLONNUT 5/16"
2 PCS
T4
PLASTIC CAP
2 PCS
1 0
Parts used for glide ride assembly
L1
TOP SECTION HANGER
2 PCS
L2
.....................................
BOTTOMSECTION HANGER
2 PCS
L3
.......................................
_
GLIDE SEAT SUPPORT
2 PCS
M1
TUBE CAP (PREASSEMBLED)
2 PCS
M2
SMALL NYLONBEARING (PREASSEMBLED)
4
M3
e_
M4
'°_
_, y '
M5
PUS
LARGE
NYLON
BEARING
(PREASSEMBLED) 4 PCS
GLIDE SEAT
2 PCS
FOOTREST
2 PCS
Brackets used for glide ride assembly
L4
L6
_
BRACKET CLAMP
1 PC
REINFORCING
2 PCS
STEEL SPACER
N3
BOI,T 5/16".25
2 PCS
N7
NYLON NUT 5/16"
2 PCS
1 1
Hardware used for glide ride assembly
N1
_
BOLT 1/4"'34
4 PCS
N2
_:_
BOLT 1/4"'48
2 PCS
N4
i
BOLT
1/4_,34
4 PCS
N5
ii
SCREWs5.5.16
4 PCS
N6
J-BOLT
2 PCS
N8
NYLONNUT 1/4"
10 PCS
N9
CAP BOLT 1/4".14
2 PCS
NIO
SMALLWASHER
10 PCS
,?
1 2
Parts used for slide assembly
Xl
SLIDE SUPPORT(W/ATTACH-MENTHOLE TO I,EG)
1 PC
X2
SLIDE SUPPORT
1 PC
X3
SLIDE LEG TUBE
2 PCS
X4
SLIDE TOP SUPPORT BAR
1 PC
X5
SLIDE FRONT SUPPORT
1 PC
X6
SLIDE LADDER STEPS
3 PCS
Y2
SLIDE
1 PC
Y3
CAP FOR X4(PREASSEMBLED)
2 PCS
Hardware used for slide assembly
1 3
ASSEMBLY
INSTRUCTION
Place the playground equipment on level ground, not less than 6 ft
(1.8 m) from any structure or obstruction such as a fence, garage,
house, overhanging branches, laundry lines, or electrical wires.
Do not install the playground equipment over concrete, asphalt,
packed earth, or any other hard surface. A fall onto a hard surface
can result in serious injury to the user.
TIGHTENING
NUTS
& BOLTS
Do not over-tighten the nuts and bolts when you are assembling
your playground equipment. This will allow for some possible
adjustments and ease of installation.
Once you have finsihed the assembly of the playground assembly,
go back over all of the nuts and bolts and properly tighten all of
them before using the playground equipment.
Main frame layout
A2
A5 J/
//
A1
///
/
\ ',,
A5 ',\,
'
',,
A4
\ \,
\ ,,
\\
', \
1 4
Step 1
Insert A1 into A3, secure with B1, B3, B4 and C1.
Insert A3 into the other end of A2, secure with B1, B3, B4 and C1
Note: Please make sure that concave holes face down and round holes face up.
Concave hole
faces down
Round hole
faces up
Cl
A2
B4
B1
A1
B1
Cl
A1
Step 2
Insert small end of A4 into the
socket at the end of A1.
B2 B4
C1 2 B4 B2
-L
Align the holes and secure
using B2, B4, B3 and C 1.
/
/
//
J //
A4
/
/
B3
B4
Insert small end of A4 into the
socket at the end of A2.
B3
Bd
//
Align the holes and secure
using B2, B4, B3 and C1.
/
A4
1 5
Step 3
Insert A5 into A4 and align the holes.
Attach A6 to the left outer side of A5.
>
Secure all three pieces using B2, B4, B5,B3 and C 1.
Repeat above the right side.
B2
B5
B4
B4
B2
A6
B4
Cl
///
B3
A5
\,
\
AS
\\
_\,, \\,
\
\\
\,
\
\,
',,
\
A1
K3
J6
Step 4
J2
J3
K2
Insert J3 which is pre-assembled
J1, K2 and J4 into holes on A1.
with
Secure it with J2, J6 and K3.
Repeat for remaining two chains on A1.
J1
J4
1 6
Step 5
>
AttachK1
to J4.
Secure with J5,J6 and K3.
Repeat for remaining One swing seat.
j1
J4
j1
j4
[
/
i
/
/
J5
J6
J5
K3
J6
K3
Step 6
;_
Attach
P1 to S1.
Attach
S 1 to A3.
Secure
using
$5,
T4
$6
and
$6
T4.
T4
$5
$6
$5
A3
S1
$1
ii
ii
ii
ii
ii
ii
ii
1 7
P1
N3
Step
7
Attach L4, L5 and L6 to A2 as shown.
Secure using N3 and N7.
L6
L6
,
Use special socket wrench and screw
driver to tighten.
//
USE SPECIALSOCKET
WRENCH
ANDSCREW
DRIVERTO TIGHTENNT.
M1
Step 8
Attach M5 to L2.
M2
Secure using N5.
Attach L2 to L 1 and align holes.
L1
Secure using N4, N10 and N8.
N10
Insert M 1 into L 1 if not pre-assembled.
Attach M 1 to the top of L 1 and insert
M2 into M1 and align if not pre-assembled.
N10
N4
L2
N5
M5
N5
1 8
N8
NIO
L5
N2
Step 9
L1
Attach L1 to L5.
_i
N2
Secure using N2, N10 and N8.
L1
[d
[ i
ii
ii
ii
ii
ii
ii
ii
ii
ii
ii
ii
ii
k_
[ i
ii
ii
ii
ii
./
./
Step 10
Insert M3 into L2 if not pre-assembled.
Attach L3 to outer sidesof L2.
L1
SecureusingN6 and N9. Seediagram
for sequence.
ii
ii
ii
L2
iq
N9
L2
N6
L3
M3
M3
M3
L3
M3
N6
ii
ii
ii
ii
1 9
N1
Step 11
Attach M4 to L3.
r
Secure using N1,N10 and N8.
N1
L3
N10
M4
J
N8
7_1
Z7
Z5
/
/
Zl
/
//¸
//
//
i/
// //
//A6
Step 12
X8
/
Attach X8 to A6 as shown.
/'
Xl
Zl
_- Attach Z1, X7,Y1,Z7 to X8
and secure with Z5. Do
not over-tighten Z5 to
allow room for adjustment.
Zl
' //
A5 ///,....
Attach X1 to X7.
A5
Secure using Z1 and Z5.
2O
Y3
Bolthole
facesup
Y2
X4
Step 13
Y3
Attach X5 to Y2.
Secureusing Z1 and Z4.
Z4
Zl
Attach X4 to Y2. Note: make
sure the bolt holes face up.
Insert Y3 into X4 if not
pre-assembled.
Z1
Z4
',, • J
j-J
_
J ...............
-......
_J Narrow side
Direction as shown
-
X5
\
"-.
below) _
\
\
\\,
Step 14
Attach X6 to X 1 and X2.
Wide side faces the front
',
direction of the slide
/
/
/
\\\\\
_-
Secure each side using Z 1,Z7and Z5.
_-
Attach X3 to X 1 and X2.
X2
Align holes and hold in position.
Xl
Zl
X3
Z5
Z1
Z7
Zl
X3
2 1
Z7
X2
Z2
\Z6
X4
Step 15
Z2
Z6
Z6
Attach
slide
assembly
from
Step 13 to X1 and X2.
Z5
Y2
Secure using Z2, Z6, Z7,
and Z5 as shown.
Xl
Insert Z3 into Z6 and inset
into Xl, X2 and X3 as shown.
X3
Secure with Z4 and Z5.
You have finished assembling
your playground
equipment.
Now go back and securely tighten all nuts and bolts before
equipment.
NOTE: Do not let children
anchored.
use the playground
equipment
22
using the playground
until it is properly
assembled
and
OPTIONAL
ANCHORS
(NOTE: ANCHORS ARE NOT INCLUDED,
SOLD SEPARATELY)
By anchoring your set with Ground Anchors, you will be able to move your gym
set at a future date. Either method is suitable for hard soil (clay, etc.). If your soil
is soft (sand, etc.), the corkscrew method is recommended. If you wish to
permanently secure your gym set, either type of anchor may set in concrete.
Ensure equipment is firmly anchored (cementing is usually recommended). When
equipment is cemented, do not bury the legs more than three inches below the
ground surface. This will ensure sufficient space remains under the swinging
plays. Be certain that all anchoring devices (including concrete) are placed below
the level of the playing surface or below ground level to prevent tripping.
Corkscrew
Anchors
is not included
Be sure the swing set is located on level ground
Turn the corkscrew anchor into the ground until only the hooked end is above the ground next
to the leg.
Insert the hooked end into the bottom opening of the leg.
Ensure that the hooked end is secure in the leg opening.
4
%
4
NOTE:
ANCHORING, ANCHOR SOLD SEPRATELY
Anchoring in concrete should be done for this swing set if it is not possible, you may purchase anchors at t-866-884-0535.
If the swing set is set up on grounds with sandy soil condition, it must be anchored with concrete looting( concrete not included)
Be sure the swing set is located in level ground
Dig holes around swing leg tube as shown below in drawing. As you dig down and create a cylindrical hole, you should use
shovel to carve out the lower part of the hole, to create a larger diameter hole bottom
Place 2 inches brick or gravel bed as shown in drawing below
Use about 45tb of concrete per leg
Cover concrete with dirt and protective surface material
Allow about 6-7 days for concrete to dry properly
23
FRAME
LEG
"xx
xx"
•
/ /,
x
4b
I
//
db
I 4
4b
.
YOU
MUST
MAINTAIN
A MINIMUM
OF
8
24
INCHES
OF
GROUND
CLEARANCE
MANUFACTURER'S
SPORTSPOWER
LTD. warrants
LIMITED
its GYM products
WARRANTY
for (180) days against defects in material, workmanship
and
rust painted parts which compromises the structural integrity of the product when used for the purpose intended,
normal conditions, and provided it receives proper care and maintenance.
Surface rust is not covered under
warranty.
This
warranty
coverage
non-transferable.
SPORTSPOWER's
proof of purchase
extends
only
to
the
original
All products for which a warranty
claim
authorized
service center, freight prepaid,
during the warranty
This limited Warranty
purchaser
with
a
receipt
and
is made must be received by
and accompanied
by sufficient
period.
does not cover our products
which: fail due to (1) normal wear; (2) abuse
and neglect; (3) improper maintenance;
(4) unauthorized
repairs or alterations;
or (5) are used
for commercial or other income producing purposes; or (6) accidents and misuse.
All warranty
are made.
IMPORTANT:
repairs
must be authorized
A missing
by SPORTSPOWER
part is not considered
Customer
Service
the same thing as a defective
before
repairs
part or unit.
If a
part is missing, there is no need to return the entire unit to the store.
In order to obtain
replacement
parts or service as provided by this warranty, please call the number below.
fast
CUSTOMER SERVICE:
DO NOT RETURN TO THE STORE,
PLEASE CALL
1-866-884-0535
Monday-Friday,
8:00AM-5:00PM
Eastern Time
www.Sportspowercustomerservice.com
Flat M, 3/Floor,
Kaiser
Sportspower
Ltd
Estate Phase 3, 11 Hok Yuen
Hunghom,
Kowloon,
25
HongKong
Street,


![[U4.22.01] Opérateur DEFI_GROUP](http://vs1.manualzilla.com/store/data/006366935_1-0cdb95057fecea60665937e72d2d7b9e-150x150.png)

![[U4.22.01] Opérateur DEFI_GROUP](http://vs1.manualzilla.com/store/data/006355074_1-4d718b3e611764055ebba019faad5ff6-150x150.png)