1
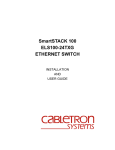
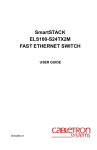
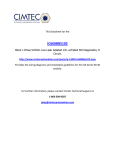
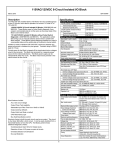
SMARTSTACK FAST ETHERNET SWITCH STACKING MODULE Cabletron’s ELS100-STACK Stacking Module can be used to stack up to four ELS100-S24TX2M switch units. Running at a bandwidth of over 4 Gbps, these modules provide a common interface to the attached switches, allowing the stack to function and be managed as a single device. System and Port Status LEDs LEDs are provided on the front panel of the switch. These LEDs can be used to verify if the stack is functioning properly. The following table details the indicator functions provided by the ELS100-S24TX2M: Port and System Status LEDs LED Condition Status Power On Switch is receiving power. RDP On Redundant power is on, and in backup or active mode. Off Redundant power is off or has failed. On Agent is operational. On Port has established a valid network connection Yellow Valid 10 Mbps connection. Green Valid 100 Mbps connection. Flashing Port has been partitioned due to an abnormal network condition, or manually disabled. Activity1 On Traffic is passing through the port. FDX1 On Port has been set to full duplex. On Flow control enabled. Mgmt RJ-45 Ports Link 1 FC Module Ports Status On A module is installed in this slot. Activity Flashing Traffic is passing through the port Handling the Module CAUTION: The ELS100-STACK Stacking Module can easily be damaged by electrostatic discharge. To prevent electrostatic damage, observe the following guidelines: • 5. Insert the new module into the switch: Holding the new module with the text on the front panel upright, carefully slide the module into the switch slot and press gently until it snaps into place. Be sure the new module’s front panel is flush with the switch panel. Do not remove the module from its packaging until you are ready to install it. • Do not touch any of the module’s pins, connectors or components. • Hold the module only by its edges or front panel. • Wear an anti-static wristband connected to a suitable earth ground whenever handling the module. • Store or transport this module only in appropriate anti-static packaging. 1. Power off the switch: Disconnect the AC power cord from the switch. If a redundant power unit (RPU) is present, disconnect its DC cable connection to the switch. 2. Remove network cables: If you are replacing a module, remove the cable attached to the port on the module. 3. Loosen the screws on the installed module or slot faceplate: Using your fingers or a flathead screwdriver, turn the screws securing the module (or faceplate) in the lower-left slot in a counterclockwise direction until they are free of the chassis. Be sure not to completely remove the screws from the module or faceplate. • Check the connectors on both ends of the stack cable to be sure they are properly engaged. Tighten the thumb screws on the cable connectors to ensure a good connection. 6. Secure the new module: Secure the new module in place by screwing the attached screws clockwise into the switch’s chassis. Tighten them enough to secure the module, but not so tight as to prevent them from being unscrewed by hand. 7. Connect the stack cables: Attach one end of the stacking cable to the stack connector labeled “DOWN” on the top device, and the other end to the connector labeled “UP” on the next lower device. Repeat this step until all the devices have been connected. 4. Remove the installed module or faceplate: Firmly pull on the screws until the module is free of the switch. Carefully slide the module straight out of the slot. Keep the original faceplate for future use. If you should remove the module, replace the faceplate to prevent dust and debris from entering the unit and to maintain proper air flow. INSTALLING THE MODULE The ELS100-STACK Stacking Module installs in the lower-left slot on the rear panel of the ELS100S24TX2M switch. Do not install this module in any other slot. To install the module, follow the instructions below. Equipment Checklist After unpacking the Stacking Module, check the contents of the box to be sure you’ve received the following items: • • • One ELS100-STACK Stacking Module One Stacking Cable This document • Ensure that all the switches in the stack are powered up. • Ensure that the Stacking Modules are properly seated in their slots. 1: Use the Mode Select button to select LED display mode. 2: There is no LED for indicating stacking status. CAUTION: The ELS100-STACK Stacking Module is designed for ELS100-S24TX2M switches only. Do not try to install these modules in any other units. If you experience any problems with the module, check the following items before contacting Cabletron’s Technical Support: • Ensure that the devices attached to the stack are powered up and operating correctly. Instructions CAUTION: The switch must be powered off before installing or replacing any module. TROUBLESHOOTING 8. Power on the switch: Reconnect the previously removed power sources to the switch. (Note that the Management Module in the bottom switch will become the master.) The front-panel LEDs on the switches should indicate their status. Refer to the table of LEDs in this guide for a description of the LED indications. If the stack is not functioning properly, see “Troubleshooting” below. More details concerning connection options and network applications can be found in the ELS100-S24TX2M Installation Guide. Information on managing the stack can be found in the Management Guide that is included with the base unit. 9033263 Only qualified personnel should perform installation procedures. NOTICE Cabletron Systems reserves the right to make changes in specifications and other information contained in this document without prior notice. The reader should in all cases consult Cabletron Systems to determine whether any such changes have been made. The hardware, firmware, or software described in this manual is subject to change without notice. IN NO EVENT SHALL CABLETRON SYSTEMS BE LIABLE FOR ANY INCIDENTAL, INDIRECT, SPECIAL, OR CONSEQUENTIAL DAMAGES WHATSOEVER (INCLUDING BUT NOT LIMITED TO LOST PROFITS) ARISING OUT OF OR RELATED TO THIS MANUAL OR THE INFORMATION CONTAINED IN IT, EVEN IF CABLETRON SYSTEMS HAS BEEN ADVISED OF, KNOWN, OR SHOULD HAVE KNOWN, THE POSSIBILITY OF SUCH DAMAGES. 1999 by Cabletron Systems, Inc., P.O. Box 5005, Rochester, NH 03866-5005 All Rights Reserved Printed in Taiwan, R.O.C. QUICK INSTALLATION GUIDE Order Number:9033263 October 1999 Cabletron, Cabletron Systems, and SmartSTACK are trademarks or registered trademarks of Cabletron Systems, Inc. Microsoft, Windows, Windows 95, Windows 98, and Windows NT are either trademarks or registered trademarks of Microsoft Corporation. Netscape and Netscape Navigator are trademarks of Netscape Communications Corporation. SmartSTACK ELS100-STACK STACKING MODULE All other product names mentioned in this manual may be trademarks or registered trademarks of their respective companies. This device complies with Part 15 of the FCC rules. Operation is subject to the following two conditions: (1) this device may not cause harmful interference, and (2) this device must accept any interference received, including interference that may cause undesired operation. NOTE:This equipment has been tested and found to comply with the limits for a Class A digital device, pursuant to Part 15 of the FCC rules. These limits are designed to provide reasonable protection against harmful interference when the equipment is operated in a commercial environment. This equipment uses, generates, and can radiate radio frequency energy and if not installed in accordance with the operator’s manual, may cause harmful interference to radio communications. Operation of this equipment in a residential area is likely to cause interference in which case the user will be required to correct the interference at his own expense. WARNING:Changes or modifications made to this device which are not expressly approved by the party responsible for compliance could void the user’s authority to operate the equipment. INDUSTRY CANADA NOTICE This digital apparatus does not exceed the Class A limits for radio noise emissions from digital apparatus set out in the Radio Interference Regulations of the Canadian Department of Communications. Le présent appareil numérique n’émet pas de bruits radioélectriques dépassant les limites applicables aux appareils numériques de la class A prescrites dans le Règlement sur le brouillage radioélectrique édicté par le ministère des Communications du Canada. VCCI NOTICE EC CONFORMANCE DECLARATION Cabletron Systems Limited Nexus House, Newbury Business Park London Road, Newbury Berkshire RG13 2PZ, England This information technology product complies with ISO/IEC Guide 22 and EN45014. It conforms to the following specifications: EN55022(1988)/CISPR-22(1985) Class A EN50082-1: IEC 1000-4-2, 3, 4, 6 E1099-R01 150182-102 CONNECTIVITY GUIDELINES Ports 2 68-pin SCSI connectors Cable Type Max. Length Connector 10Base-T Cat. 3, 4, 5 100-ohm UTP 100 m (328 ft.) RJ-45 100Base-TX Cat. 5 100-ohm UTP 100 m (328 ft.) RJ-45 100Base-FX 50/125 or 62.5/125 micron core multimode fiber Cable Type SCSI Type 4 Cable Types and Specifications Size 4.82 x 3.57 x 1.08 in. (12.25 x 90.70.5 x 2.74 cm) Power Consumption 2W maximum Compliances CE Mark Emissions FCC Class A EN55022 (CISPR 22) Class A VCCI Class A C-Tick Immunity IEC 1000-4-2/3/4/6 412 m (1,351.4 ft.) SC or ST 2 km (1.24 miles) SC or ST 5 km (16,404 ft) SC or ST 1000Base-SX 50/125 or 62.5/125 micron core multimode fiber 10/125 single-mode fiber See the following table SC or ST 1000Base-LX MMF or SMF See the following table SC or ST Temperature Operating: 32° to 122° F (0° to 50° C) Storage: -40° to 158° F (-40° to 70° C) Humidity Operating: 5% to 95% Half duplex Full duplex 1000Base-SX Fiber Specifications Fiber Diameter Modal Bandwidth 62.5/125 micron 160 MHz/km 7-722 ft (2-220 m) 200 MHz/km 7-902 ft (2-275 m) 50/125 micron Range 400 MHz/km 7-1641 ft (2-500 m) 500 MHz/km 7-1805 ft (2-550 m) 1000Base-LX Fiber Specifications Fiber Diameter Modal Bandwidth Range 62.5/125 MMF 500 MHz/km 2 - 550 m (7 - 1805 ft) 50/125 MMF 400 MHz/km 2 - 550 m (7 - 1805 ft) 500 MHz/km 2 - 550 m (7 - 1805 ft) 10/125 SMF N/A 2 m - 5 km (7 - 16,404 ft) Maximum Fast Ethernet Network Diameter FCC NOTICE European contact: SPECIFICATIONS This information technology product complies with the requirements of the Low Voltage Directive 73/23/EEC and the EMC Directive 89/336/ EEC and carries the CE Mark accordingly. Repeater Type and Number Twisted Pair 100BASE-TX Twisted Pair/Fiber 100BASE-TX and FX 1 Class I 200 m (656 ft) 260.8 m (855.4 ft) 1 Class II 200 m (656 ft) 308.8 m (1012.6 ft) 2 Class II 205 m (672.4 ft) 216.2 m (709.1 ft) Note: Network diameter is defined as the wire distance between two end stations in the same collision domain.