1
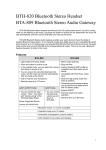
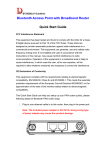
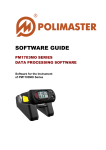
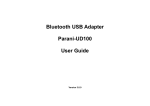
BT500+ Bluetooth Rechargeable Super Mini Mouse
Quick Setup Guide
- Appearance 2
3
2.
Install two bundled Ni-MH AAA batteries into the
BT500+ Bluetooth Super Mini Mouse’s battery slot.
3.
Slide battery cover back into position.
7.
When connection process completed, a
connection link will be shown on the Bluesoleil
main window.
1
For Toshiba Bluetooth Stack
- Pairing Process 1.
Press and hold the Pairing button until the scroll
wheel glows blue light to indicate the mouse is
ready for pairing.
Press and hold the Pairing button until the scroll
wheel glows blue light to indicate the mouse is
ready for pairing.
2.
Right-click on the Bluetooth icon in the
Once the connection between BT500+ Bluetooth Super
Mini Mouse and your computer is established, the
connection will keep permanently. That means the
connection will re-establish automatically when the
Windows runs.
For IVT Bluesoleil
5
4
1.
For WIDCOMM BTW
1.
Press and hold the Pairing button until the scroll
wheel glows blue light to indicate the mouse is
ready for pairing.
2.
Double-click on “”My Bluetooth Places” icon from
Windows desktop.
Double-click on Bluetooth Setup Wizard icon from
“My Bluetooth Places” window.
Select “I know the service I want to use and ...” and
press Next button to continue.
task tray, and then click on [Add New
Connection].
8
2.
3.
6
7
1. Right Button
2. Scrolling Wheel (Pairing LED)
3. Left Button
4. Battery Recharge Port
5. Battery Cover
6. Optical Sensor
7. Power Switch
8. Pairing Button
Function
LED
Charging Mode
Constant Red
Fully Charged
Green On
Pairing Mode
Blue On
4.
5.
Double-click on “”Bluesoleil” icon from Windows
desktop.
Double-click on “My Device” icon in the main
window of Bluesoleil to search new Bluetooth
device.
When BT500+ is searched, select “BT500” icon
and the HID profile icon will turns to yellow.
Right click the HID profile icon and select “Connect”
to start the connection process.
3.
4.
5.
Select “Human Interface Device” and then press
Next button to continue.
6.
The Bluetooth Setup Wizard starts to search for
Bluetooth HID device in the vicinity. The BT500+
Bluetooth Super Mini Mouse icon will be displayed
in the window when it is found.
Please select the BT500+ Bluetooth Super Mini
Mouse icon and then press Next button to
continue.
3.
Please choose [Custom Mode], and then
click on the [Next] button.
4.
Select“BT500” from [Device List], and
then click on the [Next] button. Please
choice the [Human Interface Device], then
click on the [Next] button.
5.
Enter the device name, and then click on
the [Next] button. Click on the [Finish]
button.
6.
Right-click on the Bluetooth icon in the
task tray, and then click on [Bluetooth
Settings]. Double click on the mouse icon,
make sure BT500+ is connected with your
computer.
Note: For the max. power saving, please turn the
BT500+ power off when you shut-down your
computer.
- Before Using 1.
2.
3.
Install batteries.
Turn the power on.
Pair the BT500+ Bluetooth Super Mini
Mouse with your computer.
6.
When connection starts, Bluesoleil will
automatically install HID driver and please wait a
moment until the “Your new hardware is installed
and ready to use” shows in your task bar, now the
connection is established.
7.
Note: Please make sure that your Bluetooth
software supports HID (Human Interface
Device) profile before the pairing
process.
- Install Batteries 1.
Press and Push raised area to open the battery
cover.
8.
The Bluetooth Setup Wizard takes several
seconds to configure related files to your system.
Please press Finish button to complete the pairing
process after the configuration.
Once the connection between BT500+ Bluetooth Super
Mini Mouse and your computer is established, the
connection will keep permanently. That means the
connection will re-establish automatically when the
Windows runs.
BT500+ Bluetooth Rechargeable Super Mini Mouse
Quick Setup Guide
Federal Communications Commission
(FCC) Statement
RADIO FREQUENCY INTERFERENCE
STATEMENT
This device complies with Part 15 of the FCC rules. Operation is
subject to the following two conditions: 1) this device may not
cause harmful interference, and 2) this device must accept any
interference received, including interference that may cause
undesired operation.
For Windows XP SP2
1.
5.
Press and hold the Pairing button until the scroll
wheel glows blue light to indicate the mouse is
ready for pairing.
The “Bluetake BT500+ Mouse” is found by
Bluetooth, please press “Continue” to the next step.
This equipment has been tested and found to comply with the limits
for a Class B digital device, pursuant to Part 15 of the FCC rules.
These limits are designed to provide reasonable protection against
harmful interference in a residential installation. This equipment
generates, uses and can radiate radio frequency energy and if not
installed and used in accordance with the instructions, may cause
harmful interference to radio communications. However, there is no
guarantee that interference will not occur in a particular installation.
If this equipment does cause harmful interference to radio or
television reception, which can be determined by turning the
equipment off and on, the user is encouraged to try correct the
interference by one or more of the following measures:
-
Reorient the receiving antenna.
Increase the separation between the equipment and receiver.
Connect the equipment into and outlet on a circuit different
from that to which the receiver is connected.
Consult the dealer or an experienced radio/TV technician for
help.
Any special accessories needed for compliance must be specified in
the instruction manual.
2.
Open the Windows control panel, then select
“Bluetooth devices”.
6.
Click “Continue” when the “Passkey exchange with
your mouse” shows up.
Copyright ® 2006 Bluetake Technology Co.,
Ltd. All Rights Reserved.
Once the connection between BT500+ Bluetooth Super
Mini Mouse and your computer is established, the
connection will keep permanently. That means the
connection will re-establish automatically when the
Windows runs.
3.
Click “Add…”
For Mac OS X 10.2.6 or later
1.
You are cautioned that changes or modifications not expressly
approved by the party responsible for compliance could void your
authority to operate the equipment.
Trademark(s)
7.
The process is finished successfully. The BT500+
Mouse is working now.
Press and hold the Pairing button until the scroll
wheel glows blue light to indicate the mouse is
ready for pairing.
TM
and Registered Trademark(s)®
The "Bluetake" name and logo are trademarks of
Bluetake Technology Co., Ltd.
The “Bluetooth” word mark and logos are owned by
the Bluetooth SIG, Inc. and any use of such marks
by Bluetake Technology Co., Ltd. is under license.
“Microsoft”
and
“Windows"
are
trademarks of Microsoft Corporation.
registered
“Apple”, “Mac” and “Mac OS” word marks and logos
are registered trademarks of Apple Computer, Inc.
“BlueSoleil” is the registered trademark of IVT Inc.
“WIDCOMM” is the registered
Broadcom Corporation.
“Toshiba Bluetooth Stack”
trademark of Toshiba Inc.
4.
Select “My device is setup and ready to be found”,
then click “Next”
2.
Click the Bluetooth icon on the task bar and select
“Setup Bluetooth device”.
Now you can use the BT500+ Bluetooth Super Mini
Mouse wirelessly with the Bluetooth-enabled Apple
computer. Afterward, the connection of the two
Bluetooth-enabled devices will re-establish automatically
when the Mac OS X runs.
5.
6.
Insert USB connector of USB Charging cable into
your computer.
2.
Insert USB charging cable* into the Battery
Recharge Port of BT500+. The recharge
batteries inside the BT500+ will be recharged
automatically.**
In “Peripherals (keyboards, mice, joysticks)”, select
“BT500” icon, and then click “Next”.
Select “Don’t use a passkey”, then click “Next”.
3.
Click “Continue” when the “Bluetooth Setup
Assistant” shows up.
Taiwan Headquarter
Tel: +886-2-2664-7199
E-mail: [email protected]
USA, California
Tel: +1-626-369-9888
E-mail: [email protected]
Mexico
Tel: +52-55-3096-5321
E-mail: [email protected]
7.
The Windows will start to connect BT500+
Bluetooth Super Mini Mouse automatically. Please
press Finish button after the connection process
completed.
Note:
* Please only use the bundled USB cable and
batteries for recharging process.
4.
Choose “Mouse” and then press “Continue” to the
next step.
** Please only recharge batteries while the
batteries are fully run out of power to
maximum the battery life.
the
of
registered
Other trademarks and trade names are those of their
respective owners.
- Recharging Process 1.
is
trademark
Japan, Tokyo
Tel: +81-424-42-8268
E-mail: [email protected]
Singapore
Tel: +65-6743-2300
E-mail: [email protected]
Hong Kong
Tel: +852-9777-8785
E-mail: [email protected]