1
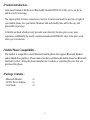
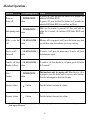
FCC INFORMATION
The Federal Communication Commission Radio Frequency Interference Statement includes the
following paragraph:
The equipment has been tested and found to comply with the limits for a Class B Digital Device,
pursuant to part 15 of the FCC Rules. These limits are designed to provide reasonable protection
against harmful interference in a residential installation. This equipment generates, uses and can
radiate radio frequency energy and, if not installed and used in accordance with the instruction,
may cause harmful interference to radio communication. However, there is no grantee that
interference will not occur in a particular installation. If this equipment does cause harmful
interference to radio or television reception, which can be determined by turning the equipment off
and on, the user is encouraged to try to correct the interference by one or more of the following
measures:
-- Reorient or relocate the receiving antenna.
-- Increase the separation between the equipment and receiver.
-- Connect the equipment into an outlet on a circuit different from that to which the receiver is
connected.
-- Consult the dealer or an experienced radio/TV technician for help.
The user should not modify or change this equipment without written approval from Bluetake
Technology Co., Ltd. Modification could void authority to use this equipment.
In some countries, there may be restrictions on using Bluetooth devices. Please check with your
local authorities for more details.
2
- Content Product Introduction............................…………………………………...4
Package Contents…………………………………………………………4
Overview…………………………………………………………………..5
Charging Your Headset……………………………………….…………..7
Turn ON/OFF Your Headset…………………………...…….…………..8
Using Your Headset for the first time……………………..….…………..9
Pair Your Headset and Cell Phone…………………………………....10
Wearing Your Headset with Best Performance………………………....10
Another Ear Use………………………………………………………....11
Using Your Headset…………………………………………………….11
3
- Product Introduction Gain more freedom with the novel Bluetooth® Headset BT400 G5 while you’re out for an
amble or in for a meeting.
The imperceptible wireless connection is reach to 10 meters and needs no any line of sight of
your mobile phone, free your hands. Moderate talk and standby time add to the easy and
pleasurable experience.
A flexible ear hook which not only provides wear elasticity but also gives a cosy wear
experience, additionally the sturdy conjunction makes the BT400 G5 stays in the place even
when you’re in motion.
- Mobile Phone Compatibility –
The headset is compatible to most Bluetooth mobile phones that support Bluetooth Headset
and/or Hands-Free profile(s). Please make sure that your Bluetooth mobile phone has Bluetooth
function by either visiting the phone manufacturer’s website or consulting the store that you
purchased the phone.
- Package Contents . Bluetooth Headset
. AC/DC Power Adapter
. User Guide
x1
x1
x1
4
- Overview The headset includes several parts:
c Talk/Transfer Button: The button is used for 2
functions.
- Talk
- Transfer
: Answers or ends the call.
: switches an active call between the
headset and the cell phone.
d Indicator LED: Displays the current status of the
headset.
- Blue Blinking: the headset is in normal status.
- Red Blinking: the headset is in low power status.
- Blue & Red Blinking: the headset is in pairing mode.
e Power/Mute Button: The button is used for 2
functions.
- Power
- Mute
: Switches the headset on and off.
: muting an ongoing call.
f Ear hook: Attaches headset to ear.
g Speaker: Plays the sound you receive on the call.
h Axis
i Microphone: Picks up your voice.
j Volume Up Button: Increases the volume.
k Charger Connector
l Volume Down Button: Decreases the volume.
5
- Headset Operations Function
Power on /
Power off
Enter pairing mode
Corresponding Button Action
To power on, press and hold the button for 6 seconds, the
< POWER/MUTE > indicator LED blinks BLUE.
To power off, press and hold the button for 2 seconds, the
button
indicator LED blinks RED twice and then snuffs out.
Make sure the headset is powered off. Press and hold the
< POWER/MUTE >
button for 8 seconds, the indicator LED blinks BLUE and
button
RED.
Make a voice dial < TALK/TRANSFER > When no call is in progress, briefly press the button once, then
call
button
you will hear a tone that indicates you to say voice tag.
Receive a call /
End a call
< TALK/TRANSFER > To receive a call, press the button once; To end a call, press
button
the button once again.
Transfer call from < TALK/TRANSFER > To switch a call from headset to cell phone, press the button
Headset to Phone button
for 2 seconds *.
Mute /
Unmute
This function is only for ongoing call. When there’s a call is
< POWER/MUTE >
in progress, press the button once to activate mute function.
button
Press the button again to deactivate the mute.
Increase volume
< + > button
Press the button to increase the volume.
Decrease volume
< - > button
Press the button to decrease the volume.
*: Not all Bluetooth phones support transfer function, please refer to your phone’s user’s manual to make sure whether your
phone supports this feature.
6
- Charging Your Headset –
Before using your headset at the first time, it’s highly recommended to charge its self-contained
battery for at lease 2 hours.
A fully charged headset battery provides approximately 5 hours talking time and 250 hours
standby time(In standby mode, the headset is powered on but no call is in progress).
The headset indicator LED displays BLUE when the headset power is sufficient. When the
headset is running out of power, the headset indicator starts to blink RED.
Please follow below steps to charge the headset battery:
Step 1 > Plug the charger cable into the headset.
Step 2 > Plug the other end of the charger into an electrical outlet.
NOTICE1: During the charging, the headset indicator LED turns to RED color.
NOTICE2: The headset needs approximately 2 hours to be fully charged.
Step 3 > When the charging is complete. Disconnect the charger from the electrical outlet and
detach the charger from the headset.
NOTICE3: The headset indicator LED turns to BLUE color when the charging is complete.
When disconnecting the power cord of any device, you should grip and pull the plug, but not the
cord.
7
Battery Notice!
1. Over extended periods of time, battery gradually wears down and requires longer charging
time. The situation is normal. Additionally, the more you talk on the phone with the headset,
the less standby time your battery has.
2. Risk of explosion if battery is replaced by incorrect type or is thrown into fire.
3. Do not store the headset in hot areas. High temperatures can shorten the life of internal
electronic components, damage battery, and warp or melt certain plastics.
4. Do not store the headset in cold areas. When it warms up to the normal temperature, moisture
can form inside, which may damage internal electronic circuit board.
Charger Notice!
Use only chargers approved by Bluetake for use with this product. The use of any other types
will invalidate any approval or warranty applying to the product, and may cause unexpected
damage. For availability of approval chargers, please check with your local dealer.
- Turn ON/OFF Your Headset Press and hold the < POWER/MUTE > button for 5 seconds,
and then the headset will emit two high tones. When the power is
ON, the indicator LED starts to blink BLUE color.
(NOTICE: the headset will enter pairing mode if you press and hold the <
POWER/MUTE > button for 7 seconds from OFF status.)
To turn off the headset, press and hold the < POWER/MUTE >
button for 2 seconds then the headset will emit two high tones
and the indicator LED displays RED color briefly.
8
- Using Your Headset for the first time –
1. Charge the headset for at least 2 hours to make sure the headset is fully charged.
2. Make sure that your phone is powered on.
3. Power on the headset.
4. Configure your phone’s Bluetooth function and make sure it’s activated.
5. Set the phone to search for Bluetooth devices, the phone searches for all Bluetooth devices
within about 10 meters and then displays them as a list.
6. Pair the headset with your phone.
7. Start using the headset when the pairing progress is complete successfully.
9
- Pair Your Headset and Cell Phone NOTICE!! You must pair the headset with a Bluetooth® phone before you can use the
headset!
Step 1 > Please make sure the headset is turned OFF.
Step 2 > Press and hold the < POWER/MUTE > button approximately 7 seconds until the
headset indicator LED starts to blink BLUE and RED color.
Step 3 > Release the < POWER/MUTE > button when the indicator LED is flashing
Step 4 > Follow the operating instruction for your Bluetooth phone to start a pairing progress.
Step 5 > The phone’s display will indicate that it found one or more Bluetooth devices, the
“BT400 G5” should be included in the list, please select it for pairing.
Step 6 > The phone’s display then prompts you for a pairing passkey or PIN, please enter four
zeros “0000”.
Step 7 > When the pairing progress is completed successfully, the headset indicator LED will
return to normal status of blinking BLUE.
Step 8 > Some phone’s display may ask you whether you want to change the headset’s name;
you can replace the “BT400 G5” with any name you prefer.
- Wearing Your Headset with Best Performance For optimal performance, wear the headset and your Bluetooth mobile phone on the same side
of your body. In regular situation, the sound performance is excellent when there’s no any
obstruction between the headset and the Bluetooth mobile phone.
10
- Another Ear Use The ear hook wear can be easily changed for another ear by below four steps:
Step 1 & Step 2 : Hold the side of ear hook that is close to the axis of the headset, and then
revolve the ear hook to 90 degrees twice. The ear hook will give out a clear
sound while it’s in 90 degrees position.
Step 3 & Step 4 : Rotate the ear hook to another side of the headset.
- Using Your Headset [ Answering a call ]
After being paired to your phone, the headset is now ready to receive incoming calls without
handling the phone. When there’s an incoming call, both the cell phone and the headset will ring
simultaneously. Upon hearing the ring tones through the headset’s speaker you can answer the
incoming call by pressing < TALK/TRANSFER > button and then speaking normally.
[ Ending a call ]
You can use either of the ways to end a call:
1. Press the headset’s < TALK/TRANSFER > button to end a call.
2. Press the phone’s keypad to end a call(Please consult your phone user’s manual).
11
[ Making a call ]
There are two ways to make a call:
1. Using the phone’s keypad:
As general usage, dial the phone number you want to call by pressing the phone’s
designated keypad. You may also hear the dialing tones through the headset.
2. Using the Voice Dialing through the headset:
What is voice dialing?
Voice dialing is a feature on some Bluetooth phones which allows you make calls by saying the name
of the person you want to call. The phone compares your voice with your previous recording (called a
voice tag). If they match then the phone will automatically dial the corresponding phone number.
NOTICE! Not all Bluetooth phones support voice dialing, please refer to your phone’s user’s manual to
make sure whether your phone supports this feature.
[ Voice dialing ]
The headset does not have a keyboard so it’s convenient to use voice dialing function to make
calls. To do this you have to record voice tags for the contacts in your phone address book. If
your phone supports voice function, you can use this feature with the headset easily. Note that
the voice dialing on your phone must be enabled and the voice tags must have been recorded
previously. (Please refer to your phone’s instruction on voice recording and storing voice tags.)
NOTICE! Not all Bluetooth phones support voice dialing, please refer to your phone’s user manual to
make sure whether your cell phone supports voice dialing.
1. Briefly press the < TALK/TRANSFER > button once.
2. After the tone, say the name of the person you want to call. The phone number will be
dialed automatically by phone after recognizing the correct voice tag.
12
[ Mute ]
This function is available for ongoing call only.
To activate mute function: Press the < POWER/MUTE > button once while there’s an ongoing
call is in progress.
To deactivate mute function: Press the < POWER/MUTE > button to release the mute.
[ Transfer ]
To activate transfer function: Press the < TALK/TRANSFER > button for 2 seconds to switch
the current call from headset to cell phone.
NOTICE! Not all Bluetooth phones support transfer function, please refer to your phone’s user’s
manual to make sure whether your phone supports this feature.
[ Multi-Pairing ]
BT400 G5 supports a particular function “Multi-Pairing”. It allows the headset to be paired with
several Bluetooth devices but connected to only one device at a time. The only one basis for
multi-pairing is that the last paired device has the highest priority than others.
13
14