1
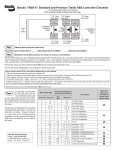
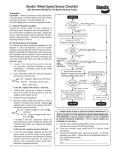
Bendix EC-60™ ABS Controller Checklist
®
• This checklist only takes a few minutes.
Follow all General Safety Guidelines (see back page.)
Step 1: What equipment does
the vehicle have?
c R. Steer Axle WSS
c R. Steer Axle PMV
Total of checked boxes:
c R. Drive Axle WSS
c R. Drive Axle PMV
c R. Add’l Axle WSS
c R. Add’l Axle PMV
(Locations vary for PMVs
and ATC valves)
cSteer
Axle
ATC
Valve
........ Wheel Speed Sensors (WSSs),
c Drive Axle ATC Valve
........ Pressure Modulator Valves (PMVs).
........ Automatic Traction Control Valves (ATCs).
c L. Steer Axle WSS
c L. Steer Axle PMV
c L. Drive Axle WSS
c L. Drive Axle PMV
c L. Add’l Axle WSS
c L. Add’l Axle PMV
Step 2: What Blink Code (BC) numbers are showing as active?
We recommend that you use Bendix ACom Diagnostics Software (with associated RP1210 harnesses,
etc.) to look up the BCs, but the blink code switch may also be used — see the info in the right column.
Use the BC Event History feature in ACom Diagnostics to view any recurring or intermittent BCs that
are not currently active, but may need attention. (visit www.bendix.com for a free software download)
®
®
Record here the BCs found:
(For example, 13-25) . . . . . . . . . . . . . . . . . . . . . . . . . . . . . . . . . . . . . . . . . . Step 3: For blink codes starting with 13 followed by a second code of 1 through 7, 9 through 17, or
19 through 24, replace the ECU (go to Step 5).
Step 4: For each BC, use the tables below and take the actions suggested for the code; typically the
steps shown will resolve the issue. See the Service Data Sheet for complete troubleshooting information,
and for any other BCs not listed. Only go to Step 5 (over) in cases where the troubleshooting suggested,
and any actions the technical help line(s) recommend, do not resolve the issue.
Blink Codes (BC)
1st code
2nd code
Description
Go To
Action
Bendix Technical
Help Line:
1‑800‑AIR‑BRAKE,
(1‑800‑247‑2725)
option 2-1,
Mon. - Fri.,
8 a.m. - 6 p.m. EST.
How to use the dash Blink Code
switch to retrieve active BCs:
1. Wait at least two seconds after
“ignition on.”
2. Toggle the blink code switch once.
3. After a pause of 3.5 seconds, the ECU
will begin responding with active BCs.
For example twelve blinks, pause, five
blinks = 12-5. There is a long pause
before any further BCs.
Note:
• Depress and release the BC switch
three times to clear BCs.
• Depress and release the BC switch
two times to see inactive BCs.
Blink Codes (BC)
1st code
2nd code
Description
2
any
Left Steer Axle WSS
13
1-7, 9-17, 19-24
3
any
Right Steer Axle WSS
13
8, or 18
4
any
Left Drive Axle WSS
13
25
ECU “VIN Check”
5
any
Right Drive Axle WSS
14
any
Left Additional Axle WSS
7
any
Left Steer Axle PMV
15
any
Right Additional Axle WSS
8
any
Right Steer Axle PMV
16
any
Left Additional Axle PMV
9
any
Left Drive Axle PMV
17
any
Right Additional Axle PMV
10
any
Right Drive Axle PMV
20
any
Trailer PMV
11
7
Transmission / Hill Start Link
21
any
Steering Angle Sensor
J1939
22
any
Yaw Rate Sensor
Retarder Relay or Hill Start Lamp
23
any
Lateral Acceleration Sensor
Hill Start Solenoid
24
6
11
Any (except 7)
12
4, 5
12
24, 25, or 26
Action
Go To
Action
Go to Step 5
ECU (16) or (19) - Call the Tech Team
Brake Demand
Key Troubleshooting Steps for the Blink Codes Shown Above
Quick Checks to Make
Next Steps
c Verify that the number of WSSs found in step 1 match the stored configuration
c Verify, for the wheel end identified in the description, that all WSS electrical connections and
• Clear the Blink Codes (BCs)
wiring, from the wheel end through to the ECU, are properly installed and free from damage
c Check that the WSS’s face is touching the exciter ring/tone ring face
• Is the same BC back?
c Verify 1500-2500 ohms across sensor leads. Reading: ........ ohms*
c Yes – see the
c While turning the wheel at 0.5 revs/sec, verify a minimum of 0.25 AC volts across the sensor
Service Data sheet
leads. Reading: ........ volts* (* Out of range? – go to BW2453 WSS inspection guide.)
Troubleshooting section
and/or contact the Bendix
c Verify that the number of modulators found in step 1 match the stored configuration
Tech Team
c Verify, for the wheel end identified in the description, that all PMV electrical connections and
wiring, from the wheel end through to the ECU, are properly installed and free from damage
c No – follow the actions
c Verify 9.8 to 11.0 ohms from the release to hold. (12 volt systems.) Reading: ........ ohms
above for any other
c With the brakes applied**, verify the chuff test runs at power-up (vehicle cannot be moving). Listen
remaining BCs
for the sequence: right steer; left steer; right drive; left drive; right add’l; left add’l
** Do not apply the brakes when testing the BC “20-any” trailer PMV blink code
The ECU is expecting the transmission to be configured for Hill Start, but is not receiving the correct message from the transmission.
Contact the OEM support line
Action
Key Troubleshooting Steps for the Blink Codes Shown Above
Quick Checks to Make
Next Steps
c Verify that the wiring and connections are free from damage
c With the vehicle power off, remove the X-1 connector from the ECU.
Verify the resistance between pins 7 and 8 is 60 ohms.
Reading: ........ ohms (Incorrect? – investigate harnesses and connectors)
c With
vehicle power on, remove the X-1 connector. Verify the voltage
between pin 7 and ground, and also pin 8 and ground is 2.5 Vdc.
Readings: (pin 7) ........ Vdc, (pin 8) ........ Vdc
(Incorrect? – investigate harnesses and connectors)
(Looking into the wire
harness connector)
X1
X 4
• Clear the Blink Codes (BCs)
• Is the same BC back?
c Yes – Contact the OEM
support line for vehiclelevel troubleshooting
c No – follow the actions
above for any other
remaining BCs
• Clear the Blink Codes (BCs)
c If there is a Hill Start dash switch installed, inspect the Hill Start lamp and switch wiring; if not, • Is the same BC back?
inspect for the retarder relay wiring for damage.
cY
es – see the Service Data
sheet and/or contact the
c Verify that the resistance between the solenoid pins is approximately 7 to 8 ohms. (12 volt
Bendix Tech Team
systems.) (Incorrect? – replace the solenoid, go to Next Steps)
c No – follow the actions
c Inspect the Hill Start solenoid for disconnected or damaged wiring and check the harness for
above for any other
continuity.
remaining BCs
Obtain the VIN stored in the ABS ECU, the VIN stamped on the vehicle, and the VIN stored in the engine controller. Next contact
the OEM support line: the ABS ECU BC is for a mismatched VIN - this indicates the wrong ABS ECU has been installed
c Verify all wiring and connectors are free from damage. When BOTH Blink Code 21-8 AND Blink
• Clear the Blink Codes (BCs)
Code 22-5 are reported, this is usually a wiring issue (check the harness for continuity).
c If 21-8 alone, unplug the Steering Angle Sensor (SAS) connector harness and test with a replacement • Is the same BC back?
SAS. If the BC clears, replace the SAS, and re-calibrate with ACom Diagnostics
c Yes – see the
Service Data sheet
c If 22-5 alone, unplug the Yaw Rate Sensor (YRS) connector harness and test with a replacement
Troubleshooting section
YRS. If the BC clears, replace the YRS, and re-calibrate with ACom Diagnostics
and/or contact the Bendix
c Any remaining sensor BCs, clear BCs and re-calibrate with ACom Diagnostics
Tech Team
c If BC returns, contact the Bendix Tech Team
c No – follow the actions
c Calibrate the brake demand sensor by fully applying the brakes for three seconds
above for any other
c Verify the sensor installation has not changed from the original OE configuration
remaining BCs
c Verify all wiring and connectors are free from damage
®
®
®
Reference Documents - Service Data sheets:
SD-13-4863 EC-60™ ABS/ATC standard & premium controllers, SD-13-4869 EC-60™ ABS/ATC ESP Advanced controllers
Go to www.bendix.com for free downloads of Service Data Sheets and Warranty Policies and to order copies of the SD sheets
Step 5: (If necessary.) Replace the ECU. If it is still under warranty coverage, file a claim and include: (a) the returned part, (b) a copy of this
document and (c) a print-out of the ACom Diagnostics report.
®
VIN #: ____________________________________________________________________ Claim #: _____________
Vehicle Make: _________________________________________ Model: _______________ Mileage: _____________
GENERAL SAFETY GUIDELINES
WARNING! PLEASE READ AND FOLLOW THESE
INSTRUCTIONS TO AVOID PERSONAL INJURY OR DEATH:
When working on or around a vehicle, the following general
precautions should be observed at all times.
1. Park the vehicle on a level surface, apply the parking brakes, and always
block the wheels. Always wear safety glasses.
2. Stop the engine and remove ignition key when working under or around
the vehicle. When working in the engine compartment, the engine should
be shut off and the ignition key should be removed. Where circumstances
require that the engine be in operation, EXTREME CAUTION should be
used to prevent personal injury resulting from contact with moving, rotating,
leaking, heated or electrically charged components.
3. Do not attempt to install, remove, disassemble or assemble a component
until you have read and thoroughly understand the recommended
procedures. Use only the proper tools and observe all precautions
pertaining to use of those tools.
4. If the work is being performed on the vehicle’s air brake system, or any
auxiliary pressurized air systems, make certain to drain the air pressure
from all reservoirs before beginning ANY work on the vehicle. If the vehicle
BW2832 ©2011 Bendix Commercial Vehicle Systems LLC. 04/11. All Rights Reserved. Printed in USA.
is equipped with a Bendix AD-IS air dryer system or a dryer reservoir
module, be sure to drain the purge reservoir.
Following the vehicle manufacturer’s recommended procedures, deactivate
the electrical system in a manner that safely removes all electrical power
from the vehicle.
Never exceed manufacturer’s recommended pressures.
Never connect or disconnect a hose or line containing pressure; it may
whip. Never remove a component or plug unless you are certain all system
pressure has been depleted.
Use only genuine Bendix brand replacement parts, components and kits.
Replacement hardware, tubing, hose, fittings, etc. must be of equivalent
size, type and strength as original equipment and be designed specifically
for such applications and systems.
Components with stripped threads or damaged parts should be replaced
rather than repaired. Do not attempt repairs requiring machining or welding
unless specifically stated and approved by the vehicle and component
manufacturer.
Prior to returning the vehicle to service, make certain all components and
systems are restored to their proper operating condition.
For vehicles with Automatic Traction Control (ATC), the ATC function must
be disabled (ATC indicator lamp should be ON) prior to performing any
vehicle maintenance where one or more wheels on a drive axle are lifted
off the ground and moving.
®
5.
6.
7.
8.
9.
10.
11.
®
®