1
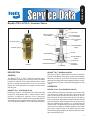
1/4” P.T. SUPPLY
O-RING
INTERNAL
PASSAGE
CAP
VALVE
SPRING
VALVE STOP
INLET &
EXHAUST
VALVE
1/8” P.T.
CONTROL
1/4” P.T.
DELIVERY
O-RING
SHIM
PISTON
O-RING
DIAPHRAGM
RETAINER
EXHAUST
NUT
DIAPHRAGM
PISTON SPRING
EXHAUST
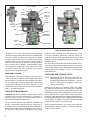
FIGURE 2 - BENDIX® TR-3™ INVERSION VALVE
The Bendix® TR-3™ valve, with the internal control passage
functions the same as described in the previous paragraph.
The only exception is that the control pressure is always
the same as the supply pressure. Consequently, as supply
pressure builds up, when the pressure is great enough to
overcome the piston return spring, the delivery pressure
will be vented out the exhaust. On descending supply/
control pressure, as the piston return spring overcomes
the control pressure the valve will deliver the remaining
supply pressure at the delivery port.
MOUNTING LOCATION
Care should be given to assure proper mounting location
of the valve with the exhaust pointed downward (toward
the road surface). It should be mounted high on the frame
rail, and away from road spray and debris. Unprotected
or exposed exhaust ports can allow migration of road
contaminants into the valve, which may cause accelerated
wear or unintended operation.
PREVENTIVE MAINTENANCE
Important: Review the Bendix Warranty Policy before
performing any intrusive maintenance procedures. A
warranty may be voided if intrusive maintenance is
performed during the warranty period.
No two vehicles operate under identical conditions, as
a result, maintenance intervals may vary. Experience is
a valuable guide in determining the best maintenance
interval for air brake system components. At a minimum,
the inversion valves should be inspected every six(6)
2
FIGURE 3 - BENDIX® TR-3™ INVERSION
VALVE INTERNAL BLEED CONTROL
months or 1500 operating hours, whichever comes first,
for proper operation. Should the inversion valves not
meet the elements of the operational tests noted in this
document, further investigation and service of the valve
may be required.
The TR-3 valve is non-serviceable while the Bendix® TR-2™
valve can be serviced with a maintenance kit. For the latest
service parts and kits, refer to the Bendix Quick Reference
Catalog (BW1114) available for order or download at
www.bendix.com
OPERATING AND LEAKAGE TESTS
NOTE: The following checks should be made with two
calibrated gauges or two gauges known to be
accurate. Depending upon installation, it may be
easier or necessary to completely remove the
valve to test properly.
Install one test gauge in a common control and supply
line; install the other gauge in the delivery port. Gradually
apply pressure to the common supply and control line. On
ascending pressure, note at what pressure exhaust occurs
and compare with the vehicle manual. With air pressure
present in supply and control ports, apply a soap solution to
the delivery and exhaust ports. Leakage should not exceed
100 SCCM or a 1" bubble in 5 seconds. Excessive leakage
would indicate a faulty o-ring or inlet valve.
Slowly decrease pressure in the control cavity and note
at what pressure delivery is made. Compare this with the
vehicle manual notation.