1
Avaya Business Communications
Manager—IVR Upgrade Guide
4.0
NN40070-400, 02.02
September 2010
© 2010 Avaya Inc.
All Rights Reserved.
Notice
While reasonable efforts have been made to ensure that the
information in this document is complete and accurate at the time of
printing, Avaya assumes no liability for any errors. Avaya reserves the
right to make changes and corrections to the information in this
document without the obligation to notify any person or organization of
such changes.
Documentation disclaimer
Avaya shall not be responsible for any modifications, additions, or
deletions to the original published version of this documentation unless
such modifications, additions, or deletions were performed by Avaya.
End User agree to indemnify and hold harmless Avaya, Avaya's agents,
servants and employees against all claims, lawsuits, demands and
judgments arising out of, or in connection with, subsequent
modifications, additions or deletions to this documentation, to the
extent made by End User.
Link disclaimer
Avaya is not responsible for the contents or reliability of any linked Web
sites referenced within this site or documentation(s) provided by Avaya.
Avaya is not responsible for the accuracy of any information, statement
or content provided on these sites and does not necessarily endorse
the products, services, or information described or offered within them.
Avaya does not guarantee that these links will work all the time and has
no control over the availability of the linked pages.
Warranty
Avaya provides a limited warranty on this product. Refer to your sales
agreement to establish the terms of the limited warranty. In addition,
Avaya’s standard warranty language, as well as information regarding
support for this product, while under warranty, is available to Avaya
customers and other parties through the Avaya Support Web site:
http://www.avaya.com/support. Please note that if you acquired the
product from an authorized Avaya reseller outside of the United States
and Canada, the warranty is provided to you by said Avaya reseller and
not by Avaya.
Licenses
THE SOFTWARE LICENSE TERMS AVAILABLE ON THE AVAYA
WEBSITE, HTTP://SUPPORT.AVAYA.COM/LICENSEINFO/ ARE
APPLICABLE TO ANYONE WHO DOWNLOADS, USES AND/OR
INSTALLS AVAYA SOFTWARE, PURCHASED FROM AVAYA INC.,
ANY AVAYA AFFILIATE, OR AN AUTHORIZED AVAYA RESELLER
(AS APPLICABLE) UNDER A COMMERCIAL AGREEMENT WITH
AVAYA OR AN AUTHORIZED AVAYA RESELLER. UNLESS
OTHERWISE AGREED TO BY AVAYA IN WRITING, AVAYA DOES
NOT EXTEND THIS LICENSE IF THE SOFTWARE WAS OBTAINED
FROM ANYONE OTHER THAN AVAYA, AN AVAYA AFFILIATE OR AN
AVAYA AUTHORIZED RESELLER, AND AVAYA RESERVES THE
RIGHT TO TAKE LEGAL ACTION AGAINST YOU AND ANYONE
ELSE USING OR SELLING THE SOFTWARE WITHOUT A LICENSE.
BY INSTALLING, DOWNLOADING OR USING THE SOFTWARE, OR
AUTHORIZING OTHERS TO DO SO, YOU, ON BEHALF OF
YOURSELF AND THE ENTITY FOR WHOM YOU ARE INSTALLING,
DOWNLOADING OR USING THE SOFTWARE (HEREINAFTER
REFERRED TO INTERCHANGEABLY AS “YOU” AND “END USER”),
AGREE TO THESE TERMS AND CONDITIONS AND CREATE A
BINDING CONTRACT BETWEEN YOU AND AVAYA INC. OR THE
APPLICABLE AVAYA AFFILIATE (“AVAYA”).
protected by copyright and other intellectual property laws including the
sui generis rights relating to the protection of databases. You may not
modify, copy, reproduce, republish, upload, post, transmit or distribute
in any way any content, in whole or in part, including any code and
software. Unauthorized reproduction, transmission, dissemination,
storage, and or use without the express written consent of Avaya can
be a criminal, as well as a civil, offense under the applicable law.
Third-party components
Certain software programs or portions thereof included in the Product
may contain software distributed under third party agreements (“Third
Party Components”), which may contain terms that expand or limit
rights to use certain portions of the Product (“Third Party Terms”).
Information regarding distributed Linux OS source code (for those
Products that have distributed the Linux OS source code), and
identifying the copyright holders of the Third Party Components and the
Third Party Terms that apply to them is available on the Avaya Support
Web site: http://www.avaya.com/support/Copyright/.
Trademarks
The trademarks, logos and service marks (“Marks”) displayed in this
site, the documentation(s) and product(s) provided by Avaya are the
registered or unregistered Marks of Avaya, its affiliates, or other third
parties. Users are not permitted to use such Marks without prior written
consent from Avaya or such third party which may own the Mark.
Nothing contained in this site, the documentation(s) and product(s)
should be construed as granting, by implication, estoppel, or otherwise,
any license or right in and to the Marks without the express written
permission of Avaya or the applicable third party.
Avaya is a registered trademark of Avaya Inc.
All other trademarks are the property of their respective owners.
Downloading documents
For the most current versions of documentation, see the Avaya Support
Web site: http://www.avaya.com/support
Contact Avaya Support
Avaya provides a telephone number for you to use to report problems
or to ask questions about your product. The support telephone number
is 1-800-242-2121 in the United States. For additional support
telephone numbers, see the Avaya Web site: http://www.avaya.com/
support
Copyright
Except where expressly stated otherwise, no use should be made of
materials on this site, the Documentation(s) and Product(s) provided
by Avaya. All content on this site, the documentation(s) and the
product(s) provided by Avaya including the selection, arrangement and
design of the content is owned either by Avaya or its licensors and is
2
Avaya Business Communications Manager—IVR Upgrade Guide
September 2010
Contents
Chapter 1: Preface.....................................................................................................................7
Scope................................................................................................................................................................7
Intended Audience............................................................................................................................................7
Customer Service..............................................................................................................................................7
Navigation.........................................................................................................................................................8
Getting technical documentation.......................................................................................................................8
Getting product training.....................................................................................................................................8
Getting help from a distributor or reseller..........................................................................................................8
Getting technical support from the Avaya Web site..........................................................................................8
How to Use This Manual...................................................................................................................................9
Organization of This Manual.............................................................................................................................9
Conventions Used in This Manual..................................................................................................................10
Solaris and Windows Conventions..................................................................................................................11
Two-Button (Windows) vs. Three-Button (Solaris) Mouse..............................................................................12
Trademark Conventions..................................................................................................................................12
Chapter 2: New in this release...............................................................................................13
Features..........................................................................................................................................................13
Revision history...............................................................................................................................................13
Other changes.................................................................................................................................................13
Chapter 3: Avaya BCM - IVR 2.1 Upgrade Overview............................................................15
The Avaya BCM-IVR 2.1 Upgrade..................................................................................................................15
New or Updated Features of Avaya BCM-IVR 2.1..........................................................................................16
Avaya BCM-IVR 1.X Configuration.................................................................................................................16
Avaya BCM-IVR 2.1 Configuration..................................................................................................................17
Prerequisites for the Avaya BCM-IVR 2.1 Upgrade........................................................................................19
Application Developer.....................................................................................................................................19
System Administrator......................................................................................................................................19
Transition Issues.............................................................................................................................................20
Transition Issues for the Application Developer..............................................................................................20
Database Access Modes................................................................................................................................20
New PeriProducer 3.00 Blocks.......................................................................................................................21
Blocking/Non-blocking Execution....................................................................................................................21
Call Progress Detection..................................................................................................................................21
PeriProducer 3.00 Block Changes..................................................................................................................22
Connection IDs (Caller I/O blocks)..................................................................................................................22
Accessory Toolkit Blocks.................................................................................................................................22
Answer Block..................................................................................................................................................22
Disconnect Block.............................................................................................................................................23
System Block..................................................................................................................................................23
Send Host Block..............................................................................................................................................23
Receive Host Block.........................................................................................................................................24
Send Fax Block...............................................................................................................................................24
Receive Fax Block..........................................................................................................................................25
Originate Block................................................................................................................................................25
Record Block...................................................................................................................................................25
Resource Block...............................................................................................................................................25
Avaya Business Communications Manager—IVR Upgrade Guide
September 2010
3
Discontinued Features and Functions.............................................................................................................26
Fax Composition.............................................................................................................................................26
Hardware Properties Window.........................................................................................................................26
Unsupported Resources.................................................................................................................................26
Obsolete Functions.........................................................................................................................................27
Other PeriProducer Changes..........................................................................................................................27
Enhanced Condition Data...............................................................................................................................27
Environment Options.......................................................................................................................................27
Conditions.......................................................................................................................................................30
Miscellaneous.................................................................................................................................................39
Transition Issues for the System Administrator...............................................................................................40
Documentation Issues.....................................................................................................................................40
Issue................................................................................................................................................................40
Chapter 4: Administrator on the Windows Workstation......................................................41
Windows Workstation Operating System Upgrade.........................................................................................41
Avaya BCM-IVR 1.X Uninstall Procedures......................................................................................................42
Uninstall Procedures with MPS 2.1 Software and Document CD...................................................................42
Avaya BCM-IVR 2.1 Installation Procedures...................................................................................................46
Installing PeriProducer 3.00 and PeriStudio 2.20...........................................................................................46
Avaya BCM-IVR 2.1 Toolkit Installation...........................................................................................................51
Introduction.....................................................................................................................................................51
Installing the Avaya BCM-IVR Toolkit..............................................................................................................53
License Service Installation.............................................................................................................................53
PeriView 2.1 and PeriView 2.1 Consolidator Installation.................................................................................56
Overview.........................................................................................................................................................56
Installing Avaya BCM-IVR 2.1 PeriView Consolidator.....................................................................................57
Launching Applications in PeriView................................................................................................................63
Loading Application .vex files..........................................................................................................................63
Loading User Defined Call Function Files.......................................................................................................66
Assigning and Starting Applications................................................................................................................67
Chapter 5: Administrator on the Avaya BCM 4.0 Platform..................................................73
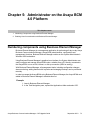
Numbering components using Business Element Manager...........................................................................73
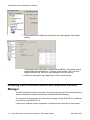
Enabling Host Communications with Business Element Manager..................................................................74
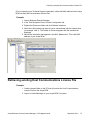
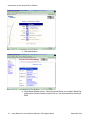
Retrieving existing Host Communications License File..................................................................................75
Getting and Applying the License File.............................................................................................................77
Application Resources....................................................................................................................................79
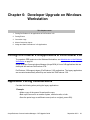
Chapter 6: Developer Upgrade on Windows Workstation...................................................81
Porting PeriProducer 2.30 Applications to PeriProducer 3.00........................................................................81
Application Porting Considerations.................................................................................................................81
Converting Standard PeriProducer 2.30 Applications to PeriProducer 3.00...................................................82
Load into PeriProducer 3.00...........................................................................................................................82
Using the PeriProducer Command Line to Port Applications..........................................................................82
Porting Events.................................................................................................................................................83
Conversion Logs.............................................................................................................................................83
Known Conversion Issues...............................................................................................................................84
Set Resource Label in 2.30.............................................................................................................................84
Unsupported 2.30 Resources.........................................................................................................................84
Resource Block Conversions..........................................................................................................................85
Flushing the Speak Prompt Buffer..................................................................................................................85
4
Avaya Business Communications Manager—IVR Upgrade Guide
September 2010
System Transfer Connection ID Datacard.......................................................................................................85
Assign and Start PeriProducer 3.00 Applications...........................................................................................85
Chapter 7: Developer Upgrade on Fedora Workstation.......................................................87
Overview.........................................................................................................................................................87
Installing Fedora..............................................................................................................................................88
Installing IVR Plugin Development Environment.............................................................................................88
Building C/C++ Call Functions Libraries.........................................................................................................88
makecall_tux Tool............................................................................................................................................89
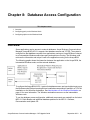
Chapter 8: Database Access Configuration..........................................................................91
Overview.........................................................................................................................................................91
VMST 3 on the Avaya BCM Node...................................................................................................................92
Install Patches on the Windows Node.............................................................................................................92
Configuring periq on the Windows Node.........................................................................................................92
Configuring sqlclnt on Windows Node............................................................................................................93
Index.........................................................................................................................................95
Avaya Business Communications Manager—IVR Upgrade Guide
September 2010
5
6
Avaya Business Communications Manager—IVR Upgrade Guide
September 2010
Chapter 1: Preface
Scope
Avaya Business Communications Manager (Avaya BCM) with Interactive Voice Response
(IVR) capabilities is a communications platform that delivers multimedia voice processing,
business telephony applications, and data networking services.
The Avaya BCM-IVR 2.1 Upgrade manual explains how to upgrade an Avaya BCM-IVR 1.X
system to an Avaya BCM-IVR 2.1 system. It further explains how to port existing applications to
run on the upgraded Avaya BCM-IVR 2.1. This manual is not intended to replace individual
software manuals. It is meant only to be used as a supplement to them.
Intended Audience
This manual is intended for both IVR Application Developers and Avaya BCM-IVR System
Administrators. This manual assumes that the reader is familiar with:
• Avaya BCM application development;
• site-specific operating procedures relating to the Avaya BCM;
• specific application functions performed by the Avaya BCM; and
• other equipment to which the Avaya BCM may be connected.
Basic knowledge of your operating system software is also assumed.
Customer Service
Visit the Avaya Web site to access the complete range of services and support that Avaya
provides. Go to http://www.avaya.com or go to one of the pages listed in the following sections.
Avaya Business Communications Manager—IVR Upgrade Guide
September 2010
7
Preface
Navigation
• Getting technical documentation on page 8
• Getting product training on page 8
• Getting help from a distributor or reseller on page 8
• Getting technical support from the Avaya Web site on page 8
Getting technical documentation
To download and print selected technical publications and release notes directly from the
Internet, go to http://www.avaya.com/support.
Getting product training
Ongoing product training is available. For more information or to register, you can access the
Web site at http://www.avaya.com/support. From this Web site, you can locate the Training
contacts link on the left-hand navigation pane.
Getting help from a distributor or reseller
If you purchased a service contract for your Avaya product from a distributor or authorized
reseller, contact the technical support staff for that distributor or reseller for assistance.
Getting technical support from the Avaya Web site
The easiest and most effective way to get technical support for Avaya products is from the
Avaya Technical Support Web site at http://www.avaya.com/support.
8
Avaya Business Communications Manager—IVR Upgrade Guide
September 2010
How to Use This Manual
How to Use This Manual
This manual uses many standard terms relating to computer systems, software application
functions, and the Internet. However, it contains some terminology that can be explained only in
the context of the Avaya Media Processing Server (Avaya MPS). Refer to the Glossary of
Avaya Media Processing Server Series Terminology for definitions of Avaya MPS Series
specific terms.
Read this manual from start to finish at least once. When you are familiar with the document,
you can use the Table of Contents to locate topics of interest for reference and review.
If you are reading this document online, use the cross-reference links (shown in blue) to quickly
locate related topics. Position your cursor over the cross-reference link and click once. Click
any point in a Table of Contents entry to move to that topic. Click the page number of any Index
entry to access that topic page.
Familiarize yourself with various specialized textual references within the manual, see
Conventions Used in This Manual on page 10.
Note:
Periphonics is now part of . The name Periphonics, and variations thereof, appear in this
manual only in reference to a product (for example, the PERImps package, the perirev
command, and so on).
Organization of This Manual
This manual is organized according to the needs and requirements of two distinct Avaya BCMIVR users: System Administrators and Application Developers.
Chapter 1 — Introduction to the Avaya BCM - IVR Upgrade
Overviews the upgraded Avaya Business Communication Manager (Avaya BCM) with
Interactive Voice Response capabilities. Explains how to access documentation on Helmsman.
Chapter 2 — Administrator Upgrade on Windows Workstation
Discusses prerequisites and steps necessary to upgrade the Avaya BCM-IVR PeriView
Consolidator workstation.
Chapter 3 — Administrator Upgrade on Avaya BCM 4.0 Platform
Discusses how to manage Avaya BCMs using Business Element Manager. Explains how to
add Avaya BCMs to the Business Element Manager administration list.
Avaya Business Communications Manager—IVR Upgrade Guide
September 2010
9
Preface
Chapter 4 — Developer Upgrade on Windows Workstation
Discusses steps necessary to port PeriProducer 2.30 applications to PeriProducer 3.00, as
well as porting events and conversion issues.
Chapter 5 — Developer Upgrade on Fedora Workstation
Discusses steps necessary to configure the Fedora workstation to compile C/C++ code for
User Defined External Call Functions.
Chapter 6 — Database Access Configuration
Discusses how to configure the Windows workstation for external database access.
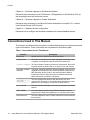
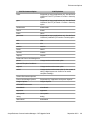
Conventions Used in This Manual
This manual uses different fonts and symbols to differentiate between document elements and
types of information. These conventions are summarized in the following table.
Table 1: Conventions Used in This Manual
Notation
Description
Normal text
Normal text font is used for most of the document.
important term
The Italics font introduces new terms, highlights meaningful words
or phrases, or distinguishes specific terms from nearby text.
system command This font indicates a system command or its arguments. Enter such
keywords exactly as shown (that is, do not fill in your own values).
command, condition
and alarm
file name /
directory
10
Command, Condition and Alarm references appear on the screen in
magenta text and reference the Command Reference Manual, the
MPS Developer User's Guide, or the Alarm Reference Manual,
respectively. Refer to these documents for detailed information
about Commands, Conditions, and Alarms.
This font highlights the names of disk directories, files, and
extensions for file names. It also shows what is displayed on a textbased screen (for example, to show the contents of a file.)
on-screen field
This font indicates field labels, on-screen menu buttons, and action
buttons.
<KEY NAME>
A term that appears within angled brackets denotes a terminal
keyboard key, a telephone keypad button, or a system mouse button.
Book Reference
This font indicates the names of other publications referenced within
the document.
Avaya Business Communications Manager—IVR Upgrade Guide
September 2010
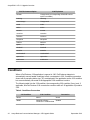
Solaris and Windows Conventions
Notation
Description
cross-reference
A cross-reference appears on the screen in blue. Click the crossreference to access the referenced location. A cross-reference that
refers to a section name accesses the first page of that section.
Note:
Notes identify important facts and other keys to understanding.
The caution icon identifies procedures or events that require special
attention. The icon indicates a warning that serious problems may
arise if the stated instructions are not followed implicitly.
The flying Window icon identifies procedures or events that apply to
the Windows operating system only. (1)
The Solaris icon identifies procedures or events that apply to the
Solaris operating system only. (2)
(1): Windows and the flying Window logo are either trademarks or registered
trademarks of Microsoft Corporation.
(2): Solaris® is a registered trademark of The Open Group in the U.S. and other
countries.
Solaris and Windows Conventions
This manual depicts examples (command line syntax, configuration files, and screen shots) in
Solaris format. Windows-specific commands, procedures, or screen shots are shown when
required. The following table lists general operating system conventions used with either the
Solaris or Windows operating system.
Solaris
Windows
Environment
$PPROHOME
%PPROHOME%
Paths
$PPROHOME/bin
%PPROHOME%\bin
Command
<command> &
start /b <command>
Avaya Business Communications Manager—IVR Upgrade Guide
September 2010
11
Preface
Two-Button (Windows) vs. Three-Button (Solaris) Mouse
Trademark Conventions
The following trademark information is presented here and applies throughout for third party
products discussed within this manual. Trademarking information is not repeated hereafter.
®
®
Solaris and Motif are registered trademarks of The Open Group in the U.S. and other
countries.
Solaris, SunOS, OpenWindows, SPARC, and UltraSPARC are trademarks or registered
trademarks of Sun Microsystems, Inc. in the United States and other countries.
Microsoft, MSSQL, Windows, Internet Explorer, and the Flying Windows logo are either
trademarks or registered trademarks of Microsoft Corporation.
®
Oracle is a registered trademark of Oracle Corporation.
Sybase™ and SYBASE™ are trademarks of Sybase, Inc. or its subsidiaries.
®
®
Informix and INFORMIX are registered trademarks of Informix Corporation or its affiliates.
12
Avaya Business Communications Manager—IVR Upgrade Guide
September 2010
Chapter 2: New in this release
The following sections detail what’s new in Avaya Business Communications Manager—IVR Upgrade
Guide for release 4.0.
Navigation
• Features on page 13
• Other changes on page 13
Features
There are no feature updates in this release.
Navigation
Revision history on page 13
Revision history
May 2007
Standard 01.01. Updates to Advanced Command window graphics.
July 2006
Standard 1.0. Avaya BCM-IVR 2.1 Upgrade Guide is issued for Release 2.1.
Other changes
There are no updates for this release.
Avaya Business Communications Manager—IVR Upgrade Guide
September 2010
13
New in this release
14
Avaya Business Communications Manager—IVR Upgrade Guide
September 2010
Chapter 3: Avaya BCM - IVR 2.1 Upgrade
Overview
This chapter covers:
1. The Avaya BCM-IVR 2.1 Upgrade
2. New or updated features of Avaya BCM-IVR 2.1
3. Pre-requisites for the BMC-IVR 2.1 upgrade
4. Transition issues
5. Documentation issues
The Avaya BCM-IVR 2.1 Upgrade
Avaya Business Communications Manager (Avaya BCM) 4.0 is a fully integrated
communication system for small businesses, government networks, retail networks, and
enterprise branch offices.
The Avaya BCM 4.0 offers interactive voice response capabilities through Interactive Voice
Response 2.1 (IVR 2.1). IVR 2.1 is a suite of products that allows businesses to create
applications callers can use to access information by responding to a series of prompts through
their touchtone phones.
The IVR applications are developed for specific customer needs and in many cases are
integrated with databases to enable real-time queries and updates. Some examples of IVR
applications are:
Example
• A pharmacy's application that lets customers access their accounts, receive real-time
status on their prescription refills, and request prescription refills.
• A bus station's IVR application that lets customers book seats on a trip or review
projected departure times.
• A bookstore's application that lets customers hear store hours, purchase books, and
check the delivery of an existing order.
The collection of hardware and software that creates and administers IVR applications on
Avaya BCMs is collectively referred to as the Avaya BCM-IVR 2.1 system.
Avaya Business Communications Manager—IVR Upgrade Guide
September 2010
15
Avaya BCM - IVR 2.1 Upgrade Overview
New or Updated Features of Avaya BCM-IVR 2.1
In previous Avaya BCM-IVR systems (such as the Avaya BCM-IVR 1.X system), both the
Avaya BCM 3.X and the IVR 1.X operated on an Embedded Windows NT platform. The IVR
1.X development and administration tools (PeriProducer 2.X, PeriStudio 1.X, PeriReporter,
and PeriView) ran on a Windows NT/2000 platform.
The Avaya BCM-IVR 2.1 system requires both the Carrier Grade Linux (NCGL) platform and
the Windows 2000 platform. The Avaya BCM 4.0 operates on the NCGL platform. The Avaya
BCM 4.0 runs IVR applications developed and administered with the latest releases of IVR
development and administration tools: PeriProducer 3.00, PeriStudio 2.20, PeriView 2.1, and
PeriReporter 1.21. These IVR development and administration tools run on the Windows 2000
platform.
In the Avaya BCM-IVR 2.1 system, Avaya BCMs are managed with Business Element
Manager, not Unified Manager (for more information about Business Element Manager, see
Avaya BCM 4.0 Networking Configuration Guide).
In the Avaya BCM-IVR 2.1 system, PeriView and PeriView Consolidator reside on a Windows
2000 workstation, and Avaya BCM 4.0 resides on an NCGL workstation. The Avaya BCMs
IVR capabilities are managed from any user PC by pointing the user PC web browser to the
PeriView/PeriView Consolidator workstation. A third workstation with Fedora Core 3 is required
if IVR applications use C/C++ external call functions.
As such, the configuration of the new Avaya BCM-IVR 2.1 system differs from that of the Avaya
BCM-IVR 1.X system.
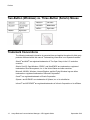
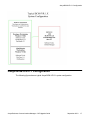
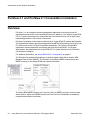
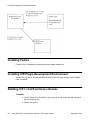
Avaya BCM-IVR 1.X Configuration
The following figure shows a graphical representation of a typical Avaya BCM-IVR 1.X
configuration.
16
Avaya Business Communications Manager—IVR Upgrade Guide
September 2010
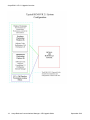
Avaya BCM-IVR 2.1 Configuration
Avaya BCM-IVR 2.1 Configuration
The following figure shows a typical Avaya BCM-IVR 2.1 system configuration.
Avaya Business Communications Manager—IVR Upgrade Guide
September 2010
17
Avaya BCM - IVR 2.1 Upgrade Overview
18
Avaya Business Communications Manager—IVR Upgrade Guide
September 2010
Prerequisites for the Avaya BCM-IVR 2.1 Upgrade
Prerequisites for the Avaya BCM-IVR 2.1 Upgrade
Application Developer
Application Developers create applications that run on the Avaya BCM-IVR system. Application
Developers must upgrade their developer workstation and install Fedora Core 3 to upgrade
any external C/C++ Call Functions in existing applications. Developer Upgrade on Windows
Workstation on page 81Chapters 4 and 5 are intended for Application Developers.
An Application Developer must obtain the following CDs to upgrade the Avaya BCM-IVR
system:
• MPS 2.1 Software, Documentation and Update CD—MPS 2.1 Patch Bundle 9,
PeriProducer 3.00, PeriStudio 2.20, PeriView 2.1 and PeriReporter 1.21 and supporting
documentation
• Avaya BCM-IVR Toolkit CD—contains Avaya BCM Toolkit for PeriProducer 3.00, NCGL
Development Environment, userdb.xml.BCM, Avaya BCM-IVR Integration Supplement,
PeriProducer for the Avaya BCM Guide, Avaya BCM-IVR 2.1 Upgrade Guide,
ReadMe_1st.
An Application Developer must have a Windows 2000 operating system.
If the IVR applications use C/C++ call functions, an Application Developer must also have a
PC with Fedora installed. See Developer Upgrade on Windows Workstation on page 81 and
Developer Upgrade on Fedora Workstation on page 87 for more information.
System Administrator
System Administrators monitor and maintain the Avaya BCM-IVR system. System
Administrators must uninstall existing PERI packages, install BMC/IVR 2.1 PERI packages,
and install PeriView Consolidator. System Administrators are also responsible for managing
the Avaya BCMs using Business Element Manager. See Administrator on the Windows
Workstation on page 41 and Administrator on the Avaya BCM 4.0 Platform on page 73 for
more information.
Avaya Business Communications Manager—IVR Upgrade Guide
September 2010
19
Avaya BCM - IVR 2.1 Upgrade Overview
A System Administrator must obtain the following CDs in order to upgrade the Avaya BCMIVR system:
• MPS 2.1 Software, Documentation and Update CD—MPS 2.1 Patch Bundle 9,
PeriProducer 3.00, PeriStudio 2.20, PeriView 2.1 and PeriReporter 1.21 and supporting
documentation
• Avaya BCM-IVR Toolkit CD—contains Avaya BCM Toolkit for PeriProducer 3.00, NCGL
Development Environment, userdb.xml.BCM, Avaya BCM-IVR Integration Supplement,
PeriProducer for the Avaya BCM Guide, Avaya BCM-IVR 2.1 Upgrade Guide,
ReadMe_1st.
A System Administrator must have a Windows 2000 operating system.
Note:
Before proceeding with this upgrade, the System Administrator must obtain ported IVR
applications from the Application Developer. See Porting PeriProducer 2.30 Applications to
PeriProducer 3.00 on page 81.
Transition Issues
Transition Issues for the Application Developer
In upgrading from Avaya BCM-IVR 1.X to Avaya BCM-IVR 2.1, Application Developers may
encounter transition issues due to new or obsolete PeriProducer features.
Database Access Modes
Avaya BCM-IVR 2.1 supports VTCPD and Host database access.
BMC/IVR 2.1 no longer supports native mode or Open Database Connectivity access (ODBC).
Existing applications configured for native mode or ODBC access must be reconfigured.
For more information about configuring your Avaya BCM-IVR 2.1 system for database access.
See Database Access Configuration on page 91.
20
Avaya Business Communications Manager—IVR Upgrade Guide
September 2010
New PeriProducer 3.00 Blocks
New PeriProducer 3.00 Blocks
PeriProducer 3.00 introduces several new toolkit blocks; however, some are not supported in
the Avaya BCM environment. The following table lists the new blocks and whether they are
supported in the Avaya BCM Environment.
Table 2: New PeriProducer 3.00 Blocks
Block
Function
Abort
Abort input/output
Bridge
Not supported
Call Control
Send data to telephony protocol layer/perform a hookflash
(moved from Originate block in PeriProducer 2.30)
Call Conferencing
Not supported
Call Progress Detection
Manage call progress detection functions
Edit Sequence
Manage touch tone input editing and user edit sequences
Line Operations
Perform phone line operations (such as offer call, accept call,
get line/application resource from pool)
Media Operations
Not supported
Select Input
Not currently implemented
See the PeriProducer 3.00 User Guide for full descriptions of the blocks.
Blocking/Non-blocking Execution
Many PeriProducer blocks provide the option of choosing blocking (execution waits at that
block until it receives success/failure message) or non-blocking (execution continues to next
block without waiting for message) execution. A Wait checkbox enables/disables blocking
execution for the applicable blocks. See Blocking/Non-blocking Operation in the PeriProducer
3.00 User Guide for details.
Call Progress Detection
Using Call Progress Detection (CPD) is updated in PeriProducer 3.00. CPD is controlled by
dynamically enabling and disabling specific tone/event detection in the Call Progress Detection
block. All CPD events return to the application as the cpd condition with the specific event
Avaya Business Communications Manager—IVR Upgrade Guide
September 2010
21
Avaya BCM - IVR 2.1 Upgrade Overview
(Busy, Reorder, and so on) in the condition data. See the PeriProducer 3.00 User Guide for
details.
PeriProducer 3.00 Block Changes
Many PeriProducer 3.00 blocks have amended or improved function.
Connection IDs (Caller I/O blocks)
Phone line and resource numbers are replaced with Connection IDs (CIDs). Connection IDs
indicate the component name and the line number of the connection. For example, the CID
mps24.1 indicates the connection is from line one on component mps24. The default
Connection ID for the current phone line is available in the System folder's DefaultCID data
card. The CID for an operation is supplied by the system (for example, when a resource is
allocated).
Accessory Toolkit Blocks
The Table Search, Table Sort, Date Calculations, and Send email blocks are moved from the
main toolkit to the accessory toolkit.
Answer Block
Continue on Ring Detect Removed
The Continue on Ring Detect option is removed.
Get Phone Number Options Removed
The Get Dialed Phone Number and Get Caller's Phone Number options are supported only
with certain protocols. See the Avaya BCM 4.0 Networking Configuration Guide for more
details.
22
Avaya Business Communications Manager—IVR Upgrade Guide
September 2010
Disconnect Block
Disconnect Block
Abandoned Call Counter Removed
The MPS does not automatically track system abandoned calls. The Mark as abandoned
option is removed. To track abandoned calls, create application statistics and use MPS
Reporter to display the reports
System Block
Diagnostic Functions Removed
The diagnostics function is removed.
Condition Data
The Get Condition Data function is added. This function replaces using the condition-data call
function. Get Condition Data requires a folder with the same structure, data names, and data
types expected with the condition.
Send Host Block
Virtual Terminal (VT) Allocation
VT allocation functions are available from the Send Host block. These functions replace the
VT allocation Environment block options.
Avaya Business Communications Manager—IVR Upgrade Guide
September 2010
23
Avaya BCM - IVR 2.1 Upgrade Overview
Setting Host Environment Parameters
Host environment parameters are sent from the Send Host block. This function replaces the
Environment block "host" option.
Receive Host Block
Asynchronous Operation
The Asynchronous checkbox is replaced by the Wait checkbox. Receive Host operates
asynchronously when the Wait checkbox is unchecked.
Send Fax Block
Fax Composition Removed
The Fax Composition feature is not supported. All controls and options used to create and
store composed faxes are removed.
Send Fax from TIFF File
PeriProducer 3.00 supports sending faxes directly from TIFF format files. TIFF faxes no longer
need to be imported into a MultiMedia File and accessed by a media storage token.
Fax Mode Removed
PeriProducer 3.00 supports only Group 3 faxes.
24
Avaya Business Communications Manager—IVR Upgrade Guide
September 2010
Receive Fax Block
Receive Fax Block
Receive Fax Direct into TIFF File
Applications can save an incoming fax directly to a TIFF-format file. In previous versions of
PeriProducer, faxes were stored in MultiMedia Files and had to be exported to individual TIFFs.
Local Station ID
The user can specify the Local Station ID (which typically represents the phone number of the
station receiving the fax) in the block. The Local Station ID is typically displayed on the
transmitting fax machine.
Fax Mode Removed
PeriProducer 3.00 supports only Group 3 faxes.
Originate Block
Moved Functions
All bridging functions are moved to the new 3.00 Bridge Block. Hookflash is moved to the Call
Control Block. The End Transfer function is deleted and the user can use the Disconnect block
instead.
Record Block
Asynchronous Recording
Asynchronous recording provides an unlimited duration message. Asynchronous recording is
explicitly started and stopped by Begin and End functions of the Record block.
Moved Functions
Element deletion functions are moved to the Media Operations block.
Resource Block
Asynchronous Execution Changes
There is no longer an Async checkbox in the Resource block. To perform the resource receive
asynchronously, clear the Wait box.
Avaya Business Communications Manager—IVR Upgrade Guide
September 2010
25
Avaya BCM - IVR 2.1 Upgrade Overview
Discontinued Features and Functions
Fax Composition
Fax composition is not supported in PeriProducer 3.00. Faxes to be sent must be created by
external applications or received (and stored for later use) by the Avaya BCM.
Hardware Properties Window
The Hardware Properties Window is removed.
Unsupported Resources
PeriProducer 3.00 no longer supports the following resources:
• mps
• abb
• asdi
• ast
• iwr
• ppd
• modem
• mts
• iscp
• ctx
• lcr
26
Avaya Business Communications Manager—IVR Upgrade Guide
September 2010
Obsolete Functions
Obsolete Functions
The Media Operations block in PeriProducer has rendered obsolete the file-to-message,
message-to-item and message-to-file functions.
Other PeriProducer Changes
Enhanced Condition Data
Condition Data is now returned as a data structure consisting of different field/value pairs. To
access the expanded condition data, use the System block's "Get Condition Data" function
and specify the appropriate response folder (templates provided in %PPROPATH%\sample
\folders). To access all of the condition data, the folder must have data cards defined as the
same name and type as the associated condition data field. The data for one field only can be
obtained by specifying a datacard whose name matches the desired field.
Note:
The condition data for many conditions have a Status field. The Status field value is
automatically copied into the System folder's ConditionData card.
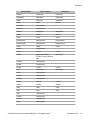
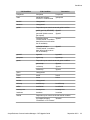
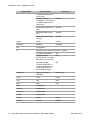
Environment Options
Many PeriProducer 2.30 Environment options are rendered obsolete or replaced by new
environment options, block built-in functions or both, in PeriProducer 3.00. The following table
lists the 2.30 Environment options and the analogous 3.00 option (if any). Comments are
provided where appropriate.
Table 3: Environment Options Conversions
2.30 Environment Option
3.00 Equivalent
Phone Environment
answer
Unsupported as environment option. Use the Answer
block (Answer function) to answer a call.
Avaya Business Communications Manager—IVR Upgrade Guide
September 2010
27
Avaya BCM - IVR 2.1 Upgrade Overview
2.30 Environment Option
3.00 Equivalent
first
DtmfFirst (Application and System Environment
options)
inter
DtmfInter (Application and System Environment
options)
keepterm
Unsupported as environment option. Use the "Retain"
option (for the termination character) in Edit Sequence
block.
termchar
Unsupported as environment option. Use the Edit
Sequence block to enable/set a termination character.
total
LineTotalCall (Application and System Environment
options)
typeahead
Unsupported
Phone Line Task Environment
backsp
Unsupported as environment option. Use the Edit
Sequence block to enable/set a backspace edit
sequence.
delete
Unsupported
eXtext
Unsupported. Use the Edit Sequence block to enable/
set user edit sequences.
Phone Resource Server Environment
prs
Unsupported
tstop
Unsupported as environment option
Message Recording Environment
intersil
RecInterSil (Application and System Environment
options)
Call Progress Detection Environment
cpansup
Unsupported
pickup
Unsupported
Speech Management Environment
clear
Supported for legacy applications only. Use the Abort
block with the "Caller I/O Only" option enabled.
vioabort
Unsupported as environment option. Use the Abort
block.
Host Environment
er
28
er
Avaya Business Communications Manager—IVR Upgrade Guide
September 2010
Environment Options
2.30 Environment Option
3.00 Equivalent
freevt
Supported for legacy applications only. Use the Send
Host block "Free VT" (in Control > Function > Controls)
option.
getvt
Supported for legacy applications only. Use the Send
Host block "Get VT" (in Control > Function > Controls)
option.
headermode
headermode
hostctl
hostctl
intime
intime
parameter
Supported for legacy applications only. Use the Send
Host block "parameter" (in Function > Controls) option.
refer
refer
rfno
rfno
session
session
setaid
setaid
unlocks
unlocks
usepool
usepool
Advanced Phone Line Management
phone
Unsupported as environment option
Optional Exception Conditions
rngback
Unsupported as environment option
uedit3
Unsupported as environment option (in the context of
taking a digital system out of wait for an outdial
complete message)
Generic Environment Options
Phone Line Manager Options
Superseded by "Application and System Options"
Vengine Options
Vengine Options
VENGINE Environment
alarmdbtask
alarmdbtask
apprestart
apprestart
centurymark
centurymark
debug
debug
deltimedcall
deltimedcall
Avaya Business Communications Manager—IVR Upgrade Guide
September 2010
29
Avaya BCM - IVR 2.1 Upgrade Overview
2.30 Environment Option
3.00 Equivalent
hnowait
Unsupported (a corresponding VENGINE runtime
option is available)
intermsg
intermsg
maxmessage
Unsupported
mode
mode
notice
notice
numset
numset
rscertime
rscertime
rscintime
rscintime
setvpsline
setvpsline
softterm
softterm
speak
speak
timedcall
timedcall
unnotice
unnotice
vmstimedcall
vmstimedcall
vpsrcvtime
vpsrcvtime
webtimeout
webtimeout
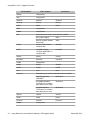
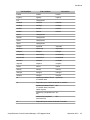
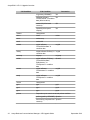
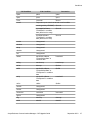
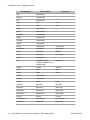
Conditions
When a PeriProducer 2.30 application is opened in 3.00, PeriProducer attempts to
automatically convert handle conditions to their counterparts in 3.00. Condition conversions
shown with a preceding dollar sign ("$") are displayed in the application as the 2.30 condition
but are automatically converted to the appropriate 3.00 condition at runtime.
The following table lists the 2.30 condition, the corresponding 3.00 condition (if any), and, if
applicable, how PeriProducer 3.00 converts the condition when a 2.30 application is ported to
3.00.
Table 4: Conditions Conversion
2.30 Condition
30
3.00 Condition
Conversion
abend
abend
abend
addfail
importfail w/Status
"ErrInUse" in condition data
$addfail
Avaya Business Communications Manager—IVR Upgrade Guide
September 2010
Conditions
2.30 Condition
3.00 Condition
Conversion
addsucc
importcmp
importcmp
altlinkdown
altlinkdown
altlinkdown
ansfail
answerfail
answerfail
asrdet
asrdet
asrdet
asyncdata
Unsupported
asyncfail
Unsupported
autofail
detinputfail
detinputfail
autotim
autotim
autotim
avserr
avserr
avserr
badoperation
badoperation
badoperation
badparameter
badparameter
badparameter
calltim
calltim
calltim
carloss
Unsupported
ccs7cc
ccs7cc
ccs7cc
chartim
getinputfail w/Status
"ErrInter" field in condition
data
getinputfail
cmrhigh
Unsupported
cmrlow
Unsupported
comfail
comfail
comfail
conn
answercmp
answercmp
crefer
Unsupported
crepeat
Unsupported
crepmax
Unsupported
cticond
cticond
cticond
ctidown
ctidown
ctidown
ctifail
ctifail
ctifail
ctiup
ctiup
ctiup
ctxcc
Unsupported
ctxfailcc
Unsupported
ctxokcc
Unsupported
cvoice
Unsupported
Avaya Business Communications Manager—IVR Upgrade Guide
September 2010
31
Avaya BCM - IVR 2.1 Upgrade Overview
2.30 Condition
32
3.00 Condition
Conversion
dcdown
Unsupported
dcup
Unsupported
deadlock
deadlock
deadlock
delcomp
delcmp
delcmp
delfail
delfail
delfail
dialtn
Unsupported
disable
Unsupported
disc
Dependent upon event that caused disc condition.
disc (caller hangup)
$disc
disccmp (system-initiated
disconnect)
$disc
discfail
discfail w/Status field in
condition data
$discfail
dtmfzl
recordfail w/Status
"ErrZeroLengthDTMF" in
condition data
recordfail
dupkey
dupkey
dupkey
dupvalidx
dupvalidx
dupvalidx
enable
Unsupported
endfail
discfail
$endfail
endfile
endfile
endfile
error
error
error
ertimeout
Dependent upon event that caused ertimeout condition
ertimeout (gen'd by
VENGINE)
$ertimeout
hrcvmapfail w/Status
"ErrTimeout" in condition
data (failed receive map)
$ertimeout
hrcvtxtfail w/Status
"ErrTimeout" in condition
data (failed receive text)
$ertimeout
expired
expired
expired
faxdet
faxdet
faxdet
forcefree
forcefree
forcefree
forward
Unsupported
Avaya Business Communications Manager—IVR Upgrade Guide
September 2010
Conditions
2.30 Condition
3.00 Condition
Conversion
fromphone
fromphone
fromphone
frstim
getinputfail w/Status
"ErrFirst" in condition data
getinputfail
ftomfail
Unsupported
ftomsucc
Unsupported
getfail
Dependent upon event that caused getfail condition
getfail (gen'd by VENGINE)
$getfail
getrsrcfail (failed resource
get request)
$getfail
rcvfaxfail w/Status
$getfail
"ErrNoFaxAvail" in condition
data (failed receive fax when
fax not available)
sndfaxfail w/Status
$getfail
"ErrNoFaxAvail" in condition
data (failed send fax when
fax not available)
getvtfail
hgetvtfail
hgetvtfail
getvtpass
hgetvtcmp
hgetvtcmp
gotres
Dependent upon event that caused gotres condition
getrsrccmp
$gotres
rcvfaxcmp
$gotres
sndfaxcmp
$gotres
green
Unsupported
hctloff
hctloff
hctloff
hctlon
hctlon
hctlon
heldres
Unsupported
hkfcomp
hookflshcmp
hookflshcmp
hkffail
hookflshfail
hookflshfail
hostasyncevt
hostasyncevt
hostasyncevt
hostdown
hostdown
hostdown
hostfail
Dependent upon event that caused hostfail condition
hrcvmapfail w/Status
$hostfail
"ErrNoData" or "ErrTimeout"
Avaya Business Communications Manager—IVR Upgrade Guide
September 2010
33
Avaya BCM - IVR 2.1 Upgrade Overview
2.30 Condition
3.00 Condition
Conversion
in condition data (failed to
receive map)
hrcvtxtfail w/Status
$hostfail
"ErrNoData" or "ErrTimeout"
in condition data (failed to
receive text)
hsndmapfail (failed to send
map)
$hostfail
hsndtxtfail (failed to send
text)
$hostfail
hsndaidfail (failed to send
AID key)
$hostfail
hostup
hostup
hostup
hstatdata
hstatdata
hstatdata
idle
Unsupported
inf
Dependent upon event that caused inf condition
inf (gen'd by VENGINE)
$inf
rcvfaxfail w/Status
$inf
"ErrNoFaxAvail" in condition
data (failure to receive fax)
34
recordfail w/Status
"ErrZeroLengthDTMF" or
"ErrZeroLengthSilence" in
condition data (failure to
record CMR message)
$inf
intertimeout
intertimeout (gend' by
VENGINE)
$intertimeout
invreq
invreq
invreq
ioerr
ioerr
ioerr
iscpf
iscpf
iscpf
isdncc
Unsupported
iupdbusy
Unsupported
iupdcomp
Unsupported
iupdfail
Unsupported
lengerr
lengerr
lengerr
linkdown
linkdown
linkdown
Avaya Business Communications Manager—IVR Upgrade Guide
September 2010
Conditions
2.30 Condition
3.00 Condition
Conversion
lockfail
lockfail
lockfail
logdeny
logdeny
logdeny
lost
Unsupported
marshall
mailshall
marshall
mmfhigh
mmfhigh
mmfhigh
mmflow
mmflow
mmflow
modvar
modvar
modvar
mpscc
Unsupported
mpsinfo
Unsupported
mpsoc
Unsupported
mpsof
Unsupported
mtoffail
exportfail
exportfail
mtofsucc
exportcmp
exportcmp
nilobjref
nilobjref
nilobjref
nonexistobj
nonexistobj
nonexistobj
norecfound
norecfound
norecfound
norestart
norestart
norestart
nospace
nospace
nospace
notfnd
notfnd
notfnd
notimpl
notimpl
notimpl
notlogon
notlogon
notlogon
notopen
notopen
notopen
oa
speakcmp w/Status "Abort"
in condition data
speakcmp
oc
Dependent upon event that caused oc condition
speakcmp w/Status "Done" $oc
in condition data (completed
speak request)
sndfaxcmp (completed send $oc
fax)
sndrsrccmp (completed
send resource)
of
$oc
Dependent upon event that caused of condition
Avaya Business Communications Manager—IVR Upgrade Guide
September 2010
35
Avaya BCM - IVR 2.1 Upgrade Overview
2.30 Condition
3.00 Condition
of (gen'd by VENGINE)
Conversion
$of
sndfaxfail w/Status
$of
"ErrNoFaxAvail" in condition
data (failed send fax)
sndrsrcfail (failed send
resource)
$of
speakfail (failed speak
request)
$of
ofaxdet
Unsupported
orberr
orberr
oscoc
sndrsrccmp
oscof
sndrsrcfail
outbad
origfail w/Status
"ErrInvalidLineState" in
condition data
outbsy
origfail w/Status "ErrBusy" in origfail
condition data
outcomp
origcmp
origcmp
outfail
origfail w/Status "ErrBusy",
"ErrInvalidLineState",
ErrNoAnswer", or
"ErrRejected" in condition
data
$outfail
outnoa
origfail w/Status
"ErrNoAnswer" in condition
data
origfail
outrej
origfail w/Status
"ErrRejected" in condition
data
origfail
outvoa
Unsupported
pgid
pgid
pgid
pgml
pgml
pgml
pgun
pgun
pgun
prsfree
Dependent upon event that caused prsfree condition
orberr
origfail
prsfree (gen'd by VENGINE) $prsfree
freersrccmp (completed free $prsfree
resource)
36
Avaya Business Communications Manager—IVR Upgrade Guide
September 2010
Conditions
2.30 Condition
3.00 Condition
Conversion
qiderr
qiderr
qiderr
qzero
qzero
qzero
rcverr
rcvrsrcfail
$rcverr
rcvnull
Dependent upon event that caused rcvnull condition
rcvnull (gen'd by VENGINE)
$rcvnull
hrcvmapfail w/Status
"ErrNoData" in condition
data (failed receive map)
$rcvnull
hrcvtxtfail w/Status
"ErrNoData" in condition
data (failed receive text)
$rcvnull
rcvoice
Unsupported
rdcdown
Unsupported
rdcup
Unsupported
rdisable
Unsupported
red
Unsupported
refbad
transferfail w/Status
"ErrInvalidLineState" in
condition data
transferfail
refbeg
transfercmp
transfercmp
refcan
disccmp
$refcan
reffail
transferfail w/Status
"ErrInvalidLineState" or
"ErrRejected" in condition
data
$reffail
refrej
transferfail w/Status
"ErrRejected" in condition
data
transferfail
reftim
calltim
$reftim
renable
Unsupported
reorder
Unsupported
resumefail
resumefail
rgreen
Unsupported
ring
alertcmp
alertcmp
rinfail
alertfail
alertfail
Avaya Business Communications Manager—IVR Upgrade Guide
resumefail
September 2010
37
Avaya BCM - IVR 2.1 Upgrade Overview
2.30 Condition
38
3.00 Condition
Conversion
rlost
Unsupported
rngback
Unsupported
rred
Unsupported
rscoc
rscoc
rscoc
rscof
rscof
rscof
rsilence
Unsupported
rvoice
Unsupported
rxdcdown
Unsupported
rxdcup
Unsupported
rxdisable
Unsupported
ryellow
Unsupported
sentcp
sndtonecmp
sndtonecmp
serverdown
serverdown
serverdown
setfail
ctrlrsrcfail
$setfail
setres
ctrlrsrccmp
ctrlrsrccmp
silence
Unsupported
silzl
recordfail w/Status
"ErrZeroLengthSilence" in
condition data
recordfail
softterm
softterm
softterm
sqlerr
sqlerr
sqlerr
sslfail
sslfail
sslfail
stoptim
Unsupported
stpring
Unsupported
tcapcc
tcapcc
tcapcc
tftprecfail
tftprecfail
tftprecfail
tftprecsucc
tftprecsucc
tftprecsucc
tftpsendfail
tftpsendfail
tftpsendfail
tftpsendsucc
tftpsendsucc
tftpsendsucc
timeres
timeres
timeres
toomanyrows
toomanyrows
toomanyrows
tophonefail
tophonefail
tophonefail
Avaya Business Communications Manager—IVR Upgrade Guide
September 2010
Miscellaneous
2.30 Condition
3.00 Condition
Conversion
ttdata
getinputcmp
getinputcmp
ttdet
ttdet
ttdet
ttfail
getinputfail w/Status
"ErrFirst" in condition data
$ttfail
uedit0 - uedit3
uedit0 - uedit3
uedit0 - uedit3
unexdata
unexdata
unexdata
unexhost
unexhost
unexhost
unexphone
unexphone
unexphone
valueperr
valueperr
valueperr
voice
Unsupported
vrto
vrto
vrto
webfail
webfail
webfail
webtimeout
webtimeout
webtimeout
xdisable
Unsupported
xmtcomp
Unsupported
xmtfail
Unsupported
yellow
Unsupported
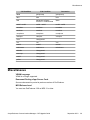
Miscellaneous
VRAM Language
VRAM is no longer supported.
Downward Porting of.ppr Source Code
Source code cannot be ported to previous versions of PeriProducer.
MPS Release Level
You must use PeriProducer 3.00 on MPS 2.1 or later.
Avaya Business Communications Manager—IVR Upgrade Guide
September 2010
39
Avaya BCM - IVR 2.1 Upgrade Overview
Transition Issues for the System Administrator
Minor changes to PeriView and PeriView Consolidator impact how System Administrators
administer IVR scripts on the Avaya BCMs; however, no functionality has been lost (see the
PeriView 2.1 Users Guide).
Note:
System Administrators now manage Avaya BCMs through Business Element Manager (see
the Avaya BCM 4.0 Networking Configuration Guide).
Documentation Issues
Issue
Documentation currently refers to hardware as the MPS.
Wherever the documentation uses MPS, assume that this refers to the Avaya
BCM-IVR, unless otherwise noted.
40
Avaya Business Communications Manager—IVR Upgrade Guide
September 2010
Chapter 4: Administrator on the Windows
Workstation
This chapter covers:
1.
Windows Workstation Operating System Upgrade
2.
Avaya BCM-IVR 1.X Uninstall Procedures
3.
Avaya BCM-IVR 2.1 Installation Procedures
4.
Avaya BCM-IVR 2.1 Toolkit Installation
5.
PeriView 2.1 and PeriView 2.1 Consolidator Installation
6.
Launching Applications in PeriView
Windows Workstation Operating System Upgrade
If either the Application Developer workstation or the System Administrator workstation is
currently running on Windows NT, both workstations must be upgraded to the Window 2000
operating system. For more information about upgrade prerequisites, see Prerequisites for the
Avaya BCM-IVR 2.1 Upgrade on page 19.
Avaya Business Communications Manager—IVR Upgrade Guide
September 2010
41
Administrator on the Windows Workstation
Avaya BCM-IVR 1.X Uninstall Procedures
Uninstall Procedures with MPS 2.1 Software and Document
CD
If Avaya Business Communications Manager (Avaya BCM) IVR 1.X is already on the Windows
Workstation, follow these procedures to remove the Avaya BCM-IVR 1.X PERI packages prior
to installing Avaya BCM-IVR 2.1.
Example
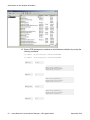
1. Ensure PERI packages are installed on the box by either:
a. running the following command:
C:\perl -S perirev.plx outfile=STDOUT
The preceding command produces an output similar to the following
sample.
PERIase
4.7.1
PERIMPSPatch Bundle 7
PERIrel5Patch Bundle 27
BundleCutDate-20031007
PkgCutDate-20020122
PERIfw
1
PERIMPSPatch Bundle 7
PERIrel5Patch Bundle 27
BundleCutDate-20031007
PkgCutDate-20011214
PERIgase
1.0.0
PERIMPSPatch Bundle 7
PERIrel5Patch Bundle 27
BundleCutDate-20031007
PkgCutDate-20020104
PERIglobl
42
1.1.1
Avaya Business Communications Manager—IVR Upgrade Guide
September 2010
Uninstall Procedures with MPS 2.1 Software and Document CD
PERIrel5Patch Bundle 27
BundleCutDate-20031007
PkgCutDate-20010611
PERIgrs
2.2
PkgCutDate-20030729
PERIperl
1.0.1
PERIrel5Patch Bundle 27
BundleCutDate-20031007
PkgCutDate-20020116
PERIplic
1.1.1
PERIMPSPatch Bundle 7
PERIrel5Patch Bundle 27
BundleCutDate-20031007
PkgCutDate-20021004
PERIppro
2.30
PERIMPSPatch Bundle 7
PERIrel5Patch Bundle 27
BundleCutDate-20031007
PkgCutDate-20010427
PERIpstu
2.20
PERIMPSPatch Bundle 7
PERIrel5Patch Bundle 27
BundleCutDate-20031007
PkgCutDate-20010427
PERIrdb
1.2
PERIMPSPatch Bundle 7
PERIrel5Patch Bundle 27
BundleCutDate-20031007
PkgCutDate-20020117
PERIview
1.0.0
PERIMPSPatch Bundle 7
PkgCutDate-20020516
Avaya Business Communications Manager—IVR Upgrade Guide
September 2010
43
Administrator on the Windows Workstation
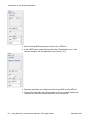
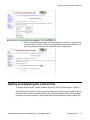
b. or by selecting Setting > Control Panel > Add/Remove.
The Add/Remove list contains the list of all PERI packages to be
uninstalled.
2. Back up old license files by copying C:\Program Files\\PERIplic\etc\plservrc to a
safe location.
Note:
If you are upgrading your operating system from Windows NT to Windows
2000, back up old license files to an external media other than the Windows
Workstation.
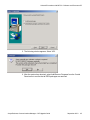
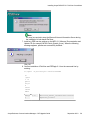
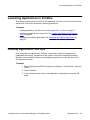
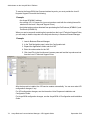
3. Insert the MPS 2.1 Software, Documentation and Update CD and run
PERIinstaller\setup.exe.
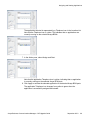
4. Select Uninstall when the Select Components window appears.
44
Avaya Business Communications Manager—IVR Upgrade Guide
September 2010
Uninstall Procedures with MPS 2.1 Software and Document CD
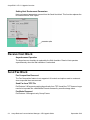
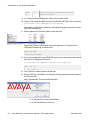
5. The following window appears. Select YES.
6. After the system has rebooted, select Add/Remove Programs from the Control
Panel menu to confirm that all PERI packages are removed.
Avaya Business Communications Manager—IVR Upgrade Guide
September 2010
45
Administrator on the Windows Workstation
Avaya BCM-IVR 2.1 Installation Procedures
The installation of the Avaya BCM-IVR 2.1 is a three-part process:
Example
1. Installation of PeriProducer 3.00 and PeriStudio 2.20
2. Installation of the Avaya BCM-IVR 2.1 Toolkit
3. Installation of the License
Note:
During these installation procedures, you may be prompted to reboot a number of times. As
well, the system may reboot automatically after installing a number of packages.
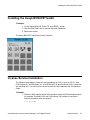
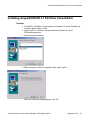
Installing PeriProducer 3.00 and PeriStudio 2.20
Example
1. From the MPS 2.1 Software, Documentation and Update CD, run PERIinstaller/
setup.exe.
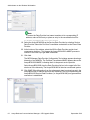
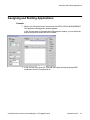
2. Select Install when the Select Components window appears.
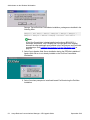
3. The Configurations window appears. Select the configuration you wish to install
and click Next.
46
Avaya Business Communications Manager—IVR Upgrade Guide
September 2010
Installing PeriProducer 3.00 and PeriStudio 2.20
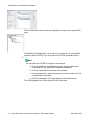
4. Select Typical when prompted to select the type of installation. Click Next.
Note:
highly recommends Typical installation. Only users with the most advanced
understanding of Avaya BCM-IVR systems and PERI packages should attempt
Custom installation.
After selecting Typical Installation, the following window appears.
Avaya Business Communications Manager—IVR Upgrade Guide
September 2010
47
Administrator on the Windows Workstation
Click Yes.
In a Typical Installation, the PERI packages install in the following order:
PERIperl > Auto Reboot > PERIfw > PERIglobl > PERIgrs >
PERIppro > PERIpstu > PERIplic > PERIrdb > Auto Reboot
5. From the MPS 2.1 Software, Documentation and Update CD, install any PERI
patch or patch bundles (for example, MPS2.1Patch_Bundle_9.exe) in the Patch
folder. If the patch or patch bundle installs successfully, the following message
appears:
6. If the Windows Workstation is used as a statistics collector node (see MPS 2.1
PeriReporter User Guide), install any patches in the Patch > Collector folder on
the MPS 2.1 Software, Documentation, and Update CD.
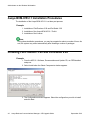
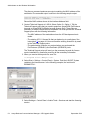
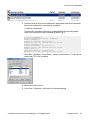
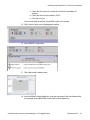
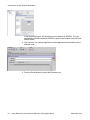
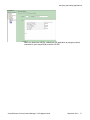
7. When all of the patch bundles (if any) have been successfully installed, open the
Services window.
Note the presence of the Networks License Service and the PeriView Data
Provider Service. The Networks Startup Service is not present.
You must manually install the Networks Startup Service.
48
Avaya Business Communications Manager—IVR Upgrade Guide
September 2010
Installing PeriProducer 3.00 and PeriStudio 2.20
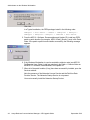
8. Install the Startup Service by entering the following command:
perisvc -install -dispname " Networks Startup Service"
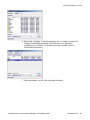
9. Confirm that srp is running by entering the following command:
srp -status
The preceding command produces an output similar to the following:
C:\WINNT\system32>vsh
vsh#common.0,gen/JVARGH-2 {1} -> srp -status
NODE:PORT
USER
PID
LINE STATE
ENTERED STATE
FLAGS
JVARGH-2:5999 SYSTEM
15900
-RUNNING Sep 15 15:52:40
C srp
CMDLINE
Confirm that Networks Startup Service is running by opening Services.
Avaya Business Communications Manager—IVR Upgrade Guide
September 2010
49
Administrator on the Windows Workstation
10. Ensure PERI packages are installed on the Windows workstation by running the
following command:
C:\>perl -S perirev.plx outfile=STDOUT
C:\>perl -S perirev.plx outfile=STDOUT
PERIase
5.0.0
MPS2.1Patch_Bundle_9
BundleCutDate-20050223
PkgCutDate-20020917
PERIfw
1
MPS2.1Patch_Bundle_9
BundleCutDate-20050223
PkgCutDate-20011214
PERIglobl
2.2.0
MPS2.1Patch_Bundle_9
BundleCutDate-20050223
PkgCutDate-20020917
PERIgrs
50
2.2
Avaya Business Communications Manager—IVR Upgrade Guide
September 2010
Avaya BCM-IVR 2.1 Toolkit Installation
MPS2.1Patch_Bundle_9
BundleCutDate-20050223
PkgCutDate-20030729
PERIperl
1.0.1
MPS2.1Patch_Bundle_9
BundleCutDate-20050223
PkgCutDate-20020116
PERIplic
1.2.0
MPS2.1Patch_Bundle_9
BundleCutDate-20050223
PkgCutDate-20030213
PERIppro
3.00
MPS2.1Patch_Bundle_9
BundleCutDate-20050223
PkgCutDate-20021017
PERIpstu
2.20
MPS2.1Patch_Bundle_9
BundleCutDate-20050223
PkgCutDate-20030220
PERIrdb
2.0
MPS2.1Patch_Bundle_9
BundleCutDate-20050223
PkgCutDate-20030310
Avaya BCM-IVR 2.1 Toolkit Installation
Introduction
When all the PERI packages for Avaya BCM-IVR 2.1 are successfully installed, you can install
the Avaya BCM-IVR 2.1 Toolkit.
Avaya Business Communications Manager—IVR Upgrade Guide
September 2010
51
Administrator on the Windows Workstation
Note:
If you already had the Avaya BCM-IVR Toolkit installed prior to upgrading to Avaya BCMIVR 2.1, recommends that you remove it prior to installing the Avaya BCM-IVR 2.1 Toolkit.
Previous versions of Avaya BCM-IVR Toolkit were not removed during the uninstall
procedures described in Uninstall Procedures with MPS 2.1 Software and Document CD on
page 42.
The Avaya BCM-IVR Toolkit is a graphical user interface (GUI) designed to allow applications to
perform Avaya BCM platform-specific operations. The Avaya BCM-IVR Toolkit contains the
feature extensions shown in Table 5: Avaya BCM-IVR Toolkit Feature Summaries on
page 52.
Table 5: Avaya BCM-IVR Toolkit Feature Summaries
Set Call Data: Associates data (for example, PIN, Credit
Card Number, and so on) with a specific call. Up to five
strings of data can be stored per call.
Get Call Data: Retrieves data that was previously stored
using Set Call Data.
Park Call: Suspends a call so that another device on the
Avaya BCM system can retrieve the call. A parked call is
connected to either a silence audio stream or the Music On
Hold input of the Avaya BCM until it is retrieved.
Check Park Status: Checks the status of a parked call in
the system. The Check Park Status operation indicates
whether a timeout has occurred, the call has been
automatically unparked and returned to the application, or
the caller has disconnected.
Begin Page: Attaches the voice port to a paging system.
When combined with the Park function, Avaya BCM-IVR
system parks a call and issues a page advising personnel
of the call (and the code to retrieve it).
End Page: Disconnects the voice port from the paging
system.
Note:
For more information about the functionality of the Avaya BCM-IVR Toolkit, see the
PeriProducer Toolkit for the Avaya BCM-IVR.
52
Avaya Business Communications Manager—IVR Upgrade Guide
September 2010
Installing the Avaya BCM-IVR Toolkit
Installing the Avaya BCM-IVR Toolkit
Example
1. On the Avaya BCM-IVR Toolkit CD, open READ_1st.htm.
2. Click the BCM Toolkit link to execute the toolkit installation.
3. Reboot the system.
The Avaya BCM-IVR Toolkit has six block functions.
License Service Installation
The following steps apply to users who are upgrading from IVR 1.X tools to IVR 2.1 tools
(PeriProducer 2.1 and PeriStudio 2.1 to PeriProducer 3.00 and PeriStudio 2.20). Users who
are installing IVR 2.1 for the first time should consult the IVR Installation and Configuration
Guide.
Example
1. Obtain the MAC address of the IVR workstation where the IVR development tools
(for example, PeriStudio 2.20 and PeriProducer 3.00) reside by issuing the
following command at the dos prompt:
c:\> plicnum
Avaya Business Communications Manager—IVR Upgrade Guide
September 2010
53
Administrator on the Windows Workstation
The plicnum command produces an output containing the MAC address of the
workstation.The command output is similar to the following sample output:
Interface Address (Interface #0) --> 0:6:5b:da:51:3f
Interface Host Name --> BCMWKSTN-1
Record the MAC address shown in the Interface Address field.
2. Contact Technical Support at 1-800-4. Select Option 5 > Option 1. Tell the
Technical Support prime that you need to produce a Avaya BCM PeriProducer
keycode or Avaya BCM PeriStudio keycode (license files). These files are
necessary to enable License Service installation.You must provide the Technical
Support prime with the following information:
• The MAC address of the workstation where the IVR development tools
reside.
• The existing IVR 1.X license file that you backed up to a safe place. See
instructions 2 on page 44. You must send the existing license file by email
to the Technical Support prime.
• The authorization numbers you received when you purchased the
PeriProducer (NTAB4211) and PeriStudio (NTAB4210) tools.
The Technical Support prime will send you the necessary keycode for license
service installation by email after receiving all the necessary information.
3. When you receive the keycode file, save it to:
c:\Program Files\\PERIplic\etc
4. Select Start > Settings > Control Panel > System. Point the LSHOST System
variable to the license server. In the following example, the local host is
BCMWKSTN-1:
5. Select Settings > Control Panel > Admin Tools > Services and start the licensing
service.
54
Avaya Business Communications Manager—IVR Upgrade Guide
September 2010
License Service Installation
6. Confirm that the license server obtained the appropriate licenses and activated
them on the workstation by entering the command:
C:\>plicmon <hostname>
The preceding command produces an output similar to the following sample
output from a workstation with hostname BCMWKSTN-1:
C:\>plicmon BCMWKSTN-1
Available Licenses from Server : BCMWKSTN-1
Product: PERIPRO 1.1
Licensed to ethernet: 0:6:5b:da:51:3f
Maximum users is: 355 Refresh every 360 seconds
Product: PERISTUDIO 1.3
Licensed to ethernet: 0:6:5b:da:51:3f
Maximum users is: 355 Refresh every 360 seconds
Product: plicd 1.2
Licensed to ethernet: 0:6:5b:da:51:3f
Maximum users is: 355 Refresh every 360 seconds
7. Select Start > Settings > Control Panel > Vision Communications > Tranports and
confirm that TCP-Unix is enabled.
8. Restart the XVision server.
9. Go to Start > Programs > and launch the licensed package.
Avaya Business Communications Manager—IVR Upgrade Guide
September 2010
55
Administrator on the Windows Workstation
PeriView 2.1 and PeriView 2.1 Consolidator Installation
Overview
PeriView 2.1 is an integrated systems management application suite that provides full
administration and control over Avaya BCM self-service platforms. It is used by Avaya BCMIVR 2.1 System Administrators to manipulate and view network activity and to deploy and
maintain applications in the network environment.
PeriView Consolidator is the communications hub for Avaya BCM-IVR system administration.
The System Administrator remotely manages the Avaya BCM-IVR system by pointing any User
PC web browser to the PeriView Consolidator workstation. The PeriView Consolidator
workstation communicates with and collects data from the Avaya BCMs. The System
Administrator also administers the Avaya BCM-IVR 2.1 system directly from the PeriView
Consolidator workstation.
For additional information, see Avaya BCM-IVR 2.1 Configuration on page 17.
The PeriView Consolidator Workstation runs both the Apache Web Server and the MPS
Manager Data Provider (MMDP). The PeriView Consolidator MMDP communicates with
MMDPs running on the Avaya BCMs and collects information.
The Avaya BCM MMDPs always run in service mode. An MMDP process in service mode
allows another, higher-level MMDP process such as PeriView Consolidator to establish a
constant and persistent connection.
56
Avaya Business Communications Manager—IVR Upgrade Guide
September 2010
Installing Avaya BCM-IVR 2.1 PeriView Consolidator
Installing Avaya BCM-IVR 2.1 PeriView Consolidator
Example
1. From MPS 2.1 Software, Documentation and Update CD, select Preinstall and
install the JAVA runtime or SDK.
2. From the MPS 2.1 Software, Documentation and Update CD, select
PERIinstaller/setup.exe.
3. Select periview-workstation.
4. When prompted to select an installation type, select Typical.
When the following message appears, click Yes.
Avaya Business Communications Manager—IVR Upgrade Guide
September 2010
57
Administrator on the Windows Workstation
During a Typical PeriView Consolidator installation, packages are installed in the
following order:
PERIperl > Auto Reboot > PERIfw > PERIglobl > PERIgrs > PERIppro >
PERIpstu > PERIplic > PERIrdb > PERIpdp > PeriView > Auto Reboot
Note:
If PeriView Consolidator is being installed on the Avaya BCM-IVR 2.1
Developer Workstation, only PERIpdp and PeriView need to be installed
because the other packages were installed in the PeriProducer and PeriStudio
upgrade steps. See Installing PeriProducer 3.00 and PeriStudio 2.20 on
page 46.
5. Select Yes to Apache Web Server installation during the PERIdist installation if
Apache Web Server is not already installed on the PeriView Consolidator
Workstation.
6. Select Yes when prompted to install web-based PeriView during the PeriView
installation.
58
Avaya Business Communications Manager—IVR Upgrade Guide
September 2010
Installing Avaya BCM-IVR 2.1 PeriView Consolidator
Note:
You may be required to stop the Microsoft Internet Information Server during
the installation of web-based PeriView.
7. Install any PERI service patches on the MPS 2.1 Software, Documentation and
Update CD (for example, MPS2.1Patch_Bundle_9.exe). When the following
message appears, patches are successfully installed:
Click OK.
8. Confirm installation of PeriView and PERIpdp 2.1 from the command line by
entering:
C:\>perl -S perirev.plx outfile=STDOUT
C:
\>per
l -S
perir
ev.pl
x
outfi
le=ST
DOUT
PERIpd
p
2.10
MPS2.1Patch_Bundle_9 BundleCutDate-20050223
PkgCutDate_20030523
Avaya Business Communications Manager—IVR Upgrade Guide
September 2010
59
Administrator on the Windows Workstation
PERIvi
ew
2.10
MPS2.1Patch_Bundle_9 BundleCutDate-20050223
PkgCutDate_20021002
9. In C:\Program Files\\PERIpdp\etc, back up the userdb.xml file.
10. Copy the file userdb.xml.BCM from the Avaya BCM-IVR Toolkit CD to overwrite
C:\Program Files\\PERIpdp\etc\userdb.xml.
The userdb.xml.BCM file contains the administrative plugins required for Avaya
BCM-IVR management.
11. Restart Apache and PeriView Data Provider services.
Ensure the PeriView Consolidator host name appears in C:\Program Files\
\PERIpdp\etc\mmdp.cfg, as shown here:
mmdpconfig=WIN2K
. .
ipcsrpconnection=WIN2K
12. If you are managing the Avaya BCM-IVR system from a browser located outside
the local host, change permissions in
C:\ProgramFiles\\PERIdist\apache\conf\httpd.conf
allow from all
#
#
deny fromm all
13. From Services, restart Apache web browser.
14. Ensure PeriView Consolidator is running by pointing the Apache web browser to
the PeriView URL:
http://<Consolidator IP>/periview/Periview.html
a. In the UserID box, enter Administrator.
b. In the Password box, enter root.
60
Avaya Business Communications Manager—IVR Upgrade Guide
September 2010
Installing Avaya BCM-IVR 2.1 PeriView Consolidator
c. Check that the Host box contains the PeriView Consolidator IP
address.
d. Check that the Port box contains "9191".
e. Click OK to log on.
You are now ready to add the Avaya BCM nodes to the system.
15. Click Control Center on the Management toolbar.
16. Select MMDP Configuration.
17. Click Add to add a data provider.
18. In the Add Data Provider dialog box, enter the host name of the new data provider
(for example, Avaya BCM1000) in the Data Provider Name box.
Avaya Business Communications Manager—IVR Upgrade Guide
September 2010
61
Administrator on the Windows Workstation
Note:
To ensure the Data Provider host name translates to its corresponding IP
address, make a DNS entry or place an entry in the consolidator host file:
C:\winnt\system32\drivers\etc\hosts
19. Select the Avaya BCM1000 as the Service Data Provider by selecting Service
Data Provider. Select the PeriView Consolidator workstation as the Parent Data
Provider.
20. At the bottom of the window, select the Will the Data Provider monitor local
components checkbox. This triggers the Avaya BCM1000's MMDP process to
connect to the local srp to get state information.
21. Click Add.
The MPS Manager Data Provider Configuration Tool window appears showing a
hierarchy of two MMDPs. The PeriView Consolidator MMDP appears above the
Avaya BCM1000 MMDP, indicating that it is the parent service provider.
Select Avaya BCM1000 from the Data Providers list box in the upper left of the
window or in the hierarchy. The Avaya BCM1000 is listed as a monitored system.
22. Click SAVE. If the information from the subsequent steps is entered correctly, the
Avaya BCM1000 IP address and node are contacted. The icons representing the
Avaya BCM-IVR Service Data Providers (i.e. Avaya BCM1000) turn green when a
connection is established.
62
Avaya Business Communications Manager—IVR Upgrade Guide
September 2010
Launching Applications in PeriView
Launching Applications in PeriView
This section describes how to launch an IVR application from the user PC and send it to the
Avaya BCM. The section includes the following procedures:
Example
• Loading application .vex files. See Loading Application .vex files on page 63.
• Loading user-defined call function files. See Loading User Defined Call Function
Files on page 66.
• Assigning and starting applications. See Assigning and Starting Applications on
page 67.
Loading Application .vex files
Prior to launching an application in PeriView, ensure that all system connections are
established and running. All elements of the system (such as the Avaya BCMs and the
Windows host workstation) that are running appear as green icons in the left area of the
PeriView launch screen.
Example
1. Ensure Windows host SRP is running using Settings > Control Panel > Services
Startup.
2. Launch PeriView.
3. In the PeriView launch screen, click Application Configuration to start the IVR
setup.
Avaya Business Communications Manager—IVR Upgrade Guide
September 2010
63
Administrator on the Windows Workstation
In the preceding fiugure, the Windows host workstation is JVARGH. The icon
representing the host worktation JVARGH is green in the left area of the PeriView
launch screen.
4. Click Choose. The Choose Application window appears showing folders on the
selected node.
5. From the Select Node list, select the Windows host.
64
Avaya Business Communications Manager—IVR Upgrade Guide
September 2010
Loading Application .vex files
6. Browse the .vex folder. In the following figure, the .vex folder is located in C:
\Program Files\\PERIppro\sample and contains only one application
(numdemo.vex). Files with .vex extensions are the compiled output of
PeriProducer source files.
7. Select the desired .vex file. Click Load then click Save.
Avaya Business Communications Manager—IVR Upgrade Guide
September 2010
65
Administrator on the Windows Workstation
Note:
Note that PeriView automatically creates the . acfg file when a .vex file is loaded to the
Application Configuration utility.
Note:
Note that you cannot have two MPS components with the same component number of the
same network.
Loading User Defined Call Function Files
Code for User Defined Call Functions is compiled on a Fedora NCGL workstation. A .so file is
generated and sent to the Windows host for transfer to the Avaya BCM. C/C++ Call Function
files are those with .so extensions. See Building C/C++ Call Functions Libraries on page
88.
To deploy User Defined Call Functions (C/C++ Call Function files) to the Avaya BCM, click
Change Option in the Application Configuration window.
Click Add. Browse the Windows host folder where .so files are located and select the
desired .so file.
Click Deploy to assign the .so file to the Avaya BCM.
66
Avaya Business Communications Manager—IVR Upgrade Guide
September 2010
Assigning and Starting Applications
Assigning and Starting Applications
Example
1. Return to the PeriView launch screen and click APPLICATION MANAGEMENT.
The Application Management window appears.
In the Choose pane of the Application Management window, you can select the
desired Avaya BCM nodes and line numbers
2. In the Choose field, select the Filter tab and select the desired Avaya BCM
component from the Components list.
Avaya Business Communications Manager—IVR Upgrade Guide
September 2010
67
Administrator on the Windows Workstation
3. Enter the Avaya BCM component number in the TYPE box.
4. In the LINES boxes, select the lines where the IVR application runs. In the
following example, the IVR application runs on lines 1 to 2:
5. Select the application to be deployed to the Avaya BCM from the APP list.
6. To enter the information in the Choose pane in the for a location listed in the
Locations list, select the desired selection in the Locations list.
68
Avaya Business Communications Manager—IVR Upgrade Guide
September 2010
Assigning and Starting Applications
The application selected is represented by a Telephone icon in the Locations list.
Note that the Telephone icon is yellow. This indicates that no applications are
currently running on the selected Avaya BCMs.
7. In the Action pane, select Assign and Start.
Note that the application Telephone icon is yellow, indicating that no application
is currently running on the selected Avaya BCM ports.
8. Click Apply to activate the selected application to the desired Avaya BCM ports.
The application Telephone icon changes from yellow to green when the
application is successfully assigned and started.
Avaya Business Communications Manager—IVR Upgrade Guide
September 2010
69
Administrator on the Windows Workstation
The PeriView launch screen shows the application running on two Avaya BCM
ports.
To validate the IVR application, use any phone connected to your Avaya BCM
system to call the IVR DN. If you do not know the IVR DN, proceed to step 9.
9.
Note:
You can obtain the IVR DN by using the vsh command.
a. From the Interactive Voice Response panel, select the Advanced
Commands tab. The Advanced Commands tab appears.
b. From the Command list, select the vsh command.
c. In the Arguments box, type the arguments you want to add to the vsh
command (bim repvoicecti).
d. Click Run Command. The output appears in the Results panel.
The IVR DN appears in the Port Group DN line of the output.
70
Avaya Business Communications Manager—IVR Upgrade Guide
September 2010
Assigning and Starting Applications
When you obtain the IVR DN, validate the IVR application by using any phone
connected to your Avaya BCM to call the IVR DN.
Avaya Business Communications Manager—IVR Upgrade Guide
September 2010
71
Administrator on the Windows Workstation
72
Avaya Business Communications Manager—IVR Upgrade Guide
September 2010
Chapter 5: Administrator on the Avaya BCM
4.0 Platform
This chapter covers:
1. Numbering Components using Business Element Manager
2. Enabling Host Communications with Business Element Manager
Numbering components using Business Element Manager
Business Element Manager is a management application for performing all day-to-day Avaya
Business Communications Manager (Avaya BCM) administration, configuration and
management functions. Business Element Manager resides on the System Administrator's
Windows 2000 workstation.
Using Business Element Manager's graphical user interface, the System Administrator can
easily configure and manage Avaya BCM nodes—whether from a PC directly connected to
the Avaya BCM or over a LAN, internet, or dial-up connection (ISDN or analog).
With Business Element Manager, all management tasks, including configuration changes,
alarm monitoring, adding features with keycodes and managing backups, can be performed
remotely.
In order to manage the Avaya BCMs using Business Element Manager, the Avaya BCMs must
added to Business Element Manager's administration list.
Example
1. Launch Business Element Manager.
2. In the Task Navigation pane, expand the Applications folder and select IVR.
Avaya Business Communications Manager—IVR Upgrade Guide
September 2010
73
Administrator on the Avaya BCM 4.0 Platform
3. The Interactive Voice Response window with three tabs appears. Select Basic
Settings.
To administer many IVR systems on different Avaya BCMs, IVR systems must be
assigned different node numbers. To change a node number, type in the new
number and select the Tab key on your keyboard to exit from the box.
4. IVR service shuts down and restarts after a node number change.
Enabling Host Communications with Business Element
Manager
The IVR Keycode files enable host access. You do not have access to IVR Host Access Service
without loading the necessary Keycode files in Business Element Manager.
The keycode files (license files) for Host Access Licensing in Avaya BCM/IVR 2.1 are different
from those in Avaya BCM/IVR 1.X.
Contact your Technical Support organization to obtain the new license file for host access.
74
Avaya Business Communications Manager—IVR Upgrade Guide
September 2010
Retrieving existing Host Communications License File
Prior to contacting your Technical Support organization, obtain the MAC address for the Avaya
BCM interface that communicates with the Host:
Example
1. Launch Business Element Manager
2. In the Task Navigation Panel, click the Configuration tab.
3. Expand the Resources folder and click Network Interfaces.
4. Select the LAN interface you want to use to communicate with the external host
(for example, LAN 1). The Details for Protocol appears with the Interface tab
displayed
5. Record the information that appears in the MAC Address box. This is the MAC
address of your Avaya BCM.
Retrieving existing Host Communications License File
Example
1. Create a shared folder on the PC that will receive the Host Communications
License File from the Avaya BCM.
2. Log on to Unified Manager on your Avaya BCM 3.X system.
Avaya Business Communications Manager—IVR Upgrade Guide
September 2010
75
Administrator on the Avaya BCM 4.0 Platform
3. Click Maintenance.
4. Select Attach Shared Volume . Select the shared folder you created in Retrieving
existing Host Communications License File so it can be accessed by the Avaya
BCM.
76
Avaya Business Communications Manager—IVR Upgrade Guide
September 2010
Getting and Applying the License File
5. Return to the Maintenance page and select Execute a Command. Copy the Host
Communications License File from the Avaya BCM to the shared folder that you
previously created by entering the command in the Command box.
Getting and Applying the License File
To acquire the license file, contact Technical Support (1-800-4). Select option 5 > option 1.
Tell the Technical Support prime that you need assistance in producing a keycode for Avaya
BCM/IVR. When you are connected with a Level 2 Keycode Support Prime, tell the support
prime that you need to produce a Avaya BCM Host Communications keycode (license file).
Avaya Business Communications Manager—IVR Upgrade Guide
September 2010
77
Administrator on the Avaya BCM 4.0 Platform
To receive the Avaya BCM Host Communications keycode, you must provide the Level 2
Keycode Support Prime with the following:
Example
• the Avaya BCM MAC address
• the existing IVR 1.X license file (you must send an email with the existing license file
attached to the Level 2 Keycode Support Prime)
• the Authorization numbers obtained from purchasing the PeriProducer (NTAB4211) and
PeriStudio (NTAB4210).
When you receive an email containing the keycode from the Level 2 Technical Support Prime,
you are ready to load the keycode to the Keycode directory in Business Element Manager.
Example
1. Launch Business Element Manager.
2. In the Task Navigation panel, select the Configuration tab.
3. Expand the Applications folder and click IVR.
4. Enter the node number for the IVR.
5. Click Load File in the Host Access Licenses pane and load the keycode received
from the Level 2 Technical Support Prime.
After the keycode is installed, the IVR service restarts automatically. You can now make IVR
configuration changes, if any.
For IVR configuration changes, see the Interactive Voice Response Installation and
Configuration Guide.
For Avaya BCM configuration changes, see the Avaya BCM 4.0 Configuration and Installation
Guide.
78
Avaya Business Communications Manager—IVR Upgrade Guide
September 2010
Application Resources
Application Resources
For more information about Application Resources, including Service Manager, Keycode, IVR
Advanced Commands, and the Advanced Commands Settings screen, see the Interactive
Voice Response Installation and Configuration Guide.
Avaya Business Communications Manager—IVR Upgrade Guide
September 2010
79
Administrator on the Avaya BCM 4.0 Platform
80
Avaya Business Communications Manager—IVR Upgrade Guide
September 2010
Chapter 6: Developer Upgrade on Windows
Workstation
This chapter covers:
1. Porting PeriProducer 2.30 Applications to PeriProducer 3.00
2. Porting Events
3. Conversion Logs
4. Known Conversion Issues
5. Assign and Start PeriProducer 3.00 Applications
Porting PeriProducer 2.30 Applications to PeriProducer 3.00
To upgrade to PERI products on the Windows Workstation, see Administrator on the Windows
Workstation on page 41.
Avaya Business Communications Manager (Avaya BCM) 4.0 runs IVR applications that are
developed with and use PeriProducer 3.00.
PeriProducer 3.00 supports legacy (PeriProducer 2.30) applications. The legacy applications
are converted automatically when they are loaded into PeriProducer 3.00.
Application Porting Considerations
Consider the following when porting the legacy applications:
Example
• Make a copy of the source file and port the copy.
• Back up the source file on another system, external media, or both.
• Save the ported copy as a different name (such as <original_name>300).
Avaya Business Communications Manager—IVR Upgrade Guide
September 2010
81
Developer Upgrade on Windows Workstation
Converting Standard PeriProducer 2.30 Applications to
PeriProducer 3.00
Applications that used the standard PeriProducer 2.30 are automatically converted by
PeriProducer 3.00. No other setup or configuration procedures are required to convert the
PeriProducer 2.30 legacy applications.
Load into PeriProducer 3.00
Load the PeriProducer 2.30 application into PeriProducer 3.00 as you would any other
application. Conversion takes place automatically. The PeriProducer logo indicates that the
application is changed and needs to be saved.
Using the PeriProducer Command Line to Port Applications
Use the following command line syntax to convert a legacy application:
peripro -c <application>
The preceding command converts the selected .ppr file to an executable .vex file.
For example, to convert numdemo.ppr, enter peripro -c numdemo. You can also use filename
wildcards (e.g. peripro -c num*) to batch-convert applications. The previous example converts
all applications in the current directory whose names start with num.
82
Avaya Business Communications Manager—IVR Upgrade Guide
September 2010
Porting Events
Porting Events
During application porting, the following events occur:
Example
• Conditions and environment options are converted when possible. See Other
PeriProducer Changes on page 27. See PeriProducer for the Avaya BCM for more
information about Avaya BCM-specific changes to PeriProducer.
• Blocks are converted to their nearest possible counterparts in 3.00. See PeriProducer
3.00 Block Changes on page 22. See PeriProducer for the Avaya BCM for more
information about Avaya BCM-specific changes to PeriProducer.
• Resources are rendered obsolete. See PeriProducer for the Avaya BCM for more
information about Avaya BCM-specific changes to PeriProducer.
• The original file is renamed by changing its extension to .p2x
• The PeriPro 2.30 Runtime Behavior is enabled by default. See the PeriProducer User
Guide for more information about the 2.30 Runtime Behavior option.
• A file with name conversionlog_ <application> .txt is created and contains messages
pertaining to the conversion process. A similar file is created with the extension .html
and is in HTML format.
Conversion Logs
The conversion logs are detailed lists of issues encountered during conversion of PeriProducer
2.30 applications to PeriProducer 3.00. The conversion logs are written to the same directory
as the source (2.30) application. The logs are named conversion_a ppname .txt (in plain text
format) and conversion_ appname .html.
Each log entry indicates an application function that required some translation to become
PeriProducer 3.00-compatible. A conversion log is divided into three categories:
Example
1. Information: An information message indicates a conversion event that does not
affect the functionality of the application. For example, an information message
generates from the conversion of a 2.30 condition name to a new 3.00 condition
Avaya Business Communications Manager—IVR Upgrade Guide
September 2010
83
Developer Upgrade on Windows Workstation
name. The application containing the condition reacts the same way in
PeriProducer 3.00; however, it uses a different condition name.
2. Warning: A warning message indicates that an application successfully converted
but may not work as expected in 3.00. A typical warning message generates to
indicate an obsoleted block setting that does not affect application function.
3. Severe: This category indicates something requiring manual application editing
for the application to run under PeriProducer 3.00. Severe messages can include:
• using unsupported features or resources. See PeriProducer for the Avaya
BCM for more information about features and resources that are not
supported in the Avaya BCM environment.
• using obsolete environment settings, conditions, system datacards that do
not have an equivalent in PeriProducer 3.00. See Discontinued Features
and Functions on page 26 for more information.
Known Conversion Issues
Set Resource Label in 2.30
PeriProducer 2.30 uses a Resource block Set operation to change the external resource (for
example, OSCAR) label. PeriProducer 3.00 converts the Resource (Set) block to an
Environment block that sets the RscLabel parameter and enables the Wait option.
If the Resource (set) block had the failure connector enabled, the Environment block has the
failure connector enabled and connects to the same failure path as in the 2.30 application.
If the 2.30 application explicitly handled the setfail (or setres) condition for a Resource set
(instead of using the failure connector), you must manually edit the converted application to
explicitly handle the envfail (or envcmp) condition. The setfail (or setres) condition in 2.30
automatically converts to ctrlrsrcfail (or ctrlrsrccmp) in 3.00. If the resource label change fails
in 3.00, the envfail condition occurs, not the ctrlrsrcfail.
Unsupported 2.30 Resources
Several resources from PeriProducer 2.30 are not supported in PeriProducer 3.00. See
Unsupported Resources on page 26 for more information. When an unsupported resource is
encountered during conversion, the unsupported resource is reported in the conversion log
file. In the application, the resource is changed from the resource name to "Unsupported" in
84
Avaya Business Communications Manager—IVR Upgrade Guide
September 2010
Resource Block Conversions
the associated Resource block. Depending on the resource type, you may not be able to use
the application with PeriProducer 3.00.
Resource Block Conversions
If Wait is enabled or a failure connector is available on a 2.30 Resource block, Wait is enabled
on the 3.00 converted block.
Flushing the Speak Prompt Buffer
The PeriProducer 2.30 System block Start Reprompt List function flushes the list of previously
spoken output. This function is still supported in PeriProducer 3.00. However, recommends
that to flush the output list buffer, use a Resource block with the Resource field set to Player,
the CID field set to System.Default.CID, the Operation set to Control, and the Send From field
set to System.Constants.Flush. This suggestion action appears in a 2.30 application's
conversion log file.
System Transfer Connection ID Datacard
PeriProducer 3.00 introduces the system datacard TransferCID. The system returns the
Connection ID (CID) of the line that is used for a transfer operation back to the TransferCID
datacard. TransferCID must not be used in PeriProducer 3.00-native applications to specify a
CID for a transfer operation.
Note:
TransferCID is populated only if the transfer operation is performed synchronously
(Originate block with Wait enabled). If Wait is not enabled, TransferCID stays empty.
During 2.30 to 3.00 conversions, PeriProducer may use TransferCID in this capacity (to specify
a CID instead of receiving a value from the system). However, this is done only when converting
applications.
Assign and Start PeriProducer 3.00 Applications
See Launching Applications in PeriView on page 63.
Avaya Business Communications Manager—IVR Upgrade Guide
September 2010
85
Developer Upgrade on Windows Workstation
86
Avaya Business Communications Manager—IVR Upgrade Guide
September 2010
Chapter 7: Developer Upgrade on Fedora
Workstation
This chapter covers:
1. Overview
2. Installing Fedora
3. Installing IVR Plugin Development Environment
4. Building C/C++ Call Functions Libraries
Overview
Some application developers create their own Call Functions using the C-language to
supplement the base language constructs.
To run applications that use User Defined Call Functions, Call Functions must be compiled into
shared libraries to be available to VENGINE at runtime. In the Avaya Business
Communications Manager (Avaya BCM)/IVR 2.1 system, Call Functions must be compiled on
a Fedora workstation using the makecall script. Compiled code is then transferred to the
Windows workstation to run on the Avaya BCM.
For more information about User Defined Call Functions, see User Defined Call Functions in
the PeriProducer Environment.
The following graphic shows the path to incorporating user-defined call functions in the Avaya
BCM/IVR 2.1 system:
Avaya Business Communications Manager—IVR Upgrade Guide
September 2010
87
Developer Upgrade on Fedora Workstation
Installing Fedora
Fedora Core 3 is available for download at http://fedora.redhat.com.
Installing IVR Plugin Development Environment
Transfer the .tgz file on the Avaya BCM/IVR Toolkit CD to the /tmp directory on the Fedora
Core 3 machine.
Building C/C++ Call Functions Libraries
Example
1. On the Fedora Core 3 machine, log on as root (or use sudo) and then change to
the root directory: cd /
2. Extract the .tgz file:
88
Avaya Business Communications Manager—IVR Upgrade Guide
September 2010
makecall_tux Tool
tar xzf /tmp/.tgz (or sudo tar xzf /tmp/.tgz)
3. Log on again as a regular user and access the IVR Plugin development
environment in /usr/local/.
A directory tree is available in /usr/local//README.
4. To build the example, go to the /usr/local//examples directory:
cd /usr/local//examples
makecall_tux Tool
The makecall_tux tool compiles C/C++ code into .so files that are transferred to the Windows
workstation to run on Periview:
makecall_tux [-C libname.a] [-d] {failname[.c[pp]...}
The following options are available with the makecall_tux tool:
Option
Description
-C libname.a
Library name. Defaults to /usr/local//examples/lib/
libcall.a
-d
Prepare to sue debugger dbx [tool]
-u
"ccopt". C compiler options
-l
"ldopt". ld link options
Note:
For help on using the makecall_tux tool, type: ./makecall_tux
Usage: makecall_tux [-C libname.a] [-d] {filename[.c[pp]] ...}
-C libname.a
library name (default /home/loucksv/lib/libcall.a)
-d
prepare to use debugger dbx[tool]
-u '"ccopt"'
C compiler options
-l '"ldopt"'
ld link options
Example
1. To compile the sample, type:
./makecall_tux new-function.c
Avaya Business Communications Manager—IVR Upgrade Guide
September 2010
89
Developer Upgrade on Fedora Workstation
The output appears in the /usr/local//examples/lib directory.
2. To compile your own code, run the makecall_tux command with your own file
name. For example:
The lib directory must exist before running makecall_tux.
90
Avaya Business Communications Manager—IVR Upgrade Guide
September 2010
Chapter 8: Database Access Configuration
This chapter covers:
1. Overview
2. Configuring periq on the Windows Node
3. Configuring sqlclnt on the Windows Node
Overview
Some applications require access to external databases. Avaya Business Communications
Manager (Avaya BCM) IVR 2.1 supports Host database access and VTCPD. The system is
configured so that database requests from applications running on Avaya BCMs are relayed
to an intermediate Windows node where periq and sqlclnt are running. The Windows node
retrieves the information and relays it back to the application running on the Avaya BCM.
The following graphic shows the interaction between the application on the Avaya BCM, the
intermediate Windows node, and the external database.
To configure the Avaya BCM-IVR 2.1 system for database access, periq and sqlclnt must run on
the Windows node. Both periq and sqlclnt are installed as components of perirdb in a TYPICAL
installation on the Windows workstation. See Administrator on the Windows Workstation on
page 41 for more information. The Windows workstation can serve as the intermediate
Windows node.
To run the database access configuration, additional components are needed from the latest
MPS 2.1 Patch Bundle and additional database patches on the MPS 2.1 Software,
Documentation and Update CD.
Avaya Business Communications Manager—IVR Upgrade Guide
September 2010
91
Database Access Configuration
VMST 3 on the Avaya BCM Node
Ensure vmst is running on the Avaya BCM node where the applications requiring database
access are running. The following command produces an output showing the list of active vmst
ports and the attached Avaya BCM components:
[root@BCM1000 root]#vvpsactive
[root@BCM1000 root]# vvpsactive Dec 6 21:55:33 Service(Port) PID Component(number)
Flags ============================================================
vmst(1) 26437 BCM1000.2 (#2) Connected: vastimer(66) vastimer(66) 26224 Connected:
vms(1)
Install Patches on the Windows Node
To configure remote database access, you must install all the patches found in the Patches
Remote Database folder on the MPS 2.1 Software, Documentation and Update CD. Install the
patches (if any) by double clicking on the executable files in the folder.
Configuring periq on the Windows Node
To configure periq on the Windows Node, you must edit the gen.cfg file. The following figure
shows a sample gen.cfg file:
#
# All executables listed in this file should support the NT convention
# for srp-triggered termination. If you do not know what this means,
# please do not add any entries to this file.
# NAME
NODE PORT is-VOS-CLASS PRI COMMAND LINE
# alarmd
1
0
alarmd
configd
1
0
configd
conout
1
0
conout
psched
0
0
"psched -run"
nriod
1
0
nriod
#vastimer
0
0
vastimer
#screendaemon 0
0
screendaemon
pmgr
1
0
pmgr
#vsupd
0
0
vsupd
#periweb
0
0
periweb
proxy
0
0
"proxy -S ccss -L cons -l info -k 10 -n"
#
#
#periq_bcm1000 0
0
"periq -s ccss -v bcm1000:1 -a sqlclnt
-q odbc1 -mt"
92
Avaya Business Communications Manager—IVR Upgrade Guide
September 2010
Configuring sqlclnt on Windows Node
#sqlclnt_bcmpsoMG2gojitTV3Rd3X8M
#
#
#periq_bcmpso odbc2 -mt"
#sqlclnt_bcmpsoMG2gojitTV3Rd3X8M
-
0
0
"sqlclnt -v 1 -N bcm1000 -s 221 -U
-
0
0
"periq -s 17 -v bcmpso:2 -a sqlclnt -q
-
0
0
"sqlclnt -v 2 -N bcmso -s 222 -U
In the gen.cfg file, make the following entry for periq:
periq -v NodeA:3 -s16 -a sqlclnt -q odbcq32
The preceding command starts periq and connects the Windows node to vmst number 3
(running on the host Avaya BCM) through port 16. Port 16 is the default port for periq and is
configured in $ASEHOME/etc/services. The preceding command also restarts sqlclnt services
and sets the queue name as odbcq32.
The following table lists periq attributes and their descriptions:
Table 6: periq Attributes
Attribute
Description
-v[host:]vps
host and vps number
-s #
port number to vms
-P poll
new connection poll (default 15 seconds
-q [name:]#
[queue name:] number of tellers
-m {g|f}
not route GET or FREE to tellers
-m i
free tellers on ISSUE FREE from app
-m r
return undelivered message to tellers
-m t
time message flow
-a {rsc|ports}
announce restart to service
-X {a|s}
debug message flow (full or short form)
-X 1
debug queueing
-r {device|file}
redirect output (to /dev/tty#,/dev/console)
-H
help
Configuring sqlclnt on Windows Node
In the gen.cfg file, make the following entry for sqlclnt:
Avaya Business Communications Manager—IVR Upgrade Guide
September 2010
93
Database Access Configuration
sqlclnt -v 3 -s 230 -N nodeA -u sa/peri@database -m odbc -q odbcq32
-P 16 -Q 5
This command specifies the system to start the sqlclnt service and connect it to vmst 3 on
Node A through port 230. Port 230 is one of many available to sqlclnt and is configured in
$ASEHOME/etc/services. The unencrypted connection string to the database is sa/
peri@database. Database mode is ODBC and sqlclnt is part of queue odbcq32. The sqlclnt
service communicates with periq through port 16 with a ping rate of 5 seconds.
The following table lists sqlclnt attributes and their descriptions:
Table 7: sqlclnt Attributes
Attribute
94
Description
-v #
vps number
-s port
port number to use
-N host
VMS host machine (default - local)
-P port
PeriQ port (default - any)
-m queue_type
'oracle', 'sybase', 'odbc', 'db2' or 'mssql'
-q name
associated queue name
-u [<usr>[/<passwd>]
[@<server><odbc dsn
%OEM>]]
RDBMS connect string. If connect string contains @ or /, use \
\ as escape character.
-U cryptstring
Crypted RDBMS connect string
-l directory
Enable SQL Timing, specify directory path to place log files
-S backup
user/psswd@server backup/fail over server. If connect string
contains @ or /, use \\ as escape character
-B crypststring
Crypted RDBMS connect string for backup/fail over server
-c AUTOCOMMIT
Enable AUTOCOMMIT
-x Transaction Timeout
Transaction Timeout for a database Query (ODBC)
-L Login TimeOut
Login TimeOut (ODBC)
-T poll
new server connection poll (default 20 seconds)
-R #
number of re-cycle attempts (default forever)
-Q ping rate
Set ping rate for retrying connection to vmst (default 60
seconds)
-X {s|n}
debugging level
-r {dev|file}
redirect output
-H
help
Avaya Business Communications Manager—IVR Upgrade Guide
September 2010
Index
Special Characters
.ppr Source Code .......................................................39
.vex files .....................................................................63
A
abend .........................................................................30
Abort ...........................................................................21
Accessory Toolkit Blocks ............................................22
acfg file .......................................................................63
addfail .........................................................................30
addsucc ......................................................................30
Adminstrative tools .....................................................16
alarmdbtask ................................................................27
alertcmp ......................................................................30
alertfail ........................................................................30
altlinkdown ..................................................................30
ansfail .........................................................................30
answer ........................................................................27
Answer Block ..............................................................22
answercmp .................................................................30
answerfail ...................................................................30
Apache Web Server ..............................................56, 57
Application Developer External Call Functions ..........19
Application Developer Fedora ....................................19
Application Developer Operating System ...................19
Application Developer Upgrade Prerequisites ............ 19
Application Resources ................................................79
Applications ................................................................81
apprestart ...................................................................27
asrdet .........................................................................30
asyncdata ...................................................................30
asyncfail .....................................................................30
Asynchronous Execution Changes ............................25
Asynchronous Operation ............................................24
autofail ........................................................................30
autotim ........................................................................30
Avaya BCM-IVR Feature Summary ............................51
Avaya BCM/IVR 2.0 Business Element Manager ......16
Avaya BCM/IVR 2.0 Installation .................................46
Avaya BCM/IVR 2.0 New Features ............................16
Avaya BCM/IVR 2.0 Operating System ......................16
Avaya BCM/IVR 2.0 System Configuration ................16
Avaya BCM/IVR 2.0 Toolkit Installation ......................51
Avaya BCM/IVR 2.0 Upgrade Prerequisites ...............19
Avaya BCM/IVR Toolkit ..............................................51
Avaya Business Communications Manager ...............16
avserr .........................................................................30
B
backsp ........................................................................27
badoperation ..............................................................30
badparameter .............................................................30
Begin Page .................................................................51
Blocking Execution .....................................................21
Blocking/Non-blocking Execution ...............................21
Bridge .........................................................................21
Business Communications Manager ..........................15
Business Element Manager ..................................16, 73
Business Element Manager Description ....................73
Business Element Manager Host Communications ....
74
Business Element Manager Keycodes .......................74
Business Element Manager Managing Avaya BCMs ....
73
C
Call Conferencing .......................................................21
Call Control .................................................................21
Call Progress Detection ..............................................21
calltim .........................................................................30
carloss ........................................................................30
Carrier Grade Linux ....................................................16
ccs7cc ........................................................................30
CDs ............................................................................19
centurymark ................................................................27
chartim ........................................................................30
Check Park Status ......................................................51
clear ............................................................................27
cmrhigh .......................................................................30
cmrlow ........................................................................30
comfail ........................................................................30
Conditions ..................................................................30
conn ............................................................................30
Connection IDs ...........................................................22
conventions ................................................................10
Conversion Table ..................................................27, 30
cpansup ......................................................................27
crefer ..........................................................................30
crepeat .......................................................................30
crepmax ......................................................................30
Avaya Business Communications Manager—IVR Upgrade Guide
September 2010
95
cticond ........................................................................30
ctidown .......................................................................30
ctifail ...........................................................................30
ctiup ............................................................................30
ctrlrsrccmp ..................................................................30
ctrlrsrcfail ....................................................................30
ctxcc ...........................................................................30
ctxfailcc .......................................................................30
ctxokcc .......................................................................30
cvoice .........................................................................30
D
Database Access Modes ............................................20
dcdown .......................................................................30
dcup ............................................................................30
deadlock .....................................................................30
debug .........................................................................27
delcmp ........................................................................30
delcomp ......................................................................30
delete ..........................................................................27
delfail ..........................................................................30
deltimedcall ................................................................27
Description ............................................................15, 51
detinputfail ..................................................................30
Development tools ......................................................16
dialtn ...........................................................................30
disable ........................................................................30
disc .............................................................................30
disccmp ......................................................................30
discfail ........................................................................30
Disconnect Block ........................................................23
dtmfzl ..........................................................................30
dupkey ........................................................................30
dupvalidx ....................................................................30
E
Edit Sequence ............................................................21
enable .........................................................................30
End Page ....................................................................51
endfail .........................................................................30
endfile .........................................................................30
Enhanced Condition Data ..........................................27
Environment Options ..................................................27
er ................................................................................27
error ............................................................................30
ertimeout ....................................................................30
expired ........................................................................30
exportcmp ...................................................................30
exportfail .....................................................................30
96
eXtext .........................................................................27
F
Fax Composition ........................................................26
Fax Composition Removed ........................................24
Fax Mode ...................................................................24
Fax Mode Removed ...................................................25
faxdet ..........................................................................30
Fedora ........................................................................66
first ..............................................................................27
forcefree .....................................................................30
forward .......................................................................30
freevt ..........................................................................27
fromphone ..................................................................30
frstim ...........................................................................30
ftomfail ........................................................................30
ftomsucc .....................................................................30
G
Get Call Data ..............................................................51
getfail ..........................................................................30
getinputcmp ................................................................30
getinputfail ..................................................................30
getrsrccmp ..................................................................30
getrsrcfail ....................................................................30
getvt ............................................................................27
getvtfail .......................................................................30
getvtpass ....................................................................30
gotres .........................................................................30
green ..........................................................................30
H
Hardware Properties Window .....................................26
hctloff ..........................................................................30
hctlon ..........................................................................30
headermode ...............................................................27
heldres ........................................................................30
hgetvtcmp ...................................................................30
hgetvtfail .....................................................................30
hkfcomp ......................................................................30
hkffail ..........................................................................30
hnowait .......................................................................27
hookflshcmp ...............................................................30
hookflshfail .................................................................30
Host ............................................................................20
hostasyncevt ..............................................................30
hostctl .........................................................................27
hostdown ....................................................................30
Avaya Business Communications Manager—IVR Upgrade Guide
September 2010
hostfail ........................................................................30
hostup .........................................................................30
hstatdata .....................................................................30
I
idle ..............................................................................30
importcmp ...................................................................30
inf ................................................................................30
Installation .................................................46, 51, 56, 57
Intended Audience .......................................................7
inter ............................................................................27
Interactive Voice Response ........................................16
Interactive Voice Response 2.0 ..................................15
intermsg ......................................................................27
intersil .........................................................................27
intertimeout .................................................................30
intime ..........................................................................27
invreq ..........................................................................30
ioerr ............................................................................30
iscpf ............................................................................30
isdncc .........................................................................30
iupdbusy .....................................................................30
iupdcomp ....................................................................30
iupdfail ........................................................................30
IVR Keycode ..............................................................74
K
keepterm ....................................................................27
L
lengerr ........................................................................30
license files .................................................................42
License Service Installation ........................................53
Line Operations ..........................................................21
linkdown .....................................................................30
Local Station ID ..........................................................25
lockfail ........................................................................30
logdeny .......................................................................30
lost ..............................................................................30
M
MAC ID .......................................................................74
mailshall .....................................................................30
manual ........................................................................10
Manual ......................................................................7, 9
marshall ......................................................................30
maxmessage ..............................................................27
Media Operations .......................................................21
Microsoft Internet Information Server .........................57
MMDP ........................................................................56
mmfhigh ......................................................................30
mmflow .......................................................................30
mode ..........................................................................27
modvar .......................................................................30
Moved Functions ........................................................25
MPS Manager Data Provider .....................................56
MPS Release Level ....................................................39
mpscc .........................................................................30
mpsinfo .......................................................................30
mpsoc .........................................................................30
mpsof ..........................................................................30
mtoffail ........................................................................30
mtofsucc .....................................................................30
N
Native Mode ...............................................................20
NCGL .........................................................................16
Networks License Service ..........................................46
Networks Startup Service ...........................................46
nilobjref .......................................................................30
Non-blocking Execution ..............................................21
nonexistobj .................................................................30
norecfound .................................................................30
norestart .....................................................................30
nospace ......................................................................30
notfnd .........................................................................30
notice ..........................................................................27
notimpl ........................................................................30
notlogon ......................................................................30
notopen ......................................................................30
Numbering Components ............................................73
numset ........................................................................27
O
oa ...............................................................................30
Obsoleted Functions ..................................................27
oc ................................................................................30
ODBC .........................................................................20
of ................................................................................30
ofaxdet ........................................................................30
Operating System ...........................................16, 19, 41
orberr ..........................................................................30
Organization .................................................................9
origcmp .......................................................................30
origfail .........................................................................30
Originate Block ...........................................................25
Avaya Business Communications Manager—IVR Upgrade Guide
September 2010
97
oscoc ..........................................................................30
oscof ...........................................................................30
outbad ........................................................................30
outbsy .........................................................................30
outcomp ......................................................................30
outfail ..........................................................................30
outnoa ........................................................................30
outrej ..........................................................................30
outvoa .........................................................................30
Overview ....................................................................56
parameter ...................................................................27
Park Call .....................................................................51
PeriProducer 2.30 ......................................................81
PeriProducer 3.00 ......................................................81
PERIproducer 3.00 .....................................................46
PeriProducer Discontinued Features ....................26, 27
PERIstudio 2.20 .........................................................46
PeriView .....................................................................16
PERIview 2.1 Assigning Applications .........................67
PERIview 2.1 Consolidator ...................................56, 57
PERIview 2.1 Installation ............................................56
PERIview 2.1 Launching an applicatino .....................63
PERIview 2.1 Loading .vex files .................................63
PERIview 2.1 Overview ..............................................56
PERIview 2.1 Starting Applications ............................67
PERIview 2.1 User Defined Call Functions ................66
Periview Consolidator .................................................16
PeriView Data Provider Service .................................46
pgid .............................................................................30
pgml ............................................................................30
pgun ...........................................................................30
phone .........................................................................27
Phone Line Manager Options .....................................27
pickup .........................................................................27
plicd ............................................................................53
Porting ........................................................................81
Porting 2.30 Applications ............................................81
Porting Applications ....................................................81
prs ..............................................................................27
prsfree ........................................................................30
rcvfaxcmp ...................................................................30
rcvfaxfail .....................................................................30
rcvnull .........................................................................30
rcvoice ........................................................................30
rcvrsrcfail ....................................................................30
rdcdown ......................................................................30
rdcup ..........................................................................30
rdisable .......................................................................30
Receive Fax Block ......................................................25
Receive Fax Direct into TIFF File ...............................25
Receive Host Block ....................................................24
Record Block ..............................................................25
Record Block Asynchronous Recording .....................25
Record Block Moved Functions ..................................25
recordfail .....................................................................30
red ..............................................................................30
refbad .........................................................................30
refbeg .........................................................................30
refcan .........................................................................30
refer ............................................................................27
reffail ...........................................................................30
refrej ...........................................................................30
reftim ..........................................................................30
renable .......................................................................30
reorder ........................................................................30
Resource Block ..........................................................25
resumefail ...................................................................30
rfno .............................................................................27
rgreen .........................................................................30
rinfail ...........................................................................30
ring .............................................................................30
rlost .............................................................................30
rngback .................................................................27, 30
rred .............................................................................30
rscertime .....................................................................27
rscintime .....................................................................27
rscoc ...........................................................................30
rsilence .......................................................................30
rvoice ..........................................................................30
rxdcdown ....................................................................30
rxdcup .........................................................................30
rxdisable .....................................................................30
ryellow ........................................................................30
Q
S
qiderr ..........................................................................30
qzero ..........................................................................30
scof .............................................................................30
Scope ...........................................................................7
Select Input ................................................................21
Send Fax Block ..........................................................24
Send Fax from TIFF File ............................................24
Send Host Block .........................................................23
P
R
rcverr ..........................................................................30
98
Avaya Business Communications Manager—IVR Upgrade Guide
September 2010
sentcp .........................................................................30
serverdown .................................................................30
session .......................................................................27
Set Call Data ..............................................................51
setaid ..........................................................................27
setfail ..........................................................................30
setres ..........................................................................30
Setting Host Environment Parameters .......................23
setvpsline ...................................................................27
silence ........................................................................30
silzl .............................................................................30
sndfaxcmp ..................................................................30
sndfaxfail ....................................................................30
sndrsrccmp .................................................................30
sndrsrcfail ...................................................................30
softterm .................................................................27, 30
speak ..........................................................................27
speakcmp ...................................................................30
sqlerr ..........................................................................30
sslfail ..........................................................................30
stoptim ........................................................................30
stpring .........................................................................30
System Administrator ...........................19, 40, 42, 73, 79
System Block ..............................................................23
T
tcapcc .........................................................................30
termchar .....................................................................27
tftprecfail .....................................................................30
tftprecsucc ..................................................................30
tftpsendfail ..................................................................30
tftpsendsucc ...............................................................30
timedcall .....................................................................27
timeres ........................................................................30
toomanyrows ..............................................................30
tophonefail ..................................................................30
total .............................................................................27
transfercmp ................................................................30
transferfail ...................................................................30
Transition .........................................................20, 21, 40
Transition Issues ........................................................40
tstop ............................................................................27
ttdata ..........................................................................30
ttdet ............................................................................30
ttfail .............................................................................30
typeahead ...................................................................27
Typical installation ......................................................46
U
uedit0 - uedit3 .............................................................30
uedit3 ..........................................................................27
unexdata .....................................................................30
unexhost .....................................................................30
unexphone ..................................................................30
Unified Manager .........................................................16
Uninstall Peri-packages ..............................................42
Uninstalling Peri-packages .........................................42
unlocks .......................................................................27
unnotice ......................................................................27
Unsupported Resources .............................................26
Upgrade Prerequisites ................................................19
usepool .......................................................................27
User Defined Call Functions .......................................66
userdb.xml ..................................................................57
userdb.xml.BCM .........................................................57
V
valueperr ....................................................................30
Vengine Options .........................................................27
vioabort .......................................................................27
Virtual Terminal (VT) Allocation ..................................23
vmstimedcall ...............................................................27
voice ...........................................................................30
vpsrcvtime ..................................................................27
VRAM Language ........................................................39
vrto .............................................................................30
VTCPD .......................................................................20
W
webfail ........................................................................30
webtimeout ...........................................................27, 30
Windows 2000 ......................................................16, 19
Windows Workstation .................................................16
X
xdisable ......................................................................30
xmtcomp .....................................................................30
xmtfail .........................................................................30
Y
yellow .........................................................................30
Avaya Business Communications Manager—IVR Upgrade Guide
September 2010
99
100
Avaya Business Communications Manager—IVR Upgrade Guide
September 2010