1
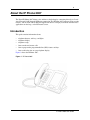
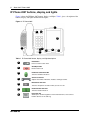
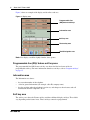
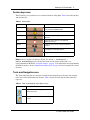
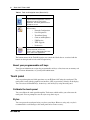
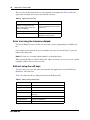
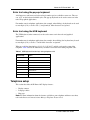
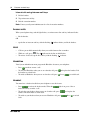
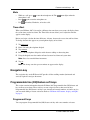
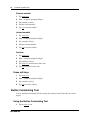
Part No. NN-10300-019
June 2005
Business Communications
Manager
IP Phone 2007
User Guide
Standard 1.00
2
Copyright © Nortel Networks Limited 2005
All rights reserved.
The information in this document is subject to change without notice. The statements, configurations, technical data, and
recommendations in this document are believed to be accurate and reliable, but are presented without express or implied
warranty. Users must take full responsibility for their applications of any products specified in this document. The
information in this document is proprietary to Nortel Networks NA Inc.
Trademarks
*Nortel, Nortel (Logo), the Globemark, and This is the way, This is Nortel (Design mark) are trademarks of Nortel Networks.
*Microsoft, MS, MS-DOS, Windows, and Windows NT are registered trademarks of Microsoft Corporation.
All other trademarks and registered trademarks are the property of their respective owners.
3
About the IP Phone 2007
The Nortel IP Phone 2007 brings voice and data to the desktop by connecting directly to a Local
Area Network (LAN) through an Ethernet connection. The IP Phone 2007 supports call processing
features, and can work with an External Application Server to display web-based and interactive
applications on the large, color LCD touch screen.
Introduction
This guide contains information about:
•
•
•
•
•
•
telephone buttons, soft keys, and lights
telephone display
telephone setup
how to make and answer calls
how to program the programmable line (DN)/ feature soft keys
how to offset the time on your telephone display
Figure 1 shows the IP Phone 2007.
Figure 1 IP Phone 2007
IP Phone 2007 User Guide
4
About the IP Phone 2007
IP Phone 2007 buttons, display, and lights
Figure 2 shows the IP Phone 2007 buttons, display, and lights. Table 1 gives a description of the
buttons, display, and lights identified in the figure.
Figure 2 IP Phone 2007
I
B
A
J
C
E
D
H
G
H
F
Table 1 IP Phone 2007 button, display, and light descriptions
A
Hold button
Places an active call on hold.
B
Goodbye button
Ends an active call.
C
Handsfree button with LED
Turns the Handsfree mode on.
D
E
F
G
NN-10300-019
Volume control bar
Adjusts the handset, Handsfree, headset, and ringer volume.
Mute button with LED
Turns the microphone off and on when you are on a call.
Headset button with LED
Turns the headset mode on.
Navigation key
Allows you to scroll through lines of text and menu items, such as those
listed in Services or the Call Log.
About the IP Phone 2007
H
I
J
5
Soft key buttons (either side of Navigation key)
Labels on the bottom of the LCD display give the meaning associated
with these keys.
Message Waiting Indicator
Flashes when a call rings at the telephone.
Lights up when Message for you appears on the display.
Color LCD
The color LCD contains the various soft keys and information areas. Tap
the soft key with the stylus to activate the feature displayed.
IP Phone 2007 LCD
The five areas to the display are:
•
•
•
•
•
Programmable line (DN)/ feature soft key area
Information area
Soft key area
Feature key area
Tools and Navigation Area
You perform point-and-click operations on the IP Phone 2007 using the touch panel. The touch
panel is used with the graphical user interface (GUI) to present keys directly on the display. You
can activate all Line/DN keys, feature keys, and soft keys by using the touch panel.
You calibrate the touch panel through the Tools menu, which enables you to fine-tune the touch
panel. You are prompted to use the stylus to tap three targets.
You can operate the touch panel using a stylus or your finger. However, use of only a stylus is
recommended to avoid damage to the touch panel and to ensure accuracy.
IP Phone 2007 User Guide
6
About the IP Phone 2007
Figure 3 shows an example of the display and describes each area.
Figure 3 Display area
Programmable line
(DN)/feature soft keys
Information area
Soft key area
Feature key area
Tools/Navigation area
Note: Your display can differ slightly from the above picture.
Programmable line (DN)/ feature soft key area
The programmable line (DN)/feature soft key area shows the label and status of the six
programmable soft keys. For more information about these soft keys, refer to “Program soft keys”
on page 15.
Information area
The Information area shows:
•
•
•
the extension number of the telephone
a line for general information (for example: caller ID, company name)
the date and time when the telephone is not in use, and changes to show features and call
information when the telephone is in use
Soft key area
The soft key area shows the Feature soft key and three additional display soft keys. These labels
vary depending on the feature in use. These soft keys cannot be reprogrammed.
NN-10300-019
About the IP Phone 2007
7
Feature keys area
The Feature keys area contains access to the fixed features of the phone. Table 2 describes the keys
and what they do:
Table 2 Feature keys
Key label
Key Icon
Description
Inbox
Open your voice mailbox. For more information,
see your System Administrator.
Directory*
Access phone directory.
Outbox
Send voice mail messages to people in your
directory.
Quit*
Exit from various menus or the External
Application Server.
Expand
Expand to PC to access text-based external
services.
Services*
Access to scrollable feature display menu,
including the hot desking feature.
Copy
Programmable key (Default: empty).
Note: Soft keys display text labels by default. Use Tools > Preferences >
Button Customizing Tool to change the labels to icons. Items marked with * are
reprogrammable on BCM. See “Program soft keys” on page 15 for instructions on reprogramming
the marked soft keys. See the “Button Customizing Tool” on page 16 to insert custom text or to use
the icons.
Tools and Navigation area
The Tools and Navigation area provides controls for navigating between features and selecting
tools. It is visible and functional at all times. Table 3 shows the icons and describes what they
represent.
Table 3 Tools and Navigation area (Sheet 1 of 2)
Tool icon
Description
Tap this icon to access graphics-based
external services.
Tap this icon to access the Telephone
screen.
IP Phone 2007 User Guide
8
About the IP Phone 2007
Table 3 Tools and Navigation area (Sheet 2 of 2)
Tool icon
Description
This soft key is used to access the first
registered external application. The icon
displayed on the key is that of the
application. The Nortel globemark is an
example of an icon.
Tap this icon to access the Tools menu,
which includes:
•
•
•
•
•
•
•
Network Configuration
Local Diagnostics
Touch Panel Setup
Contrast and Brightness
USB Devices
TFTP Upgrade
Preferences
Tap this icon to display a virtual keyboard
(pop-up keyboard) for text entry.
Use the stylus or USB keyboard to enter
text in some of the applications.
The bottom corners of the Tools/Navigation area contain the labels that are associated with the
buttons on the right and left side of the Navigation key.
About your programmable soft keys
Your System Administrator assigns the programmable soft keys as line, intercom, or memory soft
keys. For more information, see your System Administrator.
Touch panel
You can perform point-and-click operations on your IP Phone 2007 using the touch panel. The
touch panel is used with the graphical user interface (GUI) to present keys directly on the display.
You can activate all Line/DN keys, feature keys, and soft keys by using the touch panel.
Calibrate the touch panel
You can calibrate the touch panel through the Tools menu, which enables you to fine-tune the
touch panel. You are prompted to use the stylus to tap three targets.
Stylus
You can operate the touch panel using a stylus or your finger. However, using only a stylus is
recommended to avoid damage to the touch panel and to ensure accuracy.
NN-10300-019
About the IP Phone 2007
9
Cleaning the Telephone
Hold down the Goodbye key and gently wipe the telephone screen with a soft, dry cloth.
Caution:
Do not use any liquids or powders on the telephone.
Using anything other than a soft, dry cloth can contaminate telephone
components and cause premature failure.
Configure IP Phone Local Options
Your IP Phone 2007 has both local and server-based options. The local options cover the
following entries in the Tools menu:
•
•
•
•
•
•
•
Network Configuration — to enter telephone configuration information using the dialpad. Use
the touch panel to select fields, then use the pop-up keyboard, USB keyboard, or dialpad to
enter data. This menu is for administrator use only.
Local Diagnostics — to improve the troubleshooting process for Network Diagnostics (Ping,
Tracert), Ethernet Statistics IP Network Statistics and DHCP Information. This menu is for
administrator use only.
Touch Panel Setup — to calibrate the touch screen. You are prompted to use the stylus to tap
three targets.
Contrast & Brightness — to adjust contrast or brightness up or down, and to increase or
decrease the Sleep Time of the screen from the default one hour. Nortel recommends that the
Sleep function be used to extend the life of the backlight.
USB Devices — to view which USB devices are connected.
TFTP Upgrade — to allow the administrator to update the firmware for the telephone. This
menu is for administrator use only.
Preferences — to access the Button Customization tool to change the feature key labels to
display icons or custom text.
Enter and edit text
You can enter and edit text on your IP Phone 2007 using the following methods:
•
•
•
•
telephone dialpad
soft keys
pop-up keyboard
USB keyboard (optional)
IP Phone 2007 User Guide
10
About the IP Phone 2007
The use of any of these methods for text entry depends on the application. Table 4 shows the
applications and input devices that can be used for text entry:
Table 4 Application Text Entry
For:
Use:
Call Server related applications (for
example, changing feature key
labels, adding personal directory
entries or for dialing)
Dialpad
Pop-up or USB keyboard for numeric
entries only
Graphical applications
Pop-up or USB keyboard
Tools menu
Pop-up or USB keyboard
Dialpad for numeric entries
Enter text using the telephone dialpad
You use the dialpad to enter text when you use features such as programming an AutoDial soft
key.
For example, to enter the letter A, press the number 2 key once. To enter the letter C, press the
number 2 key three times.
Note: No letters are associated with the number 1 or the number 0 key.
When entering IP addresses with the dialpad, the address is entered as xxx*xxx*xxx*xxx, and the
telephone translates this to xxx.xxx.xxx.xxx.
Edit text using the soft keys
You use soft keys to access text when you work with such applications as Personal Directory,
Redial List, and Callers List.
Table 5 describes the soft key editing functions on the IP Phone 2007.
Table 5 Editing soft key description
Soft key
Description
Cancel
Stop the current action.
Choose
Select a symbol.
Clear
Clear the input field.
Case
Switch the next character to either uppercase or
lowercase.
Delete
Backspace one character.
Done/Select/Enter
Depends on application.
More…
Access additional soft keys.
NN-10300-019
About the IP Phone 2007
11
Enter text using the pop-up keyboard
A full uppercase and lowercase keyboard and a number pad are available to enter text. The user
can “type” on the keyboard with the stylus. The pop-up keyboard can be used to enter text in the
tools and graphical applications.
For number entry in telephone applications (for example, when dialing), the keyboard can be used
to enter digits (0–9), as well as star (*) and pound (#). Other characters are ignored.
Enter text using the USB keyboard
The USB keyboard, when connected, can be used to enter text in the tools and graphical
applications.
For number entry in telephone applications (for example, when dialing), the keyboard may be used
to enter digits (0–9), as well as * and #. Other characters are ignored.
When on a call, the function keys (f1, f2, f3, f4, f5, f6, f7, and f8) can be used to control the
telephone. Table 6 shows the function keys and their associated action during telephone calls.
Table 6 USB keyboard function keys during telephone calls
Function key
Action
f1
Go to Handsfree mode
f2
Go to Headset mode
f3
Place the current call on Hold
f4
Mute the current call
f5
Volume Up
f6
Volume Down
f7
Copy
f8
Quit
Telephone setup
This section describes the IP Phone 2007 display features:
• Display contrast
• Language choice
• Ring type
Note: For more information about the features available to your telephone and how to use them,
refer to the Business Communications Manager Telephone Feature Card.
IP Phone 2007 User Guide
12
About the IP Phone 2007
Display contrast level
Adjust the contrast for the telephone display.
1
Tap Feature.
2
Enter *7 using the telephone dialpad.
3
Tap DOWN and UP to view the levels.
4
Tap OK to select a level.
Language choice
Select the Primary Language for the telephone display.
1
Tap Feature.
2
Enter *501 using the telephone dialpad.
3
Select the Alternate Language for the telephone display.
To select the second alternate language:
1
Tap Feature.
2
Enter *502 using the telephone dialpad.
3
Select the Alternate Language 2 for the telephone display.
To select the third alternate language:
1
Tap Feature.
2
Enter *503 using the telephone dialpad.
3
Select the Alternate Language 3 for the telephone display.
To select the fourth alternate language:
1
Tap Feature.
2
Enter *504 using the telephone dialpad.
3
Select the Alternate Language 4 for the telephone display.
Ring type
Select a different ring type for your telephone.
1
Tap Feature.
2
Enter *6 using the telephone dialpad.
3
Press 1, 2, 3, 4 (on the telephone dialpad), or NEXT to hear the different ring types.
4
Tap OK to store the ring type.
NN-10300-019
13
Features and soft keys
This section describes some of the IP Phone 2007 soft keys and call features:
• Basic call features
• Navigation key
• Programmable line (DN)/feature soft keys
Note: For more information about the features available to your telephone and how to use them,
refer to the Business Communications Manager Telephone Feature Card.
Basic call features
You can place external and internal calls using the following features:
•
•
•
•
•
•
•
make a call
answer a call
hold a call
Handsfree
headset
Mute
Time Offset
Make a call
There are many ways to place a call depending on your telephone programming and the type of
call.
External calls using line soft keys
1
Lift the handset.
2
Tap a line soft key.
3
Dial the external telephone number.
External calls using intercom soft keys
1
Lift the handset.
2
Tap an intercom soft key, and enter a line pool access code.
3
When you hear an external dial tone, dial the external telephone number.
Note: Contact your System Administrator for a list of line pool codes. When entering a line pool
access code on PRI lines, you do not hear dial tone.
IP Phone 2007 User Guide
14
Features and soft keys
Internal calls using intercom soft keys
1
Lift the handset.
2
Tap an intercom soft key.
3
Dial the extension number.
Note: Contact your System Administrator for a list of extension numbers.
Answer calls
When your telephone rings and the light flashes, or an intercom or line soft key indicator flashes:
•
lift the handset.
OR
•
tap the line or intercom soft key with the flashing
indictor before you lift the handset.
Hold
•
•
•
Calls are put on hold automatically when you switch from one line to another.
While on a call, press
. The
indicator for the line on hold flashes.
To retrieve a held call, tap the line soft key with the flashing
indicator.
Handsfree
Your System Administrator must program the Handsfree feature to your telephone.
•
•
•
Press
to make or answer a call.
To switch to Handsfree when you are on a handset call, press
the handset to switch back.
To switch to Handsfree when you are on a headset call, press
and replace the handset. Lift
. Press
to switch back.
Headset
You must have a headset installed on your telephone to use this feature.
•
•
•
to activate the headset mode. When the
light is on, press a line or
Press
intercom soft key to make a call.
To switch to your headset when you are on a handset call, press
and replace the
handset. Lift the handset to switch back.
to switch
To switch to your headset when you are on a Handsfree call, press
. Press
back.
NN-10300-019
Features and soft keys
15
Mute
•
•
•
While on a call, press
to turn the microphone off. The
microphone is off.
Press
again to turn the microphone on.
Use
on handset, Handsfree, or headset calls.
button lights when the
Time offset
When your IP Phone 2007 is located in a different time zone from your system, the display shows
the system time, not the local time. The Time Offset feature allows you to adjust the time that
appears on the display.
Before you begin, calculate the time difference, in hours, between the server time and local time.
To change the time that appears on your telephone display to local time:
1
Tap Feature.
2
Enter *510 using the telephone dialpad.
3
Tap CHANGE.
4
Press * on the telephone dialpad to switch between adding or subtracting time.
5
Using the dialpad, enter the number of hours between local time and system time.
Note: Press # to enter half hour increments.
6
Tap OK.
Note: The change can take up to one minute to appear on the display.
Navigation key
The navigation key on the IP Phone 2007 provides all the scrolling motions (horizontal and
vertical) required to navigate the menus.
Programmable line (DN)/feature soft keys
This section contains information about the IP Phone 2007 Programmable line (DN)/feature soft
keys and how to use them. These soft keys are not assigned as line or intercom soft keys.
Programmable line (DN)/feature soft keys store internal and external numbers or features to give
you one-touch dialing or feature activation. Refer to “IP Phone 2007 buttons, display, and lights”
on page 4.
Program soft keys
You can program a Programmable line (DN)/feature soft key with a new number or feature.
IP Phone 2007 User Guide
16
Features and soft keys
External autodial
1
Tap Feature.
2
Enter *1 using the telephone dialpad.
3
Tap a memory soft key.
4
Dial the external number.
5
Tap OK to store the number.
Internal autodial
1
Tap Feature.
2
Enter *2 using the telephone dialpad.
3
Tap a memory soft key.
4
Dial the extension number.
5
Tap OK to store the number.
Features
1
Tap Feature.
2
Enter *3 using the telephone dialpad.
3
Tap a memory soft key.
4
Tap Feature and enter the feature code.
5
Tap OK to store the feature code.
Erase soft keys
1
Tap Feature.
2
Enter *1 using the telephone dialpad.
3
Tap a memory soft key.
4
Tap OK to erase the soft key.
Button Customizing Tool
You use the Button Customizing Tool to change the soft keys in the Feature Key area of the
display.
Using the Button Customizing Tool
1
Tap the Tools icon.
NN-10300-019
Features and soft keys
2
Tap the Preferences soft key.
3
Tap the Button Customizing Tool soft key.
17
At this point, the screen displays three columns and the Apply and Exit soft keys:
Buttons
Icons
Labels
_______
_______
_______
_______
_______
_______
_______
The boxes shown with a black outline are the current settings.
4
To change a soft key from displaying text to displaying the icon, tap the associated icon
button. A black box appears around the icon.
Example: to change the soft key labeled Inbox on the main display to the icon, tap the
Inbox icon.
5
To change a soft key to display a custom label:
a
Tap twice on the corresponding field in the Label column to get the blinking cursor. A
black box appears around the label.
b
Enter text by typing on the USB keyboard or virtual keyboard.
c
Tap somewhere on the screen to stop editing the field.
Note: The system truncates the label if it does not fit into the display area of the soft key.
6
To apply the changes, tap the Apply soft key. The system responds
Saving is in progress
and then
Saving is complete.
You now go to step 8.
7
To abandon the changes, tap the Exit soft key. The system responds Save changes? and the
Yes and No soft keys display.
Choose one of the following:
IP Phone 2007 User Guide
18
Features and soft keys
a
Tap the Yes soft key to save the changes.
b
Tap the No soft key to abandon the changes and exit to the Preferences menu.
8
Tap the Exit soft key to return to the Preferences menu.
9
Tap the Exit soft key to return to the main display.
For more information
For more information on other telephone features, refer to the BCM Telephone Feature User
Guide.
NN-10300-019