1
Avaya IP Deskphone Key
Expansion Module User
Guide
Avaya Communication Server 1000
Document Status: Standard
Document Version: 04.01
Part Code: NN43119-102
Date: November 2010
© 2010 Avaya Inc. All Rights Reserved.
Notices
While reasonable efforts have been made to ensure that the information in this document is complete and accurate at the time
of printing, Avaya assumes no liability for any errors. Avaya reserves the right to make changes and corrections to the
information in this document without the obligation to notify any person or organization of such changes.
Documentation disclaimer
Avaya shall not be responsible for any modifications, additions, or deletions to the original published version of this
documentation unless such modifications, additions, or deletions were performed by Avaya. End User agree to indemnify
and hold harmless Avaya, Avaya’s agents, servants and employees against all claims, lawsuits, demands and judgments
arising out of, or in connection with, subsequent modifications, additions or deletions to this documentation, to the extent
made by End User.
Link disclaimer
Avaya is not responsible for the contents or reliability of any linked Web sites referenced within this site or documentation(s)
provided by Avaya. Avaya is not responsible for the accuracy of any information, statement or content provided on these
sites and does not necessarily endorse the products, services, or information described or offered within them. Avaya does
not guarantee that these links will work all the time and has no control over the availability of the linked pages.
Warranty
Avaya provides a limited warranty on this product. Refer to your sales agreement to establish the terms of the limited
warranty. In addition, Avaya’s standard warranty language, as well as information regarding support for this product, while
under warranty, is available to Avaya customers and other parties through the Avaya Support Web site: http://
www.avaya.com/support
Please note that if you acquired the product from an authorized reseller, the warranty is provided to you by said reseller and
not by Avaya.
Licenses
THE SOFTWARE LICENSE TERMS AVAILABLE ON THE AVAYA WEBSITE, HTTP://SUPPORT.AVAYA.COM/
LICENSEINFO/ ARE APPLICABLE TO ANYONE WHO DOWNLOADS, USES AND/OR INSTALLS AVAYA
SOFTWARE, PURCHASED FROM AVAYA INC., ANY AVAYA AFFILIATE, OR AN AUTHORIZED AVAYA
RESELLER (AS APPLICABLE) UNDER A COMMERCIAL AGREEMENT WITH AVAYA OR AN AUTHORIZED
AVAYA RESELLER. UNLESS OTHERWISE AGREED TO BY AVAYA IN WRITING, AVAYA DOES NOT EXTEND
THIS LICENSE IF THE SOFTWARE WAS OBTAINED FROM ANYONE OTHER THAN AVAYA, AN AVAYA
AFFILIATE OR AN AVAYA AUTHORIZED RESELLER, AND AVAYA RESERVES THE RIGHT TO TAKE LEGAL
ACTION AGAINST YOU AND ANYONE ELSE USING OR SELLING THE SOFTWARE WITHOUT A LICENSE. BY
INSTALLING, DOWNLOADING OR USING THE SOFTWARE, OR AUTHORIZING OTHERS TO DO SO, YOU, ON
BEHALF OF YOURSELF AND THE ENTITY FOR WHOM YOU ARE INSTALLING, DOWNLOADING OR USING
THE SOFTWARE (HEREINAFTER REFERRED TO INTERCHANGEABLY AS "YOU" AND "END USER"), AGREE
TO THESE TERMS AND CONDITIONS AND CREATE A BINDING CONTRACT BETWEEN YOU AND AVAYA
INC. OR THE APPLICABLE AVAYA AFFILIATE ("AVAYA").
Copyright
Except where expressly stated otherwise, no use should be made of the Documentation(s) and Product(s) provided by
Avaya. All content in this documentation(s) and the product(s) provided by Avaya including the selection, arrangement and
design of the content is owned either by Avaya or its licensors and is protected by copyright and other intellectual property
laws including the sui generis rights relating to the protection of databases. You may not modify, copy, reproduce, republish,
upload, post, transmit or distribute in any way any content, in whole or in part, including any code and software.
Unauthorized reproduction, transmission, dissemination, storage, and or use without the express written consent of Avaya
can be a criminal, as well as a civil offense under the applicable law.
Third Party Components
Certain software programs or portions thereof included in the Product may contain software distributed under third party
agreements ("Third Party Components"), which may contain terms that expand or limit rights to use certain portions of the
Product ("Third Party Terms"). Information regarding distributed Linux OS source code (for those Products that have
distributed the Linux OS source code), and identifying the copyright holders of the Third Party Components and the Third
Party Terms that apply to them is available on the Avaya Support Web site: http://support.avaya.com/Copyright.
Trademarks
The trademarks, logos and service marks ("Marks") displayed in this site, the documentation(s) and product(s) provided by
Avaya are the registered or unregistered Marks of Avaya, its affiliates, or other third parties. Users are not permitted to use
such Marks without prior written consent from Avaya or such third party which may own the Mark. Nothing contained in
this site, the documentation(s) and product(s) should be construed as granting, by implication, estoppel, or otherwise, any
license or right in and to the Marks without the express written permission of Avaya or the applicable third party. Avaya is a
registered trademark of Avaya Inc. All non-Avaya trademarks are the property of their respective owners.
Downloading documents
For the most current versions of documentation, see the Avaya Support. Web site: http://www.avaya.com/support
Contact Avaya Support
Avaya provides a telephone number for you to use to report problems or to ask questions about your product. The support
telephone number is 1-800-242-2121 in the United States. For additional support telephone numbers, see the Avaya Web
site: http://www.avaya.com/support
Contents
Contents
About the Key Expansion Module (KEM) . . . . . . . . . . . . . . . 7
Description . . . . . . . . . . . . . . . . . . . . . . . . . . . . . . . . . . . . . . . . 7
Features . . . . . . . . . . . . . . . . . . . . . . . . . . . . . . . . . . . . . . . . . . 8
Adjusting the display . . . . . . . . . . . . . . . . . . . . . . . . . . . . . . . . . 9
Setup and assembly . . . . . . . . . . . . . . . . . . . . . . . . . . . . . . . 10
Installing the KEM . . . . . . . . . . . . . . . . . . . . . . . . . . . . . . . . . . 11
Using the wall-mount option . . . . . . . . . . . . . . . . . . . . . . . . . . 12
Adjusting the tilt base . . . . . . . . . . . . . . . . . . . . . . . . . . . . . . . 12
Initializing the KEM . . . . . . . . . . . . . . . . . . . . . . . . . . . . . . . . 13
Controls and settings . . . . . . . . . . . . . . . . . . . . . . . . . . . . . . 14
Shift key functionality . . . . . . . . . . . . . . . . . . . . . . . . . . . . . . . 14
Terms you should know . . . . . . . . . . . . . . . . . . . . . . . . . . . 15
Index . . . . . . . . . . . . . . . . . . . . . . . . . . . . . . . . . . . . . . . . . . . 17
3
Contents
4
Revision history
Revision history
November 2010
Standard 04.01. This document is up-issued to support Avaya
rebranding changes.
June 2010
Standard 03.01. This document is up-issued to support Avaya
Communication Server 1000 Release 7.0.
August 2005
Standard 2.00. This document is up-issued to support Nortel
Networks Communication Server 1000 Release 4.5.
September 2004
Standard 1.00. This document is issued to support Nortel
Networks Communication Server 1000 Release 4.0.
5
Revision history
6
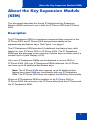
About the Key Expansion Module (KEM)
About the Key Expansion Module
(KEM)
This document describes the Avaya IP Deskphone Key Expansion
Module (KEM) and how to use it with the IP Phone 2002 and IP Phone
2004.
Description
The IP Deskphone KEM is a hardware component that connects to the
IP Phone 2002 and IP Phone 2004 and provides additional line
appearances and feature keys. See Figure 1 on page 8.
The IP Deskphone KEM provides 24 additional line/feature keys (with
labels) for your IP Phone 2002 or IP Phone 2004. The IP Deskphone
KEM keys are displayed in two columns of twelve keys on either side of a
central Liquid Crystal Display (LCD).
Up to two IP Deskphone KEMs can be attached to an one 2002 or
IP Phone 2004. With two IP Deskphone KEMs attached, the IP Phone
can have up to 48 additional line/feature keys.
Note: The IP Phone 2004 also supports up to 48 additional line/
feature keys using Shift key functionality with one IP Deskphone
KEM. The IP Phone 2002 does not support the Shift key functionality.
When an IP Deskphone KEM is installed on an IP Phone 2002 or
IP Phone 2004, the controls on the IP Phone affect both the IP Phone and
the IP Deskphone KEM.
7
About the Key Expansion Module (KEM)
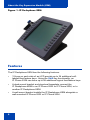
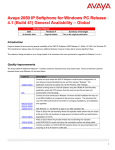
Figure 1: IP Deskphone KEM
Features
The IP Deskphone KEM has the following features:
•
12 keys on each side of an LCD provide up to 24 additional selflabeled line/feature keys. Using the Shift key functionality, an
IP Phone 2004 can have up to 48 additional logical line/feature keys.
•
A desk-mount bracket and structural baseplate connect the
IP Deskphone KEM to an IP Phone 2002 or IP Phone 2004, or to
another IP Deskphone KEM.
•
A wall-mount bracket installs the IP Deskphone KEM alongside a
wall-mounted IP Phone 2002 or IP Phone 2004.
8
About the Key Expansion Module (KEM)
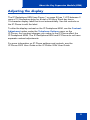
Adjusting the display
The IP Deskphone KEM (see Figure 1 on page 8) has 1 LCD between 2
rows of 12 line/feature keys for a total of 24 keys. Each key has a
10-character display label that is set automatically. Use the controls on
the IP Phone to edit the label.
To alter the display contrast on the IP Deskphone KEM, use the Contrast
Adjustment option under the Telephone Options menu on the
IP Phone. Any contrast changes you make on the IP Phone affect the
IP Deskphone KEM. The IP Deskphone KEM and IP Phone do not have
separate contrast adjustments.
For more information on IP Phone settings and controls, see the
IP Phone 2002 User Guide or the IP Phone 2004 User Guide.
9
Setup and assembly
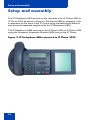
Setup and assembly
The IP Deskphone KEM mounts on the right side of an IP Phone 2002 or
IP Phone 2004 as shown in Figure 2. Secure the KEM by snapping it into
a receptacle on the back of the IP Phone using the desk-mount bracket
and structural baseplate supplied with the IP Deskphone KEM.
The IP Deskphone KEM connects to the IP Phone 2002 or IP Phone 2004
using the Accessory Expansion Module (AEM) port on the IP Phone.
Figure 2: IP Deskphone KEM connected to IP Phone 2002
10
Setup and assembly
Installing the KEM
Use the following instructions to install an IP Deskphone KEM:
1. Remove the IP Phone from the stand by pressing the IP Phone tilt
handle, and pulling the IP Phone away from the stand.
Note: For the IP Phone 2004, you can optionally adjust the stand
angle to maximum, instead of removing the stand.
2. Place the connecting arm of the IP Deskphone KEM behind the IP
Phone and align the IP Deskphone KEM connection plug to the AEM
port on the back of the IP Phone.
Note: An IP Phone 2002 with the product code NTDU76AB34,
NTDU76BB34, NTDU76AB70, or NTDU76BB70 has shorter
connector pins than an IP Phone 2002 with another product code.
If your IP Phone 2002 has a shorter connector pin, you must detach
the ribbon cable connector in the IP Deskphone KEM from the
retaining clip and press the ribbon cable connector into the header
connector before you attach the IP Deskphone KEM.
3. Press the IP Deskphone KEM and IP Phone firmly together until the
IP Phone KEM locks into place.
4. If connecting a second IP Deskphone KEM, repeat steps 2-3.
Note: The second IP Deskphone KEM is attached to the right side of
the first IP Deskphone KEM.
5. Attach the IP Phone stand and the IP Deskphone KEM stand, if
removed. Adjust each IP Deskphone KEM stand to the same angle
as the IP Phone.
The IP Deskphone KEM powers up.
Note: The IP Deskphone KEM uses the electrical connection of the
IP Phone 2002 or IP Phone 2004 for power. It does not have its own
power source.
11
Setup and assembly
Using the wall-mount option
The IP Phone and IP Deskphone KEM combination can be wall-mounted
using the optional bracket kit provided.
Adjusting the tilt base
The tilt base for the IP Phone 2002 cannot be adjusted; however, the tilt
base on the IP Deskphone KEM can be adjusted to match the fixed angle
of the IP Phone 2002.
The IP Phone 2004 has an adjustable tilt base. Adjust the tilt of both the
IP Phone 2004 and the IP Deskphone KEM as desired.
12
Initializing the KEM
Initializing the KEM
Once the IP Deskphone KEM has been installed and powered up on your
IP Phone 2002 or 2004, the IP Deskphone KEM initializes. When this
occurs, the IP Deskphone KEM display lights up and flashes until it
establishes communication with the IP Phone. When initialization is
completed successfully, the additional line/feature keys on the
IP Deskphone KEM are ready to use.
Note 1: If the IP Deskphone KEM display does not stop flashing or
does not display key labels, contact your system administrator.
Note 2: If you install two IP Deskphone KEMs on your IP Phone, the
one directly attached to the IP Phone (to the immediate right of the
IP Phone) must be functional for the second IP Deskphone KEM to
operate. This is because the second IP Deskphone KEM uses the
first IP Deskphone KEM to receive its power and communicate with
the IP Phone.
13
Controls and settings
Controls and settings
When an IP Deskphone KEM is installed on an IP Phone 2002 or
IP Phone 2004, the controls and settings of the IP Phone control both
the IP Phone and the IP Deskphone KEM. Use the Telephone Options
menu on the attached IP Phone to set the contrast and feature key labels
of the IP Deskphone KEM.
For more information about controls and settings (including the
Telephone Options menu) for your IP Phone, see the IP Phone 2002
User Guide or the IP Phone 2004 User Guide.
Shift key functionality
The IP Phone 2004 supports the Shift key functionality that enables a
single IP Deskphone KEM with 24 physical keys to support 48 logical
keys. However, if two IP Deskphone KEMs are attached to an IP Phone
2004, the Shift key functionality is disabled on the IP Deskphone KEM.
The maximum number of additional line/feature keys remains at 48 (24
keys on each IP Deskphone KEM).
The IP Phone 2002 does not support the Shift key functionality.
Therefore, to access the maximum of 48 additional line/feature keys on
an IP Phone 2002, you must install two IP Deskphone KEMs.
14
Terms you should know
Terms you should know
Accessory Expansion Module
A built-in port on an IP Phone 2002 and IP Phone 2004 that
enables accessory components (such as an IP Deskphone KEM)
to connect and communicate with the IP Phone.
Directory Number (DN)
A one- to seven-digit number assigned to a system telephone.
Feature display
An area that shows status information about the feature in use. It
also displays the name and status of the active session.
IP Deskphone Key Expansion Module
A hardware expansion module that provides 24 additional
10-character, self-labeled keys for your IP Phone 2002 or
IP Phone 2004.
Soft keys (self-labeled)
A set of keys programmed by your system administrator. The four
keys located directly below the display area have four
programmable layers. Access the layers through the More... key.
The soft keys are also used to configure parameters in the
Telephone Options menu.
User-defined Feature Key Labels
The six keys located at the sides of the upper area of the display
on the IP Phone. On the IP Deskphone KEM, the Feature Key
Labels display in the LCD in the middle of the IP Deskphone
KEM.
15
Terms you should know
16
Index
Index
A
L
Accessory Expansion Module
(AEM) 10, 15
LCD 7, 8, 9
Auto Dial 15
Liquid Crystal Display (LCD) 7, 8, 9
C
S
Controls 7, 9
Shift key 7, 14
D
Desk-mount bracket 8, 10
Line/Feature keys 7, 8, 9, 14
Soft keys 15
Structural baseplate 8, 10
Directory Number (DN) 15
T
Display 8, 9, 13
Tilt base 12
Display label 9
DN 15
U
F
User-defined Feature Key Labels
15
Feature display 15
Features 8
W
Wall-mount bracket 8
I
Wall-mount option 12
Initialize the IP Deskphone KEM
13
Install the IP Deskphone KEM 10
IP Deskphone controls 7, 9
IP Deskphone KEM 7, 10, 13, 15
IP Deskphone KEM controls and
settings 14
IP Deskphone KEM description 7
IP Deskphone KEM display 9, 13
IP Deskphone KEM features 8
IP Phone 2002 7, 8, 10, 13, 14
IP Phone 2004 7, 8, 10, 13, 14
17
Index
18