1
Avaya Video Camera 100
Installation Guide
Issue 1
June 2010
© 2010 Avaya Inc.
All Rights Reserved.
Notices
While reasonable efforts have been made to ensure that the information in this document is complete and accurate
at the time of printing, Avaya assumes no liability for any errors. Avaya reserves the right to make changes and
corrections to the information in this document without the obligation to notify any person or organization of such
changes.
Documentation disclaimer
Avaya shall not be responsible for any modifications, additions, or deletions to the original published version of this
documentation unless such modifications, additions, or deletions were performed by Avaya. End User agrees to
indemnify and hold harmless Avaya, Avaya's agents, servants and employees against all claims, lawsuits,
demands and judgments arising out of, or in connection with, subsequent modifications, additions or deletions to
this documentation, to the extent made by End User.
Link disclaimer
Avaya is not responsible for the contents or reliability of any linked Web sites referenced within this site or
documentation(s) provided by Avaya. Avaya is not responsible for the accuracy of any information, statement or
content provided on these sites and does not necessarily endorse the products, services, or information described
or offered within them. Avaya does not guarantee that these links will work all the time and has no control over the
availability of the linked pages.
Warranty
Avaya provides a limited warranty on this product. Refer to your sales agreement to establish the terms of the
limited warranty. In addition, Avaya's standard warranty language, as well as information regarding support for this
product, while under warranty, is available to Avaya customers and other parties through the Avaya Support Web
site: http://www.avaya.com/support. Please note that if you acquired the product from an authorized Avaya reseller
outside of the United States and Canada, the warranty is provided to you by said Avaya reseller and not by Avaya.
Licenses
THE SOFTWARE LICENSE TERMS AVAILABLE ON THE AVAYA WEBSITE, http://support.avaya.com/LicenseInfo
ARE APPLICABLE TO ANYONE WHO DOWNLOADS, USES AND/OR INSTALLS AVAYA SOFTWARE,
PURCHASED FROM AVAYA INC., ANY AVAYA AFFILIATE, OR AN AUTHORIZED AVAYA RESELLER (AS
APPLICABLE) UNDER A COMMERCIAL AGREEMENT WITH AVAYA OR AN AUTHORIZED AVAYA RESELLER.
UNLESS OTHERWISE AGREED TO BY AVAYA IN WRITING, AVAYA DOES NOT EXTEND THIS LICENSE IF
THE SOFTWARE WAS OBTAINED FROM ANYONE OTHER THAN AVAYA, AN AVAYA AFFILIATE OR AN AVAYA
AUTHORIZED RESELLER, AND AVAYA RESERVES THE RIGHT TO TAKE LEGAL ACTION AGAINST YOU AND
ANYONE ELSE USING OR SELLING THE SOFTWARE WITHOUT A LICENSE. BY INSTALLING,
DOWNLOADING OR USING THE SOFTWARE, OR AUTHORIZING OTHERS TO DO SO, YOU, ON BEHALF OF
YOURSELF AND THE ENTITY FOR WHOM YOU ARE INSTALLING, DOWNLOADING OR USING THE
SOFTWARE (HEREINAFTER REFERRED TO INTERCHANGEABLY AS "YOU" AND "END USER"), AGREE TO
THESE TERMS AND CONDITIONS AND CREATE A BINDING CONTRACT BETWEEN YOU AND AVAYA INC.
OR THE APPLICABLE AVAYA AFFILIATE ("AVAYA").
Avaya grants End User a license within the scope of the license types described below. The applicable number of
licenses and units of capacity for which the license is granted will be one (1), unless a different number of licenses
or units of capacity is specified in the Documentation or other materials available to End User. "Designated
Processor" means a single stand-alone computing device. "Server" means a Designated Processor that hosts a
software application to be accessed by multiple users. "Software" means the computer programs in object code,
originally licensed by Avaya and ultimately utilized by End User, whether as stand-alone products or pre-installed
on Hardware. "Hardware" means the standard hardware originally sold by Avaya and ultimately utilized by End
User.
License types
Designated System(s) License (DS). End User may install and use each copy of the Software on only one
Designated Processor, unless a different number of Designated Processors is indicated in the Documentation or
other materials available to End User. Avaya may require the Designated Processor(s) to be identified by type,
serial number, feature key, location or other specific designation, or to be provided by End User to Avaya through
electronic means established by Avaya specifically for this purpose.
2
Avaya Video Camera 100 Installation Guide
Shrinkwrap License (SR). Customer may install and use the Software in accordance with the terms and conditions
of the applicable license agreements, such as "shrinkwrap" or "clickthrough" license accompanying or applicable to
the Software ("Shrinkwrap License"). (see "Third Party Components" for more information).
Copyright
Except where expressly stated otherwise, no use should be made of materials on this site, the Documentation(s)
and Product(s) provided by Avaya. All content on this site, the documentation(s) and the product(s) provided by
Avaya including the selection, arrangement and design of the content is owned either by Avaya or its licensors and
is protected by copyright and other intellectual property laws including the sui generis rights relating to the
protection of databases. You may not modify, copy, reproduce, republish, upload, post, transmit or distribute in any
way any content, in whole or in part, including any code and software. Unauthorized reproduction, transmission,
dissemination, storage, and or use without the express written consent of Avaya can be a criminal, as well as a civil,
offense under the applicable law.
Third Party Components
Certain software programs or portions thereof included in the Product may contain software distributed under third
party agreements ("Third Party Components"), which may contain terms that expand or limit rights to use certain
portions of the Product ("Third Party Terms"). Information regarding distributed Linux OS source code (for those
Products that have distributed the Linux OS source code), and identifying the copyright holders of the Third Party
Components and the Third Party Terms that apply to them is available on the Avaya Support Web site:
http://support.avaya.com/Copyright
Preventing toll fraud
"Toll fraud" is the unauthorized use of your telecommunications system by an unauthorized party (for example, a
person who is not a corporate employee, agent, subcontractor, or is not working on your company's behalf). Be
aware that there can be a risk of toll fraud associated with your system and that, if toll fraud occurs, it can result in
substantial additional charges for your telecommunications services.
Avaya fraud intervention
If you suspect that you are being victimized by toll fraud and you need technical assistance or support, call
Technical Service Center Toll Fraud Intervention Hotline at +1-800-643-2353 for the United States
and Canada. For additional support telephone numbers, see the Avaya Support Web site:
http://support.avaya.com
Suspected security vulnerabilities with Avaya products should be reported to Avaya by sending mail to:
[email protected].
Trademarks
Avaya and Aura are trademarks of Avaya, Inc.
Avaya is a registered trademark of Avaya Inc.
Avaya Aura is a trademark of Avaya Inc.
All non-Avaya trademarks are the property of their respective owners.
Downloading documents
For the most current versions of documentation, see the Avaya Support Web site:
http://www.avaya.com/support
Contact Avaya Support
Avaya provides a telephone number for you to use to report problems or to ask questions about your product. The
support telephone number is 1-800-242-2121 in the United States. For additional support telephone numbers, see
the Avaya Web site: http://www.avaya.com/support
Patent Notice
For patents covering LifeSize® products, refer to http://www.lifesize.com/support/legal.
Avaya Video Camera 100 Installation Guide
3
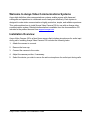
Welcome to Avaya Video Communications Systems
Avaya high definition video communications systems enable anyone with dispersed
colleagues and operations to collaborate more clearly and effectively. Each system is
designed to make video communication a highly productive, simple, and reliable experience.
This guide explains how to install Avaya Video Camera 100 for use with an Avaya video
communications system. Related documentation is available from the documentation CD
included in the product box and from support.avaya.com.
Installation Overview
Avaya Video Camera 100 is a fixed focus camera that includes microphones for audio input
during calls. Installing Avaya Video Camera 100 includes the following tasks:
1. Attach the camera to a mount.
2. Remove the lens cap.
3. Connect the camera to the codec.
4. Adjust the camera position, if necessary.
5. Select the device you wish to use as the active microphone for audio input during calls.
Avaya Video Camera 100 Installation Guide
4
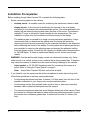
Installation Prerequisites
Before installing Avaya Video Camera 100, complete the following tasks:
•
Select a mounting option for the camera:
-
desktop mount—a movable mount for positioning the camera on a desk or table.
-
display mount—a fixed mount for positioning the camera on top of a display
connected to your Avaya video communications system. The mount attaches to the
display with an adhesive tape located under the base of the mount. The adhesive
requires 72 hours to achieve full bond strength at room temperature. Plan your
installation to allow time for the adhesive to bond securely to the display.
The adhesive tape is intended for a single use and permanent application. Avaya
recommends that you determine the optimal area for placing the camera by
removing the lens cap and connecting it to the codec as described in this document
before attaching the mount to the display. For information about techniques that you
may consider for removing the adhesive tape and cleaning the adhesive residue
from the display surface, contact the 3M company to obtain product documentation
for 3M VHB tapes. To obtain a replacement display mount, contact your Avaya
reseller.
WARNING: Use the desktop and display mounts on a horizontal surface only. Using
either mount on a vertical surface or on a surface with a slope greater than 10 degrees
may cause the camera to detach from the mount resulting in damage to the camera.
-
tripod socket—a 1/4-20 UNC threaded socket for connecting the camera to a
tripod. Refer to “Using the Tripod Socket” on page 9.
Note:
•
5
Avaya Video Camera 100 does not include a tripod.
If you intend to use the camera as the active microphone for audio input during calls,
follow these guidelines to optimize camera placement:
-
Avoid placing the camera less than .5 meters (1.64 feet) away from the front of the
speakers connected to your Avaya video communications system.
-
Avoid placing devices that generate noise (such as fans or personal computers)
between video conference participants and the camera.
-
The camera microphones attenuate sound directed at the back of the camera. Place
the camera in a location that ensures video conference participants speak in front of
the camera from a distance greater than .5 meters but less than 2.5 meters (8.2
feet).
Avaya Video Camera 100 Installation Guide
Installing Avaya Video Camera 100
Avaya Video Camera 100 includes the following components:
A-1
A-2
A-3
B
C
A
D
E
Component
Description
A
camera with lens cap (A-1), pivot collar (A-2), and microphones (A-3)
B
desktop mount
C
display mount
D
camera cable (3 meters)
E
documentation CD
Avaya Video Camera 100 Installation Guide
6
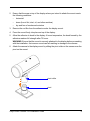
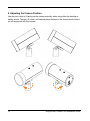
1. Attaching the Camera to a Mount
Follow the instructions in this section to attach the camera to a mount.
Attaching the Desktop Mount
To attach the camera to the desktop mount, slide the pivot collar on the camera over the
pivot on the mount.
pivot collar
pivot
Attaching the Display Mount
To attach the camera to the display mount, follow these steps:
1. Ensure that the temperature in the room in which the display is located is at least 60°F
(15°C). The ideal temperature range for applying the adhesive tape on the mount is
70°F to 100°F (21°C to 38°C).
WARNING: At temperatures below 60°F (15°C), the adhesive may fail to adhere readily
to the display.
7
Avaya Video Camera 100 Installation Guide
2. Ensure that the area on top of the display where you intend to attach the mount meets
the following conditions:
-
horizontal
-
clean (free of dirt, dust, oil, and other residues)
-
dry and free of condensed moisture
3. Remove the red film from the adhesive under the display mount.
4. Press the mount firmly into place on top of the display.
5. Allow the adhesive to bond to the display. At room temperature, the bond formed by the
adhesive reaches full strength after 72 hours.
WARNING: Ensure that the mount is securely attached to the display before proceeding
with the installation. An insecure mount can fail resulting in damage to the camera.
6. Attach the camera to the display mount by sliding the pivot collar on the camera over the
pivot on the mount.
pivot collar
pivot
Avaya Video Camera 100 Installation Guide
8
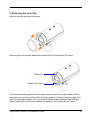
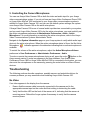
Using the Tripod Socket
The tripod socket and a screw secure the pivot collar to the camera. To expose the tripod
socket for use with a tripod, loosen the screw until the pivot collar detaches from the camera.
Note:
The screw remains attached to the pivot collar.
tripod socket
screw
pivot collar
9
Avaya Video Camera 100 Installation Guide
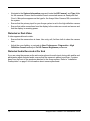
2. Removing the Lens Cap
Remove the lens cap from the camera.
Removing the lens cap also exposes the status LED and the infrared (IR) sensor.
Status LED
Infrared (IR) sensor
The IR sensor detects signals from the Avaya remote control up to eight meters (26 feet)
away when you use the remote control within two meters (6.5 feet) to the left or right of the
front of Avaya Video Camera 100. If you use the remote control directly in front of Avaya
Video Camera 100, the IR sensor detects the signal up to 14 meters (45 feet) away.
Avaya Video Camera 100 Installation Guide
10
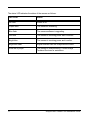
The status LED indicates the status of the camera as follows:
LED Color
Status
No color
Power is off.
Purple flash
The camera is initializing.
Blue flash
The camera software is upgrading.
Dim blue
The camera is receiving power and is inactive.
Bright blue
The camera is receiving power and is active.
Bright blue flash
Signal received from the Avaya remote control.
Solid red or purple
The camera is malfunctioning. Contact Avaya
Technical Services for assistance.
11
Avaya Video Camera 100 Installation Guide
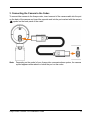
3. Connecting the Camera to the Codec
To connect the camera to the Avaya codec, insert one end of the camera cable into the port
on the back of the camera and insert the opposite end into the port marked with the camera
symbol on the back panel of the codec.
Note:
Depending on the model of your Avaya video communications system, the camera
symbol appears either above or below the port on the codec.
Avaya Video Camera 100 Installation Guide
12
4. Adjusting the Camera Position
Use the pivot collar to tilt and pivot the camera manually when using either the desktop or
display mount. The pan, tilt, zoom, and camera preset buttons on the Avaya remote control
are not supported with this camera.
13
Avaya Video Camera 100 Installation Guide
5. Controlling the Camera Microphones
You can use Avaya Video Camera 100 as both the video and audio input for your Avaya
video communications system. If you do not have an Avaya Video Conference Phone 1000
or Avaya Video MicPod 1000 connected to your Avaya video communications system in
addition to Avaya Video Camera 100, and you use the default system settings, the system
uses Avaya Video Camera 100 as the active microphone.
If Avaya Video Camera 100 is one of several audio input devices connected to your system,
and you want Avaya Video Camera 100 to be the active microphone, you must explicitly set
the active microphone preference at Administrator Preferences : Audio : Active
Microphone. For more information on selecting the active microphone, refer to the Avaya
Video Communications Systems Administrator Guide.
Navigate to the System Information page on your Avaya system to verify which audio input
device is the active microphone. When the active microphone status is None, the No Active
Microphone
indicator appears in the status bar indicating that no active microphone is
available.
To control the volume of the active microphone, adjust the Active Microphone Volume
preference in User Preferences or Administrator Preferences : Audio.
To mute or unmute the camera microphones during a call, press the mute
button on the
Avaya remote control. A mute icon appears in the user interface. If an Avaya Video
Conference Phone 1000 or Avaya Video MicPod 1000 is connected to the system, you can
also mute the microphones on the camera by pressing the mute button on either of these
devices.
Troubleshooting
The following sections describe symptoms, possible causes, and potential solutions for
common problems you may encounter when installing Avaya Video Camera 100.
No Video
If no video appears in the display from the camera:
•
Ensure that the camera cable is securely connected to the camera and to the
appropriate camera input on the codec and that nothing is obstructing the cable.
•
Verify that the blue LED on the front of the camera is lit, indicating that the camera is
receiving power. Reboot the Avaya system if necessary to verify that the camera
receives power.
Avaya Video Camera 100 Installation Guide
14
•
Navigate to the System Information page and locate the HD Camera 1 and Type fields
for the cameras. Ensure that the status of each connected camera is Ready and that
Fixed + Microphone appears as the type for the Avaya Video Camera 100 connected to
the system.
•
Ensure that the primary input for your Avaya system is set to the high definition camera.
•
Ensure that cable connections from the display to the codec are correct and secure and
that the display is receiving power.
Distorted or Dark Video
If video appears blurred or dark:
•
Ensure that the camera lens is clean. Use a dry, soft, lint-free cloth to clean the camera
lens.
•
Adjust the room lighting, or navigate to User Preferences : Diagnostics : High
Definition Camera and adjust the HD Camera Brightness preference.
Distorted Audio Received at Far End
If you are using the camera as the active microphone for audio input during calls and far end
participants report distorted audio, ensure that the camera is placed more than .5 meters
away from the front of the speakers attached to the Avaya system. Refer to “Installation
Prerequisites” on page 5 for information about camera placement.
15
Avaya Video Camera 100 Installation Guide