1
BayRS Version 13.20
Document Change
Notice
BayRS Version 13.20
Site Manager Software Version 7.20
BCC Version 4.20
Part No. 300020-D Rev. 00
April 1999
Bay Networks, Inc.
4401 Great America Parkway
Santa Clara, CA 95054
Copyright © 1999 Bay Networks, Inc.
All rights reserved. Printed in the USA. April 1999.
The information in this document is subject to change without notice. The statements, configurations, technical data,
and recommendations in this document are believed to be accurate and reliable, but are presented without express or
implied warranty. Users must take full responsibility for their applications of any products specified in this document.
The information in this document is proprietary to Bay Networks, Inc.
The software described in this document is furnished under a license agreement and may only be used in accordance
with the terms of that license. A summary of the Software License is included in this document.
Trademarks
AN, BCN, BLN, BN, FRE, and Bay Networks are registered trademarks and ANH, ARN, ASN, BayRS, and BCC, are
trademarks of Bay Networks, Inc.
Microsoft, MS, MS-DOS, Win32, Windows, and Windows NT are registered trademarks of Microsoft Corporation.
All other trademarks and registered trademarks are the property of their respective owners.
Restricted Rights Legend
Use, duplication, or disclosure by the United States Government is subject to restrictions as set forth in subparagraph
(c)(1)(ii) of the Rights in Technical Data and Computer Software clause at DFARS 252.227-7013.
Notwithstanding any other license agreement that may pertain to, or accompany the delivery of, this computer
software, the rights of the United States Government regarding its use, reproduction, and disclosure are as set forth in
the Commercial Computer Software-Restricted Rights clause at FAR 52.227-19.
Statement of Conditions
In the interest of improving internal design, operational function, and/or reliability, Bay Networks, Inc. reserves the
right to make changes to the products described in this document without notice.
Bay Networks, Inc. does not assume any liability that may occur due to the use or application of the product(s) or
circuit layout(s) described herein.
Portions of the code in this software product may be Copyright © 1988, Regents of the University of California. All
rights reserved. Redistribution and use in source and binary forms of such portions are permitted, provided that the
above copyright notice and this paragraph are duplicated in all such forms and that any documentation, advertising
materials, and other materials related to such distribution and use acknowledge that such portions of the software were
developed by the University of California, Berkeley. The name of the University may not be used to endorse or
promote products derived from such portions of the software without specific prior written permission.
SUCH PORTIONS OF THE SOFTWARE ARE PROVIDED “AS IS” AND WITHOUT ANY EXPRESS OR
IMPLIED WARRANTIES, INCLUDING, WITHOUT LIMITATION, THE IMPLIED WARRANTIES OF
MERCHANTABILITY AND FITNESS FOR A PARTICULAR PURPOSE.
In addition, the program and information contained herein are licensed only pursuant to a license agreement that
contains restrictions on use and disclosure (that may incorporate by reference certain limitations and notices imposed
by third parties).
ii
300020-D Rev. 00
Bay Networks, Inc. Software License Agreement
NOTICE: Please carefully read this license agreement before copying or using the accompanying software or
installing the hardware unit with pre-enabled software (each of which is referred to as “Software” in this Agreement).
BY COPYING OR USING THE SOFTWARE, YOU ACCEPT ALL OF THE TERMS AND CONDITIONS OF
THIS LICENSE AGREEMENT. THE TERMS EXPRESSED IN THIS AGREEMENT ARE THE ONLY TERMS
UNDER WHICH BAY NETWORKS WILL PERMIT YOU TO USE THE SOFTWARE. If you do not accept these
terms and conditions, return the product, unused and in the original shipping container, within 30 days of purchase to
obtain a credit for the full purchase price.
1. License Grant. Bay Networks, Inc. (“Bay Networks”) grants the end user of the Software (“Licensee”) a personal,
nonexclusive, nontransferable license: a) to use the Software either on a single computer or, if applicable, on a single
authorized device identified by host ID, for which it was originally acquired; b) to copy the Software solely for backup
purposes in support of authorized use of the Software; and c) to use and copy the associated user manual solely in
support of authorized use of the Software by Licensee. This license applies to the Software only and does not extend
to Bay Networks Agent software or other Bay Networks software products. Bay Networks Agent software or other
Bay Networks software products are licensed for use under the terms of the applicable Bay Networks, Inc. Software
License Agreement that accompanies such software and upon payment by the end user of the applicable license fees
for such software.
2. Restrictions on use; reservation of rights. The Software and user manuals are protected under copyright laws.
Bay Networks and/or its licensors retain all title and ownership in both the Software and user manuals, including any
revisions made by Bay Networks or its licensors. The copyright notice must be reproduced and included with any
copy of any portion of the Software or user manuals. Licensee may not modify, translate, decompile, disassemble, use
for any competitive analysis, reverse engineer, distribute, or create derivative works from the Software or user manuals
or any copy, in whole or in part. Except as expressly provided in this Agreement, Licensee may not copy or transfer
the Software or user manuals, in whole or in part. The Software and user manuals embody Bay Networks’ and its
licensors’ confidential and proprietary intellectual property. Licensee shall not sublicense, assign, or otherwise
disclose to any third party the Software, or any information about the operation, design, performance, or
implementation of the Software and user manuals that is confidential to Bay Networks and its licensors; however,
Licensee may grant permission to its consultants, subcontractors, and agents to use the Software at Licensee’s facility,
provided they have agreed to use the Software only in accordance with the terms of this license.
3. Limited warranty. Bay Networks warrants each item of Software, as delivered by Bay Networks and properly
installed and operated on Bay Networks hardware or other equipment it is originally licensed for, to function
substantially as described in its accompanying user manual during its warranty period, which begins on the date
Software is first shipped to Licensee. If any item of Software fails to so function during its warranty period, as the sole
remedy Bay Networks will at its discretion provide a suitable fix, patch, or workaround for the problem that may be
included in a future Software release. Bay Networks further warrants to Licensee that the media on which the
Software is provided will be free from defects in materials and workmanship under normal use for a period of 90 days
from the date Software is first shipped to Licensee. Bay Networks will replace defective media at no charge if it is
returned to Bay Networks during the warranty period along with proof of the date of shipment. This warranty does not
apply if the media has been damaged as a result of accident, misuse, or abuse. The Licensee assumes all responsibility
for selection of the Software to achieve Licensee’s intended results and for the installation, use, and results obtained
from the Software. Bay Networks does not warrant a) that the functions contained in the software will meet the
Licensee’s requirements, b) that the Software will operate in the hardware or software combinations that the Licensee
may select, c) that the operation of the Software will be uninterrupted or error free, or d) that all defects in the
operation of the Software will be corrected. Bay Networks is not obligated to remedy any Software defect that cannot
be reproduced with the latest Software release. These warranties do not apply to the Software if it has been (i) altered,
except by Bay Networks or in accordance with its instructions; (ii) used in conjunction with another vendor’s product,
resulting in the defect; or (iii) damaged by improper environment, abuse, misuse, accident, or negligence. THE
FOREGOING WARRANTIES AND LIMITATIONS ARE EXCLUSIVE REMEDIES AND ARE IN LIEU OF ALL
OTHER WARRANTIES EXPRESS OR IMPLIED, INCLUDING WITHOUT LIMITATION ANY WARRANTY OF
MERCHANTABILITY OR FITNESS FOR A PARTICULAR PURPOSE. Licensee is responsible for the security of
300020-D Rev. 00
iii
its own data and information and for maintaining adequate procedures apart from the Software to reconstruct lost or
altered files, data, or programs.
4. Limitation of liability. IN NO EVENT WILL BAY NETWORKS OR ITS LICENSORS BE LIABLE FOR ANY
COST OF SUBSTITUTE PROCUREMENT; SPECIAL, INDIRECT, INCIDENTAL, OR CONSEQUENTIAL
DAMAGES; OR ANY DAMAGES RESULTING FROM INACCURATE OR LOST DATA OR LOSS OF USE OR
PROFITS ARISING OUT OF OR IN CONNECTION WITH THE PERFORMANCE OF THE SOFTWARE, EVEN
IF BAY NETWORKS HAS BEEN ADVISED OF THE POSSIBILITY OF SUCH DAMAGES. IN NO EVENT
SHALL THE LIABILITY OF BAY NETWORKS RELATING TO THE SOFTWARE OR THIS AGREEMENT
EXCEED THE PRICE PAID TO BAY NETWORKS FOR THE SOFTWARE LICENSE.
5. Government Licensees. This provision applies to all Software and documentation acquired directly or indirectly by
or on behalf of the United States Government. The Software and documentation are commercial products, licensed on
the open market at market prices, and were developed entirely at private expense and without the use of any U.S.
Government funds. The license to the U.S. Government is granted only with restricted rights, and use, duplication, or
disclosure by the U.S. Government is subject to the restrictions set forth in subparagraph (c)(1) of the Commercial
Computer Software––Restricted Rights clause of FAR 52.227-19 and the limitations set out in this license for civilian
agencies, and subparagraph (c)(1)(ii) of the Rights in Technical Data and Computer Software clause of DFARS
252.227-7013, for agencies of the Department of Defense or their successors, whichever is applicable.
6. Use of Software in the European Community. This provision applies to all Software acquired for use within the
European Community. If Licensee uses the Software within a country in the European Community, the Software
Directive enacted by the Council of European Communities Directive dated 14 May, 1991, will apply to the
examination of the Software to facilitate interoperability. Licensee agrees to notify Bay Networks of any such
intended examination of the Software and may procure support and assistance from Bay Networks.
7. Term and termination. This license is effective until terminated; however, all of the restrictions with respect to
Bay Networks’ copyright in the Software and user manuals will cease being effective at the date of expiration of the
Bay Networks copyright; those restrictions relating to use and disclosure of Bay Networks’ confidential information
shall continue in effect. Licensee may terminate this license at any time. The license will automatically terminate if
Licensee fails to comply with any of the terms and conditions of the license. Upon termination for any reason,
Licensee will immediately destroy or return to Bay Networks the Software, user manuals, and all copies. Bay
Networks is not liable to Licensee for damages in any form solely by reason of the termination of this license.
8. Export and Re-export. Licensee agrees not to export, directly or indirectly, the Software or related technical data
or information without first obtaining any required export licenses or other governmental approvals. Without limiting
the foregoing, Licensee, on behalf of itself and its subsidiaries and affiliates, agrees that it will not, without first
obtaining all export licenses and approvals required by the U.S. Government: (i) export, re-export, transfer, or divert
any such Software or technical data, or any direct product thereof, to any country to which such exports or re-exports
are restricted or embargoed under United States export control laws and regulations, or to any national or resident of
such restricted or embargoed countries; or (ii) provide the Software or related technical data or information to any
military end user or for any military end use, including the design, development, or production of any chemical,
nuclear, or biological weapons.
9. General. If any provision of this Agreement is held to be invalid or unenforceable by a court of competent
jurisdiction, the remainder of the provisions of this Agreement shall remain in full force and effect. This Agreement
will be governed by the laws of the state of California.
Should you have any questions concerning this Agreement, contact Bay Networks, Inc., 4401 Great America Parkway,
P.O. Box 58185, Santa Clara, California 95054-8185.
LICENSEE ACKNOWLEDGES THAT LICENSEE HAS READ THIS AGREEMENT, UNDERSTANDS IT, AND
AGREES TO BE BOUND BY ITS TERMS AND CONDITIONS. LICENSEE FURTHER AGREES THAT THIS
AGREEMENT IS THE ENTIRE AND EXCLUSIVE AGREEMENT BETWEEN BAY NETWORKS AND
LICENSEE, WHICH SUPERSEDES ALL PRIOR ORAL AND WRITTEN AGREEMENTS AND
COMMUNICATIONS BETWEEN THE PARTIES PERTAINING TO THE SUBJECT MATTER OF THIS
AGREEMENT. NO DIFFERENT OR ADDITIONAL TERMS WILL BE ENFORCEABLE AGAINST BAY
NETWORKS UNLESS BAY NETWORKS GIVES ITS EXPRESS WRITTEN CONSENT, INCLUDING AN
EXPRESS WAIVER OF THE TERMS OF THIS AGREEMENT.
iv
300020-D Rev. 00
Contents
Preface
Text Conventions .............................................................................................................xiii
Acronyms .........................................................................................................................xiv
Bay Networks Technical Publications .............................................................................. xv
How to Get Help ..............................................................................................................xvi
Document Change Notice
Cable Guide ....................................................................................................................... 4
50-Pin to V.28 Cable (Order No. AA0018023) ............................................................. 5
15-Pin D-Sub to RS-232: Raise DTR (Order No. 7118) .............................................. 6
15-Pin D-Sub to RS-232: V.25bis (Order No. 7119) .................................................... 7
15-Pin D-Sub to V.35: V.25bis (Order No. 7120) ......................................................... 8
15-Pin D-Sub to V.35: Raise DTR (Order No. 7121) ................................................... 9
44-Pin D-Sub to V.35: Raise DTR (Order No. 7137) ................................................. 10
44-Pin D-Sub to RS-232: Raise DTR (Order No. 7138) ............................................ 12
44-Pin to V.35M (Order No. 7159) ............................................................................. 13
RS-232 Pass-Through: 15-Pin to RS-232 (Order No. 7218) ..................................... 15
44-Pin D-Sub to V.35: Leased Line or V.25bis (Order No. 7220) .............................. 16
15-Pin D-Sub to RS-232 (Order No. 7255) ............................................................... 18
15-Pin D-Sub to V.28 (Order No. 7256) ..................................................................... 19
44-Pin D-Sub to RS-232: Leased Line or V.25bis (Order No. 7826) ......................... 20
RS-232 Pass-Through: 44-Pin to RS-232 (Order No. 7833) ..................................... 21
V.35 Pass-Through: 44-Pin to V.35 (Order No. 7834) ................................................ 22
44-Pin D-Sub to V.28 (Order No. 7837) ..................................................................... 24
50-Pin to V.35 (Order No. 7932) ................................................................................ 26
50-Pin to V.35: Raise DTR (Order No. 7933) ............................................................ 28
50-Pin to RS-232 (Order No. 7934) .......................................................................... 30
50-Pin to RS-232: Raise DTR (Order No. 7935) ....................................................... 31
15-Pin to F RS-232 Synchronous Pass-Through (Order No. 7941) .......................... 32
300020-D Rev. 00
v
44-Pin to F RS-232 Synchronous Pass-Through (Order No. 7943) .......................... 33
44-Pin to F V.35 Synchronous Pass-Through (Order No. 7944) ............................... 34
50-Pin to F RS-232 Synchronous Pass-Through (Order No. 7945) .......................... 35
50-Pin to F V.35 Synchronous Pass-Through (Order No. 7946) ............................... 36
Configuring and Managing Routers with Site Manager ................................................... 37
Reallocating Memory Partitions for a Processor Module .......................................... 37
Configuring BSC Transport Services ............................................................................... 41
Configuring Data Encryption Services ............................................................................. 42
Using Encryption with Dial Services ......................................................................... 42
Configuring Dial Services ................................................................................................ 42
RADIUS Authentication Services Using VSA ............................................................ 43
Creating an Incoming Phone List (ISDN Only) .......................................................... 43
show dial demand in-phone-numbers ....................................................................... 45
Configuring Ethernet, FDDI, and Token Ring Services ................................................... 45
802.1Q Parameters ................................................................................................... 46
Ethernet Flow Control ............................................................................................... 47
Configuring Interface and Router Redundancy ............................................................... 58
Configuring IP Utilities ..................................................................................................... 58
Configuring L2TP Services .............................................................................................. 58
Maximum Number of L2TP Sessions ........................................................................ 59
Name Server Addresses ........................................................................................... 59
Support for AN and ARN ........................................................................................... 72
Support for Framed Routes ....................................................................................... 72
Configuring PPP Services ............................................................................................... 74
Setting the Maximum Receive Unit (MRU) ................................................................ 74
Disabling RFC 1661 Compliance .............................................................................. 75
PPP Line Parameters ................................................................................................ 77
Configuring RMON and RMON2 ..................................................................................... 78
Configuring Mini-RMON on BN Routers ................................................................... 78
Configuration Considerations .................................................................................... 78
Starting Mini-RMON .................................................................................................. 79
Configuring SNMP, BootP, DHCP, and RARP Services ................................................... 79
SNMP View-Based Access Control .......................................................................... 79
Configuring Syslog Services ........................................................................................... 86
Configuring and Monitoring Syslog Using the BCC .................................................. 86
vi
300020-D Rev. 00
Configuring Traffic Filters and Protocol Prioritization ..................................................... 113
Enabling Protocol Prioritization on an ATM Circuit .................................................. 113
Configuring WAN Line Services .................................................................................... 114
Setting the Cable Type Using the BCC ................................................................... 114
Sending Traffic Across a HSSI Interface ................................................................. 115
Upgrading Routers to BayRS Version 13.xx .................................................................. 115
Boot and Diagnostic PROM Upgrades for Version 13.20 ........................................ 115
Using Technician Interface Software ............................................................................. 116
Monitoring EIA Signals ............................................................................................ 117
300020-D Rev. 00
vii
Figures
Figure 1.
Kernel Configuration Window (AN, ANH, ASN, and FRE-2) ..................... 38
Figure 2.
Kernel Configuration Window (FRE-4-PPC) ............................................. 41
Figure 3.
Edit 10/100Mb/s Ethernet Parameters Window
(for 100Base-TX Module) .......................................................................... 51
Figure 4.
Edit 10/100Mb/s Ethernet Parameters Window
(for 100Base-FX Module) .......................................................................... 52
Figure 5.
Edit 1000Mb/s Ethernet Parameters Window ........................................... 53
Figure 6.
Specifying Server-Assigned NSAs in the Dial-Up Networking
TCP/IP Settings Window ........................................................................... 60
Figure 7.
Network with Name Server Address Origin Parameter Set to Local ......... 63
Figure 8.
Network with Name Server Address Origin Parameter Set to RADIUS .... 65
Figure 9.
Run Window .............................................................................................. 67
Figure 10.
IP Configuration Window .......................................................................... 68
Figure 11.
More Info. IP Configuration Window .......................................................... 69
Figure 12.
L2TP Network without Framed-Route Support ......................................... 72
Figure 13.
L2TP Network with Framed-Route Support .............................................. 73
Figure 14.
Syslog and syslogd Operations ................................................................ 87
Figure 15.
Router Event Message Filtering for One Host .......................................... 89
Figure 16.
Syslog Message Encapsulation ................................................................ 90
Figure 17.
Syslog Message Composition ................................................................... 91
Figure 18.
BCC Configuration Hierarchy for Syslog Services .................................... 94
300020-D Rev. 00
ix
Tables
Table 1.
Version 13.20/7.20 Documentation ............................................................. 1
Table 2.
Kernel Configuration Window Information ................................................. 39
Table 3.
Syslog Parameters (box or stack > syslog) ............................................. 111
Table 4.
Parameters of log-host (box or stack > syslog > log-host) ...................... 111
Table 5.
Parameters of filter (box or stack > syslog > log-host > filter) ................. 112
Table 6.
Version 13.20 Boot and Diagnostic PROM Revisions ............................. 116
300020-D Rev. 00
xi
Preface
This guide describes changes to router software and hardware documentation
since BayRS™ Version 13.00. Table 1 of this guide lists the manuals included with
Version 13.20, identifies new and revised manuals since Version 13.00, and lists
those manuals that we have not revised and which are affected by sections in this
document change notice.
Text Conventions
This guide uses the following text conventions:
angle brackets (< >)
Indicate that you choose the text to enter based on the
description inside the brackets. Do not type the
brackets when entering the command.
Example: If the command syntax is:
ping <ip_address>, you enter:
ping 192.32.10.12
bold text
Indicates command names and options and text that
you need to enter.
Example: Enter show ip {alerts | routes}.
Example: Use the dinfo command.
ellipsis points (. . . )
Indicate that you repeat the last element of the
command as needed.
Example: If the command syntax is:
ethernet/2/1 [<parameter> <value>] . . . , you enter
ethernet/2/1 and as many parameter-value pairs as
needed.
300020-D Rev. 00
xiii
BayRS Version 13.20 Document Change Notice
italic text
Indicates file and directory names, new terms, book
titles, and variables in command syntax descriptions.
Where a variable is two or more words, the words are
connected by an underscore.
Example: If the command syntax is:
show at <valid_route>
valid_route is one variable and you substitute one value
for it.
screen text
Indicates system output, for example, prompts and
system messages.
Example: Set Bay Networks Trap Monitor Filters
separator ( > )
Shows menu paths.
Example: Protocols > IP identifies the IP option on the
Protocols menu.
vertical line ( | )
Separates choices for command keywords and
arguments. Enter only one of the choices. Do not type
the vertical line when entering the command.
Example: If the command syntax is:
show ip {alerts | routes}, you enter either:
show ip alerts or show ip routes, but not both.
Acronyms
This guide uses the following acronyms:
xiv
BSC
Binary Synchronous Communication
DNS
domain name server
IP
Internet Protocol
ISDN
Integrated Services Digital Network
ISP
Internet Service Provider
L2TP
Layer 2 Tunneling Protocol
LAC
L2TP access concentrator
300020-D Rev. 00
Preface
LAN
local area network
LNS
L2TP network server
MRU
maximum receive unit
MTU
maximum transmission unit
NBNS
NetBIOS name server
NSA
name server address
NVRAM
Nonvolatile RAM
OSPF
Open Shortest Path First
PPP
Point-to-Point Protocol
SNMP
Simple Network Management Protocol
RADIUS
Remote Authentication Dial-In User Service
RAS
remote access server
RIP
Routing Information Protocol
RMON
Remote Monitoring
TCP/IP
Transmission Control Protocol/Internet Protocol
UDP
User Datagram Protocol
VPN
virtual private network
VLAN
virtual LAN
WAN
wide area network
Bay Networks Technical Publications
You can now print Bay Networks technical manuals and release notes free,
directly from the Internet. Go to support.baynetworks.com/library/tpubs/. Find the
Bay Networks product for which you need documentation. Then locate the
specific category and model or version for your hardware or software product.
Using Adobe Acrobat Reader, you can open the manuals and release notes, search
for the sections you need, and print them on most standard printers. You can
download Acrobat Reader free from the Adobe Systems Web site,
www.adobe.com.
300020-D Rev. 00
xv
BayRS Version 13.20 Document Change Notice
You can purchase Bay Networks documentation sets, CDs, and selected technical
publications through the Bay Networks Collateral Catalog. The catalog is located
on the World Wide Web at support.baynetworks.com/catalog.html and is divided
into sections arranged alphabetically:
•
The “CD ROMs” section lists available CDs.
•
The “Guides/Books” section lists books on technical topics.
•
The “Technical Manuals” section lists available printed documentation sets.
Make a note of the part numbers and prices of the items that you want to order.
Use the “Marketing Collateral Catalog description” link to place an order and to
print the order form.
How to Get Help
If you purchased a service contract for your Bay Networks product from a
distributor or authorized reseller, contact the technical support staff for that
distributor or reseller for assistance.
If you purchased a Bay Networks service program, contact one of the following
Bay Networks Technical Solutions Centers:
xvi
Technical Solutions Center
Telephone Number
Billerica, MA
800-2LANWAN (800-252-6926)
Santa Clara, CA
800-2LANWAN (800-252-6926)
Valbonne, France
33-4-92-96-69-68
Sydney, Australia
61-2-9927-8800
Tokyo, Japan
81-3-5402-7041
300020-D Rev. 00
Document Change Notice
Table 1 lists the manuals included in the Version 13.20/7.20 release and those
manuals affected by sections in this document.
Table 1.
Version 13.20/7.20 Documentation
Document Title
Revised Book
for 13.20/7.20
BCC Quick Reference
✔
BCC show Commands for IP Services
✔
Affected by
Section in DCN
Cable Guide
✔
Configuring and Managing Routers with
Site Manager
✔
Configuring and Troubleshooting Bay Dial
VPN Networks
✔
Configuring AppleTalk Services
Configuring APPN Services
Configuring ATM DXI Services
Configuring ATM Half-Bridge Services
Configuring ATM Services
✔
Configuring BaySecure FireWall-1
✔
Configuring BayStack Remote Access
Configuring Bridging Services
✔
✔
Configuring BSC Transport Services
Configuring Data Compression Services
✔
(continued)
300020-D Rev. 00
1
BayRS Version 13.20 Document Change Notice
Table 1.
Version 13.20/7.20 Documentation (continued)
Document Title
Revised Book
for 13.20/7.20
Affected by
Section in DCN
✔
Configuring Data Encryption Services
Configuring DECnet Services
Configuring Differentiated Services
✔
✔
Configuring Dial Services
Configuring DLSw Services
✔
✔
Configuring Ethernet, FDDI, and Token
Ring Services
Configuring Frame Relay Services
✔
Configuring GRE, NAT, RIPSO, and BFE
Services
✔
✔
Configuring Interface and Router
Redundancy
Configuring IP, ARP, RIP, and OSPF
Services
✔
Configuring IP Exterior Gateway Protocols
(BGP and EGP)
✔
Configuring IP Multicasting and Multimedia
Services
✔
Configuring IPsec Services
✔
✔
Configuring IP Utilities
Configuring IPv6 Services
Configuring IPX Services
✔
Configuring L2TP Services
Configuring LLC Services
✔
Configuring LNM Services
Configuring MPOA Services
✔
Configuring MPLS Services
✔
Configuring OSI Services
Configuring Polled AOT Transport Services
(continued)
2
300020-D Rev. 00
BayRS Version 13.20 Document Change Notice
Table 1.
Version 13.20/7.20 Documentation (continued)
Document Title
Revised Book
for 13.20/7.20
✔
Configuring PPP Services
Configuring RADIUS
✔
✔
Configuring RMON and RMON2
Configuring SDLC Services
Affected by
Section in DCN
✔
Configuring SMDS
Configuring SNMP, BootP, DHCP, and
RARP Services
✔
Configuring Syslog Services
✔☛
Configuring Traffic Filters and Protocol
Prioritization
✔
Configuring VINES Services
Configuring VRRP Services
✔
✔
Configuring WAN Line Services
Configuring X.25 Gateway Services
Configuring X.25 Services
Configuring XNS Services
Connecting ASN Routers to a Network
Managing Routers Using the Web Server
✔
Quick-Starting Routers
✔
Troubleshooting Routers
✔
Upgrading Routers to BayRS Version 13.xx
Using Technician Interface Scripts
Using Technician Interface Software
Using the Bay Command Console
✔
Writing Technician Interface Scripts
* This information is an addition to the BayRS documentation set. It does not
supplement or replace information in any existing document.
300020-D Rev. 00
3
BayRS Version 13.20 Document Change Notice
Cable Guide
The following sections are additions or amendments to the Cable Guide:
4
•
50-Pin to V.28 Cable (Order No. AA0018023)
•
15-Pin D-Sub to RS-232: Raise DTR (Order No. 7118)
•
15-Pin D-Sub to RS-232: V.25bis (Order No. 7119)
•
15-Pin D-Sub to V.35: V.25bis (Order No. 7120)
•
15-Pin D-Sub to V.35: Raise DTR (Order No. 7121)
•
44-Pin D-Sub to V.35: Raise DTR (Order No. 7137)
•
44-Pin D-Sub to RS-232: Raise DTR (Order No. 7138)
•
44-Pin to V.35M (Order No. 7159)
•
RS-232 Pass-Through: 15-Pin to RS-232 (Order No. 7218)
•
44-Pin D-Sub to V.35: Leased Line or V.25bis (Order No. 7220)
•
15-Pin D-Sub to RS-232 (Order No. 7255)
•
15-Pin D-Sub to V.28 (Order No. 7256)
•
44-Pin D-Sub to RS-232: Leased Line or V.25bis (Order No. 7826)
•
RS-232 Pass-Through: 44-Pin to RS-232 (Order No. 7833)
•
V.35 Pass-Through: 44-Pin to V.35 (Order No. 7834)
•
44-Pin D-Sub to V.28 (Order No. 7837)
•
50-Pin to V.35 (Order No. 7932)
•
50-Pin to V.35: Raise DTR (Order No. 7933)
•
50-Pin to RS-232 (Order No. 7934)
•
50-Pin to RS-232: Raise DTR (Order No. 7935)
•
15-Pin to F RS-232 Synchronous Pass-Through (Order No. 7941)
•
44-Pin to F RS-232 Synchronous Pass-Through (Order No. 7943)
•
44-Pin to F V.35 Synchronous Pass-Through (Order No. 7944)
•
50-Pin to F RS-232 Synchronous Pass-Through (Order No. 7945)
•
50-Pin to F V.35 Synchronous Pass-Through (Order No. 7946)
300020-D Rev. 00
BayRS Version 13.20 Document Change Notice
50-Pin to V.28 Cable (Order No. AA0018023)
15 ft
(4.57 m)
Pin 1
Pin 25
Pin 1
Pin 13
Pin 26
Pin 50
Pin 14
Pin 25
50-position 0.8-mm plug
(ground shield connected to internal shell)
25-position D-sub plug with M-3 jack screws
(ground shield connected to backshell)
CAB0103A
Industry Interface Type: V.28 (V.10)
Bay Networks Termination
Remote Termination
Signal
Pin # to Pin #
Signal
Frame Ground
1
1
Frame Ground
Send Data +
2
2
Send Data
Receive Data +
3
3
Receive Data
Request to Send +
4
4
Request to Send
Clear to Send +
5
5
Clear to Send
Data Set Ready +
6
6
Data Set Ready
Signal Ground
7
7
Signal Ground
Data Terminal Ready +
8
20
Data Terminal Ready
Data Carrier Detect +
9
8
Data Carrier Detect
Send Timing +
10
15
Send Timing
Receive Timing +
11
17
Receive Timing
Terminal Timing +
12
24
Terminal Timing
Internal Wire Connections
Pin 7 > 30 > 31
Pin 13 > 38
Pin 14 > 39
300020-D Rev. 00
5
BayRS Version 13.20 Document Change Notice
15-Pin D-Sub to RS-232: Raise DTR (Order No. 7118)
15 ft
(4.57 m)
Pin 1
Pin 8
Pin 9
Pin 15
15-position D-sub plug with locking posts
(ground shield connected to backshell)
Pin 1
P
Pin 13
Pin 14
Pin 25
25-position D-sub plug with screw locks
(ground shield connected to backshell)
CAB0005A
Industry Interface Type: RS-232-C
Bay Networks Termination
Remote Termination
Signal
Pin # to Pin #
Signal
Signal Ground
1
7
Signal Ground
Transmitted Data
2
2
Transmitted Data
Transmitter Signal Element Timing 3
(DTE Source)
24
Transmitter Signal Element Timing
(DTE Source)
Transmitter Signal Element Timing 4
(DCE Source)
15
Transmitter Signal Element Timing
(DCE Source)
Request to Send
6
4
Request to Send
Clear to Send
8
6
Data Set Ready
Data Carrier Detect
10
22
Ring Indicator
Receiver Signal Element Timing
(DCE Source)
12
17
Receiver Signal Element Timing
(DCE Source)
Received Data
14
3
Received Data
Internal Wire Connections
Pin 1 > 7
6
Pin 4 > 20 (Data Terminal Ready)
300020-D Rev. 00
BayRS Version 13.20 Document Change Notice
15-Pin D-Sub to RS-232: V.25bis (Order No. 7119)
15 ft
(4.57 m)
Pin 1
Pin 8
Pin 9
Pin 15
15-position D-sub plug with locking posts
(ground shield connected to backshell)
Pin 1
P
Pin 13
Pin 14
Pin 25
25-position D-sub plug with screw locks
(ground shield connected to backshell)
CAB0006A
Industry Interface Type: RS-232-C
Bay Networks Termination
Remote Termination
Signal
Pin # to Pin #
Signal
Signal Ground
1
7
Signal Ground
Transmitted Data
2
2
Transmitted Data
Transmitter Signal Element Timing 3
(DTE Source)
24
Transmitter Signal Element Timing
(DTE Source)
Transmitter Signal Element Timing 4
(DCE Source)
15
Transmitter Signal Element Timing
(DCE Source)
Request to Send
6
4
Request to Send
Clear to Send
8
5
Clear to Send
Data Carrier Detect
10
6
Data Set Ready
Receiver Signal Element Timing
(DCE Source)
12
17
Receiver Signal Element Timing
(DCE Source)
Received Data
14
3
Received Data
Internal Wire Connections
Pin 1 > 7
300020-D Rev. 00
Pin 4 > 20 (Data Terminal Ready)
7
BayRS Version 13.20 Document Change Notice
15-Pin D-Sub to V.35: V.25bis (Order No. 7120)
15 ft
(4.57 m)
Pin 1
A
E
C
H
P
S
Y
AA
34-position V.35 plug with screw jack retainers
(ground shield connected to backshell)
Pin 8
Pin 9
B
D
R
T
V
X
Pin 15
15-position D-sub plug with locking posts
(ground shield connected to backshell)
CAB0007A
Industry Interface Type: V.35 (V.10 and V.11)
Bay Networks Termination
Remote Termination
Signal
Pin # to Pin #
Signal
Signal Ground
1
B
Signal Ground
Send Data +
2
P
Send Data A
Send Data -
3
S
Send Data B
Serial Clock Transmit +
4
Y
Send Timing A
Serial Clock Transmit -
5
AA
Send Timing B
Request to Send +
6
C
Request to Send
Clear to Send +
8
D
Clear to Send
Data Carrier Detect +
10
E
Data Set Ready
Serial Clock Receive -
11
X
Receive Timing B
Serial Clock Receive +
12
V
Receive Timing A
Receive Data -
13
T
Receive Data B
Receive Data +
14
R
Receive Data A
Internal Wire Connections
Pin 1 > 7
8
Pin C > H (Data Terminal Ready)
300020-D Rev. 00
BayRS Version 13.20 Document Change Notice
15-Pin D-Sub to V.35: Raise DTR (Order No. 7121)
15 ft
(4.57 m)
Pin 1
A
E
C
H
P
S
Y
AA
34-position V.35 plug with screw jack retainers
(ground shield connected to backshell)
Pin 8
Pin 9
B
J
R
T
V
X
Pin 15
15-position D-sub plug with locking posts
(ground shield connected to backshell)
CAB0008A
Industry Interface Type: V.35 (V.10 and V.11)
Bay Networks Termination
Remote Termination
Signal
Pin # to Pin #
Signal
Signal Ground
1
B
Signal Ground
Send Data +
2
P
Send Data A
Send Data -
3
S
Send Data B
Serial Clock Transmit +
4
Y
Send Timing A
Serial Clock Transmit -
5
AA
Send Timing B
Request to Send +
6
C
Request to Send
Clear to Send +
8
E
Data Set Ready
Data Carrier Detect +
10
J
Ring Indicator
Serial Clock Receive -
11
X
Receive Timing B
Serial Clock Receive +
12
V
Receive Timing A
Receive Data -
13
T
Receive Data B
Receive Data +
14
R
Receive Data A
Internal Wire Connections
Pin 1 > 7
300020-D Rev. 00
Pin C > H (Data Terminal Ready)
9
BayRS Version 13.20 Document Change Notice
44-Pin D-Sub to V.35: Raise DTR (Order No. 7137)
15 ft
(4.57 m)
Pin 1
Pin 15
Pin 16
Pin 30
Pin 31
Pin 44
44-position D-sub plug with screw locks
(ground shield connected to backshell)
A
C
E
H
P
S
U
W
Y
AA
34-position V.35 plug with screw jack retainers
(ground shield connected to backshell)
B
D
J
R
T
V
X
CAB0018A
Industry Interface Type: V.35 (V.10 and V.11)
10
300020-D Rev. 00
BayRS Version 13.20 Document Change Notice
Bay Networks Termination
Remote Termination
Signal
Pin # to Pin #
Signal
Frame Ground
1
A
Frame Ground
Request to Send +
4
C
Request to Send
Clear to Send +
5
D
Clear to Send
Data Set Ready +
6
E
Data Set Ready
Data Terminal Ready +
8
H
Data Terminal Ready
Data Carrier Detect +
9
J
Ring Indicator
VTT +
40
U
Terminal Timing A
VTT -
39
W
Terminal Timing B
Signal Ground
19
B
Signal Ground
VST +
32
Y
Send Timing A
VST -
31
AA
Send Timing B
VRT +
34
V
Receive Timing A
VRT -
33
X
Receive Timing B
VRD +
37
R
Receive Data A
VRD -
35
T
Receive Data B
VSD +
38
P
Send Data A
VSD -
36
S
Send Data B
Internal Wire Connections
Pin 7 > 19 > 20
Pin 41 > 42 > 43
Pin 13 > 28
Pin 14 > 29
300020-D Rev. 00
11
BayRS Version 13.20 Document Change Notice
44-Pin D-Sub to RS-232: Raise DTR (Order No. 7138)
15 ft
(4.57 m)
Pin 1
Pin 15
Pin 16
Pin 30
Pin 31
Pin 44
Pin 1
Pin 13
Pin 14
Pin 25
25-position D-sub plug with screw locks
(ground shield connected to backshell)
44-position D-sub plug with screw locks
(ground shield connected to backshell)
CAB0019A
Industry Interface Type: RS-232-C
Bay Networks Termination
Remote Termination
Signal
Pin # to Pin #
Signal
Frame Ground
1
1
Frame Ground
Send Data +
2
2
Send Data
Receive Data +
3
3
Receive Data
Request to Send +
4
4
Request to Send
Clear to Send +
5
5
Clear to Send
Data Set Ready +
6
6
Data Set Ready
Signal Ground
7
7
Signal Ground
Data Terminal Ready +
8
20
Data Terminal Ready
Data Carrier Detect +
9
22
Ring Indicator
Send Timing +
10
15
Send Timing
Receive Timing +
11
17
Receive Timing
Transmitter Signal Element Timing + 12
24
Transmitter Signal Element Timing
Internal Wire Connections
Pin 7 > 19 > 20
Pin 13 > 28
Pin 14 > 29
12
300020-D Rev. 00
BayRS Version 13.20 Document Change Notice
44-Pin to V.35M (Order No. 7159)
10 ft
(3.05 m)
Pin 1
Pin 15
Pin 16
Pin 30
Pin 31
Pin 44
44-position D-sub plug with screw locks
(ground shield connected to backshell)
A
C
E
H
P
S
U
W
Y
AA
34-position V.35 plug with screw jack retainers
(ground shield connected to backshell)
B
D
F
R
T
V
X
CAB0031B
Industry Interface Type: V.35 (V.10 and V.11)
300020-D Rev. 00
13
BayRS Version 13.20 Document Change Notice
Bay Networks Termination
Remote Termination
Signal
Pin # to Pin #
Signal
Frame Ground
1
A
Frame Ground
Request to Send +
4
C
Request to Send
Clear to Send +
5
D
Clear to Send
Data Set Ready +
6
E
Data Set Ready
Data Terminal Ready +
8
H
Data Terminal Ready
Data Carrier Detect +
9
F
Data Carrier Detect
VTT +
40
U
Terminal Timing A
VTT -
39
W
Terminal Timing B
Signal Ground
19
B
Signal Ground
VST +
32
Y
Send Timing A
VST -
31
AA
Send Timing B
VRT +
34
V
Receive Timing A
VRT -
33
X
Receive Timing B
VRD +
37
R
Receive Data A
VRD -
35
T
Receive Data B
VSD +
38
P
Send Data A
VSD -
36
S
Send Data B
Internal Wire Connections
Pin 7 > 19 > 20
Pin 41 > 42 > 43
Pin 13 > 28
Pin 14 > 29
14
300020-D Rev. 00
BayRS Version 13.20 Document Change Notice
RS-232 Pass-Through: 15-Pin to RS-232 (Order No. 7218)
15 ft
(4.57 m)
Pin 1
Pin 8
Pin 9
Pin 15
Pin 1
Pin 13
Pin 25
Pin 14
25-position D-sub plug with screw locks
(ground shield connected to backshell)
15-position D-sub plug with locking posts
(ground shield connected to backshell)
CAB0041A
Industry Interface Type: RS-232-C
Bay Networks Termination
Remote Termination
Signal
Pin # to Pin #
Signal
Signal Ground
1
7
Signal Ground
Transmitted Data
2
3
Received Data
Transmit Clock
4
15
Transmit Clock
Data Set Ready
6
8
Data Carrier Detect
Data Carrier Detect
10
4
Clear to Send
Receive Clock
12
17
Receive Clock
Received Data
14
2
Transmitted Data
Internal Wire Connections
Pin 1 > 7
Pin 4 > 5
Pin 6 > 8
Pin 6 > 20
Pin 3 > 4 >12
300020-D Rev. 00
15
BayRS Version 13.20 Document Change Notice
44-Pin D-Sub to V.35: Leased Line or V.25bis (Order No. 7220)
15 ft
(4.57 m)
Pin 1
Pin 15
Pin 16
Pin 30
Pin 31
Pin 44
44-position D-sub plug with screw locks
(ground shield connected to backshell)
B
D
F
R
T
V
X
Y
A
C
E
H
P
S
U
W
AA
34-position V.35 plug with screw jack retainers
(ground shield connected to backshell)
CAB0106A
Industry Interface Type: V.35 (V.10 and V.11)
16
300020-D Rev. 00
BayRS Version 13.20 Document Change Notice
Bay Networks Termination
Remote Termination
Signal
Pin # to Pin #
Signal
VSD +
38
P
Send Data A
VSD -
36
S
Send Data B
VRT +
34
V
Receive Timing A
VRT -
33
X
Receive Timing B
VST +
32
Y
Send Timing A
VST -
31
AA
Send Timing B
VRD +
37
R
Receive Data A
VRD -
35
T
Receive Data B
Data Set Ready +
6
E
Data Set Ready
Data Terminal Ready +
8
H
Data Terminal Ready
Request to Send +
4
C
Request to Send
Clear to Send +
5
D
Clear to Send
VTT +
40
U
Terminal Timing A
VTT -
39
W
Terminal Timing B
Frame Ground
1
A
Frame Ground
Data Carrier Detect +
9
F
Data Carrier Detect
Signal Ground
19
B
Signal Ground
Internal Wire Connections
Pin 7 > 19 > 20
Pin 41 > 42 > 43
Pin 13 > 28
Pin 14 > 29
300020-D Rev. 00
17
BayRS Version 13.20 Document Change Notice
15-Pin D-Sub to RS-232 (Order No. 7255)
15 ft
(4.57 m)
Pin 1
Pin 8
Pin 9
Pin 15
15-position D-sub plug with locking posts
(ground shield connected to backshell)
Pin 1
Pin 13
Pin 14
Pin 25
25-position D-sub plug with screw locks
(ground shield connected to backshell)
CAB0045A
Industry Interface Type: RS-232-C
Bay Networks Termination
Remote Termination
Signal
Pin # to Pin #
Signal
Signal Ground
1
7
Signal Ground
Transmitted Data
2
2
Transmitted Data
Transmitter Signal Element Timing 3
(DTE Source)
24
Transmitter Signal Element Timing
(DTE Source)
Transmitter Signal Element
Timing (DCE Source)
4
15
Transmitter Signal Element
Timing (DCE Source)
Request to Send
6
4
Request to Send
Clear to Send
8
5
Clear to Send
Carrier Detect
10
8
Carrier Detect
Receiver Signal Element
Timing (DCE Source)
12
17
Receiver Signal Element
Timing (DCE Source)
Received Data
14
3
Received Data
Data Set Ready
15
6
Data Set Ready
Internal Wire Connections
Pin 1 > 7
18
Pin 4 > 20
300020-D Rev. 00
BayRS Version 13.20 Document Change Notice
15-Pin D-Sub to V.28 (Order No. 7256)
15 ft
(4.57 m)
Pin 1
Pin 8
Pin 9
Pin 15
15-position D-sub plug with locking posts
(ground shield connected to backshell)
Pin 1
Pin 13
Pin 14
Pin 25
25-position D-sub plug with M-3 jack screws
(ground shield connected to backshell)
CAB0045B
Industry Interface Type: V.28 (V.10)
Bay Networks Termination
Remote Termination
Signal
Pin # to Pin #
Signal
Signal Ground
1
7
Signal Ground
Transmitted Data
2
2
Transmitted Data
Transmitter Timing
(DTE Source)
3
24
Transmitter Signal Element
Timing (DTE Source)
Transmitter Signal Element Timing 4
(DCE Source)
15
Transmitter Signal Element Timing
(DCE Source)
Request to Send
6
4
Request to Send
Clear to Send
8
5
Clear to Send
Carrier Detect
10
8
Carrier Detect
Receiver Signal Element
Timing (DCE Source)
12
17
Receiver Signal Element
Timing (DCE Source)
Received Data
14
3
Received Data
Data Set Ready
15
6
Data Set Ready
Internal Wire Connections
Pin 1 > 7
300020-D Rev. 00
Pin 4 > 20
19
BayRS Version 13.20 Document Change Notice
44-Pin D-Sub to RS-232: Leased Line or V.25bis (Order No. 7826)
15 ft
(4.57 m)
Pin 1
Pin 15
Pin 16
Pin 30
Pin 31
Pin 44
Pin 1
Pin 13
Pin 14
Pin 25
25-position D-sub plug with screw locks
(ground shield connected to backshell)
44-position D-sub plug with screw locks
(ground shield connected to backshell)
CAB0069A
Industry Interface Type: RS-232-C
Bay Networks Termination
Remote Termination
Signal
Pin # to Pin #
Signal
Frame Ground
1
1
Frame Ground
Send Data +
2
2
Send Data
Receive Data +
3
3
Receive Data
Request to Send +
4
4
Request to Send
Clear to Send +
5
5
Clear to Send
Data Set Ready +
6
6
Data Set Ready
Data Terminal Ready +
8
20
Data Terminal Ready
Data Carrier Detect +
9
8
Data Carrier Detect
Send Timing +
10
15
Send Timing
Receive Timing +
11
17
Receive Timing
Transmitter Signal Element Timing + 12
24
Transmitter Signal Element Timing
Signal Ground
7
Signal Ground
7
Internal Wire Connections
Pin 7 > 19 > 20
Pin 13 > 28
Pin 14 > 29
20
300020-D Rev. 00
BayRS Version 13.20 Document Change Notice
RS-232 Pass-Through: 44-Pin to RS-232 (Order No. 7833)
15 ft
(4.57 m)
Pin 1
Pin 15
Pin 16
Pin 30
Pin 31
Pin 44
Pin 1
Pin 13
Pin 14
Pin 25
44-position D-sub plug with screw locks
(ground shield connected to backshell)
25-position D-sub plug with screw locks
(ground shield connected to backshell)
CAB0065A
Industry Interface Type: RS-232-C
Bay Networks Termination
Remote Termination
Signal
Pin # to Pin #
Signal
Receive Data +
3
2
Send Data
Send Data +
2
3
Receive Data
Data Carrier Detect +
9
5
Clear to Send
RTS +
4
8
Data Carrier Detect
Send Timing +
10
17
Receive Timing
Frame Ground
1
1
Frame Ground
Signal Ground
7
7
Signal Ground
Internal Wire Connections
Pin 4 > 5
Pin 4 > 5
Pin 10 > 11 > 12
Pin 15 > 17
Pin 7 > 19 > 20
Pin 6 > 20
Pin 13 > 28
Pin 14 > 29
300020-D Rev. 00
21
BayRS Version 13.20 Document Change Notice
V.35 Pass-Through: 44-Pin to V.35 (Order No. 7834)
15 ft
(4.57 m)
Pin 1
Pin 15
Pin 16
Pin 30
Pin 31
Pin 44
44-position D-sub plug with screw locks
(ground shield connected to backshell)
B
D
F
R
T
V
X
Y
A
C
E
H
P
S
U
W
AA
34-position V.35 plug with screw jack retainers
(ground shield connected to backshell)
CAB0106A
Industry Interface Type: V.35 (V.10 and V.11)
22
300020-D Rev. 00
BayRS Version 13.20 Document Change Notice
Bay Networks Termination
Remote Termination
Signal
Pin # to Pin #
Signal
VSD +
38
R
Receive Data A
VSD -
36
T
Receive Data B
VRD +
37
P
Send Data A
VRD -
35
S
Send Data B
Request to Send +
4
F
Data Carrier Detect
Data Carrier Detect +
9
D
Clear to Send
VTT +
40
V
Receive Timing A
VTT -
39
X
Receive Timing B
Frame Ground
1
A
Frame Ground
Signal Ground
7
B
Signal Ground
Internal Wire Connections
Pin 4 > 5
Pin C > D
Pin 32 > 34 > 40
Pin V > Y
Pin 31 > 33 > 39
Pin X > AA
Pin 7 > 19 > 20 > 41 > 42
Pin E > H
Pin 13 > 28
Pin 14 > 29
300020-D Rev. 00
23
BayRS Version 13.20 Document Change Notice
44-Pin D-Sub to V.28 (Order No. 7837)
15 ft
(4.57 m)
Pin 1
Pin 15
Pin 16
Pin 30
Pin 31
Pin 44
44-position D-sub plug with screw locks
(ground shield connected to backshell)
Pin 1
Pin 13
Pin 14
Pin 25
25-position D-sub plug with M-3 jack screws
(ground shield connected to backshell)
CAB0069B
Industry Interface Type: V.28 (V.10)
24
300020-D Rev. 00
BayRS Version 13.20 Document Change Notice
Bay Networks Termination
Remote Termination
Signal
Pin # to Pin #
Signal
Frame Ground
1
1
Frame Ground
Send Data +
2
2
Send Data
Receive Data +
3
3
Receive Data
Request to Send +
4
4
Request to Send
Clear to Send +
5
5
Clear to Send
Data Set Ready +
6
6
Data Set Ready
Data Terminal Ready +
8
20
Data Terminal Ready
Data Carrier Detect +
9
8
Data Carrier Detect
Send Timing +
10
15
Send Timing
Receive Timing +
11
17
Receive Timing
Transmitter Signal Element
Timing +
12
24
Transmitter Signal Element Timing
Signal Ground
7
7
Signal Ground
Internal Wire Connections
Pin 7 > 19 > 20
Pin 13 > 28
Pin 14 > 29
300020-D Rev. 00
25
BayRS Version 13.20 Document Change Notice
50-Pin to V.35 (Order No. 7932)
15 ft
(4.57 m)
Pin 1
Pin 25
Pin 26
Pin 50
50-position 0.8-mm plug
(ground shield connected to internal shell)
B
D
F
R
T
V
X
Y
A
C
E
H
P
S
U
W
AA
34-position V.35 plug with screw jack retainers
(ground shield connected to backshell)
CAB0070A
Industry Interface Type: V.35 (V.10 and V.11)
26
300020-D Rev. 00
BayRS Version 13.20 Document Change Notice
Bay Networks Termination
Remote Termination
Signal
Pin # to Pin #
Signal
VSD +
44
Send Data A
P
VSD -
19
S
Send Data B
VRT +
42
V
Receive Timing A
VRT -
17
X
Receive Timing B
VST +
41
Y
Send Timing A
VST -
16
AA
Send Timing B
VRD +
43
R
Receive Data A
VRD -
18
T
Receive Data B
Data Set Ready +
6
E
Data Set Ready
Data Terminal Ready +
8
H
Data Terminal Ready
Request to Send +
4
C
Request to Send
Clear to Send +
5
D
Clear to Send
VTT +
45
U
Terminal Timing A
VTT -
20
W
Terminal Timing B
Frame Ground
1
A
Frame Ground
Data Carrier Detect
9
F
Data Carrier Detect
Signal Ground
30
B
Signal Ground
Internal Wire Connections
Pin 7 > 30 > 31
Pin 46 > 47 > 48
Pin 13 > 38
Pin 14 > 39
300020-D Rev. 00
27
BayRS Version 13.20 Document Change Notice
50-Pin to V.35: Raise DTR (Order No. 7933)
15 ft
(4.57 m)
Pin 1
Pin 25
Pin 26
Pin 50
50-position 0.8-mm plug
(ground shield connected to internal shell)
B
D
J
R
T
V
X
A
C
E
H
P
S
U
W
Y
AA
34-position V.35 plug with screw jack retainers
(ground shield connected to backshell)
CAB0071A
Industry Interface Type: V.35 (V.10 and V.11)
28
300020-D Rev. 00
BayRS Version 13.20 Document Change Notice
Bay Networks Termination
Remote Termination
Signal
Pin # to Pin #
Signal
VSD +
44
Send Data A
P
VSD -
19
S
Send Data B
VRT +
42
V
Receive Timing A
VRT -
17
X
Receive Timing B
VST +
41
Y
Send Timing A
VST -
16
AA
Send Timing B
VRD +
43
R
Receive Data A
VRD -
18
T
Receive Data B
Data Set Ready +
6
E
Data Set Ready
Data Terminal Ready +
8
H
Data Terminal Ready
Request to Send +
4
C
Request to Send
Clear to Send +
5
D
Clear to Send
VTT +
45
U
Terminal Timing A
VTT -
20
W
Terminal Timing B
Frame Ground
1
A
Frame Ground
Data Carrier Detect +
9
J
Ring Indicator
Signal Ground
30
B
Signal Ground
Internal Wire Connections
Pin 7 > 30 > 31
Pin 46 > 47 > 48
Pin 13 > 38
Pin 14 > 39
300020-D Rev. 00
29
BayRS Version 13.20 Document Change Notice
50-Pin to RS-232 (Order No. 7934)
15 ft
(4.57 m)
Pin 1
Pin 25
Pin 1
Pin 13
Pin 26
Pin 50
Pin 14
Pin 25
50-position 0.8-mm plug
(ground shield connected to internal shell)
25-position D-sub plug with screw locks
(ground shield connected to backshell)
CAB0073A
Industry Interface Type: RS-232-C
Bay Networks Termination
Remote Termination
Signal
Pin # to Pin #
Signal
Frame Ground
1
1
Frame Ground
Send Data +
2
2
Send Data
Receive Data +
3
3
Receive Data
Request to Send +
4
4
Request to Send
Clear to Send +
5
5
Clear to Send
Data Set Ready +
6
6
Data Set Ready
Signal Ground
7
7
Signal Ground
Data Terminal Ready +
8
20
Data Terminal Ready
Data Carrier Detect +
9
8
Data Carrier Detect
Send Timing +
10
15
Send Timing
Receive Timing +
11
17
Receive Timing
Terminal Timing +
12
24
Terminal Timing
Signal Ground
7
7
Signal Ground
Internal Wire Connections
Pin 7 > 30 > 31
Pin 13 > 38
Pin 14 > 39
30
300020-D Rev. 00
BayRS Version 13.20 Document Change Notice
50-Pin to RS-232: Raise DTR (Order No. 7935)
15 ft
(4.57 m)
Pin 1
Pin 25
Pin 1
Pin 13
Pin 26
Pin 50
Pin 14
Pin 25
50-position 0.8-mm plug
(ground shield connected to internal shell)
25-position D-sub plug with screw locks
(ground shield connected to backshell)
CAB0072A
Industry Interface Type: RS-232-C
Bay Networks Termination
Remote Termination
Signal
Pin # to Pin #
Signal
Frame Ground
1
1
Frame Ground
Send Data +
2
2
Send Data
Receive Data +
3
3
Receive Data
Request to Send +
4
4
Request to Send
Clear to Send +
5
5
Clear to Send
Data Set Ready +
6
6
Data Set Ready
Data Terminal Ready +
8
20
Data Terminal Ready
Data Carrier Detect +
9
22
Ring Indicator
Send Timing +
10
15
Send Timing
Receive Timing +
11
17
Receive Timing
Terminal Timing +
12
24
Terminal Timing
Signal Ground
7
7
Signal Ground
Internal Wire Connections
Pin 7 > 30 > 31
Pin 13 > 38
Pin 14 > 39
300020-D Rev. 00
31
BayRS Version 13.20 Document Change Notice
15-Pin to F RS-232 Synchronous Pass-Through (Order No. 7941)
15 ft
(4.57 m)
Pin 1
Pin 8
Pin 9
Pin 15
15-position D-sub plug with locking posts
(ground shield connected to backshell)
Pin 13
Pin 1
Pin 25
Pin 14
25-position D-sub receptacle with screw locks
(ground shield connected to backshell)
CAB0079A
Industry Interface Type: RS-232-C
Bay Networks Termination
Remote Termination
Signal
Pin # to Pin #
Signal
Transmit Data
2
3
Receive Data
Receive Data
14
2
Transmit Data
Request to Send
6
8
Data Carrier Detect
Data Carrier Detect
10
4
Request to Send
Transmit Clock
4
15
Transmit Clock
Signal Ground
1
7
Signal Ground
Internal Wire Connections
32
Pin 6 > 8
Pin 4 > 5
Pin 3 > 4 > 12
Pin 15 > 17
Pin 1 > 7
Pin 6 > 20
300020-D Rev. 00
BayRS Version 13.20 Document Change Notice
44-Pin to F RS-232 Synchronous Pass-Through (Order No. 7943)
15 ft
(4.57 m)
Pin 1
Pin 15
Pin 16
Pin 30
Pin 31
Pin 44
Pin 13
Pin 1
Pin 25
Pin 14
25-position D-sub receptacle with screw locks
(ground shield connected to backshell)
44-position D-sub plug with screw locks
(ground shield connected to backshell)
CAB0081A
Industry Interface Type: RS-232-C
Bay Networks Termination
Signal
Remote Termination
Pin # to Pin #
Signal
Send Data +
2
3
Receive Data
Receive Data +
3
2
Send Data
Request to Send +
4
8
Data Carrier Detect
Data Carrier Detect +
9
4
Request to Send
Send Timing +
10
15
Send Timing
Frame Ground
1
1
Frame Ground
Signal Ground
7
7
Signal Ground
Internal Wire Connections
Pin 4 > 5
Pin 4 > 5
Pin 10 > 11 > 12
Pin 15 > 17
Pin 13 > 28
Pin 6 > 20
Pin 14 > 29
Pin 7 > 19 > 20
300020-D Rev. 00
33
BayRS Version 13.20 Document Change Notice
44-Pin to F V.35 Synchronous Pass-Through (Order No. 7944)
15 ft
(4.57 m)
Pin 1
Pin 15
Pin 16
Pin 30
A
C
E
H
P
S
U
W
Y
AA
Pin 44
Pin 31
44-position D-sub plug with screw locks
(ground shield connected to backshell)
B
D
F
R
T
V
X
34-position V.35 receptacle with screw jack retainers
(ground shield connected to backshell)
CAB0082A
Industry Interface Type: V.35 (V.10 and V.11)
Bay Networks Termination
Remote Termination
Signal
Pin # to Pin #
Signal
VSD +
38
R
Receive Data A
VSD -
36
T
Receive Data B
VRD +
37
P
Send Data A
VRD -
35
S
Send Data B
Request to Send +
4
F
Data Carrier Detect
Data Carrier Detect +
9
C
Request to Send
VTT +
40
Y
Send Timing A
VTT -
39
AA
Send Timing B
Frame Ground
1
A
Frame Ground
Signal Ground
7
B
Signal Ground
Internal Wire Connections
Pin 4 > 5
Pin C > D
Pin 32 > 34 > 40
Pin V > Y
Pin 31 > 33 > 39
Pin X > AA
Pin 13 > 28
Pin E > H
Pin 14 > 29
Pin 7 > 19 > 20 > 41 > 42
34
300020-D Rev. 00
BayRS Version 13.20 Document Change Notice
50-Pin to F RS-232 Synchronous Pass-Through (Order No. 7945)
15 ft
(4.57 m)
Pin 25
Pin 13
Pin 1
Pin 50
50-position 0.8-mm plug
(ground shield connected to internal shell)
Pin 25
Pin 14
Pin 1
Pin 26
25-position D-sub receptacle with screw locks
(ground shield connected to backshell)
CAB0083A
Industry Interface Type: RS-232-C
Bay Networks Termination
Remote Termination
Signal
Pin # to Pin #
Signal
Send Data +
2
3
Receive Data
Receive Data +
3
2
Send Data
Request to Send +
4
8
Data Carrier Detect
Data Carrier Detect +
9
4
Request to Send
Send Timing +
10
15
Send Timing
Frame Ground
1
1
Frame Ground
Signal Ground
7
7
Signal Ground
Internal Wire Connections
Pin 4 > 5
Pin 4 > 5
Pin 10 > 11 > 12
Pin 15 > 17
Pin 13 > 38
Pin 6 > 20
Pin 14 > 39
Pin 7 > 30 > 31
300020-D Rev. 00
35
BayRS Version 13.20 Document Change Notice
50-Pin to F V.35 Synchronous Pass-Through (Order No. 7946)
15 ft
(4.57 m)
Pin 1
Pin 25
Pin 26
Pin 50
A
C
E
H
P
S
Y
AA
50-position 0.8-mm plug
(ground shield connected to internal shell)
B
D
F
R
T
V
X
34-position V.35 receptacle with screw jack retainers
(ground shield connected to backshell)
CAB0084A
Industry Interface Type: V.35 (V.10 and V.11)
Bay Networks Termination
Remote Termination
Signal
Pin # to Pin #
Signal
VSD +
44
R
Receive Data A
VSD -
19
T
Receive Data B
VRD +
43
P
Send Data A
VRD -
18
S
Send Data B
Request to Send +
4
F
Data Carrier Detect
Data Carrier Detect +
9
D
Clear to Send
VTT +
45
Y
Send Timing A
VTT -
20
AA
Send Timing B
Frame Ground
1
A
Frame Ground
Signal Ground
7
B
Signal Ground
Internal Wire Connections
Pin 4 > 5
Pin C > D
Pin 41 > 42 > 45
Pin V > Y
Pin 16 > 17 > 20
Pin X > AA
Pin 13 > 38
Pin E > H
Pin 14 > 39
Pin 7 > 30 > 31 > 46 > 47
36
300020-D Rev. 00
BayRS Version 13.20 Document Change Notice
Configuring and Managing Routers with Site Manager
The following sections are additions to Configuring and Managing Routers with
Site Manager.
Reallocating Memory Partitions for a Processor Module
Using the Site Manager Kernel Configuration tool, you can reallocate global and
local memory for the following routers and processor modules:
•
AN -- The AN router contains a single processor module.
•
ANH -- The ANH router contains a single processor module.
•
ASN -- The ASN router contains a single processor module.
•
FRE-2 -- The FRE-2 processor module is used in the BLN, BLN-2, and BCN
routers.
You cannot reallocate memory partitions for the FRE-4-PPC processor module
used in BLN, BLN-2, and BCN routers. If you use the Site Manager Kernel
Configuration tool for the FRE-4-PPC processor module it will display global and
local memory.
Partitioning Overview
Router processor modules use three types of memory:
•
Global
•
Local
•
Nonvolatile RAM (NVRAM)
Global and local memory are separate partitions of a single, contiguous memory
address space. The RAM chips associated with this address space exist physically
on each processor module.
The NVRAM for each processor module stores the memory partitioning
configuration associated with that module. You cannot partition NVRAM.
NVRAM is preset on each FRE-2 processor module inside the router. If you move
a FRE-2 module to another slot in the router, the memory partitioning
configuration moves with the module to the new slot.
300020-D Rev. 00
37
BayRS Version 13.20 Document Change Notice
You can specify the amount of local and global memory (that is, the size of the
local and global memory partitions) used by a given processor module. Increasing
the size of the global memory partition automatically decreases the size of the
local memory partition. The router software ensures that the sum of local and
global memory always equals the total amount of memory available on a given
processor module.
Repartitioning Global and Local Memory (AN, ANH, ASN, and FRE-2)
Caution: Change memory partitioning only at the recommendation of, or
under the direction of, the Bay Networks Technical Solutions Center. Under
normal router and network operating conditions, there is no need to modify the
default memory partitions established for a processor module. You reallocate
processor memory partitions in rare instances, and only for the purpose of
network troubleshooting.
To repartition global and local memory:
1.
Connect to the router.
Refer to Chapter 1 of Configuring and Managing Routers with Site Manager.
for instructions.
2.
In the main Site Manager window, choose Administration > Kernel
Configuration.
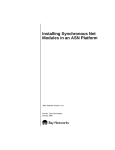
The Kernel Configuration window opens (Figure 1).
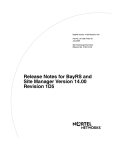
Figure 1.
38
Kernel Configuration Window (AN, ANH, ASN, and FRE-2)
300020-D Rev. 00
BayRS Version 13.20 Document Change Notice
If the router you are configuring is not an AN, ANH, or ASN, or if the router
does not contain a FRE-2 processor module, a window opens with the
following message:
No valid modules were found
The message also means that the processor modules found in the currently
connected router are not user-configurable, for example, when the Kernel
Configuration routine finds only FRE modules in the currently connected
router.
The Kernel Configuration window displays the following information
(Table 2).
Table 2.
Kernel Configuration Window Information
Memory Configuration
Information
Description
Total memory on the
specified slot
Total memory displayed depends on the type of
processor module.
Memory dedicated to the
local pool
Local pool refers to the memory used to manage the
router. For example, it contains the statistics, event
log, bootable image, and configuration file, along with
the routes that IP learned.
Memory dedicated to the
global pool
Global pool refers to the memory dedicated for
message buffers.
3.
Select the processor module slot that requires memory repartitioning.
4.
Enter an amount in the Dedicated to Global Pool field.
To add more memory to the global pool, click on Up until the desired amount
of memory appears, or type a value in the Dedicated to Global Pool field. As
you increase the amount of global memory, you decrease the amount of local
memory proportionally.
To add more memory to the local pool, click on Down until the desired
amount of memory appears, or type a value in the field.
5.
Click on Update to restart the slot with the new values.
A confirmation window prompts:
Restart slot?
300020-D Rev. 00
39
BayRS Version 13.20 Document Change Notice
To reset the memory allocation to the factory-default values, click on Default
instead of Update. A message then prompts you to confirm your decision to
reset the values.
6.
Click on Done to restart the processor module located in that slot.
You return to the main Site Manager window.
Site Manager stores the new configuration in NVRAM and restarts the
module (FRE-2) or router (AN, ANH, or ASN). This store-and-restart process
takes about 10 seconds to complete.
7.
Repeat steps 2 through 6 to reallocate memory partitioning on a different
processor module, if applicable.
Repeat steps 1 through 6 to reallocate memory partitioning for a module in a
different router.
8.
Click on Done.
Displaying Global and Local Memory (FRE-4-PPC Processor Modules
Only)
To display global and local memory:
1.
Connect to the router.
Refer to Configuring and Managing Routers with Site Manager. for
instructions.
2.
In the main Site Manager window, choose Administration > Kernel
Configuration.
The Kernel Configuration window opens (Figure 2).
40
300020-D Rev. 00
BayRS Version 13.20 Document Change Notice
Figure 2.
Kernel Configuration Window (FRE-4-PPC)
If the router you are configuring does not contain a FRE-4-PPC processor
module, a window opens with the following message:
No valid modules were found
The Kernel Configuration window displays the information listed in Table 2.
3.
Select the processor module slot that requires memory display.
The memory configuration will display as shown in Figure 2.
4.
Repeat steps 2 through 5 to display memory on a different processor
module, if applicable.
Repeat steps 1 through 5 to display memory for a FRE-4-PPC module in a
different router.
5.
Click on Done.
Configuring BSC Transport Services
The following information is an amendment to “Preparing a Configuration File”
in Chapter 1 of Configuring BSC Transport Services
You can configure BSC transport services on any COM port, not just COM1 and
COM2.
300020-D Rev. 00
41
BayRS Version 13.20 Document Change Notice
Configuring Data Encryption Services
The following sections are amendments to Configuring Data Encryption Services.
Replace “Configuring Encryption with Dial Backup” in Chapter 2 of Configuring
Data Encryption Services with the following section, “Using Encryption with Dial
Services.”
Using Encryption with Dial Services
You can configure WEP to work with dial-on-demand, dial backup, and
bandwidth-on-demand services. Using WEP for these three dial services enables
you to protect sensitive traffic across switched circuits.
Configure encryption for a PPP or frame relay switched circuit as you would for a
leased circuit.
Encryption with Dial Backup
If you configure encryption to work with dial backup service, encrypted data
travels over the backup circuit if the primary line fails. You do not have to
configure WEP over the backup circuit, because the backup circuit takes the
configuration of the primary circuit. Encryption works with any PPP or frame
relay primary and backup circuit combination.
If PPP is the protocol for the backup circuit, ensure that the parameter RFC1661
Compliance (Site Manager) or mru-compliance (BCC) is set to the default,
Enable, for encryption to work successfully.
To configure RFC 1661 compliance with Site Manager, see Configuring PPP
Services. To configure RFC 1661 compliance with the BCC, see Configuring Dial
Services.
Configuring Dial Services
The following sections are additions to Configuring Dial Services.
42
300020-D Rev. 00
BayRS Version 13.20 Document Change Notice
RADIUS Authentication Services Using VSA
RADIUS clients must have some way to authenticate routers that call.
For RADIUS clients that use a dial service, you identify remote callers by
configuring vendor-specific attributes (VSA) on the RADIUS server. These
attributes identify the router and enable you to store customized profiles for that
router. For more information on VSAs, refer to Requests for Comments (RFC)
2138 and 2139.
The fields within the VSA attribute identify this router’s vendor and set
restrictions or enable certain privileges. The Bay Networks ID is 1584.
The only required VSA is Annex-Local-IP-Address, which specifies the IP
address of the local port. This VSA must match the IP address of the interface
receiving the call.
When a call comes in that needs authentication, the RADIUS client first checks
the router’s caller resolution table for an entry that identifies the caller.
•
If the caller is authorized, the local router maps the caller to a local circuit,
and then activates that circuit.
•
If that fails, and RADIUS is configured, a request is sent to the RADIUS
server for authentication.
Note: Do not configure the router on the caller resolution table. If you do, the
RADIUS client will not access the vendor-specific attributes.
Creating an Incoming Phone List (ISDN Only)
Prior to Version 13.20, you could configure an incoming phone list with Site
Manager only. Now you can also use the BCC.
Using the BCC
To configure an incoming phone list, navigate to the isdn-in-phone-list
prompt by entering:
isdn-in-phone-list
To add a phone number to the incoming phone list, enter:
in-phone-number <number>
300020-D Rev. 00
43
BayRS Version 13.20 Document Change Notice
number is the numeric string representing the incoming phone number.
For example:
isdn-in-phone-list# in-phone-number 1234566
After you configure a phone number, you can specify a circuit name. This
command is optional unless you want to use the callback feature; the BCC needs a
circuit name to support callback functionality.
To add a phone number and configure a circuit name, navigate to the
isdn-in-phone-list prompt and enter:
in-phone-number <number> circuit-name <name>
number is the numeric string representing the incoming phone number.
name is the name of the local circuit that corresponds to this incoming phone
number.
For example, to add 1234567 from the Boston circuit to the incoming phone list,
enter:
isdn-in-phone-list# in-phone-number 1234567 circuit-name to-Boston
After you configure a phone number, you can enable call screening. This
command is optional.
To enable call screening at a specific number, navigate to the in-phone-number
prompt for that number and enter:
cwc
For example, to enable call screening for number 1234567, enter:
in-phone-number/1234567# cwc
Then you have to enable call filtering.
To enable incoming call filtering, navigate to the isdn-switch prompt for the
corresponding slot for example, isdn-switch/5 and enter:
incoming-filter <state>
state is on or off.
For example, to enable incoming filtering for the ISDN switch in slot 5, enter:
isdn-switch/5# incoming-filter on
44
300020-D Rev. 00
BayRS Version 13.20 Document Change Notice
show dial demand in-phone-numbers
The show dial demand in-phone-numbers command displays the incoming
phone list numbers.
The output contains the following information:
Incoming Phone Numbers
Lists the incoming phone numbers of the primary RADIUS
server.
Phone Extension
Specifies how many seconds the client should wait before
retransmitting a request to the server.
Circuit Name
Specifies how many times the client should send a request
to the server before considering it unreachable.
You can use the following filter flags and filter arguments with this command:
-circuit <name>
Displays the incoming phone list for the numbers on this
circuit only.
Configuring Ethernet, FDDI, and Token Ring Services
The following sections are additions and amendments to Configuring Ethernet,
FDDI, and Token Ring Services.
“802.1Q Parameters” lists corrected MIB Object IDs for the Enable/Disable,
VLAN Name, Global VLAN Id, and Protocol Type (hex) parameters. The
parameter description for Virtual Port Type is new.
“Ethernet Flow Control” on page 47 is an addition to the manual.
300020-D Rev. 00
45
BayRS Version 13.20 Document Change Notice
802.1Q Parameters
Parameter: Enable/Disable
Path:
Default:
Options:
Function:
Instructions:
Configuration Manager > Protocols > VLAN > Interfaces
Enable
Enable | Disable
Enables or disables the 802.1Q tagged circuit.
Set to Disable to disable a previously configured 802.1 tagged circuit. Set to
Enable to enable a disabled 802.1Q tagged circuit.
MIB Object ID: 1.3.6.1.4.1.18.3.5.1.12.6.1.1.1.2
Parameter: VLAN Name
Path:
Default:
Options:
Function:
Configuration Manager > Protocols > VLAN > Interfaces
None
Any character string.
Provides a mnemonic to associate with the VLAN. BayRS does not use this
string.
Instructions: Enter a name for the VLAN.
MIB Object ID: 1.3.6.1.4.1.18.3.5.1.12.6.1.1.1.3
Parameter: Global VLAN Id
Path:
Default:
Options:
Function:
Instructions:
Configuration Manager > Protocols > VLAN > Interfaces
None
Any integer value from 1 to 4095.
Provides a unique identifier for the VLAN within the layer 2/layer 3 topology.
Enter the unique VLAN numeric identifier that was assigned to the VLAN when
it was initially configured on the adjacent layer 2 device. This value must match
the one assigned during the initial VLAN configuration.
MIB Object ID: 1.3.6.1.4.1.18.3.5.1.12.6.1.1.1.5
46
300020-D Rev. 00
BayRS Version 13.20 Document Change Notice
Parameter: Virtual Port Type
Path:
Default:
Options:
Function:
Instructions:
MIB Object ID:
Configuration Manager > Protocols > VLAN > Interfaces
Tagged
Tagged
Reserved for future use.
Leave this parameter set to tagged.
1.3.6.1.4.1.18.3.5.1.12.6.1.1.1.6
Parameter: Protocol Type (hex)
Path:
Default:
Options:
Function:
Configuration Manager > Protocols > VLAN > Interfaces
33024 (8100 hexadecimal)
Any integer value
Specifies the contents of the TPID field in 802.1Q encapsulated frames
originated by this VLAN.
Instructions: Enter (in decimal notation) the TPID value that was assigned to the VLAN
when it was initially configured on the adjacent layer 2 device. This value must
match the one assigned during the initial VLAN configuration.
MIB Object ID: 1.3.6.1.4.1.18.3.5.1.12.6.1.1.1.8
Ethernet Flow Control
You can now control Ethernet flow for several boards on BN platforms. This
section describes how to use Site Manager and the BCC to control Ethernet flow.
Enabling Ethernet Flow Control
Flow control allows you to temporarily stop a remote station from sending packets
to prevent packet loss in a congested system. Ethernet flow control is supported on
BN platforms for the following boards:
300020-D Rev. 00
•
Quad 100Base-TX
•
Quad 100Base-FX
•
Gigabit Ethernet-SX
•
Gigabit Ethernet-LX
47
BayRS Version 13.20 Document Change Notice
Our implementation of flow control uses MAC control frames. These frames have
a unique value of 8808H in the length/type field. They differ from typical Ethernet
packets in that the data field is made up of an opcode field and a parameter field.
The opcode field contains the opcode command Pause; the parameter field defines
the pause time. When the receive station detects a MAC control frame with a
Pause opcode, the remote transmitter pauses for a time interval equal to the pause
time * 512 bit times. 512 bit times convert to 51.2 microseconds for 10 Mbps, 5.12
microseconds for 100 Mbps, and 512 nanoseconds for Gigabit.
When a transmitter receives a MAC control frame, it stops sending packets for the
specified time. You can configure the sender of the MAC control frame to transmit
a pause frame with a pause time of 0 when it is no longer congested, thereby
causing the remote transmitter to resume sending packets. You do this by setting
the Transmit Pause Zero Enable (Site Manager) parameter or the
pause-zero-enable (BCC) parameter to Enable.
Using the BCC
If the interface speed is in fixed mode (that is, the speed-select parameter is not set
to auto-negotiation), flow control is enabled or disabled based on the speed select
value. The BCC ignores the setting for the fc-enable parameter.
For example, if speed select is 100base-x-fd, flow control is automatically
disabled. Navigate to an Ethernet prompt (box; ethernet 2/1) and enter the
following:
ethernet/2/1# auto-neg
auto-neg/2/1# speed-select 100base-x-fd
auto-neg/2/1
To check the state of flow control, use the show ethernet auto-neg command.
If the speed-select parameter is set to 100base-x-fd-cong, flow control is
automatically enabled and the BCC ignores the setting for the fc-enable
parameter.
For example, navigate to an Ethernet prompt (box; ethernet 2/1) and enter the
following:
ethernet/2/1# auto-neg
auto-neg/2/1# speed-select 100base-x-fd-cong
auto-neg/2/1
To check the state of flow control, use the show ethernet auto-neg command.
48
300020-D Rev. 00
BayRS Version 13.20 Document Change Notice
If the speed-select parameter is set to auto-negotiation, use the fc-enable
parameter to enable or disable flow control. The BCC ignores the pause setting for
the advertised-capabilities parameter.
For example, navigate to an Ethernet prompt (box; ethernet 2/1) and enter the
following:
ethernet/2/1# fc-enable enabled
ethernet/2/1# auto-neg
auto-neg/2/1# speed-select auto-negotiation
auto-neg/2/1
If you have flow control enabled, you can enter the following parameters:
fc-pause-time <pause_time>
pause_time is the flow control pause time. The pause time is used to calculate the
total time a transmitter pauses. For example, when a transmitter receives a pause
frame, it pauses for pause_time*512 bit times. (512 bit times convert to 51.2 usec
for 10 Mbps, 5.12 usec for 100 Mbps, and 512 nsec for Gigabit.) So, if the pause
time is 65535 and the line speed is 100 Mbps, then the transmitter pauses for
335.54 ms (65535*5.12 usec).
pause-zero-enable <state>
state is enable or disable. This parameter enables or disables the ability of a
congested receiver to send a pause frame with a pause time of 0 when it is no
longer congested. When the remote transmitter receives a pause frame with a 0
pause time, it resumes sending packets.
For example, to specify a transmitter pause time of 65535, enter the following
commands:
ethernet/2/1# fc-pause-time 65535
ethernet/2/1# pause-zero-enable enable
ethernet/2/1#
300020-D Rev. 00
49
BayRS Version 13.20 Document Change Notice
Using Site Manager
To enable flow control, complete the following tasks:
Site Manager Procedure
You do this
System responds
1. In the Configuration Manager window,
choose an XCVR Connector.
The Edit Connector window opens.
2. Choose Edit Line.
The Edit 10/100MB/s Ethernet
Parameters window or the Edit 1000 Mb/s
Ethernet Parameters window opens,
depending on the module you selected.
3. Set the following parameters:
• Flow Control Enable
• Flow Control Pause Time
• Transmit Pause Zero Enable
Click on Help or see the parameter
descriptions beginning on page 55.
4. Click on OK.
The Edit Connector window opens.
Note: If the Interface Line Speed
parameter is set to Auto Negotiation, the
Auto Negotiation window opens. Click on
Done to go to the Edit Connector window.
5. Click on Done.
The Configuration Manager window
opens.
Edit Ethernet Parameter Descriptions
The Edit Ethernet Parameters windows (Figure 3, Figure 4, or Figure 5) allow you
to enable BOFL, specify line speed, and enable flow control for Ethernet lines.
Figure 3 is for the Quad 100Base-TX module. Figure 4 is for the Quad
100Base-FX module. Figure 5 is for the Gigabit Ethernet-SX and Gigabit
Ethernet-LX modules.
50
300020-D Rev. 00
BayRS Version 13.20 Document Change Notice
Figure 3.
300020-D Rev. 00
Edit 10/100Mb/s Ethernet Parameters Window (for
100Base-TX Module)
51
BayRS Version 13.20 Document Change Notice
Figure 4.
52
Edit 10/100Mb/s Ethernet Parameters Window (for
100Base-FX Module)
300020-D Rev. 00
BayRS Version 13.20 Document Change Notice
Figure 5.
Edit 1000Mb/s Ethernet Parameters Window
Parameter: Enable
Path:
Default:
Options:
Function:
Instructions:
MIB Object ID:
300020-D Rev. 00
Configuration Manager > XCVR Connector > Edit Line
Enable
Enable | Disable
Enables or disables this Ethernet line.
Select Enable or Disable.
1.3.6.1.4.1.18.3.4.1.1.2
53
BayRS Version 13.20 Document Change Notice
Parameter: BofL Enable
Path:
Default:
Options:
Function:
Configuration Manager > XCVR Connector > Edit Line
Enable
Enable | Disable
When this parameter is set to Enable, the router sends BofL polling messages
from this system to all systems on the local network.
Instructions: Set to Enable or Disable. We recommend that you enable BofL.
MIB Object ID: 1.3.6.1.4.1.18.3.4.1.1.7
Parameter: BofL Timeout
Path:
Default:
Options:
Function:
Configuration Manager > XCVR Connector > Edit Line
5 (4 if router redundancy is enabled)
1 to 60 seconds
Specifies the time between transmissions of Breath of Life messages from this
Ethernet interface. Timeout will occur if five periods elapse without a successful
BofL message transmission. When timeout occurs, the router disables and
reenables the Ethernet interface.
This parameter is valid only if you set BofL Enable to Enable.
Instructions: Accept the default BofL timeout of 5 seconds, or specify a new value up to 60
seconds.
MIB Object ID: 1.3.6.1.4.1.18.3.4.1.1.8
54
300020-D Rev. 00
BayRS Version 13.20 Document Change Notice
Parameter: Interface Line Speed
Path: Configuration Manager > XCVR Connector (100BASE-T only) > Edit Line >
Default: Auto Negotiation for 100Base-TX and Gigabit Ethernet modules;
100Base-X FD w/Flow Control for 100Base-FX module
Options: For 100Base-TX, the options are Auto Negotiation | 10Base-T |
10Base-T FD (Full Duplex) | 10Base-T FD w/Flow Control | 100Base-X |
100Base-X FD (Full Duplex | 100Base-X FD w/Flow Control
For 100Base-FX, the options are 100Base-X FD (Full Duplex) |
100Base-X FD w/Flow Control
For Gigabit Ethernet, the options are Auto Negotiation |
1000Base-X FD (Full Duplex | 1000Base-X FD w/Flow control
Function: Specifies the configured line speed and duplex setting for the selected interface,
or enables automatic line negotiation.
Instructions: For 100Base-TX and Gigabit Ethernet modules, choose Auto Negotiation to
enable automatic line negotiation. Selecting a specific line-speed configuration
disables Auto Negotiation.
For 100Base-FX modules, either accept the default, 100Base-X FD w/Flow
Control, or choose 100Base-X FD (Full Duplex).
MIB Object ID: 1.3.6.1.4.1.18.3.4.16.1.1.4
Parameter: Flow Control Enable
Path:
Default:
Options:
Function:
Instructions:
MIB Object ID:
300020-D Rev. 00
Configuration Manager > XCVR Connector > Edit Line
Enable
Enable | Disable
Enables or disables flow control.
Accept the default, Enable, or select Disable.
1.3.6.1.4.1.18.3.4.1.1.66
55
BayRS Version 13.20 Document Change Notice
Parameter: Flow Control Pause Time
Path:
Default:
Options:
Function:
Configuration Manager > XCVR Connector > Edit Line
65535
32 to 65535 (pause times)
Specifies the flow control pause time. The pause time is used to calculate the
total time a transmitter pauses. For example, when a transmitter receives a pause
frame, it pauses for pause_time*512 bit times. (512 bit times convert to 51.2
usec for 10 Mbps, 5.12 usec for 100 Mbps, and 512 nanoseconds for Gigabit.)
So, if the pause time is 65535 and the line speed is 100 Mbps, then the
transmitter pauses for 335.54 ms (65535*5.12 usec).
Instructions: Accept the default, 65535, or specify a value from 32 to 65535.
MIB Object ID: 1.3.6.1.4.1.18.3.4.1.1.67
Parameter: Transmit Pause Zero Enable
Path:
Default:
Options:
Function:
Configuration Manager > XCVR Connector > Edit Line
Enable
Enable | Disable
Enables or disables the ability of a congested receiver to send a pause frame
with a pause time of 0 when it is no longer congested. When the remote
transmitter receives a pause frame with a 0 pause time, it resumes sending
packets.
Instructions: Accept the default, Enable, if you want a congested receiver to send a pause
frame with a pause time of 0 when it is no longer congested. Choose Disable if
you do not want a congested receiver to send a pause frame with a 0 pause time.
MIB Object ID: 1.3.6.1.4.1.18.3.4.1.1.68
56
300020-D Rev. 00
BayRS Version 13.20 Document Change Notice
show ethernet flow-control
The show ethernet flow-control command shows the status of the slots on which
flow control is enabled.
This command allows for the following command filters (flags) and filter
arguments:
-circuit <circuit_name>
Displays information about the specified circuit only.
-slot <slot_number>
Displays information about the specified slot only.
<circuit_name>
Displays information about the specified circuit only.
The output includes the following information:
300020-D Rev. 00
Slot/Conn
Slot and connector number.
Circuit
Circuit number.
Flow Ctrl Enable
Whether flow control is enabled on the slot.
Pause Zero Enable
Whether transmit pause 0 is enabled on the slot.
Pause Time
Pause time specified for the transmitter.
Received FlowCtrl Frames
Number of flow control frames received by the
interface.
Transmit FlowCtrl Frames
Number of flow control frames sent by the interface.
Received Unsupported Opcodes
Number of frames received by the interface that do
not have a Pause opcode.
57
BayRS Version 13.20 Document Change Notice
Configuring Interface and Router Redundancy
The following information replaces step 8 on page 5-19 of Configuring Interface
and Router Redundancy.
When naming configuration files, use a filename that complies with the DOS
naming standards -- eight characters followed by a dot followed by three
characters. For example, save the configuration file as Routerx.cfg.
Do not use the filename Router1.config recommended in step 8 on page 5-19 of
Configuring Interface and Router Redundancy. If you use this filename, you will
see the following error message:
“Config file name must follow DOS naming conventions.”
Configuring IP Utilities
The following information is an addition to Configuring IP Utilities.
You can now create global IP access policies that permit or deny access to the
HTTP Server.
To specify that the global IP access policy should control the HTTP Server,
navigate to the policy-specific prompt and enter:
service http
Configuring L2TP Services
The following sections are additions and amendments to Configuring L2TP
Services.
“Maximum Number of L2TP Sessions” lists a revised description for the Max
L2TP Session parameter.
“Name Server Addresses” on page 59,” “Support for AN and ARN” on page 72,”
and “Support for Framed Routes” on page 72” are additions to the existing
document.
58
300020-D Rev. 00
BayRS Version 13.20 Document Change Notice
Maximum Number of L2TP Sessions
It is possible to have up to 150 L2TP sessions running concurrently on any router
interface.
You use the Max L2TP Session parameter to specify the maximum number of
L2TP sessions that the LNS (L2TP Network Server) allows. We have increased
the maximum value you can enter for the Max L2TP Session parameter from 100
to 150. The default value remains at 100.
Note: For the AN router, the maximum number of L2TP sessions is 75. The
default for the AN is 50.
A complete description of the Max L2TP parameter follows:
Parameter: Max L2TP Sessions
Path:
Default:
Options:
Function:
Instructions:
MIB Object ID:
Configuration Manager > Protocols > IP > L2TP > L2TP Configuration
100 (50 for AN)
1 to 150 sessions (1 to 75 sessions for AN)
Specifies the maximum number of L2TP sessions that the LNS allows.
Enter the maximum number of L2TP sessions that you want the LNS to support.
1.3.6.1.4.1.18.3.5.23.2.1.16
Name Server Addresses
You can now specify Name Server Addresses (see RFC 1877, “IP Control
Protocol (IPCP) Name Server Addresses,”) for Layer 2 Tunneling Protocol
(L2TP) connections.
Overview of the Name Server Addresses Feature
This name server address (NSA) feature enables a remote host dialing in to a Bay
Networks router acting as an L2TP network server (LNS) to obtain NSAs from
either the LNS or a RADIUS server.
300020-D Rev. 00
59
BayRS Version 13.20 Document Change Notice
To use the NSA feature, users at remote sites configuring their dial-up connections
in Windows® 95, Windows 98, or Windows NT® must specify that their
connections will use server-assigned name server addresses, indicating that a
remote server provides NSAs. Users specify this in the Dial-Up Networking
TCP/IP Settings window for the connection (Figure 6).
If a user does not select the server-assigned name server addresses setting, the
connection uses the NSAs that the user enters in the TCP/IP Settings window, and
the connection does not use the NSA feature.
Figure 6.
60
Specifying Server-Assigned NSAs in the Dial-Up Networking
TCP/IP Settings Window
300020-D Rev. 00
BayRS Version 13.20 Document Change Notice
When users specify that they want to use server-assigned NSAs, they should not
enter primary and secondary domain name server (DNS) and WINS name server
addresses (also called NetBIOS name server addresses or NBNS addresses).
Instead, when a user dials in, the LNS or RADIUS server automatically assigns
name server addresses for the connection. If a name server address changes, the
network administrator can make a single modification at the LNS or RADIUS
server site; every remote user is not required to go back into the TCP/IP Settings
window and enter a new address.
Specifying the Origin of the Name Server Address
When you configure the NSA feature on the router, you must use Site Manager to
set the Name Server Address Origin parameter to one of three values: Disable,
Local, or RADIUS. The following sections describe each of these options.
Disable
If you leave the Name Server Address Origin parameter at its default of Disable,
the NSA feature is disabled for the LNS configured on this router slot. When users
dial in from a remote location, the connection uses DNS and NBNS (WINS)
addresses that the users enter in the Dial-Up Networking TCP/IP Settings
windows on their PCs.
Local
If you set the Name Server Address Origin parameter to Local, users who dial in
to the LNS configured on this slot, provided that they have configured the TCP/IP
settings as server-assigned name server addresses, use the DNS and NetBIOS
NSAs that you set in Site Manager. You set these addresses via the Site Manager
parameters Primary DNS Address, Secondary DNS Address, Primary NBNS
Address, and Secondary NBNS Address.
RADIUS
If you set the Name Server Address Origin parameter to RADIUS, users who dial
in to the LNS on this slot obtain NSAs from a RADIUS server, provided that they
have configured their TCP/IP settings as server-assigned name server addresses.
300020-D Rev. 00
61
BayRS Version 13.20 Document Change Notice
Specifying the origin as RADIUS allows a finer distinction among users than is
possible with a Local origin setting. Through the RADIUS server, you can specify
that certain users use particular NSAs and other users use other NSAs, even if all
users dial in through the same LNS.
To use a RADIUS server as the Name Server Address Origin, your configuration
must meet the following requirements:
•
You must have entered valid values for these three L2TP Site Manager
parameters: RADIUS Primary Server IP Address; RADIUS Primary Server
Password; and RADIUS Client IP Address.
•
The RADIUS server must be operational at the location you specified.
•
The RADIUS server must have entries in its database corresponding to
incoming host user names.
•
The RADIUS server must support vendor specific attributes (VSA) and must
have the following entries in its dictionary:
ATTRIBUTE Annex-Primary-DNS-Server
Bay-VSA(54, ipaddr)
ATTRIBUTE Annex-Secondary-DNS-Server
Bay-VSA(55, ipaddr)
ATTRIBUTE Annex-Primary-NBNS-Server
Bay-VSA(56, ipaddr)
ATTRIBUTE Annex-Secondary-NBNS-Server
Bay-VSA(57, ipaddr)
Example 1: Name Server Address Origin Parameter Set to Local
Figure 7 shows a network with the following configuration:
62
•
Users at remote hosts A, B, and C have specified “Server assigned name
server addresses” in the Dial-Up Networking TCP/IP Settings window on
their PCs.
•
The Name Server Address Origin parameter is set to Local in Site Manager on
the LNS at the corporate site.
•
The other Site Manager parameters related to this NSA feature on the LNS
(Primary DNS Address, Secondary DNS Address, Primary NBNS Address,
and Secondary NBNS Address) are set to the addresses of name servers on the
corporate network (DNS1, DNS2, NBNS1, and NBNS2).
300020-D Rev. 00
BayRS Version 13.20 Document Change Notice
When users at remote hosts A, B, and C make dial-up connections to the corporate
network, those connections use DNS1, DNS2, NBNS1, and NBNS2 as primary
and secondary name servers.
DNS 1
Remote
host A
PC
DNS 2
ISP network
Remote
host B
Corporate
network
LNS
LAC
PC
NBNS 1
Remote
host C
PC
TMS
NBNS 2
L2T0010A
Figure 7.
Network with Name Server Address Origin Parameter Set to Local
Example 2: Name Server Address Origin Parameter Set to RADIUS
Figure 8 shows a network with the following configuration:
300020-D Rev. 00
•
Users at remote hosts Eng. host A, Eng. host B, Fin. host C, and Fin. host D
have specified “Server assigned name server addresses” in the Dial-Up
Networking TCP/IP Settings window on their PCs.
•
The Name Server Address Origin parameter is set to RADIUS in Site
Manager on the LNS at the corporate site.
•
The RADIUS server on the corporate network specifies that users dialing in
from remote hosts in Engineering should use Eng. DNS1, Eng. DNS2,
Eng. NBNS1, and Eng. NBNS2 as their primary and secondary name servers.
63
BayRS Version 13.20 Document Change Notice
•
The RADIUS server on the corporate network specifies that users dialing in
from remote hosts in Finance should use Fin. DNS1, Fin. DNS2, Fin. NBNS1,
and Fin. NBNS2 as their primary and secondary name servers.
When users at remote hosts Eng. host A and Eng. host B make dial-up
connections to the corporate network, those connections use Eng. DNS1,
Eng. DNS2, Eng. NBNS1, and Eng. NBNS2 as primary and secondary name
servers.
When users at remote hosts Fin. host A and Fin. host B make dial-up connections
to the corporate network, those connections use Fin. DNS1, Fin. DNS2,
Fin. NBNS1, and Fin. NBNS2 as primary and secondary name servers.
64
300020-D Rev. 00
BayRS Version 13.20 Document Change Notice
Eng. DNS 1
Eng.
host A
Eng. DNS 2
PC
Eng.
host B
Eng. NBNS 1
PC
Eng. NBNS 2
ISP network
Fin.
host A
Corporate
network
LNS
LAC
PC
RADIUS
server
Fin.
host B
PC
TMS
Fin. DNS 1
Fin. DNS 2
Fin. NBNS 1
Fin.NBNS 2
L2T0011A
Figure 8.
300020-D Rev. 00
Network with Name Server Address Origin Parameter Set to RADIUS
65
BayRS Version 13.20 Document Change Notice
Configuring the NSA Feature for L2TP
To configure the NSA feature for L2TP, complete the following tasks:
Site Manager Procedure
You do this
System responds
1. In the Configuration Manager window,
choose Protocols.
The Protocols menu opens.
2. Choose IP.
The IP menu opens.
3. Choose L2TP.
The L2TP menu opens.
4. Choose L2TP Configuration.
The L2TP Configuration List window
opens.
5. Set the Name Server Address Origin
parameter.
If you set this parameter to Local, you
must also set the following parameters:
•
•
•
•
Primary DNS Address
Secondary DNS Address
Primary NBNS Address
Secondary NBNS Address
If you set this parameter to Radius, you
must also set the following parameters:
•
•
•
RADIUS Primary Server IP Address
RADIUS Primary Server Password
RADIUS Client IP Address
Click on Help or see the parameter
descriptions beginning on page 70.
6. Click on Done.
66
You return to the Configuration Manager
window.
300020-D Rev. 00
BayRS Version 13.20 Document Change Notice
Checking NSA Assignments
To see which NSAs the LNS or RADIUS server assigned to a particular user,
complete the following steps at the remote user’s PC:
1.
Choose Start > Run.
The Run window opens (Figure 9).
Figure 9.
2.
Run Window
At the Open: prompt, enter:
winipcfg
The IP Configuration window opens (Figure 10).
300020-D Rev. 00
67
BayRS Version 13.20 Document Change Notice
Figure 10.
3.
IP Configuration Window
Click on More Info.
The More Info. IP Configuration window opens (Figure 11). The DNS
Servers field lists the primary and secondary DNS server addresses assigned
by the server. (Click on the ... button to see the secondary server address.)
The Primary WINS Server and Secondary WINS Server fields list the primary
and secondary NBNS addresses, if any.
68
300020-D Rev. 00
BayRS Version 13.20 Document Change Notice
Figure 11.
300020-D Rev. 00
More Info. IP Configuration Window
69
BayRS Version 13.20 Document Change Notice
Name Server Addresses Parameter Descriptions
This section includes descriptions of the Site Manager parameters related to the
NSA feature. This is the same information available by clicking on the Help
button.
Parameter: Name Server Address Origin
Path:
Default:
Options:
Function:
Configuration Manager > Protocols > IP > L2TP > L2TP Configuration
Disable
Disable | Local | RADIUS
Specifies whether or not the NSA feature is enabled and, if enabled, specifies
the source of the domain name server (DNS) and NetBIOS name server (NBNS)
addresses.
Instructions: Set to Disable if you do not want to use the NSA feature. If this feature is
disabled, remote hosts use the DNS and NBNS addresses configured on their
individual dial-up connections. Set to Local if you want all remote hosts to use
the DNS and NBNS addresses that you configure in Site Manager. Set to
RADIUS if you want remote hosts to obtain DNS and NBNS addresses from a
RADIUS server.
MIB Object ID: 1.3.6.1.4.1.18.3.5.23.2.1.23
Parameter: Primary DNS Address
Path:
Default:
Options:
Function:
Configuration Manager > Protocols > IP > L2TP > L2TP Configuration
None
Any valid IP address
If the Name Server Address Origin parameter is set to Local, the Primary DNS
Address parameter specifies the address of the primary domain name server
(DNS) that every remote host should use.
Instructions: Enter the IP address of the primary DNS.
MIB Object ID: 1.3.6.1.4.1.18.3.5.23.2.1.24
70
300020-D Rev. 00
BayRS Version 13.20 Document Change Notice
Parameter: Secondary DNS Address
Path:
Default:
Options:
Function:
Configuration Manager > Protocols > IP > L2TP > L2TP Configuration
None
Any valid IP address
If the Name Server Address Origin parameter is set to Local, the Secondary
DNS Address parameter specifies the address of the secondary domain name
server (DNS) that every remote host should use. The system uses this secondary
DNS if it cannot reach the primary DNS.
Instructions: Enter the IP address of the secondary DNS.
MIB Object ID: 1.3.6.1.4.1.18.3.5.23.2.1.25
Parameter: Primary NBNS Address
Path:
Default:
Options:
Function:
Configuration Manager > Protocols > IP > L2TP > L2TP Configuration
None
Any valid IP address
If the Name Server Address Origin parameter is set to Local, the Primary NBNS
Address parameter specifies the address of the primary NetBIOS name server
(NBNS) that every remote host should use.
Instructions: Enter the IP address of the primary NBNS.
MIB Object ID: 1.3.6.1.4.1.18.3.5.23.2.1.26
Parameter: Secondary NBNS Address
Path:
Default:
Options:
Function:
Configuration Manager > Protocols > IP > L2TP > L2TP Configuration
None
Any valid IP address
If the Name Server Address Origin parameter is set to Local, the Secondary
NBNS Address parameter specifies the address of the secondary NetBIOS name
server (NBNS) that every remote host should use. The system uses this
secondary NBNS if it cannot reach the primary NBNS.
Instructions: Enter the IP address of the secondary NBNS.
MIB Object ID: 1.3.6.1.4.1.18.3.5.23.2.1.27
300020-D Rev. 00
71
BayRS Version 13.20 Document Change Notice
Support for AN and ARN
In BayRS Version 13.20, you can configure an AN or ARN router as an LNS.
Prior to 13.20, only a BLN, BCN, or ASN router could be an LNS.
Support for Framed Routes
In BayRS Version 13.20, the L2TP implementation includes support for framed
routes. With framed-route support, the LNS does not have to use RIP (Routing
Information Protocol) to learn all routes on a remote network. Instead, when a
user dials in, the RADIUS server sends the LNS a framed route, which includes
all the information the LNS needs to communicate with the remote user.
For example, in Figure 12, Remote Site A has three networks, with addresses
1.1.1.0, 1.1.2.0, and 1.1.3.0. Without framed-route support, the LNS uses RIP to
learn the addresses of all three networks even though all users requiring VPN
services reside only on the 1.1.1.0 network. The LNS enters the addresses of all
three networks into its routing table. In large network configurations, learning the
addresses of all networks on a remote site can result in many unnecessary routes
in the LNS’s routing table.
L2TP interface
192.3.3.1
1.1.1.0
Users requiring
VPN services
LAC
2.2.2.2
1.1.2.0
Internet
L2TP tunnel
LNS
RADIUS
server
1.1.3.0
Remote
site A
Routing table without
Framed route support
1.1.1.0
1.1.2.0
1.1.3.0
L2T0012A
Figure 12.
72
L2TP Network without Framed-Route Support
300020-D Rev. 00
BayRS Version 13.20 Document Change Notice
Figure 13 shows the same network with framed-route support on the LNS. In this
configuration, Remote Site A has an associated framed route stored on the central
RADIUS server. This framed route describes the routing table entries required for
the LNS to communicate with users at Remote Site A.
When a user dials in from Remote Site A, as part of the session/user
authentication process, the RADIUS server sends the framed route to the LNS.
The LNS adds the information contained in the framed route to its routing table.
When the session goes down or the user hangs up, the LNS removes the routes it
learned from the RADIUS server from its routing table.
L2TP interface
192.3.3.1
1.1.1.0
Users requiring
VPN services
LAC
2.2.2.2
1.1.2.0
Internet
L2TP tunnel
LNS
RADIUS
server
1.1.3.0
Remote
site A
Routing table with
Framed route support
1.1.1.0
L2T0013A
Figure 13.
L2TP Network with Framed-Route Support
Using Framed Routes
The LNS can learn the routes for some remote sites using framed routes from the
RADIUS server and learn routes from other remote sites the traditional way, using
RIP. For remote sites where you want to use the framed-route feature, you must
configure your network as follows:
300020-D Rev. 00
•
Disable RIP on the remote network for which you want to use framed routes.
For example, in Figure 13, you would disable RIP on the 2.2.2.2 interface.
•
On the RADIUS server, enter the framed route for the remote network. The
framed route is a standard RADIUS attribute, with the following format:
73
BayRS Version 13.20 Document Change Notice
<destination_address> [/<prefix_length>] <gateway> <metric>
destination_address is the address of the remote user’s network.
prefix_length is optional. It specifies the length of the network mask for the
remote user’s network:8 for Class A addresses; 16 for Class B addresses; 24
for Class C addresses.
gateway is the address of the interface through which the LNS connects to the
remote user’s network. If you specifiy 0.0.0.0 for gateway, the system
automatically sets the gateway to the address of the L2TP interface.
metric is the number of hops from the gateway to the destination network.
For example, you would enter the following framed route on the RADIUS
server in Figure 13:
1.1.1.0/24 192.3.3.1 1
When the RADIUS server passes this framed route to the LNS, the LNS has
the information it needs to communicate with users on the 1.1.1.0 network:
Configuring PPP Services
The following sections are amendments to Configuring PPP Services.
Replace the existing sections “Setting the Maximum Receive Unit (MRU)” and
“Enabling RFC 1661 Compliance for Dial Circuits” with the sections that follow.
Note that all the upgrade options listed in “Setting the Maximum Receive Unit
(MRU)” are no longer valid.
Setting the Maximum Receive Unit (MRU)
The Maximum Receive Unit (MRU) Size parameter specifies the maximum
receive unit size, in bytes, for the line. The default MRU size for leased lines is
1590 bytes. The default MRU size for dial lines is 1500 bytes.
For leased lines, the router negotiates the MRU size automatically, so you do not
have to configure a value manually. However, to ensure that the router can
negotiate the MRU size successfully, you must disable the RFC1661 Compliance
parameter. This parameter is enabled by default to ensure the correct MRU size for
dial lines.
74
300020-D Rev. 00
BayRS Version 13.20 Document Change Notice
For instructions on disabling RFC 1661 compliance, see “Disabling RFC 1661
Compliance.”
Using the BCC
The MRU size and RFC 1661 compliance are included in the dial object for PPP
dial interfaces. For instructions on setting the mru parameter and
mru-compliance parameter, see Configuring Dial Services.
Using Site Manager
For leased lines, MRU is negotiated automatically, so there is no need to manually
set this parameter. To set the MRU for dial lines, complete the following tasks:
Site Manager Procedure
You do this
System responds
1. In the Configuration Manager window,
choose Protocols.
The Protocols menu opens.
1. Choose PPP.
The PPP menu opens.
2. Choose Interfaces.
The PPP Interface List window opens.
3. Click on Lines.
The PPP Line List window opens.
4. Set the MRU Size (bytes) parameter.
Click on Help or see the parameter
descriptions beginning on page 77.
5. Click on Done.
You return to the PPP Interface List
window.
6. Click on Done.
You return to the Configuration Manager
window.
Disabling RFC 1661 Compliance
RFC 1661 compliance is enabled by default for dial lines. For leased lines, you
must disable compliance so that the MRU size can be negotiated correctly.
300020-D Rev. 00
75
BayRS Version 13.20 Document Change Notice
To disable RFC 1661 compliance, complete the following tasks:
Site Manager Path
You do this
System responds
1. In the Configuration Manager window,
choose Protocols.
The Protocols menu opens.
2. Choose PPP.
The PPP menu opens.
3. Choose Interfaces.
The PPP Interface List window opens.
4. Click on Lines.
The PPP Line List window opens.
5. Set the RFC1661 Compliance parameter.
Click on Help or see the parameter
descriptions beginning on page 77.
76
6. Click on Done.
You return to the PPP Interface List
window.
7. Click on Done.
You return to the Configuration Manager
window.
300020-D Rev. 00
BayRS Version 13.20 Document Change Notice
PPP Line Parameters
Replace the existing descriptions for MRU Size and RFC1661 Compliance with
the parameter descriptions that follow.
Parameter: MRU Size (bytes)
Path:
Default:
Options:
Function:
Instructions:
Protocols > PPP > Interfaces > Lines
1590 (leased lines) | 1500 (dial lines)
1 to 4600
Sets the maximum receive unit (MRU) size, in bytes, for the line.
The router determines the MRU size based on the value of the RFC1661
Compliance parameter and whether the connection is a leased line or a dial line.
For leased lines, set the RFC1661 Compliance parameter to Disable. The router
will then negotiate the MRU size automatically; there is no need to manually
configure the MRU size.
For dial lines, accept the default value for the RFC1661 Compliance parameter
(Enable). With RFC1661 Compliance enabled, you can manually configure the
MRU size. In most cases, you should accept the default value, 1500 bytes.
However, if you configure an MRU size other than the default, be aware that the
router can negotiate only for an MRU value that is larger than its configured
value. The range that it can negotiate is between the configured MTU size and
the router driver MTU value, minus the PPP header and CRC size. For example,
if the configured MTU is 1500 and the driver MTU is 1600, the negotiation
range is 1500 to 1590 (1600 - 8 - 2 = 1590). We recommend that the peer be
configured for an MRU value of at least 1500 bytes. Note also that the router
and its peer do not have to use the same MRU value to communicate with one
another.
MIB Object ID: 1.3.6.1.4.1.18.3.5.9.2.1.1.48
300020-D Rev. 00
77
BayRS Version 13.20 Document Change Notice
Parameter: RFC1661 Compliance
Path:
Default:
Options:
Function:
Protocols > PPP > Interfaces > Lines
Enable
Enable | Disable
Enables RFC 1661 compliance for a PPP dial circuit. RFC 1661 defines the
standards for PPP operation.
Instructions: Accept the default, Enable, to make the PPP dial circuit RFC 1661-compliant.
For PPP leased lines, select Disable.
MIB Object ID: 1.3.6.1.4.1.18.3.5.9.2.1.1.49
Configuring RMON and RMON2
The following sections are additions to Configuring RMON and RMON2.
Configuring Mini-RMON on BN Routers
On the BN router, Bay Networks provides a condensed version of the RMON
MIB standard, called mini-RMON. Mini-RMON supports the statistics RMON
MIB group.
Note: Mini-RMON is available on BN platforms with FRE-4-PPC processor
modules only.
After you configure the BN router to collect RMON statistics, you can view these
statistics using the RMON tools in Optivity Analysis™ for UNIX or Optivity
Analysis for Windows NT®. For information about using these RMON tools, see
the documentation for Optivity Analysis for UNIX or Optivity Analysis for
Windows NT.
Configuration Considerations
Mini-RMON is started as a single process serving all slots on the BN. If you
remove or reset the FRE-4-PPC processor card installed in the slot from which
you started min-RMON, you must restart mini-RMON.
78
300020-D Rev. 00
BayRS Version 13.20 Document Change Notice
Starting Mini-RMON
You can enable the BN to collect RMON statistics using the Bay Command
Console (BCC) or by running the install.bat script. For instructions, see
Quick-Starting Routers.
Disabling Mini-RMON Data Collection
To stop collecting mini-RMON statistics on the Ethernet, you use the BCC to
delete the RMON Stats base module on the BN router.
To delete the RMON Stats base module on the BN router:
1.
Navigate to the native-rmon prompt (for example, box; native-rmon) and
enter:
delete
2.
Navigate to the RMON prompt (for example, box; rmon) and enter:
delete
Configuring SNMP, BootP, DHCP, and RARP Services
The following sections are additions to Configuring SNMP, BootP, DHCP, and
RARP Services.
SNMP View-Based Access Control
Beginning with Version 13.20, BayRS includes the new feature SNMP
View-Based Access Control. To understand how this feature works and its
benefits, you must be familiar with SNMP and the relationship between agents,
managers, and communities. For an explanation, refer to Configuring SNMP,
BootP, DHCP and RARP Services.
SNMP View-Based Access Control allows you to modify what can or cannot be
seen of a router’s MIB tree. It lets you include or exclude from a view any MIB
object, attribute, or instance in the router’s MIB. You can also include or exclude
access to a MIB subtree for traps, and for the SNMP operations get,
get-next, and set. When you configure a view, you specify view subtrees; that is,
instructions for what MIB information the agent will allow to be seen and not seen
within the community.
300020-D Rev. 00
79
BayRS Version 13.20 Document Change Notice
An agent view is associated with a community. In fact, a view is enabled only
when you associate it with a community. A community can have only one agent
view associated with it; however, the view itself may contain many different MIB
subtree inclusions and exclusions.
How is SNMP View-based Access Control Useful?
SNMP View-based Access Control provides an access control solution that allows
you to filter the information from an SNMP agent, thereby letting you control the
view of the network. For instance, a service provider can allow two different
customers to view their statistics on the router discretely. The service provider can
create a view for two different customers, so that each customer sees only the
statistics and configuration information that the service provider wants each to
see.
This feature also lets you manage overlapping private address spaces. For
example, if two routers use the same IP address, you can create a view that
excludes the MIB of one address. Then, when the management station queries for
information, it receives information only from the router whose view you did not
exclude.
You can configure this SNMP View-based Access Control using either the
Technician Interface or the Bay Command Console (BCC™). Use the commands
described next to configure this feature.
Configuring, Listing and Deleting Views
You use the snmpserver view command with various arguments to configure
views, or to list or delete views, and their contents. You can enter this command at
either the Technician Interface or the BCC prompt.
Configuring Views
To configure a view, enter the following command:
snmpserver view {<view_name>} {<oid_tree>} {included | excluded}
<view_name> is the name that you assign to this particular view.
<oid_tree> specifies the portions of the MIB that you want to include or exclude.
included specifies that <oid_tree> is to be included in this view.
80
300020-D Rev. 00
BayRS Version 13.20 Document Change Notice
excluded specifies that <oid_tree> is to be excluded from this view.
Using Wild Cards
When you include the <oid_tree> argument with the snmpserver view command,
you can use wild cards. You can use one wild card with any portion of the
<oid_tree>, and a second wild card at the end of the <oid_tree>. The first wild
card affects the attribute portion of the subtree, and the second wild card affects
the instance portion of the subtree. A match on an incoming SNMP OID is made
on the longest matching MIB subtree. Refer to the following examples.
Entering for the <oid_tree>:
Includes or Excludes in the View:
wfIpIntfCfgEntry.*.192.32.140.1.1
All attributes of wfIpIntfCfgEntry
wfIpIntfCfgEntry.*
or
wfIpIntfCfgEntry
All instances of wfIpIntfCfgEntry
wfIpIntfCfgEntry.1.*
All instances of wfIpIntfCfgEntry with an attribute ID
of 1
wfIpIntfCfgEntry.1.192.32.*
All of the instances of wfIpIntfCfgEntry with an
attribute of 1 that have an instance ID that begins
with 192.32
wfIpIntfCfgEntry.*.192.32.*
All attributes of wfIpIntfCfgEntry that have an
instance ID that begins with 192.32.
Note: You can only use wild cards with an object that is represented in
dotted-decimal notation.
Listing Views or View Contents
To list all previously configured views or the MIB subtrees belonging to a
particular view, enter:
snmpserver view [<view_name>] list
300020-D Rev. 00
81
BayRS Version 13.20 Document Change Notice
<view_name> is the name of the view for which you want to display MIB
subtrees.
list displays all MIB subtrees that belong to <view_name>. Or, if you do not use
the argument <view_name>, the command displays the names of all previously
configured views.
Deleting Views or View Contents
To delete a view or the MIB subtrees belonging to a particular view, enter:
snmpserver view {<view_name>} [<oid_tree>] delete
<view_name> is the name of the view that you either want to delete or from which
you want to delete MIB subtrees.
<oid_tree> specifies the MIB subtree you want to delete from <view_name>.
delete deletes an entire view if you do not specify <oid_tree>. If you do specify
<oid_tree>, then the command deletes <oid_tree> from the specified view.
Examples
When you configure a view, you create a new MIB subtree. The following
command creates a view named “block,” which will not show any attributes of
wfIpIntfCfgEntry, that belongs to 192.32.140.1.1:
snmpserver view block wfIpIntfCfgEntry.*.192.32.140.1.1 excluded
To see all of the subtrees that belong to the view block, enter:
snmpserver view block list
The command displays the following:
View Subtree
View Type
wfIpIntfCfgEntry.*.192.32.140.1.1 Excluded
Subtree Index
1.1
To see all of the previously configured views by name, enter:
snmpserver view list
82
300020-D Rev. 00
BayRS Version 13.20 Document Change Notice
The command displays the following:
View Index
View Name
1
block
You can delete an <oid_tree> from a view. When you do, you also delete the
associated subtree and its include or exclude action. For example, to delete the
<oid_tree> and its associated include or exclude action from the view named
“block,” enter:
snmpserver view block wfIpIntfCfgEntry.*.192.32.140.1.1 delete
To delete the entire view named “block” and all of its subtrees, enter the
following:
snmpserver view block delete
Associating, Listing, and Deleting Communities
You use the snmpserver community command with various arguments to
configure communities, associate views with communities, or to list or delete
communities and their contents. You can enter this command at either the
Technician Interface or the BCC prompt.
Configuring Communities
To configure a community, enter the following command:
snmpserver community {<community_name>} {RO | RW}
<community_name> is the name that you give to this community.
RO specifies read-only access to the viewable MIBs for this community.
RW specifies read-write access to the viewable MIBs for this community.
Associating a View with a Community
To associate a view with a community, enter the following command:
snmpserver community {<community_name>} {<view_name>}
300020-D Rev. 00
83
BayRS Version 13.20 Document Change Notice
<community_name> is the name of the community to which you want to associate
the view.
<view_name> is the name of the view you are associating with the community.
Listing Communities or Community Contents
To list all previously configured views or the MIB subtrees belonging to a
particular view, enter:
snmpserver view [<community_name>] list
<community_name> is the name of the community for which you want to display
this information: community name, community index, access rights of the
community, and the view associated with the community.
list displays the community name, community index, access rights of the
community, and the view associated with <community_name>, if you use the
<community_name> argument. Or, if you do not use the <community_name>
argument, the command displays the names of all configured communities.
Deleting Communities or Community Contents
To delete a community or its contents, enter:
snmpserver view {<community_name>} [<view _name>] delete
<community_name> is the name of the community from which you want to delete
a view.
<view_name> is the name of the view that you to delete from
<community_name>.
delete deletes a view from a community if you specify <view _name>. If you do
not specify <view _name>, then the command deletes the specified community
entirely.
Examples
To create a community named “pubnet” that is configured to allow read-write
access, enter:
snmpserver community pubnet RW
84
300020-D Rev. 00
BayRS Version 13.20 Document Change Notice
To associate the view named “block” with the community name “pubnet,” enter:
snmpserver community pubnet view block RW
To see the community name, access rights of the community, view name
associated with the community, and the community index, enter:
snmpserver community pubnet list
The command displays the following:
Community
Index
Community
Name
Associated
View
Access
2
pubnet
block
read-write
To see a complete list of all configured communities, enter the following
command. Note that a community named public is always configured by default.
snmpserver community list
The command displays the following
Community
Index
Community
Name
Associated View
Access
1
public
none
read-write
2
pubnet
block
read-write
You can disassociate a view from a community. For example, to delete the view
named “block” from the community “pubnet,” enter:
snmpserver community pubnet view block delete
You can also delete an entire community record. All views will be disassociated
from the record. For example, to delete the community named “pubnet,” enter the
following:
snmpserver community pubnet delete
300020-D Rev. 00
85
BayRS Version 13.20 Document Change Notice
Configuring Syslog Services
This information is an addition to the BayRS documentation set. It does not
supplement or replace information in any existing document.
Configuring and Monitoring Syslog Using the BCC
This section provides information about:
•
Syslog services on a Bay Networks router
•
Syslog daemon (syslogd) services on a UNIX workstation
•
How to configure syslogd on a UNIX workstation
•
Procedures for configuring and managing Syslog services on a router
•
BCC show commands for monitoring Syslog statistics and runtime
information
•
Syslog configuration parameters
Overview of the Syslog Service
You can use the BayRS Syslog messaging service to capture and process router
event messages on any UNIX-based network management platform. The Syslog
component of the router software supports this messaging function by
communicating with a UNIX daemon named syslogd on your management
workstation. The syslogd daemon receives and locally logs, displays, prints, and
forwards messages that originate from local and external sources.
Figure 14 illustrates Syslog and syslogd functions.
86
300020-D Rev. 00
BayRS Version 13.20 Document Change Notice
Router
Syslog software:
Polls log @ slot
P
l o ol l s
g
• Polls slot logs
• Retrieves
event messages
R
m etri
es ev
sa es
ge
s
• Filters retrieved
messages
• Maps retrieved
messages into
Syslog message
format
• Forwards
Syslog messages
to remote hosts
Log @ slot
Outgoing
Syslog
messages
IP network
Message
forwarded
Remote Host
(Unix Workstation)
UNIX
workstation
Message
printed
Syslogd daemon:
• Receives syslog messages
• Identifies message sources
• Determines message priorities
Disk
• Logs, displays, prints, and/or
forwards messages
Message
logged
Message
displayed
TS0001B
Figure 14.
300020-D Rev. 00
Syslog and syslogd Operations
87
BayRS Version 13.20 Document Change Notice
On each slot, Syslog performs the following functions:
•
Polls the local events log buffer to retrieve new event messages
•
Selects event messages that meet the requirements of entity filters that you
configure on the router
•
Maps the messages it retrieves into Syslog message format
•
Inserts a priority code into each reformatted message
•
Orders messages chronologically, if you first enabled the message sequencing
feature
•
Forwards messages to IP on the router, which in turn forwards messages to
remote hosts identified in the Syslog host table
At a remote UNIX management workstation, syslogd:
•
Receives Syslog messages from Bay Networks routers
•
Examines the priority code in each message
•
Determines the system handling for each message
•
Dispatches each message to any or all of the following destinations:
-- Workstation display
-- Local log file
-- Designated printer
-- One or more remote hosts
Entity Filters
Each protocol and system service in the router software has a unique entity name,
which is contained in each event message originated by that entity. For a complete
list of BayRS entity names and their corresponding internal entity numbers, refer
to the BayRS documentation CD or access the event message database at:
http://support.baynetworks.com/library/tpubs/events
You configure entity filters on each router to capture only the messages that you
specify.
88
300020-D Rev. 00
BayRS Version 13.20 Document Change Notice
You can filter event messages by:
•
Entity name
•
Event number
•
Event severity level
•
Device slot number
Figure 15 illustrates how an entity filter limits the number of event messages that
Syslog forwards from a router to a specific remote host.
Entity filter for one host:
Select by event
number range
New unfiltered
messages from
the events log
Select by
entity
number
(OR)
Select by slot
number range
Select by event
severity levels
Filtered
event
messages
for a
designated
remote
host
TS0002B
Figure 15.
Router Event Message Filtering for One Host
You can configure an entity filter to do one of the following:
•
Capture from one entity all messages that fall within a numbered range of
events.
•
Capture from all entities messages logged with specific severity levels.
Syslog forwards all captured events to the hosts identified in the BCC Syslog
configuration.
300020-D Rev. 00
89
BayRS Version 13.20 Document Change Notice
Syslog Message Format
Syslog running on each slot maps filtered event messages into Syslog message
format. For example, the following system log message
#1: 02/07/95 16:03:18.679 INFO SLOT2
FTP is initializing.
FTP
Code:5
looks as follows in Syslog format:
<AE>FTP: SLOT:2 SEVERITY:Info ENTITY_CODE/EVENT_CODE:88/5
FTP is initializing.
Figure 16 shows how Syslog encapsulates a message into a UDP packet.
[IP header]
[UDP header]
UDP data
"{<priority code>} {Syslog message}"
"<[Facility] | [Level]>"
"[Entity]: [Description] SLOT:[Slot Number] SEVERITY:[Severity Level]
ENTITY_CODE/EVENT_CODE: [Entity_code/Event_code]"
TS0003B
Figure 16.
Syslog Message Encapsulation
The following paragraphs describe the fields in a Syslog packet shown in
Figure 17 (for an event message that matches all filtering criteria).
IP Header -- Syslog adds the destination IP address for a specific remote host.
UDP Header -- Syslog adds the destination UDP port number on the remote host
identified in the IP header.
90
300020-D Rev. 00
BayRS Version 13.20 Document Change Notice
UDP Data -- The UDP data field in the Syslog packet contains a reformatted
router event message plus a priority code required by the remote host. The remote
host uses this information to decide how to handle messages received from a
router.
Priority Code -- A priority code and its text consist of a facility code plus an
error-level code in the form facility.error (Figure 17).
Priority code = Facility level
Error level code = 7
Facility code = 23 10
1
0
1
1
1
1
1
10
1
TS0004B
Figure 17.
Syslog Message Composition
Facility Codes
The facility code identifies a standard UNIX system facility that receives a
message from an internal or external software entity. The “Local <0-7>” UNIX
system facilities receive event messages (in Syslog format) from routers in the
network. The following table relates UNIX system facility names to their
respective facility codes on a workstation.
300020-D Rev. 00
UNIX System
Facility Name
Facility Code
(equivalent decimal value)
Local 0
1
Local 1
2
Local 2
3
Local 3
4
Local 4
5
Local 5
6
Local 6
7
Local 7
8
91
BayRS Version 13.20 Document Change Notice
Severity Levels
The error-level code identifies the level of urgency of a received message for
UNIX system-handling decisions. The following table shows one way to map
UNIX system error codes and error levels to the severity levels of event messages
from a Bay Networks router.
UNIX System
Error Codes
UNIX System Error
Levels
Bay Networks Router
Event Message
Severity Levels
1
LOG_EMERG
Fault
2
LOG_ALERT
Warning
3
LOG_CRIT
Warning
4
LOG_ERR
Warning
5
LOG_WARNING
Warning
6
LOG_NOTICE
Info
7
LOG_INFO
Info
8
LOG_DEBUG
Debug, Trace
You determine how the severity levels of Bay Networks router event messages
map to error levels on your UNIX workstation based on the requirements of the
network management application you use.
For instructions on how to map router event messages to UNIX system error level
codes, see “Mapping Router Message Severity Levels to UNIX System Error
Levels” on page 106.
Sequenced Messaging
If you enable the time-sequencing feature, Syslog captures and forwards in
timestamped order all event messages captured by entity filters on the router.
With time-sequencing disabled, Syslog forwards event messages to the remote
hosts according to the order of slots polled on the router.
92
300020-D Rev. 00
BayRS Version 13.20 Document Change Notice
For instructions on how to enable the time-sequencing feature, see “Enabling
Sequential Syslog Messaging” on page 108.
Note: Enable time sequencing only when it is important for your management
workstation to receive router event messages in timestamped order. When you
enable the time-sequencing feature, Syslog requires more processing resources
from the router.
Viewing Event Messages from a Network Device
To view event messages from a Bay Networks router, open the file you designated
on the workstation to receive Syslog messages from routers in your network.
For More UNIX Syslog Information
See the instructions provided in the UNIX manual (man) pages on your network
management workstation for more information about Syslog, syslogd, and
syslog.conf.
Configuring Syslog on the Router
The following steps describe generally how to configure Syslog on the router:
1.
Configure syslogd on a UNIX workstation.
2.
Using the console attached to the router, or using a telnet connection to
the router, log in to the Technician Interface.
3.
Start the BCC and enter configuration mode.
4.
Add Syslog to the router configuration.
5.
Configure a remote host to receive Syslog messages from the router.
6.
Configure entity filters for the new remote host.
7.
Enable system auditing (box; access; audit state enabled).
8.
Save your new router configuration to a file.
9.
Exit your BCC session.
Figure 18 shows the BCC configuration hierarchy for Syslog services on the
router.
300020-D Rev. 00
93
BayRS Version 13.20 Document Change Notice
Root Level in
BCC config mode
box (AN/ANH, ARN, BN)
stack (ASN, System 5000)
(one of many)
syslog
(one of many)
log-host
filter
Figure 18.
BCC Configuration Hierarchy for Syslog Services
The following sections describe each step in the Syslog configuration sequence.
Configuring syslogd on a UNIX Workstation
Before you configure and activate Syslog on any routers, configure syslogd on
UNIX network management workstations in your network. This helps prevent the
loss of event messages that you may want to capture as you begin to enable Syslog
on each router.
For syslogd to properly dispatch event messages, you must edit the /etc/
syslog.conf file, in which you define destinations for the event messages.
Configure syslogd on your UNIX workstation, as follows:
1.
Log in as superuser:
su root
2.
Open the syslog.conf file and examine the facility level indicators, which
are in the form local<0 - 7>.<fault | warning | info | trace | debug>.
3.
Edit syslog.conf to accommodate message handling for your management
workstation.
4.
Save the changes you made to syslog.conf.
5.
Obtain the process ID for the syslogd process currently running on the
workstation by entering:
ps
94
300020-D Rev. 00
BayRS Version 13.20 Document Change Notice
6.
Reinitialize syslogd by entering:
kill -HUP <process_id>
Starting the BCC
To start the BCC interface, log in to the Technician Interface and enter the bcc
command at the prompt:
Router1> bcc
Welcome to the Bay Command Console!
* To enter configuration mode, type config
* To list all system commands, type ?
* To exit the BCC, type exit
bcc>
If you need more information about how to log in to a Bay Networks router, see
Using Technician Interface Software.
To enter BCC configuration mode, enter:
bcc> config
Reading configuration information, please wait . . . done.
box#
On AN®, ANH™, ARN™, and BN® routers, the BCC interface returns the root
level prompt, box#, upon entering configuration mode. For ASN and System
5000™ routers, the root-level prompt in configuration mode is stack#.
Adding Syslog to the Router Configuration
To add Syslog services globally to the router configuration, enter:
box# syslog
syslog#
To enable Syslog services, you must configure at least one host to receive Syslog
messages from the router, and at least one entity filter to capture messages for that
host.
300020-D Rev. 00
95
BayRS Version 13.20 Document Change Notice
Configuring a Remote Host to Receive Router Syslog Messages
You must define which remote hosts you want to receive Syslog (event) messages
from the router. To define a host, navigate to the syslog context and enter:
log-host address <IP_address>
IP_address is the address of the remote host to receive Syslog messages.
For example, to point the Syslog service to the remote host at IP address
192.168.3.4, enter:
box# syslog
syslog# log-host address 192.168.3.4
log-host/192.168.3.4#
You can point the Syslog service to additional remote hosts, up to the value
configured for the Syslog maximum-hosts parameter. To increase or decrease the
maximum number of hosts, refer to “Defining the Maximum Number of Remote
Hosts” on page 106.
Creating Entity Filters for the Remote Host
After you define a remote host, you must configure at least one entity filter for it.
Syslog messaging to that host cannot begin until you create this filter.
To create a filter for a remote host, navigate to the log-host context and enter:
filter name <filter_name> entity <entity_name>
filter_name is any name you want to assign to this filter.
entity_name is one of the BCC values for the entity parameter.
Example:
box# syslog
syslog# log-host address 192.168.3.4
log-host/192.168.3.4# filter name telnet-sessions entity telnet
filter/192.168.3.4/telnet-sessions#
You can configure up to 10 filters per remote host without changing configuration
context. For each new filter, reenter the filter command with a unique name and
any legal value for the entity parameter. To see a list of entity names to use, enter
the following command:
96
300020-D Rev. 00
BayRS Version 13.20 Document Change Notice
log-host/192.168.3.7# filter name test entity ?
Legal values:
ace
ahb
all
aot
appn
arp
asr
async
at
atm
atm_dxi
atm_le
atm_sig
atmintf
bgp3
bgp4
bgp
bisync
bod
boot
. . .
. . .
. . .
. . .
. . .
. . .
. . .
. . .
. . .
. . .
. . .
. . .
. . .
. . .
. . .
tcp
telnet
tf
tftp
ti
ti_rui
tnc
token
topology
tty
vst
wcp
wep
x25
x25pad
xctl
xmodem
xns
After creating a filter, you need to identify the event numbers, event severity
levels, and/or slots to use as filtering criteria. Go to the following sections for that
information:
•
“Filtering by Event Number” on page 97
•
“Filtering by Event Severity Level” on page 98
•
“Filtering by Slot Number” on page 100
Filtering by Event Number
Each event message generated by a router entity has a unique number. You can
create an entity filter that captures only messages that fall within an event number
range that you specify using the following filter parameters:
•
event-lower-bound
•
event-upper-bound
Syslog includes the upper and lower boundary values as part of this range.
300020-D Rev. 00
97
BayRS Version 13.20 Document Change Notice
For example, an entity filter for FTP has an event number range with a lower
boundary of 5 and an upper boundary of 27. With this filter, Syslog captures and
forwards to a remote host all FTP log messages with event numbers 5 to 27.
To filter by event number, navigate to the appropriate entity filter and enter:
event-lower-bound <event_number>
event-upper-bound <event_number>
event_number is the lowest-numbered event or the highest-numbered event in the
range of events you want Syslog to capture.
Example:
box# syslog
syslog# log-host/192.168.125.3
log-host/192.168.3.4# filter name telnet-sessions entity telnet
filter/192.168.3.4/telnet-sessions# event-lower-bound 1
filter/192.168.3.4/telnet-sessions# event-upper-bound 52
filter/192.168.3.4/telnet-sessions#
To filter a single event, specify the same event number for the event-lower-bound
and event-upper-bound parameters.
Accepting the default values for the event-lower-bound (0) and event-upper-bound
(255) parameters causes Syslog to use only the severity and slot mask criteria for
capturing and forwarding messages.
Filtering by Event Severity Level
Each event message generated by the router software has one of the following
severity levels:
•
Fault
•
Warning
•
Information
•
Trace
•
Debug
You can create an entity filter to capture only event messages that have the severity
levels you specify. To create this type of filter:
98
300020-D Rev. 00
BayRS Version 13.20 Document Change Notice
•
Specify a filter name.
•
Specify an entity name.
•
Set the event-lower-bound parameter to 0.
•
Set the event-upper-bound parameter to 255 (the wildcard event number).
•
Set the severity-mask parameter to one or more of the following: fault,
warning, info, trace, debug.
For example, creating an entity filter for FTP with a message severity-mask value
of {warning fault info}, captures only FTP event messages with a severity level of
warning, fault, or information.
Note: Syslog checks the message severity mask only when you accept the
default event message number range of 0 to 255. This causes Syslog to ignore
event numbers as criteria for filtering messages.
To set the severity levels for capturing and forwarding event messages to a remote
host, navigate to the appropriate filter context and enter:
severity-mask {all | none | <level>...}
all specifies all severity levels.
none specifies no severity levels.
level is one or more of the following:
fault
warning
info
trace
debug
Note: When specifying multiple severity levels (other than all), enclose the
values in braces ({ }) and separate each value with a space.
300020-D Rev. 00
99
BayRS Version 13.20 Document Change Notice
Examples:
filter/192.168.3.4/telnet-sessions# severity-mask {trace}
filter/192.168.3.4/telnet-sessions# severity-mask {fault warning info}
filter/192.168.3.4/telnet-sessions# severity-mask {all}
Filtering by Slot Number
The router stores event messages in the log buffer associated with each slot. You
can create an entity filter that captures only event messages logged on specified
slots. To define a range of slot numbers for an entity filter, you specify values for
the following filter parameters:
•
slot-lower-bound
•
slot-upper-bound
Syslog includes the upper and lower boundary numbers as part of the range. You
must specify at least one slot in the range 1 to 14, where the slot numbers depend
on the model of router.
Note: Since the slot-lower-bound and slot-upper-bound parameters each have
a default value of 0, you must enter a valid, nonzero slot range or the filter will
not become active.
For example, you can configure an entity filter for FTP with an event number
range of 5 to 27 and a slot number range of 2 to 5. In this case, Syslog forwards to
the remote host associated with this filter FTP log messages numbered 5 to 27
logged on slots 2 to 5 only.
You can configure a filter to select messages logged on a specific slot by setting
the upper and lower slot boundary values to the same number.
To determine by slot numbers the event messages you want Syslog to capture and
forward to a host, navigate to the appropriate filter context and enter:
slot-lower-bound <slot_number>
slot-upper-bound <slot_number>
slot_number is the lowest-numbered slot or the highest-numbered slot in the range
of slots on which you want Syslog to capture event messages.
100
300020-D Rev. 00
BayRS Version 13.20 Document Change Notice
Example:
box# syslog
syslog# log-host/192.168.125.3
log-host/192.168.3.4# filter name telnet-sessions entity telnet
filter/192.168.3.4/telnet-sessions# slot-lower-bound 3
filter/192.168.3.4/telnet-sessions# slot-upper-bound 5
filter/192.168.3.4/telnet-sessions#
Note: Although the range for the slot lower and upper boundaries is 0 to 14,
specify only values within the range of actual slot numbers for the router
model you are configuring. Otherwise, the filter will not become active.
Saving the New Router Configuration to a File
After configuring Syslog, make sure to save the new router configuration. You can
save the router configuration in one of two forms:
•
As a binary file on an NVFS volume
•
As an ASCII file that you import into the router configuration
To save your configuration as a bootable (binary) file on an NVFS volume, enter:
save config <vol>:<filename>
To save the configuration as an ASCII file, enter:
show config -all -file <vol:>:<filename>
To import the ASCII file into the router configuration, enter:
source <vol>:<filename>
300020-D Rev. 00
101
BayRS Version 13.20 Document Change Notice
Managing Syslog Services
Once you finish configuring Syslog on a router, you may occasionally need to:
•
Stop or restart Syslog message forwarding to all remote hosts.
•
Stop or restart Syslog message forwarding to a specific remote host.
•
Disable or reenable a specific entity filter.
•
Delete a remote host from the Syslog configuration.
•
Delete an entity filter associated with a specific remote host.
•
Delete Syslog services from the router.
Stopping or Restarting Syslog Messaging to All Hosts
You can stop Syslog messaging to all remote hosts by disabling Syslog services.
Navigate to the syslog context and enter:
disable
Example:
box# syslog
syslog# disable
To confirm the change, check the current value of the state parameter by entering:
syslog# state
state disabled
To restart Syslog messaging to all remote hosts, navigate to the syslog context
and enter:
enable
Example:
box# syslog
syslog# enable
To confirm the change, check the current value of the state parameter by entering:
syslog# state
state enabled
102
300020-D Rev. 00
BayRS Version 13.20 Document Change Notice
Stopping or Restarting Syslog Messaging to one Host
You can stop Syslog messaging to a specific host by disabling that host entry in
the router configuration. Navigate to the appropriate log-host context and enter:
disable
Example:
box# syslog
syslog# log-host 192.168.3.4
log-host/192.168.3.4# disable
To confirm the change, check the current value of the state parameter by entering:
log-host/192.168.125.3# state
state disabled
To restart Syslog messaging, navigate to the appropriate log-host context and
enter:
enable
Example:
box# syslog
syslog# log-host 192.168.3.4
log-host/192.168.3.4# enable
To confirm the change, check the current value of the state parameter by entering:
log-host/192.168.3.4# state
state enabled
Disabling and Reenabling a Filter
You can stop an entity filter from capturing event messages for its associated
remote host. Navigate to the context of the appropriate filter object and enter:
disable
Example:
box# syslog
syslog# log-host 192.168.3.4
log-host/192.168.3.4# filter/192.168.3.4/telnet-sessions
filter/192.168.3.4/telnet-sessions# disable
300020-D Rev. 00
103
BayRS Version 13.20 Document Change Notice
To confirm the change, check the current value of the filter state parameter by
entering:
filter/192.168.3.4/telnet-sessions# state
state disabled
To restart Syslog messaging by a specific entity filter, navigate to that filter and
enter:
enable
Example:
box# syslog
syslog# log-host 192.168.3.4
log-host/192.168.3.4# filter/192.168.3.4/telnet-sessions
filter/192.168.3.4/telnet-sessions# enable
To confirm the change, check the current value of the filter state parameter by
entering:
filter/192.168.125.3/telnet-sessions# state
state enabled
Deleting an Entity Filter from a Configured Host
To delete an entity filter from a configured host, navigate to the appropriate filter
context and enter:
delete
Example:
box# syslog
syslog# log-host/192.168.3.4
log-host/192.168.3.4# filter/192.168.3.4/telnet-sessions
filter/192.168.3.4/telnet-sessions# delete
log-host/192.168.3.4#
Notice that the BCC prompt returns to the configuration context of the remote
host associated with the filter.
104
300020-D Rev. 00
BayRS Version 13.20 Document Change Notice
Deleting a Configured Host and its Filters
To delete a specific remote host entry from the Syslog configuration, navigate to
the appropriate log-host context and enter:
delete
Example:
log-host/192.168.3.4# delete
syslog#
Notice that the BCC prompt returns to the syslog configuration context. Deleting
a remote host automatically deletes all entity filters configured for that host.
Deleting Syslog Services from the Router
To delete all Syslog services from the router, navigate to the syslog context and
enter:
delete
Example:
box# syslog
syslog# delete
box#
Notice that the BCC prompt returns to root level, box# or stack#, depending on
the device.
Customizing Syslog Operation
Many Syslog service parameters already have suitable default values. Depending
on your specific requirements, you may want to customize settings associated
with the following tasks:
•
•
•
•
•
300020-D Rev. 00
Mapping router event message severity levels to remote host (UNIX) system
error levels
Defining the maximum number of remote Syslog hosts known to the router
Specifying the interval between polling cycles
Identifying the system facility used by a specific UNIX host to receive and
process Syslog messages from the router
Enabling sequential Syslog messaging
105
BayRS Version 13.20 Document Change Notice
Mapping Router Message Severity Levels to UNIX System Error
Levels
In most cases, you can accept the default mapping between router event severity
levels and UNIX system error levels established for a specific filter. However, you
can customize these mappings by entering new values for the following
parameters of any Syslog entity filter:
•
fault-map
•
warning-map
•
info-map
•
trace-map
•
debug-map
To change the mapping between router event severity and UNIX system error
levels, navigate to the appropriate filter context and enter:
{fault-map|warning-map|info-map|trace-map|debug-map} <host_error_level>
host_error_level is one of the following UNIX system error levels: emergency,
alert, critical, error, warning, notice, info, or debug.
Example:
filter/192.168.3.4/telnet-sessions#
filter/192.168.3.4/telnet-sessions#
filter/192.168.3.4/telnet-sessions#
filter/192.168.3.4/telnet-sessions#
filter/192.168.3.4/telnet-sessions#
warning-map warning
info-map notice
fault-map warning
debug-map debug
Defining the Maximum Number of Remote Hosts
You can accept the default maximum number of remote hosts configurable on a
device (5), or you can navigate to the router’s syslog context and enter:
maximum-hosts <maximum_hosts>
maximum-hosts is the maximum number of remote hosts to allow.
Example:
box# syslog
syslog# maximum-hosts 3
106
300020-D Rev. 00
BayRS Version 13.20 Document Change Notice
Specifying the Interval Between Polling Cycles
Syslog polls the events log buffer on each slot to retrieve any new messages
logged since the previous polling attempt. Syslog determines this interval by the
value of its log-poll-timer parameter.
You can accept the default 5-second interval that Syslog waits to reinitiate a
polling cycle across all slots, or you can navigate to the syslog context and enter:
log-poll-timer <seconds>
seconds specifies the interval between polling cycles.
Example:
box# syslog
syslog# log-poll-timer 7
Identifying a UNIX System Facility
The value of the log-facility parameter of any configured host determines which
UNIX system facility (local0 through local7) receives Syslog messages from the
device. You can accept the default setting (local7), or you can navigate to the
context of the desired log-host object and enter:
log-facility <system_facility>
system_facility is one of the following:
local0
local1
local2
local3
local4
local5
local6
local7
Example:
box# syslog
syslog# log-host/192.168.3.4
log-host/192.168.3.4# log-facility local4
300020-D Rev. 00
107
BayRS Version 13.20 Document Change Notice
Enabling Sequential Syslog Messaging
Message time-sequencing allows Syslog to capture and forward router event
messages in chronological order. Disabling this feature causes Syslog messages to
be forwarded according to the polled sequence of slots. (In either case, the UDP
transport may disrupt the sequence of messages received by the host.)
This feature is disabled by default, but you can enable Syslog message sequencing
for a specific host. To enable Syslog message sequencing, navigate to the context
of the desired log-host object and enter:
time-sequence enabled
Example:
box# syslog
syslog# log-host/192.168.125.3
log-host/192.168.125.3# time-sequence enabled
log-host/192.168.125.3#
Syslog show Commands
This section describes how to use the BCC show command to obtain Syslog
statistical data from the management information base (MIB). The type and
amount of data displayed depend on the specific BCC syntax you enter in each
show syslog command. This section describes the following show commands:
Command
Page
show syslog base
108
show syslog log-host
109
show syslog filter
110
show syslog base
The show syslog base command displays statistics for the Syslog global entity.
This command has no optional filters (flags).
108
300020-D Rev. 00
BayRS Version 13.20 Document Change Notice
The output of show syslog base includes the following information:
State
Configured state of the Syslog service
Maximum Active Hosts
Maximum number of remote Syslog hosts configured to receive
messages from this device
Poll Iteration Timer
Number of seconds that Syslog waits to reinitiate a polling cycle
across all slots
Operational State
Actual state of the Syslog service (up/down)
# Active Seq. Hosts
Number of hosts receiving time-sequenced Syslog messages
from the router
# Active Non-seq. Hosts Number of hosts receiving Syslog messages on a slot-by-slot
basis from the router
# Messages Sent
Total number of Syslog messages forwarded to all remote
Syslog hosts configured on this device
show syslog log-host
The show syslog log-host command displays statistics associated with any
Syslog log-host object configured on the device.
This command supports the following command filters (flags) and filter
arguments:
-log-host <IP_address>]
Displays statistics for all Syslog hosts configured on this
device. Adding an IP address causes the command to
display the statistics of a specific Syslog host.
-active
Displays the list of remote hosts configured and receiving
Syslog messages from this router.
-inactive
Displays the list of remote hosts configured but not
receiving Syslog messages from this router.
-enabled
Displays log-host objects that have a configured state of
enabled.
-disabled
Displays log-host objects that have a configured state of
disabled.
The output of the show syslog log-host command includes the following
information:
300020-D Rev. 00
Host IP Address
Address of a remote Syslog host.
Configured State
Administrative state of a configured log-host object.
109
BayRS Version 13.20 Document Change Notice
Operational State
Actual (active/inactive) state of a configured log-host object.
Active means that the associated host is actively receiving Syslog
messages from the router. Inactive means that the host is not
receiving Syslog messages from the router.
Time Sequencing
Status of Syslog message time-sequencing (enabled/disabled) for
the associated remote host.
UDP Port
UDP port where the remote host receives Syslog messages from
the router.
Facility Code
System facility that the remote UNIX host uses to receive and
process Syslog messages from the router.
# Messages Sent
Total number of messages sent to the remote host.
show syslog filter
The show syslog filter command displays statistics of entity filters configured on
the router.
This command supports the following command filters (flags) and filter
arguments:
-log-host <IP_address>
Displays all filters configured for this remote host
-name <log_host_name>
Displays the filter with this name
-entity <entity_name>
Displays filters configured for this entity
-active
Displays filters in the active state
-inactive
Displays filters in the inactive state
-enabled
Displays filters with a configured state of enabled
-disabled
Displays filters with a configured state of disabled
The output of the show syslog filter command includes the following
information:
110
Host IP Address
IP address of the remote host
Filter Name
Name assigned to the filter
Entity Name
Entity associated with the filter
Configured State
Administrative state of the filter
Operational State
Actual (active/inactive) state of the filter
300020-D Rev. 00
BayRS Version 13.20 Document Change Notice
Syslog Parameter Descriptions
Tables 3 through 5 describe parameters for the following BCC configurable
objects:
Table 3.
•
•
syslog
log-host
•
filter
Syslog Parameters (box or stack > syslog)
Parameter
Function
log-poll-timer
Specifies the amount of time in seconds that Syslog waits before initiating another
cycle to poll all slots for event messages logged since the previous polling cycle
maximum-hosts
Specifies the maximum number of remote hosts you can configure to receive
messages from the Syslog service on the router
state
Specifies the administrative state of the Syslog service on the router (enabled or
disabled). Before the Syslog service can actually begin filtering and forwarding
messages, you must configure at least one remote Syslog host and at least one entity
filter for that host.
Table 4.
Parameters of log-host (box or stack > syslog > log-host)
Parameter
Function
address
REQUIRED -- Specifies the IP address of this remote host
log-facility
Specifies the system facility (local0 through local7) used by this remote host to receive
Syslog messages from the router.
state
Enables or disables message forwarding to this host from the Syslog service
time-sequence
Enables or disables time-sequencing and forwarding of Syslog messages. Enabling
this feature allows Syslog messages from different slots (router-wide) to be interleaved
and forwarded sequentially. Disabling this feature causes Syslog messages to be
forwarded according to the polled sequence of slots. (In both cases, the inherent
unreliability of the UDP transport may disrupt the sequence of messages received by
the host.)
udp-port
Specifies the UDP port of this host
300020-D Rev. 00
111
BayRS Version 13.20 Document Change Notice
Table 5.
Parameters of filter (box or stack > syslog > log-host > filter)
Parameter
Function
debug-map
Maps router debug messages to an equivalent, host system error level: emergency,
alert, critical, error, warning, notice, information, or debug.
entity
REQUIRED -- Specifies the router entity logging messages that Syslog will capture
and forward to this filter's host
event-lower-bound
Specifies the lowest-numbered event in the range of events that Syslog will capture
and forward to this filter's host. If you do not want to filter by event code, accept the
default values for the event-lower-bound and event-upper-bound parameters. (This
configures the wildcard event range of 0 to 255.) By accepting the wildcard range,
Syslog ignores the event-lower-bound and event-upper-bound parameters and
checks for filtering criteria based only on the value of the severity mask.
event-upper-bound
Specifies the highest-numbered event in the range of events that Syslog will capture
and forward to this filter's host. If you do not want to filter by event code, accept the
default values for the event-lower-bound and event-upper-bound parameters. (This
configures the wildcard event range of 0 to 255.) By accepting the wildcard range,
Syslog ignores this parameter and checks for filtering criteria based only on the value
of the severity mask.
fault-map
Maps router fault messages to an equivalent, host system error level: emergency,
alert, critical, error, warning, notice, information, or debug
info-map
Maps router info messages to an equivalent, host system error level: emergency,
alert, critical, error, warning, notice, information, or debug
name
REQUIRED -- Specifies a unique alphanumeric name for this filter
severity-mask
Specifies the severity levels of router event messages -- warning, information, trace,
fault, and debug -- that Syslog will capture and forward to this filter's host. Syslog
uses this severity mask only if you specify the wildcard event number range (0 to 255)
as values for the event-lower-bound and event-upper-bound parameters. If you
specify a range of event numbers other than the wildcard range, Syslog ignores the
severity-mask parameter.
slot-lower-bound
Specifies the lowest-numbered slot in the range of slots on which Syslog will capture
and forward event messages to this filter's host
slot-upper-bound
Specifies the highest-numbered slot in the range of slots on which Syslog will capture
and forward event messages to this filter's host
state
Specifies the administrative state of this filter (enabled or disabled)
trace-map
Maps router trace messages to an equivalent, host system error level: emergency,
alert, critical, error, warning, notice, information, or debug
warning-map
Maps router warning messages to an equivalent, host system error level: emergency,
alert, critical, error, warning, notice, information, or debug
112
300020-D Rev. 00
BayRS Version 13.20 Document Change Notice
Configuring Traffic Filters and Protocol Prioritization
The following sections are additions to Configuring Traffic Filters and Protocol
Prioritization.
Sending Traffic Across HSSI and ATM Interfaces
You can now set the priorities for the traffic sent across a HSSI and ATM line
interface using a process called protocol prioritization. Protocol prioritization
enables you to prioritize traffic so that the router transmits traffic of with the
highest priority first.
You must manually start protocol prioritization on a HSSI line interface.
You must manually start protocol prioritization on an ATM circuit. For ATM, you
can use protocol prioritization for IP traffic travelling over an ATM PVC.
Enabling Protocol Prioritization on an ATM Circuit
The steps required to enable protocol prioritization for ATM differ from the steps
for all other circuit types.
To enable protocol prioritization for an ATM circuit.
Site Manager Procedure
You do this
System responds
1. In the Configuration Manager window,
The Select Connection Type window
click on the ATM1 connector on which you opens.
want to configure protocol prioritization.
300020-D Rev. 00
2. Click on ATM.
The Edit ATM Connector window opens.
3. Click on PVC Protocol Priority.
The ATM PVC Protocol Priority window
opens.
4. Click on Priority Interface.
The ATM Priority Interface List window
opens.
113
BayRS Version 13.20 Document Change Notice
From the ATM Priority List window, you can edit configuration parameters, as
described in Configuring Traffic Filters and Protocol Prioritization.
Note: You cannot change the percent of bandwidth for the priority queues
when configuring protocol prioritization over ATM.
For more information about protocol prioritization and how to configure and
outbound traffic filter with a priority queue action, see Configuring Traffic Filters
and Protocol Prioritization.
Configuring WAN Line Services
The following sections are additions to Configuring WAN Line Services.
Setting the Cable Type Using the BCC
If the synchronous interface is connected to a dial-up device for switched services,
you can specify the cable interface type of the device that connects the dial unit.
You can select one of the following cable types:
•
•
•
•
•
Null
RS232
RS422
V35
X21
By default, the cable type is set to Null. If you start SDLC on your interface, the
system sets the cable type to RS232.
Using BCC
To set the cable type, navigate to the serial prompt (for example, box; serial/2/1)
and enter:
cable-type <type>
114
300020-D Rev. 00
BayRS Version 13.20 Document Change Notice
type is one of the following:
null
rs232
rs422
v35
x21
For example, the following command sets the cable type to V35:
serial/2/1# cable-type v35
Sending Traffic Across a HSSI Interface
You can now use Site Manager to set the priorities for the traffic sent across a
HSSI line interface using a process called protocol prioritization. Protocol
prioritization enables you to prioritize traffic so that the router transmits traffic of
with the highest priority first.
You must manually start protocol prioritization on a HSSI line interface.
For information on how to configure protocol prioritization, see Configuring
Traffic Filters and Protocol Prioritization.
Upgrading Routers to BayRS Version 13.xx
The following section is an amendment to Upgrading Routers to BayRS Version
13.xx. It replaces Table A-1 in Appendix A of the book.
Boot and Diagnostic PROM Upgrades for Version 13.20
Table 6 lists the routers that require a new version of boot and diagnostic PROMs
for BayRS Version 13.20. Upgrade the PROMs if the features that you need
depend on a PROM version more recent than the version now in your router.
300020-D Rev. 00
115
BayRS Version 13.20 Document Change Notice
Table 6.
Version 13.20 Boot and Diagnostic PROM Revisions
Router Platform
Diagnostic
PROM
File Name
Diagnostic
PROM
Reason for
Revision
Upgrading
Number
PROM
AN/ANH™
andiag.exe
v7.36
Modem Hang Fix anboot.exe
AN200
an200diag.exe
v1.00
Strata flash
feature support
an200boot.exe
11.01
ARE (BN, 5782 MPE) arediag.pcc
v1.18
AMD29F040 Bit
Flip Fix
areboot.ppc
13.20
ARN
arndiag.exe
v2.16
E7S feature
support
arnboot.exe
1.25
ARN
arn.diag.rom
v2.16
E7S feature
support
Not applicable
Not applicable
ARN
e7srom.rom
2.16
E7S feature
support
Not applicable
Not applicable
ARN_PBDROM.ROM arn_pbdrom.rom
v1.22
Not applicable
Not applicable
Not applicable
ASN
asndiag.exe
v2.34
Strata flash
feature support
asnboot.exe
13.00
BN
frediag.exe
v5.14
Strata flash
feature support
freboot.exe
13.00
BN
fre4diag.pcc
v1.10
FRE-4 board
support
fre4boot.ppc
13.20
System 5000™ net
modules
s5000diag.exe
v0.04
Strata flash
feature support
s5000boot.exe
13.00
Boot PROM
Revision
Number
Boot PROM
File Name
9.00.d
Using Technician Interface Software
The following sections are additions to Using Technician Interface Software.
116
300020-D Rev. 00
BayRS Version 13.20 Document Change Notice
Monitoring EIA Signals
You can monitor Electronic Industries Association (EIA) signals on the serial
ports of Bay Networks AN, ARN, ASN™, and BN routers. You can monitor
request to send (RTS), clear to send (CTS), data send ready (DSR), data terminal
ready (DTR), and data carrier detect (DCD) signals on any serial port including
RS-232-C, RS-422, and V.35 interfaces.
Note: Only the true status of the EIA signals at the serial port are monitored.
The signals displayed are not interpreted based on the cable type. For cable
types other than straight-through, such as crossover cables, you must interpret
the signals.
You monitor EIA signals using the show command of the Technician Interface.
See Using Technician Interface Software for more information.
Using the Technician Interface
Use the Technician Interface command show sync eia_status to monitor EIA
signals on a specific serial port. An active signal is displayed as “H,” an inactive
signal is displayed as “L.”
Example
[1:1]$ show sync eia_status
Slot
Conn
Circuit RTS
CTS
DSR
DCD
DTR
------ ------ ------
------ ------ ------ ------ ------
1
H
2
S11
L
L
H
L
1 entry(s) found
300020-D Rev. 00
117