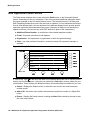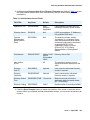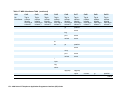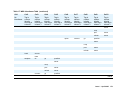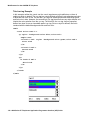
1
4600 Series IP Telephones Application Programmer Interface (API) Guide Release 2.2 for 4610SW, 4620/4620SW, 4621SW, and 4622SW IP Telephones Release 2.5 for the 4625SW IP Telephone 16-300256 Issue 1 April 2005 Copyright 2005, Avaya Inc. All Rights Reserved Notice Every effort was made to ensure that the information in this document was complete and accurate at the time of printing. However, information is subject to change. Trademarks DEFINITY is a registered trademark of Avaya, Inc. MultiVantage is a trademark of Avaya, Inc. HTTP Server functionality is provided by the GoAhead WebServer 2.1, Copyright© 2004 GoAhead Software, Inc. All rights reserved. Disclaimer Avaya is not responsible for any modifications, additions or deletions to the original published version of this documentation unless such modifications, additions or deletions were performed by Avaya. Customer and/or End User agree to indemnify and hold harmless Avaya, Avaya's agents, servants and employees against all claims, lawsuits, demands and judgments arising out of, or in connection with, subsequent modifications, additions or deletions to this documentation to the extent made by the Customer or End User. API Support This support is limited to the API. We cannot provide assistance with generic configuration, servers, other software, or network issues. See the Application Support Forum for more information. How to Get Help For additional support telephone numbers, go to the Avaya support Web site: http://www.avaya.com/support. If you are: • Within the United States, click the Escalation Contacts link that is located under the Support Tools heading. Then click the appropriate link for the type of support that you need. • Outside the United States, click the Escalation Contacts link that is located under the Support Tools heading. Then click the International Services link that includes telephone numbers for the international Centers of Excellence. Providing Telecommunications Security Telecommunications security (of voice, data, and/or video communications) is the prevention of any type of intrusion to (that is, either unauthorized or malicious access to or use of) your company's telecommunications equipment by some party. Your company's “telecommunications equipment” includes both this Avaya product and any other voice/data/video equipment that could be accessed via this Avaya product (that is, “networked equipment”). An “outside party” is anyone who is not a corporate employee, agent, subcontractor, or is not working on your company's behalf. Whereas, a “malicious party” is anyone (including someone who may be otherwise authorized) who accesses your telecommunications equipment with either malicious or mischievous intent. Such intrusions may be either to/through synchronous (time-multiplexed and/or circuit-based) or asynchronous (character-, message-, or packet-based) equipment or interfaces for reasons of: • Utilization (of capabilities special to the accessed equipment) • Theft (such as, of intellectual property, financial assets, or toll facility access) • Eavesdropping (privacy invasions to humans) • Mischief (troubling, but apparently innocuous, tampering) • Harm (such as harmful tampering, data loss or alteration, regardless of motive or intent) Be aware that there may be a risk of unauthorized intrusions associated with your system and/or its networked equipment. Also realize that, if such an intrusion should occur, it could result in a variety of losses to your company (including but not limited to, human/data privacy, intellectual property, material assets, financial resources, labor costs, and/or legal costs). Responsibility for Your Company’s Telecommunications Security The final responsibility for securing both this system and its networked equipment rests with you - Avaya’s customer system administrator, your telecommunications peers, and your managers. Base the fulfillment of your responsibility on acquired knowledge and resources from a variety of sources including but not limited to: • Installation documents • System administration documents • Security documents • Hardware-/software-based security tools • Shared information between you and your peers • Telecommunications security experts To prevent intrusions to your telecommunications equipment, you and your peers should carefully program and configure: • Your Avaya-provided telecommunications systems and their interfaces • Your Avaya-provided software applications, as well as their underlying hardware/software platforms and interfaces • Any other equipment networked to your Avaya products TCP/IP Facilities Customers may experience differences in product performance, reliability and security depending upon network configurations/design and topologies, even when the product performs as warranted. To order copies of this and other documents: Call: Avaya Publications Center Voice 1.800.457.1235 or 1.207.866.6701 FAX 1.800.457.1764 or 1.207.626.7269 Write: Globalware Solutions 200 Ward Hill Avenue Haverhill, MA 01835 USA Attention: Avaya Account Management E-mail: [email protected] For the most current versions of documentation, go to the Avaya support Web site: http://www.avaya.com/support. Contents About This Guide . . . . . . . . . . . . . . . . . . . . . . . . . . . . . . 9 About this Document . . . . . . . . . . . . . . . . . . . . . . . . . . . . . . . . . 9 Intended Audience. . . . . . . . . . . . . . . . . . . . . . . . . . . . . . . . . . . 9 Document Organization . . . . . . . . . . . . . . . . . . . . . . . . . . . . . . . . 10 Issue Date . . . . . . . . . . . . . . . . . . . . . . . . . . . . . . . . . . . . . . . 11 How to Use This Document . . . . . . . . . . . . . . . . . . . . . . . . . . . . . . 11 Terms Used in This Document . . . . . . . . . . . . . . . . . . . . . . . . . . . . 11 Conventions Used in This Document . . . . . . . . . . . . . . . . . . . . . . . . Symbolic Conventions . . . . . . . . . . . . . . . . . . . . . . . . . . . . . . Typographic Conventions. . . . . . . . . . . . . . . . . . . . . . . . . . . . . 14 15 15 Online Documentation. . . . . . . . . . . . . . . . . . . . . . . . . . . . . . . . . 15 Related Documentation Avaya Documents . Other Documents . IETF Documents . . . . . . 16 16 16 16 Chapter 1: IP Telephone Interfaces. . . . . . . . . . . . . . . . . . . . . 17 Overview . . . . . . . . . . . . . . . . . . . . . . . . . . . . . . . . . . . . . . . . 17 Existing Interfaces . . . . . . . . . . . . . . . . . . . . . . . . . . . . . . . . . . . 18 Chapter 2: Push Interface Overview . . . . . . . . . . . . . . . . . . . . 21 Introduction . . . . . . . . . . . . . . . . . . . . . . . . . . . . . . . . . . . . . . 21 Push Feature Description . . . . . . . . . . . . . . . . . . . . . . . . . . . . . . . 22 Push Architecture . . . . . . . . . . . . . . . . . The Push Flow Process . . . . . . . . . . . . The Push/Pull Process – A Two-Step View . Push operation (Step 1a and Step 1b) . . Pull operation (Step 2a and Step 2b) . . . Push Message Flow . . . . . . . . . . . . . . Step 1 - XML File Push Message Sent . . Step 2 – Push Agent Responds . . . . . . Step 3 – XML Message Parsing . . . . . . Step 4 – Request Launched . . . . . . . . Step 5 – Push Content Server Responds Step 6 – Message Sent to Telephone . . . . . . . . . . . . . . . 22 22 23 23 23 24 24 24 24 25 25 25 About the Push Agent . . . . . . . . . . . . . . . . . . . . . . . . . . . . . . . . . 26 HTTP Server . . . . . . . . . . . . . . . . . . . . . . . . . . . . . . . . . . . . . . 26 . . . . . . . . . . . . . . . . . . . . . . . . . . . . . . . . . . . . . . . . . . . . . . . . . . . . . . . . . . . . . . . . . . . . . . . . . . . . . . . . . . . . . . . . . . . . . . . . . . . . . . . . . . . . . . . . . . . . . . . . . . . . . . . . . . . . . . . . . . . . . . . . . . . . . . . . . . . . . . . . . . . . . . . . . . . . . . . . . . . . . . . . . . . . . . . . . . . . . . . . . . . . . . . . . . . . . . . . . . . . . . . . . . . . . . . . . . . . . . . . . . . . . . . . . . . . . . . . . . . . . . . . . . . . . . . . . . . . . . . . . . . . . . . . . . . . . . . . . . . . . . . . . . . . . . . . . . . . . . . . . . . . . . . . Issue 1 April 2005 3 Contents Push Agent - HTTP POST Address . . . . . . . . . . . . . . . . . . . . . . . . . . 27 Push Types . . . . . . . . . . . . . . . . . . . . . . . . . . . . . . . . . . . . . . . 27 Chapter 3: Creating Push Messages . . . . . . . . . . . . . . . . . . . . 29 Introduction . . . . . . . . . . . . . . . . . . . . . . . . . . . . . . . . . . . . . . 29 The Display Push Type . . . . . . . . . . . Web Browser Features . . . . . . . . . Alerts . . . . . . . . . . . . . . . . . . . Display Push Example 1: . . . . . . . . Priorities and States . . . . . . . . . . . Pushable vs. Non-Pushable States . Successful Push Response . . . . . Normal Priority . . . . . . . . . . . . Barge Priority . . . . . . . . . . . . Display Push XML Messages . . . . . . Display Push Message (PM). . . . . Using the <postfield> Tag . . . . . . . . Display Push Example 2: . . . . . . . . Push Agent . . . . . . . . . . . . . . . . Push Content (PC) . . . . . . . . . . . . . . . . . . . . . . . . . . . . . . . . . . . . . . . . . . . . . . . . . . . . . . . . . . . . . . . . . . . . . . . . . . . . . . . . . . . . . . . . . . . . . . . . . . . . . . . . . . . . . . . . . . . . . . . . . . . . . . . . . . . . . . . . . . . . . . . . . . . . . . . . . . . . . . . . . . . . . . . . . . . . . . . . . . . . . . . . . . . . . . . . . . . . . . . . . . . . . . . . . . . . . . . . . . . . . . . . . . . . . . . . . . . . . . . . . . . . . . . . . . . . . . . . . . . . . . . . . . . . . . . . . . . . . . . . . . . . . . . . . . . . . . . . . . . . . . . . . . . . . . . . . . . . . . . . . . . . . . . 29 29 30 30 30 30 31 31 32 33 33 34 35 35 36 The Topline Push Type . . . . . . . . . . . Text Message Features . . . . . . . . . Alerts . . . . . . . . . . . . . . . . . . . Topline Push Example 1: . . . . . . . . Priorities and States . . . . . . . . . . . Pushable vs. Non-Pushable States . Successful Push Response . . . . . Normal Priority . . . . . . . . . . . . Barge Priority . . . . . . . . . . . . Topline Push XML Messages . . . . . . Topline Push Message (PM). . . . . Using the <postfield> Tag . . . . . . . . Topline Push Example 2: . . . . . . . . Push Agent . . . . . . . . . . . . . . . . Topline Push Content (PC) . . . . . . . Using the <Response> tag . . . . . Using the <Topline> tag . . . . . . . . . . . . . . . . . . . . . . . . . . . . . . . . . . . . . . . . . . . . . . . . . . . . . . . . . . . . . . . . . . . . . . . . . . . . . . . . . . . . . . . . . . . . . . . . . . . . . . . . . . . . . . . . . . . . . . . . . . . . . . . . . . . . . . . . . . . . . . . . . . . . . . . . . . . . . . . . . . . . . . . . . . . . . . . . . . . . . . . . . . . . . . . . . . . . . . . . . . . . . . . . . . . . . . . . . . . . . . . . . . . . . . . . . . . . . . . . . . . . . . . . . . . . . . . . . . . . . . . . . . . . . . . . . . . . . . . . . . . . . . . . . . . . . . . . . . . . . . . . . . . . . . . . . . . . . . . . . . . . . . . . . . . . . . . . . . . . . . . . . . . . . . . . . . . . . . . . . . . . 37 37 38 38 39 39 39 40 40 41 41 42 43 44 44 44 45 The Audio Push Type . . . . . . . . . . . . . . . . . . . . . . . . . . . . . . . . . Audio Push Features . . . . . . . . . . . . . . . . . . . . . . . . . . . . . . . Alerts . . . . . . . . . . . . . . . . . . . . . . . . . . . . . . . . . . . . . . . . 46 46 46 4 4600 Series IP Telephones Application Programmer Interface (API) Guide Contents Audio Push Example: . . . . . . . . . . Priorities and States . . . . . . . . . . . Pushable vs. Non-Pushable States . Successful Push Response . . . . . Normal Priority . . . . . . . . . . . . Barge Priority . . . . . . . . . . . . Audio Push XML Messages . . . . . . . Audio Push Message (PM) . . . . . Using the <postfield> Tag . . . . . . RTP Port . . . . . . . . . . . . . . . . . Push Agent . . . . . . . . . . . . . . . . Audio Push Content (PC) . . . . . . . . . . . . . . . . . . . . . . . . . . . . . . . . . . . . . . . . . . . . . . . . . . . . . . . . . . . . . . . . . . . . . . . . . . . . . . . . . . . . . . . . . . . . . . . . . . . . . . . . . . . . . . . . . . . . . . . . . . . . . . . . . . . . . . . . . . . . . . . . . . . . . . . . . . . . . . . . . . . . . . . . . . . . . . . . . . . . . . . . . . . . . . . . . . . . . . . . . . . . . . . . . . . . . . . . . . . . . . . . . . . . . . . . . . . . . . . . . . . . . . . . . . . . . . . . . . . . 47 47 47 47 48 48 49 49 49 50 51 51 . . . . . . . . . . . . . . . . . . . . . . . . . . . . . . . . . . . . . . . . . . . . . . . . . . . . . . . . . . . . . . . . . . . . . . . . . . . . . . . . . . . . . . . . . . . . . . . . . . . . . . . . . . . . . . . . . . . . . . . . . . . . . . . . . . . . . . . . . . . . . . . . . . . . . . . . . . . . . . . . . . . . . . . . . . . . . . . . . . . . . . . . . . . . . . . . . . . . . . . . . . . . . . . . . . . . . . . . . . . . . . . . . . . . . . . . . . . . . . . . . . . . . . . . . . . . 54 54 54 55 55 55 55 56 56 57 57 57 Chapter 4: Push Administration . . . . . . . . . . . . . . . . . . . . . . 59 Introduction . . . . . . . . . . . . . . . . . . . . . . . . . . . . . . . . . . . . . . 59 Requirements . . . . . . . . . . . . . . . . . . . . . . . . . . . . . . . . . . . . . 59 Security. . . . . . . . . . . . . . . . . . . . . . . . . . . . . . . . . . . . . . . . . 59 Trusted Push Server List (TPSLIST) . . . . . . . . . . . . . . . . . . . . . . . . . 60 Validation Scenarios. . . . . . . . . . . . . . . . . . . . . . . . . . . . . . . . . . Recommendations: . . . . . . . . . . . . . . . . . . . . . . . . . . . . . . . . 61 62 Subscription Service . . . . . . . . . . . . . . . . . . . . . . . . . . . . . . . . . Subscriber Service . . . . . . . . . . . . . . . . . . . . . . . . . . . . . . . . 62 63 Subscription List (SUBSCRIBELIST) . Subscription Update . . . . . . . . Retry Timer . . . . . . . . . . . . . Denial of Service Timer . . . . . . 64 65 65 65 The Subscribe Push Type . . . . . . . Subscribe Push Features . . . . . Alerts . . . . . . . . . . . . . . . . Priorities and States . . . . . . . . Successful Push Response . . . . Subscribe XML Messages . . . . . Subscribe Push Message (PM) Using the <postfield> Tag . . . Push Agent . . . . . . . . . . . . . Subscribe Push Content (PC) . . . Using the <Response> Tag . . Using the <Subscribe> Tag . . . . . . . . . . . . . . . . . . . . . . . . . . . . . . . . . . . . . . . . . . . . . . . . . . . . . . . . . . . . . . . . . . . . . . . . . . . . . . . . . . . . . . . . . . . . . . . . . . . . . . . . . . . . . . . . . . . . . . . . . . . . . . . . . . . . . . . . Issue 1 April 2005 5 Contents Chapter 5: Troubleshooting the Push Interface . . . . . . . . . . . . . . 67 Avaya HTTP Header Extensions (x-Push-Status Codes) . . . . . . . . . . . . . . 67 HTTP Error Messages . . . . . . . . . . . . . . . . . . . . . . . . . . . . . . . . . 69 Chapter 6: About The Web Browser . . . . . . . . . . . . . . . . . . . . 71 Introduction . . . . . . . . . . . . . . . . . . . . . . . . . . . . . . . . . . . . . . 71 Physical Attributes . . . . . . . . . . . . . . . . . . . . . . . . . . . . . . . . . . 72 Web Browser Navigation . . . . Icons for Navigation Control Multiple Paging Indicators . Moving Up and Down a Card . . . . 73 74 76 76 Truncation Rules and Links . . . . . . . . . . . . . . . . . . . . . . . . . . . . . . Truncating Lines and Words . . . . . . . . . . . . . . . . . . . . . . . . . . . Links . . . . . . . . . . . . . . . . . . . . . . . . . . . . . . . . . . . . . . . . 78 78 79 Enabling Text Entry . . . . . . . . . . . . . . . . . . . . . . . . . . . . . . . . . . Text Entry Example: . . . . . . . . . . . . . . . . . . . . . . . . . . . . . . 79 80 Text Editing Modes . . . . . . . . . . . . . . . . . . . . . . . . . . . . . . . . . . Input Modes . . . . . . . . . . . . . . . . . . . . . . . . . . . . . . . . . . . . 81 82 Character Set Support. . . . . . . . . . . . . . . . . . . . . . . . . . . . . . . . . 84 Web History . . . . . . . . . . . . . . . . . . . . . . . . . . . . . . . . . . . . . . 84 Display Colors . . . . . . . . . . . . . . . . . . . . . . . . . . . . . . . . . . . . . 84 Call Interaction . . . . . . . . . . . . . . . . . . . . . . . . . . . . . . . . . . . . . 85 Requirements for Deck/Card Elements. . . . . . . . . . . . . . . . . . . . . . . . 85 Wireless Telephony Applications (WTA) . Syntax Implementation . . . . . . . . Click to Dial Functionality . . . . . Add to Speed Dial Functionality . . . . . 86 87 87 92 Support for HTTP Authentication. . . . . . . . . . . . . . . . . . . . . . . . . . . 94 Page Loading . . . . . . . . . . . . . . . . . . . . . . . . . . . . . . . . . . . . . 94 Error Tones. . . . . . . . . . . . . . . . . . . . . . . . . . . . . . . . . . . . . . . 95 HTTP Protocol . . . . . . . . . . . . . . . . . . . . . . . . . . . . . . . . . . . . . 95 HTTP Header . . . . . . . . . . . . . . . . . . . . . . . . . . . . . . . . . . . . . . User Agent . . . . . . . . . . . . . . . . . . . . . . . . . . . . . . . . . . . . . User-Agent Header String (4610SW IP Telephones). . . . . . . . . . . . . User-Agent Header String (4620/4620SW, 4621SW, 4622SW IP Telephones) User-Agent Header String (4625SW IP Telephones). . . . . . . . . . . . . 95 95 96 96 97 Error Messages . . . . . . . . . . . . . . . . . . . . . . . . . . . . . . . . . . . . 97 Summary Of WML Tags and Attributes . . . . . . . . . . . . . . . . . . . . . . . 99 . . . . . . . . . . . . . . . . . . . . . . . . . . . . . . . . . . . . . . . . . . . . . . . . . . . . . . . . . . . . . . . . . . . . . . . . . . . . . . . . . . . . . . . . . . . . . . . . . . . . . . . . . . . . . . . . . . . . . . . . . . . . . . . . . . . . 6 4600 Series IP Telephones Application Programmer Interface (API) Guide . . . . . . . . . . . . . . . . . . . . . . . . . . . . . . . . . . . . . . . . . . . . . . . . . . . . . . . . Contents Chapter 7: Web Browser for 4610SW, 4620/4620SW, 4621SW, and 4622SW IP Telephones . . . . . . . . . . . . . . . . . . . . . . . . . . . 103 Introduction . . . . . . . . . . . . . . . . . . . . . . . . . . . . . . . . . . . . . . 103 General Background. . . . . . . . . . . . . . . . . . . . . . . . . . . . . . . . . . 104 WML Tags and Attributes . . WML Document Skeleton Text Elements . . . . . . Text Formatting Tags . . Anchor Elements . . . . Image Elements . . . . . Event Elements . . . . . Task Elements . . . . . . Input Elements . . . . . . Variable Elements . . . . Character Entities . . . . Colors and Fonts . . . . . . . . . . . . . . . . . . . . . . . . . . . . . . . . . . . . . . . . . . . . . . . . . . . . . . . . . . . . . . . . . . . . . . . . . . . . . . . . . . . . . . . . . . . . . . . . . . . . . . . . . . . . . . . . . . . . . . . . . . . . . . . . . . . . . . . . . . . . . . . . . . . . . . . . . . . . . . . . . . . . . . . . . . . . . . . . . . . . . . . . . . . . . . . . . . . . . . . . . . . . . . . . . . . . . . . . . . . . . . . . . . . . . . . . . . . . . . . . . . . . . . . . . . . . . . . . . . . . . . . . . . . . . . . . . . . . . . . . . . . . . . . . . . . . . . . . . . . . . . . . . . . . . . . . . . . . . . . . . . . . . . . . . . . . . . . . . . . . . . . . . . . . . . . . 104 104 107 108 108 109 110 113 114 117 118 118 Access Key Input Mode (AIM). . . . . . . Support for Access Keys . . . . . . . Example of Text Entry Using AIM: AIM Considerations . . . . . . . . . . Terminating AIM . . . . . . . . . . . . . . . . . . . . . . . . . . . . . . . . . . . . . . . . . . . . . . . . . . . . . . . . . . . . . . . . . . . . . . . . . . . . . . . . . . . . . . . . . . . . . . . . . . . . . . . . . . . . . . . . . . . . . . . . . . 119 119 121 123 125 Chapter 8: Web Applications . . . . . . . . . . . . . . . . . . . . . . . . 127 Introduction . . . . . . . . . . . . . . . . . . . . . . . . . . . . . . . . . . . . . . 127 Application Platform Requirements . . . . . . . . . . . . . . . . . . . . . . . . . 129 Installing the Thin Client Directory on the Server . Pre-Installation Requirements (Apache/PHP) . Avaya-Provided Download Files . . . . . . . . Installing the Thin Client Directory . . . . . . . . . . . . . . . . . . . . . . . . . . . . . . . . . . . . . . . . . . . . . . . . . . . . . . . . . . . . . . . . . . . . . . . . . . . 129 129 129 130 Web Application User Interface. . . . . . . . . . . Generic User Interface Screen Characteristics Web Application Search Screen . . . . . . . . Web Application Successful Search Screen . . Web Application Detail Screen . . . . . . . . . Web Application Directory Trouble Screen . . . . . . . . . . . . . . . . . . . . . . . . . . . . . . . . . . . . . . . . . . . . . . . . . . . . . . . . . . . . . . . . . . . . . . . . . . . . . . . . . . . . . . . . . . . . . . . . . . . . . . . . 132 133 134 135 136 137 Directory Database Administration Interface . . . . . . . . . . . . . . . . . . . . Configuring the General Directory Application Administration Screen . . . . Configuring the Directory Application Search Administration Screen. . . . . 140 142 144 Issue 1 April 2005 7 Contents Configuring the Directory Application Details Administration Screen. . . . . Configuring the Directory Application Softkey Administration Screen . . . . 146 147 Chapter 9: Web Browser for the 4625SW IP Telephone. . . . . . . . . . 151 Introduction . . . . . . . . . . . . . . . . . . . . . . . . . . . . . . . . . . . . . . 151 General Background. . . . . . . . . . . . . . . . . . . . . . . . . . . . . . . . . . 151 WML Tags and Attributes . . WML Document Skeleton Text Elements . . . . . . Text Formatting Tags . . Anchor Elements . . . . Image Elements . . . . . Event Elements . . . . . Task Elements . . . . . . Input Elements . . . . . . Variable Elements . . . . Character Entities . . . . . . . . . . . . . . . . . . . . . . . . . . . . . . . . . . . . . . . . . . . . . . . . . . . . . . . . . . . . . . . . . . . . . . . . . . . . . . . . . . . . . . . . . . . . . . . . . . . . . . . . . . . . . . . . . . . . . . . . . . . . . . . . . . . . . . . . . . . . . . . . . . . . . . . . . . . . . . . . . . . . . . . . . . . . . . . . . . . . . . . . . . . . . . . . . . . . . . . . . . . . . . . . . . . . . . . . . . . . . . . . . . . . . . . . . . . . . . . . . . . . . . . . . . . . . . . . . . . . . . . . . . . . . . . . . . . . . . . . . . . . . . . . . . . . . . . . . . . . . 152 152 155 155 156 157 158 163 165 169 169 Image Support . . . . . . . . . . . WBMP Images . . . . . . . . . JPEG Images . . . . . . . . . . Image Rendering . . . . . . . . Scrolling Through Images. . . Image Justification . . . . . . Image Size . . . . . . . . . . . Number of Images Supported. . . . . . . . . . . . . . . . . . . . . . . . . . . . . . . . . . . . . . . . . . . . . . . . . . . . . . . . . . . . . . . . . . . . . . . . . . . . . . . . . . . . . . . . . . . . . . . . . . . . . . . . . . . . . . . . . . . . . . . . . . . . . . . . . . . . . . . . . . . . . . . . . . . . . . . . . . . . . . . . . . . . . . . . . . . . . . . . . . . . . . . . . . . . . . . . . . . . . . . . . . . . . . . . . 170 170 171 171 172 173 174 175 Support for Cascading Style Sheets Cascading Order . . . . . . . . . CSS2 Specifications . . . . . . . Syntax . . . . . . . . . . . . CSS Background Properties CSS Text Properties . . . . . Code Examples . . . . . . . . . . . . . . . . . . . . . . . . . . . . . . . . . . . . . . . . . . . . . . . . . . . . . . . . . . . . . . . . . . . . . . . . . . . . . . . . . . . . . . . . . . . . . . . . . . . . . . . . . . . . . . . . . . . . . . . . . . . . . . . . . . . . . . . . . . . . . . . . . . . . . . . . . . . . . . . . . . . . . . . . . . . . . . . . . . . . . . 175 176 182 182 183 183 184 Colors Specification . . . . . . . . . . . . . . . . . . . . . . . . . . . . . . . . . . Colors and Fonts . . . . . . . . . . . . . . . . . . . . . . . . . . . . . . . . . 195 195 Index . . . . . . . . . . . . . . . . . . . . . . . . . . . . . . . . . . . . . . . . . . . . . . . . . . . . . . . . 203 8 4600 Series IP Telephones Application Programmer Interface (API) Guide About This Guide About this Document This document describes how to set up two optional Avaya application interfaces, the Web browser and the Push interface. Both interfaces apply only to the following Avaya IP Telephones: ● 4610SW ● 4620/4620SW ● 4621SW ● 4622SW ● 4625SW This document applies to software Release 2.2 for the 4610SW, 4620/4620SW, 4621SW, and 4622SW IP Telephones, and to Release 2.5 for the 4625SW IP Telephone. This document covers only the behavior of the IP telephones specified. The performance and behavior of the application or application server(s) are not addressed. Note: Note: The 4625SW has a significantly different display than the other IP telephones, and supports the display of both color and JPEG images. Differences between the 4625SW and the other IP telephones are noted throughout this document. Intended Audience This document is intended for the application developers and System Administrators who develop or implement Web- or Push-based applications for Avaya IP Telephones. Chapter 4: Push Administration is intended for System Administrators who need to enable the Push interface and set up Subscription Server Addresses on the TFTP server. ! CAUTION: CAUTION: Avaya does not support many of the products mentioned in this document. Take care to ensure that there is adequate technical support available for the TFTP, DHCP, HTTP, LDAP, and Web servers. If the servers are not functioning correctly, the Avaya IP Telephones might not operate correctly. Issue 1 April 2005 9 About This Guide Document Organization This guide contains the following chapters: Chapter 1: IP Telephone Interfaces Describes the available Avaya IP Telephone interfaces. Chapter 2: Push Interface Overview Provides an overview of the Push technology. This chapter describes the Push Message Flow process with diagrams, and gives an overview of Push features as applicable to 4610SW, 4620/4620SW, 4621SW, 4622SW, and 4625SW IP Telephones. Chapter 3: Creating Push Messages Describes the message types that can be sent (pushed) to an IP telephone in detail, and provides setup requirements and examples. Chapter 4: Push Administration Covers Push security features and recommendations, and server setup. Chapter 5: Troubleshooting the Push Interface Describes messages received during Push interface setup or processing, and provides suggested resolutions. Chapter 6: About The Web Browser Provides a general overview of the Web browser and application setup. Chapter 7: Web Browser for 4610SW, 4620/4620SW, 4621SW, and 4622SW IP Telephones Provides information about creating and customizing Web sites for viewing on the 4610SW, 4620/4620SW, 4621SW, and 4622SW IP Telephones. Also describes the current capabilities and limitations of the Web browser. Chapter 8: Web Applications Provides information on administering an LDAP directory for the 4610SW, 4620/4620SW, 4621SW, 4622SW, and 4625SW IP Telephones. Chapter 9: Web Browser for the 4625SW IP Telephone Provides information about creating and customizing Web sites for viewing on the 4625SW IP Telephone. Also describes the current capabilities and limitations of the Web browser. 10 4600 Series IP Telephones Application Programmer Interface (API) Guide Issue Date Issue Date April, 2005 is the first issue of this document, which combines and replaces two previously-issued documents: ● Avaya IP Telephones Web Browser API (Document Number 16-300313) and ● Avaya IP Telephones Push Interface API (Document Number 16-300314). This issue also reflects updates for two 4600 IP Telephone Software Releases: ● Release 2.2 for the 4610SW, 4620/4620SW, 4621SW, and 4622SW IP Telephones, and ● Release 2.5 for the 4625SW IP Telephone. How to Use This Document This guide is organized to help you find topics in a logical manner. Read it from start to finish to get a thorough understanding of the interfaces or use the Table of Contents or Index to locate specific features. Terms Used in This Document Term Description ACM Avaya Communication Manager, previously known as MultiVantage. A member of a family of Avaya PBX’s providing advanced call features. Avaya IP Telephones register on or login to the ACM. AIM Access Key Input Mode. A new text entry mode that allows a user to access a particular URL by selecting a single dialpad key. Alerts An optional notification such as a series of ring pings to alert the user to an incoming Push Message. Card A WML card is similar to an HTML page, but WML delivers a set (deck) of closely related cards. The complete WML page comprises a collection of various cards, of which only one is visible on the browser at one time. As each of the cards is labeled by a name and ID, they can be linked together without difficulty. The WML card author determines the content of the card. The browser determines how this card will be displayed (rendered). 1 of 4 Issue 1 April 2005 11 About This Guide Term Description (continued) CAPP Cross-APEX Process Platform, the set of development processes used by most of the CES development organizations. CAPP is subject to ISO audits. CDATA Text, which can contain numeric or named character entities. CDATA, a DTD data type, is used only in attribute values. CSS2 Cascading Style Sheets Version 2. Deck A deck can be described as a stack of cards. When the browser downloads a WML page, it really is downloading a deck of cards but only one card in the deck is visible at a time. DTD Document Type Definition. The DTD defines the names and contents of all elements that permissible on a WML page, the order in which the elements must appear, the contents of all elements, attributes and default values. Elements Elements are the essential components that make up a single WML document. FLOW The flow type represents “card-level” information. In general, flow is used anywhere general markup can be included. Focus A unique adaptation of WML is the idea of focusing on a particular line on the screen. This is known as “focus.” Since the phone has no mouse to navigate around the screen, the Feature buttons that are located on the left side of the screen can be used to select a particular line on the display, or “to bring that line into focus.” Focusing on a line is used to select a line for text entry or to select a line that contains a link to another URL (card). Additionally, new titles can (not always) be presented to the user on the Top Line as each line on the screen is individually brought “into focus” (selected by pressing the Feature buttons). Frame The area in which the Web page is displayed. Full-Width Browser The Full-Width browser has with 12 linkable buttons, 6 on each side and no fixed navigation buttons. href The href attribute refers to either a relative or an absolute Uniform Resource Locator. HTML Hyper Text Markup Language is a text-based way of describing data for transmission over the Internet HTML is usually used with larger, color displays. HTTP Hyper Text Transfer Protocol, used to request and transmit pages on the World Wide Web. IP Internet Protocol – a suite of information exchanged message sets widely used for data transmission and increasingly used for the transmission of voice. Link The URI that is used to chain cards together. mode Push Priority type – normal or barge – to distinguish between emergency messages and ideal messages. NMTOKEN A name token, containing any mixture of name characters, as defined by the XML. 2 of 4 12 4600 Series IP Telephones Application Programmer Interface (API) Guide Terms Used in This Document Term Description (continued) PBX Private Branch Exchange – A generic name for a premise-based switch supporting telephony features owned by an enterprise. PCDATA Parsed CDATA. Text that can contain numeric or named character entities. This text can contain tags. PCDATA, a DTD data type, is used only in elements. Push Agent or PA The telephone software that is capable of receiving a Push Message from a server (Push Initiator). Push Initiator or Push Server A Web application that is capable of transmitting the Push Message to the Push Agent. Push Content (PC) A valid XML or a WML file that contains a <Response> tag as the root or a <WML> as the root. The file carries the actual information to be displayed or streamed on to an IP telephone. Push Message (PM) An XML message that contains a <Push> tag as the root. The Push Message uses a <go> tag to specify a URI to which the Push Agent can launch a request for Push Content. Push State When the telephone is in busy state such as an active phone call or user entering information in the Speed Dial Application. Registration The registration is a scheme of allowing an Avaya IP Telephone to authenticate itself with the Avaya Communication Manager. The Avaya Media Server switch supports registering and authenticating Avaya IP Telephones using the extension and password. RTP Audio An audio stream received from an application outside the context of a telephone call. The audio Push Message can be accompanied with an optional notification alert. Standard Browser The Standard Browser display has 6 linkable buttons on the left, plus 6 fixed navigation buttons on the right. The 4625SW IP Telephone supports both the Standard Browser and the Full-Width browser. Other IP telephones currently support the Standard Browser only. SUBSCRIBELIST The subscription list for potential pushed content contains zero or more fully qualified URLs, separated by commas without any intervening spaces, up to 255 ASCII characters, including commas. The default is “” (Null). Subscription Servers A server or a database that stores the information for a Push-enabled IP telephone such as IP Address, Extension, MAC Address, etc. Topline The topline is 18 pixels in height, including one black pixel at the bottom of the area, extending across the width of the display. The other 17 pixels of height are available for text, icons, etc. TPSLIST List of Trusted Push Servers, contains one or more domains and paths in DNS format, separated by commas without any intervening spaces, up to 255 ASCII characters, including commas. The default is “” (Null) Trusted Push Server (TPS) Application Server with a URI that conforms to the security settings as established by the TPSLIST parameter in the script file. The Trusted Push Server and the Push Initiator can be the same entity. 3 of 4 Issue 1 April 2005 13 About This Guide Term Description (continued) Type Type specifies a tag or attribute. User Agent Software that interprets WML, WMLscript, WTAI and other forms of codes. VDATA A DTD data type representing a string that can contain variable references. This type is only used in attribute values. W3C World Wide Web Consortium. WAP Wireless Application Protocol. An open global standard for wireless solutions that includes WML. WBMP WBMP is a bitmap graphic format that is required for the integration of graphics into WML pages. WML Wireless Markup Language is a subset of XML, used by Avaya IP Telephone’s Web browser to communicate with WML Servers. WML homedeck The WML start page, derived from Homepage. WML tags WML cards/deck are composed of a number of elements. Each element begins with a descriptive tag. Tags are indicated by a pair of angled brackets that start with the < character and end with the > character. The first element inside the angled brackets is the tag name. WMLscript A scripting language specifically designed for programming mobile devices. It is based on ECMAScript, but has been optimized for low bandwidth communication and limited processing power and memory. WTA Wireless Telephony Application(s). An extension of the WAE (Wireless Application Environment) that provides a set of interfaces to a mobile device’s telephony functionality. WTAI Wireless Telephony Application Interface is a set of interfaces that extend the WAE (Wireless Application Environment) to include telephony applications. x-Push-Status The Push Agent HTTP extension header. This extension is used by the Push Agent to send the Push Message status to the Push Initiator. XML eXtensible Markup Language. W3C's standard for Internet Markup Languages. WML is one of these languages. xml:lang The xml:lang attribute specifies the natural or formal language of an element or its attributes. This is a DTD term. 4 of 4 Conventions Used in This Document This guide uses the following textual, symbolic, and typographic conventions to help you interpret information. 14 4600 Series IP Telephones Application Programmer Interface (API) Guide Online Documentation Symbolic Conventions Note: Note: This symbol precedes additional information about a topic. ! CAUTION: CAUTION: This symbol is used to emphasize possible harm to software, possible loss of data, or possible service interruptions. Typographic Conventions This guide uses the following typographic conventions: Document Underlined type indicates a section or sub-section in this document containing additional information about a topic. “Document” Italic type enclosed in quotes indicates a reference to specific section or chapter of an external document. italics Italic type indicates the result of an action you take or a system response in step by step procedures. Conference In step by step procedures, words shown in bold represent a single telephone button that should be pressed/selected. message Words printed in this type are messages, prompts, code excerpts, code samples, and XML tags. Online Documentation The online documentation for this guide and related Avaya documentation is located at the following URL: http://www.avaya.com/support Issue 1 April 2005 15 About This Guide Related Documentation Avaya Documents ● 4600 Series IP Telephone LAN Administrator Guide (Document Number 555-233-507) This guide provides a description of Voice over IP, describes how to administer DHCP and TFTP servers, and how to set up Push parameters in the 46xxsettings.txt script file. ● 4600 Series IP Telephone WML Server Setup Guide (Document Number 16-300507) This guide provides information on setting up a Web server. Other Documents ● The Unicode Consortium, The Unicode Standard, Version 3.2, Addison Wesley, 2002 ● Extensible Markup Language (XML) 1.0 (Second Edition), W3C Recommendation 6 October 2000. IETF Documents The following documents provide information relevant to IP telephony and are available for free from the IETF Web site. ● IETF RFC 2616: http://www.ietf.org/rfc/rfc2616.txt?number=2616 ● IETF 1945: http://www.ietf.org/rfc/rfc1945.txt?number=1945 16 4600 Series IP Telephones Application Programmer Interface (API) Guide Chapter 1: IP Telephone Interfaces Overview Figure 1 shows a typical system-wide network diagram that includes Avaya IP Telephones, Avaya Communication Manager Servers, and application servers. The application servers include Push Servers, Subscription Servers, and a Web Application Server. Figure 1: Typical System-Wide Network Topolgy With this picture in the current context, enabling a Web server or an application server for a particular enterprise is not an additional entity. Issue 1 April 2005 17 IP Telephone Interfaces Example: ABC Company currently has an intranet Web server that serves the company’s intranet sites and other employee information. ABC has just deployed a company-wide Avaya IP Telephone system, which offers an optional Web browser application. To set up a Web server for the Avaya IP Telephones, ABC just has to add two MIME types to their existing intranet Web server. ABC does not require an additional server or entity to enable Web functionality on Avaya 4600 Series IP Telephones. Additionally, the same intranet server can be a Push Application server or a Trusted Push Server. Similarly, a subscription server can also be resident on ABC’s existing intranet server. Note: Note: For more information on setting up MIME types or setting up a Web server, see the WML Server Setup Guide (Document Number16-300507), available for download at: http://www.avaya.com/support. Existing Interfaces Avaya IP Telephones accept the interfaces shown in Figure 2. Figure 2: Avaya IP Telephone Interfaces 18 4600 Series IP Telephones Application Programmer Interface (API) Guide Existing Interfaces TAPI: This is a Telephony Application Programmer’s Interface. TAPI is primarily used for call control applications such as NetMeeting or IP Softphone. This type of interface is not covered in this guide. Push does not require this type of interface. irDA: This is an infrared interface. Users can dial telephone numbers using the IR port from other IR devices such as PDAs. This type of interface is not covered in this guide. Push does not require this type of interface. Web: This is a Web browser Interface. Users can navigate Web applications and retrieve information about the company, news, or interactive applications such as a conference room scheduler and Company Directory lookup. For detailed information about the Web interface see: ● Chapter 6: About The Web Browser, ● Chapter 7: Web Browser for 4610SW, 4620/4620SW, 4621SW, and 4622SW IP Telephones, ● Chapter 8: Web Applications, and ● Chapter 9: Web Browser for the 4625SW IP Telephone Push: This interface allows an application to spontaneously Push Message to an IP telephone’s display without involving the user. See Chapter 2: Push Interface Overview, Chapter 3: Creating Push Messages, Chapter 4: Push Administration, and Chapter 5: Troubleshooting the Push Interface for information about the Push interface. Issue 1 April 2005 19 IP Telephone Interfaces 20 4600 Series IP Telephones Application Programmer Interface (API) Guide Chapter 2: Push Interface Overview Introduction Push is the ability for an application to send content to the Web browser, to the topline of the display, or to the audio transducers of 4610SW, 4620/4620SW, 4621SW, 4622SW, and 4625SW IP Telephones. The Push interface was introduced in the 4600 Series IP Telephones’ Release 2.1 software. Before that release, external applications interfaced with the IP telephone using the Web browser. The Web browser interface requires users to “Pull” the data from an application, for example, a user has to click a particular link or page to access the information. With the Push interface, the application can spontaneously “push” the information to the telephone without the user having to click a link. Some uses of the Push interface can be: ● Broadcasting company news ● Sending meeting reminders with conference bridge numbers, so that users don’t have to search for the conference number ● Streaming music, such as wake-up alarms in hotel rooms ● Streaming audio announcements ● Sending critical stock news information ● Broadcasting critical weather alerts ● Building intelligent databases to target information to an individual or groups of phones This chapter provides an overview of the Push interface. Chapter 3: Creating Push Messages and Chapter 4: Push Administration provide detailed information on setting up and initiating Push Messages. Issue 1 April 2005 21 Push Interface Overview Push Feature Description The Push interface offers several features: ● Full screen pushes, called Display push types ● Single line top area text push, called Topline push types ● Audio streaming, called Audio push types ● Optional alerts ● Push priorities ● A Security mechanism ● A Subscription service A message can be pushed to a properly configured Avaya IP Telephone as a single text line, a full screen, or an audio stream. Avaya provides a security mechanism to assure that the content pushed to the phones is from a trusted source. Additionally, a subscription service allows the phones to provide necessary information to the application server such that pushes can be targeted to the individual user, a group of users, or to the enterprise. Push Messages have two priorities set by the application and can also be accompanied by an optional notification alert. Push Architecture The Push Flow Process The Push interface uses the following terminology: ● Push Initiator: An application capable of transmitting the Push Message to the Push Agent. ● Push Agent: The telephone software resident on the Avaya IP Telephone that is capable of receiving the Push Message from the Push Initiator. The Push Agent processes the Push Message and requests the Push Content. ● Trusted Push Server (TPS): A Web server serving the Push Content that conforms to the security settings as established by the TPSLIST parameter in the script file. This can also be an existing Web server within the network, or the same server as the Push Initiator. 22 4600 Series IP Telephones Application Programmer Interface (API) Guide Push Architecture The Push/Pull Process – A Two-Step View The Push framework is a two-step process - a “push” operation followed by a “pull” operation. See Figure 3 for a visual reference to the steps involved in the Push/Pull process. Push operation (Step 1a and Step 1b) The Push Initiator (PI), which is an application server, transmits a Push Message using the HTTP “POST” method to the phone’s Push Agent (PA). Figure 3: Push/Pull Operation Pull operation (Step 2a and Step 2b) The phone requests the target URI of the Push Content from a Trusted Push Server. The Push Content can be any valid WML file or an XML file with tags that instruct the endpoint to do one or more of the following: ● Set up an RTP audio stream, ● Display a message on the topline, ● Display a full screen message with images and links, or ● Re-subscribe with the subscription server. Issue 1 April 2005 23 Push Interface Overview Push Message Flow This section describes the step-by-step process to send a particular Push Message to an Avaya IP Telephone.Figure 4 illustrates this process. Step 1 - XML File Push Message Sent The first step of the Push process is to POST a Push Message to the telephone’s Push Agent. The Push Message can only be sent using the HTTP POST method. The message contains an XML file with the <Push> tag and instructions for the telephone’s Push Agent to request the Push Content from a Trusted Push Server. Note: Note: For more information on creating Push Messages, see Chapter 3: Creating Push Messages. Step 2 – Push Agent Responds The Push Agent sends a response back to the Push Initiator with HTTP status codes. The response also contains an HTTP header extension called “x-Avaya-Push-Status” code. The x-Avaya-Push-Status indicates the outcome of a push request back to the Push Initiator. x-Avaya-Push-Status codes respond with errors such as Forbidden, Not in Push state, etc. Note: Note: See Chapter 3: Creating Push Messages for more information on x-Avaya-Push-Status codes. Step 3 – XML Message Parsing The XML parser parses the Push Message and verifies that the Push Content URL is a Trusted Push Server. If the URL is not a Trusted Push Server, an HTTP 403 - Forbidden error message is sent back to the Push Initiator using Step 2 mechanisms. 24 4600 Series IP Telephones Application Programmer Interface (API) Guide Push Architecture Figure 4: Push Flow Step 4 – Request Launched Once the URL is verified as a Trusted Push Server, the Push Agent launches a request for the URL that is embedded in the <go> tag of the Push Message. Step 5 – Push Content Server Responds The Trusted Push Server sends a response back to the telephone with the proper Push Content. The Push Content consists of an XML file or a WML file, based on the Push type. This file is parsed by the XML Parser and the Push Content is extracted and prepared for display. Step 6 – Message Sent to Telephone Once the telephone’s XML parser parses the XML file, depending on the Push type, the telephone either displays or streams the message. Issue 1 April 2005 25 Push Interface Overview About the Push Agent The 4600 Series IP Telephones (4610SW, 4620/4620SW, 4621SW, 4622SW, and 4625SW) provide an HTTP server in addition to the HTTP client. This allows an application server to “push” a request for: ● The Web browser to get and display a particular Web page. ● The phone’s topline application to display a topline message. ● The phone to receive an audio stream from an application outside the context of a telephone call. HTTP Server functionality is based on (or is provided by) the GoAhead Web Server 2.1, Copyright© 2004 GoAhead Software, Inc. All Rights Reserved. HTTP Server Note: Note: The Push Agent will activate the receive port 80 for the HTTP server if the phone is properly registered with a call server and if the TPSLIST contains at least one non-null value. Avaya IP Telephones support an HTTP server as specified in the IETF Documents listed in Related Documentation for HTTP 1.0 and for an HTTP client. The HTTP server uses TCP as a transport-layer protocol, and supports only one connection (socket) at a time. The HTTP client uses TCP as a transport-layer protocol. Note: Note: The Push Agent only listens to port 80 for all incoming requests. 26 4600 Series IP Telephones Application Programmer Interface (API) Guide Push Agent - HTTP POST Address Push Agent - HTTP POST Address The HTTP POST address (URL) for the IP telephone where a Push request is sent to is: http://<IP_Address_of_the_telephone>/forms/push Where, <IP_Address_of_the_telephone> is the IP Address of the telephone where the push is to be sent in the dotted-decimal format. The Push Agent will process all POST methods received by the phone’s HTTP server that contain the above URL. All HTTP POST requests must be sent to this URL only. All XML messages are sent in the HTTP POST pre-defined variable called “XMLData.” A 403 Forbidden error message is sent in response to a POST with an invalid Request-URI. Push Types The 4610SW, 4620/4620SW, 4621SW, 4622SW, and 4625SW IP Telephones support the Push types described in this section. Display push type - Content can be pushed to the Web browser with an optional alert. The pushed page can access all Web browser features. See The Display Push Type on page 29 for more information about this type of push. Figure 5: Full Screen (Display) Push Issue 1 April 2005 27 Push Interface Overview Topline push type - Text can be pushed to the topline with an optional alert. Topline pushed messages and alerts can be displayed even when the Web browser is not in focus. For more information on a Topline push, see The Topline Push Type on page 37. Figure 6: Topline Push Topline Push Audio push type - The phone can receive an audio stream from an application outside the context of a telephone call. The Audio Push Message can be accompanied with an optional alert. For more information on Audio push, see The Audio Push Type on page 46. Subscribe push type - The Push Subscription Service allows the phones to re-subscribe to the subscription application server with the phone’s IP Address, user’s extension, Set ID and MAC ID. For more information on the Subscribe push, see The Subscribe Push Type on page 54 and Chapter 4: Push Administration on page 59. All Push types can be delivered either with a Normal priority or with a Barge priority on an individual push basis. See the sections on each Push type in Chapter 3: Creating Push Messages for more information on priorities and states. 28 4600 Series IP Telephones Application Programmer Interface (API) Guide Chapter 3: Creating Push Messages Introduction This chapter covers the details involved in setting up Push Messages for each type of Push: ● Display (full screen) Push ● Topline (single line) Push ● Audio Push ● Subscribe Push The Display Push Type The Display push type is a full-screen Push. Details about this type of push are provided in the sections that follow. Web Browser Features When using the Display push type, you can use the entire range of features of a 4610SW, 4620/ 4620SW, 4621SW, 4622SW, and 4625SW IP Telephone’s Web browser. Some of these features are: ● WBMP Images. ● Form controls such as Radio buttons, check boxes, etc. ● Input elements such as text boxes. ● Hyperlinks to a series of other pages with information. ● WTAI features such as click-to-dial and add-to-speed dial. ● Full use of 16 programmable soft keys. ● Capability to push an entire thin-client Web application. Issue 1 April 2005 29 Creating Push Messages Alerts A Display Push Message can be sent using alerts. Alerts are a number of ring pings sounded just prior to displaying the message on the screen. With the Display push type, an alert can be sounded with 1, 2, or 3 ring pings. If the alert attribute is not associated with the <Push> tag, then no alerts are sounded. Alternatively, if the alert attribute is set to “0” no alerts sound. Display Push Example 1: Following is an example of the Display push type. Assume that the Push Message (screen) in Figure 7 will be sent to a telephone in a hotel. Figure 7: Hotel Application Example Priorities and States Display Push Content is sent with one of two priorities: normal or barge. Normal priority push conditions are specified first, followed by barge priority push conditions. Pushable vs. Non-Pushable States The following are non-pushable states for Display pushes to an IP telephone: ● When the user is in text entry mode on a Web text entry screen or Speed Dial text entry screen (for normal priority only). ● When the telephone is in the process of restoring a retrieved backup file. ● When a Local Procedure has been initiated. If a phone is not in one of the above states, it is considered to be in a pushable state, meaning the telephone will accept a pushed message. 30 4600 Series IP Telephones Application Programmer Interface (API) Guide The Display Push Type Successful Push Response If the phone is in a pushable state, the Push Agent sends the Push Initiator the following response for all Push request modes and all Push request types: Parameter Status Code Response HTTP Status Code 200 “OK” x-Push-Status 200 “Push Message Accepted” Normal Priority When the mode attribute in the <Push> tag is set to normal, the telephone state for the Display push type is as follows: ● When the telephone is in any of the non-pushable states, the screen currently displayed continues to be displayed (i.e., the Display push is rejected). ● If the telephone is in the pushable state, the telephone accepts the Push Message and generates appropriate notification tone(s). A normal push is accepted when the telephone is in text edit mode in applications other than the Web. If a non-Web application, such as Speed Dial, is in text-edit mode, then x-Push-Status 204 “Not in Push State: Push Accepted” is sent: Parameter Status Code Reason Phrase HTTP Status Code 200 “OK” x-Push-Status 204 “Not in Push State: Push Accepted” Use Case Scenario: Q. What happens when a user is editing or adding an entry on the Speed Dial screen and a normal priority Display push Message is sent? A. If an alert is associated with this message, then the alert sounds first. The pushed content is loaded in the background. The message is not displayed until the user elects to view it by clicking the Web tab to launch the Web browser. Issue 1 April 2005 31 Creating Push Messages If the Web is in “text edit mode” a subsequent normal push is rejected and x-Push-Status 205 “Not in Push State: Push Aborted” is sent. The Push Request does not proceed. Parameter Status Code Reason Phrase HTTP Status Code 200 “OK” x-Push-Status 205 “Not in Push State: Push Aborted” Note: If a normal Display push is denied, then the entire Display push is denied, including the Web page’s title. Hence, the application writer might choose to send two pushes - a Topline push, followed by a Display push. Sending two messages maximizes the chance of the user viewing at least one message. Note: Barge Priority When the mode attribute in the <Push> tag is set to barge, the Display Push Content is accepted as a priority message, with two exceptions. A barge Display push is rejected only when the telephone is in either of these non-pushable states: ● When the telephone is in the process of restoring a retrieved backup file, or ● When a Local Procedure has been initiated. See the 4600 Series IP Telephone LAN Administrator Guide on the http://www.avaya.com/support Web site for more details on Local maintenance procedures. In either non-pushable state, the barge content, including any notification tones is discarded. In all other cases, the telephone must accept the barge request. Use Case Scenario: Q. What happens when a user is editing or adding an entry on the Speed Dial screen and a barge priority Display push message is sent? A. If an alert is associated with this message, then the alert will first sound. Then the pushed message displays immediately. The user can leave the displayed Web page normally by pressing the telephone’s Phone/Exit button. When receiving Push Content with a barge priority, the state of the telephone is as if the user had selected the Web Access tab on the Phone Screen. For example, any incomplete task, such as FTP Setup, is considered as having been interrupted. Additionally, the user can leave the displayed Web page normally by pressing the Phone/Exit button. 32 4600 Series IP Telephones Application Programmer Interface (API) Guide The Display Push Type Display Push XML Messages This section describes how to send a Display push using XML messages. Display Push Message (PM) To send a Display push, an application must send an HTTP POST request to the Push Agent in the telephone. The format of the XML Message (PM) sent from the Push Initiator to the Push Agent is as follows: <?xml version="1.0"?> <Push alert=“0|1|2|3” type=“display” mode=“normal|barge” > <go href=“http://trusted_push_server/filename.wml” method=“get|post”> <postfield name=“name1” value=“value1”/> <postfield name=“name2” value=“value2”/> </go> </Push> Issue 1 April 2005 33 Creating Push Messages Using the <postfield> Tag The IP telephones’ Web browser interface supports the <postfield> tag. The <postfield> tag allows an application to set a name/value pair that can be sent to the source of the request. The name is set by the name attribute and must be a valid WML variable name. The value is set by the value attribute. A <go> element can contain one or more <postfield> tags. Postfield tags must be sent if HTTP POST method is used. Note: Note: For more information on the <postfield> tag, see Chapter 7: Web Browser for 4610SW, 4620/4620SW, 4621SW, and 4622SW IP Telephones and Chapter 8: Web Applications. Table 1: Description of Elements and Attributes used in the Display Push XML Message Element or Tag Attribute <Push> Description Each Push Message must contain one valid root <Push> tag. alert=0|1|2|3 Optional notification alerts – number of ring pings. type Push Content = display. mode normal or barge priority. <go href=…/> A fully qualified URL - to a valid WML file for Display pushes. Cannot exceed 1024 characters. method HTTP get or post methods for Push Content. 34 4600 Series IP Telephones Application Programmer Interface (API) Guide The Display Push Type Display Push Example 2: Using our previous hotel example, the hotel is ready to serve lunch and wants to send the lunch menu directly to each room’s telephone display screen, including sounding an alert to get the guest’s attention. The XML payload sent as part of the Push Message is as follows: <!– Following is the XML Push Request Message sent as a POST request embedded as part of form data --> XMLData = <?xml version="1.0"?> <Push alert=“2” type=“display” mode=“normal”> <go href=“http://trusted_push_server/lunch_menu.wml” </go> method=“get”> </Push> <!– The above message is part of the form data (XMLData) being sent in Step 1 request --> Push Agent Once a Push Message is received from the Push Initiator, the Push Agent first parses the XML file for validation and tags mismatch errors. Then the Push Agent verifies that the URL in the <go> tag is part of the Trusted Push Servers. Then the Push Agent requests the Push Content from the Trusted Push Server using the URL. Note: Note: For more information on Trusted Push Servers, see Chapter 4: Push Administration. Issue 1 April 2005 35 Creating Push Messages Push Content (PC) The Display push type’s Push Content has to be a WML file. This WML file can contain any of the Web browser elements and features. See Chapter 7: Web Browser for 4610SW, 4620/ 4620SW, 4621SW, and 4622SW IP Telephones and Chapter 8: Web Applications for more details on elements and tags the Avaya IP Telephones support. The outline of the “lunch_menu.wml” file (PC) from the Hotel example is as follows: <!– Server Sends Response – Push Content (PC) - File in the <Push…<go href Url> --> <?xml version="1.0"?> <wml> <card id=”lunch” title=”Lunch Menu”> <p> <select name=”selection” multiple=”true”> <option value=”cheeseburger”>Cheeseburger w/fries</option> <option value=”pizza”>Pizza</option> <option value=”sub”>Sub</option> <option value=”salad”>Chicken Caesar Salad</option> </select> <a href=”wtai://wp/mc;5551212”>Call Concierge</a> </p> <do type=”accept” name=”submit” label=”Submit”> <go href=”submit_form.php” method=”get”/> </do> <do type=”prev” label=”Back”> <prev/> </do> <do type=”accept” name=”home” label=”Home”> <go href=”home.wml”/> </do> <do type=”accept” name=”help” label=”Help”> <go href=”help.wml”/> </do> </card> </wml> 36 4600 Series IP Telephones Application Programmer Interface (API) Guide The Topline Push Type The IP telephone’s XML parser parses the WML file. Depending on the priorities and state of the telephone, the Push Content displays as shown in Figure 8, with an alert of two ring pings. Figure 8: Hotel Lunch Menu Display Note: Invalid WML Display push error messages are not displayed to the user. Note: The Topline Push Type Use the Topline push when you only need to send a single-line text message. Text Message Features Some of the Topline push features are: ● A single-line, alternating text message. ● Message displays, even if Web browser is not in focus. ● Supports UTF-8[1], ISO-888991[1], and Latin1[1] character encodings. Issue 1 April 2005 37 Creating Push Messages Alerts A Topline Push Message can be sent with alerts. Alerts are number of ring pings sounded just prior to displaying the message on the screen. For a Topline push type, an alert can be sounded with 1, 2, or 3 ring pings. If the alert attribute is not associated with the <Push> tag, then no alerts are sounded. Alternatively, if the alert attribute is set to “0” no alerts sound. Topline Push Example 1: The following Stock Alert Topline Push Message is sent to a telephone to alert the user when a stock, AV in this example, reaches $15 price target. Figure 9 shows the pushed message that displays. Figure 9: Stock Alert Example Topline Push 38 4600 Series IP Telephones Application Programmer Interface (API) Guide The Topline Push Type Priorities and States Topline Push Content is sent with one of two priorities: normal or barge. Normal priority push conditions are specified first, followed by barge priority push conditions. Pushable vs. Non-Pushable States The following are non-pushable states for Topline pushes to an IP telephone: ● When the telephone is in the process of restoring a retrieved backup file ● When a Local Procedure has been initiated. See the 4600 Series LAN Administrator Guide on the http://www.avaya.com/support Web site for more details on Local maintenance procedures ● When the telephone is in any text entry mode (for normal priority) ● When any Call Appearance is in the Alerting (for normal priority) ● When the telephone is in Soft-Hold call state (for normal priority) If a phone is not in one of the above states, it is considered to be in a pushable state, meaning the telephone will accept a Pushed Message. Successful Push Response If the phone is in a pushable state, the Push Agent sends the Push Initiator the following response for all Push request modes and all Push request types: Parameter Status Code Reason Phrase HTTP Status Code 200 “OK” x-Push-Status 200 “Push Message Accepted” Issue 1 April 2005 39 Creating Push Messages Normal Priority When the mode attribute in the <Push> tag is set to normal, the telephone state for the Topline push type is as follows: ● If the Topline is being used for system messages such as application help messages, then the text string is buffered until the higher-priority message is complete. ● If the phone is in a non-pushable state, meaning the Push Message cannot be displayed on the top display line, the Push Agent sends the Push Initiator the following responses for a normal priority Topline push request. The Push request does not proceed to request Push Content. Parameter Status Code Reason Phrase HTTP Status Code 200 “OK” x-Push-Status 205 “Not In Push State: Push Aborted” If a text string is pushed while the top display line is displaying an earlier pushed text string, then the new text string replaces the previous one as a normal priority. Note: The expiration time on all pushed text strings is 30 seconds. All Topline messages are discarded after 30 seconds. Note: Barge Priority When the mode attribute in the <Push> tag is set to barge, the Topline Push Content is accepted as a priority message. However, a barge Topline push is rejected when the telephone is in one of these non-pushable states: ● When the telephone is in the process of restoring a retrieved backup file, or ● When a Local Procedure has been initiated. See the 4600 Series IP Telephone LAN Administrator Guide on the Avaya support Web site for more details on Local maintenance procedures. In either non-pushable state, the barge content, including any notification tones, is discarded. In all other cases, the telephone must accept the barge request and display the barge Topline message immediately. 40 4600 Series IP Telephones Application Programmer Interface (API) Guide The Topline Push Type Topline Push XML Messages This section describes how to send a Topline push with XML messages. Use the Stock Alert Example in Figure 9 as a reference. Topline Push Message (PM) The first step in sending a Topline push is to send an HTTP POST request from the Push Initiator to the telephone’s Push Agent. The XML Message (PM) sent from the Push Initiator to the Push Agent is as follows: <?xml version="1.0"?> <Push alert=“0|1|2|3” type=“topline” mode=“normal|barge” > <go href=“http://trusted_push_server/filename.xml” method=“get|post”> <postfield name=“name1” value=“value1”/> <postfield name=“name2” value=“value2”/> </go> </Push> Issue 1 April 2005 41 Creating Push Messages Using the <postfield> Tag The IP telephones’ Web browser interface supports the <postfield> tag. The <postfield> tag allows an application to set a name/value pair that can be sent to the source of the request. The name is set by the name attribute and must be a valid WML variable name. The value is set by the value attribute. A <go> element can contain one or more <postfield> tags. Postfield tags must be sent if HTTP POST method is used. Note: Note: For more information on the <postfield> tag, see Chapter 7: Web Browser for 4610SW, 4620/4620SW, 4621SW, and 4622SW IP Telephones. Table 2: Description of Elements and Attributes used in the Topline Push XML Message Element or Tag Attribute <Push> Description Each Push Message must contain one valid root <Push> tag. alert=0|1|2|3 Optional notification alerts – number of ring pings. type Push Content = topline. mode normal or barge priority. <go href=…/> A fully qualified URL - to a valid XML Push Content file for Topline pushes. Cannot exceed 1024 characters. method HTTP get or post methods. 42 4600 Series IP Telephones Application Programmer Interface (API) Guide The Topline Push Type Topline Push Example 2: Using our previous stock alert example, the price of the AV is reaching the $15 price target. Now, the stock broker’s telephone display shows: Figure 10: Telephone Display Prior to Receiving Stock Alert Message The code excerpt associated with the Stock Alert example to be sent as part of the Push Message is as follows: <!– Following is the XML Push Request Message sent as a POST request embedded as part of form data --> XMLData = <?xml version="1.0"?> <Push alert=“3” type=“topline” mode=“normal”> <go href=“http://trusted_push_server/stock_alert.xml” method=“get”> </go> </Push> <!– The above message is part of the form data (XMLData) being sent in Step 1 request --> Issue 1 April 2005 43 Creating Push Messages Push Agent Once a Push Message is received from the Push Initiator, the Push Agent first parses the XML file for validation and tag mismatch errors. Then the Push Agent verifies that the URL in the <go> tag is part of the Trusted Push Servers. Note: Note: For more information on Trusted Push Servers, see Chapter 4: Push Administration. Then the Push Agent requests the Push Content from the Trusted Push Server using the URL. Topline Push Content (PC) The Topline push type’s Push Content has to be an XML file. The following is the code excerpt associated with the Stock Alert Topline Push Example 2: to be sent as part of the Push Content: <!– Server Sends Response – Push Content (PC) - File in the <Push…<go href Url> --> <?xml version="1.0"?> <Response> <Topline> Stock Alert: AV @ $15 </Topline> </Response> Using the <Response> tag The <Response> tag for the Topline push type must be the root element in the (PC) XML file. 44 4600 Series IP Telephones Application Programmer Interface (API) Guide The Topline Push Type Using the <Topline> tag The <Topline> tag consists of the actual text message to display on the telephone’s Top Line. If the length of the message exceeds the given pixels, the entire message is divided. The message then fits on a single line, with the initial text and the remaining text alternating on the top display line. The Topline message can only be 56 characters long. If the text is longer than 56 characters, all characters beyond the 56th are ignored and not displayed. The text within the <Topline> tag can consist of different character encodings such as UTF-8, ISO-888991, and Latin1. See the IETF Documents listed under Related Documentation for information on character encoding. The telephone’s XML parser parses the XML file. Depending on the priorities and state of the telephone, the Push Content displays as shown in Figure 11 with an alert ring ping of 3. Figure 11: Stock Alert Message Phone screen before the Topline Push Phone screen after the Topline Push Issue 1 April 2005 45 Creating Push Messages The Audio Push Type Use an Audio push when you need to stream a particular audio message to the telephone. The Audio push is the ability to transmit RTP streams to the endpoint. This Push type provides additional capabilities such as start and stop to control audio streams. The RTP stream can also notify the phone that a stream has ended. To the user, the telephone’s handling of pushed audio content mirrors the telephone’s handling of a call. The user can switch between Speaker, Handset, and Headset as desired, adjust volume, and view LED states as with a call. The user can terminate the pushed audio stream by taking one of the following actions: ● By going on-hook, for example, picking up the handset or activating the headset, ● By pressing the telephone’s Speaker button, ● By pressing the telephone’s Drop button, or ● By selecting a Call Appearance button. While the telephone is playing back pushed audio content, the call server can independently send messages that require the telephone to generate tones, for example, alert the user to an incoming call. The Volume Up and Volume Down buttons work normally if the user presses them while listening to pushed audio content. Audio Push Features The Audio push type provides the following features: ● Telephone connection to an incoming RTP stream ● A “pure” stream, not a telephone call ● Temporarily replacement of the active stream ● Audible alerts ● A built-in timer to display the stream for given period of time Alerts An Audio Push Message can be sent with accompanying alerts. Alerts are a number of ring pings sounded just prior to displaying the message on the screen. With an Audio push type, an alert can be sounded with 1, 2, or 3 ring pings. If the alert attribute is not associated with the <Push> tag, then no alerts are sounded. Alternatively, if the alert attribute is set to “0” no alerts sound. 46 4600 Series IP Telephones Application Programmer Interface (API) Guide The Audio Push Type Audio Push Example: An Audio push example could be a hotel wake-up message a guest schedules from the room. The guest can schedule the alarm directly from an existing Web application loaded to the IP telephone. The next morning, the application sounds the alarm using RTP streaming directly to the telephone. As an added touch, a concurrent Display push can send the Hotel Breakfast menu so customer can order breakfast directly from the telephone. Priorities and States Audio Push Content is sent with one of two priorities: normal or barge. Normal priority push conditions are specified first, followed by barge priority push conditions. Pushable vs. Non-Pushable States The following are non-pushable states for an IP telephone with the Audio push type. ● Any Call Appearance is alerting. For example, the user is adjusting volume settings or the telephone is alerting the user to an incoming call. ● Any active Call Appearance, meaning the user is on a call. ● The telephone is restoring a retrieved backup file. ● When a Local Procedure has been initiated. See the 4600 Series LAN Administrator Guide on the http://www.avaya.com/support Web site for more details on Local maintenance procedures. ● The telephone is already broadcasting pushed audio content If a phone is not in one of the above states, it is considered to be in a pushable state, meaning the telephone will accept a Pushed Message. Successful Push Response If the phone is in a pushable state, the Push Agent sends the Push Initiator the following response for all Push request modes and all Push request types: Parameter Status Code Reason Phrase HTTP Status Code 200 “OK” x-Push-Status 200 “Push Message Accepted” Issue 1 April 2005 47 Creating Push Messages Normal Priority When the mode attribute in the <Push> tag is set to normal, the telephone state for the Audio push type must be pushable. If the telephone is in the pushable state, then the telephone accepts the Audio push and broadcasts the pushed audio stream through the Speaker. Once the pushed audio stream is transmitted to the user, the user can redirect it, terminate it, etc. An Audio push with a normal priority will not stream if the phone is in a non-pushable state. When the telephone is in a non-pushable state, any current audio activity continues without interruption or user notification and the Audio push stream is rejected. Error message 208 is sent and the Push Request does not proceed. Parameter Status Code Reason Phrase HTTP Status Code 200 “OK” x-Push-Status 208 “Not in Audio Push State: Push Aborted” Barge Priority When the mode attribute in the <Push> tag is set to barge, the Audio Push Content is accepted as a priority message. However, a barge Audio push is rejected when the telephone is in one of these non-pushable states: ● When the telephone is in the process of restoring a retrieved backup file, ● When a Local Procedure has been initiated (Refer to the “LAN Administrator Guide” on support.avaya.com Web site for more details on Local maintenance procedures). In either non-pushable case, the barge audio content, including any notification tones, is discarded and the RTP socket is closed. In all other cases the telephone accepts the barge audio request regardless of any user activity. Use Case Scenario: Q. What happens when a user is on the call and a barge Audio Push Message is sent? A. If a user is on the call and a barge Audio Push Message is sent, the current active call is placed on Hold, and the audio is streamed immediately. If the call is still on Hold when the pushed audio stream ends, the user can select the appropriate Call Appearance button to continue the original call. Note that the far-end party does not get any indication that the current call is being placed on hold. 48 4600 Series IP Telephones Application Programmer Interface (API) Guide The Audio Push Type Audio Push XML Messages This section describes how to send an Audio push with XML messages. Audio Push Message (PM) The first step in sending an Audio push is to send an HTTP POST request from the Push Initiator to the telephone’s Push Agent. Following is the XML Message (PM) format sent from the Push Initiator to the Push Agent: <?xml version="1.0"?> <Push alert=“0|1|2|3” type=“audio” mode=“normal|barge” > <go href=“http://trusted_push_server/filename.xml” <postfield name=“name1” value=“value1”/> <postfield name=“name2” value=“value2”/> method=“get|post”> </go> </Push> Using the <postfield> Tag The IP telephones’ Web browser interface supports the <postfield> tag. The <postfield> tag allows an application to set a name/value pair that can be sent to the source of the request. The name is set by the name attribute and must be a valid WML variable name. The value is set by the value attribute. A <go> element can contain one or more <postfield> tags. Postfield tags must be sent if the HTTP POST method is used. Note: Note: For more information on the <postfield> tag, see Chapter 7: Web Browser for 4610SW, 4620/4620SW, 4621SW, and 4622SW IP Telephones. Issue 1 April 2005 49 Creating Push Messages Table 3: Description of Elements and Attributes used in the Audio Push XML Message: Element or Tag Attribute Description <Push> Each Push Message must contain one valid root <Push> tag. alert=0|1|2|3 Optional notification alerts – number of ring pings. type Push Content = audio. mode normal or barge priority. <go href=…/> A fully qualified URL - to a valid XML file for Audio push Content. Cannot exceed 1024 characters. method HTTP get or post methods. RTP Port An RTP port is needed to stream audio to the telephone. The Push Agent sends the port information to the Trusted Push Server in the GET string. The GET string contains the variable “rtpLPort”, the telephone’s local port to be used for audio streaming. The Push Agent responds to the server with: Push Message Type Syntax “audio” GET|POST http://server_IP_address?rtpLPort=xxxx The RTP Local port information sent by the Push Agent to the Push Initiator from the GET request is as follows: Note: GET Parameter Description rtpLPort RTP Local port that will be used for streaming. Note: The rtpLPort is generated dynamically and might be different for every new Audio Stream Push session. The telephone will play the audio stream only on this specified port. 50 4600 Series IP Telephones Application Programmer Interface (API) Guide The Audio Push Type The code excerpt associated with Audio Push Example: (the hotel wake-up message), which will be sent as part of the Push Message, is as follows: <!– Following is the XML Push Request Message sent as a POST request embedded as part of form data --> XMLData = <?xml version="1.0"?> <Push alert=“3” type=“audio” mode=“barge”> <go href=“http://trusted_push_server/wake_up.xml” method=“get”> </go> </Push> <!– The above message is part of the form data (XMLData) being sent in Step 1 request --> Push Agent Once a Push Message is received from the Push Initiator, the Push Agent first parses the XML file for validation and tag mismatch errors. Then the Push Agent verifies that the URL in the <go> tag is part of the Trusted Push Servers. Then the Push Agent requests the Push Content from the Trusted Push Server using the URL. Note: Note: For more information on Trusted Push Servers, see Security on page 59. Audio Push Content (PC) A special XML file for RTP streaming must initiate Audio push. <?xml version="1.0"?> <Response> <Audio packetsize=”10|20|30|40|50|60” codec = “PCMU | PCMA” > <AudioTimer value="30"/> <Url href=”RTPRx://rtpserver_ip_address:rtpLPort”> </Audio> </Response> Issue 1 April 2005 51 Creating Push Messages Each <Response> can contain only one <Audio> tag with the following attributes: Attribute Value Description codec PCMU | PCMA Silence suppression on. G.711 Annex A (no CID frames) µ-law | A-law Default is PCMU. packetsize 10|20|30|40|50|60 (milliseconds) Default is 40 milliseconds. Each <Audio> tag can contain <AudioTimer> and <Url> tags. The <AudioTimer> tag is used as an inter-packet timer. This timer is set every time a packet is received. After an administrable duration where no packets are received the RTP stream is terminated. This tag has the following attributes: Attribute Value Description value X (seconds) Default is 20 seconds. The range is 5 to 30 seconds. Each <Url> tag consists of information for the RTP streaming server and the local receive port of the telephone. The <Url> tag has the following attributes: Attribute Value Description href string RTP Streaming URI Format. RTP Streaming URI Format IP Address Port RTPRx denotes “Receive” by the phone rtpserver_ip_address is the IP Address of the RTP streaming server. Port Number separated by a colon. This is the receive port number or rtpLPort value from the GET request. The following reserved URIs can be used in the href attribute to control an audio stream: Reserved URIs Description RTPRx://STOP Can be used to stop an audio streaming on the receive end. To be successful, all Push requests that result in sending the RTPRx://STOP must have a barge priority. 52 4600 Series IP Telephones Application Programmer Interface (API) Guide The Audio Push Type Note: Note: For example, if an audio stream originator wanted to explicitly stop an audio stream the following would be sent in new Push Content: <!– Following is the XML Push Request Message sent as a POST request embedded as part of form data --> XMLData = <?xml version="1.0"?> <Push type=“audio” mode=“barge”> <go href=“http://trusted_push_server/stop_audio.xml” method=“get”> </go> </Push> <!–The message below is from the Push Content file called “stop_audio.xml” from above go href URI --> <?xml version="1.0"?> <Response> <Audio> <Url href=”RTPRx://STOP”> </Audio> < </Response> Audio quality depends on the streaming source providing the audio at an appropriate pace. The pace depends on the packet size. If you are using 40ms packets, then the packets should be separated by 40ms. Transmitting the packets too slowly results in odd silences when the telephone has no audio to play out its Speaker. Transmitting the packets too quickly results in broken sound, as the telephone is forced to drop packets it cannot maintain in its buffer. The error in the pace measured at the telephone is called jitter. If the jitter stays below the size of one packet, then jitter does not impact the audio quality. Note that a +2ms jitter on one packet cancels out a -2ms jitter on the next. However, 40ms packets, each separated by 38ms, means that the jitter grows +2ms with each packet. After 3 seconds, the jitter would be +150ms, and the telephone would need to drop audio to maintain its buffers. Issue 1 April 2005 53 Creating Push Messages The Subscribe Push Type The Subscribe push is used as a subscription service for the IP telephones. The subscription service allows an intelligent application to get the telephone’s information from an external database without having to query for the target telephone. Subscribe Push Features The features associated with the Subscribe push type are: ● Sends re-subscription requests when the Push type is Subscribe. ● No user interface is involved, since the subscription service is launched in the background. ● This feature is recommended to build databases of IP telephones. The telephone provides the following information while subscribing to a particular subscription server: ● User’s Telephone Extension ● IP Address of the telephone ● MAC Address of the telephone ● Set ID, an eight character model number which is fixed and does not change - For a 4610SW IP Telephone, the Set ID is 4610D01A - For a 4620 IP Telephone, the Set ID is 4620D01A - For a 4620SW IP Telephone, the Set ID is 4620D01B - For a 4621SW IP Telephone, the Set ID is 4621D01A - For a 4622SW IP Telephone, the Set ID is 4622D01A - For a 4625SW IP Telephone, the Set ID is 4625D01A Alerts Alerts are not applicable to the Subscribe push type, as there is no user interaction. 54 4600 Series IP Telephones Application Programmer Interface (API) Guide The Subscribe Push Type Priorities and States Normal and barge priorities are not applicable to the Subscribe push type. The Subscription service is initialized during registration or the IP telephone boot-up process. Once the telephone is properly registered (logged in) with the media server, the telephone subscribes to the server listed in the SUBSCRIBELIST parameter. Note: For more information on SUBSCRIBELIST and boot-time subscription service, see Chapter 4: Push Administration. Note: Successful Push Response If the phone is in a pushable state, the Push Agent sends the Push Initiator the following response for all Push request modes and all Push request types: Parameter Status Code Reason Phrase HTTP Status Code 200 “OK” x-Push-Status 200 “Push Message Accepted” Subscribe XML Messages The following sections describe how to send a re-subscription Push request. Subscribe Push Message (PM) The first step in sending a Subscribe push is to send an HTTP POST request from the Push Initiator to the Push Agent in the telephone. Following is the format of the XML Message (PM) sent from the Push Initiator to the Push Agent: <?xml version="1.0"?> <Push type=“subscribe”> <go href=“http://subscription_server/filename.xml” <postfield name=“name1” value=“value1”/> <postfield name=“name2” value=“value2”/> method=“get|post”> </go> </Push> Issue 1 April 2005 55 Creating Push Messages Using the <postfield> Tag The IP telephone’s Web browser interface supports the <postfield> tag. The <postfield> tag allows an application to set a name/value pair that can be sent to the source of the request. The name is set by the name attribute and must be a valid WML variable name. The value is set by the value attribute. A <go> element can contain one or more <postfield> tags. Note: Note: Note: For more information on the <postfield> tag, see Chapter 7: Web Browser for 4610SW, 4620/4620SW, 4621SW, and 4622SW IP Telephones. Note: Postfield tags must be sent if HTTP POST method is used. Table 4: Description of Elements/Attributes used in the Subscribe Push XML Message: Element or Tag Attribute Value <Push> Description Each Push Message must contain one valid root <Push> tag. type subscribe For the Subscribe push type, set type to subscribe. <go href=…/> <Url> A fully qualified URL - to an XML file with <Response> and the associated embedded <Subscribe> tag. method get|post HTTP get or post methods. Push Agent Once a Push Message is received from the Push Initiator, the Push Agent first parses the XML file for validation and tag mismatch errors. The Push Agent verifies that the URL in the <go> tag is part of the Trusted Push Servers. The Push Agent then requests the Push Content from the Trusted Push Server using the URL. Note: Note: For more information on Trusted Push Servers, see Security in Chapter 4: Push Administration. 56 4600 Series IP Telephones Application Programmer Interface (API) Guide The Subscribe Push Type Subscribe Push Content (PC) The Push Content for the Subscribe push type must be an XML file. This XML file contains the URL for the subscription server and the type of subscription request made. Using the <Response> Tag The <Response> tag for the Subscribe push type must be the root element in the (PC) XML file. Using the <Subscribe> Tag Following is the syntax for the Subscribe XML file: <?xml version="1.0"?> <Response> <Subscribe type=”all|me”> <Url href= ”Subscription_Server_Url” /> </Subscribe> </Response > Each < Response> can contain only one <Subscribe> tag with the following attributes: Attribute Value Description type “all” Instructs the endpoint to re-subscribe to all servers in the SUBSCRIBELIST. “me” Instructs the endpoint to re-subscribe to the server in the href attribute of the <Url> tag. This url string must exactly match one of the subscription server list servers in the SUBSCRIBELIST variable for this type of subscription to proceed. If the matching fails the subscription request is aborted. The <Url> tag has the following attributes: Attribute Value Description href string Contains the URL of the subscription server for which the endpoint must subscribe. Maximum length cannot exceed 1024 characters. An exact string-based comparison matches the subscription URIs against the SUBSCRIBELIST values. If the subscription server URI does not exactly match the values in the SUBSCRIBELIST, the subscription request is aborted. Note: Note: See Subscription Service in Chapter 4: Push Administration for more information. Issue 1 April 2005 57 Creating Push Messages 58 4600 Series IP Telephones Application Programmer Interface (API) Guide Chapter 4: Push Administration Introduction This chapter covers the administrative actions required for the Push interface to work properly. Note: Note: Consult your System Administrator if appropriate to modify push-related settings. Also, see the 4600 Series IP Telephone LAN Administrator’s Guide on the http://www.avaya.com/support Web site for more information. Requirements To enable the Push interface, the non-null parameter TPSLIST (Trusted Push Server List) must be administered in the 46xxsettings.txt script file on the TFTP server. Use the SUBSCRIBELIST parameter to define the list of subscription servers to which all the telephones will subscribe. The SUBSCRIBELIST parameter is not required to send Push Messages. The remaining sections in this chapter discuss these two topics in more detail. Security Push security is validated by a domain-based authentication algorithm. If the Push Content URL is not part of the Trusted Push Server, the Push Message is denied. Issue 1 April 2005 59 Push Administration Trusted Push Server List (TPSLIST) Depending upon the TPSLIST setting in the script file, the Push Message is either accepted for additional processing or denied. An administrator can set the security level using the following domain-based security values for the TPSLIST parameter in the 46xxsettings.txt script file. System Value Name Application Software Default Usage (Value Range; References) TPSLIST “” (Null) List of Trusted Push Servers. Contains zero or more domain/path strings, separated by commas without any intervening spaces. Up to 255 ASCII characters, including commas are allowed. Specifically, the List of Trusted Push Servers contains one or more domains and paths in a DNS format or an IP Address in dotted-decimal format, separated by commas. 1. The administrator sets the TPSLIST values in the 46xxsettings.txt script file on the TFTP server. See the 4600 Series IP Telephone LAN Administrator’s Guide on the http://www.avaya.com/support Web site for more details. 2. If the value of TPSLIST is null, Push Messages cannot be received and the Push interface is disabled. 3. If the value of TPSLIST contains only a forward slash character (/), then all Push Messages are accepted, meaning any Push server is considered a Trusted Push Server. 4. Wild cards such as asterisks are not allowed for URL strings in the TPSLIST. If the pushed URI string (the value of the Push Request’s href attribute in the <go> tag does not begin with the proper HTTP schema, http://, the URI string is rejected and the response back to the Push Initiator contains the following parameters: Parameter Status Code Reason Phrase HTTP Status Code 403 “Forbidden” x-Push-Status 402 “Push security failure” To validate a particular pushed URI string, a string-based comparison is done against the values of the TPSLIST administered in the 46xxsettings.txt script file. 60 4600 Series IP Telephones Application Programmer Interface (API) Guide Validation Scenarios Validation Scenarios Table 5: URI Examples Validation String (Validation string Interpreted as) Pushed URI string ‘X’ means failure and ‘OK’ means success. / = domain/path separator Example 1 Example 2 Example 3 Example 4 http://www. company.com/ http://support. company.com/ http://www. company.com /push/ http:// www.hacker.com/ “company” (“company /”) X X X X “company.com” (“company.com/”) OK OK OK X “support.company.com” (“support.company.com/”) X OK X X “company.com/push” (“company.com/push”) X X OK X “/push” (“/push”) X X OK X (OK for “http:// www.hacker.com /push”) “company.com/xy/push”\ (“company.com/xy/push”) X X X X “http://www.company.com” (“http://www.company.com/”) OK X OK X “http://support.company.com” (“http://support.company.com/”) X OK X X “http://support.company.com/push” (“http://support.company.com/push”) X X X X “http://www.company.com/push” (“http://www.company.com/push”) X X OK X “/” (“/”) OK OK OK OK Issue 1 April 2005 61 Push Administration Recommendations: If the domain from Table 5: URI Examples is “associate.hacker.com” and the TPS string is “company.com”, then the domain “hackercompany.com” will also match the TPS string and pass the security validation. For example, if the TPS string is “company.com” & the URLs are: http://www.company.com - this URL is acceptable. http://associate.company.com - this URL is acceptable. http://www.hackercompany.com - this URL is acceptable. In this case “hackercompany” also passes the security validation. To avoid such security issues, the administrator must set the TPS string to “.company.com” (where there is a “dot” before “company”). For example, if the TPS string is “.company.com” and the URLs are: http://www.company.com - this URL is acceptable. http://associate.company.com - this URL is acceptable. http://www.hackercompany.com - this URL is not acceptable. In this case “hackercompany” fails the security validation. Subscription Service The phone provides a set of values such as the IP Address and user telephone number to subscription servers when the telephones register with the media server. An explicit subscription message can also be sent to the phone using <Push type=”subscribe”… /> to re-subscribe the phones. Note: Note: See Chapter 3: Creating Push Messages for more details on sending a re-subscribe Push Request to the telephone. Applications must maintain their own database of information for each phone. Databases can be built with respect to a group of telephones or an individual phone. A typical example in a corporate work environment is to have distribution lists according to specific teams. An application can only target pushes to that team such as “team meeting reminders” with conference bridge numbers, etc. Once an application builds a database that has the required information of all of the telephones in the network, it can target Push Content or an audio stream to a specific phone or a group of phones. Additionally, Push Initiator Servers can poll the phone to update its database. Note: Note: A phone in a logoff state does not unsubscribe from the Subscription server. 62 4600 Series IP Telephones Application Programmer Interface (API) Guide Subscription Service Subscriber Service Using the Push Subscription Service, the phone makes the following values known to the trusted subscription service server: ● IP Address of the Phone ● User’s Extension ● MAC Address ● Set ID, an eight-character model number which is fixed and does not change - For a 4610SW IP Telephone, the Set ID is 4610D01A - For a 4620 IP Telephone, the Set ID is 4620D01A - For a 4620SW IP Telephone, the Set ID is 4620D01B - For a 4621SW IP Telephone, the Set ID is 4621D01A - For a 4622SW IP Telephone, the Set ID is 4622D01A - For a 4625SW IP Telephone, the Set ID is 4625D01A The HTTP Push Subscription Message Syntax is as follows: GET:http//<subscription_server>/<script_name>?MAC=xxx+Extn=xxx+ip=xxx+ SetID=xxx Upon log on to the call server, the Push Subscription service updates all values. No unsubscribe event is sent upon user logoff. Issue 1 April 2005 63 Push Administration Subscription List (SUBSCRIBELIST) This list specifies the Push administrative requirements for setting a new system value for the subscription-trusted list of servers. Specifically, the Subscription list contains one or more fully qualified URLs, separated by commas. An administrator can set the subscription server addresses using the following domain-based values for the SUBSCRIBELIST parameter in the 46xxsettings.txt script file. System Value Name Application Software Default SUBSCRIBELIST “” (Null) Usage (Value Range; References) List of Trusted Subscription Servers, contains zero or more domain/path strings, separated by commas without any intervening spaces. Can be up to 255 ASCII characters, including commas. Specifically, the List of Trusted Subscription Servers contains one or more fully qualified URLs of the subscription servers, separated by commas. The values for SUBSCRIBELIST are set by the administrator in the 46xxsettings.txt script file on the TFTP server. See the 4600 Series IP Telephone LAN Administrator’s Guide on the http://www.avaya.com/support Web site for more details. Note that the Subscription Servers specified in the SUBSCRIBELIST parameter are considered to be Trusted Push Server. Hence, no additional security validation is done for the subscription server URIs. The syntax of the Trusted Subscription List is a series of fully qualified URIs of the form: <scheme>://<host>:<port>/<url-path> If http://10.0.1.101/subscribe.asp, http://company.com/subscribe/, and http://abc.company.com:8000/cgi/subscribe are lists of the three subscription servers, then use the following syntax in the 46xxsettings.txt script file to administer these URLs as the subscription servers: SET SUBSCRIBELIST http://10.0.1.101/subscribe.asp,http:// company.com/subscribe/, http://abc.company.com:8000/cgi/subscribe 64 4600 Series IP Telephones Application Programmer Interface (API) Guide Subscription List (SUBSCRIBELIST) Subscription Update Use the Subscribe push type to make an asynchronous request to a phone to re-subscribe and update all the values defined in the syntax examples above. Note: Note: See Chapter 3: Creating Push Messages for more details on sending a Subscribe Push Request to the telephone. An exact string-based comparison is done to match the subscription URIs against the values in the SUBSCRIBELIST. If the subscription server URI does not exactly match the values in the SUBSCRIBELIST, the subscription request is aborted. Retry Timer If the subscription server is unresponsive to the initial subscription message from the phone at boot up and does not return a Message 200 (OK), then the subscription service retry timer will send subscription messages to the subscription server every 20 minutes, up to five times. The retry timer does not apply to a subscription update from the subscription server. Denial of Service Timer The Denial of Service Subscription Timer limits the number of subscription updates requested by the trusted subscription service. The Push Agent following a successful subscription will accept only one subscription request per minute. This implies that the Push Agent in the telephone can handle one subscription request per minute. The denial of service timer starts following a Push Request for Subscribe. No Subscribe request is accepted for the next minute. If another Subscribe request is received within that time, the response is as follows: Parameter Status Code Reason Phrase HTTP Status Code 200 “OK” x-Push-Status 503 “Service Unavailable” Issue 1 April 2005 65 Push Administration 66 4600 Series IP Telephones Application Programmer Interface (API) Guide Chapter 5: Troubleshooting the Push Interface Avaya HTTP Header Extensions (x-Push-Status Codes) The Push Agent sends a response back to the Push Initiator with HTTP status codes. Note: See Push Message Flow and Figure 4 in Chapter 2: Push Interface Overview for an overview of the Push process. Note: In addition to the HTTP response codes, an additional HTTP header extension called “x-Push-Status” is sent. The x-Push-Status header is used to indicate the outcome of a Push Request back to the Push Initiator. The header is included in all responses to the Push Initiator for Push Requests. General guidelines for error codes for x-Push-Status are as follows: ● Status-Code 200-299: Push Service Response and Rejection codes, Push State codes ● Status-Code 300-399: XML parsing codes ● Status-Code 400-499: Trusted Domain Security codes ● Status-Code 500-599: General rejection reasons Table 6: x-Avaya-Push-Code Responses x-PushStatus code Reason Phrase (Description) Resolution (“N/A”: Avaya IP Telephones never send the status code) 200 “Push Message Accepted” This reports that the telephone has successfully accepted the push. 201 “Push Services Disabled” Ask your system administrator to administer the TPSLIST value on the TFTP Server. See Push Administration for more information. 202 “Internal Error: Push Aborted” There was a problem processing your request. Re-send the Push request. 204 “Not in Push State: Push Accepted” The Push Message was accepted but the user’s telephone is busy, for example, in text-edit mode. The Push Message is loaded in the background. Once the user launches the Web browser on the phone, the user will be able to view the Push Message. Try sending a “barge” priority message instead if you want the user to view the message immediately. 1 of 2 Issue 1 April 2005 67 Troubleshooting the Push Interface Table 6: x-Avaya-Push-Code Responses (continued) x-PushStatus code Reason Phrase (Description) Resolution (“N/A”: Avaya IP Telephones never send the status code) 205 “Not In Push State: Push Aborted” The Push Message was rejected because the phone is in a non-pushable state. Try sending a “barge” priority message instead. See Chapter 3: Creating Push Messages for more information. 208 “Not in Audio Push State: Push Aborted” The audio stream was rejected because the user is currently on the call or busy. Try sending a “barge” priority message instead. See The Audio Push Type on page 46for more information. 301 “XML document not valid” Check the proper XML schema as described in this API. See Chapter 3: Creating Push Messages for more information. 302 “XML document not well-formed” Make sure that all the XML tags are properly formed. See Chapter 3: Creating Push Messages for more information. 303 “No element found” Make sure that all the XML tags are properly formed. See Chapter 3: Creating Push Messages for more information. 304 “Unknown encoding” Make sure that all the XML tags are properly formed. See Chapter 3: Creating Push Messages for more information. 305 “Invalid root element” Make sure that all the XML tags are properly formed. See Chapter 3: Creating Push Messages for more information. 306 “Empty Post Content” If you are using the HTTP POST method in the Push Message, include postfield tags with the message. 307 “Push Content too large” The XML file is larger than 5Kb. Send an XML file less than 5K bytes. 402 “Push security failure” The security service failed to validate the Trusted Push Server. 501 “Invalid Push URI” Recheck the URI included in the <go href…/> request for fully qualified URL string. Also, make sure the length of the URI is no longer than 1024 characters. 503 “Subscription Service Unavailable” Ask your system administrator to administer the SUBSCRIBELIST value on the TFTP Server. See Chapter 4: Push Administration for more information. 2 of 2 68 4600 Series IP Telephones Application Programmer Interface (API) Guide HTTP Error Messages HTTP Error Messages The following standard HTTP Error Messages will be supported. Status codes starting with “4” indicate a client error in which the request contains bad syntax or cannot be fulfilled. Status codes starting with “5” indicate a server error in which the server failed to fulfill an apparently valid request. Table 7: HTTP Error Messages Status Code Cause of Failure Failure Message Displayed to the User/Resolution (“N/A”: Avaya IP Phone will never send the status code) 400 Bad Request Due to incorrect syntax the server could not understand the request. 401 Unauthorized The request requires user authentication. 402 Payment Required N/A 403 Forbidden The server has indicated it will not respond to your query. 404 Not Found The server has not found anything matching the request. 405 Method Not Allowed N/A 406 Not Acceptable N/A 407 Proxy Authentication Required The request requires user authentication. 408 Request Time-out N/A 409 Conflict The request could not be completed due to a conflict with the current state of the resource. 410 Gone The requested resource is no longer available. 411 Length Required The server refuses to accept the request. 412 Precondition Failed N/A 413 Request Entity Too Large The server refuses to accept the request because the request entity is too large. 414 Request-URI Too Large The request-URI is longer than the server can interpret. 1 of 2 Issue 1 April 2005 69 Troubleshooting the Push Interface Table 7: HTTP Error Messages (continued) Status Code Cause of Failure Failure Message Displayed to the User/Resolution (“N/A”: Avaya IP Phone will never send the status code) 415 Unsupported Media Type The server refuses to accept the request because it’s in an unsupported format. 416 Requested range not satisfiable N/A 417 Expectation Failed N/A 500 Internal Server Error The server encountered an unexpected condition that prevented it from fulfilling the request. 501 Not Implemented N/A 502 Bad Gateway The server, while acting as a gateway or proxy, received an invalid response from the upstream server it accessed in attempting to fulfill the request. 503 Service Unavailable The server is currently unable to handle the request due to a temporary overloading or maintenance of the server. 504 Gateway Time-out The server, while acting as a gateway or proxy, did not receive a timely response from the upstream server specified. 505 HTTP Version not supported The server does not support, or refuses to support, the HTTP protocol version that was used in the request message. 2 of 2 70 4600 Series IP Telephones Application Programmer Interface (API) Guide Chapter 6: About The Web Browser Introduction This chapter provides general information about and requirements for developing Web browser applications. The information covered applies to all IP telephones to which Web application development applies, specifically: ● 4610SW ● 4620/4620SW ● 4621SW ● 4622SW ● 4625SW The 4625SW IP Telephone differs from the others listed in that it has a significantly different display that supports color and JPEG images. However, basic browser principles apply to all telephones capable of maintaining a Web browser. This chapter describes those common characteristics. For specific information about Web application development for the 4625SW, see Chapter 9: Web Browser for the 4625SW IP Telephone. For specific information about Web application development for the other 4600 Series IP Telephones to which Web application development applies, see Chapter 7: Web Browser for 4610SW, 4620/4620SW, 4621SW, and 4622SW IP Telephones. Figure 12 provides a schematic view of the standard Web browser display for the 4620/ 4620SW, 4621SW, 4622SW, and 4625SW IP Telephones and the key fixed buttons associated with the display. The abbreviations “FB” and “SK” stand for “Feature button” and “Softkey” respectively. Issue 1 April 2005 71 About The Web Browser Figure 12: Schematic View of the Standard Web Browser Display and Key Fixed Buttons 723/,1( )% )% )% )% )% )% )% )% )% )% )% )% 6. 3+21( (;,7 6. 3$*( /()7 6. 3$*( 5,*+7 6. 237,216 Note: Figure 12 does not apply to the 4610SW IP Telephone, which has only has six Feature buttons. However, the fixed buttons and softkeys shown do apply to the 4610SW. Note: Physical Attributes The IP telephones that support the Web browser have these characteristics: ● Twelve Feature buttons are available for Web applications, except for the 4610SW, which has six Feature buttons. ● The top display line is reserved for messages, text entry prompts, and page titles. ● The bottom display line presents the available softkey selections. Four softkeys can be displayed at one time. For the 4625SW, the bottom display line cannot be overwritten. ● Page Left and Page Right hard buttons to navigate back to a previous page and forward to another page, if one exists. The browser uses an HTTP client to communicate with Web servers. WML 1.3 (WML June 2000) is supported. See wapforum.org for more information about WML 1.3. 72 4600 Series IP Telephones Application Programmer Interface (API) Guide Web Browser Navigation The Web browser renders pages with spaces before the XML prolog. The strict rules of XML specify that pages with any characters before the XML prolog, including spaces, are invalid and should be rejected. However, many WML pages available on the World Wide Web contain such spaces. To facilitate compatibility with existing content, this constraint is relaxed in the Web browser. The frame in which a Web page displays sits flush with both the left and right sides of the display. Pixel 319 is the last horizontally addressable pixel, and pixel 239 is the last vertically addressable pixel. The Web browser uses the right side of the display for navigation controls. These controls do not appear in any other IP telephone application. A maximum number of 96 lines per card is supported. A line corresponds to text rendered on the screen that spans the row between the left and right side Feature buttons. For deck storage, 6.5 Mbytes of memory is allocated to the Web browser. Web Browser Navigation Web screen navigation is accomplished as follows: ● Use the Feature buttons to the left of the display to select items/lines on the screen. ● Use the Feature buttons to the right of the screen for navigation. ● One link is permitted per line. To activate a link, press the left Feature button associated with a particular display line. ● Use Feature buttons to select an option. ● Use Feature buttons to focus on a text entry box, to allow entry of text. ● Use the softkeys on the bottom of display for navigation as appropriate. ● Also use the hard Page Left and Page Right buttons for navigation. The Page Left button takes the user to the previous card. The Page Right button takes the user to the next card only if it is available in the history stack. ● Horizontal scrolling is not supported for any line other than the top display line. See Icons for Navigation Control for additional information about establishing navigation controls. Issue 1 April 2005 73 About The Web Browser Icons for Navigation Control Icons associated with (default) Feature buttons 7 through 12 appear on the right side of the display. On each line of pixels corresponding to the Call Appearance/Application Areas for the Feature buttons (i.e., not for the Top Area or the Softkey Label Area) the pixel array is as follows: Note: ● pixel 242 is white, ● pixel 293 is black, and ● pixel 294 is white, resulting in a vertical line down pixel 293. ● Icons are up to 25 pixels wide and 25 pixels high, and display in horizontal pixels 295-319. Note: Horizontal and vertical pixel numbering starts with 0 in the upper-left corner. Figure 13 shows the Standard Browser Feature button icons that appear on the right side of the display. Figure 13: Standard Browser Navigation Feature Buttons 723/,1( FDUGWLWOHRUWDJWLWOH )% )% )% )% )% )% )% )% )% )% )% )% 6. 6. 6. 6. Table 8 describes the Standard Browser Feature buttons on the right side of the display. The navigation icons for the 4625SW differ from those for the other applicable IP telephones because only the 4625SW supports a color display. 74 4600 Series IP Telephones Application Programmer Interface (API) Guide Web Browser Navigation Table 8: Navigation Control Icons 4625SW All Other Phones Explanation Page Up. If more text exists than can be currently viewed on the display’s six lines, moves up an entire screen and displays the previous six lines of text. No line on the new page displays in focus and the Top Line displays the card title. The double arrows display in black when there are additional text lines that do not fit on the display. The double arrows display in the lightest shade of gray when there are no additional text lines. When any page other than the first has no line in focus and a user selects Page Up, the previous page displays with no line in focus. If a line is in focus, the same line displays in focus on the new page. When Page Up is selected on the first page, the focus moves to the first line on that page. Page Down. If more text exists than can be currently viewed on the six lines of the screen, moves down to line 7 and displays up to the next six lines of text. No line on the new page displays in focus and the Top Line displays the card title. The double arrows display in black when there are additional lines of text that do not fit on the display. The double arrows display in the lightest shade of gray when there are no additional text lines. When any page other than the first has no line in focus and a user selects Page Down, the next page displays with no line in focus. If a line is in focus, the same line displays in focus on the new page. When Page Down is selected on the last page, the focus moves to the last line on that page. Focus Up. Moves the focus up the page by one line, up to the Top Line. The single arrow displays in black when there are additional lines of text that do not fit on the display. If the first line of the first page is in focus, pressing Focus Up removes the focus entirely. The single arrow displays in the lightest shade of gray when there is no additional text. Focus Down. Moves the focus down the page by one line. If Focus Down is selected when no line on the current page is in focus, the first line on the current page is placed in focus. When the last line of the initial six lines is in focus, selecting this icon causes the screen to scroll down one line and the focus to shift to that line. The single arrow displays in black when there are additional lines of text. The single arrow displays in the lightest shade of gray when there is no additional text. HOME icon. Returns to the original card, the URL of the home card for the Web application. When a page first loads, the Home icon displays in the lightest gray shade to indicate that Feature button is not available. REFRESH icon. Refreshes the screen, unless the user is trying to refresh an expired card. Issue 1 April 2005 75 About The Web Browser Use the Focus Up and Focus Down Feature buttons (single Up and Down arrows next to Feature buttons 8 and 11, respectively) to move the focus up and down one line at a time. This is not scrolling in a conventional sense. The Up and Down arrows allow a user (in addition to directly selecting the associated left Feature button), to reach a text entry area or to focus on a line and see the associated title information displayed on the Top Line of the screen. Use the Page Up and Page Down Feature buttons (double up and down arrows next to Feature buttons 7 and 12 respectively) to navigate up and down to text that is not initially visible on the display. Note: Note: The navigation arrow controls do not have an auto-repeat capability. This means that the user must press and release the Feature button associated with the navigation icon each time the user wants to view additional display lines. Multiple Paging Indicators When the screen displayed is one of multiple “pages” in the Web history stack, the paging indicator displays on the screen. The paging indicator is one or a pair of directional arrows centered on the solid black line between the Call Appearance/Application Area 6 and the Softkey Label Area. The presence of one or both arrows tells the user that pressing the telephone’s Page Left and Page Right buttons have a visible effect. The independent Page Left and Page Right indicators let users know they can move back and forth in the Web history stack. The Left Arrow indicator appears when a previously viewed page is available in the history stack. The Right Arrow indicator appears when the user can travel forward to see the next page in the history stack. If a user attempts to go back or forward using the Page Left and Page Right buttons when there are no cards in the history stack, an error tone sounds. Moving Up and Down a Card Table 8 shows that the right Feature buttons allow the user to move up and down the lines currently displayed, or move down to additional lines of text that are not currently visible on the screen. The user moves up and down the lines currently displayed because different title information shows on the Top Line depending on which of the six currently displayed lines is brought into focus. Each time a new line is brought into focus, a new title can display on the Top Line, if the title is included in the tag coding. When you code a tag without a title, the Top Line shows the default associated with that tag. The chart of Tags with Titles and Corresponding Top Line Defaults: on page 78 provides Top Line default titles. Chapter 7: Web Browser for 4610SW, 4620/4620SW, 4621SW, and 4622SW IP Telephones and Chapter 9: Web Browser for the 4625SW IP Telephone provide tag-specific information. 76 4600 Series IP Telephones Application Programmer Interface (API) Guide Web Browser Navigation Users can move up and down, bringing displayed text into focus as they choose. This is a unique WML feature that allows additional information about a line of text to be presented to the user. Moreover, the user can move to additional text lines that do not fit on the current screen, to view all the text lines contained in one card. It appears to the users as if they are navigating to the next page of text, but they are really descending down six more lines of text on the currently displayed card. Example: Table 9 shows the relationship between moving up and down one line at a time on the current lines displayed, what appears in the Top Line, and what line is considered in focus. This example shows what happens as the user moves down the card one line at a time. The table shows the title displayed in the Top Line when its corresponding tag is in focus. In this table, for example, when line 1 is in focus, its corresponding title displays on the Top Line. When the tag associated with a line does not have a specific title, a default title displays. If the line is only text and has no actionable tags, the card title displays. Table 9: Relationship between Line/Page Movement, Focus, and Top Line Display Top Line displays: Card Title Line 1 Tag Title Line 2 Tag Title Line 3 Tag Title Line 4 Tag Title Line 1 1 1 1 1 that is 2 2 2 2 2 in focus 3 3 3 3 3 4 4 4 4 4 5 5 5 5 5 6 6 6 6 6 Action Ø Ø Ø Ø Ø Top Line displays: Line 5 Tag Title Line 6 Tag Title Line 7 Tag Title Line 8 Tag Title Line 9 Tag Title Line 1 1 2 3 4 that is 2 2 3 4 5 in focus 3 3 4 5 6 4 4 5 6 7 5 5 6 7 8 6 6 7 8 9 Ø Ø Ø Ø Ø Action Issue 1 April 2005 77 About The Web Browser Tags with Titles and Corresponding Top Line Defaults: Tag Attribute Top Line Default Values <card> Title New Card <anchor> Title Use button to select <a> Title Use button to select <input> Title Enter text between brackets <select> Title Use button to select <img> Alt Web: All Top Line messages are not prepended with the word Web: followed by a space. The card title displays on the Top Line when the page is first displayed. The card title also appears on the Top Line when the user scrolls down the screen and comes across a text element (<p> tag or <br/> tag). When pages are downloading, Loading …. displays on the Top Line for the 4625SW IP Telephone only. Note: Phone calls can be made or received while in the Web browser. The Phone application can overwrite Top Line tag titles. Note: Truncation Rules and Links Truncating Lines and Words ● Each link associated with <a> and <anchor> WML tags can take up the width of one display line. If the link would display wider than the frame width, the link is truncated at the point where it no longer fits in the frame. Links are not wrapped around to the next display line. ● The browser breaks long lines of text into multiple lines. This is equivalent to setting the <p> mode = wrap. The default is to wrap the text. ● Long words that don’t fit on an entire line are hyphenated. ● URLs cannot be broken into multiple lines. 78 4600 Series IP Telephones Application Programmer Interface (API) Guide Enabling Text Entry Links Rules for links within a page are simplified for development purposes: ● A maximum of one link can be displayed per display line. ● Regular text will not be displayed on the same line as a link. ● A link causes an automatic line break to occur both before and after the link. Enabling Text Entry Use these guidelines to enable standard text entry. See Access Key Input Mode (AIM) in Chapter 7 for information about an alternate text entry method using access keys. AIM applies only to the 4610SW, 4620/4620SW, 4621SW, and 4622SW IP Telephones. AIM does not apply to the 4625SW IP Telephone. 1. When a card displays, a set of square brackets containing the prompt Enter text here indicates a text entry area. 2. To start text entry, the user either presses the left Feature button associated with the text line/field, or uses the Up Arrow or Down Arrow key(s) to bring the line/field into focus. Either action causes a cursor that indicates where to begin text entry to replace the text entry prompt. 3. Text editing softkeys display at the bottom of the screen to assist the user with text entry. 4. Pixels 0 to 153 are addressable. 5. The user exits Standard Text Entry mode by: ● Pressing the Feature button associated with the line on which text entry occurred to de-focus the line, ● Pressing any other Feature button, or ● Pressing a Done softkey at the bottom of the screen. 6. To re-enter text entry mode, the user presses the Feature button associated with the text line/field. Text entry can proceed when a cursor appears to the right of the existing text. The Bksp (Back Space) softkey is used to delete existing text, as appropriate. 7. A page author can customize bracketed text to assist a user in text entry. For example, the author can prompt “Enter name here,” “Enter phone number here,” or “Enter email address here.” Issue 1 April 2005 79 About The Web Browser 8. On-hook keypad dialing to make a phone call is not allowed when in Text Entry mode. If the user is already off-hook, text entry is allowed. When the phone is again placed on-hook, text entry can be re-enabled at the point at which it was disabled. When text entry is active, the user can be active on a call or receive a call, but cannot use the keypad to dial a number or for interactive voice recognition (IVR) prompts. In this case, the user must disable text entry prior to using the keypad to dial a call or for IVR prompts. Text Entry Example: An <input> tag used for a text entry box has these attributes: Note: ● <title> - The title is sent to the Top Line. ● <value> - A value displays in the text entry box rather than the standard “Enter text here” prompt. When the user selects the line or brings the line in focus, the cursor displays at the end of the value. When the value field is empty, focusing in erases the “Enter text here” prompt and places the cursor at the beginning of the entry field. The <value> attribute takes precedence over an <ivalue> attribute, as explained in the examples that follow. Note: See Chapter 7: Web Browser for 4610SW, 4620/4620SW, 4621SW, and 4622SW IP Telephones and Chapter 9: Web Browser for the 4625SW IP Telephone for specific information on the <input>, <title>, <value>, and <ivalue> tags. Here is how the user experiences a value versus a non-value during standard text entry: For the tag <input title=”Hello there”/> - The text box displays [Enter text here] as a default. No value is present, meaning the user has not entered text in the text box. Upon text entry, the value equals the typed-in text, and the “Enter Text here” prompt no longer displays. For the tag <input title=Hello there” value=”Fill in the blanks”/> - The text box displays [Fill in the blanks]. The cursor is positioned after the “s” in “blanks.” In this example, “Fill in the blanks” always appears at the beginning of the text box, regardless of what the user enters. This is contrary to the situation above where no value was specified in the <input title> string and the prompt [Enter text here] no longer displays after the user types the first character. If a new attribute value is defined, the attribute takes precedence over ivalue. For the tag <input title=”Hello there” ivalue=”Enter name here”/> - the text box displays [Enter name here] and the attribute value takes precedence over ivalue. When the user enters text, the value now equals the typed-in text. The prompt “Enter name here” no longer displays and the text the user entered remains in the text box. 80 4600 Series IP Telephones Application Programmer Interface (API) Guide Text Editing Modes Text Editing Modes When a text entry area is enabled, these softkey labels display centered above the actual softkeys: Done Bksp Space alpha The labels appear at the bottom of the display and are activated by pressing the Softkey buttons directly below them. The Done softkey exits text entry mode. When Done is pressed, several actions occur: ● the line containing the text entry area no longer displays as in focus, ● the cursor no longer displays, and ● the previous softkey labels and operation are restored. The Bksp softkey is used for destructive backspacing during text entry. Pressing this softkey deletes text that is backspaced over. This softkey can only be used if there is a character to the left of the cursor. Text to the right of the cursor moves left with the cursor. The Space softkey advances the cursor forward, leaving a space. Since there is no “cursor back” ability, the cursor cannot have characters to its right. The rightmost softkey always displays the name of the current input mode. The Top Line prompts Press <mode> to change mode where <mode> is the name of the current input mode. When the user presses the rightmost “alpha” softkey for the first time, all four softkeys change to: ALPHA alpha Num Symbol After selecting one softkey, the softkeys then change back to “Done | Bksp | Space | <mode>” where <mode> is the mode just selected. When the Symbol mode is selected, the Top Line Area displays Select desired symbol. Issue 1 April 2005 81 About The Web Browser Input Modes ALPHA alpha Num Symbol The default entry mode is alpha (lower case alphanumeric). Once the user brings a text entry area into focus with the appropriate Feature button, text entry displays lower-case alphanumeric text. The user can switch between ALPHA (all capital letters), alpha (lower case alphanumeric), Num (Numeric. Numbers only) and Symbol text entry modes at any time by using the softkeys. ALPHA - This mode works just like alpha mode, except all alphabetic characters entered display in upper case letters. Num - This text entry mode allows the entry of numeric characters. Symbol - Pressing this softkey displays the first of three screens containing symbols for text entry. To select a symbol for entry, the user presses the Feature button with which the symbol is associated. Figure 14: Text Editing Symbol Screen One 723/,1( )% )% )% )% )% )% Select Desired Symbol . , " ; )% # @ : \ )% * ’ / - )% MORE CANCEL . . 6. 6. 6. 6. 82 4600 Series IP Telephones Application Programmer Interface (API) Guide )% )% )% Text Editing Modes Figure 15: Text Editing Symbol Screen Two 723/,1( )% )% Select Desired Symbol | $ )% % )% )% ! ? )% & + )% = > )% < )% )% MORE CANCEL . ( ) . 6. 6. 6. 6. )% )% Figure 16: Text Editing Symbol Screen Three 723/,1( )% )% Select Desired Symbol ~ _ } )% )% )% ^ )% )% [ )% )% ] )% )% { )% MORE 6. CANCEL 6. . 6. . 6. Use the Feature button associated with the desired symbol to place that symbol at the cursor position in the text entry area. Use either the MORE softkey or the Page Left and Page Right hard buttons to view the next page of symbols. There are three pages of symbol choices. When the user is on the last page of symbol selections, pressing the MORE softkey takes the user back to the first page of symbol selections. After selecting a symbol, the text entry screen redisplays in alpha mode. The selected symbol appears in the text entry area and the cursor advances to the next position. The default entry mode (alpha) displays. Note: Note: The * and # dial pad keys can be used to enter the * and # characters in any text mode. The cursor automatically advances after one of these characters is entered. Issue 1 April 2005 83 About The Web Browser Character Set Support Character set support differs depending on the IP telephone model. The Web browser supports ISO-8859-1 (Latin 1) encoded WML for any languages available on each specific telephone model. For example, the 4625SW does not support the Chinese and Japanese (Han and Katakana) languages. Web History The Web history is a list of URLs and starts from the point the user initiates the browser session for the first time. Up to 100 URLs can be stored in memory. Any URLs exceeding the allowable maximum are deleted in the order stored in memory, meaning the first URLs stored are the first URLs deleted. Display Colors Any line that is considered in focus displays in the reverse colors used for foreground and background. Note: Note: The 4625SW supports a color display and JPEG images. See Chapter 9: Web Browser for the 4625SW IP Telephone for specific information regarding color. 84 4600 Series IP Telephones Application Programmer Interface (API) Guide Call Interaction Call Interaction The user can make and receive calls when in a Web browser session. When users re-enter the Web browser application, they are returned to the same point at which they left. If the user is entering text and leaves the Web browser using the Phone/Exit button, the user returns to the same state of text entry upon reentering the Web application. No dialing is supported when in text entry mode. On-hook keypad dialing to make a phone call is not allowed when the user is entering text. Text entry is allowed while the user is off-hook. When the phone is placed once again on-hook, text entry can be re-enabled at the point where it was disabled. When text editing is active, the user can be active on a call or receive a call, but cannot use the keypad to dial a phone number or for interactive voice recognition (IVR) prompts. The user must disable text entry prior to using keypad dialing to make a call or for IVR prompts. Requirements for Deck/Card Elements Valid WML elements include the following: Type of Elements Element Deck/card elements wml, card, template, head, access, meta Event elements do, ontimer, onenterforward, onenterbackward, onpick, onevent, postfield Tasks go, prev, refresh, noop Variables setvar User input input, select, option, optgroup, fieldset Anchors, Images, Timers, Variables a, anchor, img, setvar, timer Unsupported tags (not well-formed) cause the error message Page cannot be rendered to appear in the Top Line. The error message Page contains invalid tags displays on the Top Line if the XML parser fails. Issue 1 April 2005 85 About The Web Browser The attributes xml:lang, class, and id are universal attributes associated with every wml element. The Web browser supports these tags as follows: Attribute Support Comments xml:lang No - will not be used Currently only English is supported. class No - will not be used Only half of the phone browsers support this attribute. id Yes - will be used The three universal tags are not repeated in requirements for other tags.The Summary Of WML Tags and Attributes on page 99 is a complete list of all supported tags and attributes. Wireless Telephony Applications (WTA) Wireless Telephony Applications (WTA) are those applications designed to interact with the telephony-related functions present in a phone. The Web browser supports: ● Originating a call - Click to Dial ● Adding entries to the phonebook - Add to Speed Dial entries The Web browser supports the WTA application “click to dial” any link on the screen. A telephone handset icon displays to the left of a “click to dial” link when the link first display. The Add to Phonebook WTAI function “wtai://wp/ap;” adds a Name and Number to the telephone’s Speed Dial application. A Speed Dial icon displays to the left of an “add to phonebook” link. The wtai syntax is supported as an href attribute. As such, any tags supporting the href attribute can use the “add to speed dial” function. These tags are <a>, <anchor>, <img>, <do>, <onevent>, <select>, <option>, and <optgroup>. When a user activates the add to speed dial function, the Web transfers the name and number to the Speed Dial application. The user can edit the entry according to the current Speed Dial functionality. The WTAI URI scheme is as follows: wtai://<library>/<function> (; <parameter>)* [! <result>] 86 4600 Series IP Telephones Application Programmer Interface (API) Guide Wireless Telephony Applications (WTA) Scheme Definition: <> Indicates an enumerated operator. [] Indicates an optional section. I Indicates a pair of mutually exclusive options. ( )* Repeat none or multiple items. *( ) Repeat one or multiple items. library Name that identifies the library type, WTA Public uses library “wp.” function Function within a library, for example, “mc” for function “make call” in “wp” library. parameter Zero or more parameters sent to a function. Delineated by a semicolon “;”. result Start of result defined by “!”. Optional. Syntax Implementation Click to Dial Functionality To enable the click to dial functionality, use the following syntax: wtai://wp/mc;number You can embed this code into any valid WML tag that implements href or a hyperlink by associating these tags with a <go> tag. Examples of tags you can associate with the <go> tag are the <a> tag, <anchor>, <do>, <option>, or <onevent> tags. Issue 1 April 2005 87 About The Web Browser Click-to-dial using <a> tag: <?xml version=”1.0”?> <!DOCTYPE wml PUBLIC “-//WAPFORUM//DTD WML 1.3//EN” “http://www.wapforum.org/DTD/wml13.dtd”> <wml> <card id=”callid1” title=”Click-to-Dial Demo”> <p> Click on the link below to originate a call <a href=”wtai://wp/mc;5551212”>Call 5551212</a> </p> </card> </wml> The generated code is rendered as the following diagram: The code shows a hyperlink as Call 5551212 on the Web screen of an Avaya 4620 IP Telephone. A phone icon precedes this hyperlink, indicating the hyperlink is a “click-to-dial” number. When a user selects this link, the phone dials the string “5551212” or any phone number that follows a semicolon in the WTAI code. Note: Note: A phone icon is generated only when an <a> tag or <anchor> tag is used. 88 4600 Series IP Telephones Application Programmer Interface (API) Guide Wireless Telephony Applications (WTA) Click-to-dial using <anchor> tag: <?xml version=”1.0”?> <!DOCTYPE wml PUBLIC “-//WAPFORUM//DTD WML 1.3//EN” “http://www.wapforum.org/DTD/wml13.dtd”> <wml> <card id=”callid2” title=”Using anchor tag”> <p> <p align=”center”>***Customer Service***</p> Your order will ship in 3-5 days. If you have any questions, then <anchor>Call us <go href=”wtai://wp/mc;5551212”/> </anchor> </p> </card> </wml> The generated code is rendered as the following diagram: 723/,1( Web: Using anchor tag ***Customer Service*** Your order will ship in 3-5 days. )% If you have any questions, then Call us . )% )% )% )% )% . . . . . 6. 6. 6. 6. 3+21( (;,7 237,216 Issue 1 April 2005 89 About The Web Browser The code shows a hyperlink as Call Us on the Web page. When a user selects this link, the phone dials the string “5551212” or any number that follows a semicolon in the WTAI code. Click-to-dial using <onevent> tag: <?xml version=”1.0”?> <!DOCTYPE wml PUBLIC “-//WAPFORUM//DTD WML 1.3//EN” “http://www.wapforum.org/DTD/wml13.dtd”> <wml> <card id=”callid3” title=”Incorrect Login”> <onevent type=”ontimer”> <timer value=”50”/> <go href=”wtai://wp/mc;+1888 555 1212"/> </onevent> <p> You have exceeded number of tries. A call will be automatically launched in 5 seconds. </p> </card> </wml> The generated code is rendered as the following diagram: 723/,1( Web: Incorrect Login You have exceeded number of tries. A call will be automatically )% launched in 5 seconds. )% )% )% . )% . )% . . . . 6. 6. 6. 6. 3+21( (;,7 237,216 The code automatically dials the number “1888 555 1212" after 5 seconds, once the Web page loads. 90 4600 Series IP Telephones Application Programmer Interface (API) Guide Wireless Telephony Applications (WTA) Click-to-dial using <do> tag (softkey): <?xml version=”1.0”?> <!DOCTYPE wml PUBLIC “-//WAPFORUM//DTD WML 1.3//EN” “http://www.wapforum.org/DTD/wml13.dtd”> <wml> <card id=”callid4” title=”Click-to-Dial Demo”> <p> Please contact us for more information. </p> <do type=”accept” label=”Call Us” name=”dotag1”> <go href=”wtai://wp/mc;+18005552525”/> </do> </card> </wml> The generated code is rendered as the following diagram: 723/,1( Web: Click-to-Dial Demo )% Please contact us for more information. )% )% . )% )% . . &DOO8V 3+21( (;,7 )% 3$*( /()7 3$*( 5,*+7 237,216 The code is implemented as a Call Us softkey, indicating the softkey is a “click-to-dial” number. When the user selects this link, the phone dials the string “18005552525” or any number that follows a semicolon in the WTAI code. Issue 1 April 2005 91 About The Web Browser Add to Speed Dial Functionality Add to Speed Dial is referred to as Add to Phone Book by WTAI. When a user clicks Add to Speed Dial, the Web transfers the name and number to the telephone’s speed dial application. The speed dial application allows the user to edit and save the entry to their speed dial list. To enable the add to speed dial functionality, use the following syntax: wtai://wp/ap;number;name This code can be embedded into any valid WML tag that implements href or a hyperlink by associating these tags with a <go> tag. Examples of tags you can associate with the <go> tag are the <a> tag, <anchor>, <do>, <option>, or <onevent> tags. Add to Speed Dial using <a> tag: <?xml version=”1.0”?> <!DOCTYPE wml PUBLIC “-//WAPFORUM//DTD WML 1.3//EN” “http://www.wapforum.org/DTD/wml13.dtd”> <wml> <card id=”addap1” title=”Add to speed dial Demo”> <p> My number is: <a href=”wtai://wp/ap;5551212;My </p> </card> </wml> 92 4600 Series IP Telephones Application Programmer Interface (API) Guide Company”>5551212</a> Wireless Telephony Applications (WTA) The generated code is rendered as the following diagram: 723/,1( )% )% Web: Add-to-speed dial Demo My number is: )% )% 5551212 )% . )% )% . )% )% . )% )% . )% . . . . 6. 6. 6. 6. 3+21( (;,7 3$*( /()7 3$*( 5,*+7 237,216 The code adds the entry to the speed dial group with the name “My Company” on the telephone’s speed dial screen. A Save icon precedes this hyperlink, indicating the hyperlink is an “add to speed dial” number. When the user selects this link, the Web transfers the name and number, for example, “My Company” and “5551212,” to the telephone’s speed dial application. Users can then edit and save the entry to their speed dial list. Note: Note: A Save icon is generated only when an <a> tag or an <anchor> tag is used. Issue 1 April 2005 93 About The Web Browser Support for HTTP Authentication An authentication input screen displays when a response code of 401 (Unauthorized Response) or a response code of 407 (Proxy Authentication Required) is received. The authentication input screen has a text entry area for the user to enter a name and password, and two softkeys labeled Submit and Cancel. The word Authenticate appears on the Top Line. The Submit softkey is enabled whenever there is at least one character in one of the input fields. If the Submit softkey is selected, the original HTTP request is reissued and contents of the user-input fields used to generate the appropriate authentication header. The Cancel softkey is always enabled. If Cancel is selected, the contents of the user input controls are discarded, and the previous screen redisplays. The authentication screen is as follows: Web: Authenticate User Name: [Enter text here] Password: [Enter text here] Submit Cancel Page Loading When a page is loading, any additional button presses are not honored and the user receives an error tone. If a user tries to reach another link before a page is loaded, the page will continue to load and the user cannot go to another link until the page is loaded. 94 4600 Series IP Telephones Application Programmer Interface (API) Guide Error Tones Error Tones Error tones are consistent with other applications. When a labeled button is pressed but the button’s function is not specified for the current state of the browser, an error tone sounds. Presses of unlabeled Feature buttons or softkeys are ignored. When users press a Feature button or softkey inappropriately, they receive an error tone. HTTP Protocol The Web browser uses an HTTP client to communicate with Web servers. HTTP Header User Agent The User-Agent request-header field contains the Web browser’s signature. This is for: ● tracking requests, ● statistical purposes, ● tracing protocol violations, and ● automated user agent recognition to tailor responses to avoid particular user agent limitations. User agents should include the User-Agent request-header field with requests. The field can contain multiple product tokens and comments identifying the agent (browser) and any sub-products that form a significant part of the user agent. By convention, the product tokens are listed in order of their significance in identifying the application. User-Agent = “User-Agent” “:” 1*(product | comment) Example: User-Agent: CERN-LineMode/2.15 libwww/2.17b3 The User-Agent header is included in all HTTP messages initiated by the browser, formatted as specified below for the appropriate IP telephone. Issue 1 April 2005 95 About The Web Browser User-Agent Header String (4610SW IP Telephones) Identify the 4610 WML Web browser using the following user-agent string: "AVAYA/IGEN/v2.2+(4610x)/0.0" Where: Avaya : Company Name IGEN : Product Family Name V2.2 : Firmware version no 4610 : Set Type x : Reserved Extensions 0.0 : Minor Version Number 2.5 User-Agent Header String (4620/4620SW, 4621SW, 4622SW IP Telephones) Identify the 4620/4620SW, 4621SW and 4622SW WML Web browsers using the following user-agent string: Note: Note: The 4620SW, 4621SW, and 4622SW are aliased as 4620 IP Telephones, and therefore use the same header as that phone. "AVAYA/IGEN/v2.2+(4620x)/0.0" Where: Avaya : Company Name IGEN : Product Family Name V2.2 : Firmware version no 4620 : Set Type x : Reserved Extensions 0.0 : Minor Version Number 96 4600 Series IP Telephones Application Programmer Interface (API) Guide Error Messages User-Agent Header String (4625SW IP Telephones) Identify the 4625SW Web browser using the following User-Agent string: "AVAYA/IGEN/v2.5+(4625)/0.0" Where: Avaya : Company Name IGEN : Product Family Name V2.5 : Firmware version no 4625 : Set Type x : Reserved Extensions 0.0 : Minor Version Number Error Messages The Web browser supports the following HTTP standard Error Messages. The 4xx Status Codes indicate a client error in which the request contains bad syntax or cannot be fulfilled. The 5xx status codes indicate a server error in which the server failed to fulfill an apparently valid request. Table 10: HTTP Error Messages Status Code Failure Message 400 Bad Request The request could not be understood by the server due to incorrect syntax. 401 Unauthorized The request requires user authentication. 402 Payment Required 403 Forbidden The server has indicated it will not respond to your query. 404 Not Found The server has not found anything matching the request. 405 Method Not Allowed 406 Not Acceptable 407 Proxy Authentication Required 408 Request Time-out Meaning The request requires user authentication. 1 of 2 Issue 1 April 2005 97 About The Web Browser Table 10: HTTP Error Messages (continued) Status Code Failure Message 409 Conflict The request could not be completed due to a conflict with the current state of the resource. 410 Gone The requested resource is no longer available. 411 Length Required The server refuses to accept the request. 412 Precondition Failed 413 Request Entity Too Large The server refuses to accept the request because the request entity is too large. 414 Request-URI Too Large The request-URI is longer than the server can interpret. 415 Unsupported Media Type The server refuses to accept the request because it is in an unsupported format. 416 Requested range not satisfiable 417 Expectation Failed 500 Internal Server Error 501 Not Implemented 502 Bad Gateway The server, while acting as a gateway or proxy, received an invalid response from the upstream server it accessed. 503 Service Unavailable The server is currently unable to handle the request due to a temporary overloading or maintenance of the server. 504 Gateway Time-out The server, while acting as a gateway or proxy, did not receive a timely response from the upstream server specified. 505 HTTP Version not supported The server does not support, or refuses to support, the HTTP protocol version used in the request message. Meaning The server encountered an unexpected condition that prevented it from fulfilling the request. 2 of 2 When the client server receives a Status Code 431, it safely assumes there was something wrong with its request and treats the response as if it had received a Status Code 400. 98 4600 Series IP Telephones Application Programmer Interface (API) Guide Summary Of WML Tags and Attributes Summary Of WML Tags and Attributes Table 11: Summary Of WML Tags And Attributes Tag Attribute <a> accesskey href title <access> Supported? Yes Yes, except No for the 4625SW Yes Yes No <anchor> accesskey Yes Yes, except No for the 4625SW Yes title <b> No <big> No <br/> Yes <card> newcontext onenterbackward onenterforward ontimer ordered title <do> label name optional type Yes No, except Yes for the 4625SW Yes Yes Yes No Yes Yes Yes Yes Yes Yes, except x-* <em> No <fieldset> No <go> Yes Yes Yes Yes Yes accept-charset href method sendreferer 1 of 3 Issue 1 April 2005 99 About The Web Browser Table 11: Summary Of WML Tags And Attributes (continued) Tag Attribute Supported? <head> No <i> No <img> align alt height hspace localsrc src vspace width <input> accesskey ivalue emptyok format maxlength name size tabindex title type value Yes No Yes No Yes No Yes Yes No Yes No Yes Yes Yes Yes No No Yes Yes Yes <meta> No <noop> Yes <onevent> Yes <optgroup> title Yes Yes onpick title value No Yes Yes Yes align mode Yes Yes No <option> <p> 2 of 3 100 4600 Series IP Telephones Application Programmer Interface (API) Guide Summary Of WML Tags and Attributes Table 11: Summary Of WML Tags And Attributes (continued) Tag Attribute Supported? name value Yes Yes Yes <postfield> <prev> Yes <refresh> Yes ivalue multiple name tabindex title value Yes Yes Yes Yes No Yes Yes name value Yes Yes Yes <select> <setvar> <small> No <strong> No <table> No <td> No <template> onenterbackward onenterforward ontimer Yes Yes Yes Yes name value Yes Yes Yes <timer> <tr> No <u> No <wml> Yes {Universal Attributes} xml:lang class id No No Yes 3 of 3 Issue 1 April 2005 101 About The Web Browser 102 4600 Series IP Telephones Application Programmer Interface (API) Guide Chapter 7: Web Browser for 4610SW, 4620/4620SW, 4621SW, and 4622SW IP Telephones Introduction This chapter describes the capabilities and limitations of the Web browser in the following 4600 Series IP Telephones: ● 4610SW ● 4620/4620SW ● 4621SW ● 4622SW This chapter also provides suggestions to design Web sites for viewing on these telephones. This chapter is intended for IP telephone Web browser (Web page) designers, and assumes that readers are somewhat familiar with WML. Note: For information specific to Web development for the 4625SW IP Telephone, see Chapter 9: Web Browser for the 4625SW IP Telephone. Note: This chapter serves these functions: ● Presents the WML portions implemented in the 4610SW, 4620/4620SW, 4621SW, and 4622SW IP Telephone Web Access applications. Any limitations or non-standard implementations are mentioned. ● Provides considerations to develop effective Web pages for browser viewing. This chapter is not intended to provide technical details on setting up a Web server, nor does it provide information on Web server technologies. Finally, this document is not intended to provide an introduction to Web browser protocols or technologies. Note: Note: Unless otherwise noted, all references in this chapter to the 4610SW or 4620 IP Telephone apply equally to the 4620SW, 4621SW, and 4622SW IP Telephones. Issue 1 April 2005 103 Web Browser for 4610SW, 4620/4620SW, 4621SW, and 4622SW IP Telephones General Background The 4620/4620SW IP Telephone has a 168 pixel-by-132 pixel four grayscale LCD display. The available WML Web page display area is 153 pixels across by 96 pixels in height, arranged in 6 rows each 16 pixels in height. In addition, the top row displays the Web page title, if any, and the bottom row presents up to four softkey labels at one time. Softkey labels are used for <do> tags, each a maximum of 6 characters. The only relevant difference between the 4620SW and the 4621SW/4622SW IP Telephones is that the latter have backlighted displays. The 4610SW IP Telephone has a 168 pixel-by-80 pixel four grayscale LCD display. The available WML Web page display area is 153 pixels across by 44 pixels in height. In addition, the top row displays the Web page title, if any, and the bottom row presents up to four softkey labels at one time. Softkey labels are used for <do> tags, each a maximum of 6 characters. The 4610SW supports all the data types, features, tags, etc. that the 4620 supports. The only difference is the size of the display. Unless otherwise indicated, all subsequent references to the 4620 IP Telephone and its Web application apply equally to the 4610SW, 4620SW, 4621SW, and 4622SW IP Telephones. The data types and other features supported in this browser include: ● WML 1.3, June 2002 ● HTTP 1.1 The Summary Of WML Tags and Attributes on page 99 summarizes the detailed tag-related information provided in each section in this chapter. Note: Note: Unsupported WML 1.3 tags are not rendered, and do not cause the browser to fail. Unknown tags and misspelled tags generate error messages. WML Tags and Attributes WML Document Skeleton Certain tags define the basic framework of a WML document. The tags listed below make up the basic skeleton of a WML document. The designated IP telephones support these tags unless otherwise indicated. 104 4600 Series IP Telephones Application Programmer Interface (API) Guide WML Tags and Attributes ● Common tag attributes: xml:lang, class, and id. The attributes xml:lang, class and id are universal attributes associated with each WML element. The Web browser supports these tags: Attribute Comments xml:lang NOT SUPPORTED class NOT SUPPORTED id SUPPORTED ● <wml> tag - The <wml> tag defines a deck of cards and encloses all information about the deck. This tag is a required WML element and must contain at least one <card> tag. ● <head> tag - The <head> tag is an optional WML tag. This tag contains information that relates to the deck as a whole, including meta-data and access control elements. This tag is not supported. ● <meta> tag - The optional <meta> tag is contained between multiple <head> tags. This tag gives values for the parameters that describe the content of the deck. This tag is not supported. ● <card> tag - A single WML file can contain multiple cards, supporting the analogy of a “deck” of “cards” within a single WML file. A “card” is essentially the specification of one specific WML page. This is a mandatory tag. The card element attributes supported by the Web browser are as follows (unsupported attributes are indicated as such in the Comments column): Attribute Value(s) Description Comments newcontext true Re-initializes the browser context. Default is “false.” Clears out the current WML browser context, which entails emptying the navigation stack history and clearing out all variables. NOT SUPPORTED. false 1 of 2 Issue 1 April 2005 105 Web Browser for 4610SW, 4620/4620SW, 4621SW, and 4622SW IP Telephones Attribute Value(s) Description Comments ordered true Specifies the order of card content. When ordered is set to “true” the browser displays the content in a fixed order. When ordered is set to “false” the users decide the order as they navigate between content. Default is “true.” Optional. Sets a Boolean value that provides information on how the content of the current card is arranged. Used by the browser to organize the display presentation and layout. If set to true, content is organized in a linear sequence of elements - for example, a series of ordered or non-optional input elements. If set to false, content is in no natural order - for example, a series of unordered or optional input elements. The default is true. NOT SUPPORTED. false title cdata The title of the card. Can be used for title displays. SUPPORTED. onenterbackward url Occurs when the user navigates into a card by means of a “prev” task. SUPPORTED. onenterforward url Occurs when the user navigates into a card by means of a “go” task. SUPPORTED. ontimer url Occurs when a “timer” expires. SUPPORTED. 2 of 2 ● <template> tag - The <template> tag defines a template for all the cards in a deck. The “code” in the <template> tag is added to each card in the deck. Only one <template> tag for each deck can be specified. This tag can only contain <do> and <onevent> tags. The template tag attributes the Web browser supports are: Attribute Value(s) Description Comments onenterbackward url Occurs when the user navigates into a card by means of a “prev” task. SUPPORTED. onenterforward url Occurs when the user navigates into a card by means of a “go” task. SUPPORTED. ontimer url Occurs when the “timer” expires. SUPPORTED. Note: The implication for rendering WML pages is that the local environment always overrides a global template for <do> types with the same name and type. If there is a onevent in the template and a local onevent of the same type, the local onevent takes precedence over the global one. Note: ● <access> - The <access> tag limits access within the deck to certain cards. This tag is not supported. 106 4600 Series IP Telephones Application Programmer Interface (API) Guide WML Tags and Attributes Text Elements See Enabling Text Entry on page 79 and Text Editing Modes on page 81 for guidelines to enable standard text entry and facilitate text editing. See Access Key Input Mode (AIM) on page 119 for information about an alternate text entry method using access keys. ● <br/> tag - The <br/> tag tells the browser to add a line break to the text at the point the element is written. ● <p> tag - The <p> tag specifies a paragraph of text with alignment and line wrapping properties. All text data must be contained inside this tag. Only <do> tags, wml and card elements can exist outside the <p> tag. When rendered, this tag causes subsequent text to start on the next line. Attribute Value Description Comments align left right center Aligns the paragraph. Default is “left.” SUPPORTED. mode wrap nonwrap Sets whether a paragraph wraps lines or not. Since horizontal scrolling is not supported, all text lines wrap. WML pages with mode=nowrap are ignored, and the text wraps. If the align attribute is set to center or right, the mode attribute is set to nowrap for all tags except <img>. NOT SUPPORTED. The following tags are not supported but the content inside the tags is rendered as normal text: ● <table> tag - The <table> tag specifies a table. This tag is not supported. ● <td> tag - The <td> tag defines individual cell contents in each row of a defined table. This tag is not supported. ● <tr> tag - The <tr> tag defines each row of a defined table. This tag is not supported. Issue 1 April 2005 107 Web Browser for 4610SW, 4620/4620SW, 4621SW, and 4622SW IP Telephones Text Formatting Tags The following tags are not supported but the content inside the tags is rendered as normal text: ● <b> tag - The <b> tag specifies bold text. This tag is not supported. ● <big> tag - The <big> tag specifies large font text. This tag is not supported. ● <em> tag - The <em> tag specifies emphasized text. This tag is not supported. ● <i> tag - The <i> tag specifies italicized text. This tag is not supported. ● <small> tag - The <small> tag specifies small font size text. This tag is not supported. ● <strong> tag - The <strong> tag specifies strongly emphasized text. This tag is not supported. ● <u> tag - The <u> tag specifies underlined text. For the 4620 Web Access application, only links appear underlined. This tag is not supported. Anchor Elements ● <a> tag - <a> elements define <go> tasks that require a URL link specification. All <a> tags are rendered as underlined. All <a> nested tags like br and img are supported. One anchor is rendered per line. A maximum of six anchors can be rendered on the screen at one time. The user selects the link by pressing one of the Feature buttons associated with that display line. Attribute Value Description Comments href url REQUIRED. Defines where to go when the user selects the link. SUPPORTED. title cdata Defines a text identifying the link. SUPPORTED. accesskey 1,2,3,4,5,6, 7,8,9,0,*,# A keypad key the user can press as a shortcut to selecting a link. SUPPORTED. ● <anchor> tag - <anchor> elements define <go> tasks that require a URL link specification. All anchors are rendered as underlined. All <anchor> nested tags (br, go, img, prev, and refresh) are supported. A maximum of six anchors can be rendered on the screen at one time. The user selects a link by pressing one of the Feature button associated with that display line. You cannot specify more than one <onevent> tag inside an <anchor> tag. Attribute Value Description Comments title cdata Defines a text identifying the link. SUPPORTED. accesskey 1,2,3,4,5,6,7, 8,9,0,*,# A keypad key the user can press as a shortcut to select a link. SUPPORTED. 108 4600 Series IP Telephones Application Programmer Interface (API) Guide WML Tags and Attributes Image Elements ● <img> tag - Use the <img> tag to place an image in the text flow. The telephones (4610SW, 4620/4620SW, 4621SW, 4622SW) support black-and-white Wireless Bitmap (WBMP) image rendering, up to 152 pixels wide and 1536 pixels (96 lines of 16 pixels high each) high. Up to 3 Mbytes of volatile memory is available for display of all WBMP images. We do not recommend large images. Images can be part of a link and can be selectable. At most, each card can display 10 images. Attribute Value Description Comments align top middle bottom Aligns the image. NOT SUPPORTED. alt cdata REQUIRED. Sets an alternate text to be displayed if the image is not displayed. If this is not supplied, either default text displays (if available) or the following message displays: “Image not displayed.” SUPPORTED. height px (pixel) % Sets the height of the image. NOT SUPPORTED. The true height parameters are determined by parsing the WBMP information. hspace px % Sets white space to the left and right of the image. SUPPORTED. The default is 1 pixel. localsrc cdata Sets an alternate representation for the image. NOT SUPPORTED. src url REQUIRED. The path to the image. Must be a .wbmp file. SUPPORTED. vspace px % Sets white space above and below the image. SUPPORTED. The default is 1 pixel. width px % Sets the width of the image. NOT SUPPORTED. The true width parameters are determined by parsing the WBMP/ JPEG information. Issue 1 April 2005 109 Web Browser for 4610SW, 4620/4620SW, 4621SW, and 4622SW IP Telephones Event Elements ● <do> tag - The <do> tag is a card-level user interface. It serves as a general mechanism to activate a task, usually performed by the user clicking a word or phrase in the display. A task is performed in response to an event. There are four tasks in WML: go, noop, prev, and refresh. The mandatory type attribute provides information about the intent of the element, helping to improve processing. If the Web browser does not recognize the specified type, the specified type is treated as unknown. For example, testing, experimental, and vendor specific types would be unknown. The browser only renders WML 1.2 tags. Any other tags cause an error and the user receives a “not a valid wml page” error statement. Attribute Value Description Comments type accept prev help reset options delete unknown x-* vnd.* REQUIRED. Defines the type of the “do” element. SUPPORTED. label cdata Creates a label for the “do” element. Optional. Creates a string label for the element. The telephone browser imposes a six character limit. SUPPORTED. name mmtoken Defines a name for the “do” element. SUPPORTED. optional true false If set to true, the browser ignores this element. If set to false, the browser does not ignore this element. Default is “false.” Optional. SUPPORTED. Type Description Comments accept Acknowledgement of acceptance. SUPPORTED. delete Delete item. SUPPORTED. help Request for help. SUPPORTED. options Options or additional operations. SUPPORTED. prev Backward navigation. SUPPORTED. reset Clearing or reset. SUPPORTED. X-*n or x-*n Experimental. SUPPORTED, but treated as “unknown.” 110 4600 Series IP Telephones Application Programmer Interface (API) Guide WML Tags and Attributes <do> tags are rendered as softkey labels on the bottom line of the display. <do> tags are specified per WML page and therefore are page context-sensitive. The eight “do” types are labeled either specifically in a WML page or by a browser-dependent label. If no labels are given, then the “do” types have the following default labels: Type Default Label if no label specified accept ACCEPT delete DELETE help HELP options OPTIONS prev BACK reset RELOAD X-*n or x-*n UNKNOWN Vnd* Any mix of upper or lower cases AVAYA. Available for future use, but currently UNKNOWN. If no <do> tags were specified, no softkeys display: If one <do> tag was specified, these softkeys display: 1st DO If multiple <do> tags are specified, display them as follows: 1st DO 2nd DO 3rd DO MORE 2nd DO 3rd DO MORE 5th DO Etc. MORE Page 1 softkeys: 1st DO Page 2 softkeys: 4th DO Note: Note: If more than one page of softkey labels are specified, pressing the MORE softkey automatically presents the user with the next page of labels. If the last page displays and the user presses the MORE softkey, the first page of labels is then displayed. As implied in the examples, the Softkey buttons are labeled in sequential order of the <do> tags. Issue 1 April 2005 111 Web Browser for 4610SW, 4620/4620SW, 4621SW, and 4622SW IP Telephones ● <onevent> tag - The onevent tag serves as a container for code that you want executed automatically when one of the four intrinsic events occurs. The onevent element is said to bind (associate) the tasks (code) to the event for the element. You must specify the intrinsic event using the mandatory type attribute. For example, when a user presses the BACK softkey, instead of being routed to the previous screen, the user is directed to another specified page because this tag carries out an onevent backward event. The intrinsic events are: Event Permitted Tags Description onenterbackward card or template Occurs when a <prev> navigates back onto a card. SUPPORTED. onenterforward card or template Occurs when a <go> navigates into a card. SUPPORTED. onpick option Occurs when a user selects/ deselects an item. SUPPORTED. ontimer card or template Occurs when the time expires. SUPPORTED. The template element creates code that is inserted into all cards in a single deck. The nested tags are: go, noop, prev, and refresh. There are no visual implications for supporting the <onevent> tag. ● Attribute Value Description Comments type onenterbackward onenterforward onpick ontimer REQUIRED. Specifies the type of the “onevent” element. SUPPORTED. <postfield> tag - Use the postfield tag to set a name/value pair that can be transmitted during a URL request to an origin server, the request’s source. The name attribute sets the name, which must be a valid WML variable name. The value attribute sets the value. There are no visual rendering implications with this tag. Attribute Value Description Comments name cdata REQUIRED. The name of the field. SUPPORTED. value cdata REQUIRED. The value of the field. SUPPORTED. 112 4600 Series IP Telephones Application Programmer Interface (API) Guide WML Tags and Attributes Task Elements ● <go> tag - The go element can contain one or more postfield elements. If a go element’s destination is a card within the same deck, all postfield elements are ignored. The go element can also contain one or more setvar elements. Unlike postfield elements, there are no destination limitations on passing information contained in the setvar elements. The <go> nested tags, postfield and setvar, are supported. Attribute Value Description Comments href url REQUIRED SUPPORTED. accept-charset Charset_list A comma- or space-separated list of character encoding the server must be able to process. The default value is “unknown”. SUPPORTED. method post Sets how to send the data to the server. Default method is get. When method=”get”, the data is sent as a request with?data appended to the URL. A get can be used only for a limited amount of data, which is a disadvantage. If you send sensitive information it is displayed on the screen and saved in the Web server's logs. With method=”post”, the data is sent as a request with the data sent in the body of the request. This method has no limit, and sensitive information is not visible. The data sent in a get method is limited to ASCII characters. The data sent in a post method can include non-ASCII characters that are included as part of a value attribute in an <input>, <select>, or <option> tag that is part of the current WML page. SUPPORTED. If set to true, the browser sends the URL of the current deck with the request, which allow servers to perform simple access control on decks, based on which decks are linking to them. Default is “false.” SUPPORTED. get sendreferer true false ● <noop> tag - The noop tag dictates that no operation should be done. This tag can be used on the card level to prevent an event that is specified on the deck level by the template element from occurring. This tag can only be contained in either a do or onevent element. Issue 1 April 2005 113 Web Browser for 4610SW, 4620/4620SW, 4621SW, and 4622SW IP Telephones An example of noop is to use a <do> tag to add a “Back” link to the card. When users click the “Back” link, generally they should be taken back to the previous card. However, the <noop> tag prevents this operation. When the user clicks on the “Back” link nothing happens. ● <prev> tag - The prev tag specifies navigation to the previous URL in the history. ● <refresh> tag - The refresh tag specifies a refresh task whereby whatever card is being displayed is refreshed. This task specifies the need for an update of the user agent context as specified by the contained <setvar> elements.This tag can only be nested inside an anchor, do, or onevent element. Xml:lang is not an associated attribute. User-visible side effects of the update can occur during the processing of the <refresh>. Input Elements ● <input> tag supported - The input tag specifies a point where the user is prompted to enter text. Attribute Value Description Comments accesskey 1,2,3,4,5, 6,7,8,9,0, *,# A Dialpad button used to access a link containing selections. If the element is a Radio button, pressing the access key is a shortcut for selecting the Radio button. If the element is a check box, pressing the access key is a shortcut to check or uncheck the box. If the element is a Submit or Reset button, pressing the access key is a shortcut for pressing that button. For example, pressing a Submit button’s access key submits the applicable form. NOT SUPPORTED. name nmtoken REQUIRED. The name of the variable that is set with the result of the user's input. SUPPORTED. emptyok true false Sets whether the user can leave the input field blank or not. Default is “true.” SUPPORTED. 1 of 2 114 4600 Series IP Telephones Application Programmer Interface (API) Guide WML Tags and Attributes Attribute Value format A a N X x M m *f nf ivalue Description Comments Sets the data format for the input field. Default is “M.” SUPPORTED. A = uppercase alphabetic or punctuation characters a = lowercase alphabetic or punctuation characters N = numeric characters X = uppercase characters x = lowercase characters M = all characters m = all characters *f = Any number of characters. Replace the f with one of the letters above to specify what characters the user can enter. nf = Replace the n with a number from 1 to 9 to specify the number of characters the user can enter. Replace the f with one of the letters above to specify what characters the user can enter. The user cannot exit the input box unless the correct number or type of characters is entered. The user does not receive an error message if incorrect data is entered. The attribute value takes precedence over ivalue. SUPPORTED. maxlength number Sets the maximum number of characters the user can enter in the field. SUPPORTED. size number_ of_char Sets the width of the input field. NOT SUPPORTED. tabindex number Sets the tabbing position for the input field. NOT SUPPORTED. title cdata Sets a title for the input field. SUPPORTED. type text password Indicates the type of the input field. The default value is “text.” SUPPORTED. value cdata Sets the default value of the variable in the name attribute. SUPPORTED. 2 of 2 Issue 1 April 2005 115 Web Browser for 4610SW, 4620/4620SW, 4621SW, and 4622SW IP Telephones The 4620/4620SW, 4621SW, and 4622SW’s six display lines associated with Feature buttons are available for input elements. The Top Line of the display cannot be used for input. The input tag causes an automatic line break before and after input text. Only one input tag can exist per display line. When a user views a page with the input tag specified, the first thing that shows up in the Top Line is the card title, if specified. When the user scrolls to the first line containing input, the Top Line shows the input box title if specified, otherwise the card title is shown. The Top Line displays the card title for all non-input text. When the input box is selected, a vertical line (the “cursor”) appears at the left side of the input box. The attribute type password should only be used when it is important to not display the user' s password on the screen. Asterisks are displayed instead. It is also important that the password not be cached. The phrase [enter text here] appears for all input tags if the value attribute is null. If the author specifies a non-null content in the value attribute, that content displays between brackets for that input tag. Only the correct size, type, and number of characters are accepted in to the input box. For example, if alpha text is specified and the user types in a symbol or numeric text, the user input is not accepted. The screen repaints and the user has to re-enter the text. If the wrong kind of text is typed, the user receives an error tone. If the “n” (number) value is specified and the user types in the incorrect number of characters, that input is rejected. See Text Elements for other text entry guidelines. ● <fieldset> tag - The fieldset tag is used to group logically related elements in a card. This tag is not supported. ● <optgroup> tag - Sets of <optgroup> brackets can be put around <options> in a <select> list. The results in breaking a list into sublists. ● Attribute Value Description Comments title cdata Sets a title for the optgroup element. SUPPORTED. <option> tag - A set of option tags is needed to specify each individual item in a list. This tag must be used with the select tag. Attribute Value Description Comments onpick url Sets what is going to happen when a user selects an item. SUPPORTED. title cdata Sets a title for the option SUPPORTED. value cdata Sets the value to use when setting the “name” variable in the select element. SUPPORTED. 116 4600 Series IP Telephones Application Programmer Interface (API) Guide WML Tags and Attributes ● <select> tag - The select tag allows for the definition of a list, embedded in a card. This tag allows the user to choose inputs from a list rather than having to type a value. The select tag must be used with the option tag. Attribute Value Description Comments name nmtoken Names the variable that is set with the index result of the selection. SUPPORTED. ivalue cdata Sets the pre-selected option element. If none is specified, the first item in a list is automatically selected. SUPPORTED. multiple true false Sets whether multiple items can be selected. Default is “false”. False is used for a single selection. SUPPORTED. tabindex number Sets the tabbing position for the select element. NOT SUPPORTED. title cdata Sets a title for the list. SUPPORTED. value cdata Sets the default value of the variable in the name attribute. SUPPORTED. A single select is rendered with a small square containing a dot. A multiple select is rendered as multiple squares - blank if there is nothing in them, else a lowercase “x”. Variable Elements ● <setvar> tag - There are no visual rendering implications with this tag. Attribute Value Description Comments name cdata REQUIRED. Sets the name of the variable. SUPPORTED. value cdata REQUIRED. Sets the value of the variable. SUPPORTED. Issue 1 April 2005 117 Web Browser for 4610SW, 4620/4620SW, 4621SW, and 4622SW IP Telephones ● <timer> tag - The timer tag sets a timer that starts counting. This tag must be used with <onevent type=”ontimer”> to be useful. Attribute Value Description Comments value cdata REQUIRED. Sets the default value of the variable defined in the name attribute. SUPPORTED. name nmtoken Names the variable that is set with the value of the timer. SUPPORTED. Character Entities As with any syntactic language, WML has certain characters that have special meaning. The two most obvious of these characters are the < and > symbols, which surround all tags. These characters cannot be typed in directly if the designer's intent is to display these characters. Thus, all characters that can be displayed in a Web browser have numeric values assigned to them. The numeric values are entered into the source Web page as &#nnn; where nnn is a three-digit value. For example, the < symbol is entered as '<'. In addition, many of these characters also have names assigned. Name values are entered into the source Web page as &name; where name is the WML name associated with this character. For example, the < symbol would be entered as '<'. The set of characters defined by the World Wide Web Consortium are fully supported in the 4620 browser in conformance with the standard. For convenience, here are a few of these key symbols: Description Symbol Numeric Entity Name Entity double quotation “ " " ampersand & & & apostrophe ‘ ' ' less than < < Colors and Fonts The 4610SW/4620/4620SW/4621SW/4622SW Browser supports a four grayscale display. Because of the telephone’s screen size, the browser has only a single font available for use, which is based on Latin-1. Only a normal font weight is supported. Bold, italic and different font sizes are not supported. The font the telephone uses defines characters to have at most six pixels in width. 118 4600 Series IP Telephones Application Programmer Interface (API) Guide Access Key Input Mode (AIM) Access Key Input Mode (AIM) The Web browser considers cards that include the accesskey attribute and which require the user to enter text to be in a new Text Entry mode. That new mode is called Access Key Input Mode (AIM). Unlike standard Text Entry mode, AIM arbitrates dialpad use between the phone and Web applications that use accesskey attributes. When a Web page with one or more valid accesskey attributes loads completely, the Web page takes control of the dialpad. With standard Text Entry, text entry is considered complete once a URL is launched and the Web relinquishes control of the dialpad. AIM works differently than standard text editing by maintaining control of the dialpad over the course of loading one or multiple new Web pages. AIM stays in effect until either: ● the user presses the Phone/Exit or Options button, ● the phone goes off-hook to make or receive a call, or ● a Web page without any valid accesskey attribute is completely loaded. Support for Access Keys The accesskey attribute assigns a particular key on the phone to an element. Its purpose is to allow the user to activate a particular element using a single key. For the IP telephone’s Web browser, an access key is a single Dialpad button and the element is a URL. The access keys associated with the IP telephone Web browser are as follows: Accesskey 1 2ABC 3DEF 4GHI 5JKL 6MNO 7PQRS 8TUV 9WXYZ 0 * # Issue 1 April 2005 119 Web Browser for 4610SW, 4620/4620SW, 4621SW, and 4622SW IP Telephones In Table 12 each of the Dialpad button access keys is mapped to a different URL. For example, when the “2” button on the dialpad is pressed, the example2.com URL is launched because it is mapped to the “2ABC“ button, as shown in the following code example: <a href="http://example.2ABC.contents/wml" accesskey="2”> Similarly, to inform the Web server that any of the Keypad buttons were pressed, the Table 12 example URLs would be launched for any of the 12-keypad buttons. Each button is assigned to a different access key and URL. Each button to be tracked must have a URL mapped to it in the page. If the page author wants to know whether any of the 12 possible Dialpad buttons are pressed, then the page must include access keys pointing to specific URLs. Table 12: Dialpad/URL Mapping Example Dialpad Button Example 1 <a href=”http://URL1” accesskey=”1">1</a> 2ABC <a href=”http://URL2” accesskey=”2">2</a> 3DEF <a href=”http://URL3” accesskey=”3">3</a> 4GHI <a href=”http://URL4” accesskey=”4">4</a> 5JKL <a href=”http://URL5” accesskey=”5">5</a> 6MNO <a href=”http://URL6” accesskey=”6">6</a> 7PQRS <a href=”http://URL7” accesskey=”7">7</a> 8TUV <a href=”http://URL8” accesskey=”8">8</a> 9WXYZ <a href=”http://URL9” accesskey=”9">9</a> 0 <a href=”http://URL10” accesskey=”0">0</a> * <a href=”http://URL11” accesskey=”*">*</a> # <a href=”http://URL12” accesskey=”#">#</a> Button presses do not distinguish among the characters a button represents. For example, if a user presses Dialpad button 2, it is impossible to distinguish anything other than the user pressed the second button. No refinement is made to inform the Web server that the user meant 2 or A or B or C. An AIM application is one where the page currently being loaded contains <a> or <anchor> tags with access keys defined. The application developer has a choice of mapping every keypad entry to a URL or can opt to leave some unmapped keypad entries. The <a> or <anchor> tags support the accesskey attribute. The correct syntax is: WML tag <a> or <anchor> Note: href=”URL” accesskey=dialpad button Note: The <input> tag does not support the accesskey attribute because AIM and standard Text Entry cannot be mixed on one page. Example: <a href="http://Example.2ABC.contents/wml" accesskey="2"> 120 4600 Series IP Telephones Application Programmer Interface (API) Guide Access Key Input Mode (AIM) Example of Text Entry Using AIM: The user wants to look up a person named Oscar in a Directory database. The user presses a Directory softkey on the Home page that initiates the AIM application. Figure 17 shows a sample starting page. The user presses the 6MNO Dialpad button because it contains the first letter of the name to be found. In most cases, AIM avoids the user having to enter the entire first and/or last name. AIM also avoids multiple key presses to select letters, for example, pressing 6 four times to select the letter O. The user then presses the dialpad number key that corresponds to the second letter in the name once, etc. There is no need to press a number key multiple times to select a letter. Figures 18 through 20 illustrate locating the name “Oscar” in the directory. Figure 17: Starting Page 723/,1( :HE'LUHFWRU\$SSOLFDWLRQ )% >(QWHU1DPH+HUH@ )% )% >(QWHU3KRQH1XPEHU+HUH@ )% )% >(QWHU(PDLO$GGUHVV+HUH@ )% )% >(QWHU2UJDQL]DWLRQ&RGH+HUH@ )% )% )% )% )% 6HDUFK &OHDU 6. 6. +HOS 6. 6. Issue 1 April 2005 121 Web Browser for 4610SW, 4620/4620SW, 4621SW, and 4622SW IP Telephones Figure 18: User presses “6” one time for “O” and the closest match to “O” displays. 723/,1( 8VHGLDOSDGIRUWH[WHQWU\ )% 0D% )% )% 0DEHO6 )% )% 0DNL7 + )% )% 0DSSOH( 5 )% )% )% )% )% 6. 6. 6. 6. Figure 19: User presses “7” one time for “S,” narrowing the search. 723/,1( 8VHGLDOSDGIRUWH[WHQWU\ )% 7RSKX7 )% )% 2PDEHO6 )% )% 2PDNL7 + )% )% 2PDSSOH( 5 )% )% )% )% )% 6. 6. 6. 6. 122 4600 Series IP Telephones Application Programmer Interface (API) Guide Access Key Input Mode (AIM) Figure 20: User presses “2” one time for “C” and the search result displays the desired result - Oscar Hillard. 723/,1( 8VHGLDOSDGIRUWH[WHQWU\ )% 2VFDU+LOODUG )% )% )% )% + )% )% 5 )% )% )% )% )% 6. 6. 6. 6. AIM Considerations AIM mode cannot be enabled when the browser is not in focus. AIM maintains dialpad control while loading one, or multiple, new Web pages as long as the accesskey attribute is part of the page. When a user presses a Dialpad button, or “access key,” the browser launches a URL without displaying any characters to the user. The button press information is sent to the URL and the Web page author returns subsequent screens. What the user views is up to the page author. Access key supplies the mechanism to capture button press information and send that information to a Web server. The user is automatically in AIM when the page loads (attribute=accesskey) and can begin pressing Dialpad buttons to send button press information. As an example, you may want to have a link from your Home page to the AIM application or wherever else such a link makes sense. When a user clicks a button that has not been mapped to a URL and the browser is in AIM mode, nothing happens. Having a Clear softkey on the AIM page allows a user to clear previous search results and start a new search. The page author must set up a Clear softkey that loads the first AIM page to allow this action. Issue 1 April 2005 123 Web Browser for 4610SW, 4620/4620SW, 4621SW, and 4622SW IP Telephones The Web pages resulting from Dialpad button presses are part of the history stack. This is normal browser behavior. AIM is re-enabled when the phone goes back on-hook and the current Web page has valid access keys. An error beep sounds if the user presses any Dialpad buttons while a new page is loading. If the accesskey attribute is on the page, then: ● Text Entry/Editing (TE) softkeys do not appear when the user is in AIM. AIM does not have the default Text Editing softkeys such as alpha, backwards, etc. ● The Top Line help states “Use dial pad for text entry” when the user is in AIM mode. The message displays when the page first loads and when the user restarts AIM. When AIM is disabled the message no longer appears. When AIM is restarted, the message reappears. ● The <a> and <anchor> links that would normally appear on the screen are hidden. ● Normal text entry (<input> tags) is prohibited because it cannot co-exist with access keys. If, by error, regular Text Entry and access keys are on the same page, AIM rules take precedence. This means when the accesskey attribute appears on a page, the regular text entry (TE) softkeys do not appear. ● If the user enters the AIM Application, and there is an input field for TE, the field will not get focus. Focus does not occur, regardless of how many times the user selects the Feature button next to the TE input field. Since TE is prohibited when access keys are present on a page, TE does not get focus. ● The server must send back a resulting page with the access keys for each Dialpad button in the page. Doing so maintains AIM across pages and retains dialpad ownership. The URLs associated with each accesskey can differ from the starting page in case the proxy server caches Web pages. For example, after the page with access keys loads and the user pushes Feature button 2, the Web server launches the URL: <a href="http://URL2" accesskey="2">2<\a> In the resulting page, the page author can send a different URL to be associated with the same access key: <a href="http://URL2a" accesskey="2">2<\a> 124 4600 Series IP Telephones Application Programmer Interface (API) Guide Access Key Input Mode (AIM) Terminating AIM The user ends AIM by: ● Pressing the Phone/Exit button or Options button. ● Selecting (loading) a Web page that does not contain any valid accesskey attributes. Pressing any of the navigation scroll Feature buttons does not terminate AIM. This is because the user might want to scroll to see results, then continue a search. AIM is re-enabled when the user goes back on hook and the current Web page has valid accesskeys. Issue 1 April 2005 125 Web Browser for 4610SW, 4620/4620SW, 4621SW, and 4622SW IP Telephones 126 4600 Series IP Telephones Application Programmer Interface (API) Guide Chapter 8: Web Applications Introduction If you have a corporate database that supports the Lightweight Directory Access Protocol (LDAP), Avaya’s Thin Client Directory application can communicate with that database. IP telephone users can then use their phones to search for names, telephone numbers, or other information. Using search results, users can call a person directly, store a number on a Speed Dial button, and view more details about the person. The Thin Client Directory application applies only to these IP telephone types: ● 4610SW ● 4620/4620SW ● 4621SW ● 4622SW Note: All subsequent references to the 4620 IP Telephone in this chapter apply equally to the 4610SW, 4620SW, 4621SW, and 4622SW IP Telephones. Note: This chapter provides the information you need to install and administer Avaya’s Thin Client Directory. It has four primary sections: ● Application Platform Requirements - Describes the operating environment for the Thin Client Directory application. ● Installing the Thin Client Directory on the Server - Lists the Avaya-provided download files needed for installation, pre-installation requirements, and step-by-step installation instructions. ● Web Application User Interface - Describes and illustrates the Directory application screens with which IP telephone users perform Directory searches and review search results. ● Directory Database Administration Interface - Describes and illustrates the administration screens with which you define LDAP attributes and configure the user interface screens. Figure 21: High-Level Thin Client Architecture on page 128 provides a high-level overview of the Thin Client architecture. Issue 1 April 2005 127 Web Applications Figure 21: High-Level Thin Client Architecture DIRECTORY DATABASE SERVER ADMINISTRATION FILE DIRECTORY APPLICATION DIRECTORY ADMINISTRATION HTTP SERVER APPLICATION SERVER HTML WML Telephone As Figure 21 shows, the Directory application and its administration are co-resident with an HTTP server. Administration screens allow all Directory application parameters like the directory database server’s IP Address, allowable search fields, etc. to be set using a PC browser. The Web browser can be co-resident on the Directory application server. When a 4620 IP Telephone user starts a directory search, the user’s browser sends the search criteria to the Directory application. The Directory application sends a query based on administered parameters to the directory database, usually located on a separate server. The directory database server then returns search results to the Directory application. The Directory application formats the results in the appropriate markup language and sends the results back to the end user. The user then has several options regarding the search results. 128 4600 Series IP Telephones Application Programmer Interface (API) Guide Application Platform Requirements Application Platform Requirements The LAN Administrator or System Administrator must provide and configure the LDAP server and the operating environment on which to install the Thin Client Directory. The recommended server configuration is Red Hat for Linux 8.0 or greater software. This version facilitates optimal, automatic Thin Client Directory application installation. Other configurations, not recommended by Avaya, require HTTP/Apache 2.0 and PHP Version 4.2.0, with PHP Version 4.2.4 preferred. Installing the Thin Client Directory on the Server Pre-Installation Requirements (Apache/PHP) Before you install the Thin Client Directory application, you must install the PHP Apache module included with Red Hat 8.0. If necessary, you can download this module for free from the http://www.php.net/downloads.php Web site. Go to http://www.php.net for installation instructions. Otherwise, the distribution you download will contain its own set of installation instructions. If you are not using Red Hat 8.0 or greater, Apache must be configured to accept PHP so the Web server recognizes it. This process differs depending on whether PHP is being installed on Linux or Windows. Further configuration variations depend on the Apache version installed. Avaya-Provided Download Files Two Thin Client Directory application versions are available from the Avaya Web site at: http://avaya.com/support The recommended download version (avayadir-1.0-1.0.i386.rpm) is for Red Hat Linux 8.0 or greater installations only. This download allows the Red Hat Package Manager to automatically install the required directories and associated files in the correct locations. Note: Note: A README file containing Thin Client Directory application installation instructions is also available from the Avaya Web site, if needed. Issue 1 April 2005 129 Web Applications The other application version available is a Winzip-readable file. This file is for those installations with Windows or any other operating system not using Red Hat for Linux 8.0 or greater. This version requires that you select specific files to download. You must also perform additional server/file customization to properly install the Thin Client Directory application. The download contains these directories: ● avayadiradmin - Files needed for the HTML administration part of the LDAP application. Includes the PHP files needed for administration. ● avayadirclient - Files necessary for the telephone/user interface. These files perform the search query and return search results to the telephone’s display screen. ● avayadir.ini - Files containing settings that control the administration and client application. This is a protected directory that cannot be browsed. During the unzip process, it is placed in the same root as the other two sub-directories. If desired, you can move this directory outside the HTML path, providing the new path is PHP-accessible. ● avaydirinclude - Common files shared between the Directory administration and client (end user) interface. ● avayadirerror - Text files for search-related error message generation. ● avayadirhelp - Text files containing end user Directory assistance. Installing the Thin Client Directory Installations using Red Hat for Linux 8.0 (or greater): 1. Login at the root. 2. Copy this download file to the Linux system: avayadir-1.0-1.0.i386.rpm. 3. Run the following command from the command line to extract the files to the /var/www/html/avayadir directory: rpm –ivh avayadir-1.0-1.0.i386.rpm. 4. To enable password control for the Directory Administration application, create a directory entry in the httpd.conf file as follows: Note: Note: The correct filename is httpd.conf, not http.conf. <Directory “/var/www/html/avayadir/avayadiradmin”> AuthType Basic AuthName “Password Required” AuthUserFile “/var/www/password/avayadirpasswd” Require user ldap </Directory> 130 4600 Series IP Telephones Application Programmer Interface (API) Guide Installing the Thin Client Directory on the Server 5. The default user/password combination is ldap/ldap. To change the password, run “htpasswd/var/www/passwd/avayadirpasswd ldap.” 6. Open the file /etc/php.ini for editing. 7. Set the option “short_open_tag = On” in php.ini. 8. Uncomment the line “extension=ldap.so” in php.ini. 9. To finish, restart the Web server by running “/sbin/service httpd restart.” 10. Now test everything out by pointing a browser at the newly created directory structure such as <http://yourserver/avayadir/avayadiradmin/index.htm>. Installation for any other Unix-based operating system: 1. Download the winzip file and run: unzip avayadir-1.0.zip 2. Copy the entire tree that was created by running unzip under the documentRoot of the httpd server. For example, if your directory is /var/www/html, the directory created is /var/www/html/avayadir. 3. Use the command “chown apache:apache /var/www/html/avayadir/ avayadirini” to change the user and group of the directory /var/www/html/avayadir/ avayadirini to user:apache, group:apache. 4. Run “chmod 755 /var/www/avayadir/avayadirini” to change the permission of the /var/www/html/avayadir/avayadirini to 755. 5. To enable password control for the Directory Administration application, create a directory entry in the httpd.conf file as follows: Note: Note: The correct filename is httpd.conf, not http.conf. <Directory “/var/www/html/avayadir/avayadiradmin”> AuthType Basic AuthName “Password Required” AuthUserFile “/var/www/password/avayadirpasswd” Require user ldap </Directory> 6. The default user/password combination is ldap/ldap. To change the password, run “htpasswd /var/www/passwd/avayadirpasswd ldap”. 7. Open the file /etc/php.ini for editing. 8. Set the option “short_open_tag = On” in php.ini. 9. Uncomment the line “extension=ldap.so” in php.ini. 10. To finish, restart the Web server by running “/sbin/service httpd restart.” 11. Now test everything out by pointing a browser at the newly created directory structure such as <http://yourserver/avayadir/avayadiradmin/index.htm>. Issue 1 April 2005 131 Web Applications Installation for Windows with Apache: 1. Extract the file avayadir-1.0.zip to the documentRoot folder. Note: Note: Making LDAP/PHP work with Apache is not necessarily easy. This procedure contains only the basics. For further information, you can download a free white paper available on the Avaya support Web site. After accessing the Avaya support Web site, make the following selections: Telephone Devices & User Agents, then IP Telephones & User Agents, then 4600 IP Telephones and SDK and Browser Information. The documentRoot location varies based on Web server installation. This is the directory where the Web server originates the files it serves. 2. Go to www.php.net to determine how to install and configure PHP for your server. 3. Check your Web server’s installation instructions to determine how to enable directory-level password control. We strongly recommend that you enable password protection for the directory administration folder avayadiradmin. 4. Open the file php.ini for editing. This file is typically located in the Windows folder c:\windows. 5. In php.ini, set the option “short_open_tag = On”. 6. Uncomment the line “extension=php_ldap.dll” 7. Save the updated php.ini file. 8. To finish, restart the Web server. 9. Now test everything out by pointing a browser at the newly created directory structure such as: <http://yourserver/avayadir/avayadiradmin/index.htm>. Web Application User Interface This section describes the user interface screens required for the Directory application. The Directory application’s phone screens are accessed using the 4620’s Web Access application. Therefore, any Directory user interface screen you administer must use LDAP attributes only. Some examples are provided in Table 16: List of Drop-Down Attributes available for Search, Query and Details Administration Screens on page 149. Chapter 7: Web Browser for 4610SW, 4620/4620SW, 4621SW, and 4622SW IP Telephones provides detailed information about how Web pages/screens are rendered. Once you familiarize yourself with the user interface, see Directory Database Administration Interface for instructions on completing the associated administration screens. 132 4600 Series IP Telephones Application Programmer Interface (API) Guide Web Application User Interface Note: Specific user instructions regarding the Directory application are not provided in the respective 4610SW, 4620/4620SW/4621SW, 4622SW, or 4625SW IP Telephone User Guides. Each user guide has a “Using the Web Access Application” chapter that provides general information only for working with Web pages. We do not provide detailed information because the Directory user interface screens are considered part of a Web-based application that you can customize. Note: Generic User Interface Screen Characteristics All Directory application phone screens have similar layouts with: Note: ● A display area. ● Feature buttons down the left and right sides related to a text entry field or data item. ● Softkeys below the display that start screen-related actions, such as Search or Call. ● Web browser navigation buttons down the right side of the display, which allow the user to move forward, back and return to the Home page. Note: Standard softkey labels on text entry screens are translated into the user’s language. The Directory application itself, and associated help or error messages are in English only. Issue 1 April 2005 133 Web Applications Web Application Search Screen The Search screen displays upon user selection of the Directory application. At a minimum, administer these two user text entry fields: ● Enter Name Here ● Enter Phone Number Here Either field provides basic search criteria. You can administer up to four additional text entry fields. Figure 22: Sample Search Screen 723/,1( :HE'LUHFWRU\$SSOLFDWLRQ )% >(QWHU1DPH+HUH@ )% )% >(QWHU3KRQH1XPEHU+HUH@ )% )% >(QWHU(PDLO$GGUHVV+HUH@ )% )% >(QWHU2UJDQL]DWLRQ&RGH+HUH@ )% )% )% )% )% 6HDUFK &OHDU 6. 6. +HOS 6. 6. The three softkeys at the bottom of the screen function as follows: ● Search - Sends user input to the Directory application to initiate a search. ● Clear - Discards user input. ● Help - Retrieves a Help page specific to the Search screen. Search responses take one of two forms. A successful search, one returning at least one telephone number when a name was provided as search criteria, displays the Successful Search screen. This screen offers options to call the number found, add it to a Speed Dial button or review more detail. An unsuccessful search, for example, no name found, error report(s) and/or unintelligible responses, displays the Directory Trouble screen. Note: Note: You complete the Search Administration screen to administer the [user interface] Search screen. See Configuring the Directory Application Search Administration Screen on page 144. 134 4600 Series IP Telephones Application Programmer Interface (API) Guide Web Application User Interface Web Application Successful Search Screen The Successful Search screen displays when at least one match results from a user-submitted search. The top display line provides one of these messages: X found. Select choice. where X = the number of matches found, or More results - please try again and refine search. to indicate more than 96 matches were found. This screen’s display area provides the name and phone number of up to 96 matches. If the search returns more than 96 matches, only the first 96 are shown and the rest are lost. The user can scroll through the matches using the Web browser navigation key to move forward one page. To select an entry, the user presses the Feature button to the left of that entry. Figure 23: Sample Successful Search Screen 723/,1( :HE )% )XOO1DPHDQG1XPEHU )% )% )XOO1DPHDQG1XPEHU )% )% )XOO1DPHDQG1XPEHU )% )% )XOO1DPHDQG1XPEHU )% )% )XOO1DPHDQG1XPEHU )% )% )XOO1DPHDQG1XPEHU )% 6HDUFK $GGWR6' 'HWDLO &DOO 6. 6. 6. 6. The four softkeys across the bottom of the display function as follows: ● Search - Displays the Search screen, to allow the user to enter new criteria and start another search. ● Add to SD - Allows the user to add a selected name and phone number to a Speed Dial button. ● Detail - Displays more directory information on the person selected, such as a department, secondary contact, manager, etc. (as administered). See Figure 24 for a sample Detail screen. ● Call - Allows the user to initiate a call to a person listed. Issue 1 April 2005 135 Web Applications Web Application Detail Screen The Detail screen displays when a user selects the Detail button on the Successful Search screen. Depending on how you administer it, this screen provides additional information about the person selected on the Successful Search screen. The selected person’s Full Name and Main Telephone Number show on the first two lines as a default. You can administer the first two lines to show different data. You can administer four additional display lines to provide specific corporate or personal information about the person. Examples of data you can administer to appear as follows. (You can use any valid LDAP attribute in place of the sample data.) ● Additional Phone Number - a cell phone or other related telephone number. ● E-mail - the person’s business e-mail address. ● Organization - the department or organization to which this person belongs. ● Other - any other pertinent information, such as the name of the person’s manager or assistant. Figure 24: Sample Detail Screen 723/,1( :HE )XOO1DPH )% &0DLQ3KRQH1XPEHU )% $GGLWLRQDO1XPEHUHJ&HOO3KRQH )% (PDLO )% 2UJDQL]DWLRQ )% 0DQDJHU )% 6HDUFK AddToSD Return Customized Softkey 6. 6. 6. 6. Click to dial A “click to dial” icon ( ) to the left of the Main Phone Number allows the user to call the person directly from the Detail screen. Using this icon instead of a Call softkey saves a softkey for your customization. Three softkeys are labeled as follows, the fourth softkey is available for your use: ● Search - Displays the Search screen, to allow the user to enter new criteria and start another search. ● Add to SD - Allows the user to add a selected name and phone number to a Speed Dial button. ● Return - Displays the Search screen, including the Name field entered by the user to start the most recent search. 136 4600 Series IP Telephones Application Programmer Interface (API) Guide Web Application User Interface Note: You administer the [user interface] Detail screen on the Details Administration screen. See Configuring the Directory Application Details Administration Screen on page 146. Note: Web Application Directory Trouble Screen Unsuccessful Directory searches occur for several reasons. For example, an inability to connect to the server for a search or finding no Directory listings that match the search criteria produce unsuccessful searches. Any search-related problem displays as an error message on the Directory Trouble screen, shown in Figure 25. Figure 25: Sample Directory Trouble Screen 723/,1( :HE )% (UURU0HVVDJH )% )% )% )% )% )% )% )% )% )% )% 6HDUFK 6. Retry 6. Return 6. 6. The Trouble Screen’s softkeys function as follows: ● Search - Displays the Search screen, to allow the user to enter new criteria and start another search. ● Retry - Allows the user to restart the search using the same search criteria. ● Return - Displays the Search screen, with the Name field the user entered to start the most recent search. Issue 1 April 2005 137 Web Applications Possible reasons for search failure and the resulting messages displayed on the Trouble screen follow in Table 13. Table 13: Search Failure Causes and Corresponding Trouble Screen Error Messages Cause of Search Failure LDAP Result Code Trouble Screen Message N/A. The corresponding LDAP Result Code represents a successful search. 0 No message displayed. The search was successful. Operations/Protocol error. 1, 2 Operations/ Protocol error. Server-generated timeout. 3 Server timed out. More than 96 entries match the Search criteria. 4 Size limit exceeded. Various unexpected errors. You should never receive these result codes. 5, 6, 10, 11, 12, 13, 14, 18, 19, 20, 21, 34, 36, 54, 64, 65, 66, 67, 68, 69, 71 Invalid response. Authentication not accepted. 7, 8, 48, 49, 50, 53 Authentication error. Telephone Number not recognized. 16, 17 Telephone Number not recognized. Object not found. 32 No results found. Server responds with “null” as data. N/A No results found. Server not available. 51, 52 Server not available. Other, unspecified failure. 80 An unknown problem has occurred. If any of these system values are null (except DIRUSERID and DIRSRVRPWD, which are optional and might remain null), and the user tries to access the Directory application, the endpoint receives a Trouble Screen. N/A Insufficient Administrative Information. The Directory server does not respond at all within an administrable amount of seconds. The default is 10 seconds. N/A Unable to contact server. 1 of 2 138 4600 Series IP Telephones Application Programmer Interface (API) Guide Web Application User Interface Table 13: Search Failure Causes and Corresponding Trouble Screen Error Messages (continued) Cause of Search Failure LDAP Result Code Trouble Screen Message When the Directory application receives a request for a Search screen, it sends a Search screen in response only if supplied with the minimum administrative information. Otherwise, the endpoint receives a Trouble Screen. N/A Insufficient Administrative Information. When the Directory application receives a request for a search from an endpoint, it initiates a connection to the directory database server. If the connection succeeds, a query is formatted and sent to the database server based on the input received from the endpoint. If the input received from the endpoint is null, the endpoint receives a Trouble Screen. N/A Insufficient Query Information. If a connection to the database server cannot be established, or if the connection fails before a response is received, the endpoint receives a Trouble Screen. N/A Connection Failure. When the Directory application receives a successful response from the database server, the endpoint receives a Successful Result screen. If no matching database entries are returned, the endpoint receives a No Match Result screen. If the database returns an error, the endpoint receives a Trouble screen. N/A No Match Result. Cannot be determined. 9, 22 - 31, 35, 37 - 47, 55 - 63, 70, 72 - 79, and 81 - 90 Unknown Error. 2 of 2 Issue 1 April 2005 139 Web Applications Directory Database Administration Interface The Directory application file you download from the Avaya Web site contains five primary screens on which you administer and customize the Thin Client Directory. Additionally, each administration screen has embedded Help to guide you through the administrative process. The primary screens are: 1. Welcome screen - The Home Page for administering your Directory application. This screen provides pre-administration requirements, basic administration information, links to all other administration screens, and a link to administrative Help. Figure 26: Welcome Screen Note: Note: The Welcome screen (Home page) provides a checklist of the values required to set up general administration, such as the LDAP Server Address. Ensure that you have this required information before starting to configure the General Directory application Administration screen. 140 4600 Series IP Telephones Application Programmer Interface (API) Guide Directory Database Administration Interface 2. General Directory Application Administration screen - You provide general information about your Directory application, such as: the Application Title displayed at the top of the first user interface screen, the LDAP Server Address, the search root and port network identification, optional User ID and Password for accessing the application, and the amount of time to be allowed for a search. 3. Directory Application Search Administration screens - You specify required and optional LDAP search attributes that display on the [user interface] Search screen. 4. Details Administration screen - You specify the detail information the user sees on the [user interface] Detail screen, such as an e-mail address for a person found, etc. 5. Softkey Administration screen - Allows you to optionally specify additional softkeys, to appear below the [user interface] Detail screen’s display area. Note: The Directory application administration interface is in the English language only. Note: Each screen has required and optional parameters. The input fields have a definition and/or explanation of what is required to their right in the yellow areas. There can also be yellow Help areas at the bottom of a screen to help you populate the screens correctly. You can select the Home option from the left side of any administration screen to return to the Welcome screen (Home page). The bottom of each screen provides navigation and save options, as shown here: After entering the screen values, press the Save Changes button to save your entries. Then use the Right Arrow or Left Arrow buttons to move from that screen to another. Pressing an arrow button without first saving what you entered or changed displays a dialog box. The dialog box allows you to: ● confirm that you do not want to retain your entries or any changes you’ve made to existing values, or ● allows you to select Cancel to return to the screen and save the data. Configuring the required information in accordance with the instructions in this section allows the Thin Client Directory application to communicate properly with the LDAP server. After configuring and saving the required information, test the Directory application to ensure that: ● the user interface screen values are correct, ● the application is interfacing properly with the LDAP server, and ● the Directory application server is interfacing properly with the end user’s phone. Issue 1 April 2005 141 Web Applications Configuring the General Directory Application Administration Screen To configure the General Directory Application Administration screen: 1. From the Welcome screen, select the General Administration screen link. Alternately, select the Right Arrow icon at the bottom of the Welcome screen. Figure 27: Directory Application Administration Screen 142 4600 Series IP Telephones Application Programmer Interface (API) Guide Directory Database Administration Interface 2. All fields except Directory User ID and Directory Password are required. Table 14 shows the Administration screen fields, their associated key names, default values, and descriptions: Table 14: Administration Screen Fields Field Title Key Name Default Description Application Title DIRSVRNAME 4620 Directory Application Label appearing at top of the user interface’s Directory Search screen. Directory Server DIRSRVR Null LDAP server address, IP Address or fully qualified DNS name. Topmost Distinguished Name (Search Root) DIRTOPDN Null The search root base, usually “ou=people” or o=company name. Note that spaces and other special characters might need to be treated as specified in RFC 2253, Lightweight Directory Access Protocol (v3): UTF-8 String Representation of Distinguished Names. Port Network DIRLDAPPORT 389 for LDAP 686 for SSI-enabled LDAP Directory Server Port. 96 The maximum number of result entries that can be displayed on the 4620. Max number of hits Directory User ID DIRUSERID Optional User name for authorized Directory search, if required. Directory Password DIRSRVRPWD Optional User’s password for authorized Directory search, if required. Directory Search Time DIRSEARCHTIME 10 seconds Maximum amount of time the application waits for search results (01 - 59 seconds). Directory Coding DIRCODING Latin 1 No other option is currently available. 3. Press the Save Changes button as stated at the bottom of the screen to save the values entered. When you complete the final administration screen, you can review all values on all screens. Issue 1 April 2005 143 Web Applications Configuring the Directory Application Search Administration Screen The Search screen’s administration requires that you provide labels for the LDAP attributes that appear on the user interface Search screen. These attributes are the labeled search fields the end user sees when the Search screen displays. Any Customer-Defined Label you create populates the Label value of the Enter Label Here text entry box on the Search Administration screen. This label also displays as the text entry prompt on the user interface Search screen. See Figure 22: Sample Search Screen on page 134 for an illustration of the user interface Search screen 1. From the Welcome screen, select the Search Administration screen link. Alternately, select the Right Arrow icon at the bottom of the General Administration screen. Figure 28: Search Administration Screen 144 4600 Series IP Telephones Application Programmer Interface (API) Guide Directory Database Administration Interface 2. Enter the search fields, corresponding LDAP attribute names, and associated labels by which your end users can search your corporate Directory. The Search Administration screen contains the fields shown in Table 15. Table 15: Search Administration Screen Fields Search Screen Line # Search Field/ Search Object LDAP Attribute Name Associated (Customer-Defined) Label (20 characters maximum) 1 Name (fixed) cn Customer administrable. 2 Main Phone Number (fixed) phoneNumber Customer administrable. 3 E-mail (default) mail Customer administrable. 4 Customer administrable Customer administrable Customer administrable. 5 Customer administrable Customer administrable Customer administrable. 6 Customer administrable Customer administrable Customer administrable. Example: Line 3 above shows a search field “E-mail” with the LDAP attribute “mail.” If you enter the Associated Label in column 4 as “E-mail Address” the end users’ Search screen third line prompts: “Enter E-mail Address Here.” You can populate fields with well-known LDAP attributes from an Avaya-provided drop-down list. Table 16: List of Drop-Down Attributes available for Search, Query and Details Administration Screens on page 149 provides a list of allowable attributes you can use to label such fields. Issue 1 April 2005 145 Web Applications Configuring the Directory Application Details Administration Screen The Detail screen’s administration requires you to provide the LDAP attributes to display on the user interface Details screen. These attributes are the details the end user sees about a selected person when the Details screen displays. 1. From the Welcome screen, select the Details Administration screen link. Alternately, select the Right Arrow icon at the bottom of the Search Administration screen. Figure 29: Details Administration Screen 146 4600 Series IP Telephones Application Programmer Interface (API) Guide Directory Database Administration Interface 2. Enter the LDAP attribute names that represent the detail information you want to display about a person found by a search. These entries appear on the user interface Detail screen, as shown in the Web Application Detail Screen on page 136. Note: Note: We assume that detail information has, at minimum, the name and telephone number. You can change these defaults and provide different attributes, if desired. To override an attribute that does not appear in a drop-down list, change the Use Other radio box next to the appropriate displayed attribute from “Yes” to “No.” Then enter the custom attribute in the Other text entry field. Labels are not required because the detail attribute should be unique enough for end user identification. If the attribute does not provide a sufficient description, you can include a label of up to 8 or less characters. Doing so, however, reduces the number of characters in the text display area accordingly. You can populate LDAP attributes from an Avaya-provided drop-down list. Table 16: List of Drop-Down Attributes available for Search, Query and Details Administration Screens on page 149 provides a list of allowable attributes you can use to label such fields. Configuring the Directory Application Softkey Administration Screen Avaya provides specific softkeys with specific functions on each user interface screen. Where space is available in the softkey area at the bottom of a [user interface] screen, you can optionally configure up to five additional softkeys. Then you can link them to specific Detail screen display fields. For example, you might have configured “Manager” as a detail screen attribute, which shows a [found] person’s manager as part of the detail information. Linking a softkey to that field can provide a report/list of any person in the directory having that manager as part of his or her own detail information. The Softkey Administration screen lists all attributes you previously defined on the Detail Administration screen as “From” attributes. You configure softkeys by providing a “To” attribute that establishes a link between the two attributes, and which is used as the softkey’s label. You can populate LDAP “To” attributes with values from an Avaya-provided drop-down list. Find these values in Table 16: List of Drop-Down Attributes available for Search, Query and Details Administration Screens on page 149. You can also provide a specific label for the new softkey, using the minimum number of characters that display in the screen’s softkey label area. Issue 1 April 2005 147 Web Applications Figure 30: Softkey Administration Screen 148 4600 Series IP Telephones Application Programmer Interface (API) Guide Directory Database Administration Interface Table 16: List of Drop-Down Attributes available for Search, Query and Details Administration Screens Field LDAP Attribute person sn cn userPassword telephoneNumber description organizationalPerson title registered address telexNumber teletexTerminalIdentifier telephoneNumber internationalISDNNumber facsimileTelephoneNumber street postOfficeBox postalCode postalAddress physicalDelieveryOfficeName ou st l inetOrgPerson businessCategory carLicense departmentNumber employeeNumber employeeType givenName homePhone homePostalAddress initials labeledURL mail manager mobile pager roomNumber secretary uid userCertificate;binary x500uniqueIdentifier Issue 1 April 2005 149 Web Applications 150 4600 Series IP Telephones Application Programmer Interface (API) Guide Introduction Chapter 9: Web Browser for the 4625SW IP Telephone Introduction This chapter describes the capabilities and limitations of the Web browser for the 4625SW IP Telephone. This chapter also provides suggestions to design Web sites for viewing on the 4625SW IP Telephone. The 4625SW has a significantly different display than other IP telephones and supports display of color and JPEG images. This chapter serves these functions: ● Presents the WML portions implemented in the 4625SW IP Telephone Web browser applications. Any limitations or non-standard implementations are mentioned. ● Provides considerations to develop effective Web pages for browser viewing. This chapter is intended for IP telephone Web browser [Web page] designers, and assumes that readers are somewhat familiar with WML. This chapter is not intended to provide technical details on setting up a Web server, nor does it provide information on Web server technologies. Finally, this document is not intended to provide an introduction to Web browser protocols or technologies. General Background The 4625SW has a 1/4-VGA 320 pixels wide by 240 pixels high backlighted display that supports 65K colors. The available WML Web page display area is 291 pixels across by 180 pixels in height. In addition, the top row displays the Web page title, if any. The bottom row presents up to four softkey labels at one time for <do> tags. The 4625SW can display JPEG images as part of a WML page or for softkey labels. Softkey label images should at most be 79 pixels wide and 29 pixels high. If the <do> tag is only text, use up to 6 characters per tag. Issue 1 April 2005 151 Web Browser for the 4625SW IP Telephone The data types and other features supported in this browser include: ● WML 1.3, June 2002 ● HTTP 1.1 The Summary Of WML Tags and Attributes on page 99 summarizes the detailed information provided in each tag-related section in this chapter. Note: Unsupported WML 1.3 tags are not rendered, and do not cause the browser to fail. Unknown tags and misspelled tags generate error messages. Note: WML Tags and Attributes WML Document Skeleton Certain tags define the basic framework of a WML document. The tags listed below make up the basic skeleton of a WML document. The 4625SW IP Telephone supports these tags unless otherwise indicated. ● Common tag attributes: xml:lang, class, and id. The attributes xml:lang, class and id are universal attributes associated with each WML element. The Web browser supports these tags: ● Attribute Comments xml:lang NOT SUPPORTED class NOT SUPPORTED id SUPPORTED <wml> tag - The <wml> tag defines a deck of cards and encloses all information about the deck. This tag is a required WML element and must contain at least one <card> tag. If a onevent attribute is defined for the <card> tag and one already exists for the <wml> tag, the <card> onevent attribute overwrites that of the <wml> tag, assuming they are the same type. If a <do> tag is defined for the <card> tag and one already exists for the <wml> tag, the <card> tag overwrites that of the <wml> tag, assuming they are the same type and name. 152 4600 Series IP Telephones Application Programmer Interface (API) Guide WML Tags and Attributes ● <head> tag - The <head> tag is an optional WML tag. This tag contains information that relates to the deck as a whole, including meta-data and access control elements. This tag is not supported. ● <meta/> tag - The optional <meta> tag is contained between multiple <head> tags. This tag gives values for the parameters that describe the content of the deck. This tag is not supported. ● <card> tag - A single WML file can contain multiple cards, supporting the analogy of a “deck” of “cards” within a single WML file. A card is essentially the specification of one specific WML page. This is a mandatory tag. The card element attributes supported by the Web browser are as follows (unsupported attributes are indicated as such in the Comments column): Attribute Value(s) Description Comments newcontext true Re-initializes the browser context. Default is “false.” Clears out the current WML browser context, which entails emptying the navigation stack history and clearing out all variables. When set to “true” the browser clears its history buffer and captures and buffers the WML card title attribute of the WML card containing the newcontext tag. This buffered attribute is used as the title for every WML element having a null or missing title attribute, including top-level cards. SUPPORTED. Specifies the order of card content. When ordered is set to “true” the browser displays the content in a fixed order. When ordered is set to “false” the users decide the order as they navigate between content. Default is “true.” Optional. Sets a Boolean value that provides information on how the content of the current card is arranged. Used by the browser to organize the display presentation and layout. If set to true, content is organized in a linear sequence of elements - for example, a series of ordered or non-optional input elements. If set to false, content is in no natural order - for example, a series of unordered or optional input elements. The default is true. NOT SUPPORTED. false ordered true false title cdata The title of the card. Can be used for title displays. SUPPORTED. onenterbackward url Occurs when the user navigates into a card by means of a “prev” task. SUPPORTED. 1 of 2 Issue 1 April 2005 153 Web Browser for the 4625SW IP Telephone Attribute Value(s) Description Comments onenterforward url Occurs when the user navigates into a card by means of a “go” task. SUPPORTED. ontimer url Occurs when a “timer” expires. SUPPORTED. 2 of 2 The seven display lines are used to render a card. If a onenterforward or onenterbackward attribute is defined for a <card> tag, and the <card> tag also has a <onevent> tag defined with a onenterforward or onenterbackward event type, the attribute defined in the <card> tag supersedes the onevent binding. If a onevent attribute is defined for the <card> tag and one already exists for the <wml> tag, the <card> onevent attribute overwrites that of the <wml> tag, assuming they are the same type. If a <do> tag is defined for the <card> tag and one already exists for the <wml> tag, the <card> tag overwrites that of the <wml> tag, assuming they are the same type and name. ● <template> tag - The <template> tag defines a template for all the cards in a deck. The “code” in the <template> tag is added to each card in the deck. Only one <template> tag for each deck can be specified. This tag can only contain <do> and <onevent> tags. The template tag attributes the Web browser supports are: Attribute Value(s) Description Comments onenterbackward url Occurs when the user navigates into a card by means of a “prev” task. SUPPORTED. onenterforward url Occurs when the user navigates into a card by means of a “go” task. SUPPORTED. ontimer url Occurs when the “timer” expires. SUPPORTED. Note: The implication for rendering WML pages is that the local environment always overrides a global template for <do> types with the same name and type. If there is a onevent in the template and a local onevent of the same type, the local onevent takes precedence over the global one. Note: ● <access> - The <access> tag limits access within the deck to certain cards. This tag is not supported. 154 4600 Series IP Telephones Application Programmer Interface (API) Guide WML Tags and Attributes Text Elements See Enabling Text Entry in Chapter 6 for text entry guidelines. ● <br/> tag - The <br/> tag tells the browser to add a line break to the text at the point the element is written. ● <p> tag - The <p> tag specifies a paragraph of text with alignment and line wrapping properties. All text data must be contained inside this tag. Only <do> tags, wml and card elements can exist outside the <p> tag. When rendered, this tag causes subsequent text to start on the next line. Attribute Value Description Comments align left right center Aligns the paragraph. Default is “left.” SUPPORTED. mode wrap nowrap Sets whether a paragraph wraps lines or not. Since horizontal scrolling is not supported, all text lines wrap. WML pages with mode=nowrap are ignored, and the text wraps. If the “align” attribute is set to center or right, the mode attribute is set to nowrap for all tags except <img>. SUPPORTED. The following tags are not supported but the content inside the tags is rendered as normal text: ● <table> tag - The <table> tag specifies a table. This tag is not supported. ● <td> tag - The <td> tag defines individual cell contents in each row of a defined table. This tag is not supported. ● <tr> tag - The <tr> tag defines each row of a defined table. This tag is not supported. Text Formatting Tags The following tags are not supported but the content inside the tags is rendered as normal text: ● <b> tag - The <b> tag specifies bold text. This tag is not supported. ● <big> tag - The <big> tag specifies large font text. This tag is not supported. ● <em> tag - The <em> tag specifies emphasized text. This tag is not supported. ● <i> tag - The <i> tag specifies italicized text. This tag is not supported. ● <small> tag - The <small> tag specifies small font size text. This tag is not supported. ● <strong> tag - The <strong> tag specifies strongly emphasized text. This tag is not supported. ● <u> tag - The <u> tag specifies underlined text. This tag is not supported. Issue 1 April 2005 155 Web Browser for the 4625SW IP Telephone Application developers can create a JPEG image with different font styles, since the browser does not support any of the text formatting tags listed. Anchor Elements ● ● <a> tag - <a> elements define <go> tasks that require a URL link specification. All <a> tags are rendered as underlined. All <a> nested tags like br and img are supported. One anchor is rendered per line. A maximum of six anchors can be rendered on the screen at one time. The user selects the link by pressing one of the Feature buttons associated with that display line. Attribute Value Description Comments href url REQUIRED. Defines where to go when the user selects the link. SUPPORTED. title cdata Defines a text identifying the link. SUPPORTED. accesskey 1,2,3,4, 5,6,7,8, 9,0,*,# A keypad key the user can press as a shortcut to selecting a link. NOT SUPPORTED. <anchor> tag - <anchor> elements define <go> tasks that require a URL link specification. All anchors are rendered as underlined. All <anchor> nested tags (br, go, img, prev, and refresh) are supported. A maximum of six anchors can be rendered on the screen at one time. The user selects a link by pressing one of the Feature button associated with that display line. You cannot specify more than one <onevent> tag inside an <anchor> tag. Attribute Value Description Comments title cdata Defines a text identifying the link. SUPPORTED. accesskey 1,2,3,4, 5,6,7,8, 9,0,*,# A keypad key the user can press as a shortcut to select a link. NOT SUPPORTED. 156 4600 Series IP Telephones Application Programmer Interface (API) Guide WML Tags and Attributes Image Elements The 4625SW display has a higher pixel density, and supports rendering of both grayscale WBMP images and color JPEG images. All images must be at most 291 pixels wide and at most 2880 pixels high, which corresponds to 96 rows of 30 pixels each. In addition, JPEG files can display in the softkey label area, with a maximum width of 79 pixels and a maximum height of 29 pixels. ● <img> tag - Use the <img> tag to place an image in the text flow. Either the monochrome wbmp (wireless bitmap) format or the color JPEG format is used to code display images. Up to 3 Mbytes of volatile memory is available for display of all WBMP and JPEG images. Avaya does not recommend large images. Images can be part of a link and can be selectable. At most, each card can display up to 16 images. Attribute Value Description Comments align top middle bottom left right center Aligns the image. Top, middle, bottom, right and center are NOT SUPPORTED. Left is SUPPORTED. alt cdata REQUIRED. Sets an alternate text to be displayed if the image is not displayed. If this is not supplied, either default text displays (if available) or the following message displays: “Image not displayed.” If alternative text is available, that should be the default text. When an alt tag is not associated with an image, the Top Line should be empty. SUPPORTED. height px (pixel) % Sets the height of the image. NOT SUPPORTED. The true height parameters are determined by parsing the WBMP/ JPEG information. hspace px % Sets white space to the left and right of the image. SUPPORTED. The default is 0 pixel. localsrc cdata Sets an alternate representation for the image. NOT SUPPORTED. src url REQUIRED. The path to the image. Must be either a .wbmp or JPEG file. SUPPORTED. 1 of 2 Issue 1 April 2005 157 Web Browser for the 4625SW IP Telephone Attribute Value Description Comments vspace px % Sets white space above and below the image. SUPPORTED. The default is 0 pixel. width px % Sets the width of the image. NOT SUPPORTED. The true width parameters are determined by parsing the WBMP/ JPEG information. 2 of 2 The 4625SW Web browser follows the WML 1.3 specifications, and images can be used as hyperlinks. The <img> element can be contained in the following elements: <a>, <anchor>, <b>, <big>, <em>, <fieldset>, <i>, <p>, <small>, <strong>, <td>, and <u>. Event Elements ● <do> tag - The <do> tag is a card-level user interface. It serves as a general mechanism to activate a task, usually performed by the user clicking a word or phrase in the display. A task is performed in response to an event. There are four tasks in WML: go, noop, prev, and refresh. The mandatory type attribute provides information about the intent of the element, helping to improve processing. If the Web browser does not recognize the specified type, the specified type is treated as unknown. For example, testing, experimental, and vendor specific types would be unknown. The browser only renders WML 1.2 tags. Any other tags cause an error and the user receives a “not a valid wml page” error statement. Attribute Value Description Comments type accept prev help reset options delete unknown x-* vnd.* cdata REQUIRED. Defines the type of the “do” element. SUPPORTED. Creates a label for the “do” element. Optional. Creates a string label for the element. The telephone browser imposes a six character limit. SUPPORTED. 1 of 2 label 158 4600 Series IP Telephones Application Programmer Interface (API) Guide WML Tags and Attributes Attribute Value Description Comments name mmtoken SUPPORTED. optional true false Defines a name for the “do” element. If set to true, the browser ignores this element. If set to false, the browser does not ignore this element. Default is “false.” NOT SUPPORTED. 2 of 2 Type Description Comments accept delete help options prev reset X-*n or x-*n Vnd - any mix of upper and lower cases Acknowledgement of acceptance. Delete item. Request for help. Options or additional operations. Backward navigation. Clearing or reset. Experimental. Vendor-specific (to be determined) SUPPORTED. SUPPORTED. SUPPORTED. SUPPORTED. SUPPORTED. SUPPORTED. NOT SUPPORTED. SUPPORTED. <do> tags are rendered as softkey labels on the bottom line of the display. <do> tags are specified per WML page and therefore are page context-sensitive. The eight “do” types are labeled either specifically in a WML page or by a browser-dependent label. The softkeys default to mixed case, where the first letter is capitalized and the remaining letters are lower case unless the Web designer specifies otherwise. If no labels are given, then the “do” types have the following default labels: Type Default Label if no label specified accept ACCEPT delete DELETE help HELP options OPTIONS prev BACK reset REFRESH X-*n or x-*n UNKNOWN Vnd* Any mix of upper or lower cases AVAYA. Available for future use, but currently UNKNOWN. Issue 1 April 2005 159 Web Browser for the 4625SW IP Telephone All <do> tags with the type attribute X* or x* (experimental) and any vendor-specific tags are treated as unknown types.Therefore, shadow rules apply where the last attribute overwrites the previous attribute when a <do> tag with the same type and name. In this case, a <do> tag with the same type and name at the card level, shadows or renders a <do> tag inactive at the deck level. A <do> tag with the <noop> tag embedded is not rendered on the Web browser. An unspecified name attribute for the <do> tag defaults to the <type> attribute value. If a <do> tag is defined for the <card> tag and one already exists for the <wml> tag, the <card> tag overwrites that of the <wml> tag, assuming they are the same type and name. If no <do> tags were specified, no softkeys display: If one <do> tag was specified, these softkeys display: 1st DO If multiple <do> tags are specified, display them as follows: 1st DO 2nd DO 3rd DO MORE 2nd DO 3rd DO MORE 5th DO Etc. MORE Page 1 softkeys: 1st DO Page 2 softkeys: 4th DO Note: Note: If more than one page of softkey labels are specified, pressing the MORE softkey automatically presents the user with the next page of labels. If the last page displays and the user presses the MORE softkey, the first page of labels is then displayed. As implied in the examples, the Softkey buttons are labeled in sequential order of the <do> tags. To render JPEG or WBMP images in the softkey area, embed <img> tags in the <do> tag. For example, the syntax might be: <do type="example-accept" label="SK1"> <go href="example-#card2"/> <img src="x.jpg"/> </do> Note: Note: When an image tag existing inside a <do> tag results in a failed attempt to retrieve the image through http, the softkey label displays the do tag label. 160 4600 Series IP Telephones Application Programmer Interface (API) Guide WML Tags and Attributes ● <onevent> tag - The onevent tag serves as a container for code that you want executed automatically when one of the four intrinsic events occurs. The onevent element is said to bind (associate) the tasks (code) to the event for the element. You must specify the intrinsic event using the mandatory type attribute. For example, when a user presses the BACK softkey, instead of being routed to the previous screen, the user is directed to another specified page because this tag carries out an onevent backward event. The intrinsic events are: Event Permitted Tags Description onenterbackward card or template Occurs when a <prev> navigates back onto a card. SUPPORTED. onenterforward card or template Occurs when a <go> navigates into a card. SUPPORTED. onpick option Occurs when a user selects/ deselects an item. SUPPORTED. ontimer card or template Occurs when the time expires. SUPPORTED. Issue 1 April 2005 161 Web Browser for the 4625SW IP Telephone The template element creates code that is inserted into all cards in a single deck. The nested tags are: go, noop, prev, and refresh. There are no visual implications for supporting the <onevent> tag. Attribute Value Description Comments type onenterbackward onenterforward onpick ontimer REQUIRED. Specifies the type of the “onevent” element. onenterbackward - triggered when a <prev> goes to a previous card. onenterforward - triggered when a <go> goes to a card. onpick - triggered when an item is selected or deselected. ontimer triggered when a timer expires. SUPPORTED. If there is more than one <onevent> tag defined with the same type in a deck or card, only the last <onevent> is rendered. Specifying more than one <onevent> tag inside an <anchor> tag causes an error. ● <postfield> tag - Use the postfield tag to set a name/value pair that can be transmitted during a URL request to an origin server, the request’s source. The name attribute sets the name, which must be a valid WML variable name. The value attribute sets the value. There are no visual rendering implications with this tag. Attribute Value Description Comments name cdata REQUIRED. The name of the field. SUPPORTED. value cdata REQUIRED. The value of the field. SUPPORTED. 162 4600 Series IP Telephones Application Programmer Interface (API) Guide WML Tags and Attributes Task Elements ● <go> tag - The go element can contain one or more postfield elements. If a go element’s destination is a card within the same deck, all postfield elements are ignored. The go element can also contain one or more setvar elements. Unlike postfield elements, there are no destination limitations on passing information contained in the setvar elements. The <go> nested tags, postfield and setvar, are supported. Attribute Value Description Comments href url REQUIRED SUPPORTED. accept-charset Charset_list A comma- or space-separated list of character encoding the server must be able to process. The default value is “unknown”. Used by the server to specify which character sets it supports in POST data the client sends. This applies only to POST data, since the character set that can be used to encode data sent in a GET is specified by URL-encoding rules. The accept-charset header is: accept-charset: US-ASCII, ISO-8859-1, UTF-8:q=0.1 SUPPORTED. method post Sets how to send the data to the server. Default method is get. When method=”get”, the data is sent as a request with?data appended to the URL. A get can be used only for a limited amount of data, which is a disadvantage. If you send sensitive information it is displayed on the screen and saved in the Web server's logs. With method=”post”, the data is sent as a request with the data sent in the body of the request. This method has no limit, and sensitive information is not visible. The data sent in a get method is limited to ASCII characters. The data sent in a post method can include non-ASCII characters that are included as part of a value attribute in an <input>, <select>, or <option> tag that is part of the current WML page. SUPPORTED. get 1 of 2 Issue 1 April 2005 163 Web Browser for the 4625SW IP Telephone Attribute Value Description Comments sendreferer true If set to true, the browser sends the URL of the current deck with the request, which allow servers to perform simple access control on decks, based on which decks are linking to them. Default is “false.” SUPPORTED. false 2 of 2 ● <noop> tag - The noop tag dictates that no operation should be done. This tag can be used on the card level to prevent an event that is specified on the deck level by the template element from occurring. This tag can only be contained in either a do or onevent element. An example of noop is to use a <do> tag to add a “Back” link to the card. When users click the “Back” link, generally they should be taken back to the previous card. However, the <noop> tag prevents this operation. When the user clicks on the “Back” link nothing happens. ● <prev> tag - The prev tag specifies navigation to the previous URL in the history. Xml:lang is not an associated attribute. ● <refresh> tag - The refresh tag specifies a refresh task whereby whatever card is being displayed is refreshed. This task specifies the need for an update of the user agent context as specified by the contained <setvar> elements.This tag can only be nested inside an anchor, do, or onevent element. Xml:lang is not an associated attribute. User-visible side effects of the update can occur during the processing of the <refresh>. 164 4600 Series IP Telephones Application Programmer Interface (API) Guide WML Tags and Attributes Input Elements ● <input> tag supported - The input tag specifies a point where the user is prompted to enter text. Attribute Value Description Comments accesskey 1,2,3,4,5, 6,7,8,9,0, *,# A keypad key the user can press as a shortcut to selecting the link by pressing the primary softkey. If the element is a Radio button, pressing the access key is a shortcut for selecting the Radio button. If the element is a check box, pressing the access key is a shortcut to check or uncheck the box. If the element is a Submit or Reset button, pressing the access key is a shortcut for pressing that button. For example, pressing a Submit button’s access key submits the applicable form. NOT SUPPORTED. name nmtoken REQUIRED. The name of the variable that is set with the result of the user's input. SUPPORTED. emptyok true false Sets whether the user can leave the input field blank or not. The WML default is “false.” SUPPORTED. Sets the data format for the input field. Default is “M” SUPPORTED. format A a N X x M m *f nf A = uppercase alphabetic or punctuation characters a = lowercase alphabetic or punctuation characters N = numeric characters X = uppercase characters x = lowercase characters M = all characters m = all characters *f = Any number of characters. Replace the f with one of the letters above to specify what characters the user can enter. nf = Replace the n with a number from 1 to 9 to specify the number of characters the user can enter. Replace the f with one of the letters above to specify what characters the user can enter. The user cannot exit the input box unless the correct number or type of characters is entered. The user does not receive an error message if incorrect data is entered. 1 of 2 Issue 1 April 2005 165 Web Browser for the 4625SW IP Telephone Attribute Value ivalue Description Comments The attribute value takes precedence over ivalue. SUPPORTED. maxlength number Sets the maximum number of characters the user can enter in the field. SUPPORTED. size number_o f_char Sets the width of the input field. NOT SUPPORTED. tabindex number Sets the tabbing position for the input field. NOT SUPPORTED. title cdata Sets a title for the input field. SUPPORTED. type text password Indicates the type of the input field. The default value is “text.” SUPPORTED. value cdata Sets the default value of the variable in the name attribute. SUPPORTED. 2 of 2 The value attribute takes precedence over ivalue. For example, the tag syntax is as follows: <input title=”Hello there” ivalue=”Enter name here” /> The text box displays [Enter name here] instead of the default [Enter text here]. The page author can supply any text to the ivalue. Once the user enters text, the value attribute now equals the typed-in text. The words “Enter name here” disappear and the user-entered text remains in the text box. The optional empty OK attribute sets a Boolean value that specifies whether empty input can be accepted, even if the format attribute is set. The WML default is false, which forbids empty values, while a true WML browser default permits empty values. This means that if the user is in text entry mode and the page author sets the value as false, the user cannot leave text entry mode without entering some characters. At this point, the phone must display the following message “Input field cannot be empty” so the user can make an entry and leave text entry mode. The six display lines/cells associated with the phone’s Feature buttons are available for input elements. The Top Line of the display cannot be used for input. The input tag causes an automatic line break before and after input text. Only one input tag can exist per display line. When a user views a page with the input tag specified, the card title displays first. When the user scrolls to the first line containing input, the Top Line shows the input box title if specified, otherwise the card title is shown. The TopLine displays the card title for all non-input text. When the input box is selected a vertical line, or cursor, appears at the beginning of the input box. 166 4600 Series IP Telephones Application Programmer Interface (API) Guide WML Tags and Attributes When a given character is selected, that character is immediately replaced with an asterisk. For example, the user takes an action that moves the cursor to the right of the current character, such as pressing a different dial pad key or pressing an arrow softkey. If the user returns to that character, it continues being displayed as an asterisk. Only the correct size, type, and number of characters are accepted in to the input box. For example, if alpha text is specified and the user types in a symbol or numeric text, the user input will not be accepted. If the user enters the wrong kind of text, an error beep sounds. If the “n” (number) value is specified and the user enters an incorrect number of characters, that input is not accepted. The user cannot exit the field if this invalid character exists. The Top Line will displays the error message: “Invalid character. Please check and try again.” Only use the attribute type password when it is important not to display the user' s password on the screen. Asterisks display instead. It is also important that the password not be cached. The phrase [Enter text here] appears for all input tags if the value attribute is null. If the author specifies a non-null content in the value attribute, that content displays between brackets for that input tag. Only the correct size, type, and number of characters are accepted in to the input box. For example, if alpha text is specified and the user types in a symbol or numeric text, the user input is not accepted. The screen repaints and the user has to re-enter the text. If the wrong kind of text is typed, the user receives an error tone. If the “n” (number) value is specified and the user types in the incorrect number of characters, that input is rejected. See Text Elements for other text entry guidelines. ● <fieldset> tag - The fieldset tag is used to group logically related elements in a card. This tag is not supported. ● <optgroup> tag - Sets of <optgroup> brackets can be put around <options> in a <select> list. The results in breaking a list into sublists. ● Attribute Value Description Comments title cdata Sets a title for the optgroup element. SUPPORTED. <option> tag - A set of option tags is needed to specify each individual item in a list. This tag must be used with the select tag. Attribute Value Description Comments onpick url Sets what is going to happen when a user selects an item. SUPPORTED. title cdata Sets a title for the option. SUPPORTED. value cdata Sets the value to use when setting the “name” variable in the select element. SUPPORTED. Issue 1 April 2005 167 Web Browser for the 4625SW IP Telephone The user makes a selection as follows: If an onpick attribute is specified, the user simply presses the associated Feature button(s). If no onpick is specified, the user must make a choice and use the (Do tag) softkey to execute that choice. A WML page cannot specify both a do type (select softkey) and onpick on the same page. Either the do type or onpick specifies the next card’s URL. Feature buttons toggle the state. When a Feature button is initially pressed a choice is selected. Pressing the same Feature button again deselects the choice. If an onpick attribute is defined for an <option> tag and the <option> tag also has an <onevent> tag defined, the onpick attribute supersedes the onevent binding. ● <select> tag - The select tag allows for the definition of a list, embedded in a card. This tag allows the user to choose inputs from a list rather than having to type a value. The select tag must be used with the option tag. Attribute Value Description Comments name nmtoken Names the variable that is set with the index result of the selection. SUPPORTED. ivalue cdata Sets the pre-selected option element. If none is specified, the first item in a list is automatically selected. SUPPORTED. multiple true false Sets whether multiple items can be selected. Default is “false.” False is used for a single selection. SUPPORTED. tabindex number Sets the tabbing position for the select element. NOT SUPPORTED. title cdata Sets a title for the list. SUPPORTED. value cdata Sets the default value of the variable in the name attribute. SUPPORTED. The graphic template to render single and multiple choice selections is defined as follows: Single selection - a modified Radio button is rendered for single selection of multiple choices. A complete empty circle indicates the user did not select the associated item, while a complete empty circle with a round black dot in the center indicates user selection. Multiple selection - a check box is rendered for multiple selections of multiple choices. An empty check box indicates the user did not select the associated item, while a check box(es) with a centered X indicates user selection(s). 168 4600 Series IP Telephones Application Programmer Interface (API) Guide WML Tags and Attributes Variable Elements ● ● <setvar> tag - There are no visual rendering implications with this tag. Attribute Value Description Comments name cdata REQUIRED. Sets the name of the variable. SUPPORTED. value cdata REQUIRED. Sets the value of the variable. SUPPORTED. <timer> tag - The timer tag sets a timer that starts counting. This tag must be used with <onevent type=”ontimer”> to be useful. The Web browser sets the timer value to 10 or to the value set in the <timer> tag, whichever is greater. A minimum setting of 10 equates to a minimum timer setting of one second. Attribute Value Description Comments value cdata REQUIRED. Sets the default value of the variable defined in the name attribute. SUPPORTED. name nmtoken Names the variable that is set with the value of the timer. SUPPORTED. Character Entities As with any syntactic language, WML has certain characters that have special meaning. The two most obvious of these characters are the < and > symbols, which surround all tags. These characters cannot be typed in directly if the designer's intent is to display these characters. Thus, all characters that can be displayed in a Web browser have numeric values assigned to them. The numeric values are entered into the source Web page as &#nnn; where nnn is a three-digit value. For example, the < symbol is entered as '<'. In addition, many of these characters also have names assigned. Name values are entered into the source Web page as &name; where name is the WML name associated with this character. For example, the < symbol would be entered as '<'. The set of characters defined by the World Wide Web Consortium are fully supported in the Web browser in conformance with the standard. Issue 1 April 2005 169 Web Browser for the 4625SW IP Telephone For convenience, here are a few of these key symbols: Description Symbol Numeric Entity Name Entity double quotation “ " " ampersand & & & apostrophe ‘ ' ' less than < < Image Support WBMP Images The 4625SW Web browser supports rendering of Wireless Bitmap (WBMP) images. WBMP is a graphic format optimized for mobile computing devices. At present WBMP supports only a simple picture format that is restricted to bi-level (black and white pixel) images. A WBMP image is identified using a TypeField value, which describes encoding information such as pixel and palette organization, compression, and animation. The TypeField value also determines image characteristics according to WAP documentation. An Image Type Identifier represents Type Field values. Currently, there is only one type of WBMP specified. The Image Type Identifier label for this is 0. This image type has the following characteristics: ● No compression ● One bit color (white=1, black=0) ● One bit deep (monochrome) The 4625SW Web browser does not support graphic animation. WBMP is part of the Wireless Application Protocol, Wireless Application Environment Specification Version 1.1. The WBMP specification is available at: http://www.wapforum.org/docs/technical1.1/. Many utilities are available as shareware to convert other graphical file formats to the WBMP format. 170 4600 Series IP Telephones Application Programmer Interface (API) Guide Image Support JPEG Images In addition to WBMP, the 4625SW’s Web browser supports renderings of JPEG images. JPEG stands for the Joint Photographic Experts Group, and is a digital image file format designed for maximal image compression. JPEG uses “lossy” compression in such a way that, when the image is decompressed, the human eye does not find the loss too obvious. The amount of compression is variable and the extent to which an image may be compressed without too much degradation depends partly on the image and partly on its use. JPEG is designed for compressing either full-color or gray-scale images of natural, real-world scenes. It works well on photographs, naturalistic artwork, and similar material. JPEG does not work as well on lettering, simple cartoons, or line drawings. JPEG handles only still images. Image Rendering The mime type for the WBMP is image/vnd.wap.wbmp. The mime type for the JPEG image is as follows: Extension Mime Type jpe image/jpeg jpeg image/jpeg jpg image/jpeg Without a mime type, the Web servers are not able to process JPEG files. Due to the current browser implementation, no text is rendered on the same line as an image. If a page author attempts to include both text and image on the same line, the image is rendered first, followed by the text. Issue 1 April 2005 171 Web Browser for the 4625SW IP Telephone Scrolling Through Images Users can scroll through an image using the current navigation schema as described in Web Browser Navigation in Chapter 6. The Page Up/Down Feature buttons (double up and down arrows) navigate up and down to a portion of the image that is not initially visible on the display. Icon Explanation If the image is larger than the six lines of the display, move up an entire screen and display the image’s previous six lines. If the image is larger than the six lines of the screen, move down to line 7 and display up to the next six lines of image. When the user focuses on the first line of an image and the image spans multiple lines on the screen, the following occurs when the user presses Feature button 11 (line down navigation softkey): The focus drops to the bottom line of the image if the entire image can fit on the screen. For example, assume the image spans lines 1 to 5, and line 1 is in focus. The user presses Feature button 11, and the focus shifts to the bottom of the image on line 5. If the user focuses on line 2 (and so forth) and presses Feature button 11, again the last line of the image on the screen is put in focus. If the image does not fit on the screen, pressing Feature button 11 causes the focus to drop to the last line on the screen. For example, if the image spans lines 1 to 6 and does not fit on the screen, the focus shifts to the bottom of the screen on line 6. When the user focuses on the last line of an image and the image spans multiple lines on the screen, the following occurs when the user presses Feature button 8 (line up navigation softkey): The focus goes to the first line of the image if the entire image can fit on the screen. For example, if the image spans lines 1 to 5, the user focuses on line 5 and presses Feature button 8. The focus shifts to the first line of the image on line 1. If the user focuses on line 2 (and so forth) and presses line up, again the first line of the image on the screen will be in focus. If the image does not fit on the screen, pressing Feature button 8 causes the focus to go to the first line on the screen. For example, if the image spans lines 1 to 6 and does not fit on the screen, the focus shifts to the bottom of the screen on line 6. As another example, an image takes up three of the six available display lines. The user presses a navigation Feature button next to any of the three lines displaying the image, and the entire three lines of the image are brought into focus. The image itself does not change color when in focus, but the screen area outside of the image changes color when in focus. 172 4600 Series IP Telephones Application Programmer Interface (API) Guide Image Support Images can be a part of a link and be selectable. An image inside an <a> or an <anchor> tag can be selected to activate a <go> task. For information see Anchor Elements. The browser follows the WML 1.3 specs which allow images to be used as hyperlinks. The img element can be contained within the following elements: a, anchor, p and do tags for softkeys. All supported images can have up to 3 Mbytes of volatile memory per WML file. Images cannot be partially parsed. If the memory size requirement is met and the size of the full image is less than 3 MB or the available memory, images larger than 96 lines are truncated by the graphic engine at the 96th line. The browser processes images successfully as long as the upper limit of 3 Mbytes is not reached. The browser checks for sufficient memory as image processing starts. If sufficient memory to process the entire image is not found, the image’s alternate text displays instead of the actual image. For example, there are ten images, the first four of which use 1.5 Kbytes. But the fifth image is 2.0 Mbytes, and the browser does not have sufficient memory to process that image. The browser will continue to process the next image if sufficient memory for that is available. The browser displays a page with first four images, then an image for which the alternate text is displayed, followed by the sixth image and so on. Alternate text is displayed only for those images where: ● the browser could not successfully parse the image file because of memory limitations, ● the image could not be found on the server (404 error), or ● the image file is corrupt. When an image tag exists inside a <do> tag, and it results in a failed attempt to retrieve the image through http, the <do> tag’s label attribute value (text) displays on the softkey label. Image Justification :HE 0 pixel 723/,1( )% )% )% Image area )% + 5 )% )% )% 0 pixel %71 0 pixel )% )% )% )% )% 6(/(&7 0 pixel 6. 6. 6. 6. Issue 1 April 2005 173 Web Browser for the 4625SW IP Telephone The Image Area is the screen area that is available for the browser to render that particular image. If an image overflows the image area, the graphic engine expands to the right and downward until the image completes or truncates the image at the image area’s border (screen glass). The hspace and vspace values define the Image Area. Images line up with the left side Feature buttons as follows: ● A 0 (zero) pixel border on the left and right sides of all images displayed, as well as on top of any image displayed. The border area is empty. ● A 0 (zero) pixel border at the bottom. ● No 0 (zero) pixel border on the top of the remaining lines of images that span multiple lines. Left-justified images begin at pixel 0. Center-justified images center at pixel 146. Right-justified images end at pixel 291. The default values for hspace and vspace are 0 pixel. This default value is honored only if the authors have not specified their own hspace and vspace values. Image Size The maximum width of an image is 291 pixels. The maximum height is 30 pixels of height x 96 lines is 2880 pixels. Images greater than 291 X 1536 pixels are truncated. This is translated as the maximum image width being from pixel 1 to pixel 291. The maximum height is 96 lines. Images greater than the maximums are truncated. Each Call Appearance/Application Area is 29 pixels in height, including one black pixel at the bottom of the area, making the maximum supported image height 96 lines x 30 pixels, or 2880 pixels. To ensure the best image quality, use only images having an equal height and width. Odd width and/or height images will automatically be adjusted to even-sized images. For example, the right and/or bottom 1-pixel edge(s) will be removed. JPEG images can appear in the softkey area. The softkey label area is 30 pixels in height, including one black pixel at the top of the area extending across the width of the display. Each softkey can be a maximum of 79 pixels in width and 29 pixels high. Softkey # Pixel Range 1 0 - 79 2 80 - 159 3 160 - 239 4 240 - 319 Scaling to reduce images to fit the screen is not supported. This means that if an image is bigger than the screen width/height, both the width and the height of the image will be truncated. WML is intended for small screens. Large images are not recommended. 174 4600 Series IP Telephones Application Programmer Interface (API) Guide Support for Cascading Style Sheets Number of Images Supported A maximum of 16 images can be displayed per card, in either the middle content area or softkey area. For any additional images that exceed this maximum number, the “alt” text is presented. Support for Cascading Style Sheets XHTML and Cascading Style Sheets (CSS) are designed to separate content from its presentation. XHTML and WML tags were originally designed to define the content of a document. In this way, the same content can be rendered on diverse devices. Most XHTML elements are semantic elements, that is, they convey meaning about their content rather than information on how to display it. For example, the <em> element contains content that should be emphasized. It is up to the browser to figure out how to render the emphasis, with a different typeface, a louder voice, or in another way. Style sheets are a way to manage a Web page’s overall look such as the page background, background color or font color. A style is a rule that tells the browser how to render a particular tag’s contents. Each tag has a number of style properties associated with it, whose values define how that tag is rendered by the browser. A rule defines a specific value for one or more tag properties. Style Sheets allow style information to be specified in many ways. The Web browser supports the inline style where a style attribute and tag along with a list of properties and their values are specified. The browser uses those style properties and values to render the tag’s contents. The browser supports CSS2. CSS2 is compatible with both WML and XHTML and can be re-used if the browser evolves to XHTML. See http://www.w3.org/TR/CSS21/cascade.html for further details about CSS2. Issue 1 April 2005 175 Web Browser for the 4625SW IP Telephone Cascading Order If more than one style is specified for a WML element, the multiple style definitions cascade into one style definition. Many factors affect the precedence of styles, including: ● The default style of the browser on the phone, that is, how elements are presented in the absence of presentation rules from a style sheet. ● Inheritance rules under which style rules are inherited by elements. ● A style rule that is more specific takes precedence over a less specific, conflicting rule. For example, a style rule applied to a class of elements takes precedence over a rule that applies to an element in general, and a rule that applies to an element ID takes precedence over both. ● In general, the most recent style rule in a document takes precedence over earlier style rules. ● If a style rule in a style sheet conflicts with a presentational attribute of a WML element, the style sheet takes precedence. In lieu of a specific rule for a particular tag element, properties and their values for tags within tags are inherited from their parent tag. Thus, setting a property for the <wml> tag effectively applies that property to every tag in the body of the document, except for those that specifically override it. To make all the text in the page blue, code the following: wml style="color:blue;" rather than creating a rule for every tag used in the page. This inheritance extends to any level. If the page author later creates a <p> tag with different color text. The style-conscious browser displays all the contents of <p> tag and all its included tags in that new color. When the <p> tag ends, the color reverts to that of the <wml> tag. For example, for WML: ● <card> tags inherit all <wml> tag properties. ● All <card> properties are inherited by <p>, <do>, <onevent>, <timer> tags. ● All <p> tag properties are inherited by other wml tags. This inheritance is not restricted to its immediate child tags, but can cascade further down. Also note that some inherited properties may not have any meaning in the scope of the child tag. For example, a background color defined for a <card> tag has no meaning for a <onevent> tag that has no visual rendering. 176 4600 Series IP Telephones Application Programmer Interface (API) Guide Table 17 shows which WML tags are parent and which tags inherit properties. Table 17: WML Inheritance Table Col1 Col2 Col3 Col4 Col5 Col6 Col7 Col8 Col9 Col10 No inheritance. Tag in column inherits from tag in column 1. Tag in column inherits from tag in column 1. Tag in column inherits from tag in column 1. Tag in column inherits from tag in column 1. Tag in column inherits from tag in column 1. Tag in column inherits from tag in column 1. Tag in column inherits from tag in column 1. Tag in column inherits from tag in column 1. Tag in column inherits from tag in column 1. card do go postfield wml setvar noop onevent prev setvar refresh setvar go postfield setvar noop prev setvar refresh setvar timer p a br img anchor br 1 of 4 Issue 1 April 2005 177 Table 17: WML Inheritance Table (continued) Col1 Col2 Col3 Col4 Col5 Col6 Col7 Col8 Col9 Col10 No inheritance. Tag in column inherits from tag in column 1. Tag in column inherits from tag in column 1. Tag in column inherits from tag in column 1. Tag in column inherits from tag in column 1. Tag in column inherits from tag in column 1. Tag in column inherits from tag in column 1. Tag in column inherits from tag in column 1. Tag in column inherits from tag in column 1. Tag in column inherits from tag in column 1. go postfield onevent go postfield setvar img prev setvar refresh setvar go postfield br do setvar noop prev setvar refresh setvar optgroup optgroup i input img select option 2 of 4 178 4600 Series IP Telephones Application Programmer Interface (API) Guide Table 17: WML Inheritance Table (continued) Col1 Col2 Col3 Col4 Col5 Col6 Col7 Col8 Col9 Col10 No inheritance. Tag in column inherits from tag in column 1. Tag in column inherits from tag in column 1. Tag in column inherits from tag in column 1. Tag in column inherits from tag in column 1. Tag in column inherits from tag in column 1. Tag in column inherits from tag in column 1. Tag in column inherits from tag in column 1. Tag in column inherits from tag in column 1. Tag in column inherits from tag in column 1. setvar noop option onevent go prev setvar refresh setvar postfield setvar noop head prev setvar refresh setvar access meta template do go postfield setvar noop onevent prev setvar refresh setvar go postfield 3 of 4 Issue 1 April 2005 179 Table 17: WML Inheritance Table (continued) Col1 Col2 Col3 Col4 Col5 Col6 Col7 Col8 Col9 Col10 No inheritance. Tag in column inherits from tag in column 1. Tag in column inherits from tag in column 1. Tag in column inherits from tag in column 1. Tag in column inherits from tag in column 1. Tag in column inherits from tag in column 1. Tag in column inherits from tag in column 1. Tag in column inherits from tag in column 1. Tag in column inherits from tag in column 1. Tag in column inherits from tag in column 1. setvar noop prev setvar refresh setvar 4 of 4 180 4600 Series IP Telephones Application Programmer Interface (API) Guide Support for Cascading Style Sheets Table 18 provides a list of CSS2-affected WML tags. Applicable tags are indicated by a Yes. The Color column applies to the foreground color, while the Background Color column is the alternative used to set the background color. Table 18: WML Tags to Which CSS2 Applies WML Tag CSS2 Property Color Background Color wml Yes Yes card Yes Yes template Yes Yes br/ Yes Yes - see Note below p Yes Yes a Yes Yes anchor Yes Yes img Yes Yes do Yes Yes input Yes Yes optgroup Yes Yes option Yes Yes onevent postfield go noop prev refresh select setvar timer Note: Note: The <br/> tag’s color setting needs to support color property so the inverse color shows when a line with this tag is in focus. Issue 1 April 2005 181 Web Browser for the 4625SW IP Telephone CSS2 Specifications The browser supports Cascading Style Sheets Version 2 to render color backgrounds, text and images. Syntax The CSS2 syntax the browser uses is made up of three parts - a wml tag with a new attribute called style, a property, and a value: WML tag style= “property: value” The property is the attribute that will be changed, and each property can take a value. The property and value are separated by a colon and surrounded by quotes. To specify more than one property, separate each property with a semi-colon: style="property1:value1; property2: value2; ... ; propertyN: valueN" The browser uses CSS2 with inline styles. The style attribute can be used with every WML tag. The style attribute can contain only the CSS properties. The code example that follows shows how to change the color: <p style="color: sienna"> This is a paragraph </p> Another example is: <wml> tag: <wml style= “|properties|”> .. </wml> <card> tag: <card style= “|properties|” title=”Card Title”> .. </card> <p> tag: <p style= “|properties|” mode=”wrap”> .. </p> <a> tag: <a style= “|properties|” href=”…”>Link </a> Note: Note: The browser does not support external stylesheet linking using <link> tags. For example, <link rel=”stylesheet” type=”text/css” href=”phone.css”/> is not supported. 182 4600 Series IP Telephones Application Programmer Interface (API) Guide Support for Cascading Style Sheets CSS Background Properties The Background properties control an element’s background color, set an image as the background, repeat a background image vertically or horizontally, and position an image on a page. Property Description Value background- color Sets the background color. Used to paint the background color of the screen. color-rgb color-hex color-name transparent If a background color is set, set the foreground to a contrasting color, so that its content remains visible. The transparent value allows the parent element's color to show. CSS Text Properties Text properties allow for control of the text appearance. It is possible to change the color of a text, increase or decrease the space between characters in a text, align a text, decorate a text, indent the first line in a text, and more. Property Description Value color Sets the foreground color. Used to paint the icons (not including the navigation bar), brackets for text editing, text, numbers, symbols, horizontal line under the Top Line, horizontal line above the softkeys. color Issue 1 April 2005 183 Web Browser for the 4625SW IP Telephone Code Examples <wml> Example with the entire page blue <wml style=”background-color:blue;”> <card> </card> </wml> 184 4600 Series IP Telephones Application Programmer Interface (API) Guide Support for Cascading Style Sheets <card> Example The <wml> tag and the first <card> tag have CSS2 style attributes defining background colors. The second card does not have a defined background attribute and therefore the second card inherits the color from the <wml> tag. <wml style=”background-color:blue;”> <card style=”background-color:green;” title=”Card 1”> </card> <card title=”Card 2”> </card> </wml> Issue 1 April 2005 185 Web Browser for the 4625SW IP Telephone <p> tag Example This example shows the background-color and color attribute specifying the font color. A second card does not have a defined background attribute and therefore would inherit the color from the <wml> tag. <wml> <card title=”Card 1”> <p style= ”background-color:blue; text:red;”> Sample Text </p> </card> </wml> 186 4600 Series IP Telephones Application Programmer Interface (API) Guide Support for Cascading Style Sheets Another <p> tag Example This example illustrates using the background-color specified in the <card> tag for the whole page and a special color specification for the <p> tag. <wml> <card style=”background-color:green;” title=”Card 1”> <p style= ”background-color:blue; text:red;”> Sample Text </p> </card> </wml> Issue 1 April 2005 187 Web Browser for the 4625SW IP Telephone First <a> tag Example CSS2 properties for an <a> tag are inherited from its parent <p> tag. Properties can also be inherited from <p>’s parent tag <card> tag, etc. This example shows that the background-color is specified in the <card> tag for the whole page and a special color is specified for the <a> tag. <wml> <card style=”background-color:green;” title=”Card 1”> <p> Sample Text <a href=”1.wml” style= ”background-color:green; text:medium blue;”> First Link </a> </p> </card> </wml> 188 4600 Series IP Telephones Application Programmer Interface (API) Guide Support for Cascading Style Sheets Second <a> tag Example The CSS attributes for the <a> tag are inherited from its parent <p> tag. In the following example, the parent <p> tag defines the font color of the <a> tag, but the background-color of the <a> tag overrides the parent <p> tag. <wml> <card style=”background-color:green;” title=”Card 1”> <p> Sample Text <a href=”1.wml” style= ”background-color:blue;”> First Line <a> </p> </card> </wml> Issue 1 April 2005 189 Web Browser for the 4625SW IP Telephone Third <a> tag Example In this example neither the <card> nor the <wml> tags has any style attributes, so there is nothing to which to default. The <p> tag has a style defined such that it gets a background color of blue and font color of red. The first link (<a> tag) has a background-color defined as green and font color in blue. However, the second link (<a> tag) does not have any style defined, so it inherits the color selection from the <p> tag. The third link, the <a> tag, has no properties defined nor does it have an immediate parent <p> tag. Since no style is defined, the link is rendered with the default background color and font color. <wml> <card title=”Card 1”> <p style= ”background-color:blue;color:red”> Sample Text <a href=”1.wml” style= ”background-color:green;color:red”> First Link </a> <a href=”2.wml”> Second Link </a> </p> <p> <a href=”3.wml”> Third Link </a> </p> </card> </wml> 190 4600 Series IP Telephones Application Programmer Interface (API) Guide Support for Cascading Style Sheets <do> tag Example CSS2 properties for a <do> tag are inherited from its parent <card> tag. The CSS2 properties for a <card> tag are inherited from its parent <wml> tag This example shows that the <do> tags can define a separate background color for a softkey than from rest of the page. <wml> <card style=”background-color:green;” title=”Card 1”> <p> Sample Text </p> <do type= “accept” label= “SK1” style=”background-color:blue;” <go href=”1.wml”/> </do> </card> </wml> Issue 1 April 2005 191 Web Browser for the 4625SW IP Telephone CSS2 Color Image Support Examples In this example, the image spans across the browser’s screen. <wml> <card style=”background-color:blue;” title=”Card 1”> <p> <img src=”Avaya.jpeg” alt+”Avaya building”/> </p> </card> </wml> The image in the above diagram can be supported as either: ● A series of six individual images with the slices cut exactly to fit each line. This way the page author must send six images. When displayed on the browser, the six images look like one single image. ● A large image that is left justified on line 1 and expands to cover the screen exactly. 192 4600 Series IP Telephones Application Programmer Interface (API) Guide Support for Cascading Style Sheets <do> tag image support for softkeys To render JPEG or WBMP images in the softkey area, use the CSS2 property background-image with a <do> tag. This example shows multiple <do> tags with images embedded in them. The first <do> tags have a background image and a label (SK1). Softkey 1’s font color is inherited from the <card>. The second <do> tag shows the background image (“red.jpg”) and a color (“yellow”) as set by the style attribute. The third <do> tag has an image that does not completely fit in softkey 3. The user can see the background color where the image does not cover the softkey area. Issue 1 April 2005 193 Web Browser for the 4625SW IP Telephone The code example that follows embeds <img> tags in the <do> tags: <wml> <card style=”background-color:blue;” title=”Card 1”> <p> Sample Text </p> <do type= “accept” label= “SK1”> <img src= “blue.jpg”/> <go href=”1.wml”/> </do> <do type= “accept” label= “SK2” style=”color:yellow;”> <img src= “red.jpg”/> <go href=”1.wml”/> </do> <do type= “accept”> <img src= “hotel.jpg”/> <go href=”1.wml”/> </do> </card> </wml> 194 4600 Series IP Telephones Application Programmer Interface (API) Guide Colors Specification Colors Specification Properties that set colors accept the standard 16 HTML 4.0 color keywords (color=”yellow”) or RGB values. RGB values can be specified in short hexadecimal format (color=”#FF0”), long hexadecimal format (color=”#FFFF00”). If an invalid color name is specified, for example, bluu rather than blue, the default color is used. A card’s background color is extended to empty cells, empty lines, empty softkey areas, and the MORE softkey. For example, if a card’s background color is specified as blue, and the contents occupy only three lines, the background color extends to the remaining three empty lines. The Web Authentication screen, Text Entry softkey color, and Symbol Text Entry screen will take on the default Web background and text color. The Topline color will match the background and text color of the line or cell currently in focus. For more information on specifying colors in style sheets, see Section 4.3.6, “Colors” in the W3C CSS2 Specification available at http://www.w3.org/TR/REC-CSS2. Possible Value Description Color The color value can be a color name (red) or a hex number (#ff0000). 16 bit colors are supported. Transparent The background color is transparent. Colors and Fonts The foreground color CSS2 property is used to paint the icons (not including the navigation bar) and brackets for text editingThe navigation bar, excluding the vertical line, remains the same color regardless of how the foreground color is set. The 4625SW has a color browser that supports rendering of 256 colors. Properties that set colors accept the standard 16 HTML 4.0 color keywords (for example, color=”yellow”) as shown in Table 19 or RGB values as shown in Table 20. You can specify RGB values any of these ways: ● short hexadecimal format, for example, color=”#FF0” ● long hexadecimal format, for example, color=”FFFF00” Issue 1 April 2005 195 Web Browser for the 4625SW IP Telephone Table 19: Supported Colors and Corresponding Hexadecimal Coding 1 of 2 196 4600 Series IP Telephones Application Programmer Interface (API) Guide Colors Specification Table 19: Supported Colors and Corresponding Hexadecimal Coding (continued) 2 of 2 Issue 1 April 2005 197 Web Browser for the 4625SW IP Telephone Table 20: Supported Colors by Name and Hex Coding 1 of 4 198 4600 Series IP Telephones Application Programmer Interface (API) Guide Colors Specification Table 20: Supported Colors by Name and Hex Coding (continued) 2 of 4 Issue 1 April 2005 199 Web Browser for the 4625SW IP Telephone Table 20: Supported Colors by Name and Hex Coding (continued) 3 of 4 200 4600 Series IP Telephones Application Programmer Interface (API) Guide Colors Specification Table 20: Supported Colors by Name and Hex Coding (continued) 4 of 4 Issue 1 April 2005 201 Web Browser for the 4625SW IP Telephone 202 4600 Series IP Telephones Application Programmer Interface (API) Guide Index Index Numerical 4610SW, 4620/4620SW, 4621SW, and 4622SW IP Telephones Anchor Elements . . . . . . . . . . . . . . . Character Entities . . . . . . . . . . . . . . . Colors and Fonts . . . . . . . . . . . . . . . Event Elements . . . . . . . . . . . . . . . . Image Elements . . . . . . . . . . . . . . . Input Elements . . . . . . . . . . . . . . . . Task Elements . . . . . . . . . . . . . . . . Text Elements . . . . . . . . . . . . . . . . Text Formatting Tags . . . . . . . . . . . . . Variable Elements . . . . . . . . . . . . . . Web Browser . . . . . . . . . . . . . . . . . WML Tags and Attributes . . . . . . . . . . . 4625SW IP Telephone Anchor Elements . . . . . . . . . . . . . . . Character Entities . . . . . . . . . . . . . . . Colors and Fonts . . . . . . . . . . . . . . . Event Elements . . . . . . . . . . . . . . . . Image Elements . . . . . . . . . . . . . . . Image Support . . . . . . . . . . . . . . . . Input Elements . . . . . . . . . . . . . . . . Task Elements . . . . . . . . . . . . . . . . Text Elements . . . . . . . . . . . . . . . . Text Formatting Tags . . . . . . . . . . . . . Variable Elements . . . . . . . . . . . . . . 4625SW IP Telephone, Web Interface. . . . . . . . 108 . 118 . 118 . 110 . 109 . 114 . 113 . 107 . 108 . 117 . 103 . 104 . 156 . 169 . 195 . 158 . 157 . 170 . 165 . 163 . 155 . 155 . 169 . 151 A Access Key Input Mode (AIM) . . . . . . . . . . . 119 Access Keys, Support for . . . . . . . . . . . . . . 119 Add-to-Speed Dial Functionality, for WTA Applications 92 Administering the Push Interface . . . . . . . . . . 59 AIM Considerations . . . . . . . . . . . . . . . . 123 AIM, Terminating . . . . . . . . . . . . . . . . . 125 Alerts Audio Push . . . . . . . . . . . . . . . . . . . 46 Display . . . . . . . . . . . . . . . . . . . . . 30 Subscribe Push . . . . . . . . . . . . . . . . . 54 Topline Push . . . . . . . . . . . . . . . . . . 38 Anchor Elements . . . . . . . . . . . . . . 108, 156 Audio Push Alerts . . . . . . . . . . . . . . . . . . . . . Barge Priority . . . . . . . . . . . . . . . . . Normal Priority . . . . . . . . . . . . . . . . Priorities and States . . . . . . . . . . . . . . Push Agent . . . . . . . . . . . . . . . . . . Push Content . . . . . . . . . . . . . . . . . Push Response . . . . . . . . . . . . . . . . Pushable vs. Non-Pushable States . . . . . . . Using the postfield Tag . . . . . . . . . . . . XML Messages . . . . . . . . . . . . . . . . Audio Push Example 1 . . . . . . . . . . . . . . Audio Push Features . . . . . . . . . . . . . . . Audio Push Type . . . . . . . . . . . . . . . . . Avaya HTTP Header Extensions, for Push Interface . . . . . . . . . . . . . . 46 48 48 47 51 51 47 47 49 49 47 46 46 67 B Brief Feature Description . . . . . . . . . . . . . . 22 C Call Interaction . . . . . . . . . . . . . . . . Cascading Style Sheets, Support for . . . . . . Character Entities . . . . . . . . . . . . . . Character Set Support . . . . . . . . . . . . Click to Dial Functionality, for WTA Applications Colors and Fonts, for 4625SW. . . . . . . . . Colors and Fonts, for other IP Telephones . . . Colors Specification, for 4625SW . . . . . . . Colors, Display, for Web Browser . . . . . . . Creating Push Messages . . . . . . . . . . . Creating Web Sites for Other IP Telephones Anchor Elements . . . . . . . . . . . . . General Background . . . . . . . . . . . . Summary Of WML Tags and Attributes . . . WML Document Skeleton . . . . . . . . . CSS2 Specifications . . . . . . . . . . . . . . . . 85 . . 175 118, 169 . . . 84 . . . 87 . . 195 . . . 118 . . 195 . . . 84 . . . 29 . . 156 104, 151 121, 196 104, 152 . . 182 D Deck/Card Elements, for Web Browser. . . . . . . . 85 Dial Pad/URL Mapping Example . . . . . . . . . . 120 Directory Database Administration Interface . . . . 140 Issue 1 April 2005 203 Index Display Push Barge Priority . . . . Normal Priority . . . postfield Tag . . . . Push Agent. . . . . Push Content . . . . Push Message (PM) XML Messages . . . Display Push Example 1 Display Push Example 2 Display Push Type . . . . . . . . . . . . . . . . . . . . . . . . . . . . . . . . . . . . . . . . . . . . . . . . . . . . . . . . . . . . . . . . . . . . . . . . . . . . . . . . . . . . . . . . . . . . . . . . . . . . . . . . . . . . . . . . . . . . . . . . . . . . . . . . . . . . . . . . . . . . . . . 32 31 34 35 36 33 33 30 35 29 L Error Messages, for Web Browser . . . . . Error Tones, in Web Browser . . . . . . . . Event Elements . . . . . . . . . . . . . . Existing Interfaces, for Avaya IP Telephones . . . . . . . 97 . . . 95 110, 158 . . . 18 N . . . . . . . . . . . . . . . . Links, for Web Browser . . . . . . . . . . . . . . . 78 M Messages Display Push . . . . . . . Messages, for Audio Push . . Messages, for Subscribe Push Messages, for Topline Push . . . . . . . . . . . . . . . . . . . . . . . . . . . . . . . . . . . . . . . . . . . . . . 33 49 55 41 E H Hexadecimal Coding . . . . . . . Hotel Application Example . . . . HTTP Authentication, Support for . HTTP Error Messages . . . . . . HTTP Header, in Web Browser . . HTTP POST Address, Push Agent HTTP Protocol . . . . . . . . . . HTTP Server . . . . . . . . . . Navigation Control, Icons for, in Web Browser . . . . 74 Navigation, for Web Browser . . . . . . . . . . . . 73 Network Topolgy, illustration of . . . . . . . . . . . 17 O . . . . . . . . . . . . . . . . . . . . . . . . . . . . . . . . . . . . . . . . . . . . . . . . . 196 . 30 . 94 . 69 . 95 . 27 . 95 . 26 I Image Elements . . . . . . . . . . . . . . . 109, Image Justification . . . . . . . . . . . . . . . . . Image Rendering . . . . . . . . . . . . . . . . . Image Size . . . . . . . . . . . . . . . . . . . . Image Support, for 4625SW . . . . . . . . . . . . Images Supported . . . . . . . . . . . . . . . . . Images, JPEG . . . . . . . . . . . . . . . . . . . Images, Scrolling Through . . . . . . . . . . . . . Images, WBMP . . . . . . . . . . . . . . . . . . Input Elements . . . . . . . . . . . . . . . 114, Input Modes, for Web Browser . . . . . . . . . . . Installing the Thin Client Directory on the Server . . . IP Telephone Interfaces . . . . . . . . . . . . . . irDA (Infrared) interface . . . . . . . . . . . . . . 157 173 171 174 170 175 171 172 170 165 82 129 17 19 J JPEG Images . . . . . . . . . . . . . . . . . . . 171 Overview, of IP Telephone Interfaces . . . . . . . . 17 P Page Loading, in Web Browser . . . . . Paging Indicators, for Web Browser . . . Physical Attributes, of Web Browser . . . Postfield Tag, in Topline Push . . . . . . Postfield Tag, Using for Audio Push . . . Postfield Tag, Using for Subscribe Push . Postfield Tag, Using the, for Display Push Priorities and States . . . . . . . . . . Audio Push . . . . . . . . . . . . . Display Push . . . . . . . . . . . . Subscribe Push . . . . . . . . . . . Topline Push . . . . . . . . . . . . Push Administration . . . . . . . . . . Push Agent Audio Push . . . . . . . . . . . . . Display Push . . . . . . . . . . . . Subscribe Push . . . . . . . . . . . Topline Push . . . . . . . . . . . . Push Agent - HTTP POST Address . . . Push Agent, About the . . . . . . . . . Push Architecture. . . . . . . . . . . . Push Content . . . . . . . . . . . . . Audio . . . . . . . . . . . . . . . . Subscribe Push . . . . . . . . . . . Topline Push . . . . . . . . . . . . Push Content (PC) Display Push . . . . . . . . . . . . 204 4600 Series IP Telephones Application Programmer Interface (API) Guide . . . . . . . . . . . . . . . . . . . . . . . . . . . . . . . . . . . . . . . . . . . . . . . . . . . . . . . . . . . . . . . . . . . . . . . . . . . . . . 94 76 72 42 49 56 34 30 47 30 55 39 59 . . . . . . . . . . . . . . . . . . . . . . . . . . . . . . . . . . . . . . . . . . . . . . . . . . . . . . . . . . . . . . . . . . 51 35 56 44 27 26 22 25 51 57 44 . . . . . . 36 Index Push Feature Description . . . . . . . . . . . . . . Push Flow Process . . . . . . . . . . . . . . . . Push Interface Denial of Service Timer . . . . . . . . . . . . . Overview . . . . . . . . . . . . . . . . . . . . Requirements . . . . . . . . . . . . . . . . . Retry Timer . . . . . . . . . . . . . . . . . . Security . . . . . . . . . . . . . . . . . . . . Subscription Service . . . . . . . . . . . . . . Troubleshooting . . . . . . . . . . . . . . . . Validation Scenarios . . . . . . . . . . . . . . Push interface . . . . . . . . . . . . . . . . . . . Push Message Subscribe Push . . . . . . . . . . . . . . . . . Topline . . . . . . . . . . . . . . . . . . . . . Push Message Flow . . . . . . . . . . . . . . . . Push Messages, Creating . . . . . . . . . . . . . Push operation . . . . . . . . . . . . . . . . . . Push Response Display Push . . . . . . . . . . . . . . . . . . Subscribe Push . . . . . . . . . . . . . . . . . Push Types . . . . . . . . . . . . . . . . . . . . Push/Pull Process, in Push Interface . . . . . . . . Pushable vs. Non-Pushable States . . . . . . . . . Pushable vs. Non-Pushable States, for Display push . Push-Code Responses . . . . . . . . . . . . . . . 22 22 65 21 59 65 59 62 67 61 19 55 41 24 29 23 31 55 27 23 39 30 67 R . . . . . . . . . . . . 62 59 44 50 Security, for Push Interface . . . . . . . . . . . Setting Up Push Messages . . . . . . . . . . . Standard Text Entry Example . . . . . . . . . . Stock Alert Example . . . . . . . . . . . . . . Stock Alert Message . . . . . . . . . . . . . . Stock Alert Message, Telephone Display Prior to Receiving . . . . . . . . . . . . . . . . . . Subscribe Push Alerts . . . . . . . . . . . . . . . . . . . Features . . . . . . . . . . . . . . . . . . Priorities and States . . . . . . . . . . . . Push Agent. . . . . . . . . . . . . . . . . Push Content . . . . . . . . . . . . . . . . Push Message . . . . . . . . . . . . . . . Push Response . . . . . . . . . . . . . . XML Messages . . . . . . . . . . . . . . . . . . . . . . . . . 59 29 80 38 45 Recommendations, for setting up TPSLIST Requirements, for Push Interface . . . . . Response tag, Using for Topline Push . . . RTP Port . . . . . . . . . . . . . . . . . . . . . . . . S . . 43 . . . . . . . . . . . . . . . . 54 54 55 56 57 55 55 55 Subscribe Push Type . . . . . . . . . . . . Subscribe Tag, Using the . . . . . . . . . . Subscriber Service, for Push Interface . . . . Subscription List, for Push Interface . . . . . Subscription Service . . . . . . . . . . . . Subscription Update . . . . . . . . . . . . Successful Push Response . . . . . . . . . Supported Colors by Name and Hex Coding . Syntax Implementation, for WTA Applications . . . . . . . . . . . . . . . . . . . . . . . . . 54 . 57 . 63 . 64 . 62 . 65 31, 39 . 198 . . 87 T TAPI (Telephony Application Programmer’s Interface) 19 Task Elements . . . . . . . . . . . . . . . . 113, 163 Terminating AIM . . . . . . . . . . . . . . . . . 125 Text Editing Modes, for Web Browser . . . . . . . . 81 Text Editing Symbol Screens, for Web Browser . . . . 82 Text Elements . . . . . . . . . . . . . . . . 107, 155 Text Entry Example . . . . . . . . . . . . . . . . . 80 Text Entry, for Web Browser . . . . . . . . . . . . 79 Text Formatting Tags . . . . . . . . . . . . . 108, 155 Text Message . . . . . . . . . . . . . . . . . . . 37 Text Message Features, for Topline Push . . . . . . 37 Thin Client Directory, Avaya-Provided Download Files 129 Thin Client Directory, Installing on the Server . . . . 129 Thin Client Directory, Installing the . . . . . . . . . 130 Timer Denial of Service . . . . . . . . . . . . . . . . 65 Retry . . . . . . . . . . . . . . . . . . . . . . 65 Top Line Defaults, for Web Browser . . . . . . . . . 78 Topline Push Alerts . . . . . . . . . . . . . . . . . . . . . . 38 Barge Priority . . . . . . . . . . . . . . . . . . 40 Normal Priority . . . . . . . . . . . . . . . . . 40 postfield Tag . . . . . . . . . . . . . . . . . . 42 Priorities and States . . . . . . . . . . . . . . . 39 Push Agent . . . . . . . . . . . . . . . . . . . 44 Push Content . . . . . . . . . . . . . . . . . . 44 Push Message . . . . . . . . . . . . . . . . . 41 Push Response . . . . . . . . . . . . . . . . . 39 Pushable vs. Non-Pushable States . . . . . . . . 39 Text Message Features . . . . . . . . . . . . . 37 XML Messages . . . . . . . . . . . . . . . . . 41 Topline Push Example 1 . . . . . . . . . . . . . . 38 Topline Push Example 2 . . . . . . . . . . . . . . 43 Topline Push Type . . . . . . . . . . . . . . . . . 37 Topline tag, using for Topline Push . . . . . . . . . 45 TPSLIST (See Trusted Push Server List) . . . . . . . 60 Troubleshooting the Push Interface . . . . . . . . . 67 Truncation Rules, for Web Browser . . . . . . . . . 78 Trusted Push Server List . . . . . . . . . . . . . . 60 Two Step View – Push/Pull Process . . . . . . . . . 23 Typical System-Wide Network Topolgy. . . . . . . . 17 Issue 1 April 2005 205 Index U URI Examples, for Push Interface Validation . . . . . 61 V Validation Scenarios, for Push Interface . . . . . . . 61 Variable Elements . . . . . . . . . . . . . . 117, 169 W WBMP Images . . . . . . . . . . . . . . . Web Application User Interface . . . . . . . . Web Applications . . . . . . . . . . . . . . Web Browser About the . . . . . . . . . . . . . . . . Call Interaction . . . . . . . . . . . . . . Character Set Support . . . . . . . . . . Display Colors . . . . . . . . . . . . . . Error Messages . . . . . . . . . . . . . Input Modes . . . . . . . . . . . . . . . Moving Up and Down a Card . . . . . . . Navigation . . . . . . . . . . . . . . . . Navigation Control Icons . . . . . . . . . Page Loading . . . . . . . . . . . . . . Physical Attribute . . . . . . . . . . . . . Relationship between Line/Page Movement, Focus, and Top Line Display . . . . . . . Requirements for Deck/Card Elements . . . Summary of WML Tags and Attributes . . . Support for HTTP Authentication. . . . . . Text Editing . . . . . . . . . . . . . . . Text Entry . . . . . . . . . . . . . . . . Top Line Defaults . . . . . . . . . . . . . Truncation Rules and Links . . . . . . . . . . . 170 . . . 132 . . . 127 . . . . . . . . . . . . . 71 . . 85 . . 84 . . 84 . . 97 . . 82 . . 76 . . 73 . 74, 75 . . 94 . . 72 . . . . . . . . . . . . . . . . . . . . . . . . Web Browser Features . . . . . . . . . . . . . . . 29 Web Browser Features, with Display Push Type . . . 29 Web Browser for 4610SW, 4620/4620SW, 4621SW, and 4622SW IP Telephones . . . . . . . . . . . 103 Web History . . . . . . . . . . . . . . . . . . . . 84 Web Interface . . . . . . . . . . . . . . . . . . 103 Wireless Telephony Applications (WTA) . . . . . . . 86 WML Tags and Attributes . . . . . . . . . . . . . 104 WML Tags and Attributes, for 4625SW IP Telephone 152 WML Tags and Attributes, Summary for Web Browser 99 X XML Message Parsing XML Messages Audio Push . . . . Display Push . . . Subscribe Push . . Topline Push . . . . . . . . . . . . . . . . . . 24 . . . . . . . . 77 85 99 94 81 79 78 78 206 4600 Series IP Telephones Application Programmer Interface (API) Guide . . . . . . . . . . . . . . . . . . . . . . . . . . . . . . . . . . . . . . . . . . . . . . . . . . . . 49 33 55 41