1
Tutorial for Developing Avaya IP Telephone Web
Applications using WML
KS; Reviewed:
SPOC 6/3/2008
Solution & Interoperability Test Lab Tutorial
©2008 Avaya Inc. All Rights Reserved.
1 of 26
WMLBasics
Contents
About this Tutorial ............................................................................................................................ 3
Intended Audience .............................................................................................................. 3
Prerequisites ....................................................................................................................... 3
Chapter 1:
Overview of WML and the WML browser .............................................................. 4
1.1
Attributes of Avaya 4600 Series IP Telephones .................................................... 4
1.2
Attributes of Avaya 9600 Series IP Telephones .................................................... 5
Chapter 2:
2.1
Elements of WML................................................................................................... 7
Tags in WML .......................................................................................................... 7
2.1.1
2.1.2
2.1.3
2.1.4
2.1.5
2.1.6
2.1.7
2.1.8
2.1.9
2.1.10
2.1.11
2.2
Anchor Elements ....................................................................................... 7
Deck/Card Elements.................................................................................. 8
Text Elements of WML .............................................................................. 9
Event elements of WML ............................................................................ 9
Image Elements of WML ......................................................................... 11
Task Elements of WML ........................................................................... 12
Input Elements of WML ........................................................................... 13
Variable Elements in WML ...................................................................... 15
Wireless Telephony Applications Links ................................................... 16
Access Key Input Mode (AIM) ............................................................... 17
Unsupported WML Tags........................................................................ 19
Navigation between cards in WML ...................................................................... 20
Chapter 3:
Configuration Parameters .................................................................................... 22
Chapter 4:
User-Agent header............................................................................................... 23
References..................................................................................................................................... 25
KS; Reviewed:
SPOC 6/3/2008
Solution & Interoperability Test Lab Tutorial
©2008 Avaya Inc. All Rights Reserved.
2 of 26
WMLBasics
About this Tutorial
This tutorial demonstrates the usage of WML (Wireless Markup Language) to build browser based
applications for Avaya 4600 and 9600 Series IP Telephones.
The tutorial comprises of sections on the WML browser in Avaya IP Telephones; it also includes a section
on programming the soft-keys. The tutorial also consists of sections providing details of the WML tags
that are supported by Avaya IP Telephones.
After completing this tutorial, the application programmer will be able to use WML to develop browser
based applications for Avaya 4600 and 9600 Series IP Telephones.
Intended Audience
This Tutorial is intended for application developers who want to use WML to develop applications for
Avaya 4600 and 9600 Series IP Telephones.
Prerequisites
This tutorial assumes that the developer already knows how to configure Avaya 4600 and 9600 series IP
Telephones and is also familiar with programming languages such as HTML and XML.
KS; Reviewed:
SPOC 6/3/2008
Solution & Interoperability Test Lab Tutorial
©2008 Avaya Inc. All Rights Reserved.
3 of 26
WMLBasics
Chapter 1: Overview of WML and the WML
browser
WML is an acronym for "Wireless Markup Language". It is a mark-up language inherited from HTML, but
based on XML and hence, is much stricter than HTML. WML is used to create pages that can be
displayed by Web browsers in mobile phones, embedded devices, etc.
Avaya 4610SW, 4620, 4620SW, 4621SW, 4622SW, 4625SW and the 9600 Series IP Telephones provide
an embedded Web browser which can be used to view Web pages that are designed to be displayed on
Avaya IP Telephones. Each WML page comprises of various tags such as <card>, <anchor>,
<input>, etc.
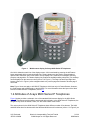
1.1 Attributes of Avaya 4600 Series IP Telephones
Figure 1 below provides a schematic view of the standard Web browser display for Avaya 4620/4620SW,
4621SW, 4622SW, and 4625SW IP Telephones and the key buttons associated with the display. The
Feature buttons are the ones on the left and right side of the screen (refer to 1 in Figure 1). The buttons
on the left are used to select lines/items on the screen whereas the buttons on the right of the screen are
used for performing navigation functions such as Page Up, Page Down, Refresh, Home, etc.
KS; Reviewed:
SPOC 6/3/2008
Solution & Interoperability Test Lab Tutorial
©2008 Avaya Inc. All Rights Reserved.
4 of 26
WMLBasics
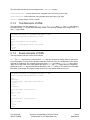
Figure 1:
Web browser display for Avaya 4600 Series IP Telephones
One link is allowed on each line of the display screen. A link is activated by pressing the left Feature
button associated with the particular display line. Feature buttons are also used to select displayed
options and to allow text entry in text boxes. The top display line is reserved for messages, text entry
prompts, and page titles. The bottom display line presents the available softkey selections. Four softkeys
can be displayed on the screen at a time (refer to 2 in Figure 1). The Page Left and Page Right hard
buttons (refer to 3 in Figure 1) allow navigation back to a previous page and forward to another page if
one exists.
Note: Figure 1 does not apply to 4610SW IP Telephone, which has only six Feature Buttons. However,
the fixed buttons and softkeys apply to the 4610SW. For more information about the layout of the Web
browser on 4600 Series IP Telephones, refer to [1].
1.2 Attributes of Avaya 9600 Series IP Telephones
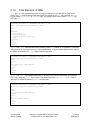
Figure 2 below provides a schematic view of the standard Web browser display for the 9600 Series
Avaya IP Telephones and the softkeys associated with its display. In the 9600 Series IP Telephones, the
navigation keys such as Refresh, Home, etc. are at the bottom of the screen.
The various phones in the 9600 Series IP Telephones have different number of line buttons. The 9620
and 9650 have three line buttons while the 9630 and 9640 have six line buttons (refer to 1 in Figure 2) as
KS; Reviewed:
SPOC 6/3/2008
Solution & Interoperability Test Lab Tutorial
©2008 Avaya Inc. All Rights Reserved.
5 of 26
WMLBasics
shown below. The 9610 is a single-line Telephone and hence has no line buttons. These line buttons are
used to select items on the screen; for example, to select a hyperlink that will load another WML page or
to select a text box to enter information.
For all 9600 Series IP Telephones, the top display area consists of a Top Line, a Title Line and a Prompt
Line for messages, text entry prompts, and page titles. The 9610 has only a Top Line on which titles are
displayed. The bottom display line provides the softkeys (refer to 2 in Figure 2) available in the standard
Web browser. Each 9600 Series IP Telephone also has a circular navigation cluster of five buttons (refer
to 3 in Figure 2) consisting of Left and Right buttons to navigate back to the previous page and forward to
another page if one exists. It also consists of Up and Down navigation keys to scroll up and down a Web
page. The OK button provides an alternative way to select a line, a field or an item.
For more information about the layout of the Web browser on 9600 Series IP Telephones, refer to [2].
Figure 2:
KS; Reviewed:
SPOC 6/3/2008
Avaya 9630 IP Telephone
Solution & Interoperability Test Lab Tutorial
©2008 Avaya Inc. All Rights Reserved.
6 of 26
WMLBasics
Chapter 2: Elements of WML
This chapter describes the tags and attributes of a WML Web page. WML pages are called decks. They
are constructed as a set of cards, related to each other with links. When a WML page is accessed, all the
cards in the deck are downloaded from the server. Navigation between the cards is done without any
additional accesses to the server.
An example code snippet for a WML page is given below:
<?xml version="1.0"?>
<!DOCTYPE wml PUBLIC "-//WAPFORUM//DTD WML 1.1//EN"
"http://www.wapforum.org/DTD/wml_1.1.xml">
<wml>
<card id="id1" title="AvayaBrowser">
<p>
Avaya IP Telephone Web Browser.
</p>
</card>
</wml>
As can be seen from the example, the WML document is an XML document. The DOCTYPE is defined to
be wml, and the DTD is accessed at www.wapforum.org/DTD/wml_1.1.xml.
The document content is presented within the <wml>...</wml> tags. Each card in the document is
within the <card>...</card> tags with actual paragraphs inside the <p>...</p> tags. Each card
element has an id and a title. A card element can contain text, markup, links, input-fields, tasks, images
and more. Cards can be related to each other with links. In the above example, the card contains
paragraphs of text. Only one card will be shown on the screen of an Avaya IP Telephone at a time.
2.1 Tags in WML
This section explains the various tags supported by WML. For additional information on each of the below
mentioned tags, refer to [1] and [2].
2.1.1
Anchor Elements
Anchor elements, namely the <a> and <anchor> tags define a link. This link allows the browser to
navigate from one card/deck to another. The <anchor> tag always has a task ("go", "prev", or "refresh")
specified. The task defines what needs to be done when the user selects the link. The code snippet below
shows the <anchor> tag in detail.
<?xml version="1.0"?>
<!DOCTYPE wml PUBLIC "-//WAPFORUM//DTD WML 1.1//EN"
"http://www.wapforum.org/DTD/wml_1.1.xml">
<wml>
<card title="Anchor Tag">
<p>
<anchor>Next page
<go href="test.wml"/>
</anchor>
</p>
</card>
</wml>
KS; Reviewed:
SPOC 6/3/2008
Solution & Interoperability Test Lab Tutorial
©2008 Avaya Inc. All Rights Reserved.
7 of 26
WMLBasics
The <a> tags can be used to go to internet sites supporting the wap interface. The example shown below
demonstrates this feature. Suppose the user wants to access the websites of BBC and New York Times
on the Avaya IP phone. The WML code snippet is as follows:
<?xml version="1.0"?>
<!DOCTYPE wml PUBLIC "-//WAPFORUM//DTD WML 1.1//EN"
"http://www.wapforum.org/DTD/wml_1.1.xml">
<wml>
<card id="bbccard" title="News">
<p><a href="http://www.bbc.co.uk/mobile/index.wml?">BBC (news)</a></p>
<p><a href="http://www.nytimes.com/wap">NYTimes</a></p>
</card>
</wml>
The href attribute in the <a> tag defines where to go when the user selects the link.
2.1.2
Deck/Card Elements
The following elements are supported under this category.
<card>: The <card> tag defines a card. A card can contain text, markup, links, input-fields, tasks,
images and more. The sample code shown below explains the <card> tag in detail.
<wml>: The <wml> tag defines a WML deck. This tag contains cards and information about the WML
document. A WML document must contain an XML declaration and a DTD. Refer to the sample code
given below for example usage.
<template>: The <template> tag defines a template for all the cards in a deck. The "code" in the
<template> tag is added to each card in the deck. Only one <template> tag can be specified for each
deck. The example below uses the <do> tag to add a "back" link to each card. The “back” link is a soft
key on the IP telephone.
<?xml version="1.0"?>
<!DOCTYPE wml PUBLIC "-//WAPFORUM//DTD WML 1.1//EN"
"http://www.wapforum.org/DTD/wml_1.1.xml">
<wml>
<template>
<do type="prev" label="Back">
<prev/>
</do>
</template>
<card id="card1" title="Card
<p>
<a href="#card2">Go to Card
</p>
</card>
<card id="card2" title="Card
<p>
<a href="#card3">Go to Card
</p>
</card>
<card id="card3" title="Card
<p>
This is Card three!!
</p>
</card>
</wml>
KS; Reviewed:
SPOC 6/3/2008
1"
2</a>
2">
3</a>
3">
Solution & Interoperability Test Lab Tutorial
©2008 Avaya Inc. All Rights Reserved.
8 of 26
WMLBasics
The other attributes that can be used inside of the <template> tag are:
onenterbackward - Occurs when the user navigates into a card using a "prev" task.
onenterforward - Occurs when the user navigates into a card using a "go" task.
ontimer - Occurs when the "timer" expires.
2.1.3
Text Elements of WML
The tags defined under this category are <br>, <p>, <table>, <td> and <tr>. The <br> tag defines a
line break and the <p> tag defines a paragraph in WML. The following example shows usage of the <br>
and <p> tags in WML.
<?xml version="1.0"?>
<!DOCTYPE wml PUBLIC "-//WAPFORUM//DTD WML 1.1//EN"
"http://www.wapforum.org/DTD/wml_1.1.xml">
<wml>
<card title="Break and Paragraph">
<p>
This is a paragraph<br/>with a line break
</p>
</card>
</wml>
2.1.4
Event elements of WML
The tags defined under this section are as follows:
<do>: The <do> tag serves as a user interface. <do> tags are rendered as softkey labels on the bottom
line of the display. It can be used to activate a task when the user clicks on a word/phrase on the screen
of Avaya IP Telephones. The example given below uses a <do> tag inside a <template> tag to add a
"Back" link to each card. Here, name defines the name of <do> tag, type defines the type of operation
performed by the <do> tag and label defines the label for the <do> element. The bottom row of the WML
Web page on the Avaya IP Telephone presents up to four such softkey labels at one time.
<?xml version="1.0"?>
<!DOCTYPE wml PUBLIC "-//WAPFORUM//DTD WML 1.1//EN"
"http://www.wapforum.org/DTD/wml_1.1.xml">
<wml>
<template>
<do name="back" type="prev" label="Back">
<prev/>
</do>
</template>
<card id="card1" title="Card 1">
<p>
This is Card 1
</p>
</card>
<card id="card2" title="Card 2">
<p>
This is Card 2!
</p>
</card>
</wml>
KS; Reviewed:
SPOC 6/3/2008
Solution & Interoperability Test Lab Tutorial
©2008 Avaya Inc. All Rights Reserved.
9 of 26
WMLBasics
Also, in order to configure a soft-key on the Avaya IP Telephone to indicate the label “SK1” and to load
another card, the following code is used.
<?xml version="1.0"?>
<!DOCTYPE wml PUBLIC "-//WAPFORUM//DTD WML 1.1//EN"
"http://www.wapforum.org/DTD/wml_1.1.xml">
<wml>
<card id="card1" title="Card 1">
<p>
This is Card 1!
</p>
<do name="back" type="prev" label="SK1">
<go href="#Card2"/>
</do>
</card>
<card id="card2" title="Card2">
<p>
This is Card 2!
New card has been loaded!
</p>
</card>
</wml>
<onevent>: The <onevent> tag contains code to be executed when one of the following events occurs:
onenterbackward, onenterforward, onpick and ontimer. The example below uses the
<onevent> tag to always navigate to ‘card1’ when an onenterbackward event occurs:
<?xml version="1.0"?>
<!DOCTYPE wml PUBLIC "-//WAPFORUM//DTD WML 1.1//EN"
"http://www.wapforum.org/DTD/wml_1.1.xml">
<wml>
<template>
<onevent type="onenterbackward">
<go href="#card1"/>
</onevent>
</template>
<card id="card1" title="Card 1">
<p>
This is Card 1 in WML
</p>
</card>
<card id="card2" title="Card 2">
<p>
This is Card 2 in WML
</p>
</card>
</wml>
<postfield>: The <postfield> tag contains information to be sent to the server along with a <go>
tag. Consider the following example:
KS; Reviewed:
SPOC 6/3/2008
Solution & Interoperability Test Lab Tutorial
©2008 Avaya Inc. All Rights Reserved.
10 of 26
WMLBasics
<?xml version="1.0"?>
<!DOCTYPE wml PUBLIC "-//WAPFORUM//DTD WML 1.1//EN"
"http://www.wapforum.org/DTD/wml_1.1.xml">
<wml>
<card>
<p>
Click OK to Send
<do type="accept">
<go href="test.wml" method="post">
<postfield name="i" value="20"/>
<postfield name="j" value="30"/>
</go>
</do>
</p>
</card>
</wml>
The <postfield> tag can also be used with the get method. Refer to the code snippet below:
<?xml version="1.0"?>
<!DOCTYPE wml PUBLIC "-//WAPFORUM//DTD WML 1.1//EN"
"http://www.wapforum.org/DTD/wml_1.1.xml">
<wml>
<card>
<p>
Click OK to Send
<do type="accept">
<go href="test.wml" method="get">
<postfield name="i" value="20"/>
<postfield name="j" value="30"/>
</go>
</do>
</p>
</card>
</wml>
Note: If the get method is used, the fields and their values are added at the end of the URL.
2.1.5
Image Elements of WML
<img>: The <img> tag defines an image which is displayed on the Avaya 4600 or 9600 Series IP
Telephones. In the example given below, src stands for the path of the image and alt sets an alternate
text to be displayed if the image is not displayed on the screen. WBMP and JPEG images are supported
on the Avaya 9600 Series IP Telephone, whereas only WBMP images are supported on the Avaya 4600
Series IP Telephone.
<?xl version="1.0"?>
<!DOCTYPE wml PUBLIC "-//WAPFORUM//DTD WML 1.1//EN"
"http://www.wapforum.org/DTD/wml_1.1.xml">
<wml>
<card title="Image">
<p>
An image:
<img src="Avayalogo.wbmp" alt="No Logo displayed"/>
</p>
</card>
</wml>
KS; Reviewed:
SPOC 6/3/2008
Solution & Interoperability Test Lab Tutorial
©2008 Avaya Inc. All Rights Reserved.
11 of 26
WMLBasics
2.1.6
Task Elements of WML
<go>: The <go> task represents the action of going to a new card or to a new deck of cards on the
server. The href attribute specifies the target card. The content for the <go> tag is optional. The <go>
tag can contain <postfield> or <setvar> tags. The example given below uses the <setvar> tag
within the <go>.
<?xml version="1.0"?>
<!DOCTYPE wml PUBLIC "-//WAPFORUM//DTD WML 1.1//EN"
"http://www.wapforum.org/DTD/wml_1.1.xml">
<wml>
<p>
<anchor>
Go To Card 2
<go href="#card2">
<setvar name="x" value="30"/>
</go>
</anchor>
</p>
</card>
</wml>
<noop>: The <noop> task says that nothing should be done (noop stands for "no operation"). This tag is
used to prevent an event from occurring. In the example below, no action is taken when the user clicks on
the "Back" link because the <noop> tag prevents this operation.
<?xml version="1.0"?>
<!DOCTYPE wml PUBLIC "-//WAPFORUM//DTD WML 1.1//EN"
"http://www.wapforum.org/DTD/wml_1.1.xml">
<wml>
<card>
<p>
<do type="prev" label="Back">
<noop/>
</do>
</p>
</card>
</wml>
<prev>: The <prev> tag represents the action of returning to the previous card visited. If no previous
URL exists, specifying <prev> has no effect. The content between the <prev>...</prev> tags is
optional. If no content is specified, <prev/> must be used.
<?xml version="1.0"?>
<!DOCTYPE wml PUBLIC "-//WAPFORUM//DTD WML 1.1//EN"
"http://www.wapforum.org/DTD/wml_1.1.xml">
<wml>
<card>
<do type="accept" label="Back">
<prev/>
</do>
<p>
This is a Sample code!
</p>
</card>
</wml>
KS; Reviewed:
SPOC 6/3/2008
Solution & Interoperability Test Lab Tutorial
©2008 Avaya Inc. All Rights Reserved.
12 of 26
WMLBasics
<refresh>: The <refresh> task refreshes some specified card variables. If any of the variables are
shown on the screen, this task also refreshes the screen. The <refresh> tag can be nested within an
<anchor>, <do>, or <onevent> tag. The example below uses an <anchor> tag to add a "Refresh this
page" link to the card. When the user clicks on the link, the page is refreshed and the value of the variable
x will be set to 30:
<?xml version="1.0"?>
<!DOCTYPE wml PUBLIC "-//WAPFORUM//DTD WML 1.1//EN"
"http://www.wapforum.org/DTD/wml_1.1.xml">
<wml>
<card>
<p>
<anchor>
Refresh this page
<go href="thispage.wml"/>
<refresh>
<setvar name="x" value="30"/>
</refresh>
</anchor>
</p>
</card>
</wml>
2.1.7
Input Elements of WML
<input>: The <input> tag defines an input field (a text field where the user can enter some text). In this
case the user can choose the ‘type’ attribute of <input> tag to indicate ‘text’ or ‘password’.
If the ‘type’ attribute is set to ‘password’, then the field can be used to accept password type input.
Consider the example given below:
<?xml version="1.0"?>
<!DOCTYPE wml PUBLIC "-//WAPFORUM//DTD WML 1.1//EN"
"http://www.wapforum.org/DTD/wml_1.1.xml">
<wml>
<card title="Input">
<p>
Name: <input type="text" size="15"/><br/>
Password: <input type="password" size="15"/><br/>
</p>
</card>
</wml>
<select> and <option>: The <select> tag defines a selectable list. The <option> tag is used to
define the options in the selectable list. Refer to the example shown below:
<?xml version="1.0"?>
<!DOCTYPE wml PUBLIC "-//WAPFORUM//DTD WML 1.1//EN"
"http://www.wapforum.org/DTD/wml_1.1.xml"><wml>
<card title="Tutorial List">
<p>
<select>
<option value="aes">Avaya AES Tutorial</option>
<option value="ss">Avaya Self Services Tutorial</option>
<option value="ipp">Avaya IP Telephone Tutorial</option>
</select>
</p>
</card>
</wml>
KS; Reviewed:
SPOC 6/3/2008
Solution & Interoperability Test Lab Tutorial
©2008 Avaya Inc. All Rights Reserved.
13 of 26
WMLBasics
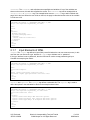
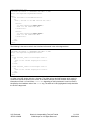
The example given below demonstrates how to use the <input> tag. It also shows how check boxes
and radio buttons are generated for the WML page as shown in figure 3. The source code is shown
below:
<?xml version="1.0"?>
<!DOCTYPE wml PUBLIC "-//WAPFORUM//DTD WML 1.1//EN"
"http://www.wapforum.org/DTD/wml_1.1.xml">
<wml>
<card id="card1" title="Forms">
<p>
Text Fields:
[Entered text replaces label]<br/>
[<input name="text" format="M" title=”Enter text between brackets”> ]<br/>
<input type="checkbox" name="Check1" checked="checked">Check Box</input><br/>
<input type="radio" name="Radio1" checked="checked">Selected Radio Button</input><br/>
<input type="radio" name="Radio2">Unselected Radio Button</input>
<do name="done" type="accept" label="Done">
<do name="cancel" type="prev" label="Cancel">
<do name="more" type="options" label="More">
</p>
</card>
</wml>
Figure 3:
Example for Input elements
<optgroup>: The <optgroup> tag defines a group of options in a selectable list. The <optgroup> tag
must go inside the select element. Refer to the example below for the <optgroup> tag.
KS; Reviewed:
SPOC 6/3/2008
Solution & Interoperability Test Lab Tutorial
©2008 Avaya Inc. All Rights Reserved.
14 of 26
WMLBasics
<?xml version="1.0"?>
<!DOCTYPE wml PUBLIC "-//WAPFORUM//DTD WML 1.1//EN"
"http://www.wapforum.org/DTD/wml_1.1.xml"><wml>
<card title="Selectable List">
<p>
<select>
<optgroup title="4600 Series Phones">
<option value="4610">Avaya 4610 Tutorial</option>
<option value="4620">Avaya 4620 Tutorial</option>
<option value="4625">Avaya 4625 Tutorial</option>
</optgroup>
<optgroup title="9600 Series Phones">
<option value="9610">Avaya 9610 Tutorial </option>
<option value="9620">Avaya 9620 Tutorial </option>
<option value="9630">Avaya 9630 Tutorial </option>
</optgroup>
</select>
</p>
</card>
</wml>
2.1.8
Variable Elements in WML
<setvar>: The <setvar> tag sets a variable to a specified value in a <go>, <prev>, or <refresh>
task. The example below has the variable ‘x’ set to 30 using the <setvar> tag. The value can later be
displayed on the screen as shown:
<?xml version="1.0"?>
<!DOCTYPE wml PUBLIC "-//WAPFORUM//DTD WML 1.1//EN"
"http://www.wapforum.org/DTD/wml_1.1.xml">
<wml>
<card>
<p>
<anchor>
Go To Card 2
<go href="#card2">
<setvar name="x" value="30"/>
</go>
</anchor><br/>
The Value of x is $x
</p>
</card>
</wml>
<timer>: The <timer> tag defines a card timer. The timer starts when the card is entered, and stops
when the card is exited. Only one timer element is allowed per card. The time unit of the timer is 1/10 of a
second. This tag can be used with <card>, <onevent>, and <template> tags. The example below will
display "Hello World!" for 3 seconds, and then the browser redirects to the test.wml file:
<?xml version="1.0"?>
<!DOCTYPE wml PUBLIC "-//WAPFORUM//DTD WML 1.1//EN"
"http://www.wapforum.org/DTD/wml_1.1.xml">
<wml>
<card ontimer="test.wml">
<timer value="30"/>
<p>Hello World!
</p>
</card>
</wml>
KS; Reviewed:
SPOC 6/3/2008
Solution & Interoperability Test Lab Tutorial
©2008 Avaya Inc. All Rights Reserved.
15 of 26
WMLBasics
2.1.9
Wireless Telephony Applications Links
Wireless Telephony Applications (WTA) are those applications designed to interact with the
Telephone related functions present in an Avaya IP Telephone. The Web browser supports “Click to Dial”
and “Add to Speed Dial” applications. In the “Click to Dial” application, a telephone handset icon is
displayed to the left of a “click to dial” link when the link first displays on the screen. It allows the
application to embed a phone number in the link. The phone places an outgoing call when the link is
clicked. The “Add to Speed Dial” application adds a Name and Number to the Telephone’s Speed Dial. A
Speed Dial icon displays to the left of an “add to phonebook” link.
The WTAI URI scheme is as follows:
wtai://<library>/<function> (; <parameter>)* [! <result>]
where,
library: the name that identifies the library type, WTA Public uses library “wp.”
function: the function within a library, for example, “mc” for function “make call” in “wp” library.
parameter: zero or more parameters sent to a function. Delineated by a semicolon “;”
result: start of result defined by “!”. This is optional.
To enable the click to dial functionality, use the following syntax: wtai://wp/mc;number
This code can be embedded into any valid WML tag that implements href or a hyperlink by associating
these tags with a <go> tag. The tags are <a>, <anchor>, <img>, <do>, <onevent>, <select>,
<option>, and <optgroup>.
Given below is the sample code snippet to implement the Click-to-dial using the <anchor> tag:
<?xml version=”1.0”?>
<!DOCTYPE wml PUBLIC “-//WAPFORUM//DTD WML 1.3//EN”
“http://www.wapforum.org/DTD/wml13.dtd”>
<wml>
<card id=”callid2” title=”Click-to-Dial Demo”>
<p>
Click on the link to originate a call
<a href=”wtai://wp/mc;5551212”>Call 5551212</a>
</p>
</card>
</wml>
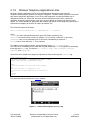
The generated code is rendered as in Figure 4 below:
Figure 4:
KS; Reviewed:
SPOC 6/3/2008
Click to Dial using the <anchor> tag
Solution & Interoperability Test Lab Tutorial
©2008 Avaya Inc. All Rights Reserved.
16 of 26
WMLBasics
The diagram above shows a Hyperlink titled Call us on the Web page. When a user selects this link, the
phone dials the string “5551212” or any number that follows a semicolon in the WTAI code.
In a similar manner the user can implement the Click to dial application using the <do> and <onevent>
tags. In the <onevent> tag the user must set the attribute type to “ontimer”. By doing so, the code
automatically dials the given phone number after the Web page loads successfully.
Similarly, the Add to Speed dial functionality can also be implemented using the WTAI. Refer to the code
sample given below. For more information on WTAI refer to [1] and [2]. In the example below, the code is
written using the <a> tag:
<?xml version=”1.0”?>
<!DOCTYPE wml PUBLIC “-//WAPFORUM//DTD WML 1.3//EN”
“http://www.wapforum.org/DTD/wml13.dtd”>
<wml>
<card id=”addap1” title=”Add to Contacts Demo”>
<p>
My number is:
<a href=”wtai://wp/ap;5551212;My Company”>5551212</a>
</p>
</card>
</wml>
The generated code is rendered as shown in Figure 5 below:
Figure 5:
Add to Speed Dial
The above sample code adds the entry to the group with the name “My Company”. When the user selects
the hyperlink, the Web browser transfers the name and contact number information to the application that
controls the telephone’s Contacts. Users can then edit and save the entry in the Contacts list.
2.1.10 Access Key Input Mode (AIM)
Access Key Input Mode (AIM) is used for cards in the Web browser that use the accesskey attribute,
and it requires the user to enter some text. This is a new type of Text Entry mode. AIM controls the dial
pad usage between the phone and Web applications that use the accesskey attribute. When a Web
page with one or more valid accesskey attributes loads completely, the page takes control of the dial
pad. AIM is enabled only when the browser is in focus.
AIM stays in effect until either:
KS; Reviewed:
SPOC 6/3/2008
Solution & Interoperability Test Lab Tutorial
©2008 Avaya Inc. All Rights Reserved.
17 of 26
WMLBasics
•
•
•
the user presses the Phone/Exit or Options button,
the phone goes off-hook to make or receive a call, or
a Web page without any valid accesskey attribute is completely loaded.
The accesskey attribute assigns a particular key on the phone to an element. For example, the digit “2”
on the dial pad of the Avaya IP Telephone is assigned the access key “2ABC”. When the “2” button on
the dial pad is pressed, the example2.com URL is launched because it is mapped to the “2ABC“ button,
as shown in the following code example:
<a href="http://example2.com/contents/wml" accesskey="2”>
An AIM application is one where the page currently being loaded contains <a> or <anchor> tags with
access keys defined. Application developers decide that each button on the dial pad is mapped to a
different access key and URL. When a user presses a dial pad button, or “access key”, the browser
launches a URL without displaying any characters to the user on the screen. The button press information
is sent to the URL and the subsequent pages are returned.
Directory lookup is a simple example of the AIM functionality. In this case, suppose the user wants to look
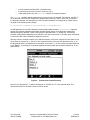
up the name of a person (e.g., “Oscar”) in the Contacts Directory. Here, the user presses the key “6” on
the dial pad because it corresponds to the first letter of the name i.e. “O” (the access keys associated with
6 are “6MNO”). On pressing 6, the browser displays the names which are the closest matches to “O” as
shown below:
Figure 6:
Results from Contact Directory
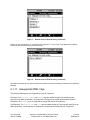
Next, the user presses key “7” (which corresponds to “7PQRS”) for “S” in the required name. This
narrows the search for the name “Oscar” as shown below:
KS; Reviewed:
SPOC 6/3/2008
Solution & Interoperability Test Lab Tutorial
©2008 Avaya Inc. All Rights Reserved.
18 of 26
WMLBasics
Figure 7:
Results from Contact Directory (continued)
Finally, the user presses key “2” to search for the character “C” in the name. This displays the required
name from the Contact Directory as shown below:
Figure 8:
Results from Contact Directory (continued)
The AIM functionality can be used to improve the search process for looking up contacts in the telephone
directory.
2.1.11 Unsupported WML Tags
The following WML tags are not supported by Avaya IP Telephone:
Deck/Card: The <access>, <head> and <meta> tags are additional tags for deck/card elements
specified in the WML specification. These tags are not supported by Avaya 4600 and 9600 Series IP
Telephones. The <meta> tag is not supported by Avaya 4600 Series IP Telephones.
Text Elements: The <table>, <td> and <tr> tags are additional tags for Text elements specified in the
WML specification. These tags are not supported by Avaya 4600 and 9600 Series IP Telephones.
KS; Reviewed:
SPOC 6/3/2008
Solution & Interoperability Test Lab Tutorial
©2008 Avaya Inc. All Rights Reserved.
19 of 26
WMLBasics
Text Formatting Tags of WML: The <b>, <big>, <em>, <i>, <small>, <strong> and <u> tags are
available under the Text formatting type in WML. These tags are not supported by Avaya 4600 and 9600
Series IP Telephones. However, the content inside the tags is rendered as normal text.
Input Elements: The <fieldset> tag is an additional tag for Input Elements specified in the WML
specification. This tag is not supported by the Avaya 4600 and 9600 Series IP Telephones.
2.2 Navigation between cards in WML
Navigation between cards in WML is shown in the sample code snippet below. A WML file provides the
<card> tag along with <anchor> tags. <anchor> tags are used together with elements called <go>
and <prev> to specify a destination for the hyperlink. If the user navigates to another card of the same
deck, the browser does not have to send any requests to the server since the file that contains the deck is
already stored in the device.
<?xml version="1.0"?>
<!DOCTYPE wml PUBLIC "-//WAPFORUM//DTD WML 1.1//EN"
"http://www.wapforum.org/DTD/wml_1.1.xml">
<wml>
<card id="Main" title="Select example">
<p>
<select>
<option title="Card1" onpick="#CardOne">One</option>
<option title="Card2" onpick="#CardTwo">Two</option>
</p>
</card>
<card id="CardOne" title="FirstCard">
<p>
Your choice was Card one.
</p>
</card>
<card id="CardTwo" title="SecondCard">
<p>
Your choice was Card two.
</p>
</card>
</wml>
In the above example, the user can navigate between the different cards available in the same deck. The
example below shows how to load another deck and to control which card is initially displayed from the
deck.
KS; Reviewed:
SPOC 6/3/2008
Solution & Interoperability Test Lab Tutorial
©2008 Avaya Inc. All Rights Reserved.
20 of 26
WMLBasics
<?xml version="1.0"?>
<!DOCTYPE wml PUBLIC "-//WAPFORUM//DTD WML 1.3//EN"
"http://www.wapforum.org/DTD/wml13.dtd">
<wml>
<card id="card1" title="WML Tutorial">
<p>
Hello, welcome to our WML tutorial.<br/><br/>
<anchor>
<go href="Links2.wml#text_card1"/>
Card 1 of the Links2.wml file
</anchor><br/>
<anchor>
<go href="links2.wml#text_card2"/>
Card 2 of the Links2.wml file
</anchor><br/>
</p>
</card>
</wml>
The following is the source code for the Links2.wml referenced in the code snippet above:
<?xml version="1.0"?>
<!DOCTYPE wml PUBLIC "-//WAPFORUM//DTD WML 1.3//EN"
"http://www.wapforum.org/DTD/wml13.dtd">
<wml>
<card id="text_card1" title="Sample Card 1">
<p>
This is the content displayed for Card 1.
</p>
</card>
<card id="text_card2" title="Sample Card 2">
<p>
This is the content displayed for Card 2.
</p>
</card>
</wml>
An offset in the URL begins with the # character. This offset informs the WAP browser which card of a
certain deck should be shown on the screen. In the above example, the WAP browser either displays
information of Card 1 or Card 2 from Links2.wml depending on the link selected. A card in a deck is
identified by the id attribute value of the <card> tag. The offset of a URL (highlighted in bold) should be
the ID of the target card.
KS; Reviewed:
SPOC 6/3/2008
Solution & Interoperability Test Lab Tutorial
©2008 Avaya Inc. All Rights Reserved.
21 of 26
WMLBasics
Chapter 3: Configuration Parameters
This section explains the various parameters in the 46xxsettings.txt file that are related to the Web
browser.
WMLHOME – This value must be set to allow an application to be launched from the IP Telephone’s Web
browser. The setting WMLHOME, which sets the URL of the telephone home page may be different for each
set type to take advantage of the capabilities of the individual sets.
Example: SET WMLHOME http://<webserverIP>/<Homepage>
WMLIDLETIME – This value must be set to allow the sample application to be launched via an idle
timeout. WMLIDLETIME is the number of minutes of no activity on the Avaya IP Telephone WML Web
browser after which the IP telephone will load the Web page pointed to by WMLIDLEURI.
Example: SET WMLIDLETIME 2
WMLIDLEURI – This value must be set to allow the sample application to be launched via an idle timeout.
After WMLIDLETIME minutes of no activity on the IP Telephone’s WML Web browser, the Web page
pointed to by this setting will be loaded into the browser.
Example: SET WMLIDLEURI http://<webserverIP>/<Webpage>
WMLPROXY – This value corresponds to a text string containing the IP Address, in dotted decimal or DNS
format, of an HTTP proxy server.
Example: SET WMLPROXY my.proxy.company.com
WMLPORT – WMLPORT is the TCP port number of the HTTP proxy server. This parameter is assigned as
follows. Here 8080 corresponds to the port number of the server.
Example: SET WMLPORT 8080
WMLEXCEPT – WMLEXCEPT corresponds to a list of one or more HTTP proxy server domains separated by
commas and without any spaces. Accesses to these addresses will not go through the proxy server.
Example: SET WMLEXCEPT mycompany.com,135.20.21.20
Note: If the user wants to access a website on the Internet and access to the Internet is through a proxy
server, then the WMLPROXY, WMLEXCEPT and the WMLPORT values must be set accordingly. The IP
Telephone must be rebooted when the 46xxsettings.txt file is changed.
KS; Reviewed:
SPOC 6/3/2008
Solution & Interoperability Test Lab Tutorial
©2008 Avaya Inc. All Rights Reserved.
22 of 26
WMLBasics
Chapter 4: User-Agent header
The User-Agent request-header field contains the Web browser’s signature. This information is sent by
the Avaya IP Telephone Web browser and can be used to determine the set type and firmware version of
the IP Telephone making the request. This information is used for tracking different requests and for useragent recognition to avoid limitations of different IP Telephones. For example, if a user-agent uses an
older firmware that needs to be upgraded, information in the signature can be used for the firmware
upgrade. This message is specified for different types of Avaya IP Telephones as follows:
Message for Avaya 4600 Series IP Telephones:
Identify the 4610 WML Web browser using the following user-agent string:
"AVAYA/IGEN/v2.8+(4610x)/0.0"
Identify the 4620/4620SW, 4621SW and 4622SW WML Web browsers using the following user-agent
string:
"AVAYA/IGEN/v2.8+(4620x)/0.0"
Note: The 4620SW, 4621SW, and 4622SW are aliased as 4620 IP Telephones, and therefore use the
same header as the 4620 IP phone.
Identify the 4625SW Web browser using the following User-Agent string:
"AVAYA/IGEN/v2.8+(4625)/0.0"
In each of the above user-agent strings we have the following components:
AVAYA: This indicates the Company Name for the product.
IGEN: This indicates the name of the Product Family.
v2.8: This indicates the Firmware version number.
4610 or 4620 or 4625: This indicates the Set Type of Avaya IP Telephones.
x: This indicates Reserved Extensions.
0.0: This indicates Minor Version number.
Message for Avaya 9600 Series IP Telephones:
Identify the 9610 WML Web browser using the following user-agent string:
AVAYA/SPICE/v1.2+(9610)/Std/0.1
Identify the 9620 WML Web browser using the following user-agent string:
AVAYA/SPICE/v1.0+(9620)/Std/0.1
Identify the 9630 WML Web browser using the following user-agent string:
AVAYA/SPICE/v1.0+(9630)/Std/0.1
KS; Reviewed:
SPOC 6/3/2008
Solution & Interoperability Test Lab Tutorial
©2008 Avaya Inc. All Rights Reserved.
23 of 26
WMLBasics
Identify the 9640 WML Web browser using the following user-agent string:
AVAYA/SPICE/v1.0+(9640)/Std/0.1
Identify the 9650 WML Web browser using the following user-agent string:
AVAYA/SPICE/v1.0+(9650)/Std/0.1
where:
Avaya: This indicates the Company Name for the product.
SPICE: This indicates the name of the Product Family.
V1.0: This indicates the Firmware version number.
9610 or 9620 or 9630 or 9640 or 9650: This indicates the Set Type of Avaya IP Telephones
0.1: This indicates Minor Version number
Browser Type: Std
Browser Mode:
Accept-Charset
The client uses the Accept-Charset header to specify which character sets it understands for WML page
coding.
KS; Reviewed:
SPOC 6/3/2008
Solution & Interoperability Test Lab Tutorial
©2008 Avaya Inc. All Rights Reserved.
24 of 26
WMLBasics
References
[1]
4600 Series IP Telephones Application Programmer Interface (API) Guide.
[2]
Avaya one-X™ Deskphone Edition for 9600 Series IP Telephones Application Programmer
Interface (API) Guide.
[3]
4600 Series IP Telephone LAN Administrator Guide. (Issue 6 February 2007)
[4]
Avaya one-X™ Deskphone Edition for 9600 Series IP Telephones Administrator Guide Release
1.5. (Issue 4 May 2007)
KS; Reviewed:
SPOC 6/3/2008
Solution & Interoperability Test Lab Tutorial
©2008 Avaya Inc. All Rights Reserved.
25 of 26
WMLBasics
©2008 Avaya Inc. All Rights Reserved.
Avaya and the Avaya Logo are trademarks of Avaya Inc. All trademarks identified by ® and ™ are
registered trademarks or trademarks, respectively, of Avaya Inc. All other trademarks are the property of
their respective owners. The information provided in this tutorial is subject to change without notice. The
configurations, technical data, and recommendations provided in this tutorial is believed to be accurate
and dependable, but is presented without express or implied warranty. Users are responsible for their
application of any products specified in this tutorial.
Please e-mail any questions or comments pertaining to this tutorial along with the full title name and
filename, located in the lower right corner, directly to the Avaya DevConnect Program at
[email protected].
KS; Reviewed:
SPOC 6/3/2008
Solution & Interoperability Test Lab Tutorial
©2008 Avaya Inc. All Rights Reserved.
26 of 26
WMLBasics