Transcript
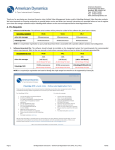
VideoEdge ™ NVR Bundled Server 1 4 What’s in the Box Standard Items 5 Panel Connectors Power Up and Test The unit should power up as soon as you press the Power button on the front of the unit. Back Panel Power button LCD Panel Reset button 2 x Localized Power Cords USB Keyboard Rack Mounting Kit Connect both Power Cords Optional: Connect the Fibre RAID Storage Unit Note: The Fibre HBA Kit is required and sold separately* VideoEdge™ NVR Bundled Server Observe the boot sequence on the VGA monitor. On the client computer launch the Internet browser and enter the IP address of the VideoEdge™ NVR Bundled Server. 6 Results The VideoEdge™ NVR Bundled Server should be powered up and running. The VideoEdge™ web page should be displayed on the client PC. Is the Unit Functioning as Described? Quick Setup Guide and VideoEdge™ NVR Installation Disc. Connect Gb 2 (LAN2) to Camera Network NOTE: Store the VideoEdge™ NVR CD and jewel case in a safe place. The serial number printed on the label is your proof of license to use the software. Use proper network switch Connect Gb 1 (LAN1) to Client Network Use proper network switch or cross-over cable Connect the USB Keyboard 2 Required Accessories (not in this box) Connect the VGA Main Monitor Connect to blue female connector VGA or Flat Panel Monitor (not shown) PC with Internet Browser and Network Connection (not shown) YES! The VideoEdge™ NVR Bundled Server is ready to be licensed and configured. Use the following information to log in: Default Username: admin Default Password: admin You must now register the VideoEdge(tm) NVR Bundled Server to license the NVR, complete the installation and configure the network, users/groups and camera configuration settings. For details refer to the User Manual on the VideoEdge™ NVR Installation Disc. NOTE: The registered camera license file must be applied to the VideoEdge™ NVR Bundled Server before the temporary license period expires. Supported IP Cameras or VideoEdge™ IP Encoders Gigabit Ethernet switches and cabling CAUTION: Do not boot the VideoEdge™ NVR Installation Disc on your desktop computer. Booting from this disc removes all data from the primary hard disk. NO! Is the VideoEdge™ NVR Bundled Server powered up? Check the power connections. IP Encoder IP Network Camera Gigabit Switch Connect Power and additional cables as indicated above 3 Optional Accessories for Extended Storage American Dynamics Fibre Host Bus Adapter (HBA) Kit* American Dynamics Fibre RAID Storage System* Be sure to use an Uninterruptible Power Supply (UPS) Be sure to use surge protection for power supply and provide appropriate grounding VGA Monitor and peripherals should be powered up before the unit is powered up *Contact your American Dynamics Representative for more information. Always follow appropriate safety precautions Unit powers up when you press the Power button on the front panel Did you see the boot sequence on the VGA monitor? If not, power the VideoEdge™ NVR Bundled Server off and restart. You may need to re-install the NVR Software. Can you connect with a browser? If not, verify the IP address is correct by using the ping command from a Command Prompt window. Verify the network connections, IP addresses and subnet masks on the client. If you have checked all these items and the unit fails to power up, or you repowered your unit and the unit still fails to operate properly, please contact your American Dynamics Representative. © 2008 Tyco International Ltd. and its Respective Companies. All Rights Reserved 8200-2601-01 B0