1
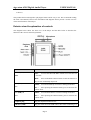
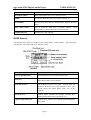
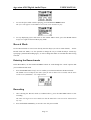
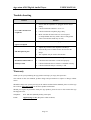
aigo atom A205 Digital Audio Player
USER MANUAL
USER MANUAL
THE PRODUCT PACK .................................................................................................................4
PREPARATION & GETTING STARTED...................................................................................4
Before first use ..........................................................................................................................4
Tutorial Presentations...............................................................................................................4
Points to Note............................................................................................................................4
ABOUT THE PLAYER..................................................................................................................5
FEATURES ...........................................................................................................................5
EXTERIOR VIEW & EXPLANATION OF CONTROLS .....................................................................6
OLED SCREEN ....................................................................................................................7
BATTERY ............................................................................................................................8
Charging the Battery.................................................................................................................8
BASIC OPERATIONS ...................................................................................................................8
TURNING THE PLAYER ON ...................................................................................................9
TURNING THE PLAYER OFF ..................................................................................................9
PLAYING TRACKS .............................................................................................................. 10
PLAYING RECORDED VOICE FILES....................................................................................... 10
PAUSING TRACKS ............................................................................................................... 10
SELECTING A TRACK/FILE ................................................................................................... 10
SCROLLING THROUGH MENUS ............................................................................................. 11
FAST-FORWARDING AND FAST-REVERSING ........................................................................... 11
INCREASING/DECREASING VOLUME .................................................................................... 11
LOCKING THE BUTTONS/KEYS ............................................................................................. 11
THE MAIN MENU.......................................................................................................................12
MUSIC MODE..............................................................................................................................12
Entering the Music Mode........................................................................................................12
FILE MENU ( ACCESSED WHEN NOT PLAYING A TRACK OR VOICE FILE)..................................... 12
Local Folder (File Menu) .......................................................................................................13
Delete File ..............................................................................................................................13
Delete All ................................................................................................................................13
Exit (File Menu)......................................................................................................................13
PLAY MENU ( ACCESSED WHILE PLAYING A TRACK OR VOICE FILE).......................................... 14
Repeat .....................................................................................................................................14
Equalizer.................................................................................................................................15
Tempo Rate..............................................................................................................................15
Replay (A-B Repeat) ...............................................................................................................16
Follow Read Mode..................................................................................................................16
Comparison Replay.................................................................................................................17
Page 1
aigo atom A205 Digital Audio Player
USER MANUAL
Replay Times...........................................................................................................................17
Replay Gap .............................................................................................................................17
Exit (Play Menu).....................................................................................................................18
DISPLAYING LYRICS ........................................................................................................... 18
Using Lyrics Files ...................................................................................................................18
How to tell if lyrics exist for a track........................................................................................18
RECORD MODE..........................................................................................................................19
ENTERING THE RECORD MODE ............................................................................................ 19
RECORDING ...................................................................................................................... 19
ACCESSING THE RECORD MODE FILE MENU ........................................................................ 21
Local Folder (Record mode)...................................................................................................21
Record Type (Record mode)....................................................................................................21
VOICE (REPLAY) MODE ..........................................................................................................22
ENTERING THE VOICE (REPLAY) MODE ................................................................................ 22
Entering the Voice mode File Menu........................................................................................23
Entering the Voice mode Play Menu.......................................................................................23
FM (RADIO) MODE....................................................................................................................24
ENTERING THE FM (RADIO) MODE ..................................................................................... 24
FM MENU......................................................................................................................... 24
Search Mode ...........................................................................................................................24
Search Level............................................................................................................................25
Save.........................................................................................................................................26
Delete......................................................................................................................................26
Select Band .............................................................................................................................26
REC Type (FM mode) .............................................................................................................27
Exit (FM mode).......................................................................................................................28
Scrolling through Saved Radio Stations..................................................................................28
EBOOK MODE ............................................................................................................................28
THE EBOOK MENU ............................................................................................................ 28
Local Folder ...........................................................................................................................29
Select File ...............................................................................................................................29
Reading Set .............................................................................................................................29
Delete File ..............................................................................................................................30
Delete All ................................................................................................................................30
Exit (eBook Menu) ..................................................................................................................31
SYSTEM MODE...........................................................................................................................31
ENTERING THE SYSTEM MODE ........................................................................................... 31
SYSTEM MENU .................................................................................................................. 31
Record Time ............................................................................................................................32
Page 2
aigo atom A205 Digital Audio Player
USER MANUAL
Backlight .................................................................................................................................32
Language ................................................................................................................................33
Power Off................................................................................................................................33
Replay Mode ...........................................................................................................................34
Contrast ..................................................................................................................................34
Firmware Version....................................................................................................................35
Firmware Upgrade .................................................................................................................35
Exit (System mode)..................................................................................................................35
CONNECTING THE PLAYER TO A PC ..................................................................................35
Disconnecting the Player from a PC ......................................................................................36
INSTALLATION OF DRIVER SOFTWARE (FOR PCS RUNNING WINDOWS 98SE ONLY) .................. 36
TRANSFERRING TRACKS TO THE PLAYER FROM A CD (VIA A PC)............................................ 36
SENDING AND DELETING FILES BETWEEN PC AND PLAYER .................................................... 40
ADDING FOLDERS TO THE PLAYER ...................................................................................... 40
CHANGING THE NAMES OF FOLDERS ON THE PLAYER ............................................................ 41
DIGITAL RIGHTS MANAGEMENT (DRM)...........................................................................42
TECHNICAL SPECIFICATION ................................................................................................42
UNDERSTANDING THE TECHNICAL SPECIFICATION ................................................................ 43
TROUBLE-SHOOTING..............................................................................................................45
WARRANTY.................................................................................................................................45
Page 3
aigo atom A205 Digital Audio Player
USER MANUAL
The aigo atom A205 MP3 player is a brand-new generation of portal digital device, which
supports multiple music formats (including MP3, WMA. Its high sound quality, reliability and
streamlined appearance make it not only stand out in its field, but makes it a pleasure to look at
and use. We sincerely hope that your purchase of the aigo atom A205 brings you the pleasure
and enjoyment you deserve in this digital era.
The Product Pack
The Product Pack (box) for the aigo atom A205 contains:
Ø
Ø
Ø
Ø
Ø
Ø
1 MP3 Digital Audio Player (“the Player”)
1 Earphones
1 USB cable (for connecting to PC)
Charger for on-board battery
1 User Manual (“the Manual”)
1 CD-ROM (containing tutorial presentations & driver software for Windows 98 only)
If any of the above items are missing from the product pack, contact the aigo UK Support team:
using the details provided in the “Warranty” section of this Manual on page 45.
When opening the Product Pack for the first time, be careful when removing the contents, as many
of the items contained in the box are fairly small and could fall out without being noticed.
Preparation & Getting Started
Before first use
Before first use of the product, take time to read this User Manual and, if desired, to view the
product Tutorial Presentations which are included on the CD-ROM in the Product Pack.
Tutorial Presentations
The Tutorial Presentations included on the CD in the product pack provide a very quick lesson in
the basic use of digital audio players. Should you mislay the CD-ROM, these presentations are
also available in the Support section of the aigo UK website, www.aigo.co.uk.
Points to Note
Ø Keep the Player dry.
Ø To avoid damage that can be caused by static electricity, operate the Player in a dry
environment.
Ø Do not drop the Player onto hard surfaces, as damage may be caused which may affect
the performance of the Player.
Ø Please charge the on-board battery if:
•
The Battery Level indicator is low;
Page 4
aigo atom A205 Digital Audio Player
•
•
USER MANUAL
The Player plays only briefly and then shuts off; or
There is no response when pressing the keys/buttons even after recharging the
battery.
About the Player
Features
Ø Streamlined Appearance
The unique, streamlined appearance has been designed for convenience and comfortable
handling.
Ø Plays Multiple Formats
This model of player can play MP3, WMA file formats.
Ø FM Radio Function
Listen to FM radio stations – and set your favourite stations (using Auto Search or Manual
Search). The Player can save up to 40 station pre-sets (20 per Band).
Ø Record & Replay Options
Record directly onto the Player via the built-in microphone.
(replay) or comparison replay.
Replay using A-B Repeat
Ø 7 Equalizer Pre-sets
Choose from seven (7) Equaliser pre-sets - Normal, Rock, Pop, Classic, Soft, Jazz and DBB –
to optimise the sound quality no matter what your musical tastes.
Ø 7 Play Modes
Seven (7) play modes - Normal, Repeat One, Folder, Repeat Folder, Repeat All,
Random/Shuffle, Preview/Intro – facilitate a variety of playing requirements.
Ø Power Off
Two (2) power-off options (Sleep Timer and Off Time) provide flexibility and convenience.
Ø Graphic Menu Interface
The menus shown in the OLED screen use symbols, as well as text, thereby making the Player
easy to use and operate.
Ø Drive Free USB Disk [What exactly does this mean?]
The Player will be recognised by your computer as an additional drive (E:/Removable Disk)
without the need for driver software (unless your PC uses Windows 98SE) - and you can
manage the tracks/files that are on the Player directly via your PC (if running Windows 2000
Page 5
aigo atom A205 Digital Audio Player
USER MANUAL
or above).
This product has been designed to play digital music and be easy to use. We recommend reading
the entire User Manual, however the information and diagrams below provide a useful overview
of the main functions of the Player.
Exterior view & explanation of controls
The diagram below shows the front view of the Player and the table below it describes the
function of the various control keys/buttons.
Button
Volume (VOL) &
Hold
Function
VOL:
To cause the NEXT & PREV buttons to become the Vol
+ and Vol -.
Hold:
Press and hold the Volume button to lock the buttons so
they are not accidentally depressed.
Next (◄◄) &
Vol -
NEXT:
To scroll forward/up in a menu or among tracks/files.
Vol - :
After pressing the Volume button, press to decrease the
volume level.
Prev (►►) &
PREV:
To scroll back/down in a menu or among tracks/files.
Vol +
Vol + : After pressing the Volume button, press to increase the
volume level.
Earphone plug
Plug the earphone/headset in here.
USB Port (USB)
Plug the small end of the USB cable in here when connecting to a
Page 6
aigo atom A205 Digital Audio Player
USER MANUAL
PC.
Microphone (MIC)
Built-in microphone (for use in “Record” mode).
MODE
To enter the Main Menu and select modes, options, etc.
Record (REC)
Press to record voice directly onto the Player when in “Record”
mode.
PLAY / Pause / Select
Play or pause the track that is currently selected.
occasionally in various sub-menus to select an option.
POWER ON/OFF
Turn the Player ON and OFF.
Used
OLED Screen
The diagram below shows an example of the OLED display in Music Mode. The table below
explains what each of the symbols or indicators means.
Symbol or indicator
Description
Track Length/Duration
Total duration of track in minutes and seconds.
Mode icon
Symbol shown indicates the currently specified Mode
(Play Music, Radio, Voice, Record).
Bits & File Format
This indicator consists of two parts. The top figure (in
numbers) shows the size of the file/track in bits. The
bottom shows the format (MP3, WAV, etc) of the
track/file.
Play Mode icon
Symbol shown indicates the currently specified Play
Mode (Normal, Repeat One, Repeat All, etc).
Equaliser (EQ) mode icon
Symbol shown indicates the currently specified Equaliser
(EQ) mode.
Page 7
aigo atom A205 Digital Audio Player
USER MANUAL
Battery Level indicator
Symbol shown indicates the level of charge left in the
on-board battery..
Song number &
This indicator consists of two parts. The top figure (in
numbers) indicates the number of the track within the
currently specified folder. The bottom number indicates
the total number of tracks in the currently specified
folder.
total in current folder
Artist & Track Name
Text showing the name of the artist and track.
Elapsed Play Time
Shows the elapsed play time for the current track.
Battery
The aigo A205 atom has a built-in battery that can be charged using the charger and USB lead
provided in the Product Pack.
The battery monitoring system in the Player has 9-levels. The level of charge in the battery is
indicated by the level of “fill” in he Battery Level indicator shown on the OLED screen.
Symbol or indicator
Description
Indicates that battery is fully charged, and the
power in the battery will be discharged (used up)
as you use the Player.
Indicates low battery power and the battery should
be charged.
Charging the Battery
To charge Player’s built-in battery:
1. Plug the small end of the USB cable into the Player.
2. Plug the large end of the USB cable into the Charger (provided in Product Pack).
3. Plug the Charger into a socket in the wall (turn on socket switch, if necessary) and leave it to
charge until the Battery Level indicator shows that the battery is fully charged.
Basic Operations
After reading through this User Manual (and viewing the Tutorial Presentations, if desired), you
are ready to start using the Player.
Page 8
aigo atom A205 Digital Audio Player
USER MANUAL
Turning the Player ON
The Player can be turned on in two (2) ways, which are outlined below:
Method 1:
When the Player is OFF, push the Power button to the ON position and the Player
will turn on automatically. The aigo logo will appear in the OLED screen as the
Player is powering up, then the Main Menu will appear.
Method 2:
When the Player is OFF, press and hold the PLAY button for several seconds, as
shown below.
The aigo logo will appear in the OLED screen as the Player is powering up, then
the menu for the last mode used by the Player will appear. For example, if the
last mode used was the FM radio, then the FM radio menu will appear in the
OLED screen.
NOTE:
Should the buttons be locked, press and hold the Volume (VOL) button in order to
remove the button “lock” so that the buttons will function normally.
Turning the Player OFF
The Player can be turned OFF in two (2) ways, which are outlined below:
Method 1:
When the Player is ON, push the Power button to the OFF position and the Player
will turn off and the OLED screen will go black.
Method 2:
When the Player is ON, press and hold the PLAY button for several seconds (see
diagram below).
When the Player is turned off in this way, and prior to powering-off, the OLED
screen will display the following:
Page 9
aigo atom A205 Digital Audio Player
USER MANUAL
Playing Tracks
With the Player ON and in Music mode, press the PLAY button briefly (see illustration below).
The track will begin to play and the Artist and Track Name for the current track will begin to
scroll across the OLED screen.
Playing Recorded Voice Files
With the Player ON and in Voice mode, press the PLAY button briefly (see illustration below).
The selected voice file will begin to play and the file information will begin to scroll across the
OLED screen.
Pausing tracks
1. While a track is playing in Music mode, press the PLAY button briefly.
The Artist and Track Name will stop scrolling across the OLED screen and the Elapsed Play
Time will running/increasing.
2. Press the PLAY button again briefly to begin playing the track from the point that it was
paused.
Selecting a track/file
With the Player ON and in Music mode, press the PREV or the NEXT button to scroll to the next
track (forward or back). Keep pressing the PREV or NEXT button until you find the one you
want to play.
Page 10
aigo atom A205 Digital Audio Player
USER MANUAL
Scrolling through menus
Use the PREV and NEXT buttons to scroll through the options within any menu or sub-menu.
Fast-forwarding and Fast-Reversing
1. With the Player ON and playing, press and hold the PREV or the NEXT button to fast scroll
forward or backward through the tracks.
2. Release the NEXT or PREV button once you have reached the track that you want to play, and
the track will begin to play.
Increasing/decreasing Volume
To increase (+) or decrease (-) Volume is a two-step process.
1. First, press the Volume key, as shown in the illustration below.
The Volume level indicator will then appear in the OLED screen.
2. Then, press either the VOL+ or VOL- button, depending on whether you want to increase or
decrease the volume.
The Volume level indicator in the OLED screen will go up (or down) and the volume you hear
will be either louder or softer (depending on your selection).
3. Press the Volume key again to exit the volume controls and return to the Music mode.
Locking the buttons/keys
In order to avoid accidental pushing of buttons/keys, they can be “locked” using the VOLUME
button.
1. Press and hold the VOLUME button until the symbol of a locked padlock appears in the
OLED display along with the word “HOLD”.
Once the buttons/keys are locked, a Lock symbol and the word “HOLD” will appear in the
OLED display any time a button is pressed. All the other buttons (except the VOLUME or
“hold” button) will not work as normal when pressed.
2. To “unlock” the buttons, simply press and hold the VOLUME button until an unlocked
padlock symbol and the word “unhold” appears in the OLED screen. The buttons/keys on
the Player will then operate as normal.
Page 11
aigo atom A205 Digital Audio Player
USER MANUAL
The Main Menu
The Main Menu is the default menu that appears in the OLED screen when the Player has been
turned ON (see example illustration below).
The Main Menu options include the following “modes”:
Ø
Ø
Ø
Ø
Ø
Ø
Music
Record
Voice (Replay)
FM
EBook
System
1. Use the NEXT and PREV buttons to scroll through the “mode” options until you reach the
desired mode.
2. Press the MODE button briefly once to confirm your selection and enter the relevant mode
and its menu.
The function and options available within each of these modes is explained in greater detail in the
remainder of this Manual.
Music Mode
Use the Music mode in order to play tracks/files that are on the Player.
Entering the Music Mode
In the Main Menu, use the NEXT and PREV buttons to scroll through the “mode” options until
you reach the Music mode.
1. Press the MODE button briefly once to confirm your selection and enter the Music mode.
An example of the OLED screen in Music mode is shown below.
Once in the Music mode, you can begin to play tracks/files, as well as enter the File and Play
menus.
The File and Play menus are explained in greater detail below.
File Menu (accessed when not playing a track or voice file)
After entering the Music or Voice mode, but without playing a track/file, press the MODE button
Page 12
aigo atom A205 Digital Audio Player
USER MANUAL
briefly once in order to enter File Menu.
The options in the File Menu enable you to delete tracks (one or all) and view the folder(s) that are
on the Player. The options in the File Menu include:
Ø
Ø
Ø
Ø
Local Folder
Delete File
Delete All
Exit
Each of these options is explained in further detail below.
Local Folder (File Menu)
The Local Folder function enables you to view the folder currently being used by the Player in the
selected mode, as well as to change the folder being accessed.
1. From within the Music mode (or Voice mode), and while a track/file is not playing, press the
MODE key briefly once in order to access the File Menu.
The first option in the File Menu, “Local Folder”, will appear in the OLED screen.
3. Press the MODE key briefly once again, to view the folders available in the current mode.
4. Use the NEXT or PREV keys to scroll down and up the list until you have selected the folder
you wish to access.
5. Press the MODE button briefly once to confirm your selection and return to the Music (or
Voice) mode screen.
The track information for the first track/file in the newly selected folder will appear in the
OLED screen.
To find out how to add folders to the Player, see section “Adding Folders to the Player” on page
40.
To find out how to rename folders on the Player, see section “Changing the Names of Folders on
the Player” on page 41.
Delete File
The Delete File function enables you to delete individual tracks/files from the Player relevant to
the mode that you are in. For example, when in Music mode, you can only delete tracks that are
in the Music folder. In Voice mode, you can only delete voice files that you have recorded onto the
Player.
Delete All
The Delete All function allows you to delete all of the tracks/files from the Player relevant to the
mode you are in. For example, when in Music mode, you can only delete all of the music tracks
that are in the Music folder. In Voice mode, you can only delete all of the voice files that you
have recorded onto the Player.
Exit (File Menu)
Page 13
aigo atom A205 Digital Audio Player
USER MANUAL
From within the File Menu, use the Exit option to leave the File Menu and return to the Music
mode (or Voice mode) screen.
Play Menu (accessed while playing a track or voice file)
After entering the Music or Voice mode and while a track/file is playing, press the MODE button
briefly once in order to enter Play Menu.
The options in the Play Menu enable you to change the way in which tracks are played on the
Player. The options in the Play Menu include:
Ø
Ø
Ø
Ø
Ø
Ø
Repeat
Equalizer
Replay
Replay Times
Replay Gap
Exit
Each of these options, along with their sub-menus, is explained in further detail below.
Repeat
The Repeat function allows you choose from a number of different Play/Repeat options.
Option
Description
Normal
Plays all of the tracks/files only once, in order, and then stops.
Repeat One
Plays the currently selected track/file repeatedly.
Folder
Plays all of the tracks/files in the currently selected Folder only
once, in order, and then stops.
Repeat Folder
Plays all of the tracks/files in the currently selected Folder
repeatedly until another operation is performed or specified.
Repeat All
Plays all tracks/files in order repeatedly until another operation
is performed or specified.
Random
Plays all the tracks/files at random and then stops.
Intro
Plays the first 10 seconds of each track/file and stops after the
last Intro has played.
1. Press the PREV or NEXT button to scroll through the Repeat options until you find the one
Page 14
aigo atom A205 Digital Audio Player
USER MANUAL
that you want.
2. Press the MODE button briefly once to confirm your selection and return to the Music mode
screen.
Equalizer
The Equalizer function enables you to optimise the sound quality when playing different types of
music or other recorded file.
Choose from the following pre-set Equalizer options:
Ø
Ø
Ø
Ø
Ø
Ø
Ø
Normal/Natural
Rock
Pop
Classic
Jazz
Soft
DBB
1. Press the PREV or NEXT button to scroll through the Equalizer options until you find the one
that you want.
2. Press the MODE button briefly once to confirm your selection and return to the Music mode
screen.
Tempo Rate
The Tempo Rate function enables you to change the tempo (speed) at which tracks/files are
played.
1. In the Music mode, and with a track playing, press the MODE button briefly once to enter the
Play Menu.
2. Use the NEXT (or PREV) button to scroll through the menu option until “Tempo Rate” is
highlighted/selected.
3. Press the MODE key to select the Tempo Rate option.
A Tempo level indicator will appear in the OLED screen – see example below.
4. Use the PREV and NEXT keys to decrease/increase the tempo to the desired speed.
The Tempo level indicator will go up or down depending on your selection.
Page 15
aigo atom A205 Digital Audio Player
USER MANUAL
5. Press the MODE (or VOL) button to return to the Music mode (or Voice mode) screen.
Replay (A-B Repeat)
The Replay function allows you to specify a section of a specific track/file to play repeatedly (also
known as A-B Repeat) - A is the start of the section and B is the finish.
1. In the Music mode, and with a track playing, press the MODE button briefly once to enter the
Play Menu.
2. Use the NEXT (or PREV) button to scroll through the menu option until “Replay” is
highlighted/selected.
3. Press the MODE key briefly once to select the Replay option.
You will be returned to the Music mode screen, with the “A” flashing in the Replay icon (
).
4. Press the NEXT key to identify the start of the section (A).
The “A” in the Replay icon (
) will become static and the “B will start flashing.
5. Let the track/file continue to play and, when you reach the point in the track/file that you want
to be the end of the selection (B), press the NEXT key again.
The specified selection will then begin to replay. The number of times it plays and the gap
between each play is defined in the Replay Times and Replay Gap options, which are outlined
below. The Player will quit the Replay mode as soon as it has played the specified section
the specified number of times.
Follow Read Mode
The Follow Read function enables you to record an audio segment (Replay or A-B Repeat) and
then follow-on by recording your voice for the same amount of time. This can be very useful
when learning another language.
NOTE:
The Follow Read function is NOT available in the Voice mode.
1. After a Replay (or A-B Repeat) segment has been specified and is playing, press the NEXT
button in order to enter the “Follow Read” mode and start recording.
The Replay icon
NOTE:
will change to
, and the Player will begin to record.
The amount of time that the Player records in Follow Read mode is the same as the
duration of the previously specified Replay (or A-B Repeat) segment.
When the amount of recording time is finished, the Replay icon changes to
previously specified Replay (A-B Repeat) segment is played.
, and the
2. Press the NEXT button for Comparison Replay (see following section in this Manual).
3. Or press the MODE key briefly once to exit the Follow Read mode and return to the Music
mode screen.
NOTE:
While in the Follow Read mode, pressing the PREV button will return you to the
Replay (A-B Repeat) mode.
Page 16
aigo atom A205 Digital Audio Player
USER MANUAL
Comparison Replay
This mode is an extension of the Follow Read mode outlined above, and it enables you to listen
and compare a Follow Read recorded segment to a specified Replay (A-B Repeat) segment. This
can be very useful, particularly in learning a language.
NOTE:
This function is NOT available in the Voice mode.
1. To enter this mode, press the NEXT button after recording in the Follow Read mode.
The Replay icon changes to
played.
and the voice segment recorded in the Follow Read mode is
2. After playing the recorded Follow Read segment, the icon changes to
Replay (A-B Repeat) segment is played
and the original
3. The recorded Follow Read segment is then played again.
4. The Player will continue to toggle between playing the A-B Repeat segment and the recorded
Follow Read segment (for an unlimited number of times) until another action is specified.
5. Press the MODE key briefly once to exit the Follow Read mode and return to the Music mode
screen.
NOTE:
While in the Comparison Replay mode, pressing the PREV button will return you to the
Follow Read mode.
Replay Times
The Replay Times function allows you to specify the number of times that a specified Replay
(A-B Repeat) selection is played.
1. In the Music mode, and with a track playing, press the MODE button briefly once to enter the
Play Menu.
2. Use the NEXT (or PREV) button to scroll through the menu option until “Replay Times” is
highlighted/selected.
3. Press the MODE button briefly once to confirm your selection.
4. Use the NEXT (or PREV) buttons to increase/decrease the number of times a segment will be
replayed.
5. When finished, press the MODE key briefly once to confirm your selection and return to the
Music mode screen.
Replay Gap
The Replay Gap function allows you to specify the time gap between each repeated play of a
specified Replay (A-B Repeat) selection.
1. In the Music mode, and with a track playing, press the MODE button briefly once to enter the
Play Menu.
Page 17
aigo atom A205 Digital Audio Player
USER MANUAL
2. Use the NEXT (or PREV) button to scroll through the menu option until “Replay Gap” is
highlighted/selected.
3. Press the MODE button briefly once to confirm your selection and enter the Replay Gap
screen.
4. Use the NEXT (or PREV) button to increase/decrease the gap level.
5. When finished, , press the MODE key briefly once to confirm your selection and return to the
Music mode screen.
Exit (Play Menu)
From within the Play Menu, use the Exit option to leave the Play Menu and return to the Music
mode (or Voice mode) screen.
Displaying Lyrics
This Player supports the use of .LRC lyric files so that lyrics can be displayed simultaneously
while playing music.
The tracks that you choose to put on the Player will not have the lyrics with them, so you will
need get the lyric files and put them onto the Player. The lyrics of many songs can be
downloaded from various Internet sites - for example, from:
http://www.mstclub.com/lyrics/search.aspx
Using Lyrics Files
Connect the Player to you PC with the USB cable (as outlined later in this manual), and find the
exact name of the file (i.e. GiGi-Sky.mp3).
Download a lyric file in .LRC format from the Internet, making sure to save the lyric file with
exactly the same name as that of the corresponding music file.
Example:
Music file name:
Lyric file name:
NOTE:
GiGi-Sky.mp3
GiGi-Sky.lrc
The lyric file will have a different suffix (.LRC) than the music file (.MP3) – just make
sure that the name of the file before the dot or full-stop is the same.
How to tell if lyrics exist for a track
If the current song has a matching lyric file, the Music icon in the middle left of the Music mode
screen will change.
The normal Music icon
screen will look something like the example below.
Page 18
will change to
, and the Music mode
aigo atom A205 Digital Audio Player
USER MANUAL
1. To view the lyrics while a track is playing, press and hold the MODE button.
The lyrics will appear in the OLED screen as the track continues to play.
2. To stop displaying lyrics and return to the normal Music mode, press the MODE button
briefly once again to return to Music play mode.
Record Mode
Use the Record mode to record voice directly onto the Player (as a file in .WAV format). Via the
Record mode File Menu, it is also possible to change the way in which the Player records (by
specifying a particular Recording Type), as well as change the folder of recorded files that is being
accessed.
Entering the Record mode
In the Main Menu, use the NEXT and PREV buttons to scroll through the “mode” options until
you reach the Record mode.
1. Press the MODE button briefly once to confirm your selection and enter the Record mode.
The OLED screen will display the name of the file that is about to be recorded, and the timer
will be at zero (00:00:00) – see example below.
Recording
1. After entering the Record mode (as outlined above), press the RECORD button to start
recording.
The timer will begin to increase. Make sure that the MIC hole is not covered or obstructed in
any way.
2. Press and hold the MODE key to save the voice file just recorded.
Page 19
aigo atom A205 Digital Audio Player
USER MANUAL
To play the voice file just recorded, you must enter the Voice mode, which is covered in the next
section of this Manual.
NOTE:
The Player has automatic voice control, which means that when the Player detects no
sound via the microphone, recording will automatically be paused.
Page 20
aigo atom A205 Digital Audio Player
USER MANUAL
Accessing the Record Mode File Menu
Via the Record mode File Menu it is possible to change the way in which the Player records (by
specifying a particular Recording Type), as well as to change the folder of recorded files that is
being accessed.
The options available in the Record mode File Menu are:
Ø Local Folder
Ø Record Type
Ø Exit
The Record mode File Menu can be accessed as follows:
1. Enter the Record mode (as outlined above) and, without recording, press the MODE button
briefly once in order to enter the Record mode File Menu.
The OLED screen will display the first option “Local Folder”.
Local Folder (Record mode)
The Local Folder function enables you to view the folder currently being used by the Player in the
selected mode (in this case, the Record mode), as well as to change the folder being accessed.
1. Enter the Record mode (as outlined above) and, without recording, press the MODE key
briefly once in order to access the Record mode File Menu.
The first option in the File Menu, “Local Folder”, will appear in the OLED screen.
2. Press the MODE key briefly once again, to view the folders available in the Record mode.
3. Use the NEXT or PREV keys to scroll down and up the list until you have selected the folder
you wish to access.
4. Press the MODE button briefly once to confirm your selection and return to the Record mode
screen.
The track information for the next track/file that can/will be created in the newly selected
folder will appear in the OLED screen.
NOTE:
To find out how to add folders to the Player, see section “Adding Folders to the Player”
on page 40.
To find out how to rename folders on the Player, see section “Changing the Names of
Folders on the Player” on page 41.
Record Type (Record mode)
Record Type (REC Type) is the second option in the Record mode File Menu. This option
enables you to specify the type of file that is created when you record directly onto the Player.
There are four (4) choices of Record Type:
Page 21
aigo atom A205 Digital Audio Player
USER MANUAL
1. After entering the Record mode, and without recording, press the MODE button briefly once
in order to enter the Record mode File Menu.
2. Press the NEXT (or PREV) key to scroll through the menu options until “REC Type” appears
in the OLED screen.
3. Press the MODE button briefly once to confirm enter the REC Type sub-menu
6. Press the NEXT (or PREV) key to scroll through the menu options until the desired Record
Type is highlighted/selected.
7. Press the MODE button briefly once to confirm your selection and return to the Record mode
screen.
8. Press the REC button to start recording (as outlined above).
NOTE:
If “over flow” is displayed on the OLED screen, the Player’s memory is full.
Therefore, it will be necessary to delete some files in order to make some space
available to do further recording.
NOTE:
If “Out of Folder ” is displayed on the OLED screen, the current folder already has 99
recorded files, which is the maximum amount of files per folder. You will need to
switch to another folder in order to do further recording.
Voice (Replay) Mode
Use the Voice (Replay) mode to listen to the voice files that you had recorded directly onto the
Player (in .WAV format).
Entering the Voice (Replay) mode
In the Main Menu, use the NEXT and PREV buttons to scroll through the “mode” options until
you reach the Voice mode.
1. Press the MODE button briefly once to confirm your selection and enter the Voice mode.
The OLED screen will display the name of the voice file that was last accessed by the Voice
mode – see example below.
Page 22
aigo atom A205 Digital Audio Player
USER MANUAL
2. Press the NEXT or PREV button to scroll through the voice files to find the one you wish to
play.
3. Press the PLAY button to start listening to the selected voice file.
The timer will begin to increase as the file plays. The Player will continue playing
(including subsequent files) until you tell it to stop.
9. Press the PLAY key to stop/pause the playing of the voice file and remain in Voice (Replay)
mode. The timer will stop increasing.
10. Press and hold the MODE button to exit the Voice (Replay) mode and return to the Main
Menu.
Entering the Voice mode File Menu
As in the Music mode, the File Menu can be accessed while in Voice mode, as long as a track/file
is not being played.
NOTE:
The File Menu options for the Voice mode are the same as those for the Music mode,
and these are outlined in “File Menu” on page 12.
1. Press the MODE button briefly once and the first option in the File Menu, “Local Folder”,
will appear in the OLED screen.
2. Scroll through the menu options using the NEXT and PREV buttons.
3. Confirm a selection by pressing the MODE button.
4. Press and hold the MODE button to exit the File Menu and return to the Voice mode screen.
Entering the Voice mode Play Menu
As in the Music mode, the Play Menu can be accessed while in Voice mode, as long as a track/file
is being played.
NOTE:
The Play Menu option for the Voice mode are the same as those for the Music mode,
and these are outlined in “Play Menu” on page 14.
1. Press the MODE button briefly once.
The first option in the Play Menu, “Repeat”, will appear in the OLED screen.
2. Use the NEXT (or PREV) button to scroll through the menu options until you reach the
desired one.
3. Press the MODE button briefly once to confirm your selection.
4. Press and hold the MODE button to exit the Play Menu and return to the Voice mode screen.
Page 23
aigo atom A205 Digital Audio Player
USER MANUAL
FM (Radio) Mode
The FM Mode enables you to play FM radio stations within the bands 87.0 MHz – 108.0 MHz
(Normal - US) and 76.0 MHz– 90.00 MHz (School Band - Japan).
Entering the FM (Radio) Mode
To enter the FM mode:
1. Enter the Main Menu.
2. Use the NEXT (or PREV) buttons to scroll through the menu until the FM mode is
highlighted/selected.
3. Press the MODE button briefly once to confirm your selection and enter the FM mode.
If there are saved FM radio stations on the Player, then the FM mode will open with the most
recently accessed station playing.
4. Press the MODE button briefly once again to enter the FM Menu.
NOTE:
If a station is FM Stereo, then
will appear in the OLED screen in FM mode.
FM Menu
The FM Menu provides you with various options for changing bandwidth, saving a channel,
changing the method of station search, and so on. The options available in the FM Menu, and
related sub-menus, are outlined below.
Search Mode
The Search Mode option enables you to specify the way in which you wish to search for stations.
The Search Mode options include:
Page 24
aigo atom A205 Digital Audio Player
Option
Frequency Mode
USER MANUAL
Description
Allows you to search for stations manually by scrolling up or down
in the frequency range.
You will be returned to the FM Mode screen.
Use the NEXT (or PREV) buttons to scroll up through the
frequency band in increments of 100Khz.
Search Station
Allows you to search for stations manually by scrolling up or down
through the available stations.
You will be returned to the FM Mode screen.
Use the NEXT (or PREV) button to scroll through the stations.
Auto Search
Searches, finds and saves all available stations at your current
location.
You will be returned to the FM Mode screen.
The Player will automatically search the band for available stations
and will save them.
When Auto Search is complete, the last station found will play on
the Player.
To exit the Search Mode sub-menu and return to FM mode.
Exit
NOTE:
Remember the radio stations that you are able to access depends on your current
location, so stations that are available in one location, may not be available in another.
1. Use the NEXT (or PREV) button to scroll through the Search Mode options until the one you
want is highlighted/selected.
2. Press the MODE button briefly once to confirm your selection.
NOTE:
If you selected Auto Search, please wait a few minutes while the Player searches for the
available stations.
Search Level
The Search Level option enables you to specify the level of FM station search.
levels 1-8.
Choose from
1. While in the FM mode, press the MODE button briefly once to open the FM Menu.
2. Use the NEXT (or PREV) button to scroll through the FM Menu options until “Search Level”
is highlighted/selected.
3. Press the MODE button briefly once to confirm your selection and enter the Search Level
sub-menu.
Page 25
aigo atom A205 Digital Audio Player
USER MANUAL
4. Use the NEXT (or PREV) button to scroll through the Search Level options until the desired
level is highlighted/selected. Choose from Level 1 through Level 8.
5. Press the MODE button briefly once to confirm your selection and return to the FM mode
screen.
Save
Use the Save option to save (store) FM radio stations that have been selected manually using the
Frequency Mode or Station Search.
1. After finding the required radio station (using either the Frequency Mode or Station Search
option, as outlined above), press the MODE button briefly once to enter the FM Menu.
2. Use the NEXT (or PREV) button to scroll through the FM Menu options until “Save” is
highlighted/selected.
3. Press the MODE button briefly once again in order to save the selected station.
The currently selected FM radio station will then play on the Player.
Delete
The Delete option enables you to delete one or all of the saved FM radio stations from the Player.
1. While in the FM mode, press the MODE button briefly once to open the FM Menu.
2. Use the NEXT (or PREV) button to scroll through the FM Menu options until “Delete” is
highlighted/selected.
3. Press the MODE button briefly once to confirm your selection and enter the Delete sub-menu.
The Delete sub-menu includes the following options:
Option
Description
Delete One
Use to delete one station – the currently selected station – from the
saved FM radio stations on the Player.
Delete All
Use to delete all saved FM radio stations from the Player.
Exit
To exit the Delete sub-menu and return to the FM mode screen.
4. Use the NEXT (or PREV) button to scroll through the Search Level options until the desired
level is highlighted/selected. Choose from Level 1 through to Level 8.
5. Press the MODE button briefly once to confirm your selection and return to the FM mode
screen.
Select Band
Use the Select Band option in the FM Menu to specify the frequency range or band that is to be
used. Choose from:
Ø Normal: FM 87.0 - 108MHz
Ø School: FM 76.0 – 90.0MHz
Page 26
aigo atom A205 Digital Audio Player
Ø Exit
USER MANUAL
To exit the Select Band sub-menu and return to the FM mode screen.
1. While in the FM mode, press the MODE button briefly once to open the FM Menu.
2. Use the NEXT (or PREV) button to scroll through the FM Menu options until “Select Band”
is highlighted/selected.
3. Press the MODE button briefly once to confirm your selection and enter the Delete sub-menu.
4. Use the NEXT (or PREV) button to scroll through the Select Band options until the desired
band is highlighted/selected.
5. Press the MODE button briefly once to confirm your selection and return to the FM mode
screen.
REC Type (FM mode)
As in the Record mode, the REC Type option in the FM Menu enables you to record from the
currently selected radio station onto the Player, as well as to specify the type of file that is created
when you record from the radio directly onto the Player. Choose from:
Ø Fine REC:
Ø Long REC:
Ø Exit
WAM format
Fine timbre
ACT format
Generic timbre
To exit the REC Type sub-menu and return to the FM mode screen.
1. While in the FM mode, select the FM radio station from which you wish to record.
2. Then, press the MODE button briefly once to open the FM Menu.
3. Use the NEXT (or PREV) button to scroll through the FM Menu options until “REC Type” is
highlighted/selected.
4. Press the MODE button briefly once to confirm your selection and enter the REC Type
sub-menu.
5. Use the NEXT (or PREV) button to scroll through the REC Type options until the desired
option is highlighted/selected.
6. Press the MODE button briefly once to confirm your selection and begin recording the
currently selected radio station.
NOTE:
For other operations that are available during recording, see the “Record Mode” on
page 19.
7. Press the PLAY button to pause recording, or press the MODE button to stop recording, save
the recorded segment, and return to the FM mode screen.
Page 27
aigo atom A205 Digital Audio Player
USER MANUAL
8. To play the file you just recorded, you must enter the Voice mode, which is covered in “Voice
Mode” on page 22.
Exit (FM mode)
Use the Exit option in the FM Menu to exit the FM Menu and return to the FM mode screen.
Scrolling through Saved Radio Stations
As well using the NEXT and PREV buttons to scroll up and down the saved stations, the PLAY
key can be used to scroll through saved stations.
eBook Mode
The eBook functionality enables you to read eBooks (in .TXT format) on the Player.
No eBook files are provided on the Player when it is new. Therefore, eBook files in .TXT format
must be downloaded from a PC or from the Internet in order for the eBook functionality to work.
NOTE:
If no .TXT files exist on the Player and you select the eBook mode, the OLED screen
will display the words, “No Files!”.
To enter the eBook mode:
1. In the Main Menu, use the NEXT (or PREV) button to scroll through the menu options until
“eBook” is highlighted/selected.
2. Press the MODE button briefly once in order to confirm you selection and enter the eBook
mode.
On first entering the eBook mode, you will immediately enter the “Select File” sub-menu, so
that you can select an eBook to read on the Player. There will be a list of available eBooks
in .TXT format from which to choose.
The eBook Menu
The eBook Menu provides the following options:
Ø
Ø
Ø
Ø
Ø
Ø
Local Folder
Select File
Reading Set
Delete File
Delete All
Exit
After opening an eBook file, press the MODE button briefly once in order to enter the eBook
Menu.
Each of the options in the eBook Menu is outlined in detail below.
Page 28
aigo atom A205 Digital Audio Player
USER MANUAL
Local Folder
As in most of the other modes, the Local Folder option enables you to view and change the eBook
folder(s) that you are currently using.
The Local Folder option can only be accessed after an eBook file has been selected and opened.
1. With an eBook file open on the OLED screen, press the MODE button briefly once, to enter
the eBook Menu.
The first menu option, “Local Folder”, will appear in the OLED screen.
2. Press the MODE button briefly once again, in order to enter the Local Folder list.
3. Use the NEXT (or PREV) button to scroll up/down the folder list until the desired folder is
highlighted/selected.
4. Press the MODE button briefly once to confirm your selection and return to the eBook mode.
The file(s) in the newly selected folder will be displayed in the OLED screen.
Select File
On first entering the eBook mode, you will immediately enter the “Select File” sub-menu, so that
you can select an eBook to read on the Player. There will be a list of available eBooks in .TXT
format from which to choose.
1. Use the NEXT (or PREV) button to scroll up/down the list of files until the desired eBook file
is highlighted/selected.
2. Press the MODE button briefly once to confirm your selection and open the eBook file.
The text of the eBook will appear in the OLED screen.
3. Once the eBook is open, use the NEXT button to scroll down through the text.
use the PREV button to scroll back up through the text.
NOTE:
In necessary,
A blank screen can indicate that there are blank lines where carriage returns exist in the
text. Keep scrolling down (using the NEXT button) until text appears in the OLED
screen.
Reading Set
The Reading Set option enables you to adjust the type of replay (Automatic or Manual) and the
speed at which next eBook text appears in the OLED screen (Reading Rate).
Option
Description
Automatic Replay
Select this option to instruct the Player to automatically start
scrolling the “pages” (screens) of the eBook again after it has
reached the end.
Manual Replay
Select this option to instruct the Player that you will manually
re-start the eBook.
Page 29
aigo atom A205 Digital Audio Player
Reading Rate
USER MANUAL
The Reading Rate is the speed at which the Player will
automatically scroll down through the eBook text (so that you don’t
have to constantly keep pressing the NEXT button in order to
manually scroll down through the text).
A Reading Rate level indicator will appear in the OLED screen.
Use the NEXT (or PREV) button to adjust the reading rate speed up
(or down).
Exit
To exit the Reading Set menu and return to the eBook mode screen.
1. Scroll through the Reading Set options using the NEXT (or PREV) button.
2. Once your desired selection is reached, press the MODE button briefly once in order to
confirm your selection.
Delete File
Use the Delete File option to delete the currently selected eBook file.
1. With an eBook file open on the OLED screen, press the MODE button briefly once, to enter
the eBook Menu.
2. Scroll through the menu using the NEXT (or PREV) button until “Delete File” is
highlighted/selected.
3. Press the MODE button briefly once again, in order to delete the file.
A prompt screen will appear asking if you would like to delete the currently selected file.
4. Use the NEXT (or PREV) button to toggle (scroll) between YES and NO until the desired
answer is highlighted/selected. (YES = Delete and NO = Do not delete.)
5. Press the MODE button briefly once to confirm your selection and return to the eBook mode.
Delete All
Use the Delete All option to delete all of the eBook files in the currently selected folder.
1. With an eBook file open on the OLED screen, press the MODE button briefly once, to enter
the eBook Menu.
2. Scroll through the menu using the NEXT (or PREV) button until “Delete All” is
highlighted/selected.
3. Press the MODE button briefly once again, in order to delete all the files in the currently
selected folder.
A prompt screen will appear asking if you would like to delete all of the files in the currently
selected folder.
4. Use the NEXT (or PREV) button to toggle (scroll) between YES and NO until the desired
answer is highlighted/selected. (YES = Delete and NO = Do not delete.)
5. Press the MODE button briefly once to confirm your selection and return to the eBook mode.
Page 30
aigo atom A205 Digital Audio Player
USER MANUAL
Exit (eBook Menu)
To leave the eBook Menu and return to the eBook mode screen (with the currently selected eBook
showing in the OLED screen).
System Mode
Use the System mode make changes to the parameters and functions that affect the Player overall
(regardless of mode).
Entering the System Mode
To enter the System mode:
1. Enter the Main Menu.
2. Use the NEXT (or PREV) buttons to scroll through the menu until the System mode is
highlighted/selected.
3. Press the MODE button briefly once to confirm your selection and enter the System Menu.
The System Menu will open and, “Record Time”, the first option in the System Menu, will
appear in the OLED screen.
System Menu
The System Menu contains the following options:
Ø
Ø
Ø
Ø
Ø
Ø
Ø
Ø
Ø
Record Time
Backlight
Language
Power Off
Replay Mode
Contrast
Firmware Version
Firmware Upgrade
Exit
Page 31
aigo atom A205 Digital Audio Player
USER MANUAL
Each of these options will be explained in detail below.
Record Time
The Record Time option enables you to set the time and date on the Player.
1. Enter the System mode (as outlined above).
2. Using the NEXT (or PREV) button, scroll through the System Menu until “Record Time”
appears in the OLED screen.
3. Press the MODE button briefly once to confirm your selection and enter the Record Time
screen (see example below).
4. Press the PLAY button in order to edit the date and time.
The YEAR will start flashing.
5. Use the NEXT (or PREV) button to scroll to the desired number.
6. When the correct number is reached, press the PLAY button in order to edit the next part of
the date.
7. Continue this process (steps 4-6) until all parts of the date and time are correct.
8. Then, press the MODE button to confirm the new date and time setting and return to the
System Menu.
Backlight
Use the Backlight option ( ) to specify a fixed time after which, provided there has been no
operation of buttons/keys, the backlight in the OLED screen will go out (screen will go blank and
a moving screensaver will appear).
1. Enter the System mode (as outlined above).
2. Using the NEXT (or PREV) button, scroll through the System Menu until “Backlight”
appears in the OLED screen.
3. Press the MODE button briefly once to confirm your selection.
A Backlight level indicator will appear in the OLED screen.
4. Use the NEXT (or PREV) button to increase/decrease the number, which indicates the amount
of time (in seconds) that the Backlight should remain lit before going into screensaver mode.
5. When the desired number is reached, press the MODE button briefly once to confirm your
selection and return to the System Menu.
Page 32
aigo atom A205 Digital Audio Player
USER MANUAL
Language
The Language option ( ) in the System Menu allows you to specify the language that is used by
the Player in the OLED screen.
Choose from the following eighteen (18) languages:
Ø
Ø
Ø
Ø
Ø
Ø
Ø
Ø
Ø
Ø
Ø
Ø
Ø
Ø
Ø
Ø
Ø
Ø
Simple Chinese
English
Traditional Chinese
English
Japanese
Korean
French
Italian
German
Spanish
Swedish
Portuguese
Danish
Dutch
Thai
Russian
Czech
Polish
1. Enter the System mode (as outlined above).
2. Using the NEXT (or PREV) button, scroll through the System Menu until “Language”
appears in the OLED screen.
3. Press the MODE button briefly once to confirm your selection and enter the Language
sub-menu.
4. The Language sub-menu will open with the most recently specified language selected and
showing in the OLED display.
5. Use the NEXT (or PREV) button to scroll through the menu list until the desired language is
reached.
6. Press the MODE button briefly once to confirm your selection and return to the System Menu.
Power Off
) in the System Menu enables you to set a fixed time after which,
The Power Off option (
provided there has been no operation of buttons/key, the Player will automatically power-off.
The options in the Power Off sub-menu are:
Option
Description
Off Time
Set the time (in seconds) after which the Player will automatically
turn itself off if there is no activity or no buttons pressed.
Sleep Time
Set the time (in minutes) after which the Player will automatically
turn itself off (if it is in ON and PLAYING).
1. Enter the System mode (as outlined above).
2. Using the NEXT (or PREV) button, scroll through the System Menu until “Power Off”
appears in the OLED screen.
Page 33
aigo atom A205 Digital Audio Player
USER MANUAL
3. Press the MODE button briefly once to confirm your selection and enter the Power Off
sub-menu.
4. Use the NEXT (or PREV) button to scroll through the Power Off menu options – Off Time
and Sleep Time.
5. Press the MODE button briefly once to confirm your selection and enter either the Off Time
or Sleep Time screen.
6. Use the NEXT (or PREV) button to increase/decrease the time to the desired level (see NOTE
below).
NOTE:
Setting the Off Time or Sleep Time to “0” means that option will be disabled and the
Player will not turn itself off or “sleep” at any time. It must then to be turned off
manually.
Replay Mode
The Replay Mode option allows you to choose whether the replaying of Replay/A-B Repeat
segments is automatic or manual.
1. Enter the System mode (as outlined above).
2. Using the NEXT (or PREV) button, scroll through the System Menu until “Replay Mode”
appears in the OLED screen.
3. Press the MODE button briefly once to confirm your selection and enter the Replay Mode
sub-menu.
4. Use the NEXT (or PREV) button to scroll through the Replay Mode options – Automatic and
Manual – until the desired one is showing in the OLED screen.
5. Press the MODE button briefly once to confirm your selection and return to the System Menu.
Contrast
The Contrast option in the System Menu enables you to adjust the contrast of the OLED screen.
1. Enter the System mode (as outlined above).
2. Using the NEXT (or PREV) button, scroll through the System Menu until “Contrast” appears
in the OLED screen.
3. Press the MODE button briefly once to confirm your selection.
A Contrast level indicator will appear in the OLED screen.
4. Use the NEXT (or PREV) button to increase/decrease the number, which indicates the amount
of contrast in the OLED screen.
5. When the desired level is reached, press the MODE button briefly once to confirm your
selection and return to the System Menu.
Page 34
aigo atom A205 Digital Audio Player
USER MANUAL
Firmware Version
The Firmware Version option enables you to see the version of Firmware that is used by the
Player.
NOTE:
You should only ever use the Firmware functionality if instructed to do so by the aigo
UK Support Team.
Firmware is a technology for updating elements of the computer code that runs the Player.
Firmware is installed to enable the aigo UK Support Team to correct elements of the computer
code quickly and easily (if required) should you experience problems with the Player that can be
correct via Firmware.
Firmware Upgrade
The Firmware Upgrade option is the functionality that enables you to load corrected/updated
computer code onto the Player.
NOTE:
You should only ever use the Firmware functionality if instructed to do so by the aigo
UK Support Team.
Firmware is a technology for updating elements of the computer code that runs the Player.
Firmware is installed to enable the aigo UK Support Team to correct elements of the computer
code quickly and easily (if required) should you experience problems with the Player that can be
correct via Firmware.
Exit (System mode)
Use the Exit option to leave the System Menu and return to the Main Menu.
Connecting the Player to a PC
Make sure your PC/computer supports USB devices. (Refer to your PC manual for the
information about hardware).
The Player can be used as a spare mass storage device that is connected to your PC via a USB
cable. This functionality is supported under the following Operating Systems:
Ø Windows 98SE (with driver, provided on CD-ROM in Product Pack)
Ø Windows 2000 and above (no driver required)
1. Connect your PC to your player using the USB cable provided in the Product Pack. The
small end of the USB cable goes into the USB plug of the Player, and the large end goes into a
spare USB port on your PC.
2. After connecting the USB cable to both the Player and your PC, the Player will turn ON
automatically and will enter the USB mode. The OLED screen will appear as follows:
Page 35
aigo atom A205 Digital Audio Player
NOTE:
USER MANUAL
If your PC is running Windows 98, then you will need to install the driver software
(provided on the CD-ROM in the Product Pack) before you connect the Player to your
PC for the first time.
See “Installation of the Driver Software” below.
When connected to a PC, the OLED screen on the Player may appear as follows:
When uploading from the Player to the PC:
When downloading from the PC to the Player:
Disconnecting the Player from a PC
To safely disconnect the MP3 Player from the PC each time you want to disconnect it, you must
double-click on the “Safely Remove Hardware” icon located in the System Tray at the right-hand
end of the Windows Taskbar (which is the blue bar located at the bottom of the screen).
Remove the USB cable only after the PC has instructed you that it is safe to do so.
Installation of Driver Software (for PCs running Windows 98SE only)
NOTE:
Installation of the Driver Software is ONLY required if the PC to which you are
connecting the Player is running the operating system Windows 98SE.
The CD-ROM enclosed in the Product Pack includes the driver software that is required in order
to enable a PC running Windows 98SE to load or delete tracks/files onto or from the Player.
1. Place the installation CD into the CD-ROM drive of your PC/computer.
2. If the installation does not start automatically, click on the Windows Start button (in the
bottom left of the window/screen, and select the “Run” option from the resulting menu.
3. In the Run window, type D:\SETUP.EXE (where D:\ is the your CD drive) to run the
installation program and install the driver software onto your PC.
4. Re-start your PC after installation is completed.
Transferring Tracks to the Player from a CD (via a PC)
NOTE:
If your PC/computer is running Windows 98SE, then you will need to install the driver
software (provided on the CD-ROM in the Product Pack).
Page 36
aigo atom A205 Digital Audio Player
USER MANUAL
This section outlines the steps involved in transferring tracks/files from your PC to the aigo MP3
Player.
1. Ensure that you have Windows Media Player (preferably version 10) installed on the PC you
will be using. Windows Media Player 10 can be downloaded from:
http://www.microsoft.com/windows/windowsmedia/mp10/default.aspx
2. Connect the Player to a PC as explained in “Connecting the Player to a PC” on page 35.
3. Ensure that all other programmes are closed.
NOTE:
To ensure maximum compatability, you must specify that you want Windows Media
Player to transfer (“rip”) the tracks in MP3 format.
4. Open Windows Media Player, click on the “Tools” menu and select “Options” (see example
below).
5. When the Options dialog box opens, click on the “Rip Music” tab, as indicated in the picture
below.
6. Click on the “Format” drop-down list and select “MP3”, make sure that the option, “Copy
protect music” is NOT selected, then click OK.
NOTE:
This Player DOES NOT support copy-protected or otherwise secured WMA files (such
as DRM9 or DRM10). For further information about DRM technology, see “Digital
Rights Management (DRM)” on page Error! Bookmark not defined..
7. Open the CD drive, carefully insert the CD containing the tracks that you wish to transfer to
your MP3 Player, and close the CD drive.
A pop-up box will appear asking what you would like to do with the tracks/files (see example
below).
Page 37
aigo atom A205 Digital Audio Player
USER MANUAL
8. Select “Rip Music from CD using Windows Media Player” and click OK.
Windows Media Player will open and will automatically begin to transfer (rip) the tracks into
your Windows Media Player Library, which can be accessed by clicking on the “Library” tab
at the top of the window (see example below).
9. Once the tracks/files have been transferred (ripped), click on the “Library” tab at the top of the
player window and you will see the tracks/files that you have just imported.
10. Select a track and, while holding the left mouse key down, drag it over to the “Sync List” on
the right-hand side. Drop it into the Sync List by releasing the left mouse key. See
example below.
Page 38
aigo atom A205 Digital Audio Player
USER MANUAL
11. Once you have dragged all of the tracks that you want into the Sync List, click on the “Sync”
tab at the top of the player window.
On the left, you will see tracks you have just imported. On the right, you will see your MP3
Player directory. If there are no tracks/files on the Player, the words “There are no items on
this device.” will appear.
12. Click on the green “Start Sync” button (see example below).
You will see progress of the transfer on the left-hand side. The right-hand side will say
“Synchronization in progress.” (See example below.)
Page 39
aigo atom A205 Digital Audio Player
USER MANUAL
Once the synchronisation has completed, you will see all of the tracks on the right-hand side,
indicating that they have been successfully transferred to the MP3 Player (see example
below).
13. Close Windows Media Player by clicking on the “X” in the top right of the player window.
Sending and Deleting files between PC and Player
The Player can be used like an extra disk drive for your PC to upload, download or delete file(s).
1. Turn the Player ON and connect it to your PC with the USB lead provided in the Product
Pack.
2. Open Windows Explorer by right mouse clicking on the “Start” button at the bottom left of
the taskbar and selecting “Explore”.
3. Then simply copy and paste (or drag and drop) the tracks/files you wish to put onto the Player.
Caution: DO NOT disconnect the Player while a track/file is being downloaded from a PC, as it
may damage your Player.
Adding Folders to the Player
Folders can easily be added to the Player, via your PC.
Page 40
aigo atom A205 Digital Audio Player
USER MANUAL
1. Connect the Player to your PC using the USB cable provided in the Product Pack.
Once the Player is recognised by your PC, a “Safely Remove Hardware” icon will appear
among the icons at the right-hand end of the Windows Taskbar (which is located at the bottom
of the screen).
2. Open Windows Explorer by right-mouse clicking on the Start icon in far left-hand side of the
Windows Taskbar (which is located at the bottom of the screen).
The Player will appear as a new drive “E:/ Removable Disk” in the left-hand navigator in
Windows Explorer.
3. Open the Player by clicking once on the “+” next to the drive name, “E:/ Removable Disk”.
The folder structure that already exists on the Player will appear in the right-hand pane in
Windows Explorer.
4. With the Player’s drive name “E:/ Removable Disk” selected (highlighted) in the left-hand
navigator, click File > New > Folder.
A new folder will appear in the right-hand pane, with the name “New Folder” highlighted
and inside a box, which indicates that the name can be edited.
5. Before clicking on anything else, while the folder name is still highlighted and inside of an
editing box, type in the name that you wish to give the new folder.
NOTE:
Any new folders that you create and put on the Player must be at the top “level” on the
player. The Player does not recognise folders in a hierarchy (i.e. folders within
folders).
Changing the names of Folders on the Player
The names of folders on the Player are changed in the same way as you change the names of
folders on your PC.
1. Connect the Player to your PC using the USB cable provided in the Product Pack.
Once the Player is recognised by your PC, a “Safely Remove Hardware” icon will appear in
the System Tray at the right-hand end of the Windows Taskbar (which is located at the bottom
of the screen).
2. Open Windows Explorer by right-mouse clicking on the Start icon in far left-hand side of the
Windows Taskbar (which is located at the bottom of the screen).
The Player will appear as a new drive “E:/ Removable Disk” in the left-hand navigator in
Windows Explorer.
3. Open the Player by clicking once on the “+” next to the drive name, “E:/ Removable Disk”.
The folder structure that already exists on the Player will appear in the right-hand pane in
Windows Explorer.
4. In the right-hand pane in Windows Explorer, select the folder that you wish to rename.
5. Right-mouse click on the folder, and select the “Rename” option.
The menu will disappear. The folder will be highlighted in the right-hand pane, and the
Page 41
aigo atom A205 Digital Audio Player
USER MANUAL
folder name will be highlighted inside of an editing box.
6. Type in the new name for the folder, and press the Return (8 ) key on the keyboard.
The new name will appear next to the folder and will be changed on the Player.
7. When you have finished and want to disconnect the Player from your PC, single-click on the
“Safely Remove Hardware” icon in the System Tray at the right-hand end of the Windows
Taskbar (located at the bottom of the screen), and then single-click on “Safely Remove USB
Mass Storage Device – Drive (E:).
After a few seconds, a text bubble will appear tell you that it is safe to remove the connection
between the Player and the PC.
Digital Rights Management (DRM)
DRM (Digital Rights Management) is new technology for securing WMA files. This standard is
in common use by on-line music stores that allow you to purchase music on a one-off basis or via
a fixed-price monthly contract.
This Player DOES NOT support files secured with the DRM technology; only unsecured WMA
files can be played.
Technical Specification
Dimensions
58mm x 40mm x 8mm (H x W x D)
Weight
25 grams
Flash memory size
128Mb-1Gb (depending on model purchased)
USB2.0 (FS)
Read: 1000Kb
PC connection
Write: 1000-900Kb
OLED Screen Size
96 x 26 pixels (Width x Height)
On-Board Battery
Max Play time = 10 hours
Acceptable
formats
Record
Music
MP3, WMA
Sample rate:
8Khz
Recording formats:
WAV
Page 42
aigo atom A205 Digital Audio Player
USER MANUAL
Battery only allows for 8 hours max.
recording time.
Max. Recording Time:
Max. Headphone output:
.ACT format recording offers 24 hours
of voice recording will take up 128Mb
of Flash memory space.
LEFT: 10mW, and RIGHT: 10mW
(32Ohm)
MP3 bit rate:
8K bps – 320K bps (bits per second)
WMA bit rate:
5K bps – 320K bps (bits per second)
MP3, WMA
Dynamic Range:
20Hz to 20KHz
Sound-to-Noise Ratio:
85dB (decibels)
Receiving frequency
range:
76Mhz – 96Mhz (School Band)
87Mhz – 108Mhz (Normal Band)
20 in Normal Band (87.0-108.00Mhz)
FM radio
Max. Number of Stations:
Max. headphone output:
Sound-to-Noise Ratio:
and
20 in School Band (76.0-90.00Mhz)
LEFT: 10mW, and RIGHT: 10mW
(32Ohm)
45dB (decibels)
Functional Temperature
Range
-5 to 40 Celsius
Available Languages
Simple Chinese, English, Traditional Chinese, English, Japanese,
Korean, French, Italian, German, Spanish, Swedish, Portugese, Danish,
Dutch, Thai, Russian, Czech, Polish
Operating Systems
Windows 98SE, ME, 2000, XP
Understanding the Technical Specification
Flash Memory Size:
Indicates the amount of Flash memory or storage space that is available to the Player on which to
store tracks/files.
OLED Screen Size:
Indicates the maximum size (in number of pixels) of the OLED display screen.
Page 43
aigo atom A205 Digital Audio Player
USER MANUAL
Sample Rate:
Also known as “Sampling Rate”, this measures the “resolution” of the sound - the higher the
Sample Rate, the higher the quality of sound.
Recording Formats:
Indicates the formats that the Player can create when recording.
Max. Recording Time:
Indicates the maximum amount of direct recording time.
MP3 Bit Rate:
This indicates the sample rate for MP3 files.
Frequency Response:
Also known as “Dynamic Range”, this indicates the tonal range of the sounds that can be played
on the Player.
SNR (Sound-to-Noise Ratio):
SNR is a ratio of the power or volume (amplitude) of a sound to the amount of unwanted
interference (noise) that has mixed in with it. Measured in decibels, the sound-to-noise ratio
measures the clarity of the signal in a circuit or a wired or wireless transmission channel. The
greater the ratio (evidenced by a larger number), the less noise and the more easily it can be
filtered out.
Receiving Frequency Range:
This indicates the range of frequencies that the player can receive – in this case, the FM band
frequencies.
Acceptable File Formats:
Refers to the file formats or types of music track that can be loaded and played by the Player.
Functional Temperature Range:
Indicates the temperature range at which you can expect the Player to function normally.
Available Languages:
Indicates the languages that can be specified by the user to be used by the Player and shown in the
OLED screen.
Operating Systems:
Indicates the operating systems on a PC with which the Player can connect for downloading of
files, etc.
Page 44
aigo atom A205 Digital Audio Player
USER MANUAL
Trouble-shooting
Problem
Solution
1. Ensure that the earphones are plugged into the Player
firmly.
2. Check whether the Volume is set to “0”.
No sound is heard from
earphones
3. Check whether the earphone plug is dirty.
4. Make sure that the music files are not corrupted.
(Corrupted MP3 files may make a have a background
static noise and the sound may cut off.)
Characters in OLCD
appear corrupted
1. Check whether the correct language has been selected.
1. Adjust the position of the earphones and Player.
FM Reception is poor
2. Turn off the power of other electric devices near the
Player.
3. The earphone may be used as the antenna.
1. Check whether the USB cable is damaged.
Download of music files to
the Player fails
2. Check that the USB cable is connected properly.
3. Check whether the driver software is installed correctly.
4. Check whether the Player’s memory is full.
Warranty
Thank you for your purchasing an aigo product. We hope you enjoy the experience.
The content of this User Manual, product design and specification is subject to change without
notice.
Should the Player not operate precisely in the manner outlined in this Manual, please visit the aigo
UK website (www.aigo.co.uk) for the latest product information.
Should you require any assistance with your aigo product, please be sure to first contact the aigo
UK Support team:
Telephone:
0871 288 0536 (Monday-Friday, 9am-5pm)
Email:
[email protected]. (Response within 24 hours)
Page 45
aigo atom A205 Digital Audio Player
The Support Team
aigo UK
SBC House
Restmor Way
Wallington
SM6 7AH
www.aigo.co.uk
Page 46
USER MANUAL