1
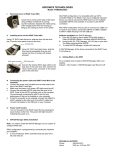
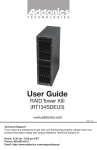
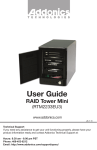
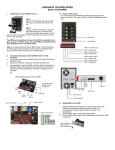
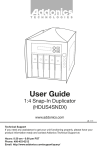
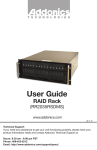
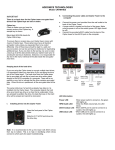
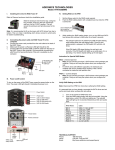
RAID Mode
BIG 2
BIG 4
FAST 2
FAST 4
SAFE FAST
SAFE 2
RAID 5
RAID 5 + S
LEDs
LEDs 1, 2 & 4 all OFF
4 ON, 2 & 1 OFF
2 ON, 4 & 1 OFF
1 ON, 4 & 2 OFF
4 & 2 ON, 1 OFF
4 & 1 ON, 2 OFF
2 & 1 ON, 4 OFF
4, 2 & 1 all ON
Front
T E C H N O L O G I E S
Back
LED3
HPM
Power
LED1
eSATA
Status
Power
Switch
USB Port
RAID Setting
Button
RAID Config
Rotary Switch
LED4
HPM
Health
LED2
USB
Status
Power
LED
eSATA Port
Connecting the Power Cable and Storage Tower to the
Computer
a.
b.
c.
Connect the power cord provided from the wall outlet to the back of the
tower.
Make sure the power is off (power LED light should be off).
Connect the eSATA cable from the back of the tower to the eSATA port on
the computer.
Power On/Off Control
a.
b.
c.
A main power switch is located at the back of the tower. Turn the switch
on. Another auxiliary switch is located on the front of the tower.
Make sure the power is off on the auxiliary switch (power LED light should
be off).
Power on the tower.
User Guide
Mini Storage Tower
(NA3MS4HU2B / NASMS4HPMB)
www.addonics.com
v6.1.11
Technical Support
If you need any assistance to get your unit functioning properly, please have your
product information ready and contact Addonics Technical Support at:
Hours: 8:30 am - 6:00 pm PST
Phone: 408-453-6212
Email: http://www.addonics.com/support/query/
1.
2.
Removing Cover of Mini
Storage Tower
Loosen the 3 screws at the back of the tower
using a Philips screwdriver by turning
counter-clockwise. Separate the metal
casing of the tower from the housing by lifting
up the casing as shown on the photo.
Note: Do not use paper clip or sharp
object. Use a ballpoint pen to press the
raid setting button.
3.
While holding the RAID setting
button, turn on the tower and continue
to hold for at least 5 seconds.
Installing drives into the
Storage Tower
Note: The LED's for SATA and USB will blink while pressing on the raid setting
button. Once the button is release, the PM Health LED will blink for 4-6 times then
stops. This indicates the raid was setup correctly. Otherwise, the PM Health LED
will remain lit up indicating incorrect raid setup.
Step 1
Slide the storage device into the embedded
mounting bracket.
Instruction for Special RAID Modes:
Step 2
Using 3.5” SATA Hard Disk Drives - Connect
the internal SATA data cable to the data port
of the hard drive then connect the 15-pin
SATA power connector to the power port on
the hard drive.
Hard Disk
Step 3
Secure the hard disk by using screws
provided. Repeat the above procedure for
additional hard drives.
+
eSATA Status
-
+
USB Status
-
+
PM Power
-
+
PM Health
-
+
HD3 PWR & Access
-
+
HD2 PWR & Access
-
+
HD1 PWR & Access
-
+
HD0 PWR & Access
BIG 2 - 2 Drives Spanned
o
Note: Do not connect more than 2 SATA drives to the HPM. Doing so will
hang the system when you configure the raid.
o
For SATA drives with different capacities, the HPM will use the smallest
drive capacity of the 2 drives connected to create the total partition size.
FAST 2 - 2 Drives Striped
o
Note: Do not connect more than 2 SATA drives to the HPM. Doing so will
hang the system when you configure the raid.
Setting RAID on the Hardware Port Multiplier (HPM)
-
Set the Rotary switch to the RAID mode required.
Push the RAID setting button with a ballpoint pen while the tower is
turned off.
Verify RAID Setting on the HPM
Note: Disconnect the HPM from host when verifying the RAID setting.
It is assumed that you have already connected the SATA drives and set up the raid
mode when verifying the raid setting.
1.
2.
SATA Port 4
SATA Port 1
Pin 1
Turn on power for the tower.
Push the RAID setting button with the tool provided. Using the table
below, verify if the LEDs are lighting up. The selected LEDs will light up for
2 seconds followed by a blink and cycles back.
SATA Port 2
SATA Port 3
LED Pins
1
2
www.addonics.com
Technical Support (M-F 8:30am - 6:00pm PST)
Phone: 408-453-6212
Email: www.addonics.com/support/query/