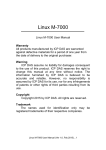
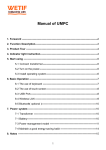
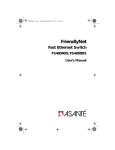
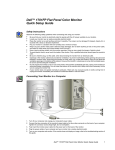
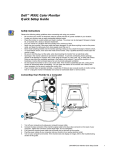
1
CardBus 10/100 Ethernet
PC Card Adapter
Quick Installation Guide
Hardware Installation
This chapter describes how to install the CardBus
10/100M dual-speed PC Card in your notebook
computer and connect it to network. It’s referred to “the
PC Card” in this manual.
The PC Card could connect to either 100Mbps Fast
Ethernet or 10Mbps Ethernet over unshielded twisted
pair (UTP) calbe. The PC Card has the ability of
automatic sensing and operating on either speed
without manual recofiguration.
After finishing the installation of PC Card into your
Notebook, please refer to Software Installation on
how to install network drivers using menu driven
installation utility.
Inserting the CardBus Dual-Speed PC Card
1.
2.
Hold the CardBus PC Card with wide connector
toward the slot and the brand lable facing
upward.
Insert the CardBus PC Card and push it firmly
into the bottom. ( Please see the figuer on the next
page for reference)
-1-
Removing the CardBus Dual-Speed PC Card
It’s quite different for various computer mechanical
design. Please refer to the PC Card removal instruction
in the document for your notebook computer.
Connecting and Removing the Cable of Media
Coupler to the CardBus PC Card
Grasp the PC Card 15-pins connector at the end of the
media coupler with the pointing triangle facing
upward. Gently insert it into the mating connector on
the PC Card until it clicks in place at both sides.
Attention should be paid when removing the 15-pins
connector. Please press the both sides of the connectors
before dragging it out of the PC Card.
-2-
Connecting to the Network
Connect unshielded twisted pair (UTP) cable to the
RJ-45 connector of media coupler before loading any
network driver.
For operation in the100Mbps (100Base-TX)
Ethernet network, a Category 5 unshielded twisted
pair (UTP) cable should be used to connect
between media coupler and 100Mbps hub or
switch.
For operation in the 10Mbps (10Base-T) Ethernet
network, Category 3, 4 or 5 unshielded twisted
pair (UTP) cable could be used to connect between
the media coupler and a 10Mbps hub or switch.
LED Indicators
-3-
Software Installation
Extensive software drivers have been developped for
CardBus 10/100M PC Card including DOS-Mode,
Microsoft Windows 3.x, Windows 95, Windows NT.
Some of the Operating Systems and PC Card/Socket
Services haven’t been well implemented to support
new CardBus technology at the present time. Our
unique drivers and utility enable the CardBus 10/100M
Ethernet PC Card to run almost all the major
environments.
This Chapter consists several parts: Windows 95,
Windows 98, Windows 2000, Windows NT 4.0,
Windows NT 3.5x and various configuration in
DOS-mode. The user could refer to specific section for
installation.
-4-
Windows 95 Installation
Windows 95 released two major versions at the time
when this manual is written. The first version ( refer to
“Native Windows 95” afterward ) supports for 16-bit
PC Card but not for CardBus PC Card. The latest
version Windows 95 with OEM Service Release #2
( refer to OSR2 Windows 95 or later ) supports both
16-bit and CardBus PC Card. The CardBus 10/100M
Ethernet PC Card could operates in either Native or
OSR2 version Windows 95 environments. However,
the installation procedures are different. The section
will presents you how to identify your version of
Windows 95 first. Then you could decide which kind
of installation process should be followed:
Determining the Version of Windows 95
1. After successfully booting and login the Windows
95. Click on the Start Button.
2. Select the Settings.
3. Select Control Panel.
4. Within the Control Panel, double-click the
System icon.
5. Select the General Tab, this system information
will displayed like the following figure.
-5-
Version Information here!
4.00.950 or 4.00.950a is first released Windows
95 which don’t support CardBus. Refer to Native
Windows 95 section for installation.
4.00.950B is Windows 95 with OEM Service
Release #2 which support both PC Card and
CardBus PC Card. Refer to OSR2 Windows 95 or
Later section for installation.
Native Windows 95
Though Non-OSR2 Windows 95 doesn’t support
CardBus PC Card, you could use our driver to run the
the CardBus 10/100M Ethernet PC Card.
-6-
1. Insert the Cardbus 10/100M Ethernet PC Card into
the socket.
2. Click on the Start button.
3. Select Setting
4. Select Control Panel. And the Control Panel
show up.
5. Double-click the Network icon. And the Network
Menu prompt up.
6. Click the Add button. And Select Network
Components Type Menu shows.
7. Double-click the Adapter. The Select Network
Adapters Menu opens.
8. Click the Have Disk button. The Install From Disk
Menu shows.
9. Insert the Drive Disk.
10. Give A:\ in the input box. Click OK. ( Or type the
path name whereever you place
the driver
programs)
11. Select the CardBus Fast Ethernet 10/100
Adapter manual load
-7-
12. Click OK. A dialog box will appear to adjust the
driver's settings. The resources assignment to
adapter should be uniqe in the system.
13. The Newwork window reopens.
14. Click OK
15. Insert your original Windows 95 CD or disk set.
Input the drive which contain the source. Click OK
16. After the copy file process is complete, the system
will promt you to restart the Computer.
17. For the first time installation, you need to go to the
Network in the Control Panel to setup the
protocols, clients and services properly according
to your need.
Note: If you start the computer without the CardBus
10/100 Ethernet PC Card installed in the socket,
the native Windows 95 system will prompt you
the warning message “Your Network Adapter
CardBus Fast Ethernet 10/100 Adapter
manual load”[0001] is not working properly.
-8-
You may need to set it up again. For more
information see the network troubleshutter
in the windows Help”.
If you don’t need to use the CardBus 10/100 PC Card
at this time, you can just ignore the message.
Otherwise, you need to insert the CardBus 10/100
Ethernet PC Card into the CardBus socket and just
restart the native Windows 95 again to make the Card
working functionally.
OSR2 Windows 95 and Later
Windows 95 OSR2 and later versions support both
CardBus and 16-bit PC Card. That is, you could run
the 16-bit PC Card and CardBus 10/100M Ethernet
PC Card simultaneously with the plug-n-play support.
In addition to the plug n-play support of both types of
PC Card, the user also could perform the Hot Swap
function provided by the Card and Socket Service
built in the OSR2 Windows 95 or later.
1.
After the Windows 95 OSR2 have successfully
boot, insert the CardBus 10/100 Ethernet PC Card
with media coupler attached into the CardBus
Socket.
2.
3.
Click Next on Update Device Drivers Winzard
Click The Others Locations button
-9-
4.
5.
6.
7.
Insert driver diskette into the floopy disk.
Type A:\ .The driver will be installed and you
may be asked for the original Windows 95
CD/disks.
For the first time installation, please click
Network icon in Control Panel to add Protocols,
Client and Service if you needed
Reboot the machine and the card will be fully
functional.
- 10 -
Windows 98 Installation
1.
When the CardBus 10/100 Ethernet PC Card
Adapter is well inserted into the PC Card slot of
your system, the following figure will appear
automatically. Click Next to proceed.
2.
Select Search for the best driver for your
device (Recommended) and click Next.
- 11 -
3.
Insert the device driver disk into the floppy disk
drive. Select Floppy disk drives and click Next.
4.
Select The updated driver (Recommended)
CardBus Fast Ethernet 10/100 Adapter and
click Next.
5.
When the appropriate driver for the device is
found, click Next to install. When asked to
supply the original Windows 98 installation
- 12 -
CD-ROM, you’ll have to load it into the
CD-ROM drive for the software installation need.
6.
7.
8.
Wait for a while until the file copy process is
complete.
Click Finish. Then the software installation is
successfully complete.
When asked to restart your system, click Yes to
activate the device.
- 13 -
9.
To verify if the device is well installed in your
system and enabled, go to Start → Settings →
Control Panel → System → Device Manager.
Make sure CardBus Fast Ethernet 10/100 Adapter
appears as illustrated below. If not, it means your
device is not properly installed. Then consult
your dealer for more information.
- 14 -
Windows 2000 Installation
1.
When the CardBus 10/100 Ethernet PC Card
Adapter is well inserted into the PC Card slot of
your system, the following figure will appear
automatically. Click Next to proceed.
2.
Select Search for a suitable driver for my
device (recommended) and click Next.
- 15 -
3.
Insert the device driver disk into the floppy disk
drive. Select Floppy disk drives and click Next.
4.
When the appropriate driver for the device is
found, click Next to install.
5.
Click Yes.
- 16 -
6.
Click Finish. Then the software installation is
successfully complete.
7.
To verify if the device is well installed in your
system and enabled, go to Start → Settings →
Control Panel→System→Hardware→Device
Manager. Make sure CardBus Fast Ethernet
10/100 Adapter appears as illustrated below. If
not, it means your device is not properly installed.
Then consult your dealer for more information.
- 17 -
Windows NT 4.0 Installation
Assumed that the Network Services already installed in
the NT 4.0 system.
1.
Insert the Cardbus 10/100M Fast Ethernet PC
Card into any one of PC Card Slots in system.
2.
3.
Power up Windows NT 4.0
Open My Computer
4.
Open Control Panel icon
5.
Double-click the Network icon
6.
Select Adapters tab.
7.
Press Add to add network adapter
8.
Press Have Disk button
9.
Insert the driver disk into floppy drive
10. Specify the path to ” A:\ and press OK
- 18 -
(Or type the path name whereever you place
driver programs)
the
11. A dialog box will appear to adjust the
driver's settings. The resources assignment to the
adapter must be unique in the system.
12. Press OK when all setting are completed.
13. Press Close to complete network setting
Windows NT 3.5x Installation
1.
2.
3.
4.
5.
In Main Group of NT 3.5x, open Control Panel
and click on Network icon.
In Network Settings dialog box, push Add
Adapter... button. The Add Network Adapter
dialog box will appear.
Choose <Other> requires disk from
manufacturer” from the network adapter card list
and press Continue.
When Windows NT prompts for manufacturer
disk, insert driver diskette and press OK until the
Network Setting Change dialog box appears.
Restart now to have the card take effect.
- 19 -